

Page 1
Quick Installation Guide
Philips CorePro LED T8 lamps
Please take the time to read this quick installation guide. The guide contains important information and notes
regarding the installation and operation of Philips CorePro LED T8.
Instructions
• Philips CorePro LED T8 Lamps are suitable to replace either T8 fluorescent lamps in fixtures containing standard
non-shunted G13 (medium bi-pin) sockets.
Ordering, Electrical and Technical Data (Subject to change without notice)
Rated Color
Product Ordering Nom. Lamp Avg. Life Approx. Temp. MOL
Number Code Watts Volts Description Type
CorePro LED T8
42975-3 20T8/COREPRO/48-3000K FRST UNV 20 100-277 LED T8 4ft 3000K T8 G13 30,000 1500 80 3000 48
42976-1 20T8/COREPRO/48-4000K FRST UNV 20 100-277 LED T8 4ft 3000K T8 G13 30,000 1600 80 4000 48
42977-9 16T8/COREPRO/48-4000K CLR UNV 16 100-277 LED T8 4ft 3000K T8 G13 30,000 1400 80 4000 48
42981-1 10T8/COREPRO/24-3000K FRST UNV 10 100-277 LED T8 2ft 3000K T8 G13 30,000 750 80 3000 24
42982-9 10T8/COREPRO/24-4000K FRST UNV 10 100-277 LED T8 2ft 3000K T8 G13 30,000 800 80 4000 24
42983-7 8T8/COREPRO/24-4000K CLR UNV 8 100-277 LED T8 2ft 3000K T8 G13 30,000 700 80 4000 24
1) Rated average life based on engineering testing and probability analysis.
2) Light output comparison based upon the ENERGY STAR® Integral LED Lamp Center Beam Intensity Benchmark tool which can be found at EnergyStar.gov/LEDbulbs, LED Light Bulbs for Partners, Program Requirements PDF Pg. 11.
Base
(Yrs.)1 Lumens CRI (Kelvin) (in.)
Electrical and Technical Data (Subject to change without notice)
LED Tube Input Input Input Input
Model No. Voltage, Vac Frequence, Hz Wattage, W Current, mA
9290002989 120-277 60 20 70-195
9290002990 120-277 60 20 70-195
9290002991 120-277 60 10 35-100
9290002992 120-277 60 10 35-100
9290002993 120-277 60 8.5 32-75
9290002994 120-277 60 16 55-140
Page 2
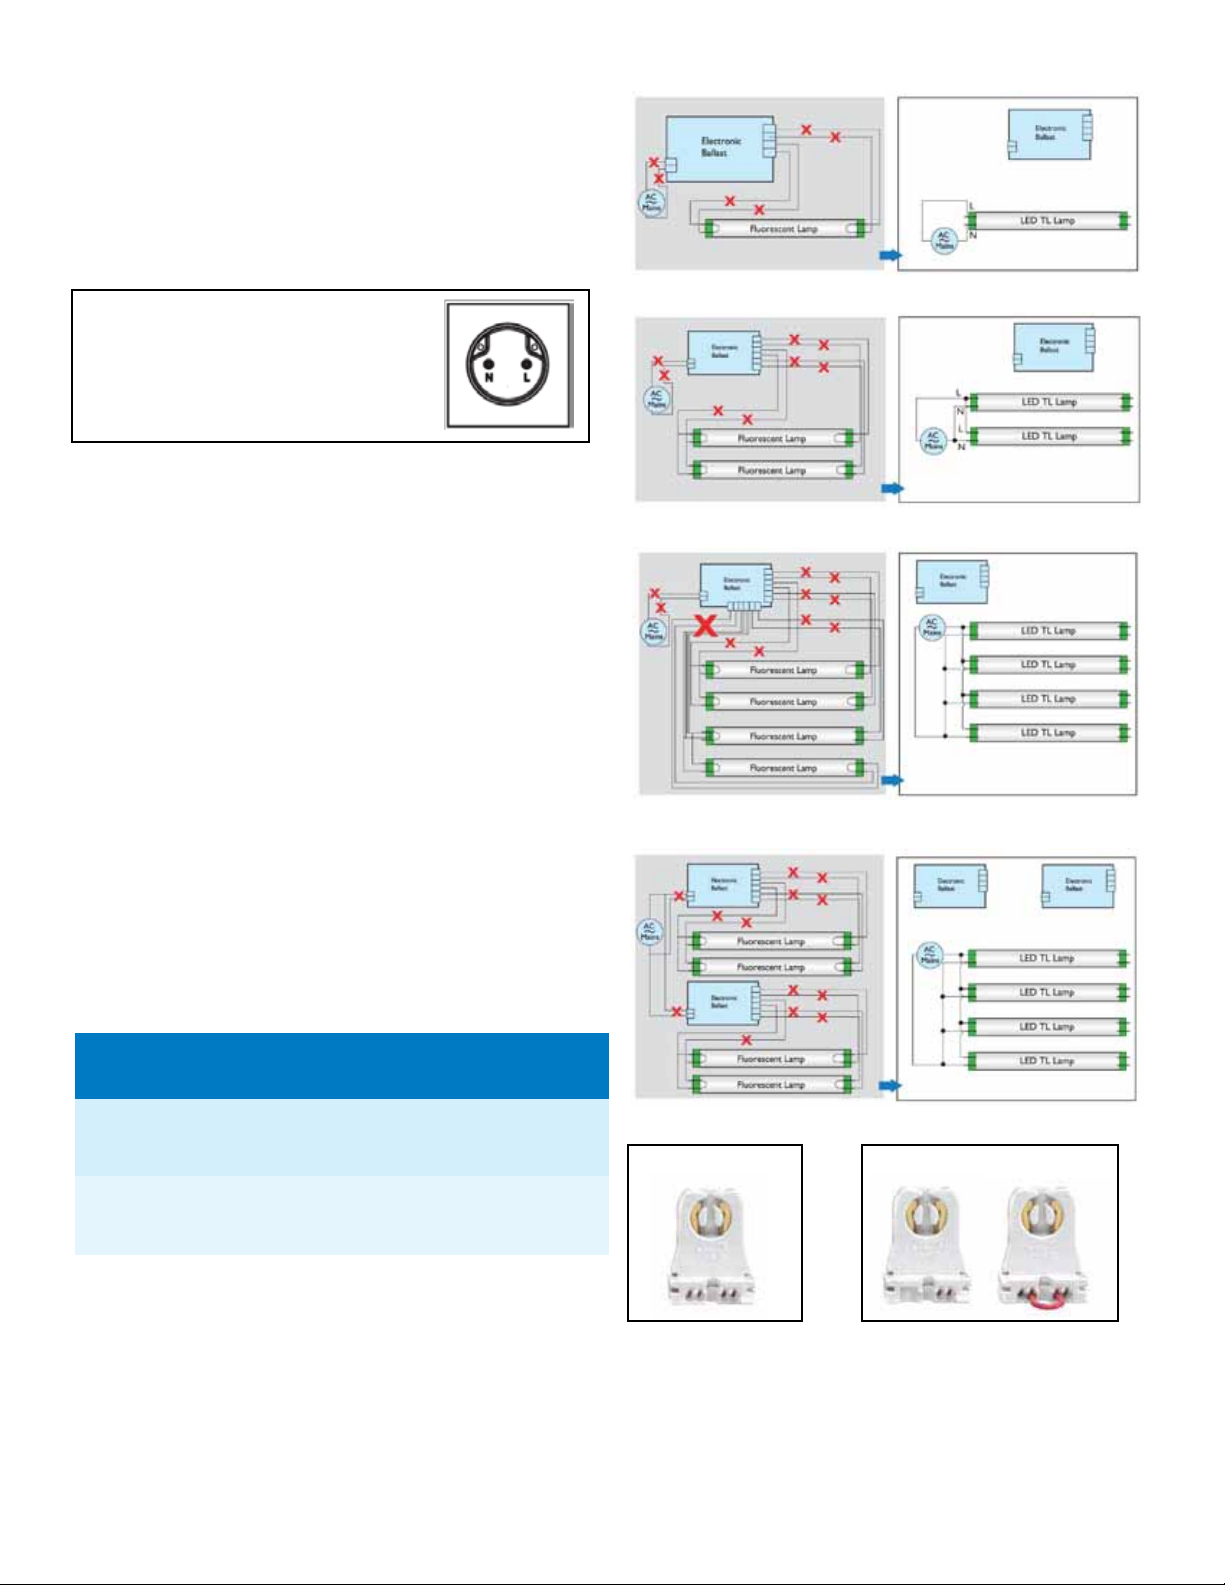
During retrofit, rewiring is a MUST, please follow the
installation steps below.
Retrofit Instructions
1. Remove diffuser (if applicable) and fluorescent lamp.
2. Open\Remove Wiring Compartment Cover.
3. Cut off all wires which connected to ballast.
4. Connect one wire from each lampholder together.
Please check the L/N (Mains Input) markings
on the lamp end and insert the lamp with AC
Mains supplied to the corresponding end.
5. Connect one wire from the lampholder to branch circuit L (Live
wire) and the other wire at the opposite end to the Branch
Circuit N ( Neutral wire).
6. Close up wiring compartment.
7. Install TL LED tube.
8. Switch on power.
9. Repeat steps 3 to 5 for each additional bulb\ballast based on
illustration below.
Figure A – Retrofit Luminaire with One Lamp
Figure B – Retrofit Luminaire with Two Lamps and one ballast
Figure C – Retrofit Luminaire with Three/Four Lamps and one ballast
Luminare Description
• Philips TL LED tube is suitable to be installed in T8 or T12
standard luminaries.
• Philips TL LED tubes can’t retrofit original luminaries which use
remote Starter.
• Ensure all parts and accessories are in the package, included
instruction, filed-applied label and tubular LED lamp, the additional
wire connector and No. 18 AWG wiring maybe provided.
• Philips TL LED tubes are intended to retrofit maximum four lamps,
UL Listed surface mount, or type IC or non-IC recessed mount
fluorescent luminaries with diffuser that use straight tubular lamps.
These products intended to be used in dry or damp locations only.
• Please make sure the existed luminaire dimension is larger than
dimension described in below table.
Philips EnduraLED tube
intended to retrofit Max.
Number tubes in original luminaire
Max. 4pcs LED tubes(19290002989,
9290002990 or 9290002994)
can be operated in a luminaire
with or without diffuser
Max. 4pcs LED tubes(9290002991,
9290002992 or 9290002993)
can be operated in a luminaire
with or without diffuser
Luminaire Dimension
with Max. No. of tubes
Length X Width X Height (cm)
120 x 60 x 8
60 x 60 x 8
Figure D – Retrofit Luminaire with Three/Four Lamps and two ballasts
Sockets
Rapid Start Socket Instant Start Sockets
vs.
ShuntedNon-Shunted
Page 3

WARNINGS, CAUTIONS AND OPERATING INSTRUCTIONS
WARNING: “THIS PRODUCT MUST BE INSTALLED IN ACCORDANCE
WITH THE APPLICABLE INSTALLATION CODE BY A PERSON FAMILIAR
WITH THE CONSTRUCTION AND OPERATION OF THE PRODUCT AND
THE HAZARDS INVOLVED.”
1. Risk of fire or electric shock. Not for direct replacement of fluorescent
lamps. Use only with Philips ICN2P24TLEDSC35M / ICN4P24TLEDSC35M
power supply.
2. Risk of fire or electric shock. Luminaires wiring, ballasts, or other electrical
parts may be damaged when installing of reflector kit hardware. Check for
enclosed wiring and components.
3. Risk of fire or electric shock. Reflector kit installation requires knowledge of
fluorescent lighting luminaires electrical systems. If not qualified, do not attempt
installation. Contact a qualified electrician.
4. Risk of fire or electric shock. Install this kit only in the luminaires that has the
construction features and dimensions shown in the photographs and/or drawings.
5. To prevent wiring damage or abrasion, do not expose wiring to edges of sheet
metal or other sharp objects.
6. Only those open holes indicated in the photographs and/or drawings may be
made or altered as a result of kit installation. Do not leave any other open holes
in an enclosure of wiring or electrical components.
DANGER-RISK OF SHOCK-DISCONNECT POWER BEFORE INSTALLATION.
WARNING - Risk of fire or electric shock. Install this kit only in the luminaires
that have the construction features and dimensions shown in the photographs and/
or drawings.
WARNING: To avoid potential fire or shock hazard, do not use this retrofit kit in
luminaires employing shunted bi-pin lampholders. Note: Shunted lamp holders are
found only in fluorescent luminaires with Instant-Start ballasts. Instant-start ballasts
can be identified by the words “Instant Start” or “I.S.” marked on the ballast. This
designation may be in the form of a statement pertaining to the ballast itself, or may
be combined with the marking for the lamps with which the ballast is intended to
be used, for example F40T12/IS. For more information, contact the LED luminaire
retrofit kit manufacturer.
Installers should not disconnect existing wires from lampholder terminals to make
new connections at lampholder terminals. Instead installers should cut existing lam-
pholder leads away from the lampholder and make new electrical connections to
lampholder lead wires by employing applicable connectors.
SUITABLE FOR DAMP LOCATIONS.
NOT FOR USE WITH DIMMERS
THIS DEVICE IS NOT INTENDED FOR USE WITH EMERGENCY EXITS.
Lamps must be operated within an ambient fixture temperature of -22F
(-30c) and 113F (45c) to ensure UL compliance.
© 2013 Philips Lighting Company. A Division of
Philips Electronics North America Corporation.
All rights reserved.
Printed in USA 3/13
www.philips.com
Philips Lighting Company
200 Franklin Square Drive
Somerset, NJ 08873
1-800-555-0050
Philips Lighting
281 Hillmount Road
Markham, Ontario
Canada L6C 2S3
1-800-555-0050
A Division of Philips Electronics Ltd.
 Loading...