

Page 1

User manual
Page 2

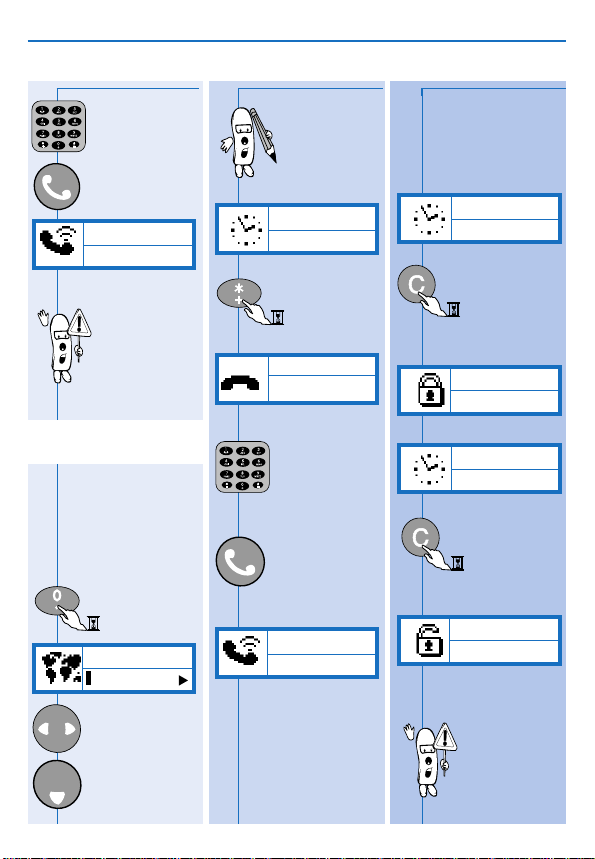
QUICK GUIDE
OK
OK
Stored
SWITCH ON
Press and
hold
Enter PIN:
_
Enter your
PIN code.
OK
MAKE A CALL
number .
Call the
number
(e.g.:112 for
emergency see p.9)
ANSWER A CALL
12345678
END A CALL
✄
Enter
phone
Accept.
End.
ADD A NAME
Network
Enter
phone
number .
_
1234
OK
_
1234
Store no
OK
Name:
_
Enter name
OK
Number:
1234_
If number is OK
OK
For Voice dial options
(see page 13)
ACCESS T O MENU
Enter or exit
the menus.
NAVIGATION
Move Up
or
Back.
Move Right.
.
Move Left.
Move Down
or
Forward
or
Validate.
SWITCH OFF
Press
and hold.
When your
phone is
switched off,you
cannot receive
calls.
Page 3

MENU
FORWARDING MESSAGES NAMES CALLS EXTRA SETTINGS SECURITY
Forwarding
Always Status If no reply If busy Unreachable Cancel all
Messages
Centre no. Archive Send Usual msg. Forwarding
Names
Search View Add Own number
Calls
Delete all View Meters
Extra
Stopwatch Clock Alarm clock Calculator BioCalendar Converter
Settings
Register Key tones Ringer Voicemail Box number Broadcast
Security
Change PIN2 Change PIN PIN code Fixed names Restriction
✄
MENU MAP
Page 4

GLOSSARY
DTMF Dual Tone Multi Frequency
GSM Network Global System for Mobile communications. The type
PIN Code Personnal Identification Number, this is the secret
PIN2 Code Secret code that allows you to access certain SIM
PUK Code Secret code used to unblock your SIM card if you,
Roaming Using your phone in a network other than your
SIM card Subscriber Identification Module. This card which is
The tones are transmitted by the phone to the
network. They are used to interrogate answering
machines, transmit codes,...
of phone network used by your phone.
code of the SIM Card. If you, or someone else,
enters the wrong PIN code three times your SIM
card is blocked. If this happens, please contact
your service provider.
card dependent features. If you, or someone else,
enters the wrong PIN2 code three times your SIM
card is blocked. If this happens, please contact
your service provider.
or someone else, enters the wrong PIN code three
times. This code will be given to you by your
service provider.
home network in your country or abroad.
provided by your GSM service provider allows you
to make phone calls with your GSM phone. Your
phone number is contained inside the card.
SMS Short Messages Service. This service provided by
the operator allows you to send and receive short
written messages (Maximum : 160 characters).
1
Page 5
BEFORE YOU START
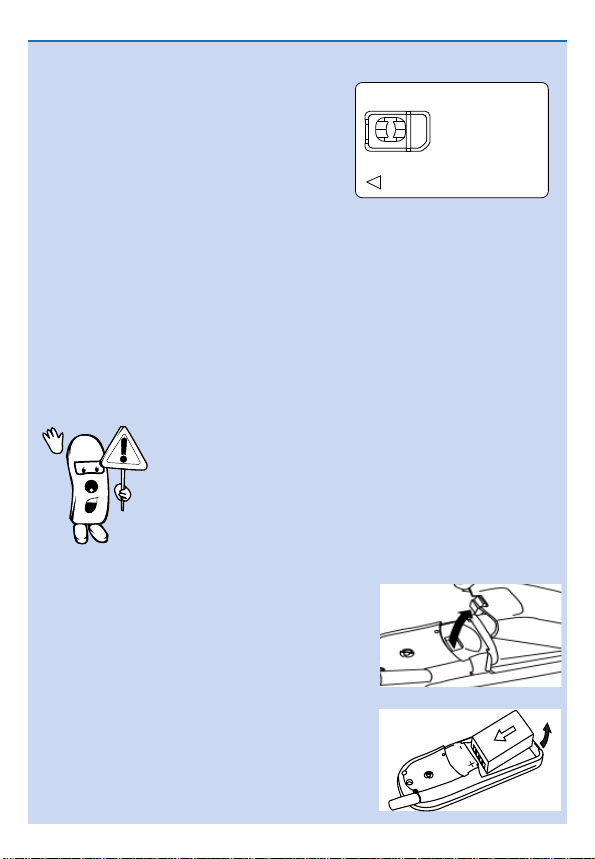
From your card,remove
the micro-SIM card
The micro-SIM card
To use your phone,you must insert a valid
micro-SIM card supplied by your GSM network
operator.When you switch the phone on,it may
ask for the PIN code.The PIN code is the secret
code of the micro-SIM card.
The micro-SIM card contains your subscription number and phone number.It
also contains a memory in which you can store phone numbers and messages.If
you use your micro-SIM card on another phone,you still retain the same phone
number, stored numbers,and messages.
The battery
Your phone is powered by a rechargeable battery.
• After you plug in the battery,please wait a few seconds
before pressing the on/off key to switch the phone on.
• A battery only reaches its maximum capacity after being
totally discharged and recharged 2 or 3 times.
• A battery lasts longer if you allow it to fully discharge from
time to time.
• If you do not use your phone for several days, it is better
to remove the battery.
Remove the battery cover
Press on the latch on the back of the phone
and lift off the battery cover.
Remove the battery (if necessary)
Lift up on the bottom of the battery and
remove it from the phone.
2
Page 6
BEFORE YOU START
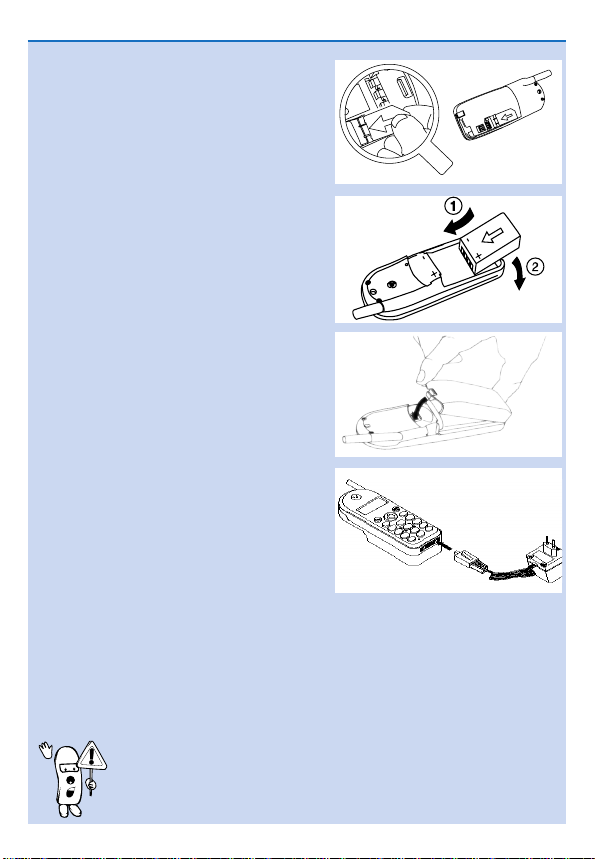
Insert the micro-SIM card
First,place the micro-SIM card into the
appropriate slot in the battery compartment
(the clipped corner should be at the top left).
Then,slide the card with your finger until it
stops.
Insert the battery
1. Keep the battery + and - on the top
facing the + and - of the phone.
2. Slide the battery onto the contacts
points and press.
Replace the battery cover
Hook the battery cover onto the hinges on
bottom of phone and press forward until the
latch catches.
Charge the battery
With the battery inserted in the phone, plug
the connector into the right socket at the
base of the phone.Next, plug the transformer
unit into an AC power socket.
The only way to turn off the charger is to
unplug it,so use an easily accessible AC
power socket.
The battery icon on your phone’s display
indicates the state of the charge process:
• Bars moving = battery is charging.
• Bars steady = battery is fully charged.
• Battery outline flashing (see Troubleshooting p. 32).
You can switch the phone on and use it during charging.
The first time you charge the battery and later, if it is completely discharged, the
battery icon will only appear 2 to 3 minutes after you connect the charger.
Please charge the phone for a minimum of 3 hours before first use.
3
Page 7
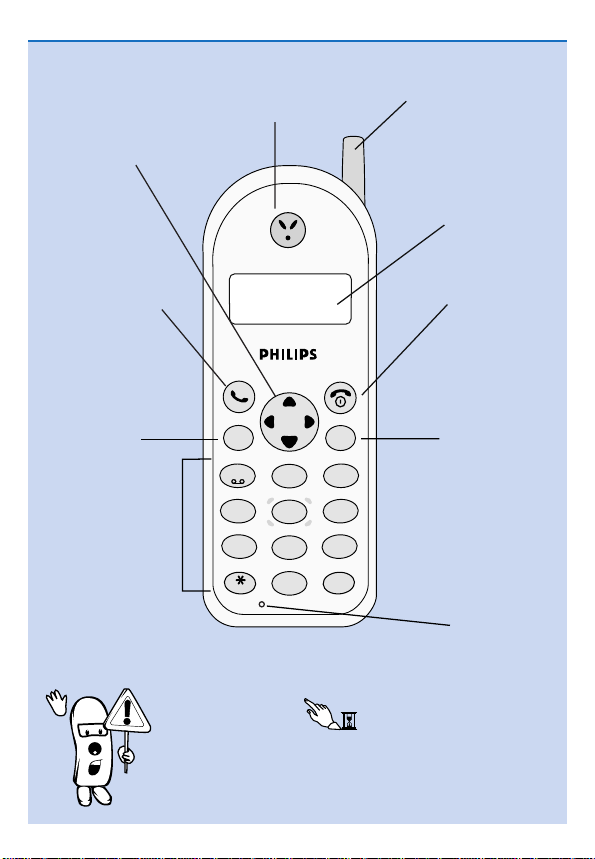
DISCOVER YOUR PHONE
Antenna
Earpiece
listen here
Display
see next page
Red "ON/OFF" key
a long press on
this key switches
the phone on/off,
a short press ends
a call
Green "CALL" key
press this key to dial the
number or name on the
display, or use it to
answer a call
"CLEAR" key
to delete numbers and
letters on the display
Keypad
to enter
numbers and
text
MENU key
to enter and exit
the menus
Microphone
"Compass" key
use this key to navigate
in the menus,
the OK key is used to
validate information
MENU
C
7
8
6
9
5
2
4
MNO
PQRS
TUV
WXYZ
JKL
ABC
GHI
1
3
DEF
#
0
.
+
=
OK
If you encounter the symbol in this manual,it means
that you have to press and hold the key to activate the
function.
4
Page 8
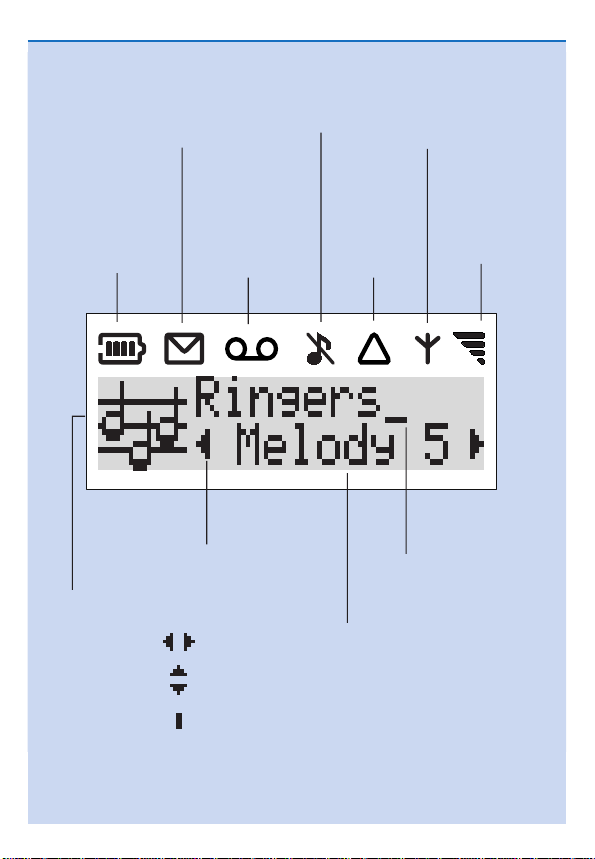
DISPLAY
Silent mode
if on: phone will not
ring or beep (except
for the alarm clock)
New text message(s)
- if on: you received new messages
- if flashing: the memory is full,
you need to delete old messages
before you can receive new ones
Roaming
your phone
is registered
to a foreign
network
Network
if on: your phone is
registered to a network
if flashing: registration
is in progress
New voicemail
if on: there are
new messages
waiting in your
voicemailbox (*)
Reception quality
the more bars are
shown the better
the reception
Battery level
the bars indicate the
battery level (4 bars
is full, no bars
means recharging is
needed)
2 text lines
to enter numbers
and text or to read
text messages
Arrows
indicate in which directions
you can go using the
Compass key
left/right
and
back/forward
or
end of menu
Graphics area
displays the clock
and guides you
through the menu
Cursor
indicates that you can
enter numbers or text
(*) Depending on the network.
5
Page 9

ENTERING TEXT
Each key allows you to obtain several characters.You have to quickly press
the same key several times to reach the desired character.
TO OBTAIN Space D ü
Example:
Key Characters
PRESS
space 1 @ # = <> ( ) & £ $ ¥
a b c 2 à ä å æ ç
d e f 3 é è ∆ Φ
g h i 4 Γ ì
j k l 5 Λ
m n o 6 ñ ò ö ø
p q r s 7 β Π Θ Σ
t u v 8 ü ù
w x y z 9 Ω Ξ Ψ
.0 ” ’ ? ! ,: ¡ ¿
+ - / %
*
upper-case lower-case mode
While you enter text your phone changes between upper-case and lower-case
automatically.
If you wish to enter text in the upper-case mode press ,to enter text in the
lower-case mode press again.
The icons will show that you are in the upper-case mode.In the lower-case
mode the icons appear.
Once Once
Five times
quickly
6
Page 10

BASIC FUNCTIONS
Black Jack
00:02
Switch on/off... ... Make a call
SWITCH ON
Press and
Enter PIN:
_
Sometimes
entering the PIN
code is not
necessary
(depends on your
subscription and
on your PIN
request settings see page 24).
Enter your
PIN code.
The digits entered
are replaced by
big dots.
OK
If you enter a
wrong code
3 times your card
will be blocked.If
this happens,
contact your
operator.
PIN correct
hold.
If this is the phone’s
initial use or if the
battery has been
removed since the
last use,you will need
to re-set the clock
Registering
Network
SWITCH OFF
Press and
hold.
Goodbye
Voice dialling
You can also make a call
by pronouncing the voice
tag you have associated
to a number (see p.13).
Press and hold
Speak now
Pronounce the name
you have associated to
the number.The phone
dials automaticaly the
number.
7
Network
01456
Call the number
Calling
0145678901
Display shows
a call cost if sent
by your network.
The name will
be displayed only
if the name is
stored in your
phone’s Names
list.
END CALL
Enter
phone
number
_
Page 11

BASIC FUNCTIONS
OK
Volume
Vibrator
Answer or
reject a call Consult last calls
Adjust ringer volume
and vibrator
123456789
The caller number
is displayed only if
your subscription
supports caller line
identification.
If the number is in
your Names list,the
name will appear
instead.
Accept the call
Reject the call.
Earpiece volume
While on a call you
can adjust the
earpiece volume.
Helen
17:24
Raise earpiece
volume.
OR
Helen
17:24
Lower earpiece
OK
volume.
Helen
17:24
or
Your phone
automatically stores a
list of the last 10 calls
you dialled and the last
10 callers who dialled
you (including missed
calls).
Network
Display the
last call made,
received or
missed.
Calls
Florence
To view other
calls.
To call.
For information
on viewing the
last
20 calls you
placed or
received,see
“Calls Section”
p.20.
8
You can select the
vibrator options and
adjust or turn off the
ringer volume
Network
Display ringer
volume
selection.
Volume
Medium
❚Silent◆Vibrator◆Vibra+ring◆
Low◆Medium◆High❚
Select the
volume.
Volume
High
OR
Select
vibrator mode
Validate
vibrator or
volume
selection.
Page 12
BASIC FUNCTIONS
Keypad is
unlocked
Emergency call International call Keypad lock/unlock
Enter 112
Calling
112
Depending on
your network
operator,the
emergency
number 112 can
be dialled without
the micro-SIM
card inserted.
Change language
Normally your phone
automatically selects
the right language for
your country,but in
case you want to
change it:
Press and
hold.
Language
English
Select
language.
OK
To make an
international call,
you can use “+”
as the
international
prefix.
Network
Press and
hold.
+_
Dial the
number
(international
country code
and local
number).
Call the
number.
Calling
+831234567
9
Avoid undesired
keystrokes when the
phone is in your
pocket or purse.
Network
Press and
hold
to lock
keypad.
Keypad is
locked
Network
Press and
hold to
unlock
keypad.
When the
keypad is locked,
it is possible
to dial the
emergency
number and to
receive calls.
Page 13

SPECIAL FUNCTIONS
67890123
Store no
.
Answer a second
call (Call Waiting)
This feature
depends on the
network.If a second
person calls you,you
will hear a beep.
Check the display
for a second call.
Rob
Waiting
Reject
second call
OR
Accept
second call
Call 1 is put on
hold.
Rob
00:02
Switch
between Call 1
and Call 2.
Kim
To end the call
on display and
return to other
Return to single
call state.
Rob
call.
Kim
01:16
Automatic
redial Scratchpad
When you dial a
number and your
correspondant is
busy,your phone
offers the function
of automatically
redialling.
Failed
Call failed or
recipient is busy.
0123456789
Autoredial?
Confirm.
OK
Any other key
cancels autoredial.
0123456789
A beep will sound
for each redial
attempt or vibrate 5
seconds in both
vibrator modes
0123456789
00:01
A beep informs
you when the
connection has
been made.
An incoming call
or any use of the
phone will end
automatic redial.
10
OR
The scratchpad
feature is useful if
you want to store a
telephone number
during a call.
The number can be
dialled or viewed
later.
0123456789
05:12
Enter the
number you
want to keep.
67890123
The display
automatically
returns to your call.
0123456789
12:15
End the call.
67890123
Call the
number on the
scratchpad.
OR
For options.
OK
_
_
Page 14

SPECIAL FUNCTIONS
Network
Touchtones (DTMF) Hide your identity
During a call or in direct
dialling,the numeric
keys always transmit
DTMF tones (Dual Tone
Multi Frequency) also
known as “touchtones”.
These tones are used to
operate services that
you can reach with your
phone, like a pager or
an answering machine.
Example, to consult your
home answering
machine:
Enter
telephone
number of
your home
answering
machine.
0123456789
’
“wait”signal
for the phone
0123456789w
password of your
home answering
machine (e.g.:
code:9876).
_
Enter a
to give time
to connect.
Enter the
_
Hide your identity
If you type #31#
followed by the
phone number
you call,your
phone number is
hidden to the other
person.
Enter
“pause”
character.
0123456789w9
876p_
Enter code to
listen to new
message
(e.g.: code 3).
0123456789w
876p3_
Call.
#31#0123456
_
78
Availability of this
feature depends
on your network.
Setting up
Flash Dial
You can associate
8 names in the Names
list or FDN list with keys
2-9 on the keypad. A
long press on one of
these keys will
automaticaly dial the
the associated number.
Names
Vincent
Choose the name
you want to
make Flash Dial.
Press and
hold to link
the name to
key 4.
CANCEL FLASH DIAL
Names
Vincent
Press and
hold to cancel
link.
TO FLASH DIAL
Press and
hold to dial
linked
number.
11
Page 15

OK
Anders
Send msg.
Menu
Names
MENUS
Discover the Compass Key
The Compass Key is your navigator while in the menus.
Press to enter or exit the menus.
Move one menu-
level back.
Switches to option on the left. Switches to option on the right.
OK
or validate the displayed option.
Here’s an example:
What you see on the display
Move forward
Press this key The Names list menu options
Network
Names
View
Names
Anders
012345
MENU
OK
OK
OK
OK
Messages Names Calls
Search View Add
Zara Anders Barbara
012345_
Delete Send msg. Usual msg.
12
Page 16

MENUS / NAMES...
Stored
Add a name ... Add Voice Dial
With your phone, you
can store the names and
phone numbers of
people you call
frequently.
Menu
Names
OK
Names
View
Switch to
“Add”.
Names
Add
Accept.
OK
Name:
_
Enter name
(max 11
characters).
For example:Jim
J I M
Once Three Once
times
quickly
Name:
Jim
OK
Number:
_
Number:
0123456789_
OK
Delete one
character.
OR
Press and
hold to
delete all
characters.
_
Enter number
(20 digits
max).
Accept
number.
13
NO VOICE DIAL
Voice dial
Yes
Select “No”
OK
TO ADD VOICE DIAL
OK
Press OK
and speak
Pronounce
the voice tag
OK
you want to
associate to
the number
Press OK
and speak
Repeat the
voice tag you
OK
want to
associate to
the name
When Voice dial
memory is full
(10 names) the
Voice dial menu
disappears
Page 17

MENUS/ NAMES...
View names
in the Names list ...
For example:
Press to jump to
names starting
with “P”,“Q”,
Menu
Names
Accept.
OK
“R”or “S”.
Names
Philippe
Quick access
to names..
Zara
Send msg.
❚
Delete◆Send msg◆Usual msg
Voice dial◆Change❚
Switch to the
option you
want.
◆
OK
Names
View
Accept.
Names
Adam
To scroll
through the
list.
OR
Use the
keypad to
quickly jump
to a name.
Names
OK
0123456789
OK
Press to jump
to next name.
Rozenn
Call the
number.
OR
To view the
number.
To view the
available
options.
14
OK
Accept.
Quick access to
names
There is a quick way to
access the names you
stored:
Network
OK
Names:
Anders
Switch to
other names.
Call.
Page 18

Search for a
Deleted
specific name
Menu
Names
Accept.
OK
Names
View
Switch to
“Search”.
Accept.
OK
Example:
Search for:
_
Ur
Enter first few letters
of name
U R
Twice Three times
quickly quickly
OK
Names
Urszula
MENUS / NAMES...
Read your own phone number Delete a name
To access
directly to
OK
phonebook
Names
Axel
Names
Xavier
“Accept twice”
OK
Xavier
Send msg.
Go to delete
OK
Press C
to delete
Select name
you want to
delete
OK
Names
OK
Own number
0123456789
Menu
Names
Switch to
“Own
number”.
number
Own
Accept.
Only available if
present in the
SIM card.
Call name on
display.
15
Page 19

MENUS / MESSAGES..
OK
12 AUG 17:55
Hello, how
Messages New message(s) ...
With your GSM phone you
can receive text messages
(SMS) and send messages
to other GSM phones.
To have the possibility of
writing and sending messages,
you need to enter a service
center number first.
If it is not present in the
SIM card,ask your network
operator for it.
Switch to
“Messages”.
Menu
Messages
OK
Switch to
“Centre no.”
Messages
Centre no.
Your phone allows you
to send or receive short
written messages.
NEW MESSAGE
INDICATORS
Lights up on the
display when
you receive a
text message.
Flashes when the
message
memory is full. If
this happens,
you need to
delete archived
messages
otherwise new
ones will be
rejected.
READ NEW
MESSAGE(S)
Network
2 msg.
OK
OK
OK
Menu
Names
Switch to
“Messages”.
Menu
Messages
Messages
New
Messages
1 of 2
Read the
message.
OK
OK
Centre no:
_
Enter number.
OK
Messages
1 of 2
OR
16
Scroll
through the
message.
To switch
to other
messages.
Page 20

MENUS / MESSAGES...
OK
Text:
_
...
messages
Read archived
Send short
messages (SMS)
At the end of
a message.
OK
...........
Reply
❚Delete◆Reply◆Forward ❚
Switch to
the option
you want.
OK
Accept.
When you receive
a text message
that comprises a
telephone number
enclosed between
double quotes
(e.g.:
“+33900112233”),
then the number is
automatically
extracted and
stored in your calls
list so that you can
call it back easily.
Messages you have read
and messages you have
saved can be found in
the Archive.
Switch to
“Messages”.
Menu
Messages
OK
Switch to
“Archives”.
Messages
Archive
OK
Accept
Messages
1 of 3
Switch to the
message you
want to read.
Read the
message.
OK
To switch
to other
messages
17
Menu
Messages
OK
Messages
Send
OK
Accept
Enter phone
number or select
a name from the
phonebook by
pressing OK a
second time.
To number:
0123_
OK
Enter message
(maximum 160
characters).
See “Entering T ext”
section for
instructions.
Page 21

MENUS / MESSAGES..
Save
Yes
... Emotion Icons ...
Icons
None
Select the icon
you want to send.(See
“Emotion Icons”table
at the end of this
procedure).If you do
not want to send
an icon,choose
“None”.
Select icon
❚ No◆Yes ❚
Decide to save or not.
To see the icon the
receiver needs a
Philips Savvy ™
phone, otherwise the
equivalent code will
be displayed at the
end of the receiver’s
message.
Magic =:I
Love (O)
Brocken (X)
Yo! Yo!
Well ==b
done
Party o<I
Validate.
OK
Send
Yes
❚ No◆Yes ❚
Decide to send or not.
OK
Requesting
Wait while message is
being sent.
Confirmation will
appear.
Sent
Emotion Icons
Icon Code
sent
Smile :-)
Wink ;-)
Cool B-)
Pfrrt... :-P
Sad :-(
Grrr... :-/
Meow!, :<*
Woof! :>#
Teddy 8<)
18
Hooray! iii
Flowers @>-
Drink >-I
Coffee ID
Cloudy ;:;
Sunny >o<
Holidays –Y–
Ball (I)
BOOM! >*<
Deadly %-I
Page 22

MENUS / MESSAGES...
OK
Please call
me back_
Send SMS from
phonebook ... Usual Messages
You can also send an
SMS directly from your
phonebook without
having to enter the
phone number.
Network
OK
Names:
Anders
Names
Sebastian
Accept
OK
twice
Sebastian
Send msg.
OK
Text:
_
Enter message (maximum
160 characters).
See “Send short messages
(SMS)”for more instructions.
OK
OR
Menu
Messages
Accept twice
OK
To number:
_
You have direct
acces to the
OK
phonebook
Select the
name
Accept twice.
OK
Text:
_
Enter message
(maximum
160 characters).
See “Send short
messages (SMS)”for
more instructions.
OK
19
Your phone contains a
number of pre-defined text
messages like:
“Please call me back”
“I will be late”
“I will call you back”,etc.
OK
OK
OK
From Messages
switch to “Usual
msg. ”
Messages
Usual msg.
Accept
Usual msg.
Please call
Switch to the
desired message.
Accept
To number:
_
Enter number.
Accept
Change text
(if wished).
Accept.
Page 23

MENUS/ CALLS...
View calls... ... Delete all calls
You can consult the
last 20 calls in the
Calls list.
Switch to
“Calls”.
Menu
Calls
Accept
OK
Calls
Barbara
OK
0123456789
You can delete all the
calls in the calls list.
To view other
calls.
To call
OR
To view the
number.
OK
Switch to
“Calls”.
Menu
Calls
Accept.
Calls
View
Calls
View
OK
The Icon indicates
the type of call.
Phone number
you dialled.
Phone number of
answered call.
Phone number of
call you missed.
Phone number
extracted from an
SMS message.
To options.
OK
Barbara
Store no.
❚Delete◆Storeno◆
Send msg.◆Usual msg.
Choose other
option if you
wish.
Confirm
selection.
OK
20
Switch to
“Delete All”.
Calls
Delete all
❚
OK
Accept.
Press C
to delete
You must confirm the
deletion.
To delete.
Deleted
Page 24

MENUS/ CALLS...
Meters View Meters Reset Meters
Your phone has
meters that allow
you to see the total
cost of your calls.
It also allows you to
set limits on cost
and check your
consumption.
Calls
View
Switch to
“Meters”.
Calls
Meters
Meters
Show
OK
Show
Duration
❚ Duration◆ Remaining◆ Cost❚
Switch to the
meter you
want.
Accept.
OK
OK
OK
Meters
Show
Reset
Duration
“Duration”
Switch to
“Reset”.
Accept.
Select
or “Cost”.
To reset.
OK
The cost counters
and limits will
only work if the
network supports
this feature.
Duration
00:55:26
21
For some of
these options
you might need
your PIN or
PIN2 code
(depending
on your
operator).
Page 25

MENUS / SETTINGS...
Set
Set-up meters ... Key tones ON/OFF
OK
OK
OK
From Meters
switch to
“Setup”.
Meters
Setup
Enter PIN:
_
Type your
PIN code (or
more often,
your PIN2).
Depending on
the network.
Currency
_
Press and
hold to clear
your entry.
For example
BEF (Belgian
francs).
Currency
BEF_
OK
Price/unit:
_
For example 2.50
francs per unit.
Price/unit:
2_
Press and
hold for the
decimal
point.
Price/unit:
2.5_
OK
Each time you press a
key,a tone is emitted.
You can silence the
key tones by turning
them off.
Switch to
“Settings”.
OK
From Settings
switch to “Key
tones”».
Settings
Key tones
OK
Key tones
Set off
❚
Set off◆Set on
OK
❚
Accept.
22
Page 26

MENUS / SETTINGS...
Broadcast
Reception
Choose ringer
When your phone
rings, it plays a
melody.
You can change this
melody.
Settings
Ringer
OK
Ringer
Special
Current melody
For other
melodies.
Ringer
Fortissimo
Phone plays the
melody.
Accept.
OK
Set
The «Key tones» and
«Ringers» menu
items are not visible
when the volume is
set to “Silent”or
“Vibrator”
Cell broadcast
The broadcast menu
allows you to activate or
desactivate the reception
of SMS broadcast by the
network.
From “Setting”
switch to
“Broadcast”
Settings
Broadcast
Accept.
OK
Broadcast
Topics
❚Reception◆Topics◆District❚
The topics menu
allows you to define
the type of message
you want to receive.
VIEW TOPICS
Accept.
OK
Topics
View
❚View◆Add ❚
This fonction allows
you to view which
topics are registered
in your phone (e.g:
weather report).To
delete or change a
topic in the topics
list use delete or
change options.
23
...
ADD A T OPIC
Topics
Add
Accept.
OK
Names:
_
Enter the name you
want to associate
with the topics.
Accept.
OK
Enter code:
_
Enter the code given by
your network operator
for this topics.
Accept.
OK
RECEPTION
The reception menu
allows you to activate or
deactivate the reception
of registered topics.
From Broadcast
switch to
“Reception”
Page 27

MENUS / SETTINGS...
OK
Box number:
_
...
Accept.
OK
Reception
Set off
❚
Set on◆Set off
Select the
desired option.
OK
DISTRICT
The district menu allows
you to select a topic
from the topics list,
which you would like be
permanently dispayed.
As a result,for this
special handling of
messages you must enter
the topic in both the
district menu and the
topics menu.
Broadcast
District
OK
❚
Accept.
Accept.
Manual
registration
When travelling abroad,
it may be useful to
manually register with a
network of your choice.
From Settings
switch to
“Register”.
Settings
Register
OK
Requesting
Register
Net A
Switch to
desired
network.
OK
Accept.
Your phone will
revert to
automatic
network selection
next time you
switch it on.
Voice
Mailbox number
To be able to use
Voicemail you need to
set up your voice
mailbox number.
Ask your network
operator for this
number.
From Settings
switch to
“Box number”.
Settings
Box number
OK
Enter
number.
To correct
(if needed).
This menu may
not appear.
Depends on
your
subscription.
24
Page 28

MENUS/ SECURITY...
Consult your
voice messages Pin request
Lights up on the
display if you
have a new
voice message.
Availability of this
feature depends on
your network.
Press and
hold to call
for your
voicemail.
OR
Network
Consult
OK
Voicemail
0123456789
To call.
You can (de)activate the
request for the PIN code
at power-on.
Switch to
“Security”
OK
Security
PIN code
OK
PIN code
Set off
❚Set off◆Set on❚
Switch to
desired
option.
OK
Enter PIN:
_
Enter the PIN
code.
Change PIN
and PIN 2 codes
Security
Change PIN
Accept.
OK
Old PIN:
_
Enter old
PIN code.
OK
New PIN:
_
Enter new
PIN code.
Accept.
OK
Repeat PIN:
_
Enter new
PIN code
again.
OK
Desactived
25
OK
Accept.
Changed
Page 29

MENUS / SECURITY...
Activated
Fixed names Add names
Your network operator
may have provided you
with a SIM card which
supports fixed names
(FDN).You can restrict
the use of your phone to
the numbers stored in
the fixed names list.
VIEW FIXED NAMES
From Security
switch to “Fixed
names”.
Security
Fixed names
OK
Names”switch
Fixed names
Add
OK
Enter PIN2:
_
Name:
_
From “Fixed
to “Add”.
Enter PIN2.
Restrict
to fixed names
From “Fixed
Names”
switch to
Restriction.
Fixed names
Restriction
OK
Restriction
Set on
❚Set off◆Set on❚
Accept.
OK
Fixed names
View
❚Search◆View◆Add◆Restrictions ❚
OK
Fixed names
Thomas
To view other
names.
OR
To call.
OK
OK
Enter name.
Number:
_
Enter number.
Stored
26
Enter PIN2:
_
Enter PIN2:
OK
If “Restriction”is
activated,then only
the numbers in the
fixed names list can
be called.
Page 30

MENUS / EXTRA...
Set
Alarm Set alarm on Set clock
The phone offers
you some fun and
practical functions.
Switch to
“Extra”
OK
ALARM
Your phone has a
24 hour alarm clock.
The alarm will ring
even if the phone is
switched off.
When the alarm
rings press any key to
silence it.
SET ALARM OFF
Extra
Alarm clock
OK
Alarm clock
Set off
❚Set off◆Set on❚
OK
Deactivated
Extra
Alarm clock
OK
Alarm clock
Set on
❚Set off◆Set on❚
OK
Alarm Clock
18:44
Minutes
>
decrease
Minutes
<
increase
OR
Enter hour
and minutes
(eg:07:45).
OK
Set
27
OK
OR
OK
From Extra
switch to “Set
clock”.
Extra
Set clock
Set clock
11:37
<
Minutes
decrease
> Minutes
increase
Enter hour
and minutes
(eg:19:42).
Set clock
19:42
Accept.
You have to set
the clock if you
remove the
battery.
Page 31

MENUS / EXTRA...
OK
Euro:
10.5
To
PRESS
Once Twice Three Four
times times
+ - * /
,
Calculator ... Euro converter
Your phone has a
calculator to add (+),
substract (-),multiply
(*),and divide (/).
Network
Press and
hold to
use
calculator.
OR
from Extra
switch to
“Calculator”.
Extra
Calculator
OK
Calculate:
3
Calculate:
3 *
Calculate:
3 * 6
Calculate:
=18
To clear.
This feature is only
available for countries
_
participating in the European
Monetary Union. It allows
you to easily convert Euros
into your local currency and
vice versa.
_
OK
_
❚Euro->FF◆FF->Euro❚
OK
From Extra
switch to
“Converter”.
Extra
Converter
Converter
Euro->FF
Switch to desired
type of conversion.
Calculate:
0
For example
3x6=18
_
Euro:
_
Enter amount
(e.g.: 10.5
Euros).
Press and hold
zero to enter
a decimal point.
28
Page 32

MENUS / EXTRA...
OK
OK
OK
Stopwatch:
00:00:00.00
Biorythm
calendar ... Stopwatch
10.5 Euro
66.75 FF
Your phone has a game
which allows you to find
your potential,or this of
your friends, for a given
day.
From Extra
switch to “Bio
calendar”.
Extra
Bio calendar
Enter the date
for which you
want to know
the bio-rythm
results.
Date:
30/03/1999
OK
The results can be:
Chance
You can time a race or
other event.
This stopwatch
is not a
professional
mesuring
device.Its
measurements
cannot be
applied in an
official context.
From Extra
switch to
“Stopwatch”.
Extra
Stopwatch
OK
OK
Birth date:
dd/mm/yyyy
Type your
birth date.
Birth date:
04/06/1974
Date:
dd/mm/yyyy
Love
Energy
Success
29
OK
Start the
stopwatch.
Stop the
stopwatch.
Restart the
stopwatch.
Reset the
stopwatch to
zero (when
stopped).
Page 33

MENUS / CALL FORWARDING...
Deactivated
Call forwarding ... Cancel all
Depending on your
network operator your
phone will allow you to
divert all your calls to
voicemail or to another
number.You will have to
select the type of
forwarding you want .
Switch to
“Forwarding”
Menu
Forwarding
OK
Forwarding
If no reply
❚Always◆If no reply◆If busy◆
Unreacheable◆Cancel all❚
Select the option
wanted by pr essing
OK
the OK key
Example :Always
FORWARD ALWAYS
TO MAILBOX
Forwarding
Always
❚Status◆Cancel◆To mailbox ◆To number❚
Switch to
mailbox
OK
Requesting
Activated
Your phone will not ring
as long as your calls are
forwarded to your mail
box.
T
o be able to forward
calls to your voice mail
check that your mail box
number has been set
correctly ( see “Settings”
section page 23)
FORWARD ALWAYS TO
NUMBER
From
“Forwarding”
switch to
“Always”
Forwarding
Always
❚Status◆Cancel◆To mailbox◆To number❚
OK
Select “T o
number”
OK
Number:
_
30
Enter the
number to which
you want to
divert your calls
Requesting
Activated
“Status”will show you
if this specific call
forwarding option is
activated or not .
You can cancel each
individual forwarding
option by using “Cancel
”instead of “Cancel all”
CANCEL ALL
From “Forw arding”
“Cancel all”
Forwarding
Cancel all
OK
Your phone will now
receive calls as normal ;
switch to
Page 34

PHILIPS AUTHENTIC ACCESSORIES
“When Performance Counts... Philips Authentic Accessories are Designed to
Maximize the Performance of Your Philips Phone”.
PLUS Battery
SLIM Battery
Cigarette Lighter Adapter 12V - 24V
Deskstand Charger
Fast T ravel Charger
Europe ACSR 12/P 9911 240 30042
Taïwan/USA ACTR 12/P 9911 240 30043
UK ACUB 12/P 9911 240 30044
Australia ACAR 12/P 9911 240 30045
Fast Battery Charger and Conditioner
The cradle holds a single battery.Four versions of AC plugs available.
Reference
BHR 130/P 9911 240 32041
NIMH 1300 mAh
Reference
BHR 127/P 9911 240 32040
NIMH 700 mAh
Reference
CKLR 12/P 9911 240 34118
Reference
DTSC 12/P 9911 240 35143
Reference
Reference
Europe DTER 12/P 9911 240 35137
Taiwan/USA DTTC 12/P 9911 240 35139
UK DTUC 12/P 9911 240 35140
Australia DTAC 12/P 9911 240 35141
31
Page 35

PHILIPS AUTHENTIC ACCESSORIES
Basic Car Kit
Keeps your phone secure and within easy reach while the battery is
charging.
CKBR 12/P 9911 240 34210
Car Kit with Headset
Enjoy hands-free conversation while your phone is secure and within
easy reach.
CKSR 12/P 9911 240 34211
Easy Hands-Free Car Kit
Complete hands-free solution with an advanced design speaker and
microphone.Easy to install - simply plug into the vehicle power outlet.
Your battery charges while secure in the cradle.
CKER 12/P 9911 240 34420
Headset
Use your phone under almost any situation with this convenient
hands-free,very mobile solution.
HSSR 12/P 9911 241 30017
Personal Accessories
Keeps your phone within easy reach, safe and secure.
Carry Case with Belt Clip PBCR 12/P 9911 240 37023
Belt Clips (3 colors per package) VBCR 12/P 9911 241 39203
Phone Necklace VPNR 12/P 9911 241 39204
Reference
Reference
Reference
Reference
Reference
Easel-Style Phone Stand
Keeps the display on your phone at an easy-to-read angle.
VPER 12/P 9911 241 39205
Reference
Ask for Philips Authentic Accessories where you
bought your Philips phone.
32
Page 36

TROUBLESHOOTING
PROBLEM
The phone does not
switch on.
The display shows
«BLOCKED» when you
switch on.
The and
symbols are not
displayed.
The display doesn’t
respond (or responds
slowly) to key pushes.
Your phone shows
"insert SIM” on the
display.
SOLUTION
Check if the battery is correctly inserted (big
arrow facing you and pointing to the top) and/or
charge the phone until the battery icon has
stopped flashing.
Somebody tried to use your phone but did not
know the PIN code or Unblocking code.
Contact your service provider.
The network connection is lost.Either you are
in a radio shadow (in a tunnel or between tall
buildings) or you are outside of the network
coverage area.Try from another place.
The display responds mor e slo wl y at v ery low
temperatures.This is normal and does not affect
the operation of the phone.Take the phone to a
warmer place and try again.
Remove your battery. Check that the micro SIM
card is correctly inserted (clipped corner at the
top left - see
page 3).
When charging the
battery,the battery icon
shows no bars and the
outline is flashing.
Only charge the battery in an environment
where the temperature does not go below 0˚C
(32˚F) or above 50˚C (113˚F).
33
Page 37

SAFETY PRECAUTIONS
RADIO W AVES
•
Your phone transmits/receives radio waves in the GSM fr equency (900/1800 Hhz).
• The GSM network controls transmission power (0.01 to 2 watts).
• Your phone complies with all relevant safety standards.
• The CE mark on your phone shows compliancy with European
electromagnetic compatibility (Ref.89/336/EEC) and low voltage directives
(Ref.73/23/EEC).
SAFETY PRECAUTIONS
• Careless use can cause harm to you and others.
• Please inquire and respect local laws and regulations.
• Use your phone in the normal operating position (to ear).
• Avoid touching the antenna while a call is in progress.
• Do not use your phone if the antenna is damaged (risk of minor skin burn).
• Keep your phone in a safe place,out of reach of small children.
• Check with other manufacturers that consumer electronics will not be
affected by radio energy.
• Avoid use of phone while driving. It affects your concentration.
• Switch phone off in an aircraft.It is illegal to use cellular phones when
airborne.
• Switch phone off near hospitals or medical equipment.
• Ask manufacturer about radio wave shielding of electronic medical devices
you may use (pacemaker,hearing aid).
• Switch phone off where blasting is in progress (for example in quarries).
• Switch phone off in potentially flammable atmosphere (petrol stations,fuel
depot,chemical plants).
ENVIRONMENTAL CARE
• Please remember to observe the local regulation regarding the disposal of
your packaging material,exhausted batteries and old phone and where
possible promote their recycling.
• The phone must ALWAYS be switched OFF by pressing the Red ON/OFF key
and never by removing the battery while the phone is ON.Otherwise,the
stability of the settings,alarm clock and ring cannot be guaranteed.
• The phone is equipped with an alarm clock that,if set,will ring.If the phone is
off and the alarm rings, no radio waves are transmitted.Press any key to turn
off the alarm.
34
Page 38

Accessories - 31
Alarm - 27
Battery - 2,31
Biorhythm calendar - 29
Calculator - 28
Calls - 20
Answer a call - 8
Answer a second call - 10
Call forwarding - 30
Emergency call - 9
End a call - 7
International call - 9
Last calls - 8
Make a call - 7
Menu - 19
Reject a call - 8
Capital letters - 6
Cell Broadcast - 23
Clear display - 8
Clock - 26
Compass key - 4,12
Consult last calls - 8
Display - 5
DTMF tones - 11
Earpiece volume - 8
Emergency - 9
Emotion Icons - 18
Entering Text - 6
Euro Converter - 28
Extra - 27
Alarm - 27
Biorhythm calendar - 28
Calculator - 28
Clock - 26
Euro Converter - 28
Stopwatch - 28
Fixed names - 26
Flash Dial - 11
Forward calls - 30
Hide identity - 11
Keypad - 4
Lock - 9
Unlock - 9
Languages - 9
Last calls - 8
INDEX
Mailbox number - 24
Manual registration - 24
Menus
Calls - 20
Extra - 27
Messages - 16
Names - 13
Security - 25
Settings - 22
Voicemail - 24
Messages - 16
Cell Broadcast - 22
Menu - 16
Meters - 21
Micro-SIM card - 2
Names - 13
Add a name - 13
Menu - 13
Fixed names - 26
Search a name - 15
View list - 14
Phone - 4
Own number - 15
PIN - 25
Ringer volume - 8
Restrict to FDN - 26
Scratchpad - 10
Safety Precautions - 34
Security - 25
Settings - 22
Set
Alarm On/Off - 27
Clock - 27
Set-Up - 22
Switch On/Off - 7
Stopwatch - 28
Touchtones (DTMF) - 11
Troubleshooting - 33
Voice dialling - 7
Voicemail - 24
Volume
Earpiece - 8
Ringer - 8
Vibrator - 8
Page 39

TABLE OF CONTENTS
Table of contents
Glossary 1
Before you start 2
The micro-SIM card 2
The battery 2
Insert the micro-SIM card 3
Insert the battery 3
Discover your phone 4
Display 5
Entering text 6
Basic functions 7
Switch ON/OFF 7
Voice dialling 7
Make a call 7
Answer or reject a call 8
Earpiece volume 8
Consult last calls 8
Adjust ringer volume 8
Emergency call 9
Change language 9
International call 9
Keypad lock/unlock 9
Special functions 10
Answer a second call 10
Automatic redial 10
Scratchpad 10
Touchtones (DTMF) 11
Hide your identity 11
Setting up Flash Dial 11
Menus 12
Discover the Compass key 12
Names 13
Add a name 13
Add voice dial 13
View names in the name list 14
Quick access to names 14
Search for a specific name 15
Road your own number 15
Delete a name 15
Messages 16
Read new messages 16
Read archived messages 17
Send short messages (SMS) 17
Service center number 17
Emotion icons 18
Send short messages from
phoneboock 19
Usual messages 19
Calls 20
View calls 20
Delete all calls 20
Meters 21
View meters 21
Reset meters 21
Settings 22
Set up meters 22
Key tones ON/OFF 22
Choose ringer 23
Cell broadcast 23
View topics, add a topic 23
Manual registration 24
Voice mailbox number 24
Consult your voice messages 25
Security 25
Pin request, 25
change PIN and PIN 2 codes 25
Fixed names 26
Extra 27
Alarm clock,(set off/set on) 27
Set clock 27
Calculator 28
Euro converter 28
Biorythm calendar 29
Stopwatch 29
Call forwarding 30
Forward always to voice mail 30
Forward always to number 30
Cancel all 30
Philips Authentic Accessories 31
T roubleshooting 33
Safety Precautions 34
Index
 Loading...