

Philips Centrifugeuse User Manual [en, de, es, it]
HR 2825/26

2
English Page 4
• Keep page 3 open when reading
these operating instructions.
Français Page 6
• Pour le mode d'emploi: dépliez les page 3.
Deutsch Seite 8
• Schlagen Sie beim Lesen der Gebrauchsanweisung Seite 3 auf.
Nederlands Pagina 11
• Sla bij het lezen van de gebruiksaanwijzing
pagina 3 op.
Italiano Pagina 14
• Prima di usare l'apparecchio, aprite le pagina 3
e leggete attentamente le istruzioni per l'uso.
Español Página 17
• Desplegar las página 3 al leer las instrucciones
de manejo.
Português Página 20
• Durante a leitura do modo de emprêgo,
desdobre e verifique as pág. 3.
Ελληνικά Σελίδα 23
• Ανοίξτε την σελίδα 3 για τις οδηγίες
χρήσεως.
3
1
A
B
C
D
E
G
0
F
0
5
0
5
4
0
0
4
0
5
3
0
0
3
0
5
2
0
0
2
0
5
1
0
0
1
0
5
H
I
4
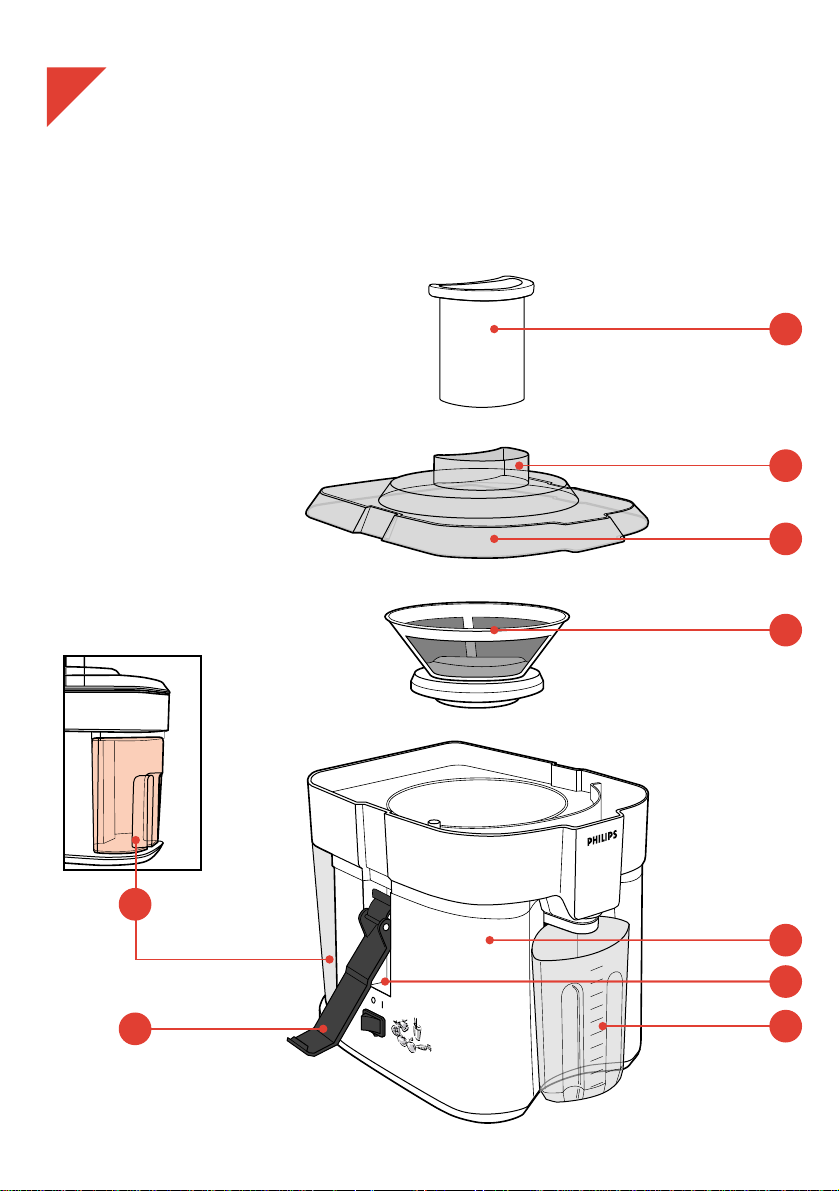
General description (fig. 1)
A Pusher
B Feeding tube
C Lid
D Sieve
E Pulp container
F Base unit
G Lid latches
H On/off switch
I Juice cup (type HR 2826 only)
English
Important
• Read the instructions in conjunction
with the illustrations before using the
appliance.
• Avoid damage. Before connecting please
check if the voltage indicated on the
appliance corresponds to the mains
voltage in your home (110 - 127 V;
220 - 240 V).
• If the mains cord of this appliance is
damaged, it must only be replaced by
Philips or their service representative, as
special tools and/or parts are required.
• Keep the appliance away from children.
• Do not leave the appliance switched on
unattended.
• Never use any accessories or parts from
other manufacturers or which have not
specifically been advised by Philips.
Your guarantee is void if such
accessories or parts have been used.
• Never put your fingers or cutlery into the
feeding tube. Only the provided pusher
is suited for this purpose.
• Let the sieve come to a complete stop
before releasing the latches and opening
the lid.
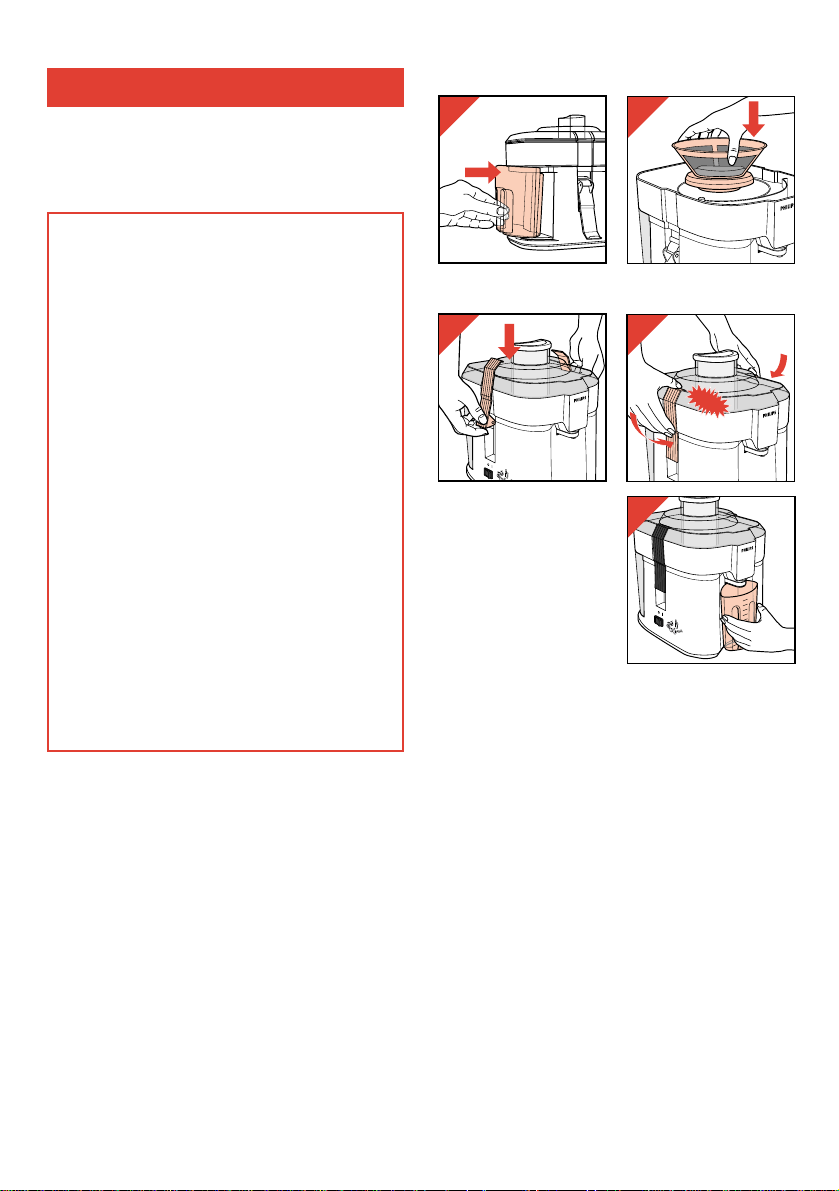
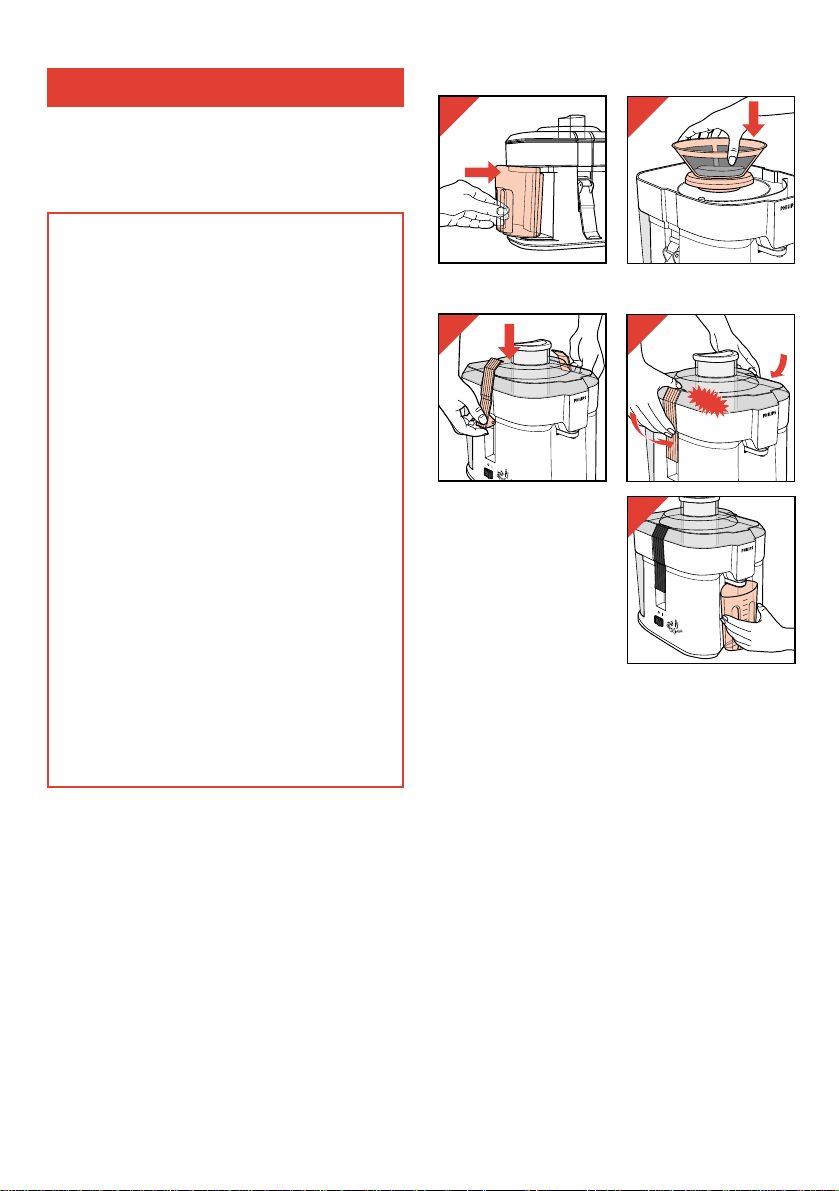
Assembling
- Position the pulp container (fig. 2).
- Position the sieve (fig. 3).
- Place the lid so that it
fits on all sides (fig. 4a).
Lock the lid with the
latches (“Click!”)
(fig. 4b). Check if the lid
is positioned correctly.
- Position your juice jar
or cup (fig. 5).
- Insert the mains plug
into the wall socket.
Ingredients
• Always use fresh fruits and vegetables,
because they produce more juice.
• Especially advisable are pineapple, beetroot,
apple, cucumber, carrot, spinach, melon,
tomato, orange and grape.
• Starchy fruits, such as banana, paw-paw,
avocado, fig and mango fruit should not be
processed in this juice extractor.
For these types of fruit use a food processor or
a (bar) blender.
• It is not necessary to remove thin skins and
peels. Only thick ones of e.g. orange,
pineapple, apple, uncooked beetroot must be
removed.
• Leaves and stems of e.g. lettuce can also be
processed in the juice extractor.
• If you wish to make juice from oranges, lemons,
mandarin or grape fruit, it is necessary to
unpeel and remove the white fibres as
otherwise the juice will acquire a bitter taste.
• Apple juice may quickly turn brown. A few drops
of lemon juice will slow down this process.
With this juice extractor you can make 100% pure
fruit juice and vegetable juice.
The appliance is simple to use and very easy to
clean.
2
3
4a
4b
CLICK
5
500
450
400
350
300
250
200
150
50
5
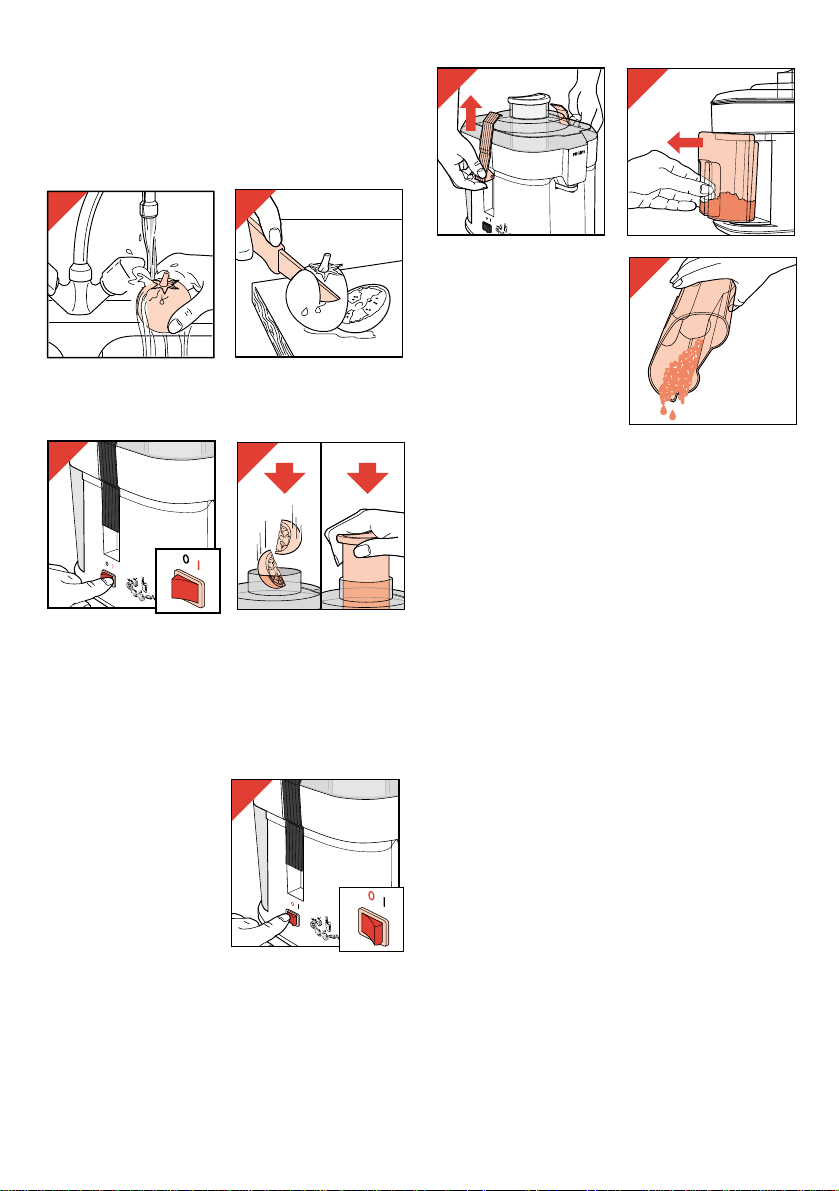
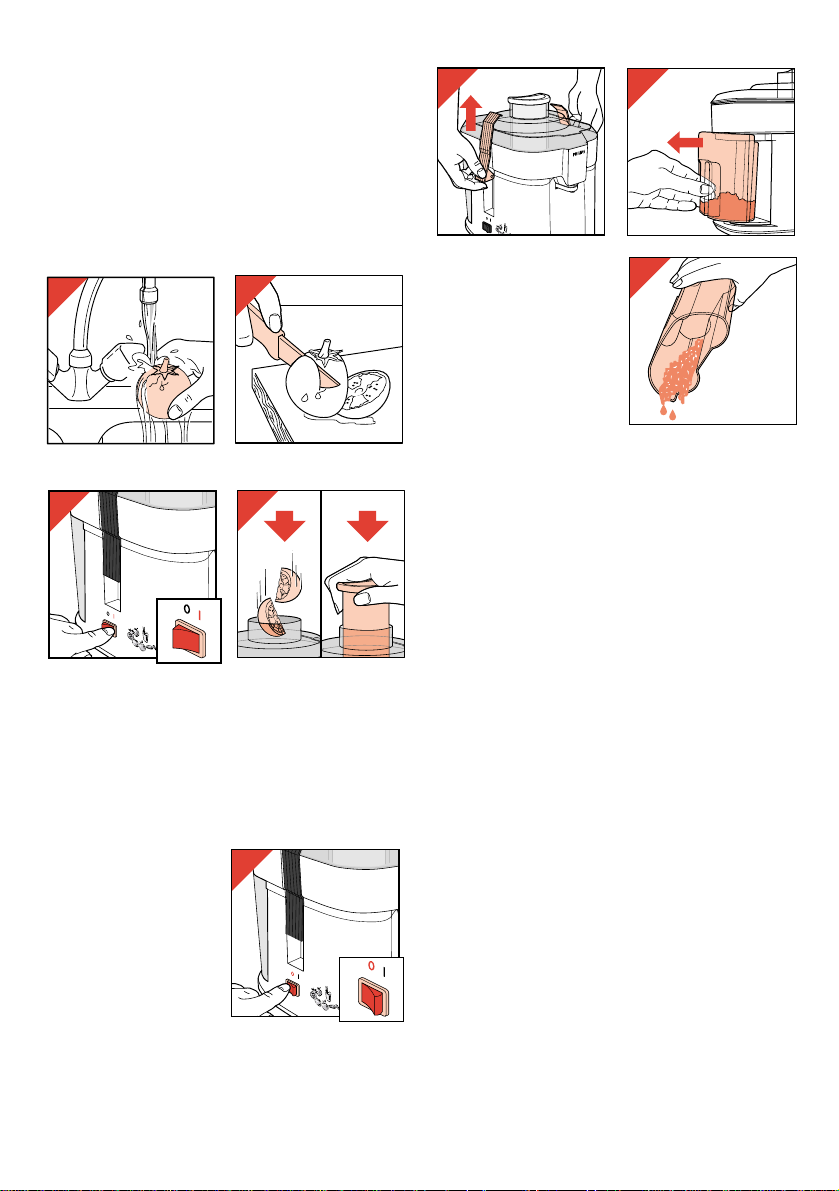
How to use
- Check if the lid is correctly placed.
• For your safety: the appliance can only
operate when the lid has been correctly
mounted on to the base unit.
- Wash the fruits and/or vegetable(s) (fig. 6) and
cut them in pieces (fig. 7) to fit into the feeding
tube.
- Switch the appliance on by pressing the on/off
switch (fig. 8).
- Put the pieces into the feeding tube and press
them gently downwards with the pusher (fig. 9).
• Do not press down with force. This would
give worse results and could even block the
rotating sieve.
• Never put any objects or your fingers in the
feeding tube.
- After the juice has
stopped flowing:
switch the appliance
off (fig. 10) and wait
for the sieve to come
to a complete
standstill before
removing the juice jug
or cup.
- Preferably, drink the juice immediately after it
has been extracted.
Exposure to the open air for any length of time
will result in the juice losing its nutritional value
and its taste.
However, if you wish to keep the juice, put it
into the refrigerator in a well-closed container
for a maximum of 24 hours.
- When the pulp
container is full:
switch off (fig. 10) and
wait for the sieve to
come to a complete
standstill,
release the two latches
to disassemble the lid
(fig. 11),
remove the pulp
container (fig. 12),
empty the pulp container (fig. 13).
Reassemble the juice extractor and continue
the process.
Culinary hints
• With tomato juice you can prepare a delicious
Bloody Mary.
• Pulp of e.g. carrots, beetroots, cabbage,
spinach can be used as a basis for soup,
sauce, jam, ice-cream and dessert.
Cook the pulp with some spices. Liquidize the
cooked pulp using a food processor or a (bar)
blender.
Use tomato pulp to make a tomato paste.
• Try these combinations of juices: apple with
carrot, orange with grape, pineapple with
grapefruit, beetroot with carrot, carrot with
melon, apple with orange.
Cleaning
• Switch off and remove the mains plug from the
wall socket before cleaning.
• Disassemble the appliance for washing-up as
indicated in figs. 11-13.
• The base unit may be wiped with a damp cloth,
some detergent may be required.
• Do not use scourers, scouring pads, abrasives,
steel wool, acetone, alcohol etc.
• Wash the parts which have been in contact with
food in warm soapy water immediately after
use.
• Do not clean parts in a dishwasher.
• Use a soft brush for cleaning the sieve.
6
7
11
12
8
9
10
13
6
Description générale (fig. 1)
A Poussoir
B Cheminée
C Couvercle
D Tamis
E Réservoir à pulpe
F Bloc moteur
G Bouton de verrouillage
H Interrupteur marche/arrêt
I Récipient à jus (uniquement type HR 2826 )
Français
Important
• Lisez les instructions en regardant les
illustrations avant d'utiliser l'appareil.
• Avant de brancher l'appareil, vérifiez si
la tension indiquée sur celui-ci
correspond bien à celle de votre
logement ( 110-127 v ; 220 - 240 v ).
• Si le cordon secteur de votre appareil est
endommagé, il doit impérativement être
remplacé par un réparateur indépendant
agréé Philips car des équipements et
des composants spécifiques sont
exigés.
• Tenez l'appareil hors de portée des
enfants.
• Ne quittez pas l'appareil lorsqu'il est en
marche.
• N'utilisez jamais d'accessoires ou
d'éléments en provenance d'autres
fabricants ou qui n'ont pas été
spécifiquement conseillés par Philips,
car votre garantie deviendrait caduque.
• N'introduisez jamais vos doigts ou un
couteau dans la cheminée. Utilisez
uniquement le poussoir fourni à cet
effet.
• Attendez toujours l'arrêt complet du
tamis avant d'appuyer sur le bouton
d'ouverture du couvercle.
Assemblage
- Positionnez le réservoir à pulpe (fig. 2).
- Positionnez le tamis (fig. 3).
- Mettez en place le
couvercle (fig. 4a) ;
poussez les 2 crochets
vers le bas pour
verrouiller ("clic")
(fig. 4b).
- Mettez en place le
récipient à jus ou un
verre (fig. 5).
- Vérifiez que le bouton
marche/arrêt est bien
sur la position "Arrêt".
- Branchez l'appareil.
Ingrédients
• Utilisez toujours des fruits et légumes frais qui
donneront plus de jus.
• Nous vous conseillons particulièrement :
ananas, betteraves, pommes, concombres,
carottes, épinards, melons, tomates, oranges
et raisins.
• Vous ne pouvez pas utiliser : bananes,
papayes, avocats, figues et mangues, qui
nécessitent un robot ou un mixer.
• Il n'est pas nécessaire de retirer les peaux et
pelures, sauf sur les oranges, ananas,
pommes, betteraves crues.
• Les feuilles et tiges de laitue par exemple
peuvent être mis dans la centrifugeuse.
• Si vous désirez préparer des jus d'orange,
citron, mandarine ou pamplemousse, il est
nécessaire de les peler et de retirer les peaux
blanches, qui pourraient donner un goût amer
au jus.
Cette centrifugeuse vous permet de réaliser des
jus de fruits et légumes 100 % naturels.
L'appareil est simple à utiliser et très facile à
nettoyer.
2
3
4a
4b
CLICK
5
500
450
400
350
300
250
200
150
50
7
• Le jus de pomme brunit rapidement. Afin de
l'éviter, ajoutez quelques gouttes de jus de
citron.
Utilisation
- Vérifiez si le couvercle est correctement placé.
• Pour votre sécurité : l'appareil ne peut être
mis en marche que si le couvercle est
monté correctement sur le bloc moteur.
- Lavez les fruits et/ou les légumes (fig. 6) et
coupez-les en morceaux (fig. 7)
- Mettez en marche l'appareil en appuyant sur
l'interrupteur (H) (fig. 8).
- Ensuite seulement introduisez les morceaux
dans la cheminée et appuyez légèrement à
l'aide du poussoir (fig. 9).
• N'appuyez pas trop fort sur le poussoir,
afin d'obtenir de meilleurs résultats et de ne
pas bloquer éventuellement le tamis.
• Ne mettez jamais d'objets ni vos doigts dans
la cheminée.
- Quand le jus ne
coule plus :
arrêtez l'appareil (fig.
10), et attendez que la
pulpe ait fini de
s'écouler avant de
retirer le récipient à
jus ou le verre.
- Buvez le jus
immédiatement, car il
perd sa valeur nutritionnelle et son goût si vous
le laissez à l'air libre quelque temps.
Néanmoins, vous pourrez conserver le jus 24
heures maximum dans un récipient bien fermé
au réfrigérateur.
- Quand le réservoir à
pulpe est plein :
arrêtez l'appareil (fig.
10), attendez que la
pulpe ait fini de
s'écouler,
liberez les crochets de
verrouillage pour retirer
le couvercle (fig. 11),
retirez le réservoir à
pulpe ou le verre (fig. 12),
videz-le (fig. 13)
Assemblez l'appareil de nouveau.
Conseils de préparation
• Vous pouvez préparer un délicieux "Bloody
Mary" avec du jus de tomates.
• La pulpe de carottes, betteraves, choux,
épinards, peut être utilisée comme base pour
les soupes, sauces, confitures, glaces et
desserts.
Faites cuire la pulpe avec quelques épices.
Utilisez un robot ou un mixer pour la rendre
liquide.
Utilisez de la pulpe de tomates pour faire une
pâte à la tomate.
• Essayez ces combinaisons de fruits : pomme
et carotte, ananas et raisin, ananas et
pamplemousse, betterave et carotte, carotte
et melon, pomme et orange.
Nettoyage
• Arrêtez l'appareil et débranchez-le.
• Désassemblez l'appareil comme indiqué
(fig. 11 à 13).
• Vous pouvez nettoyer le bloc moteur avec un
chiffon humide, et éventuellement un peu de
détergent.
• N'utilisez jamais de produits abrasifs, éponges
métalliques, d'acétone, alcool, etc.
• Nettoyez immédiatement après utilisation les
éléments qui ont été en contact avec des
aliments.
• Aucun élément ne peut être mis au lavevaisselle.
• Nettoyez le tamis à l'aide d'une brosse
souple.
6
8
7
9
10
11
12
13

8
Allgemeine Beschreibung (Abb. 1, Seite 3)
A Stopfer
B Einfüllöffnung
C Deckel
D Raspelsieb
E Tresterbehälter
F Grundgerät
G Deckelverriegelungen
H Ein-/Ausschalter
I Saftkanne (Nur Type HR 2826)
Deutsch
Wichtig
• Lesen Sie die Gebrauchsanweisung
sorgfältig durch, und sehen Sie sich
dabei die Abbildungen an, bevor Sie das
Gerät zum ersten Mal benutzen.
• Prüfen Sie, bevor Sie das Gerät in Betrieb
nehmen, ob die Spannungsangabe auf
dem Typenschild mit der örtlichen
Netzspannung (110-127 V; 220-240 V)
übereinstimmt.
• Wenn das Netzkabel defekt oder
beschädigt ist, muß es von einer durch
Philips autorisierten Werkstatt ersetzt
werden, da für die Reparatur SpezialWerkzeug und/oder spezielle Teile
benötigt werden.
• Halten Sie Kinder von dem Gerät fern.
• Lassen Sie das eingeschaltete Gerät
nicht unbeaufsichtigt.
• Verwenden Sie keine Zusatzteile oder geräte, die nicht von Philips
ausdrücklich empfohlen werden.
Anderenfalls erlischt die Garantie.
• Stecken Sie niemals Ihre Finger oder
Besteckteile in die Einfüllöffnung.
Verwenden Sie stets nur den
mitgelieferten Stopfer.
• Lassen Sie das Raspelsieb zum völligen
Stillstand kommen, bevor Sie den Deckel
entriegeln und öffnen.
Zusammensetzen des Entsafters
- Setzen Sie den Tresterbehälter ein (Abb. 2).
- Setzen Sie das Raspelsieb ein (Abb. 3).
- Setzen Sie den Deckel
auf das Gerät
(Abb. 4a). Befestigen
Sie den Deckel mit
dem Schnappveschluß
("Klick") (Abb. 4b).
Prüfen Sie, ob der
Deckel richtig sitzt und
fest geschlossen ist.
- Stellen Sie die
Saftkanne oder einen
anderen passenden Behälter unter den Auslauf
(Abb. 5).
- Stecken Sie den Stecker in die Steckdose.
Die Zutaten
• Verwenden Sie nur frisches Obst bzw. frisches
Gemüse. Sie erhalten dann mehr Saft.
• Besonders zu empfehlen sind Ananas, Äpfel,
Melonen, Orangen und Grapefruit bzw. Möhren,
rote Rüben, Tomaten, Gurken und Spinat.
• Stärkehaltige Früchte, z.B. Bananen, Papaya,
Avocado, Mango und Feigen, sollten mit
diesem Gerät nicht entsaftet werden.
Verwenden Sie für solche Früchte eine
Küchenmaschine oder einen Stabmixer.
• Sie brauchen nur Früchte mit dicken oder
harten Schalen zu schälen, wie Ananas, Äpfel,
Orangen, Grapefruit und rohe rote Rüben.
• Blätter und Strünke (z.B. vom Kopfsalat)
können in diesem Gerät mitverarbeitet werden.
• Wenn Sie Saft aus Zitrusfrüchten herstellen
wollen, müssen Sie den weißen Anteil der
Mit diesem Entsafter können Sie 100 % reinen
Frucht- oder Gemüsesaft zubereiten.
Das Gerät ist einfach zu bedienen und zu
reinigen.
2
3
4a
4b
CLICK
5
500
450
400
350
300
250
200
150
50
 Loading...