

Page 1
Page 2
IMPORTANT SAFETY NOTICE
Proper service and repair is important to the safe, reliable operation of all Philips
Consumer Electronics Company** Equipment. The service procedures recommended by
Philips and described in this service manual are effective methods of performing service
operations. Some of these service operations require the use of tools specially designed
for the purpose. The special tools should be used when and as recommended.
It is important to note that this manual contains various CAUTIONS and NOTICES
which should be carefully read in order to minimize the risk of personal injury to service
personnel. The possibility exists that improper service methods may damage the
equipment. It also is important to understand that these CAUTIONS and NOTICES
ARE NOT EXHAUSTIVE. Philips could not possibly know, evaluate and advise the
service trade of all conceivable ways in which service might be done, or of the possible
hazardous consequences of each way. Consequently, Philips has not undertaken any such
broad evaluation. Accordingly, a servicer who uses a service procedure or tool which is
not recommended by Philips must first satisfy himself thoroughly that neither his safety
nor the safe operation of the equipment will be jeopardized by the service method
selected.
** Hereafter throughout this manual, Philips Consumer Electronics Company will be
referred to as Philips.
WARNING
Critical components having special safety characteristics are identified with a or
"S" by the Ref. No. in the parts list and enclosed within a broken line* (where
several critical components are grouped in one area) along with the safety symbol
on the schematics or exploded views. Use of substitute replacement parts which
do not have the same specified safety characteristics may create shock, fire, or other
hazards. Under no circumstances should the original design be modified or altered
without written permission from Philips. Philips assumes no liability, express or
implied, arising out of any unauthorized modification of design. Servicer assumes all
liability.
* Broken Line ____ _ ____ _ ____ _ ____
Page 3

FIRE AND SHOCK HAZARD
1. Be sure all components are positioned in such a way as to avoid the possibility of adjacent component
shorts. This is especially important on those chassis which are transported to and from the service shop.
2. Never release a repaired unit unless all protective devices such as insulators, barriers, covers, strain
reliefs, and other hardware have been installed in accordance with the original design.
3. Soldering and wiring must be inspected to locate possible cold solder joints, solder splashes, sharp solder
points, frayed leads, pinched leads, or damaged insulation (including the ac cord). Be certain to remove
loose solder balls and all other loose foreign particles.
4. Check across-the-line components and other components for physical evidence of damage or
deterioration and replace if necessary. Follow original layout, lead length, and dress.
5. No lead or component should touch a receiving tube or a resistor rated at 1 watt or more. Lead tension
around protruding metal surfaces or edges must be avoided.
6. Critical components having special safety characteristics are identified with an 'S' by the Ref. No. in the
parts list and enclosed within a broken line* (where several critical components are grouped in one area)
along with the safety symbol on the schematic diagrams and /or exploded views.
7. When servicing any unit, always use a separate isolation transformer for the chassis. Failure to use a
separate isolation transformer may expose you to possible shock hazard, and may cause damage to
servicing instruments.
8. Many electronic products use a polarized ac line cord (one wide pin on the plug). Defeating this safety
feature may create a potential hazard to the servicer and the user. Extension cords which do not
incorporate the polarizing feature should never be used.
9. After reassembly of the unit, always perform an ac leakage test or resistance test from the line cord to all
exposed metal parts of the cabinet. Also, check all metal control shafts (with knobs removed), antenna
terminals, handles, screws, etc., to be sure the unit may be safely operated without danger of electrical
shock.
* Broken line ____ _ ____ _ ____ _ ____
Page 4

LEAKAGE CURRENT COLD CHECK
1. Unplug the ac line cord and connect a jumper between the two prongs of the plug.
2. Turn on the power switch.
3. Measure the resistance value between the jumpered ac plug and all exposed cabinet parts of the receiver,
such as screw heads, antennas, and control shafts. When the exposed metallic part has a return path to the
chassis, the reading should be between 1 megohm and 5.2 megohms. When the exposed metal does not
have a return path to the chassis, the reading must be infinity. Remove the jumper from the ac line cord.
LEAKAGE CURRENT HOT CHECK
1. Do not use an isolation transformer for this test. Plug the completely reassembled receiver directly into
the ac outlet.
2. Connect a 1.5k, 10W resistor paralleled by a 0.15uF. capacitor between each exposed metallic cabinet
part and a good earth ground such as a water pipe, as shown below.
3. Use an ac voltmeter with at least 5000 ohms/volt sensitivity to measure the potential across the resistor.
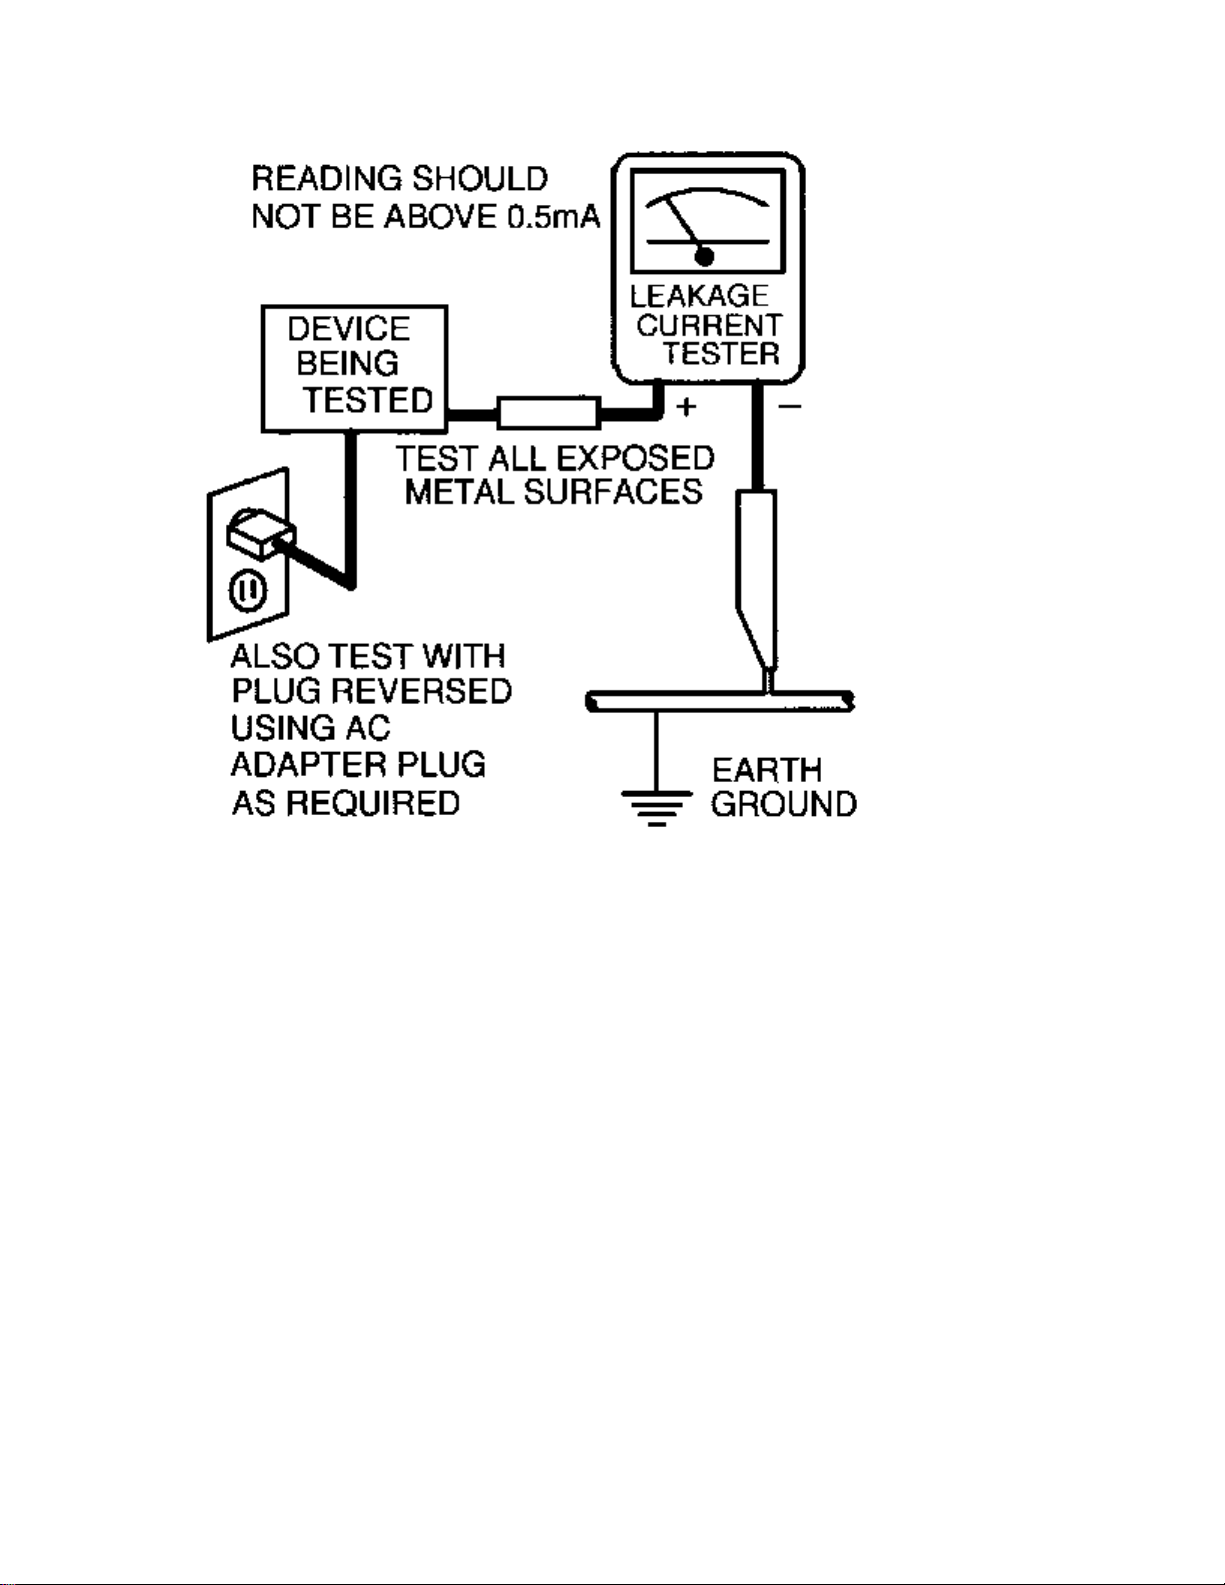
4. The potential at any point should not exceed 0.75 volts. A leakage current tester may be used to make
this test; leakage current must not exceed 0.5mA. If a measurement is outside of the specified limits,
there is a possibility of shock hazard. The receiver should be repaired and rechecked before returning it
to the customer.
5. Repeat the above procedure with the ac plug reversed. (Note: An ac adapter is necessary when a
polarized plug is used. Do not defeat the polarizing feature of the plug.)
OR
With the instrument completely reassembled, plug the ac line cord directly into a 120Vac outlet. (Do not
use an isolation transformer during this test.) Use a leakage current tester or a metering system that
complies with American National Standards Institute (ANSI) C101.1 Leakage Current for Appliances and
Underwriters Laboratories (UL) 1410, (50.7). With the instrument ac switch first in the on position and
then in the off position, measure from a known earth ground (metal water pipe, conduit, etc.) to all exposed
metal parts of the instrument (antennas, handle brackets, metal cabinet, screw heads, metallic overlays,
control shafts, etc.), especially any exposed metal parts that offer an electrical return path to the chassis.
Any current measured must not exceed 0.5mA. Reverse the instrument power cord plug in the outlet and
repeat the test. See the graphic below.
Page 5
Page 6

TV-VCR SAFETY NOTES
SAFETY PRECAUTIONS FOR TV CIRCUITS
1. Before returning an instrument to the customer, always make a safety check of the entire instrument,
including, but not limited to, the following items:
a. Be sure that no built-in protective devices are defective or have been defeated during servicing.
Protective shields are provided on this chassis to protect both the technician and the customer.
Correctly replace all missing protective shields, including any removed for servicing convenience.
When reinstalling the chassis and/or other assembly in the cabinet, be sure to put back in place all
protective devices, including but not limited to, nonmetallic control knobs, insulating fishpapers,
adjustment and compartment covers/shields, and isolation resistor/capacitor networks. Do not operate
this instrument or permit it to be operated without all protective devices correctly installed and
functioning. Servicers who defeat safety features or fail to perform safety checks may be liable for any
resulting damage.
b. Be sure that there are no cabinet openings through which an adult or child might be able to insert their
fingers and contact a hazardous voltage. Such openings include, but are not limited to, (1) spacing
between the picture tube and the cabinet mask, (2) excessively wide cabinet ventilation slots, and (3)
an improperly fitted and/or incorrectly secured cabinet back cover.
c. Do a leakage current check.
ANY MEASUREMENTS NOT WITHIN THE LIMITS SPECIFIED HEREIN INDICATE A
POTENTIAL SHOCK HAZARD THAT MUST BE ELIMINATED BEFORE RETURNING THE
INSTRUMENT TO THE CUSTOMER OR BEFORE CONNECTING THE ANTENNA OR
ACCESSORIES.
d. X-Radiation and High Voltage Limits - Because the picture tube is the primary potential source of
X-radiation in solid-state TV receivers, it is specially constructed to prohibit X-radiation emissions.
For continued X-radiation protection, the replacement picture tube must be the same type as the
original. Also, because the picture tube shields and mounting hardware perform an X-radiation
protection function, they must be correctly in place. High voltage must be measured each time
servicing is performed that involves B+, horizontal deflection or high voltage. Correct operation of the
X-radiation protection circuits also must be reconfirmed each time they are serviced. (X-radiation
protection circuits also may be called "horizontal disable" or "hold down.") Read and apply the high
voltage limits and, if the chassis is so equipped, the X-radiation protection circuit specifications given
on instrument labels and in the Product Safety and X-Radiation Warning note on the service data
chassis schematic. High voltage is maintained within specified limits by close tolerance safety-related
components/adjustments in the high-voltage circuit. If high voltage exceeds specified limits, check
each component specified on the chassis schematic and take corrective action.
2. Read and comply with all caution and safety-related notes on or inside the receiver cabinet, on the
receiver chassis, or on the picture tube.
3. Design Alteration Warning - Do not alter or add to the mechanical or electrical design of this TV
receiver. Design alterations and additions, including, but not limited to circuit modifications and the
addition of items such as auxiliary audio and/or video output connections, might alter the safety
characteristics of this receiver and create a hazard to the user. Any design alterations or additions will
void the manufacturer's warranty and may make you, the servicer, responsible for personal injury or
property damage resulting therefrom.
Page 7

4. Picture Tube Implosion Protection Warning - The picture tube in this receiver employs integral
implosion protection. For continued implosion protection, replace the picture tube only with one of the
same type number. Do not remove, install, or otherwise handle the picture tube in any manner without
first putting on shatterproof goggles equipped with side shields. People not so equipped must be kept
safely away while picture tubes are handled. Keep the picture tube away from your body. Do not handle
the picture tube by its neck. Some "in-line" picture tubes are equipped with a permanently attached
deflection yoke; because of potential hazard, do not try to remove such "permanently attached" yokes
from the picture tube.
5. Hot Chassis Warning
a. Some TV receiver chassis are electrically connected directly to one conductor of the ac power cord and
may be serviced safely without an isolation transformer only if the ac power plug is inserted so that the
chassis is connected to the ground side of the ac power source. To confirm that the ac power plug is
inserted correctly, with an ac voltmeter, measure between the chassis and a known earth ground. If a
voltage reading in excess of 1.OV is obtained, remove and reinsert the ac power plug in the opposite
polarity and again measure the voltage potential between the chassis and a known earth ground.
b. Some TV receiver chassis normally have 85Vac (RMS) between chassis and earth ground regardless of
the ac plug polarity. This chassis can be safety-serviced only with an isolation transformer inserted in
the power line between the receiver and the ac power source, for both personnel and test equipment
protection. Some TV receiver chassis have a secondary ground system in addition to the main chassis
ground. This secondary ground system is not isolated from the ac power line. The two ground systems
are electrically separated by insulation material that must not be defeated or altered.
6. Observe original lead dress. Take extra care to assure correct lead dress in the following areas: a. near
sharp edges, b. near thermally hot parts - be sure that leads and components do not touch thermally hot
parts, c. the ac supply, d. high voltage, and e. antenna wiring. Always inspect in all areas for pinched,
out of place, or frayed wiring. Check ac power cord for damage.
7. Components, parts, and/or wiring that appear to have overheated or are otherwise damaged should be
replaced with components, parts, or wiring that meet original specifications. Additionally, determine the
cause of overheating and/or damage and, if necessary, take corrective action to remove any potential
safety hazard.
Page 8

PRECAUTIONS DURING SERVICE
A. Parts identified by the symbol are critical for safety. Replace only with part number specified.
B. In addition to safety, other parts and assemblies are specified for conformance with regulations
applying to spurious radiation. These must also be replaced only with specified replacements.
Examples: RF converters, RF cables, noise blocking capacitors, and noise blocking filters, etc.
C. Use specified internal wiring. Note especially:
1) Wires covered with PVC tubing
2) Double insulated wires
3) High voltage leads
D. Use specified insulating materials for hazardous live parts. Note especially:
1) Insulation Tape
2) PVC tubing
3) Spacers
4) Insulators for transistors
E. When replacing ac primary side components (transformers, power cord, etc.), wrap ends of wires
securely about the terminals before soldering.
F. Observe that the wires do not contact heat producing parts (heat sinks, oxide metal film resistors,
fusible resistors, etc.)
G. Check that replaced wires do not contact sharp edged or pointed parts.
H. When a power cord has been replaced, check that 10-15 kg of force in any direction will not loosen it.
I. Also check areas surrounding repaired locations.
J. Use care that foreign objects (screws, solder droplets, etc.) do not remain inside the set.
K. Crimp type wire connector
When replacing the power transformer in sets where the connections between the power cord and
power transformer primary lead wires are performed using crimp type connectors, in order to prevent
shock hazards, perform carefully and precisely the following steps.
Replacement procedure
1) Remove the old connector by cutting the wires at a point close to the connector. Important: Do not
re-use a connector (discard it).
2) Strip about 15 mm of the insulation from the ends of the wires. If the wires are stranded, twist the
strands to avoid frayed conductors.
3) Align the lengths of the wires to be connected. Insert the wires fully into the connector.
4) Use the crimping tool to crimp the metal sleeve at the center position. Be sure to crimp fully to the
complete closure of the tool.
L. When connecting or disconnecting the VCR connectors, first disconnect the ac plug from the ac supply
socket.
Page 9
SAFETY CHECK AFTER SERVICING
Examine the area surrounding the repaired location for damage or deterioration. Observe that screws, parts
and wires have been returned to original positions. Afterwards, perform the following test and confirm the
specified values in order to verify compliance with safety standards.
Clearance Distance
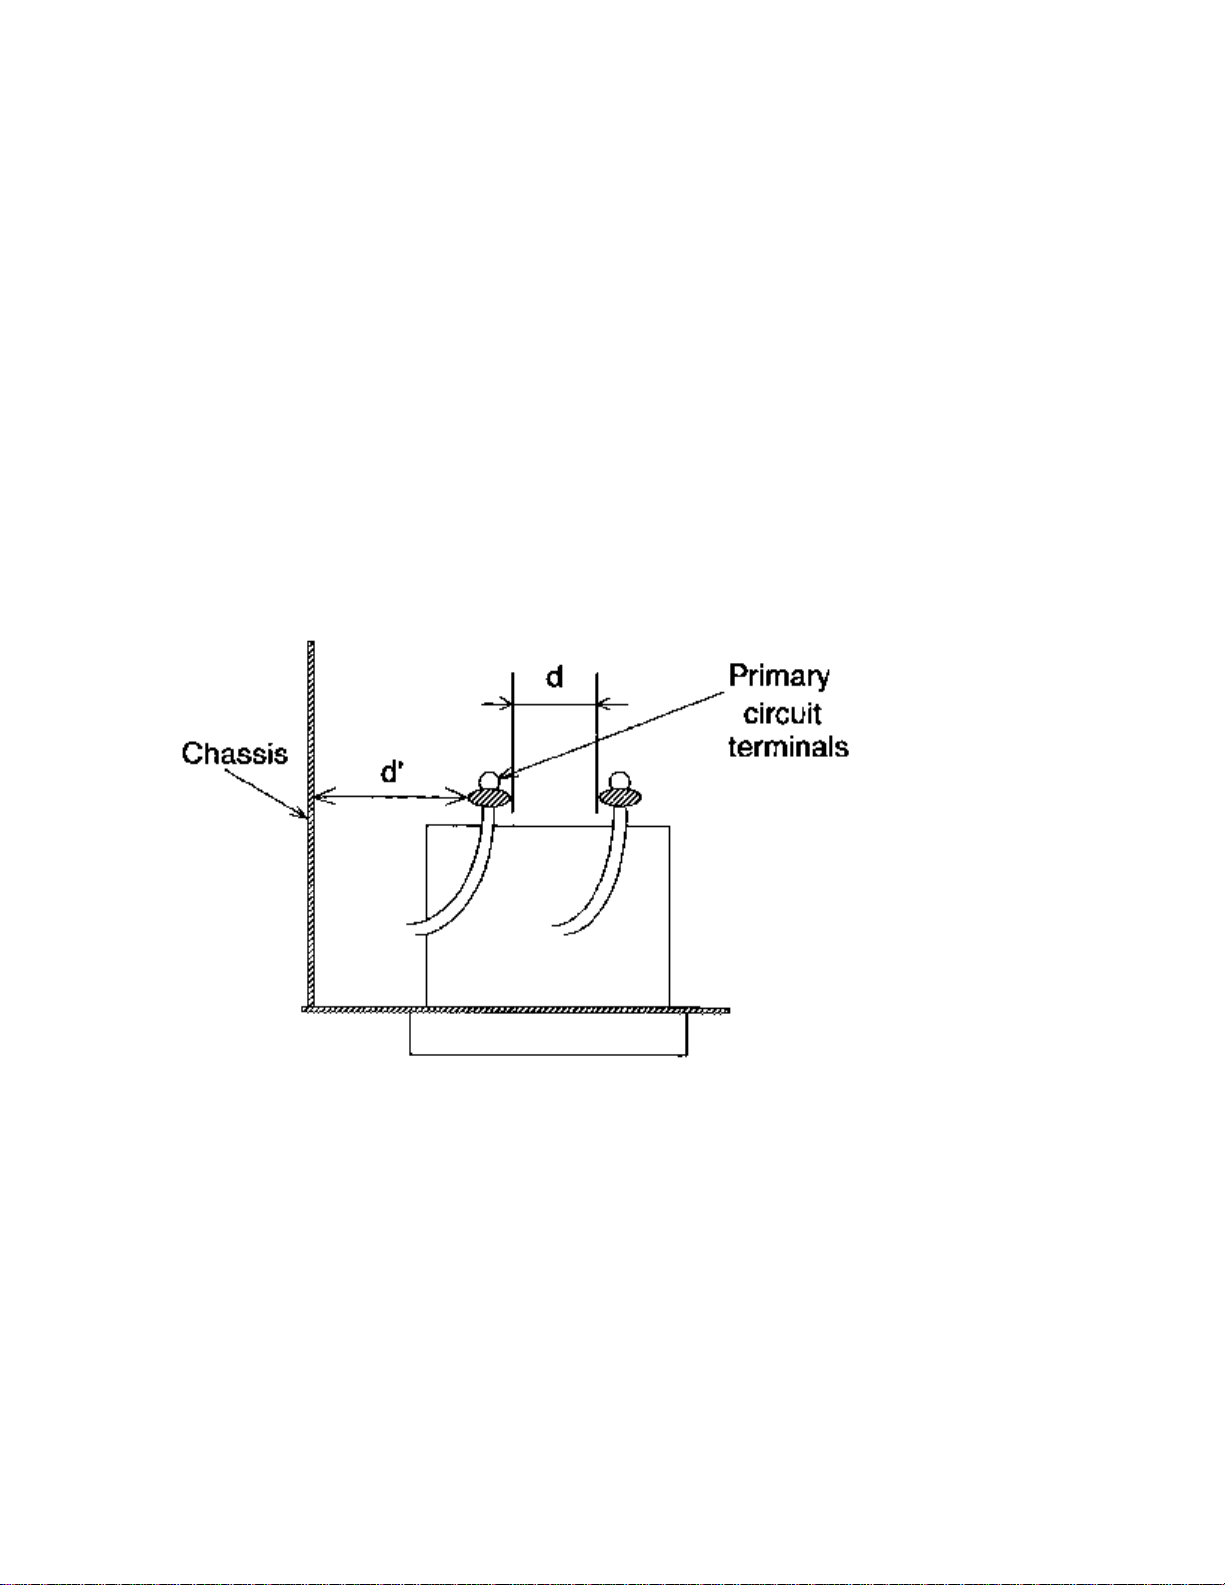
When replacing primary circuit components, confirm specified clearance distance (d) and (d') between
soldered terminals, and between terminals and surrounding metallic parts. See the graphic below.
Table 1: Ratings for selected area
AC Line Voltage Region Clearance Distance
(d) (d')
USA or > 3.2 mm
110 to 130 V CANADA (0.126 inches)
Note: This table is unofficial and for reference only. Be sure to confirm the precise values.
Page 10

SAFETY CHECKS
After the original service problem has been corrected, a complete safety check should be made. Be sure to
check over the entire set, not just the areas where you have worked. Some previous servicer may have left
an unsafe condition, which could be unknowingly passed on to your customer. Be sure to check all of the
following:
Fire and Shock Hazard
Implosion
X-Radiation
Leakage Current Cold Check
Leakage Current Hot Check
Picture Tube Replacement
Parts Replacement
WARNING: Before removing the CRT anode cap, turn the unit OFF and short the HIGH VOLTAGE to
the CRT DAG ground.
SERVICE NOTE: The CRT DAG is not at chassis ground.
IMPLOSION
1. All picture tubes used in current model receivers are equipped with an integral implosion system.
Care should always be used, and safety glasses worn, whenever handling any picture tube. Avoid
scratching or otherwise damaging the picture tube during installation.
2. Use only replacement tubes specified by the manufacturer.
X-RADIATION
1. Be sure procedures and instructions to all your service personnel cover the subject of X-radiation.
Potential sources of X-rays in TV receivers are the picture tube and the high voltage circuits. The
basic precaution which must be exercised is to keep the high voltage at the factory recommended
level.
2. To avoid possible exposure to X-radiation and electrical shock, only the manufacturer's specified
anode connectors must be used.
3. It is essential that the service technician has an accurate HV meter available at all times. The
calibration of this meter should be checked periodically against a reference standard.
4. When the HV circuitry is operating properly there is no possibility of an X-radiation problem. High
voltage should always be kept at the manufacturer's rated value - no higher - for optimum
performance. Every time a color set is serviced, the brightness should be run up and down while
monitoring the HV with a meter to be certain that the HV is regulated correctly and does not exceed
the specified value. We suggest that you and your technicians review test procedures so that HV and
HV regulation are always checked as a standard servicing procedure, and the reason for this prudent
routine is clearly understood by everyone. It is important to use an accurate and reliable HV meter. It
is recommended that the HV reading be recorded on each customer's invoice, which will
demonstrate a proper concern for the customer's safety.
5. When troubleshooting and making test measurements in a receiver with a problem of excessive high
voltage, reduce the line voltage by means of a Variac to bring the HV into acceptable limits while
troubleshooting. Do not operate the chassis longer than necessary to locate the cause of the excessive HV.
Page 11

6. New picture tubes are specifically designed to withstand higher operating voltages without creating
undesirable X-radiation. It is strongly recommended that any shop test fixture which is to be used
with the new higher voltage chassis be equipped with one of the new type tubes designed for this
service. Addition of a permanently connected HV meter to the shop test fixture is advisable. The
CRT types used in these new sets should never be replaced with any other types, as this may result in
excessive X-radiation.
7. It is essential to use the specified picture tube to avoid a possible X-radiation problem.
8. Most TV receivers contain some type of emergency "Hold Down" circuit to prevent HV from rising
to excessive levels in the presence of a failure mode. These various circuits should be understood by
all technicians servicing them, especially since many hold down circuits are inoperative as long as
the receiver performs normally.
PICTURE TUBE REPLACEMENT
The primary source of X-radiation in this television receiver is the picture tube. The picture tube
utilized in this chassis is specially constructed to limit X-radiation emissions. For continued Xradiation protection, the replacement tube must be the same type as the original, including suffix letter,
or a Philips approved type.
PARTS REPLACEMENT
Many electrical and mechanical parts in Philips television sets have special safety related
characteristics. These characteristics are often not evident from visual inspection nor can the protection
afforded by them necessarily be obtained by using replacement components rated for higher voltage,
wattage, etc. The use of a substitute part which does not have the same safety characteristics as the
Philips recommended replacement part shown in this service manual may create shock, fire, or other
hazards.
PRODUCT SAFETY GUIDELINES FOR ALL PRODUCTS
CAUTION: Do not modify any circuit. Service work should be performed only after you are thoroughly
familiar with all of the following safety checks. Risk of potential hazards and injury to the user increases if
safety checks are not adhered to.
USE A SEPARATE ISOLATION TRANSFORMER FOR THIS UNIT WHEN SERVICING.
Page 12

PREVENTION OF ELECTROSTATIC DISCHARGE (ESD)
Some semiconductor solid state devices can be damaged easily by static electricity. Such components
commonly are called Electrostatically Sensitive (ES) Devices, Examples of typical ES devices are
integrated circuits and some field-effect transistors and semiconductor "chip" components. The following
techniques should be used to help reduce the incidence of component damage caused by electrostatic
discharge (ESD).
1. Immediately before handling any semiconductor component or semiconductor-equipped assembly, drain
off any ESD on your body by touching a known earth ground. Alternatively, obtain and wear a
commercially available discharging ESD wrist strap, which should be removed for potential shock
reasons prior to applying power to the unit under test.
2. After removing an electrical assembly equipped with ES devices, place the assembly on a conductive
surface such as aluminum foil, to prevent electrostatic charge buildup or exposure of the assembly.
3. Use only a grounded-tip soldering iron to solder or unsolder ES devices.
4. Use only an anti-static solder removal device. Some solder removal devices not classified as "antistatic
(ESD protected)" can generate an electrical charge sufficient to damage ES devices.
5. Do not use Freon propelled chemicals. These can generate electrical charges sufficient to damage ES
devices.
6. Do not remove a replacement ES device from its protective package until immediately before you are
ready to install it (most replacement ES devices are packaged with leads electrically shorted together by
conductive foam, aluminum foil or comparable conductive material).
7. Immediately before removing the protective material from the leads of a replacement ES device, touch
the protective material to the chassis or circuit assembly into which the device will be installed.
CAUTION: Be sure no power is applied to the chassis or circuit and observe all other safety precautions.
8. Minimize bodily motions when handling unpackaged replacement ES devices. (Otherwise harmless
motion such as the brushing together of your clothes fabric or the lifting of your feet from a carpeted
floor can generate static electricity (ESD) sufficient to damage an ES device.)
NOTE to CATV system Installer:
This reminder is provided to call the CATV system installer's attention to article 820-22 of the NEC that
provides guidelines for proper grounding and, in particular, specifies that the cable ground shall be
connected to the grounding system of the building, as close to the point of cable entry as practical.
Page 13

PRACTICAL SERVICE PRECAUTIONS
IT MAKES SENSE TO AVOID EXPOSURE TO ELECTRICAL SHOCK. While some sources are
expected to have a possible dangerous impact, others of quite high potential are of limited current and are
sometimes held in less regard.
ALWAYS RESPECT VOLTAGES. While some may not be dangerous in themselves, they can cause
unexpected reactions – reactions that are best avoided. Before reaching into the powered color TV set, it is
best to test the high voltage insulation. It is easy to do, and is just a good service precaution.
BEFORE POWERING UP THE TV WITH THE BACK OFF (or on a test fixture), attach a clip lead to
the CRT DAG ground and to a screwdriver blade that has a well insulated handle. After the TV is powered
on and high voltage has developed, probe the anode lead with the blade, starting at the bottom of the High
Voltage Transformer (flyback – IFT). Move the blade to within two inches of the connector of the CRT. IF
THERE IS AN ARC, YOU FOUND IT THE EASY WAY, WITHOUT GETTING A SHOCK! If
there is an arc to the screwdriver blade, replace the High Voltage Transformer or the lead, (if removable)
whichever is causing the problem.
PICTURE TUBE REPLACEMENT PROCEDURE
Note: a. Two (2) people are required to handle this picture tube.
b. Safety Glasses must be worn during this procedure or whenever directly handling a picture tube.
c. Take care in each step not to damage the CRT or the cabinet.
1. Remove the Chassis and the CRT Socket Board Module from the cabinet.
2. A furniture pad or blanket should be positioned on the floor to support only the CRT Face. This pad or
blanket should be high enough to keep the CRT Face approximately 12 to 14 inches off the floor.
3. Using two people, place the cabinet in a front down position with the CRT Face on the pad or blanket.
4. Place padded blocks under each corner of the cabinet to keep it from rocking.
5. Remove the four screws, at the corners of the CRT.
6. With two people lowering the cabinet to the floor, leave the CRT elevated by the pad or blanket.
Note: Take care not to grasp the neck of the CRT during this procedure, as it is extremely fragile.
7. Two (2) people may then lift the CRT from the cabinet.
8. Remove the degaussing coil from the defective CRT and mount on the replacement. Take care to
maintain the exact shape and fit.
To install the new CRT, reverse steps 1 to 7.
Page 14
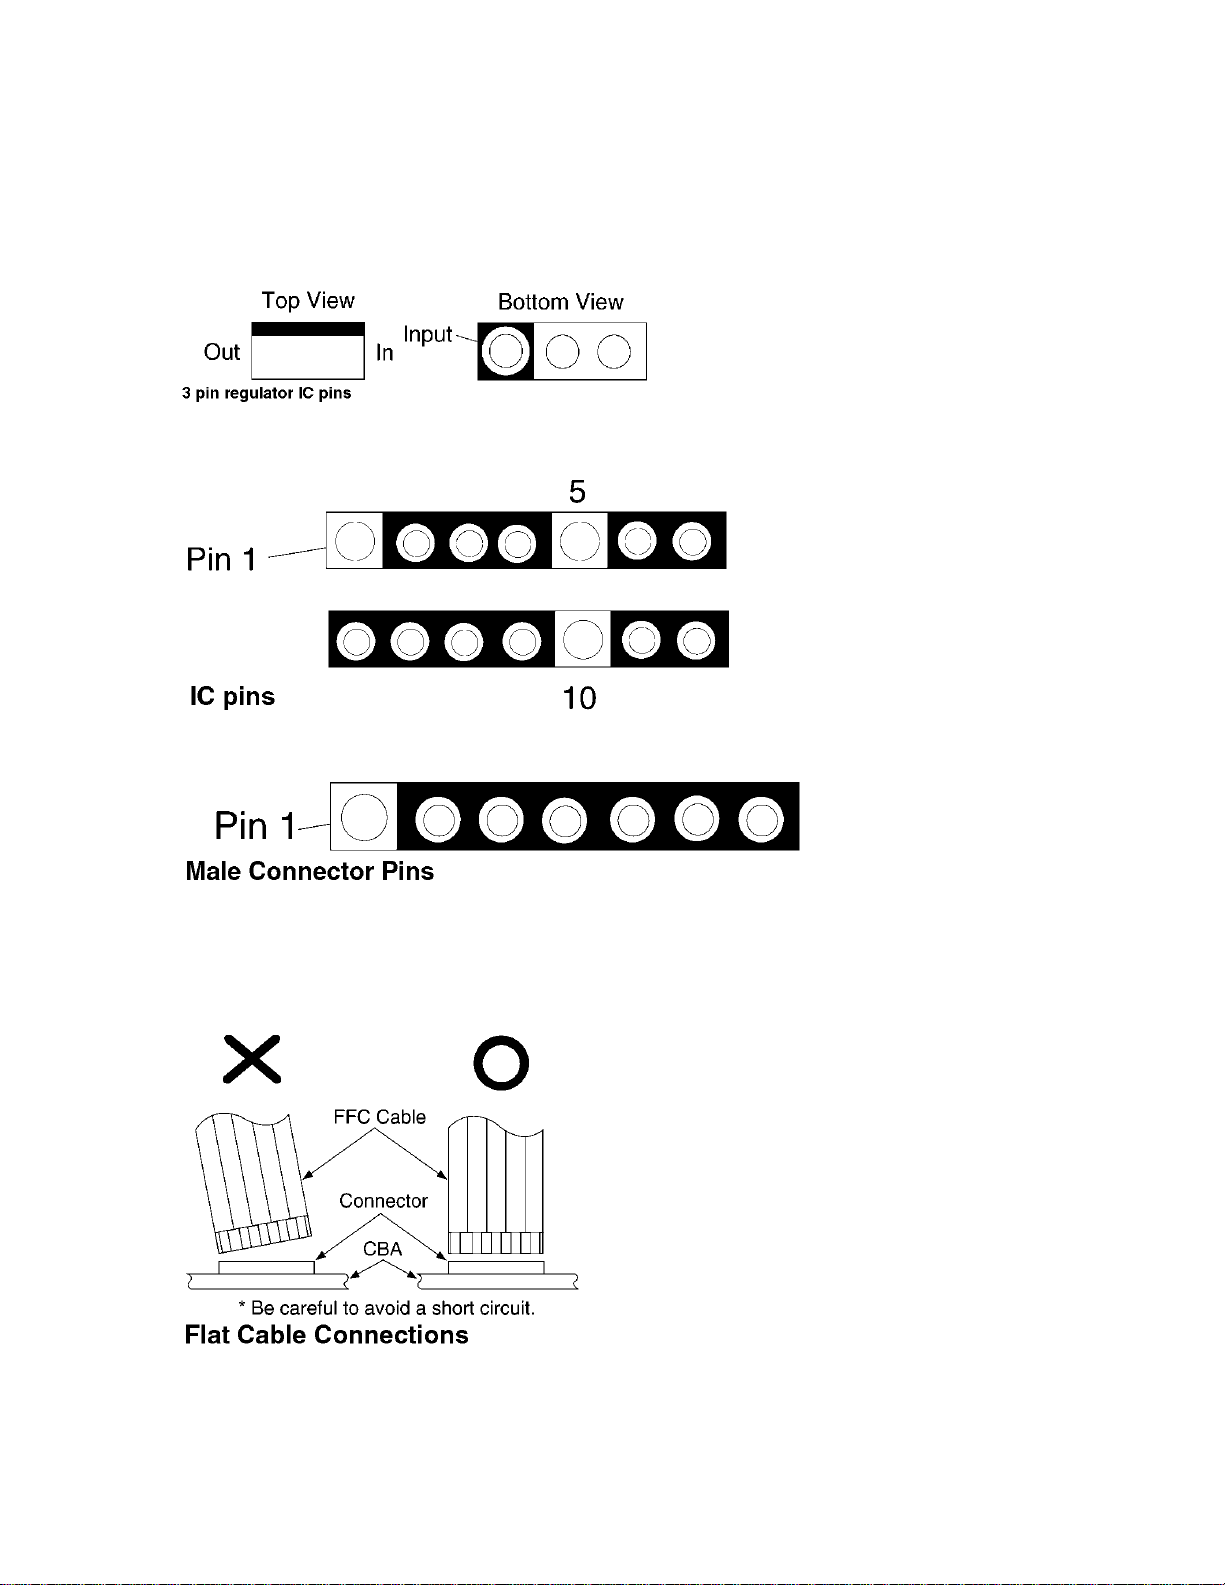
STANDARD NOTES FOR SERVICING
Circuit Board Indications
1. The output pin of the 3 pin Regulator ICs is indicated as shown:
2. For other ICs, pin 1 and every 5th pin are indicated as shown:
3. The 1st pin of every pin connector is indicated as shown:
Instructions for Connectors
1. When you connect or disconnect FFC cable (connector), be sure to disconnect the AC cord.
2. FFC cable (connector) should be inserted parallel into the connector, not at an angle.
Caution:
Once chip parts (Resistors, Capacitors, Transistors, etc.) are removed, they must not be reused. Always use
a new part.
Page 15

Replacement Procedures for Leadless (Chip)
Components
The following procedures are recommended for the replacement of the leadless components used in
this unit.
1. Preparation for replacement
a. Soldering Iron: Use a pencil-type soldering iron (less than 30 watts).
b. Solder: Eutectic solder (Tin 63%, Lead 37%) is recommended.
c. Soldering time: Do not apply heat for more than 4 seconds.
d. Preheating: Leadless capacitor must be preheated before installation. (130°C~150°C, for about two
minutes.)
Notes:
a. Leadless components must not be reused after removal.
b. Excessive mechanical stress and rubbing for the component electrode must be avoided.
2. Removing the leadless component
Grasp the leadless component body with tweezers and alternately apply heat to both electrodes. When the
solder on both electrodes has melted, remove leadless component with a twisting motion.
Notes:
a. Do not attempt to lift the component off the board until the component is completely disconnected from
the board by the twisting action.
b. Take care not to break the copper foil on the printed board.
3. Installing the leadless component
a. Presolder the contact points of the circuit board.
b. Press the part downward with tweezers and solder both electrodes.
Note:
Do not glue the replacement leadless component to the circuit board.
Page 16
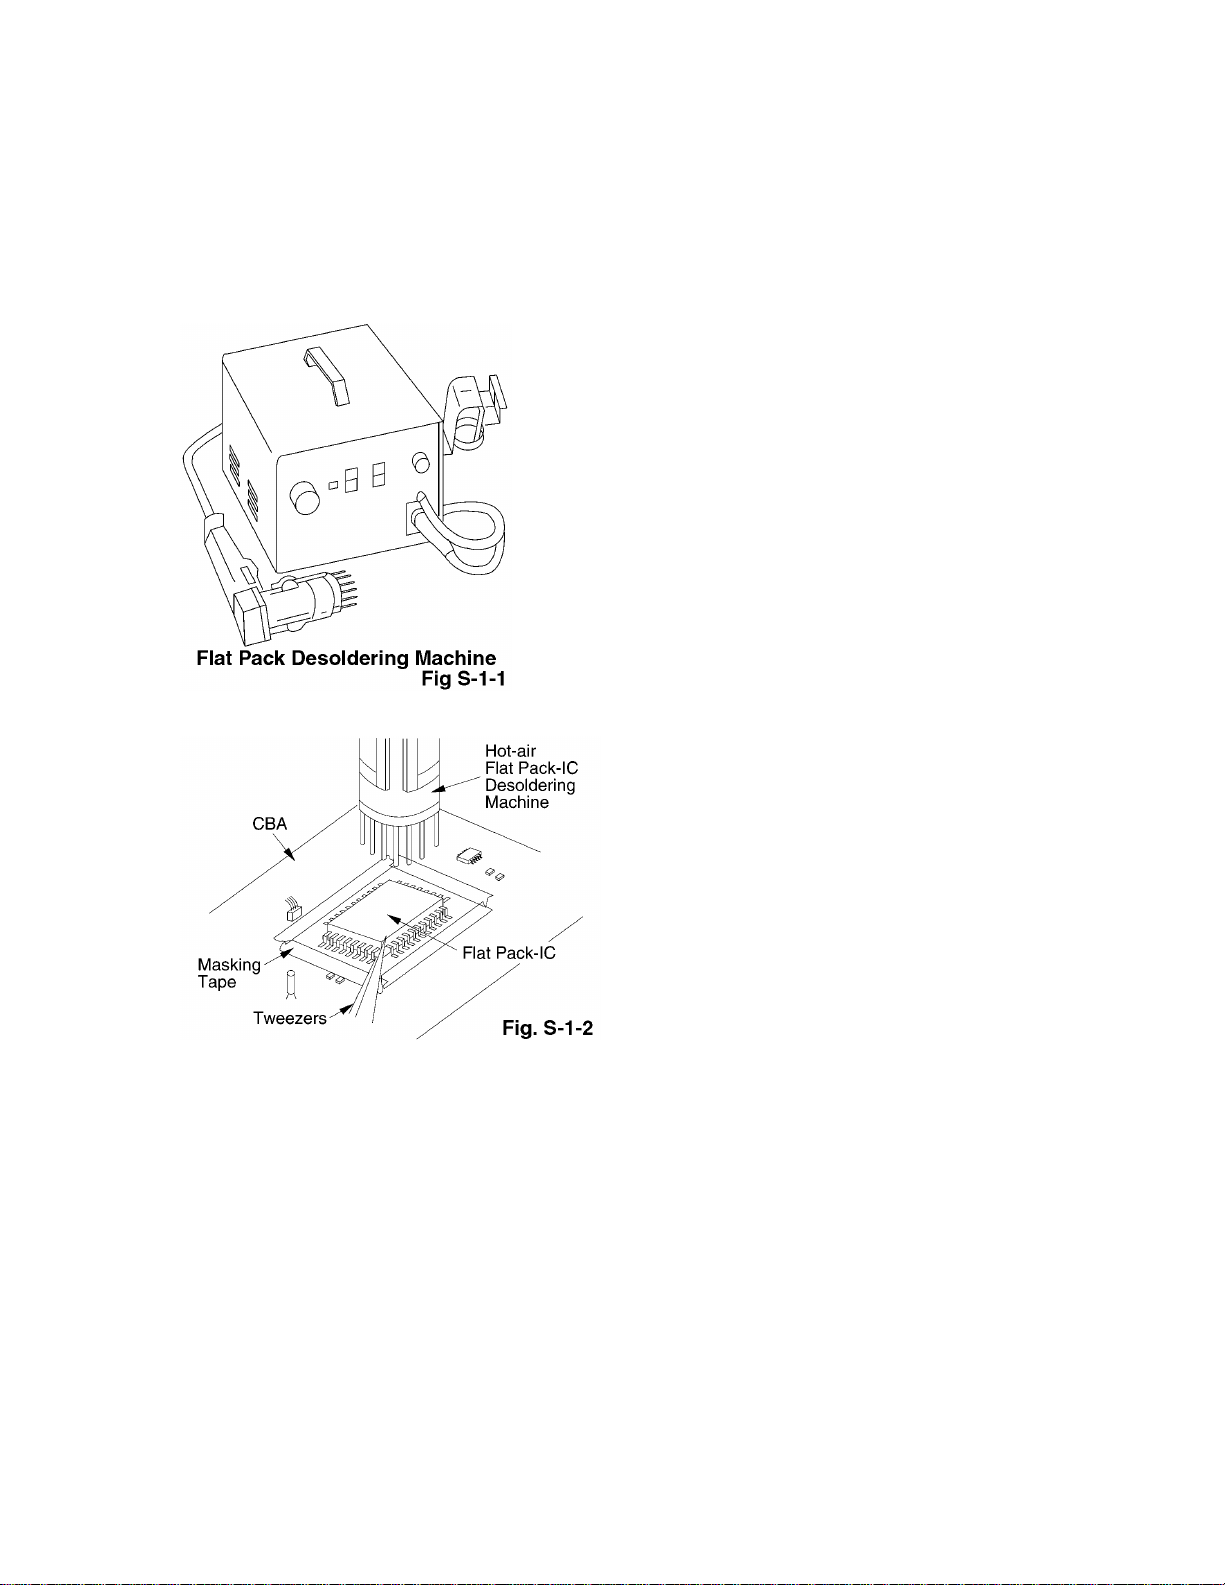
How to Remove / Install Flat Pack IC
Caution:
1. Do not apply the hot air to the chip parts around the Flat Pack-IC for over 6 seconds as damage may
occur to the chip parts. Put Masking Tape around the Flat Pack-IC to protect other parts from damage. (Fig.
S-1-2)
2. The Flat Pack-IC on the CBA is affixed with glue, so be careful not to break or damage the foil of each
pin or solder lands under the IC when removing it.
1. Removal
With Hot - Air Flat-Pack IC Desoldering Machine:
a. Prepare the Hot - Air Flat-Pack IC Desoldering Machine, then apply hot air to Flat-Pack IC (about 5~6
seconds). (Fig. S-1-1)
b. Remove the Flat Pack- IC with tweezers while applying the hot air.
With Soldering Iron:
a. Using desoldering braid, remove the solder from all pins of the Flat Pack - IC. When you use solder flux
which is applied to all pins of the Flat Pack - IC, you can remove it easily. (Fig. S-1-3)
Page 17
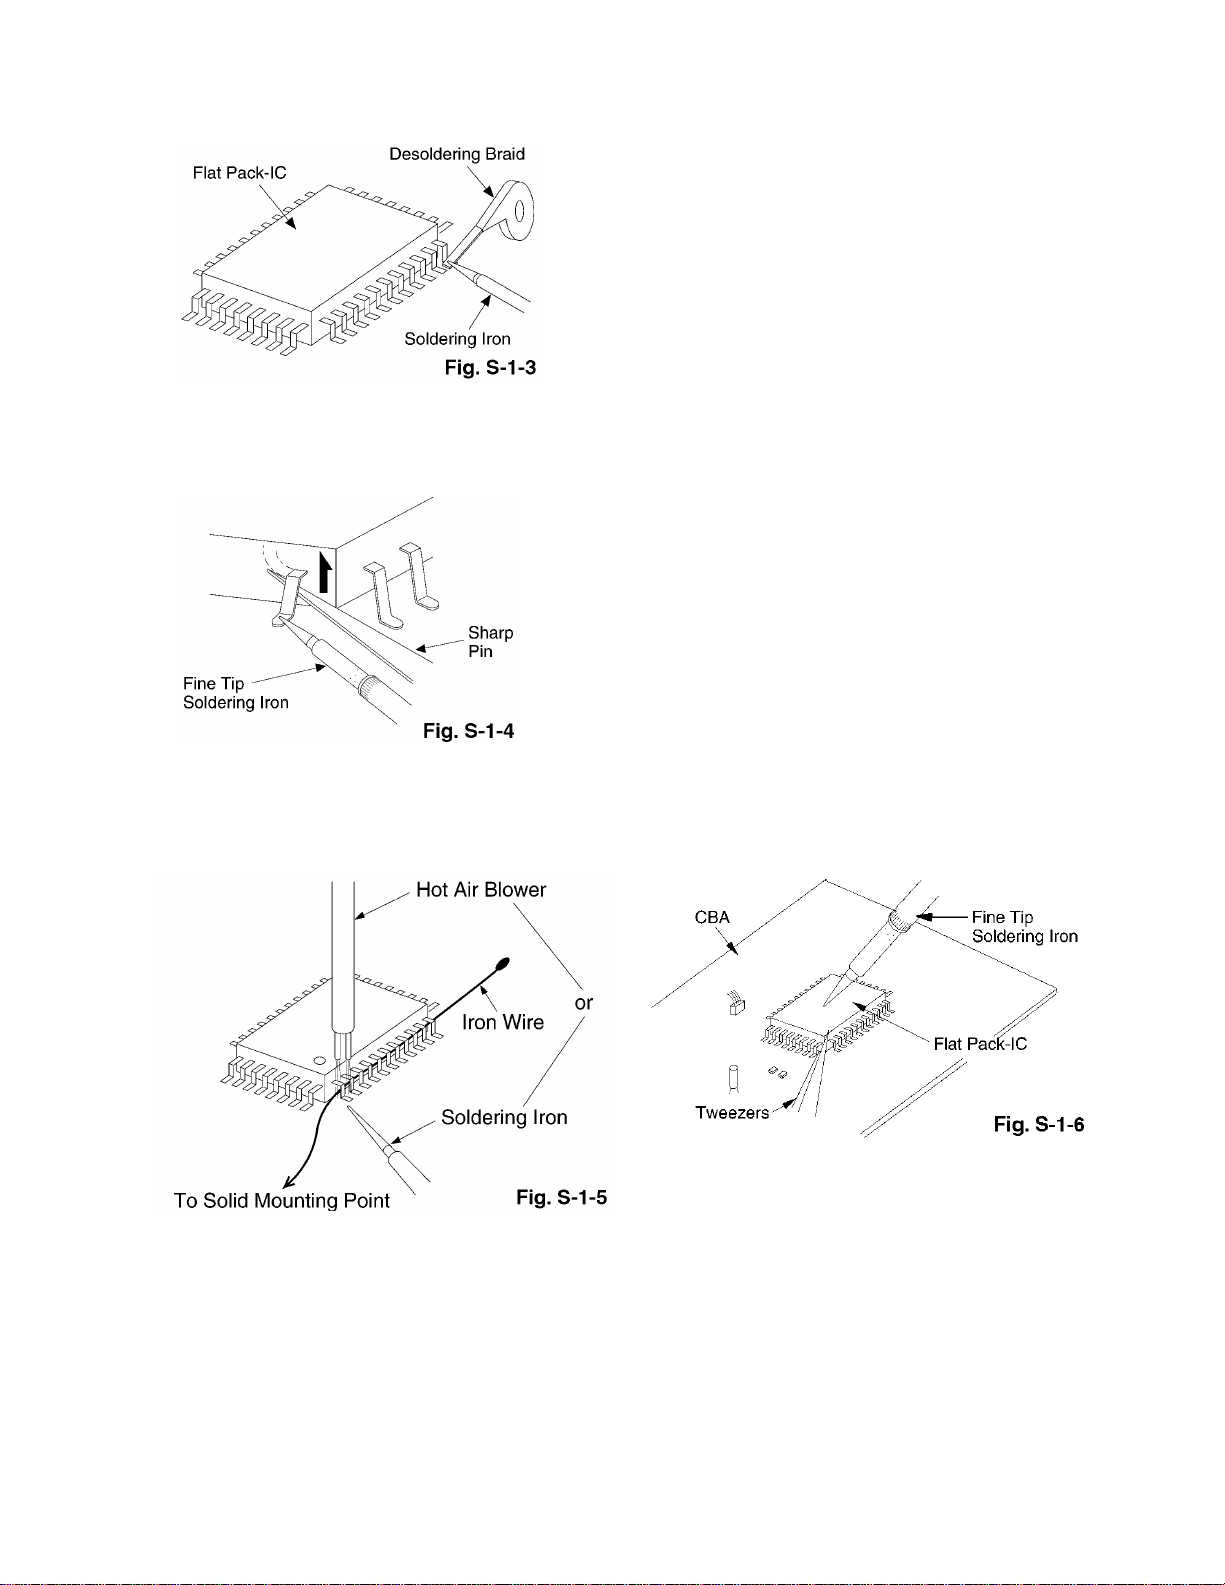
b. Lift each lead of the Flat Pack - IC upward one by one, using a sharp pin or wire to which solder will not
adhere (iron wire). When heating the pins, use a fine tip soldering iron or a hot air Desoldering Machine.
(Fig. S-1-4)
With Iron Wire:
a. Using desoldering braid, remove the solder from all pins of the Flat Pack - IC. When you use solder flux
which is applied to all pins of the Flat Pack - IC, you can remove it easily. (Fig. S-1-3)
b. Affix the wire to a workbench or solid mounting point, as shown in Fig. S-1-5.
c. Pull up on the wire as the solder melts so as to lift the IC leads from the CBA contact pads, while heating
the pins using a fine tip soldering iron or hot air blower.
Note:
When using a soldering iron, care must be taken to ensure that the Flat Pack - IC is not being held by glue,
or when it is removed from the CBA, it may be damaged if force is used.
Page 18
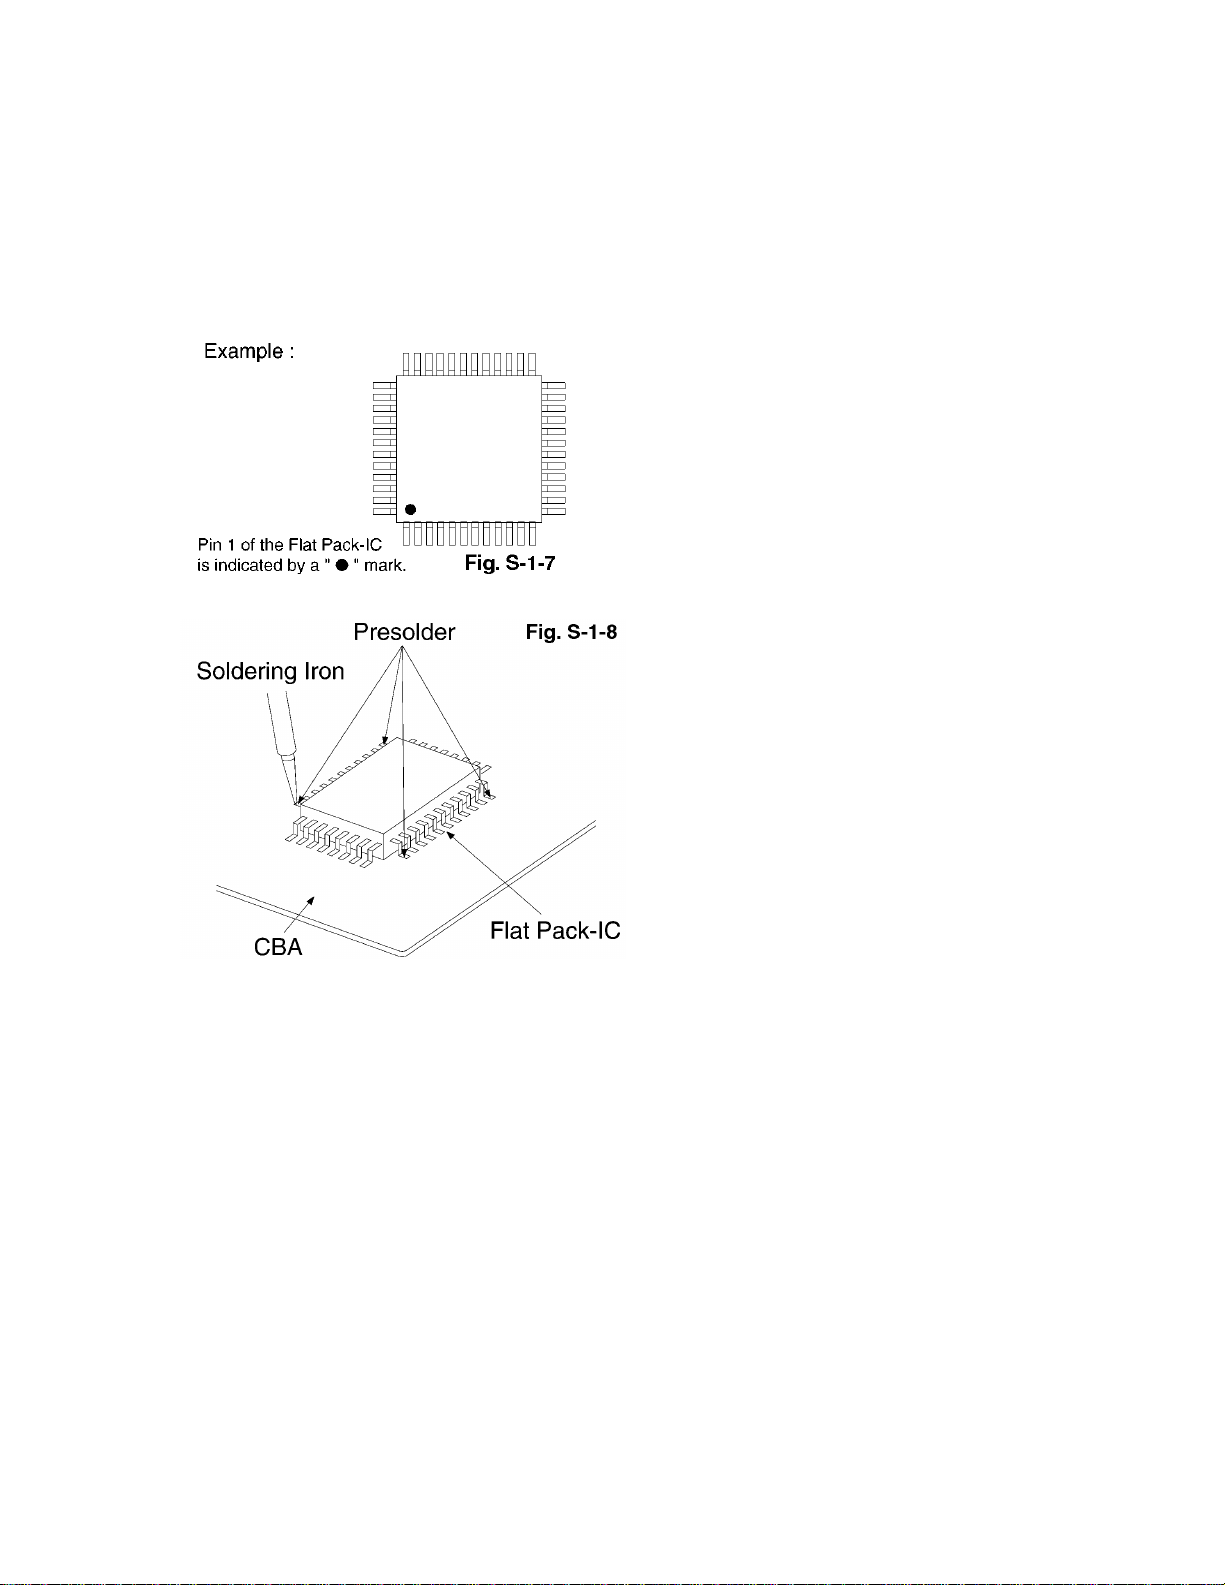
2. Installation
a. Using desoldering braid, remove the solder from the foil of each pin of the Flat Pack – IC on the CBA, so
you can install a replacement Flat Pack - IC more easily.
b. The ”•“ mark on the Flat Pack - IC indicates pin 1 (See Fig. S-1-7). Make sure this mark matches the 1
on the CBA when positioning for installation. Then pre - solder the four corners of the Flat Pack- IC (See
Fig. S-1-7).
c. Solder all pins of the Flat Pack - IC. Make sure that none of the pins have solder bridges.
Page 19
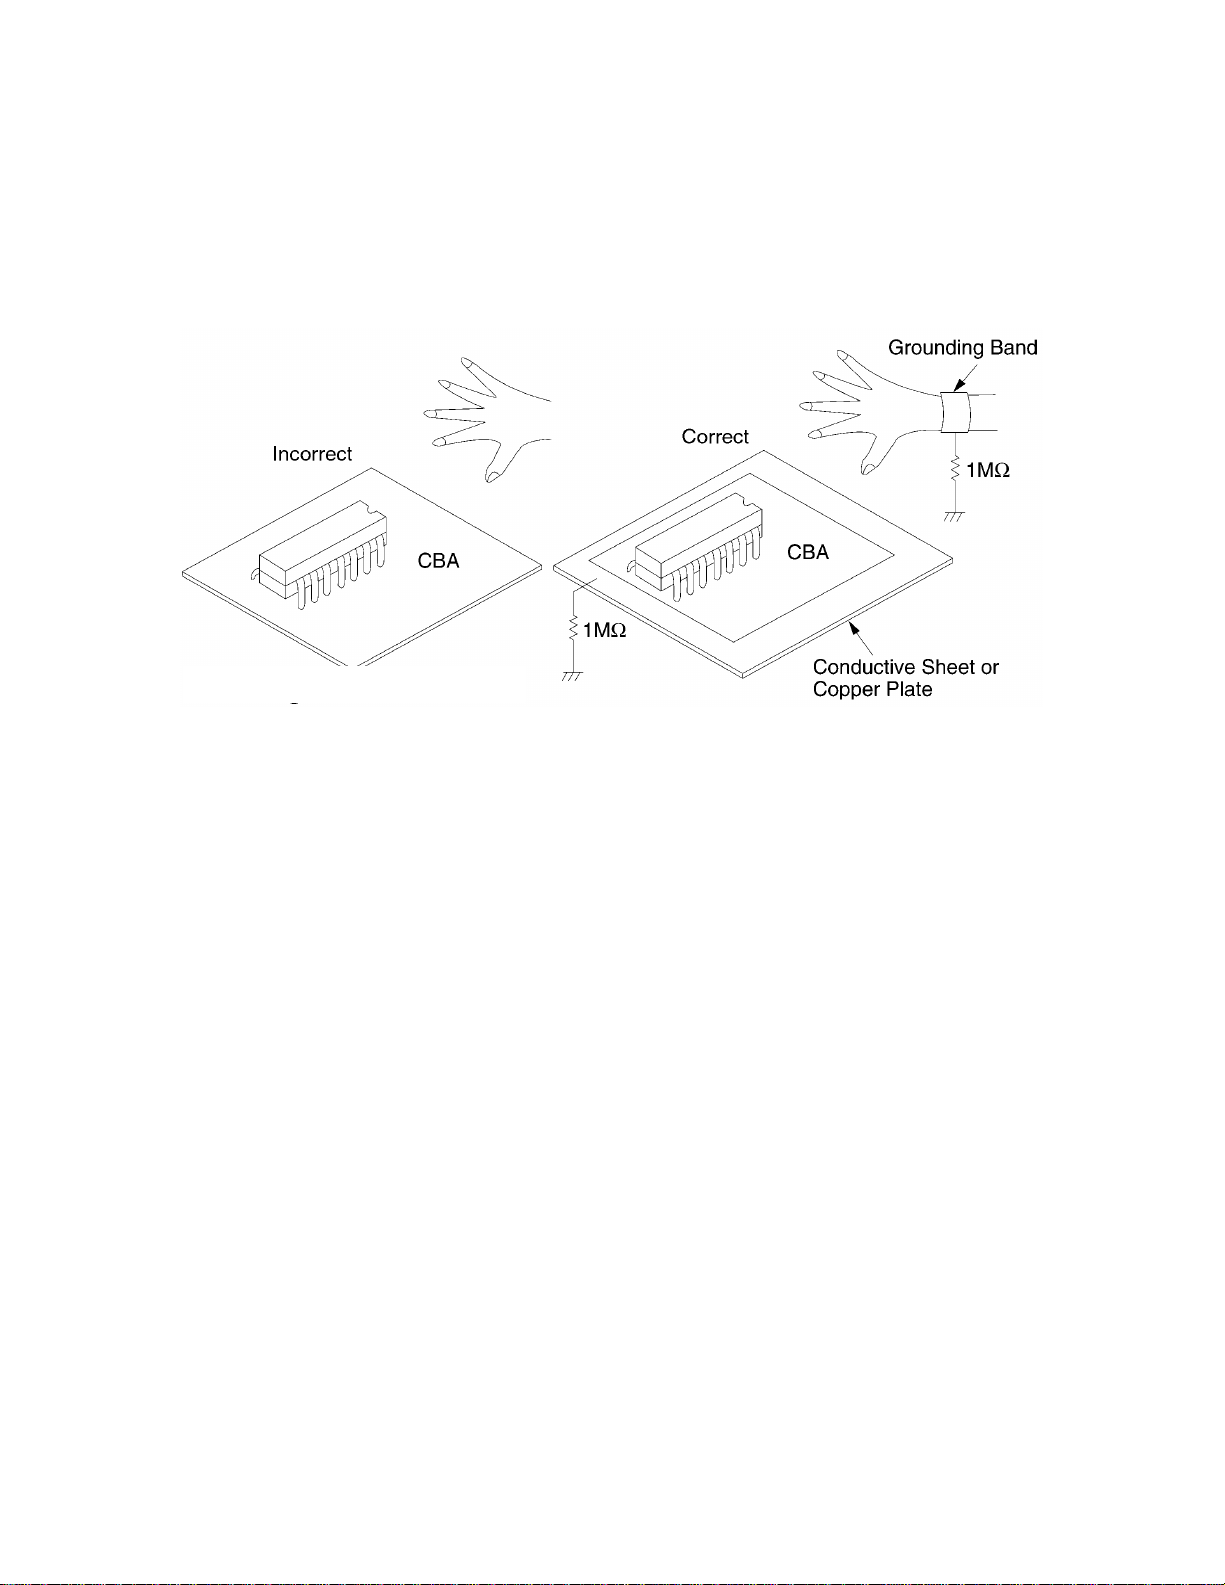
Instructions for Handling Semiconductors
Electrostatic breakdown of the semiconductors may occur due to a potential difference caused by
electrostatic charge during unpacking or repair work.
Ground for Human Body
Be sure to wear a grounding band (1MW) that is properly grounded to remove any static electricity that
may be charged on the body.
Ground for Work Bench
Be sure to place a conductive sheet or copper plate with proper grounding (1MW) on the workbench or
other surface, where the semiconductors are to be placed. Because the static electricity charge on the
clothing will not escape through the body grounding band, be careful to avoid contacting semiconductors to
clothing.
Page 20
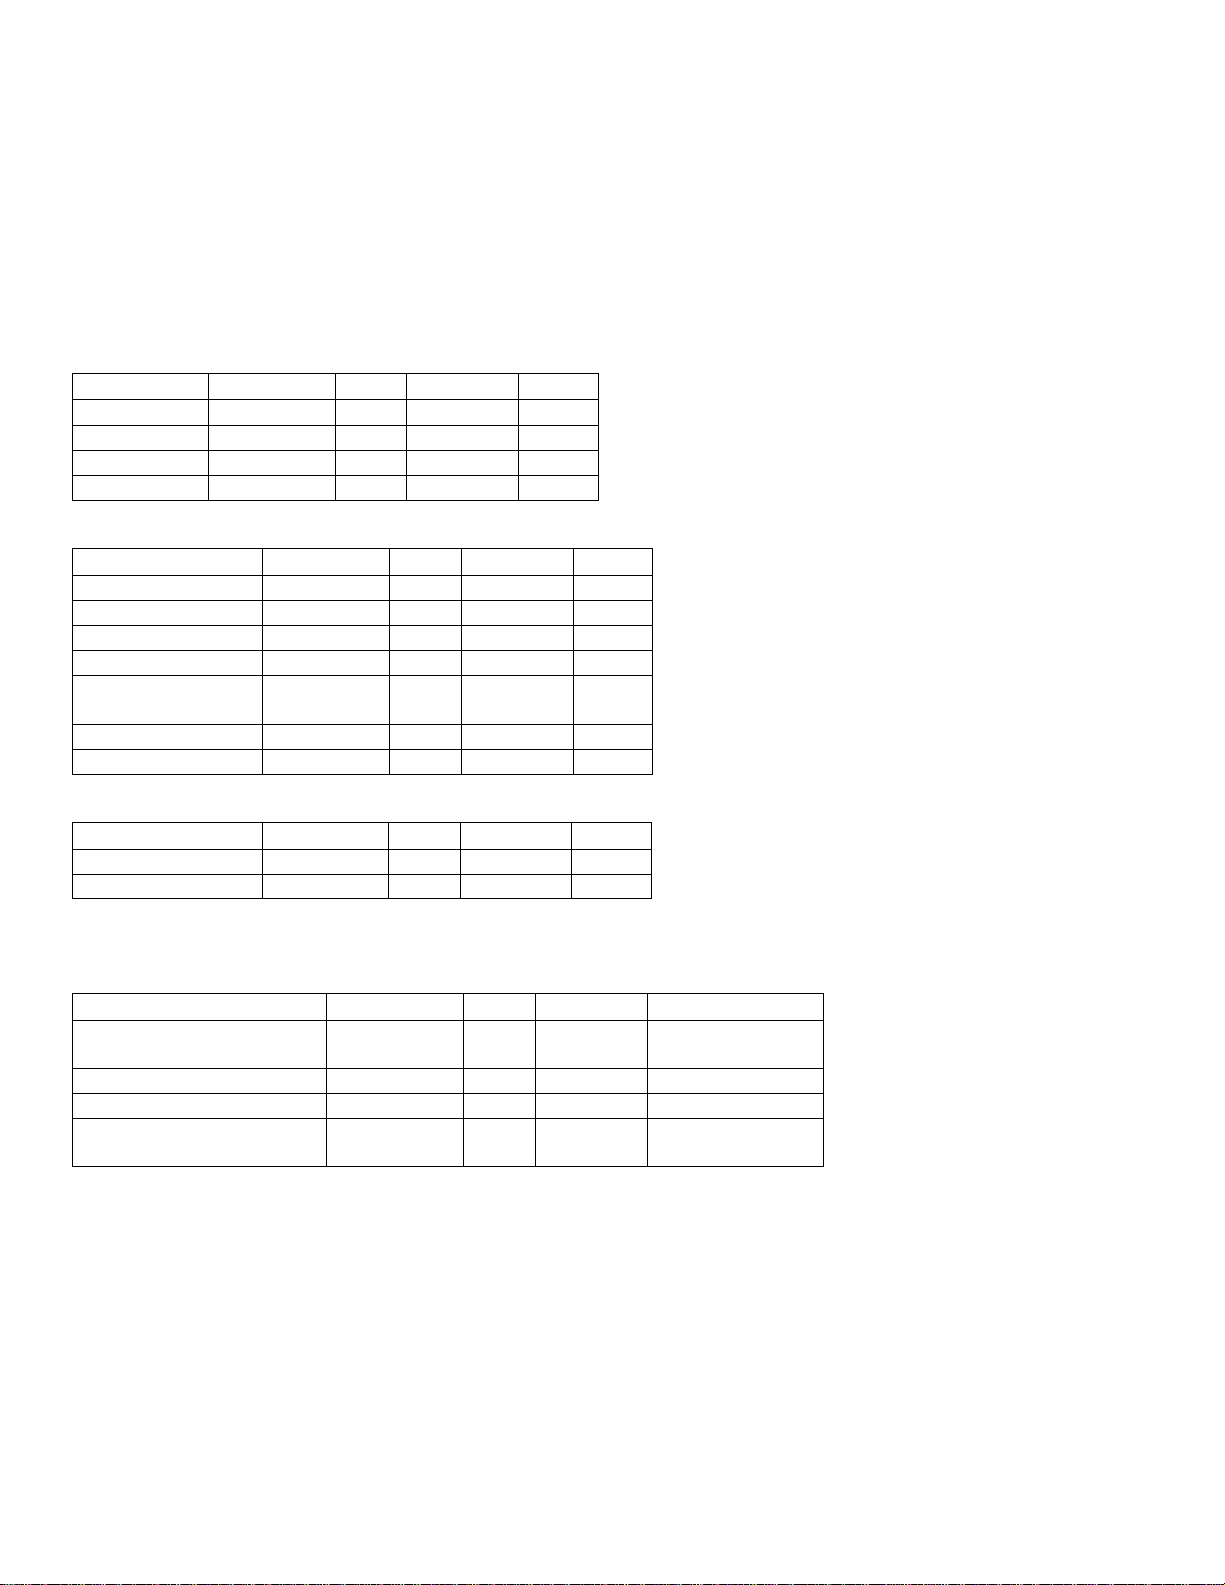
SPECIFICATIONS
< TV Section >
Mode: SP mode unless otherwise specified
Test input terminal:
<Except Tuner> Video input (1Vp-p)
Audio input (-10dB)
<Tuner> Ant. input (80dBmV) Video: 87.5%
Audio: 25kHz dev (1kHz Sin)
<DEFLECTION>
Description Condition Unit Nominal Limit
Over Scan — % 90 —
Linearity Horizontal % — 15
Vertical % — 10
High Voltage — kV 27 —
<VIDEO & CHROMA>
Description Condition Unit Nominal Limit
Misconvergence Center m/m — 0.4
Corner m/m — 1.5
Side m/m — 1.4
Tint Control Range — deg 30 —
Contrast Control
Range
Brightness APL 100% ft-L 35 40
Color Temperature — K 9200 —
— dB 6 4
<TUNER>
Description Condition Unit Nominal Limit
Video S/N — dB 45 40
Audio S/N (W/LPF) — dB 43 40
<AUDIO>
All items are measured across 8W resistor at speaker output terminal.
Description Condition Unit Nominal Limit
Audio Output Power
(Max.)
Audio S/N (W/LPF) (R/P) dB 40 36
Audio Distortion (W/LPF) (R/P) % 3.0 5.0
Audio Freq. Response
(-10dB Ref. 1kHz)
Note: Nominal specifications represent the design specifications. All units should be able to approximate
these. Some will exceed and some may drop slightly below these specifications. Limit specifications
represent the absolute worst condition that still might be considered acceptable. In no case should a unit
fail to meet limit specifications.
(R/P) W 1.0 0.8
200Hz (R/P)
8kHz (R/P)
DB
dB
-2.0
0
-2.0 ± 5.0
0 ± 6.0
Page 21
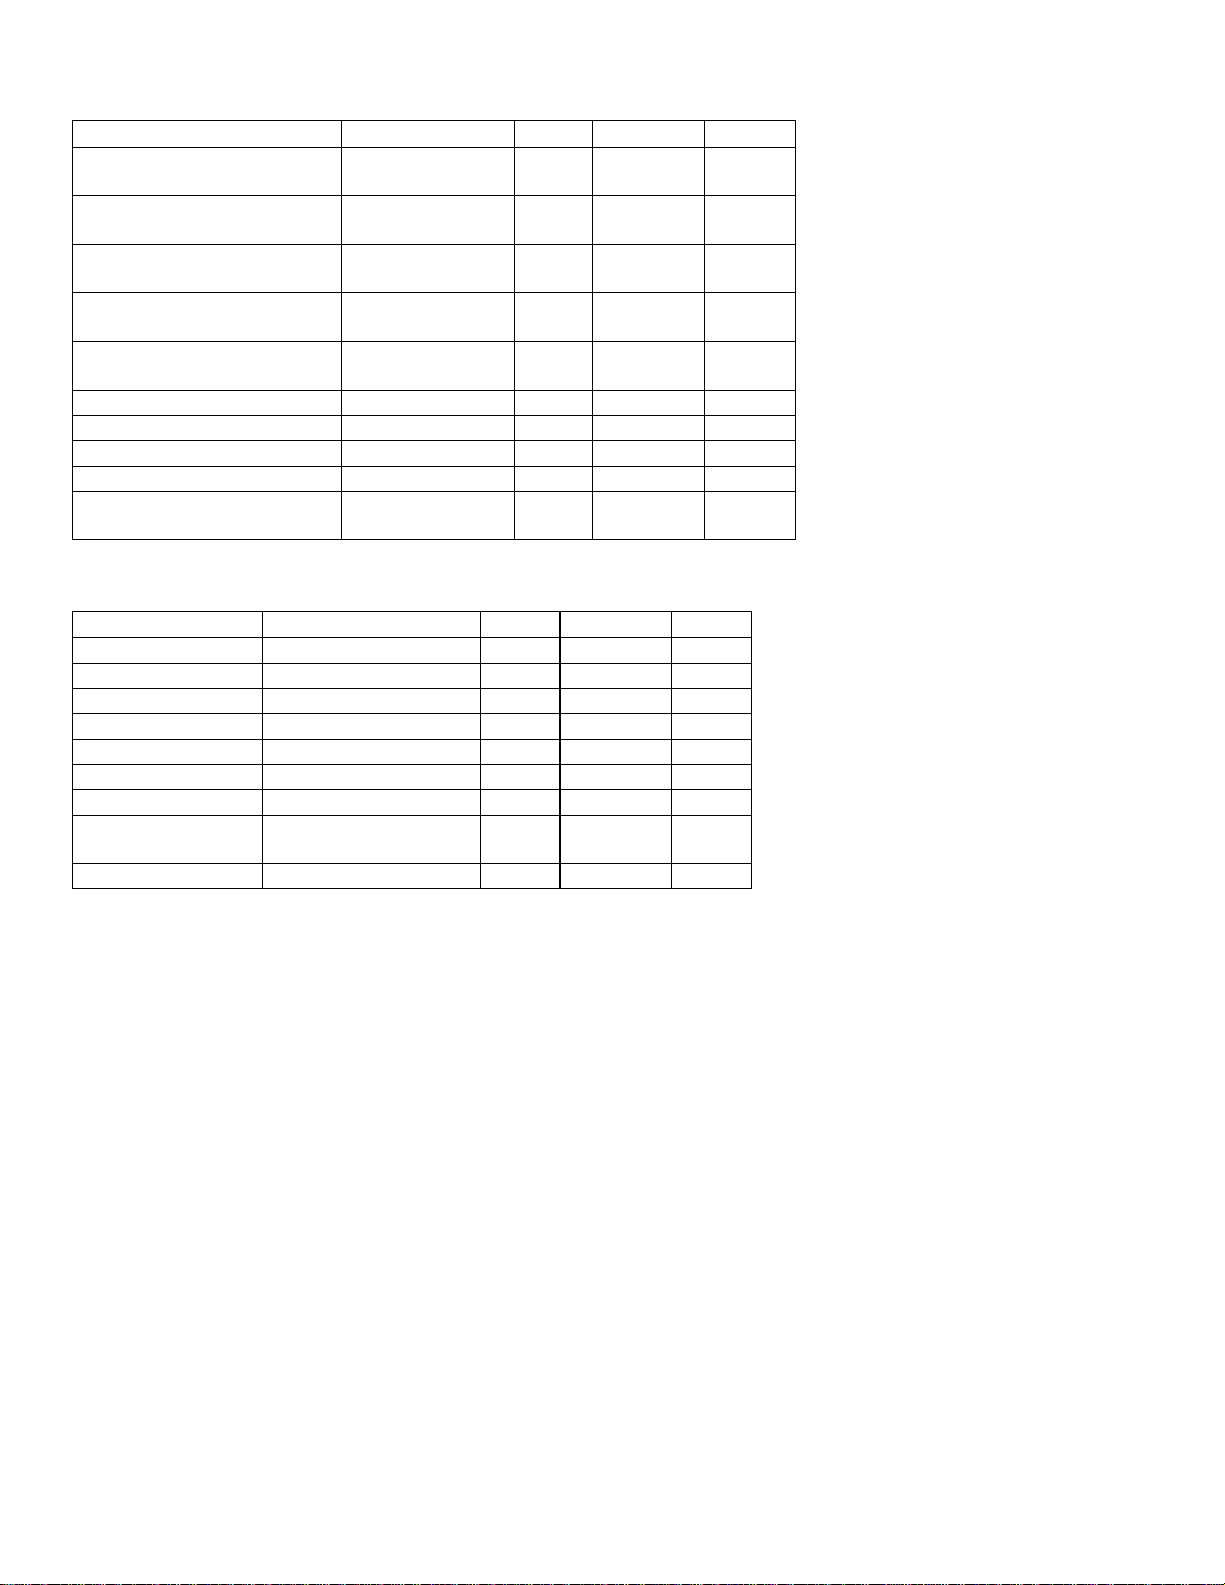
< DVD SECTION >
Description Condition Unit Nominal Limit
Horizotal Resolution (TDV-540 TIT2
CHP16)
VIDEO S/N (TDV-540 TIT2
CHP6)
S/N Chroma AM
S/N Chroma PM
Audio Distortion (PTD1-NOR
Audio Frequency Response (PTD1-NOR
20Hz dB 0 +2 / -3
100Hz dB 0 +2 / -3
20kHz dB 0 +2 / -3
10kHz dB 0 +2 / -3
Audio S/N (PTD1-NOR
< DVD Section >
Item Conditions Unit Nominal Limit
Video Output 75 ohm load Vpp 1.0
Optical Digital Out dB -18
Audio(PCM)
Output Level 1kHz 0dB Vrms 2.0
S/N dB 90
Freq. Response
DVD fs=48kHz 2~22kHz dB ± 2
CD fs=44.1kHz 2~22
kHz
THD 1 kHz 0dB % 0.01
(TDV-540 TIT2
CHP17)
TIT1 CHP1)
TIT1 CHP5--10)
TIT1 CHP1--2)
LINE 350 330
dB 68 63
dB 65
65
% 0.03 0.07
dB 100 84
dB ± 2
60
60
NOTES:
All Items are measured without pre-emphasis unless otherwise specified.
Power supply: AC120 V 60 Hz
Load imp.: 100 k ohm
Room ambient: +25 °C
Page 22
Page 23
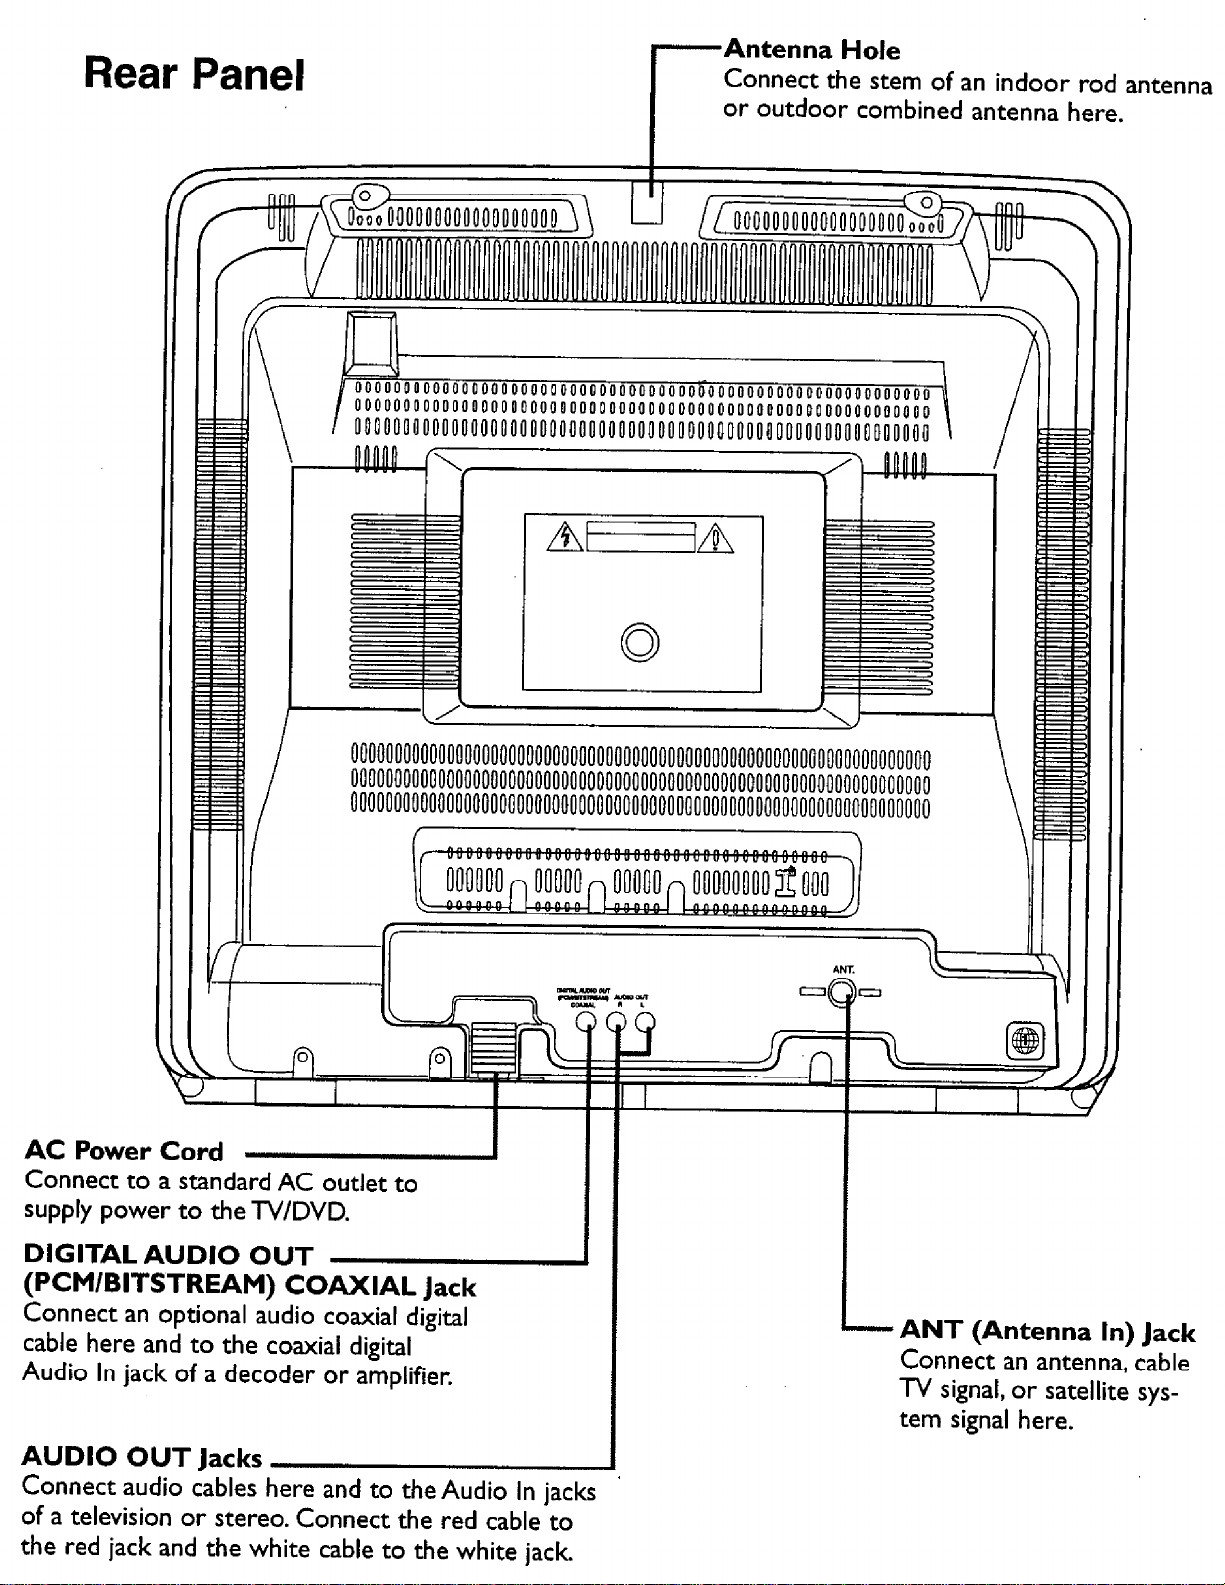
Page 24
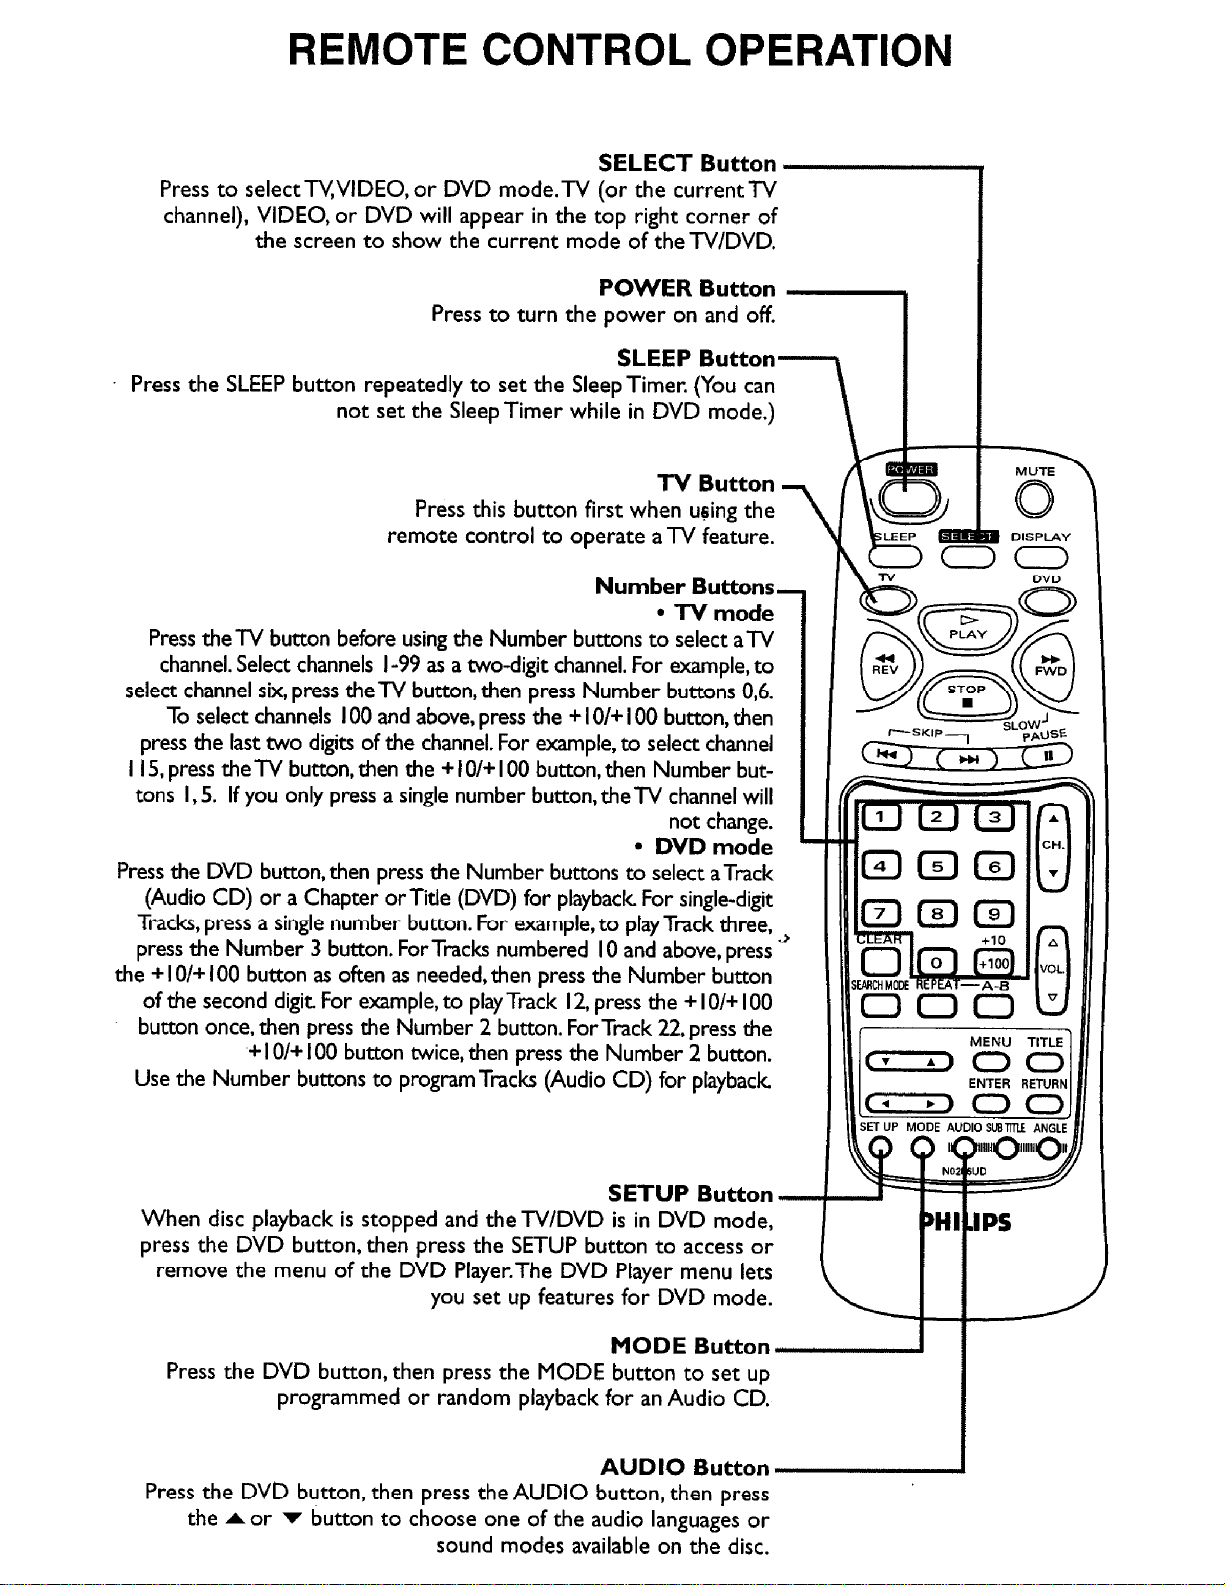
Page 25
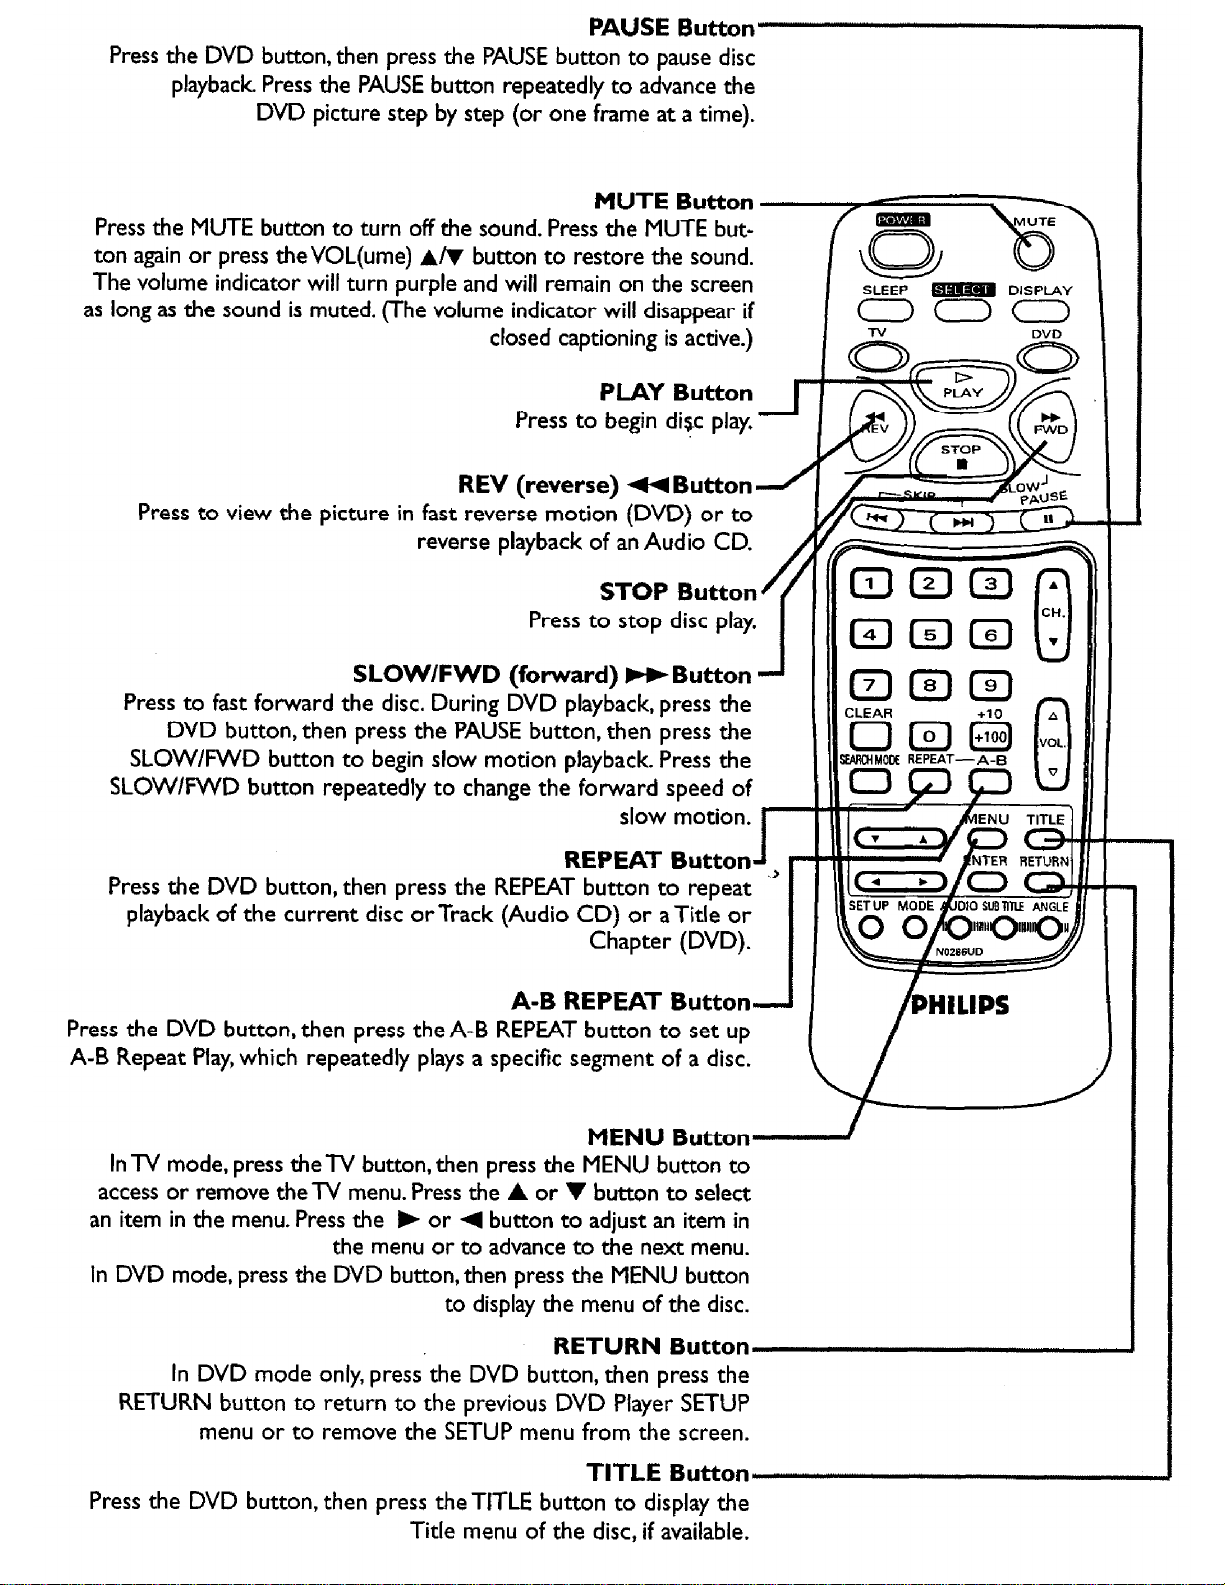
Page 26
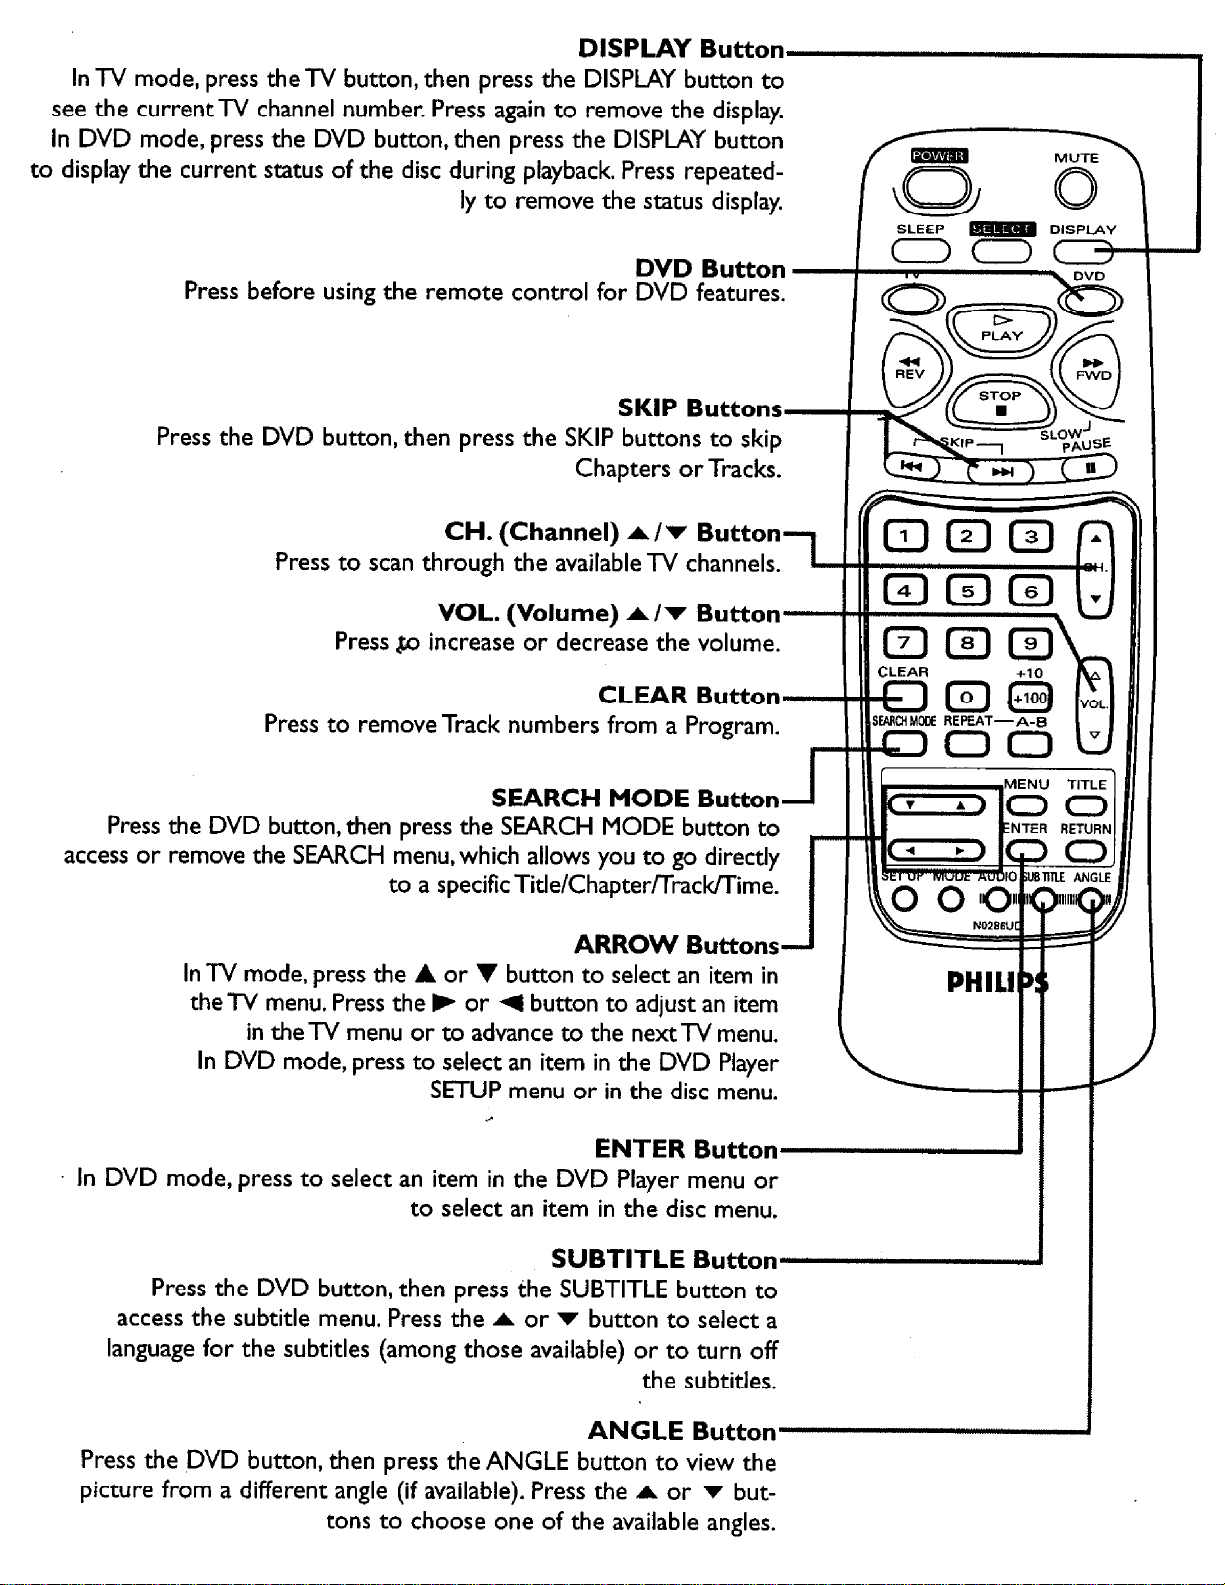
Page 27
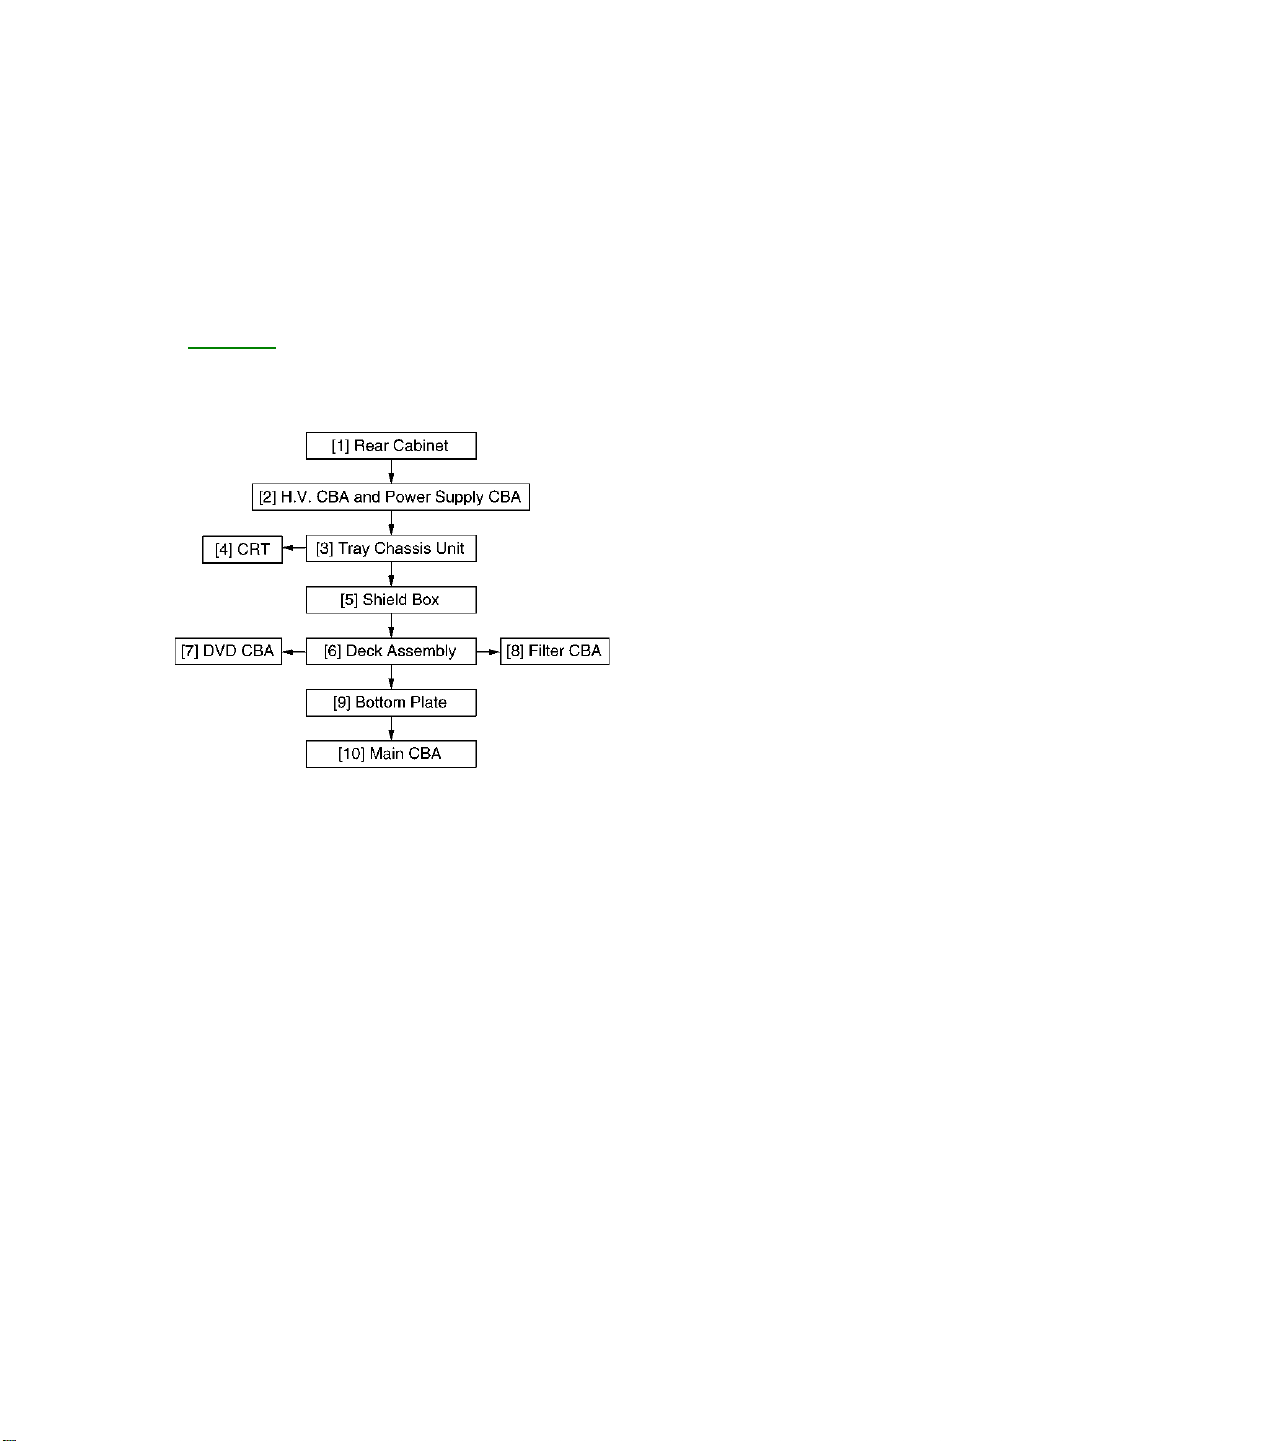
CABINET DISASSEMBLY INSTRUCTIONS
Disassembly Flowchart
This flowchart indicates the disassembly steps for the cabinet parts and the CBA in order to gain access to
item(s) to be serviced. When reassembling, follow the steps in reverse order. Bend, route and dress the cables
as they were.
Page 28
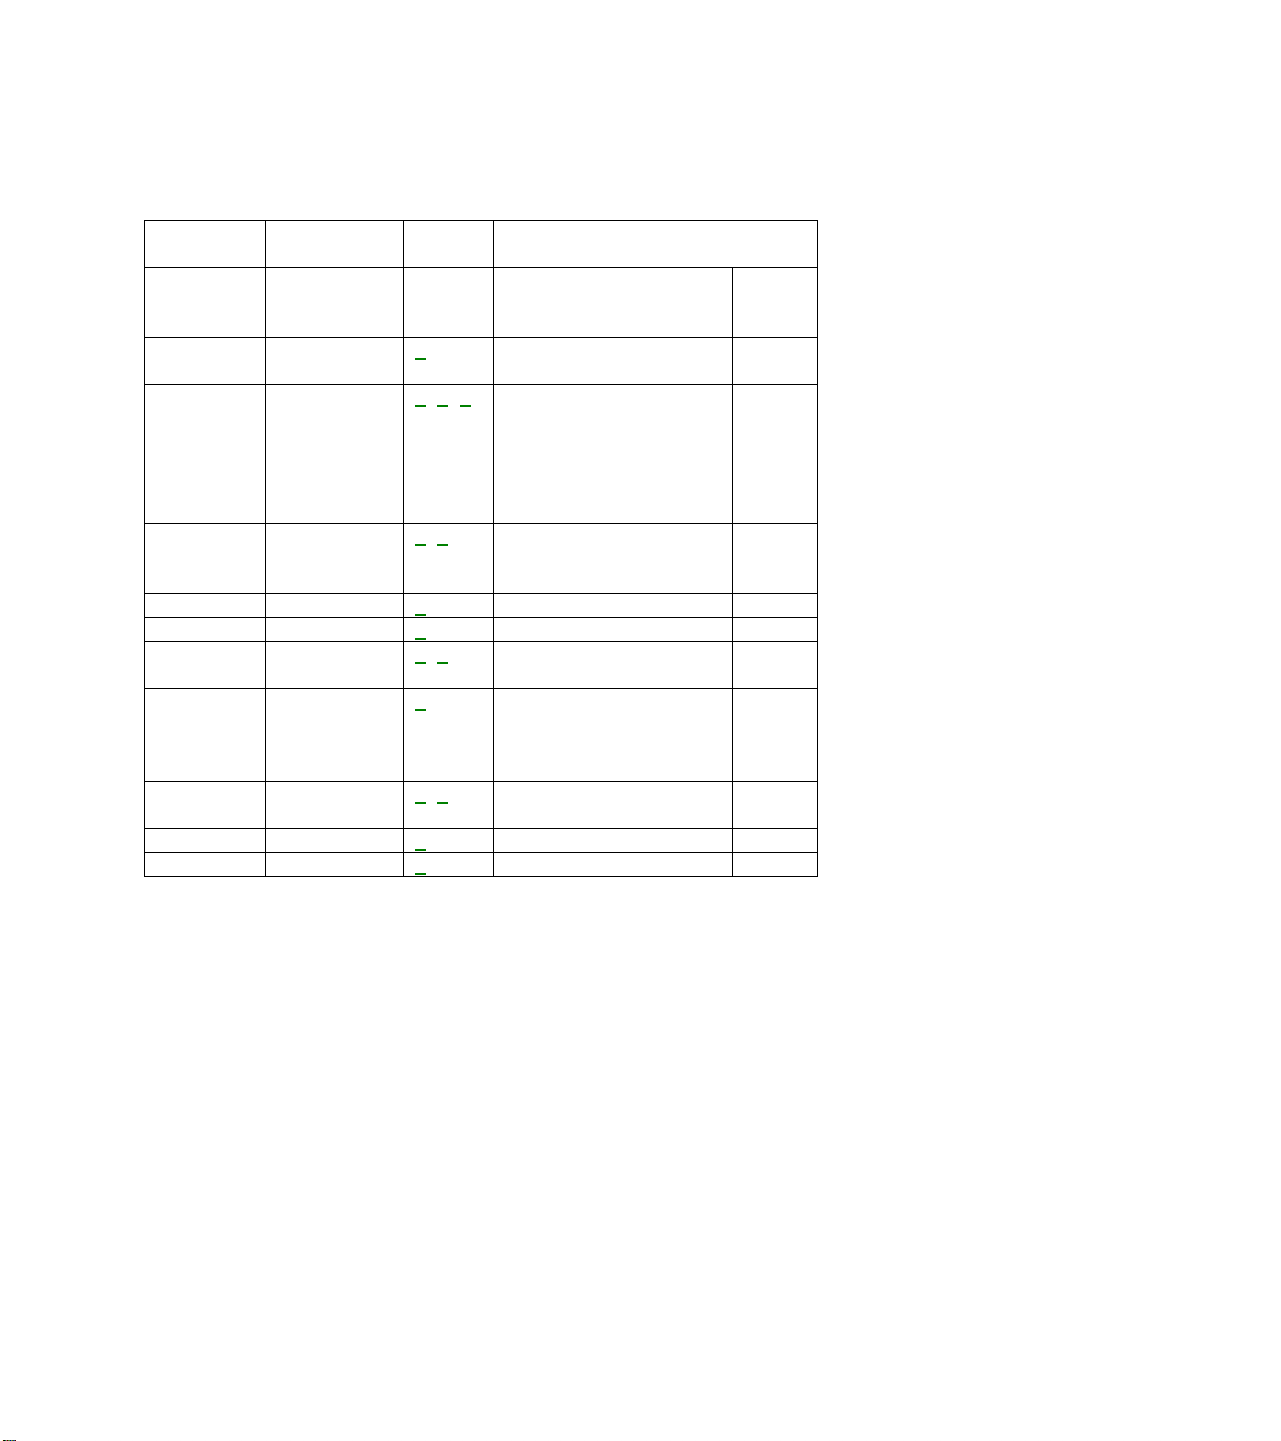
Disassembly Method
STEP/
LOC. NO.
REMOVE/*UNLOCK/
[1] Rear
[2] H.V. CBA
[3] Tray
[4] CRT
[5] Shield Box
[6] Deck
[7] DVD CBA
[8] Filter CBA
[9] Bottom Plate
[10] Main CBA
Note :
1. Order of steps in Procedure. When reassembling, follow the steps in reverse order. These numbers are also
used as the Identification (location) No. of parts in Figures.
2. Parts to be removed or installed.
3. Fig. No. showing Procedure of Part Location
4. Identification of part to be removed, unhooked, unlocked, released, unplugged, unclamped, or desoldered.
S=Screw, P=Spring, L=Locking Tab, CN=Connector, *=Unhook, Unlock, Release, Unplug, or Desolder
2(S-3) = two Screws (S-3)
5. Refer to the following “Reference Notes in the Table.”
PART FIG.
NO.
1
Cabinet
2, 3, 5
(With
Holder)
and Power
Supply CBA
3, 5
Chassis
Unit
2
2
3, 5
Assembly
4
3, 5
3
3
REMOVAL
NOTE
RELEASE/UNPLUG/
UNCLAMP/DESOLDER
4(S-1), 1(S-2) Anode Cap, CN501,
CRT CBA, CN571,
CN1201, CN1202
CN1203,
CN1204, CN691
4(S-3), 2(S-4),1(L-1)
CN1801, CN1802 -
4(S-5) 6(S-6) CN302, CN304, CN305,
4(S-7)
4(S-8), CN001, CN120 2-1
3(S-9), CN404, CN405,
CN406, CN407
5(S-10) 4(S-11) -
1
-
2-2
2-3
3
-
Caution !
When removing the CRT, be sure to discharge the Anode Lead of the CRT with the CRT Ground Wire before
removing the Anode Cap.
Page 29
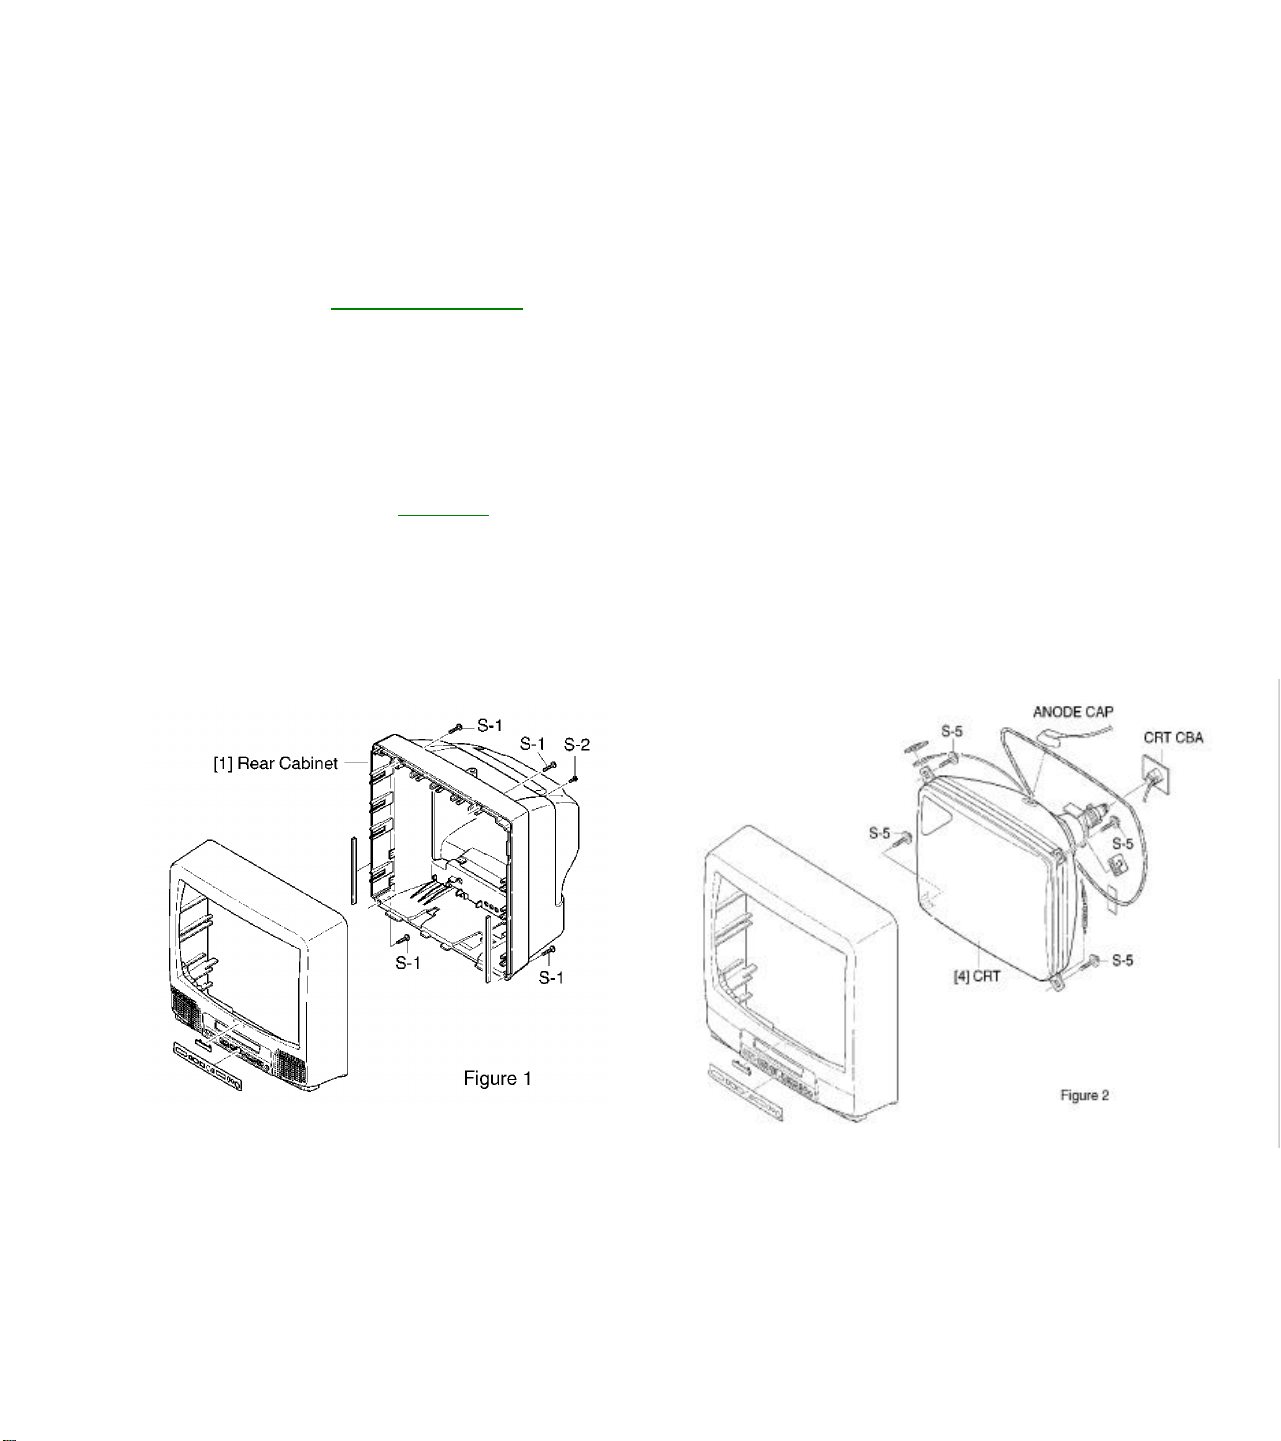
Reference Notes in the Table
CAUTION 1: Discharge the Anode Lead of the CRT with the CRT Ground Wire before removing the Anode
Cap.
1. Disconnect the following: Anode Cap., CN501, CRT CBA, CN571, CN1201, CN1202, CN1203 and CN1204
and CN691, and remove four Screws (S-3) to remove the Power Supply CBA.
2. Remove H.V. CBA (with Holder) and Power Supply CBA.
3. Remove two Screws (S-4) and unlock 1(L-1). Pull the H.V. CBA backward.
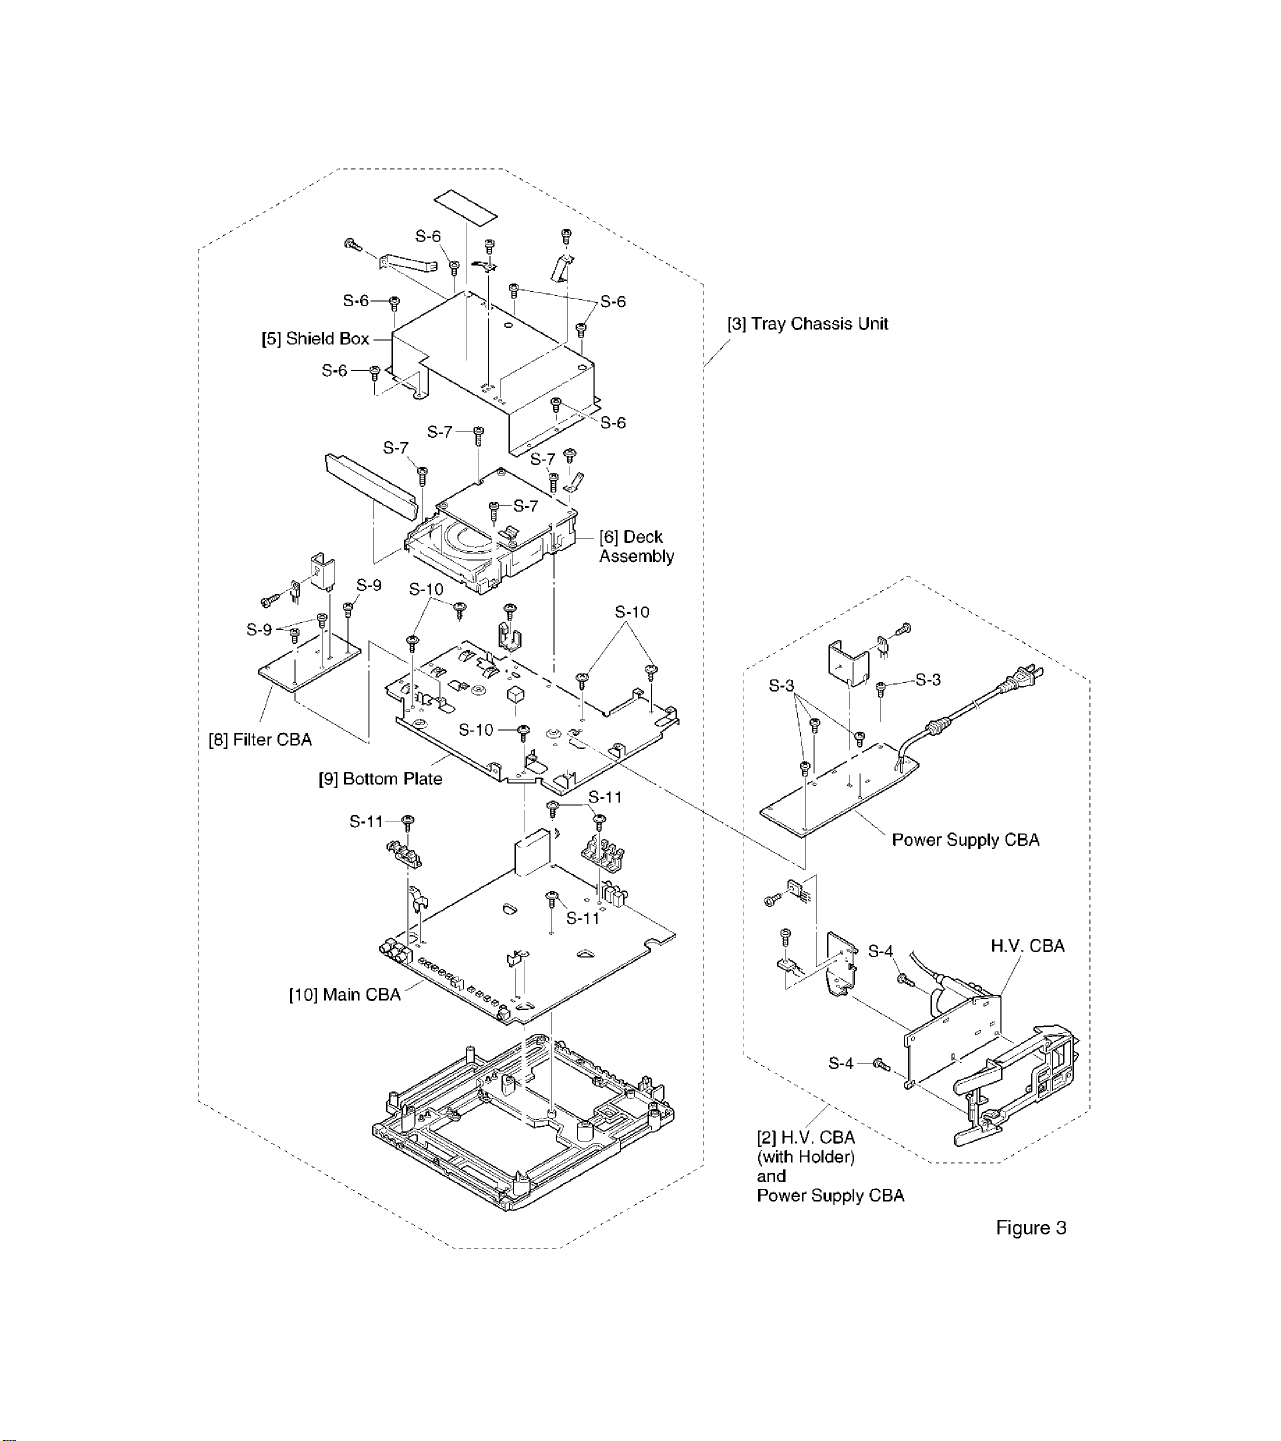
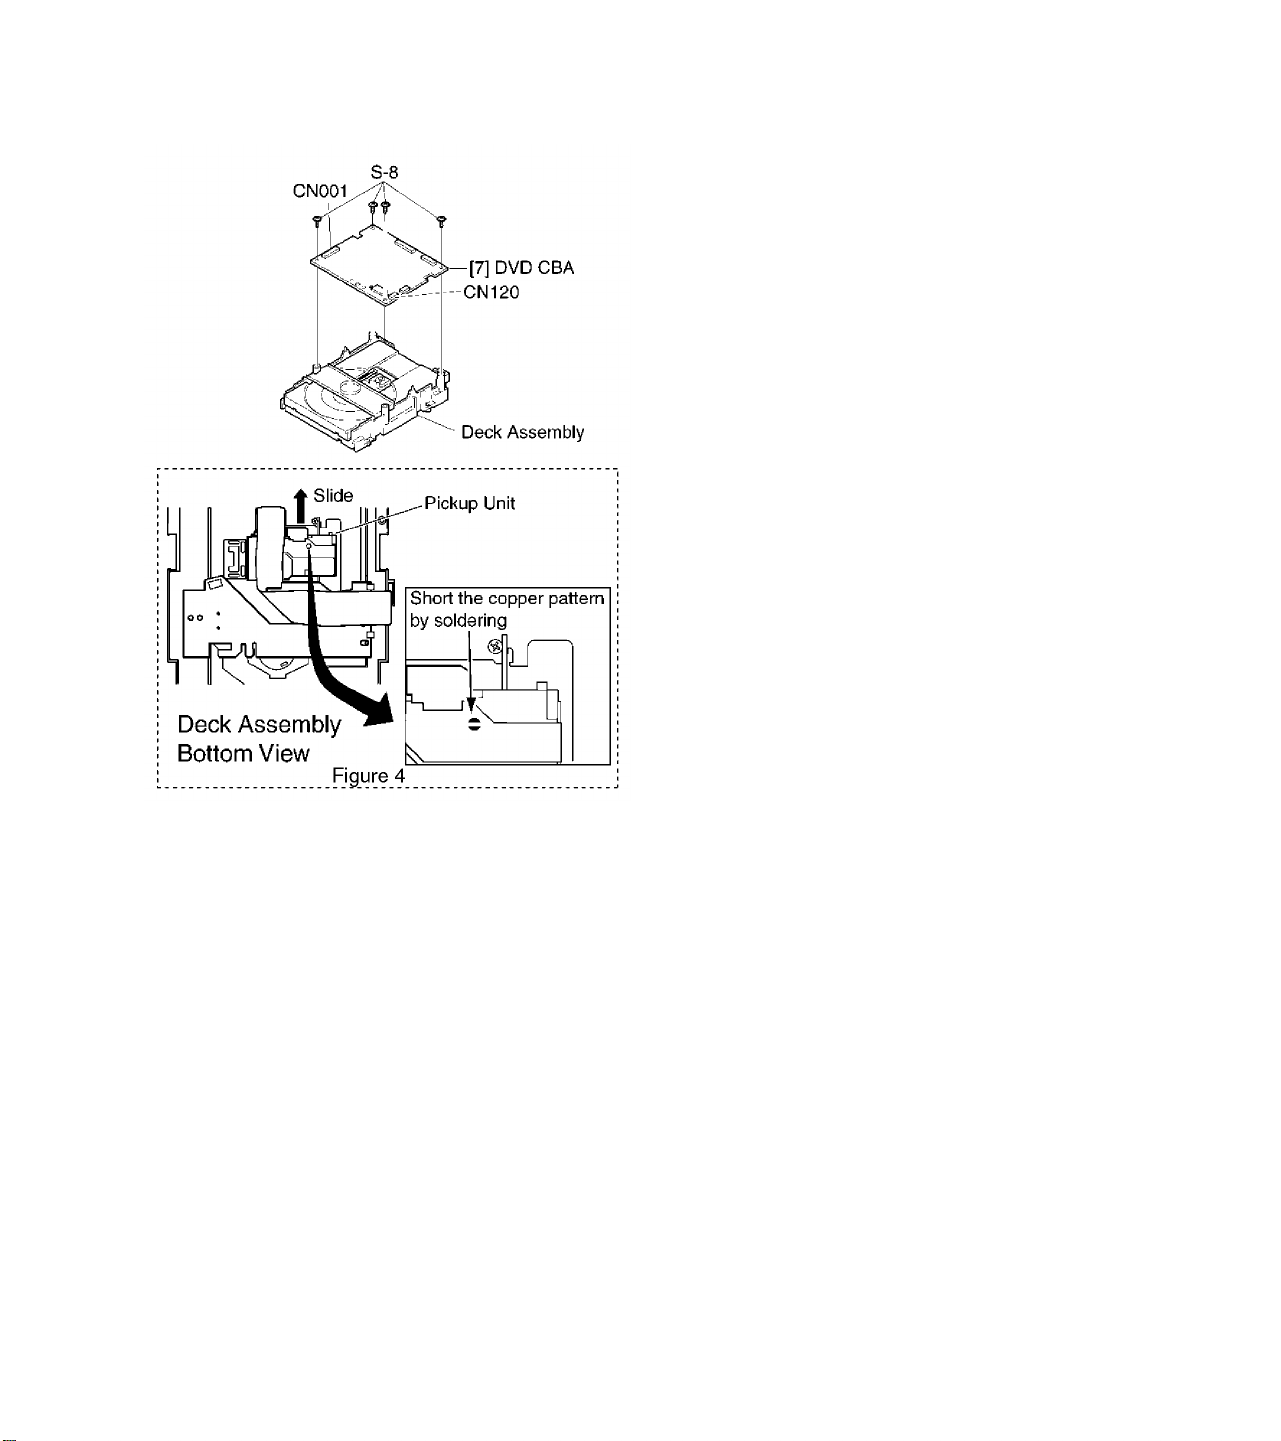
CAUTION 2: Electrostatic breakdown of the laser diode in the optical system block may occur as a potential
difference caused by electrostatic charge accumulated on cloth, human body etc, during unpacking or repair
work.
To avoid damage of pickup follow next procedures.
1. Slide out the pickup unit as shown.
2. Short the copper pattern (half-moon shape) of FPC cable with solder before removing the FFC cable
(CN001) from it. If you disconnect the FFC cable (CN001), the laser diode of pickup will be destroyed. (Fig.
4)
3. Disconnect Connector (CN120). Remove four Screws (S-8) and lift the DVD CBA.
CAUTION 3: When reassembling, confirm the FFC cable (CN001) is connected completely. Then remove the
solder from copper pattern (half-moon shape) of FPC cable.
Page 30
Page 31
Page 32
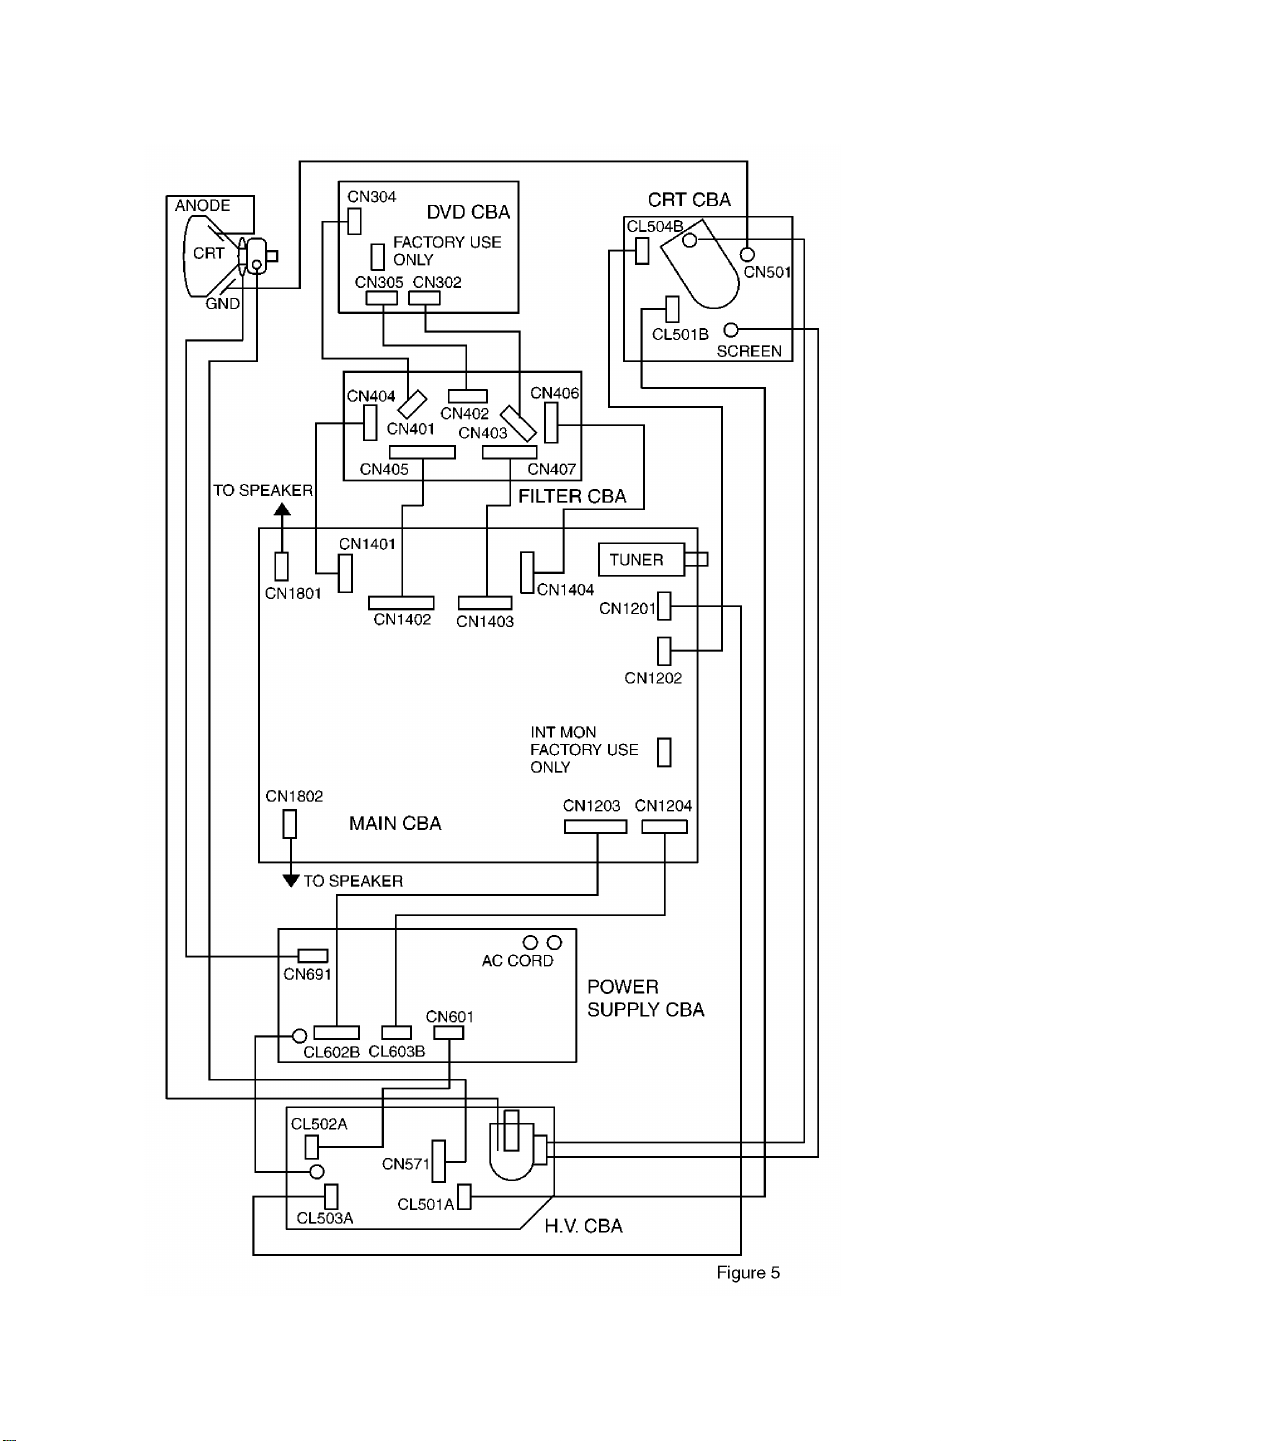
Page 33
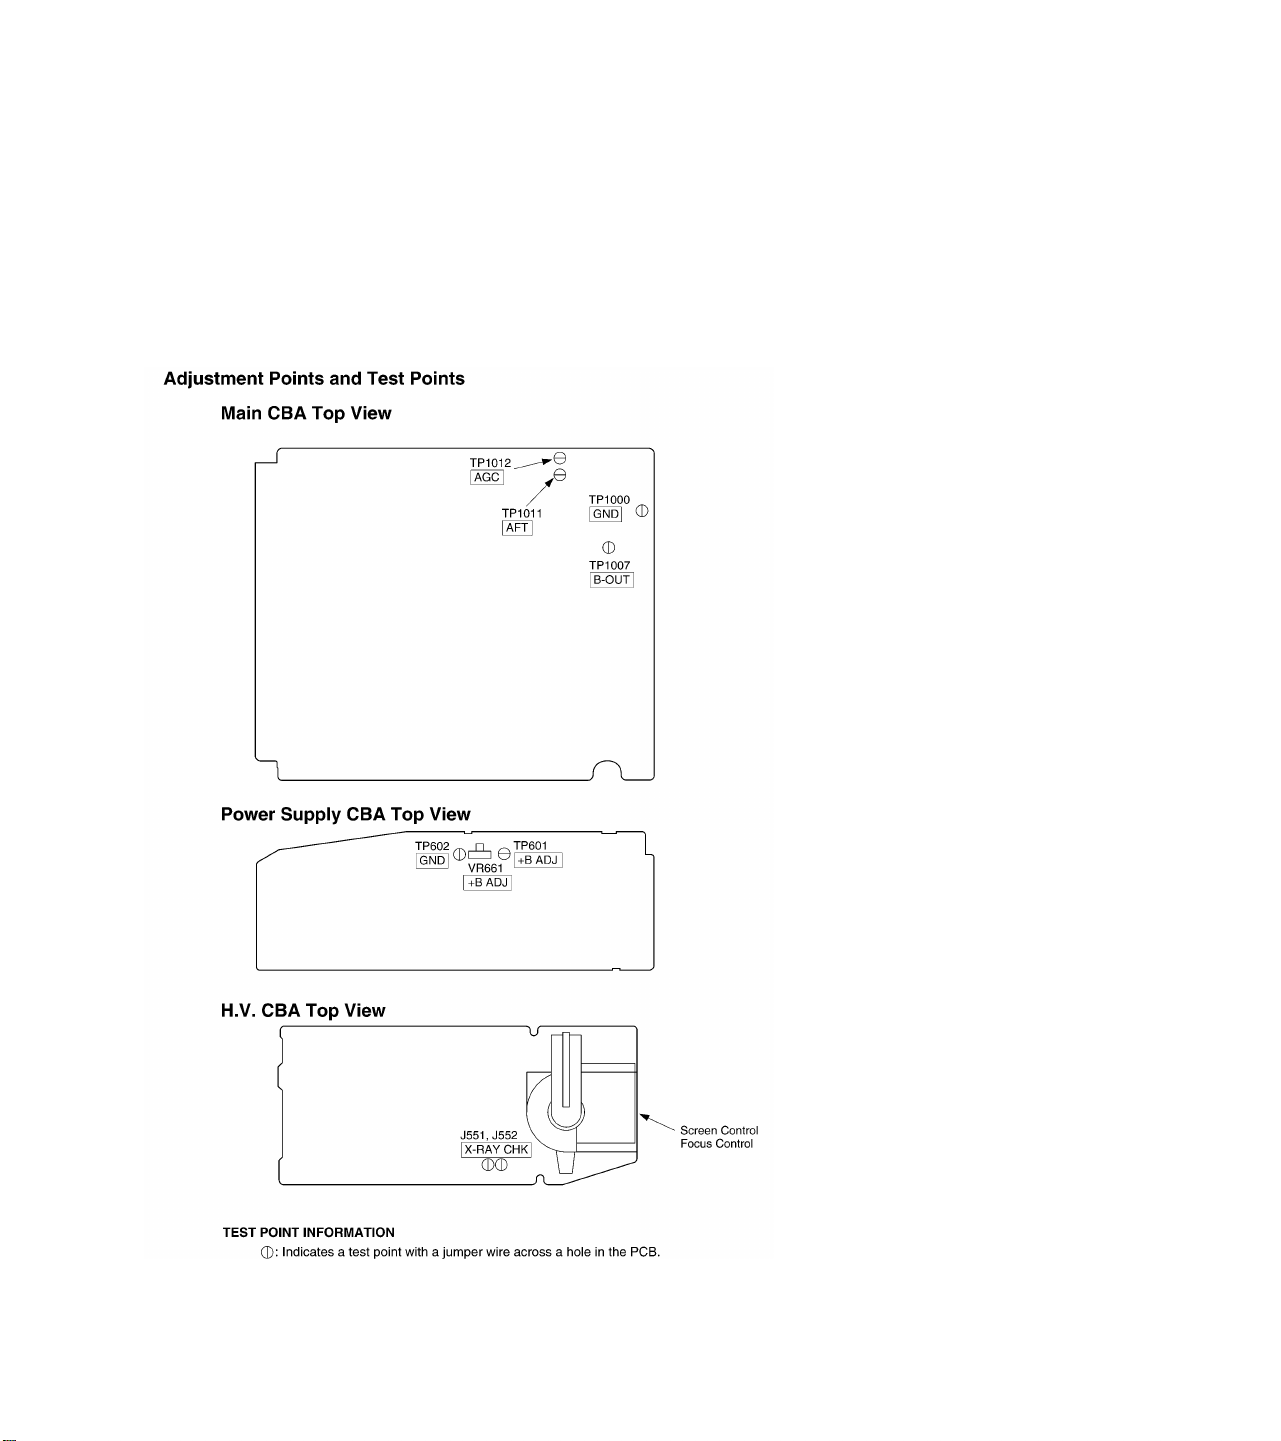
< TV Section Adjustments >
General Note:
“CBA” is abbreviation for “Circuit Board Assembly.”
Note: Electrical adjustments are required after replacing circuit components and certain mechanical parts. It is
important to perform these adjustments only after all repairs and replacements have been completed. Also, do
not attempt these adjustments unless the proper equipment is available.
Page 34

Test Equipment Required
1. NTSC Pattern Generator (Color Bar W/White Window, Red Color, Dot Pattern, Gray Scale, Monoscope,
Multi-Burst)
2. AC Milli Voltmeter (RMS)
3. DC Voltmeter
4. Oscilloscope: Dual-trace with 10:1 probe,
V-Range: 0.001~50V/Div,
F-Range: DC~AC-60MHz
5. Frequency Counter
6. Plastic Tip Driver
How to set up the service mode:
To enter the Service mode:
1. Enter the unit into the Standby mode. (Turn the power off.)
2. Press “TV” button on the remote control unit.
3. Press “2.” “7.” “1.” and “MUTE” button in sequence on the remote control unit. The power is turned on with
the F-Mode and the unit enters the Service mode.
To cancel the Service mode:
Using the remote control unit, press “POWER” button. The unit enters the MUTE mode.
Using the front panel, press “POWER” button. The unit turns the power off.
X-Ray Protection Test
X-Ray protection test should be done when replacing any parts of this chassis.
1. Short test points J535 and J536 (on H.V. CBA).
2. Confirm that the main power turns off.
3. If the main power does not turn off, then replace the following parts (D591, Q591, R592, R593, R594 and
IC201).
4. Perform steps 1 to 3 again.
Page 35
DC 114V (+B) Adjustment
Purpose: To obtain correct operation.
Symptom of Misadjustment: The picture is dark and unit does not operate correctly.
Test Point Adjustment Point Mode Input
TP601 (+B)
TP602 (GND)
Disc M. EQ. Spec.
--- DC Voltmeter +114 ± 0.5V DC
Note: TP601(+B), TP602(GND), VR661 --- Power Supply CBA
1. Connect the unit to an isolation transformer.
2. Connect DC Voltmeter to TP601(+B) and TP602(GND).
3. Adjust VR661 so that the voltage of TP601(+B) becomes +114 ± 0.5V DC.
VR661
--- ---
Auto AFT (VCO) Adjustment
Purpose: To operate AFT correctly.
Symptom of Misadjustment: AFT does not work correctly and/or synchronization is faulty.
Test Point Adjustment Point Mode Input
--- --- VIDEO ---
Disc M. EQ. Spec.
--- --- ---
1. Set the unit to the VIDEO mode with no signal input.
2. Enter the Service mode. Then press “3" button on the remote control unit
3. If the screen color changes to “Green” then this adjustment is finished.
4. If the screen color changes to “Red” then this adjustment is failed. Repeat steps 1 and 2 or check connection
and input signal.
Page 36
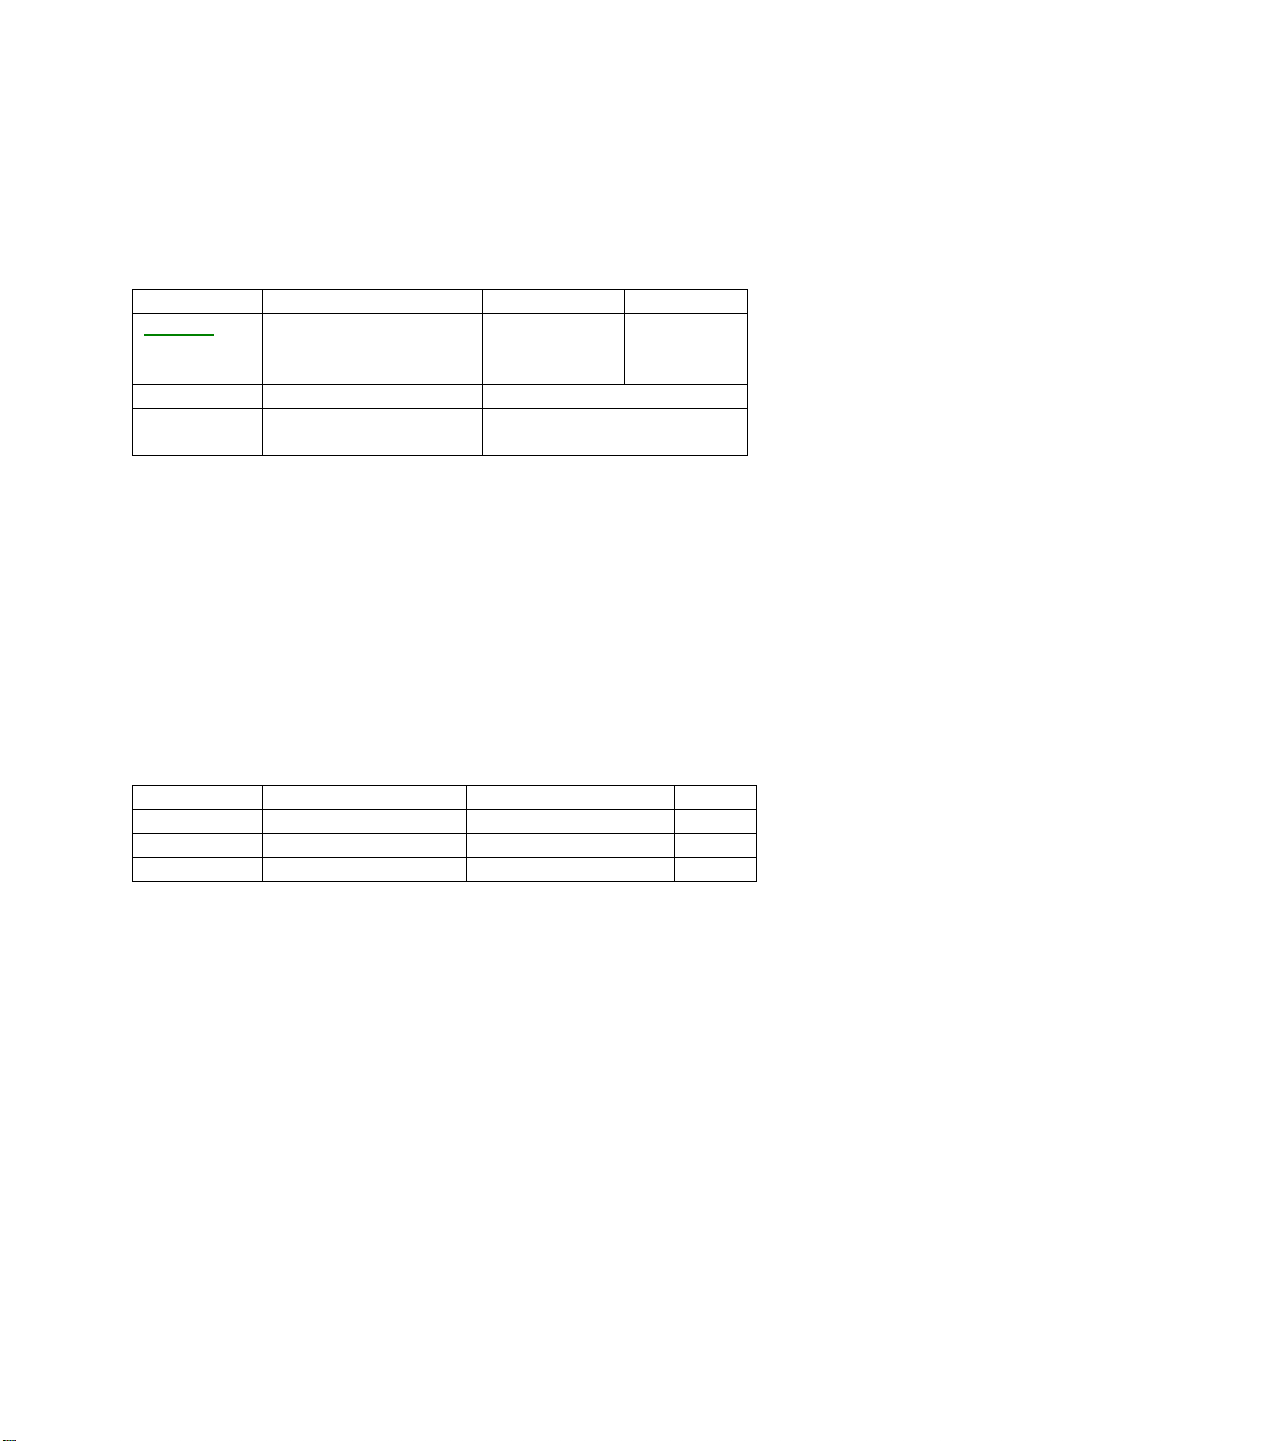
TV AGC Adjustment
Purpose: Set AGC (Auto Gain Control) Level.
Symptom of Misadjustment: AGC does not synchronize correctly when RF input level is too weak and picture
distortion may occur if it is too strong.
Test Point Adjustment Point Mode Input
TP1012
Disc M. EQ. Spec.
--- Pattern Generator
Notes: TP1012 --- Main CBA
1. Enter the Service mode. Then press number 2 button on the remote control unit.
2. Receive the Color Bar signal for channel 4 (67.25MHz). (RF Input Level: 60dBmV)
3. Press CH. up/down buttons so that the voltage of TP1012 becomes +2.30.3V DC.
(Tuner Type No. B8045AR)
4. Turn the power off and on again.
CH. up/down buttons --- Color Bar
67.25MHz
60dBmV
+2.30.3VDC
DC Voltmeter
H Adjustment
Purpose: To get correct horizontal position and size of screen image.
Symptom of Misadjustment: Horizontal position and size of screen image may not be properly displayed.
Test Point Adjustment Point Mode Input
R583 CH up/down buttons
Disc M. EQ. Spec.
--- Frequency Counter 15.734kHz ± 300Hz
Note: R583 --- Main CBA
1. Connect frequency counter to R583.
2. Operate the unit for at least 20 minutes.
3. Press “2" button on the remote control unit and select H-ADJ Mode. (By pressing ”2" button the display will
change H-ADJ and AGC cyclically).
4. Press CH up/down buttons on the remote control unit so that the display will change “0" to ”7."
5. At this moment, choose display “0" to ”7" when the frequency counter shows
15.734kHz ± 300Hz.
6. Turn the power off and on again.
VIDEO ---
Page 37
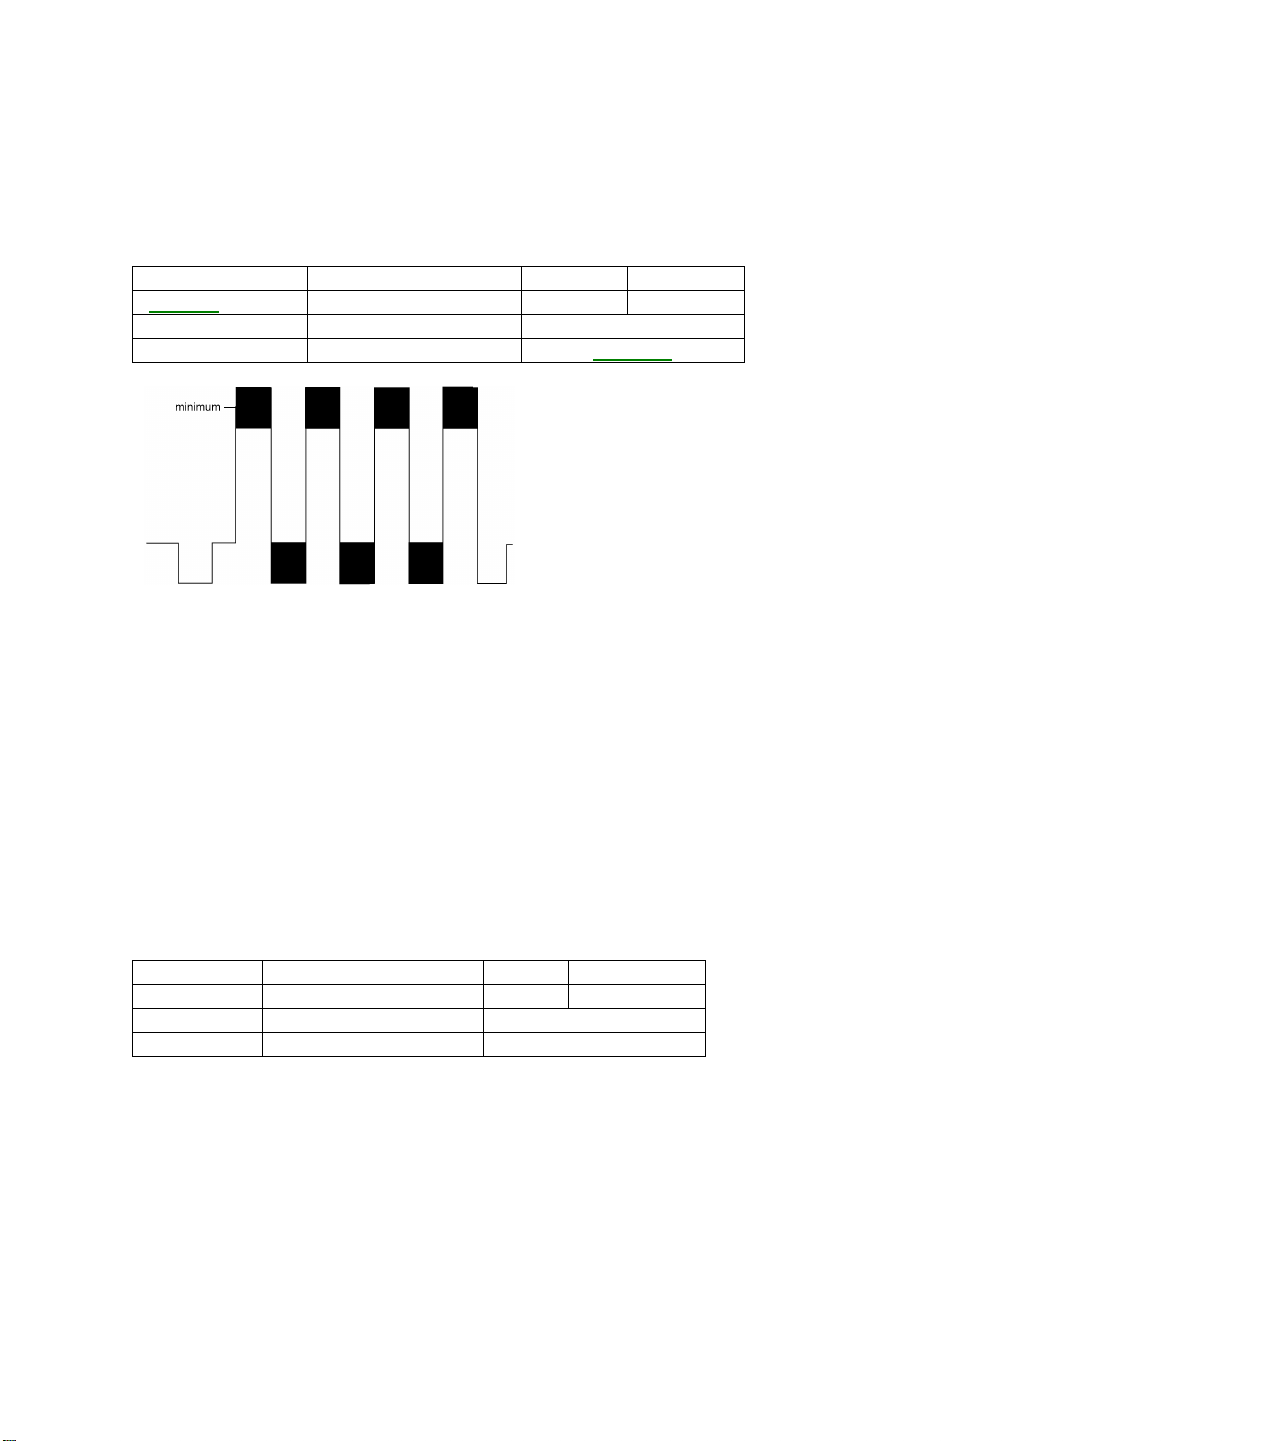
C-Trap Adjustment
Purpose: To get minimum leakage of the color signal carrier.
Symptom of Misadjustment: If C-Trap Adjustment is incorrect, stripes will appear on the screen.
Test Point Adjustment Point Mode Input
TP1007 (B-Out)
Disc M. EQ. Spec.
--- Oscilloscope
CH up/down buttons --- Color Bar
Figure 2
Note: TP1007 (B-Out) --- Main CBA
1. Connect oscilloscope to TP1007.
2. Input a color bar signal from RF input. Enter the Service mode.
3. Press “0" button on the remote control unit and select C-TRAP mode.
4. Press CH up/down buttons on the remote control unit so that the carrier leakage B-Out (3.58MHz) value
becomes minimum on the oscilloscope.
5. Turn the power off and on again.
V. Size Adjustment
Purpose: To obtain correct vertical height of screen image.
Symptom of Misadjustment: If V. Size is incorrect, vertical height of image on the screen may not be properly
displayed.
Test Point Adjustment Point Mode Input
--- CH up/down buttons --- Monoscope
Disc M. EQ. Spec.
--- Pattern Generator 90 ± 5%
Note:
1. Enter the Service mode. Press “9" button on the remote control unit and select V-S mode.
(By pressing ”9" button the display will change V-P and V-S cyclically).
2. Input the Monoscope pattern.
3. Press CH up/down buttons on the remote control unit so that the monoscope pattern
is 90 ± 5% of display size and the circle is round.
Page 38
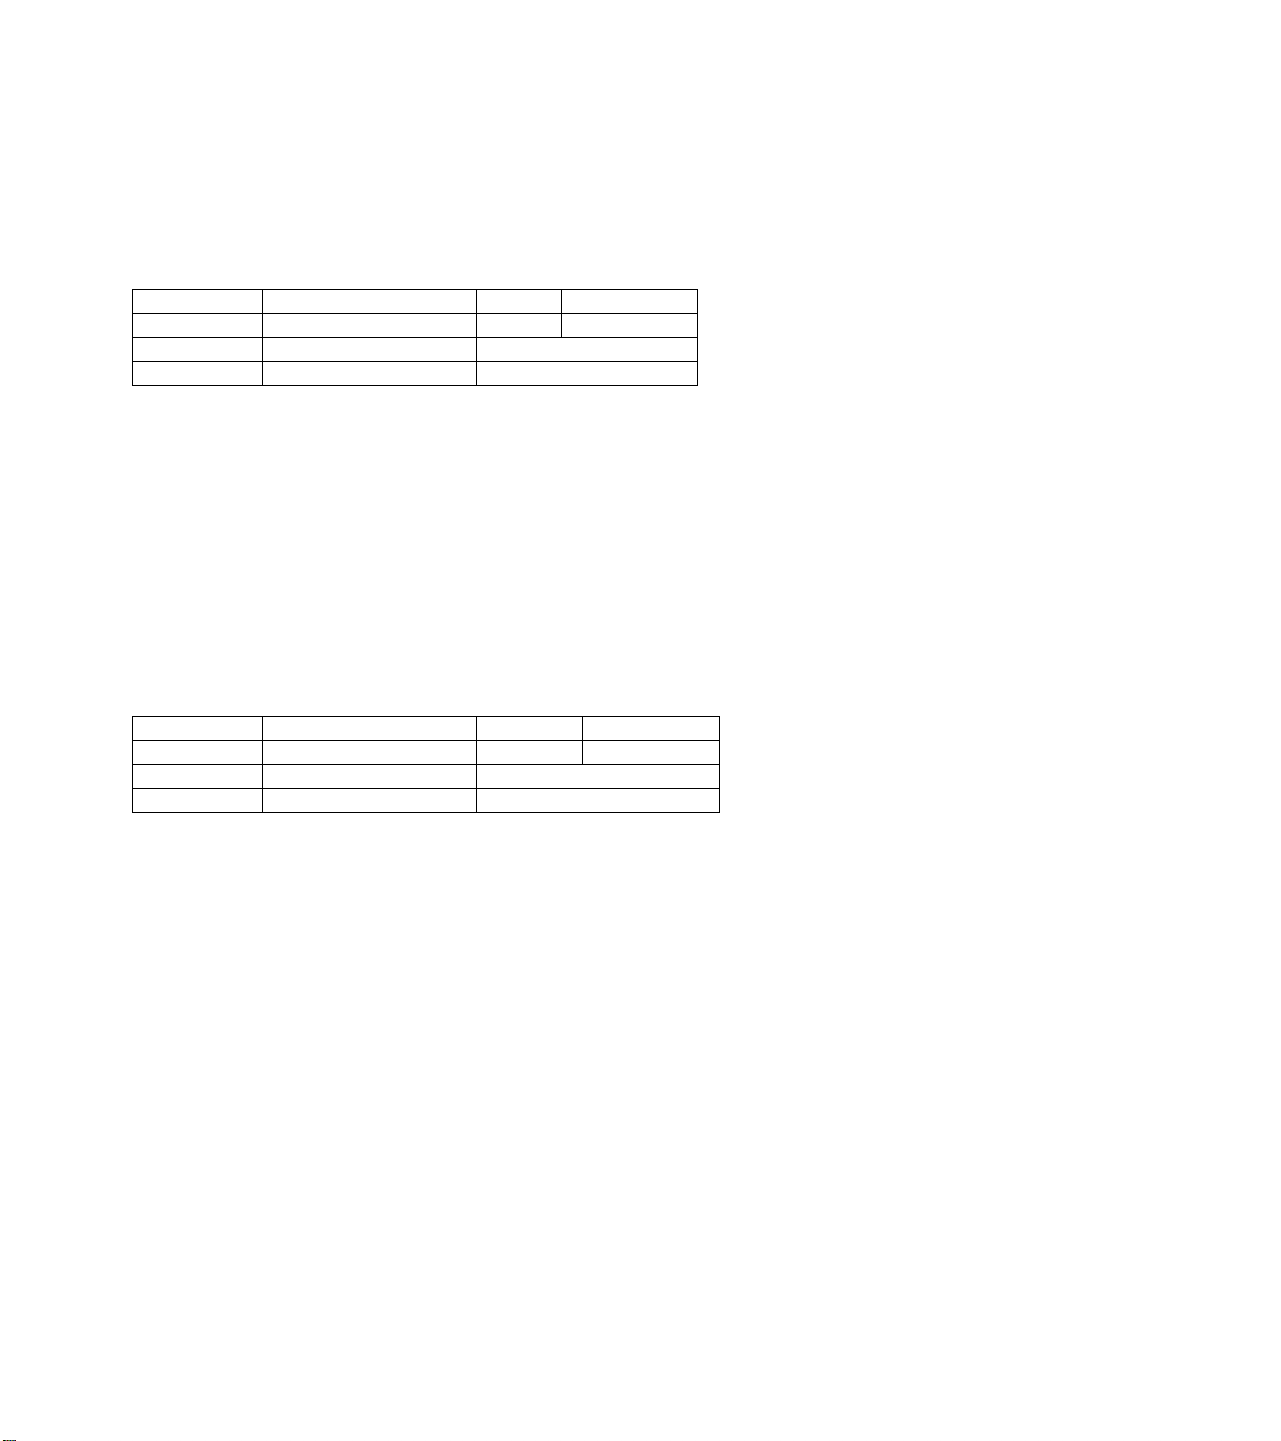
V. Shift Adjustment
Purpose: To obtain correct vertical position of screen image.
Symptom of Misadjustment: If V. shift is incorrect, vertical position of image on the screen may not be
properly displayed.
Test Point Adjustment Point Mode Input
--- CH up/down buttons --- Monoscope
Disc M. EQ. Spec.
--- Pattern Generator 90 ± 5%
Note:
1. Enter the Service mode. Press “9" button on the remote control unit and select V-P mode.
(By pressing ”9" button the display will change V-P and V-S cyclically).
2. Input Monoscope pattern.
3. Press CH up/down buttons on the remote control unit so that the left and right side of the Monoscope pattern
are equal to each other. (90 ± 5%)
H. Shift Adjustment
Purpose: To obtain correct horizontal position and size of screen image.
Symptom of Misadjustment: Horizontal position and size of screen image may not be properly displayed.
Test Point Adjustment Point Mode Input
--- CH up/down buttons --- Monoscope
Disc M. EQ. Spec.
--- Pattern Generator 90 ± 5%
Note:
1. Enter the Service mode. Press “8" button on the remote control unit and select H-P mode.
2. Input Monoscope pattern.
3. Press CH up/down buttons on the remote control unit so that the left and right side of the Monoscope pattern
are equal to each other. (90 ± 5%)
4. Turn the power off and on again.
Page 39
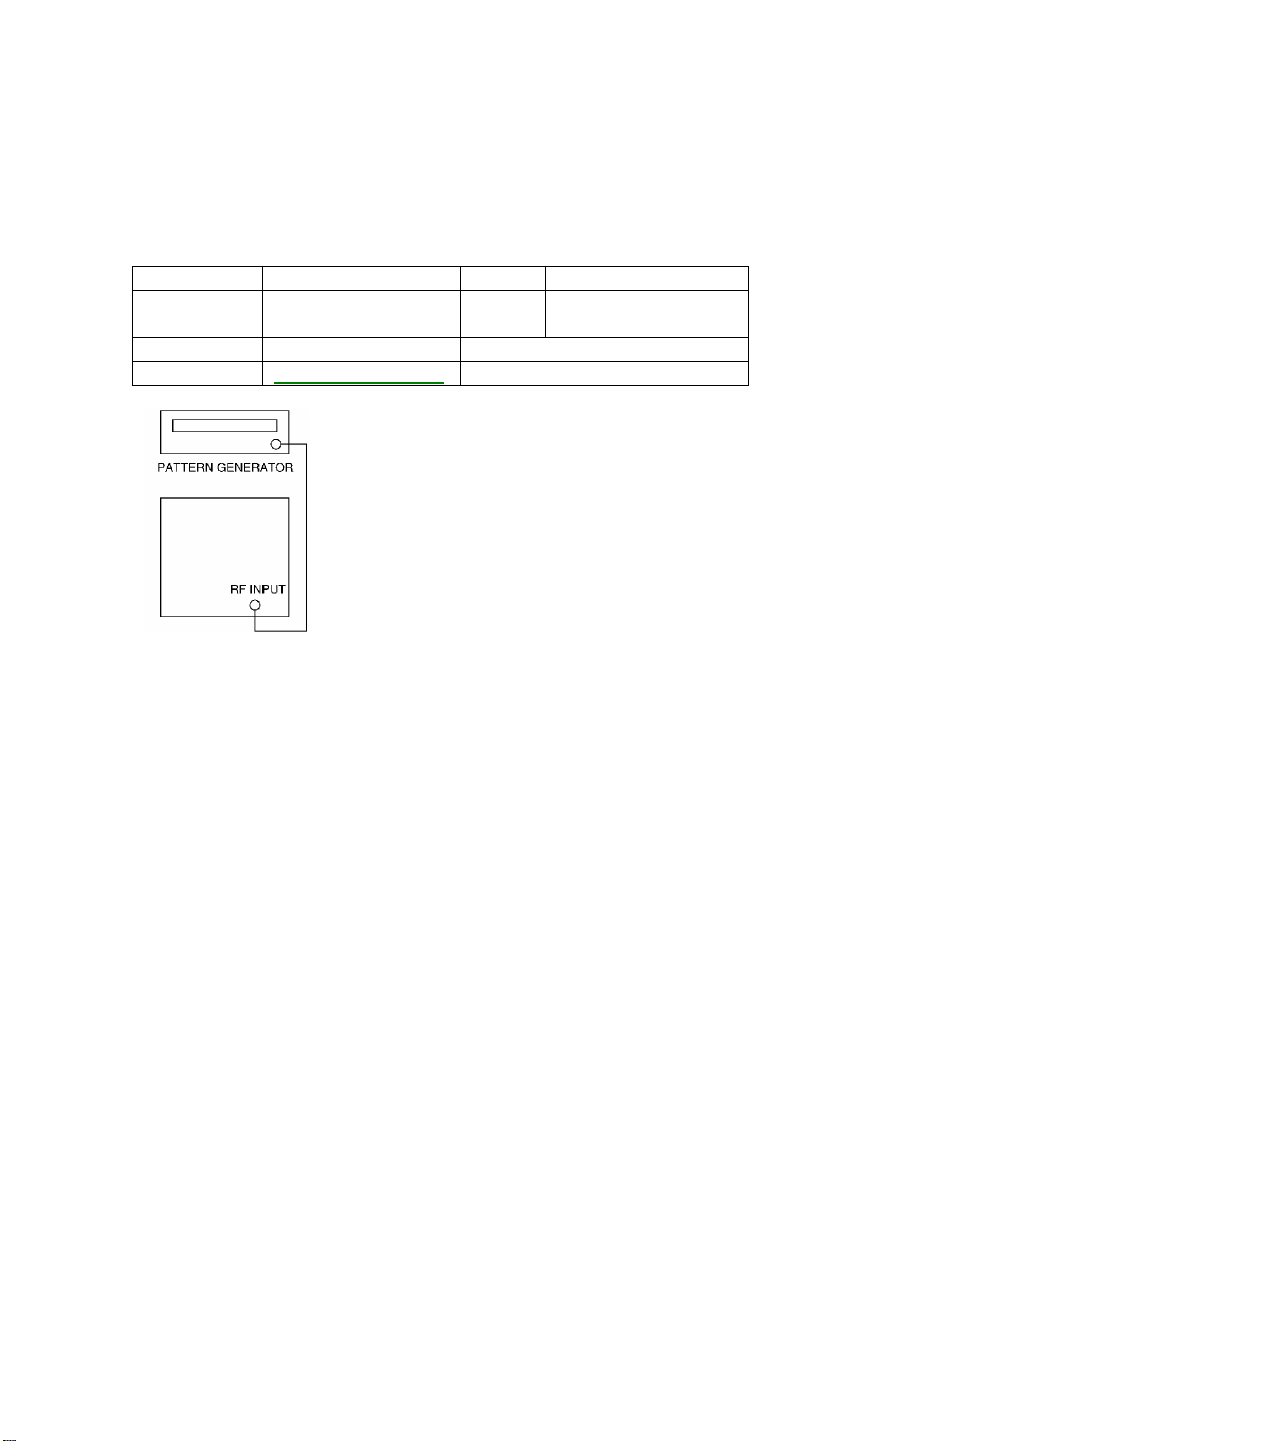
Cut-off Adjustment
Purpose: To adjust the beam current of R, G, B, and screen voltage.
Symptom of Misadjustment: White color may be reddish, greenish or bluish.
Test Point Adjustment Point Mode Input
--- Screen-Control Ext. Black Raster /
White Raster
Disc M. EQ. Spec.
---
Pattern Generator
See Reference Notes below.
Note: Screen Control FBT --- H/V CBA
F.B.T= Flyback Transformer
Use the remote control unit
1. Degauss the CRT and allow CRT to operate for 20 minutes before starting the alignment.
2. Set the screen control to minimum position. Input the black raster signal from RF input.
3. Enter the Service Mode. Dimmed horizontal line appears on the CRT.
4. Press the “VOL up/down” button. (By pressing VOL up/down the display will change CUT OFF/DRIVE, VCO
adjustment, Analog OSD adjustment cyclically).
5. Choose CUT OFF/DRIVE mode then press “1" button. This adjustment mode is
CUT OFF (R).
6. Press the “CH up/down” button until the horizontal line becomes white.
7. Choose CUT OFF/DRIVE mode then press “2" button. This adjustment mode is CUT OFF (G). Press ”CH
up/down “ until the horizontal line becomes white.
8. Choose CUT OFF/DRIVE mode then press “3" button. This adjustment mode is CUT OFF (B). Press ”CH
up/down “ until the horizontal line becomes white.
9. Input the white raster signal from Video In.
10. Choose CUT OFF/DRIVE mode then press “4.” Adjust the RED DRIVE as needed with the CH up/down
buttons.
11. Choose CUT OFF/DRIVE mode then press “5.” Adjust the BLUE DRIVE as needed with the CH up/down
buttons.
12. Turn the power off and on again.
Page 40
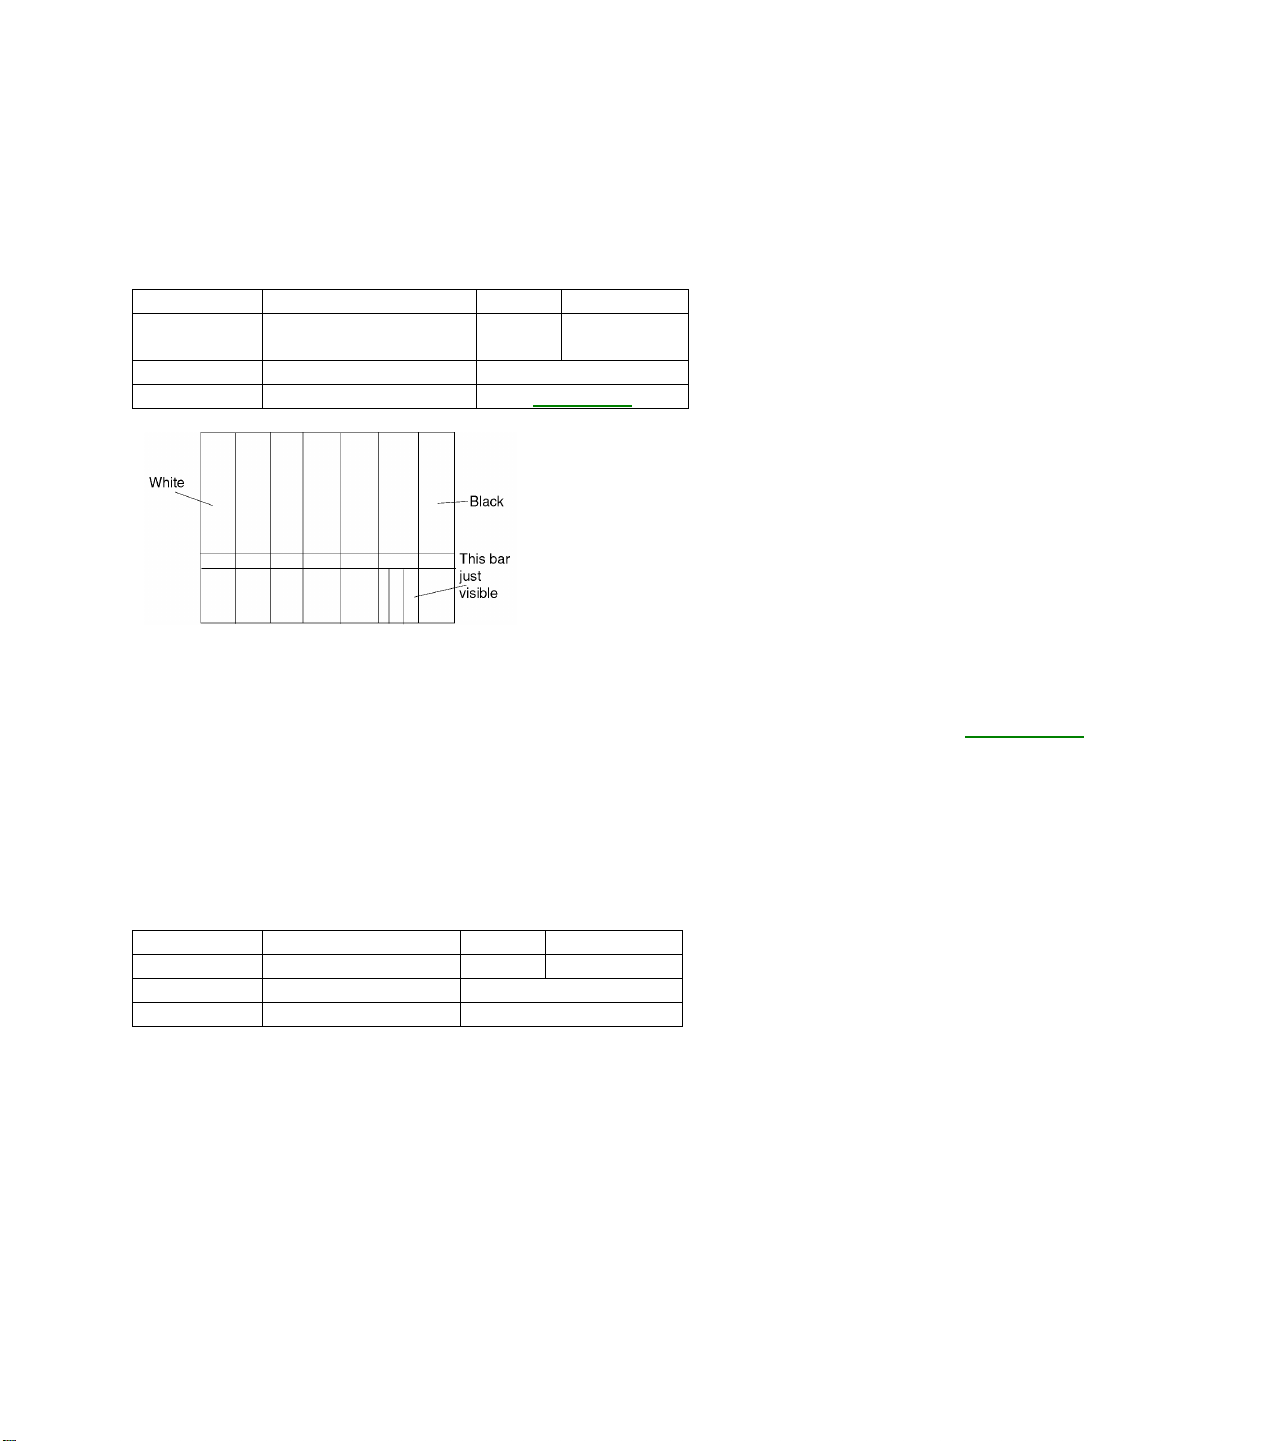
Sub-Brightness Adjustment
Purpose: To get proper brightness.
Symptom of Misadjustment: If Sub-Brightness is incorrect, proper brightness cannot be obtained by adjusting
the Brightness Control.
Test Point Adjustment Point Mode Input
--- CH up/down buttons --- SYMPTE
7.5 IRE
Disc M. EQ. Spec.
--- Pattern Generator
See below
Note: SYMPTE Setup level --- 7 IRE
1. Enter the Service Mode. Then input SYMPTE signal from RF input.
2. Press MENU button. (By pressing MENU button the display will change B R T, C N T, T N T, V-T and SHP
cyclically). Select BRT and press CH up/down buttons so that the bar is just visible (see above figure).
3. Turn the power off and on again.
Focus Adjustment
Purpose: Set the optimum Focus.
Symptom of Misadjustment: If Focus Adjustment is incorrect, blurred images are shown on the display.
Test Point Adjustment Point Mode Input
--- Focus Control --- Monoscope
Disc M. EQ. Spec.
--- Pattern Generator See below.
Note: Focus VR (FBT) --- H/V CBA
FBT= Flyback Transformer
1. Operate the unit more than 30 minutes
2. Face the unit to the East and degauss the CRT using a Degaussing Coil.
3. Input the Monoscope pattern.
4. Adjust the Focus Control on the FBT to obtain a clear picture.
Page 41
SIF Adjustment
Purpose: To set the SIF (Sound Intermediate Frequency).
Symptom of Misadjustment: Audio may not sound correctly.
Note: This adjustment is automatically done by the chrominance IC (IC301).
CCS Text Box Location
When replacing the CRT, the CCS Box might not stay in appropriate position. Then, replace micro computer.
This adjustment is automatically done by the microcomputer.
The following 2 adjustments are not normally attempted in the field. They should be done only when replacing
the CRT then adjust as a preparation.
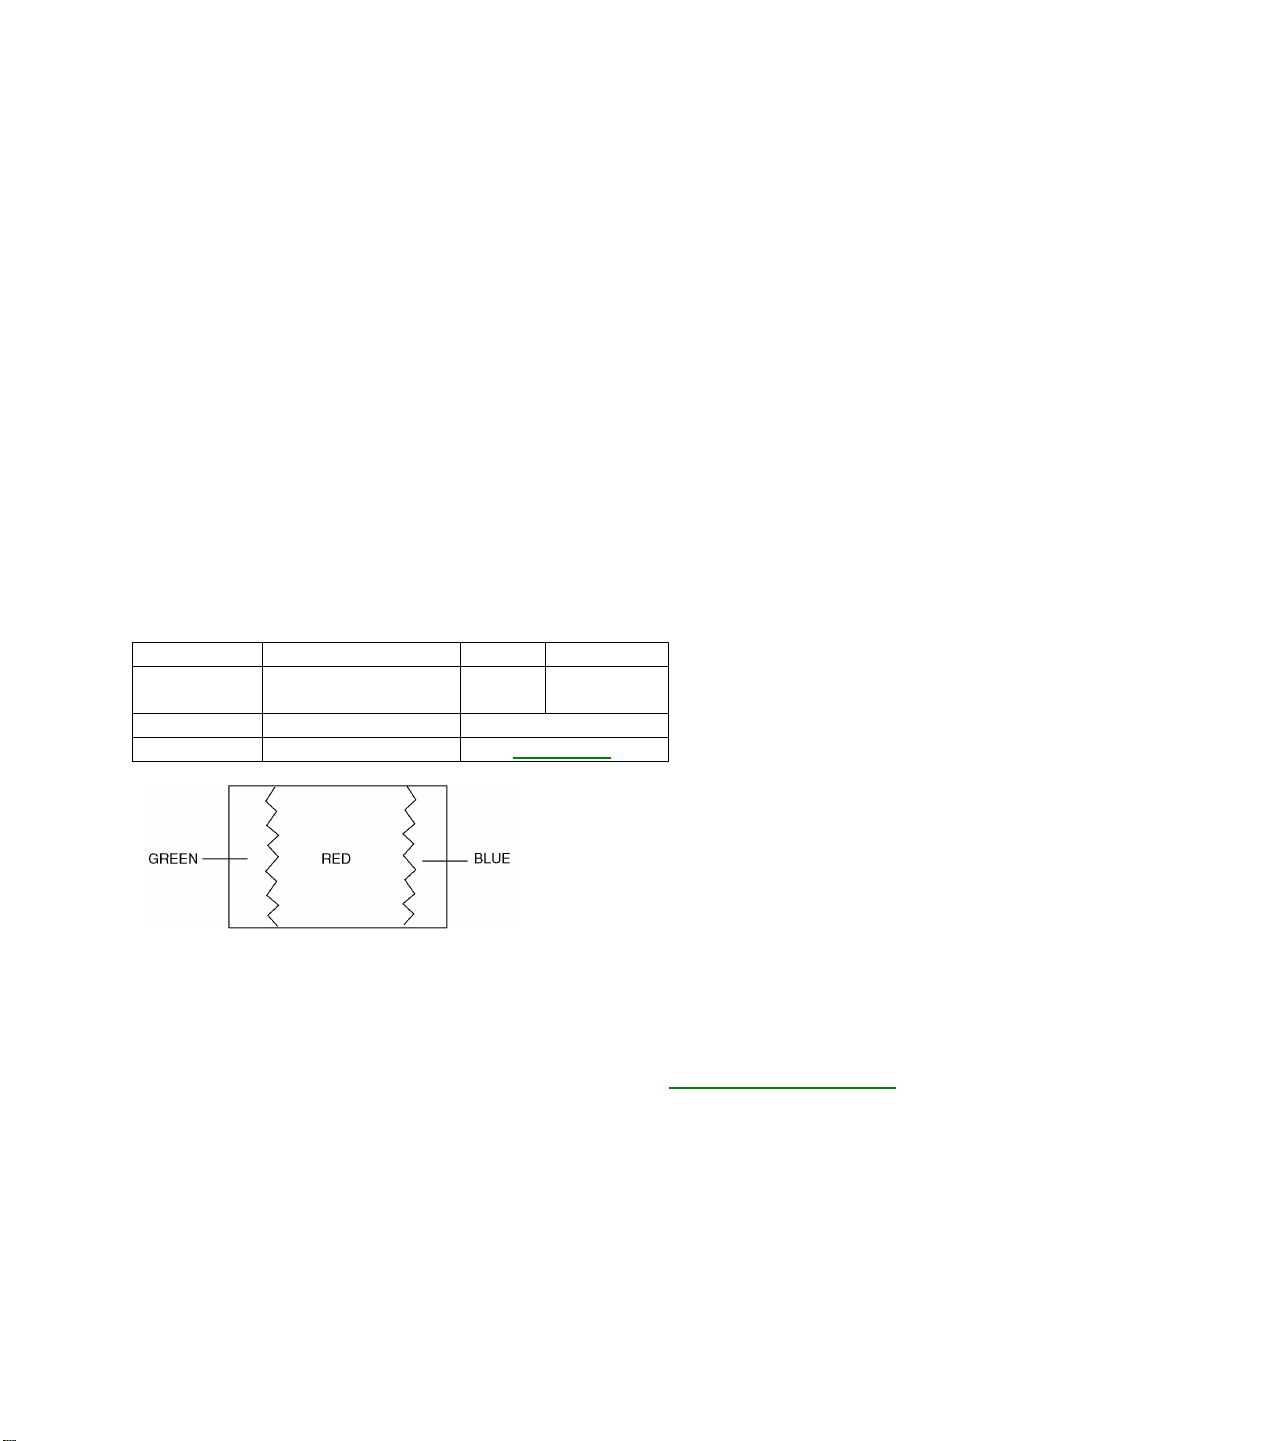
Purity Adjustment
Purpose: To obtain pure color.
Symptom of Misadjustment: If Color Purity Adjustment is incorrect, large areas of color may not be properly
displayed.
Test Point Adjustment Point Mode Input
--- Deflection Yoke
Purity Magnet
Disc M. EQ. Spec.
--- Pattern Generator
--- Red Color
See below.
1. Set the unit facing east.
2. Operate the unit for over 30 minutes before adjusting.
3. Fully degauss the unit using an external degaussing coil.
4. Set the unit to the AUX Mode which is located before CH2 then input a red raster
from video in.
5. Loosen the screw on the Deflection Yoke Clamper and pull the Deflection Yoke
back away from the screen.
6. Loosen the Ring Lock and adjust the Purity Magnets so that a red field is obtained at the center of the
screen. Tighten Ring Lock.
7. Slowly push the Deflection Yoke toward the bell of the CRT and set it where a uniform red field is obtained.
8. Tighten the clamp screw on the Deflection Yoke.
Page 42
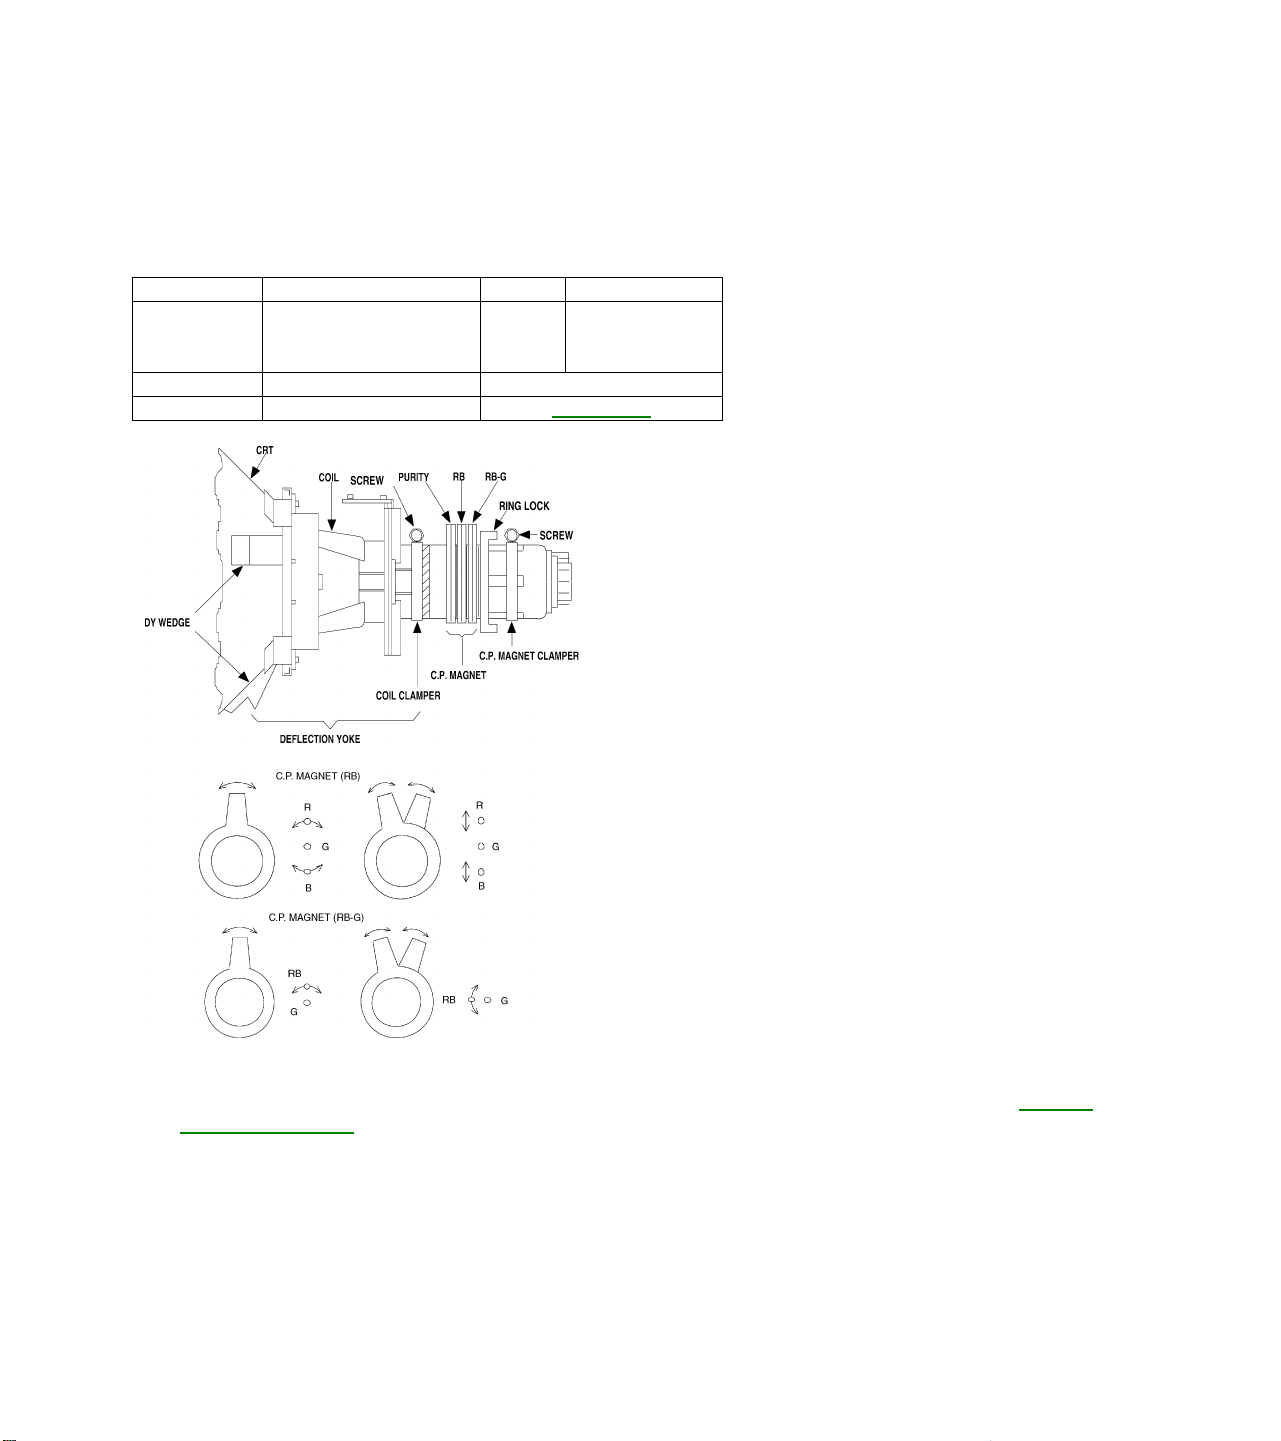
Convergence Adjustment
Purpose: To obtain proper convergence of red, green and blue beams.
Symptom of Misadjustment: If Convergence Adjustment is incorrect, the edge of white letters may have color
edges.
Test Point Adjustment Point Mode Input
--- C.P. Magnet (RB),
C.P. Magnet (RB-G),
Deflection Yoke
Disc M. EQ. Spec.
--- Pattern Generator
--- Dot Pattern
or Crosshatch
See below
1. Set the unit to the AUX Mode which is located before CH2 then input a dot or crosshatch pattern.
2. Loosen the Ring Lock and align red with blue dots or crosshatch at the center of the screen by rotating
(RB) C.P. Magnets.
3. Align red / blue with green dots at the center of the screen by rotating (RB-G) C.P. Magnet.
4. Fix the C.P. Magnets by tighteni ng the Ring Lock.
5. Remove the DY Wedges and slightly tilt the Deflection Yoke horizontally and vertically to obtain the best
overall convergence.
6. Fix the Deflection Yoke by carefully inserting the DY Wedges between CRT and Deflection Yoke.
Page 43
< DVD Section Adjustments>
General Note: “CBA” is an abbreviation for “Circuit Board Assembly.”
Note:
Electrical adjustments are required after replacing circuit components and certain mechanical parts. It is
important to do these adjustments only after all repairs and replacements have been completed. Also, do not
attempt these adjustments unless the proper equipment is available.
Test Equipment Required
Oscilloscope: Dual-trace with 10:1 probe, V-Range: 0.01~50V/Div., F-Range: AC~DC-20MHz
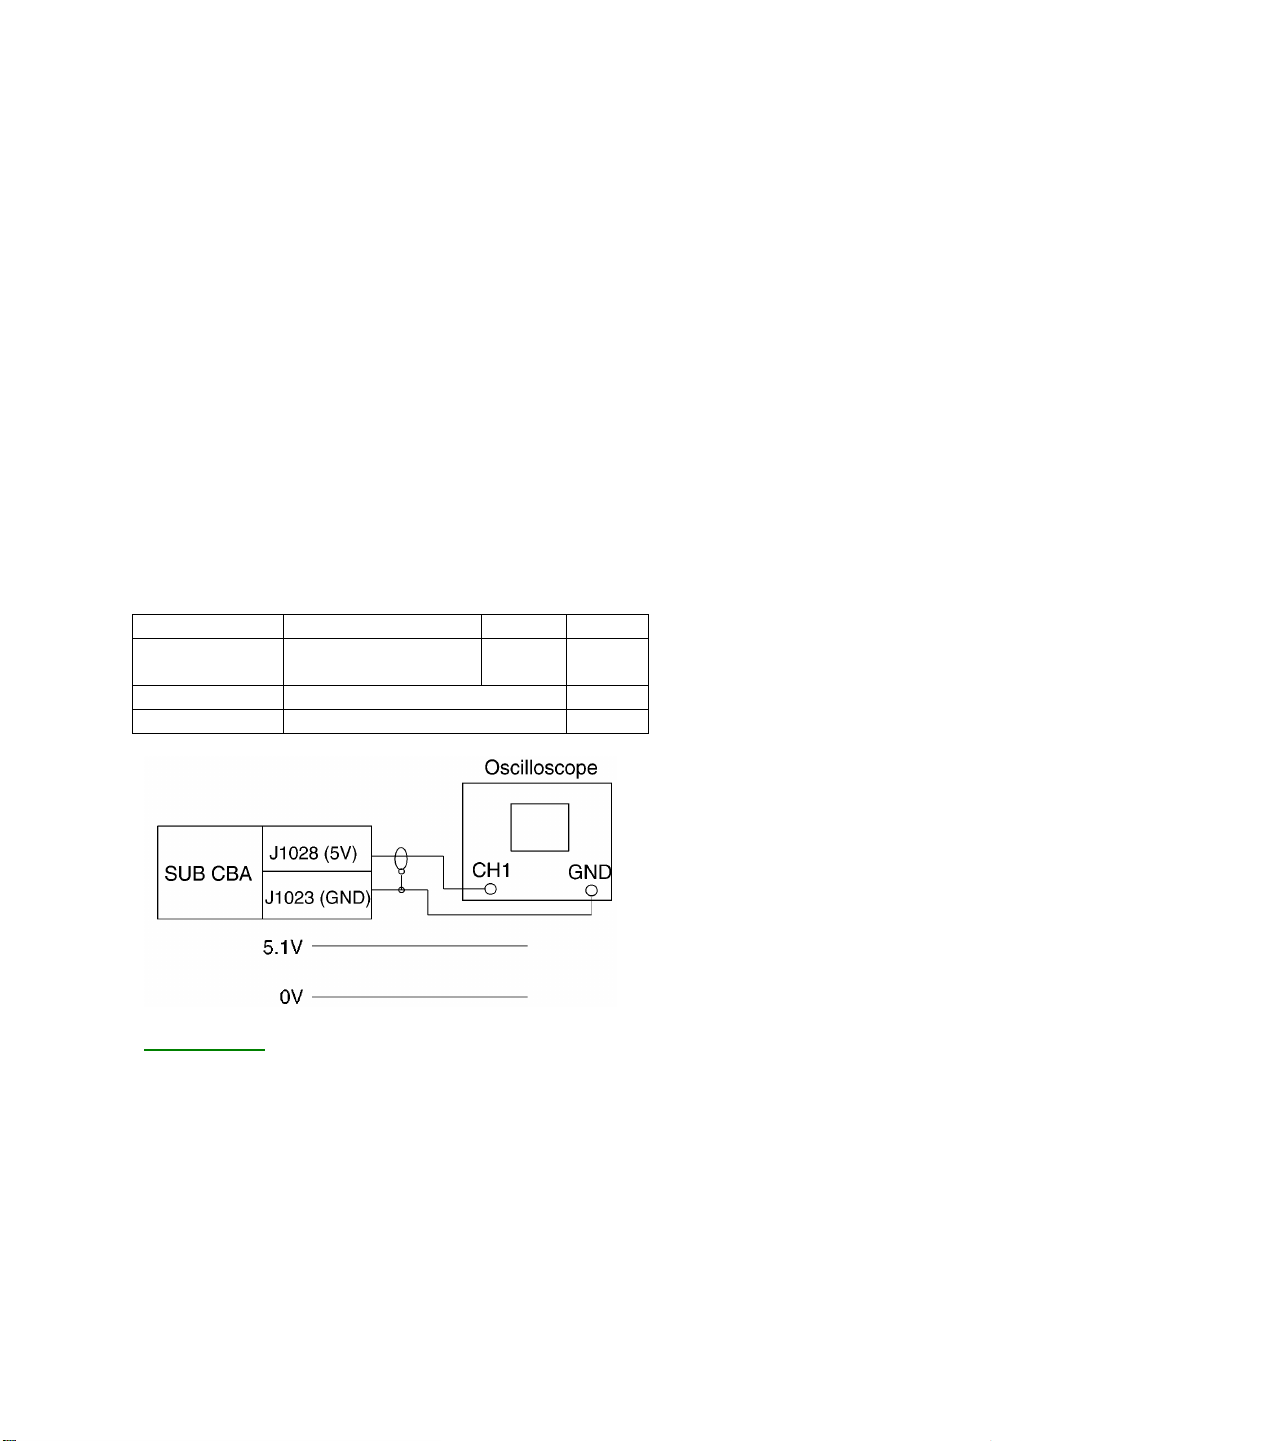
1. 5V Adjustment
Purpose: To ensure proper operation.
Symptom of Misadjustment: Not operating or IC defective.
Test Point Adjustment Point Mode Input
J1023 (GND)
J1028 (5V)
Disc Measurement Equipment Spec
--- Oscilloscope 5.1V
VR1001 --- ---
Connections of Measurement Equipment
Reference Notes:
J1023, J1028, VR1001 : SUB CBA
With the DVD player in STOP mode, adjust VR1001 for a reading of 5.1Vdc at pins 3, 4, and 5 of CN1001 (P-
ON 5V terminals).
Page 44
Page 45
Page 46
Page 47
Page 48
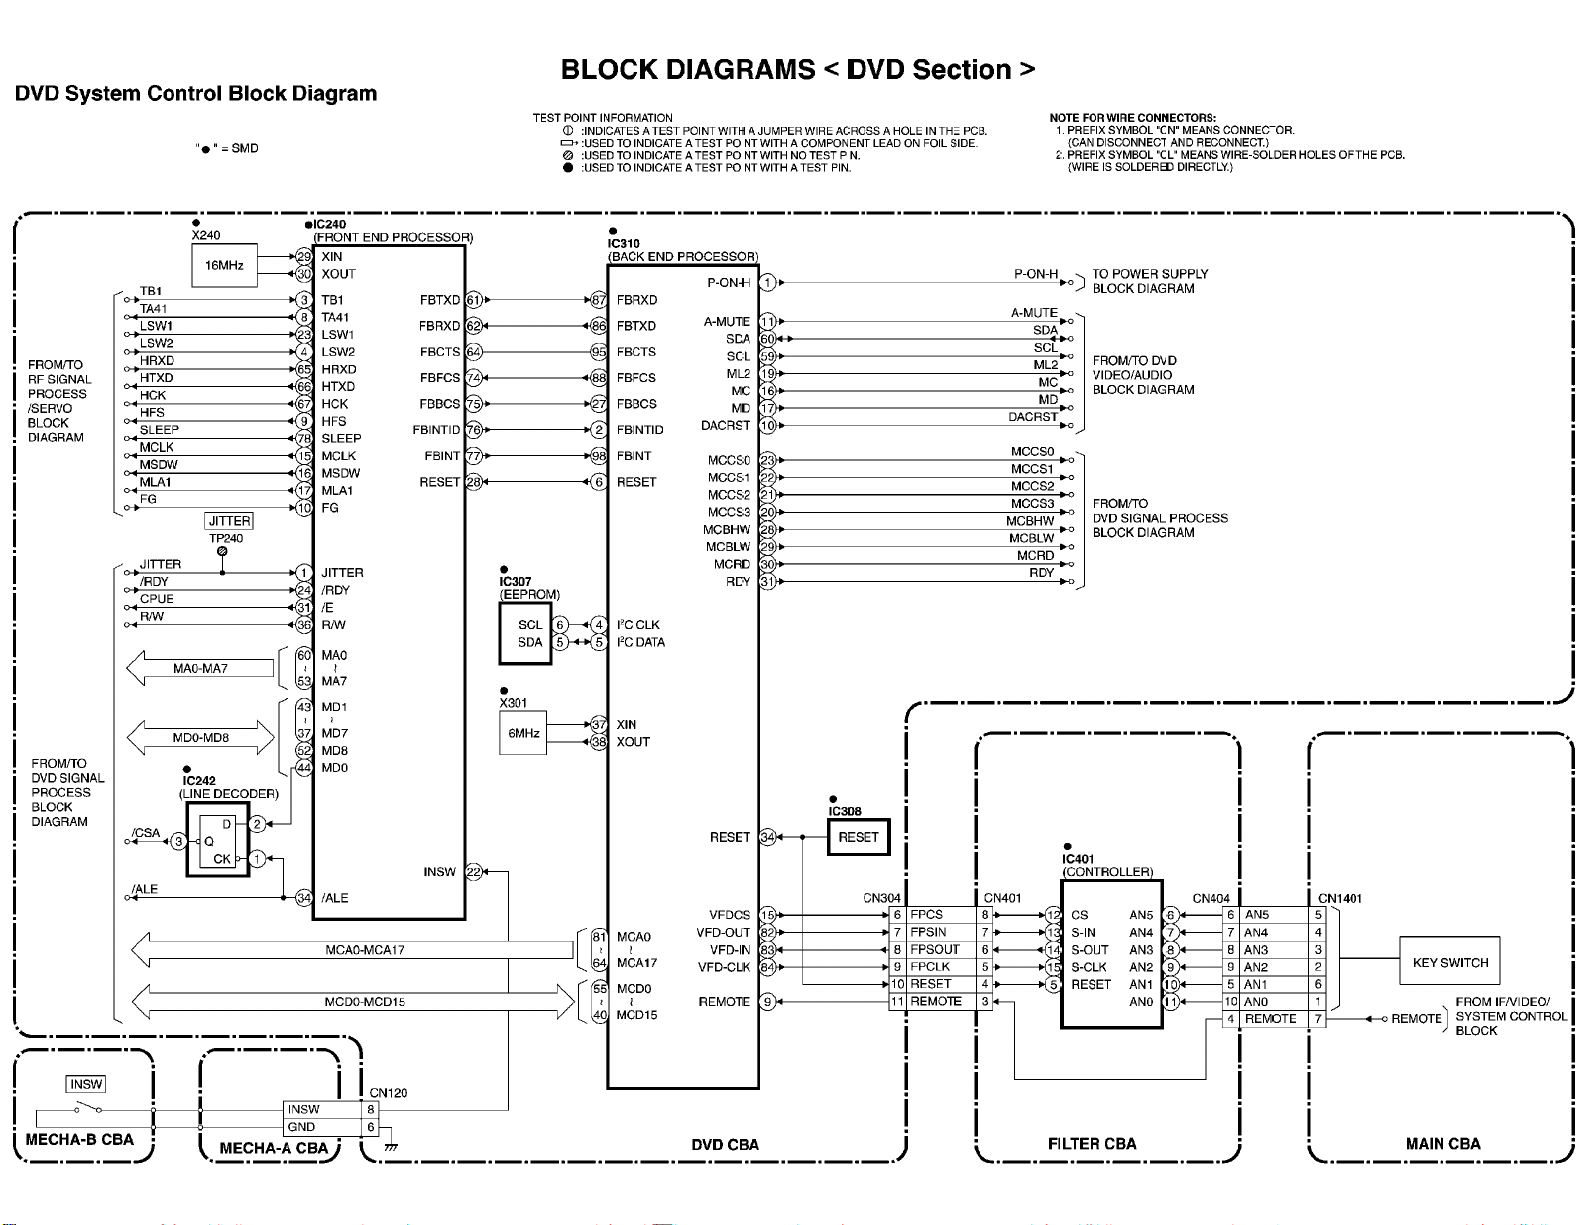
Page 49
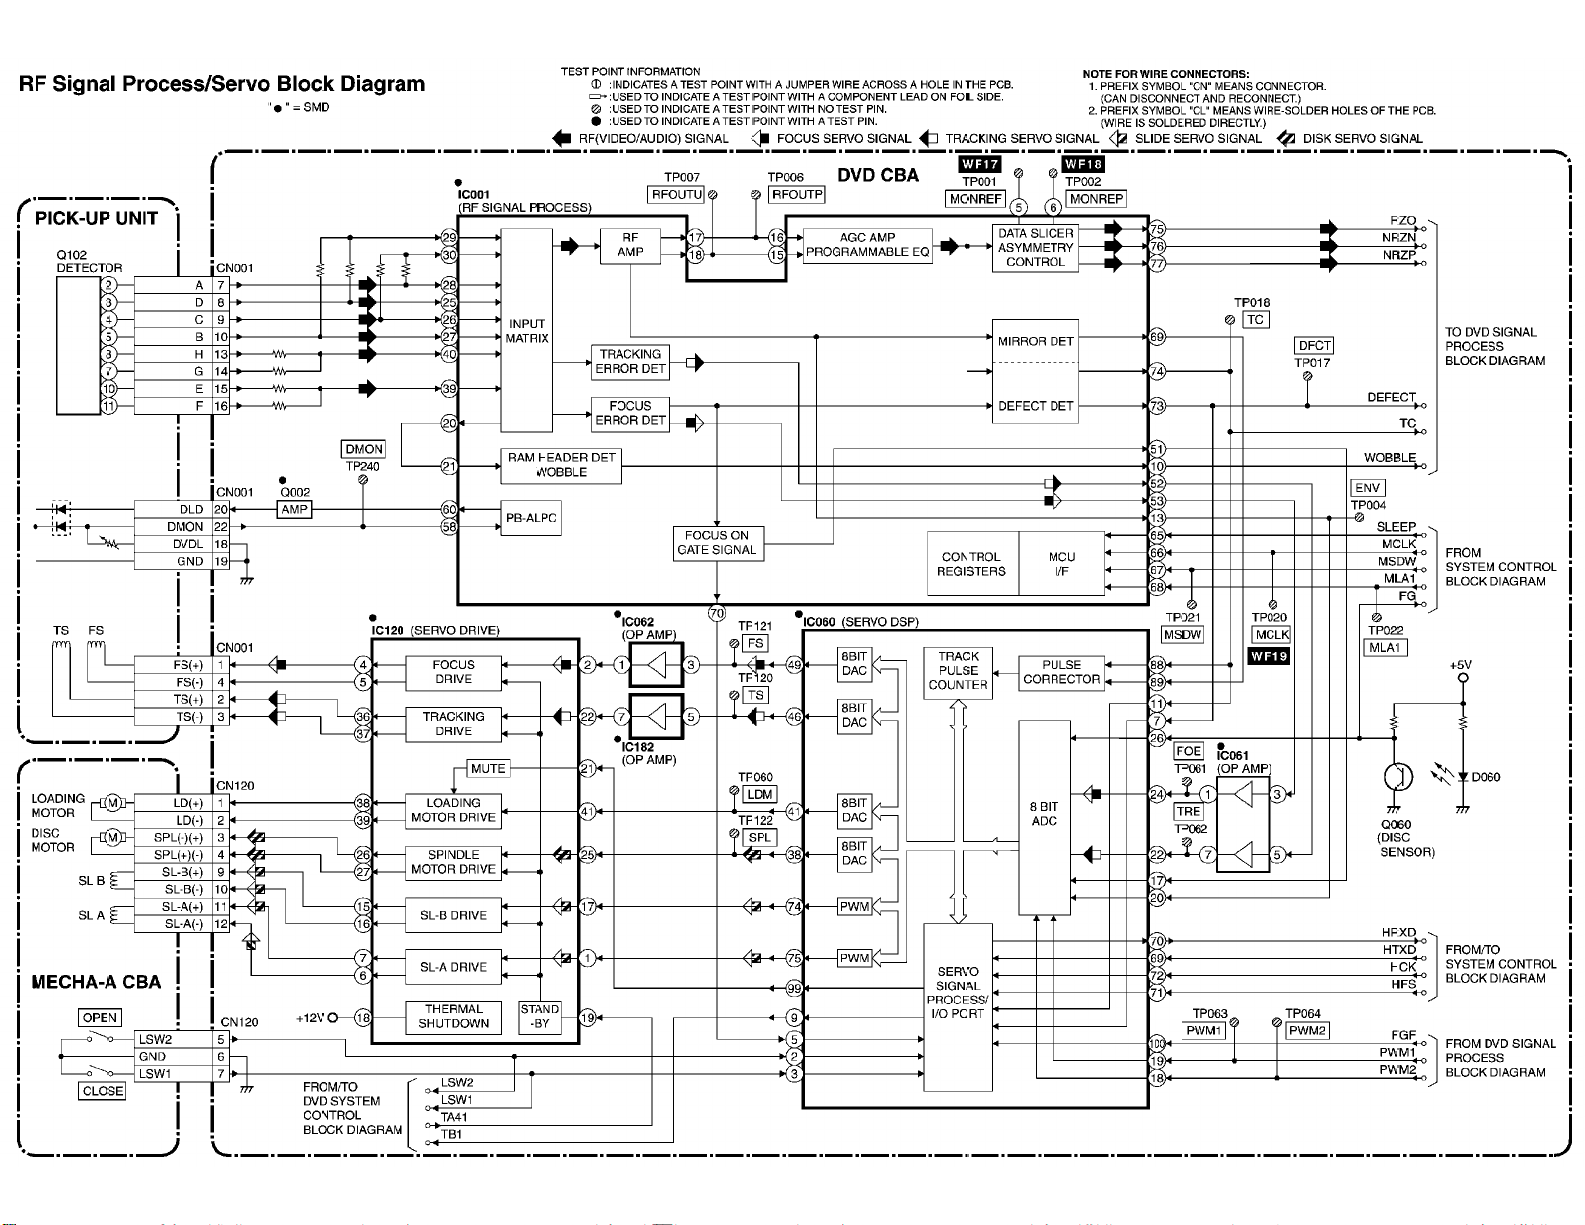
Page 50
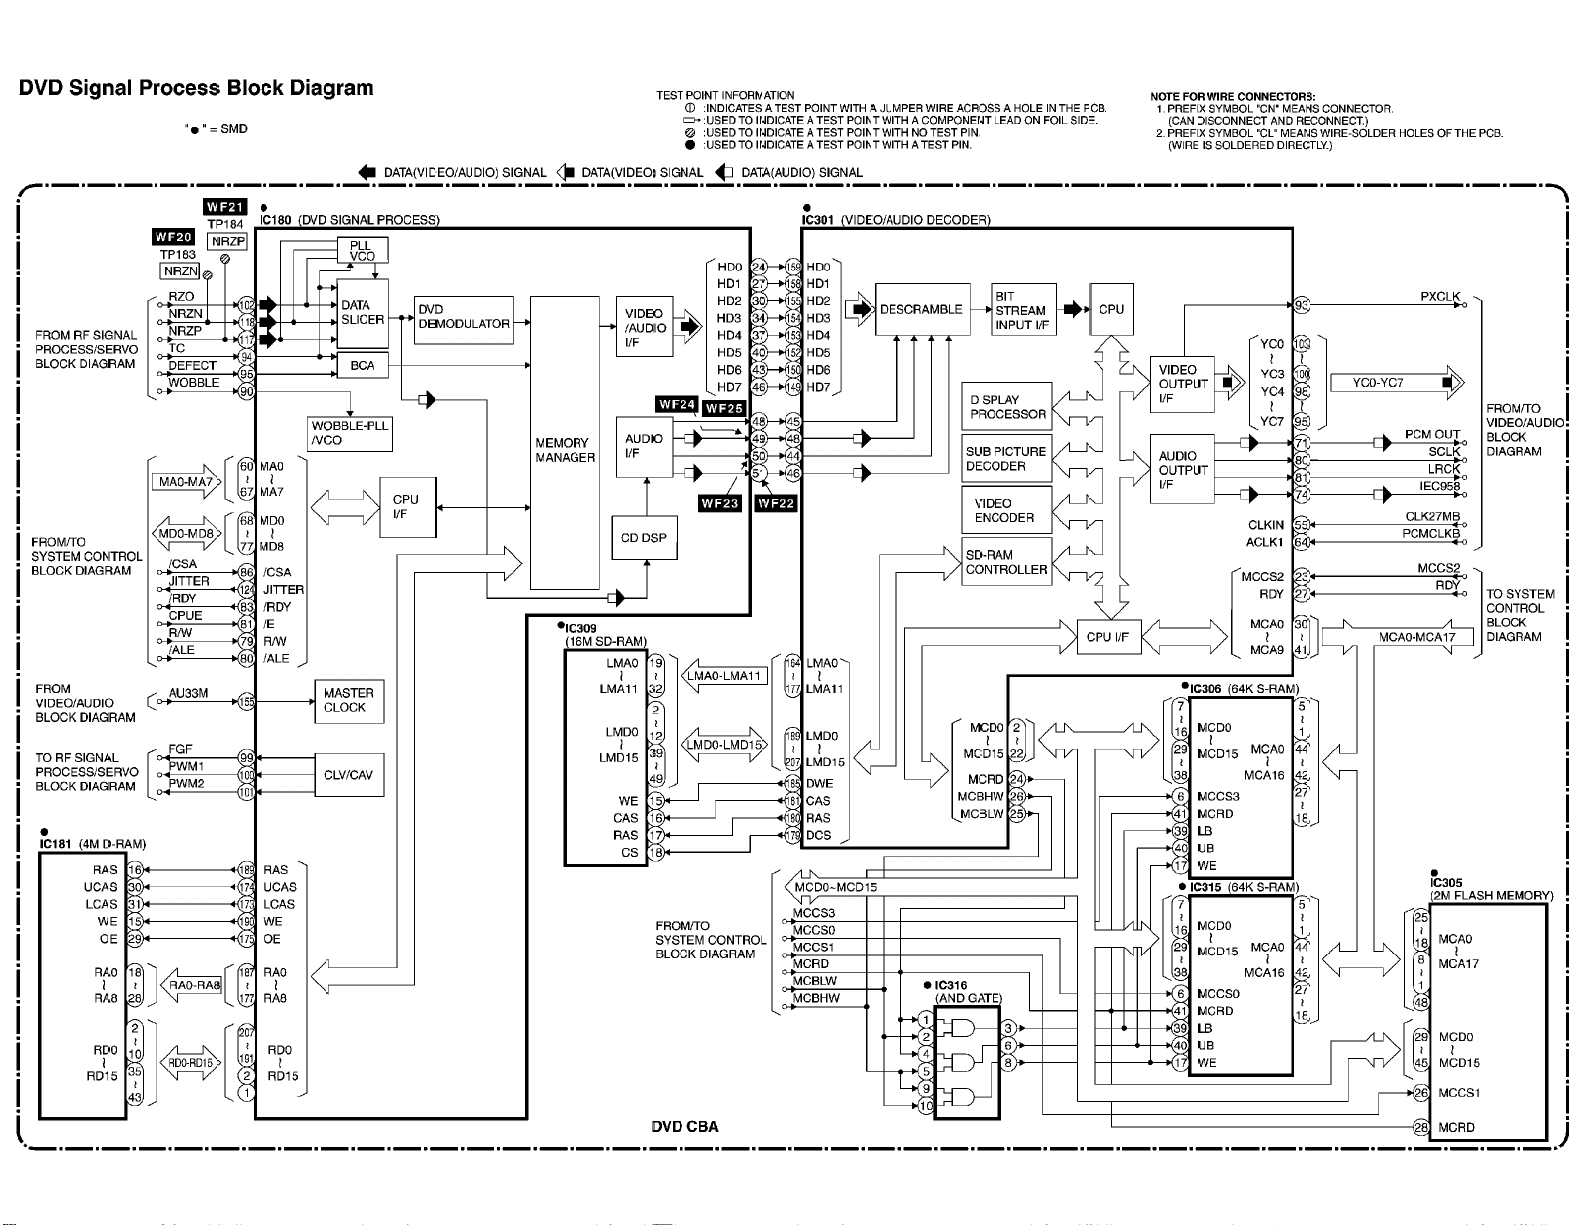
Page 51
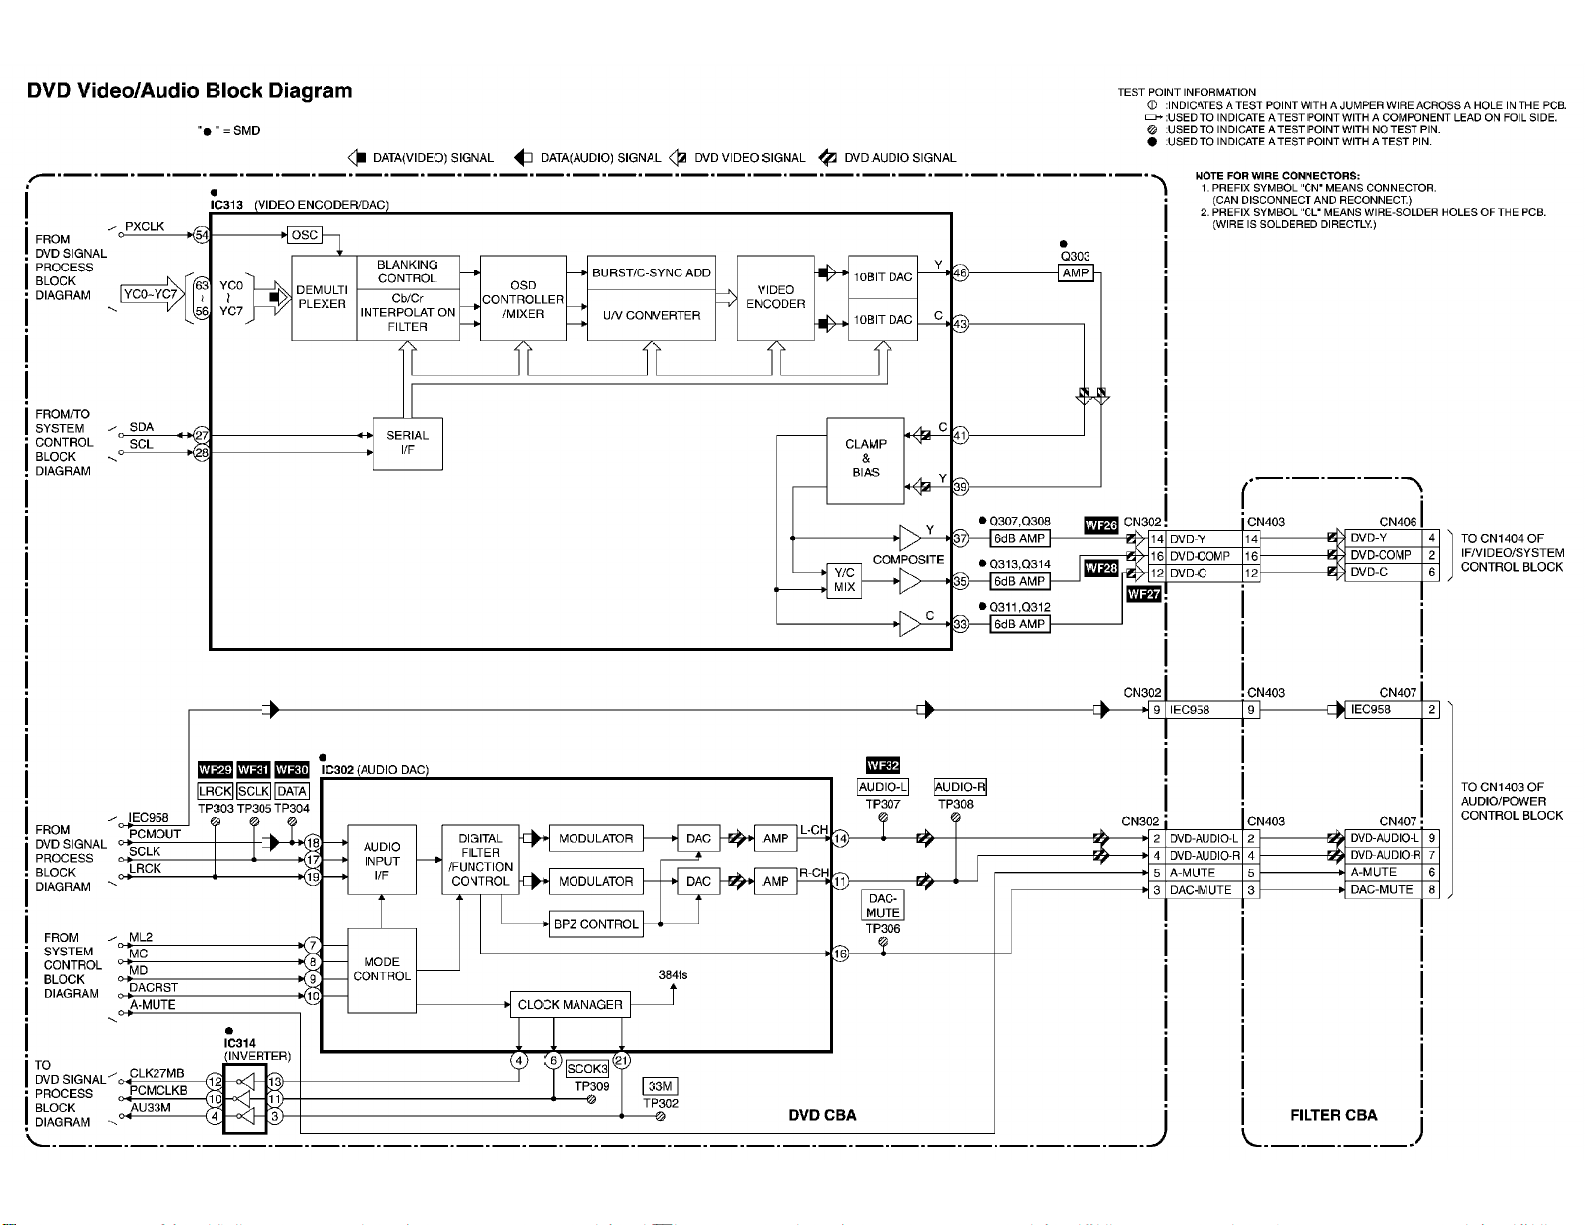
Page 52
(7607)
Page 53
(7607)
Page 54
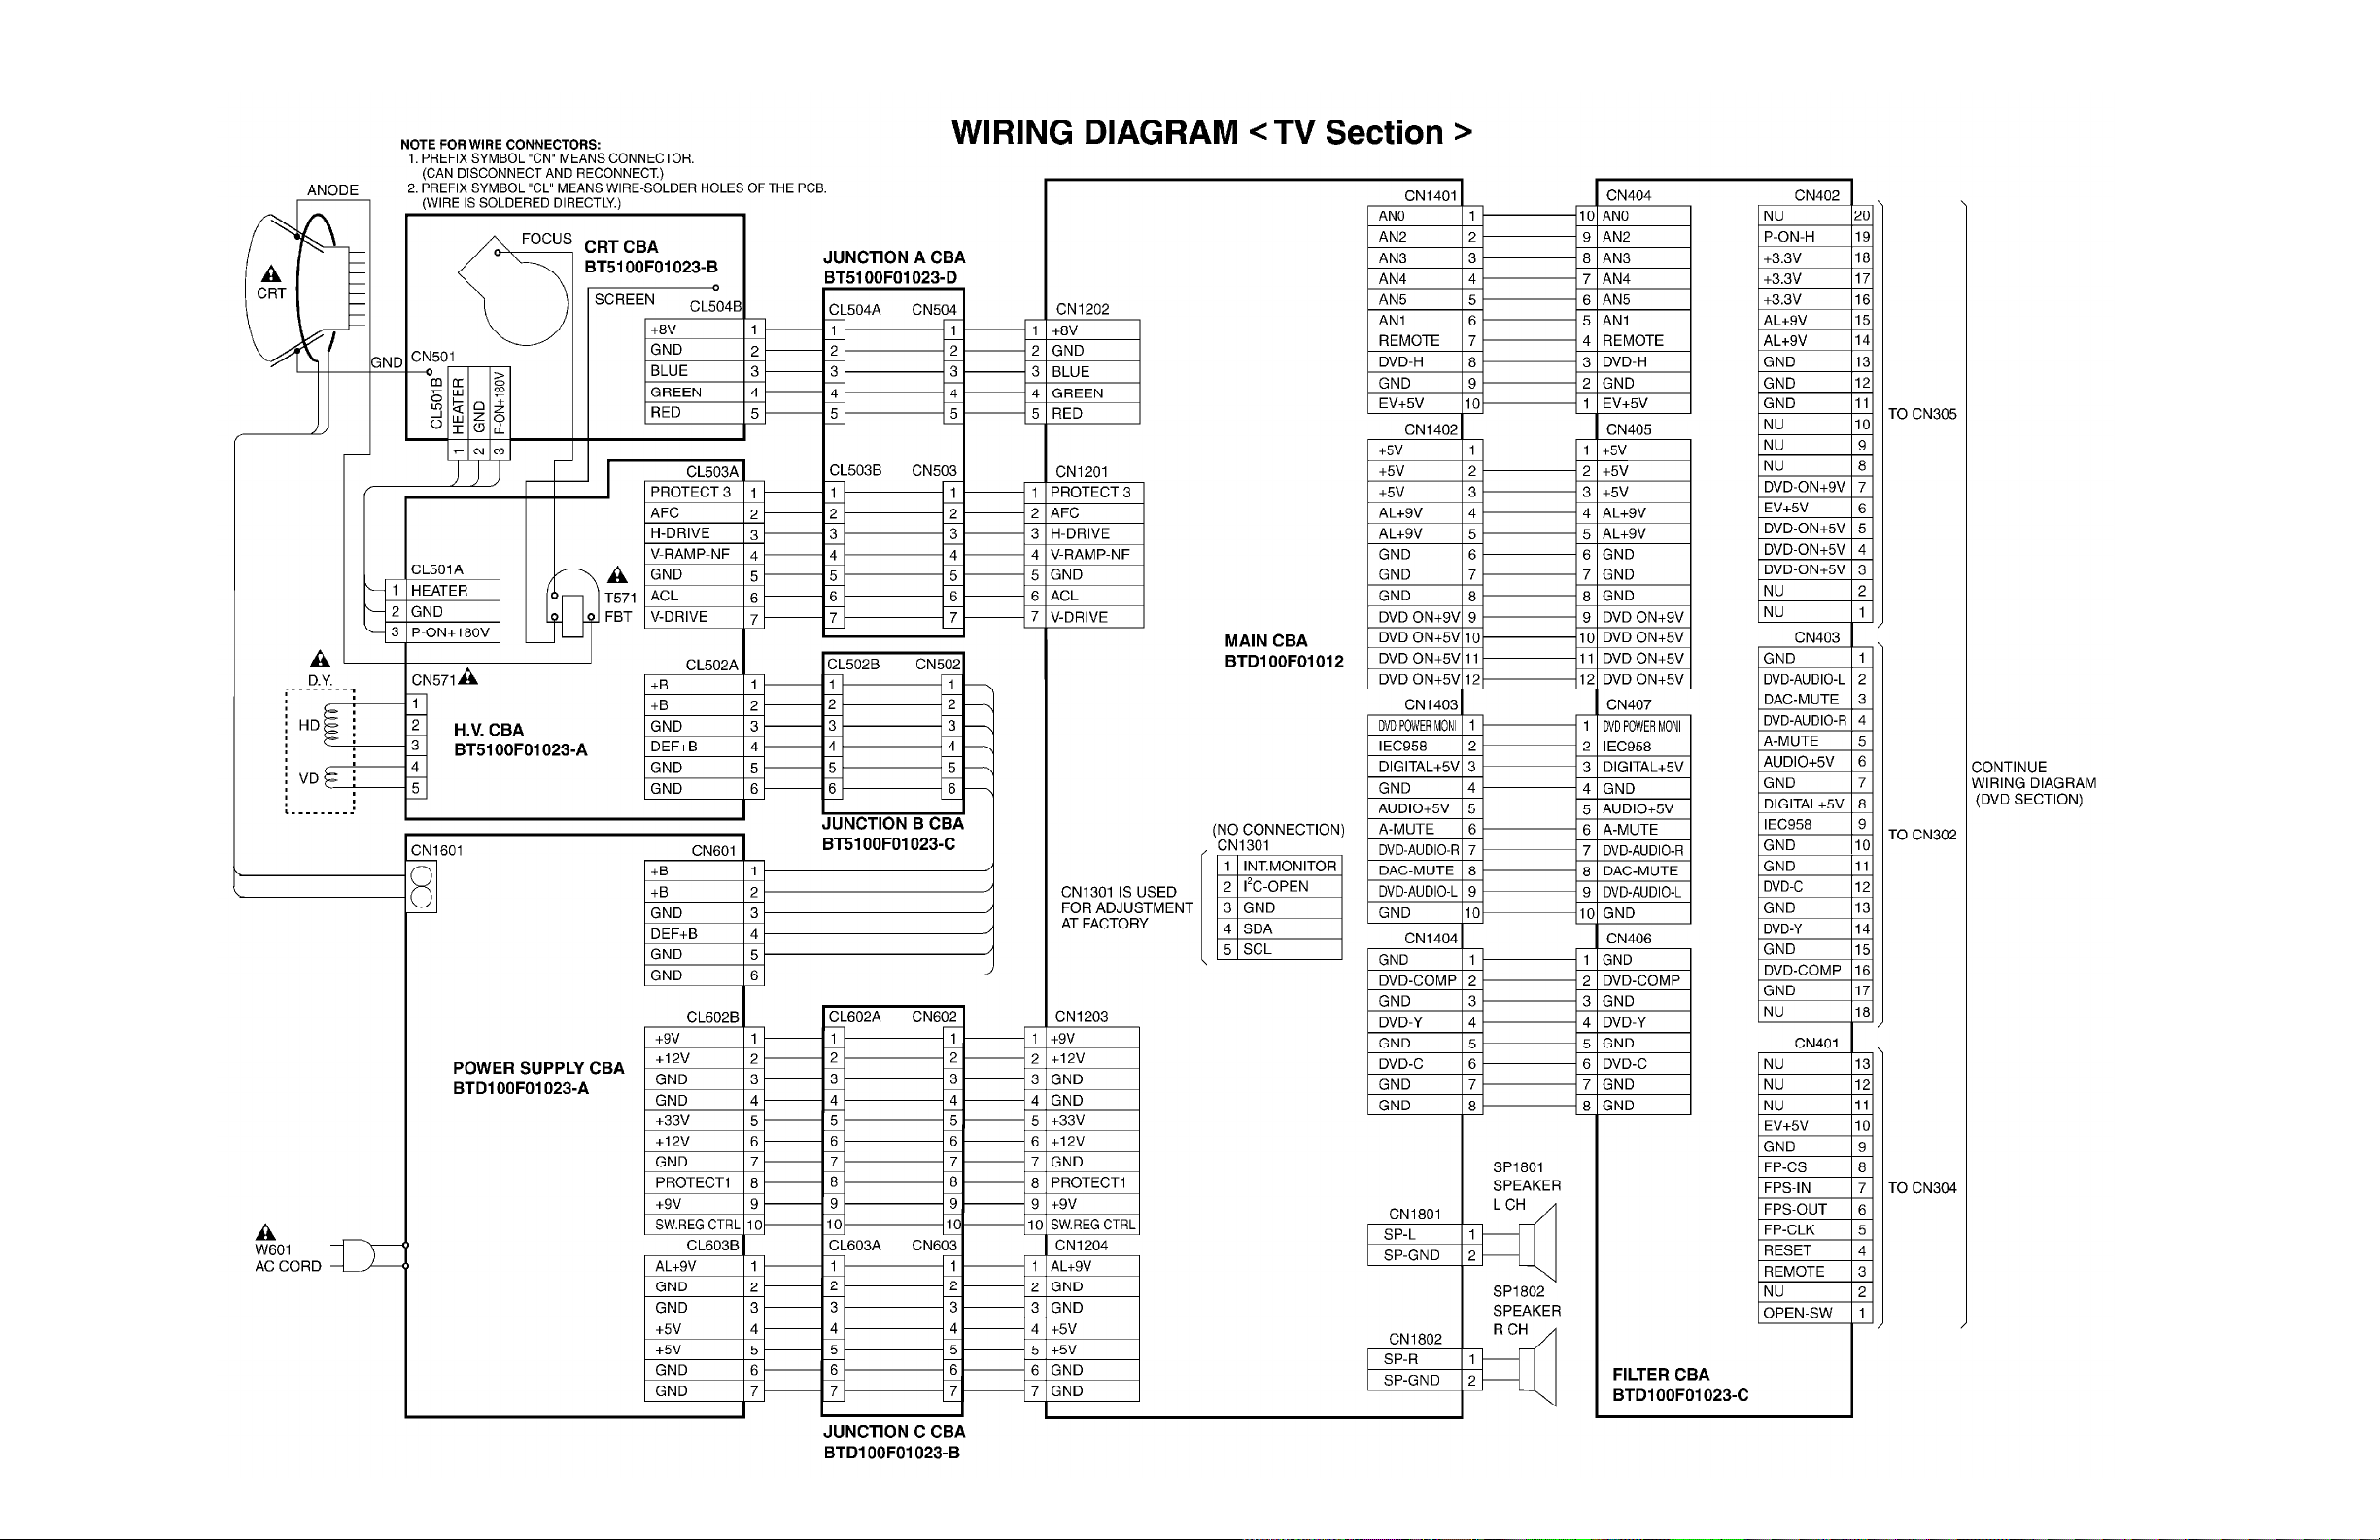
All Models (7607) - WIRING DIAGRAM (TV SECTION)
Page 55
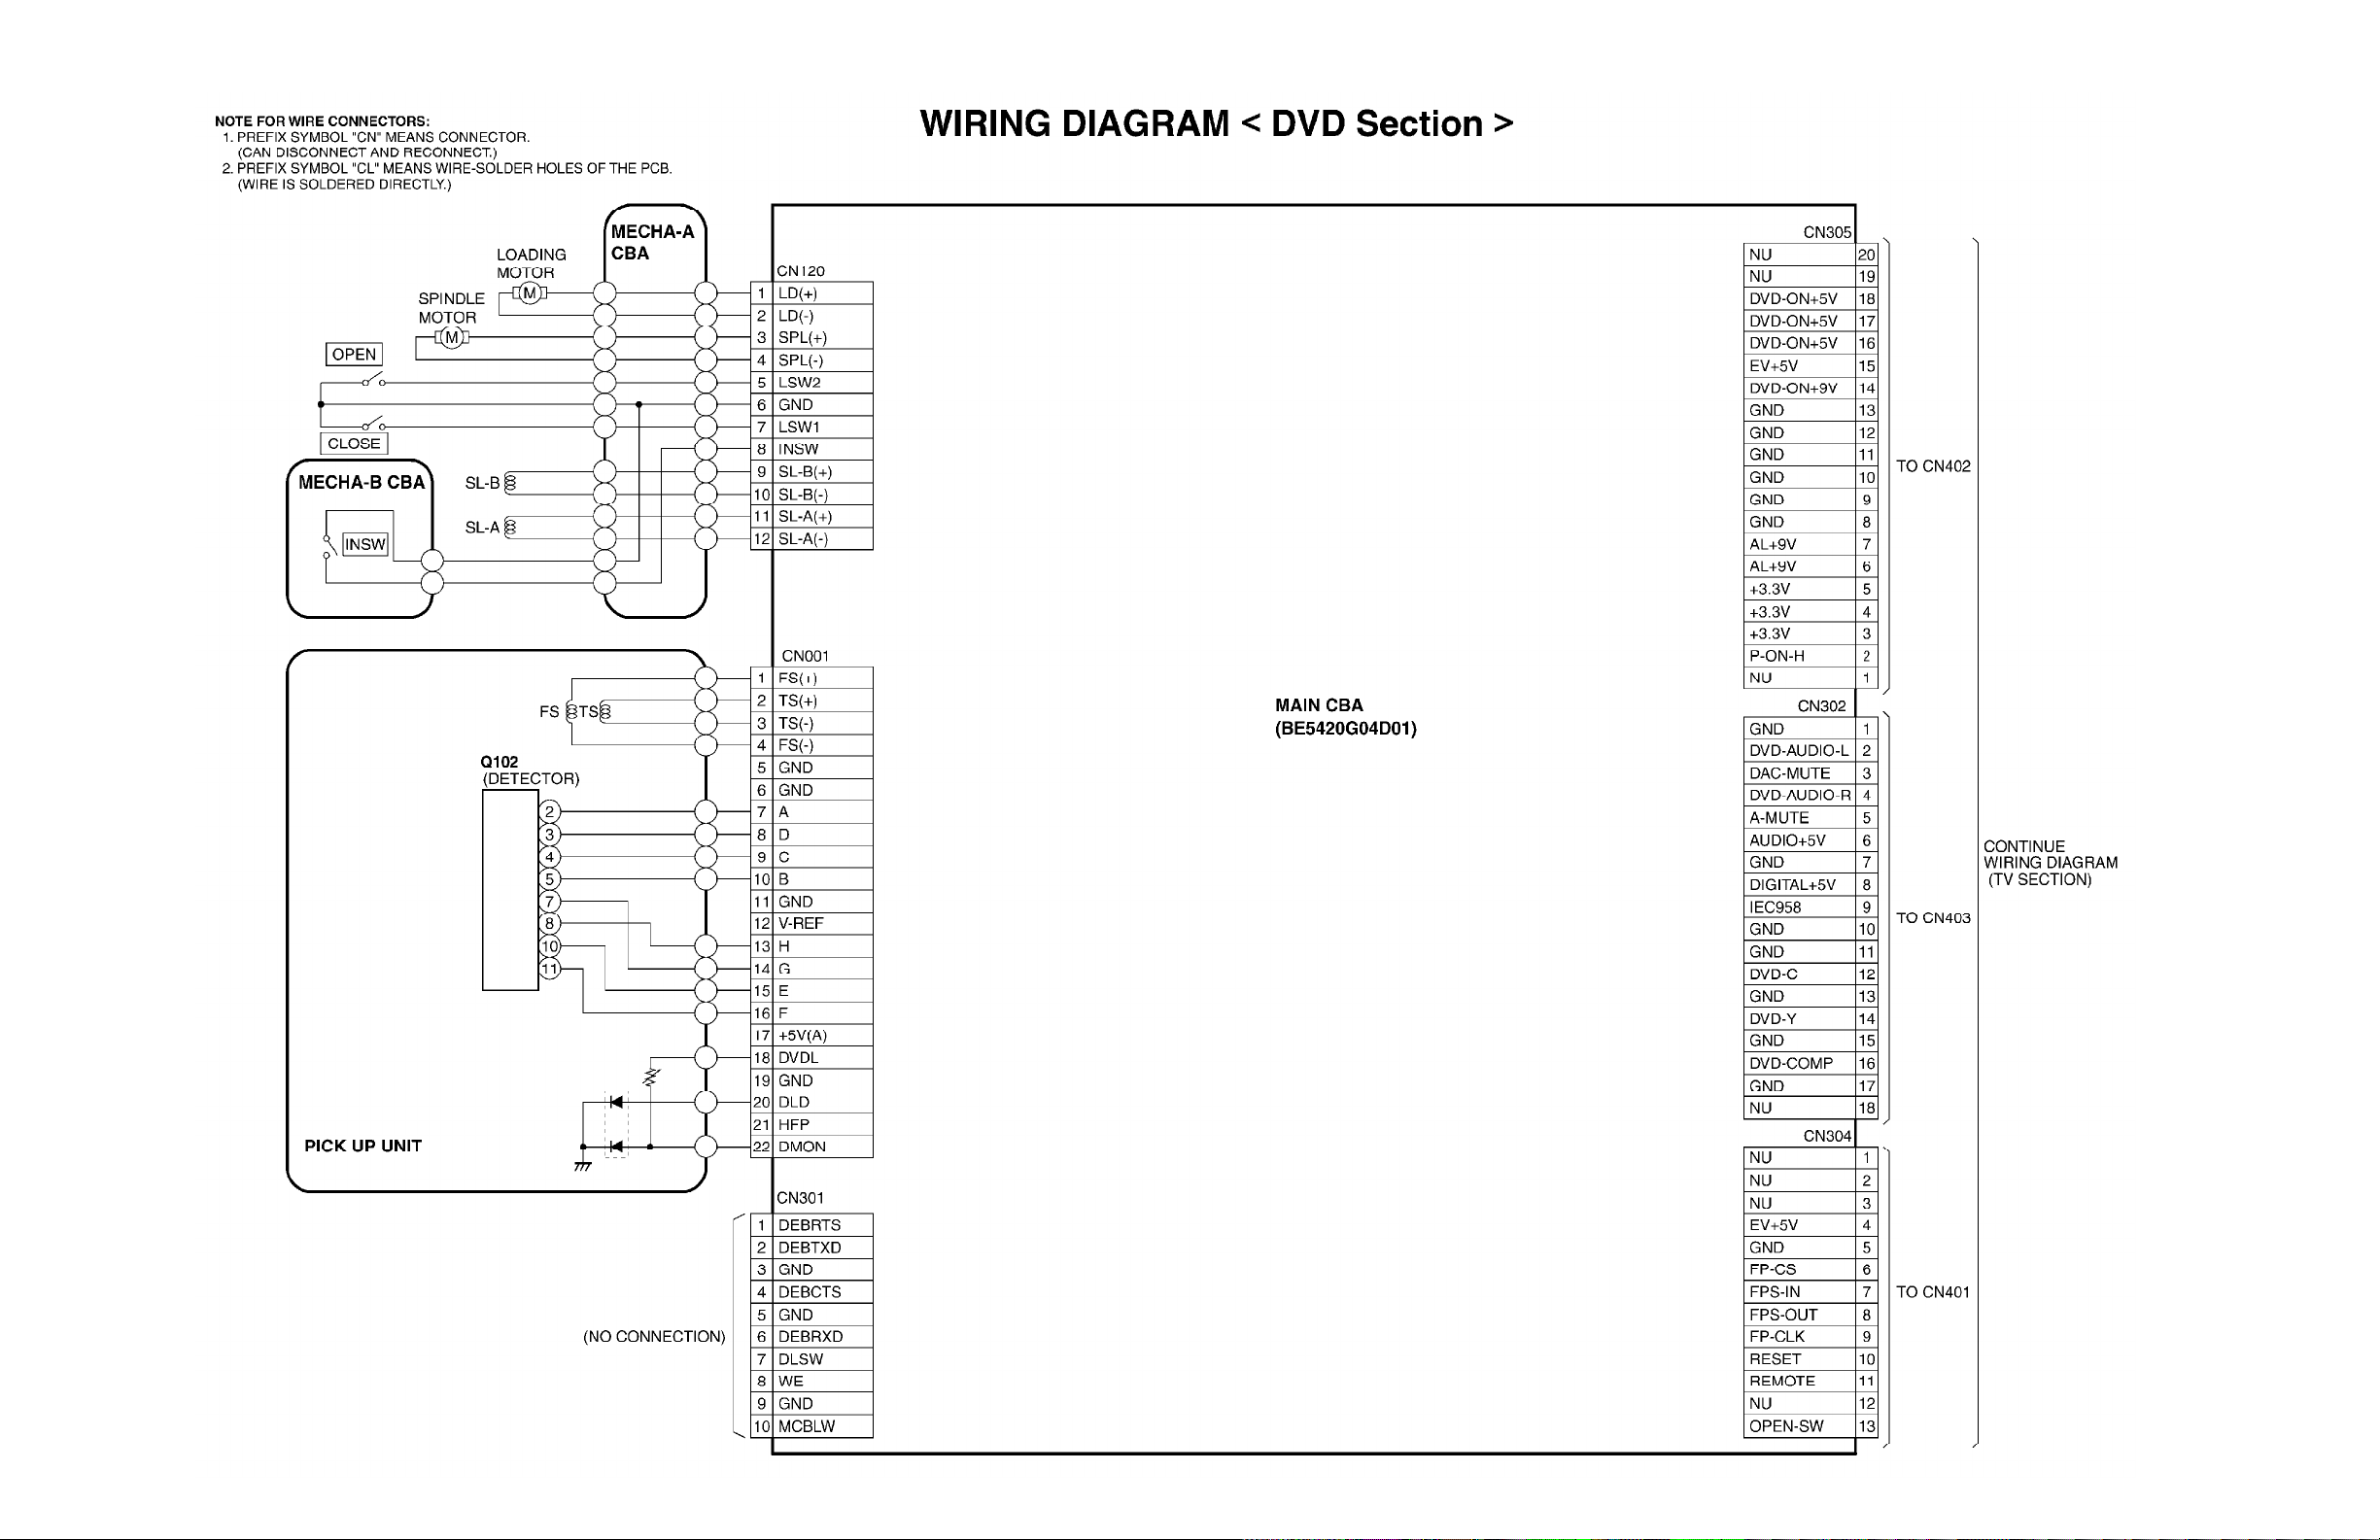
All Models (7607) - WIRING DIAGRAM (DVD SECTION)
Page 56
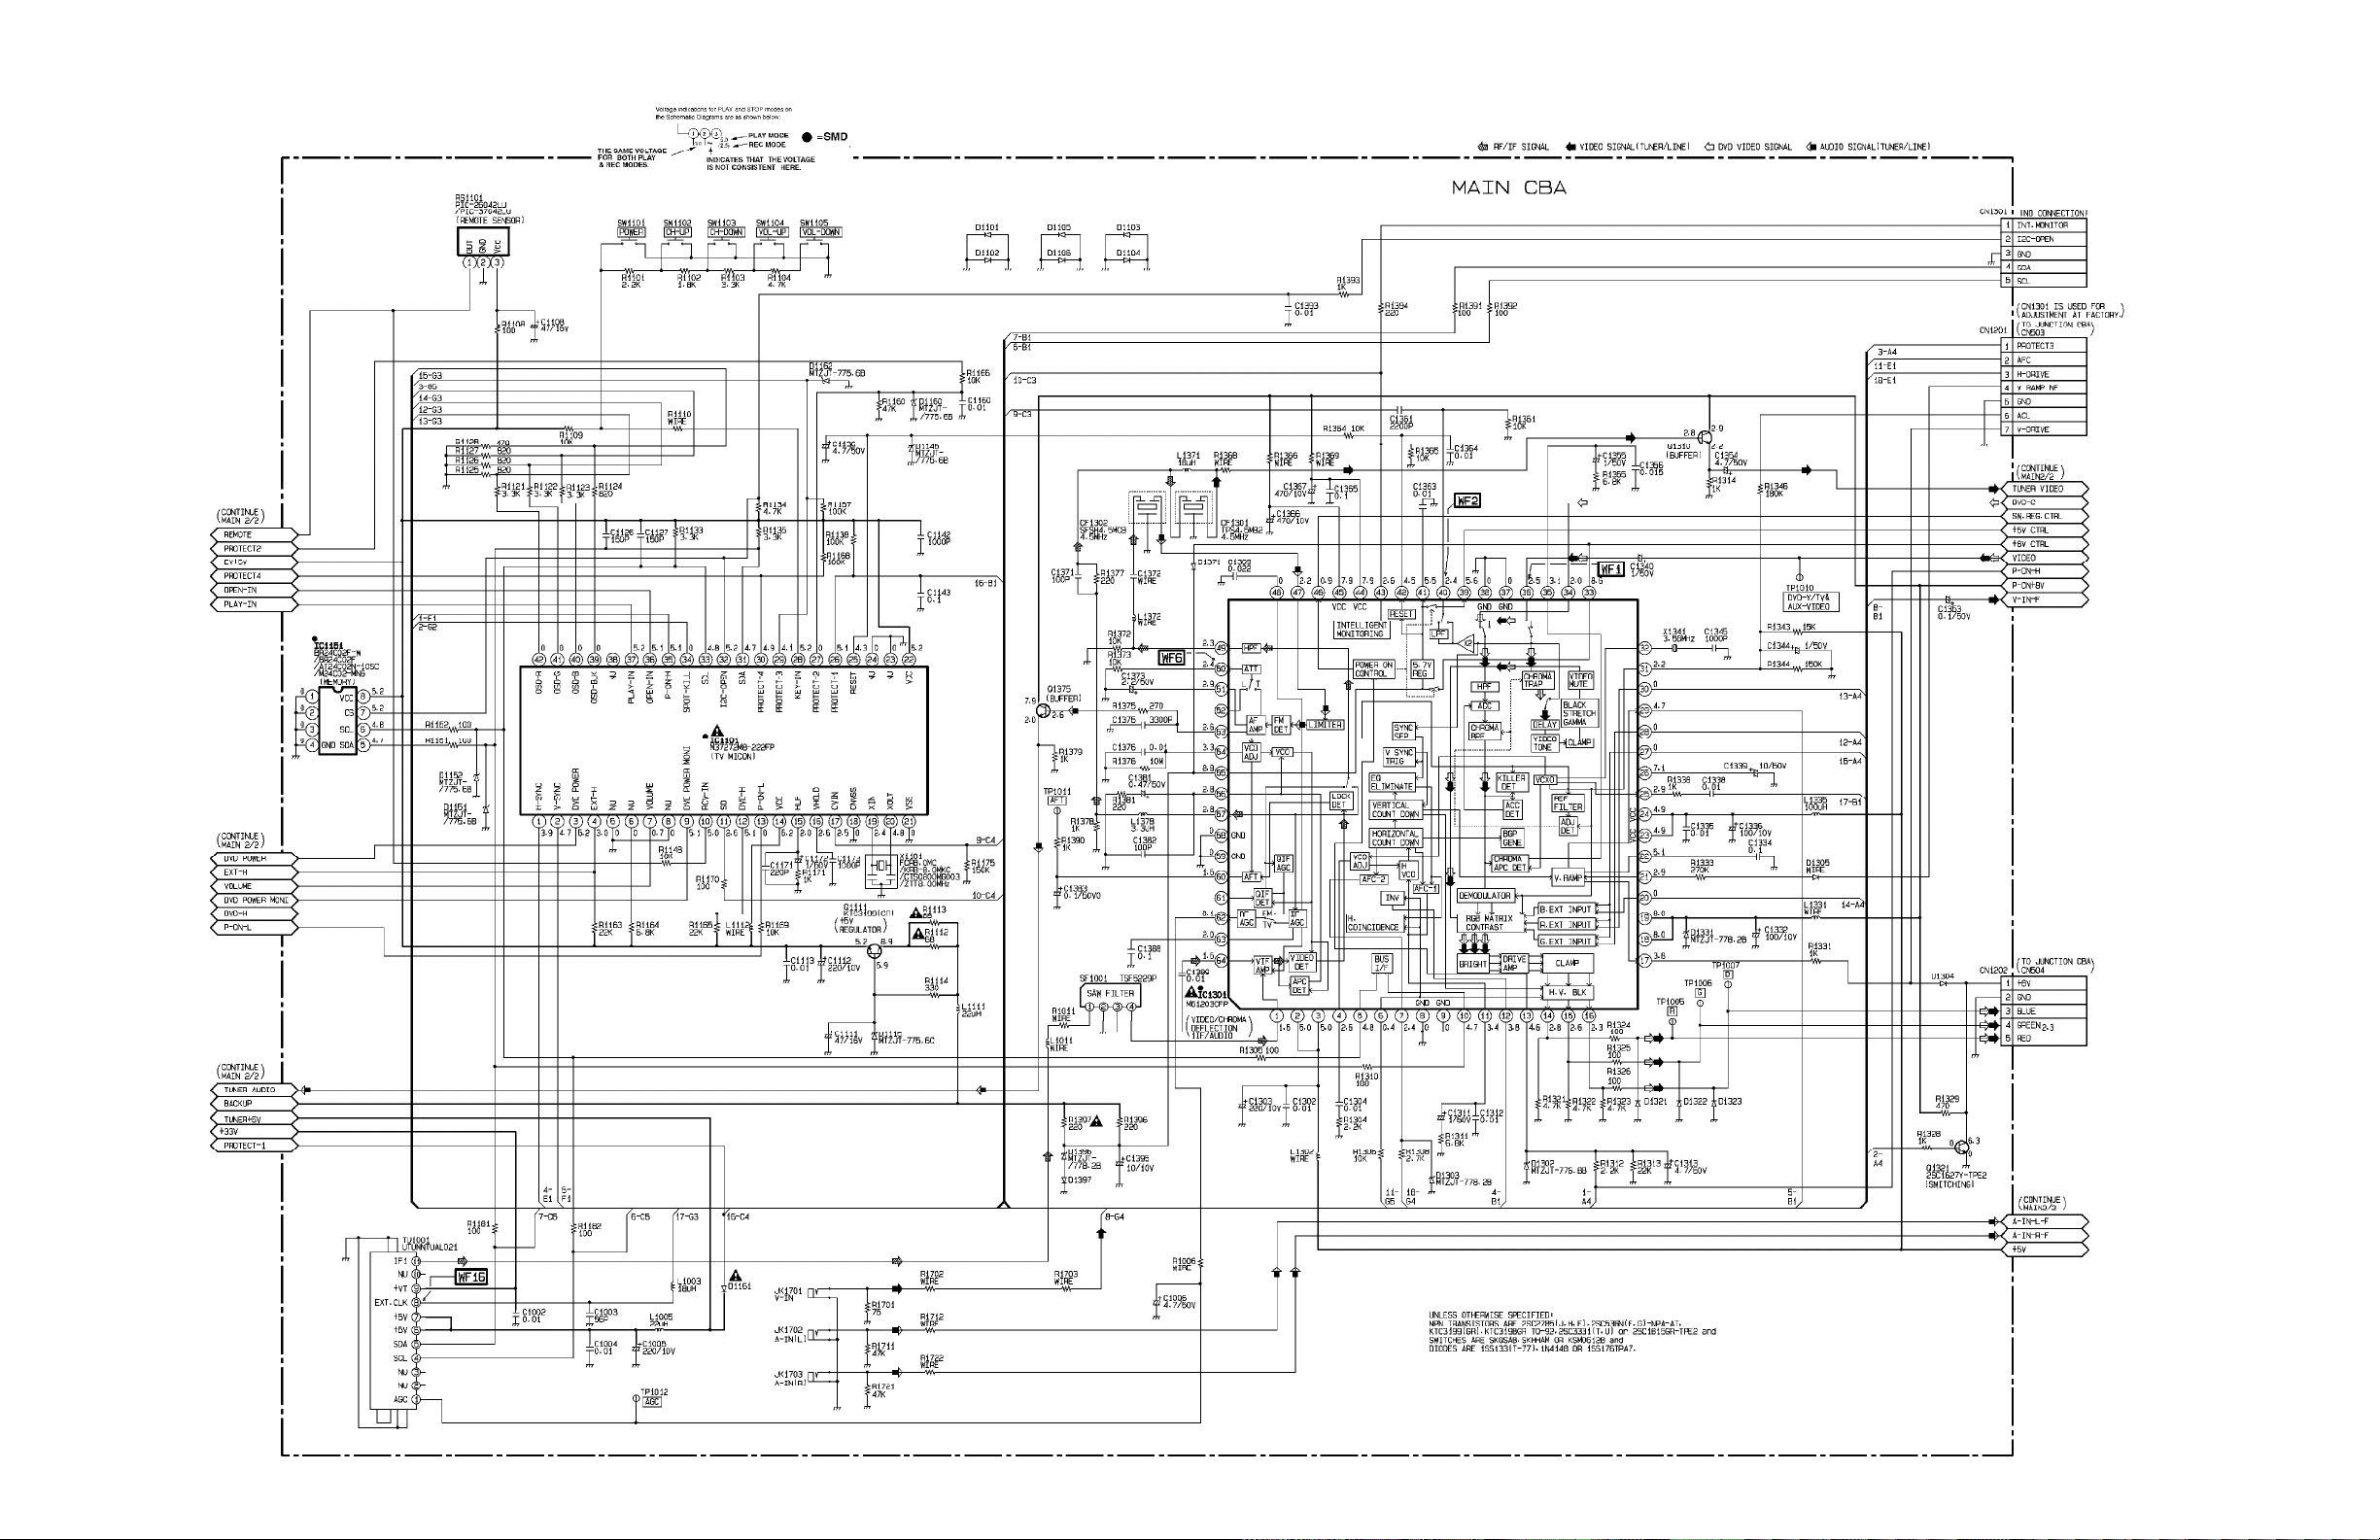
All Models (7607) - MAIN 1/2 SCHEMATIC DIAGRAM (TV SECTION)
Page 57
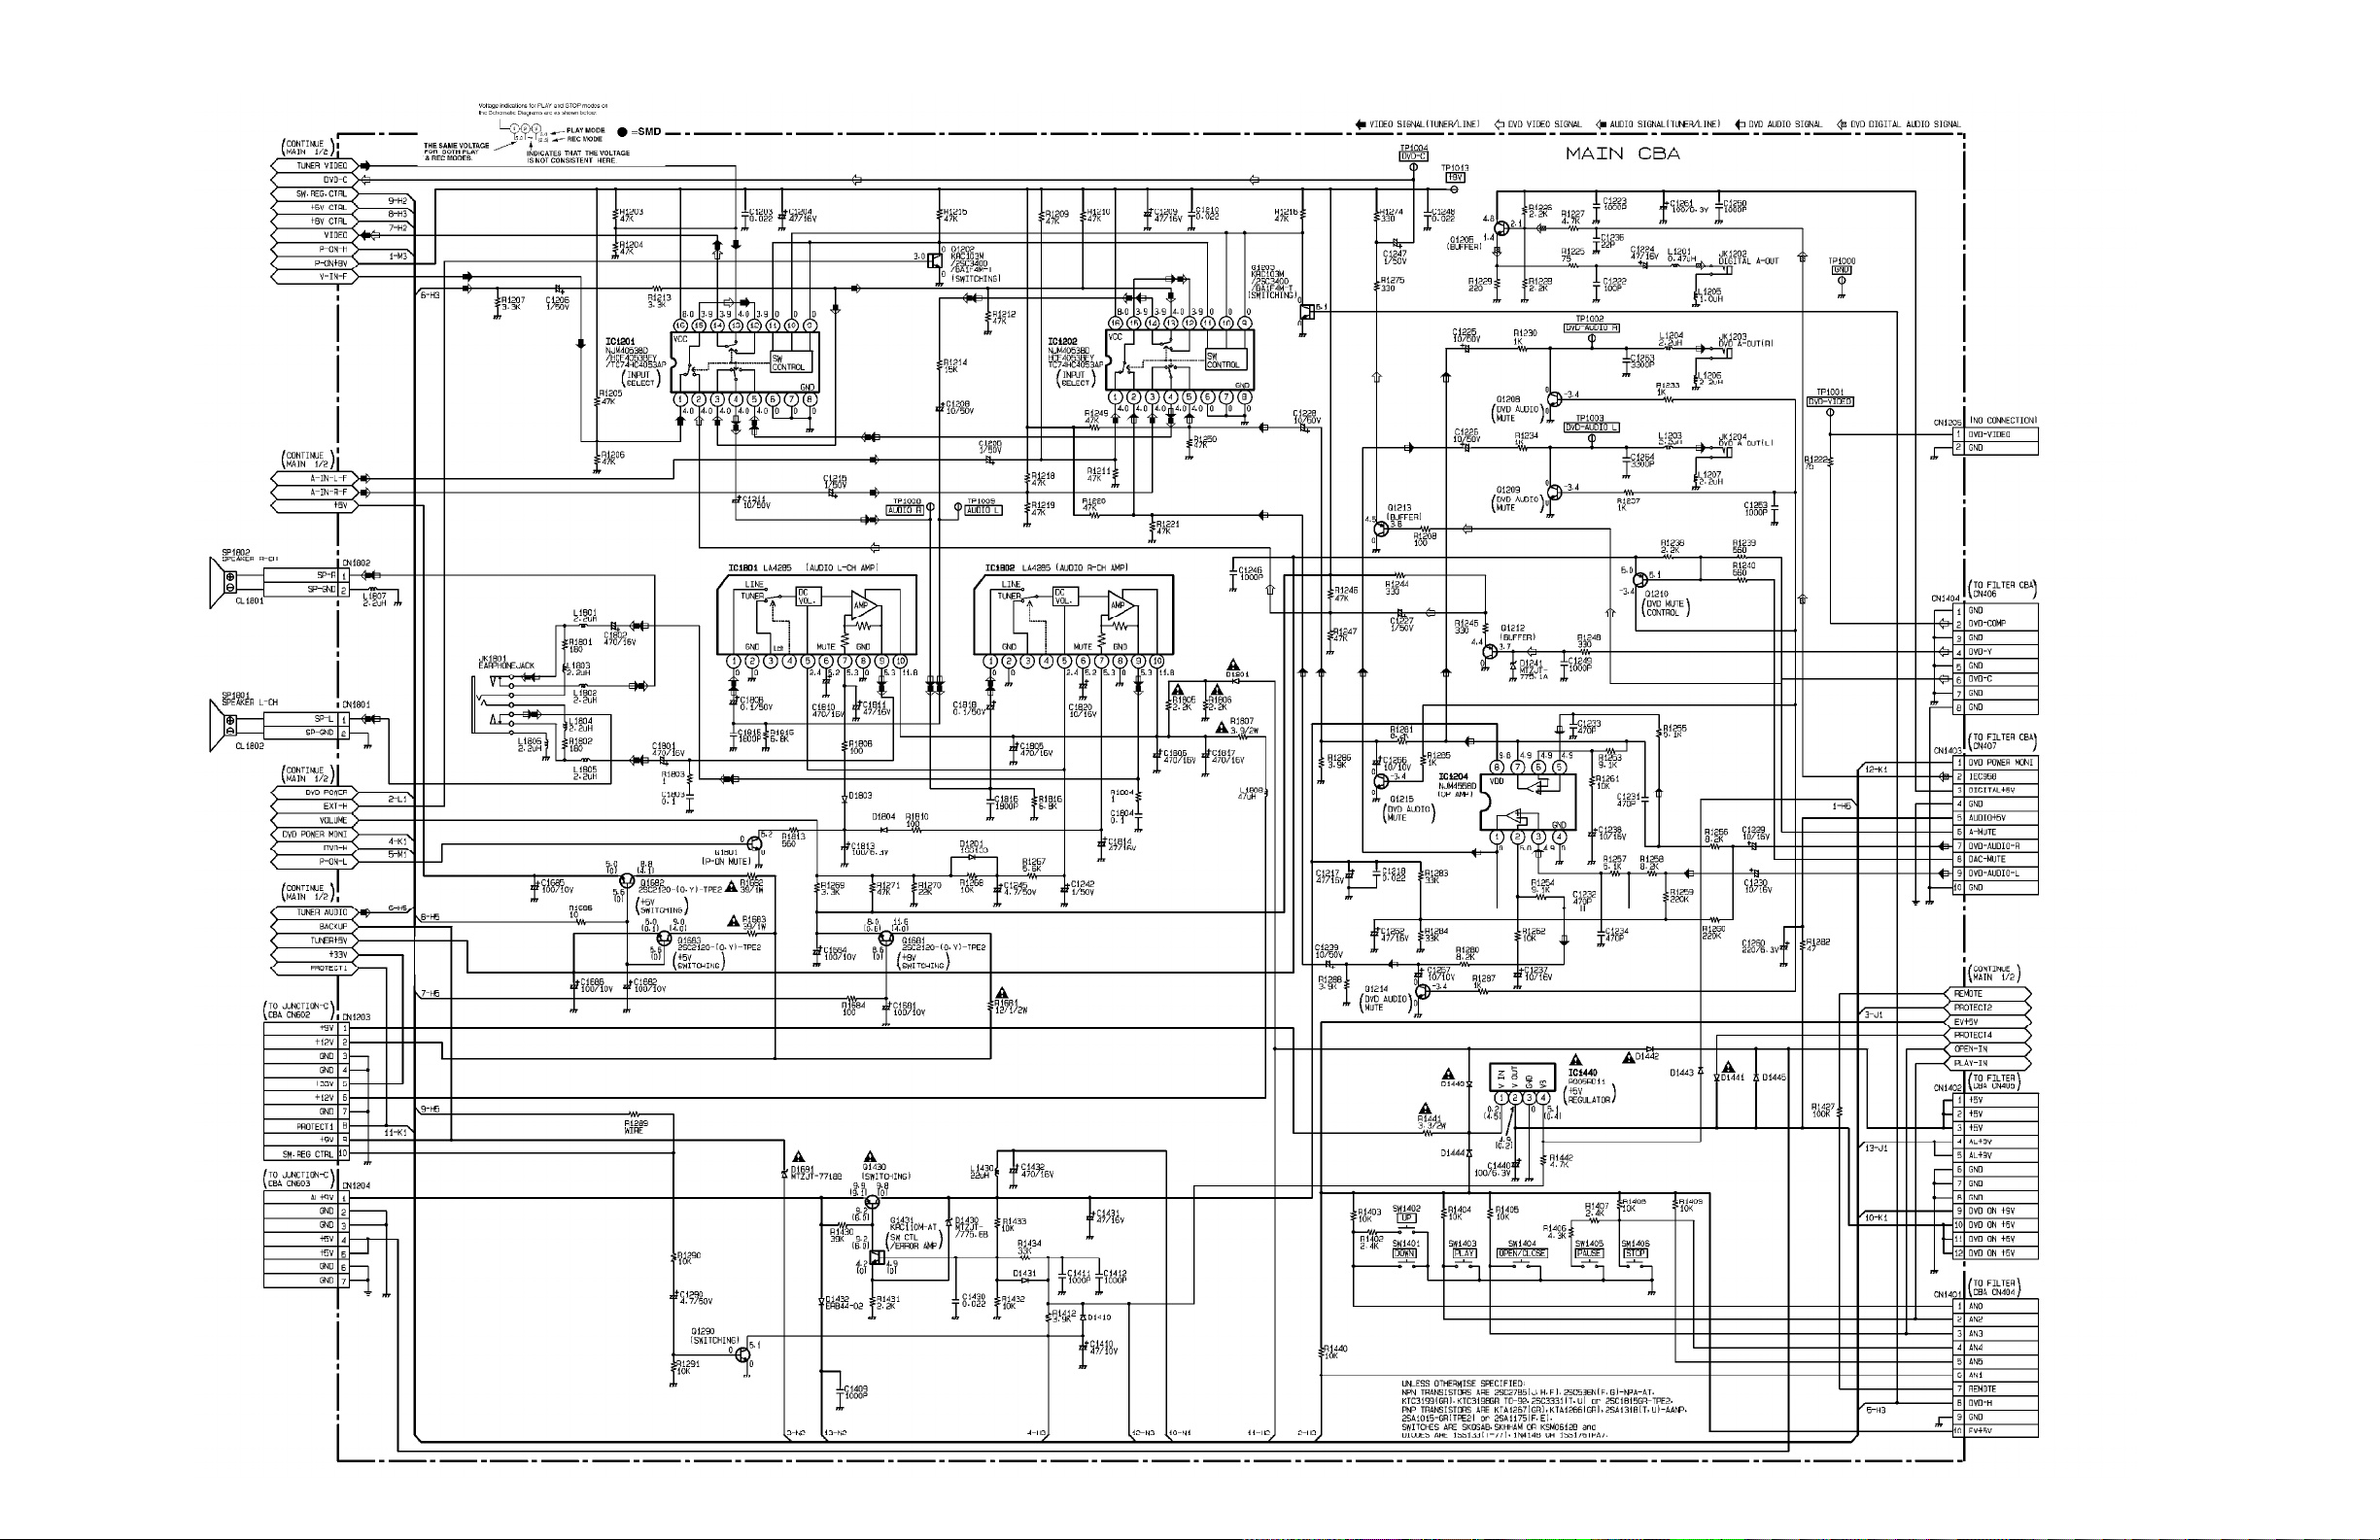
All Models (7607) - MAIN 2/2 SCHEMATIC DIAGRAM (TV SECTION)
Page 58
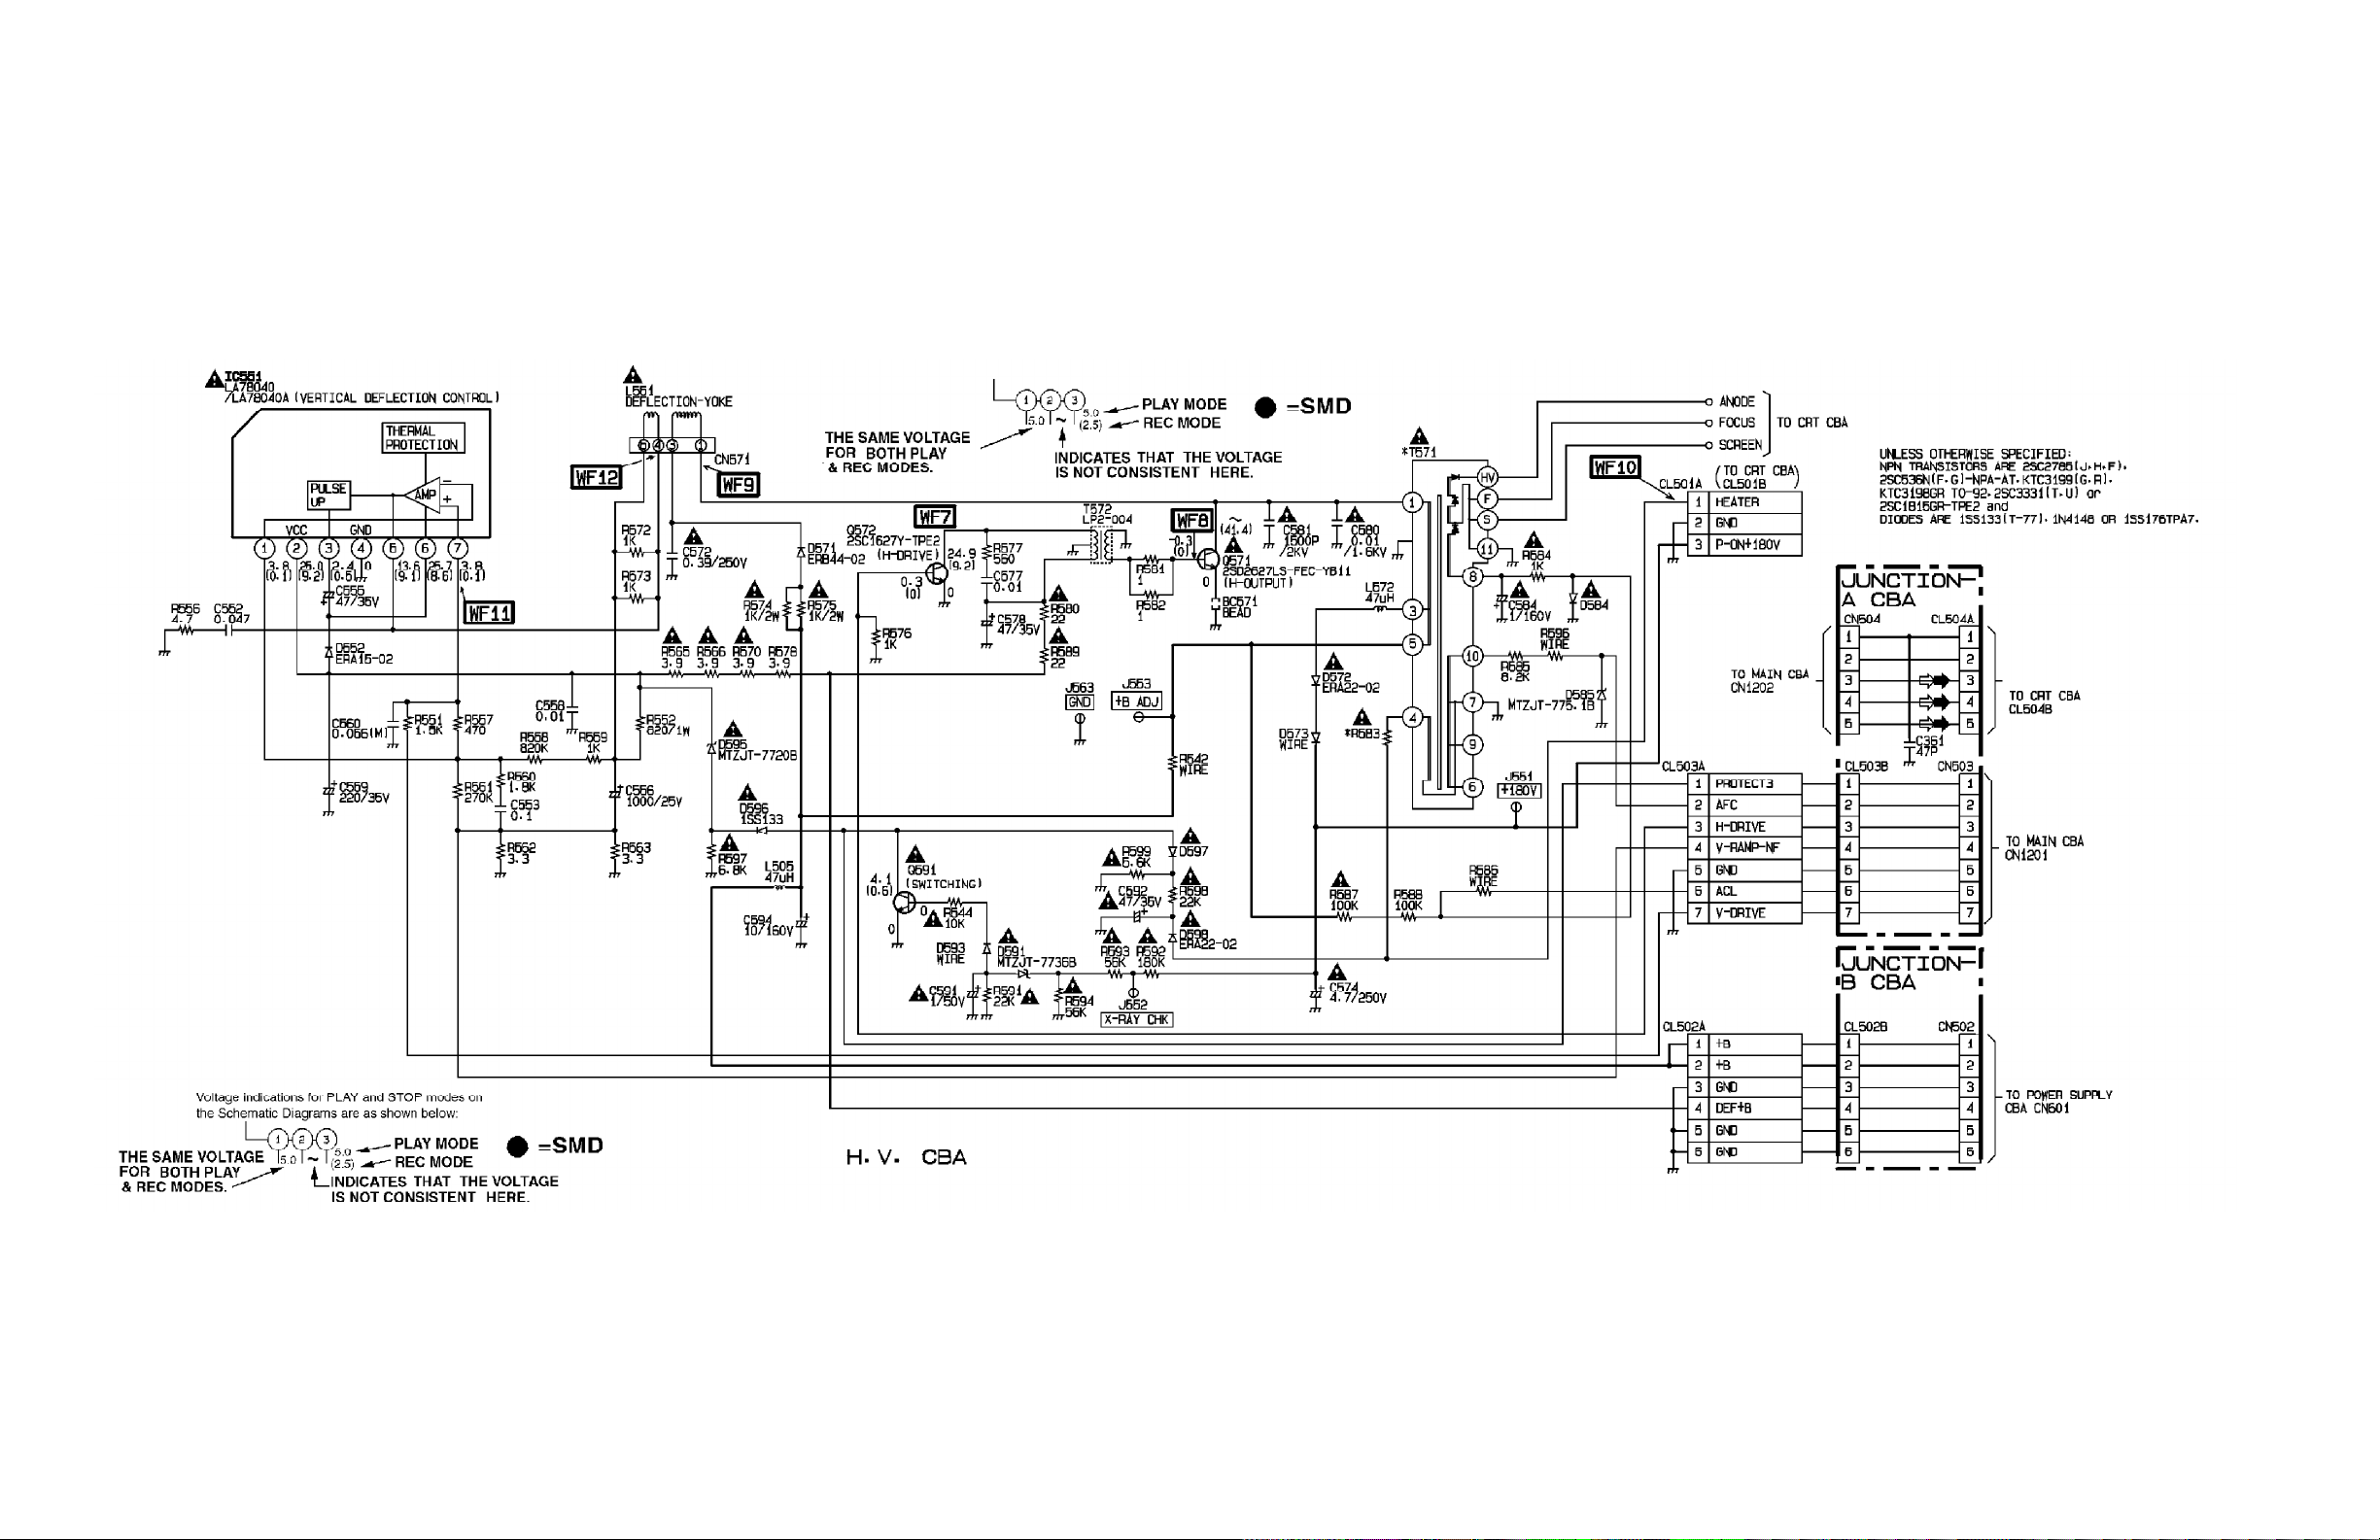
All Models (7607) - H.V. SCHEMATIC DIAGRAM (TV SECTION)
Page 59
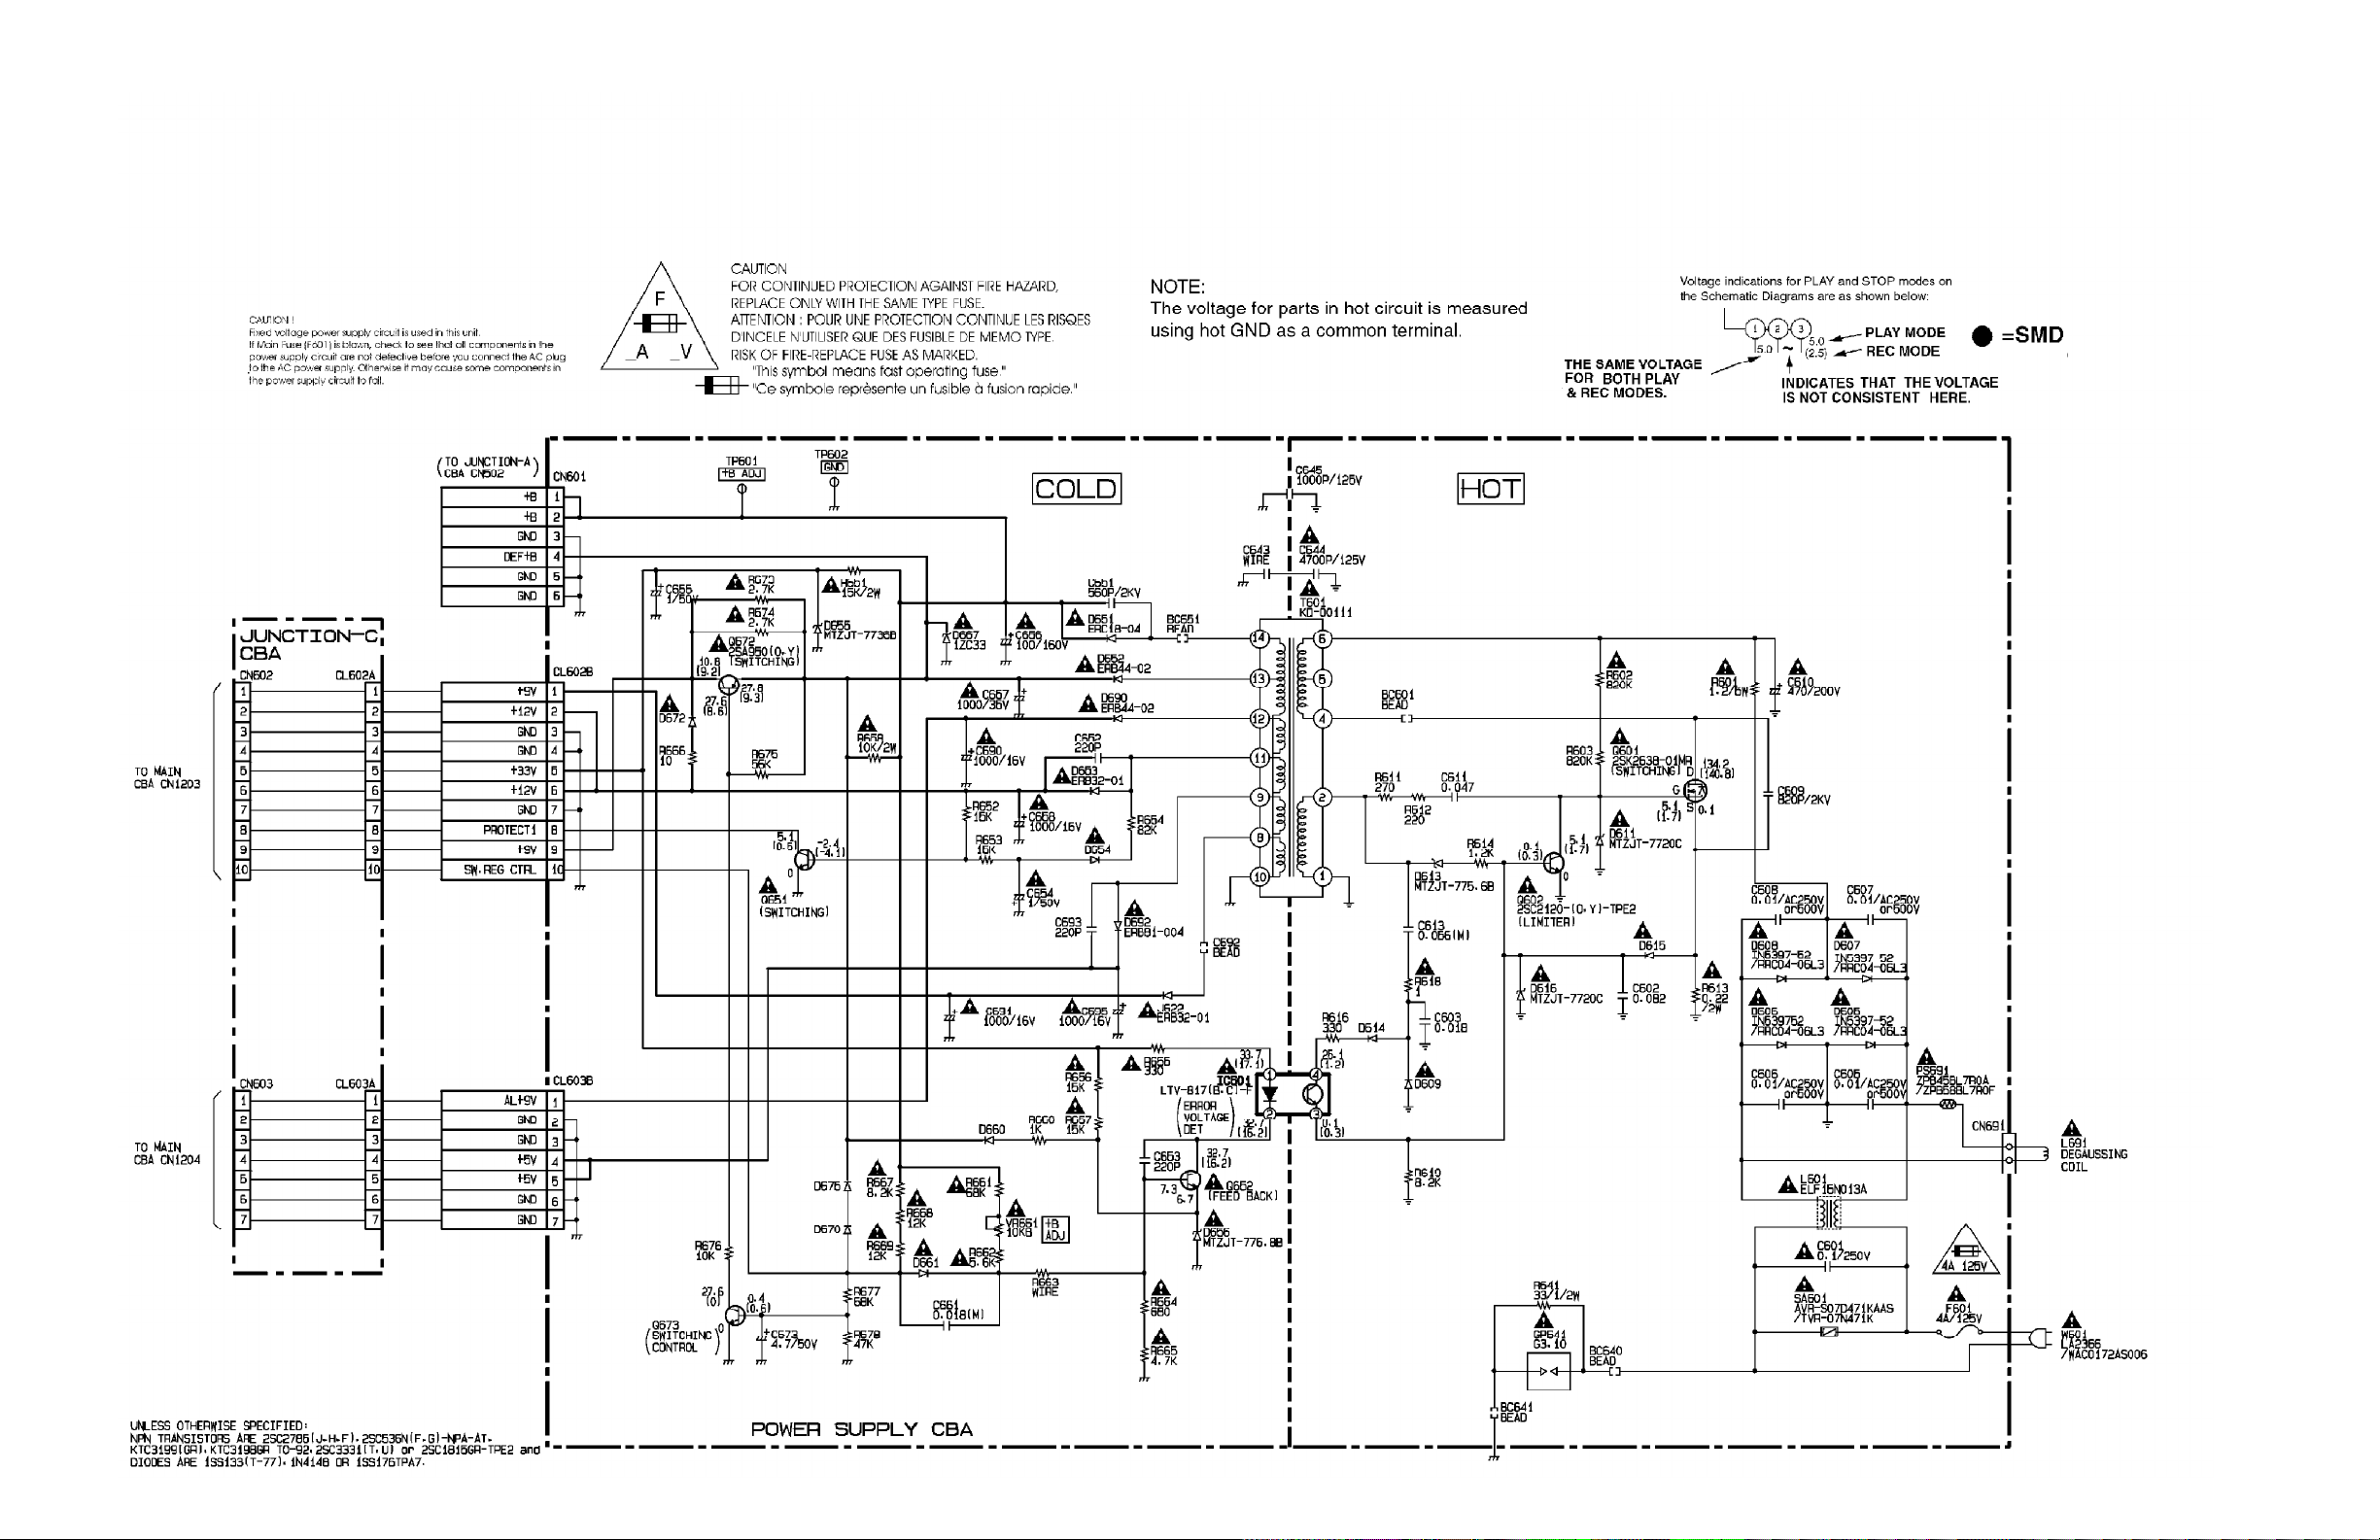
All Models (7607) - POWER SUPPLY SCHEMATIC DIAGRAM (TV SECTION)
Page 60
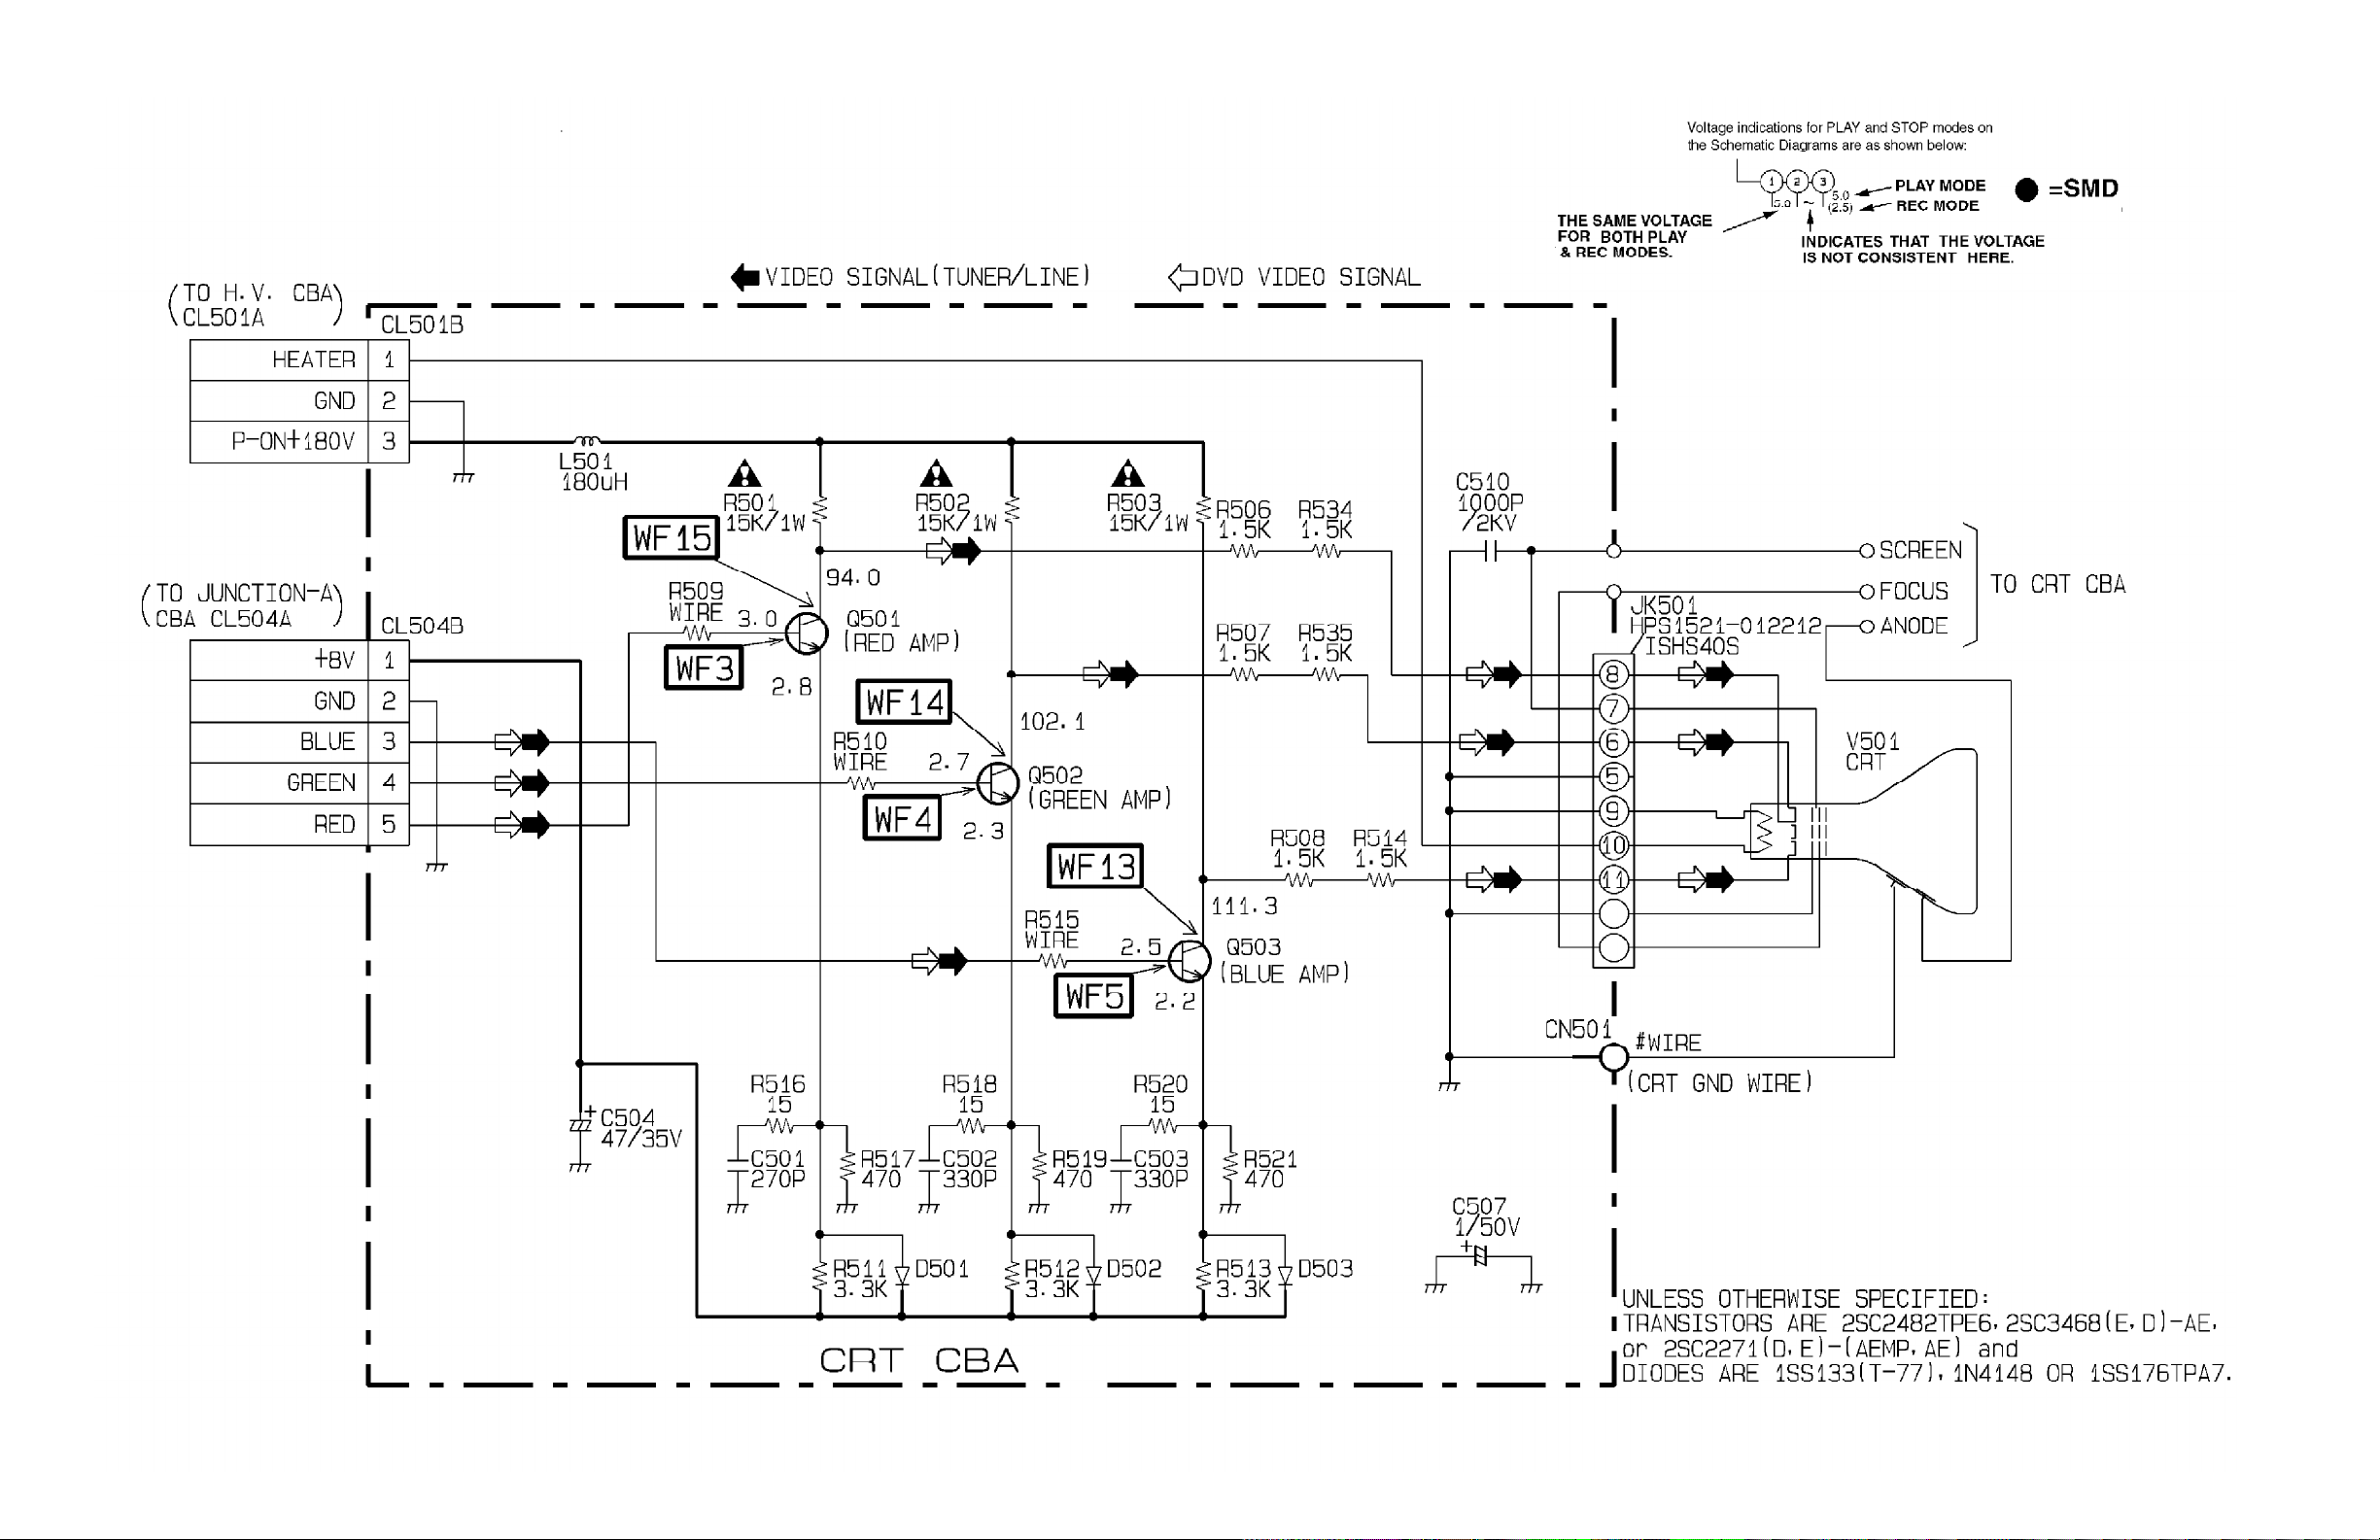
All Models (7607) - CRT SCHEMATIC DIAGRAM (TV SECTION)
Page 61
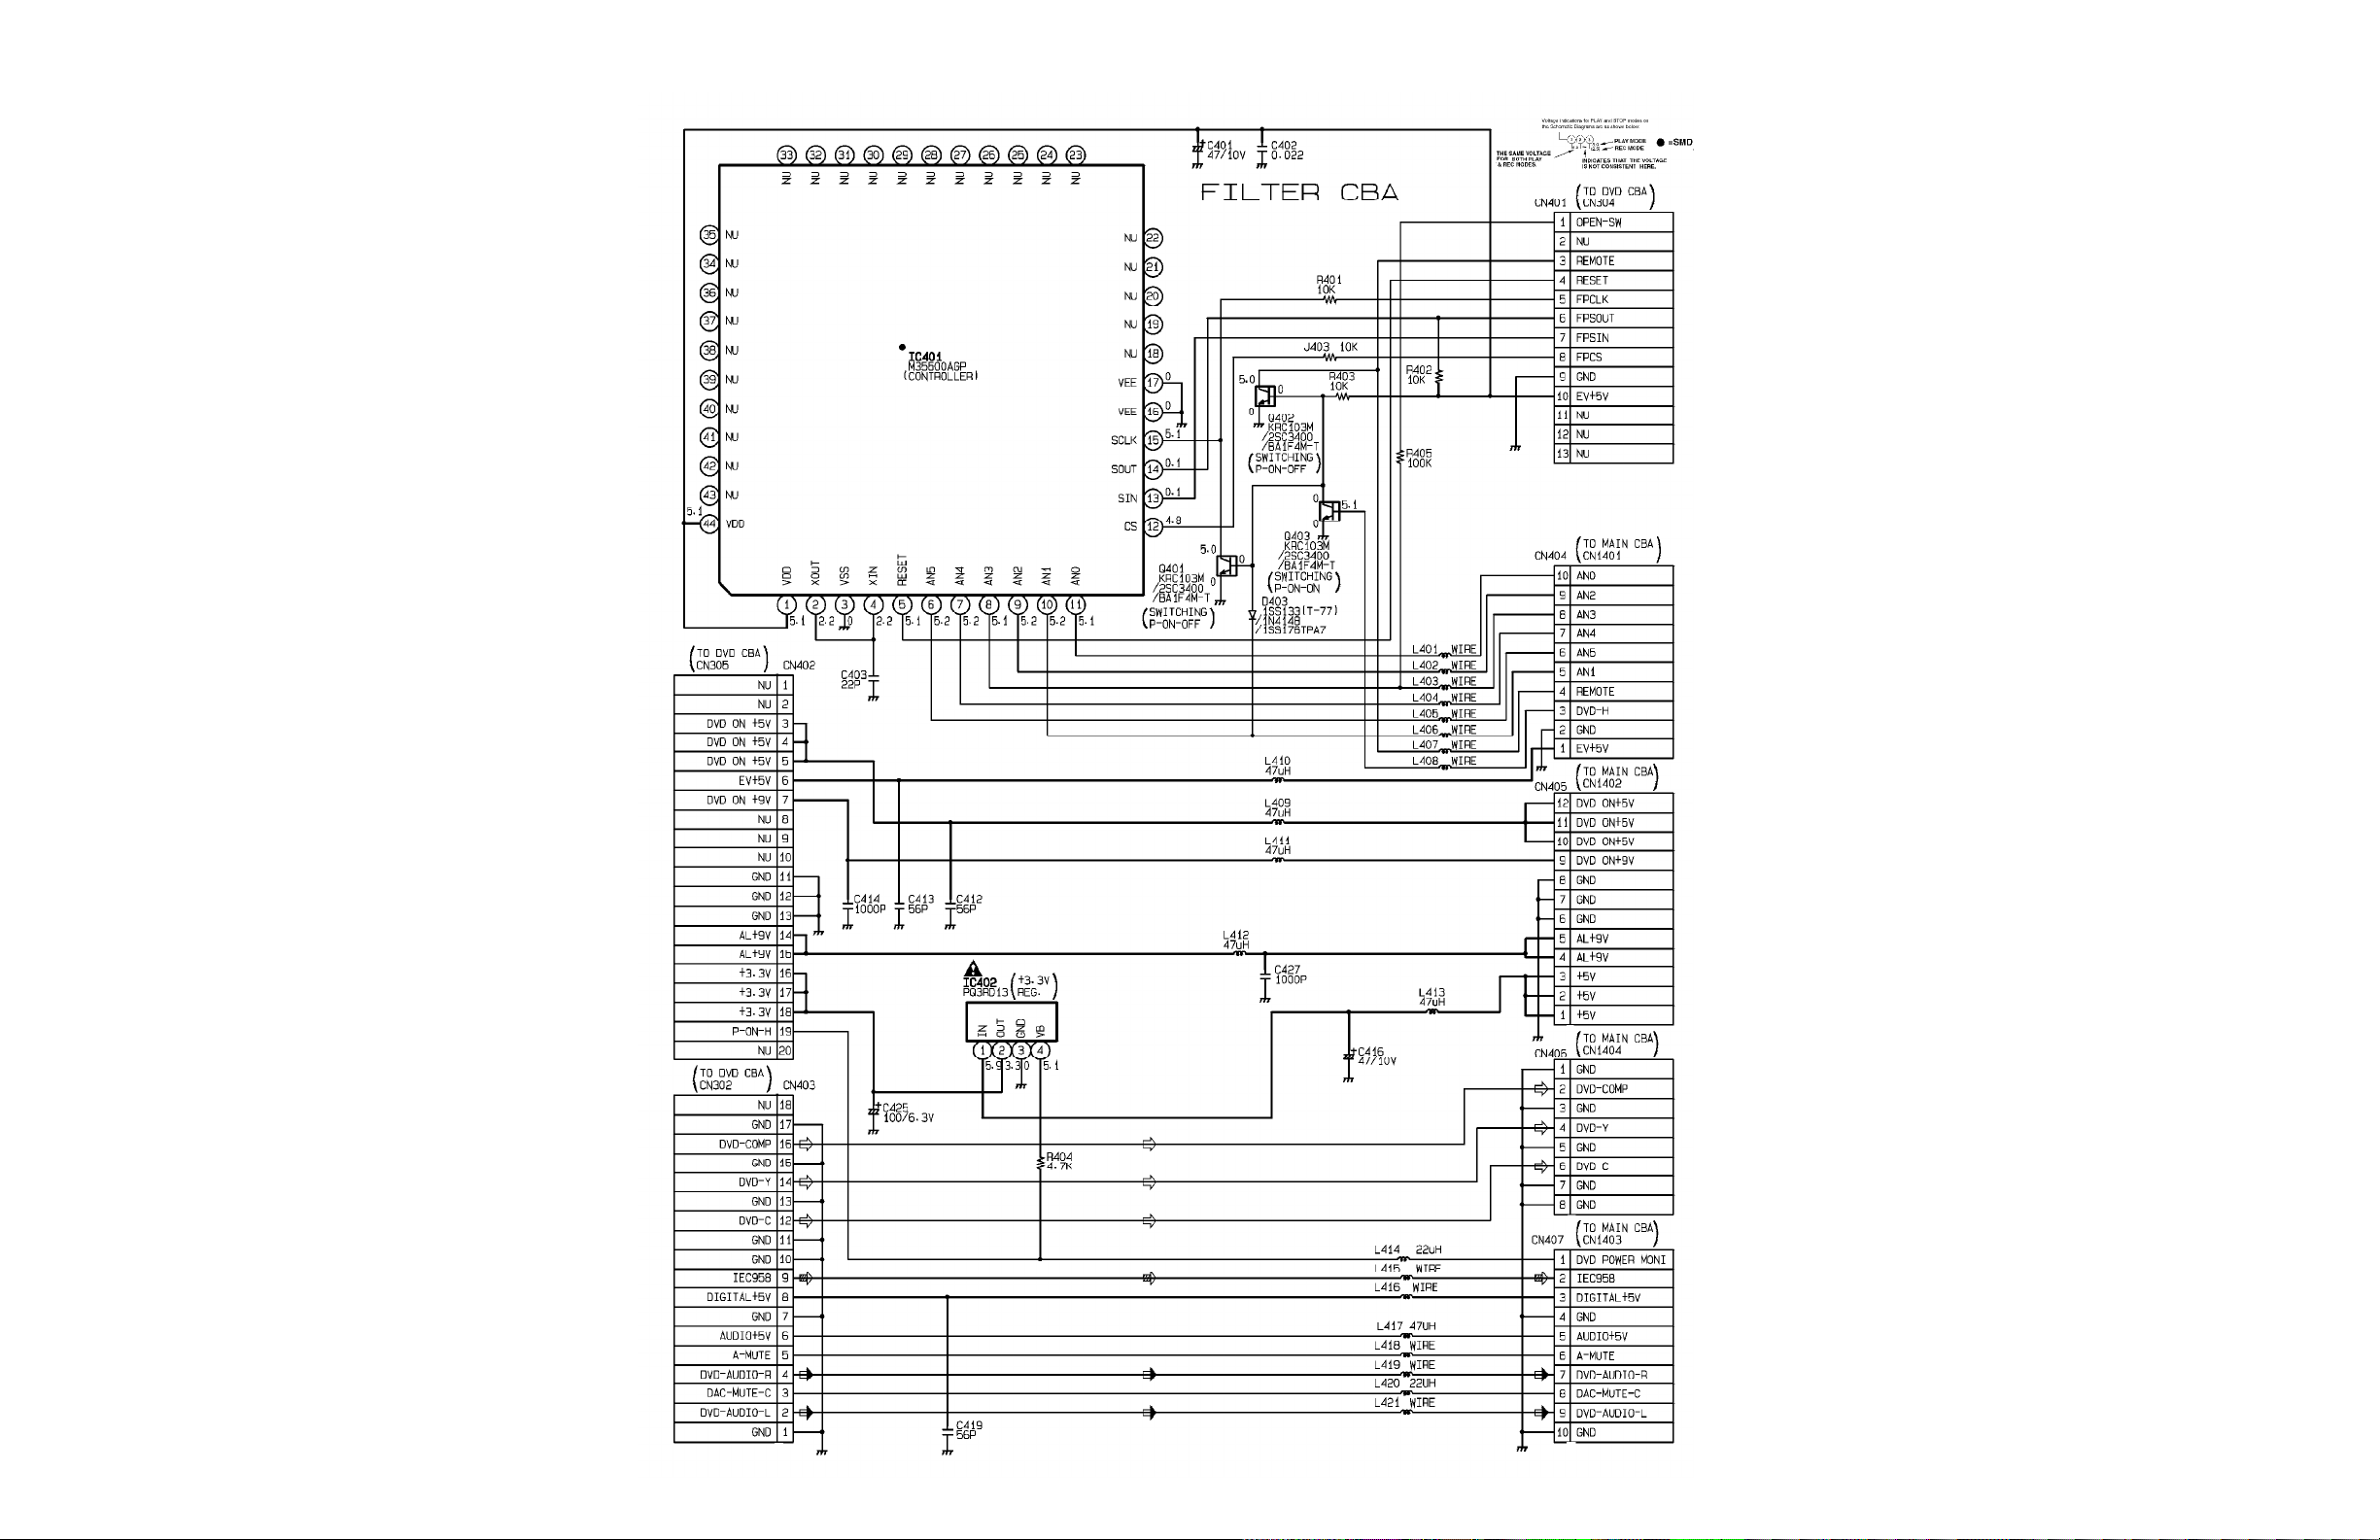
All Models (7607) - FILTER SCHEMATIC DIAGRAM (TV SECTION)
Page 62
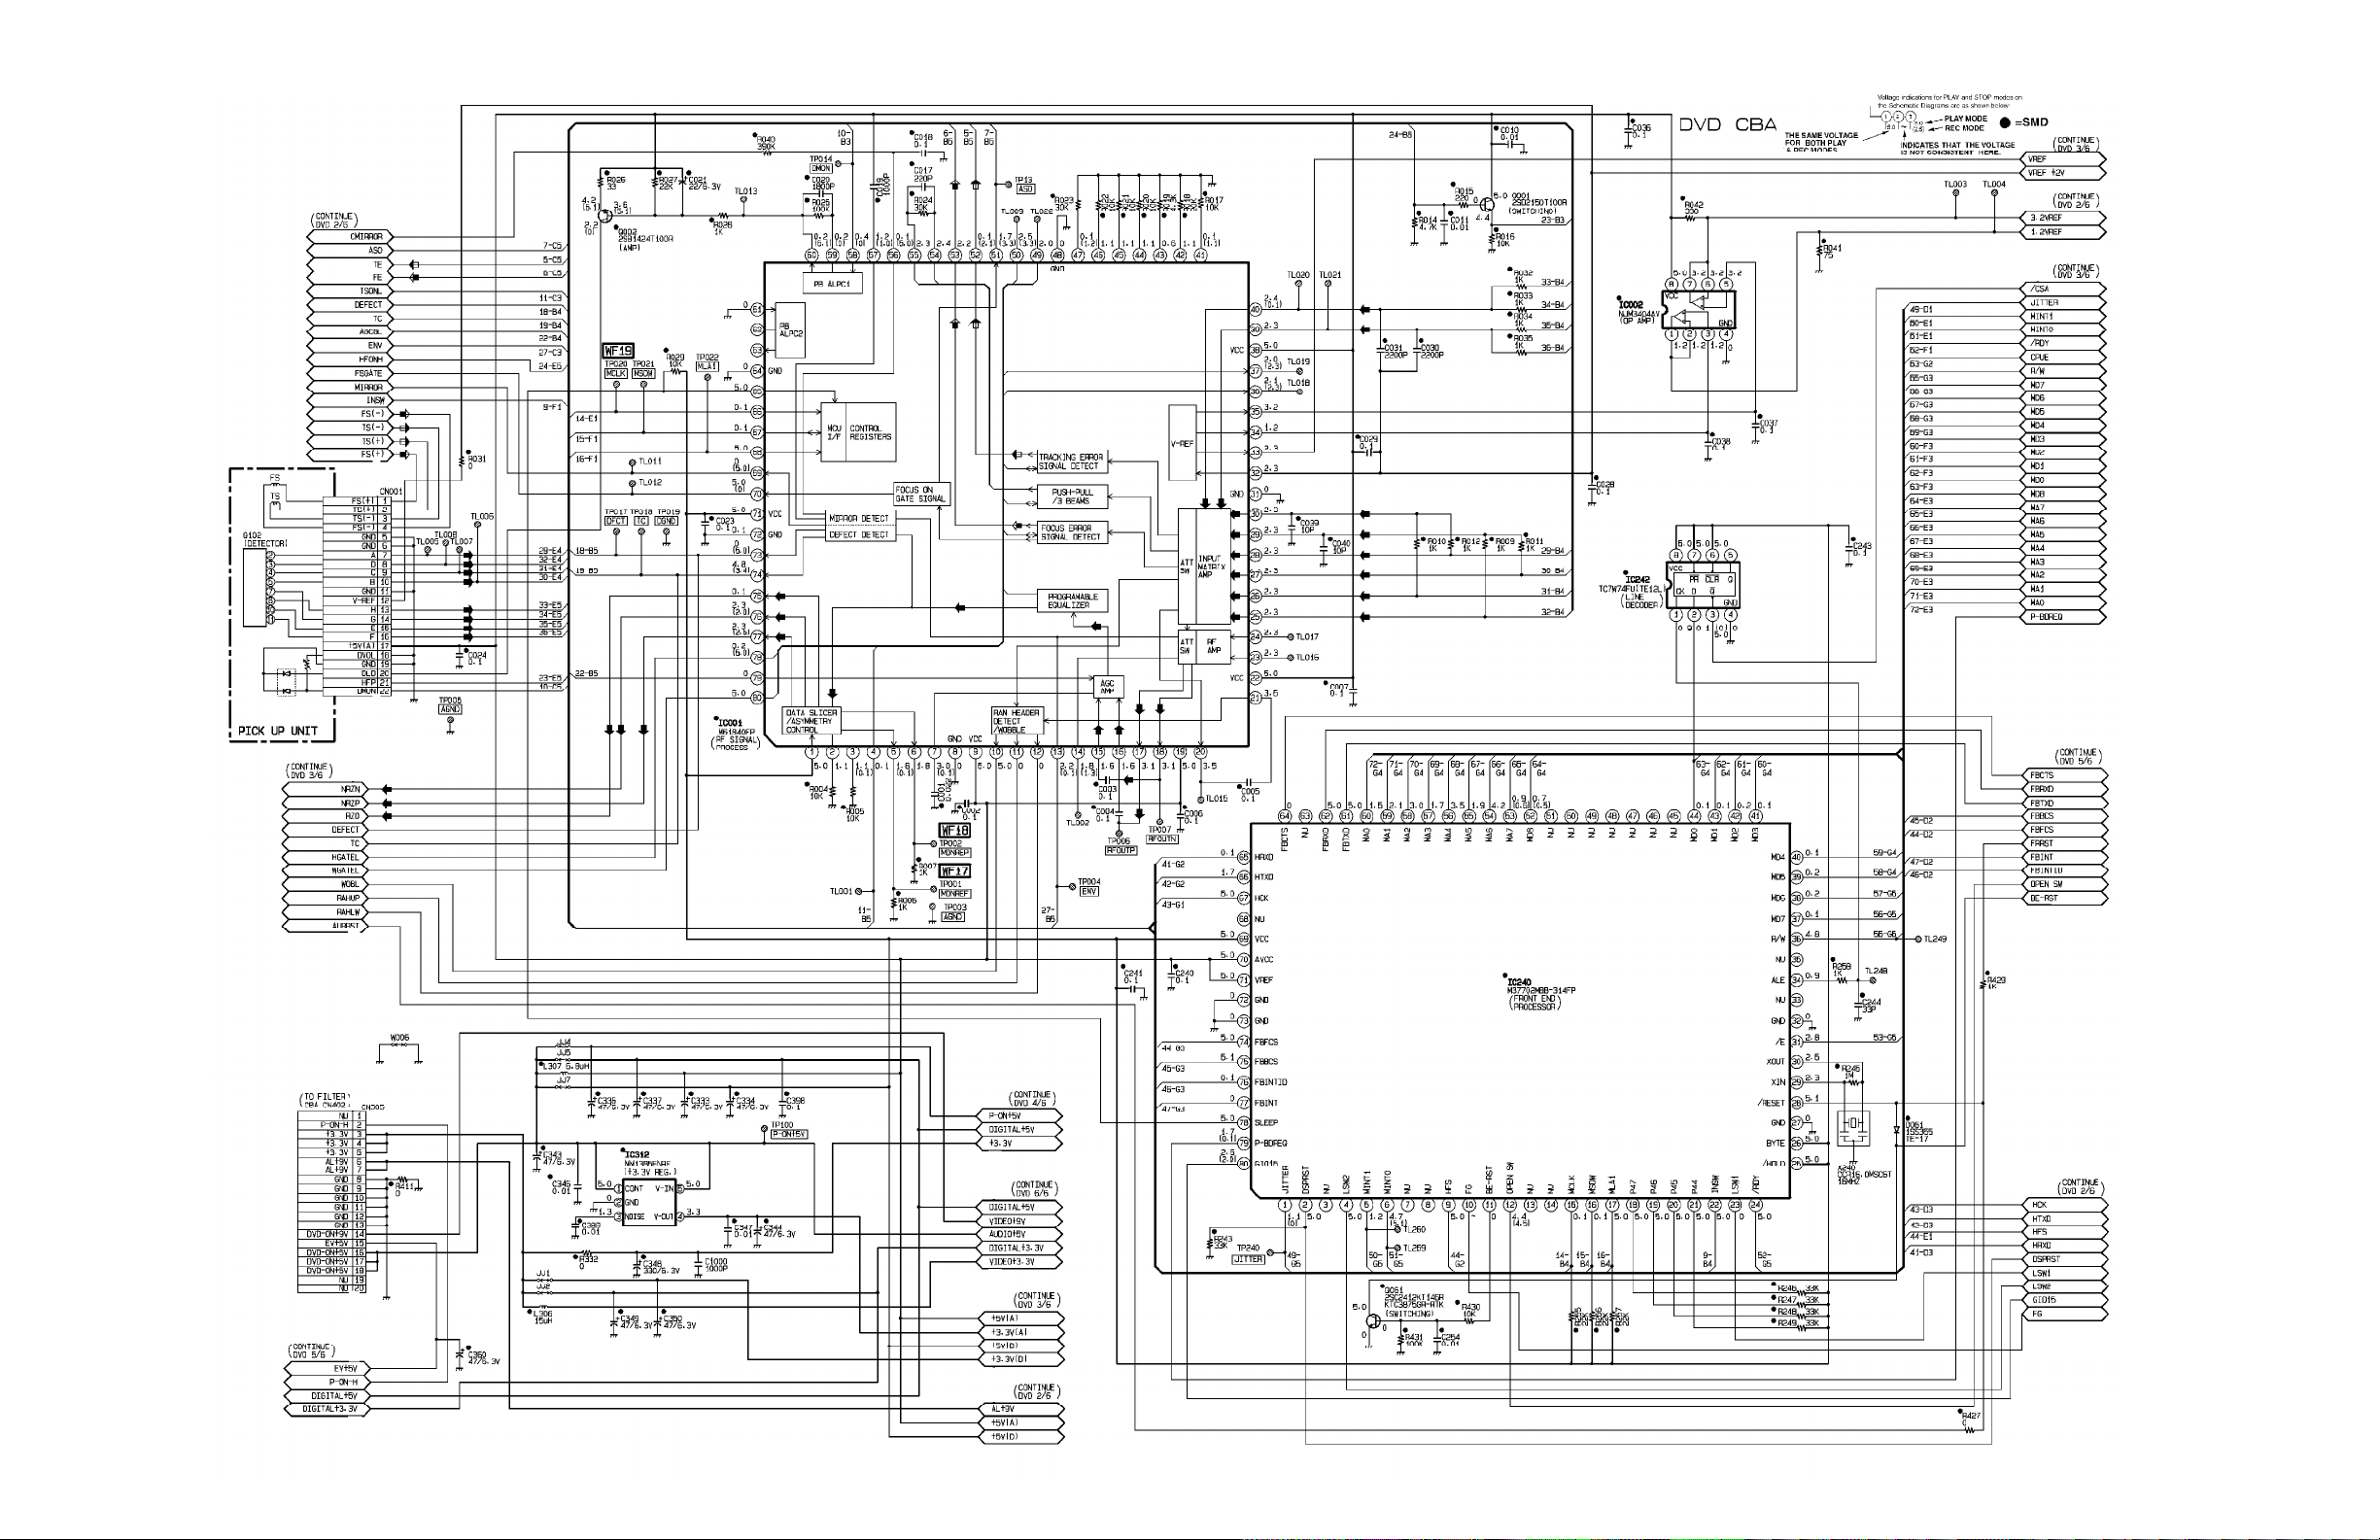
All Models (7607) - DVD 1/6 SCHEMATIC DIAGRAM (DVD SECTION)
Page 63
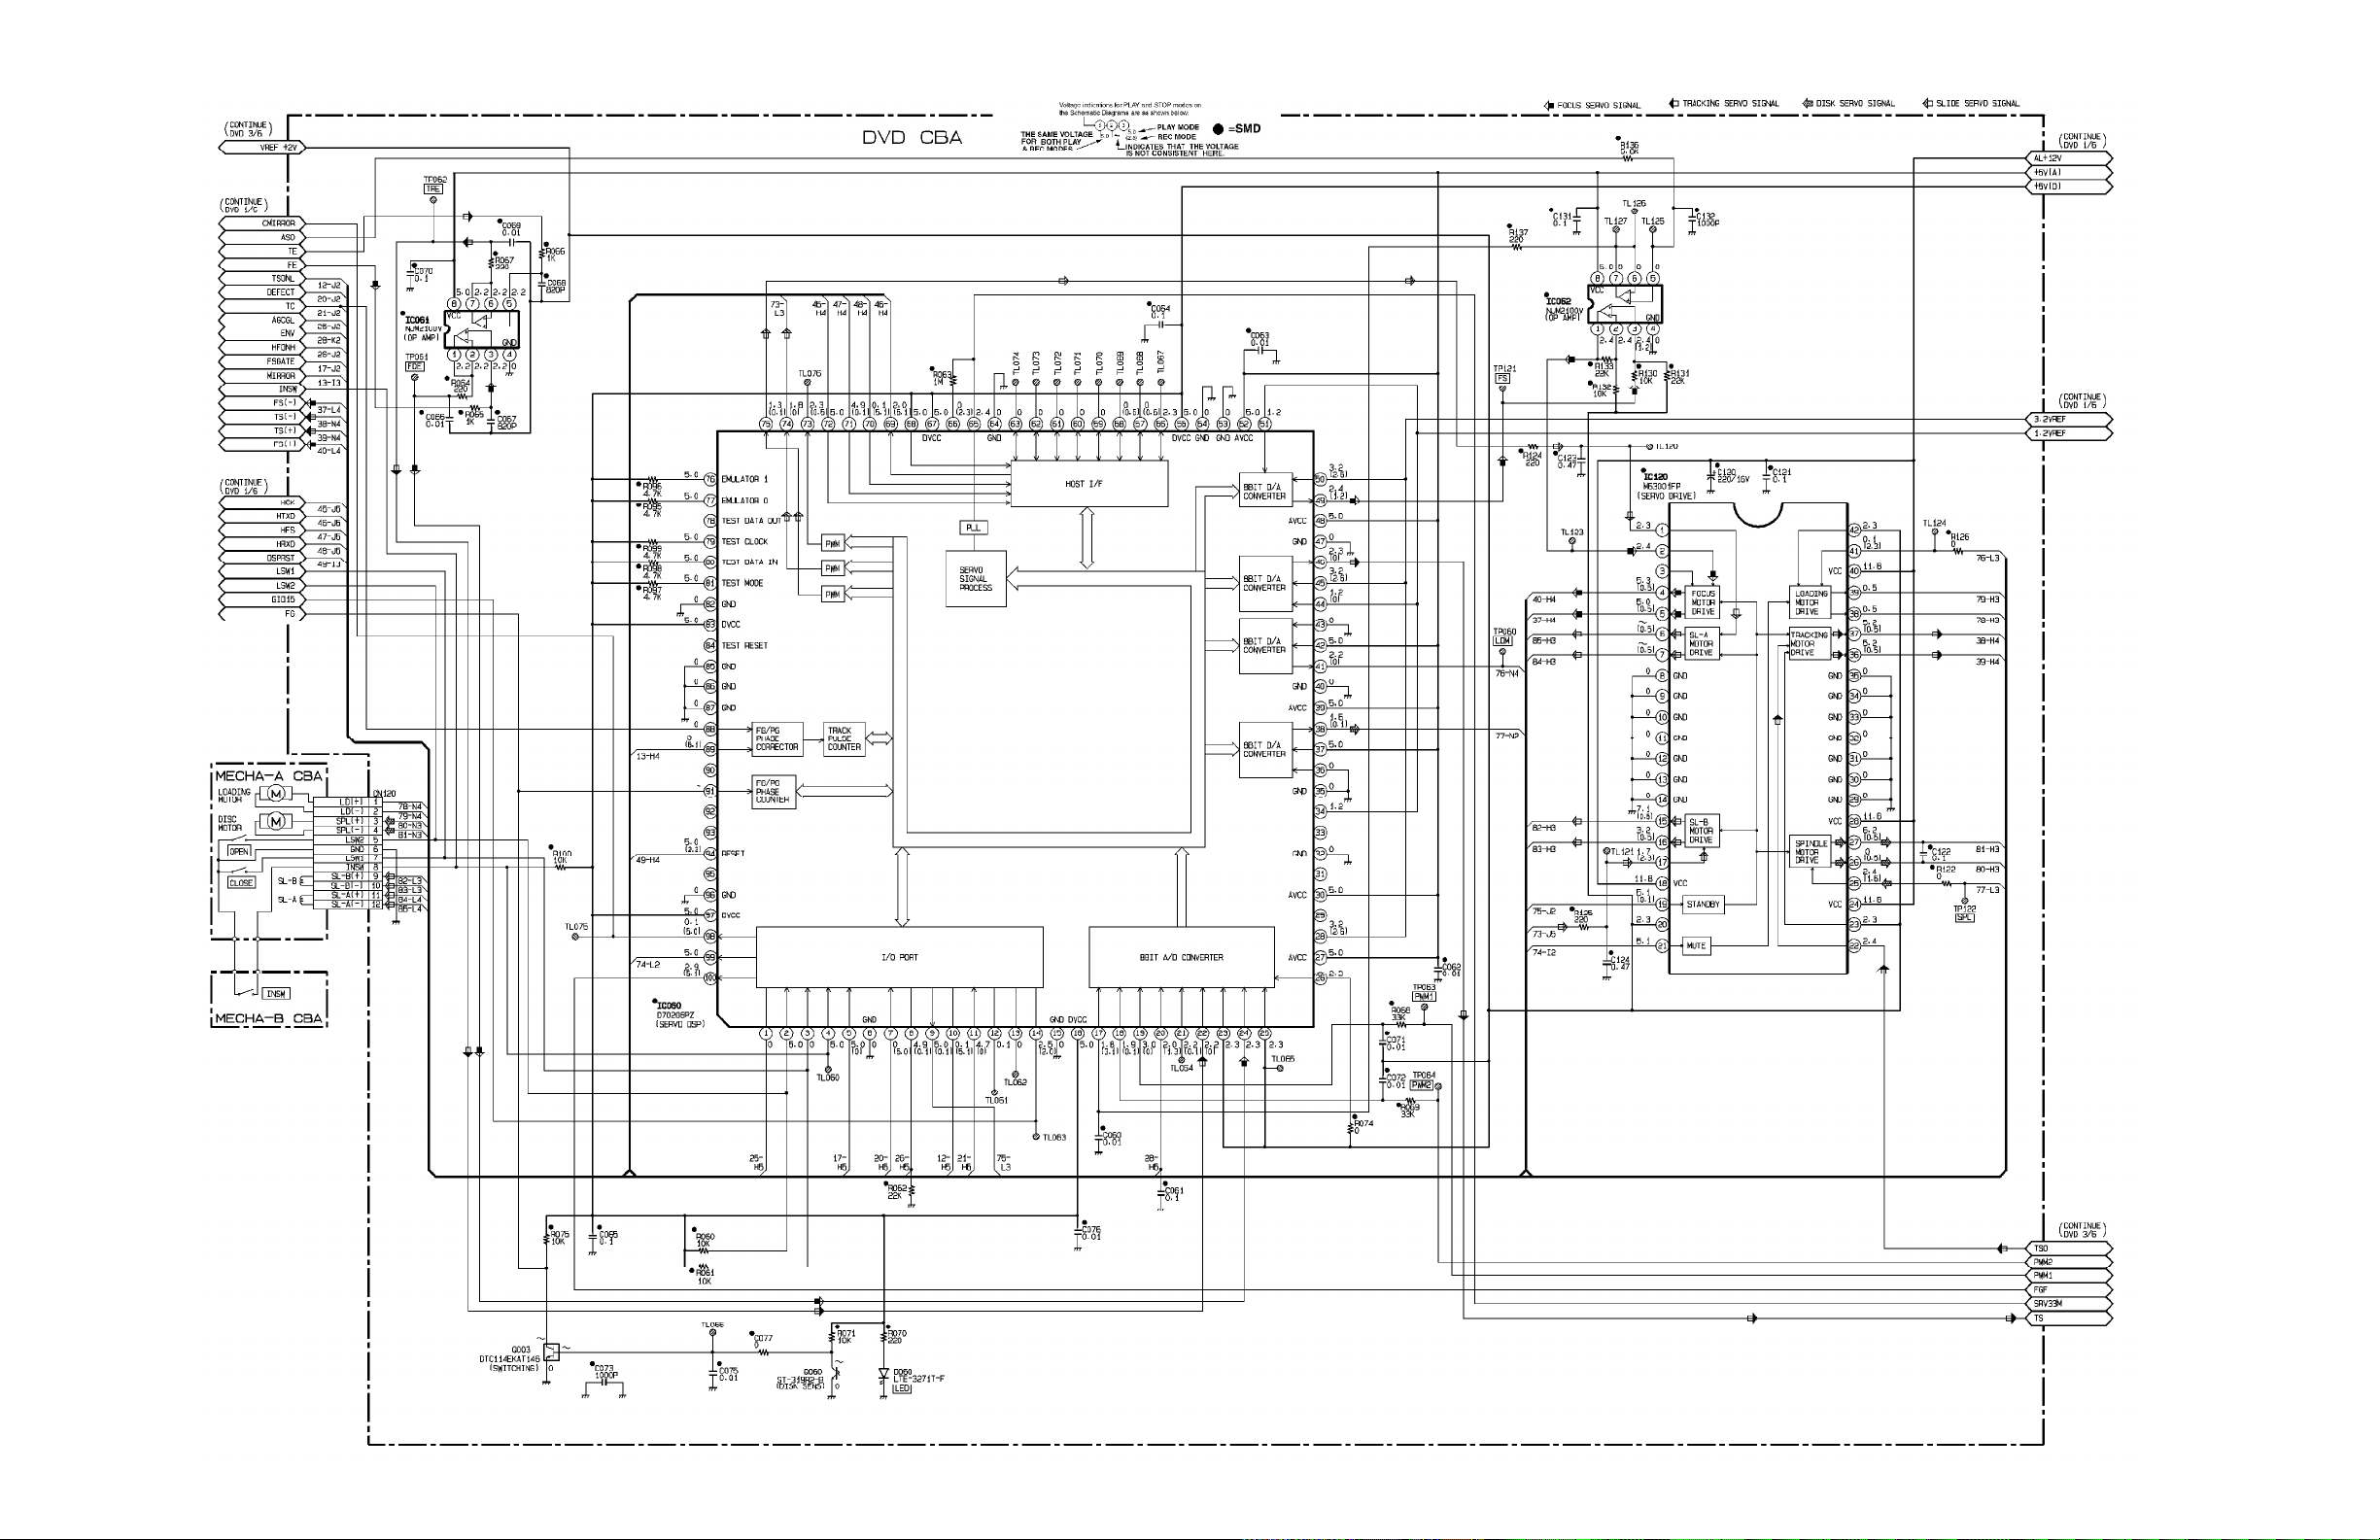
All Models (7607) - DVD 2/6 SCHEMATIC DIAGRAM (DVD SECTION)
Page 64
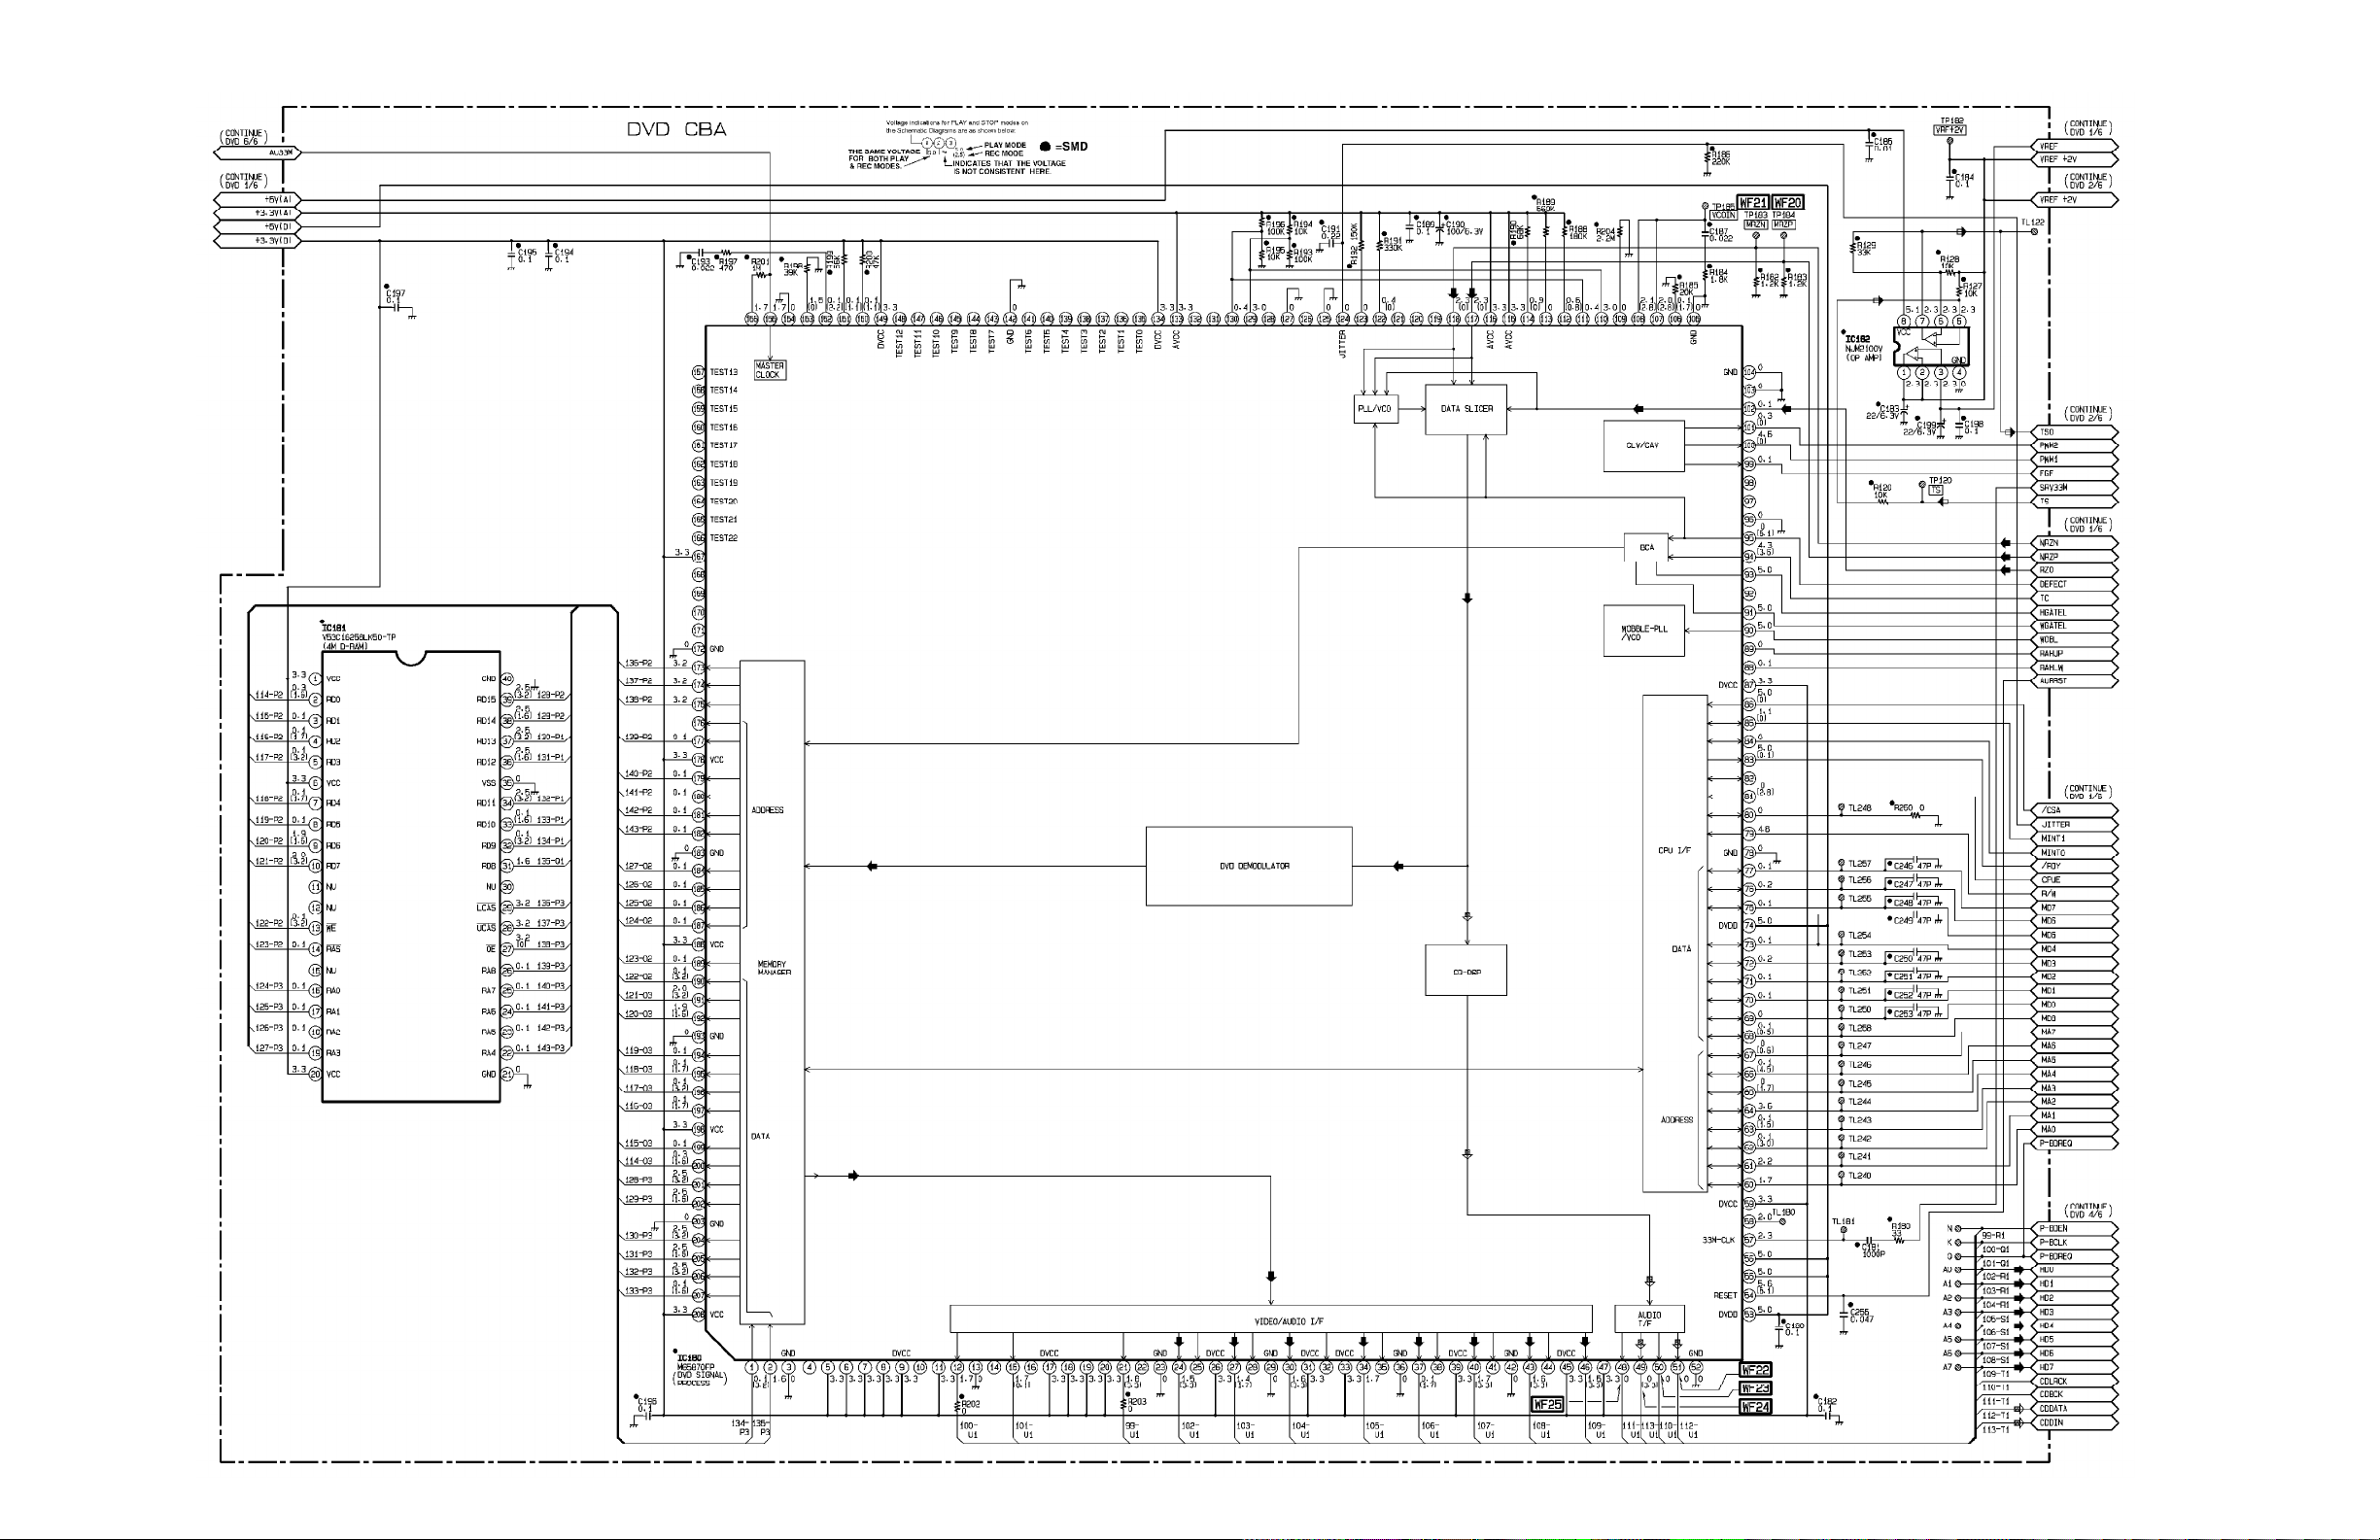
All Models (7607) - DVD 3/6 SCHEMATIC DIAGRAM (DVD SECTION)
Page 65
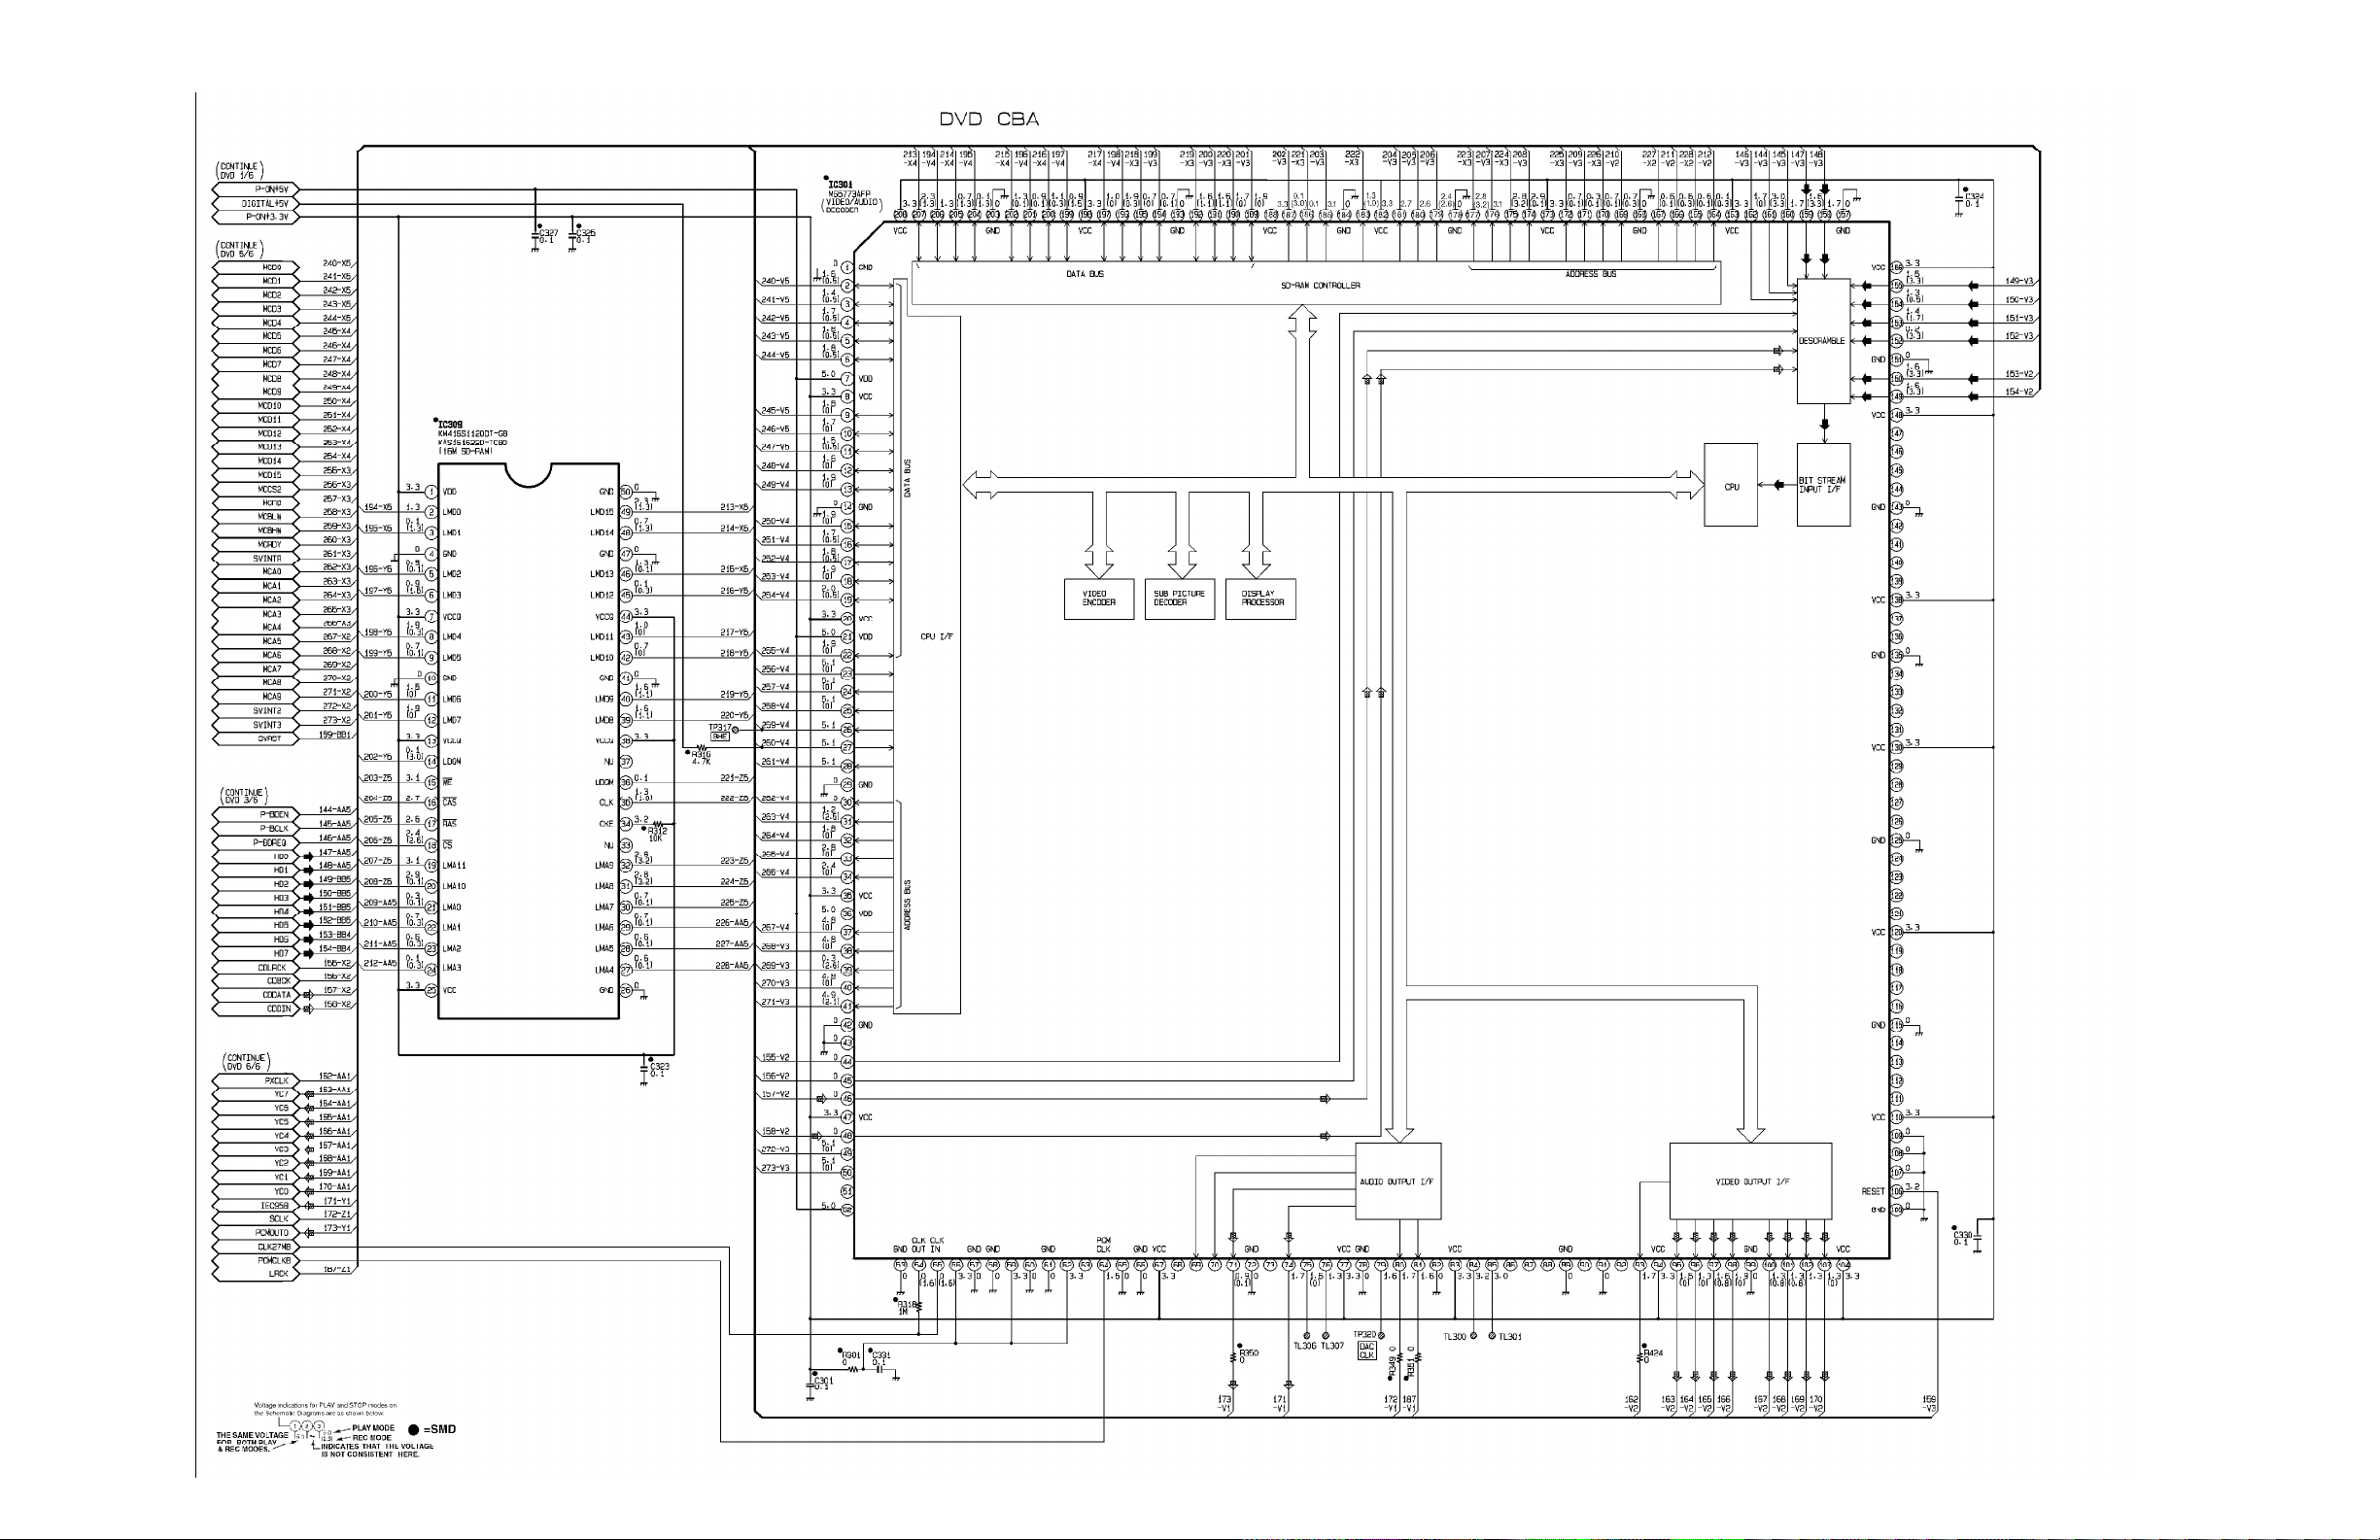
All Models (7607) - DVD 4/6 SCHEMATIC DIAGRAM (DVD SECTION)
Page 66
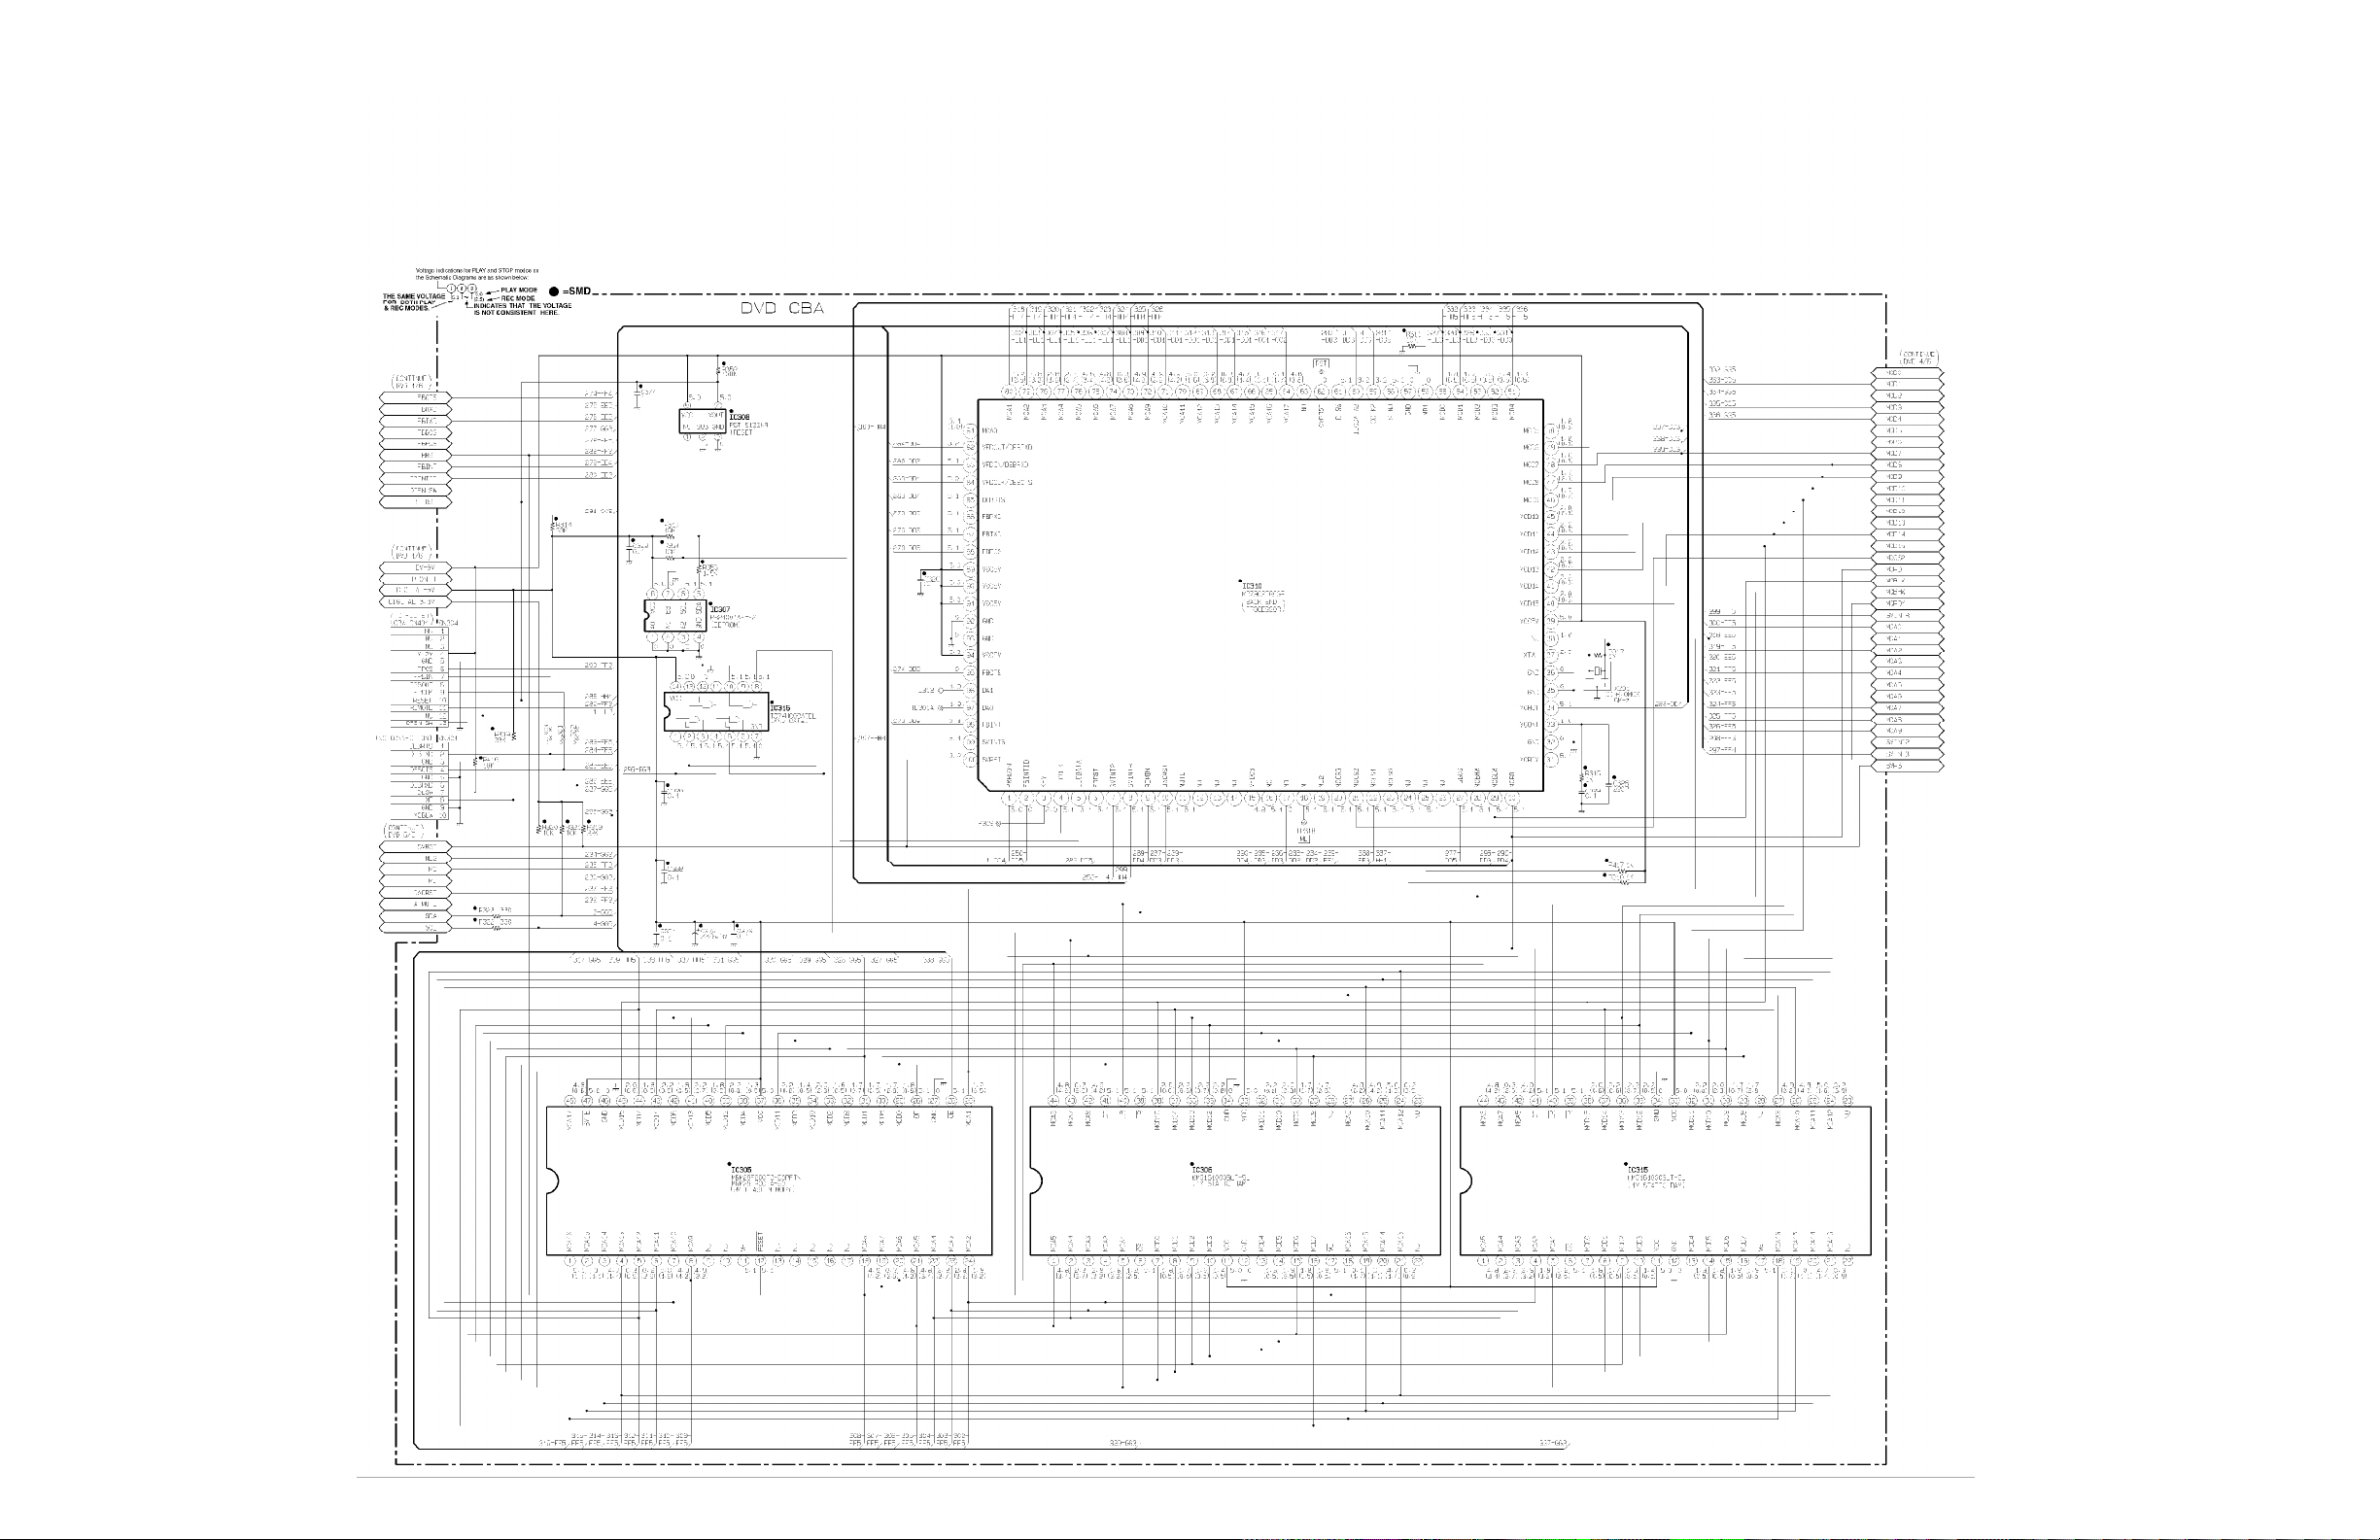
All Models (7607) - DVD 5/6 SCHEMATIC DIAGRAM (DVD SECTION)
Page 67
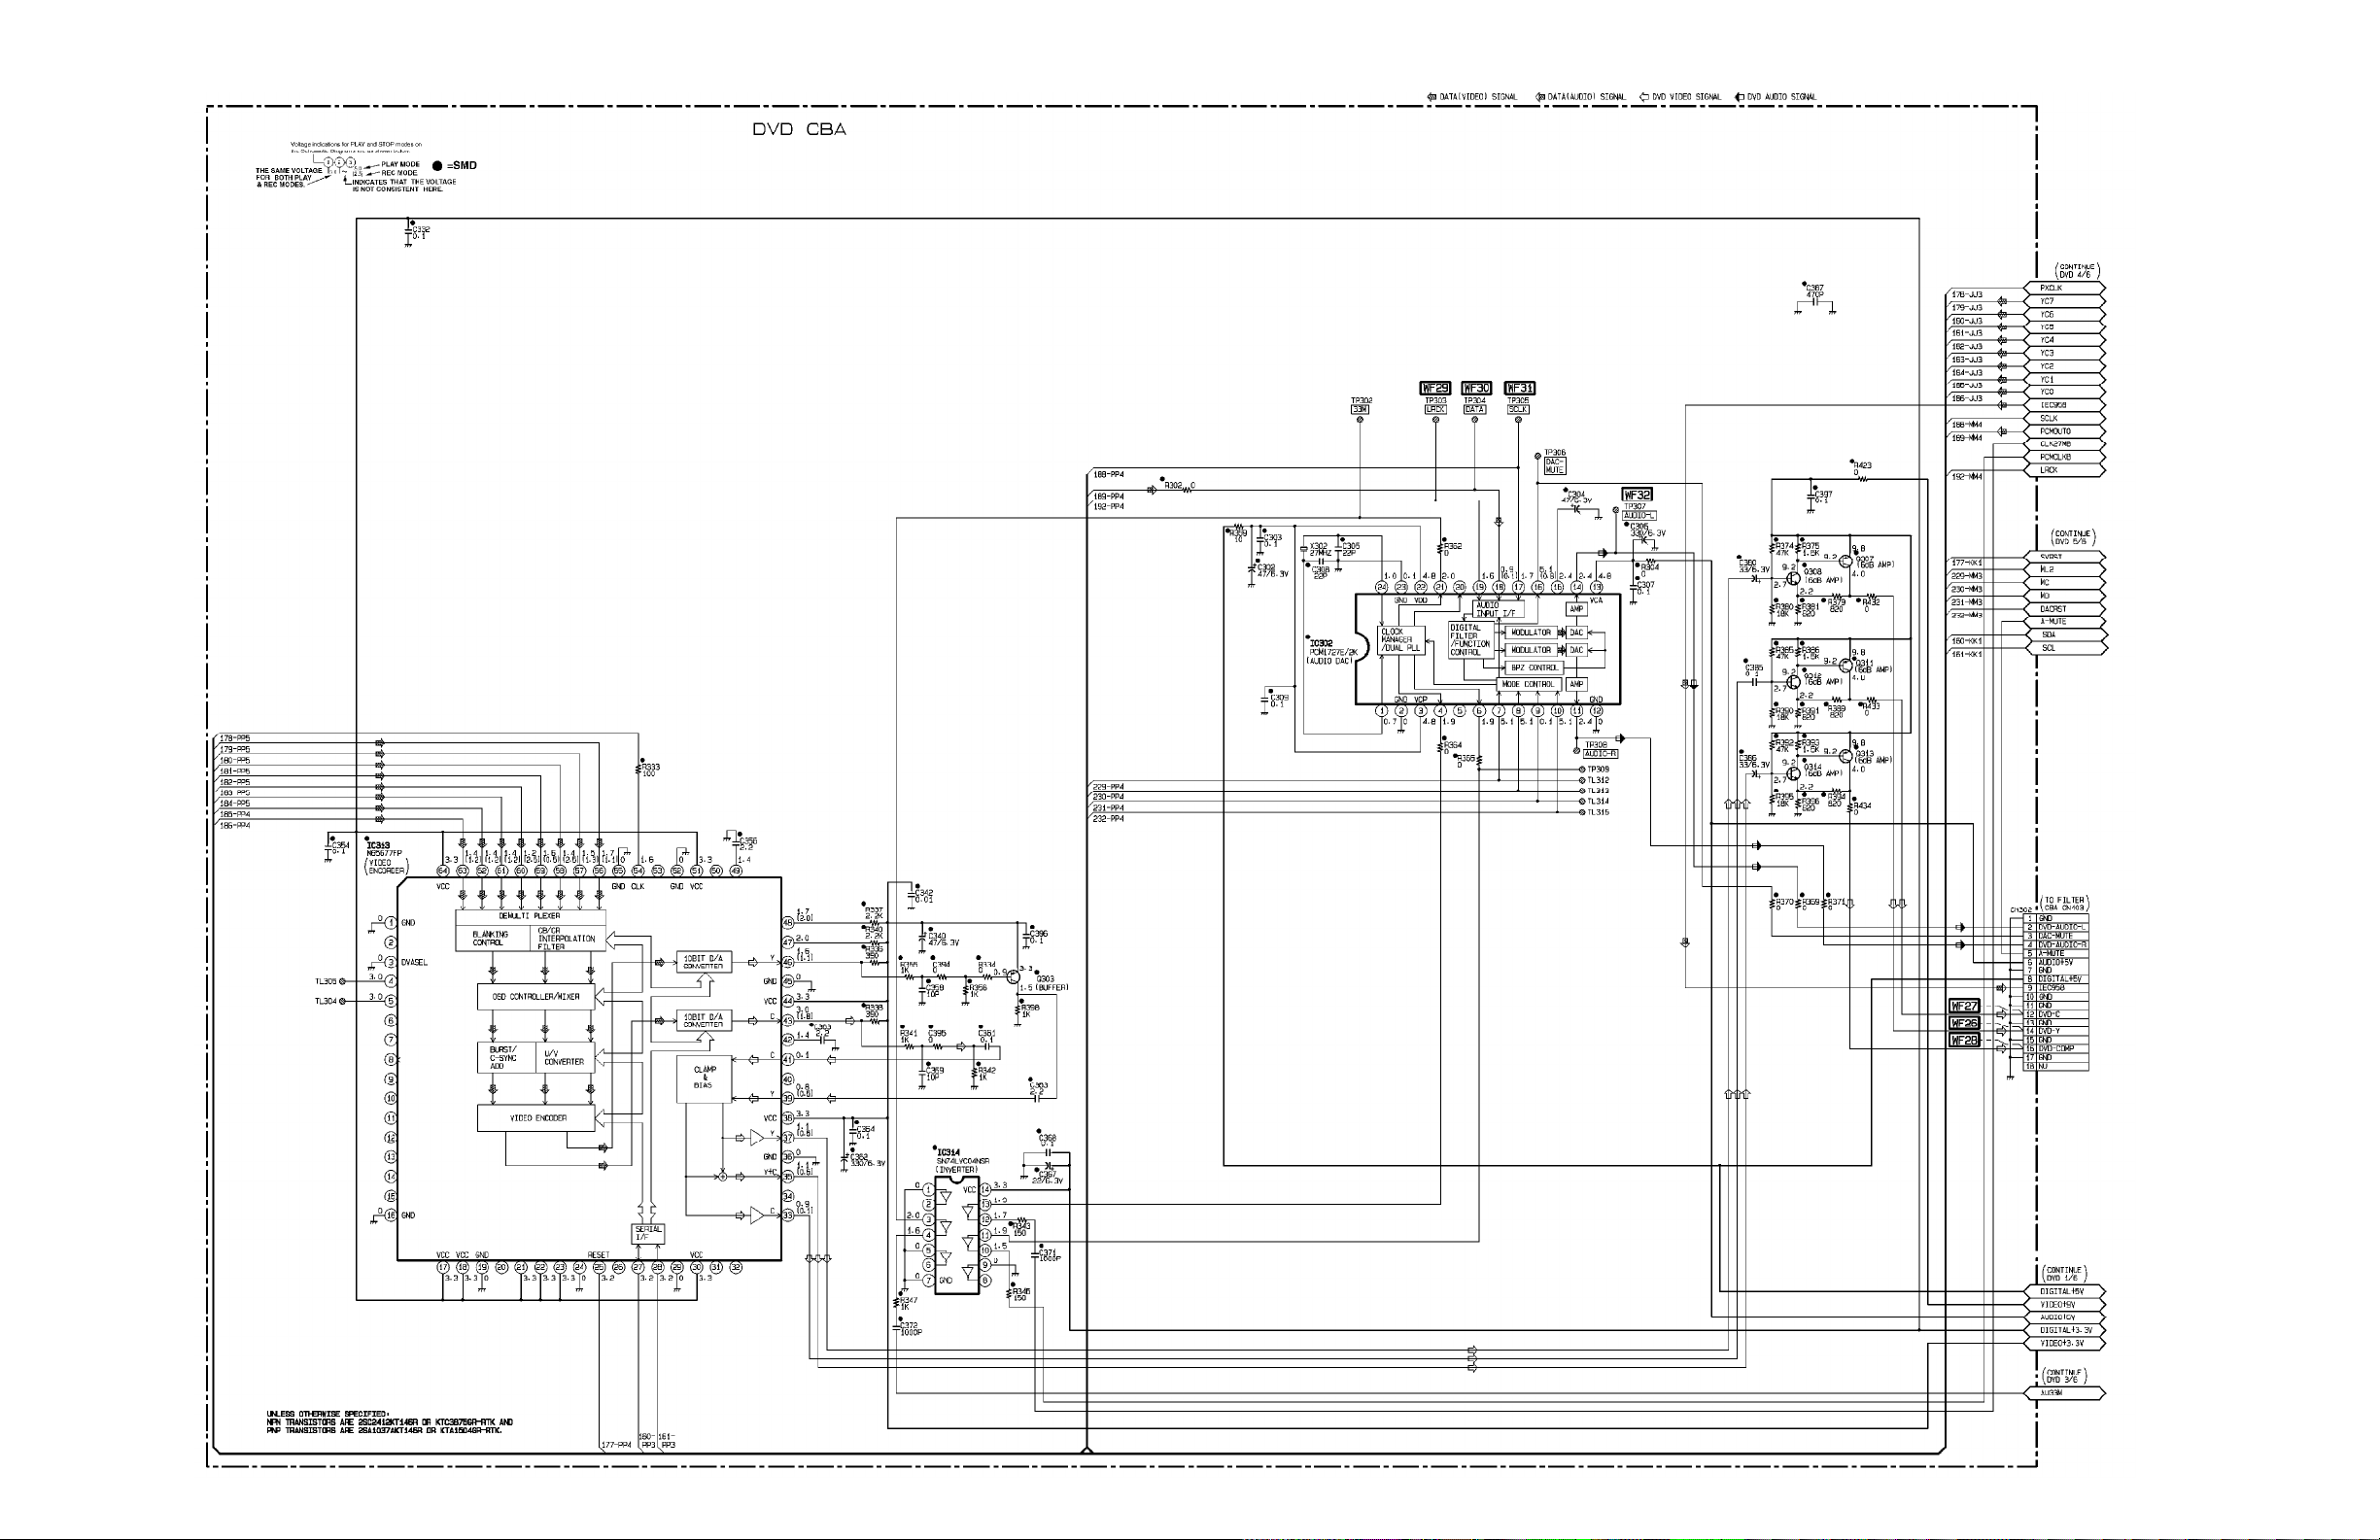
All Models (7607) - DVD 6/6 SCHEMATIC DIAGRAM (DVD SECTION)
Page 68
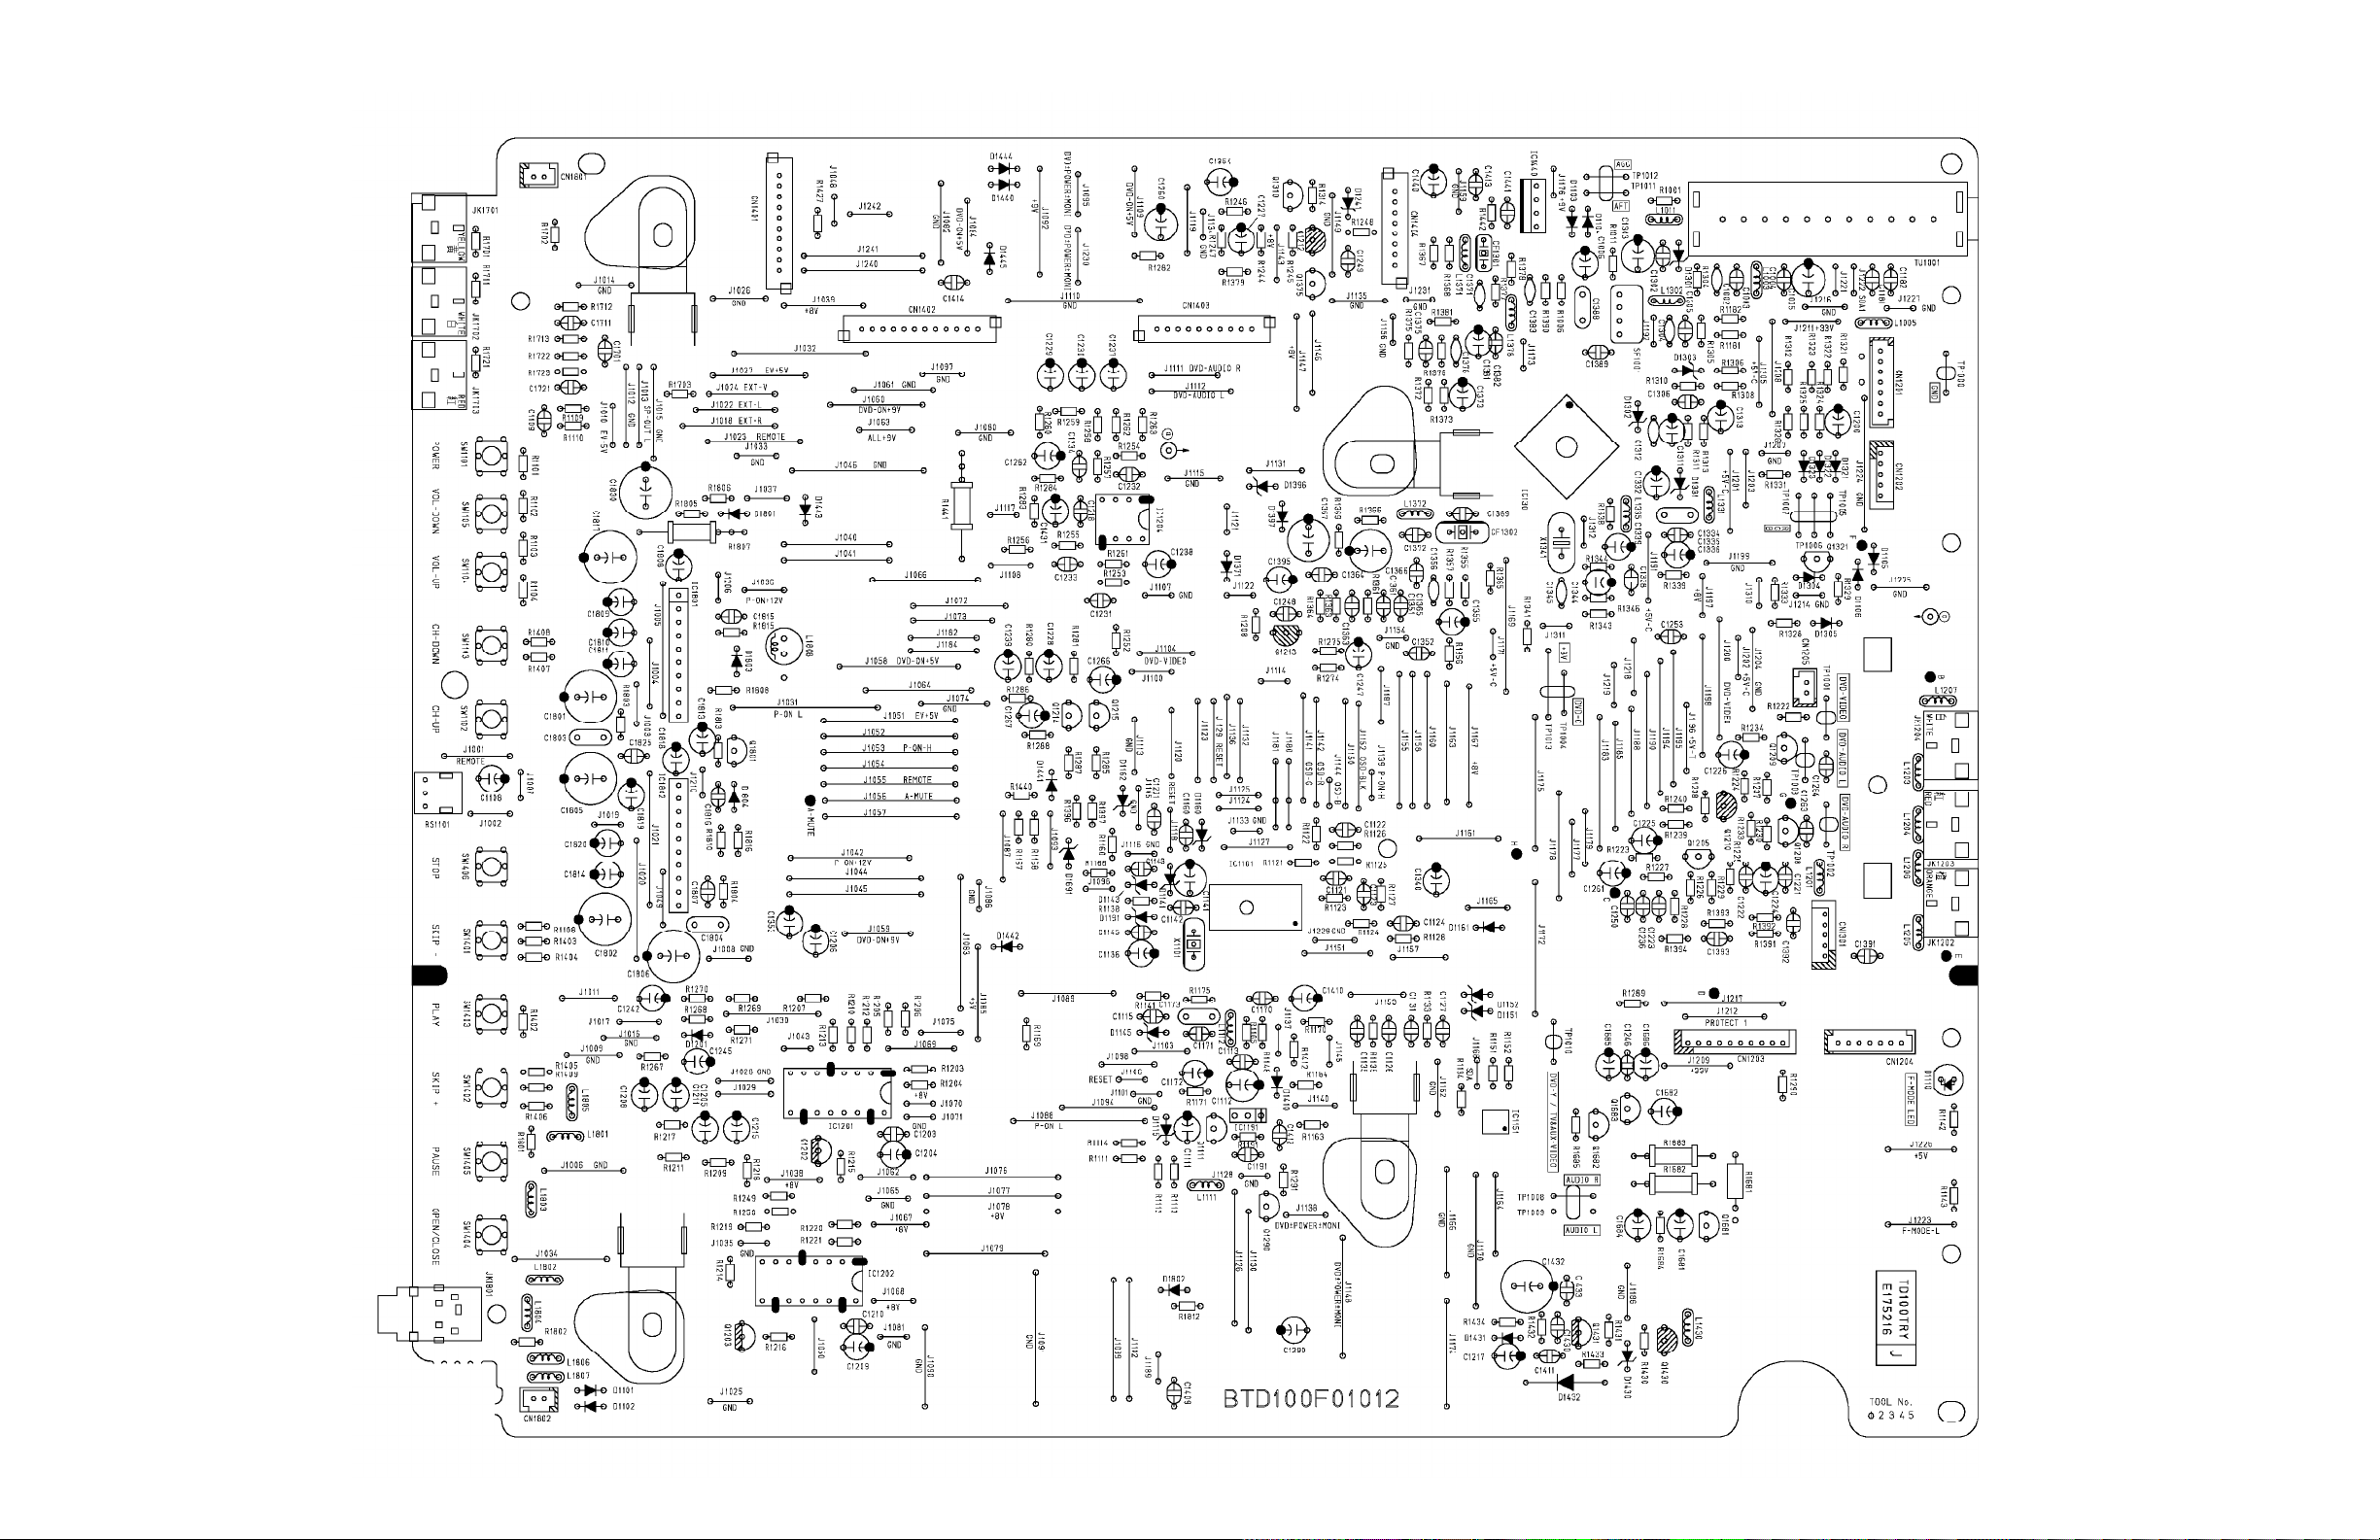
All Models (7607) - MAIN CBA TOP VIEW (TV SECTION)
Page 69
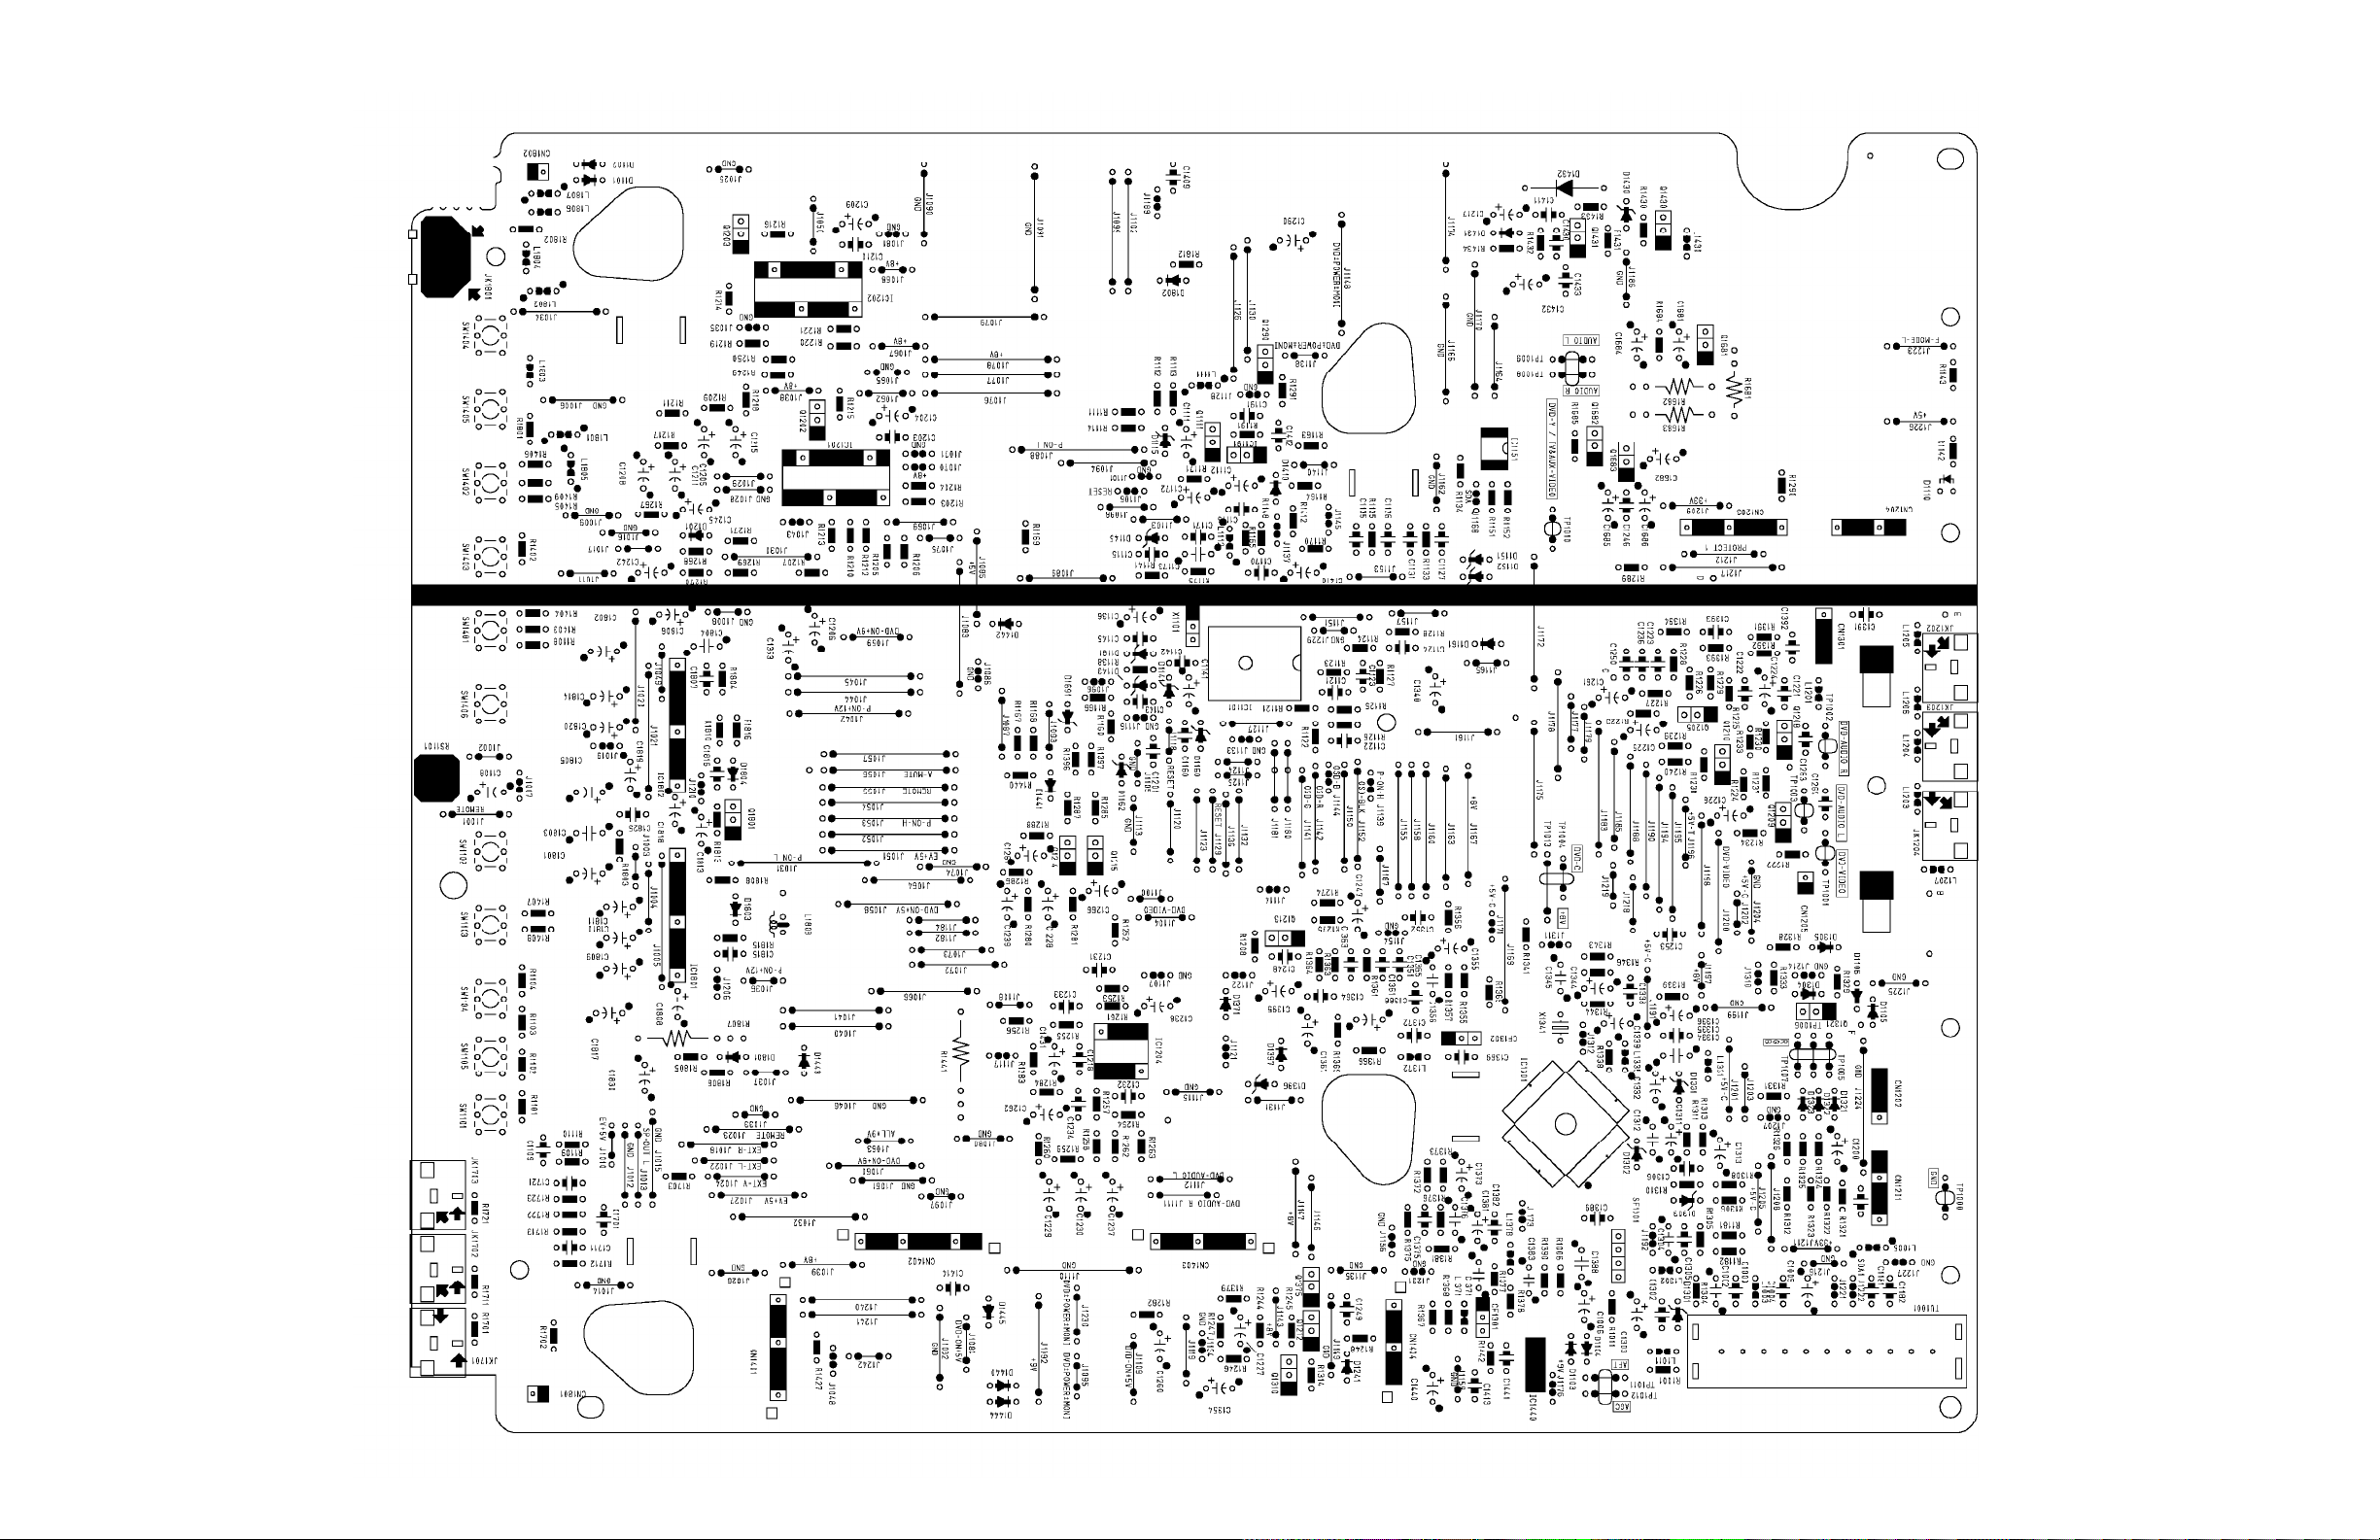
All Models (7607) - MAIN CBA BOTTOM VIEW (TV SECTION)
Page 70
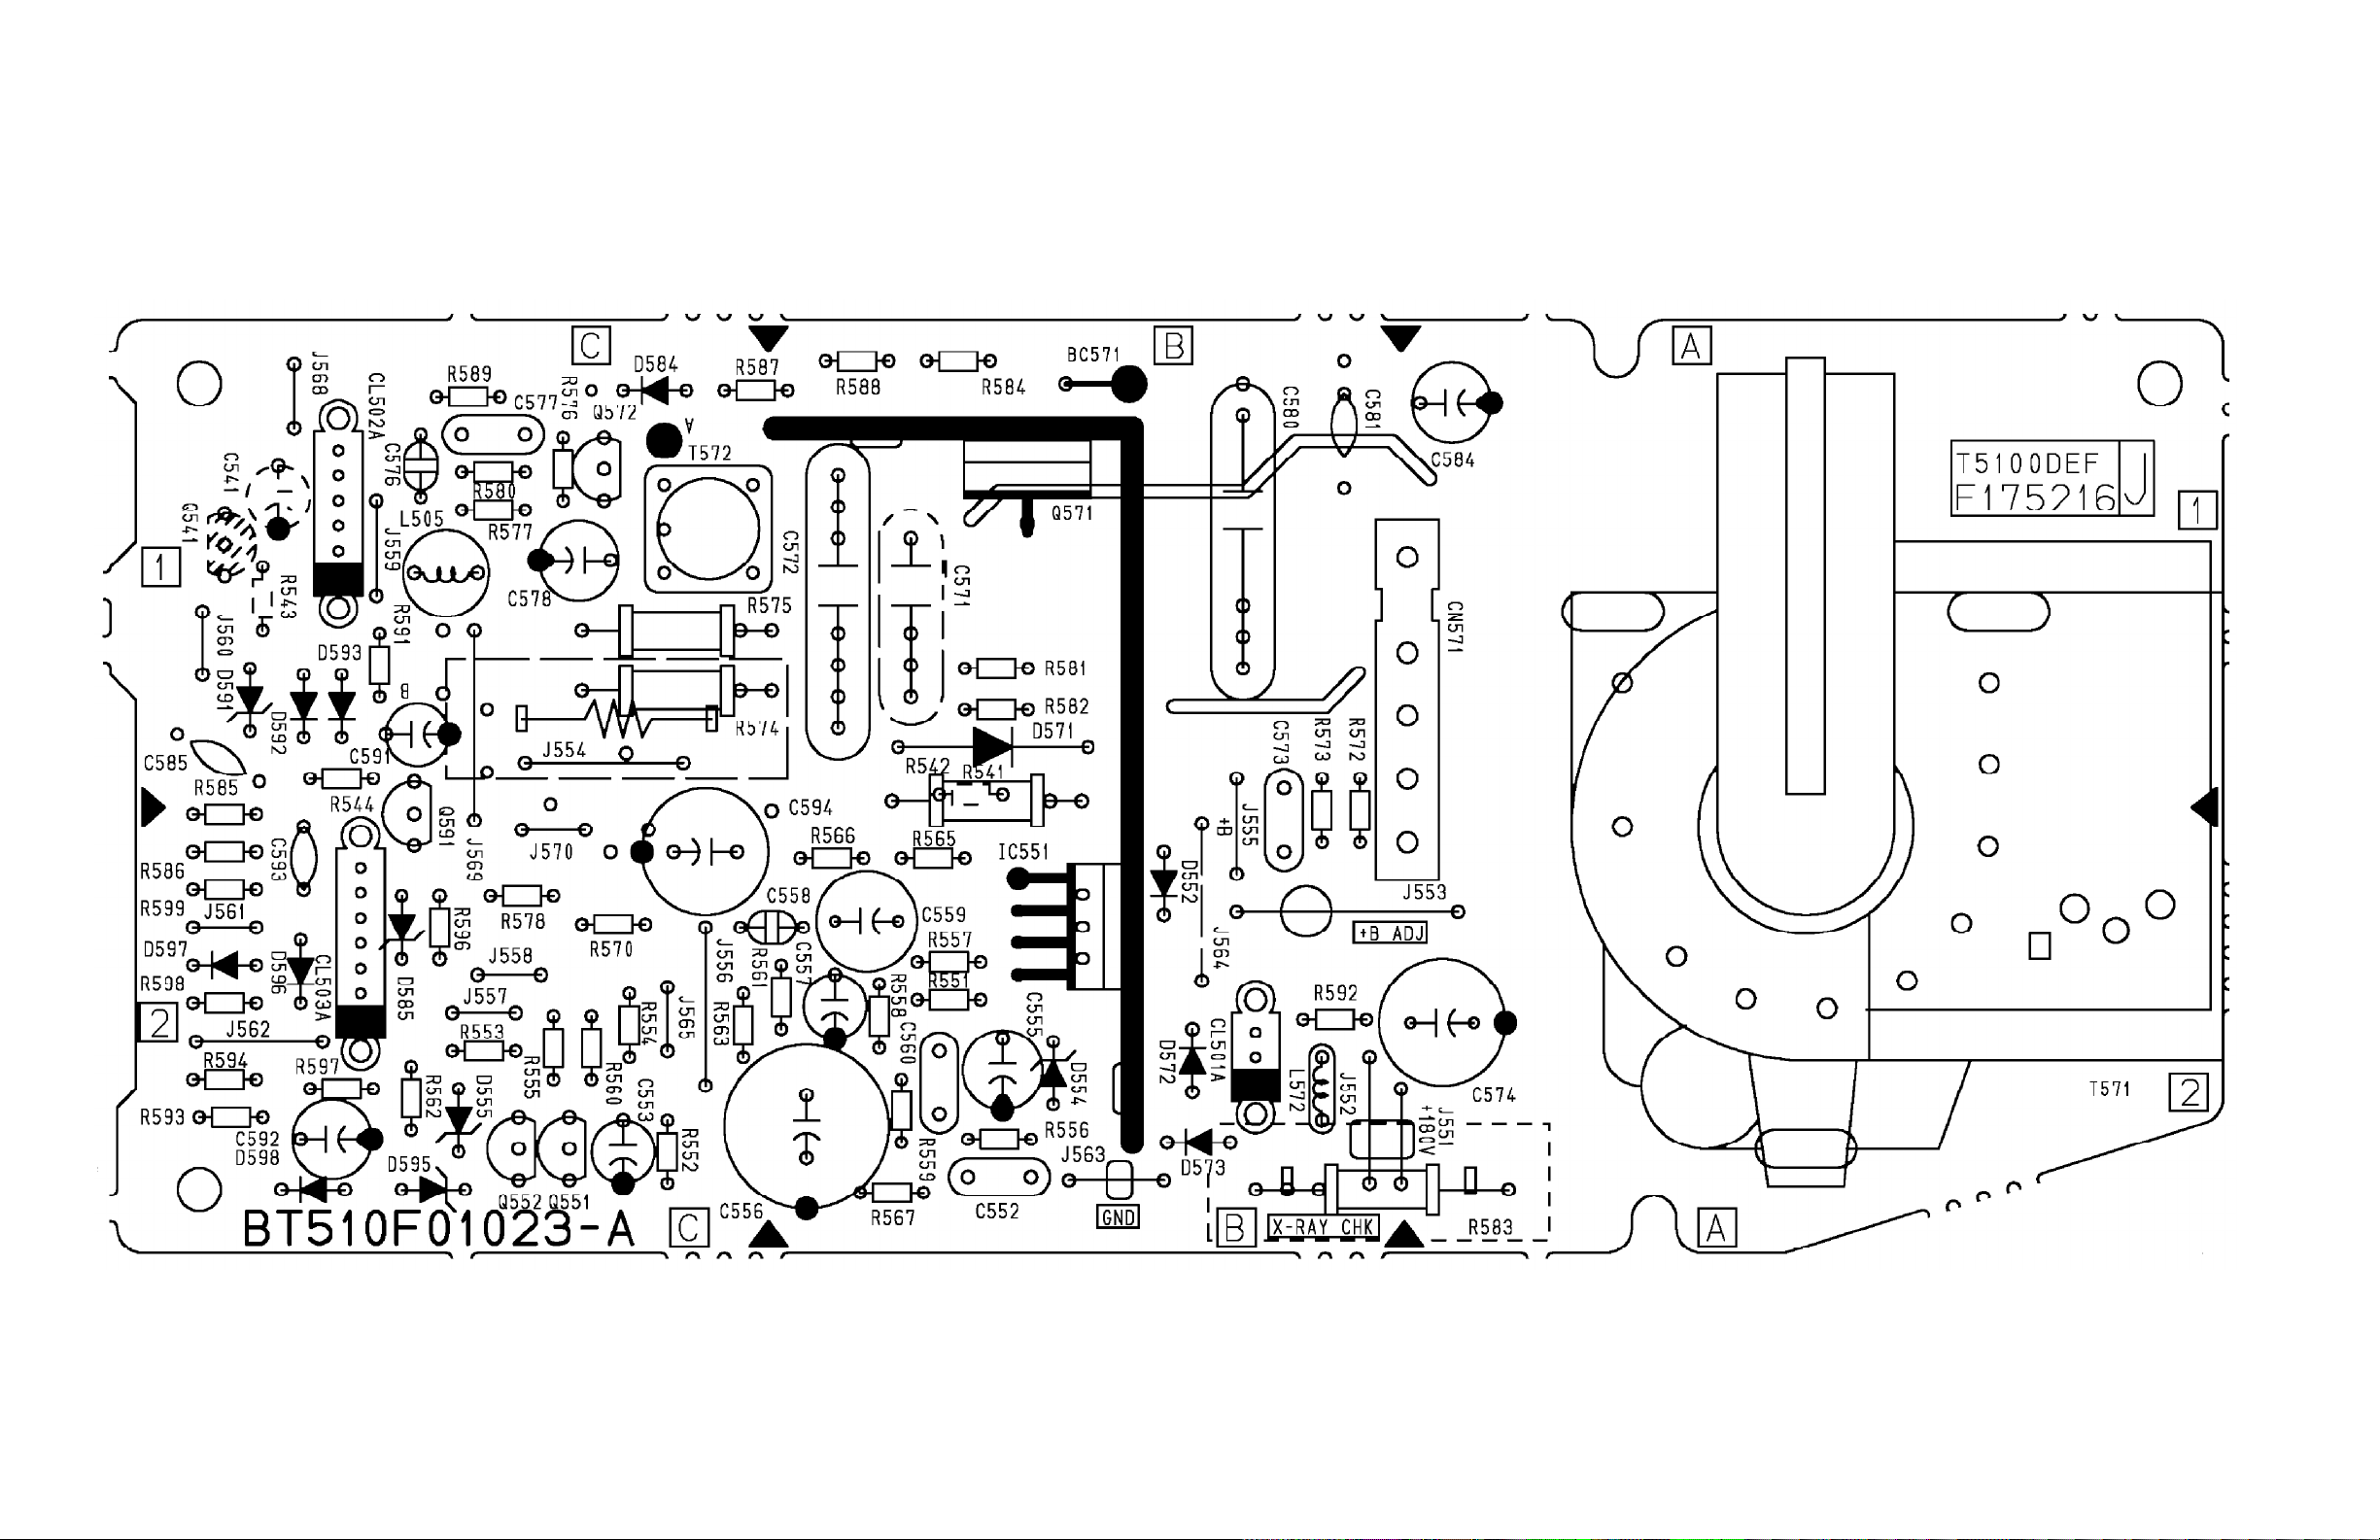
All Models (7607) - H.V. CBA TOP VIEW (TV SECTION)
Page 71
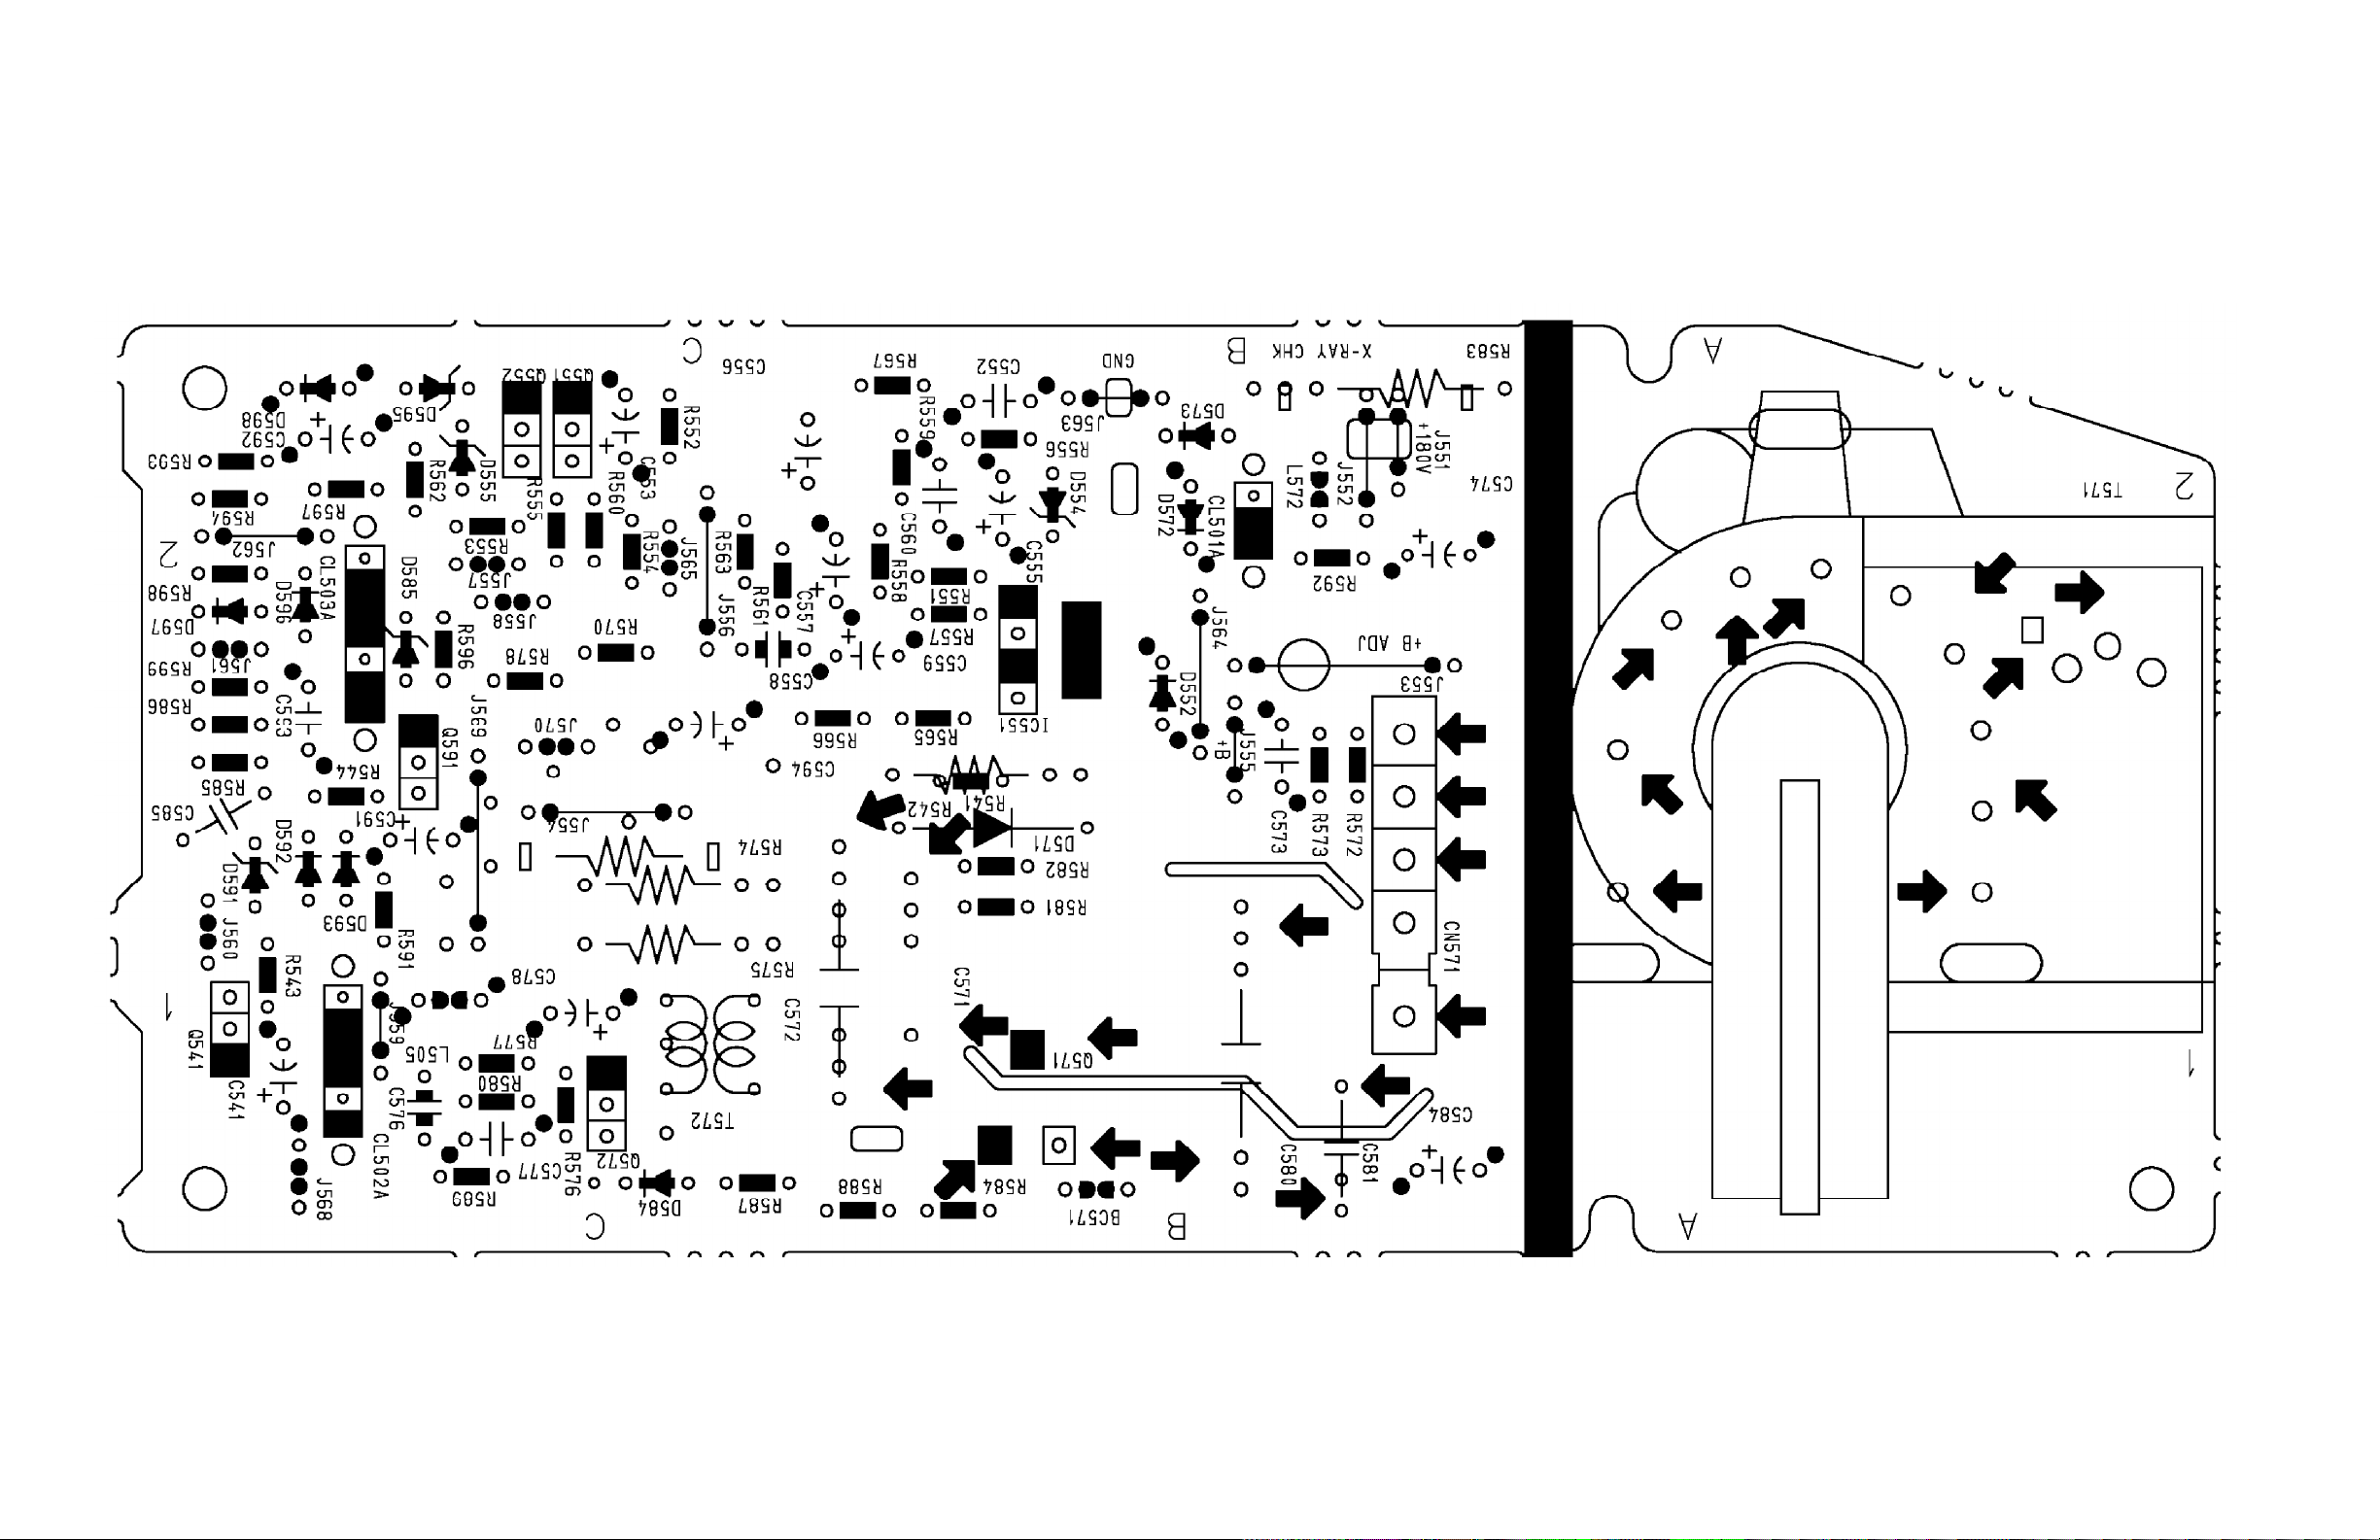
All Models (7607) - H.V. CBA BOTTOM VIEW (TV SECTION)
Page 72
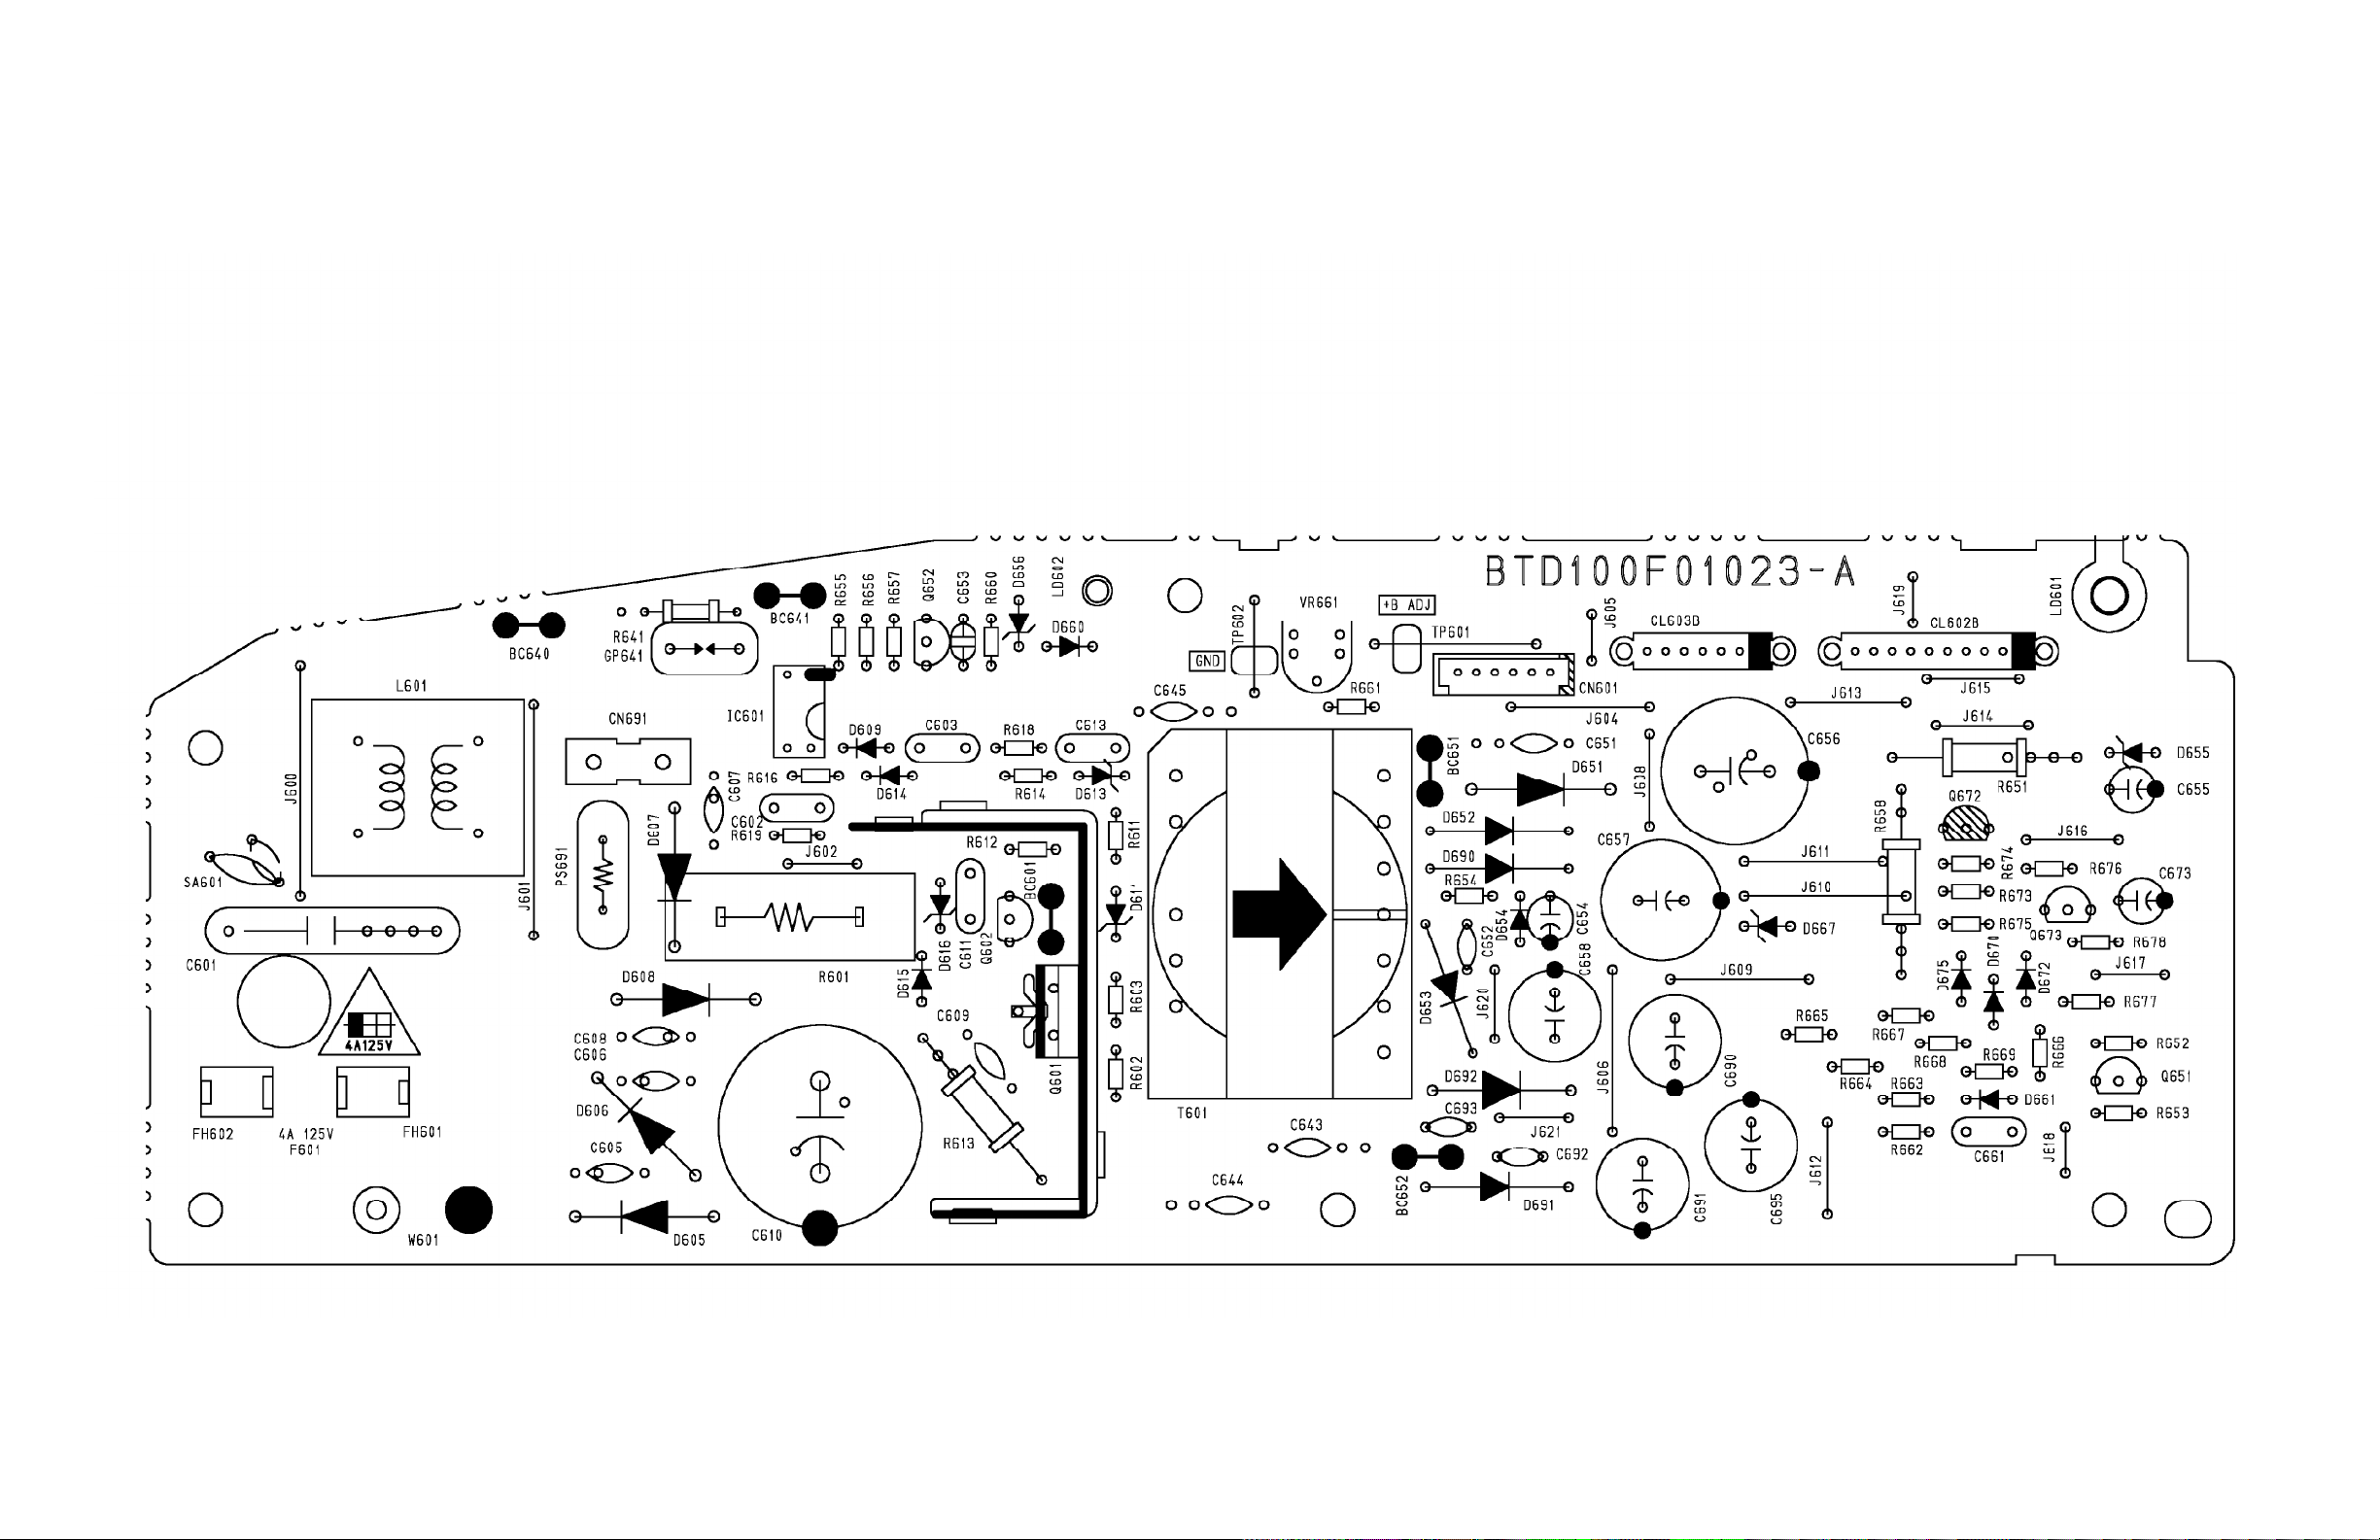
All Models (7607) - POWER SUPPLY CBA TOP VIEW (TV SECTION)
Page 73
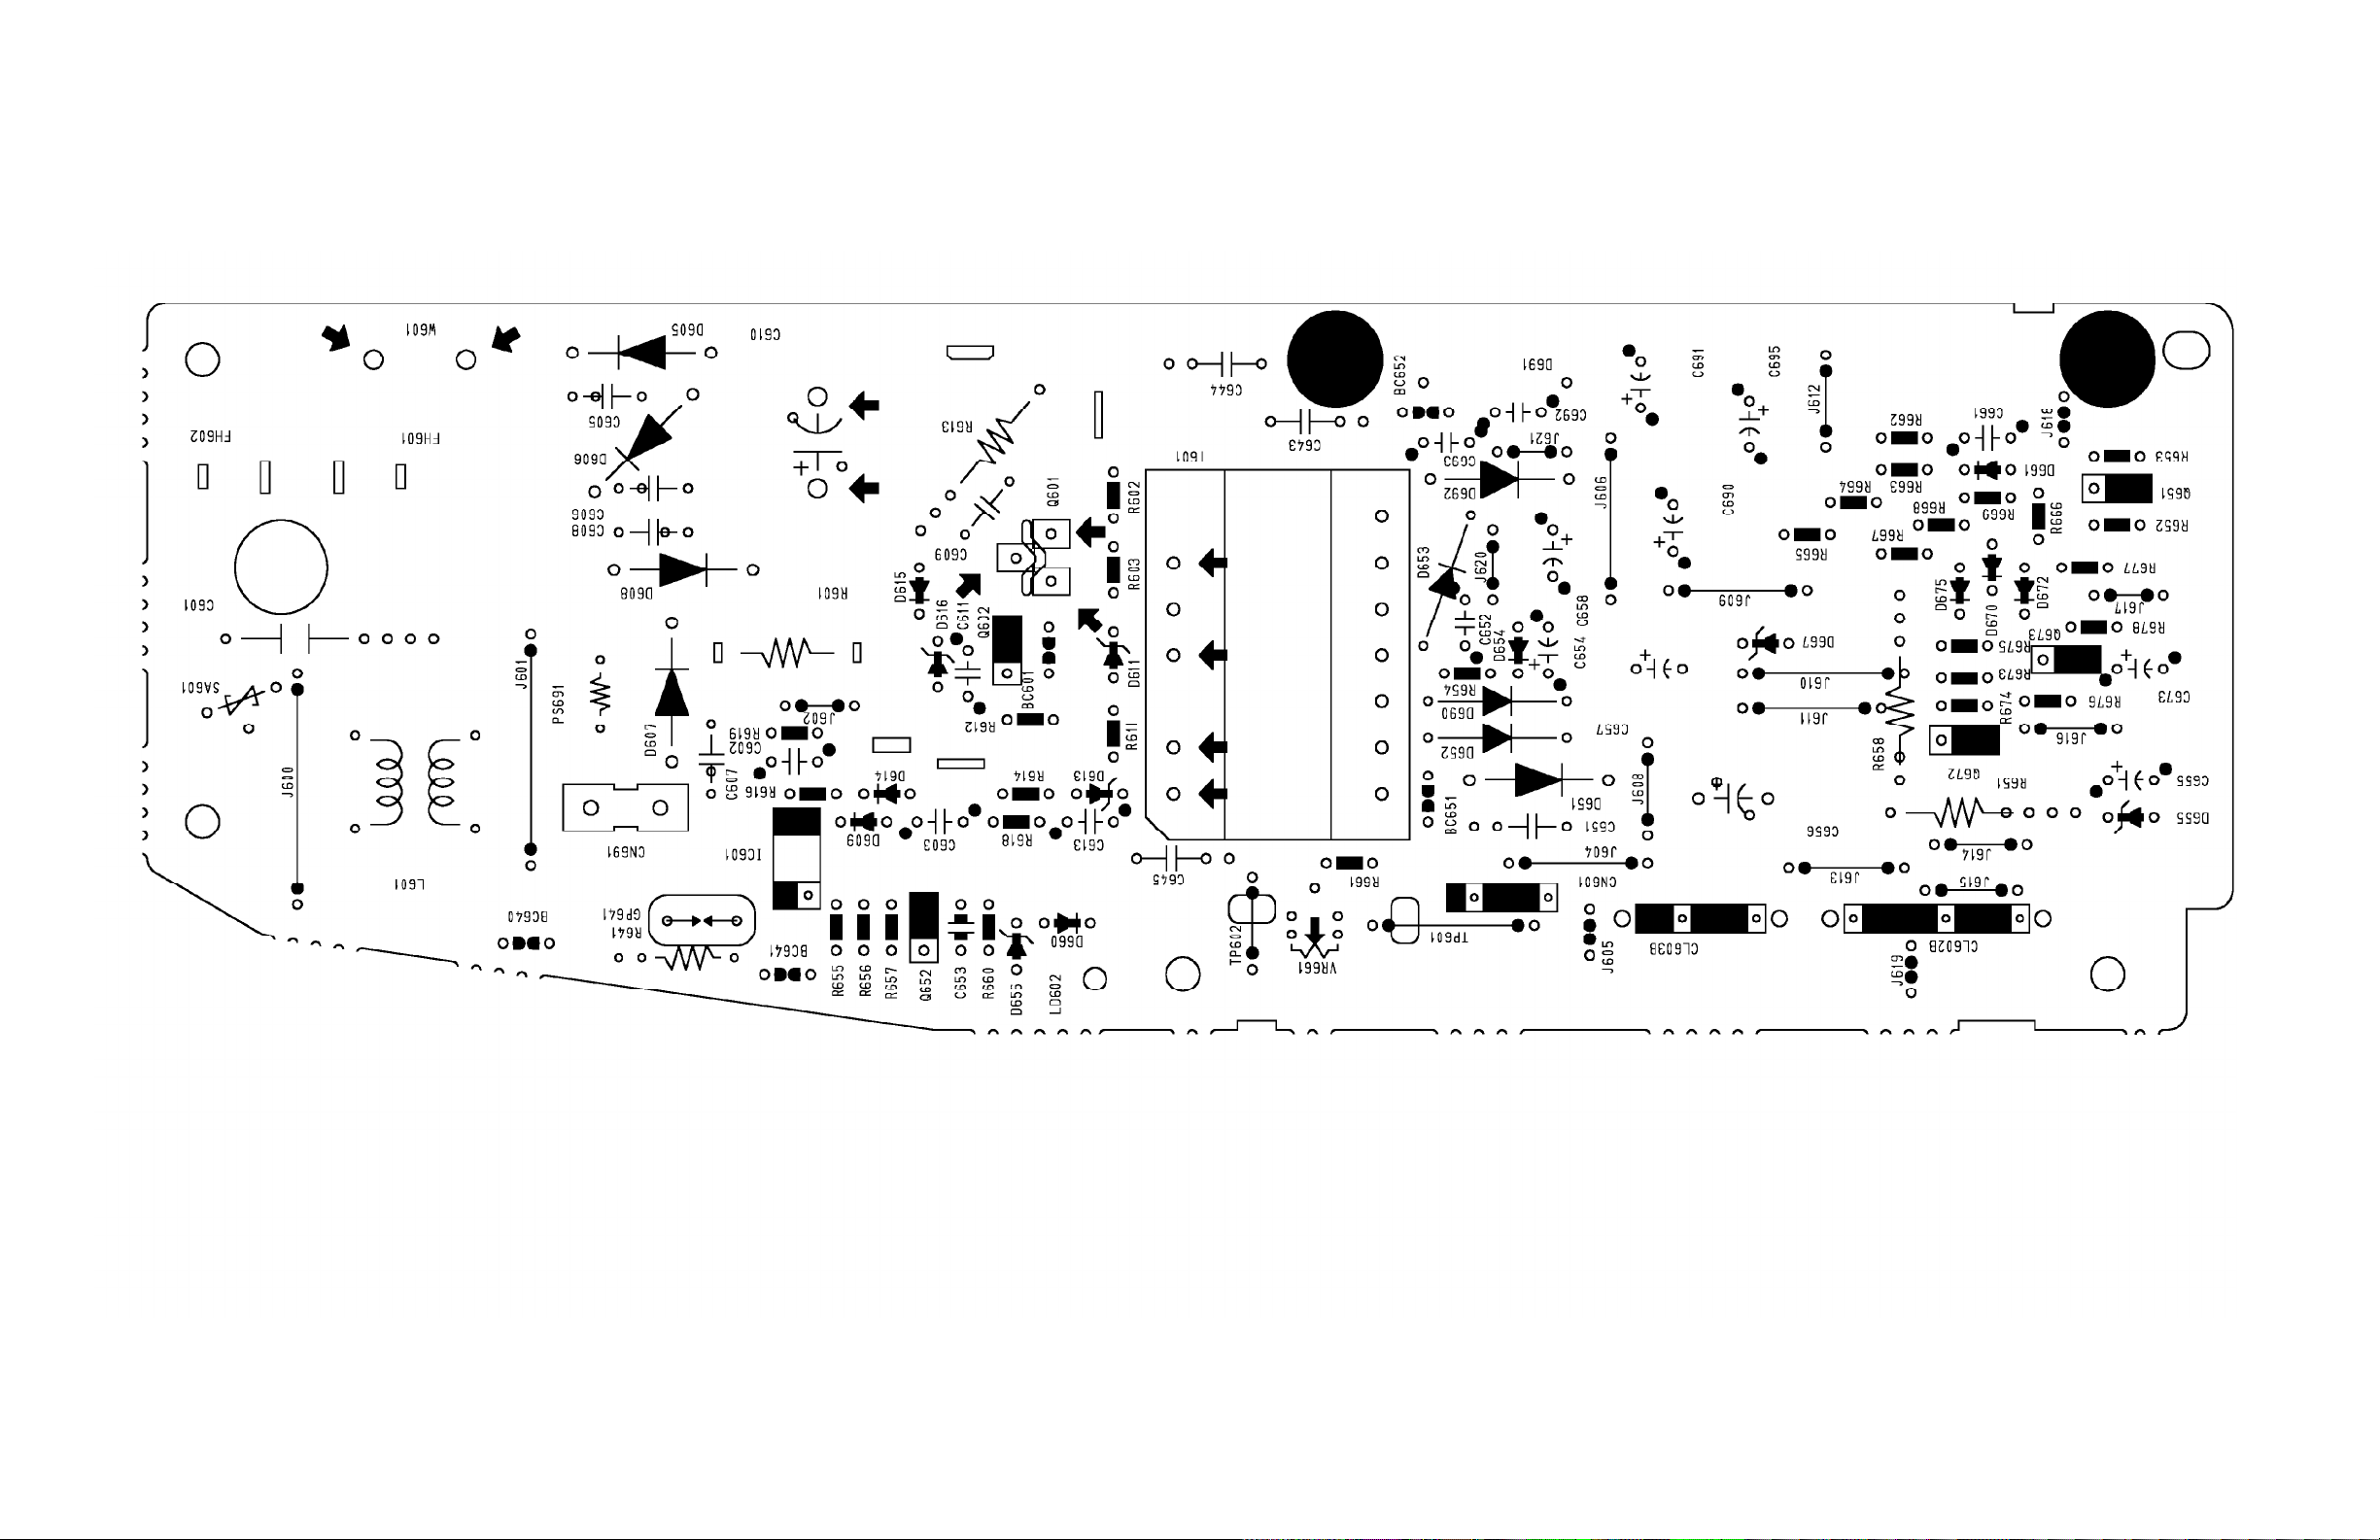
All Models (7607) - POWER SUPPLY CBA BOTTOM VIEW (TV SECTION)
Page 74
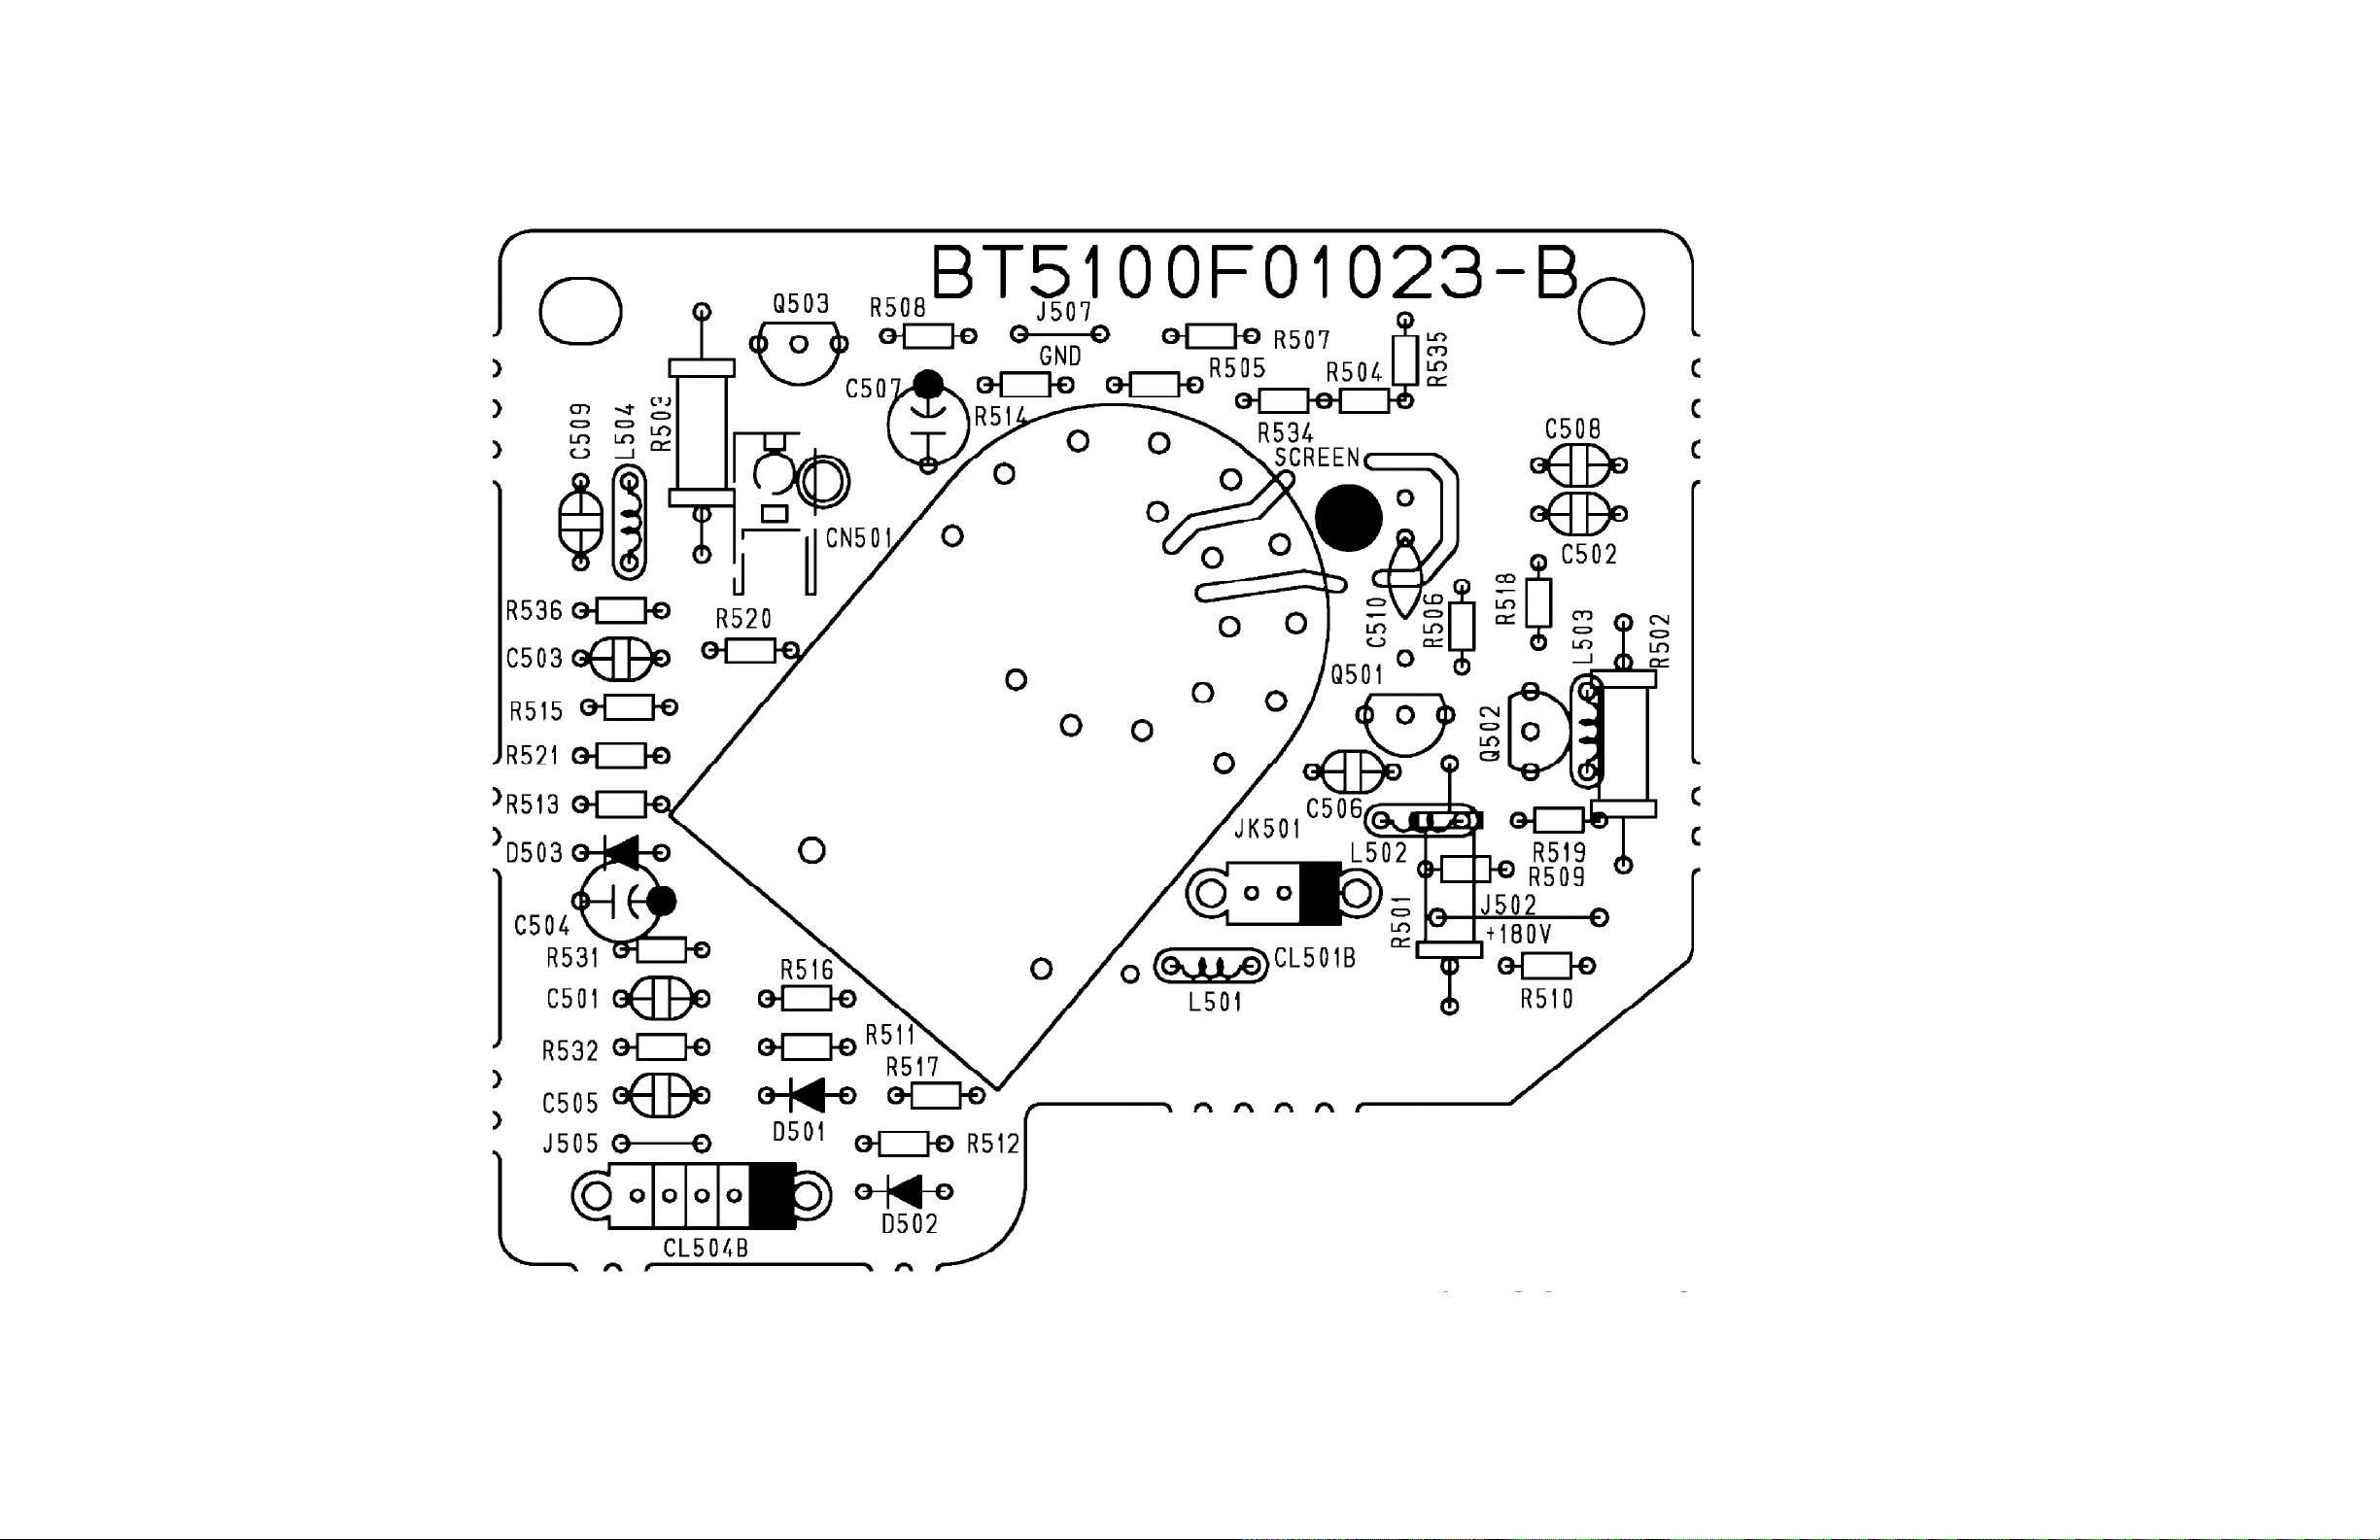
All Models (7607) - CRT CBA TOP VIEW (TV SECTION)
Page 75
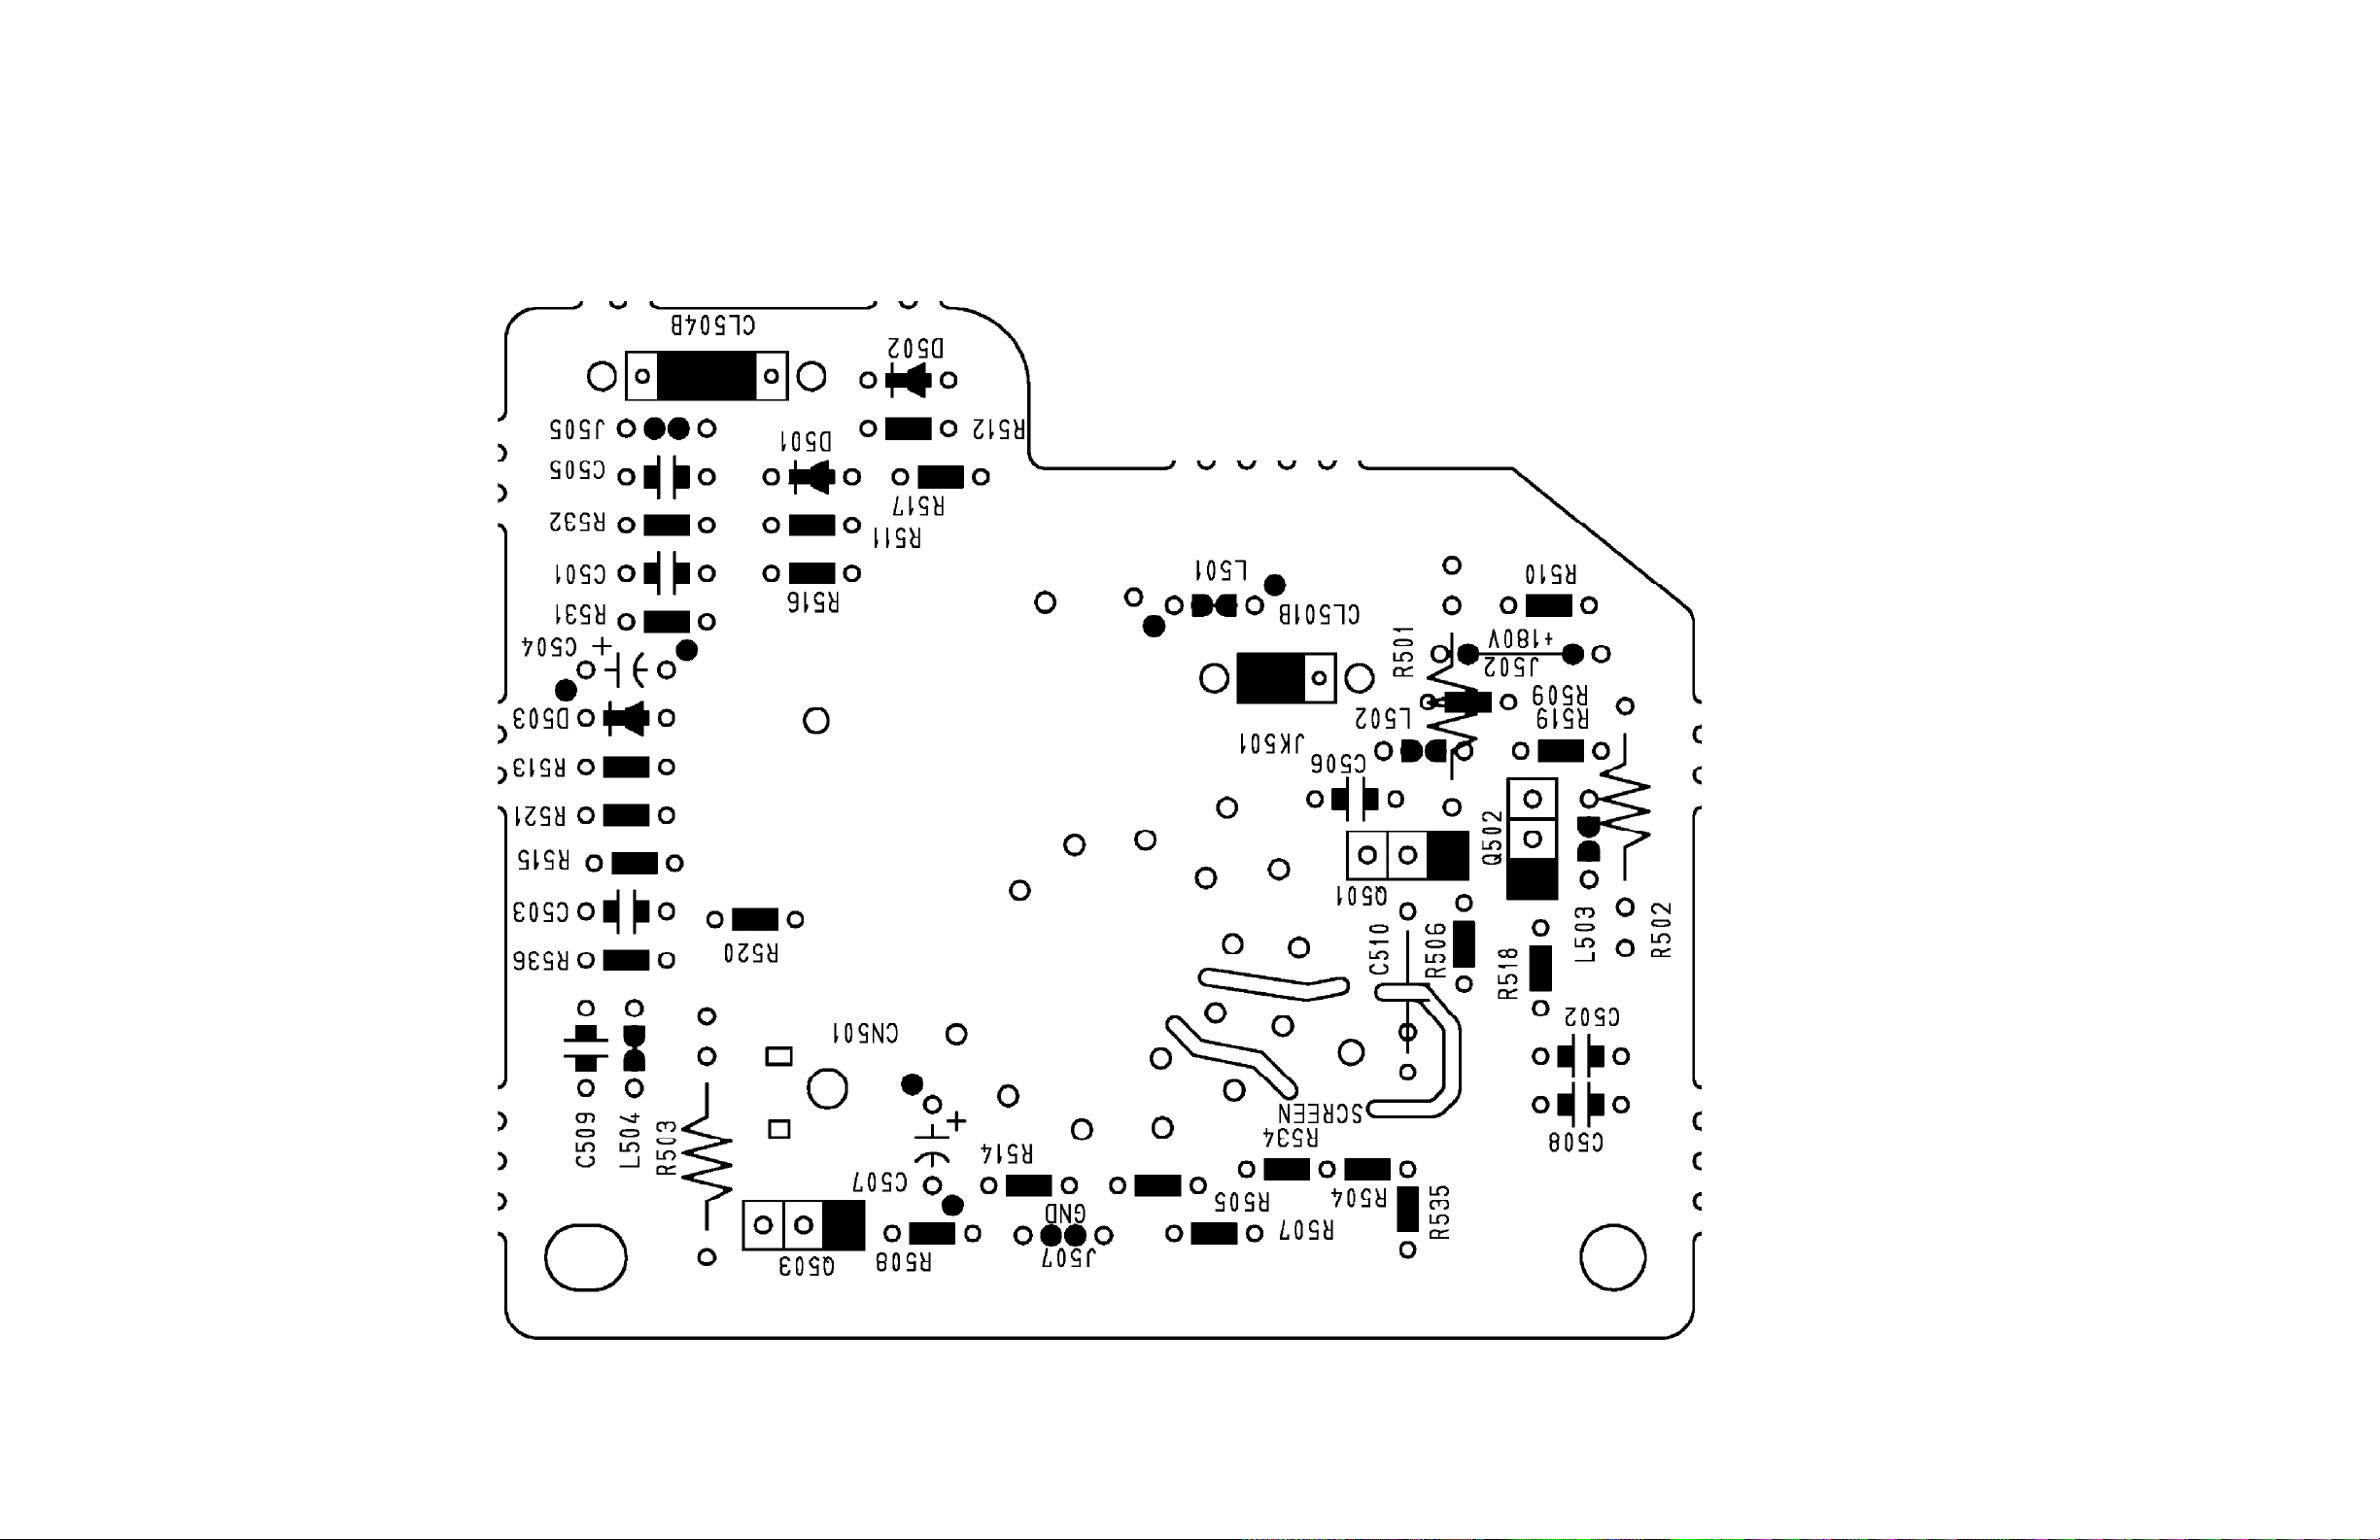
All Models (7607) - CBT CBA BOTTOM VIEW (TV SECTION)
Page 76
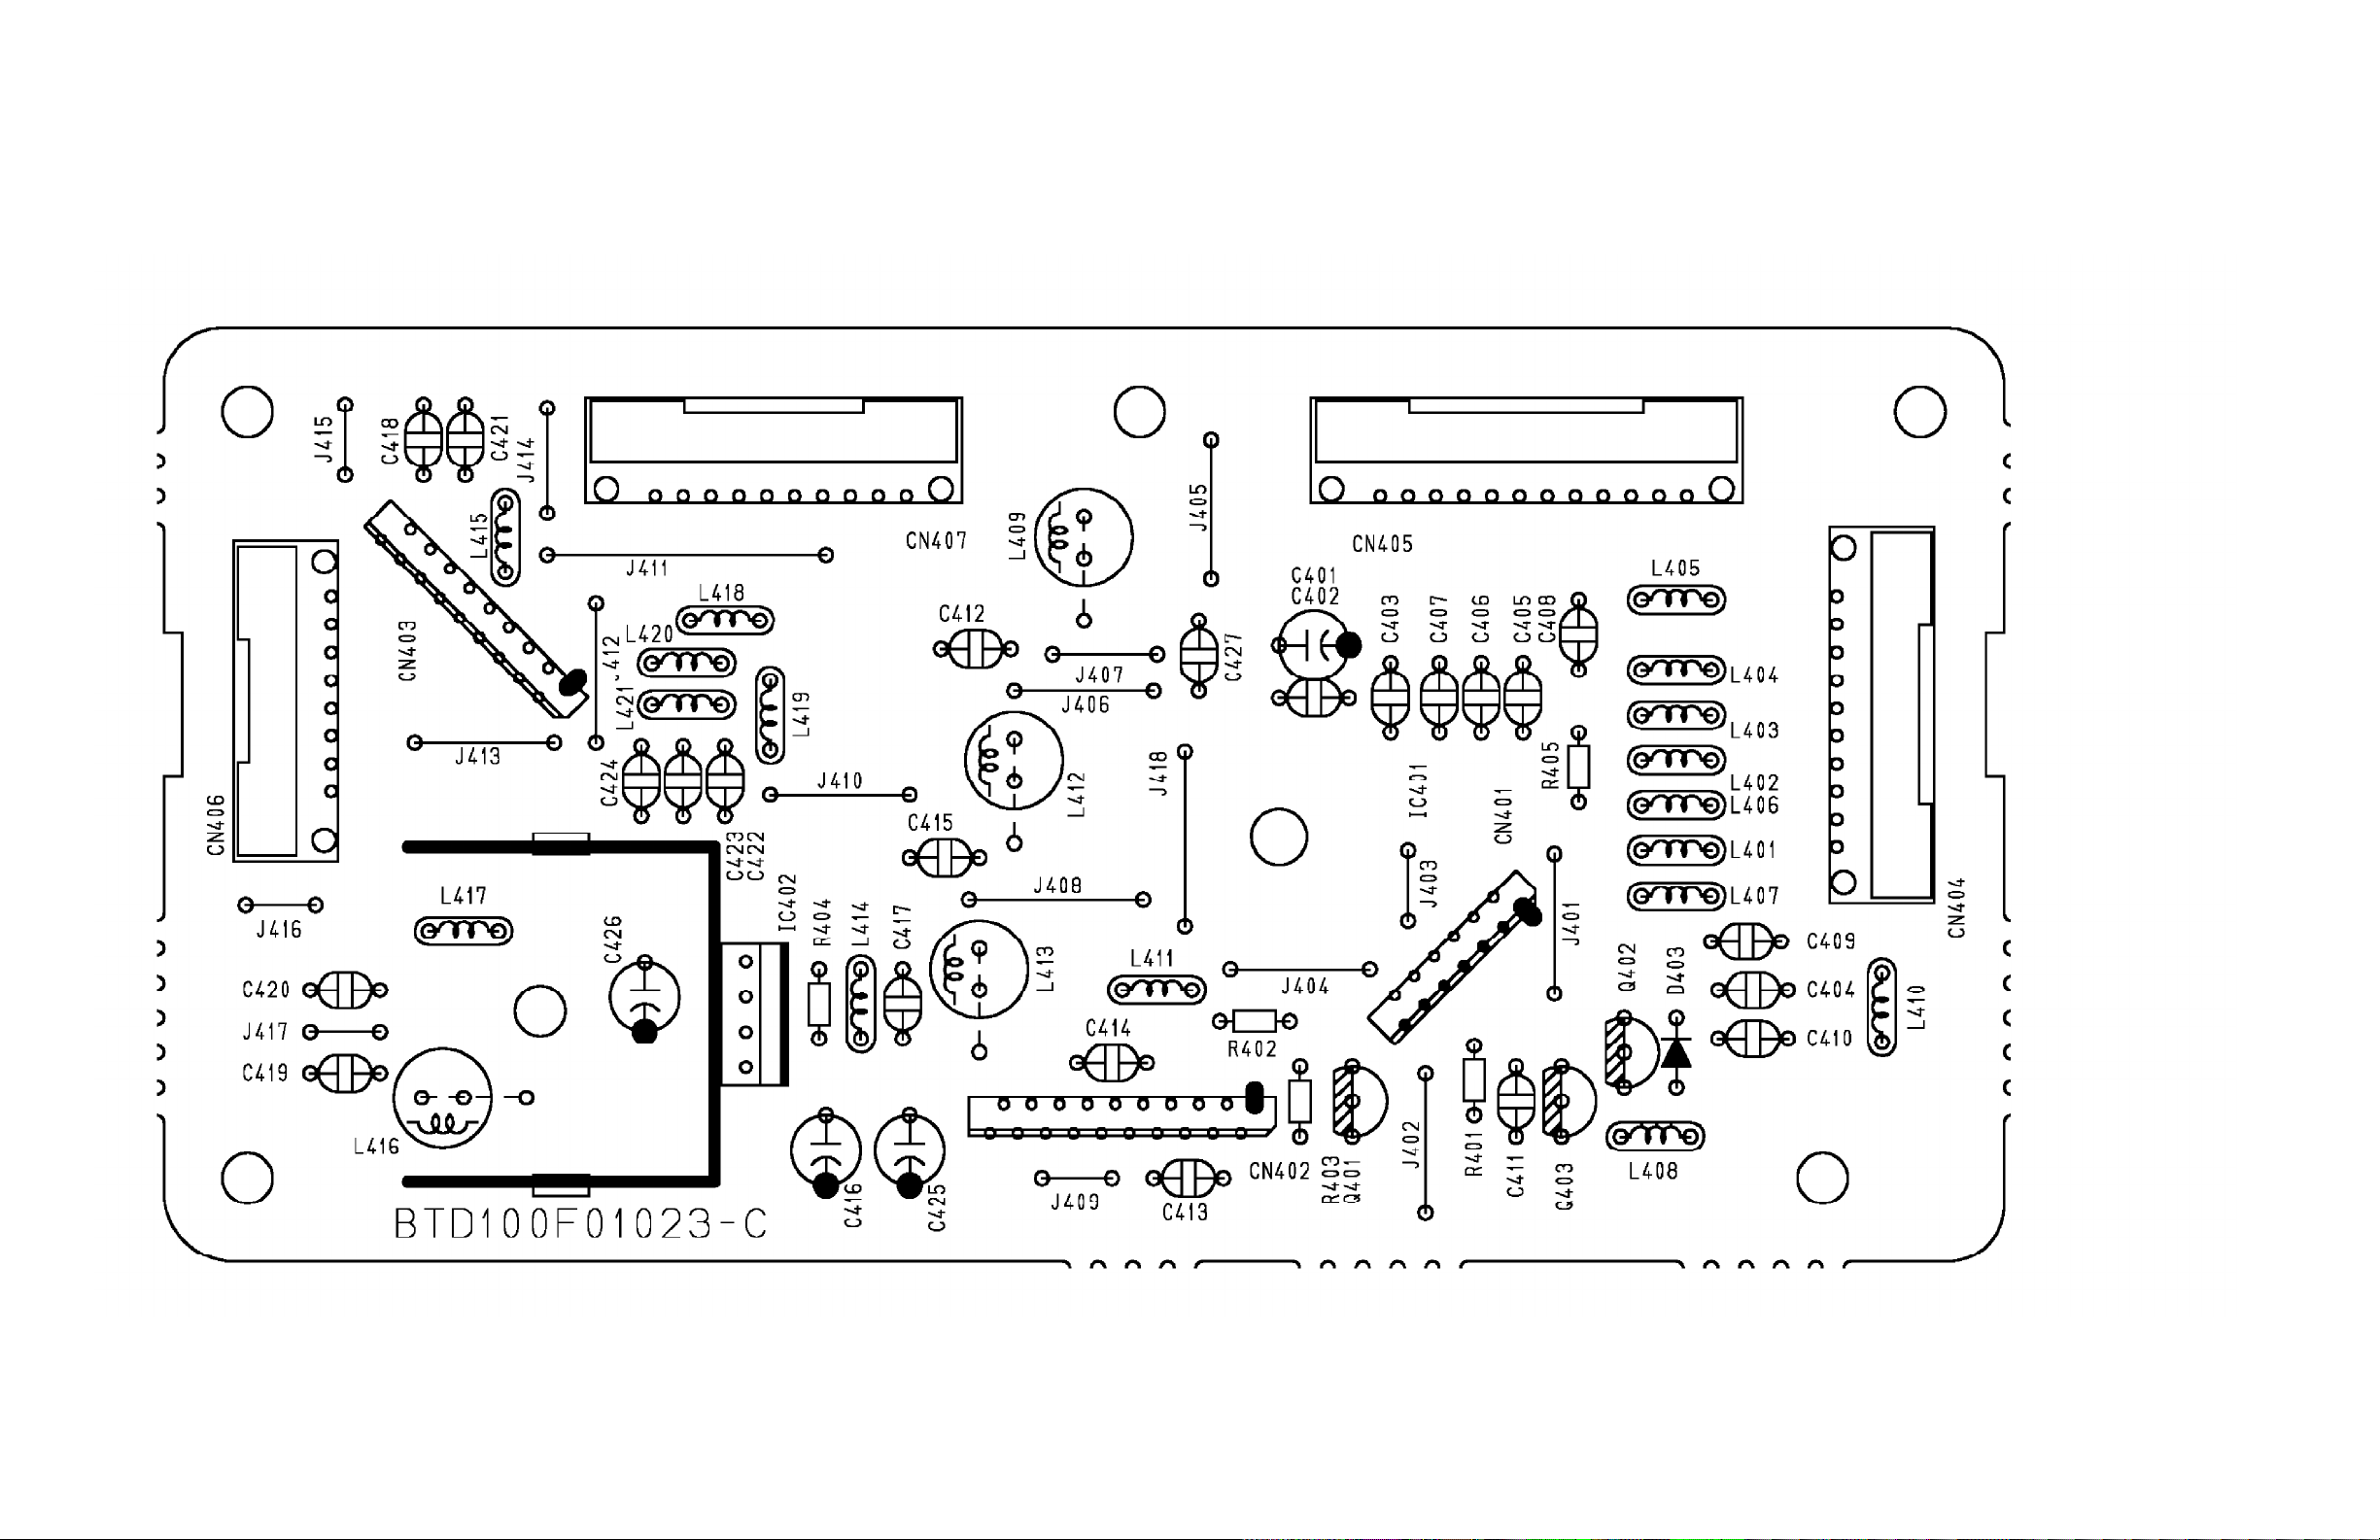
All Models (7607) - FILTER CBA TOP VIEW (TV SECTION)
Page 77
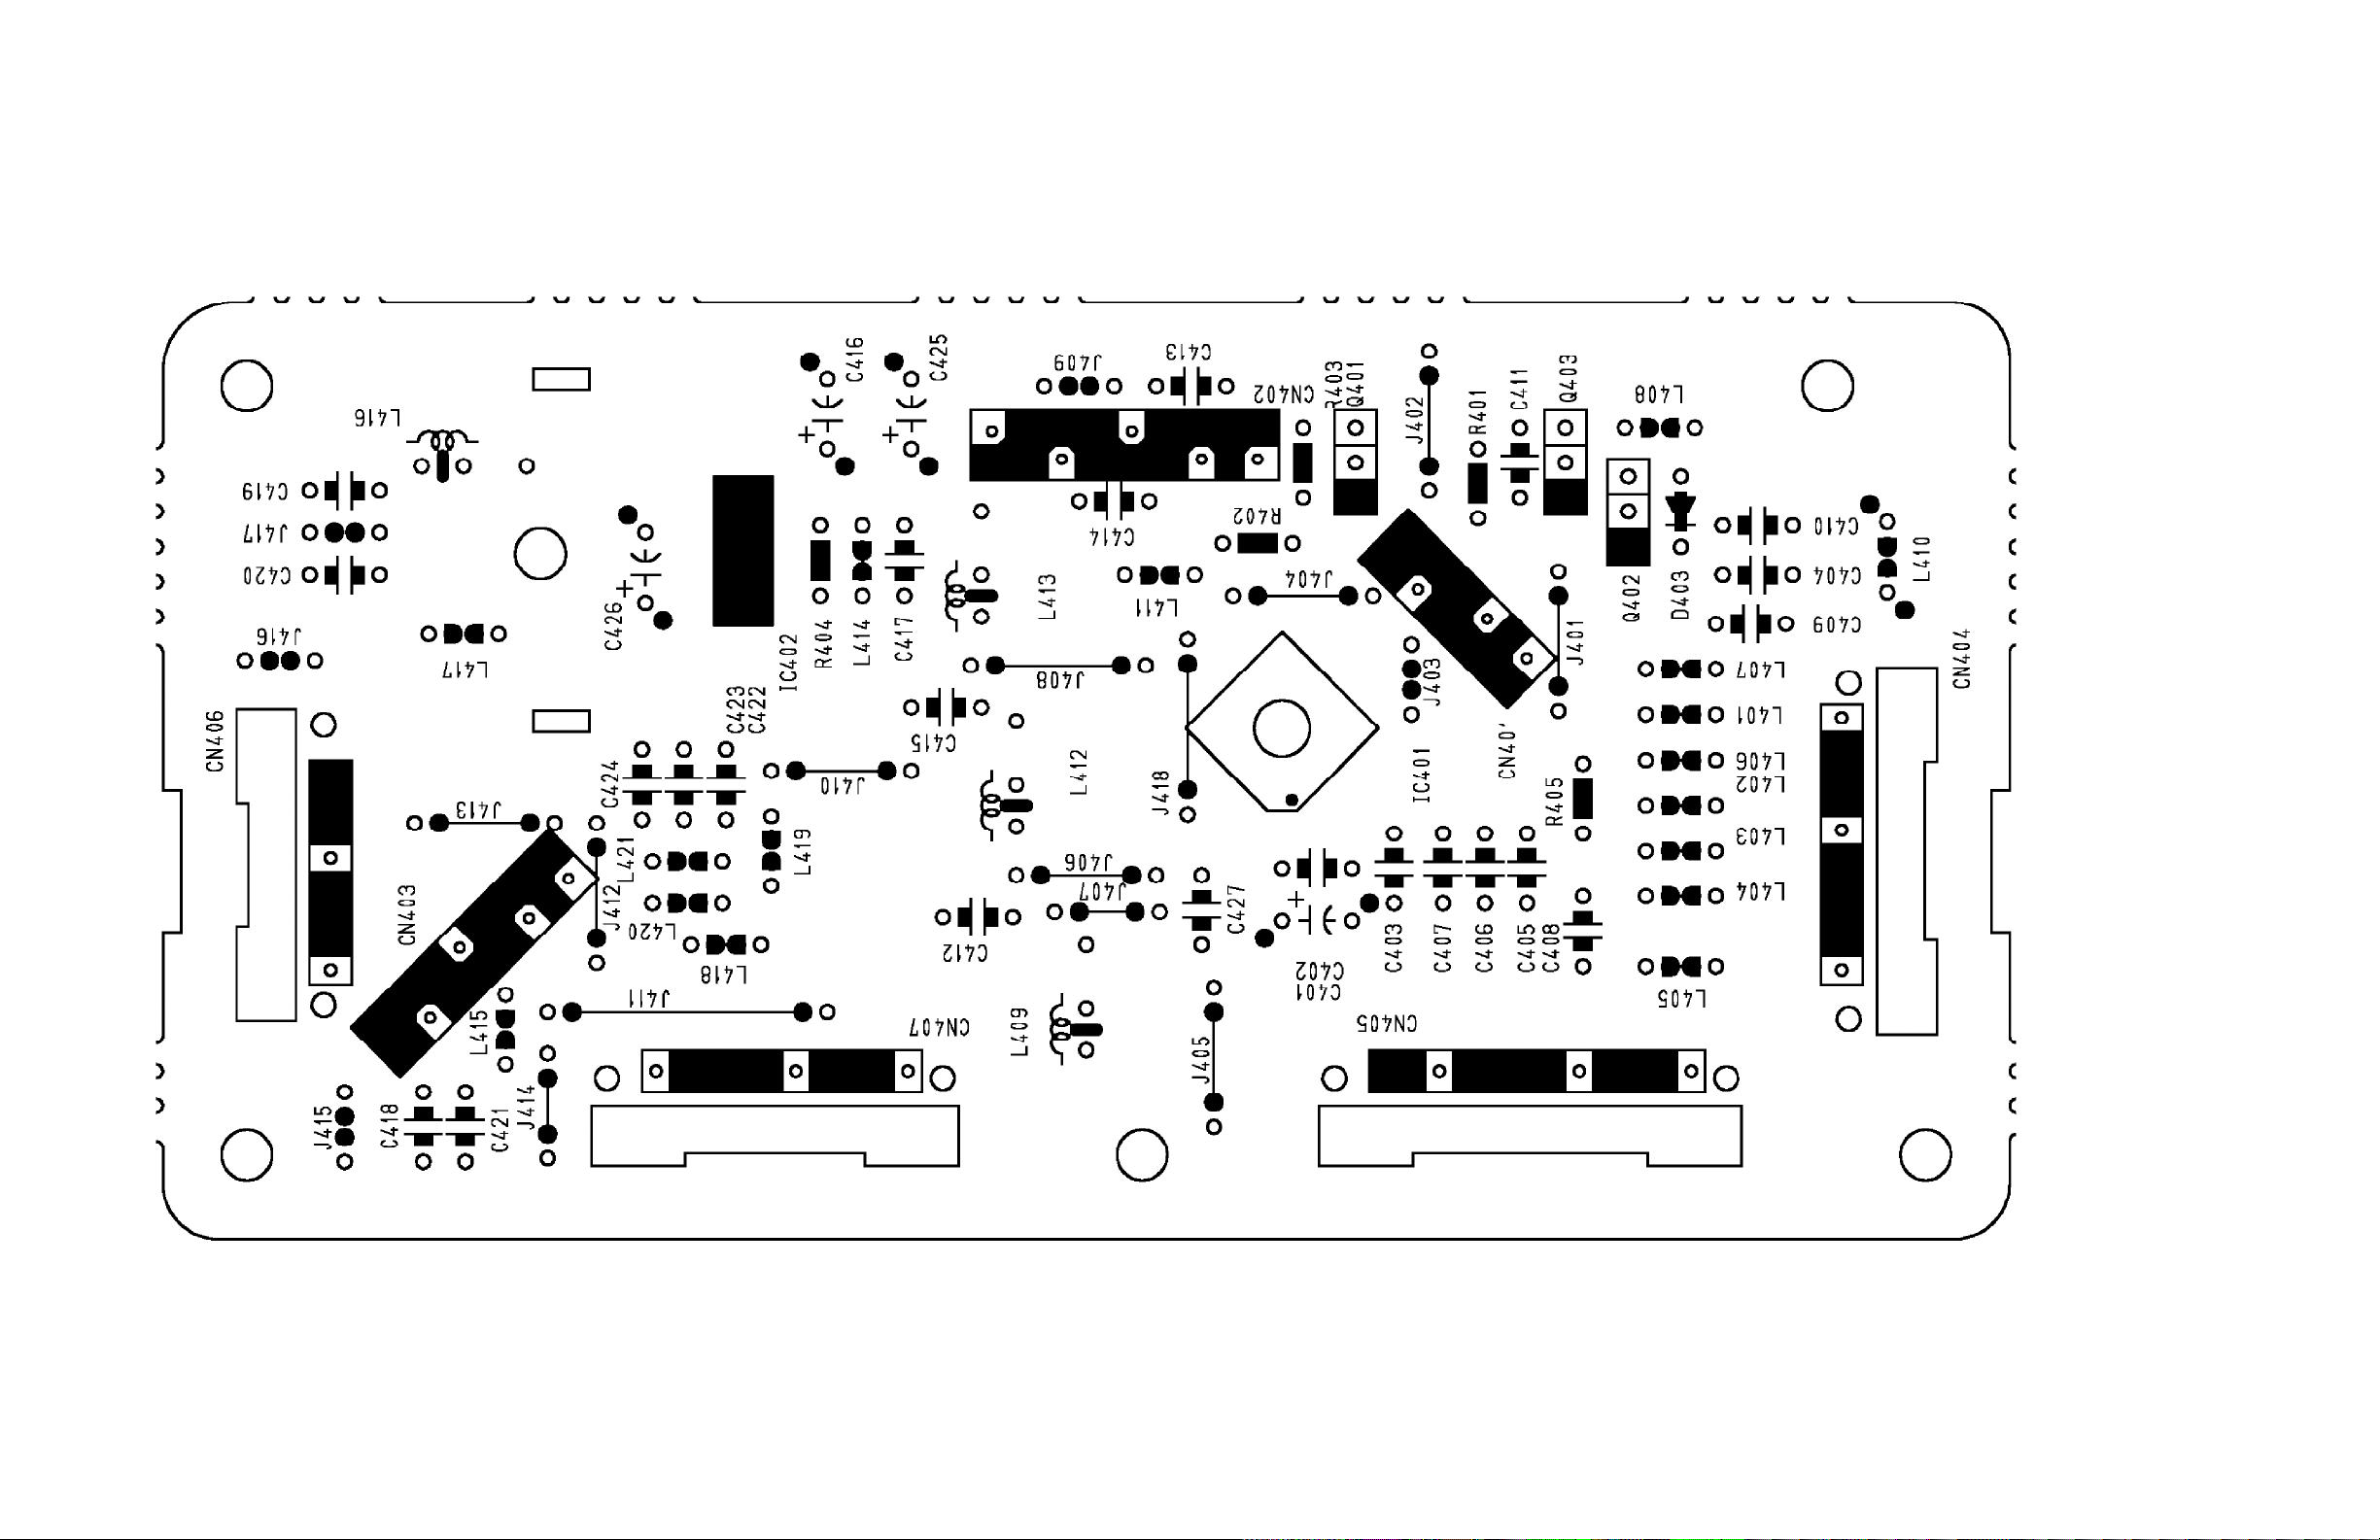
All Models (7607) - FILTER CBA BOTTOM VIEW (TV SECTION)
Page 78
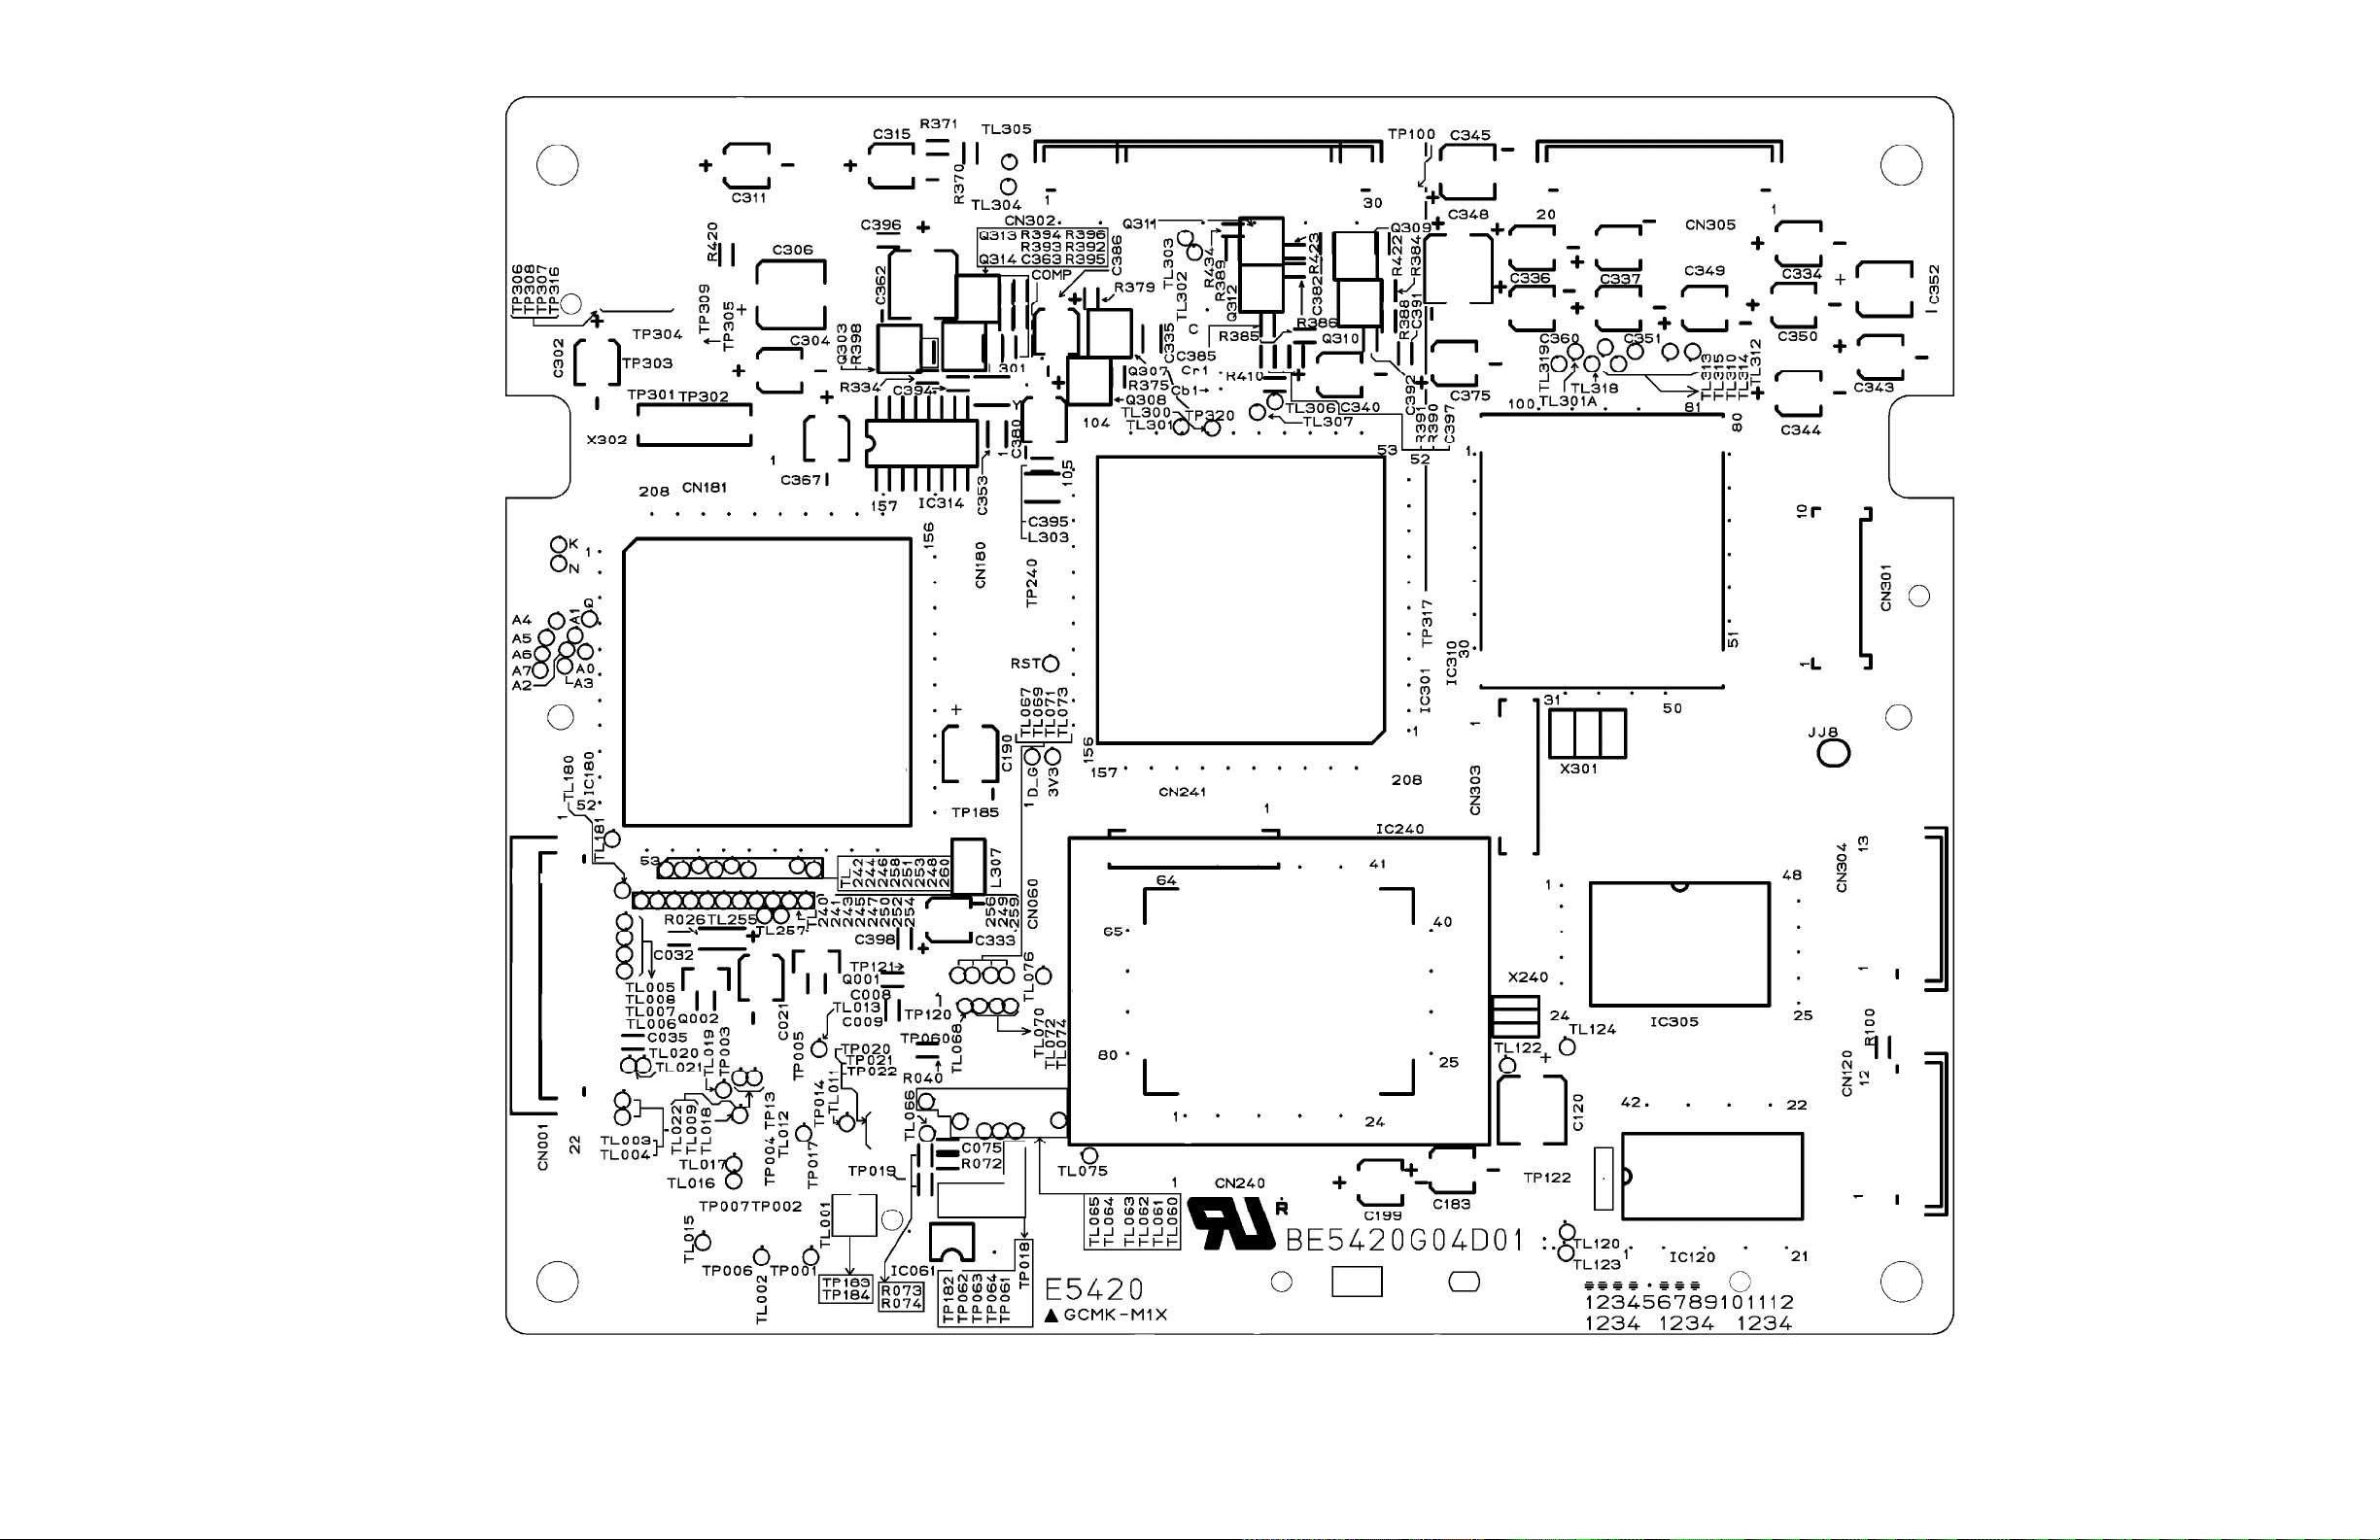
All Models (7607) - DVD CBA TOP VIEW (DVD SECTION)
Page 79
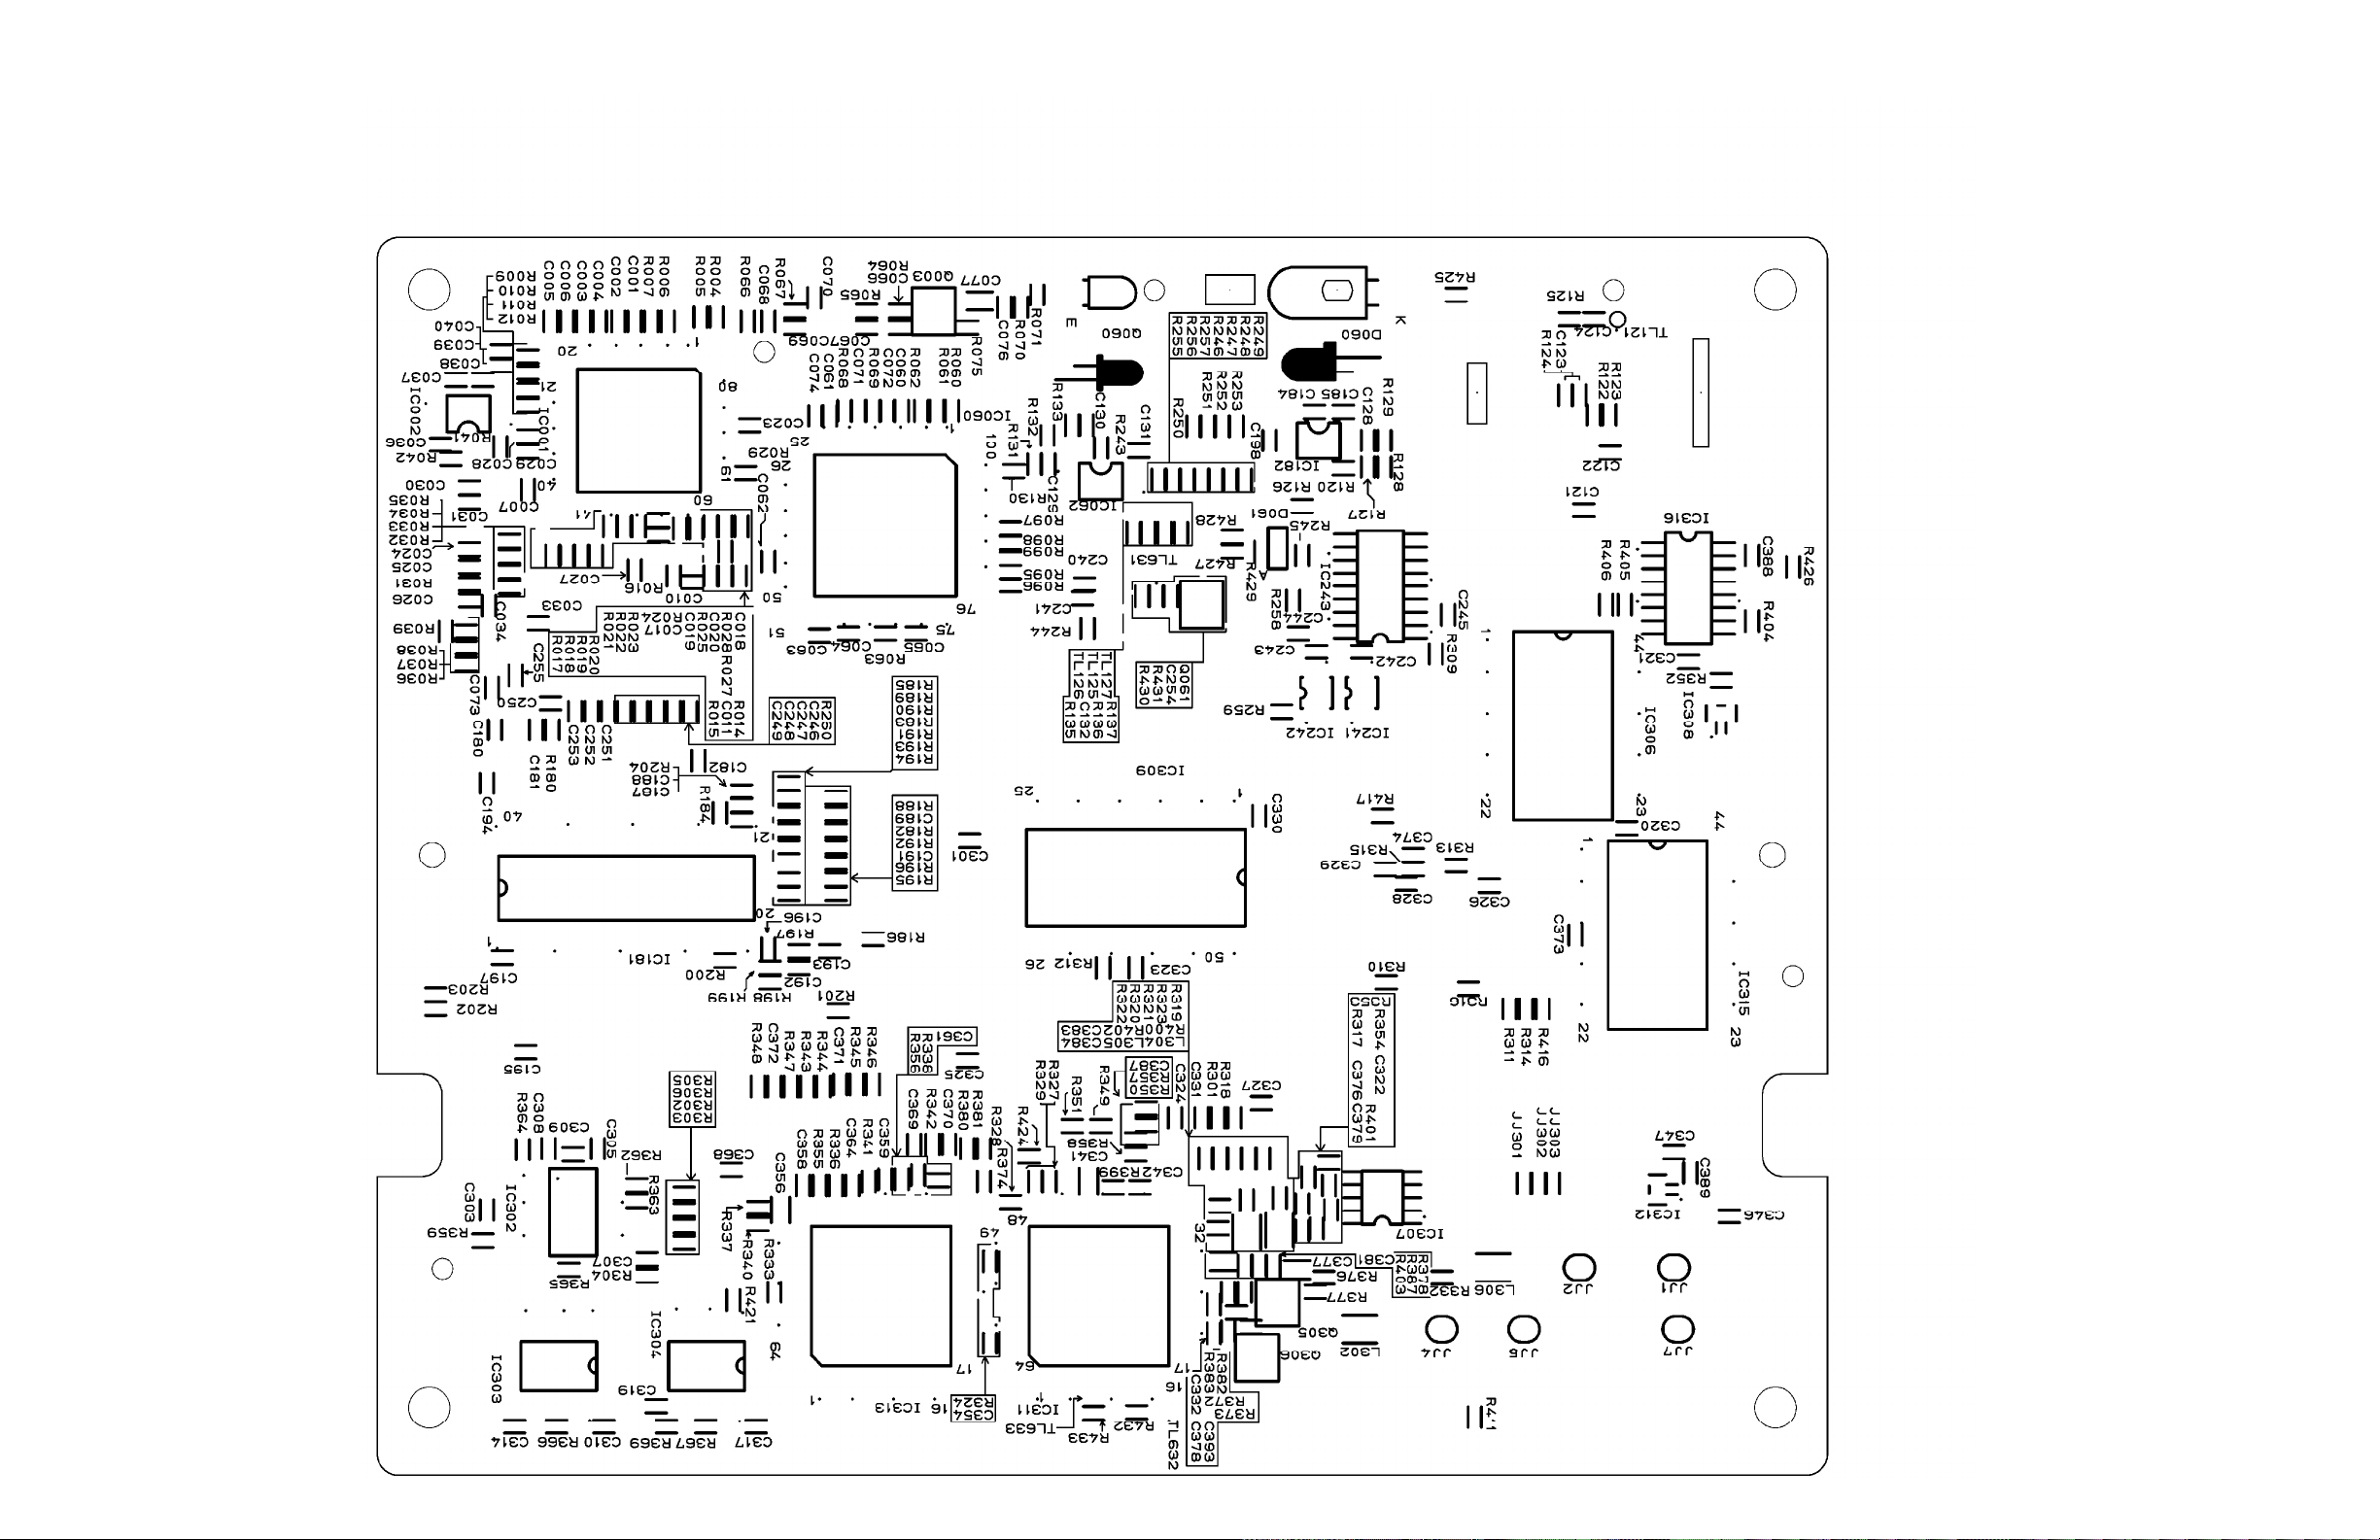
All Models (7607) - DVD CBA BOTTOM VIEW (DVD SECTION)
Page 80
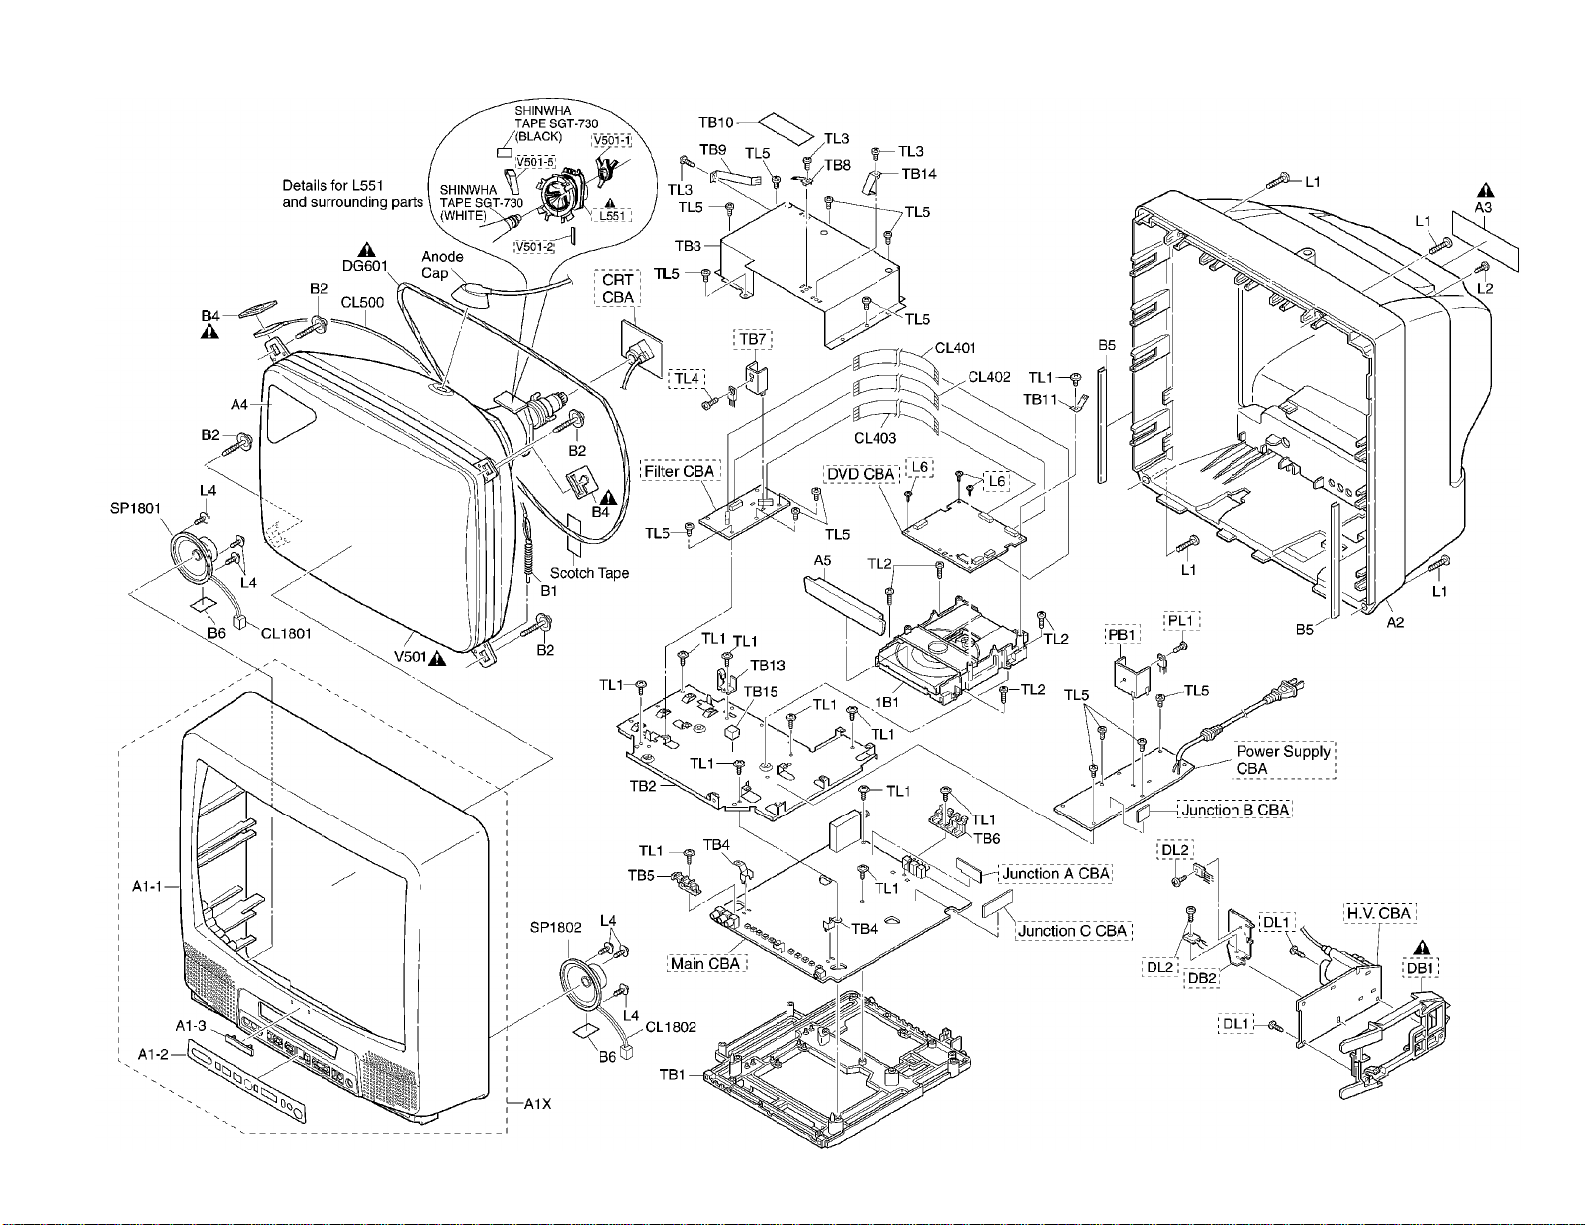
CABINET EXPLODED VIEW
Page 81
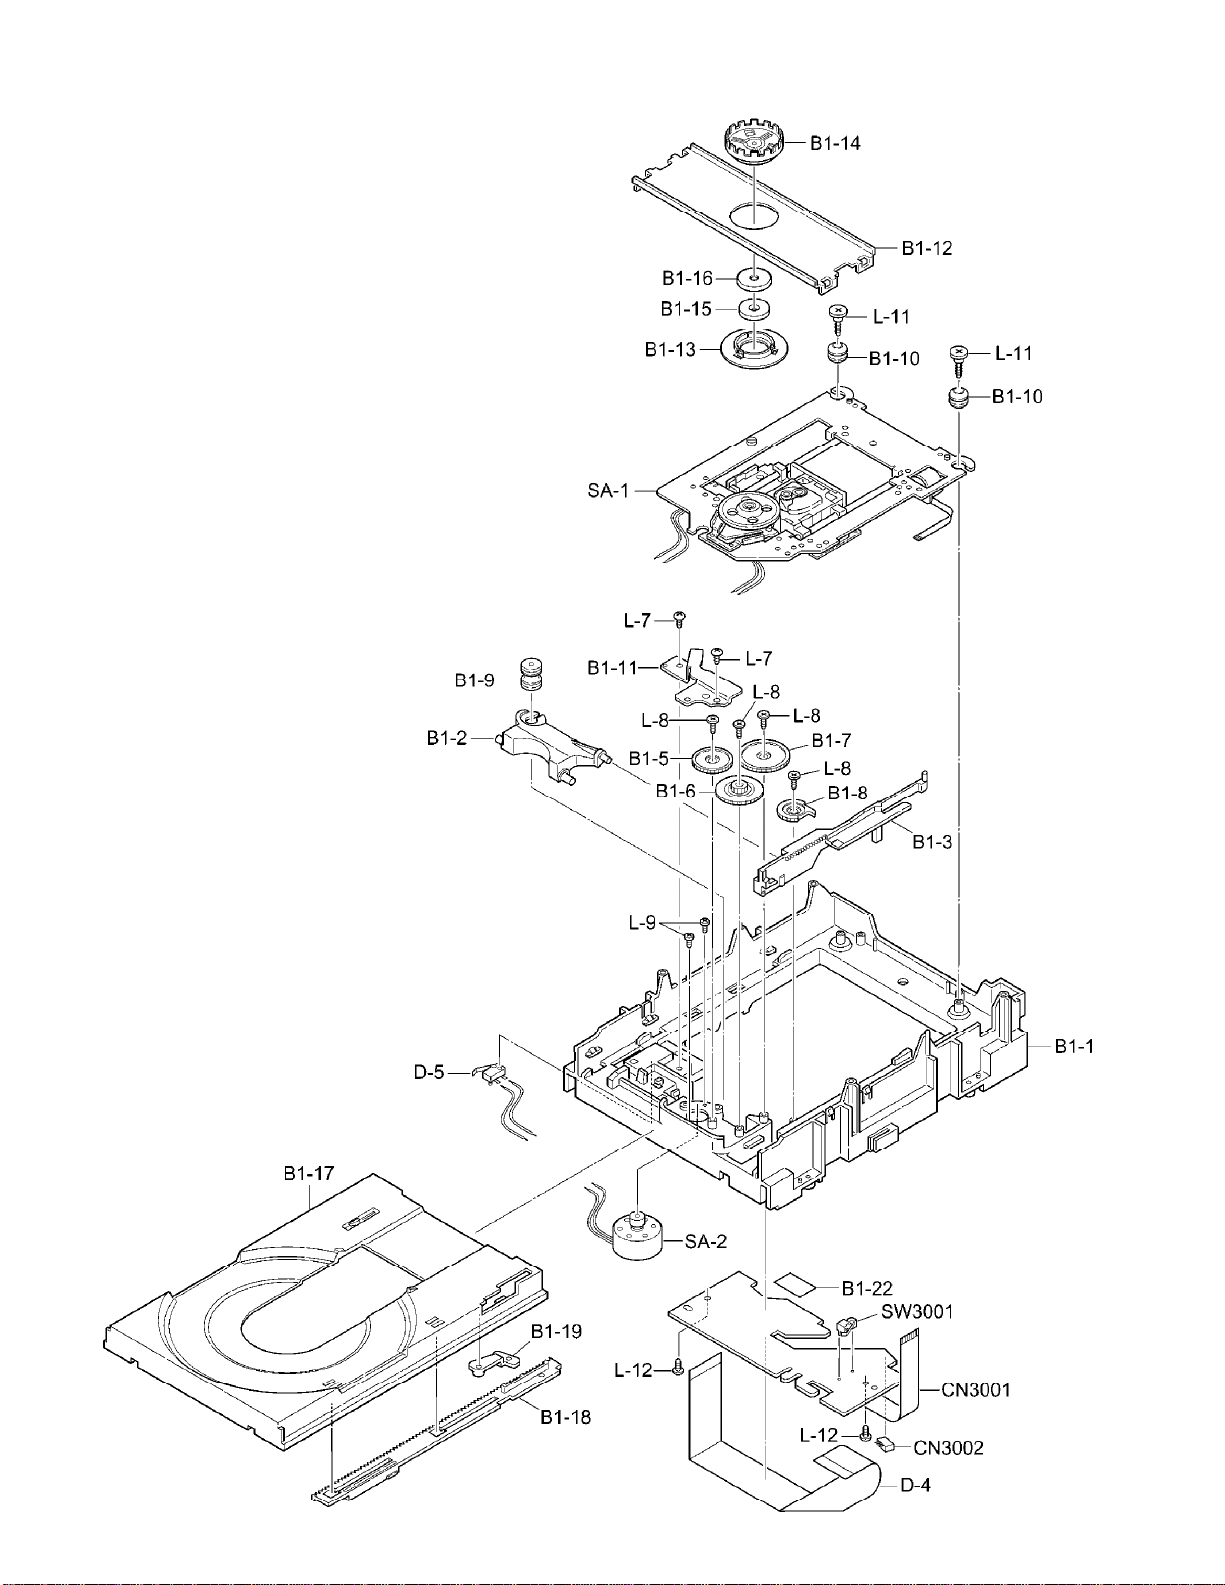
DVD MECHANISM EXPLODED VIEW
Page 82
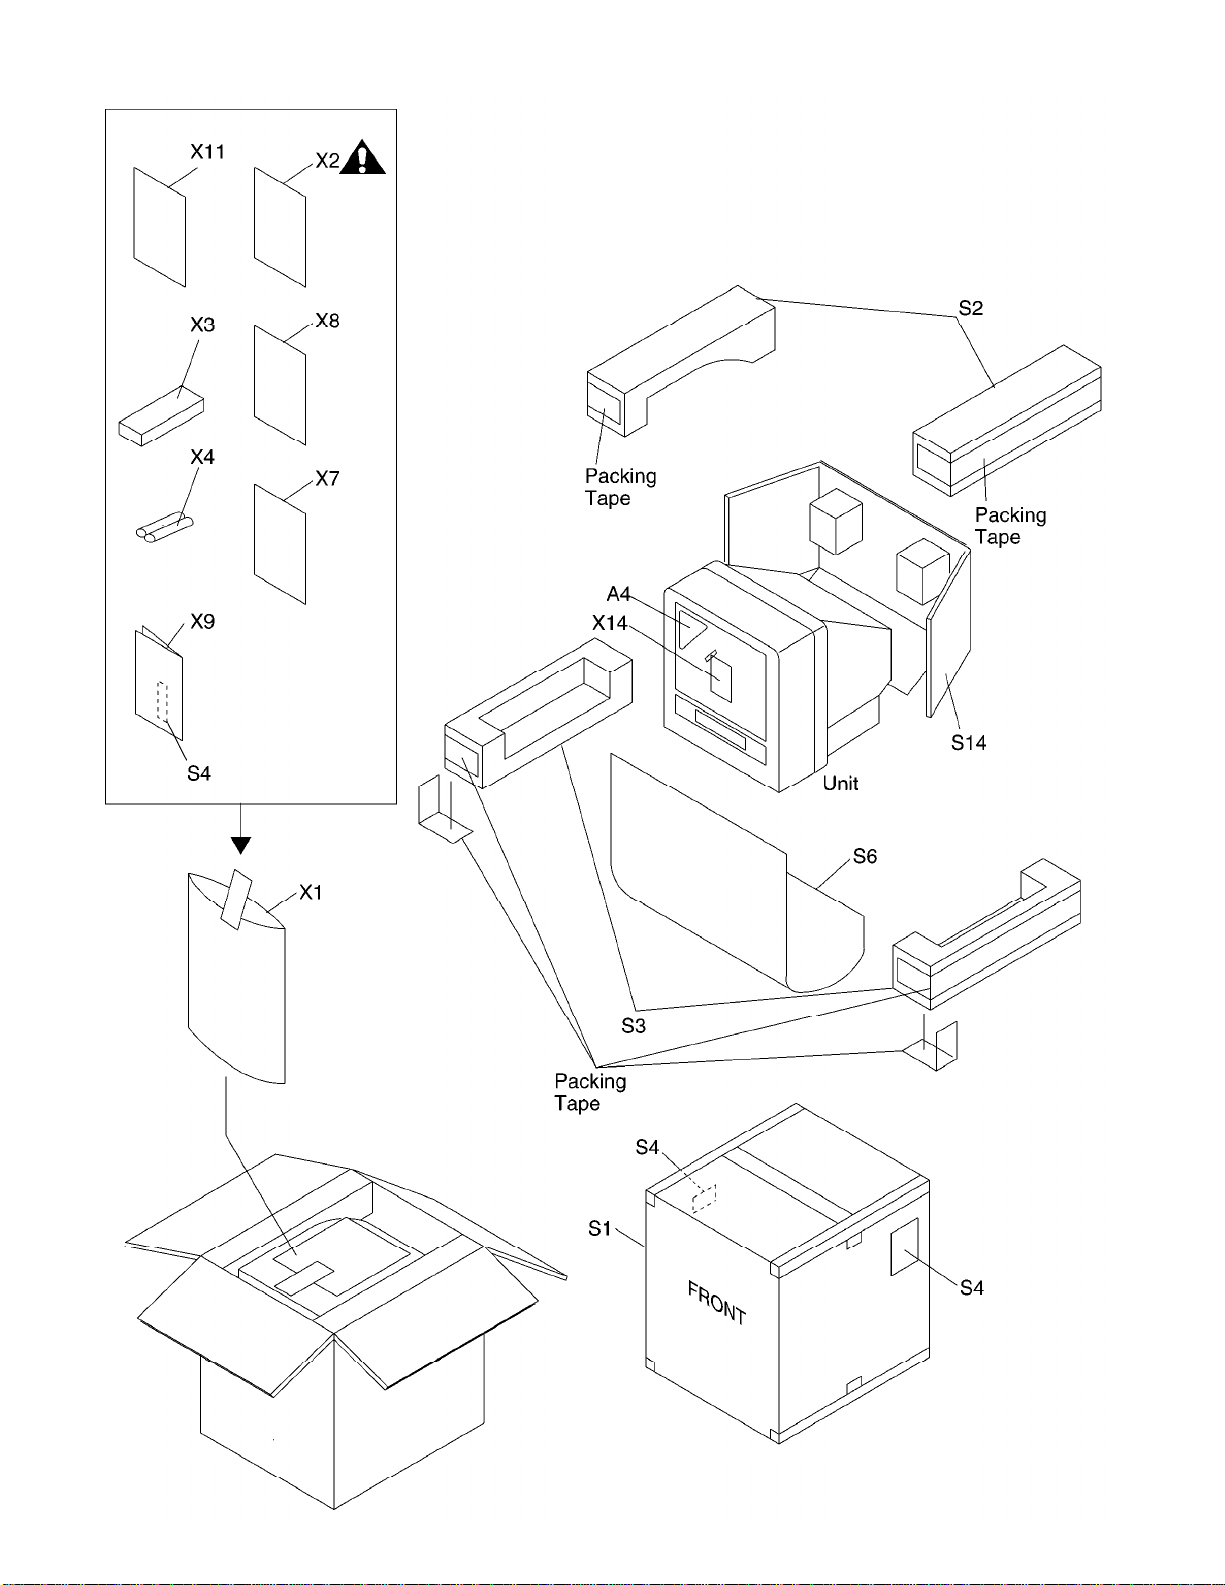
PACKING EXPLODED VIEW
Page 83

CDV19BPH - Manual no. 7607
MECHANICAL
MECHANICAL
1B1 DVD MECHA ASSEMBLY (WITHOUT DVD CBA) . 4835 691 17082
A1X FRONT CABINET ASSEMBLY . . . . . . . . 4835 443 47649
A1-1 FRONT CABINET TD204UE. . . . . . . . . 0000 EM0 00466
A1-2 CONTROL PLATE. . . . . . . . . . . . . 4835 443 67507
A1-3 BRAND BADGE. . . . . . . . . . . . . . 4835 459 17609
A2 REAR CABINET . . . . . . . . . . . . . 4835 443 47648
A3 RATING LABEL . . . . . . . . . . . . . 0000 EM4 05985
A4 POP LABEL. . . . . . . . . . . . . . . 0000 EM4 05984
A5 TRAY PANEL . . . . . . . . . . . . . . 4835 443 67508
B1 TENSION SPRING . . . . . . . . . . . . 4835 492 37025
B2 M6 CRT SCREW 2 . . . . . . . . . . . . 0000 EM4 05741
B4 DEGAUSS HOLDER . . . . . . . . . . . . 0000 EM4 05476
B5 CLOTH 190X15XT0.5. . . . . . . . . . . 0000 00T S7623
B6 CLOTH (10X30XT0.5) . . . . . . . . . . 0000 EM4 04486
CL401 FFC WIRE FFC13P 370MM. . . . . . . . . WX1T D10 0-001
CL402 FFC WIRE FFC20P 310MM. . . . . . . . . WX1T D10 0-003
CL403 FFC WIRE FFC18P 230MM. . . . . . . . . WX1T D10 0-002
CL500 CRT GND WIRE CRT GND . . . . . . . . . WX1T D20 0-002
CL1801 WIRE ASSEMBLY 2P/150 . . . . . . . . . WX1B 590 0-001
CL1802 WIRE ASSEMBLY 2P/150 . . . . . . . . . WX1B 590 0-001
DG601 DEGAUSSING COIL TES-S-0282A. . . . . . 4835 157 97055
L1 SCREW, P-TIGHT 4X18 BIND HEAD +. . . . 0000 GBM P4180
L2 SCREW TAPPING M4X14. . . . . . . . . . 0000 DBU 14140
L4 SCREW, ASSEMBLED 12:M3X14. . . . . . . 0000 EM4 04416
L551 DEFLECTION YOKE KDY3MDA83X . . . . . . 4835 150 17176
SP1801 SPEAKER S08F02B. . . . . . . . . . . . 4835 240 17019
SP1802 SPEAKER S08F02B. . . . . . . . . . . . 4835 240 17019
TB1 TRAY CHASSIS . . . . . . . . . . . . . 0000 EM0 00463
TB2 BOTTOM PLATE . . . . . . . . . . . . . 4835 443 57074
TB3 SHIELD BOX . . . . . . . . . . . . . . 0000 EM2 01317
TB5 RCA HOLDER(1). . . . . . . . . . . . . 0000 EM4 05941
TB6 RCA HOLDER(2). . . . . . . . . . . . . 0000 EM4 05942
TB8 EARTH SPRING(H/S). . . . . . . . . . . 0000 EM4 05969
TB9 EARTH SPRING(TU) . . . . . . . . . . . 0000 EM4 05970
TB10 LABEL, LASER CAUTION (C) . . . . . . . 0000 EM4 05997
TB11 EARTH SPRING(PCB). . . . . . . . . . . 0000 EM4 05992
TB13 LEAD CLAMPER . . . . . . . . . . . . . 0000 EM4 05996
TB14 EARTH SPRING(LOADER) . . . . . . . . . 0000 EM4 05999
TB15 SPACER . . . . . . . . . . . . . . . . 0000 EM4 06006
TL1 SCREW, P-TIGHT 3X12 WASHER HEAD+ . . . 0000 GCM P3120
TL2 B TIGHT SCREW 3X12 BIND +. . . . . . . 0000 GBM B3120
TL3 SCREW, S-TIGHT M3X6 BIND HEAD+ . . . . 0000 GBM S3060
TL5 B-TITE SCREW 3X8 BIND + CHROME . . . . 0000 GBM B3080
V501 TYPE A, CRT A48AGY13X26 (L551 +V501-1+
V501-5). . . . . . . . . . . . . . . . 4835 131 27186
V501 TYPE B, CRT A48AGY13X (V501-1+V501-5). 4835 131 27185
L551 DEFLECTION YOKE KDY3MDA83X . . . . . . 4835 150 17176
V501-1 C.P.MAGNET JH8210-SD . . . . . . . . . XM04 000 BV008
V501-5 WEDGE FT-00110W. . . . . . . . . . . . XV10 000 T4001
PACKING
PACKING
S1 CARTON . . . . . . . . . . . . . . . . 0000 EM4 05986
S2 STYROFOAM TOP. . . . . . . . . . . . . 0000 EM0 00472
S3 STYROFOAM BOTTOM . . . . . . . . . . . 0000 EM0 00473
S4 SERIAL NO. LABEL . . . . . . . . . . . 0000 EM4 05987
S6 SET SHEET. . . . . . . . . . . . . . . 0000 EM4 02178
S14 HOLD PAD . . . . . . . . . . . . . . . 0000 EM3 01408
ACCESSORIES
ACCESSORIES
X1 POLYETHYLENE BAG . . . . . . . . . . . 0000 0Z2 23380
X2 OWNER'S MANUAL . . . . . . . . . . . . 00IB 824 0E001
X3 REMOCON UNIT 182/ERC001/N0286UD. . . . 4835 218 37297
X4 DRY BATTERY R6P UM3. . . . . . . . . . 4835 138 17012
X7 RETURN STOP SHEET. . . . . . . . . . . 0000 VM4 11287
X8 SERVICE CENTER MAP . . . . . . . . . . 0000 VMN 01909
X9 REGISTRATION CARD. . . . . . . . . . . 0000 VMN 02431
X11 IMPORTANT SAFEGUARDS . . . . . . . . . 0000 EMN 01729
X14 QUICK START GUIDE. . . . . . . . . . . 0000 EM4 06089
Main CBA (MMA)
Main CBA (MMA)
Main CBA (MMA) . . . . . . . . . . . . 0000 ESA 03899
C1002 CERAMIC CAP. 0.01mF/50V +80/-20% (F) . 4835 122 37011
C1003 CERAMIC CAP.(AX) 56pF/50V ±5% (SL) . . 4835 122 47053
C1004 CERAMIC CAP.(AX) 0.01mF/25V +80/-20% (
F) . . . . . . . . . . . . . . . . . . 4835 125 17009
C1005 ELECTROLYTIC CAP. 220mF/10V ±20% . . . 4835 124 97065
C1006 ELECTROLYTIC CAP. 4.7mF/50V ±20% . . . 4835 124 47506
C1108 ELECTROLYTIC CAP. 47mF/16V ±20%. . . . 4835 124 47073
C1111 ELECTROLYTIC CAP. 47mF/16V ±20%. . . . 4835 124 47073
C1112 ELECTROLYTIC CAP. 220mF/10V ±20% . . . 4835 124 97065
C1113 CERAMIC CAP.(AX) 0.01mF/25V +80/-20% (
F) . . . . . . . . . . . . . . . . . . 4835 125 17009
C1126 CERAMIC CAP.(AX) 150pF/50V ±10% (B). . 4835 122 47042
C1127 CERAMIC CAP.(AX) 150pF/50V ±10% (B). . 4835 122 47042
C1136 ELECTROLYTIC CAP. 4.7mF/50V ±20% . . . 4835 124 47506
C1142 CERAMIC CAP.(AX) 1000pF/50V ±10% (B) . 4835 122 47215
C1143 CERAMIC CAP.(AX) 0.1mF/50V +80/-20% (F 4835 122 47162
S = Safety Part Be sure to use exact replacement part.
C1160 CERAMIC CAP.(AX) 0.01mF/25V +80/-20% (
F) . . . . . . . . . . . . . . . . . . 4835 125 17009
C1171 CERAMIC CAP.(AX) 220pF/50V ±5% (B) . . 4835 122 47006
C1172 ELECTROLYTIC CAP. 1mF/50V ±20%. . . . 4835 124 47014
C1173 FILM CAP.(P) 0.001mF/50V ±5% . . . . . 4822 121 43191
C1203 CERAMIC CAP.(AX) 0.022mF/25V +80/-20%
(F). . . . . . . . . . . . . . . . . . 4835 122 47214
C1204 ELECTROLYTIC CAP. 47mF/16V ±20%. . . . 4835 124 47073
C1205 ELECTROLYTIC CAP. 1mF/50V ±20%. . . . 4835 124 47014
C1206 ELECTROLYTIC CAP. 1mF/50V ±20%. . . . 4835 124 47014
C1208 ELECTROLYTIC CAP. 10mF/50V ±20% . . . 4835 124 47037
C1209 ELECTROLYTIC CAP. 47mF/16V ±20% . . . 4835 124 47073
C1210 CERAMIC CAP.(AX) 0.022mF/25V +80/-20%
(F). . . . . . . . . . . . . . . . . . 4835 122 47214
C1211 ELECTROLYTIC CAP. 10mF/50V ±20% . . . 4835 124 47037
C1215 ELECTROLYTIC CAP. 1mF/50V ±20%. . . . 4835 124 47014
C1217 ELECTROLYTIC CAP. 47mF/16V ±20% . . . 4835 124 47073
C1218 CERAMIC CAP.(AX) 0.022mF/25V +80/-20%
(F). . . . . . . . . . . . . . . . . . 4835 122 47214
C1222 CERAMIC CAP.(AX) 100pF/50V ±10% (B). . 4835 122 47014
C1223 CERAMIC CAP.(AX) 1000pF/50V ±10% (B) . 4835 122 47215
C1224 ELECTROLYTIC CAP. 47mF/16V ±20% . . . 4835 124 47073
C1225 ELECTROLYTIC CAP. 10mF/50V ±20% . . . 4835 124 47037
C1226 ELECTROLYTIC CAP. 10mF/50V ±20% . . . 4835 124 47037
C1227 ELECTROLYTIC CAP. 1mF/50V ±20%. . . . 4835 124 47014
C1228 ELECTROLYTIC CAP. 10mF/50V ±20% . . . 4835 124 47037
C1229 ELECTROLYTIC CAP. 10mF/16V ±20% . . . 4835 124 47268
C1230 ELECTROLYTIC CAP. 10mF/16V ±20% . . . 4835 124 47268
C1231 CERAMIC CAP.(AX) 470pF/50V ±5% (B) . . 4835 122 47009
C1232 CERAMIC CAP.(AX) 470pF/50V ±5% (B) . . 4835 122 47009
C1233 CERAMIC CAP.(AX) 470pF/50V ±5% (B) . . 4835 122 47009
C1234 CERAMIC CAP.(AX) 470pF/50V ±5% (B) . . 4835 122 47009
C1236 CERAMIC CAP.(AX) 22pF/50V ±5% (SL) . . 4835 122 37016
C1237 ELECTROLYTIC CAP. 10mF/16V ±20%. . . . 4835 124 47268
C1238 ELECTROLYTIC CAP. 10mF/16V ±20%. . . . 4835 124 47268
C1239 ELECTROLYTIC CAP. 10mF/50V ±20%. . . . 4835 124 47037
C1242 ELECTROLYTIC CAP. 1mF/50V ±20% . . . . 4835 124 47014
C1245 ELECTROLYTIC CAP. 4.7mF/50V ±20% . . . 4835 124 47506
C1246 CERAMIC CAP.(AX) 1000pF/50V K B. . . . 4835 122 47215
C1247 ELECTROLYTIC CAP. 1mF/50V ±20% . . . . 4835 124 47014
C1248 CERAMIC CAP.(AX) 0.022mF/25V +80/-20%
(F). . . . . . . . . . . . . . . . . . 4835 122 47214
C1249 CERAMIC CAP.(AX) 100pF/50V ±10% (B). . 4835 122 47014
C1250 CERAMIC CAP.(AX) 1000pF/50V ±10% (B) . 4835 122 47215
C1253 CERAMIC CAP.(AX) 1000pF/50V ±10% (B) . 4835 122 47215
C1260 ELECTROLYTIC CAP. 220mF/6.3V ±20%. . . 4835 124 47168
C1261 ELECTROLYTIC CAP. 100mF/6.3V ±20%. . . 4835 124 47263
C1262 ELECTROLYTIC CAP. 47mF/16V ±20%. . . . 4835 124 47073
C1263 CERAMIC CAP.(AX) 3300pF/16V ±10% (X) . 4835 122 47475
C1264 CERAMIC CAP.(AX) 3300pF/16V ±10% (X) . 4835 122 47475
C1266 ELECTROLYIC CAP 10mF/10V ±20%. . . . . 4835 124 47268
C1267 ELECTROLYIC CAP 10mF/10V ±20%. . . . . 4835 124 47268
C1290 ELECTROLYTIC CAP. 4.7mF/50V ±20% . . . 4835 124 47506
C1302 CERAMIC CAP.(AX) 0.01mF/25V +80/-20% (
F) . . . . . . . . . . . . . . . . . . 4835 125 17009
C1303 ELECTROLYTIC CAP. 220mF/10V ±20% . . . 4835 124 97065
C1304 CERAMIC CAP.(AX) 0.01mF/16V ±10% (Y) . 4835 122 47552
C1311 ELECTROLYTIC CAP. 1mF/50V ±20% . . . . 4835 124 47014
C1312 CERAMIC CAP.(AX) 0.01mF/16V ±10% (Y) . 4835 122 47552
C1313 ELECTROLYTIC CAP. 4.7mF/50V ±20% . . . 4835 124 47506
C1332 ELECTROLYTIC CAP. 100mF/10V ±20% . . . 4835 124 47323
C1334 FILM CAP.(P) 0.1mF/50V ±5% . . . . . . 4835 122 47451
C1335 CERAMIC CAP.(AX) 0.01mF/25V +80/-20% (
F) . . . . . . . . . . . . . . . . . . 4835 125 17009
C1336 ELECTROLYTIC CAP. 100mF/10V ±20% . . . 4835 124 47323
C1338 CERAMIC CAP.(AX) 0.01mF/25V +80/-20% (
F) . . . . . . . . . . . . . . . . . . 4835 125 17009
C1339 ELECTROLYTIC CAP. 10mF/50V ±20%. . . . 4835 124 47037
C1340 ELECTROLYTIC CAP. 1mF/50V ±20% . . . . 4835 124 47014
C1344 ELECTROLYTIC CAP. 1mF/50V ±20% . . . . 4835 124 47014
C1345 CERAMIC CAP.(AX) 1000pF/50V ±10% (B) . 4835 122 47215
C1353 ELECTROLYTIC CAP. 1mF/50V ±20% . . . . 4835 124 47014
C1354 ELECTROLYTIC CAP. 4.7mF/50V ±20% . . . 4835 124 47506
C1355 ELECTROLYTIC CAP. 1mF/50V ±20% . . . . 4835 124 47014
C1356 SEMICONDUCTOR CAP. YR K 0.015mF/25V. . 4835 122 97009
C1361 CERAMIC CAP.(AX) 0.01mF/25V +80/-20% (
F) . . . . . . . . . . . . . . . . . . 4835 125 17009
C1363 CERAMIC CAP.(AX) 0.01mF/25V +80/-20% (
F) . . . . . . . . . . . . . . . . . . 4835 125 17009
C1364 CERAMIC CAP.(AX) 0.01mF/25V +80/-20% (
F) . . . . . . . . . . . . . . . . . . 4835 125 17009
C1365 CERAMIC CAP.(AX) 0.1mF/50V +80/-20% (F 4835 122 47162
C1366 ELECTROLYTIC CAP. 470mF/10V ±20% . . . 4835 124 47286
C1367 ELECTROLYTIC CAP. 470mF/10V ±20% . . . 4835 124 47286
C1369 CERAMIC CAP.(AX) 0.022mF/25V +80/20% (
F) . . . . . . . . . . . . . . . . . . 4835 122 47214
C1371 CERAMIC CAP. 100pF/50V ±5% (SL). . . . 4835 122 47014
C1372 PCB JUMPER D0.6-P5.0 . . . . . . . . . 0000 00J W5.0T
C1373 ELECTROLYTIC CAP. 2.2mF/50V ±20% . . . 4835 124 47049
C1375 CERAMIC CAP.(AX) 3300pF/16V ±10% (X) . 4835 122 47475
C1376 CERAMIC CAP.(AX) 0.01mF/16V ±10% (Y) . 4835 122 47552
C1381 ELECTROLYTIC CAP. 0.47mF/50V ±20%. . . 4835 124 47155
Page 84

CDV19BPH (continued)
C1382 CERAMIC CAP.(AX) 100pF/50V ±10% (B). . 4835 122 47014
C1383 ELECTROLYTIC CAP. 0.1mF/50V ±20% H7 . 4835 124 47048
C1388 FILM CAP.(P) 0.1mF/50V ±5% . . . . . . 4835 122 47451
C1389 CERAMIC CAP.(AX) 0.01mF/25V +80/-20% (
F) . . . . . . . . . . . . . . . . . . 4835 125 17009
C1393 CERAMIC CAP.(AX) 0.01mF/25V +80/-20% (
F) . . . . . . . . . . . . . . . . . . 4835 125 17009
C1395 ELECTROLYTIC CAP. 100mF/10V ±20% . . . 4835 124 47323
C1409 CERAMIC CAP.(AX) 1000pF/50V ±10% (B) . 4835 122 47215
C1410 ELECTROLYTIC CAP. 47mF/10V ±20%. . . . 4835 124 47154
C1411 CERAMIC CAP.(AX) 1000pF/50V ±10% (B) . 4835 122 47215
C1412 CERAMIC CAP.(AX) 1000pF/50V ±10% (B) . 4835 122 47215
C1430 CERAMIC CAP.(AX) 0.022mF/25V +80/20% (
F) . . . . . . . . . . . . . . . . . . 4835 122 47214
C1431 ELECTROLYTIC CAP. 47mF/16V ±20%. . . . 4835 124 47073
C1432 ELECTROLYTIC CAP. 470mF/16V ±20% . . . 4835 124 47286
C1440 ELECTROLYTIC CAP. 100mF/6.3V ±20%. . . 4835 124 47263
C1681 ELECTROLYTIC CAP. 100mF/10V ±20% . . . 4835 124 47323
C1682 ELECTROLYTIC CAP. 100mF/10V ±20% . . . 4835 124 47323
C1684 ELECTROLYTIC CAP. 100mF/10V ±20% . . . 4835 124 47323
C1685 ELECTROLYTIC CAP. 100mF/10V ±20% . . . 4835 124 47323
C1686 ELECTROLYTIC CAP. 100mF/10V ±20% . . . 4835 124 47323
C1801 ELECTROLYTIC CAP. 470mF/16V ±20% . . . 4835 124 47286
C1802 ELECTROLYTIC CAP. 470mF/16V ±20% . . . 4835 124 47286
C1803 FILM CAP.(P) 0.1mF/50V ±5% . . . . . . 4835 122 47451
C1804 FILM CAP.(P) 0.1mF/50V ±5% . . . . . . 4835 122 47451
C1805 ELECTROLYTIC CAP. 470mF/16V ±20% . . . 4835 124 47286
C1806 ELECTROLYTIC CAP. 470mF/16V ±20% . . . 4835 124 47286
C1808 ELECTROLYTIC CAP. 0.1mF/50V ±20% . . . 4835 124 47048
C1810 ELECTROLYTIC CAP. 10mF/16V ±20%. . . . 4835 124 47268
C1811 ELECTROLYTIC CAP. 47mF/16V ±20%. . . . 4835 124 47073
C1813 ELECTROLYTIC CAP. 47mF/16V ±20%. . . . 4835 124 47073
C1814 ELECTROLYTIC CAP. 47mF/16V ±20%. . . . 4835 124 47073
C1815 CERAMIC CAP.(AX) 1800pF/16V ±10% (X) . 4835 122 47219
C1816 CERAMIC CAP.(AX) 1800pF/16V ±10% (X) . 4835 122 47219
C1817 ELECTROLYTIC CAP. 470mF/16V ±20% . . . 4835 124 47286
C1818 ELECTROLYTIC CAP. 0.1mF/50V ±20% . . . 4835 124 47048
C1820 ELECTROLYTIC CAP. 10mF/16V ±20%. . . . 4835 124 47268
CN1201 CONNECTOR BASE, 7P TUC-P07P-B1 . . . . J3TU A07 TG001
CN1202 CONNECTOR BASE, 5P TUC-P05P-B1 . . . . J3TU A05 TG001
CN1203 CONNECTOR BASE, 10P TUC-P10P-B1. . . . J3TU A10 TG001
CN1204 CONNECTOR BASE, 7P TUC-P07P-B1 . . . . J3TU A07 TG001
CN1205 STRAIGHT CONNECTOR BASE 00 8283 0212 0
0 000. . . . . . . . . . . . . . . . . J383 C02 UG002
CN1301 CONNECTOR BASE, 5P TUC-P05P-B1 . . . . J3TU A05 TG001
CN1401 CONNECTOR 10P TKC-A10P-G1. . . . . . . JCTK B10 TG004
CN1402 CONNECTOR 12P TKC-A12P-G1. . . . . . . JCTK B12 TG004
CN1403 CONNECTOR 10P TKC-A10P-G1. . . . . . . JCTK B10 TG004
CN1404 CONNECTOR 8P TKC-A08P-G1 . . . . . . . JCTK B08 TG004
CN1801 STRAIGHT CONNECTOR BASE 00 8283 0212 0
0 000. . . . . . . . . . . . . . . . . J383 C02 UG002
CN1802 STRAIGHT CONNECTOR BASE 00 8283 0212 0
0 000. . . . . . . . . . . . . . . . . J383 C02 UG002
D1101 SWITCHING DIODE 1SS133(T-77) . . . . . 4835 130 37235
D1102 SWITCHING DIODE 1SS133(T-77) . . . . . 4835 130 37235
D1103 SWITCHING DIODE 1SS133(T-77) . . . . . 4835 130 37235
D1104 SWITCHING DIODE 1SS133(T-77) . . . . . 4835 130 37235
D1105 SWITCHING DIODE 1SS133(T-77) . . . . . 4835 130 37235
D1106 SWITCHING DIODE 1SS133(T-77) . . . . . 4835 130 37235
D1115 ZENER DIODE MTZJT-775.6C . . . . . . . 4835 130 37329
D1145 ZENER DIODE MTZJT-775.6B . . . . . . . 4835 130 37329
D1151 ZENER DIODE MTZJT-775.6B . . . . . . . 4835 130 37329
D1152 ZENER DIODE MTZJT-775.6B . . . . . . . 4835 130 37329
D1160 ZENER DIODE MTZJT-775.6B . . . . . . . 4835 130 37329
D1161 SWITCHING DIODE 1SS133(T-77) . . . . . 4835 130 37235
D1162 ZENER DIODE MTZJT-775.6B . . . . . . . 4835 130 37329
D1201 SWITCHING DIODE 1SS133(T-77) . . . . . 4835 130 37235
D1241 ZENER DIODE MTZJT-775.1A . . . . . . . 4835 130 37964
D1302 ZENER DIODE MTZJT-776.8B . . . . . . . 4835 130 37881
D1303 ZENER DIODE MTZJT-778.2B . . . . . . . 4835 130 37963
D1304 SWITCHING DIODE 1SS133(T-77) . . . . . 4835 130 37235
D1305 PCB JUMPER D0.6-P5.0 . . . . . . . . . 0000 00J W5.0T
D1321 SWITCHING DIODE 1SS133(T-77) . . . . . 4835 130 37235
D1322 SWITCHING DIODE 1SS133(T-77) . . . . . 4835 130 37235
D1323 SWITCHING DIODE 1SS133(T-77) . . . . . 4835 130 37235
D1331 ZENER DIODE MTZJT-778.2B . . . . . . . 4835 130 37963
D1371 SWITCHING DIODE 1SS133(T-77) . . . . . 4835 130 37235
D1396 ZENER DIODE MTZJT-778.2B . . . . . . . 4835 130 37963
D1397 SWITCHING DIODE 1SS133(T-77) . . . . . 4835 130 37235
D1410 SWITCHING DIODE 1SS133(T-77) . . . . . 4835 130 37235
D1430 ZENER DIODE MTZJT-775.6B . . . . . . . 4835 130 37329
D1431 SWITCHING DIODE 1SS133(T-77) . . . . . 4835 130 37235
D1432 FAST RECOVERY DIODE ERB44-02 . . . . . 4835 130 37944
D1440 SWITCHING DIODE 1SS133(T-77) . . . . . 4835 130 37235
D1441 SWITCHING DIODE 1SS133(T-77) . . . . . 4835 130 37235
D1442 SWITCHING DIODE 1SS133(T-77) . . . . . 4835 130 37235
D1443 SWITCHING DIODE 1SS133(T-77) . . . . . 4835 130 37235
D1444 SWITCHING DIODE 1SS133(T-77) . . . . . 4835 130 37235
D1445 SWITCHING DIODE 1SS133(T-77) . . . . . 4835 130 37235
D1691 ZENER DIODE MTZJT-7718B. . . . . . . . 4835 130 37784
D1801 SWITCHING DIODE 1SS133(T-77) . . . . . 4835 130 37235
D1803 SWITCHING DIODE 1SS133(T-77) . . . . . 4835 130 37235
S = Safety Part Be sure to use exact replacement part.
D1804 SWITCHING DIODE 1SS133(T-77) . . . . . 4835 130 37235
IC1101 TV MICON M37272M8-222FP. . . . . . . . 4835 209 17663
IC1151 MEMORY BR24C02F-W. . . . . . . . . . . 4835 209 47446
IC1201 INPUT SELECT HCF4053BEY. . . . . . . . 4835 209 47362
IC1202 INPUT SELECT HCF4053BEY. . . . . . . . 4835 209 47362
IC1204 OP AMP NJM4558D. . . . . . . . . . . . 4835 209 47544
B VIDEO/CHROMA DEFLECTION 1 IF/AUDIO 1 C
HIP M61203CFP. . . . . . . . . . . . . 4835 209 47501
IC1440 +5V REGULATOR PQ05RD11 . . . . . . . . 4835 209 47545
IC1801 AUDIO L-CH AMP LA4285. . . . . . . . . 4835 209 47546
IC1802 AUDIO R-CH AMP LA4285. . . . . . . . . 4835 209 47546
L1003 INDUCTOR 18mH-J-26T. . . . . . . . . . 4835 157 58179
L1005 INDUCTOR 22mH-K-5FT. . . . . . . . . . 4835 157 57373
L1011 PCB JUMPER D0.6-P5.0 . . . . . . . . . 0000 00J W5.0T
L1111 INDUCTOR 22mH-K-5FT. . . . . . . . . . 4835 157 57373
L1112 PCB JUMPER D0.6-P5.0 . . . . . . . . . 0000 00J W5.0T
L1201 INDUCTOR 0.47mH-J-26T. . . . . . . . . 4835 157 58018
L1203 INDUCTOR 2.2mH-J-26T . . . . . . . . . 4835 157 57639
L1204 INDUCTOR 2.2mH-J-26T . . . . . . . . . 4835 157 57639
L1205 PCB JUMPER D0.6-P5.0 . . . . . . . . . 0000 00J W5.0T
L1206 INDUCTOR 2.2mH-J-26T . . . . . . . . . 4835 157 57639
L1207 INDUCTOR 2.2mH-J-26T . . . . . . . . . 4835 157 57639
L1302 PCB JUMPER D0.6-P5.0 . . . . . . . . . 0000 00J W5.0T
L1331 PCB JUMPER D0.6-P5.0 . . . . . . . . . 0000 00J W5.0T
L1335 INDUCTOR 100mH-K-5FT . . . . . . . . . 4835 157 57798
L1371 INDUCTOR 18mH-J-26T. . . . . . . . . . 4835 157 58179
L1372 PCB JUMPER D0.6-P5.0 . . . . . . . . . 0000 00J W5.0T
L1378 INDUCTOR 3.3mH-J-26T . . . . . . . . . 4835 157 58166
L1430 INDUCTOR 22mH-J-26T. . . . . . . . . . 4835 157 57641
L1801 INDUCTOR 2.2mH-K-5FT . . . . . . . . . 4835 157 58225
L1802 INDUCTOR 2.2mH-K-5FT . . . . . . . . . 4835 157 58225
L1803 INDUCTOR 2.2mH-J-26T . . . . . . . . . 4835 157 57639
L1804 INDUCTOR 2.2mH-J-26T . . . . . . . . . 4835 157 57639
L1805 INDUCTOR 2.2mH-K-5FT . . . . . . . . . 4835 157 58225
L1806 INDUCTOR 2.2mH-J-26T . . . . . . . . . 4835 157 57639
L1807 INDUCTOR 2.2mH-K-5FT . . . . . . . . . 4835 157 58225
L1808 CHOKE COIL 47mH-K. . . . . . . . . . . 4835 157 58208
LD1002 WIRE ASSEMBLY 110MM. . . . . . . . . . WX1T D10 0-012
LD1003 WIRE ASSEMBLY 75MM . . . . . . . . . . WX1T D10 0-011
Q1111 +5V REGULATOR KTC3199(GR) "NPN" . . . 4835 130 47914
Q1202 SWITCHING KRC103M "NPN". . . . . . . . 4835 130 47909
Q1203 SWITCHING KRC103M "NPN". . . . . . . . 4835 130 47909
Q1205 BUFFER 2SC2785(J) "NPN". . . . . . . . 4835 130 47722
Q1208 DVD AUDIO MUTE 2SC2785(J) "NPN". . . . 4835 130 47722
Q1209 DVD AUDIO MUTE 2SC2785(J) "NPN". . . . 4835 130 47722
Q1210 DVD MUTE CONTROL KTA1267(GR) "PNP" . . 4835 130 47913
Q1212 BUFFER KTA1267(GR) "PNP" . . . . . . . 4835 130 47913
Q1213 BUFFER KTA1267(GR) "PNP" . . . . . . . 4835 130 47913
Q1214 DVD AUDIO MUTE 2SC2785(J) "NPN". . . . 4835 130 47722
Q1215 DVD AUDIO MUTE 2SC2785(J) "NPN". . . . 4835 130 47722
Q1290 SWITCHING 2SC2785(J) "NPN" . . . . . . 4835 130 47722
Q1310 BUFFER 2SC2785(J) "NPN". . . . . . . . 4835 130 47722
Q1321 SWITCHING 2SC1627Y-TPE2 "NPN". . . . . 4835 130 48141
Q1375 BUFFER 2SC2785(J) "NPN". . . . . . . . 4835 130 47722
Q1430 SWITCHING KTA1267(GR) "PNP". . . . . . 4835 130 47913
Q1431 SW CTL/ERROR AMP KRC110M-AT "NPN". . . 4835 130 48179
Q1681 +8V SWITCHING 2SC2120-O-TPE2 "NPN" . . 4835 130 47756
Q1682 +5V SWITCHING 2SC2120-O-TPE2 "NPN" . . 4835 130 47756
Q1683 +5V SWITCHING 2SC2120-O-TPE2 "NPN" . . 4835 130 47756
Q1801 P-ON MUTE 2SC2785(J) "NPN" . . . . . . 4835 130 47722
R1006 PCB JUMPER D0.6-P5.0 . . . . . . . . . 0000 00J W5.0T
R1011 PCB JUMPER D0.6-P5.0 . . . . . . . . . 0000 00J W5.0T
R1101 CARBON RES. 1/4W 2.2k W ±5%. . . . . . 4835 110 57079
R1102 CARBON RES. 1/4W 1.8k W ±5%. . . . . . 4835 110 57033
R1103 CARBON RES. 1/4W 3.3k W ±5%. . . . . . 4835 110 57046
R1104 CARBON RES. 1/4W 4.7k W ±5%. . . . . . 4835 110 57051
R1108 CARBON RES. 1/4W 100 W ±5% . . . . . . 4835 110 57003
R1109 CARBON RES. 1/4W 10k W ±5% . . . . . . 4835 110 57026
R1110 PCB JUMPER D0.6-P5.0 . . . . . . . . . 0000 00J W5.0T
R1112 CARBON RES. 1/4W 68 W ±5%. . . . . . . 4835 110 57248
R1113 CARBON RES. 1/4W 68 W ±5%. . . . . . . 4835 110 57248
R1114 CARBON RES. 1/4W 330 W ±5% . . . . . . 4835 110 57045
R1121 CARBON RES. 1/4W 3.3k W ±5%. . . . . . 4835 110 57046
R1122 CARBON RES. 1/4W 3.3k W ±5%. . . . . . 4835 110 57046
R1123 CARBON RES. 1/4W 3.3k W ±5%. . . . . . 4835 110 57046
R1124 CARBON RES. 1/4W 820 W ±5% . . . . . . 4835 110 57059
R1125 CARBON RES. 1/4W 820 W ±5% . . . . . . 4835 110 57059
R1126 CARBON RES. 1/4W 820 W ±5% . . . . . . 4835 110 57059
R1127 CARBON RES. 1/4W 820 W ±5% . . . . . . 4835 110 57059
R1128 CARBON RES. 1/4W 470 W ±5% . . . . . . 4835 110 57167
R1133 CARBON RES. 1/4W 3.3k W ±5%. . . . . . 4835 110 57046
R1134 CARBON RES. 1/4W 4.7k W ±5%. . . . . . 4835 110 57051
R1135 CARBON RES. 1/4W 3.3k W ±5%. . . . . . 4835 110 57046
R1138 CARBON RES. 1/4W 100k W ±5%. . . . . . 4835 110 57185
R1148 CARBON RES. 1/4W 10k W ±5% . . . . . . 4835 110 57026
R1151 CARBON RES. 1/4W 100 W ±5% . . . . . . 4835 110 57003
R1152 CARBON RES. 1/4W 100 W ±5% . . . . . . 4835 110 57003
R1160 CARBON RES. 1/4W 47k W ±5% . . . . . . 4835 110 57189
R1163 CARBON RES. 1/4W 22k W ±5% . . . . . . 4835 110 57038
R1164 CARBON RES. 1/4W 6.8k W ±5%. . . . . . 4835 110 57193
R1165 CARBON RES. 1/4W 22k W ±5% . . . . . . 4835 110 57038
R1166 CARBON RES. 1/4W 10k W ±5% . . . . . . 4835 110 57026
Page 85

CDV19BPH (continued)
R1167 CARBON RES. 1/4W 100k W ±5%. . . . . . 4835 110 57185
R1168 CARBON RES. 1/4W 100k W ±5%. . . . . . 4835 110 57185
R1169 CARBON RES. 1/4W 10k W ±5% . . . . . . 4835 110 57026
R1170 CARBON RES. 1/4W 100 W ±5% . . . . . . 4835 110 57003
R1171 CARBON RES. 1/4W 1k W ±5%. . . . . . . 4835 110 57025
R1175 CARBON RES. 1/4W 150k W ±5%. . . . . . 4835 110 57206
R1181 CARBON RES. 1/4W 100 W ±5% . . . . . . 4835 110 57003
R1182 CARBON RES. 1/4W 100 W ±5% . . . . . . 4835 110 57003
R1203 CARBON RES. 1/4W 47k W ±5% . . . . . . 4835 110 57189
R1204 CARBON RES. 1/4W 47k W ±5% . . . . . . 4835 110 57189
R1205 CARBON RES. 1/4W 47k W ±5% . . . . . . 4835 110 57189
R1206 CARBON RES. 1/4W 47k W ±5% . . . . . . 4835 110 57189
R1207 CARBON RES. 1/4W 3.3k W ±5%. . . . . . 4835 110 57046
R1208 CARBON RES. 1/4W 100 W ±5% . . . . . . 4835 110 57003
R1209 CARBON RES. 1/4W 47k W ±5% . . . . . . 4835 110 57189
R1210 CARBON RES. 1/4W 47k W ±5% . . . . . . 4835 110 57189
R1211 CARBON RES. 1/4W 47k W ±5% . . . . . . 4835 110 57189
R1212 CARBON RES. 1/4W 47k W ±5% . . . . . . 4835 110 57189
R1213 CARBON RES. 1/4W 3.3k W ±5%. . . . . . 4835 110 57046
R1214 CARBON RES. 1/4W 15k W ±5% . . . . . . 4835 110 57032
R1215 CARBON RES. 1/4W 47k W ±5% . . . . . . 4835 110 57189
R1216 CARBON RES. 1/4W 47k W ±5% . . . . . . 4835 110 57189
R1217 CARBON RES. 1/4W 15k W ±5% . . . . . . 4835 110 57032
R1218 CARBON RES. 1/4W 47k W ±5% . . . . . . 4835 110 57189
R1219 CARBON RES. 1/4W 47k W ±5% . . . . . . 4835 110 57189
R1220 CARBON RES. 1/4W 47k W ±5% . . . . . . 4835 110 57189
R1221 CARBON RES. 1/4W 47k W ±5% . . . . . . 4835 110 57189
R1222 CARBON RES. 1/4W 75 W ±5%. . . . . . . 4835 110 57056
R1225 CARBON RES. 1/4W 75 W ±5%. . . . . . . 4835 110 57056
R1226 CARBON RES. 1/4W 2.2k W ±5%. . . . . . 4835 110 57079
R1227 CARBON RES. 1/4W 2k W ±5%. . . . . . . 4835 110 57253
R1228 CARBON RES. 1/4W 2.2k W ±5%. . . . . . 4835 110 57079
R1229 CARBON RES. 1/4W 220 W ±5% . . . . . . 4835 110 57037
R1230 CARBON RES. 1/4W 1k W ±5%. . . . . . . 4835 110 57025
R1233 CARBON RES. 1/4W 1k W ±5%. . . . . . . 4835 110 57025
R1234 CARBON RES. 1/4W 1k W ±5%. . . . . . . 4835 110 57025
R1237 CARBON RES. 1/4W 1k W ±5%. . . . . . . 4835 110 57025
R1238 CARBON RES. 1/4W 2.2k W ±5%. . . . . . 4835 110 57079
R1239 CARBON RES. 1/4W 560 W ±5% . . . . . . 4835 110 57052
R1240 CARBON RES. 1/4W 560 W ±5% . . . . . . 4835 110 57052
R1244 CARBON RES. 1/4W 330 W ±5% . . . . . . 4835 110 57045
R1245 CARBON RES. 1/4W 330 W ±5% . . . . . . 4835 110 57045
R1246 CARBON RES. 1/4W 47k W ±5% . . . . . . 4835 110 57189
R1247 CARBON RES. 1/4W 47k W ±5% . . . . . . 4835 110 57189
R1248 CARBON RES. 1/4W 330 W ±5% . . . . . . 4835 110 57045
R1249 CARBON RES. 1/4W 47k W ±5% . . . . . . 4835 110 57189
R1250 CARBON RES. 1/4W 47k W ±5% . . . . . . 4835 110 57189
R1253 CARBON RES. 1/4W 9.1k W ±5%. . . . . . 4835 110 57165
R1254 CARBON RES. 1/4W 9.1k W ±5%. . . . . . 4835 110 57165
R1255 CARBON RES. 1/4W 5.1k W ±5%. . . . . . 4835 110 57226
R1256 CARBON RES. 1/4W 8.2k W ±5%. . . . . . 4835 110 57264
R1257 CARBON RES. 1/4W 5.1k W ±5%. . . . . . 4835 110 57226
R1258 CARBON RES. 1/4W 8.2k W ±5%. . . . . . 4835 110 57264
R1259 CARBON RES. 1/4W 220k W ±5%. . . . . . 4835 110 57208
R1260 CARBON RES. 1/4W 220k W ±5%. . . . . . 4835 110 57208
R1261 CARBON RES. 1/4W 10k W ±5% . . . . . . 4835 110 57026
R1262 CARBON RES. 1/4W 10k W ±5% . . . . . . 4835 110 57026
R1267 CARBON RES. 1/4W 5.6k W ±5%. . . . . . 4835 110 57304
R1268 CARBON RES. 1/4W 10k W ±5% . . . . . . 4835 110 57026
R1269 CARBON RES. 1/4W 3.3k W ±5%. . . . . . 4835 110 57046
R1270 CARBON RES. 1/4W 22k W ±5% . . . . . . 4835 110 57038
R1271 CARBON RES. 1/4W 47k W ±5% . . . . . . 4835 110 57189
R1274 CARBON RES. 1/4W 330 W ±5% . . . . . . 4835 110 57045
R1275 CARBON RES. 1/4W 330 W ±5% . . . . . . 4835 110 57045
R1280 CARBON RES. 1/4W 8.2k W ±5%. . . . . . 4835 110 57264
R1281 CARBON RES. 1/4W 8.2k W ±5%. . . . . . 4835 110 57264
R1282 CARBON RES. 1/4W 47 W ±5%. . . . . . . 4835 110 57019
R1283 CARBON RES. 1/4W 33k W ±5% . . . . . . 4835 110 57211
R1284 CARBON RES. 1/4W 33k W ±5% . . . . . . 4835 110 57211
R1285 CARBON RES. 1/4W 1k W ±5%. . . . . . . 4835 110 57025
R1286 CARBON RES. 1/4W 3.9k W ±5%. . . . . . 4835 110 57049
R1287 CARBON RES. 1/4W 1k W ±5%. . . . . . . 4835 110 57025
R1288 CARBON RES. 1/4W 3.9k W ±5%. . . . . . 4835 110 57049
R1289 PCB JUMPER D0.6-P5.0 . . . . . . . . . 0000 00J W5.0T
R1290 CARBON RES. 1/4W 10k W ±5% . . . . . . 4835 110 57026
R1291 CARBON RES. 1/4W 10k W ±5% . . . . . . 4835 110 57026
R1304 CARBON RES. 1/4W 2.2k W ±5%. . . . . . 4835 110 57079
R1305 CARBON RES. 1/4W 100 W ±5% . . . . . . 4835 110 57003
R1306 CARBON RES. 1/4W 10k W ±5% . . . . . . 4835 110 57026
R1308 CARBON RES. 1/4W 2.7k W ±5%. . . . . . 4835 110 57006
R1310 CARBON RES. 1/4W 100 W ±5% . . . . . . 4835 110 57003
R1311 CARBON RES. 1/4W 6.8k W ±5%. . . . . . 4835 110 57193
R1312 CARBON RES. 1/4W 2.2k W ±5%. . . . . . 4835 110 57079
R1313 CARBON RES. 1/4W 22k W ±5% . . . . . . 4835 110 57038
R1314 CARBON RES. 1/4W 1k W ±5%. . . . . . . 4835 110 57025
R1321 CARBON RES. 1/4W 4.7k W ±5%. . . . . . 4835 110 57051
R1322 CARBON RES. 1/4W 4.7k W ±5%. . . . . . 4835 110 57051
R1323 CARBON RES. 1/4W 4.7k W ±5%. . . . . . 4835 110 57051
R1324 CARBON RES. 1/4W 100 W ±5% . . . . . . 4835 110 57003
R1325 CARBON RES. 1/4W 100 W ±5% . . . . . . 4835 110 57003
R1326 CARBON RES. 1/4W 100 W ±5% . . . . . . 4835 110 57003
R1328 CARBON RES. 1/4W 1k W ±5%. . . . . . . 4835 110 57025
S = Safety Part Be sure to use exact replacement part.
R1329 CARBON RES. 1/4W 470 W ±5% . . . . . . 4835 110 57167
R1331 CARBON RES. 1/4W 1k W ±5%. . . . . . . 4835 110 57025
R1333 CARBON RES. 1/4W 270k W ±5%. . . . . . 4835 110 57312
R1338 CARBON RES. 1/4W 1k W ±5%. . . . . . . 4835 110 57025
R1343 CARBON RES. 1/4W 15k W ±5% . . . . . . 4835 110 57032
R1344 CARBON RES. 1/4W 150k W ±5%. . . . . . 4835 110 57206
R1346 CARBON RES. 1/4W 180k W ±5%. . . . . . 4835 110 57259
R1355 CARBON RES. 1/4W 6.8k W ±5%. . . . . . 4835 110 57193
R1361 CARBON RES. 1/4W 10k W ±5% . . . . . . 4835 110 57026
R1364 CARBON RES. 1/4W 10k W ±5% . . . . . . 4835 110 57026
R1365 CARBON RES. 1/4W 10k W ±5% . . . . . . 4835 110 57026
R1366 PCB JUMPER D0.6-P5.0 . . . . . . . . . 0000 00J W5.0T
R1368 PCB JUMPER D0.6-P5.0 . . . . . . . . . 0000 00J W5.0T
R1369 PCB JUMPER D0.6-P5.0 . . . . . . . . . 0000 00J W5.0T
R1372 CARBON RES. 1/4W 10k W ±5% . . . . . . 4835 110 57026
R1373 CARBON RES. 1/4W 10k W ±5% . . . . . . 4835 110 57026
R1375 CARBON RES. 1/4W 270 W ±5% . . . . . . 4835 110 57041
R1376 CARBON RES. 1/4W 10M W ±5% . . . . . . 4835 110 57288
R1377 CARBON RES. 1/4W 220 W ±5% . . . . . . 4835 110 57037
R1378 CARBON RES. 1/4W 1k W ±5%. . . . . . . 4835 110 57025
R1379 CARBON RES. 1/4W 1k W ±5%. . . . . . . 4835 110 57025
R1381 CARBON RES. 1/4W 220 W ±5% . . . . . . 4835 110 57037
R1390 CARBON RES. 1/4W 1k W ±5%. . . . . . . 4835 110 57025
R1391 CARBON RES. 1/4W 100 W ±5% . . . . . . 4835 110 57003
R1392 CARBON RES. 1/4W 100 W ±5% . . . . . . 4835 110 57003
R1393 CARBON RES. 1/4W 1k W ±5%. . . . . . . 4835 110 57025
R1394 CARBON RES. 1/4W 220 W ±5% . . . . . . 4835 110 57037
R1396 CARBON RES. 1/4W 220 W ±5% . . . . . . 4835 110 57037
R1397 CARBON RES. 1/4W 220 W ±5% . . . . . . 4835 110 57037
R1402 CARBON RES. 1/4W 2.4k W ±5%. . . . . . 4835 110 57269
R1403 CARBON RES. 1/4W 10k W ±5% . . . . . . 4835 110 57026
R1404 CARBON RES. 1/4W 10k W ±5% . . . . . . 4835 110 57026
R1405 CARBON RES. 1/4W 10k W ±5% . . . . . . 4835 110 57026
R1406 CARBON RES. 1/4W 4.3k W ±5%. . . . . . 4835 110 57149
R1407 CARBON RES. 1/4W 2.4k W ±5%. . . . . . 4835 110 57269
R1408 CARBON RES. 1/4W 10k W ±5% . . . . . . 4835 110 57026
R1409 CARBON RES. 1/4W 10k W ±5% . . . . . . 4835 110 57026
R1412 CARBON RES. 1/4W 3.9k W ±5%. . . . . . 4835 110 57049
R1427 CARBON RES. 1/4W 100k W ±5%. . . . . . 4835 110 57185
R1430 CARBON RES. 1/4W 39k W ±5% . . . . . . 4835 110 57262
R1431 CARBON RES. 1/4W 2.2k W ±5%. . . . . . 4835 110 57079
R1432 CARBON RES. 1/4W 10k W ±5% . . . . . . 4835 110 57026
R1433 CARBON RES. 1/4W 10k W ±5% . . . . . . 4835 110 57026
R1434 CARBON RES. 1/4W 33k W ±5% . . . . . . 4835 110 57211
R1440 CARBON RES. 1/4W 10k W ±5% . . . . . . 4835 110 57026
R1441 FIXED METAL OXIDE FILM RES. 2W 3.3 W±5 4835 116 57805
R1442 CARBON RES. 1/4W 4.7k W ±5%. . . . . . 4835 110 57051
R1681 CARBON RES. 1/2W 12 W ±5%. . . . . . . 4835 110 47222
R1682 FIXED METAL OXIDE FILM RES. 1W 39 W±5% 4835 116 57356
R1683 FIXED METAL OXIDE FILM RES. 1W 39 W±5% 4835 116 57356
R1684 CARBON RES. 1/4W 100 W ±5% . . . . . . 4835 110 57003
R1685 CARBON RES. 1/4W 10 W ±5%. . . . . . . 4835 110 57002
R1701 CARBON RES. 1/4W 75 W ±5%. . . . . . . 4835 110 57056
R1702 PCB JUMPER D0.6-P5.0 . . . . . . . . . 0000 00J W5.0T
R1703 PCB JUMPER D0.6-P5.0 . . . . . . . . . 0000 00J W5.0T
R1711 CARBON RES. 1/4W 47k W ±5% . . . . . . 4835 110 57189
R1712 PCB JUMPER D0.6-P5.0 . . . . . . . . . 0000 00J W5.0T
R1721 CARBON RES. 1/4W 47k W ±5% . . . . . . 4835 110 57189
R1722 PCB JUMPER D0.6-P5.0 . . . . . . . . . 0000 00J W5.0T
R1801 CARBON RES. 1/4W 180 W ±5% . . . . . . 4835 110 57219
R1802 CARBON RES. 1/4W 180 W ±5% . . . . . . 4835 110 57219
R1803 CARBON RES. 1/4W 1 W ±5% . . . . . . . 4835 110 57229
R1804 CARBON RES. 1/4W 1 W ±5% . . . . . . . 4835 110 57229
R1805 CARBON RES. 1/4W 2.2k W ±5%. . . . . . 4835 110 57079
R1806 CARBON RES. 1/4W 2.2k W ±5%. . . . . . 4835 110 57079
R1807 FIXED METAL OXIDE FILM RES. 2W 3.9 W±5 4835 116 57794
R1808 CARBON RES. 1/6W 100 W ±5% . . . . . . 4835 111 37161
R1810 CARBON RES. 1/6W 100 W ±5% . . . . . . 4835 111 37161
R1813 CARBON RES. 1/4W 560 W ±5% . . . . . . 4835 110 57052
R1815 CARBON RES. 1/4W 6.8k W ±5%. . . . . . 4835 110 57193
R1816 CARBON RES. 1/4W 6.8k W ±5%. . . . . . 4835 110 57193
SW1101 TACT SWITCH SKQSAB . . . . . . . . . . 4835 276 17331
SW1102 TACT SWITCH SKQSAB . . . . . . . . . . 4835 276 17331
SW1103 TACT SWITCH SKQSAB . . . . . . . . . . 4835 276 17331
SW1104 TACT SWITCH SKQSAB . . . . . . . . . . 4835 276 17331
SW1105 TACT SWITCH SKQSAB . . . . . . . . . . 4835 276 17331
SW1401 TACT SWITCH SKQSAB . . . . . . . . . . 4835 276 17331
SW1402 TACT SWITCH SKQSAB . . . . . . . . . . 4835 276 17331
SW1403 TACT SWITCH SKQSAB . . . . . . . . . . 4835 276 17331
SW1404 TACT SWITCH SKQSAB . . . . . . . . . . 4835 276 17331
SW1405 TACT SWITCH SKQSAB . . . . . . . . . . 4835 276 17331
SW1406 TACT SWITCH SKQSAB . . . . . . . . . . 4835 276 17331
CF1301 CERAMIC TRAP TPS4.5MB2 . . . . . . . . 4835 153 97048
CF1302 CERAMIC FILTER SFSH4.5MCB. . . . . . . 4835 153 97029
JK1202 RCA JACK(ORANGE) MSP-281V13-B-PBSN . . 4835 265 97501
JK1203 RCA JACK(RED) MSP-281V3-B-PBSN . . . . 4835 265 97499
JK1204 RCA JACK(WHITE) AV1-15-4 . . . . . . . 4835 265 97401
JK1701 RCA JACK(YELLOW) AV1-15-3. . . . . . . 4835 265 97402
JK1702 RCA JACK(WHITE) AV1-15-4 . . . . . . . 4835 265 97401
JK1703 RCA JACK(RED) MSP-281V3-B-PBSN . . . . 4835 265 97499
JK1801 MINI JACK HSJ2000-01-010 . . . . . . . 4835 265 97502
RS1101 REMOTE RECEIVER PIC-37042LU. . . . . . 4835 210 27058
Page 86

CDV19BPH (continued)
SF1001 SAW FILTER TSF5229P. . . . . . . . . . 4835 153 97062
TB4 EARTH PLATE. . . . . . . . . . . . . . 0000 EM4 05943
TP1000 PCB JUMPER D0.6-P7.5 . . . . . . . . . 0000 00J W7.5T
TP1001 PCB JUMPER D0.6-P7.5 . . . . . . . . . 0000 00J W7.5T
TP1002 PCB JUMPER D0.6-P7.5 . . . . . . . . . 0000 00J W7.5T
TP1003 PCB JUMPER D0.6-P7.5 . . . . . . . . . 0000 00J W7.5T
TP1004 PCB JUMPER D0.6-P7.5 . . . . . . . . . 0000 00J W7.5T
TP1005 PCB JUMPER D0.6-P7.5 . . . . . . . . . 0000 00J W7.5T
TP1006 PCB JUMPER D0.6-P7.5 . . . . . . . . . 0000 00J W7.5T
TP1007 PCB JUMPER D0.6-P7.5 . . . . . . . . . 0000 00J W7.5T
TP1008 PCB JUMPER D0.6-P7.5 . . . . . . . . . 0000 00J W7.5T
TP1009 PCB JUMPER D0.6-P7.5 . . . . . . . . . 0000 00J W7.5T
TP1010 PCB JUMPER D0.6-P7.5 . . . . . . . . . 0000 00J W7.5T
TP1011 PCB JUMPER D0.6-P7.5 . . . . . . . . . 0000 00J W7.5T
TP1012 PCB JUMPER D0.6-P7.5 . . . . . . . . . 0000 00J W7.5T
TP1013 PCB JUMPER D0.6-P12.5. . . . . . . . . 0000 0JW 12.5T
TU1001 TUNER UNIT TEDH9-203B. . . . . . . . . 4835 210 47109
X1101 CERAMIC RESONATOR KBR-8.0MKC . . . . . 4835 242 77163
X1341 X'TAL 3.579545 MHz . . . . . . . . . . FXD3 55L LN003
MUT CBA (H.V.CBA + CRT CBA)
MUT CBA (H.V.CBA + CRT CBA)
H.V. CBA (MUT-A) . . . . . . . . . . . 00ES A03 855-A
Junction A CBA (Included in H.V. CBA)
Junction A CBA (Included in H.V. CBA)
C361 CERAMIC CAP.(AX) 47pF/50V ±5% (SL) . . 4835 122 37017
CN503 CONNECTOR, 7P TUC-P07X-B1. . . . . . . JCTU S07 TG001
CN504 CONNECTOR, 5P TUC-P05X-B1. . . . . . . JCTU S05 TG001
CL503B LEAD WIRE 7P 480MM . . . . . . . . . . WX1T 510 0-104
CL504A LEAD WIRE 5P 270MM . . . . . . . . . . WX1T 510 0-102
Junction B CBA (Included in H.V. CBA)
Junction B CBA (Included in H.V. CBA)
CN502 CONNECTOR, 6P TUC-P06X-B1. . . . . . . JCTU S06 TG001
CL502B LEAD WIRE 6P 290MM . . . . . . . . . . WX1T 510 0-103
C552 FILM CAP.(P) 0.047mF/50V ±5% . . . . . 4835 121 47456
C553 FILM CAP.(P) 0.1mF/50V ±5% . . . . . . 4835 122 47451
C555 ELECTROLYTIC CAP. 47mF/35V ±20%. . . . 4835 124 97066
C556 ELECTROLYTIC CAP. 1000mF/25V ±20%. . . 4835 124 47007
C558 CERAMIC CAP.(AX) 0.01mF/50V ±10% (B) . CCA1 JKT 0B103
C559 ELECTROLYTIC CAP. 220mF/35V ±20% . . . 4835 124 47358
C560 FILM CAP.(P) 0.056mF/50V ±5% . . . . . 4835 121 47439
C572 PP CAP. 0.39mF/250V ±5%. . . . . . . . 4835 121 47689
C574 ELECTROLYTIC CAP. 4.7mF/250V ±20%. . . 4835 124 47465
C577 FILM CAP.(P) 0.01mF/50V ±5%. . . . . . 4835 121 47461
C578 ELECTROLYTIC CAP. 47mF/35V ±20%. . . . 4835 124 97066
C580 PP CAP. 0.01mF/1.6KV ±5% . . . . . . . 4835 121 47622
C581 CERAMIC CAP. 1500pF/2KV BN . . . . . . 4835 122 47722
C584 ELECTROLYTIC CAP. 1mF/160V ±20%. . . . 4835 124 47516
C591 ELECTROLYTIC CAP. 1mF/50V ±20% . . . . 4835 124 47014
C592 ELECTROLYTIC CAP. 47mF/35V ±20%. . . . 4835 124 97066
C594 ELECTROLYTIC CAP. 10mF/160V ±20% . . . 4835 124 47742
CN502 CONNECTOR, 6P TUC-P06X-B1. . . . . . . JCTU S06 TG001
CN571 CONNECTOR BASE, 5P TV-50P-05-V3. . . . J3TV C05 TG002
D552 RECTIFIER DIODE ERA15-02 . . . . . . . 4835 130 37515
D571 FAST RECOVERY DIODE ERB44-02 . . . . . 4835 130 37944
D572 RECTIFIER DIODE ERA22-02 . . . . . . . 4835 130 37788
D573 PCB JUMPER D0.6-P5.0 . . . . . . . . . 0000 00J W5.0T
D584 SWITCHING DIODE 1SS133(T-77) . . . . . 4835 130 37235
D585 ZENER DIODE MTZJT-775.1B . . . . . . . 4835 130 37964
D591 ZENER DIODE MTZJT-7736B. . . . . . . . 4835 130 37785
D593 PCB JUMPER D0.6-P5.0 . . . . . . . . . 0000 00J W5.0T
D595 ZENER DIODE MTZJT-7720B. . . . . . . . 4835 130 37965
D596 SWITCHING DIODE 1SS133(T-77) . . . . . 4835 130 37235
D597 SWITCHING DIODE 1SS133(T-77) . . . . . 4835 130 37235
D598 RECTIFIER DIODE ERA22-02 . . . . . . . 4835 130 37788
IC551 VERTICAL DEFLECTION CONTROL LA78040. . 4835 209 47503
L505 CHOKE COIL 47mH-K. . . . . . . . . . . 4835 157 58208
L572 CHOKE COIL 47mH-K. . . . . . . . . . . 4835 157 58208
Q571 H-OUTPUT 2SD2627LS-FEC-YB11 "NPN". . . 4835 130 48195
Q572 H-DRIVE 2SC1627Y-TPE2 "NPN". . . . . . 4835 130 48141
Q591 SWITCHING 2SC2785(J) "NPN" . . . . . . 4835 130 47722
R542 PCB JUMPER D0.6-P12.5. . . . . . . . . 0000 0JW 12.5T
R544 CARBON RES. 1/4W 10k W ±5% . . . . . . 4835 110 57026
R551 CARBON RES. 1/4W 1.5k W ±5%. . . . . . 4835 110 57186
R552 METAL FILM RES.(STRAIGHT)1W 820 W±5% . 4835 116 57147
R556 CARBON RES. 1/4W 4.7 W ±5% . . . . . . 4835 110 57212
R557 CARBON RES. 1/4W 4.7k W ±5%. . . . . . 4835 110 57051
R558 CARBON RES. 1/4W 820k W ±5%. . . . . . 4835 110 57344
R559 CARBON RES. 1/4W 1k W ±5%. . . . . . . 4835 110 57025
R560 CARBON RES. 1/4W 39k W ±5% . . . . . . 4835 110 57262
R561 CARBON RES. 1/4W 270k W ±5%. . . . . . 4835 110 57312
R562 CARBON RES. 1/4W 3.3 W ±5% . . . . . . 4835 110 57026
R563 CARBON RES. 1/4W 3.3 W ±5% . . . . . . 4835 110 57026
R565 CARBON RES. 1/4W 3.9 W ±5% . . . . . . 4835 110 57281
R566 CARBON RES. 1/4W 3.9 W ±5% . . . . . . 4835 110 57281
R570 CARBON RES. 1/4W 3.9 W ±5% . . . . . . 4835 110 57281
R572 CARBON RES. 1/4W 1k W ±5%. . . . . . . 4835 110 57025
R573 CARBON RES. 1/4W 1k W ±5%. . . . . . . 4835 110 57025
R574 FIXED METAL OXIDE FILM RES. 2W 1k W±5% 4835 116 57057
R575 FIXED METAL OXIDE FILM RES. 2W 1k W±5% 4835 116 57057
S = Safety Part Be sure to use exact replacement part.
R576 CARBON RES. 1/4W 1k W ±5%. . . . . . . 4835 110 57025
R577 CARBON RES. 1/4W 560 W ±5% . . . . . . 4835 110 57052
R578 CARBON RES. 1/4W 3.9 W ±5% . . . . . . 4835 110 57281
R580 CARBON RES. 1/4W 22 W ±5%. . . . . . . 4835 110 57036
R581 CARBON RES. 1/4W 1 W ±5% . . . . . . . 4835 110 57229
R582 CARBON RES. 1/4W 1 W ±5% . . . . . . . 4835 110 57229
R584 CARBON RES. 1/4W 1k W ±5%. . . . . . . 4835 110 57025
R585 CARBON RES. 1/4W 8.2k W ±5%. . . . . . 4835 110 57264
R586 PCB JUMPER D0.6-P5.0 . . . . . . . . . 0000 00J W5.0T
R587 CARBON RES. 1/4W 100k W ±5%. . . . . . 4835 110 57185
R588 CARBON RES. 1/4W 100k W ±5%. . . . . . 4835 110 57185
R589 CARBON RES. 1/4W 22 W ±5%. . . . . . . 4835 110 57036
R591 CARBON RES. 1/4W 22k W ±5% . . . . . . 4835 110 57038
R592 CARBON RES. 1/4W 180k W ±5%. . . . . . 4835 110 57259
R593 CARBON RES. 1/4W 56k W ±5% . . . . . . 4835 110 57213
R594 CARBON RES. 1/4W 56k W ±5% . . . . . . 4835 110 57213
R596 PCB JUMPER D0.6-P5.0 . . . . . . . . . 0000 00J W5.0T
R597 CARBON RES. 1/4W 6.8k W ±5%. . . . . . 4835 110 57193
R598 CARBON RES. 1/4W 22k W ±5% . . . . . . 4835 110 57038
R599 CARBON RES. 1/4W 5.6k W ±5%. . . . . . 4835 110 57304
BC571 BEAD INDUCTOR FBA04HA600VB-00. . . . . LLBF 00S TU026
CL502A LEAD WIRE 6P 430MM . . . . . . . . . . WX1T 710 0-103
CL503A LEAD WIRE 7P 580MM . . . . . . . . . . WX1T 710 0-106
DB1 H/V PCB HOLDER T5000UA . . . . . . . . 0000 EM2 00987
DB2 19V H/V HEAT SINK(PDY) . . . . . . . . 0000 EM4 05400
DL1 SCREW, P-TIGHT 3X10 BIND HEAD. . . . . 0000 GBU P3100
DL2 B-TITE SCREW 3X8 BIND + CHROME . . . . 0000 GBM B3080
LD501 WIRE ASSEMBLY 400MM. . . . . . . . . . WX1T D20 0-001
T572 H0RIZONTAL DRIVE TRANS LP2-004 . . . . 4835 148 87394
T571 FLYBACK TRANSFORMER (TYPE A) JF0501-
2401A. . . . . . . . . . . . . . . . . 4835 140 67199
R583 METAL RES. 2W 1 W±5% . . . . . . . . . 4835 220 27043
T571 FLYBACK TRANS (TYPE B ) BSC25-2050S . 4835 148 87404
R583 METAL RES. 2W 1.8 W±5% . . . . . . . . 4835 116 67311
CRT CBA (MUT-B)
CRT CBA (MUT-B)
CRT CBA (MUT-B). . . . . . . . . . . . 00ES A03 855-B
C501 CERAMIC CAP.(AX) 270pF/50V ±10% (B). . 4835 122 47122
C502 CERAMIC CAP.(AX) 330pF/50V ±10% (B). . 4835 122 47047
C503 CERAMIC CAP.(AX) 330pF/50V ±10% (B). . 4835 122 47047
C504 ELECTROLYTIC CAP. 47mF/35V ±20%. . . . 4835 124 97066
C507 ELECTROLYTIC CAP. 1mF/50V ±20% . . . . 4835 124 47014
C510 CERAMIC CAP. 0.001mF/2KV ±10% (B). . . 4835 122 37048
CN501 PIN CONNECTOR 005P-5100. . . . . . . . JTEA 001 TG001
D501 SWITCHING DIODE 1SS133(T-77) . . . . . 4835 130 37235
D502 SWITCHING DIODE 1SS133(T-77) . . . . . 4835 130 37235
D503 SWITCHING DIODE 1SS133(T-77) . . . . . 4835 130 37235
L501 INDUCTOR 180mH-J-5FT . . . . . . . . . 4835 157 58066
Q501 RED AMP 2SC2482 TPE6 "NPN" . . . . . . 4835 130 48046
Q502 GREEN AMP 2SC2482 TPE6 "NPN" . . . . . 4835 130 48046
Q503 BLUE AMP 2SC2482 TPE6 "NPN". . . . . . 4835 130 48046
R501 FIXED METAL OXIDE FILM RES. 1W 15k W±5 4835 116 87019
R502 FIXED METAL OXIDE FILM RES. 1W 15k W±5 4835 116 87019
R503 FIXED METAL OXIDE FILM RES. 1W 15k W±5 4835 116 87019
R506 CARBON RES. 1/4W 1.5k W ±5%. . . . . . 4835 110 57186
R507 CARBON RES. 1/4W 1.5k W ±5%. . . . . . 4835 110 57186
R508 CARBON RES. 1/4W 1.5k W ±5%. . . . . . 4835 110 57186
R509 PCB JUMPER D0.6-P5.0 . . . . . . . . . 0000 00J W5.0T
R510 PCB JUMPER D0.6-P5.0 . . . . . . . . . 0000 00J W5.0T
R511 CARBON RES. 1/4W 3.3k W ±5%. . . . . . 4835 110 57046
R512 CARBON RES. 1/4W 3.3k W ±5%. . . . . . 4835 110 57046
R513 CARBON RES. 1/4W 3.3k W ±5%. . . . . . 4835 110 57046
R514 CARBON RES. 1/4W 1.5k W ±5%. . . . . . 4835 110 57186
R515 PCB JUMPER D0.6-P5.0 . . . . . . . . . 0000 00J W5.0T
R516 CARBON RES. 1/4W 15 W ±5%. . . . . . . 4835 110 57177
R517 CARBON RES. 1/4W 470 W ±5% . . . . . . 4835 110 57167
R518 CARBON RES. 1/4W 15 W ±5%. . . . . . . 4835 110 57177
R519 CARBON RES. 1/4W 470 W ±5% . . . . . . 4835 110 57167
R520 CARBON RES. 1/4W 15 W ±5%. . . . . . . 4835 110 57177
R521 CARBON RES. 1/4W 470 W ±5% . . . . . . 4835 110 57167
R534 CARBON RES. 1/4W 1.5k W ±5%. . . . . . 4835 110 57186
R535 CARBON RES. 1/4W 1.5k W ±5%. . . . . . 4835 110 57186
CL501A LEAD WIRE 3P 400MM . . . . . . . . . . WX1T 710 0-101
CL504A LEAD WIRE 5P 340MM . . . . . . . . . . WX1T 710 0-105
JK501 CRT SOCKET ISHS40S . . . . . . . . . . 4835 265 97454
POWER SUPPLY CBA (MPS-A)
POWER SUPPLY CBA (MPS-A)
POWER SUPPLY CBA (MPS-A) . . . . . . . 00ES A03 858-A
C601 METALLIZED FILM CAP. 0.1mF/250V. . . . 4835 121 47025
C602 FILM CAP.(P) 0.082mF/50V ±5% . . . . . 4835 121 47704
C603 FILM CAP.(P) 0.018mF/50V ±5% . . . . . 4822 121 42701
C605 CERAMIC CAP. 0.01mF/AC250V . . . . . . 4835 122 47502
C606 CERAMIC CAP. 0.01mF/AC250V . . . . . . 4835 122 47502
C607 CERAMIC CAP. 0.01mF/AC250V . . . . . . 4835 122 47502
C608 CERAMIC CAP. 0.01mF/AC250V . . . . . . 4835 122 47502
C609 CERAMIC CAP. 820pF/2KV BN. . . . . . . 4835 122 47681
C610 ELECTROLYTIC CAP. 470mF/200V . . . . . 4835 124 47097
C611 FILM CAP.(P) 0.047mF/50V ±5% . . . . . 4835 121 47456
C613 FILM CAP.(P) 0.056mF/50V ±5% . . . . . 4835 121 47439
C643 PCB JUMPER D0.6-P10.0. . . . . . . . . 0000 0JW 10.0T
Page 87

CDV19BPH (continued)
C644 SAFETY CAP. 4700pF/125V ±20% X . . . . 4835 125 97035
C645 SAFETY CAP. 1000pF/125V ±20% X . . . . 4835 122 17031
C651 CERAMIC CAP. 1000pF/2KV BN . . . . . . 4835 122 47551
C652 CERAMIC CAP. 220pF/50V ±10% (B). . . . 4835 122 47006
C653 CERAMIC CAP.(AX) 220pF/50V ±10% (B). . 4835 122 47006
C654 ELECTROLYTIC CAP. 1mF/50V ±20% . . . . 4835 124 47014
C655 ELECTROLYTIC CAP. 1mF/50V ±20% . . . . 4835 124 47014
C656 ELECTROLYTIC CAP. 100mF/160V ±20%. . . 4835 124 47698
C657 ELECTROLYTIC CAP. 1000mF/35V ±20%. . . 4835 124 47143
C658 ELECTROLYTIC CAP. 1000mF/16V ±20%. . . 4835 124 47005
C661 FILM CAP.(P) 0.018mF/50V ±5% . . . . . 4822 121 42701
C673 ELECTROLYTIC CAP. 4.7mF/50V ±20% . . . 4835 124 47506
C690 ELECTROLYTIC CAP. 1000mF/16V ±20% (VR/
HC). . . . . . . . . . . . . . . . . . 4835 124 47005
C691 ELECTROLYTIC CAP. 1000mF/16V ±20% (VR/
HC). . . . . . . . . . . . . . . . . . 4835 124 47005
C692 BEAD INDUCTOR FBR07HA121TB-00. . . . . LLBF 00Z TU021
C693 CERAMIC CAP. 220pF/50V ±10% (B). . . . 4835 122 47006
C695 ELECTROLYTIC CAP. 1000mF/16V ±20% (VR/
HC). . . . . . . . . . . . . . . . . . 4835 124 47005
CN601 CONNECTOR BASE, 6P TUC-P06P-B1 . . . . J3TU A06 TG001
CN602 CONNECTOR, 10P TUC-P10X-B1 . . . . . . JCTU S10 TG001
CN603 CONNECTOR, 7P TUC-P07X-B1. . . . . . . JCTU S07 TG001
CN691 CONNECTOR BASE, 2P RTB-1.5-2P. . . . . J3RT C02 JG001
D605 DIODE 1N5397-52. . . . . . . . . . . . 4835 130 38014
D606 DIODE 1N5397-52. . . . . . . . . . . . 4835 130 38014
D607 DIODE 1N5397-52. . . . . . . . . . . . 4835 130 38014
D608 DIODE 1N5397-52. . . . . . . . . . . . 4835 130 38014
D609 SWITCHING DIODE 1SS133(T-77) . . . . . 4835 130 37235
D611 ZENER DIODE MTZJT-7724C. . . . . . . . 4835 130 37984
D613 ZENER DIODE MTZJT-775.6B . . . . . . . 4835 130 37329
D614 SWITCHING DIODE 1SS133(T-77) . . . . . 4835 130 37235
D615 SWITCHING DIODE 1SS133(T-77) . . . . . 4835 130 37235
D616 ZENER DIODE MTZJT-7720C. . . . . . . . 4835 130 37983
D651 RECOVERY DIODE ERC18-04. . . . . . . . 4835 130 37994
D652 FAST RECOVERY DIODE ERB44-02 . . . . . 4835 130 37944
D653 FAST RECOVERY DIODE ERB32-01 . . . . . 4835 130 37149
D654 SWITCHING DIODE 1SS133(T-77) . . . . . 4835 130 37235
D655 ZENER DIODE MTZJT-7736B. . . . . . . . 4835 130 37785
D656 ZENER DIODE MTZJT-776.8B . . . . . . . 4835 130 37881
D660 SWITCHING DIODE 1SS133(T-77) . . . . . 4835 130 37235
D661 SWITCHING DIODE 1SS133(T-77) . . . . . 4835 130 37235
D667 DIODE 1ZC33. . . . . . . . . . . . . . 4835 130 37958
D670 SWITCHING DIODE 1SS133(T-77) . . . . . 4835 130 37235
D672 SWITCHING DIODE 1SS133(T-77) . . . . . 4835 130 37235
D675 SWITCHING DIODE 1SS133(T-77) . . . . . 4835 130 37235
D690 FAST RECOVERY DIODE ERB44-02 . . . . . 4835 130 37944
D692 SCHOTTKY BARRIER DIODE ERB81-004 . . . 4835 130 37233
IC601 ERROR VOLTAGE DET LTV-817B-F . . . . . 4835 130 37977
Q601 SWITCHING 2SK2638-01MR . . . . . . . . 4835 130 48168
Q602 LIMITER 2SC2120-O-TPE2 "NPN" . . . . . 4835 130 47756
Q651 SWITCHING 2SC2785(J) "NPN" . . . . . . 4835 130 47722
Q652 FEED BACK 2SC2785(J) "NPN" . . . . . . 4835 130 47722
Q672 SWITCHING 2SA950(O) "PNP". . . . . . . 4835 130 47576
Q673 SWITCHING CONTROL 2SC2785(J) "NPN" . . 4835 130 47722
R601 CEMENT RES. 5W K 1.2 W . . . . . . . . 4835 113 87008
R602 CARBON RES. 1/4W 820k W ±5%. . . . . . 4835 110 57344
R603 CARBON RES. 1/4W 820k W ±5%. . . . . . 4835 110 57344
R611 CARBON RES. 1/4W 270 W ±5% . . . . . . 4835 110 57041
R612 CARBON RES. 1/4W 330 W ±5% . . . . . . 4835 110 57045
R613 FIXED METAL OXIDE FILM RES. 2W 0.22 W±
5% . . . . . . . . . . . . . . . . . . 4835 116 57572
R614 CARBON RES. 1/4W 1.2k W ±5%. . . . . . 4835 110 57027
R616 CARBON RES. 1/4W 330 W ±5% . . . . . . 4835 110 57045
R618 CARBON RES. 1/4W 1 W ±5% . . . . . . . 4835 110 57229
R619 CARBON RES. 1/4W 8.2k W ±5%. . . . . . 4835 110 57264
R651 FIXED METAL OXIDE FILM RES. 2W 15k W±5 4835 116 57041
R652 CARBON RES. 1/4W 15k W ±5% . . . . . . 4835 110 57032
R653 CARBON RES. 1/4W 15k W ±5% . . . . . . 4835 110 57032
R654 CARBON RES. 1/4W 82 W ±5%. . . . . . . 4835 110 57274
R655 CARBON RES. 1/4W 330 W ±5% . . . . . . 4835 110 57045
R656 CARBON RES. 1/4W 15k W ±5% . . . . . . 4835 110 57032
R657 CARBON RES. 1/4W 15k W ±5% . . . . . . 4835 110 57032
R658 FIXED METAL OXIDE FILM RES. 2W 10k W±5 4835 116 57179
R660 CARBON RES. 1/4W 1k W ±5%. . . . . . . 4835 110 57025
R661 CARBON RES. 1/4W 68k W ±5% . . . . . . 4835 110 57168
R662 CARBON RES. 1/4W 5.6k W ±5%. . . . . . 4835 110 57304
R663 PCB JUMPER D0.6-P5.0 . . . . . . . . . 0000 00J W5.0T
R664 CARBON RES. 1/4W 680 W ±5% . . . . . . 4835 110 57054
R665 CARBON RES. 1/4W 4.7k W ±5%. . . . . . 4835 110 57051
R666 CARBON RES. 1/4W 10 W ±5%. . . . . . . 4835 110 57002
R667 CARBON RES. 1/4W 8.2k W ±5%. . . . . . 4835 110 57264
R668 CARBON RES. 1/4W 12k W ±5% . . . . . . 4835 110 57282
R669 CARBON RES. 1/4W 12k W ±5% . . . . . . 4835 110 57282
R673 CARBON RES. 1/4W 2.7k W ±5%. . . . . . 4835 110 57006
R674 CARBON RES. 1/4W 2.7k W ±5%. . . . . . 4835 110 57006
R675 CARBON RES. 1/4W 56k W ±5% . . . . . . 4835 110 57213
R676 CARBON RES. 1/4W 10k W ±5% . . . . . . 4835 110 57026
R677 CARBON RES. 1/4W 68k W ±5% . . . . . . 4835 110 57168
R678 CARBON RES. 1/4W 47k W ±5% . . . . . . 4835 110 57189
BC601 BEAD INDUCTOR FBR07HA121TB-00. . . . . LLBF 00Z TU021
BC640 BEAD INDUCTOR FBR07HA121TB-00. . . . . LLBF 00Z TU021
S = Safety Part Be sure to use exact replacement part.
BC641 BEAD INDUCTOR FBR07HA121TB-00. . . . . LLBF 00Z TU021
BC651 BEAD INDUCTOR FBR07HA121TB-00. . . . . LLBF 00Z TU021
CL502B LEAD WIRE 6P 290MM . . . . . . . . . . WX1T 510 0-103
CL503B LEAD WIRE 7P 480MM . . . . . . . . . . WX1T 510 0-104
CL602A WIRE HOLDER 10P 51048-1000 . . . . . . XW01 D10 NF001
CL602B WIRE HOLDER 10P 51048-1000 . . . . . . XW01 D10 NF001
CL603A LEAD WIRE 7P 350MM . . . . . . . . . . WX1T D10 0-004
F601 FUSE TDS4A/125VU/C . . . . . . . . . . 4835 253 97153
FH601 FUSE HOLDER MSF-015. . . . . . . . . . XH01 Z00 LY001
FH602 FUSE HOLDER MSF-015. . . . . . . . . . XH01 Z00 LY001
GP641 GAP. FNR-G3.10D. . . . . . . . . . . . 4835 252 27025
J622 FAST RECOVERY DIODE ERB32-01 . . . . . 4835 130 37149
L601 LINE FILTER 2.7MH ELF15N013A . . . . . 4835 154 97208
LD602 WIRE ASSEMBLY 5P 350MM . . . . . . . . WX1T D10 0-005
LD604 WIRE ASSEMBLY 5P 350MM . . . . . . . . WX1T D10 0-005
PB1 13VPOW HEAT SINK PEU ASSEMBLY. . . . . 0000 EM4 05994
PL1 B-TITE SCREW 3X8 BIND + CHROME . . . . 0000 GBM B3080
PS691 POSISTER ZPB45BL7R0A . . . . . . . . . QNZZ 45B L7R0A
SA601 SURGE ABSORBER JVR-07N471K . . . . . . 4835 252 27024
T601 SWITCHING TRANS KD-00111 . . . . . . . 4835 148 87411
TP601 PCB JUMPER D0.6-P17.5. . . . . . . . . 0000 0JW 17.5T
TP602 PCB JUMPER D0.6-P10.0. . . . . . . . . 0000 0JW 10.0T
VR661 CARBON P.O.T. 10k W B . . . . . . . . 4835 100 97516
W601 AC CORD WAC0172AS006 . . . . . . . . . 4835 321 17153
JUNCTION C CBA (Included in Power Supply CBA)
JUNCTION C CBA (Included in Power Supp
ly CBA)
CN602 CONNECTOR, 10P TUC-P10X-B1 . . . . . . JCTU S10 TG001
CL602A WIRE HOLDER 10P 51048-1000 . . . . . . XW01 D10 NF001
CN603 CONNECTOR, 7P TUC-P07X-B1. . . . . . . JCTU S07 TG001
CL603A LEAD WIRE 7P 350MM . . . . . . . . . . WX1T D10 0-004
FILTER CBA (MPS-B)
FILTER CBA (MPS-B)
FILTER CBA (MPS-B) . . . . . . . . . . 00ES A03 858-B
C401 ELECTROLYTIC CAP. 47mF/10V ±20%. . . . 4835 124 47154
C402 CERAMIC CAP.(AX) 0.022mF/25V +80/20% (
F) . . . . . . . . . . . . . . . . . . 4835 122 47214
C403 CERAMIC CAP.(AX) 22pF/50V ±5% (SL) . . 4835 122 37016
C412 CERAMIC CAP.(AX) 56pF/50V ±5% (SL) . . 4835 122 47053
C413 CERAMIC CAP.(AX) 56pF/50V ±5% (SL) . . 4835 122 47053
C414 CERAMIC CAP.(AX) 1000pF/50V ±10% (B) . 4835 122 47215
C416 ELECTROLYTIC CAP. 47mF/10V ±20%. . . . 4835 124 47154
C419 CERAMIC CAP.(AX) 56pF/50V ±5% (SL) . . 4835 122 47053
C423 CERAMIC CAP.(AX) 56pF/50V ±5% (SL) . . 4835 122 47053
C425 ELECTROLYTIC CAP. 100mF/6.3V ±20%. . . 4835 124 47263
C427 CERAMIC CAP.(AX) 1000pF/50V ±10% (B) . 4835 122 47215
CN401 FMN CONNECTOR, TOP 13P 13FMN-BTRK. . . JCFN G13 JG002
CN402 FMN CONNECTOR, TOP 20P 20FMN-BTRK. . . JCFN G20 JG002
CN403 FMN CONNECTOR, TOP 18P 18FMN-BTRK. . . JCFN G18 JG002
CN404 CONNECTOR 10P TKC-A10X-B1. . . . . . . JCTK C10 TG003
CN405 CONNECTOR 12P TKC-A12X-B1. . . . . . . JCTK C12 TG003
CN406 CONNECTOR 8P TKC-A08X-B1 . . . . . . . JCTK C08 TG003
CN407 CONNECTOR 10P TKC-A10X-B1. . . . . . . JCTK C10 TG003
D403 SWITCHING DIODE 1SS133(T-77) . . . . . 4835 130 37235
IC401 CONTROLLER (FL DRIVER) M35500AGP . . . 4835 209 47398
IC402 +3.3V REGULATOR PQ3RD13(1A). . . . . . 4835 209 47484
L401 PCB JUMPER D0.6-P5.0 . . . . . . . . . 0000 00J W5.0T
L402 PCB JUMPER D0.6-P5.0 . . . . . . . . . 0000 00J W5.0T
L403 PCB JUMPER D0.6-P5.0 . . . . . . . . . 0000 00J W5.0T
L404 PCB JUMPER D0.6-P5.0 . . . . . . . . . 0000 00J W5.0T
L405 PCB JUMPER D0.6-P5.0 . . . . . . . . . 0000 00J W5.0T
L406 PCB JUMPER D0.6-P5.0 . . . . . . . . . 0000 00J W5.0T
L407 PCB JUMPER D0.6-P5.0 . . . . . . . . . 0000 00J W5.0T
L408 PCB JUMPER D0.6-P5.0 . . . . . . . . . 0000 00J W5.0T
L409 CHOKE COIL 47mH-K. . . . . . . . . . . 4835 157 58208
L410 INDUCTOR 47mH-K-5FT. . . . . . . . . . 4835 157 57375
L411 INDUCTOR 47mH-J-26T. . . . . . . . . . 4835 157 58271
L412 CHOKE COIL 47mH-K. . . . . . . . . . . 4835 157 58208
L413 CHOKE COIL 47mH-K. . . . . . . . . . . 4835 157 58208
L414 INDUCTOR 22mH-J-26T. . . . . . . . . . 4835 157 57641
L415 PCB JUMPER D0.6-P5.0 . . . . . . . . . 0000 00J W5.0T
L416 PCB JUMPER D0.6-P5.0 . . . . . . . . . 0000 00J W5.0T
L417 INDUCTOR 47mH-J-26T. . . . . . . . . . 4835 157 58271
L418 PCB JUMPER D0.6-P5.0 . . . . . . . . . 0000 00J W5.0T
L419 PCB JUMPER D0.6-P5.0 . . . . . . . . . 0000 00J W5.0T
L420 INDUCTOR 22mH-J-26T. . . . . . . . . . 4835 157 57641
L421 PCB JUMPER D0.6-P5.0 . . . . . . . . . 0000 00J W5.0T
Q401 SWITCHING P-ON-OFF KRC103M "NPN" . . . 4835 130 47909
Q402 SWITCHING P-ON-OFF KRC103M "NPN" . . . 4835 130 47909
Q403 SWITCHING P-ON-ON KRC103M "NPN". . . . 4835 130 47909
J403 CARBON RES. 1/4W 10k W ±5% . . . . . . 4835 110 57026
R401 CARBON RES. 1/4W 10k W ±5% . . . . . . 4835 110 57026
R402 CARBON RES. 1/4W 10k W ±5% . . . . . . 4835 110 57026
R403 CARBON RES. 1/4W 10k W ±5% . . . . . . 4835 110 57026
R404 CARBON RES. 1/4W 4.7k W ±5%. . . . . . 4835 110 57051
R405 CARBON RES. 1/4W 100k W ±5%. . . . . . 4835 110 57185
TB7 13V FILTER HEAT SINK PEV . . . . . . . 000E M40 5957A
TL4 B-TITE SCREW 3X8 BIND + CHROME . . . . 0000 GBM B3080
DVD CBA
DVD CBA
Page 88

CDV19BPH (continued)
DVD CBA. . . . . . . . . . . . . . . . 0000 VSA 10634
C001 CHIP CERAMIC CAP. 0.022mF/50V ±10% (B) 4835 122 87209
C002 CHIP CERAMIC CAP. 0.1mF/25V +80/-20% (
F) . . . . . . . . . . . . . . . . . . 4835 122 87213
C003 CHIP CERAMIC CAP. 0.1mF/16V ±10% (B) . 4835 122 87634
C004 CHIP CERAMIC CAP. 0.1mF/16V ±10% (B) . 4835 122 87634
C005 CHIP CERAMIC CAP. 0.1mF/16V ±10% (B) . 4835 122 87634
C006 CHIP CERAMIC CAP. 0.1mF/25V +80/-20% (
F) . . . . . . . . . . . . . . . . . . 4835 122 87213
C007 CHIP CERAMIC CAP. 0.1mF/25V +80/-20% (
F) . . . . . . . . . . . . . . . . . . 4835 122 87213
C010 CHIP CERAMIC CAP. 0.01mF/50V +80/-20%
(F). . . . . . . . . . . . . . . . . . 4835 122 87314
C011 CHIP CERAMIC CAP. 0.01mF/50V +80/-20%
(F). . . . . . . . . . . . . . . . . . 4835 122 87314
C017 CHIP CERAMIC CAP. 220pF/50V ±5% CH . . 4835 122 87137
C018 CHIP CERAMIC CAP. 0.1mF/25V +80/-20% (
F) . . . . . . . . . . . . . . . . . . 4835 122 87213
C019 CHIP CERAMIC CAP. 1000pF/50V ±10% (B). 4835 122 87153
C020 CHIP CERAMIC CAP. 1800pF/50V ±10% (B). 4835 122 87206
C021 CHIP ELECTROLYTIC CAP. 22mF/6.3V ±20%. 4835 124 97148
C023 CHIP CERAMIC CAP. 0.1mF/25V +80/-20% (
F) . . . . . . . . . . . . . . . . . . 4835 122 87213
C024 CHIP CERAMIC CAP. 0.1mF/25V +80/-20% (
F) . . . . . . . . . . . . . . . . . . 4835 122 87213
C028 CHIP CERAMIC CAP. 0.1mF/25V +80/-20% (
F) . . . . . . . . . . . . . . . . . . 4835 122 87213
C029 CHIP CERAMIC CAP. 0.1mF/25V +80/-20% (
F) . . . . . . . . . . . . . . . . . . 4835 122 87213
C030 CHIP CERAMIC CAP. 2200pF/50V ±10% (B). 4835 122 87207
C031 CHIP CERAMIC CAP. 2200pF/50V ±10% (B). 4835 122 87207
C036 CHIP CERAMIC CAP. 0.1mF/25V +80/-20% (
F) . . . . . . . . . . . . . . . . . . 4835 122 87213
C037 CHIP CERAMIC CAP. 0.1mF/25V +80/-20% (
F) . . . . . . . . . . . . . . . . . . 4835 122 87213
C038 CHIP CERAMIC CAP. 0.1mF/25V +80/-20% (
F) . . . . . . . . . . . . . . . . . . 4835 122 87213
C039 CHIP CERAMIC CAP. 10pF/50V ±5% CH. . . 4835 122 87045
C040 CHIP CERAMIC CAP. 10pF/50V ±5% CH. . . 4835 122 87045
C060 CHIP CERAMIC CAP. 0.01mF/50V ±10% (B). 4835 122 87255
C061 CHIP CERAMIC CAP. 0.1mF/25V +80/-20% (
F) . . . . . . . . . . . . . . . . . . 4835 122 87213
C062 CHIP CERAMIC CAP. 0.01mF/50V +80/-20%
(F). . . . . . . . . . . . . . . . . . 4835 122 87314
C063 CHIP CERAMIC CAP. 0.01mF/50V +80/-20%
(F). . . . . . . . . . . . . . . . . . 4835 122 87314
C064 CHIP CERAMIC CAP. 0.1mF/25V +80/-20% (
F) . . . . . . . . . . . . . . . . . . 4835 122 87213
C065 CHIP CERAMIC CAP. 0.1mF/25V +80/-20% (
F) . . . . . . . . . . . . . . . . . . 4835 122 87213
C066 CHIP CERAMIC CAP. 0.01mF/50V ±10% (B). 4835 122 87255
C067 CHIP CERAMIC CAP. 820pF/50V ±5% CH . . 4835 122 87359
C068 CHIP CERAMIC CAP. 820pF/50V ±5% CH . . 4835 122 87359
C069 CHIP CERAMIC CAP. 0.01mF/50V ±10% (B). 4835 122 87255
C070 CHIP CERAMIC CAP. 0.1mF/25V +80/-20% (
F) . . . . . . . . . . . . . . . . . . 4835 122 87213
C071 CHIP CERAMIC CAP. 0.01mF/50V ±10% (B). 4835 122 87255
C072 CHIP CERAMIC CAP. 0.01mF/50V ±10% (B). 4835 122 87255
C073 CHIP CERAMIC CAP. 1000pF/50V ±10% (B). 4835 122 87153
C075 CHIP CERAMIC CAP. 0.01mF/50V ±10% (B). 4835 122 87255
C076 CHIP CERAMIC CAP. 0.01mF/50V +80/-20%
(F). . . . . . . . . . . . . . . . . . 4835 122 87314
C077 CHIP RES.(2125) 1/10W 0 W. . . . . . . RRXA ZR6 Z0000
C120 CHIP ELECTROLYTIC CAP. 220mF/16V . . . 4835 124 47081
C121 CHIP CERAMIC CAP. 0.1mF/25V +80/-20% (
F) . . . . . . . . . . . . . . . . . . 4835 122 87213
C122 CHIP CERAMIC CAP. 0.1mF/25V +80/-20% (
F) . . . . . . . . . . . . . . . . . . 4835 122 87213
C123 CHIP CERAMIC CAP. 0.47mF/10V ±10% (B). 4835 122 87638
C124 CHIP CERAMIC CAP. 0.47mF/10V ±10% (B). 4835 122 87638
C131 CHIP CERAMIC CAP. 0.1mF/25V +80/-20% (
F) . . . . . . . . . . . . . . . . . . 4835 122 87213
C132 CHIP CERAMIC CAP. 1000pF/50V ±10% (B). 4835 122 87153
C180 CHIP CERAMIC CAP. 0.1mF/25V +80/-20% (
F) . . . . . . . . . . . . . . . . . . 4835 122 87213
C181 CHIP CERAMIC CAP. 1000pF/50V ±10% (B). 4835 122 87153
C182 CHIP CERAMIC CAP. 0.1mF/25V +80/-20% (
F) . . . . . . . . . . . . . . . . . . 4835 122 87213
C183 CHIP ELECTROLYTIC CAP. 22mF/6.3V ±20%. 4835 124 97148
C184 CHIP CERAMIC CAP. 0.1mF/25V +80/-20% (
F) . . . . . . . . . . . . . . . . . . 4835 122 87213
C185 CHIP CERAMIC CAP. 0.01mF/50V +80/-20%
(F). . . . . . . . . . . . . . . . . . 4835 122 87314
C187 CHIP CERAMIC CAP. 0.022mF/50V ±10% (B) 4835 122 87209
C189 CHIP CERAMIC CAP. 0.1mF/25V +80/-20% (
F) . . . . . . . . . . . . . . . . . . 4835 122 87213
C190 CHIP ELECTROLYTIC CAP. 100mF/6.3V ±20%
BSS. . . . . . . . . . . . . . . . . . 4835 124 47165
C191 CHIP CERAMIC CAP. 0.22mF/10V ±10% (B). 4835 122 87637
C193 CHIP CERAMIC CAP. 0.022mF/50V ±10% (B) 4835 122 87209
C194 CHIP CERAMIC CAP. 0.1mF/25V +80/-20% (
F) . . . . . . . . . . . . . . . . . . 4835 122 87213
S = Safety Part Be sure to use exact replacement part.
C195 CHIP CERAMIC CAP. 0.1mF/25V +80/-20% (
F) . . . . . . . . . . . . . . . . . . 4835 122 87213
C196 CHIP CERAMIC CAP. 0.1mF/25V +80/-20% (
F) . . . . . . . . . . . . . . . . . . 4835 122 87213
C197 CHIP CERAMIC CAP. 0.1mF/25V +80/-20% (
F) . . . . . . . . . . . . . . . . . . 4835 122 87213
C198 CHIP CERAMIC CAP. 0.1mF/25V +80/-20% (
F) . . . . . . . . . . . . . . . . . . 4835 122 87213
C199 CHIP ELECTROLYTIC CAP. 22mF/6.3V ±20%. 4835 124 97148
C240 CHIP CERAMIC CAP. 0.1mF/25V +80/-20% (
F) . . . . . . . . . . . . . . . . . . 4835 122 87213
C241 CHIP CERAMIC CAP. 0.1mF/25V +80/-20% (
F) . . . . . . . . . . . . . . . . . . 4835 122 87213
C243 CHIP CERAMIC CAP. 0.1mF/25V +80/-20% (
F) . . . . . . . . . . . . . . . . . . 4835 122 87213
C244 CHIP CERAMIC CAP. 33pF/50V ±5% CH. . . 4835 122 87138
C246 CHIP CERAMIC CAP. 47pF/50V ±5% CH. . . 4835 122 87148
C247 CHIP CERAMIC CAP. 47pF/50V ±5% CH. . . 4835 122 87148
C248 CHIP CERAMIC CAP. 47pF/50V ±5% CH. . . 4835 122 87148
C249 CHIP CERAMIC CAP. 47pF/50V ±5% CH. . . 4835 122 87148
C250 CHIP CERAMIC CAP. 47pF/50V ±5% CH. . . 4835 122 87148
C251 CHIP CERAMIC CAP. 47pF/50V ±5% CH. . . 4835 122 87148
C252 CHIP CERAMIC CAP. 47pF/50V ±5% CH. . . 4835 122 87148
C253 CHIP CERAMIC CAP. 47pF/50V ±5% CH. . . 4835 122 87148
C254 CHIP CERAMIC CAP. 0.01mF/50V ±10% (B). 4835 122 87255
C255 CHIP CERAMIC CAP. 0.047mF/50V +80/-20%
(F). . . . . . . . . . . . . . . . . . 4835 122 87162
C301 CHIP CERAMIC CAP. 0.1mF/25V +80/-20% (
F) . . . . . . . . . . . . . . . . . . 4835 122 87213
C302 CHIP ELECTROLYTIC CAP. 47mF/6.3V ±20%
BSS. . . . . . . . . . . . . . . . . . 4835 124 47265
C303 CHIP CERAMIC CAP. 0.1mF/25V +80/-20% (
F) . . . . . . . . . . . . . . . . . . 4835 122 87213
C304 CHIP ELECTROLYTIC CAP. 47mF/6.3V ±20%
BSS. . . . . . . . . . . . . . . . . . 4835 124 47265
C305 CHIP CERAMIC CAP. 22pF/50V ±5% CH. . . 4835 122 87049
C306 CHIP ELECTROLYTIC CAP. 330mF/6.3V ±20% 4835 124 47153
C307 CHIP CERAMIC CAP. 0.1mF/25V +80/-20% (
F) . . . . . . . . . . . . . . . . . . 4835 122 87213
C308 CHIP CERAMIC CAP. 22pF/50V ±5% CH. . . 4835 122 87049
C309 CHIP CERAMIC CAP. 0.1mF/25V +80/-20% (
F) . . . . . . . . . . . . . . . . . . 4835 122 87213
C320 CHIP CERAMIC CAP. 0.1mF/25V +80/-20% (
F) . . . . . . . . . . . . . . . . . . 4835 122 87213
C321 CHIP CERAMIC CAP. 0.1mF/25V +80/-20% (
F) . . . . . . . . . . . . . . . . . . 4835 122 87213
C322 CHIP CERAMIC CAP. 0.1mF/25V +80/-20% (
F) . . . . . . . . . . . . . . . . . . 4835 122 87213
C323 CHIP CERAMIC CAP. 0.1mF/25V +80/-20% (
F) . . . . . . . . . . . . . . . . . . 4835 122 87213
C324 CHIP CERAMIC CAP. 0.1mF/25V +80/-20% (
F) . . . . . . . . . . . . . . . . . . 4835 122 87213
C325 CHIP CERAMIC CAP. 0.1mF/25V +80/-20% (
F) . . . . . . . . . . . . . . . . . . 4835 122 87213
C326 CHIP CERAMIC CAP. 0.1mF/25V +80/-20% (
F) . . . . . . . . . . . . . . . . . . 4835 122 87213
C327 CHIP CERAMIC CAP. 0.1mF/25V +80/-20% (
F) . . . . . . . . . . . . . . . . . . 4835 122 87213
C328 CHIP CERAMIC CAP. 220pF/50V ±5% CH . . 4835 122 87137
C329 CHIP CERAMIC CAP. 0.1mF/16V ±10% (B) . 4835 122 87634
C330 CHIP CERAMIC CAP. 0.1mF/25V +80/-20% (
F) . . . . . . . . . . . . . . . . . . 4835 122 87213
C331 CHIP CERAMIC CAP. 0.1mF/25V +80/-20% (
F) . . . . . . . . . . . . . . . . . . 4835 122 87213
C332 CHIP CERAMIC CAP. 0.1mF/25V +80/-20% (
F) . . . . . . . . . . . . . . . . . . 4835 122 87213
C333 CHIP ELECTROLYTIC CAP. 47mF/6.3V ±20%
BSS. . . . . . . . . . . . . . . . . . 4835 124 47265
C334 CHIP ELECTROLYTIC CAP. 47mF/6.3V ±20%
BSS. . . . . . . . . . . . . . . . . . 4835 124 47265
C336 CHIP ELECTROLYTIC CAP. 47mF/6.3V ±20%
BSS. . . . . . . . . . . . . . . . . . 4835 124 47265
C337 CHIP ELECTROLYTIC CAP. 47mF/6.3V ±20%
BSS. . . . . . . . . . . . . . . . . . 4835 124 47265
C340 CHIP ELECTROLYTIC CAP. 47mF/6.3V ±20%
BSS. . . . . . . . . . . . . . . . . . 4835 124 47265
C342 CHIP CERAMIC CAP. 0.1mF/25V +80/-20% (
F) . . . . . . . . . . . . . . . . . . 4835 122 87213
C343 CHIP ELECTROLYTIC CAP. 47mF/6.3V ±20%
BSS. . . . . . . . . . . . . . . . . . 4835 124 47265
C344 CHIP ELECTROLYTIC CAP. 47mF/6.3V ±20%
BSS. . . . . . . . . . . . . . . . . . 4835 124 47265
C346 CHIP CERAMIC CAP. 0.01mF/50V +80/-20%
(F). . . . . . . . . . . . . . . . . . 4835 122 87314
C347 CHIP CERAMIC CAP. 0.01mF/50V +80/-20%
(F). . . . . . . . . . . . . . . . . . 4835 122 87314
C348 CHIP ELECTROLYTIC CAP. 330mF/6.3V ±20%
LZ . . . . . . . . . . . . . . . . . . 4835 124 47131
C349 CHIP ELECTROLYTIC CAP. 47mF/6.3V ±20%
BSS. . . . . . . . . . . . . . . . . . 4835 124 47265
C350 CHIP ELECTROLYTIC CAP. 47mF/6.3V ±20%
BSS. . . . . . . . . . . . . . . . . . 4835 124 47265
Page 89

CDV19BPH (continued)
C353 CHIP CERAMIC CAP. 2.2mF/16V +80/-20% (
F) . . . . . . . . . . . . . . . . . . 4835 122 87641
C354 CHIP CERAMIC CAP. 0.1mF/25V +80/-20% (
F) . . . . . . . . . . . . . . . . . . 4835 122 87213
C356 CHIP CERAMIC CAP. 2.2mF/16V +80/-20% (
F) . . . . . . . . . . . . . . . . . . 4835 122 87641
C358 CHIP CERAMIC CAP. 10pF/50V ±5% CH. . . 4835 122 87045
C360 CHIP ELECTROLYTIC CAP. 47mF/6.3V ±20%
BSS. . . . . . . . . . . . . . . . . . 4835 124 47265
C361 CHIP CERAMIC CAP. 0.1mF/16V ±10% (B) . 4835 122 87634
C362 CHIP ELECTROLYTIC CAP. 330mF/6.3V ±20%
LZ . . . . . . . . . . . . . . . . . . 4835 124 47131
C363 CHIP CERAMIC CAP. 2.2mF/16V +80/-20% (
F) . . . . . . . . . . . . . . . . . . 4835 122 87641
C364 CHIP CERAMIC CAP. 0.1mF/25V +80/-20% (
F) . . . . . . . . . . . . . . . . . . 4835 122 87213
C367 CHIP ELECTROLYTIC CAP. 22mF/6.3V ±20%. 4835 124 97148
C368 CHIP CERAMIC CAP. 0.1mF/25V +80/-20% (
F) . . . . . . . . . . . . . . . . . . 4835 122 87213
C369 CHIP CERAMIC CAP. 10pF/50V ±5% CH. . . 4835 122 87045
C371 CHIP CERAMIC CAP. 1000pF/50V ±10% (B). 4835 122 87153
C372 CHIP CERAMIC CAP. 1000pF/50V ±10% (B). 4835 122 87153
C373 CHIP CERAMIC CAP. 0.1mF/25V +80/-20% (
F) . . . . . . . . . . . . . . . . . . 4835 122 87213
C374 CHIP CERAMIC CAP. 1mF/10V +80/-20% (F) 4835 122 87639
C375 CHIP ELECTROLYTIC CAP. 22mF/6.3V ±20%. 4835 124 97148
C380 CHIP ELECTROLYTIC CAP. 33mF/6.3V ±20%
BSS. . . . . . . . . . . . . . . . . . 4835 124 47169
C385 CHIP CERAMIC CAP. 0.1mF/16V ±10% (B) . 4835 122 87634
C386 CHIP ELECTROLYTIC CAP. 33mF/6.3V ±20%
BSS. . . . . . . . . . . . . . . . . . 4835 124 47169
C387 CHIP CERAMIC CAP. 470pF/50V ±5% CH . . 4835 122 87203
C388 CHIP CERAMIC CAP. 0.1mF/25V +80/-20% (
F) . . . . . . . . . . . . . . . . . . 4835 122 87213
C389 CHIP CERAMIC CAP. 0.01mF/50V +80/-20%
(F). . . . . . . . . . . . . . . . . . 4835 122 87314
C394 CHIP RES. 1/16W 0 W±5% . . . . . . . . RRXG JR5 Z0000
C395 CHIP RES. 1/16W 0 W±5% . . . . . . . . RRXG JR5 Z0000
C396 CHIP CERAMIC CAP. 0.1mF/25V +80/-20% (
F) . . . . . . . . . . . . . . . . . . 4835 122 87213
C397 CHIP CERAMIC CAP. 0.1mF/25V +80/-20% (
F) . . . . . . . . . . . . . . . . . . 4835 122 87213
C398 CHIP CERAMIC CAP. 0.1mF/25V +80/-20% (
F) . . . . . . . . . . . . . . . . . . 4835 122 87213
CN001 FFC CONNECTOR 22P 9611S-22Y901 . . . . JC96 D22 ER006
CN120 FFC CONNECTOR 12P 9611S-12Y901 . . . . JC96 D12 ER006
CN301 10P SMT CONNECTOR 53398-1090 . . . . . J398 D10 NF001
CN302 FFC CONNECTOR 18P 9611S-18Y901 . . . . JC96 D18 ER006
CN304 FFC CONNECTOR 13P 9611S-13Y901 . . . . JC96 D13 ER006
CN305 FFC CONNECTOR 20P 9611S-20Y901 . . . . JC96 D20 ER006
D060 LED LTE-3271T-F. . . . . . . . . . . . 4835 130 87158
D061 CHIP DIODE 1SS355 TE-17. . . . . . . . 4822 130 83649
IC001 RF SIGNAL PROCESSOR M61840FP . . . . . 4835 209 47489
IC002 OP AMP NJM3404AV . . . . . . . . . . . 4835 209 47497
IC060 SERVO DSP D70206PZ . . . . . . . . . . 4835 209 47532
IC061 OP AMP NJM2100V. . . . . . . . . . . . 4835 209 47485
IC062 OP AMP NJM2100V. . . . . . . . . . . . 4835 209 47485
IC120 SERVO DRIVER M63001FP. . . . . . . . . 4835 209 47486
IC180 DVD SIGNAL PROCESSOR M65870FP. . . . . 4835 209 47538
IC181 4M D-RAM V53C16258LK50-TP. . . . . . . 4835 209 47483
IC182 OP AMP NJM2100V. . . . . . . . . . . . 4835 209 47485
IC240 FRONT END PROCESSOR M37702M8B-314FP. . 4835 209 17666
IC242 LINE DECORDER TC7W74FU(TE12L). . . . . 4822 209 90909
IC301 VIDEO/AUDIO DECODER M65773_AFP . . . . 4835 209 47537
IC302 AUDIO DAC PCM1727E/2K. . . . . . . . . 4835 209 47471
IC305 2M FLASH MEMORY MBM29F200TC-90PFTN . . 4835 209 47539
IC306 1M STATIC RAM (50NSEC) KM6161000BLT-5L 4835 209 47482
IC307 1K EEPROM BR24C01AF-E2 . . . . . . . . 4835 209 17649
IC308 RESET 3.9V PST-9139NR. . . . . . . . . 4835 209 47487
IC309 16M SD-RAM KM416S1120DT-G8 . . . . . . 4835 209 47481
IC310 BACK END PROCESSOR M37902FGCGP . . . . 4835 209 17648
IC312 +3.3V REGULATER ±20% M1385ENRE. . . . 4835 209 47488
IC313 VIDEO ENCODER M65677FP . . . . . . . . 4835 209 47491
IC314 INVERTER IC SN74LVC04NSR . . . . . . . 4835 209 47477
IC315 1M STATIC RAM (50NSEC) KM6161000BLT-5L 4835 209 47482
IC316 AND GATE TC74HC08AF EL . . . . . . . . 4822 209 17212
L306 CHIP INDUCTOR 15mH LEMF2520T150K . . . 4835 157 58246
L307 CHIP INDUCTOR 6.8mH LEMC3225T6R8M. . . 4835 157 58247
Q001 SWITCHING 2SD2150 T100R "NPN". . . . . 4835 209 17658
Q002 AMP 2SB1424 T100R "PNP". . . . . . . . 4835 130 48186
Q003 SWITCHING DTC114EKA T146 . . . . . . . 4835 130 48214
Q060 PHOTO TRANSISTOR ST-319R2-B. . . . . . 4835 130 48138
Q061 SWITCHING 2SC2412K T146R "NPN" . . . . 4835 130 48213
Q303 BUFFER 2SA1037AK T146R "PNP" . . . . . 9965 000 04336
Q307 6dB AMP 2SA1037AK T146R "PNP". . . . . 9965 000 04336
Q308 6dB AMP 2SC2412K T146R "NPN" . . . . . 4835 130 48213
Q311 6dB AMP 2SA1037AK T146R "PNP". . . . . 9965 000 04336
Q312 6dB AMP 2SC2412K T146R "NPN" . . . . . 4835 130 48213
Q313 6dB AMP 2SA1037AK T146R "PNP". . . . . 9965 000 04336
Q314 6dB AMP 2SC2412K T146R "NPN" . . . . . 4835 130 48213
R004 CHIP RES.(1608) 1/16W 10k W±5% . . . . 4835 111 17242
R005 CHIP RES.(1608) 1/16W 10k W±5% . . . . 4835 111 17242
S = Safety Part Be sure to use exact replacement part.
R006 CHIP RES.(1608) 1/16W 1k W±5%. . . . . 4835 111 17068
R007 CHIP RES.(1608) 1/16W 1k W±5%. . . . . 4835 111 17068
R009 CHIP RES.(100PPM) 1/16W 1k W . . . . . 4835 111 17068
R010 CHIP RES.(100PPM) 1/16W 1k W . . . . . 4835 111 17068
R011 CHIP RES.(100PPM) 1/16W 1k W . . . . . 4835 111 17068
R012 CHIP RES.(100PPM) 1/16W 1k W . . . . . 4835 111 17068
R014 CHIP RES.(1608) 1/16W 4.7k W±5%. . . . 4835 111 17264
R015 CHIP RES.(1608) 1/16W 220 W±5% . . . . 4835 111 17251
R016 CHIP RES.(1608) 1/16W 10k W±5% . . . . 4835 111 17242
R017 CHIP RES.(1608) 1/16W 10k W±5% . . . . 4835 111 17242
R018 CHIP RES.(100PPM) 1/16W 20k W. . . . . 4835 111 17383
R019 CHIP RES.(100PPM) 1/16W 4.3k W . . . . 4835 111 17501
R020 CHIP RES.(1608) 1/16W 10k W±5% . . . . 4835 111 17242
R021 CHIP RES.(1608) 1/16W 10k W±5% . . . . 4835 111 17242
R022 CHIP RES.(1608) 1/16W 10k W±5% . . . . 4835 111 17242
R023 CHIP RES.(1608) 1/16W 30k W±5% . . . . 4835 111 17489
R024 CHIP RES.(100PPM) 1/16W 30k W. . . . . 4835 111 17489
R025 CHIP RES.(1608) 1/16W 100k W±5%. . . . 4835 111 17243
R026 CHIP RES.(3216) 1/4W 33 W J. . . . . . 4835 110 57044
R027 CHIP RES.(1608) 1/16W 22k W±5% . . . . 4835 111 17253
R028 CHIP RES.(1608) 1/16W 1k W±5%. . . . . 4835 111 17068
R029 CHIP RES.(1608) 1/16W 10k W±5% . . . . 4835 111 17242
R031 CHIP RES. 1/16W 0 W±5% . . . . . . . . RRXG JR5 Z0000
R032 CHIP RES.(100PPM) 1/16W 1k W . . . . . 4835 111 17068
R033 CHIP RES.(100PPM) 1/16W 1k W . . . . . 4835 111 17068
R034 CHIP RES.(100PPM) 1/16W 1k W . . . . . 4835 111 17068
R035 CHIP RES.(100PPM) 1/16W 1k W . . . . . 4835 111 17068
R040 CHIP RES.(1608) 1/16W 390k W±5%. . . . 4835 111 17179
R041 CHIP RES.(1608) 1/16W 75 W±5%. . . . . 4835 111 17131
R042 CHIP RES.(1608) 1/16W 330 W±5% . . . . 4835 111 17257
R060 CHIP RES.(1608) 1/16W 10k W±5% . . . . 4835 111 17242
R061 CHIP RES.(1608) 1/16W 10k W±5% . . . . 4835 111 17242
R062 CHIP RES.(1608) 1/16W 22k W±5% . . . . 4835 111 17253
R063 CHIP RES.(1608) 1/16W 1M W±5%. . . . . 4835 111 17244
R064 CHIP RES.(1608) 1/16W 220 W±5% . . . . 4835 111 17251
R065 CHIP RES.(1608) 1/16W 1k W±5%. . . . . 4835 111 17068
R066 CHIP RES.(1608) 1/16W 1k W±5%. . . . . 4835 111 17068
R067 CHIP RES.(1608) 1/16W 220 W±5% . . . . 4835 111 17251
R068 CHIP RES.(1608) 1/16W 33k W±5% . . . . 4835 111 17259
R069 CHIP RES.(1608) 1/16W 33k W±5% . . . . 4835 111 17259
R070 CHIP RES.(1608) 1/16W 220 W±5% . . . . 4835 111 17251
R071 CHIP RES.(1608) 1/16W 10k W±5% . . . . 4835 111 17242
R074 CHIP RES. 1/16W 0 W±5% . . . . . . . . RRXG JR5 Z0000
R075 CHIP RES.(1608) 1/16W 10k W±5% . . . . 4835 111 17242
R095 CHIP RES.(1608) 1/16W 4.7k W±5%. . . . 4835 111 17264
R096 CHIP RES.(1608) 1/16W 4.7k W±5%. . . . 4835 111 17264
R097 CHIP RES.(1608) 1/16W 4.7k W±5%. . . . 4835 111 17264
R098 CHIP RES.(1608) 1/16W 4.7k W±5%. . . . 4835 111 17264
R099 CHIP RES.(1608) 1/16W 4.7k W±5%. . . . 4835 111 17264
R100 CHIP RES.(1608) 1/16W 10k W±5% . . . . 4835 111 17242
R120 CHIP RES.(1608) 1/16W 10k W±5% . . . . 4835 111 17242
R122 CHIP RES. 1/16W 0 W±5% . . . . . . . . RRXG JR5 Z0000
R124 CHIP RES.(1608) 1/16W 220 W±5% . . . . 4835 111 17251
R125 CHIP RES.(1608) 1/16W 220 W±5% . . . . 4835 111 17251
R126 CHIP RES. 1/16W 0 W±5% . . . . . . . . RRXG JR5 Z0000
R127 CHIP RES.(1608) 1/16W 10k W±5% . . . . 4835 111 17242
R128 CHIP RES.(1608) 1/16W 10k W±5% . . . . 4835 111 17242
R129 CHIP RES.(1608) 1/16W 33k W±5% . . . . 4835 111 17259
R130 CHIP RES.(1608) 1/16W 10k W±5% . . . . 4835 111 17242
R131 CHIP RES.(1608) 1/16W 22k W±5% . . . . 4835 111 17253
R132 CHIP RES.(1608) 1/16W 10k W±5% . . . . 4835 111 17242
R133 CHIP RES.(1608) 1/16W 22k W±5% . . . . 4835 111 17253
R136 CHIP RES.(1608) 1/16W 5.6k W±5%. . . . 4835 111 17168
R137 CHIP RES.(1608) 1/16W 220 W±5% . . . . 4835 111 17251
R180 CHIP RES.(1608) 1/16W 33 W±5%. . . . . 4835 111 17375
R182 CHIP RES.(1608) 1/16W 1.2k W±5%. . . . 4835 111 17174
R183 CHIP RES.(1608) 1/16W 1.2k W±5%. . . . 4835 111 17174
R184 CHIP RES.(1608) 1/16W 1.8k W±5%. . . . 4835 111 17248
R185 CHIP RES.(1608) 1/16W 20k W±5% . . . . 4835 111 17383
R186 CHIP RES.(1608) 1/16W 220k W±5%. . . . 4835 111 17254
R188 CHIP RES.(1608) 1/16W 180k W±5%. . . . 4835 111 17365
R189 CHIP RES.(1608) 1/16W 560k W±5%. . . . 4835 111 17366
R190 CHIP RES.(1608) 1/16W 68k W±5% . . . . 4835 111 17272
R191 CHIP RES.(100PPM) 1/16W 330k W . . . . 4835 111 17178
R192 CHIP RES.(1608) 1/16W 150k W±5%. . . . 4835 111 17176
R193 CHIP RES.(1608) 1/16W 100k W±5%. . . . 4835 111 17243
R194 CHIP RES.(1608) 1/16W 10k W±5% . . . . 4835 111 17242
R195 CHIP RES.(1608) 1/16W 10k W±5% . . . . 4835 111 17242
R196 CHIP RES.(1608) 1/16W 100k W±5%. . . . 4835 111 17243
R197 CHIP RES.(1608) 1/16W 470 W±5% . . . . 4835 111 17263
R198 CHIP RES.(1608) 1/16W 39k W±5% . . . . 4835 111 17262
R199 CHIP RES.(1608) 1/16W 56k W±5% . . . . 4835 111 17269
R200 CHIP RES.(1608) 1/16W 47k W±5% . . . . 4835 111 17265
R201 CHIP RES.(1608) 1/16W 1M W±5%. . . . . 4835 111 17244
R202 CHIP RES. 1/16W 0 W±5% . . . . . . . . RRXG JR5 Z0000
R203 CHIP RES. 1/16W 0 W±5% . . . . . . . . RRXG JR5 Z0000
R204 CHIP RES.(1608) 1/16W 2.2M W±5%. . . . 4835 111 17076
R243 CHIP RES.(1608) 1/16W 33k W±5% . . . . 4835 111 17259
R245 CHIP RES.(1608) 1/16W 1M W±5%. . . . . 4835 111 17244
R246 CHIP RES.(1608) 1/16W 33k W±5% . . . . 4835 111 17259
R247 CHIP RES.(1608) 1/16W 33k W±5% . . . . 4835 111 17259
R248 CHIP RES.(1608) 1/16W 33k W±5% . . . . 4835 111 17259
Page 90

CDV19BPH (continued)
R249 CHIP RES.(1608) 1/16W 33k W±5% . . . . 4835 111 17259
R255 CHIP RES.(1608) 1/16W 22k W±5% . . . . 4835 111 17253
R256 CHIP RES.(1608) 1/16W 22k W±5% . . . . 4835 111 17253
R257 CHIP RES.(1608) 1/16W 22k W±5% . . . . 4835 111 17253
R258 CHIP RES.(1608) 1/16W 1k W±5%. . . . . 4835 111 17068
R260 CHIP RES. 1/16W 0 W±5% . . . . . . . . RRXG JR5 Z0000
R301 CHIP RES. 1/16W 0 W±5% . . . . . . . . RRXG JR5 Z0000
R302 CHIP RES. 1/16W 0 W±5% . . . . . . . . RRXG JR5 Z0000
R304 CHIP RES. 1/16W 0 W±5% . . . . . . . . RRXG JR5 Z0000
R309 CHIP RES.(1608) 1/16W 33k W±5% . . . . 4835 111 17259
R310 CHIP RES.(1608) 1/16W 1k W±5%. . . . . 4835 111 17068
R311 CHIP RES.(1608) 1/16W 10k W±5% . . . . 4835 111 17242
R312 CHIP RES.(1608) 1/16W 10k W±5% . . . . 4835 111 17242
R313 CHIP RES.(1608) 1/16W 1M W±5%. . . . . 4835 111 17244
R314 CHIP RES.(1608) 1/16W 33k W±5% . . . . 4835 111 17259
R315 CHIP RES.(1608) 1/16W 1k W±5%. . . . . 4835 111 17068
R316 CHIP RES.(1608) 1/16W 4.7k W±5%. . . . 4835 111 17264
R317 CHIP RES.(1608) 1/16W 10k W±5% . . . . 4835 111 17242
R318 CHIP RES.(1608) 1/16W 1M W±5%. . . . . 4835 111 17244
R319 CHIP RES.(1608) 1/16W 33k W±5% . . . . 4835 111 17259
R320 CHIP RES.(1608) 1/16W 10k W±5% . . . . 4835 111 17242
R321 CHIP RES.(1608) 1/16W 10k W±5% . . . . 4835 111 17242
R322 CHIP RES.(1608) 1/16W 330 W±5% . . . . 4835 111 17257
R323 CHIP RES.(1608) 1/16W 330 W±5% . . . . 4835 111 17257
R332 CHIP RES. 1/16W 0 W±5% . . . . . . . . RRXG JR5 Z0000
R333 CHIP RES.(1608) 1/16W 100 W±5% . . . . 4835 111 17239
R334 CHIP RES. 1/16W 0 W±5% . . . . . . . . RRXG JR5 Z0000
R336 CHIP RES.(1608) 1/16W 390 W±5% . . . . 4835 111 17079
R337 CHIP RES.(100PPM) 1/16W 2.2k W . . . . 4835 111 17252
R338 CHIP RES.(1608) 1/16W 390 W±5% . . . . 4835 111 17079
R340 CHIP RES.(100PPM) 1/16W 2.2k W . . . . 4835 111 17252
R341 CHIP RES.(1608) 1/16W 1k W±5%. . . . . 4835 111 17068
R342 CHIP RES.(1608) 1/16W 1k W±5%. . . . . 4835 111 17068
R343 CHIP RES.(1608) 1/16W 150 W±5% . . . . 4835 111 17246
R345 CHIP RES.(1608) 1/16W 150 W±5% . . . . 4835 111 17246
R347 CHIP RES.(1608) 1/16W 1k W±5%. . . . . 4835 111 17068
R349 CHIP RES. 1/16W 0 W±5% . . . . . . . . RRXG JR5 Z0000
R350 CHIP RES. 1/16W 0 W±5% . . . . . . . . RRXG JR5 Z0000
R351 CHIP RES. 1/16W 0 W±5% . . . . . . . . RRXG JR5 Z0000
R352 CHIP RES.(1608) 1/16W 100k W±5%. . . . 4835 111 17243
R353 CHIP RES.(1608) 1/16W 1.5k W±5%. . . . 4835 111 17175
R354 CHIP RES.(1608) 1/16W 10k W±5% . . . . 4835 111 17242
R355 CHIP RES.(1608) 1/16W 1k W±5%. . . . . 4835 111 17068
R356 CHIP RES.(1608) 1/16W 1k W±5%. . . . . 4835 111 17068
R359 CHIP RES.(1608) 1/16W 10 W±5%. . . . . 4835 111 17067
R362 CHIP RES. 1/16W 0 W±5% . . . . . . . . RRXG JR5 Z0000
R364 CHIP RES. 1/16W 0 W±5% . . . . . . . . RRXG JR5 Z0000
R365 CHIP RES. 1/16W 0 W±5% . . . . . . . . RRXG JR5 Z0000
R369 CHIP RES. 1/16W 0 W±5% . . . . . . . . RRXG JR5 Z0000
R370 CHIP RES. 1/16W 0 W±5% . . . . . . . . RRXG JR5 Z0000
R371 CHIP RES. 1/16W 0 W±5% . . . . . . . . RRXG JR5 Z0000
R374 CHIP RES.(1608) 1/16W 47k W±5% . . . . 4835 111 17265
R375 CHIP RES.(1608) 1/16W 1.5k W±5%. . . . 4835 111 17175
R379 CHIP RES.(1608) 1/16W 820 W±5% . . . . 4835 111 17273
R380 CHIP RES.(1608) 1/16W 18k W±5% . . . . 4835 111 17396
R381 CHIP RES.(1608) 1/16W 820 W±5% . . . . 4835 111 17273
R385 CHIP RES.(1608) 1/16W 47k W±5% . . . . 4835 111 17265
R386 CHIP RES.(1608) 1/16W 1.5k W±5%. . . . 4835 111 17175
R389 CHIP RES.(1608) 1/16W 820 W±5% . . . . 4835 111 17273
R390 CHIP RES.(1608) 1/16W 18k W±5% . . . . 4835 111 17396
R391 CHIP RES.(1608) 1/16W 820 W±5% . . . . 4835 111 17273
R392 CHIP RES.(1608) 1/16W 47k W±5% . . . . 4835 111 17265
R393 CHIP RES.(1608) 1/16W 1.5k W±5%. . . . 4835 111 17175
R394 CHIP RES.(1608) 1/16W 820 W±5% . . . . 4835 111 17273
R395 CHIP RES.(1608) 1/16W 18k W±5% . . . . 4835 111 17396
R396 CHIP RES.(1608) 1/16W 820 W±5% . . . . 4835 111 17273
R398 CHIP RES.(1608) 1/16W 1k W±5%. . . . . 4835 111 17068
R411 CHIP RES. 1/16W 0 W±5% . . . . . . . . RRXG JR5 Z0000
R416 CHIP RES.(1608) 1/16W 10k W±5% . . . . 4835 111 17242
R417 CHIP RES.(1608) 1/16W 1k W±5%. . . . . 4835 111 17068
R423 CHIP RES. 1/16W 0 W±5% . . . . . . . . RRXG JR5 Z0000
R424 CHIP RES. 1/16W 0 W±5% . . . . . . . . RRXG JR5 Z0000
R427 CHIP RES. 1/16W 0 W±5% . . . . . . . . RRXG JR5 Z0000
R429 CHIP RES.(1608) 1/16W 1k W±5%. . . . . 4835 111 17068
R430 CHIP RES.(1608) 1/16W 10k W±5% . . . . 4835 111 17242
R431 CHIP RES.(1608) 1/16W 100k W±5%. . . . 4835 111 17243
R432 CHIP RES. 1/16W 0 W±5% . . . . . . . . RRXG JR5 Z0000
R433 CHIP RES. 1/16W 0 W±5% . . . . . . . . RRXG JR5 Z0000
R434 CHIP RES. 1/16W 0 W±5% . . . . . . . . RRXG JR5 Z0000
B1-20 LED HOLDER . . . . . . . . . . . . . . 0000 VM3 03725
B1-21 HEAT SINK N7910DCM . . . . . . . . . . 0000 VM4 10653
L-6 SCREW, P-TIGHT 3X12 BIND HEAD+ . . . . 0000 GBK P3120
W006 1P WIRE ASSEMBLY UL1007,AWG22,OS-1 . . WX1E 542 0-011
X240 CERAMIC RESONATOR 16MHz CCR16.0MSC6T . 4835 242 77331
X301 CERAMIC RESONATOR 6MHz CCR6.0MC3T. . . 4835 242 77332
X302 CRYSTAL OSCILLATOR 27.000MHz . . . . . 4835 242 77329
DVD ASSEMBLY
DVD ASSEMBLY
B0-1 DRIVE CHASSIS. . . . . . . . . . . . . 0000 VM1 00816
B0-2 GUIDE NUT. . . . . . . . . . . . . . . 0000 VM2 02573
B0-3 SCREW HOLDER . . . . . . . . . . . . . 0000 VM3 03731
S = Safety Part Be sure to use exact replacement part.
B0-4 GUIDE PLATE F2 . . . . . . . . . . . . 0000 VM4 10206
B0-5 GUIDE SHAFT. . . . . . . . . . . . . . 0000 VM4 09775
B0-6 BEARING BALL . . . . . . . . . . . . . 0000 VM4 09875
B0-7 GUIDE PLATE R2 . . . . . . . . . . . . 0000 VM3 03939
B0-8 MOTOR HOLDER S . . . . . . . . . . . . 000V M30 3729C
B0-9 TURN TABLE . . . . . . . . . . . . . . 0000 VM1 00814
B0-10 MOTOR HOLDER D . . . . . . . . . . . . 0000 VM2 02571
B0-11 MOTOR SHAFT HOLDER . . . . . . . . . . 0000 VM4 10592
B0-12 SHAFT SPRING . . . . . . . . . . . . . 0000 VM4 10593
B0-13 PIPE . . . . . . . . . . . . . . . . . 0000 VM4 10598
B1-1 MAIN CHASSIS . . . . . . . . . . . . . 000V M10 0817F
B1-2 LIFT ARM . . . . . . . . . . . . . . . 0000 VM3 03732
B1-3 CAM LIFT . . . . . . . . . . . . . . . 0000 VM3 03733
B1-4 GEAR M . . . . . . . . . . . . . . . . 0000 VM4 09771
B1-5 GEAR L1. . . . . . . . . . . . . . . . 000V M40 9767B
B1-6 GEAR L2. . . . . . . . . . . . . . . . 0000 VM3 03773
B1-7 GEAR L3. . . . . . . . . . . . . . . . 0000 VM4 09769
B1-8 GEAR L4. . . . . . . . . . . . . . . . 0000 VM4 09770
B1-9 DAMPER F . . . . . . . . . . . . . . . 0000 VM4 09762
B1-11 DECK HOLDER. . . . . . . . . . . . . . 0000 VM4 09772
B1-12 HOLDER CL. . . . . . . . . . . . . . . 0000 VM3 03730
B1-13 CLAMPER BOT. . . . . . . . . . . . . . 0000 VM3 03734
B1-14 CLAMPER TOP. . . . . . . . . . . . . . 0000 VM3 03735
B1-15 MAGNET . . . . . . . . . . . . . . . . 0000 VM4 09759
B1-16 BACK YOKE. . . . . . . . . . . . . . . 0000 VM4 09760
B1-17 TRAY . . . . . . . . . . . . . . . . . 000V M10 0815F
B1-18 RACK PLATE . . . . . . . . . . . . . . 000V M30 3728D
B1-19 HOOK LOCK. . . . . . . . . . . . . . . 0000 VM4 09773
B1-22 BOTH SIDES TAPE 15X6 NITTO #500. . . . 0000 VM4 10198
B1-25 HOLDER WASHER. . . . . . . . . . . . . 0000 VM4 10638
B1-26 SCREW WASHER . . . . . . . . . . . . . 0000 VM4 10639
B1-27 RUBBER SHEET . . . . . . . . . . . . . 0000 VM4 10640
B1-28 DAMPER RL. . . . . . . . . . . . . . . 0000 VM4 10645
B1-29 DAMPER RR. . . . . . . . . . . . . . . 000V M41 0646A
B1-30 DECK HOLDER RUBBER . . . . . . . . . . 0000 VM4 10662
B1-31 CUSHION, PCB . . . . . . . . . . . . . 0000 VM4 08145
CN3001 12P FFC MECHA TO MAIN. . . . . . . . . WX1E 542 0-008
CN3002 FFC CONNECTOR 4P 9611S-04D . . . . . . JC96 A04 ER006
D-1 DISC MOTOR R-14 2022 . . . . . . . . . MMDZ B02 MM002
D-2 FEED MOTOR PL15S-020-MUA4. . . . . . . MMM1 812 NM001
D-3 LOADING MOTOR R-14 2023. . . . . . . . MMDZ B03 MM001
F-1 LAED WIRE L=70 UL1571 AWG30. . . . . . WX30 01V 03307
F-2 LAED WIRE L=100 UL1571 AWG30 . . . . . WX38 01V 03310
L-1 SCREW M2.6X6 . . . . . . . . . . . . . 0000 SEK 39060
L-2 SCREW PAN HEAD M2X3 M2X3 + . . . . . . 0000 SPM 32030
L-3 SCREW M2X4 PAN HEAD +. . . . . . . . . 0000 SPK 32040
L-4 SCREW M1.4X1.8 . . . . . . . . . . . . 0000 MPM JE018
L-5 M1.7X2 SCREW ?????? + ?? . . . . . . . 0000 MPK J7020
L-7 SCREW, P-TIGHT M2.6X5 BIND HEAD+ . . . 0000 GBM P9050
L-8 SCREW B-TIGHT M1.7X5 . . . . . . . . . 0000 VM4 09985
L-9 SCREW M1.7X4 . . . . . . . . . . . . . 0000 MPM J7040
L-10 TORQS M2X5 . . . . . . . . . . . . . . 0000 VM4 09893
L-11 DAMPER SCREW . . . . . . . . . . . . . 0000 VM4 09764
L-12 SCREW, P-TIGHT M2.6X8 BIND HEAD+ . . . 0000 GBM P9080
L-13 SCREW, B-TIGHT M1.7X8 BIND HEAD+ . . . 0000 MPK B7080
L-14 M1.7X3.5 SCREW ??? +?????. . . . . . . 0000 MPM E7035
SA-1 DRIVE MECHA ASS'Y. . . . . . . . . . . 0000 VSA 09671
SA-2 LOADING MOTOR ASS'Y. . . . . . . . . . 0000 VSA 10085
SW3001 DETECTOR SWITCH SPPB6A0400 . . . . . . SSP0 101 AL009
SW3002 PUSH SWITCH SPPB640201 . . . . . . . . SSP0 101 AL010
 Loading...