

Page 1
1 1
0 0 3
PHILIPS
PHILIPS
3 8 5
User manual
Page 2

PHILIPS
WARRANTY
REGISTRATION
CARD
Return your Warranty Registration Card
ensure you receive all the benefits you’re
Once your PHILIPS purchase is registered, you’re eligible to receive all the privileges of owning a PHILIPS product. So
complete and return the Warranty Registration Card enclosed with your purchase at once. And take advantage of
these important benefits.
■ Warranty
Verification
Registering your product within 1 □
days confirms your right to maximum
protection under the terms and
conditions of your PHILIPS
warranty.
PHILIPS
Congratulations on your purchas^
and welcome to the “family!”
□ear PHILIPS product owner:
Thank you for your confidence in PHILIPS You’ve selected one of the bestbuilt, best-backed products available today. And we’ll do everything in our
power to keep you happy with your purchase for many years to come.
As a member of the PHILIPS “family,” you’re entitled to protection by one of
the most comprehensive warranties and outstanding service networks in
the industry.
What’s more, your purchase guarantees you’ll receive all the information
and special offers for which you qualify, plus easy access to accessories
from our convenient home shopping network.
And most importantly you can count on our uncompromising commitment
to your total satisfaction.
All of this is our way of saying welcome-and thanks for investing in a
PHILIPS product.
Sincerely,
■ Owner
Confirmation
Your completed Warranty Registra
tion Card serves as verification of
ownership in the event of product
theft or loss.
■ Model
Registration
Returning your Warranty Registration
Card right away guarantees you’ll
receive all the information and special
offers which you qualify for as the
owner of your model.
KNOW THESE SAFETY
CAUIKM: TO REDUCE THE RISK OF UECmC SHOCK. DO NOT
REMOVE COVER (OR BACK] NO USEMERVICEABU PARTS
MISIOE. REFER SERVICING TO OUAUFIED SERVICE PERSONNEL
This “bolt of lightning" indicates
uninsulated material within your
A
household, please do not remove
product covering.
A
and maintenance problems.
WARNING: TO PREVENT FIRE OR
SHOCK HAZARD, DO NOT EXPOSE THIS
EQUIPMENT TO RAIN OR MOISTURE
CAUTION: To prevent electric shock,
match wide blade of plug to wide slot,
and fully insert.
ATTENTION; Pour éviter les chocs
électriques, introduire la lame la plus
large de la fiche dans la borne
correspondante de la prise et pousser
jusqu’au fond.
unit may cause an electrical
shock. For the safety of everyone in your
The “exclamation point” calls
attention to features for which
you should read the enclosed
literature closely to prevent operating
today to
entitled.
SYMBOLS.
CAUTIOIXl
RISK OF ELECTRIC SHOCK
DO NOT OPEN
A
Robert Minkhorst
President and Chief Executive Officer
P.S. Remember, to get the most from your PHILIPS product, you
must return your Warranty Registration Card within 10 days.
So please mail it to us right now!
For Customer Use:
Enter below the Serial No which is
located on the rear of the cabinet.
Retain this information for future
reference.
Model No
Serial No
Page 3

Safety Precautions
WARNING: TO PREVENT FIRE OR SHOCK HAZARD. DO NOT EXPOSE THIS EQUIPMENT TO RAIN OR
MOISTURE.
CAUTION: TO PREVENT ELECTRIC SHOCK, MATCH
WIDE BLADE OF PLUG TO WIDE SLOT, FULLY
INSERT.
LASER SAFETY: This unit employs a laser. Only a
qualified service person should remove the cover or
attempt to service this device, due to possible eye injury.
ATTENTION: POUR EVITER LES CHOCS
ÉLECTRIQUE, INTRODUIRE LA LAME LA PLUS
LARGE DE LA FICHE DANS LA BORNE
CORRESPONDANTE DE LA PRISE ET POUSSER
JUSQU'AU FOND.
CAUTION: USE OF CONTROLS OR ADJUSTMENTS
OR PERFORMANCE OF PROCEDURES OTHER THAN
THOSE SPECIFIED HEREIN MAY RESULT IN
HAZARDOUS RADIATION EXPOSURE.
THIS DIGITAL APPARATUS DOES NOT EXCEED THE
CLASS В LIMITS FOR RADIO NOISE EMISSIONS FROM
DIGITAL APPARATUS AS SET OUT IN THE RADIO
INTERFERENCE REGULATIONS OF THE CANADIAN
DEPARTMENT OF COMMUNICATIONS.
CET APPAREIL NUMÉRIQUE N'ÉMET PAS DE BRUITS
RADIOÉLECTRIQUES DÉPASSANT LES LIMITES
APPLICABLES DANS LA RÈGLEMENT SUR LE
BROUILLAGE RADIOÉLECTRIQUES ÉDICTÉ PAR LE
MINISTÈRE DES COMMUNICATIONS DU CANADA.
WARNING:
This device complies with Part 15 of the FCC (U.S.A.) Rules. Operation is subject to the following two conditions: (1)
this device may not cause harmful interference, and (2) this device must accept any interference received, including
interference that may cause undesired operation.
NOTE:
This equipment has been tested and found to comply with the limits for a Class B digital device, pursuant to Part 15
of the FCC Rules. These limits are designed to provide reasonable protection against harmful interference in a
residential installation! This equipment generates, uses and can radiate radio frequency energy and, if not installed
and used in accordance with the instructions, may cause harmful interference to radio communications. However,
there is no guarantee that interference will not occur in a particular installation. If this equipment does cause harmful
interference to radio or television reception, which can be determined by turning the equipment off and on, the user
is encouraged to try to correct the interference by one or more of the following measures:
NOTICE: This device incorporates an anticopy
process technology that is protected by U.S. patents
and other intellectual property rights. The anticopy
process is licensed for non-commercial, home use
only. Reverse engineering or disassembly is
prohibited.
f
CLASSI
LASER PRODUCT
X
)
— Reorient or relocate the receiving antenna.
— Increase the separation between the equipment and receiver.
— Connect the equipment into an outlet on a circuit different from that to which the receiver is coimected.
— Consult the dealer or an experienced radio/TV technician for help.
IMPORTANT:
This product was FCC certified tmder test conditions that included use of shielded cables and cormectors between
system components. It is important that you use shielded cables to reduce the possibility of causing interference to
radios, television sets, and other electronic devices. If you have any problems, contact your dealer.
Any change or modifications to the equipment by the user not expressly approved by the grantee or manufacturer
could void the user's authority to operate such equipment.
NOTE TO CATV SYSTEM INSTALLER:
This reminder is provided to call the CATV (Cable-TV) system installer's attention to Article 820-40 of the NEC that
provides guidelines for proper grounding and, in particular, specifies that the cable grotmd shall be connected to the
grounding system of the building, as close to the point of cable entry as practical.
3
Page 4

IMPORTANT SAFETY INSTRUCTIONS
1. Read Instructions - All the safety and operating instructions should be
read before the appliance is operated.
2. Retain Instructions - The safety and operating instructions should be
retained for future reference.
3. Heed Warnings - All warnings on the appliance and in the operating
instructions should be adhered to.
4. Follow Instructions - All operating and use instructions should be
followed.
5. Cleaiung - Unplug this product from the wall outlet before cleaning. Do
not use liquid cleaners or aerosol cleaners. Use a damp cloth for cleaning.
Exception: A product that is meant for uninterrupted service and that for
some specific reason, such as the possibiUty of the loss of an authorization
code for a CATV converter, is not intended to be unplugged by the user for
cleaning or any other purpose, may exclude the reference to implugging the
appliance in the cleaning description otherwise required in item 5.
6. Attachments - Do not use attachments not recommended by the video
product manufacturer as they may cause hazards.
7. Water and Moistvue - Do not use this video product near water - for
example, near a bath tub, wash bowl, kitchen sink, or laundry tub, in a wet
basement, or near a swimming pool, and the like.
8. Accessories - Do not place this video product on an imstable cart, stand,
tripod, bracket, or table. The video product may fall, causing serious injury
to a child or adult, and serious damage to the appliance. Use only with a
cart, stand, tripod, bracket, or table recoimnended by the manufachurer, or
sold with the video product. Any mounting of the appliance should follow
the manufacturer's instructions, and should use a mounting accessory
recommended by the manufacturer.
8A.
An appliance and cart combination should be moved with
care. Quick stops, excessive force, and uneven surfaces
may cause the appliance and cart combination to overtiun.
grounded so as to provide some protection against voltage sirrges and
built-up static charges.
Section 810 of the National Electrical Code, ANSI/NFPA 70, provides
information with regard to proper groimding of the mast and supporting
structure, grounding of the lead-in wire to an antenna discharge unit, size of
grounding conductors, location of antenna-discharge unit, cormection to
grounding electrodes, and requirements for the groimding electrode. See
Fig.A.
15. Lightning - For added protection for this product during a lightning
stonn, or when it is left unattended and unused for long periods of time,
unplug it from the wall outlet and disconnect the antenna or cable system.
This will prevent damage to the product due to lightning and powerline
surges.
16. Power lines - An outside antenna system should not be located in the
vicinity of overhead power lines or other electric tight or power circuits, or
where it can fall into such power tines or circuits. When installing an outside
antenna system, extreme care should be taken to keep from touching such
power tines or circuits as contact with them might be fatal.
17. Overloading - Do not overload wall outlets and extension cords as this
can result in a risk of fire or electric shock.
9. Ventilation - Slots and openings in the cabinet are provided for ventilation
and to ensure reliable operation of the video product and to protect it from
overheating, and these openings must not be blocked or covered. The
openings should never be blocked by placing the video product on a bed,
sofa, rug, or other similar surface. This video product should never be
placed near or over a radiator or heat register. This video product should
not be placed in a built-in installation such as a bookcase or rack unless
proper ventilation is provided or the manufacturer's instructions have been
adhered to.
10. Power Sources - This video product should be operated only from the
type of power source indicated on the marking label. If you are not sure of
the type of power supply to your home, consult your appliance dealer or
local power company. For video products intended to operate from battery
power, or other sources, refer to the operating instructions.
11. Grounding or Polarization - This video product is equipped with a
polarized alternating-current line plug (a plug having one blade
wider than the other). This plug will fit into the power outlet in
only one way. This is a safety feature. If you are unable to insert the plug
fully into the outlet, try reversing the plug. If the plug should still fail to fit,
contact your electrician to replace your obsolete outlet. Do not defeat the
safety purpose of the polarized plug.
12. Power-Cord Protection - Power-Supply cords should be routed so that
Uiey are not likely to be walked on or pinched by items placed upon or
against them, paying particular attention to cords at plugs, convenience
receptacles, and the point where they exit from the appEance.
13. Protective Attachment Plug - The appliance is equipped with an
attachment plug with overload protection. This is a safety feature.
See Instruction Manual for replacement or resetting of protective device. If
replacement of the plug is required, be sure the service technician has used a
replacement plug specified by the manufacturer that has the same overload
protection as the original plug.
18. Object and Liquid Entry - Never push objects of any kind into this
product through openings as they may touch dangerous voltage points or
short-out parts that could result in a fire or electric shock. Never spill liquid
of any kind on the product.
19. Servicing - Do not attempt to service this product j'ourself, as opening or
removing covers may ex-pose you to dangerous voltage or other hazards.
Refer all servicing to qualified service persoimel.
20. Damage Requiring Service - Unplug this product from the wall outlet
and refer servicing to qualified service personnel under the following
conditions
a. When the power-supply cord or plug is damaged.
b. If liquid has been spilled, or objects have fallen into the product.
c. If the product has been exposed to rain or water.
d. If the product does not operate normally by folloiving the operating
instructions. Adjust only those controls that are covered by the ope
rating instructions as an improper adjustment of other controls may
result in damage and ivill often require extensive work by a qualified
technician to restore the product to its normal operation.
e. If the product has been dropped or the cabinet has been damaged.
f. When the product exhibits a distinct change in performance -
this indicates a need for service.
21. Replacement Parts - When replacement parts are required, be sure the
service technician has used replacement parts specified by the manufactu
rer or which have the same characteristics as the original part. Unauthorized
substitutions may result in fire, electric shock or other hazards.
22. Safety Check - Upon completion of any service or repairs to this product,
ask the service technician to perform safety checks to determine that the
product is in proper operating condition.
23. Carts and Stands - The appliance should be used only with a cart or
stand that is recommended by the manufacturer.
14. Outdoor Antenna Grounding - If an outside antenna or cable system is
connected to the video product, be sure the antenna or cable system is
24. Heat - The product should be situated away from heat sources such as
radiators, heat registers, stoves, or other products that produce heat.
Page 5

LIMITED WARRANTY
CD-i
• One (1) Year Free Labor • One (1) Year Free Parts Service
• This CD-i must be shipped in for warranty service.
Please keep...
...your sales receipt and other material proving proof-ofpurchase. Attach it to this owner's manual and keep it nearby.
Please also keep the original box and packing material should
you ever need to ship your CD-i player to Phihps for service.
One (1) Year Coverage...
...starts from the date you bought your product. Both parts
and labor are covered at no cost to you. Any defective part
will be repaired or replaced. Any part is covered only for the
original warranty period. Once the one (1) year warranty on
the product has expired, the warranty on any replaced or
repaired part also expires. Service for your CD-i is provided by
shipping it to the Philips Factory Service Center (listed to the
right) which specializes in this type of product.
After one year, you must pay for all labor, parts,
transportation, and service charges.
Who is Protected? ... Where?
Only the person who has proof-of-purchase wiU receive
warranty service. This service will be provided to any product
bought and used in the U.S.A., Puerto Rico, the Virgin Islands
and Canada. If you move within these areas you must ship
your monitor to the designated Philips Factory Service Center
listed in this warranty.
Before Calling for Service...
...please check your owner's manual. A check of the controls
discussed there may save you a service caU.
How To Get Warranty Service
Due to the sophisticated nature of this product, warranty
service will be provided by the Philips Personal Information
Products Answer Center. If you feel you require warranty
service for or need to discuss a problem about your CD-i,
please contact the Philips Personal Information Products
Answer Center at (800) 845-7301. There, a technician will go
through a diagnostic check list with you and if it is determined
the unit needs to be repaired, you will be given a return
authorization number. Carefully pack the CD-i in secure
packaging for safe shipment. It is recommended that you retain
the carton and all packing materials from this unit. These
materials are specifically designed and manufactured for
shipping this product. Deliver or ship it freight prepaid and
insured to the Philips Factory Service Center listed, with
evidence of the purchase date and description of the problem.
Following warranty repair, the unit will be returned to you
freight prepaid. Be sure you include your complete return
address on the outside of the carton.
Warranty Exclusions Your Warranty Does Not Cover...
...replacing or repairing your product because of misuse,
accident, unauthorized repair, or other cause not within the
control of Philips Consumer Electronics Company.
...incidental or consequential damages resulting from the
product. Some states do not allow the exclusion of incidental
damages, so the above exclusion may not apply to you.
EL4931E001
...labor charges for installation or set-up, adjustment of
customer or preference controls, and installation or repair of
anteima systems outside the product.
...a product bought, used, or serviced outside the U.S.A., Puerto
Rico, the Virgin Islands, and Canada.
...problems caused by signal or cable conditions outside the
product.
For product purchased in the U.S.A., Puerto
Rico, or the Virgin Islands
How To Get Warranty Service:
If warranty service is required, you must ship your product
with proof-of-purchase to a Philips Factory Service Center
(hsted below.)
Philips Factory Service
6333 Busch Boulevard
Columbus, OH 43229
(614) 781-2605
IN THE U.S.A., PUERTO RICO, OR THE VIRGIN ISLANDS,
ALL IMPLIED WARRANTIES INCLUDING IMPLIED
WARRANTIES OF MERCHANTABILITY AND FITNESS FOR
A PARTICULAR PURPOSE, ARE LIMITED IN DURATION
TO THE DURATION OF THIS EXPRESS WARRANTY. Some
states do not allow limitations on how long an implied
warranty lasts, so the above limitation may not apply to you.
This warranty gives you specific legal rights, and you may
have other rights wMch vary from state to state.
Philips Service Company
P.I.P. Information Center
(800) 835-3506
For product purchased in Canada
How To Get Warranty Service:
To obtain warranty service, the product must be delivered
(carried-in) to a Philips Consumer Service Branch (listed
below). These warranties are given in lieu of aU other
warranties. No other guarantees or warranties are expressed or
implied, including any implied warranties of merchantability
or fitness for a particular purpose. Philips shall not be liable
under any circumstances for any direct, indirect, special,
incidental or consequential damages, howsoever incurred,
even if notified of the possibility of same.
AU thaf s required to validate your original factory warranty is
to present your biU of sale as proof of purchase.
Philips Electronics Ltd.
601 Milner Avenue • Scarborough, Ontario Ml B1M8 • (416) 292-5161
4977 Levy Street • St. Lurent, Québec H4R 2N9 • (514) 956-0210
1741 Boundary Road, • Vancouver, B.C. V5M 3Y2 • (604) 294-3441
IMPORTANT REMINDER:
Please fill out and mail your warranty registration card promptly.
It will be easier for us to notify you if it should ever be required.
Please also keep your sales receipt and other proof-of-purchase
information.
Please write in your model and serial numbers below.
These numbers are located on your unit. Keep this
manual nearby for easy reference.
Model No.: GDI 615______________________________
Serial No.:
Page 6

For Customer Use:
Read carefully the information
located at the bottom of your
GDI player and enter below the
Serial №.
Retain this information for
future reference.
Model №. CDI 6l5
LASER SAFETY; This unit employs a laser. Only a qualified
service person should remove the cover or attempt to service
this device, due to possible eye injury.
NEVER MAKE OR CHANGE CONNECTIONS WITH THE
POWER SWITCHED ON.
Serial №.
CLASS 1 I
LASER product!
Page 7

CONTENTS
SAFETY PRECAUTIONS
................................................
3
CONTENTS...................................................................... 7
INTRODUCTION - INSTALLATION
...........................
8
INSTALLATION..............................................................9-11
POINTING DEVICE
........................................................
12
SETTING UP.....................................................................14
PLAYING DISCS............................................................. 16-18
GROUPWORKING......................................................... 19-20
BEFORE REQUESTING SERVICE
SPECIFICATIONS
...........................................................
.................................
21
22
NEVER LEAVE A STHL PICTURE ON THE SCREEN FOR ANY
LENGTH OF TIME. THIS CAN CAUSE BURNING-IN OF THE
PICTURE TUBE. TO AVOID THIS, SWITCH OFF THE PLAYER
OR REMOVE THE DISC.
CAUnON
Page 8
INTRODUCTION
INTRODUCTION PLACEMENT
INSTALLATION
We are pleased to introduce you to one of the most innovative
products available today: the Compact Disc Interactive player.
You’ll be surprised how easy it is! Once correcdy hooked up to
your TV, you simply 'point-and-click' to explore the intriguing
new world of interactive Compact Disc.
Your CD-i player also plays CD-DA (audio compact discs) and
audio tracks from CD-ROM discs.
In addition it can play the following disc types: Photo CD, CD-i
Ready, CD Bridge and CD Graphics (CD+G).
With the installed Digital Video Circuit, it also runs interactive
Digital Video titles including movies, music videos and highpower action games as well as Video CD's.
A wide variety of optional accessories enhances the player’s
flexibility. Contact your supplier.
We are confident that you will find this product surprisingly
easy to use, and quite unique in its fascination.
The disc types which run on this CD-i player feature one or
more of these logos on the disc packaging:
COMPACT
ACT n COMPACT
(@ iQg®
Interactive
DIGITAL AUOIO
_n COMPACT
ÈMÌE
(digital video]
Place the player on a firm, flat surface.
Keep the player away from heat sources and direct sunlight.
In a cabinet, allow 2-3 cm (approx. 1 inch) of free space all
around the unit for adequate ventilation.
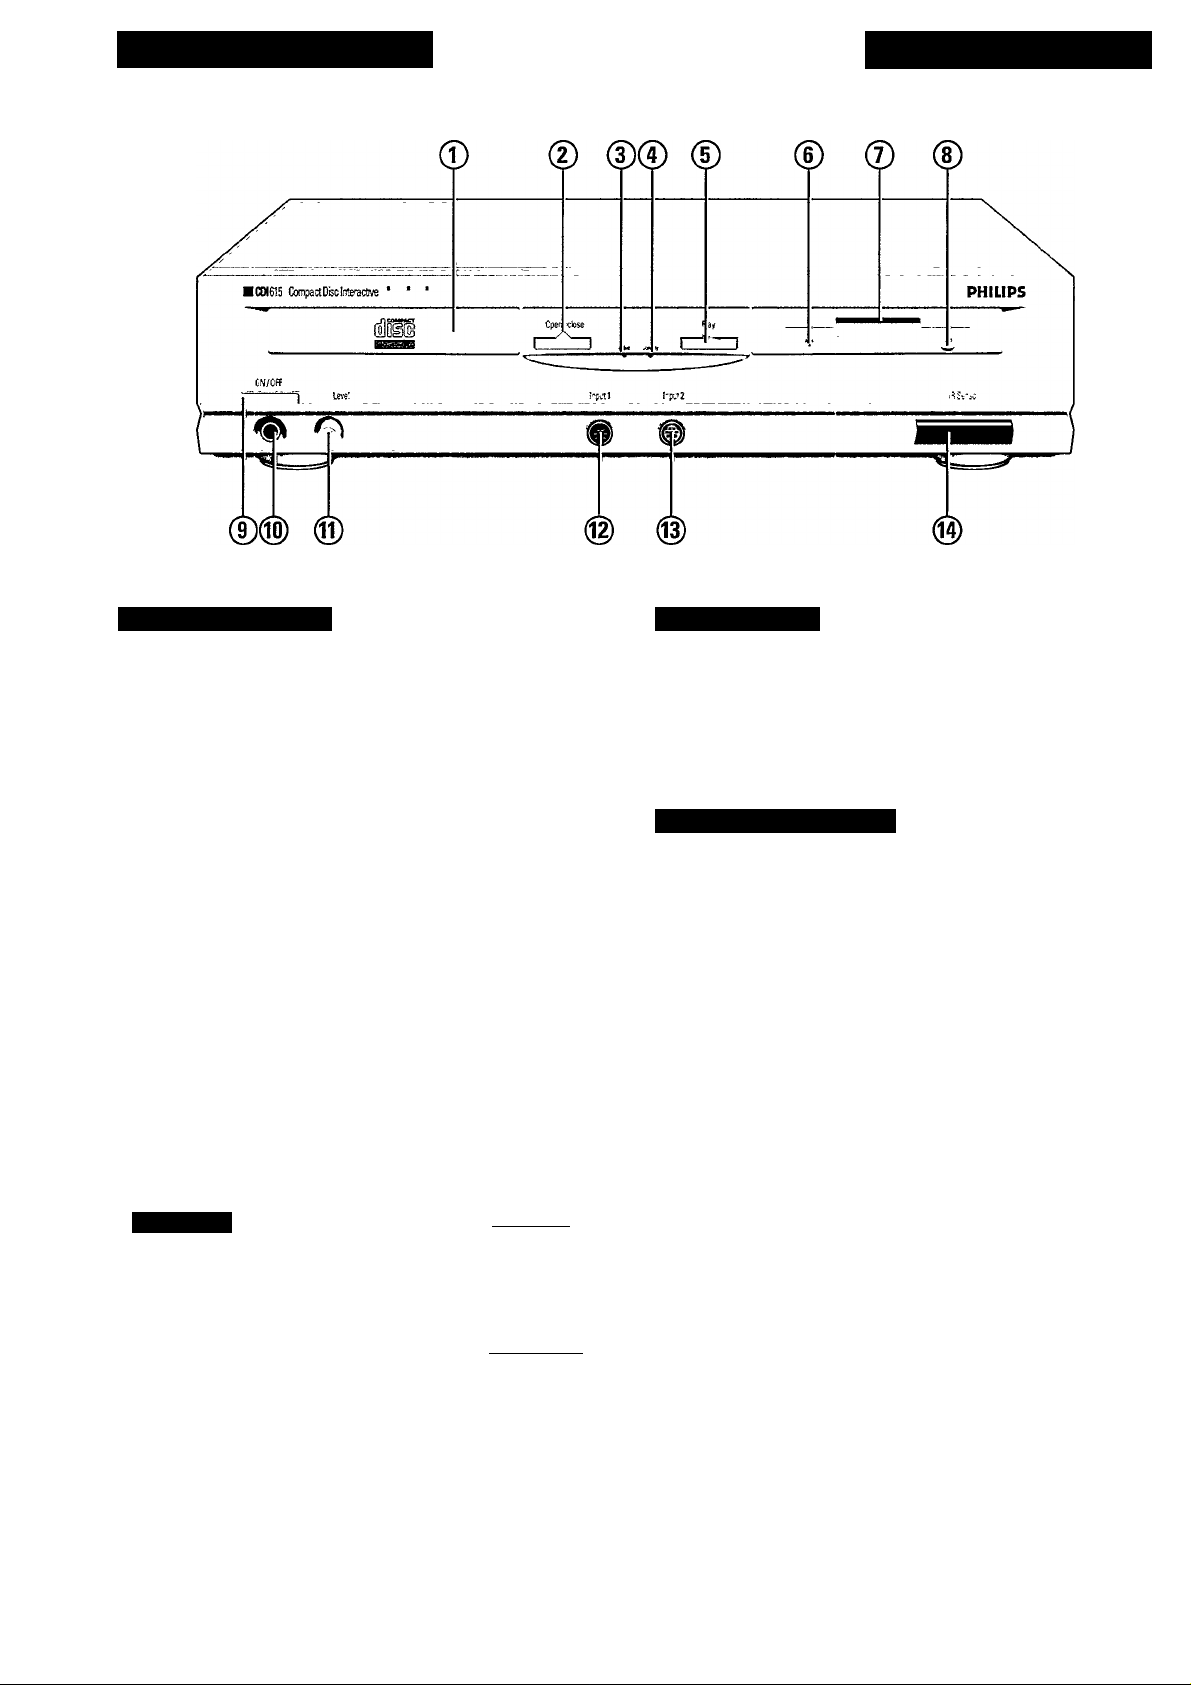
FRONT OF PLAYER
1 Disc loading tray.
2 Open/close button.
3 ‘CD-i’ busy indicator (green)
4 ‘On/Standby’ indicator (red)
5 Play button.
6 ‘FDD-busy’ indicator (green)
7 Floppy Disc Drive 3.5”
8 FDD eject button.
9 ON/OFF button.
10 Headphone socket.
11 Headphone volume control.
12 Pointing device input 1.
13 Pointing device input 2.
14 IR-receiver eye with ‘Active’ indicator (red).
ɧIS
PHOTO I
videoCD
COMPACT
DIBITAL AUDIO
I GRAPHICS I
Page 9

INSTALLATION
REAR OF PLAYER
1 Port #1: RS232 serial port.
2 Port #2: RS232 serial port.
3 Cover plate for extension slot.
4 Port #3: Centronics parallel port.
5 Port #4: AT-keyboard connector.
6 Channel selector.
7 RF-input connector.
8 RF-output connector.
9 CVBSA^ldeo connector.
10 Audio L-channel connector.
11 Audio R-channel connector.
12 Y/C (S-Video) connector.
13 Digital output connector.
14 Serial I/O port.
15 Power connector (AC socket).
• For any optional connection accessories you require, contact
your supplier.
CAUTION
AVOID TO TOUCH THE INNER PINS OF CONNECTORS AT
THE REAR SIDE. ELECTROSTATIC DISCHARGE MAY CAUSE
PERMANENT DAMAGE TO THE PLAYER. DO NOT REMOVE
PROTECTIVE CONNECTOR HOODS FROM UNUSED
CONNECTORS.
REMOTE CONTROL
1 Infra red remote transmitter
2 Action button.
3 Thumbpad.
4 Action buttons (for left or right handed operation).
5 Sliding Cover.
6 Play button.
7 Pause button (CD-Audio + Video CD).
8 Stop button (CD-Audio + Video CD).
9 Volume up button.
10 Volume down button.
11 CD-i/TV button.
12 Next track (CD-Audio + Video CD).
13 Previous track (CD-Audio + Video CD).
14 standby.
Page 10

INSTALLATION STANDARD CONNECTIONS
I . CONNECTION TO A TV WITH A Y/C (S-VIDEO) SOCKET
• Just connect the corresponding connectors with the supplied Y/C
cable.
' As this Y/C cable does not connect the audio, the audio has to
be connected separately.
NOTE
Please refer to the instructions that came with the TV set for
selection of the correct input.
2. AUDIO CONNECTIONS
If required, you can connect the player’s audio output (see
10,11 page to the input of your HiFi system with an
optional audio cable.
IN
•HED
Y/C (S-VlDEO) CABLE^^i
--
: i
i O O GZ? i
®© C
' !• • • ©
CAUTION
DO NOT CONNECT THE PLAYER’S AUDIO OUTPUT (10,11)
TO THE HIFI PHONO (RECORD PLAYER) INPUT.
3. POWER CONNECTION
• Connect the female end of the supplied AC (alternating current)
cord into the AC socket (15) at the rear.
• Insert the male end of the cord into an AC outlet.
CAUnON
NEVER MAKE OR CHANGE CONNECTIONS WITH THE
POWER SWITCHED ON.
ONLY A QUALIFIED SERVICE PERSON SHOULD REMOVE
THE COVER OR ATTEMPT TO SERVICE THIS DEVICE.
USE OF CONTROLS OR ADJiUSTMENTS OTHER THAN THOSE
SPECIFIED HEREIN MAY RESULT IN HAZARDOUS
RADIATION EXPOSURE OR OTHER UNSAFE CONDITION.
THE PLAYER AUTOMATICAIXY ADJUSTS TO THE LOCAL
MAMS VOLTAGE.
WHEN THE PLAYER IS M “STANDBY” OR “OFF” MODE, TT IS
STnX CONSUMMG SOME POWER. IF YOU WISH TO
DISCONNECT YOUR PLAYER COMPLETELY FROM THE POWER
SOURCE, WITHDRAW THE PLUG FROM THE AC OUTLET.
10
Page 11

OPTIONAL CONNECTIONS INSTALLATION
I. CONNECTION TO A TV WITH A VIDEO (CVBS) SOCKET
' Just connect the corresponding sockets with the supplied video
(CVBS) cable.
' This cable does not connect the audio, which has to be
connected separately.
■ Please refer to the instructions that come with the TV set for
NOTE
selection of the correct input.
2. ANTENNA CONNECTIONS
Connect the player to the TV antenna input, using the
supplied antenna cable.
If you already have a VCR (or antenna or cable TV) connected
to the TV antenna input, connect the CD-i player between the
VCR (or antenna or cable TV) antenna output and the TV
antenna input. You may also use an optional external
switchbox, if desired.
Your CD-i player sends pictures and sound to your TV on the
channel Indicated on the selector switch (6) on the rear of the
CD-i player. This signal is sent through the coaxial cable to the
TV.
To operate the player with your TV, tune your TV to the same
channel that the selector switch is set to on the rear of the
CD-i player..
Since your CD-i player has a channel selector (6), located at the
rear of the unit, you can avoid local interference by tuning to a
different channel.
O O
(ANTENNA or CABLE INPUT
or VCR OUTPUT)
---------------
——DB8EE3
SELECTOR
_____________
CHANNEL
CH3jj
CHS
7SQ
O—CEEJ«J
RF COAXIAL CABLE
----
The sound sent through the RF output to your TV is mono
NOTE
only (not stereo).
Please refer to the instructions that came with the TV-set for
the selection of the proper channel.
11
Page 12

POINTING DEVICE
PRECAUTIONS
To operate your CD-i player, a pointing device is needed. For
pointing devices other than the remote control included, please
consult your supplier.
CAUnON
NEVER MAKE OR CHANGE CONNECTIONS WITH THE
POWER SWITCHED ON.
INFRA RED REMOTE CONTROL
Loading the batteries in the remote control
• Push and slide the battery compartment cover (see figure
below).
• Insert three 'AA' (R6 or SUM3) batteries as indicated inside the
battery compartment.
• Close the cover.
CAUnON
DO NOT MIX OLD AND NEW BATTERIES. ALSO NEVER MIX
DIFFERENT TYPES OF BATTERIES (STANDARD, ALKALINE
AND SO ON).
NOTE
- To save battery power, the remote control automatically
switches off after approximately one minute if a button is
pressed continuously. It is automatically reactivated the next
time you press any button.
Pointing devices are sensitive precision instruments. Handle
them with care, keeping in mind the following precautions;
• Avoid dropping or knocking.
• Do not use them in locations subject to extreme temperatures,
humidity, dust or vibration.
Remote control interactive operation
For normal interactive operation, use the remote control to select
functions displayed on the TV screen.
• Point the remote control at your CD-i player.
• Move the cursor in the direction you want by pressing in that
direction on the "Thumbpad".
- The harder you press the faster the cursor moves.
• Click on one of the action buttons.
- The function selected by this 'point-and-click' technique is
highlighted to confirm the selection.
NOTE
- To 'point-and-click' on any screen shown in this manual, any
one of the action buttons can be used.
- The shape of the cursor is different according to the program
you are playing, but it is always controlled in the same way.
IF A WIRED CD-i CONTROLLER IS CONNECTED TO INPLIT 2,
CAUTION
THE INFRA RED REMOTE CONTROL IS INACTIVE.
e:
■ \----------
------------------------ -- -- -- -- -- ---
(
___ __
• ®
Шт»
П-Т?
-----------------
----------- ------------------
ч/
Ч
PHIUPS
12
Page 13

CD-i CONTROLLER
POINTING DEVICE
For some applications, other types of pointing devices,
keyboards or controllers may be required. These CD-i
controllers are defined in the CD-i Pointing Devices and
Keyboards specifications, and can be connected through the
CD-i I/O input 1 (12) and 2 (13) on the front of the player.
Optional devices are: Roller Controller, Trackerball, Mouse,
Gamepad f refer to the accessories page on the back of this
manual). For further information on this subject, please contact
your national Philips organization.
• Press the ON/OFF button (9) to switch the player off.
• Plug the connector of the CD-i controller into the input port
(12) on the front of the player. Insert the connector with the
arrow at tlie top.
• Switch the player on.
• Move tlie cursor in the direction you want.
• Click on one of the action buttons.
- The function selected by this "point-and-click" technique is
highlighted to confirm the selection.
- To "point-and-click" on any screen shown in this manual,
NOTE
either one of the action buttons of the pointing device can be
used.
- The shape of the cursor can be different depending on the
program you are playing, but it is always controlled in the
same way.
- Pointing devices are sensitive precision instruments. Handle
with care, keeping in mind the following precautions:
• Avoid dropping or knocking.
• Do not use in locations subject to extreme temperatures,
humidity, dust or vibration.
• Never hold the pointing device by the cable.
• Never pull the cable to disconnect the pointing device from
the player.
• When only one pointing device is used preferably, connect
it to input 1 to avoid problems with the remote control.
CAUTION
NEVER MAKE OR CHANGE CONNECTIONS WITH THE
POWER SWITCHED ON.
INTERFACES
RS 232C Ports
I/O ports #1 and #2 (D-sub 9) on the rear panel can be used for
general RS 232C based devices according to the application.
Further information on this subject can be found in the CD-i
Technical Documentation.
Depending on the application, RS 232C based devices may also be
connected to CD-i I/O port #4 on the rear panel. For more
information, please refer to the Technical Documentation of this
CD-i player.
Extension Slot
An extension slot provides opportunities for upgrading of system
functionality and establishment of communication facilities.
As functional requirements differ from one application to another,
it is of no use to offer a ‘‘standard” optional extension. Instead, a
tailor-made extension, on the basis of a flexible and optimal
specification, will be scheduled for each project.
13
Page 14

SETTING UP
SWITCHING ON AND OFF
Press the ON/OFF button (9) to switch the player on.
Switch on the TV (and HiFi system if used).
Select the input on the TV (and HiFi system if used) to which
the CD-i player has been connected.
Make sure the TV is tuned to the same channel as CD-i
selector switch (6) is set to on back of unit.
On the TV, the player
start-up screen will appear.
This screen has the following |
system function icons to
guide and assist you;
Option« Tools Ope:
OPTIONS SCREENS
1. CD Audio Options
To preselect your preferred
settings when playing audio
CDs:
Auto shuffle
When the player is switched
on, the tracks on the CD will
automatically be played in a
random order.
Auto FTS (Favorite Track Selection)
When the player is switched on, the FTS program of the CD
will be played automatically
Repeat
Select to repeat a complete audio disc or a single track when
the repeat function is activated.
Scan time
Select the time you want the beginning of each audio track to
play for (5, 10 or 20 seconds) when the scan function is
activated.
mm gai
Open/Close:
To open or close the disc tray.
Options:
See: “OPTIONS SCREENS”.
To get “Options Screens” click on “Options”. To leave “Options
Screens” click on “Exit”.
Tools:
See: TOOLS SCREENS
To get these Tools Screens click on “Tools”. To leave the Tools
Screens click on “Exit”.
When finished with CD-i player:
• Press the ON/OFF button (9) to switch the player off.
• Switch off the TV^ (and HiFi system, if used).
3. Time and Date Options
To change the player time/
date settings:
Time/Date set
If the time or date shown on
the screen is wrong, select the
appropriate A and T arrows to
set hour, minute, day, month
and year in turn, as required.
Time format
Select 24 hour or 12 hour clock.
Date format
Select d/m/y to present the date in day-month-year sequence.
Select m/d/y to present the date in month-day-year sequence.
Display time/date
Select whether time and date will be displayed on the TV^
screen or not.
2. General Options
To change the player general
settings:
Auto play
When the player is switched
on, playback will start auto
matically when a disc is loaded
and the tray is closed.
Volume
Selecting the player default volume setting. When the player
is switched on, the player volume will rise to the preset
“default” volume setting automatically.
16 : 9 screen display
Selecting l6 : 9 screen display, when you have your player
connected to a TV with a l6 : 9 screen.
standby
Select standby to enable or disable the standby function of the
player (this can be done using the Remote Control button
(W)-
Especially useful! for groupworking environments.
14
Page 15

TOOLS SCREENS
SETTING UP
1. View screen
To display the contents of files
held in memory or on a floppy
disc:
Click on ‘Memory’ or ‘Floppy’
to select the preferred source
JSSSl
N«m*
(FTS;
Ckrtoen Jvtrto»
Coo( Old>«<
0»« S*r*i*» (TTS)
Mox^t (FTS;
23 Iv« '94 2.1 X
10 M»f '94 S,1 X
30 J»A '94 2.3 X
5 Miy '94 3 0 X
24 Jur. '94 8.2 X
of files.
To view a file, click on its title
and then click on ‘View’
NOTE
Only ASCII characters will be displayed on the screen. Other
characters will be displayed as blanks.
Clicking on ‘Name’, ‘Date’ or ‘Size’ sorts the information
accordingly.
Use the scroll arrows to move up and down the list/contents.
Favorite Track Selections (CD-Audio) can not be viewed.
2. Delete screen
To delete a file from the
memory of the player or from
a floppy disc:
Click on ‘Memory’ or ‘Floppy’
in order to select the preferred
> (¡022
Name
8««(K«v«ri iFTSj
C»ot C»4t«(
Dw* irrS>
Dale i ; Site
23 fuA '94
10 M«r '94
30 J*f. ‘94 ; 3 X
5 M*y‘94
24 iuA '94
IíMbI «aMb
source of files.
To delete a file click on its title
and tlien click on ‘Delete’. If
you change your mind after deleting, click on ‘Undo’. This is
only possible on the last deleted file.
Clicking on ‘Name’, ‘Date’ or ‘Size’ sorts the information
accordingly.
Use the scroll arrows to move up and down the list.
: 1 X
51 X
S,2 X
3 C X
3- Copy to screen
To copy files from/to the
memory of the player or
floppy disc and to copy
(download) files to other
CDI615 players (see page 19
groupworking):
• In addition to the source, a
destination also has to be
specified to which the file has to be copied. Therefore, click
on the preferred source and preferred destination.
• To copy a file click on the name of the preferred file and then
click on ‘Copy.
• Clicking on ‘Name’, ‘Date’ or ‘Size’ sorts the information
accordingly.
• Use the scroll arrows to move up and down the list/contents.
COPYING FROM MEMORY TO FLOPPY WILL CONVERT
THE FILENAME TO PC FORMAT. (LE. 8 CHARACTERS
MAXIMUM AND IN CAPITALS). COPYING BACK DOES
NOT RESTORE THIS.
FAVORITE TRACK SELECTIONS (CD-AUDIO) CAN NOT BE
COPIED.
4. Format floppy screen
• To format a floppy disc first
select the preferred floppy disc
format by clicking on one of
the format types.
• Then select format.
24
After formatting of the floppy
disc has begun, it caimot be
cancelled.
NOTE
CAUnON
u QQS
Nm*
Cwto«»
Cooi
Dir* (FT3J
Moz»»» tfTSj
23 '94
M) '94
30 i»« '94
5 M»y '94
NOTE
Only the root directory is displayed. Subdirectories are not
displayed
CAUTION
THE MAXIMUM FILE SIZE TO VIEW OR COPY IS 32 KBYTES
15
Page 16

PLAYING DISCS
GENERAL
Push button controL
• For basic play control, or for playing discs through a stereo
system without using the TV, you can use the buttons on the
front panel or on the remote control.
- The PLAY and STOP buttons operate in the same way as the
corresponding on-screen functions.
- PREVIOUS (TRACK) button: to return to the start of a track,
select a previous track or search for a passage during
playback.
- NEXT (TRACK) button: To select the next track or search for a
passage during playback.
NOTE
- The functioning of these buttons will depend completely on
the application when playing a CD-i program.
LOADING AND UNLOADING
Loading:
• Point and click on 'Open'
(you may also press the
OPEN /CLOSE button (2) on
the player) to open the disc
trayf/j.
• Take the disc from its holder
and place it on the tray with
the label up.
• Point and click on 'Close' (you
may also press the
OPEN/CLOSE button (2) on
the player, or gently push the
front of the tray) to close the
tray.
- The TV screen changes according to the type of disc being
played.
CAUTION
NEVER PUT MORE THAN ONE DISC AT A TIME INTO THE
CD-i PLAYER
PLAYING A CD-i DISC
Playing a CD-i disc depends on the value of Autoplay (see
Options Screens). The factory setting is default "OFF".
1. AXTien autoplay is "OFF":
After the disc is loaded, the CD-i start-up screen appears on the
TV. To start the CD-i program, select 'Play CD-i' and click on it.
2. When autoplay is "ON":
After the disc is loaded, the CD-i program will start up
automatically.
Unloading:
• Point and click on 'Open' (you may also press the
OPEN /CLOSE button (2) to open the disc loading tray.
- The player start-up screen reappears on the TV.
• Take the disc from the tray and replace it in its holder.
• Point and click on 'Close' (you may also press the
OPEN/CLOSE button (2) on the player, or gently press the
front of the tray) to close the tray with or without a new disc.
NOTE
- You may unload the disc at any time by pressing the
OPEN/CLOSE button (2).
- Unloading a CD-i disc while the CD-i program is running, will
terminate the CD-i program abruptly. 'Bookmarks' or
intermediate results, if used by the CD-i program, might not
be updated to the latest situation.
The opening screen of the CD-i
program now appears on the TV.
From this point, all interaction is
between you and the program.
To stop at any time, select the
STOP or EXIT function provided
by the CD-i program.
16
NOTE
- This procedure applies equally to CD BRIDGE discs, CD-i
READY discs, PHOTO CDs for Digital Video discs and \Tdeo
CD's.
CAUTION
NEVER LEAVE A STILL PICTURE ON THE SCREEN FOR ANY
LENGTH OF TIME. THIS CAN CAUSE BURNING-IN OF THE
PICTURE TUBE. TO AVOID THIS, SWITCH OFF THE PLAYER
OR REMOVE THE DISC.
Page 17

PLAYING DISCS
PLAYING AN AUDIO CD
- After the disc is loaded,
the CD-Audio screen appears on
the TV.
1. Play track bar: shows all the
track numbers (up to 30). You
can 'point-and-click' to select any
track. For discs with more than
V I ®8.27
r j
^^1
20 Trad'S
Disc time
30 tracks, use the right > and left
< scroll arrows to move through
the track list.
2. PROGRAM: allows you to program a list of special tracks
called a Favorite Track Selection. \Xdien you select PROGRAM,
the FTS track bar and the FTS icon will appear.
3. FTS: allows you to play Favorite Track Selections. This icon
only appears if a Favorite Track Selection has been created for
the disc that is loaded in the player.
4. SCAN: allows you to listen to the beginning of every track
listed in tlie play track bar. You can set the scan time to 5, 10
or 20 seconds in the 'Options' screen, (see p.l4).
5. SHUFFLE: allows you to play the tracks in the play track bar
in a random order.
6. REPEAT: allows you to repeat either a track or the entire disc.
You can change the repeat mode in the 'Options' screen, (see
p.l4).
7. TRACK/TIME window:
- in STOP mode, this shows the total number of tracks and the
total playing time. When you click at this window ("7), the
track time of the selected track is displayed.
- in PLAY and PAUSE modes, the window shows the track number
and either the elapsed or the remaining track playing time. To
change between elapsed and remaining time, 'point-and-click' at
the time shown in the window.
8. All the disc play control functions are shown on the screen,
and can be selected as desired by 'point-and-click' with your
remote control. The operation of the functions is briefly
explained in the following table.
NOTE
- If auto Shuffle, auto Play or auto FTS has been selected on the
‘CD Audio’ screen, this function will be activated
automatically.
- Sound level:
• When playing any disc adjust the sound level as required,
preferably on the TV or LLiFi amplifier.
• The volume up (30/down (10) buttons on the remote control
(see page 9) may also be used, but for each disc these
controls always start at the level set in the General Options
Screens (see page 14).
A suitable level must therefore first be set on the TV or HiFi
amplifier.
OPERATION SELECT
Start play
PLAY^
play starts at the beginning of track 1, or any
other preselected track number. If a track is
already playing, it is re-started.
Select a track
TRACK NUMBER !◄ ► !
if the disc contains more than 30 tracks, use the
left < and right > scroll arrows to move through
the track numbers as required.
Pause
PAUSE II
interrupts play.
Exit pause PAUSE II or PLAY ►
play restarts at exactly the same point as when
pause was selected.
Forward search FORWARD ► ►
searches forward through the disc.
Reverse search REVERSE-
searches backwards through the disc.
Stop play STOP ■
stops playing. If play is re-started, it begins at
the first track.
Scan the disc SCAN
plays the beginning of each track listed in the
play track bar.
Exit scan SCAN
normal play starts from this point.
Shuffle play SHUFFLE
shuffle sequence appears in track bar.
Exit shuffle SHUFFLE
normal play starts from this point.
Repeat REPEAT
repeats the entire disc (or FTS program), or the
track being played, as selected on the
"Options" screen.
Play FTS FTS
only available when an FTS program has
already been created for the disc in the player.
Exit FTS FTS
normal play starts from this point.
Program FTS PROGRAM
• Point to tracks as required on the play track
bar, and in each case click on an action button
to enter the track in the FTS track bar.
• To cancel an unwanted track, point to it in
the FTS track bar and click on an action
button.
• To cancel the entire FTS program, point to
the first track in the FTS track bar and click on
an action button repeatedly until all the tracks
disappear.
Store FTS SAVE FTS
the keyboard screen replaces the CD-Audio
screen. See 'CREATING FTS TITLES' ( p.l8).
I. Using the audio screen
17
Page 18

PLAYING DISCS
playing an audio CD 2. Creating FTS titles
At the CD-Audio screen (see p.l7), 'point-and-click' on the
Program button, then 'point-and-click' on the "Save FTS"
(Favorite Track Selection) button.
The keyboard screen will
appear.
Select each character of the
title in turn, using Shift to
change between upper and
lower case characters and
Space to separate words.
Delete erases the last selected
character.
Clear erases the complete (or
partially complete) title.
Cancel returns to the CD-Audio screen without saving the title.
Save saves the tide and returns to the CD-Audio screen.
PLAYING AN AUDIO CD
When an audio CD with graphics is played, the CD Graphics
screen will appear automadcaUy.
To make the picture
channel bar appear/disappear |
click on the acdon button
anywhere outside the channel |
bar.
You can select another track
number by clicking on 'Track' or|
either arrow next to it.
Depending on the disc, other
channel numbers might give
you other informadon, such as the lyrics in a different
language.
For informadon about the actual graphics funcdons, refer to the
instrucdons that come with the disc.
To play audio only, click on 'Audio'.
FTS ml.
шапвашшшш
1яяЕ1аатиязшга1
• Using the keyboard screen, you can compose a dde of
approx. 30 characters (depending on the character width) for
the selecdon.
- After creating an FTS, the dde then appears on the CD-Audio
screen whenever the disc is loaded.
3. CD graphics
CAUnON
NEVER LEAVE A SHIX PICTURE ON THE SCREEN FOR ANY
LENGTH OF TEVIE. THIS CAN CAUSE BURNING-IN OF THE
PICTURE TUBE. IN SUCH A CASE SWITCH OFF THE PLAYER
OR REMOVE THE DISC.
PLAYING A PHOTO CD
After loading the disc, the CD-i start-up screen appears on the TV.
To start the Photo CD program, select the ‘PLAY CD-i’; you
may also press the PLAY button (5^ on the player or remote
control (6).
The opening screen of the Photo CD program now appears on
the TV.
At the bottom of this screen a menu bar with icons is shown.
О
□ аз||Н в
Select the 13^ icon.
The 'Options' screen will now appear.
To select a language click on the box, the flag or the name of
a country.
The previous setting will be replaced automadcaUy.
18
Select the icon (Return) of this screen to go back to the
Photo CD opening screen.
• Select the 4 icon (Informadon) and the INFORMATION
screen, explaining the control buttons of the menu bar in the
selected language, appears.
• From this point, aU interacdon is between you and the
program.
NEVER LEAVE A STILL PICTURE ON THE SCREEN FOR ANY
LENGTH OF TIME. THIS CAN CAUSE BURNING-IN OF THE
PICTURE TUBE. IN SUCH A CASE SWITCH OFF THE PLAYER
OR REMOVE THE DISC.
* •
CAUTION
Page 19

INTRODUCTION
GROUPWORKING
This chapter describes the different steps which are necessary to
instali a linked group of GDI 615 players.
One of the CD-i players becomes ‘masted player after using the
download function. It remains ‘masted until all players are
INSTALLATION
To operate the groupworking functionality, first follow the instructions
given in the ‘installation’ chapter earlier in this user manual.
Before connecting the power to each individual player, connect
the different players as shown in the following picture using
D-sub 9 cables (for specification see Technical Documentation).
a. Using both RS232 ports on the rear panel of the ‘master’ player.
switched off.
It also describes the instructions for
downloading a file from the central CD-i player
(‘masted) to all connected CD-i players (‘slaves’).
b. Using one of the two RS232 ports on the rear panel of the ‘master’ player.
Connect each player to the power supply and switch on.
CAUTION
MAKE SURE THAT DURING THE DOWNLOAD
PROCEDURE ALL PLAYERS ARE IN THE START-UP
SCREEN.
IN CASE ONE OF THE PLAYERS IS NOT POWERED (E.G. IN
standby POSITION OR POWER OFF) THE NETWORK WILL
BE INTERRUPTED FROM THIS PLAYER ON. THE NEXT
PLAYER(S) WILL NOT BE DOWNLOADED WITH THE
INFORMATION OF THE MASTER’S FLOPPY.
NOTE
To avoid unintentionalilly putting one of the players into
standby mode (by pushing the standby button on the remote
control), disable the standby function by selecting ‘standby off
in the General Options screen. This must be done for each
player which is intended to function as slave device. This step
needs to be executed only once, the setting ‘standby off wiU
remain active until ‘standby on’ is selected again via the same
screen.
General Options
Auto play
Volume
16 : S screen display on
Standby
high med low
off
IQ
Page 20

GROUPWORKING
DOWNLOADING OF FILES
1. To download a file from a floppy disc to the connected
players, first insert a floppy disc in the floppy disc drive of the
‘master’ player.
On the Tools screen, select the Copy file screen.
2a. On the Copy file screen, select the source ‘Flopp/.
Cc^ay file
Beethoven rFTò)
Cartoon Jul;ehox
Cool Oldieo
Dire 5trajt5 (FTS)
Mozsrt (FTS)
23 juni '94
10 Mar '94
30 Jan '94
5 May *94
24 Jun *94
Total used: 24
2,1 /'
5,1 %
2,3
3 0 Ч
&2Z
4
%
3. The names of all the floppy disc files will be displayed. Select
the preferred file by clicking on it.
Copy file
Ext.
Wk
3,0
8,2 ^
24 %
lOEMO
TESTFILECDI
FRENCH!
FRENCH 2
Poppy
Date Size
СЭ tun '94
10 Mar '94
00 Ian '94
S May '94
24 lua '94
Total usedt
4. To start downloading of the selected file, click on ‘Copy' on
the same screen.
Copy file
Floppy
Dete Size
10 Mar'94 S.T^.
30 Jan '94 2,3 ’
5 May’94 3,0 ’
24 Jun ’94 8,2 •
Total used: 24
Ext,
lun '94 2 1
2b. On the Copy file screen, select the destination ‘External’
(Ext.).
СЪру file
From l^g^Roppy
Kame
ART 1900
DEMO
TESTFILE COI
FREN'>11
FRENCH 2
EMEM
Total used:
Ext.
To Mem
1 Size
23 jun '94 2,1
10 Мэг '94 5,1 7
30 Jan '94 2,3 /
5 May’94 3,0
24 Jun ’94
8.2
24
'4
4
4
CAunoN
DURING DOWNLOADING, ’WHEN THERE IS NOT ENOUGH
MEMORY AVAILABLE IN ONE OF THE PLAYERS, THE
NEEDED AMOUNT OF MEMORY WILL BE CREATED BY
DELETING THE OLDEST FILE(S)
ONE OF THE CD-i PLAYERS BECOMES ‘MASTER’ PLAYER
AFTER USING THE DOWNLOAD FUNCTION,
rr REMAINS ‘MASTER’ UNTIL ALL PLAYERS ARE
SWITCHED OFF.
MAKE SURE ALL FOLLOWING DOWNLOAD PROCEDURES
TAKE PLACE FROM THIS ‘MASTER’ PLAYER.
NOTE
- It is not possible to select another function (on screen, front or
remote control) during the download operation.
The file is now downloaded to the memories of all players
which are linked to the groupwork setup.
When the download function has been completed, the total
number of players to which the selected file has been
downloaded will be displayed on the screen.
If this number corresponds to the total number of players
cormected, the download operation has been successful.
If this number does not correspond to the total number of
players, the download operation was not successful. It is
possible that:
a one of the connections between tsv'o players is malfunctioning.
In this case, check all the connections bertv'een the different
players.
b
the start-up screen is not active,
c one of the CD-i players is switched off.
Before restarting the download operation again, switch all
players OFF and ON.
20
Page 21

BEFORE REQUESTING SERVICE
If it appears that the CD-i player is faulty, first consult this
check-list. It may be that something simple has been
overlooked.
Under no circumstances attempt to repair the player yourself;
this will invalidate the warranty.
No power.
No picture.,
Distorted picture
The tray cannot be opened
(no open Icon........................• Switch the player off, then switch
on start-up screen) on again while holding the
.................
..• Check that the ON/OFF button
on the front of the player is set to on.
• Check that both plugs on the power
cord are properly cormected.
• Check that there is power at the AC
outlet by plugging in another appliance.
Check that the TV is switched on.
• Refer to the instructions of the TV
set for selection of the correct input
and channel.
• Select the same channel or input on
the TV as that of the player channel
selector switch on rear of player.
• Check the video cormection.
• Check the disc for fingerprints and
clean with a soft cloth, wiping from
center to edge.
PLAY button pressed.
Copy to other CDI 6l5 players failed
(error message or
displayed number of ...» Make sure all players are connected
players does not
correspond with
linked number
of players)
Copy to floppy failed...» Check that the floppy is formatted
Copy to memory failed
................................................
View failed after selecting next page
................................................
correcdy (see chapter groupworking
installation, page 19).
• Check that aU players display the
start-up screen.
• Check to make sure that all players
are switched on.
• Make sure there is no other ‘masted
player.
(PC type format)
• Check that the floppy is not write
protected.
• Check that there is enough disc
space available for the file.
• Make sure that the same file is not
already on floppy with write
protection on.
• Check that there is enough memory
space available for the file.
• Make sure that the size of the file is
smaller than 32Kbytes.
• Check that the file is smaller than
32Kbytes.
Disc can’t be played
No sound..
Distorted sound
from HiFi amplifier
No return to start-up
screen when disc is
removed
The player can’t be
remote controlled...
.............................
............
Ensure the disc label is upwards.
• Clean the disc.
• Check to see if the disc is defective
by trying another disc.
..• Check audio connections.
• If using a HiFi amplifier, try another
sound source.
• Check to make sure that audio
connections are not made to amplifier
Phono input.
.• Reset by switching the player off,
then on again.
• Check to see if the CD-i program
requires another disc to be loaded.
..• Aim the remote control directly at
the sensor on the front of the player
(14).
• Avoid all obstacles which may inter
fere with the signal path.
• Inspect or replace the batteries.
• Check that no pointing device is
connected to input 2.
Delete of floppy file failed
................................................
Format floppy failed
• Check that the floppy is still in the
disc drive.
• Check that the floppy is not write
protected.
• Make sure that the file is not write
protected.
..• Check that the floppy is not write
protected.
• Make sure that the floppy type is
equal to the type selected in the
format menu.
The player can’t be
controlled
(While using a wired
CD-i controller)
..........................
Check the CD-i controller
cormection.
• Switch the player off, then switch on
again.
21
Page 22

22
Page 23

For more Information refer to the supplied Technical Documentation
System
CD-Interactive
Usable discs
CD-I
CD-DA
PHOTO-CD
CD-i READY
CD BRIDGE
VIDEO CD
CD DIGITAL
CD+GRAPHICS
Power requirement
120VAC
Power consumption
23W approx
Operating temperature
4rF(5"C)to95’F(35°C)
Relative humidity
5% to 95% (no condensation)
50/60HZ
Weight
4,200 kg approx
Dimensions (w x h x d)
435 mm x 105 mm x 280 mm
17 1/8x4 1/8x11”
Connections
AT-keyboard Din connector (rear)
pin signal
1
2
3
4
5
levels
Digital out (rear)
0,5 Vpp Into 75 ohm
clock
data
n.c.
GND
+5V (300 mA max)
TTL
RCA pin cinch socket
Y/C (S-vIdeo) (rear)
minl-DINI 4-pin
pin
signal
GND
GND
Y (IVpp into 75 ohm)
C (burst 300mVpp into 75 ohm)
RFI/0
Connector F-type
Antenna input 75 ohm unbal
out to TV 75 ohm unbal with
Channel selector ch3=61.250 MHz
*CD-i RF out to TV = 66 dBrv
* antenna RF out to TV = loop through (CD-i power off)
Ch4=67.250 MHz
serial I/O (rear) (1 ports) 8-pin mini-DIN
pin
1 nc
2
3
4
5
6
7 rts
8
signal
rxd
txd
nc
ground
cts
+5V (100 mA max)
I/O
O
I
O
I
Serial communication at 9600 baud.
SPECIFICATIONS
RS232 Serial Port #1, #2 (rear)
Centronics parallel port #3 (rear)
25 pin sub D connector female
standard centronics interface / ECP / EPP for printers
and general purpose parallel I/O.
pin
1
2 DO I/O
3
4
5 D3 I/O
6 D4
7
8
9 D7
10 ACK*
11 BUSY
12
13
’ Low = active
Levels TTL
Pointing device input 1 and input 2 (front)
Pointing device speed of 1200 baud is supported.
Audio out
video out (NTSC)1 Vpp (75 Ohm load, sync neg) RCA pin jack
Headphone
Designs and specifications are subject to change without notice.
2 connectors DB9 male
Signals according EIA RS232 - E standard and CCiTTV.28
Baudrates up to 115200 baud are supported .
pin
1
2 RXD
3 TXD
4 DTR
5 GND
6 DSR
7
8
9 RI
levels
signal
STROBE*
D1 I/O 16
D2 I/O 17
D5 I/O 20
D6 I/O 21
PE (paper empty) 1 25
SEL (on-line)
signal
DCD
RTS
CTS 1
RS standard
I/O
I/O 19
I/O 22
pin
14
0
15 ERROR* 1
18 GROUND
1 23
1 24
1
signal
AOTOFDXT*
INIT* (reset)
SEL* (select in)0
GROUND
GROUND
GROUND
GROUND
GROUND
GROUND
GROUND
I/O
1
1
0
0
.
1
0
1
I/O
0
0
-
-
-
-
-
-
-
-
(2 ports) 8-pin mlnl-DIN
mini-DIN input 1
pin
1
2 rxd2
3
4
5 gnd
6 n.c.
7
8
levels
mini-DIN input 2
pin
1
2
3
4
5
6
7
8
levels
signal
n.c.
txd2
n.c.
rts2
+5V (100 mA max)
TTL
signal
n.c.
rxdl
n.c.
n.c.
gnd
n.c.
rtsi
+5V (100 mA max)
TTL
I/O
1
I/o
1
.
-
-
-
-
0
0
.
0
-
-
-
0
0
2 Vrms
2 channel individual RCA pin cinch sockets
Socket for 6.3 mm stereo jack
8-2000 ohm
30mw @ 32 ohm
Page 24

ACCESSORIES • ACCESSOIRES
SUPPLIED ACCESSORIES • ACCESSOIRES FOURNIS
These accessories are provided to help you use or set-up your CD-i
Player.
Remote Control
Handset
OPTIONAL ACCESSORIES • ACCESSOIRES EN OPTION
Maximize your pleasure v/ith state-of-the-art accessories designed
specifically for your CD-i Player.
The optional accessories shown here may be purchased from your
supplier.
CD-i Mouse
22ER9011 22ER9012
22ER9013
(RF coaxial cable) Cable
Audio L-R Cable
Gamepad
22ER9021
type no. of product» Numéro de série du produit
GDI 615
Date of purchase
day » Jour month » Mois
The products and services described herein are not necessarily available in all countries.
year » Année 19
©1995 PHILIPS INTERACTIVE MEDIA SYSTEMS
Dealer's name, address and signature
Due to continuous product improvements this document is subject to change v.iihou! notice
Printed in Belgium. 3104 125 21591
IB7458E001
 Loading...