

Page 1
pimimifflni
CDI450/CDI550
Operating Instructions
anaaaoQ 002113
Page 2

Please Follow These Three
Important Steps To Get The
Most From Your Product
MASNAVCK
RETURN YOUR OWNER'S
REGISTRATION CARD WITHIN
10 DAYS.
Registering your purchase is an essential
step to guarantee that you'll receive all
of the benefits you're entitled to as a
MAGNAVOX product owner. Complete
and mail your Owner's Registration
Card today to ensure your right to war
ranty verification, owner confirmation,
model registration, plus a wide variety
of special services and savings.
KNOW THESE SAFETY
SYMBOLS.
CAUTIOIM
RISK OF ELECTRIC SHOCK
DO NOT OPEN
САШЮХ TOREDUCETffiRISKOFELECTraCSHOCK,DOXOI
REMOV’E COVER (OR ВАСЮ. NO USEE-SERVICEABIE PARIS
KSTOE REFER SERVICING TO QUAUBED SERVICE PERSONNEL
This "bolt of lightning" indicates
tminsulated material within your
A
in your household, please do not remove
product covering.
rmit may cause an electrical
shock. For the safety of everyone
A
Congratulations On Your New
Purchase ... And Welcome To
The MAGNAVOX Family!
Dear MAGNAVOX Family Member:
Thank you for your confidence in MAGNAVOX.
You've selected one of the best-built, best-backed
products available today.
We appreciate your support, and we'U do every
thing we can do to keep you happy with your
purchase for many years to come. After all, you're
the reason we're in business!
As a MAGNAVOX family member, you're entitled
to a world of special privileges - and our imcompromising commitment to your total satisfaction.
Your MAGNAVOX product is protected by one of
the most comprehensive warranties and
outstanding service networks in the industry.
What's more, yotir purchase qualifies you to
receive advance information on exciting new
products from MAGNAVOX, convenient access to
our home shopping network for special products
and accessories, plus factory-direct rebates and
discounts on your future MLAGNAVOX purchases.
All of this is our way of saying "thanks" for
joining the MAGNAVOX family.
The "exclamation point" calls
attention to features for which
A
maintenance problems.
you should read the enclosed lit
erature closely to prevent operating and
READ OPERATING
INSTRUCTIONS CAREFULLY.
The information in this manual can
help you take full advantage of your
product's many features, and ensure
years of safe, reliable operation. So
don't miss out. Read the enclosed
instructions, safety tips and warranty
in-formation today.
To start taking advantage of these great benefits,
just remember to return your MAGNAVOX
Owner's Registration Card.
Simply complete, detach and mail us your
Owner's Registration Card today. And enjoy your
new purchase with our best wishes!
Sincerely,
irAJ
Donald F. Johnstone
President and Chief Executive Officer
For Customer Use:
Enter below the Serial No. which is lo
cated on the rear of the cabinet. Retain
this information for future reference.
Model No.: CDI450 / CDiSSO
Serial No.:
________
Page 3

Safety Precautions
WARNING: TO PREVENT FIRE OR SHOCK HAZARD. DO NOT EXPOSE THIS EQUIPMENT TO RAIN OR
MOISTURE.
CAUTION: TO PREVENT ELECTRIC SHOCK, MATCH
WIDE BLADE OF PLUG TO WIDE SLOT, FULLY
INSERT.
LASER SAFETY: This unit employs a laser. Only a
qualified service person should remove the cover or
attempt to service this device, due to possible eye injury.
THIS DIGITAL APPARATUS DOES NOT EXCEED THE CLASS
В LIMITS FOR RADIO NOISE EMISSIONS FROM DIGITAL
APPARATUS AS SET OUT IN THE RADIO INTERFERENCE
REGULATIONS OF THE CANADIAN DEPARTMENT OF
COMMUNICATIONS.
ATTENTION: POUR EVITER LES CHOCS ÉLEC
TRIQUE, INTRODUIRE LA LAME LA PLUS LARGE
DE LA FICHE DANS LA BORNE CORRESPONDANTE
DE LA PRISE ET POUSSER JUSQU'AU FOND.
CAUTION: USE OF CONTROLS OR ADJUSTMENTS
OR PERFORMANCE OF PROCEDURES OTHER THAN
THOSE SPECIFIED HEREIN MAY RESULT IN HAZ
ARDOUS RADIATION EXPOSURE.
CLASS 1
LASER PRODUCT
CET APPAREIL NUMÉRIQUE N'ÉMET PAS DE BRUITS
RADIOÉLECTRIQUES DÉPASSANT LES LIMITES
APPLICABLES DANS LA RÈGLEMENT SUR LE BROUILLAGE
RADIOÉLECTRIQUES ÉDICTÉ PAR LE MINISTÈRE DES
COMMUNICATIONS DU CANADA.
WARNING:
This device complies with Part 15 of the FCC (U.S.A.) Rules. Operation is subject to the following two conditions; (1)
this device may not cause harmful interference, and (2) this device must accept any interference received, including
interference that may cause imdesked operation.
NOTE:
This equipment has been tested and foimd to comply with the limits for a Class B digital device, pursuant to Part 15
of the FCC Rules. These limits are designed to provide reasonable protection against harmful interference in a resi
dential installation! This equipment generates, uses and can radiate radio frequency energy and, if not installed and
used in accordance with the instructions, may cause harmful interference to radio communications. However, there is
“no guarantee that interference will not occur in a particular installation. If this equipment does cause harmful inter
ference to radio or television reception, which can be determined by turning the equipment off and on, the user is en
couraged to try to correct the interference by one or more of the following measures:
— Reorient or relocate the receiving anteima.
— Increase the separation between the equipment and receiver.
— Connect the equipment into an outlet on a circuit different from that to which the receiver is connected.
— Consult the dealer or an experienced radio/TV technician for help.
IMPORTANT:
This product was FCC verified under test conditions that included use of shielded cables and cormectors between
system components. It is important that you use shielded cables to reduce the possibility of causing interference to
radios, television sets, and other electronic devices. If you have any problems, contact your dealer.
Any change or modifications to the equipment by the user not expressly approved by the grantee or manufacturer
could void the user's authority to operate such equipment.
NOTE TO CATV SYSTEM INSTALLER:
This reminder is provided to call the CATV (Cable-TV) system installer's attention to Article 820-40 of the NEC that
provides guidelines for proper grotmding and, in particular, specifies that the cable groimd shall be coimected to the
grounding system of the building, as close to the point of cable entry as practical.
Page 4
IMPORTANT SAFETY INSTRUCTIONS
1. Read Instructions - All the safety and operating instructions should be
read before the appliance is operated.
2. Retain Instructions - The safety and operating instructions should be
retained for future reference.
3. Heed Warnings - All warnings on the appliance and in the operating
instructions should be adhered to.
4. Follow Instructions - All operating and use instructions should be
followed.
5. Cleaning - Unplug this product from the wall outlet before cleaning. Do
not use liquid cleaners or aerosol cleaners. Use a damp cloth for cleaning.
Exception: A product that is meant for uninterrupted service and that for
some specific reason, such as the possibility of the loss of an authorization
code for a CATV converter, is not intended to be unplugged by the user for
cleaning or any other piupose, may exclude the reference to unplugging the
appliance in the cleaning description otherwise required in item 5.
6. Attachments - Do not use attachments not recommended by the video
product manufacturer as they may cause hazards.
7. Water and Moisture - Do not use this video product near water - for
example, near a bath tub, wash bowl, kitchen sink, or laimdry tub, in a wet
basement, or near a swimming pool, and the like.
8. Accessories - Do not place this video product on an unstable cart, stand,
tripod, bracket, or table. The video product may fell, causing serious injury
to a child or adult, and serious damage to the appliance. Use only with a
cart, stand, tripod, bracket, or table recommended by the manufacturer, or
sold with the video product. Any mounting of the appliance should follow
the manufacturer's Instructions, and should use a mounting accessory
recommended by the manufacturer.
8A.
9. Ventilation - Slots and openings in the cabinet are provided for ventilation
and to ensure reliable operation of the video product and to protect it from
overheating, and these openings must not be blocked or covered. The
openings should never be blocked by placing the video product on a bed,
sofa, rug, or other similar surface. This video product should never be
placed near or over a radiator or heat register. This video product should
not be placed in a built-in installation such as a bookcase or rack unless
proper ventilation is provided or the manufacturer's instructions have been
adhered to.
10. Power Sources - This video product should be operated only from the
type of power source indicated on the marking label. If you are not sure of
the type of power supply to your home, consult your appliance dealer or
local power company. For video products intended to operate from battery
power, or other sources, refer to the operating instructions.
11. Groimding or Polarization - This video product is equipped with a
only one way. This is a safety feature. If you are unable to insert the plug
fully into the outlet, try reversing the plug. If the plug should still fail to fit,
contact your electrician to replace your obsolete outlet. Do not defeat the
safety purpose of the polarized plug.
12. Power-Cord Protection - Power-Supply cords should be routed so that
they are not likely to be walked on or pinched by items placed upon or
against them, paying particular attention to cords at plugs, convenience
receptacles, and the point where they exit from the appliance.
13. Protective Attachment Plug - The appliance is equipped with an
attachment plug with overload protection. This is a safety feature.
See Instruction Manual for replacement or resetting of protective device. If
replacement of the plug is required, be sure the service technician has used a
replacement plug specified by the manufactiuer that has the same overload
protection as the original plug.
An appliance and cart combination should be moved with
care. Quick stops, excessive force, and uneven surfaces
may cause the appliance and cart combination to overturn.
apolarized alternating-current line plug (a plug having one blade
wider than the other). This plug will fit into the power outlet in
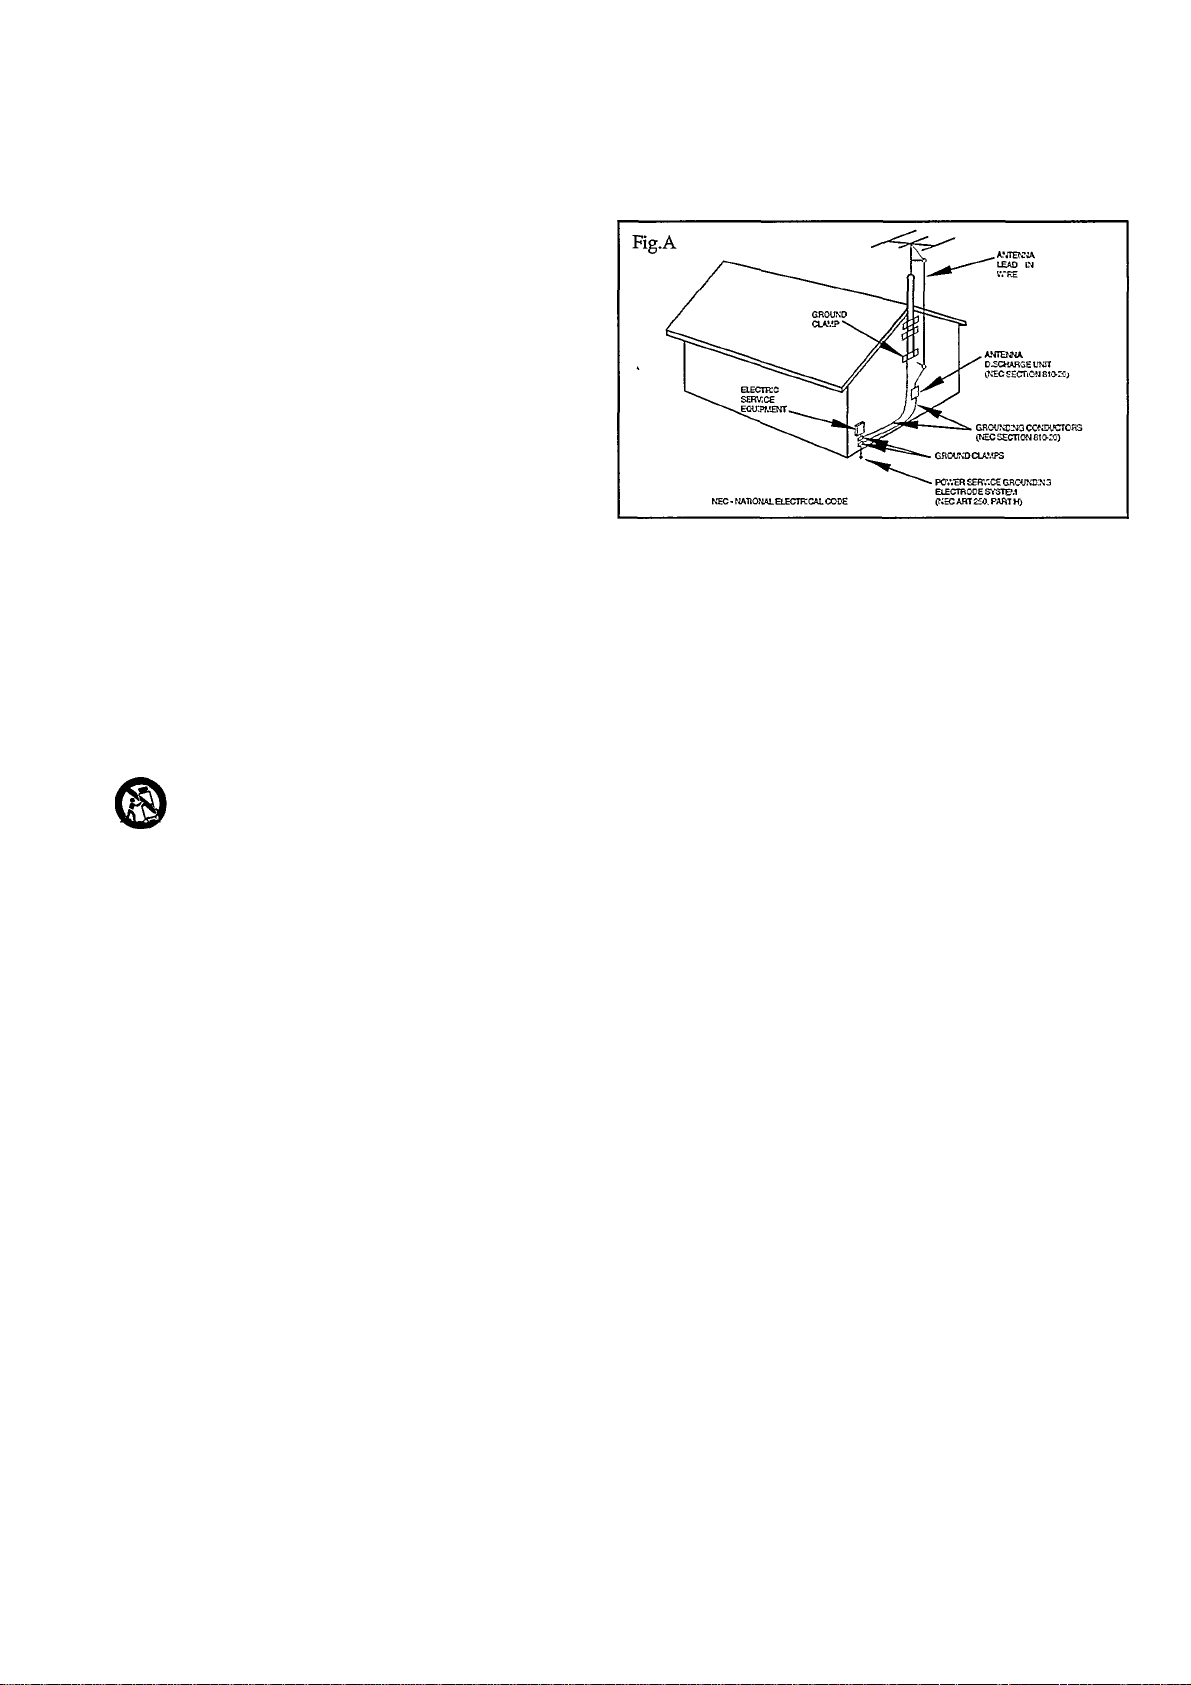
information with regard to proper grounding of the mast and supporting
structure, grounding of the lead-in wire to an antenna discharge uiut, size of
grounding conductors, location of anteiuia-discharge unit, connection to
grounding electrodes, and requirements for the grounding electrode. See
Fig.A.
15. Lightning - For added protection for this product during a lightning
storm, or when it is left vmattended and unused for long periods of time,
unplug it from the wall outlet and disconnect the antenna or cable system.
This prevent damage to the product due to lightning and powerline
surges.
16. Power lines - An outside anteima system should not be located in the
vicinity of overhead power lines or other electric fight or power circuits, or
where it can fall into such power fines or circuits. When installing an outside
anterma system, extreme care should be taken to keep from touching such
power fines or circuits as contact ivith them might be fetal.
17. Overloading - Do not overload wall outlets and extension cords as this
can result in a risk of fire or electric shock.
18. Object and Liquid Entry - Never push objects of any kind into this
product through openings as they may touch dangerous voltage points or
short-out parts that could result in a fire or electric shock. Never spill liquid
of any kind on the product.
19. Servicing - Do not attempt to service this product yourself, as opening or
removing covers may expose you to dangerous voltage or other hazards.
Refer all servicing to qualified service personnel.
20. Damage Requiring Service - Unplug this product from the wall outlet
and refer servicing to qualified service personnel under the following
conditions
a. When the power-supply cord or plug is damaged.
b. If liquid has been spilled, or objects have fallen into the product.
c. If the product has been e.\posed to rain or water.
d. If the product does not operate normally by following the operating
instructions. Adjust only those controls that are covered by the ope
rating instructions as an improper adjustment of other controls may
result in damage and ivill often require extensive work by a qualified
technician to restore the product to its normal operation.
If the product has been dropped or the cabinet has been damaged.
When the product exhibits a distinct change in performance -
f.
this indicates a need for service.
21. Replacement Parts - When replacement parts are required, be sure the
service technician has used replacement parts specified by the manufactu
rer or which have the same characteristics as the original part. Unauthorized
substitutions may result in fire, electric shock or other hazards.
22. Safety Check - Upon completion of any service or repairs to this product,
ask the service technician to perform safety checks to determine that the
product is in proper operating condition.
23. Carts and Stands - The appliance should be used only with a cart or
stand that is recommended by the manufacturer.
24. Heat - The product should be situated away from heat sources such as
radiators, heat registers, stoves, or other products that produce heat.
14. Outdoor Antenna Grounding - If an outside anteima or cable system is
coimected to the video product, be sure the antenna or cable system is
grovmded so as to provide some protection against voltage surges and
built-up static charges.
Section 810 of the National Electrical Code, ANSI/NFPA 70, provides
4
Page 5

LIMITED WARRANTY
CD-I
• One (1) Year Free Labor • One (1) Year Free Parts Service
• This CD-I must be shipped in for warranty service.
Please keep...
...your sales receipt and other material proving proof-ofpurchase. Attach it to this orvner's manual and keep it nearby.
Please also keep the original box and packing material should
you ever need to ship your CD-I player to Philips for service.
One (1) Year Coverage...
...starts from the date you bought your product. Both parts
and labor are covered at no cost to you. Any defective part
will be repaired or replaced. Any part is covered only for the
original warranty period. Once the one (1) year warranty on
the product has expired, the warranty on any replaced or
repaired part also expires. Service for your CD-I is provided by
shipping it to the Philips Factory Service Center (listed to the
right) which specializes in this type of product.
After one year, you must pay for all labor, parts,
transportation, and service charges.
Who is Protected? ... Where?
Only the person who has proof-of-purchase will receive
warranty service. This service will be provided to any product
bought and used in the U.S.A., Puerto Rico, the Virgin Islands
and Canada. If you move within these areas you must ship
your monitor to the designated Philips Factory Service Center
listed in this warranty.
Before Calling for Service...
...please check your owner's manual. A check of the controls
discussed there may save you a service call.
...labor charges for installation or set-up, adjustment of
customer or preference controls, and installation or repair of
antenna systems outside the product.
...a product bought, used, or serviced outside the U.S.A., Puerto
Rico, the Virgin Islands, and Canada.
...problems caused by signal or cable conditions outside the
product.
For product purchased in the U.S.A., Puerto
Rico, or the Virgin Islands
How To Get Warranty Service:
If warranty service is required, you must ship your product
with proof-of-purchase to a Philips Factory Service Center
(hsted below.)
Philips Factory Service
5164 Biazer Parkway
Dubiin, OH 43017
(614) 792-1495
IN THE U.S.A., PUERTO RICO, OR THE VIRGIN ISLANDS,
ALL IMPLIED WARRANTIES INCLUDING IMPLIED
WARRANTIES OF MERCHANTABILITY AND FHNESS FOR
A PARTICULAR PURPOSE, ARE LIMITED IN DURATION
TO THE DURATION OF THIS EXPRESS WARRANTY. Some
states do not allow limitations on how long an implied
warranty lasts, so the above limitation may not apply to you.
This warranty gives you specific legal rights, and you may
have other rights which vary from state to state.
How To Get Warranty Service
Due to the sophisticated nature of this product, warranty
service will be provided by the Philips Personal Information
Products Answer Center. If you feel you require warranty
service for or need to discuss a problem about your CD-I,
please contact the Philips Personal Information Products
Answer Center at (800) 845-7301. There, a technician will go
through a diagnostic check list with you and if it is determined
the unit needs to be repaired, you will be given a return
authorization number. Carefully pack the CD-I in secure
packaging for safe shipment. It is recommended that you retain
the carton and all packing materials from this unit. These
materials are specifically designed and manufactured for
shipping this product. Deliver or ship it freight prepaid and
insured to the Pliilips Factory Service Center listed, with
evidence of the purchase date and description of the problem.
Following warranty repair, the unit will be retiuned to you
freight prepaid. Be sure you include your complete retinn
address on the outside of the carton.
Warranty Exclusions Your Warranty Does Not Cover...
...replacing or repairing your product because of misuse,
accident, unauthorized repair, or other cause not within the
control of Philips Consumer Electronics Company.
...incidental or consequential damages resulting from the
product. Some states do not allow the exclusion of incidental
damages, so the above exclusion may not apply to you.
EL4931E001
Philips Service Company
P.I.P. Information Center
(800) 835-3506
For product purchased In Canada
How To Get Warranty Service:
To obtain warranty service, the product must be delivered
(carried-in) to a Philips Consumer Service Branch (listed
below). These warranties are given in lieu of all other
warranties. No other guarantees or warranties are expressed or
implied, including any implied warranties of merchantability
or fitness for a partioilar purpose. Philips shall not be liable
under any circumstances for any direct, indirect, special,
incidental or consequential damages, howsoever incurred,
even if notified of the possibility of same.
AU that's required to vaUdate your original factory warranty is
to present your bUl of sale as proof of purchase.
601 Milner Avenue • Scarborough, Ontario M1B 1M8 •
(416) 292-5161 5930 Côte de Liesse • Montréal, Québec
H4T1E1 • (514) 342-9180 3695 Grandview Hwy. •
Vancouver, B.C. V5M 2G7 • (604) 435-4411
Please fill out and mail your warranty registration card promptly.
It will be easier for us to notify you if it should ever be required.
Please also keep your sales receipt and other proof-of-purchase
Please write in your model and serial numbers below.
These numbers are located on your unit. Keep this
manual nearby for easy reference.
Model No.: CDI450 / CDI550
Serial No.:
Philips Electronics Ltd.
IMPORTANT REMINDER:
information.
_______________
______________________________
Page 6

Page 7

SAFETY PRECAUTIONS.............................................. 3
IMPORTANT SAFETY INSTRUCTIONS................. 4
LIMITED WARRANTY................................................. 5
CONTENTS...................................................................... 7
INTRODUCTION ........................................................... 8
CONTENTS
INSTALLATION
SETTINGUP................................................................... 13
PLAYING DISCS............................................. 14, 15, l6
BEFORE REQUESTING SERVICE............................ 17
GLOSSARY..................................................................... 18
SPECIFICATIONS......................................................... 19
........................................
8, 9, 10, 11,12
Page 8

INTRODUCTION INSTALLATION
INTRODUCTION
We are pleased to introduce you to one of the most innovative
products available today: Compact Disc Interactive. You’ll be
surprised how easy it is! Once correctly hooked up to your TV,
you simply 'point-and-click' to explore the intriguing new world
of interactive Compact Disc.
Your CD-I player also plays CD-DA (audio compact discs) and
audio tracks from both 5 - inch laser discs and CD-ROM discs.
In addition it can play also one or more of the following disc
types: Photo CD, CD-I Ready, CD Bridge and CD Graphics
(CD+G).
By simply plugging in the optional Digital Video Cartridge, you
can upgrade the player to run interactive Digital Video titles
including movies, music videos and high-power action games as
well as Video CD's.
A wide variety of optional accessories enhances its flexibility.
Contact your supplier.
We are confident that you will find this product surprisingly
easy to use, and uniquely innovative to operate.
FRONT AND SIDE OF PLAYER
1 Disc cover.
2 ON/OFF button.
3 Input.
4 Power ON/READ IN indication.
5 Digital Video Cartridge cover.
REAR OF PLAYER
6 DC IN.
7 DC OUT (for external RF-modulator only).
8 Audio R (right).
9 Audio L (left).
10 Video (CVBS).
CD-I CONTROLLER
11 Action buttons.
12 Thumbpad.
CAUTION
NEVER MAKE OR CHANGE CONNECTIONS WITH THE
POWER SWITCHED ON.
Page 9

INSTALLATION
POWER SUPPLY
13 DC output
14 Mains AC input.
RF MODULATOR
15 ANT IN.
16 ANT OUT.
17 Channul Selector.
18 Audio/Power Cable.
19 Video Cable.
PLACEMENT
Place the player on a firm, flat surface.
Keep away from heat sources and direct sunlight.
In a cabinet, allow 2-3 cm (appr. I") of free space around the
circumference of the player for adequate ventilation.
POWER CONNECTION
• Connect the DC output (13) of the power supply into the DC IN
(6) of the player.
• Insert the plug of the cord (14) into an AC outlet.
NOTE
- The power supply automatically adjusts to the local power
voltage.
- This power supply is intended to be used only with this CD-I
player.
Only use the prescribed Power Supply:
• For USA use type 20PS301/17
CAUnON
- ONLY A QUALIFIED SERVICE PERSON SHOULD REMOVE
THE COVER OTHER THAN THE DIGITAL VIDEO
CARTRIDGE COVER OR ATTEMPT TO SERVICE THIS
DEVICE.
- USE OF CONTROLS, ADJUSTMENTS OR PERFORMANCE OF
PROCEDURES OTHER THAN THOSE SPECIFIED HEREIN
MAY RESULT IN HAZARDOUS RADIATION EXPOSURE.
- NEVER MAKE OR CHANGE CONNECTIONS WITH THE
POWER SWITCHED ON.
Page 10

INSTALLATION
I. CHOOSING THE RIGHT VIDEO CONNECTIONS
Most of today's TV receivers have several possible picture input
connections. In order of picture quality, these are:
- Video (CVBS).
- Antenna in.
Depending on the version of your player, it is advised that you
connect it to the TV input with the highest picture quality.
NOTE
Please refer to the instructions that come with the TV set for
selection of the correct input.
roiilf
7. DC OUT.
8. Audio R (right).
9. Audio L (left).
10. Video (CVBS).
For any optional connection accessories you require, contact
your supplier.
2. CONNECTION TO A TV WITH A VIDEO (CVBS) SOCKET
Connect the corresponding connectors with a matching video cable.
Since this cable does not connect the audio, it has to be connected
separately with a matching cable (refer to the accessories page on
the back of this manual).
iiniiBiiBimiHinBm
3. EXTERNAL RF MODULATOR CONNECTION
• Connect the Audio/Power cable and the Video (CVBS) cable
of the RF modulator unit to the corresponding connectors of
the player.
• Disconnect the input cable from the antenna at the TV and
plug it into the AOT IN socket of the RF modulator.
• Link the modulator's ANT OUT socket with the TV using the
RF cable.
• If you have a VCR (or antenna or cable) connected to the TV
antenna input and your RF modulator has an antenna input,
connect the RF modulator between the VCR (or antenna or
cable) antenna output and the TV antenna input. You may
also use an optional external switchbox, if desired.
- Your CD-I player sends pictures and sound to your TV on the
channel number indicated by the channel selector position at
the RF modulator. This signal is sent through the coaxial cable.
• To operate the player with your TV, set your TV to the same
channel.
- You can avoid local interference by selecting a different
channel with the channel selector.
Please refer to the instructions that came with the TV set for the
selection of the channel.
10
Page 11

4. AUDIO CONNECTIONS
INSTALLATION
If you use the video (C\T5S) (10) output, you also will need
to connect the player's audio output (8,9) to the TV's audio
input.
/
Ui
iimBHiimiiiiHii
NOTE
The sound sent through the RF output to your TV is mono
only.
5. POINTING DEVICE CONNECTION
For HiFi sound, you can connect the player’s audio output
(8,9) to the input of your HiFi system.
CAUTION
DO NOT CONNECT THE PIAYER’S AUDIO OUTPUT TO THE
mn PHONO (RECORD PIAYER) INPUT.
INCLUDED POINTING DEVICE: The CD-I Controller
To operate your CD-I player:
A pointing device is needed.
Plug the CD-I controller connector into the CD-I player .
Insert the connector with the arrow at the top.
Then you can switch on the player.
Move the cursor in the direction you want by pressing in that
direction on the thumbpad.
Click on one of the action buttons.
The function selected by this "point-and-click" technique is
highlighted to confirm the selection.
OPTIONAL DEVICES: Roller Controller, Trackerball, Mouse,
Touchpad, CD-I Controller, IR-Remote kit, Splitter (refer to the
accessories page on the back of this manual).
NOTE
To "point-and-click" on any screen shown in this manual, any
one of the two action buttons of the pointing device can be
used.
The shape of the cursor may be different depending on the
program you are playing, but it is always controlled in the same
way.
Pointing devices are sensitive precision instruments. Handle
them with care, keeping in mind the following precautions:
• Avoid dropping or knocking.
• Do not use them in locations subject to extreme temperatures,
humidity, dust or vibration.
• Never hold the pointing device by the cable.
• Never pull the cable to disconnect the pointing device from
the player.
CAUTION
NEVER MAKE OR CHANGE CONNECTIONS WITH THE
POWER SWITCHED ON.
11
Page 12

INSTALLATION
6. INSTALLING A DIGITAL VIDEO CARTRIDGE (*)
INTRODUCTION:
As soon as you have plugged this cartridge into your CD-I
player, you can play the latest CD-I discs, featuring interactive
movies, music videos and state-of-art video games and video
CD's. Enjoy yourself! But first
CAUTION - WHmE INSTALUNG (OR REMOVING) YOUR CARTRIDGE:
Make sure the player is switched off.
INSTALLATION:
......
Do not touch the cartridge
connector!
Note: A special tool is supplied with the cartridge. Keep it safe in
case you need it.
Do not probe into the ventilation
holes!
Do not block the ventilation holes!
Open the disc cover.
Plug in the Digital Video Cartridge.
REMOVAL:
Open the disc cover.
Push at the latches (side) to open
the Digital Video Cartridge cover.
Reinstall the Digital Video Cartridge
cover.
Push at the latches (side) to open
the Digital Video Cartridge cover.
Mount the Digital Video Cartridge
identification badge on the Digital
Video Cartridge cover.
y,
Remove the metal protection of the
conneaor in the player witli tire
supplied tool. < Keep it tor possible
future use). Do not touch tile
connector.
THE CARTRIDGE IS NOW INSTALLED AND SHOULD NOT BE
REMOVED WITHOUT CAUSE: IT CARRIES A LOT OF EXTRA
MEMORY WHICH IS VALUABLE EVEN FOR TITLES WITHOUT
DIGITAL VIDEO (FULL MOTION).
Remove the Digital Video Cartridge
with the supplied tool.
Reinstall the metal protection. Do
not touch the conneaor.
Reinstall the Digital Video Cartridge
cover.
12
BEFORE REQUESTING SERVICE!
- IF THE PLAYER MALFUNCTIONS AFTER CARTRIDGE INSERTION, TRY REMOVING AND REINSERTING IT.
- DO NOT ATTEMPT REPAIRS: THIS WILL INVALIDATE THE
WARRANTY.
C) OPTIONAL WITH (3DI450
SUPPLIED WITH CDI55O
Page 13

SWITCHING ON AND OFF
Press the ON/OFF button (2) to switch the player on.
The green LED lights up.
Switch on the TV (and HiFi system if used).
Select the CD-I input on the TV (and HiFi system if used).
On the TV, the player
.start-up screen will appear.
This screen has the following
system function icons to guide
and assist you:
SETTING UP
Press the ON/OFF button (2) to switch the player off.
Switch off the TV (and HiFi system, if used).
Options:
See: "OPTIONS SCREEN".
OPTIONS SCREEN
1. CD Audio
To preselect your preferred
settings when playing audio
CDs:
Auto shuffle
After switching the player on,
the tracks on the CD will
automatically be played in a
random order.
Auto FTS
After switching the player on, the FTS program of the CD will be
played automatically.
Repeat
Select to repeat a complete audio disc or a single track when the
repeat function is activated.
Scan time
Select the time you want the beginning of each audio track to
play (5, 10 or 20 seconds) when the scan function is activated.
• When finished, point-and-click on 'Exit'.
System information:
OPEN: Indicates that the disc cover is open (or not fully closed).
DISC: Means that there is no disc in the player or the disc can
not be read due to damages or dirt (refer to p.l7)
3- Time and Date
To change the player's time and
date settings:
Time/Date set
If the time or date shown on the
screen is wrong, select the
appropriate ▲ and V arrows to
set hours, minutes, day, month
Tim» «thI O««» Option«
mt] 8i {pm {S^tj ag, 11!
rimr format i 12 h
DispUy time datr
24 he
nv’dy
■
and year in turn, as required.
Time format
Select 24 hour or 12 hour clock.
Date format
Select d/m/y to present the date in day-month-year sequence.
Select m/d/y to present the date in month-day-year sequence.
Display time/date
Select to display the time and date on the TV screen.
• When finished, point-and-click on 'Exit'.
2. General
To change the players general
■settings:
Auto play
After .switching the player on,
playback will start automatically
when a disc is loaded.
Volume
Selecting the player default
volume setting
Dim Time (min) '
On all screens shown in this manual except CD Graphics screen,
dim occurs automatically after 1-5-10 minutes if the player is not
used.
Dim greatly reduces the brightness of the displayed picture. The
normal brightness is restored by any user action with the control
device(s).
When finished, point-and-click on 'Exit'.
4. Storage
Use to refer to the intermediate
results of CD-I titles and of
programs created for your audio
and Photo CDs.
The "Storage" screen shows the
information held in memory:
titles, dates and percentage of
Ham»
»—{PTS)
Car*«Mt
Cotri OWnm
Dir* Stratts ffTS)
M»sait jFTS)
War L*r»r
5tor«p» Optle««
>*•23-99 02 IS
Urn n ‘99
)H>aS '93 023S
'99 094»S
Apr 9 ‘99 04.4S
memory used.
Clicking on "Name", "Date" or
"Size" sorts the information
accordingly.
Use the scroll arrows to move up and down the list.
To delete an item, click on its title and then click on "Delete".
If you change your mind after deleting, click on "Undo".
When finished, point-and-click on 'Exit'.
EBI
•S-tS
002«
24 X
13
Page 14

PLAYING DISCS
loading and unloading
Loading:
• Push on the disc cover (1) to open.
- The disc cover unlatches.
• Open the cover gently until it is in the open position (60°
approx.) where it latches.
• Take the disc and place it in the player with the label up.
• Push the disc cover (1) to close.
- The LED flashes whilst the disc is starting up and lights stable
when the disc is ready for play.
- The TV screen changes according to the type of disc.
Push on the disc cover to open.
The player start-up screen reappears on the T\L
Take the disc from the player.
Push the disc cover (1) to close.
PLAYING A CD-I DISC
NOTE
This procedure is the same for CD BRIDGE discs, CD-I READY
discs and PHOTO CDs. It is also the same for Digital Video discs
and Video CDs when a Digital Video Cartridge has been
installed.
CAUTION
NEVER LEAVE A STILL PICTURE ON THE SCREEN FOR
ANY LENGTH OF TTME. THIS CAN CAUSE BURNING-IN OF
THE PICTURE TUBE. IN SUCH A CASE, SWITCH OFF THE
PLAYER OR REMOVE THE DISC.
■ When a title consists of more than one consecutive disc, a so
called 'multi-disc' title, follow the instructions for opening and
closing the disc cover as shown on this screen.
— Unloading a CD-I disc while the CD-I program is running, will
NOTE
terminate the CD-I program abruptly. 'Bookmarks' or
intermediate results, if used by the CD-I program, might not
be updated to reflect the latest situation.
CAUTION
NEVER PUT MORE THAN ONE DISC AT A TIME INTO THE
CD-I PLAYER
2. When autoplay is "OFF":
After loading the disc, the CD-I start-up screen will appear on the
TV.
To start the CD-I program, select the 'Play' icon on the screen and
click on it.
The opening screen of the CD-I
program now appears on the TV.
From this point, all interaction is
between you and the program.
To stop at any time, select the
STOP or EXIT function provided
by the CD-I program.
Certain aspects of CD-I disc playback depend on the value of
Auto play (see settings). The factory setting is default "ON".
1. When autoplay is "ON":
After loading the disc, the CD-I program will start up
automatically.
14
Page 15

PLAYING DISCS
PLAYING AN AUDIO CD
NOTE; This procedure also can be used for audio sections on 5
inch (12 cm) laser discs.
- After loading the disc, the CDAudio screen appears on the TV.
l.Play track bar: shows the total
number of tracks (up to 30).
You can 'point-and-click' to
select any track. For discs with
more than 30 tracks, the right ►
and left scroll arrows are used
to move through the track list.
2. PROGRAM; allows you to program a list of special tracks,
called a Favorite Track Selection. When you select PROGRAM,
the FTS track bar and the FTS icon will appear.
3. FTS: allows you to play Favorite Track Selections. This icon
only appears if a Favorite Track Selection has been created for
the disc that is loaded in the player.
4. SCAN: allows you to listen to the beginning of every track
li.sted in the play track bar. You can set the scan time to 5, 10
or 20 seconds by using the 'Options' screen.
5. SHUFFLE: allows you to play the tracks in the play track bar
in a random order.
6. REPEAT: allow'S you to repeat either one track or the entire
disc. You can change the repeat mode in the 'Options' screen.
7. TRACK/TIME window;
- after loading, and in STOP mode, this shows the total number
of tracks and the total playing time. When you click on this
window' (7), the track time of the selected track is displayed.
- in PLAY and PAUSE modes, the window show's the track number
and either the elapsed or the remaining track playing time. To
•switch betw'een elapsed and remaining time, 'point-and-click' at
the time shown in the window'.
8. All the disc play control functions are shown on the screen,
and can be selected as desired by 'pointing-and-clicking' with
your pointing device. The operation of the functions is briefly
explained in the follow'ing table.
NOTE
If auto SHUFFLE or auto FTS has been selected on the 'CD
Audio' .screen, this function will be activated automatically.
I 68.27
I Disc time
I. Using the audio screen
OPERATION SELECT
Start play play
play starts at the beginning of track 1, or any
other preselected track number. If a track is
already playing, it is restarted.
NOTE: When play starts, adjust the sound
level as required.
Select a track track number
if the disc contains more than 30 tracks, use the
left •< and right ► scroll arrows to move
through the track numbers as required.
Pause pause
interrupts the play mode.
Exit pause pause or play
play restarts at exactly the same point as that
at which pause was selected.
Forward search forward
searches forw'ard through disc, first slow'ly,
then quickly.
Reverse search reverse
searches backwards through disc, first slowly,
then quickly.
Stop play stop
use to stop playing.
Scan the disc scan
plays the beginning of each track on the disc
in turn.
Exit scan scan
normal play starts from this point.
Shuffle play shuffle
shuffle sequence appears in track bar.
Exit shuffle shuffle
normal play starts from this point.
Repeat repeat
repeats the entire disc (or FTS program), or the
track being played, as selected on the
"Options" screen.
Play FTS FTS
only available when an FTS program has
already been created for the disc in the
player.
Exit FTS FTS
normal play starts from this point.
Program FTS program
• Point to tracks as required on the play track
bar, and in each case click on any action button
to record the track in the FTS track bar.
• To cancel an unwanted track, point to it in
the FTS track bar and click on any action
button.
• To cancel the entire FTS program, point to
the first track in the FTS track bar and click on
any action button repeatedly until all the
tracks disappear.
Store FTS save FTS
the keyboard screen replaces the CD-Audio
screen. See 'CREATING FTS TITLES', p l6.
15
Page 16

PLAYING DISCS
PLAYING AN AUDIO CD
After creating a Favorite Track Selection for a disc, you can
compose a title of approx. 30 characters (depending on the
character width) for the selection using the keyboard screen.
The title then appears on the CD-Audio screen whenever the
disc is loaded.
At the CD-Audio screen, 'point-and-click' on the program
button, then 'point-and-click' on the "Save FTS" button.
The CD-Audio screen will change'
to the keyboard screen.
Select each character of the
title in turn, using shift to
change between upper and
lower case characters and
space to separate words.
PLAYING AN AUDIO CD
When an audio CD with
graphics is played, the CD
Graphics screen will appear
automatically.
To let the picture channel bar
appear/disappear, click on the
action button anywhere
outside the channel bar.
You can select another track
number by clicking on "Track" or either arrow next to it.
Depending on tlie disc, other channel numbers might give you
other information, such as the lyrics in a different language.
Refer to the instmctions that came with the disc for their functions.
To play audio only, click on the 'Audio' icon.
________________
2. Creating FTS titles
- Delete erases the last selected character.
- Clear erases the complete (or partially complete) title.
- Cancel returns to the CD-Audio screen without saving the title.
- OK saves the title and returns to the CD-Audio screen.
3. CD graphics
CAUnON
NEVER LEAVE A STILL PICTURE ON THE SCREEN FOR ANY
LENGTH OF TIME. THIS CAN CAUSE BURNING-IN OF THE
PICTURE TUBE. IN SUCH A CASE SWITCH OFF THE PLAYER
OR REMOVE THE DISC (SEE DEVI OPTIONS).
PLAYING A PHOTO CD
After loading the disc, the CD-I start-up screen appears on the TV.
To start the Photo CD program, select the ‘PLAY CD-F icon on
the screen.
The opening screen of the Photo CD program now appears on
the TV.
At the bottom of this screen a menu bar with icons is shown.
Select the S' icon.
The 'Options' screen will now appear.
To select a language, click on the box, the flag or the name of
a country.
The previous setting will be replaced automatically.
Select the icon (Return) on this screen to go back to the
Photo CD opening screen.
• Select the icon (Information) and the INFORMATION
screen, explaining the control buttons of the menu bar in the
selected language, appears.
• From this point, all interaction is between you and the
program.
CAUTION
NEVER LEAVE A STILL PICTURE ON THE SCREEN FOR ANY
LENGTH OF TIME. THIS CAN CAUSE BURNING-IN OF THE
PICTURE TUBE. IN SUCH A CASE SWITCH OFF THE PLAYER
OR REMOVE THE DISC. (SEE DEVI OPTIONS).
16
Page 17

BEFORE REQUESTING SERVICE
If it appears that the CD-I player is faulty, first consult this
checklist.
It may be that something simple has been overlooked.
Under no circumstances should you attempt to repair the system
yourself; this will invalidate the warranty.
No power..........................• Check that the ON/OFF
button (2) is set to ON.
• Check that both plugs of the power
supply are properly connected.
• Check that there is power at the AC
outlet by plugging in another appliance.
Controller does not
operate..............................• Reset by switching player off, then
on again.
No picture..
Distorted picture
Interference pattern
on TV
...............................
White dots on the screen (only for RF).
.........................................• Check the position of the power
No start-up.
Screen does not change
No sound
..............
..........................
Check that the TV is switched on.
• Select the same channel or input on
the TV as that of the player or check
the video connection.
• Check the disc for fingerprints and
clean with a soft cloth, wiping from
centre to edge.
• Avoid close position of video and
audio cables to power supply.
supply and RF modulator (cables). Avoid
close position.
Check if the disc door is properly
closed.
• Make sure the disc label is facing up.
• Clean the disc.
• See if the disc is defective by
trying another disc.
• Check audio connections.
• If using a HiFi amplifier, try another
sound source.
Distorted sound
from HiFi amplifier
No return to start-up
screen when disc is
removed
...........................
.........
• Check to ensure that audio
connections have not been made to
the amplifier Phono input.
• Check to see if the CD-I program
requires another disc to be loaded.
• Reset by switching the player off,
then on again.
17
Page 18

GLOSSARY
For your convenience, the following list of terms is provided to help you rmderstand the CD-I Player and its
operation.
ACTION BUTTON - Two keys on the pointing device to
perform actions or features.
AUDIO OUT - There are two jacks located on the back of yoiu
CD-I Player. They are used to send audio (sound) from the
Player to either the TV, Stereo Receiver, or Amplifier. You could
also hook it up to a VCR (Video Cassette Recorder) or Audio
Cassette Recorder to record sound sent out from your Player.
CD, CD-DA, or CD-AUDIO - Terms used to describe a disc
that produces only audio (soimd) for your CD-I Player.
CD = Compact Disc
CD-DA = Compact Disc-Digital Audio
CD-Audio = Compact Disc Audio
DIGITAL VIDEO DISCS and VIDEO CD'S -These discs can
only be played when a Digital Video cartridge is installed.
CD GRAPHICS - a technique for generating text, still
pictures, or animated graphics that are related to the sotmd
portion of the Compact Disc (CD).
CD-I - Compact Disc Interactive. A type of disc with both
pictures and sound. Interacting with the disc ahows you to
tailor it to your taste.
CD-I PLAYER - Compact Disc Interactive Player. A device that
allows you to play several types of discs, including CD-I, CD,
Photo-CD and CD-ROM XA (Bridge).
CD-ROM-XA (Bridge) - One of several types of discs you can
play in your CD-I Player.
CURSOR - Moving spot, controlled by your pointing device,
shaped as an arrow or something else according the program
you are playing, to guide you across the screen.
FEATURE - A task the CD-I Player can perform. For example,
the Dim feature of the Player will dim your TV screen if it is
selected.
ICON - a display on one of the CD-I shell screens. The icon
shows where to place the arrow. Press on one of the
ACTION buttons to begin that feature. Example: "PLAY CD-I
►" on tlie CD-I screen. Place the arrow on top of the and
click on one of the ACTION buttons and the CD-I starts
playing.
MODE - The operating condition or status of the CD-I Player.
This is determined by the function ourently engaged and/or
the setting selected. For example, "Play mode".
PAUSE - Temporarily stopping play of a CD-Audio. When in
the Play mode, press the PAUSE button to put the CD-I Player
in the Pause mode.
PHOTO-CD - A type of compact disc on which photographs
have been stored.
PLAY - The act of the Player taking the picture and/or sound
from a disc and sending it to your TV and/or Stereo Receiver or
Amplifier. You must press the PLAY button or select the PLAY
icon before the Player will start reading a disc.
RF COAXIAL CABLE - Black, insulated, roimd cable used to
connect the RF-modulator to the TV anteima input.
RF MODULATOR - Converts the audio and video output
signal of the CD-I player to a RF-signal which can be fed into
your TV’s anteima input.
SCREENS - Word used when discussing with your TV. For
example, "TV screen" refers to the area on the TV for \dewing
pictures.Word also used when discussing CD-I Player display
screens. For example, the "CD-I Player Start-Up screen." These
screens allow you to select functions you want the Player to
perform.
STOP - Ending play of a disc. When in the Play mode, press
the STOP button to end play of a CD-Audio.
THUMBPAD - The part of the pointing device used to guide
the arrow across the screen. Place the arrow on top of the icon
of a feature you want to perform.
TRACKS - Disc sections varying in length. There can be many
tracks on one disc, with each track a distinct unit. Tracks are
important in using the Scan and Shuffle features.
VIDEO OUT - There is one jack on the back of your CD-I
Player that can be used to send pictures (video) to your TV. You
coidd also hook it to a VCR (Video Cassette Recorder) to record
pictures sent out from the Player.
VOLUME - The amount of sound you hear.
POINTING DEVICE - By pressing the buttons, signals are
sent to the CD-I player to perform desired actions. For e.xample
PLAY.
18
Page 19

System
CD-Interactive
Usable discs
CD-I
CD-DA
PHOTO-CD
CD-I READY
CD BRIDGE
CD+GRAPHICS
Power requirement
120 V AC / 60 Hz.
Power consumption
28 W with, 21 W without Digital Video Cartridge (22ER9956).
Operating temperature
41“F(5°C) to 95°F(35°C)
Relative humidity
5% to 95% (no condensation)
Weight
With Digital Video Cartridge: 1,460 Kg, 0,661 lbs.
Without Digital Video Cartridge: 1,210 Kg, 0,548 lbs.
Dimensions (w x h x d)
Cover closed:
269 mm X 67 mm x 190 mm
11,75" X 2,64" X 7,5"
Cover open:
299 mm x 183 mm x 190 mm
11,75" X 7,32" X 7,5"
SPECIFICATIONS
Input
Note: Pointing device speed of 1200 baud is supported.
Designs and specifications are subject to change without notice.
Output
video (NTSC) 1 Vpp (75 Ohm load, sync neg) RCA jack socket.
input (1 ports) 8-pin mini-DIN
suitable for connection of max. 2 devices (when splitter
is used), e.g. 2 pointing devices
pin signal
1 rxdl
2 rxd2 I
3 txdl O
4 rtsl
5
6 ctsl I
7 rts2
8
ground
+5V (150 mA max.) o
I/O
I
O
-
o
audio 2 Vrms
2 channel individual RCA jack sockets
Audio-Power Cable:
RF Power + 5V, max. 50 mA
Audio Audio(mono); 1.55 Vrms
19
Page 20

ACCESSORIES
I SUPPLIED ACCESSORIES
These accessories are provided to help you use or set-up
your CD-I Player.
Power supply
22ER9156/17
RF Modulator*
22ER9071/17
Audio L-R Cable
SBA2135A01
OPTIONAL ACCESSORIES
Maximize your pleasure with state-of-the-art accessories
designed specifically for your CD-I Player.
The optional accessories shown here may be purchased from
your supplier.
22ER9011
22ER9012
22ER9013
(RF coaxial cable) 22ER9019
SBV1130A01
Digital Video
Cartridge**
22ER9956
IR set (Receiver +
Rem. Control)
22ER9054
Connection kit
22ER9155/17
I/O Port Splitter
22ER9208
Transformer
00SBV1113A01
Audio Stereo
Splitter
22ER9209
Touchpad
22ER9017
Video (CVBS)
Cable
SBV1127A01
type no. of product
GDI 450
Date of purchase
M
________
• available on some player versions only.
•* supplied With CDI550
The products and services described herein are not necessarily available in all countries
month year 19
©1994 PHILIPS INTERACTIVE MEDIA SYSTEMS
Dealer's name, address and signature
Due to continuous product improvements this document is subject to change without not co
Printed in Belgium 3104 125 21041
IB7108E001
 Loading...