

Philips CDC 925-20S User Manual [en, es]

CDC 925
@) Compact Disc Changer 4
PHILIPS
CE) Changeur de CD
(d) Compact Disc-Wechsler
Compact Disc-Wisselaar 27
CD Cambiador 'Compact Disc'
CD CambiaCompact Disc 43
Compact Disc-Skifter
CD Compact Disc-Vâxlare 58
Compact Disc-Levynvaihdin
11
19
35
51
66
PHILIPS

@ México
PRECAUCION - ADVERTENCIA
NO ABRIR, RIESGO DE CHOQUE ELECTRICO
ATENCION
A
PARA EVITAR EL RIESGO DE CHOQUE ELECTRICO, NO QUITE LA TAPA;
EN CASO DE REQUERIR SERVICIO, DIRIJASE AL PERSONAL AUTORIZADO DE PHILIPS.
VERIFIQUE QUE EL VOLTAJE DE ALIMENTACION
SEA EL REQUERIDO PARA SU APARATO
NOM
NOM
Es necesario que lea cuidadosamente su instructivo de
manejo.
Garantia............................................................................... página 75
@ Australia
Guarantee and Service...............................................................page 75
(© New Zealand
Guarantee and Service...............................................................page 75
® Norge
Typeskilt finnes bak pá apparaten.

(H) English
Installation. ...
Operation
Programming,
..........
....................................
..........page4
.....
.pages 5-7
.....
page 4
page 8
Other possibilities
System aspects..................................................................pages 9-10
Additional information
Technical data..............................................................................pages 72-74
...............................................................
....................................................................
pages 8-9
page 10
Sí
.Í2
O)
c
Ul
(T) Français
Mise en service
Utili sation .............
Progiaiïimation
(5) Deutsch.
Inbetriebnahme
Bedienung
Piogramrnieren
(NL) Nederlands.........................
In gebruik nemen,
Bediening
Piograrnrneren..,..
...............
.......................
.................
.................
CD Español
Puesta en funcionamiento.............................................................página 35
Manejo.,,.,
Programación........................................................................página 39
...................................................................
.............................. ..........
....page 11
.
.......
page 11
..pages 12-15
........page 15
.....Seite 19
.......
Seite 19
■Seiten 20-23
.......
Seite 23
............
pagina 27
........
pagina 27
..pagina's 28-31
........
pagina 31
............... ..........página 35
páginas 36-39
Autres possibilités.......................................................................... page 16
Fonctions du système..................................................................... page 17
Généralités....................................................................................page 18
Caractéristiques techniques............................................................ pages 72-74
Weitere Möglichkeiten
System-Funktionen
Ergänzende Informationen...............................................................Seite 26
Technische Daten
Andere mogelijkheden
Systeem aspecten........................................................................pagina 33
Aanvullende informatie
Technische gegevens
Otras posibilidades.......................................................................página 40
Aspectos del sistema
Información complementaria.........................................................página 42
Datos técnicos........................................................................... paginas 72-74
.....................................................................
........................................................................
.........................................................................
.................................................................
..........................................................
.................................................................
...................................................................
pagina 34
Seite 24
Seite 25
Seiten 72-74
pagina 32
pagina's 72-74
página 41
'<5
M-1
c
n
JC
o
M
4->
3
0)
o
U)
•o
c
V
■o
(U
o
1C
(O
Q.
(A
lU
® Italiano
Installazione
Funzionamento. .
Programmazione.
(DK) Dansk
Opstilling
Betjening...........
Prograrnmering...
..............
....................................
............
.................................... .
.
(f) Svenska
Installation........................
Anvandning...
Prograrnmering
Asennus.
Käyttö... .....
Ohjelmointi.
....................
.................
Suomi
........
.................................
.........pagina
......
pagina 43
.pagine 44-47
......
pagina 47
.............
...side 51
.......
side 51
..sider 52-54
.......
side 55
.........
sida 58
............
sida 58
..sidorna 59-61
............
sida 62
.............sivu 66
.......
sivu 65
.sivut 66-68
.......
sivu 69
43
Altre possibilità..................................................................... pagina 48
Aspetti del sistema....................................................................... pagina 49
Informazioni addizionali
Dati tecnici................................................................................. pagine 72-74
Andre muligheder
System aspekter.............................................................................sider 56-57
Yderligere informationer................................................................... side 57
Tekniske data................................................................................ sider 72-74
Andra möjligheter....................................................................... sidorna 62-63
Systemaspekter..........................................................................sidorna 63-64
Mera information
Tekniska data.............................................................................sidorna 72-74
Muita mahdollisuuksia
Järjestelmän toiminnot.................................................................... sivut 70-71
Muuta tietoa.................................................................................. sivu 71
Tekniset tiedot............................................................................... sivut 72-74
...............................................................
..........................................................................
............................................................................
....................................................................
pagina 50
sider 55-56
sida 64
sivut 69-70
Q
CO
(O
O
c
re
U)
c
re
re
<A
C
re
>
E
o
3
INSTALLATION
Thank you for selecting the Philips CDC 925 Compact
Disc Changer.
A Compact Disc Changer of the state-of-the-art Philips 900
series, the CDC 925 combines supreme playback quality
vi/ith a high degree of user-friendliness by offering the
following possibilities;
- changing CDs during play;
- quick access to a particular CD by means of QUICK PLAY;
- storing 30 tracks from different CDs in any desired order
in the changer memory;
- storing the required recording time and playing time in the
EDIT mode;
- full integration in ESI remote-controllable HiFi systems of
the Philips 900 series.
ACCESSORIES
With this changer are supplied;
- a connection cable (ANALOG OUT);
- a remote control;
- batteries for the remote control.
POWER SUPPLY SETTING
Check that the type plate on the rear of your changer
indicates the correct supply voltage.
If your mains supply voltage is different, consult your dealer
or our Service Organisation.
Certain versions of this changer are equipped with a voltage
selector (5), which enables you to set the changer to the
correct mains voltage yourself. When changing the voltage
setting, it is also necessary to change the mains fuse (4) to one
of the correct rating; T200 mA (slow-blow fuse) for 110/127 V;
T100 mA (slow-blow fuse) for 220 V - 230 V/ 230 V - 240 V.
FITTING A MAINS PLUG (U.K. only)
This apparatus is fitted with an approved moulded 13 Amp plug.
To change a fuse in this type of plug proceed as follows;
• Remove fuse cover and fuse.
• Fix new fuse which should be a BS1362 5A, A.S.T.A. or
BSI approved type.
• Refit the fuse cover.
If the fitted plug is not suitable for your socket outlets, it should
be cut off and an appropriate plug fitted in its place.
If the mains plug contains a fuse, this should have a value of 5A.
If a plug without a fuse is used, the fuse at the distribution board
should not be greater than 5A.
NOTE: The severed plug must be destroyed to avoid a possible
shock hazard should it be inserted into a ISA socket elsewhere,
HOW TO CONNECT A PLUG
isThe wires in the mains lead are coloured in accordance with
the following code; BLUE - 'NEUTRAL' ('N') BROWN - 'LIVE' CL')
• The BLUE wire must be connected to the terminal which is
marked with the letter 'N' or coloured BLACK.
• The BROWN wire must be connected to the terminal which
is marked with the letter 'L' or coloured RED.
• Do not connect either wires to the earth terminal in the plug
which is marked by the letter 'E' or by the safety earth
symbol or coloured green or green-and-yellow.
Before replacing the plug cover, make certain that the cord
grip is clamped over the sheath of the lead - not simply over
the two wires.
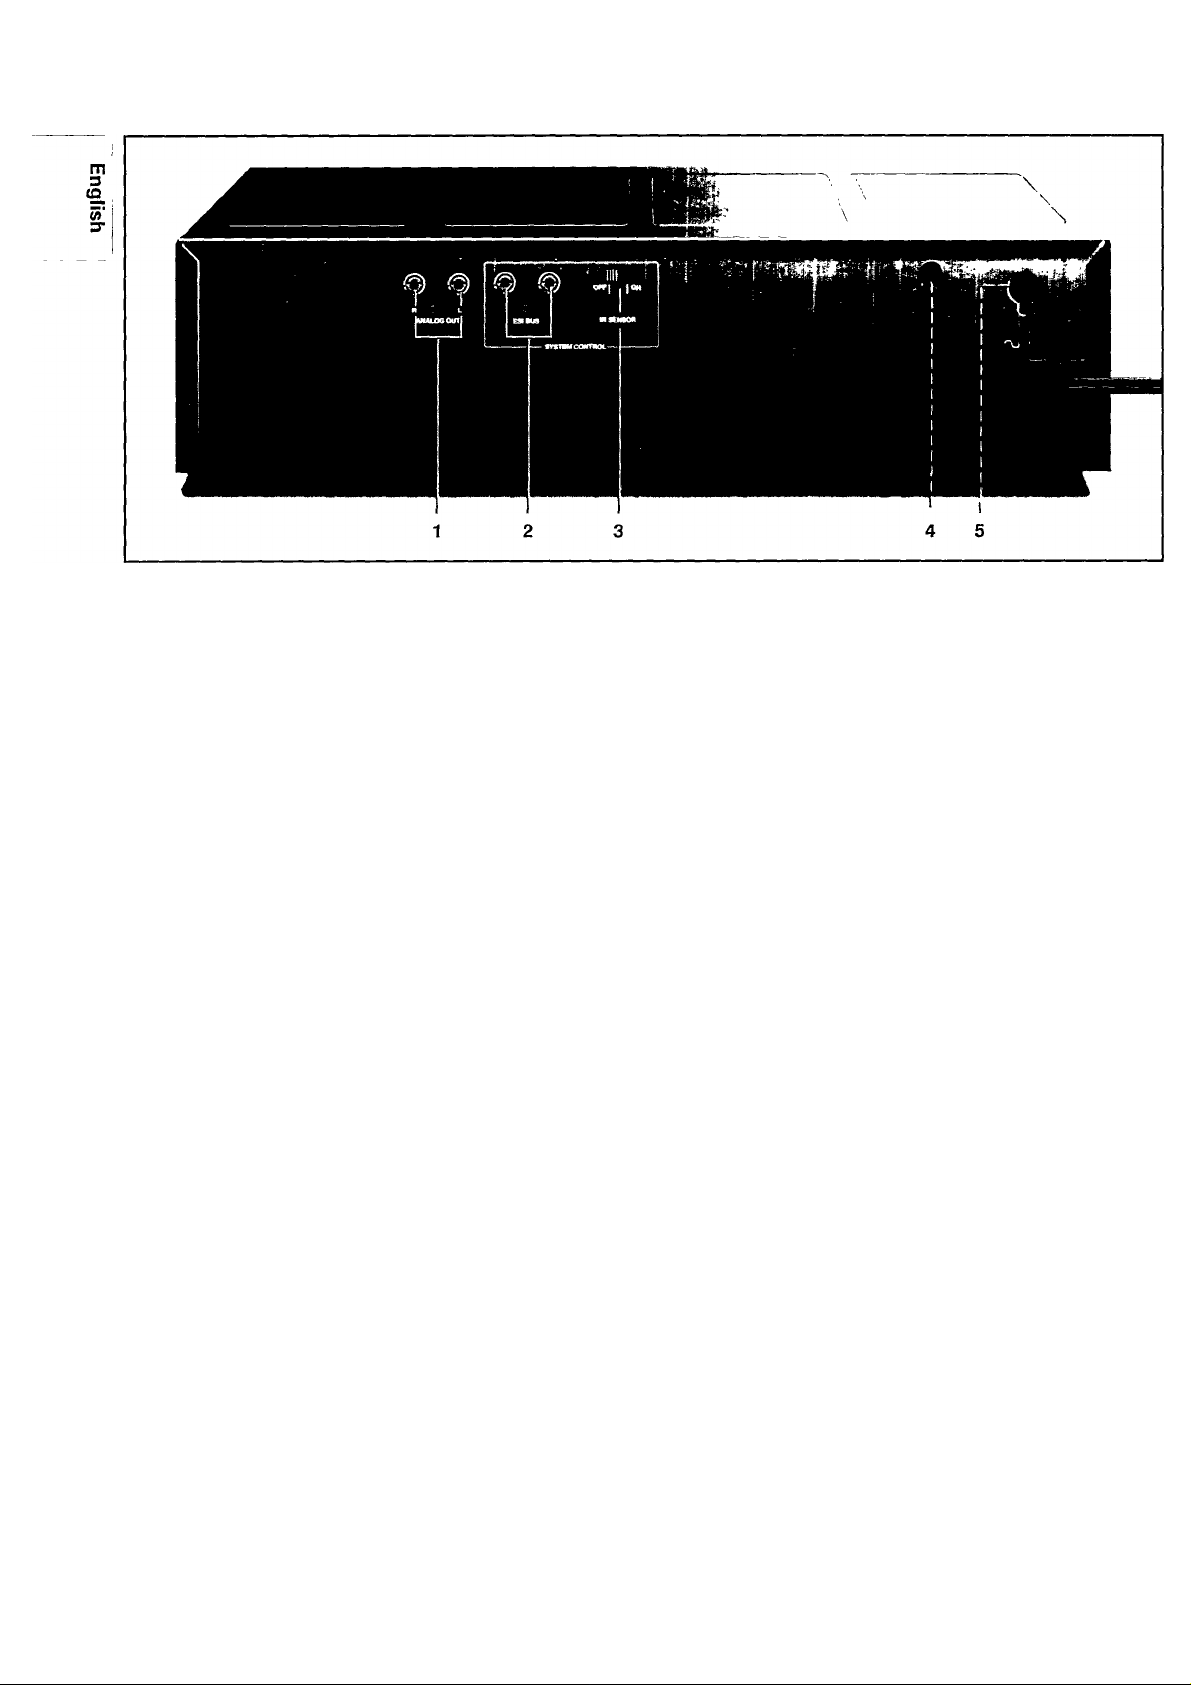
CONNECTIONS
1 ANALOG OUT
For the connecting cable to the amplifier.
• Insert a red plug into the 'R' socket and the other plug into
the 'L' socket.
• Insert the two other plugs into the corresponding sockets of
the CD or AUX input of your amplifier.
You can also use the TUNER or TAPE IN connection, but
never the PHONO input!
2 ESI BUS (Enhanced System Intelligence)
For connecting up the equipment when you are incorpo
rating the changer in a HiFi system with ESI BUS
connection (e.g. the PHILIPS 900 series) or its own remote
control system.
3 IR SENSOR OFF ON
Switching the l(nfra) R(ed) SENSOR on and off.
IMPORTANT!
When the changer is incorporated in a HiFi system with ESI
BUS connection, this switch should always be in the OFF
position.
When the changer is not incorporated in a HiFi system with
ESI BUS connection, the switch should be in the ON position.
When switching the IR SENSOR on and off, the CD changer
should always be switched off.

34
9 1011 12 13 14 15 1718 19 20
OPERATION @)
O)
c
' m
4 Mains fuse holder (not all versions)
See 'Power supply setting'.
5 Voltage selector (not all versions)
See 'Power supply setting'.
FRONT OF PLAYER
1 POWER STANDBY/OFF - Switching on and off.
2 0-9 digit buttons
- Selecting another track during play.
- Selecting a track to start play with.
- Selecting tracks when compiling a programme.
- Selecting the recording time when making a tape recording
(EDIT),
- Selecting the playing time in the TIMER EDIT mode.
3 P(rogramme) - Opening and closing the memory when
compiling a programme.
4 C(ancel) - Erasing track numbers from a programme. 5 Display - informs you about the functioning of the player. 6 DISC SELECT
- Selecting another CD during play.
- Selecting a CD to start play with.
- Selecting CDs when compiling a programme.
The DISC button on the remote control has the same
function.
7 OPEN/CLOSE - Opening and closing the CD compartment.
8 l(nfra) R(ed) SENSOR- Receives the signals from the
remote control.
9 REVIEW - Checking a programme.
10 SHUFFLE - Playing in random order.
11 SCAN - Automatically playing the beginning of each track.
12 !◄ TRACK ►!
- Selecting another track during play.
- Selecting a track to start play with.
- Selecting the recording time when making a tape recording
(EDIT),
- Selecting the playing time in the TIMER EDIT mode.
The PREV (= !◄ TRACK) and NEXT (= TRACK ►!) buttons
on the remote control have the same function.
13 STOP/CP
- Stopping play,
- Erasing a programme (CP = Clear Programme).
14 PLAY/REPLAY
- Starting play.
- Returning to the beginning of a track.
15 PAUSE - Interrupting play.
16 ◄◄ SEARCH ►► - Fast search to a particular passage
during play.
17 EDIT
- Entering the recording time when making a tape recording.
- Entering the playing time in the TIMER EDIT mode.
18 TIME - Selecting the time information you want to see.
19 REPEAT - Repeating play.
20 PHONES - Connecting headphones.
21 LEVEL - Adjusting the volume when listening with head
phones.
22 QUICK PLAY - Immediate playing of a particular CD.
23 LOAD - Rotating the turntable in the CD compartment
when inserting CDs.
 Loading...