

Page 1

^ OlOnVVVXIOlO
о Z>Z>^ /
О wiioiaÊ jT
% „
® ОЭ »0
niil^ S ■lli.'^ D 0 0 0
a30i\ivHO lasnoavo ao oaaiA m¿¿ эао
J
Page 2

Page 3

SAFETY PRECAUTION
Only a qualified service person should remove the cover or
attempt to service this device.
Caution: Use of controls or adjustments other than those
specified herein may resuit in hazardous radiation exposure or
other unsafe operation.
CLASS1 LASER PRODUCT
KLASSE 1 LASER PRODUKT
I.H.T. lEC 825
English«.«■»■•■m......... page4
CD Frangais
CD Español.
® 4'S
....................... I..... page 18
I página 32
x:
ÜÍ
O)
c
Ul
fO
o
c
2
u.
o
tc
m
a.
m
lU
-e-
Page 4

CONTENTS
INTRODUCTION
(O
m
3
INTRODUCTION..............................................................4
INSTALLATION...............................................................5
POWER SUPPLY SETTING........................................................5
SITTING THE COMPACT DISC CHANGER
CONNECTIONS...........................................................................5
CONNECTING HEADPHONES...................................................5
CONNECTING MICROPHONES.................................................5
FUNCTION OVERVIEW
FRONT OF CHANGER................................................................6
REMOTE CONTROL
DISPLAY......................................................................................8
PLAYBACK (PLAY^)
Playing a Video CD with PBC:...................................................9
INSERTING THE CDs
SEARCHING FOR PARTICULAR SCENE (SCENE)
PLAYBACK (PLAY^)
SELECTING ANOTHER TRACK DURING PU\Y
(N^ ►►!)
SELECTING ANOTHER CD DURING PLAY
(DISC SELECT)
SEARCHING FOR A PASSAGE DURING PLAY
...............................................................................
.....................................................................
..................................................
...................................................................
......................................................
.................................................................
....................................................
...............................
..................
5
6
7
9
9
9
10
10
10
Thank you for selecting the Philips CDC 771V Video CD
CAROUSEL CHANGER
A Compact Disc Changer of the state-of-the-art Philips 700
series, the CDC 771V combines supreme playback quality
with a high degree of user-friendliness by offering the follow
ing possibilities:
- changing CDs during play;
- quick access to a particular CD by means of QUICK
PLAY;
- storing 30 tracks from different CDs in any desired order in
the changer memory;
- storing the required recording time and playing time in the
EDIT mode.
Note!
This Video-CD player can playback the VideoCD(VCD), Audio-CD, CD-Graphics and CD-I Digital
Video disc (only for the MPEG Video part).
Video CD disc contains the moving picture and
high quality level of Audio. Maximum playback time
_n COMPACT
m
is 74 min by Digital compression technology. Video
CD are being used for Audio, Karaoke, Movie,
Education & information etc.
CD-Graphics disc contains the Still picture and CD
Audio. CD-G are being used mainly for karaoke
application.
[DGnALVIOeDl
mm
DiCITAL AUDIO
I GRAPHCS I
Note!
PLAYING A NORMAL PL^Y^^^^ ►)
SEARCHING FOR A PASSAGE USING AN INDEX +/-... 10
STARTING WITH A PARTICULAR CD (DISC SELECT) .. 10
STARTING WITH A PARTICULAR TRACK
(DISC SELECT, \« and PLAY ►)..............................................10
SCANNING CDs (SCAN)..........................................................11
PLAYING IN RANDOM ORDER (SHUFFLE)...........................11
.....................
10
DICITAL AUDIO
117/17 version player can not playback CD-
Graphics disc.
AUDIO CD
PLAYBACK (PLAY^).....................................................1l‘
CALLING UP INFORMATION ON THE DISPLAY (TIME) 11
REPEATING PLAY (REPEAT)
PLAYBACK (PLAY^)
SEARCHING THE LOUDEST PASSAGE
(PEAK SEARCH) only for audio CD/CD-G
.................................................
....................................................
.............................
11
12
12
PROGRAMMING...........................................................13
PLAYING THE PROGRAMME (PLAY ►)
STORING A PROGRAMME (PROGRAM)
ERASING A PROGRAMME (STOP L or OPEN/CLOSE). 13
................................
................................
13
13
EDIT...............................................................................14
BEFORE RECORDING
RECORDING..............................................................................14
KARAOKE MODE
VOCAL FADER/MULTIPLEX
CHANGING THE KEY (KEY CONTROL [> #)
.............................................................
.....................................................................
....................................................
..........................
14
15
15
15
ADDITIONAL INFORMATION.......................................16
STANDBY
MAINTENANCE.........................................................................16
RECYCLING
TECHNICAL DATA....................................................................16
..................................................................................
..............................................................................
16
16
CD-I Digital Video Disc
Interactive
Note!
This player conforms to Ver.1.1 and Ver. 2.0 of VIDEO CD
standards. You can enjoy two kinds of playback according to
the discs.
Disc type
VIDEO CDs without PBC play
(Ver.1.1 discs)
VIDEO CDs with PBC play
(Ver.2.0 discs)
You can
Enjoy video playback (moving
pictures) as well as music.
Play interactive software using
menu screens displayed on
the monitor screen, in addition
to the video playback
function of Ver. 1.1 discs.
Note!
/17 version player can not conform to CD-Graphics disc.
TROUBLESHOOTING...................................................17
-'r-y- •'
Page 5
INSTALLATION
x:
.2
ro
c
U1
POWER SUPPLY SETTING
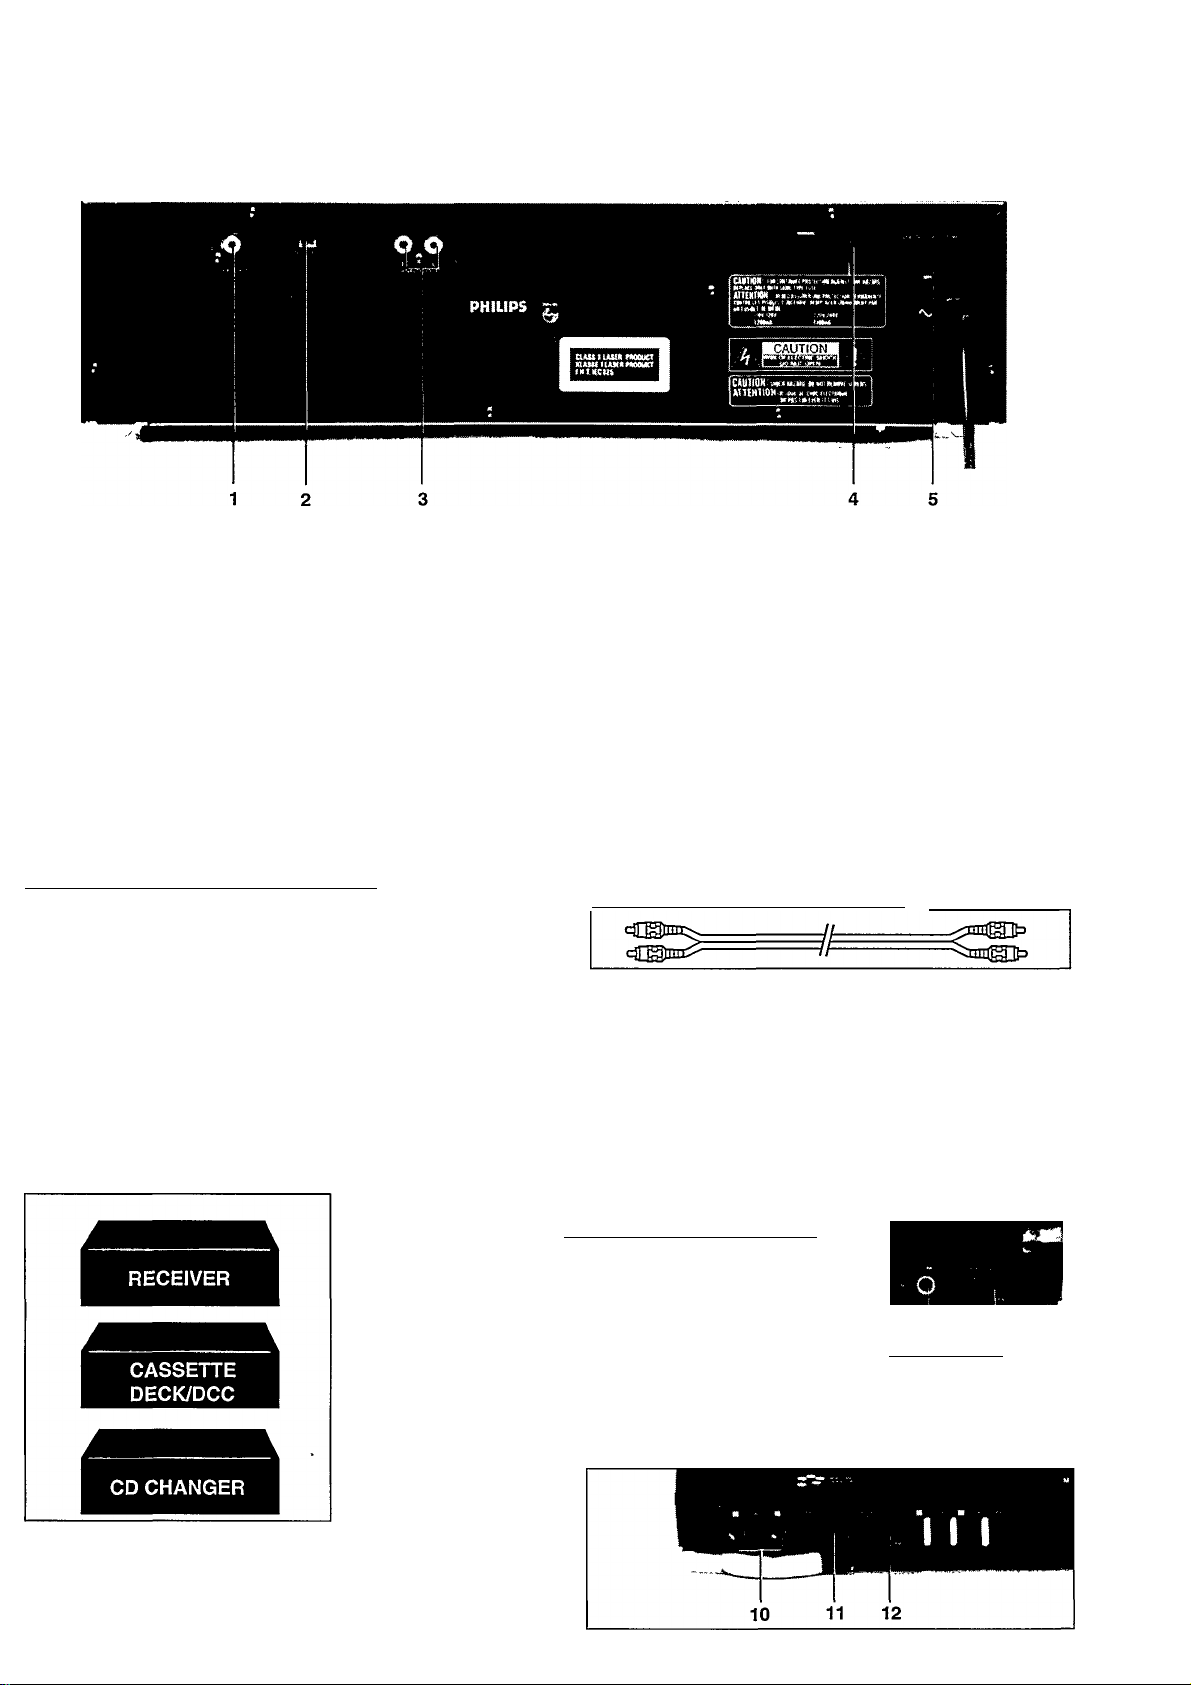
• Check that the type plate on the rear of your changer
indicates the correct supply voltage.
• If your mains supply voltage is different, consult your
dealer or our Service Organisation.
Certain versions of this changer are equipped with a voltage
selector 5, which enables you to set the player to the correct
mains voltage yourself. When changing the voltage setting, it
is also necessary to change the mains fuse 4 to one of the
correct rating: T250 mA (slow blow fuse) for 110/120 V,
T125mA (slow blow fuse) for 220/240V.
SITTING THE COMPACT DISC CHANGER
_______________
Free standing
• Always position the changer horizontally on a flat, firm
surface.
• Allow a free space of at least 3 cm above the changer so
as not to interfere with the cooling of the changer.
In an audio rack
• The changer can be sited in any desired position.
Stacked
• Site the changer preferably at the bottom or at the top.
• Never position the changer directly on top of a high-power
amplifier, as such an amplifier gives off a substantial
amount of heat.
CONNECTIONS
VIDEO OUT
For connecting to the Video terminal of the TV, VCR, or AV
amplifier.
Wever connect this jack to the Audio input/output or
Digital input/output.
NTSC/PAL
Set the color TV system switch to the proper position,
NTSC or PAL, according to your TV. Make sure only to
change the setting when the changer is in the power off.
ANALOG OUT
For the connecting to the TV or amplifier.
• Insert a red plug into the ‘R’ socket and the other plug into
the ‘L’ socket.
• Insert the two other plugs into the corresponding sockets
of the CD or AUX input of your amplifier.
You can also use the TUNER or TAPE IN connection, but
never the PHONO input!
4 Mains fuse holder (not all versions)
See 'POWER SUPPLY SETTING’.
5 Voltage selector (not all versions)
See ‘POWER SUPPLY SETTING’.
CONNECTING HEADPHONES
• Connect headphones with a 6.3
mm plug to the PHONES socket 17.
• The sound level is adjusted with
the LEVEL control 18.
CONNECTING MICROPHONES
Connect the microphone(s) with a 6.3 min plug to the MIC
jack 10.
The microphone level is adjusted with the MIC LEVEL 11.
The strength of echo is adjusted with the DIGITAL ECH012.
I 17 18
Page 6

FUNCTION OVERVIEW
m
3
(Û
w*
3*
PHILIPS
L»
10
FRONT OF CHANGER
1 POWER
Switching on and off.
2 DISC SELECT
- Selecting another CD during play.
- Selecting a CD to start play with.
- Selecting CDs when compiling a program.
3a PROGRAM
Opening and storing the memory when compiling a
program,
b SCAN
Automatically playing the beginning of each track
MENU-
Decreasing item number in the menu PBC.
c EDIT
Activating the EDIT function when making a tape recording.
MENU +
Increasing item number in the menu of PBC.
d P(eak)-SEARCH
Searching the loudest passage (peak) on a disc or in a
program when making a tape recording (only for Audio CD/
CD-Graphics).
RETURN
Going back to the preceding menu of PBC.
e TIME
Selecting the information you want to see on the display.
Display
Informs you about the functioning of the player.
I(nfra) R(ed) SENSOR
Receives the signals from the remote control.
PAUSE II
Interrupting play and the picture is frozen except Audio CD.
7 SHUFFLE
Playing in random order.
8 STOPb
- Stopping play.
- Erasing a programme.
9 PLAY^
- Starting play
- Returning to the beginning of a track. ^
SELECT
Selecting the desired item in the menu of PBC.
10 MIC
Connecting microphones.
11 MIC LEVEL
Adjusting the microphones volume.
11 12 13 14
11 I
9
J
___
|_
L
I
15
12 DIGITAL ECHO
Adjusting the strength of echo.
13 KEY CONTROL
Changing the key to suit your vocal range.
14 V(ocal)-FADER/MPX (multiplex)
Selecting audio mode for playing Karaoke.
15 REPEAT
Repeating play.
16
- Selecting another track during play.
- Selecting a track to start play with.
- Selecting tracks when compiling a programme.
- Fast search to a particular passage during play.
- Selecting the recording mode when making a tape record
ing.
- Selecting the recording time when making a tape recording
PREV/NEXT
- Seeing the preceding page of the menu of PBC.
- Seeing the next page of the menu of PBC
17PHONES
Connecting headphones.
18 LEVEL
Adjusting the volume when listening with headphones,
19 OPEN/CLOSE
Opening and closing the CD compartment.
20 QUICK PLAY
Immediate playing of a particular CD.
21 LOAD
Rotating the turntable in the CD compartment when
inserting CDs.
I I I I
17 16 18 19
Page 7
FUNCTION OVERVIEW
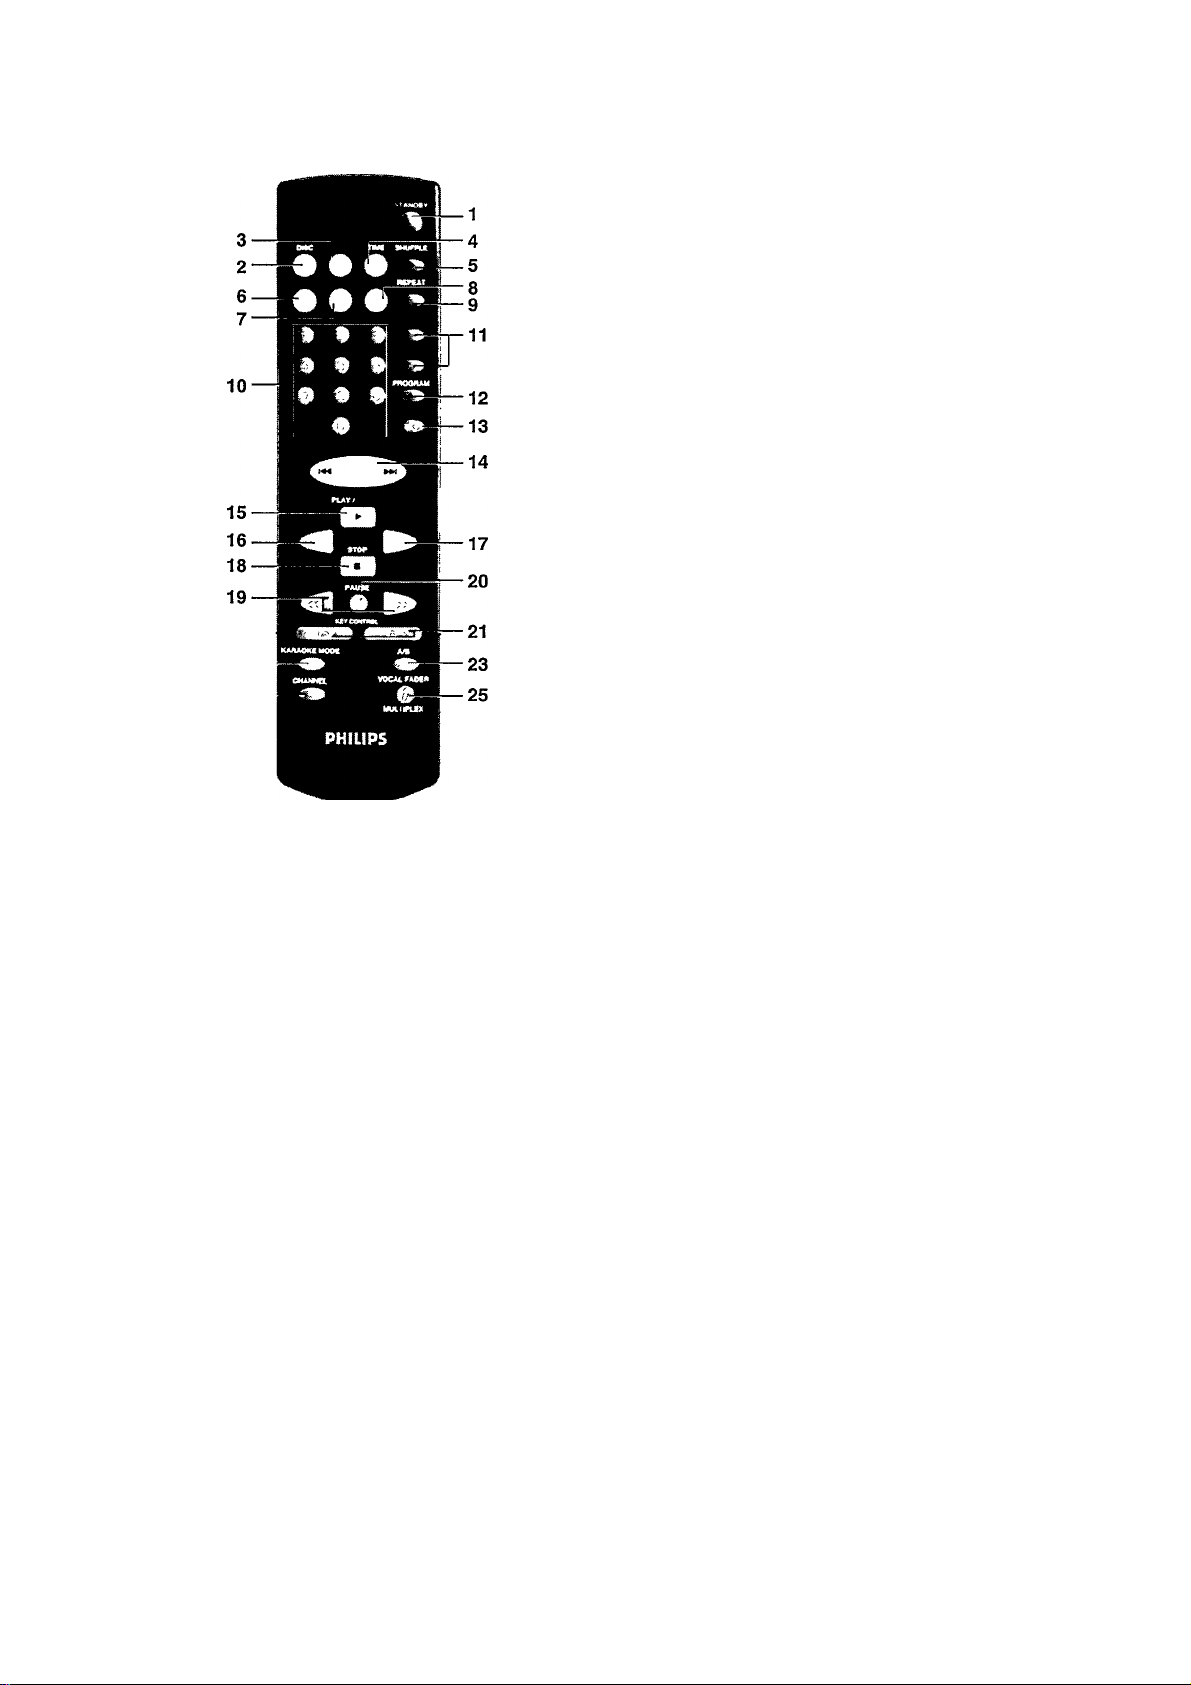
REMOTE CONTROL
+
'
--------
2X1.5V
R03/UM4/AAA
22 —
10 0-9 digit keys
- Selecting another track during play.
- Selecting a track to start play with.
- Entering a scene number when playing start with the
scene number.
- Selecting tracks when reserving a program in Karaoke
mode.
11 INDEX
Selecting an index during play (only for indexed discs).
12 PROGRAM
Opening and storing the memory for compiling a program.
13 RETURN ( (Tm ) [PBC]
Opening and storing the memory for compiling a program.
14
- Selecting another track during play.
- Selecting a track to start play with.
- Selecting tracks when compiling a program.
- Cancelling the previous reserved track when reserving a
Karaoke program in stop mode.
PREV [PBC]
Seeing the preceding page of the menu.
- Selecting another track during play.
- Selecting a track to start play with.
- Selecting tracks when compiling a program.
- Canceling current playing track during Karaoke play.
NEXT [PBC]
Seeing the next page of the menu.
x:
TO
c
Ul
1 STANDBY
Switching the changer to standby mode.
2 DISC
- Selecting another CD during play.
~ Selecting a CD to start play with.
" Selecting CDs when compiling a program or when
reserving a program in Karaoke mode.
3 PBC (Playback Control)
Selecting playback with PBC or playback without PBC.
4 TIME
Selecting the time information you want to see.
5 SHUFFLE
Playing in random order.
6 SHUTTER
Playing still picture in succession without sound.
7 SCENE [PBC]
Playing start with designated scene number.
8 OSD (On Screen Display)
Switching the OSD on and off. and display off the scene
number when playback with PBC.
9 REPEAT
Repeating play.
15 ► PLAY
- Starting play.
- Restarting current track during play.
SELECT [PBC]
Selecting the desired item in the menu.
16 RESUME
Piaying from where you have stopped:
If you stop CD play by pressing the STOP ■ button,
always the last played position will be stored.
NOTE!
- In case you rotate the turntable or turn the power off, the
information about the position last played gets lost.
- Resume play does not conform to CD-I discs.
17 SLOW
Playing in slow motion without sound.
NOTE!
Slow motion does not conform to CD-I discs and Audio discs.
18 «STOP
- Stopping play.
- Erasing a program.
19
Fast search to a particular passage during play.
20 II PAUSE
Interrupting play and the picture is frozen except Audio
CD.
21 KEY CONTROL }> #
Changing the key to suit your vocal range.
Page 8

FUNCTION OVERVIEW
22 KARAOKE MODE
m
3
IQ
W
3
Selecting Karaoke mode or normal mode.
23 A/B
"
Playing repeatedly a desired passage.
24 CHANNEL
This function does not work for this changer.
25 / VOCAL FADER/MULTIPLEX
Selecting audio mode for playing Karaoke.
The life of the batteries of the remote control is around one
year.
For replacement only use batteries of the type R03, UM3 or
AAA.
DISPLAY
(«O
TRACK PEAK TOT REM TRACK TIME
IJJ CO CD CO- C0
LN U3. LN LS- LN
I PROGRAM I
CO - Lights up when the changer receives a command
from the remote control, and the changer is at STANDBY
mode.
1-5 CD number indicator
- Lights up when you switch the changer on.
- Indicates the number of CDs in the CD compartment.
- Indicates what CD is being played (CD number flashes),
I PROGRAM I
- Flashes when a programme is being compiled.
- Lights up when a programme is being played,
TRACK -Indicates:
- Which track is being played;
- the number of tracks on a CD or in a programme.
PEAK
- Flashes when the loudest passage (peak) on a CD or in a
programme is being searched.
- Lights up when the loudest passage (peak) has been
found.
TRACKTIME - Indicates the elapsed playing time of the track
being played.
REM(aining) TRACKTIME - Indicates the remaining playing
time of the track being played.
TOT(al) REM(aining) TIME - Indicates the remaining playing
time of a CD.
TOT(al) TIME - Indicates the total playing time of a CD
SHUFFLE - Lights up when the tracks are played in random
order.
VIDEO CD - Lights up when a video CD is being played
CD-I - Lights up when a CD-I disc is being played.
PAUSE - Play is interrupted.
REPEAT 1 - Lights up when you repeat a track.
REPEAT DISC - Lights up when you repeat a CD.
REPEAT - Lights up when you repeat all CDs or a programme
from them.
SHUFFLE VIDEO CD-I PAUSE REPE.AT1 DISC
Display messages:
PJ^[^ - Lights up when the changer plays video CD with PBC.
PPP]] - Lights up when a CD’s contents list is being
scanned.
N0 HI5E ■ Lights up when there are no CDs in the CD
compartment.
NOT P055IIBL0 ■ Lights up when insert an incorrect CD
(CD-ROM).
NRONO TRPO-' - Lights up when you select a non
existent track number.
NRONO J1I50 ~ Lights up when you select a non-existent
CD number.
OELOOT moo ~ Lights up when you try to activate a
function for which you must first select a CD number.
ENOORT JII5E ~ Lights up when you give a play
command while the CD compartment is empty.
00 TO PLF?y ~ Lights up if you try to activate a function
for which you must first start play.
PIJ JjJ EJPP - Lights up if you try to activate a function
for which you must first stop play.
p]]IT ~ Lights up when the changer is put into the EDIT
mode.
Page 9
PLAYBACK (PLAY^)
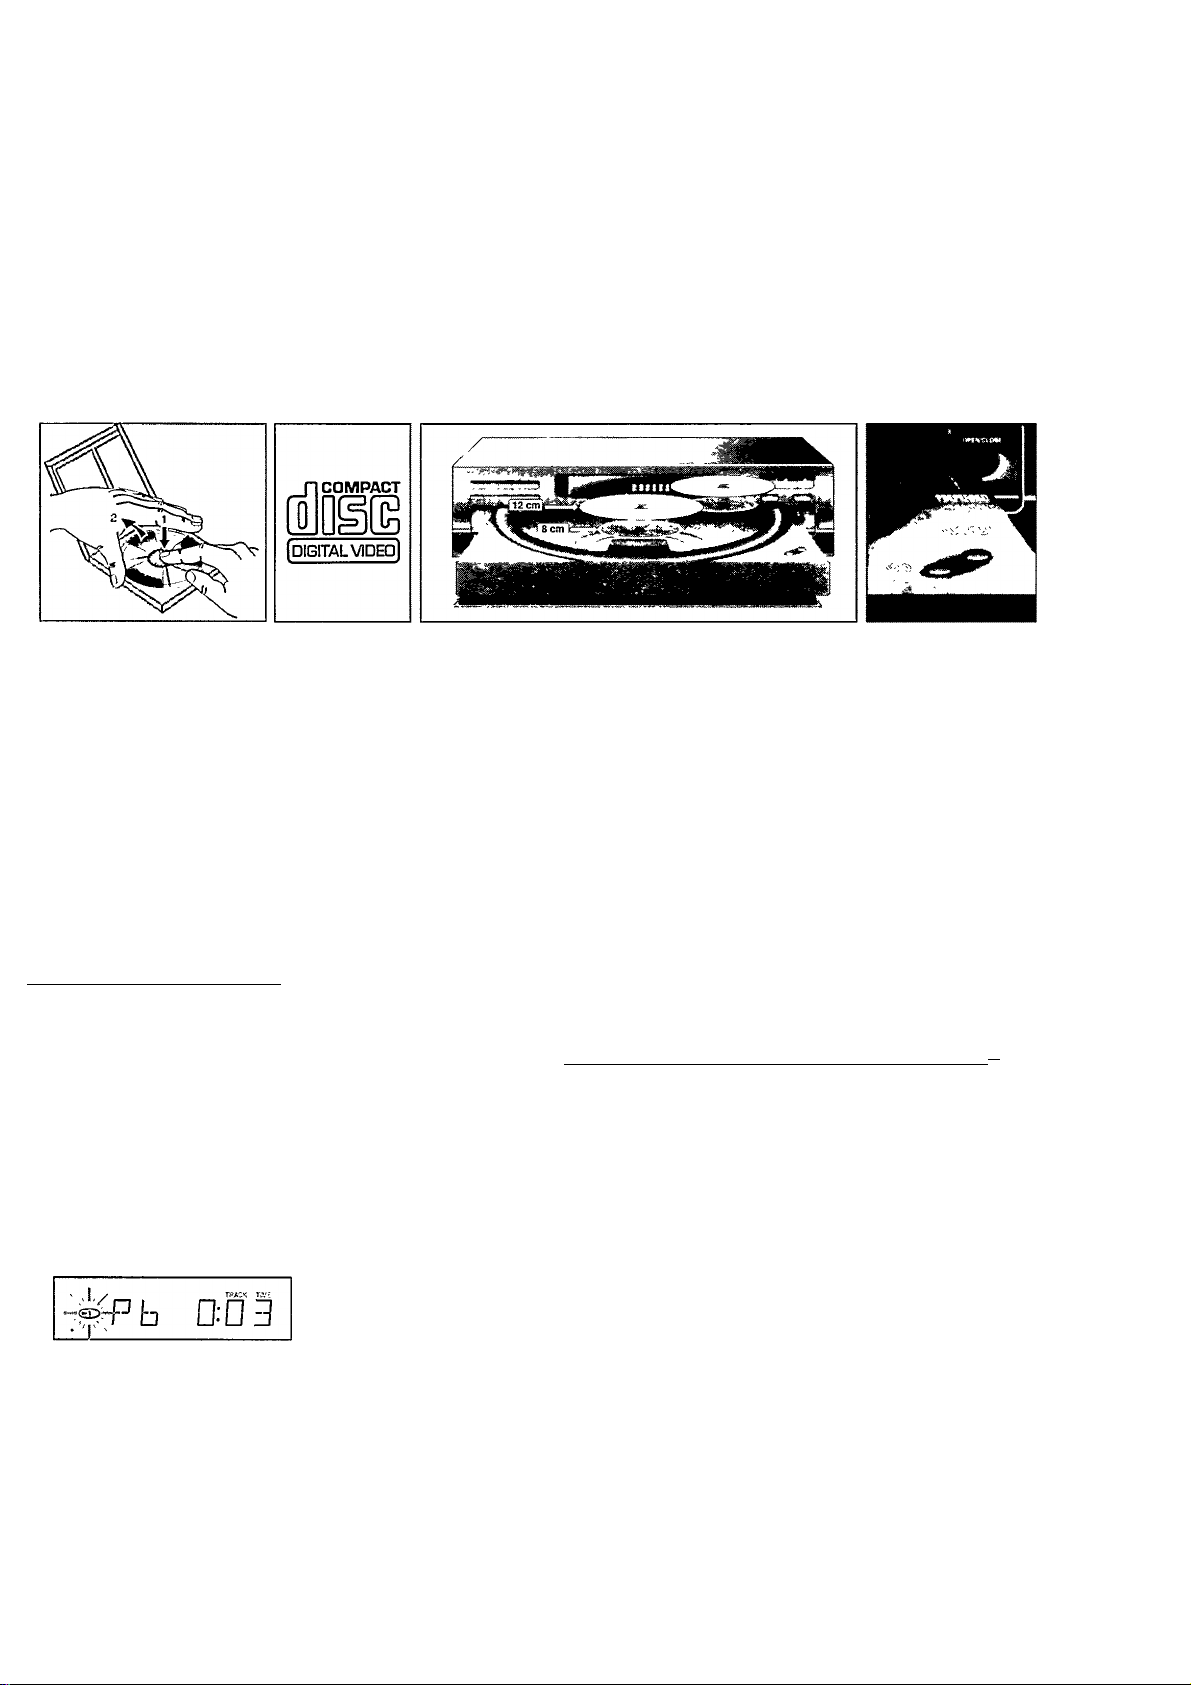
INSERTING THE CDs
NOTES! On CD-I discs, the changer activate only'
PLAY" In following explanation.
Press POWER1 to switch the changer on
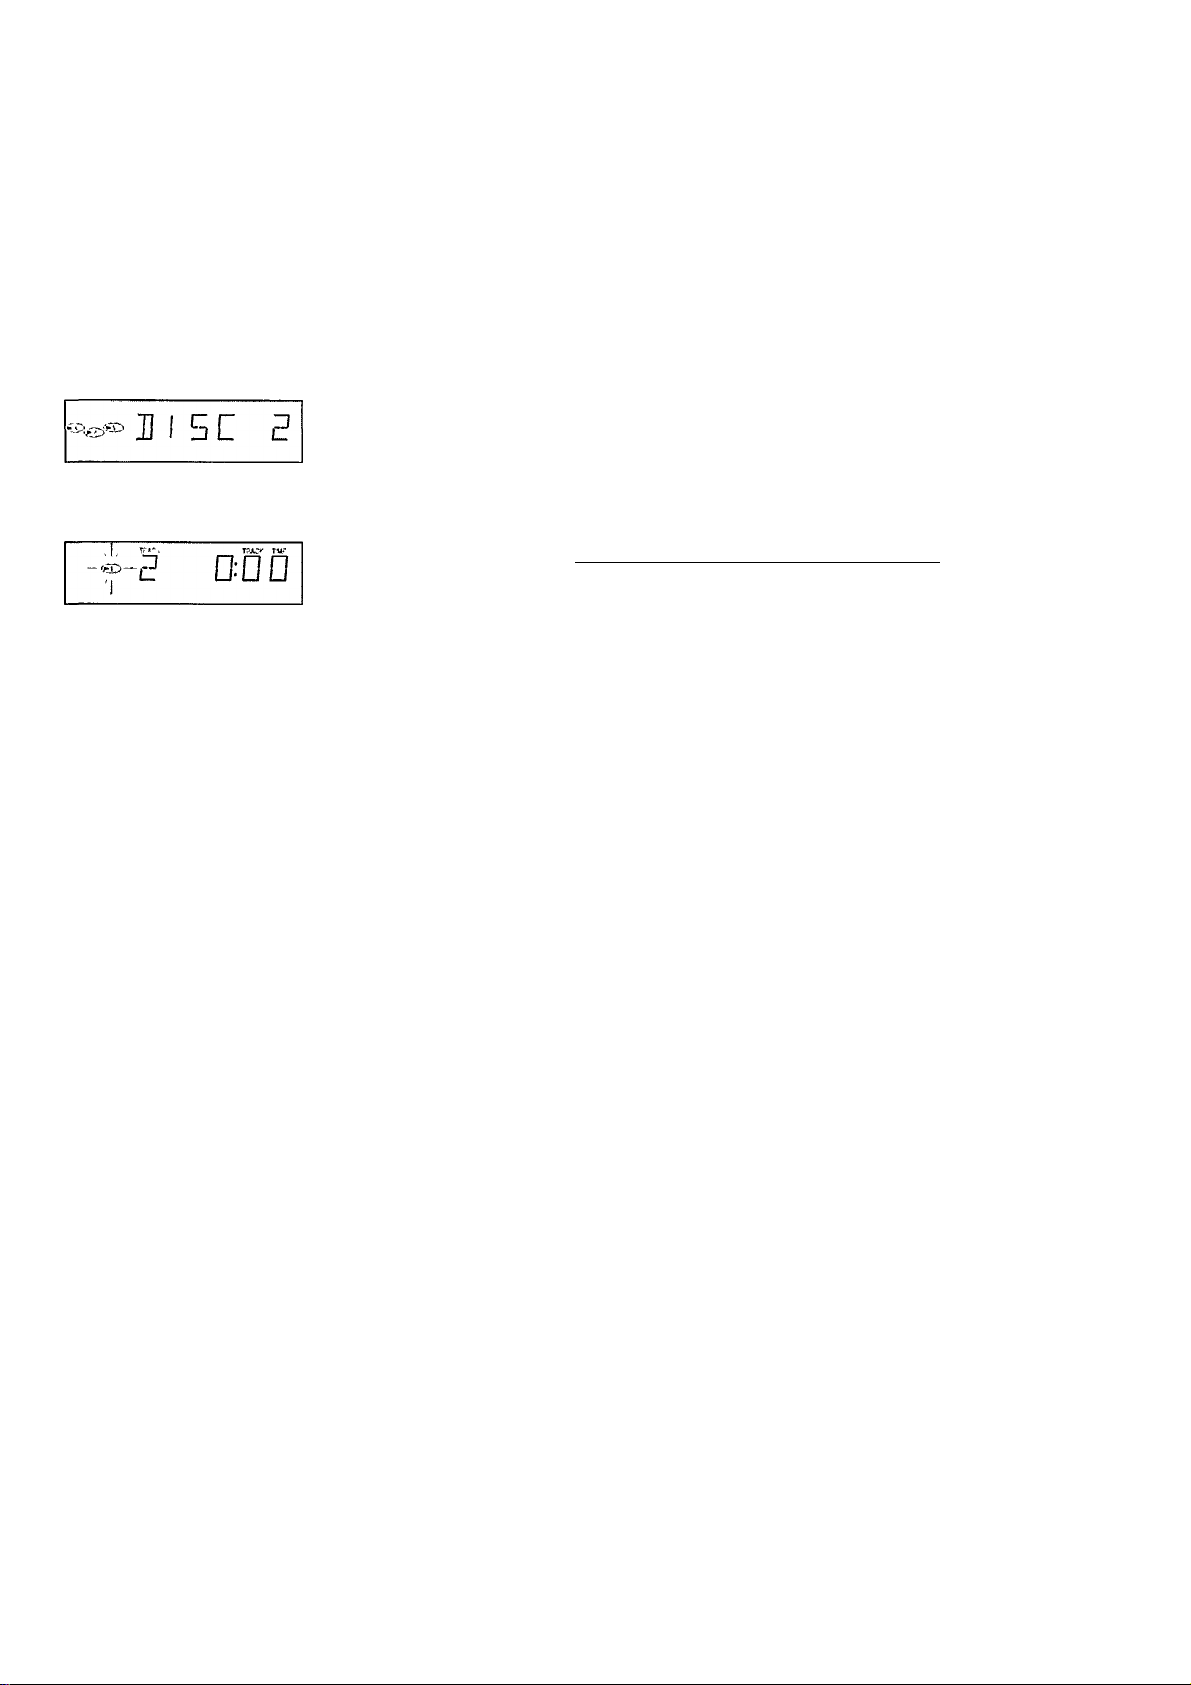
The changer vi/ill now' start CD detection to check how many CDs there are in the CD compartment. The turntable will
rotate slowly until all positions (1-5) in the CD compartment have been checked.
The position which is being checked is always shown on the display III5C x.
After CD detection the 1-5 CD number indicator will show the number of CDs in the CD compartment.
Open the CD compartment by pressing OPEN/CLOSE 19.
OPEN lights up.
Insert an audio CD, or Video CD or CD-G, printed side up, use the LOAD button 21 to rotate the turntable in the CD
compartment.
• Close the compartment by pressing OPEN/CLOSE 19.
- CLOSE lights up. The changer will start CD detection again.
NORMAL PLAYBACK" and “SEARCHING FOR A PASSAGE DURING
NOTES!
- CD detection may never be interrupted. If, during detection, you press any button, then the changer will stop detection
and the display will give an incorrect indication of the number of CDs in the CD compartment.
- Always remove all CDs from the CD compartment if you want to transport the changer.
JC
.2
lU
O)
c
When the Video CD disc with PBC operation is played the
operation of the "Menu Play" & "Still Picture" can be pleasure.
The "Menu Play" is the interactive operation displaying the
information on the Monitor Screen.
Playing a Video CD with PBC:________________________
Following are operations for Video CD with PBC disc. The
player detects PBC disc, then change to "MENU play"
automatically. If you wish normal (continuous) play with PBC
disc, press PBC, KARAOKE, STANDBY, DISC, to cancel the
PBC mode.
To resume playback with PBC, press PBC key of the remote
control.
- Turn on the TV and select the video input. Insert a Video
CD with PBC disc, printed side up.
- The display shows the number of the current CD.
• Press PLAY ► 9 to start Video CD play and the menu
screen appears on the TV screen.
• Select the desired item in the menu screen with DSC •
MENU+3C and MENU-3b then press SELECT 9 or with
numeric keys of the remote control.
Adjust the volume on the TV.
NOTE!
Menu structure depends on Video CD software. Refer to the
instructions supplied with the disc.
The other menu control;
• You can see the next page of the menu by pressing NEXT
16.
• You can see the preceding page of the menu by pressing
PREV16.
• You can go back to the preceding menu by pressing
RETURN 3d shortly or by pressing <5« RETURN 13 on the
remote control.
SEARCHING FOR PARTICULAR SCENE (SCENE)
The scene number are encoded on Video CD with PBC disc,
you can check the scene number by using OSD full informa
tion mode.
If you remember the number of particular scene, you can play
the Video CD start with the scene, (scene search)
• Press SCENE 7 on the remote control before or during
playback.
• Then enter the scene number by using 0-9 digit keys 10 of
the remote control.
• Press ► PLAY 15 of the remote control, play starts from the
entered scene.
* •
NOTES!
- On some discs, prohibited to start with specific scene. In
this case the changer refuses the entering scene number.
- When there is no change in the display state (of a menu
screen, etc.) for 10 minutes, display is automatically
turned off (switched to a blue background) to prevent
image burn-in due to prolonged display of an unchanging
image.
Page 10

PLAYBACK (PLAY^)
PLAYING A NORMAL PLAYBACK (PLAY ►)
m
3
in
55• *
3
*
The display shows the number of the current CD.
U I 5E E
Press PLAY ► 9 to start playback.
RERU lights up and play starts from the first available CD.
The CD number indicator (1-5) always shows what CD is being played (► x flashes).
The track being played and its elapsed playing time are shown under TRACK and TRACK TIME. See ‘CALLING UP
INFORMATION ON THE DISPLAY' if you wish to see other information on the display.
j - r«A^ ___ rvt.
D-‘3D
Play v/ill stop after all CDs have been played.
Press POWER 1 to switch the changer off.
You can also press PLAY ► 9 immediately after inserting the CDs; the compartment then closes automatically and play
starts from the first available CD.
Use the PREFERRED POSITION in the CD compartment if you wish to insert only one CD and then start play by pressing
the QUICK PLAY button 15. Play will then start immediately with the inserted CD.
You can interrupt playback by pressing PAUSE ii 6, PAUSE then lights up. Press PLAY ► or PAUSE ii to restart.
If you press QUICK PLAY ► during play, the current track will start again from the beginning.
You can stop playback by pressing STOP ■ 8.
If you press OPEN/CLOSE 19 during play, the CD compartment will open while play continues. The three CDs outside
the changer may now be changed without playback being interrupted.
ТЯ«:
D:D3
NOTES!
SELECTING ANOTHER TRACK DURING PLAY ►»!) SEARCHING FOR A PASSAGE USING AN INDEX +/-
Press or 1« 14 {less than 0.5 seconds) until the
desired track number appears under TRACK.
&
В
- The music stops and a moment later the selected track
begins to play.
NRDNB TRREH Lights up when you select a non-existent track
number. You can also select the track by using the ^ 14
button on the remote control
130
SELECTING ANOTHER CD DURING PLAY (DISC SELECT)
• Key in the desired CD number.
- The music stops and a moment later the selected CD
begins to play.
NRDNB M5E lights up if you select a non-existent number.
You can also select the number by using the DISC button 2
on the remote control.
SEARCHING FOR A PASSAGE DURING PLAY (h^ ►»!)
• Hold 14 down to search backwards to the beginning.
• Hold 14 down to search forwards to the end.
The searching speed is determined by how long a key is
pressed:
- the first 2 seconds fairly slowly, with sound;
- then at the maximum speed, with no sound.
If you reach the end of the last track and release ►►), play will
resume a few seconds before the end of the CD. You can
search for a passage by using the 19 button on the
remote control.
You can locate a particular point in a track during play, (only
for indexed discs).
• Press INDEX +/- repeatedly, until you find the point during
play.
NOTE!
Index is a number that divides a track or a disc into some
sections.
STARTING WITH A PARTICULAR CD (DISC SELECT)
• Key in the required CD number.
- If the CD compartment was open, it will now close
- Play starts from the selected CD.
NRDNB UI5E lights up if you select a non-existent number.
You can also select the number by using the DISC button 2 on
the remote control.
STARTING WITH A PARTICULAR TRACK
(DISC SELECT. 1« and PLAY ►)
• First select the number of the required CD using DISC
SELECT2 or DISC 2 on the remote control.
- If the CD compartment was open, it will now close.
• Then select the (track) number by using or 14
(press less than 0.5 seconds).
• Press PLAY ► 9.
- Play starts from the selected track.
NRDNB TRREK lights up when you select a non-existent
track number.
____________________
10
Page 11

PLAYBACK (PLAY^)
SCANNING CDs (SCAN)
All CDs;
• Press SCAN 3b before or during play,
- If the CD compartment was open, it will now close.
- BERN lights up and the first 10 seconds of each track are
played in turn (starting from the current track).
10 seconds are counted down each time under
REM(aining) TRACK TIME.
TK‘:-( f- <j 7pa:k t-”z
H 0:0B
• When the player reaches a track which you wish to hear in
full, press SCAN again or PLAY ► 9.
One CD:
• The CD-player should be in position STOP.
• Select the number of the required CD using DISC SELECT
2 or DISC 2 (on the remote control).
• Press SCAN 3b, within the time the CD number is
flashing on the display.
- Now only the first 10 seconds of each track on the
selected CD will be played in turn.
PLAYING IN RANDOM ORDER (SHUFFLE)______________
All CDs;
• Press SHUFFLE 7 before or during play.
- If the CD compartment was open, it will now close.
- SHUFFLE lights up and all the tracks are now played in a
random order.
3 0:30
tracks.
• Press SHUFFLE again if you wish to return to normal play.
16, you will select any one of the following- If you press I
NOTE!
If, during play, you open the CD compartment to change CDs
(see “NORMAL PLAYBACK”) then playback in random order
will be cancelled. Playback will stop as soon as the last track
of the current CD has been played (in-normal order).
One CD:
• The CD-player should be in position STOP.
• Select the number of the required CD using DISC SELECT
2 or DISC 2 (on the remote control).
• Press SHUFFLE 7, within the time the CD number is
flashing on the display.
- DISC and SHUFFLE light up; the tracks of the selected CD
will now be played in a random order.
1
If you press 16, you will select any one of the following
tracks.
If you press REPEAT 15 twice, the tracks will be repeated
in a different order each time, although the first track will
always be the same.
When all tracks of the selected CD have been played,
playback stops.
Press SHUFFLE again if you wish to return to normal play.
r:u i7'.Ky r\-
1:0 0
CALLING UP INFORMATION ON THE DISPLAY (TIME) r
In STOP mode:
Text display
- After loading the CDs and closing the CD compartment,
the display shows the number of the CD to be played
(=default display in STOP mode).
U I 5 E 0
During play:
i.Time display
- When you start play (from STOP mode), the display shows
the elapsed playing time of the current track (=default
display in PLAY mode).
tiAT' TIK
0:0 0
Press TIME 3e whenever you want to know the remaining
playing time of the current track (REM TRACK TIME).
■V 1, ' TRACS
3 IE
Press TIME again if you wish to know the remaining
playing time of the entire CD (TOTAL REM TIME).
■ 1 , > TRACS
0:
rsACS TEi£
10
Note - TOTAL REM(aining) TIME indication is not available in
SHUFFLE mode.
¿.Text display
• If you press TIME again, you will switch to text display; the
display shows the number of the current CD.
jJ
50 0
If you wish to know the total playing time of the entire CD
you must go back to STOP mode first and then press
TIME.
The display now shows the number of tracks and the total
playing time of the current CD (TOTAL TIME).
'JC s TOi
I 00:00
REPEATING PLAY (REPEAT)
Repeating a track:
• Press REPEAT 15 before or during playback of the CD.
- REPEAT 1 lights up; the track will now be repeated
continuously.
TP,A5<
j
• Press REPEAT three times to stop the track being re
peated.
Repeating a CD:
• Press REPEAT 15 twice before or during playback of the
CD.
- REPEAT DISC lights up; the CD will now be repeated
continuously.
■SD
1
fSy WAX TiS
0:00
R£?£AT1
PSU TPASi TJZ
0:00
j=
.to
O)
c
Ul
Press REPEAT twice to stop the CD being repeated.
11
Page 12

PLAYBACK (PLAY^)
Repeating all CDs:
• Press REPEAT 15 three times before or during playback.
m
3
- REPEAT lights up; all CDs will now be repeated continu
(Q
w*
3"
ously.
• Press REPEAT again to stop the CDs being repeated.
____
Repeating a specific portion (A/B)
• Press A/B 23 button on the remote control during playback
when you find the starting point to be played repeatedly.
- “R- ” lights up.
• Press A/B button again when you find the ending point to
be played repeatedly with in the track. (If reach the end of
track, the starting point is cancelled.)
- "REPERT" and “R-T lights up; the portion will now be
repeated continuously.
• Press A/B or ► PLAY 15 or ■ STOP 18 to cancel the
portion being repeated.
NOTES!
A/B repeat is not activated in Karaoke mode.
Repeating a track is not possible in SHUFFLE mode or
when a programme is being stored.
When a programme has been stored (for one or more
CDs), then only the programme will be repeated.
SEARCHING THE LOUDEST PASSAGE
(PEAK SEARCH) only for Audio CD/CD-G_______________
• In STOP mode, press PEAK SEARCH 3d.
- SELECT UI5E lights up and PEAK starts flashing.
• Select the number of the required CD using DISC SELECT
2 or DISC 2 (on the remote control).
- The CD will now be scanned for the loudest passage (the
peak).
- The display shows the track being scanned and its
elapsed playing time.
TfWCK ft« TV'V Tift
U:5 5
When the loudest passage has been found it will be
repeated continuously (from 2 seconds before the peak
until 2 seconds after the peak) and PEAK lights up.
You can now adjust the recording level on your recording
device.
You can stop the scan by pressing STOP ■ 8: if you press
PLAY ► 9, the CD will be played from the beginning
NOTES!
When searching for the loudest passage in a programme
(from one or more CDs) there is no need to enter the CD
number(s).
If you wish to record tracks from different CDs you have to
repeat peak search for each CD.
You can interrupt PEAK SEARCH by pressing STOP ■ 8.
12
Page 13

PROGRAMMING
STORING A PROGRAMME (PROGRAM)
By programming the changer you can play up to 30 tracks in any required sequence.
FULL lights up if you exceed the maximum of 30 tracks.
WRONG UI5C lights up if you select a non-existent CD number.
in STOP mode, press PROGRAM 3a to open the memory.
SELECT J1I50 lights up and I PROGRAM I start flashing.
Select the number of the first required CD using DISC SELECT 2 or DISC 2 (on the remote control).
Press 16 or 16 (/ess t/ian 0.5 seconds) until the first track number you wish to programme appears under
TRACK.
Press PROGRAM 3a again
re •-><
‘S)
Q 3D
The track number has now been stored in the changers memory.
Select the other track numbers required and store each track by pressing PROGRAM.
The number of tracks and the playing time of your programme will be shown under TRACK and TOT(al) TIME.
Press STOP ■ to quit the PROGRAM mode.
O)
c
lU
PLAYING THE PROGRAMME (PLAY ►)
• Press PLAY ► 9.
- Playback starts with the first number of the programme.
The PROGRAM 3a and EDIT 3c buttons cannot be used
during programmed play.
Search for a particular passage is only possible within the
track being played.
______________
ERASING A PROGRAMME (STOP ■ or OPEN/CLOSE)
In PLAY mode:
• Press OPEN/CLOSE 19 or STOP ■ 8 (twice).
In STOP mode:
• Press OPEN/CLOSE 19 or STOP ■ 8.
- The programme has now been erased.
13
Page 14

IQ
m
3
m
3"
EDIT
The EDIT function has two recording modes in which you can store the recording time of the tape in the changer memory
EDIT NORMAL - The changer will determine which tracks fit on each side of the tape and will stop after the last track The
tracks will be recorded in the order in which they appear on the CD(s).
EDIT OPTIMAL - The changer now calculates the combination of tracks that will optimize the use of available recording
time.
NOTE!
The EDIT function cannot be used for CDs containing more than 30 tracks.
BEFORE RECORDING
Preparation:
• A programme to be recorded, must be stored in advance.
See ‘PROGRAMMING’.
• If required you can search the loudest passage and
adjust your recording device. See ‘SEARCHING THE
LOUDEST PASSAGE (PEAK SEARCH)’.
This can also be done after selecting the recording mode
and the recording time. See below.
• Press EDIT 3c to activate the EDIT mode.
- EHIT lights up and SELECT M5E appears on the
display.
• Select the number of the required CD using DISC SELECT
2 or DISC 2 (on the remote control).
When recording a programme there is no need to enter
the CD number(s).
Selecting the recording mode:
- The display shows EIIT (=EDIT NORMAL which is the
default setting).
• With 14 you can now select OPT(imal), CANCEL
or EDIT (NORMAL) again.
- The display shows DPT (imal), ERNEEL or EIIT again.
• Press EDIT 3c to store the required recording mode
(NORMAL or OPTimal).
If you select CANCEL, the EDIT mode will be cancelled
and the changer will go back to STOP mode.
- As soon as you have stored the recording mode the
display shows E3D (default setting).
Selecting the recording time:
- As soon as you have stored the recording mode the
display shows E3D (default setting).
• With 1« 14 you can now select the required record
ing time:
E IDD, E IDS, E ED, E3D, ERS, EED, EIS, or E3D.
In EDIT NORMAL mode the recording time must be at
least equal to the playing time of the first track on the first
CD or in the programme.
In EDIT OPTimal mode the recording time must be at least
equal to the playing time of the shortest track on the
CD(s) or in the programme.
- NOT PDSSIILE lights up if you select a ‘wrong’ time.
• Press EDIT 3c to store the required recording time.
- The CD changer will now go back to STOP mode
• You can now record the CD or the programme.
After the last track that fits on side A of the tape, the CD
changer will go into PAUSE mode.
PRU5E lights up.
Under TRACK you will see the number of the first track to
be recorded on side B of the tape.
Turn the tape over or select the tape travel direction for
side B.
Press PLAY ► 9.
The remaining tracks will now be played.
After the last track play will stop; EIIT ERNEELEI lights
up.
NOTES!
As soon as you press PLAY ► 9 the other changer
functions will temporarily be switched off to prevent the
recording being interfered with; EIIT RETIt'E lights up if
you press one of the other buttons during recording.
You can quit the EDIT mode by pressing STOP ■ 8 or
OPEN/CLOSE 19; EIIT ERNEELEI then lights up
EIIT NOT RDSSIILE lights up if you try to record a CD
containing more than 30 tracks.
Should the CD or the programme be longer than the total
recording time of the tape, play will stop after the last
track that fits onto side B of the tape.
Should the first track of the first CD or the programme be
longer than one side of the tape (=the entered recording
time divided by two), then EIIT NOT PDSSIILE will light
up. You will now have to enter another recording time.
The EDIT function will be cancelled if the CD changer (or
the system) is set to STAND BY mode (see ‘ADDITIONAL
INFORMATION’).
RECORDING
Press PLAY ► 9.
Playback starts with the selected CD (or with the first
track of the programme).
The display shows the elapsed playing time of the current
track.
Press TIME 3e to switch to other time display information.
The number of tracks for side A and their playing time are
shown on the display.
14
Page 15
KARAOKE
KARAOKE MODE
You can play Karaoke with CDs, Then you can use the
following keys. (PLAY. STOP, NEXT. PREV, OSD, PBC,
STANDBY. DISC. VOCAL FADER/MULTIPLEX, KEY CON
TROL), refer to the information on the monitor. (OSD)
• Press “KARAOKE MODE” 22 on the remote control to enter
the Karaoke mode. (When you play the Video CD with
PBC, PBC mode will be cancelled.)
- KARAOKE LIST is displayed on the monitor.
• Press DISC 2 on the remote control to select the disc until
the desired disc numbers appears on the display.
- The CD number indicator flashes.
Enter the desired track number of the disc by using 0-9
digit keys 10 on the remote control.
The track number lights up.
• You can reserve up to 8 tracks by same operation as
above.
• Press ► PLAY 15 on the remote control or PLAY ► 9.
- Playback start with the first reserved track.
• Press 14 on the remote control to cancel the previous
reserved track in stop mode.
• Press ►►M4 on the remote control to cancel the current
playing track during play.
In the Karaoke mode, the changer works following functions:
VOCAL FADER/MULTIPLEX
This Video CD player has the V(ocal)-Fader/MPX (MULTI
PLEX) control feature as below.
1. MIC LEVEL control and DIGITAL ECHO control.
Connect the Microphone, then adjust the level by MIC
LEVEL knob and Echo level by DIGITAL ECHO knob.
2. Press V-Fader/MPX or VOCAL FADER. MULTIPLEX on the
remote control to change the audio mode for the
KARAOKE by cyclic as follows:
CÎ
(1) LR(Left and Right)...Normal stereo sound
(2) LL(Left and Left)...Monoral output only Left sound
(3) RR(Right and Right)...Monoral output only Right sound
(4) Vocal Fader... The vocal part is faded with general
LR LL RR ^ Vocal Fader
you can select (2) or (3) which mutes singer’s voice of
multiplex discs.
stereo discs. With some discs, however, the singer's
voice may remain audible.
CHANGING THE KEY (KEY CONTROL h # )
You can change the key of the CD to suit your vocal range.
• Press KEY CONTROL # 13 or KEY CONTROL # 21 on the
remote control to raise the key up to 4 steps from original.
- “HIGH1”-“H1GH4” lights up.
• Press KEY CONTROL |> 13 or KEY CONTROL i 21 on the
remote control to lower the key up to 4 steps from original.
- “LOW1 ” - “LOW4” lights up.
□
______________
Note!
When the track ends, the key return to the original automati
cally.
x:
.52
O)
c
Ul
AUTO PAUSE:
The player change to pause mode automatically after play
back one track.
Press “PLAY" to resume playback.
KARAOKE RESERVE:
You can reserve up to 8 tracks in any order while playing a
disc.
AUTO ERASE:
Reserved track is erased automatically when the track is
played to the end so that you can reserve always up to
8 tracks.
- To cancel Karaoke mode, press “KARAOKE” key of the
remote control in Karaoke mode.
15
Page 16
ADDITIONAL INFORMATION
STAND BY
(Q
m
3
w‘
3-
If the CD compartment was open, it will now close.
Any programme present will be erased.
Press any of the following buttons to cancel the STAND BY
mode: DISC SELECT 2, PLAY ► 9. STOP ■ 8, SCAN 3b.
SHUFFLE 7. EDIT 3c OPEN/CLOSE 19. ►►M4 or
PROGRAM 3a.
"Lights up
(«0
TRACK PEAK TOT REM TRACK TIME
Щ Щ Ш Щ-Ш Щ
LS Ш. LN Ш-LN
[PROGRAMi
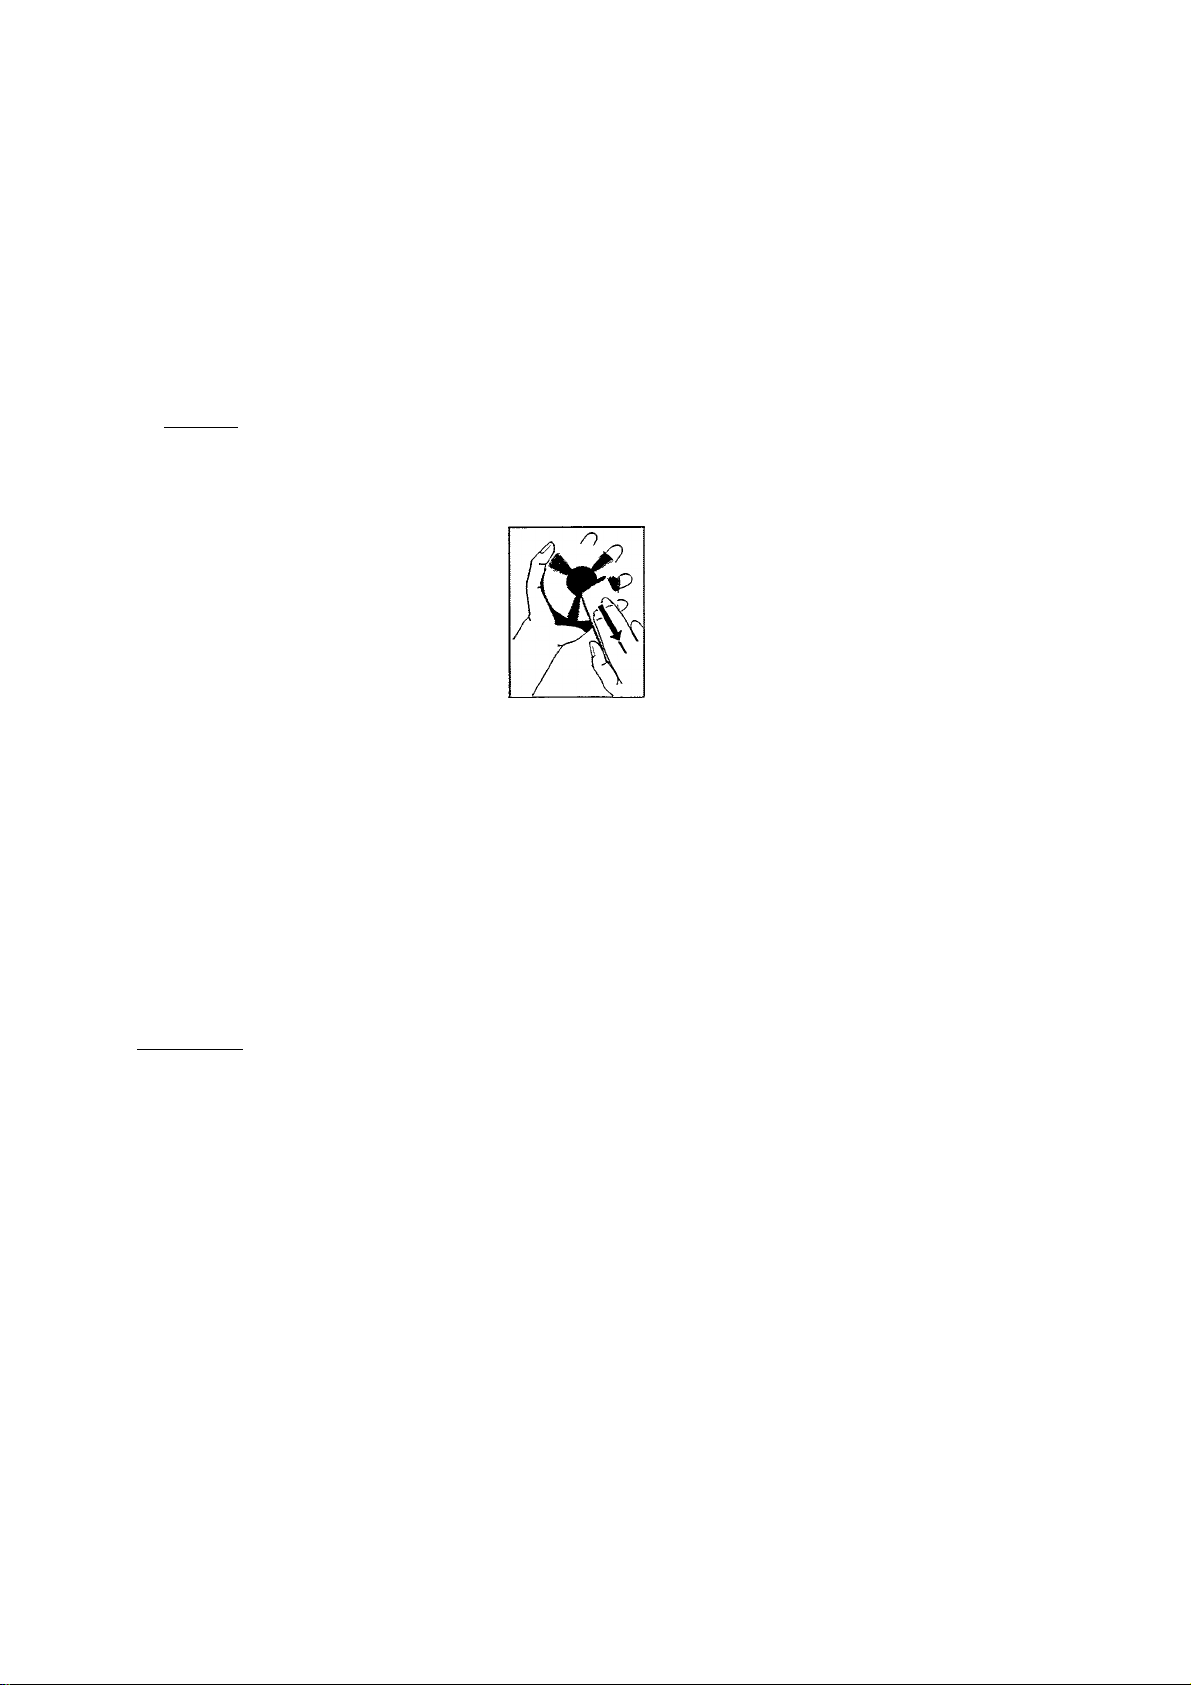
MAINTENANCE
THE CDs
• Never write on the printed side of a
CD.
• Do not attach any stickers to the CD.
• Keep the shiny surface of the disc
clean.
Use a soft lint-free cloth and always
wipe the disc in a straight line from
centre to edge.
• Never use cleaning agents for conven
tional records.
• Detergents or abrasive cleaning agents should not be
used either.
SHUFFLE VIDEO CD-I PAUSE REPEAT1 DISC
TECHNICAL DATA
Typical Audio Performance
Frequency range
Amplitude linearity
Dynamic range.
Signal-to-noise ratio
Channel separation....................
Total harmonic distortion
Audio output level......................
Impedance PHONES socket.
Video
...........................................
....................................................
..............................
...............
.
........
±3 dB (20 Hz ■
IVpp (75 Q load, sync neg)
2Hz
>65dB(1 kHz)
>80dB(1 kHz)
>60dB(1 kHz)
............2V rrns
Power supply
Mains voltage and frequency
see the type plate on the rear of the changer
Power consumption................................................
Safety requirements...............................................
Cabinet
Material/finish; metal and polystyrene'
Dimensions ('wxhxd)................................
V^feight.....................................................
.'ith decorative trim
...435 106-380 mm
.. .. 7 kg .zpprox
Subject to modification
This Compact Disc changer complies with radio
interference requirements as laid down
in EC regulation.
■ 20 kHz
20 kHz)
0 03%(1 kHz)
. , 30-600 Q
<19W
I EC 65
The changer
• A chamois leather slightly moistened with water is suffi
cient for cleaning the changer.
• Do not use cleaning agents containing alcohol, spirits,
ammonia or abrasives.
Lens Dirty
This statement informs the customer the possible causes of
Lens Dirty and also advices the customer to purchase the
commercial cleaning Disc to clean the CD Lens.
RECYCLING
Please observe the local regulations regarding the disposal of
packing materials, exhausted batteries and old equipment.
1. All redundant packaging material has been omitted. We
have done our utmost to make the packaging easy
separable into three mono-materials:
- cardboard (box)
- expandable polystyrene (buffer)
- polyethylene (bags, protective form sheet)
2. Your set consists of materials which can be recycled if
disassembled by a specialized company.
3. Do not dispose of exhausted batteries with your house
hold waste.
4. Note: Switching off the standby mode overnight will save
energy.
_______________________________________
16
Page 17

TROUBLESHOOTING
If a fault occurs run through the points listed below before taking your changer for repair.
If the fault remains, try to clear it by switching the changer off and on again. If this also fails to help, consult your dealer.
Under no circumstances shouid you repair the changer yourself as this will invalidate the guarantee!
SYMPTOM POSSIBLE CAUSE
REMEDY
s:
.¡2
O)
c
UJ
- Playback does not start or interrup
tion of playback.
- Sound skips (at the same part). - The current CD is dirty. • Clean the CD with a soft, lint-free
- The current CD skips tracks.
- Playback does not start from the
first track (of the current CD).
- No sound or bad sound.
- No sound or bad sound on head
phones.
- Remote control does not function.
- Remote control commands are not
properly received.
- The current CD has been loaded
upside down.
- No CDs inserted.
- The current CD is badly scratched
or dirty.
- Moisture condensation on the lens.
- The CD is damaged or dirty.
- PRG (program) or SHUFFLE acti
vated.
- Loose or wrong connections.
- Strong magnetic fields near the CD
changer.
- Level control set to - position.
- Headphones plug is dirty.
- Batteries are empty. • Replace the batteries.
- The distance between remote control
and Video CD player is larger than
10 meters.
• Reload the CD, label side up.
• Insert the CDs, label side up.
• Clean the CD with a soft, lint-free
cloth.
• Leave the CD changer in a
warm environment until the
moisture evaporates.
cloth.
• Replace or clean the CD.
• Switch off SHUFFLE or clear
programme.
• Check connections.
• Find another place for the unit or
change connections.
• Set level control.
• Clean plug.
• Use remote control receiver EM
2200/2201.
• Reduce the distance between
the remote control and Video CD
player.
- No picture on the monitor.
- The cable is not connected to the
monitor terminal.
- The monitor is powered off.
- The undefined CD DISC is used.
• Connect the cable between CD
player & monitor.
• Switch on the monitor power.
• Use the defined DISC (Video,
CD. CD-I Digital Video. CD-G)
17
Page 18

NOTES
Page 19

NOTES
Page 20

Page 21

CDC 771V
3120 205 20230
Printed in Singapore
 Loading...