

Page 1
MAGNAVOX
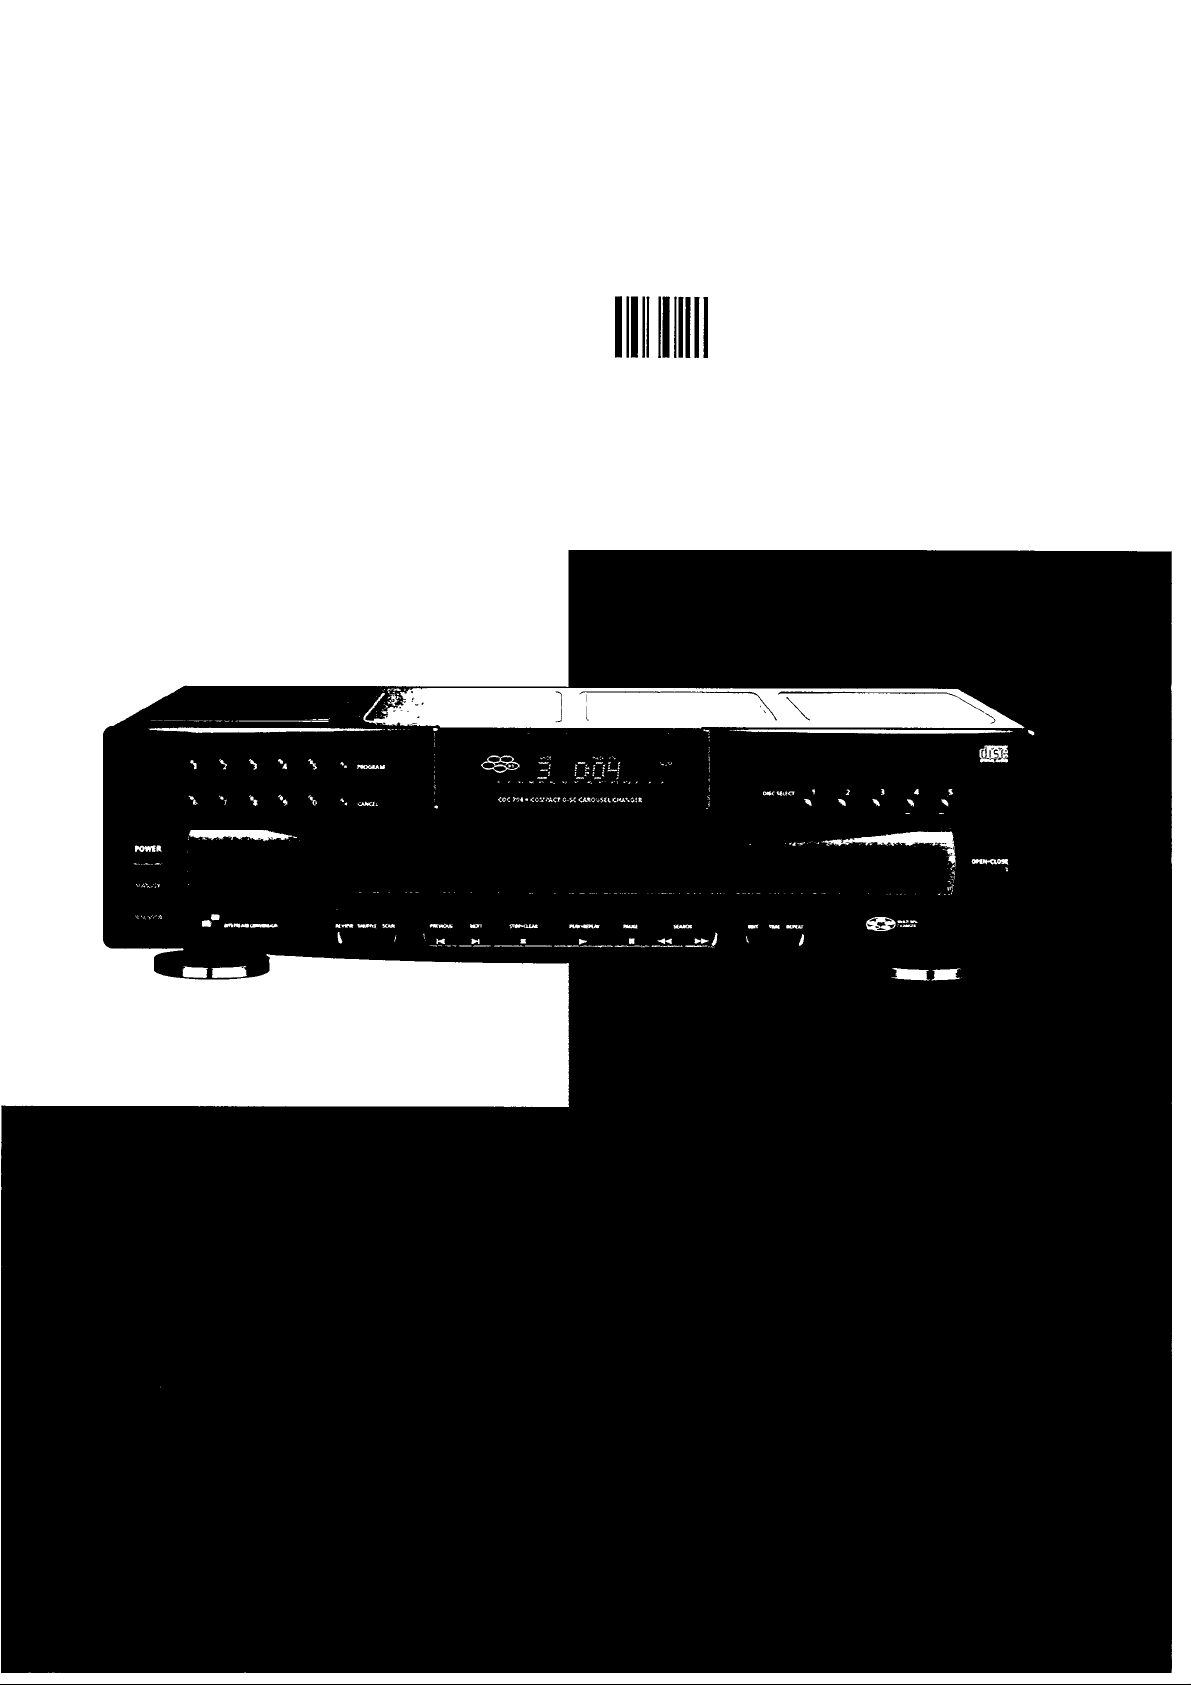
CDC 745
_________I------------------------------------
C om pa ct D i sc C ar ou se l Ch an ge r
^ □ Q Q 0
0 3 0 2
Page 2
INDEX
CAUTION
A
TO REDUCE THE RISK OF ELECTRIC SHOCK,
DO NOT REMOVE COVER (OR BACK).
NO USER-SERVICEABLE PARTS INSIDE.
TO QUALIFIED SERVICE PERSONNEL.
A
A
WARNING
To reduce the risk of fire or electric shock,
do not expose this apliance to rain or
moisture.
RISK OF ELECTRIC SHOCK
DO NOT OPEN
A
CAUTION
REFER SERVICING
This symbol warns the user that uninsulated
voltage within the unit may have sufficient
magnitude to cause electric shock.
Therefore, it is dangerous to make any kind
of contact with any inside part of this unit.
This symbol alerts the user that important
literature concerning the operation and
maintenance of this unit has been included.
Therefore, it should be read carefully in order
to avoid any problems.
English
Safety Instructions page 4
Limited Warranty page 15
CD Français
Conseils De Sécurité
Garantie Limitée page 28
CD Español página 29
Instrucciones Sobre Seguridad página 30
Garantía Limitada
\
página 41
page 3
page 16
page 17
sz
.w
m
.52
‘5
uZ
ic
m
O)
c
a>
c
(0
O
CQ
Q.
(/)
Page 3

ADDENDUM SHEET
English
B Connecting cable to the amplifier
Pages • Insertthe red plug (rightchannel)andthe white plug
(left channel) into the corresponding sockets of the
CD or AUX input of your amplifier. You can also use
the TUNER or TAPE IN-connection, but never Vcie
PHONO input!
Random Play
page 11 All the tracks in one CD can be randomly played.
• Press SHUFFLE on the main unit (or on the remote
control).
- The display shows SHUFFLE and play starts at a
randomly chosen disc and track.
• Select the number of the desired CD using DISC
SELECT or press DISC on the remote control.
- The display shows SHUFFLE and DISC and play
starts with a track randomly selected of the
desired CD.
- When one track finishes, its number disappears
from the display and another track is randomly
selected from those which have not yet been
played.
• When all tracks of one CD have been played, it will
continue to play the next available CD. It will stop
after all CDs have been played.
• Press SHUFFLE again if you wish to return to normal
play.
• If you press REPEAT, the tracks of one CD will be
repeated In a different order each time, although the
first track will always be the same.
Programming
page 11 Notes: Go to STOP before you start programming.
Dubbing an entire CD or Dubbing a program
page 12 Notes:
Before you start the CD-player start the recording func-
■tion on the cassette deck and allow 7 seconds for the
leadertape to pass through the recorder head.
- An extra pause of 4 seconds (AUTOSPACE) will be
inserted after each track only when the CD-player is
in the EDIT mode.
Français
B Câble de raccordement à l'amplificateur.
page 18 • Insérez les connecteurs rouge (voie droite) et blanc
(voie gauche) dans les prises correspondantes d'en
trées CD ou AUX de votre amplificateur.
Vous pouvez également utiliser l'entrée TUNER ou
TAPE IN (= entrée magnétophone), mais en aucun
cas l'entrée PHONO!
Lecture aléatoire
page 24 Toutes les plages d'un CD peuvent être lues dans un
ordre quelconque.
• Pressez SHUFFLE sur l'appareil (ou sur la télécom
mande) avant la lecture.
- L'afficheur indique SHUFFLE et la lecture com
mence sur un disque et une plage choisis de
façon aléatoire.
• Choisissezie numéro du CDsouhaitéàl'aidede DISC
SELECT ou en pressant DISC sur la télécommande.
- L'afficheur indique SHUFFLE et DISC et la lecture
commence sur une plage choisie de façon aléa
toire du disque CD souhaité.
- Lorsque la plage fini, son numéro disparaît de
l'afficheur et une autre plage est choisie de façon
aléatoire parmi celles qui n'ont pas été lues.
• Lorsque toutes les plages d'un CD ont été lues, la
lecture du disque suivant commencera. Le lecteur
s'arrête lorsque tous les CD sont lus.
• Pressez SHUFFLE à nouveau si vous désirez evenir à
la lecture normale.
• Si vous pressez REPEAT, les plages d'un CD seront
répétées chaque fois dans un ordre différent, même
si la première plage est toujours la même.
Programmation
page 24 Remarques:
Avant la programmation, mettez l'appareil en mode
d'arrêt STOP.
Copie d'un CD en entier ou d'un programme
page 25- Remarques:
26 Avant de démarrer le lecture CD, engagez la fonction
d'enregistrementsurlaplatine-cassette.etlaissezécouler
7 secondes pour que la bande amorce passe àtraversia
tête d'enregistrement.
- Lorsque le lecteur CD est un mode EDIT, une pause
supplémentaire de 4 secondes (AUTOSPACE) sera
ajoutée après chaque plage.
CD Español
B Conexión del cable al amplificador
página 31 • Introduzca la clavija roja (canal derecho) y la clavija
blanca (canal izquierdo) en los conectores
correspondientes CD o AUX dei amplificador.
También puede Vd. usar los enchufes TUNER o
TAPE IN, pero en ningún caso la entrada PHONO!
Reproducción aleatoria
página 37 Las piezas de un CD pueden ser reproducidas de manera
aleatoria.
• Oprima SHUFFLE en el aparato (o en el control
remoto) antes o durant la reproducción.
- La pantalla muestra SHUFFLE y da comienzo la
reproducción del disco y pista seleccionados en
un orden aleatorio.
• Seleccione el número del CD deseado con DISC
SELECT u oprimendo DISC en el control remoto.
- La pantalla muestra SHUFFLE and DISC y da
comienzo la reproducción de la pista del disco
que se desee seleccionada en un orden aleatorio.
- Cuando se acaba la pieza otra pista es
seleccionada en forma aleatoria, etre las que no
han sido reproducidas.
• Una vez reproducidas todas las pistas de un disco,
continuará la reproducción del siguiente disco
disponible, y se detendrá una vez reproducidos
todos los discos.
• Pulse de nuevo SHUFFLE si desea regresar a la
reproducción normal.
• Si pulsa REPEAT, las pistas de un disco se repetirán
en un orden distinto cada vez, aunque la primera
será siempre la misma.
Programmación
página 37 Observaciones: Pulse latecla de parada antes de iniciar
la programmación.
Copia de CD entero o copia de programa
página 38/ Observaciones:
39 Antes de poner en marcha el reproductor de CD active
la función de grabación en la platina de casete, y espere
7 segundos hasta que la cabecera de cinta pase por la
cabeza de grabación.
- Después de cada pista se insertará una pausa de 4
segundos (espaciamiento automático), sólo cuando
el reproductor de CD se encuentre en el modo de
edición.
Page 4

Page 5
Please follow these three important steps
to get the most from your product
MAGNAVOX
Return your owner's
registration card within 10 days
Registering your purchase is an essential
step to guarantee that you'll receive all of
the benefits you're entitled to as a
Magnavox product owner.
Complete and mail your Owner's Registra
tion Card today to ensure your right to war
ranty verification, owner confimation, model
registration, plus a wide variety of special
services and savings.
Know these safety symbols
CAUTION
A
CAUTION: TO REDUCE THE RISK OF ELECTRIC SHOCK.
REFER SERVICING TO QUALIFIED SERVICE PERSONNEL.
This bolt of lightning indicates uninsulat
A
ed material within your unit may cause
an electrical shock. For the safety of
everyone in your household, please do
not remove product covering.
I A This exclamation point calls attention to
I features for which you should read the
enclosed literature closely to prevent
operating and maintenance problems.
RISK OF ELECTRIC SHOCK
DO NOT OPEN
DO NOT REMOVE COVER (OR BACK).
N0 USER-SERVICEABLE PARTS INSIDE.
A
Congratulations on your new purchase...
and welcome to the Magnavox family!
Dear Magnavox family member:
Thank you for your confidence in Magnavox.
You've selected one of the best-built, best-backed
products available today.
We appreciate your support, and we'll do every
thing we can do to keep you happy with your pur
chase for many years to come. After all, you're
the reason we're in business!
As a Magnavox family member, you're entitled to
a world of special privileges - and our uncompro
mising commitment to your total satisfaction.
Your Magnavox product is protected by one of
the most comprehensive warranties and out
standing service networks in the industry.
What's more, your purchase qualifies you to
receive advance information on exciting new
products from Magnavox, convenient access to
our home shopping network for special products
and accessories, plus factory-direct rebates and
discounts on your future Magnavox purchases.
All of this is our way of saying 'thanks' for joining
the Magnavox family.
To start taking advantage of these great benefits,
just remember to return your Magnavox Owner's
Registration Card.
Simply complete, detach and mail us your
Owner's Registration Card today. And enjoy your
new purchase with our best wishes!
Read operating instructions
carefully
The information in this manual can help you
take full advantage of your product's many
features, and ensure years of safe, reliable
operation. So don't miss out. Read the
enclosed instructions, safety tips and war
ranty information today.
Sincerely,
Donald F. Johnstone
President and Chief Executive Officer
For Customer Use:
Enter below the Serial No. which is located on
the type plate on the base of the cabinet.
Retain this information for future reference.
Model No.
Serial No.
CDC 745
Page 6

m
3
<Q
co’
3"
SAFETY
CAUTION
Use of controls or adjustments or
performance of procedures other than herein
may result in hazardous radiation exposure.
The set complies with the FCC-Rules,
Part 15 and with 21 CFR 1040.10.
@> Canada
This digital apparatus does not exceed the
Class B limits for radio noise emissions from
digital apparatus as set out in the Radio
Interference Regulations of the Canadian
Department of Communucations.
SAFETY INSTRUCTIONS - Read before operating equipment
This product was designed and manufactured to meet strict quality and
safety standards. There are, however, some installation and operation
precautions which you should be particularly aware of.
1. Read Instructions - All the safety and operating instructions
should be read before the appliance is operated.
2. Retain Instructions - The safety and operating instructions should
be retained for future reference.
3. Heed Warnings - All warnings on the appliance and in the operat
ing instructions should be adhered to.
4. Follow Instructions - All operating and use instructions should be
followed.
5. Water and Moisture - The appliance should not be used near wa
ter - for example, near a bathtub, washbowl, kitchen sink, laundry
tub, in a wet basement or near a swimming pool, etc.
6. Carts and Stands - The appliance should be used only with a cart
or stand that is recommended by the manufacturer.
6A. An appliance and cart combination should be moved
with care. Quick stops, excessive force, and uneven
surfaces may cause the appliance and cart combina
tion to overturn.
7. Wall or Ceiling Mounting - The appliance should be mounted to
a wall or ceiling only as recommended by the manufacturer.
8. Ventilation - The appliance should be situated so that its location
or position does not interfere with its proper ventilation. For exam
ple, the appliance should not be situated on a bed, sofa, rug, or sim
ilar surface that may block the ventilation openings; or, placed in a
built-in installation, such as a bookcase or cabinet that may impede
the flow of air through the ventilation openings.
9. Heat - The appliance should be situated away from heat sources
such as radiators, heat registers, stoves, or other appliances (includ
ing amplifiers) that produce heat.
10. Power Sources - The appliance should be connected to a power
supply only of the type described in the operating instructions or as
marked on the appliance.
11. Grounding or Polarization -
The precautions that should be taken
so that the grounding or polarization
means of an appliance is not defeated.
Caution: To prevent electric shock,
match the wide blade of this plug to the wide slot, fully insert. Do
not use this (polarized) plug with an extension cord, receptacle or
other outlet unless the blades can be fully inserted to prevent blade
exposure.
12. Power-Cord Protection - Power supply cords should be routed so
that they are not likely to be walked on or pinched by items placed
upon or against them, paying particular attention to cords and plugs,
convenience receptacles, and the point where they exit from the ap
pliance.
13. Cleaning - The appliance should be cleaned only as recommended
by the manufacturer.
14. Power Lines - An outdoor antenna should be located away from
power lines.
15. Nonuse Periods - The power cord of the appliance should be un
plugged from the outlet when left unused for a long period of time.
16. Object and Liquid Entry - Care should be taken so that objects do
not fall and liquids are not spilled into the enclosure through open
ings.
17. Damage Requiring Service - The appliance should be serviced by
qualified service personnel when;
A. The power-supply cord or the plug has been damaged; or
B. Objects have fallen, or liquid has spilled into the appliance; or
C. The appliance has been exposed to rain; or
D. The appliance does not appear to operate normally or exhibits a
marked change in performance; or
E. The appliance has been dropped, or the enclosure damaged.
18. Servicing - The user should not attempt to service the appliance
beyond that described in the operating instructions. All other servic
ing should be referred to qualified service personnel.
92/11 EL 4562-1
AC
Polarized Plug
Page 7

INSTALLATION
ACCESSORIES (Supplied)
CONTROLS
W
D)
c
LU
Standard items:
Remote control transmitter (1x)
Batteries (2x AAA size) for remote control
transmitter
INSTALLATION
Unpack all parts and remove protective material.
Insert the batteries into the remote control
transmitter, as shown in the battery compartment.
Do not connect the unit to the mains before
checking the mains voltage and before all other
connections have been made. Power cord. Do
nof connect the unit to the power without having
checked whether the voltage given on the type
plate corresponds with the local AC outlet voltage.
If not, please consult your dealer. The type plate
is located on the rear of the unit.
Always remove the CDs from the tray before
moving the unit.
CONNECTIONS
A) MAINS CONNECTION
• Connect the mains lead to your main supply.
B) CONNECTING CABLE TO THE AMPLIFIER
• Insert a red plug into the 'R' socket and the other
plug into the 'L' socket.
• Insert the two other plugs into the corresponding
sockets of the CD or AUX input of your amplifier.
You can also use the TUNER or TAPE IN
connection, but nof the PHONO input!
Page 8

(Q
m
3
55'
3"
CONTROLS
OPERATION
3 4
9 10 11 12 13
ON THE UNIT
1 POWER STANDBY/OFF
To switch the unit on and off.
2 0-9 DIGIT BUTTONS
- for selecting another track during playback.
- for selecting a track to start playback with.
- for selecting tracks when compiling a pro
gram.
- for selecting the recording time when mak
ing a tape recording (EDIT).
- for selecting the playing time in the TIMER
EDIT mode
3 PROGRAM - To activate the program function
when compiling a program.
4 CANCEL - To erase/clear a program or part of
a program.
5 Display
To indicate the function currently being
performed.
6 DISC SELECT
- for selecting another CD during playback.
- for selecting a CD to start playback with.
- for selecting CDs when compiling a program.
7 OPEN*CLOSE
To open or close the CD tray.
8 l(nfra) R(ed) SENSOR
To receive signals from the remote control
9 REVIEW:
To review the program.
10 SHUFFLE
To play all tracks of the CDs in a random order.
11 SCAN
To start "Introductory Play" of the CDs.
12 «PREVIOUS NEXT tH :
- To select another track during playback
- To start playback of a particular track
14 15
- To select the recording time when doing a
- To select the playing time in the TIMER
13 STOP*CLEAR
To stop playback or cancelling of a program.
14 PLAY*REPLAY
To start playback or to return to the beginning of
a track.
15 PAUSE
To interrupt playback.
16 «SEARCH»
To search for a particular passage during
playback.
17 EDIT
To enter the recording time when making a tape
recording or to enter the playing time in the
TIMER EDIT mode.
18 TIME
To change the playing time information when
playback.
19 REPEAT
To repeat playback.
20 QUICK PLAY
To start immediate playback of a particular CD.
21 LOAD
Rotating the tray in the CD tray when inserting
CDs.
17 18 19
16
tape recording (EDIT)
EDIT mode
Page 9

OPERATION
ON THE REMOTE CONTROL
The life of the batteries of the remote control is
around one year,. For replacement only use
batteries of the type R03, UM4 or AAA.
OPEN*CLOSE
To open or close the CD tray.
PAUSE
To interrupt piayback
PLAY
To start piayback
NEXT
- To seiect the next track.
- To seiect another track during piayback
- To start piayback of a particular track
- To select the recording time when doing a
tape recording (EDIT)
- To select the playing time in the TIMER
EDIT mode
SHUFFLE
To play all tracks of the CDs in a random order.
REPEAT
To repeat playback.
STOP
To stop playback.
PREV
- To select a previous track.
- To seiect another track during playback.
- To start playback of a particular track.
- To select the recording time when doing a
tape recording (EDIT).
- To select the playing time in the TIMER
EDIT mode.
9 DISC UP
To select disc in the next tray.
10 DISC DOWN
To select disc in the previous tray.
11 SEARCH BACKWARD
To search backward for a particuiar passage
during playback.
12 SEARCH FORWARD
To search forward for a particular passage dur
ing playback.
OT
O)
c
LU
Page 10

PLAYBACK
(Q
m
3
w‘
2T
COMPACT DISCS (CD)
Use compact discs bearing the symbol below. In
addition to the conventional 12 cm CDs, 8 cm CDs
can be used without an adaptor.
_r COMPACT
mME
DIGITAL AUDIO
Bear in mind the following points, since any dirt,
scratches or warping of the disc can cause broken or
intermittent sound and also noise.
• To remove the disc from its case lift it out by
holding the disc’s centre with your forefinger and
the outside of the disc with your thumb.
- always wipe from the inside toward the outside of
the disc;
- do not use conventional record cleaners, anti
static agents, benzene, thinner or other sol
vents.
FUNCTIONS AND OPERATION
__________________
When holding the discs, take care not to touch
the playing surface.
Store the discs in their cases. Return them to
their cases with the label surface facing up and
push down lightly on the label surface.
Do not place discs in the following locations:
- near a heating device or a place where the
temperature is high;
- on a seat or on the dashboard of a vehicle
which is exposed to direct sunlight, since
these areas can become very hot;
- in damp or dusty areas.
Do not write on the label surface using a ballpoint
pen or hard pencil and do not stick labels on this
surface.
Wipe away any fingerprints or dust on the playing
surface of a disc using a soft cloth. Bear in mind
the following points:
DISPLAY
SHUFFLE
- Lights up when the tracks are played in a random
order.
(((O
- Lights up when the changer receives acommand
from the remote control.
I program!
Flashes when a programme is being complied.
Lights up when a programme is being played.
REPEAT DISC
Lights up when you repeat a CD
REPEAT
Lights up when repeating all the CDs or a programme
from them
- Flashes when switching the changer on.
- Indicates the numbers of the CDs in the CD tray.
- Indicates which CD is currently being played.
TRACK
Indicates:
- which track is being played;
- ■ the number of tracks on a CD or in a program.
TRACK TIME
- Indicates the elapsed playing time of the track
being played.
Page 11

PLAYBACK
REM(aining) TRACK TIME
Indicates the remaining piaying time of the track
being piayed.
TOTAL REM(aining) TIME
- Indicates the remaining playing time of the entire
CD
TOTAL TIME
- Indicates the total playing time of a CD.
AUTOSPACE
- Lights up when an extra pause is inserted
between the different tracks in the EDIT and CD
DUBBING mode.
PAUSE
- Lights up when playback is interrupted.
I edit!
- Lights up when the player is in EDIT mode
I TIMER EDITI
- Lights up when the changer is in TIMER EDIT
mode
1-15 tracks number indicator
- Indicates the numbers of tracks on a CD.
+15
- Lights up when there are more than 15 tracks on
the CD.
NO DISC
- Lights up when there are no CDs in the CD tray.
Err
- Lights up when you make a mistake while
operating the changer.
• Press the LOAD button to rotate the pocket in the
CD tray.
• Close the tray by pressing OPEN-CLOSE
- "CLOSE" will appear on the display.
- The changer will start to scan the CD to
check how many CDs there are in the CD
tray. The tray will rotate slowly until all the
pockets in the CD tray have been checked.
- After CD detection the display will show the
number of CDs in the CD tray (X disc).
Notes:
• Use the PREFERRED POSITION in the CD tray
if you wish to play only one CD. Playback will
start from the first track of the disc in the
preferred position by pressing the QUICK PLAY
button..
• During the scanning of the CD, it is advisable not
to press any buttons as the CD will stop scanning
immediately and the display will give an incorrect
indication of the numbers of CDs in the CD tray.
PLAYBACK (PLAY-REPLAY)________________________
• Press PLAY-REPLAY on the unit or PLAY on the
remote control.
-
-----------------
1 will begin.
) will start to flash in the display indicating
flashes and playback of DISC
£
W
D)
C
III
- Flashes when a CD's contents list is being
scanned.
INSERTING THE DISCS
• Press POWER STANDBY/OFF to switch the
changer on.
- The changer will start to scan the CD to
check how many CDs there are in the CD
tray. The tray will rotate slowly until all the
pockets in the CD tray have been checked.
- After CD detection the display will show the
number of CDs in the CD tray (X disc).
• Press OPEN'CLOSE on the changerto open the
CD tray.
- "OPEN" will appear on the display.
• Insert the CDs, printed side up in the tray.
_________________________
the disc that is being played (^j)). Shortly
afterwards the first track of the chosen disc will
start to play. The disc position indicator (if DISC
1 is chosen, ^ flashes) and the track number
indicator (1-15) shows how many tracks are on
the CD, when a track has been played, its
number disappears.
- flashes to indicate the playback of DISC
1, and the display shows the current track
number and its elapsed playing time. The
track being played is always shown under
TRACK, and its elapsed playing time is
shown under TRACK TIME.
- When all the tracks have been played, the
CD player stops, and the total number of
tracks and total playing time of the last CD
played are shown on the display.
To stop playback, press STOP-CLEAR □ on the
unit or STOP on the remote control.
To interrupt playback, press PAUSE DO on the unit
or PAUSE on the remote control. PAUSE lights
up.
To resume playback, press PLAY-REPLAY on
the unit again or PLAY on the remote control.
If you press PLAY-REPLAY during playback,
the current track will start again from the
beginning.
Press POWER STANDBY/OFF to switch the
player off.
Page 12

PLAYBACK
m
<Q
c5'
3T
Notes:
• Playback will continue from the first track of
"€>" to the last track of
When all the tracks have been played, the CD
player stops with
• To change the CDs during PLAYBACK, press
OPEN'CLOSE.
- The CD tray open and the three CDs out
side can be changed without interrupting
playback.
Interrupting play
• Press PAUSE.
- The display shows PAUSE.
• Press PLAY*REPLAY if you want to resume
playback.
- PAUSE goes out.
Stopping play
• Press STOP*CLEAR if you wish to stop play.
The disc and track number which can be played
will now appear in the display.
• Press OPEN'CLOSE to remove the CDs.
Changing the playing time information
• Press TIME on the unit if you want to see the
remaining playing time of the track being played
(REM(aining) TRACK TIME).
• Press TIME again if you want to know the
remaining playing time of the entire CD (TOTAL
REM(aining) TIME).
• Press TIME once more if you want to return to
the elapsed playing time of the current track
(TRACK TIME).
Note:
This does not apply for CD with more than 29 tracks
title.
Selecting a different disc during play (DISC SE
LECT)
• Key in the desired CD number on the unit or
press DISC on the remote control.
- The player will stop playing and
I will start to flash indicating the
order of discs are being switched to the
number selected.
The disc position indicator (if DISC 1 is
chosen, flashes) will appear in the CD
display. Shortly afterwards the first track of
the chosen disc will start to play.
Notes:
• If you select a non-existent number,
will
lights up.
Selecting a different track during play (0-9)
• Key in the desired track number (on the current
CD); two digits number must be keyed in within
2 seconds otherwise the CD player will start
playback with the first number keyed in.
- Shortly after this, the chosen track will start
playing.
You can also select the required number by pressing
M PREVIOUS NEXTW until the required track number
appears in the display.
Searching for a passage during play
• Hold <M SEARCH » pressed down to search for
the required passage. If you release the button,
play will continue.
Note:
The searching speed is determined by the length of
time the key is pressed:
- the first 2 seconds fairly slowly, with low level of
volume.
- then at the maximum speed, with no sound
output.
The volume will automatically return to its normal
level when the search button is released.
Repeating A CD
• During play, press REPEAT. The REPEAT DISC
indicator lights up.
- The current CD is played and then repeated.
• Press REPEAT twice, to stop the repeat function.
Repeating ALL CDs
• Press REPEAT twice before or during playback.
REPEAT will appear on the display.
- All 5 discs are played and then repeated.
• Press REPEAT again, to stop the repeatfunction.
- The REPEAT indicator light goes out.
- Play continues as normal.
introductory Play
The Introductory play function can be used in both
STOP and PLAY modes by pressing the SCAN
button. The SCAN function causes the first 10
seconds of every track on all CDs to be played (If CD
is already in PLAY mode, only the first 10 seconds of
the remaining tracks are played). After playing the
opening seconds of a track, the CD player jumps to
the beginning of the next track. The corresponding
track number appears in the display.
• Press SCAN on the unit or on the remote control.
- If the CD tray is open, it will close and the
introductory play will begin.
- SCAN lights up and the first 10 seconds of
each track on the discs will be played. (The
seconds are counted down under
REM(aining) TRACK TIME.
10
Page 13

PROGRAMMING
• Press SCAN again or PLAY*REPLAY if you
want to play the complete track.
Random Play
All the tracks of the five CDs can be randomly played.
• Press SHUFFLE on the main unit (or on the
remote controi) before or during play.
- The display shows SHUFFLE and play starts
with a track which has been randomly se
lected.
- When one track finishes, another track is
randomiy selected from those which have
not yet been played.
- During piay you can use NEXT CH to select
another random track, or W PREVIOUS to
play the same track again.
• Press SHUFFLE again if you wish to return to
normai play.
All the tracks in one CD can be randomly played.
• Select the number of the desired CD using DISC
SELECT or press DISC on the remote control.
• Press SHUFFLE on the main unit (or on the
remote control) before play.
- The display shows SHUFFLE and DISC;
playback starts with a track which has been
randomly selected.
- When one track finishes, its number disap
pears from the display and another track is
randomly selected from those which have
not yet been played.
• Press SHUFFLE again if you wish to return to
normal play.
Programming
By programming the player, you can play up to 30
tracks in any desired order. If you exceed the maxi
mum of 30 tracks, 'FULL' will appear in the dispiay.
• Press PROGRAMtoactivatethe Program mode..
- PROGRAM flashes andlPROGRAMl appears
on the display, and select the number of the
first desired CD using DISC SELECT on the
unit or press DISC on the remote control.
• Using the 0-9 digit buttons, key in the desired
track numbers of the CD.
- Every track numbers you enter wili be in
cluded immediately in the program.
- The display always shows the track number
and the number of tracks in your program.
• If you wish to store Iracks from another CD,
select the number of the CD.
- flashes indicating the CD being se
lected.
- Repeat the above procedure to program
the desired tracks in the second CD.
Reviewing the program
• Press REVIEW prior to, during or after
programmed play.
- The review of the tracks currentiy pro
grammed will begin in sequence.
Err will light up if there is no program stored.
With REVIEW you can proceed more rapidly to the
next block of information.
Playing a program
• Press PLAY'REPLAY.
- Playback starts with the first track of the
program.
- When ali tracks have been played, the dis
play shows the number of tracks of the
program.
During programmed play, the EDIT, PROGRAM and
CANCEL functions will not worked.
Search for a particular passage is oniy possible
within the track being played.
Erasing a program
A program is erased if you:
- Press STOP*CLEAR twice,
or
- Press OPEN'CLOSE on the unit,
or
- Switch the unit off.
Erasing a track from the program
• Press REVIEW before or after programmed play
at STOP mode.
- The review of the tracks currently pro
grammed will begin in sequence.
• Press CANCEL as soon as the number you wish
to erase appears.
- The number has now been erased.
Err will light up if there is no program stored and if
you have not pressed REVIEW first before cancel
ling.
EDIT
The EDIT function has a recording mode (EDIT) and
a play mode (I timer editi).
- In the EDIT mode you can store the recording
time of the tape in the changer memory. This will
determine which tracks fit on one side of the tape
and will stop automatically after the last track.
- In the TIMER EDIT mode, you can store a
desired playing time. If necessary, the CD orthe
program you wish to play will be partly repeated
to fill the entered time.
w
ro
c
lU
11
Page 14

OTHER POSSIBILITIES
(Q
m
3
w'
=r
Notes:
The EDIT function cannot be used for CDs containing
more than 29 tracks. wili light up if a CD contains
more than 29 tracks.
Recording in the EDIT mode:
• Press EDIT in the stop mode.
- I EDIT I iights up and £o'i t appears in
the dispiay, foilowed by C 3D.
• With K! PREViOUS NEXT W you can now seiect
the desired recording time: C 30,
T0 seiect other recording times, use the 0-9 digit
numbers.
- You can now record an entire CD or a
program (from one or more CDs).
With Edit features, you can designate the
recording time of your tape, and then the
unit automaticaliy seiects tracks from a singie disc that can be recorded within the
designated recording time.
The seiected tracks are then edit recorded
onto one side of a tape at a time (side A and
side B).
Dubbing an entire CD
• Select the number of the desired CD using DISC
SELECT or press DISC on the remote control.
- Playback starts immediately with the se
lected CD.
- An extra pause of 4 seconds (AUTOSPACE)
will be inserted after each track.
- AUTOSPACE lights up.
- After the last track that fits on side A of the
tape, the CD changer will go into PAUSE mode.
• Turn the tape over or select the tape travel
direction for side B.
• Press PLAY*REPLAY.
- The remaining tracks will now be played.
- After the last track play will stop.
- If, after the last track of the CD, there is still
enough space available on side B, then the
tray will rotate to the next CD in the CD tray
to record some more tracks from this CD
(this will also happen if the last track has
been recorded on side A).
• Press STOP'CLEAR if this is not required.
Dubbing a program
• Compile your program (from one or more CDs)
as described in the 'PROGRAMMING' section
(the program can also be stored in advance).
• Press PLAY*REPLAY to start playback.
- An extra pause of 4 seconds (AUTOSPACE)
will be inserted after each track.
- AUTOSPACE lights up. .
- After the last track that fits on side A of the
tape, the CD changer will go into PAUSE
mode.
• Flip the tape over or select the tape travel direc
tion for side B.
• Press PLAY'REPLAY.
- The remaining tracks will now be played.
- Playback will stop after the last track of the
program.
Notes:
- The edit function always starts with the first track
on the CD.
- To cancel edit during dubbing, press
STOP*CLEAR.
- As soon as you press PLAY*REPLAY the other
changerfunctions (exceptTIMER and REVIEW)
will temporarily be switched off to prevent the
recording being interfered with; lights up if
you press one of the other buttons during play/
recording.
- You can stop playback/recording by pressing
STOP*CLEAR.
- Should the CD or the program be longer than the
total recording time of the tape, play will stop
after the last track that fits onto side B of the tape.
- Should the first track of the CD orthe program be
longer than one side of the tape (= the entered
recording time divided by two), then Err will
light up. You will now have to enter another
recording time.
Playback in the TIMER EDIT mode:
• Press EDIT twice in the stop mode.
- I TIMER EDiTi lights up and fc.'/ E appears in
the display, followed by C 3D.
• With K1 PREVIOUS NEXTW you can now select
the desired playing time: 3D, E 3S, E ED, C
o n r inn _ r I "f n
Ji U J L I U U O > U t L, U .
To select other playing times, use the 0-9 digit
numbers.
- You can now play an entire CD or a program
(from one or more CDs) or tracks from
different CDs in random order:
12
Page 15

OTHER POSSIBILITIES
An entire CD
• Selectthe number of the desired CD using DISC
SELECT or press DISC on the remote control..
- Playback starts immediately with the se
lected CD.
- You can also press SHUFFLE immediately
after selecting the CD; the tracks will then be
played in a random order.
- If necessary, the CD will be partly repeated
to fill the entered time, if there are more CDs
in the CD tray, play will continue with the
next CD.
- At the end of the entered playing time,
playback will stop.
A program
• Compile your program (from one or more CDs)
as described in the 'PROGRAMMING' section
(the program can also be stored in advance).
• Press PLAY*REPLAY or SHUFFLE to start
playback.
- If necessary, the program will be partly
repeated to fill up the entered time..
- At the end of the entered playing time,
playback will stop.
.2
TO
c
LU
Tracks from different CDs in random order:
• Press SHUFFLE.
- During the entered playing time, tracks from
different CDs will be played in a random
order.
- At the end of the entered playing time,
random playback will stop.
Notes:
- As soon as you press PLAY*REPLAY or
SHUFFLE the other changer functions (except
TIME and REVIEW) will be temporarily switched
off; Err lights up if you press one of the other
buttons during play.
- You can stop playback by pressing
STOP*CLEAR.
13
Page 16

MAINTENANCE
TECHNICAL DATA
<û
m
3
w
3"
MAINTENANCE
THE SYSTEM
• A chamois leather slightly moistened with water
is sufficient for cleaning the housing of the unit
and the enclosures.
• Do not use cleaning agents containing alcohol,
spirits, ammonia or abrasives.
THE CD PLAYER
• Keep the CD tray free of dust using a clean cloth.
THE CDs
• Never write on the printed side of a CD.
• Do not attach any stickers to a CD.
• Keep the shiny surface of a CD clean. Use a soft
lint-free cloth and always wipe the CD in a
straight line from centre to edge.
• Never use cleaning agents for conventional
records and grease solvents or abrasives to
clean CDs.
FAULTS AND THEIR LIKELY CAUSES
• If a fault occurs, first check the points listed
below before sending the unit for repair. If the
remedies fail to help, consult your dealer.
Problems with the CD player
- The CD is not inserted properly with the
printed side facing up.
- The CD is dirty, badly scratched or warped.
- Because of large temperature differences,
condensation has formed on the lens of the
laser. This will disappear after some time.
TECHNICAL DATA
Typical Audio Performance
Frequency range;
Amplitude Linearity:
Phase Non-linearity:
Dynamic range:
Signal-to-noise ratio:
Channel separation:
Total Harmonic distortion: 0.02%
D/A conversion: Bitstream conversion (256 x
oversampling, 1 bit), in differential mode
Audio output level: 2 V rms
Power supply
Mains voltage and frequency:
See the type plate on the rear of the changer
Power consumption:
Safety requirements:
Cabinet
Material/finish:
Dimensions (w x h x d):
Weight:
Subject to modification
± 0.5 dB (20 Hz - 20 kHz)
metal and polystyrene
20 Hz-20 kHz
±5° (20 Hz-20 kHz)
86 dB
Min 84 dB from
20Hz to 20 kHz
Min 65 dB from
20Hz to 20kHz
9 W approx.
lEC 65
with decorative trim
435 X 106x380 mm
7 kg approx.
PROBLEMS WITH THE WHOLE SYSTEM
Electrostatic charge may cause unexpected symp
toms. See whether these symptoms disappear if you
unplug the AC cord and plug it in again after a short
period.
CAUTION:
INVISIBLE LASER RADIATION WHEN OPEN AND
INTERLOCKS DEFEATED. AVOID EXPOSURETO
BEAM.
Under no circumstances should you repair the
CD changer yourseif as this wiii invaiidate the
guarantee!
14
Page 17

LIMITED WARRANTY
Audio Systems
• One (1) Year Carry-In Labor Warranty
• One (1) Year Carry-In Service Parts Warranty
For purchases outside the U.S.A. and Canada, see applicable warranty from country of purchase.
Replacement Parts and Service Labor:
For one (1) year from the date of purchase an Authorized Service
Center will replace any part found defective and will repair any
product defect without charge to you for parts or labor.
Replacement parts installed during the warranty period are war
ranted only for the balance of the original warranty.
Warranty Exclusions - Your Warranty Does Not Cover:
Labor charges for installation or set-up, adjustment of customer or
preference controls and installation or repair of audio antenna sys
tems outside the unit.
Product repair and/or part replacement because of mis-use, acci
dent, unauthorized repair or other cause not within the control of
Philips Consumer Electronics Company.
Who is protected?... Where?
This warranty is extended to the original retail purchaser for prod
ucts purchased and used in the U.S.A., Puerto Rico, the Virgin Is
lands and Canada. If you move within these areas an Authorized
Service Center in your area will honor this warranty for the remain
der of the original warranty period.
What the Purchaser Must Do:
Before delivering your unit for service, check your operating instruc
tion booklet. A slight adjustment of the customer controls dis
Reception problems caused by signal conditions or antenna sys
tems outside the unit.
A unit purchased, used or serviced outside the U.S.A., Puerto Rico,
the Virgin Islands and Canada, or used for commercial or institu
tional purposes (included but not limited to products used for rental
purposes).
Incidental or consequential damages resulting from the product or
use of the product. Some states do not allow the exclusion of inci
dental or consequential damages, so the above exclusion may not
apply to you.
cussed in your instruction booklet may save you a service call.
IMPDRTANT REMINDER:
Please fill out and mail your Warranty Registration Card promptly.
It will be easier for us to notify you ¡fit should ever be required.
The return of the Warranty Registration Card is not a condition to
Warranty Coverage.
£
.2
111
O)
c
For product purchased in the U.S.A., Puerto Rico, or the
Virgin Islands
How To Get Warranty Service:
To obtain warranty service you must deliver your unit, with evi
dence of the purchase date, to an Authorized Service Center (see
enclosed listing) for repair if service is required during the warran
ty period. When repair is completed you must pick up the unit at
the Service Center.
In the U.S.A., Puerto Rico or the Virgin Islands, all implied war
ranties including implied warranties of merchantability and fitness
for a particular purpose, are limited in duration to the duration of
this express warranty. Some states do not allow limitations on
how long an implied warranty lasts, so the above limitation may
not apply to you.
This warranty gives you specific legal rights, and you may have
other rights which vary from state to state.
Philips Service Company - Q (615) 475-8869
401 East Old Andrew Johnson Highway
Jefferson City, Tennessee, USA 37760
For product purchased in Canada
How To Get Warranty Service:
To obtain warranty service, the product must be delivered (carried-
in) to a Philips Consumer Service Branch (see enclosed listing).
Philips Self-Servicing Dealer or Authorized Service Depot.
These warranties are given in lieu of all other warranties. No other
guarantees or warranties are expressed or implied, including any
implied warranties of merchantability or fitness for purpose.
Philips shall not be liable under any circumstances for any direct,
indirect, special, incidental or consequential damages, howsoever
incurred, even if notified of the possibility of same.
Philips Electronics Ltd.
601 Milner Avenue
Scarborough, Ontario, Canada M1B1M8
O (416)292-5161
Please write in your Model and Serial numbers below. The numbers are located on your unit. Keep this manual nearby for easy reference.
Model No.___
____ _______
________ Serial No.
EL 4553-1 91/8
15
Page 18

42
Page 19

Page 20

CDC 745
Philips Consumer Electronics Company
A Division of Phiiips Eiectronics North America Corporation
3139 116 14961
Printed In Singapore
 Loading...