

Page 1

Compact Disc Changer
CDC735
Owner’s Manual
CDC735comb 4/9/99 5:39 PM Page 1
Page 2
For Customer Use
Enter below the Serial No. which is located on the rear of the cabinet. Retain this information for future reference.
Know these
safetysymbols
t This “bolt of lightning” indicates uninsulated material within your unit may cause an elec-
trical shock. For the safety of everyone in your household, please do not remove product covering.
s The “exclamation point” calls attention to features for which you should read the
enclosed literature closely to prevent operating and maintenance problems.
WARNING: TO PREVENT FIRE OR SHOCK HAZARD, DO NOT EXPOSE THIS EQUIP-
MENT TO RAIN OR MOISTURE.
CAUTION: To prevent electric shock, match wide blade of plug to wide slot, and fully insert.
ATTENTION: Pour éviter les chocs électriques, introduire la lame la plus large de la fiche
dans la borne correspondante de la prise et pousser jusqu’au fond.
Once your PHILIPS MAGNAVOX purchase is registered, you’re eligible to receive all the privileges of owning a
PHILIPS MAGNAVOX product. So complete and return the Warranty Registration Card enclosed with your purchase at once. And take advantage of these important benefits.
Return your Warranty Registration card today to ensure
you receive all the
benefits
you’re entitled to.
Warranty
Verification
Registering your product within
10 days confirms your right to maximum protection under the terms and
conditions of your PHILIPS MAGNAVOX warranty.
Owner
Confirmation
Your completed Warranty
Registration Card serves as
verification of ownership in the
event of product theft or loss.
Model
Registration
Returning your Warranty Registration
Card right away guarantees you’ll
receive all the information and special
offers which you qualify for as the
owner of your model.
Congratulations
on your
purchase,
and wel-
come to the
“family!”
Dear PHILIPS MAGNAVOX product owner:
Thank you for your confidence in PHILIPS MAGNAVOX. You’ve selected one of the best-built, best-backed products
available today. And we’ll do everything in our power to keep you happy with your purchase for many years to come.
As a member of the PHILIPS MAGNAVOX “family,” you’re entitled to protection by one of the most comprehensive warranties and outstanding service networks in the industry.
What’s more, your purchase guarantees you’ll receive all the information and special offers for which you qualify, plus easy access to accessories from
our convenient home shopping network.
And most importantly you can count on our uncompromising commitment to your total satisfaction.
All of this is our way of saying welcome–and thanks for investing in a PHILIPS MAGNAVOX product.
Sincerely,
Robert Minkhorst
President and Chief Executive Officer
P.S. Remember, to get the most from your
PHILIPS MAGNAVOX product, you must
return your
Warranty Registration Card within 10 days.
So please mail it to us right now!
MAC5097
CDC735comb 4/9/99 5:39 PM Page 2
Page 3
3
Introduction
Welcome to your Compact Disc
Changer owner’s manual. This manual was designed for you. When
looking through it, it will help you to
keep several things in mind.
One, this manual is divided into four
sections. The Getting Started section
guides you through the initial setup
of your Compact Disc Changer. The
Operating Your Compact Disc
Changer section shows you all of the
controls of the Compact Disc
Changer and remote control and
guides you through the simple operations of your Compact Disc
Changer. The Doing More section
guides you through the more
advanced features of your Compact
Disc Changer. Finally, the
Information You May Need section
provides information you may or
may not need – the warranty, for
example, and trouble checks.
Two, the instructions follow a simple
format. Detailed steps explaining
operations are on the outside edges
of pages. Illustrations accompanied
by brief steps explaining operations
are on the inside edges of pages.
Additional information can be found
in boxes labeled NOTES, which are
along the lower edges of pages.
Finally, never be afraid to try a feature! You cannot hurt your
Compact Disc Changer by trying
any of the features in this manual!
So read on – and relax.
• Before doing anything else, record the
Compact Disc Changer’s model and
serial numbers in the spaces provided
on page two. These numbers will help
us assist you if you ever call for help.
NOTE
• Wireless Remote Control
• Automatic Search Music System
• Audible Search
• Repeat Play
• Random Play
• Programmed Play
FCC Warning:Any unauthorized changes or modifications to
this equipment void the user’s authority to operate it.
Warning: To prevent fire or shock hazard, do not expose this
equipment to rain or moisture.
Philips Consumer Electronics Company recommends that you
use only compact discs which are labeled with the mark.
Warning: This unit uses a laser. Because of possible eye injury,
only a qualified service person should remove the cover or
attempt to service this device.
Caution: The use of controls or adjustments, or the performance
of procedures other than specified herein, can result in hazardous
exposure to laser light.
This digital apparatus does not exceed the Class B limits for radio
noise emissions from digital apparatus.
Radio/TV Interference
This equipment has been tested and found to comply with the limits for a Class B digital device, pursuant to Part 15 of the Federal
Communications Commission Rules. These limits are designed to
provide reasonable protection against harmful interference in a
residential installation. This equipment generates, uses, and can
radiate radio frequency energy and, if not installed and used in
accordance with the instructions, may cause harmful interference
to radio communications. However, there is no guarantee that
interference will not occur in a particular installation. If this
equipment does cause harmful interference to radio or television
reception, which can be determined by turning the equipment off
and on, the user is encouraged to try to correct the interference by
one or more of the following measures:
1) Reorient or relocate the receiving antenna.
2) Increase the distance between the equipment and the receiver.
3) Connect the equipment to an outlet on a circuit different from
the circuit to which the receiver is connected.
4) Consult the dealer or an experienced radio/TV technician for
help.
Copyright 1998 Philips Consumer Electronics Company. All
rights reserved.
Features
Safety Precautions
CDC735comb 4/9/99 5:39 PM Page 3
Page 4

Getting Started
Introduction . . . . . . . . . . . . . . . . . . . . . . . . . . . . . . . . . . . . . . . . . . . . . . . . . . . . . . . . . . . .3
Table of Contents . . . . . . . . . . . . . . . . . . . . . . . . . . . . . . . . . . . . . . . . . . . . . . . . . . . . . . .4
Before Using Your Compact Disc Changer . . . . . . . . . . . . . . . . . . . . . . . . . . . . . . . . . . . .5
Hooking Up Your Compact Disc Changer . . . . . . . . . . . . . . . . . . . . . . . . . . . . . . . . . . . . .6
Operating Your Compact Disc Changer
Remote Control Buttons . . . . . . . . . . . . . . . . . . . . . . . . . . . . . . . . . . . . . . . . . . . . . . . . . .7
Front Panel . . . . . . . . . . . . . . . . . . . . . . . . . . . . . . . . . . . . . . . . . . . . . . . . . . . . . . . . . . . .8
Rear Panel . . . . . . . . . . . . . . . . . . . . . . . . . . . . . . . . . . . . . . . . . . . . . . . . . . . . . . . . . . . . .9
Playing . . . . . . . . . . . . . . . . . . . . . . . . . . . . . . . . . . . . . . . . . . . . . . . . . . . . . . . . . . . .10-11
Doing More
Playback Options . . . . . . . . . . . . . . . . . . . . . . . . . . . . . . . . . . . . . . . . . . . . . . . . . . . .12-13
Special Playback . . . . . . . . . . . . . . . . . . . . . . . . . . . . . . . . . . . . . . . . . . . . . . . . . . . .14-15
Information You May Need
Specifications/Care and Maintenance . . . . . . . . . . . . . . . . . . . . . . . . . . . . . . . . . . . . . . .16
Before Requesting Service . . . . . . . . . . . . . . . . . . . . . . . . . . . . . . . . . . . . . . . . . . . . . . .17
Warranty . . . . . . . . . . . . . . . . . . . . . . . . . . . . . . . . . . . . . . . . . . . . . . . . . . . . . . . . . . . . .18
Index . . . . . . . . . . . . . . . . . . . . . . . . . . . . . . . . . . . . . . . . . . . . . . . . . . . . . . . . . . . . . . . .19
Accessories . . . . . . . . . . . . . . . . . . . . . . . . . . . . . . . . . . . . . . . . . . . . . . . . . . . . . . . . . . .20
4
Table of Contents
CDC735comb 4/9/99 5:39 PM Page 4
Page 5

5
Before Using Your Compact Disc Changer
Remove the battery compartment
cover on the bottom of the remote
control by sliding it in the direction
of the arrow.
Place two AA batteries inside the
battery compartment with their +
and – ends aligned as indicated.
Replace the battery compartment
cover.
• The remote control and its batteries are supplied.
• Do not mix alkaline and manganese batteries.
• Do not mix old and new batteries.
NOTES
Putting Batteries
in the Remote Control
Using the Remote Control
Point the remote control at the
Compact Disc Changer’s remote sensor, making sure to stay within the
angle shown.
Do not put objects between the remote
control and the Compact Disc Changer.
OPEN/CLOSE
DISC SELECT
POWER
PLAY/PAUSESTOP
5-DISC CAROUSEL CD CHANGER
PROG.DISPLAY
STORE
2 3
4 5
SKIP
TRACK
1 2 3
5 6
7
0
DISC1
4
8
9
RANDOM
REPEAT
H
E
G
D
BPLAY/PAUSE
F
C
STOP
11
22
33
60˚
Always hold the disc by the edge,
and keep it in its case when it is not
in use. Fingerprints and scratches on
the disc’s surface can prevent the
laser beam from correctly reading
the digital information.
For details on cleaning discs, see
page 16.
Handling discs
CDC735comb 4/9/99 5:39 PM Page 5
Page 6
OUTPUT
R
L
6
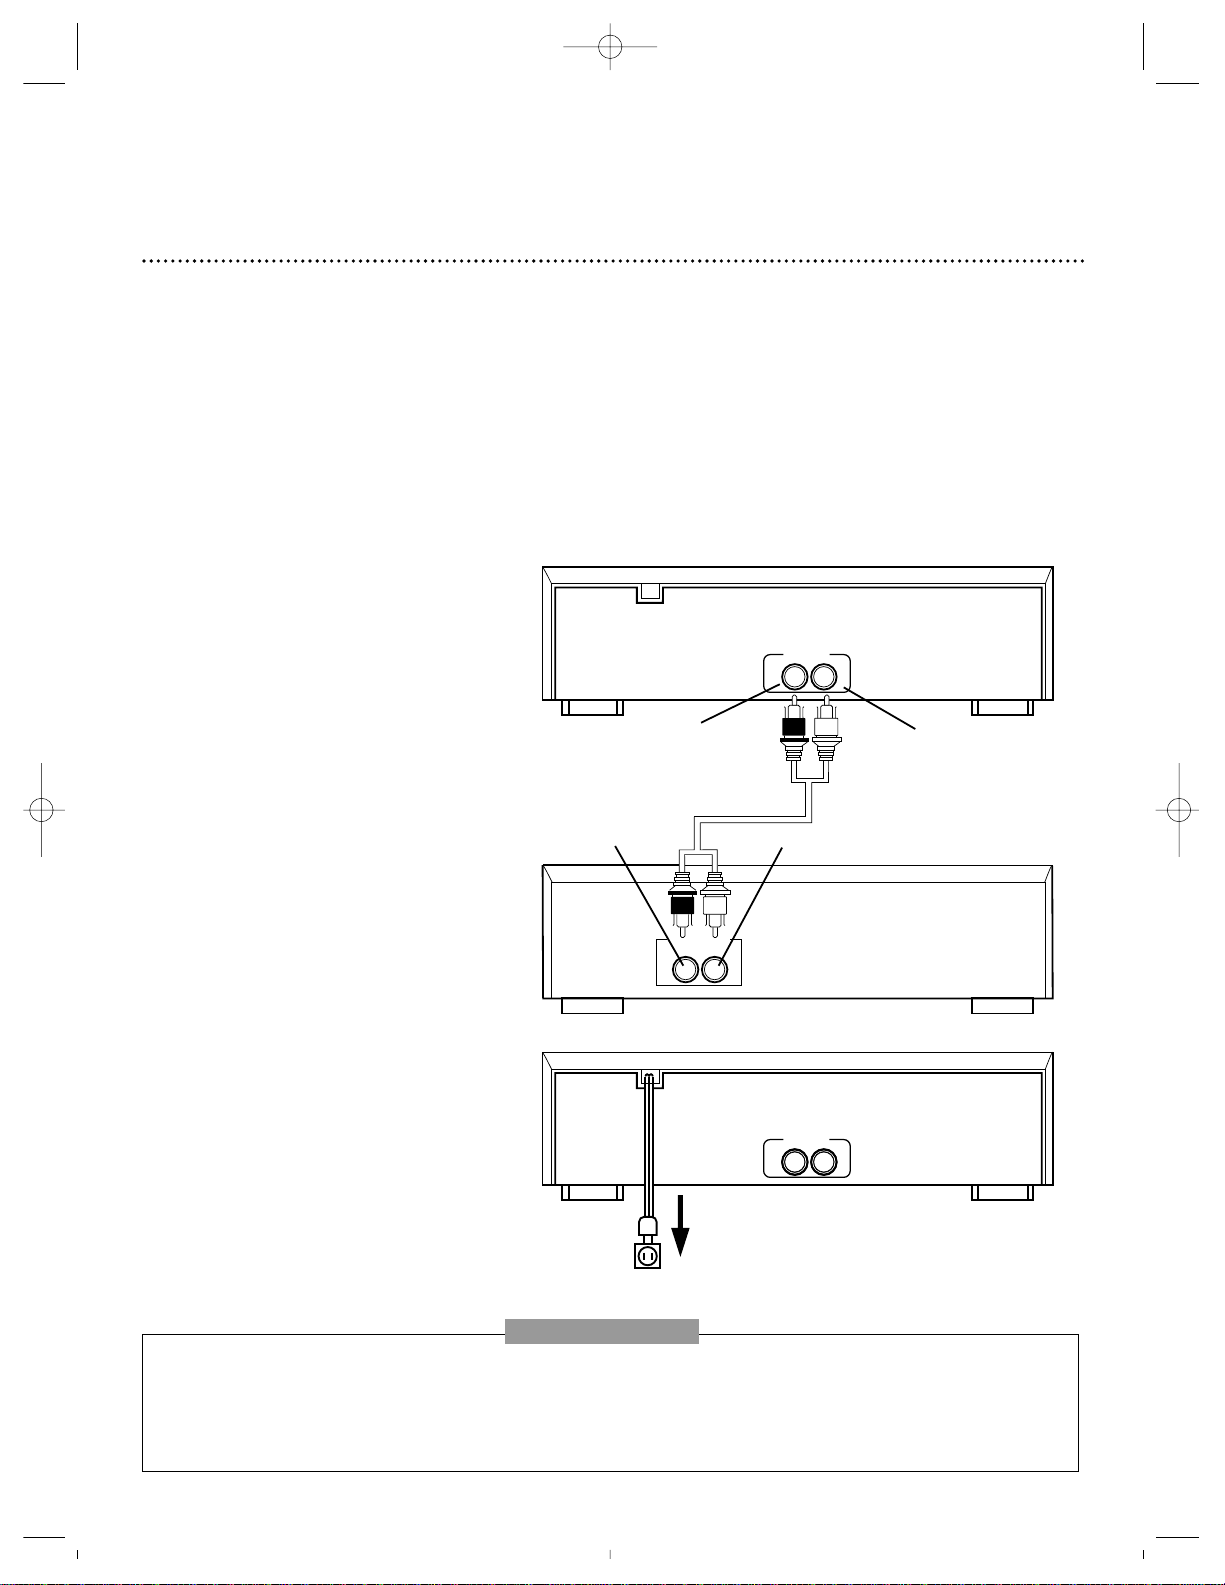
Hooking Up Your Compact Disc Changer
The Compact Disc Changer connection – an audio system to Compact Disc Changer – is shown below.
Back of Compact Disc Changer
L(eft) OUTPUT Jack
Select a location for your
Compact Disc Changer that is
near your receiver/amplifier
and a standard AC outlet.
Plug one end of the supplied
audio cable into the Compact
Disc Changer’s R(ight) and
L(eft) OUTPUT jacks, match-
ing the red plug to the red
R(ight) jack and the white plug
to the white L(eft) jack.
Plug the other end of the cable
into the receiver/amplifier’s
corresponding left and right
CD, AUX, or TAPE INPUT
jacks.
Plug the Compact Disc
Changer’s power cord into a
standard AC outlet.
OUTPUT
R
L
CD
R
L
RR
L
RR
L
11
22
33
44
• Do not place the Compact Disc Changer on top of the receiver/amplifier or on any component that emits heat.
• If you place the Compact Disc Changer near other audio components or their wires, you might hear a hum when you play a
disc. Move the components or their wires to eliminate the noise.
• Do not use the receiver/amplifier’s PHONO inputs. This could damage the receiver/amplifier.
• To prevent electric shock, do not use this polarized plug with an extension cord, receptacle, or other outlet unless the blades
can be fully inserted to prevent blade exposure.
NOTES
R(ight) OUTPUT Jack
Back of the Receiver/Amplifier
L(eft) Input Jack
R(ight) Input Jack
Back of Compact Disc Changer
Wall
Outlet
CDC735comb 4/9/99 5:39 PM Page 6
Page 7

7
Remote Control Buttons
STOP Button
Press to stop playback.
PROG.DISPLAY
STORE
2 3
4 5
SKIP
TRACK
1 2 3
5 6
7
0
DISC1
4
8
9
RANDOM
REPEAT
H
E
G
D
BPLAY/PAUSE
F
C
STOP
PLAY/PAUSE Button
During playback, press to temporarily stop
playback. Details are on page 12. When
in the Pause mode or the Stop mode, press
to begin playback. Details are on pages
11-12.
REPEAT Button
Press to select a Repeat mode. Details are
on page 14.
RANDOM Button
Press to play the tracks on all available
discs in random order.
SKIP Button
Press to select a disc for playback.
When in the Programming mode, press to
select a disc number.
STORE Button
Press to store selected disc and track numbers for programmed playback.
PROG(ram). Button
Press to program disc and track numbers
for playback.
DISPLAY Button
Press to select the desired display mode.
DISC Number (1-5) Buttons
Press to directly select a disc for playback
or to program a disc for playback.
TRACK Number (0-9) Buttons
Press to directly select a track for play-
back or to program a track for playback.
ASMS (Automatic Search Music
System) Buttons
During Stop or Play mode, press to skip
forward or backward one track at a time.
Details are on page 13. Press to program a
track for playback. Details are on page 15.
SEARCH Buttons
When in Play mode, press and hold to
search forward or backward for a desired
part of the track (Audible Search).
Release to resume normal playback.
Details are on page 13.
CDC735comb 4/9/99 5:39 PM Page 7
Page 8

8
Front Panel
STANDBY-ON Button
Press to turn the power on and off.
PLAY/PAUSE Button
During playback, press to temporarily stop the playback. Details are
on page 12. When in the Pause mode or the Stop mode, press to
begin playback. Details are on pages 11-12.
Track Skip Buttons
When in the Stop mode, press to go to a particular track
number on a disc. Details are on page 13.
STOP Button
Press to stop the disc.
OPEN/CLOSE Button
Press to open or close the CD Compartment.
OPEN/CLOSE
DISC SELECT
POWER
PLAY/PAUSE STOP
5-DISC CAROUSEL CD CHANGER
Wireless Remote Sensor
Receives the infrared signal from your remote control so you can
operate your Compact Disc Changer from a distance.
DISC SELECT Button
Press to select a disc for playback.
When in the Programming mode, press to select
a disc number for programmed playback.
Details are on pages 12 and 15.
CD Compartment
Insert up to five discs here.
Display window
During playback, B appears. If playback
is paused, B flashes. Other information
about CDs and operations also appears
here. Details are on page 10.
CDC735comb 4/9/99 5:39 PM Page 8
Page 9

9
Rear Panel
OUTPUT R(ight) / L(eft) Jacks
Connect a cable going to the audio
input jacks of a receiver or amplifier
here. Details are on page six.
OUTPUT
R
L
AC Power Cord
Connect to a standard AC (alternating current) outlet to supply power to
the Compact Disc Changer.
CDC735comb 4/9/99 5:39 PM Page 9
Page 10

10
Playing
1 2 3
4
5
TRACK
DISC
● During playback, the display shows the current disc and
track numbers.
1 2 3
4
5
MIN
DISC
SEC
When you press the DISPLAY button, the elapsed playing
time of the current track appears on the display.
the track currently playing
the number of the current disc
the elapsed playing time
When you press the DISPLAY button again, the display
shows the current disc and track numbers again.
● When you turn on the Compact Disc Changer, select a
disc, or press the STOP button to stop playback, the
number of the current disc in the play position and its total
number of tracks appear on the display. The bottom row of
the display shows the disc holder numbers; the holder(s)
that contain(s) a disc are circled.
1 2 3
4
5
TRACK
DISC
● If you press the DISPLAY button on the remote control
while in Stop mode, the total playing time of the current
disc appears on the display.
Display
1 2 3
4
5
MIN
DISC
SEC
When you press the DISPLAY button again, the display
shows the total number of tracks again.
the total number of tracks
the total playing time of the disc
the holder(s) that contain(s) a disc
1 2 3
4
5
TRACK
DISC
1 2 3
4
5
TRACK
DISC
the number of the
disc currently in play
position
CDC735comb 4/9/99 5:39 PM Page 10
Page 11

With the label side up, carefully place the
disc in the holder.
Repeat steps 4 and 5 to load more discs.
Press the OPEN/CLOSE button to close the
CD compartment. The number of the disc in
the play position and its total number of
tracks appear on the display. Press the DISPLAY button on the remote control to display the total playing time of the disc.
Press the PLAY/PAUSE button to play the
disc in the play position. Playback will begin
with Track 1.
Press the STOP button to stop playback.
Press the OPEN/CLOSE button to open the
CD compartment. Remove the disc and
return it to its case.
66
557788
99
11
Playing (cont’d)
OPEN/CLOSE
DISC SELECT
POWER
PLAY/PAUSE STOP
5-DISC CAROUSEL CD CHANGER
Press the
OPEN/CLOSE
button to close the
CD compartment.
Press the STANDBY-ON button.
To start playback, press the
PLAY/PAUSE
button.
To stop playback, press the
STOP button.
• Do not force the compartment to open or close. You might damage its
loading mechanism.
• If you use 3-inch CDs, place the discs in the middle of the holders.
• After the Compact Disc Changer plays all tracks on the current disc, the
Compact Disc Changer automatically loads the next disc and plays all of
its tracks. After it plays all tracks on the last disc, playback stops.
• Do not touch the disc tray while it is rotating.
• Do not load more than one disc into each disc holder.
NOTES
PROG.DISPLAY
STORE
2 3
4 5
SKIP
TRACK
1 2 3
5 6
7
0
DISC
1
4
8
9
RANDOM
REPEAT
H
E
G
D
BPLAY/PAUSE
F
C
STOP
•
Turn on your receiver/amplifier and select the audio input to
which you connected your Compact Disc Changer.
11
Press the
OPEN/CLOSE button on the Compact
Disc Changer to
open the CD com-
partment.
22
33
66
•
Press the DISC
SELECT button on
the Compact Disc
Changer until the
desired disc holder
moves to the front
position.
44
With the label side up, carefully
place the disc in the holder.
55
Press the
OPEN/CLOSE but-
ton to open the CD
compartment and
remove the disc.
99
•
778811
22
33
44
Press the POWER button on the Compact
Disc Changer. The display illuminates.
Press the DISC SELECT button on the Compact
Disc Changer until the desired disc holder (Disc
1, Disc 2, etc.) moves to the front position.
Turn on your receiver/amplifier and select the
audio input to which you connected your
Compact Disc Changer (CD, AUX, or TAPE).
Press the OPEN/CLOSE button on the Compact
Disc Changer to open the CD compartment.
Playing discs
Your Compact Disc Changer can play standard 5-inch or 3-inch CDs. Before playing a
disc, make sure the Compact Disc Changer
and the receiver/amplifier are connected (see
CDC735comb 4/9/99 5:39 PM Page 11
Page 12

12
Playback Options
During CD playback, press the PLAY/PAUSE button on the remote
control or on the Compact Disc Changer.
Stopping playback temporarily
PLAY/PAUSE
Button
SEARCH
Buttons
PROG.DISPLAY
STORE
2 3
4 5
SKIP
TRACK
1 2 3
5 6
7
0
DISC
1
4
8
9
RANDOM
REPEAT
H
E
G
D
BPLAY/PAUSE
F
C
STOP
OPEN/CLOSE
DISC SELECT
POWER
PLAY/PAUSE STOP
5-DISC CAROUSEL CD CHANGER
OPEN/CLOSE Button
DISC SELECT
Button
PLAY/PAUSE
Button
To select a disc directly during playback, press the DISC number (1-5)
button on the remote control. The selected disc starts to play automatically from Track 1.
11
Selecting a specific disc
OR, to have the Compact Disc Changer play the disc in the next disc
holder, press the DISC SELECT button or the SKIP button. The
Compact Disc Changer moves to the next disc holder that contains a
disc and plays from its Track 1.
11
OR, when the Compact Disc Changer is stopped, press the DISC
SELECT button or the SKIP button until you reach the desired disc
holder.
11
During CD playback, press the OPEN/CLOSE button on the Compact
Disc Changer to open the CD compartment without stopping playback.
You can then change the CDs in the front disc holders.
Do not press any buttons, or playback will be interrupted. Press the
OPEN/CLOSE button to close the CD compartment when you are finished.
11
Changing discs during playback
11
• You cannot use the SKIP button, DISC number (1-5) buttons, or the DISC
SELECT button during programmed playback. Details are on page 15.
• If you press the DISC SELECT button on the Compact Disc Changer or
the SKIP button on the remote control to rotate the tray during playback,
the Compact Disc Changer stops playing the current disc and starts playing the next disc (if another disc holder is loaded).
NOTES
Press the PLAY/PAUSE button again to resume playback.
22
Press the PLAY/PAUSE button to play the disc.
22
DISC Number
(1-5) Buttons
SKIP Button
CDC735comb 4/9/99 5:39 PM Page 12
Page 13

13
Playback Options (cont’d)
During CD playback, press the ASMS H button once to return
to the beginning of the current track. Press the ASMS G button
to skip to the next track.
If you try to advance past the disc’s last track, the changer starts
counting again from Track 1. If you try to go before Track 1, the
changer starts counting backward from the last track on the disc.
11
Automatic Search Music System (ASMS)
During CD playback, press and hold the SEARCH E button on
the remote control to search backward. Or, press and hold the
SEARCH D button to search forward. You can search forward
or backward for a specific section of a track on a particular disc.
The disc will play at a faster speed and a lower volume.
When the end of the disc is reached during a forward search, the
changer advances to the next available disc and starts searching.
However, you cannot search backward past the beginning of a
disc.
11
Audible search
Release the button to resume normal play.
22
SEARCH
Buttons
PROG.DISPLAY
STORE
2 3
4 5
SKIP
TRACK
1 2 3
5 6
7
0
DISC
1
4
8
9
RANDOM
REPEAT
H
E
G
D
BPLAY/PAUSE
F
C
STOP
ASMS
Buttons
During Stop mode, enter the track number using the TRACK
number (0-9) buttons on the remote control. To select a two-digit
track number, press the second digit within five seconds of the
first digit. Then, press the PLAY/PAUSE button to play the disc
from the specified track number.
11
Selecting a specific track
Or, when playback is stopped or paused, press the ASMS H or
G button on the remote control or the Track Skip H or G
button on the Compact Disc Changer to select a track. Press the
PLAY/PAUSE button to begin playback.
11
TRACK
Number (0-9)
Buttons
• You cannot use the TRACK number (0-9) buttons during programmed playback. Details are on page 15.
NOTE
OPEN/CLOSE
DISC SELECT
POWER
PLAY/PAUSE STOP
5-DISC CAROUSEL CD CHANGER
Track Skip Buttons
CDC735comb 4/9/99 5:39 PM Page 13
Page 14

14
Special Playback
Repeat Playback
Follow the instructions below to program the Compact Disc Changer to play a track,
disc, or program over and over.
Make sure:
● There is a disc in the Compact Disc Changer.
REPEAT
Button
PROG.DISPLAY
STORE
2 3
4 5
SKIP
TRACK
1 2 3
5 6
7
0
DISC
1
4
8
9
RANDOM
REPEAT
H
E
G
D
BPLAY/PAUSE
F
C
STOP
Repeat a Track
Before or during playback, repeatedly press the REPEAT button until REP. ONE
appears on the display. At the end of the track, the Compact Disc Changer plays the
track again.
1 2 3
4
5
REP.
TRACKDISC
ONE
Repeat all loaded discs or repeat a program
Before or during playback, press the REPEAT button until REP. ALL appears on the
display. When the end of the disc is reached, the Compact Disc Changer will play
the next available disc. All discs will play repeatedly until you cancel repeat playback.
If a sequence of tracks has been programmed, press the REPEAT button until REP.
ALL appears on the display. The Compact Disc Changer will play the programmed
tracks. When the end of the program is reached, the Compact Disc Changer will
play the program again.
1 2 3
4
5
REP.
TRACKDISC
ALL
Random Playback
Follow the instructions below to set the Compact Disc Changer to select and play
tracks at random from one or more discs.
Make sure:
● There is a disc in the Compact Disc Changer.
Before or during playback, press the RANDOM button until RAND. appears on the
display. The Compact Disc Changer plays tracks at random from all of the discs
available.
1 2 3
4
5
RAND.
TRACK
DISC
• The Compact Disc Changer does
not successively select the same
track, but might select the same
track during programmed playback.
• You cannot activate random playback if programmed playback is
activated (PROG appears on the
display). Press the STOP button,
then the PROG button, to deactivate the program, then press the
RANDOM button. Details are on
page 15.
• To cancel repeat playback, repeatedly press the REPEAT button until
neither REP. ALL nor REP. ONE
appears on the display.
NOTES
The Compact Disc Changer will randomly select and play tracks until you press the
STOP button. RAND. disappears from the display.
RANDOM
Button
CDC735comb 4/9/99 5:39 PM Page 14
Page 15

15
Special Playback (cont’d)
Press the STOP button to cancel the
current function.
11
Program Tracks
You can program up to 32 tracks to
play in any order you choose. You
can program tracks while the disc
compartment is open.
Press the PROG. button. The display
shows PROG. and program step number (PROG. NO.) 1.
22
1 2 3
4
5
PROG.
TRACK
DISC
PROG. NO.
Press the DISC number (1-5) button
or the SKIP button on the remote control or the DISC SELECT button on
the Compact Disc Changer to select
the disc that contains the first track
you want to program. The display
shows the selected disc. For example,
disc number 3.
33
1 2 3
4
5
PROG.
TRACK
DISC
PROG. NO.
Press the TRACK number buttons or the
ASMS H or G button to select the
track you want to play. The display shows
the selected track. For example, track
44
1 2 3
4
5
PROG.
TRACK
DISC
PROG. NO.
Press the STORE button to store the displayed disc and track numbers in the first
memory position. The display changes to
TRACK 0 and PROG. NO. 2, indicating
you may store the next track. (The disc
number will not change.)
55
1 2 3
4
5
PROG.
TRACK
DISC
PROG. NO.
Repeat steps 3-5 for each track you want
to program.
66
When you are finished storing tracks in the
program, press the PLAY/PAUSE button.
The Compact Disc Changer starts to play the
programmed tracks in the order you entered.
77
• Press the ASMS Hor Gbutton during programmed playback to move back-
ward or forward through the programmed sequence. Press the PLAY/PAUSE button to resume playback of the program.
• You can use audible search during programmed play. Details are on page 13.
• You cannot use the DISC SELECT button, the SKIP button, the DISC number (1-
5) buttons or the TRACK number (0-9) buttons during programmed playback.
• To stop programmed playback, press the STOP button, then press the PROG. button. PROG. disappears from the display. The program is stored until you turn off
the Compact Disc Changer or open the CD compartment.
To play a stored program again, press the STOP button to cancel the current
function. Then, press the PROG. button so PROG. appears on the display. Press
the PLAY/PAUSE button to begin playback.
• During Stop mode, you may review the tracks stored in a program. Press the
PROG. button so that PROG. appears on the display. Then, press the STORE
button repeatedly to advance through a display of the tracks. You can not do this
while the program is playing.
• To clear the program from memory, press the STANDBY-ON button to turn off the
Compact Disc Changer, or press the OPEN/CLOSE button to open the CD compartment.
NOTES
PROG.DISPLAY
STORE
2 3
4 5
SKIP
TRACK
1 2 3
5 6
7
0
DISC
1
4
8
9
RANDOM
REPEAT
H
E
G
D
BPLAY/PAUSE
F
C
STOP
OPEN/CLOSE
DISC SELECT
POWER
PLAY/PAUSESTOP
5-DISC CAROUSEL CD CHANGER
OPEN/CLOSE Button
STANDBY-ON
Button
PROG. Button
STORE Button
DISC Number
(1-5) Buttons
SKIP Button
STOP Button
PLAY/PAUSE
Button
TRACK
Number (0-9)
ASMS
Buttons
DISC
SELECT
Button
CDC735comb 4/9/99 5:39 PM Page 15
Page 16

16
Specifications/Care and Maintenance
Care and Maintenance
Frequency Response
20 - 20,000Hz
Signal-to-Noise Ratio
100 dB (A -WTD)
Harmonic Distortion
20kHz Low Pass Filter 0.01%(1kHz)
Separation 83 dB
Wow and Flutter
Not measurable
Diameter
4-3/4 inch (120 mm), 3-1/8 inch (80 mm)
Sampling Frequency
44.1kHz
Oversampling
8 times
Quantization Number
16 Bit Linear
Transmission Bit Rate
4.3218 MHz
Type
Optical pick up
Object Lens Drive System
Two-dimensional parallel drive
Optical Source:
Semi conductor laser
Wavelength
770~795 nm
Tracking System
Three beam system
Power Requirement
120V ± 10%, 60Hz ± 5%,
Power Consumption
10 W
Operating Temperature
41°F (5°C) to 104°F (40°C)
Relative Humidity
10% to 80%
Weight
7.9 lbs. (3.6 kg.)
Dimensions
16-15/16” (W) x 4-1/16” (H) x 14-1/4” (D)
(430 mm x 104 mm x 363 mm)
NOTE: Designs and specifications are subject to change without notice.
Specifications
The Compact Disc Changer is an example of superior design and craftsmanship. The following suggestions will help you care for the Compact Disc
Changer so that you can enjoy it for years.
● Use a soft cloth to wipe the disc. Wipe the disc
in a straight line from the center to the edge.
● Wipe the Compact Disc Changer with a damp-
ened cloth to keep it looking new. Do not use
harsh chemicals, cleaning solvents, or strong
detergents to clean the Compact Disc Changer.
● Keep the Compact Disc Changer dry. If it gets wet, dry it immediately.
Liquids can contain minerals that can corrode the electronic circuits.
● Handle the Compact Disc Changer gently and carefully. Dropping it can
damage circuit boards and can cause the product to work improperly.
● Use and store the Compact Disc Changer only in normal temperature envi-
ronments. Temperature extremes can shorten the life of electronic devices,
damage batteries, and distort or melt plastic parts.
● Keep the Compact Disc Changer away from dust and dirt.
● Modifying or tampering with the Compact Disc Changer’s internal compo-
nents can cause a malfunction and might invalidate the warranty.
CDC735comb 4/9/99 5:39 PM Page 16
Page 17

Power
No power
17
Before Requesting Service
If you are having problems with your Compact Disc Changer, check the following list of problems and possible solutions
before requesting service. You may be able to solve the problem yourself.
● Make sure the power plug is completely connected to an AC (alternating current) outlet.
● Make sure the power is turned on.
Playback
Disc is inserted, but the total number of tracks is not displayed.
DISC number does not appear on
the display.
No sound
A particular portion of the disc
does not play correctly (sound cuts
out, or same portion is repeated).
● Make sure the disc is in the Compact Disc Changer with its label side up.
● Clean the disc.
● Load a disc that has the standard compact disc label (page three).
● Connect the audio cable properly (page six).
● Clean the disc.
Remote Control
The Compact Disc Changer can
not be controlled with the remote
control.
● Aim the remote control directly at the Compact Disc Changer’s remote sensor (page
five).
● Remove all obstacles between the remote control and the Compact Disc Changer (page
five).
● Inspect and/or replace the batteries in the remote control (page five).
CDC735comb 4/9/99 5:39 PM Page 17
Page 18

HOME AUDIO COMPACT DISC
One Year Free Exchange
This product must be carried in for an exchange.
LIMITED WARRANTY
EL6274E001 / MAC 6271 / 7-97
This warranty gives you specific legal rights. You may have other rights which vary from state/province to state/province.
WHO IS COVERED?
You must have proof of purchase to exchange the product. A sales
receipt or other document showing that you purchased the product is
considered proof of purchase. Attach it to this owner’s manual and
keep both nearby.
WHAT IS COVERED?
Warranty coverage begins the day you buy your product. For one year
thereafter, a defective or inoperative product will be replaced with a
new, renewed, or comparable product at no charge to you. A replacement product is covered only for the original warranty period. When
the warranty on the original product expires, the warranty on the
replacement product also expires.
WHAT IS EXCLUDED?
Your warranty does not cover:
• labor charges for installation or setup of the product, and adjustment of customer controls on the product.
• product repair and/or part replacement because of misuse, accident, unauthorized repair or other cause not within the control of
Philips Consumer Electronics Company.
• reception problems caused by signal conditions or cable or antenna
systems outside the unit.
• a product that requires modification or adaptation to enable it to
operate in any country other than the country for which it was
designed, manufactured, approved and/or authorized, or repair of
products damaged by these modifications.
• incidental or consequential damages resulting from the product.
(Some states do not allow the exclusion of incidental or consequential damages, so the above exclusion may not apply to you. This
includes, but is not limited to, prerecorded material, whether copyrighted or not copyrighted.)
• a product that is used for commercial or institutional purposes.
WHERE IS EXCHANGE AVAILABLE?
You may exchange the product in all countries where the product is
officially distributed by Philips Consumer Electronics Company. In
countries where Philips Consumer Electronics Company does not distribute the product, the local Philips service organization will attempt
to provide a replacement product (although there may be a delay if the
appropriate product is not readily available).
BEFORE REQUESTING EXCHANGE...
Please check your owner’s manual before requesting an exchange.
Adjustments of the controls discussed there may save you a trip.
EXCHANGING A PRODUCT IN U.S.A.,
PUERTO RICO, OR U.S. VIRGIN ISLANDS...
Contact your dealer or the Consumer Access Center at (423) 4758869 to arrange an exchange. Or, ship the product, insured and freight
prepaid, and with proof of purchase enclosed, to the address listed
below.
Small Product Service Center
Philips Service Company
1001 Snapps Ferry Road
Plant 2, Building 6
Greeneville, TN 37743
(In U.S.A., Puerto Rico, and U.S. Virgin Islands, all implied warranties,
including implied warranties of merchantability and fitness for a particular purpose, are limited in duration to the duration of this express
warranty. But, because some states do not allow limitations on how
long an implied warranty may last, this limitation may not apply to
you.)
EXCHANGING A PRODUCT IN CANADA...
Please contact Philips at:
1-800-661-6162 (French Speaking)
1-800-363-7278 (English Speaking)
(In Canada, this warranty is given in lieu of all other warranties. No
other warranties are expressed or implied, including any implied warranties of merchantability or fitness for a particular purpose. Philips is
not liable under any circumstances for any direct, indirect, special, incidental or consequential damages, howsoever incurred, even if notified
of the possibility of such damages.)
TO GET OUT-OF-WARRANTY EXCHANGE...
In U.S.A., Puerto Rico, or U.S. Virgin Islands, contact Philips Service
Company at (800) 531-0039 to obtain the cost of out-of-warranty
exchange. Then carefully pack the product and ship it to the Small
Product Service Center (address listed above). In Canada, call the
phone number listed under “Exchanging a Product in Canada” to
obtain the cost of out-of-warranty exchange.
REMEMBER...
Please record below the model and serial numbers found on the product. Also, please fill out and mail your warranty registration card
promptly. It will be easier for us to notify you if necessary.
MODEL # ___________________________________________
SERIAL # ___________________________________________
Philips Service Company, P.O. Box 555, Jefferson City, Tennessee 37760, (423) 475-8869
CDC735comb 4/9/99 5:39 PM Page 18
Page 19

19
Index
accessories . . . . . . . . . . . . . . . . . . . . . . . . . . . . . . . . . . . . .20
ac power cord . . . . . . . . . . . . . . . . . . . . . . . . . . . . . . . . . .6, 9
asms buttons . . . . . . . . . . . . . . . . . . . . . . . . . . . . . . . . . . . . .7
audible search . . . . . . . . . . . . . . . . . . . . . . . . . . . . . . . . . . .13
automatic search music system (asms) . . . . . . . . . . . . . . . .13
batteries . . . . . . . . . . . . . . . . . . . . . . . . . . . . . . . . . . . . . . . .5
care and maintenance . . . . . . . . . . . . . . . . . . . . . . . . . . . . .16
cd compartment . . . . . . . . . . . . . . . . . . . . . . . . . . . . . . . . . .8
changing discs . . . . . . . . . . . . . . . . . . . . . . . . . . . . . . . . . .12
connections . . . . . . . . . . . . . . . . . . . . . . . . . . . . . . . . . . . . .6
disc number (1-5) buttons . . . . . . . . . . . . . . . . . . . . . . . . . . .7
disc select button . . . . . . . . . . . . . . . . . . . . . . . . . . . . . . . . .8
display . . . . . . . . . . . . . . . . . . . . . . . . . . . . . . . . . . . . . .8, 10
display button . . . . . . . . . . . . . . . . . . . . . . . . . . . . . . . . . . . .7
introduction . . . . . . . . . . . . . . . . . . . . . . . . . . . . . . . . . . . . .3
open/close button . . . . . . . . . . . . . . . . . . . . . . . . . . . . . . . . .8
output r/l jacks . . . . . . . . . . . . . . . . . . . . . . . . . . . . . . . . .6, 9
playback options . . . . . . . . . . . . . . . . . . . . . . . . . . . . .12 - 13
playing . . . . . . . . . . . . . . . . . . . . . . . . . . . . . . . . . . . .10 - 11
playing discs . . . . . . . . . . . . . . . . . . . . . . . . . . . . . . . . . . . .11
prog(ram). button . . . . . . . . . . . . . . . . . . . . . . . . . . . . . . . . .7
programming tracks . . . . . . . . . . . . . . . . . . . . . . . . . . . . . .15
random
button . . . . . . . . . . . . . . . . . . . . . . . . . . . . . . . . . . .7
playback . . . . . . . . . . . . . . . . . . . . . . . . . . . . . . . .14
remote control . . . . . . . . . . . . . . . . . . . . . . . . . . . . . . . . .5, 7
remote sensor . . . . . . . . . . . . . . . . . . . . . . . . . . . . . . . . . .5, 8
repeat
button . . . . . . . . . . . . . . . . . . . . . . . . . . . . . . . . . . .7
playback . . . . . . . . . . . . . . . . . . . . . . . . . . . . . . . .14
safety precautions . . . . . . . . . . . . . . . . . . . . . . . . . . . . . . . . .3
search buttons . . . . . . . . . . . . . . . . . . . . . . . . . . . . . . . . . . . .7
selecting
a specific disc . . . . . . . . . . . . . . . . . . . . . . . . . . . .12
a specific track . . . . . . . . . . . . . . . . . . . . . . . . . . .13
skip button . . . . . . . . . . . . . . . . . . . . . . . . . . . . . . . . . . . . . .7
special playback . . . . . . . . . . . . . . . . . . . . . . . . . . . . .14 - 15
standby-on button . . . . . . . . . . . . . . . . . . . . . . . . . . . . . . . . .8
stop button . . . . . . . . . . . . . . . . . . . . . . . . . . . . . . . . . . . .7, 8
store button . . . . . . . . . . . . . . . . . . . . . . . . . . . . . . . . . . . . .7
table of contents . . . . . . . . . . . . . . . . . . . . . . . . . . . . . . . . . .4
track number (0-9) buttons . . . . . . . . . . . . . . . . . . . . . . . . . .7
track skip buttons . . . . . . . . . . . . . . . . . . . . . . . . . . . . . . . . .8
warranty . . . . . . . . . . . . . . . . . . . . . . . . . . . . . . . . . . . . . . .18
wireless remote sensor . . . . . . . . . . . . . . . . . . . . . . . . . . .5, 8
CDC735comb 4/9/99 5:39 PM Page 19
Page 20

SUPPLIED ACCESSORIES
4835 218 37214
Remote Control
Two AA Batteries (4835 138 17012)
Check to be sure the items on this page are packed
with your Compact Disc Changer. These accessories
are provided to help you use or set up your Compact
Disc Changer.
If any of these items are not included, or if you need
to replace an item, contact Philips Service Company
at the address below.
Philips Service Company
P.O. Box 967
Greeneville, TN 37744-0967
Or, call 1-800-851-8885.
IB8008E001
Compact Disc Changer
Printed In China
0VMN02073 / E7723UD * * * * *
4835 321 57015
One-piece Audio Cable
CDC735comb 4/9/99 5:39 PM Page 20
 Loading...