

Page 1
MAGNAVOX
□ tiQaaao oo as
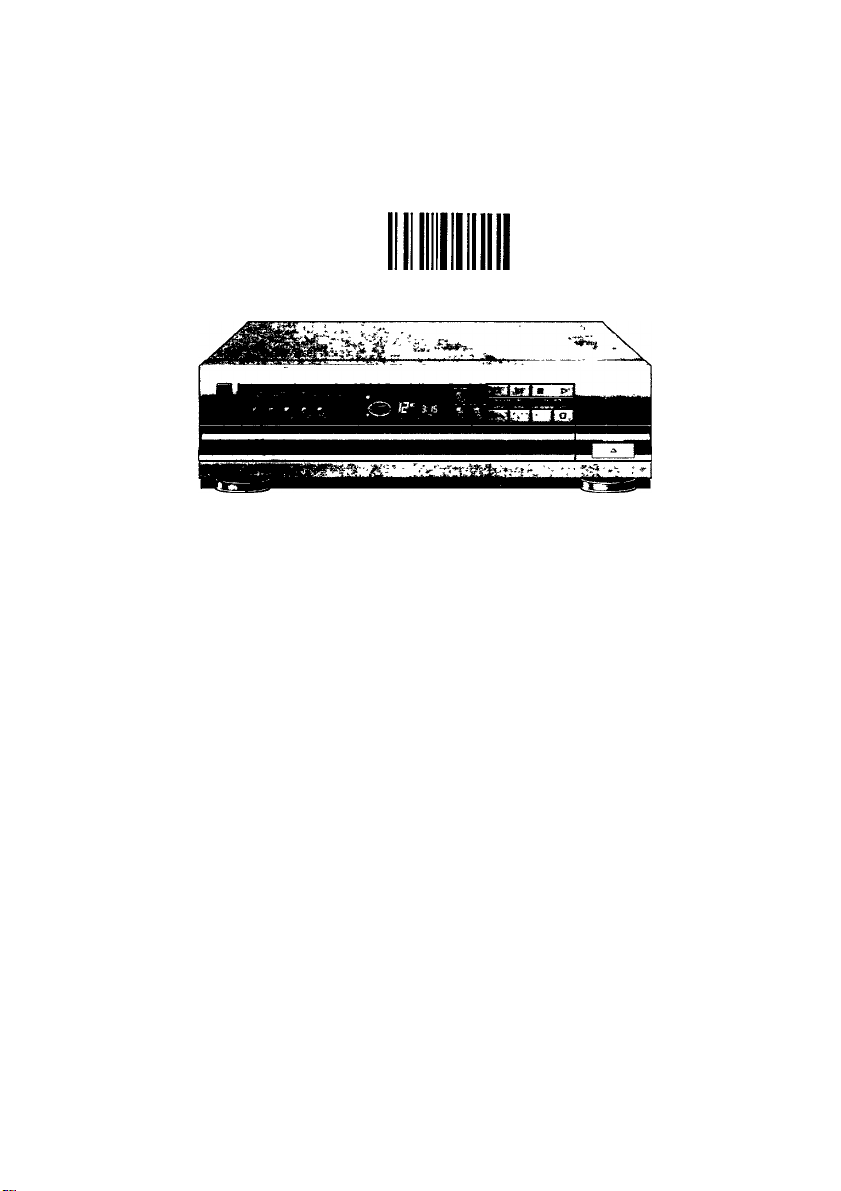
CDC 550 / CDC 552
Compact Disc Changer
Page 2
WARNING
TO REDUCE THE RISK OF FIRE OR
ELECTRIC SHOCK, DO NOT EXPOSE
THIS APPLIANCE TO RAIN OR MOISTU
RE.
CAUTION
USE OF CONTROLS OR ADJUST
MENTS OR PERFORMANCE OF PRO
CEDURES OTHER THAN THOSE SPEC
IFIED HEREIN MAY RESULT IN HAZ
ARDOUS RADIATION EXPOSURE.
The Model and Serial Number of your unit
will be found on the rear of the set.
Please record the Model and Serial Num
ber in the space provided below.
MODEL NUMBER: CDC 550 / CDC 552
SERIAL NUMBER;
CAUTION
RISK OF ELECTRIC SHOCK
A
TO REDUCE THE RISK OF ELECTRIC SHOCK.
DO NOT REMOVE COVER (OR BACK).
NO USER-SERVICEABLE PARTS INSIDE.
TO QUALIFIED SERVICE PERSONNEL
This symbol IS intended to alert the user of the
presence of uninsulated 'dangerous voltage' within
the product's enclosure, that may be of sufficient
magnitude to constitute a risk of electric shock to
persons.
This symbol is intended to alert the user of the
presence of important operating and maintenance
(servicing) instructions in the literature accompa
nying the appliance.
DO NOT OPEN
CAUTION
REFER SERVICING
This set compiles with the FCC-Rules, Part 15,
-21 CFR 1040.10
-21 CFR 1040.11
Page 3

SAFETY INSTRUCTIONS
Read before operating equipment
This product was designed and manufactured to meet stnct quatit/ and safety standards Tnera are. however,
some installation and operation precautions which you should be particularfy aware of
1 Read Instructions - AH the safety and operating
instructions should be read before the appliance
IS operated
2 Retain Instructions - The safety and operating
instructions should be retained for future refer
ence
3 Heed Warnings - AH warnings on the appliance
and in the operating instructions should be
adhered to
4 Follow Instructions ■ AH operating and use
instructions should be followed
5. Water and Moisture • The appliance should not
be used nearwater ■ for example, nearabathiub,
washbowl, kitchen sink, laundry tub, in a wet
basement or near a swimming pool, etc.
6 Carts and Stands - The appliance should be
used only With a cart or stand that Is recommend
ed by the manufacturer »
An appliance and cart combination
should be moved with care Quick
stops, excessive force, and uneven
surfaces may cause the appliance and
cart combination to overturn.
Wall or Ceiling Mounting - The appliance should
be mounted to a wall or ceiling only as recom
mended by the manufacturer.
Ventilation -The appliance should be situated so
9
that its location or position does not interfere with
its proper ventilation For example, the appliance
should not be situated on a bed, sofa, rug, or
similar surface that may block the ventilation
openings;or, placed ina built-in installation, such
as a bookcase or cabinet that may impede the
flow of air through the ventilation openings
9 Heat - The appliance should be situated away
from heat sources such as radiators, heat
registers, stoves, or other appliances (including
amplifiers) that produce heat
10 Pov/er Sources ■ The appliance should be
connected to a power supply only of the type
described in the operating Instructions or as
marked on the appliance.
11. Grounding or Polarization - The precautions that
should be taken so that the grounding or
polanzation means of an appliance Is not
defeated.
12. Power-Cord Protection - Power supply cords
should be routed so that they are not likely to be
walked on or pinched by items placed upon or
against them, paying particular attention to cords
and plugs, convenience receptacles, and the
point where they exit from the appliance
13 Cleaning • The appliance should be cleaned only
as recommended by the manufacturer
14 Power Lines - An outdoor antenna should be
located away from power lines
15. Outdoor Antenna Grounding - If an outside
antenna is connected to the receiver, be sure the
antenna system is grounded so as to provide
some protection against voltage surges and built
up static charges.
Section 810 of the National Electric Code.
ANSI/NfT‘A No. 70-1984, provides Information
j With respect to proper grounding ol the mast ?ind
supporting structure, grounding of the lead-in
wire to an antenna discharge unit, size of
grounding connectors, location of antenna-discharge unit, connection to grounding elec
trodes, and requiiements lor the grounding
electrode. See Rg A
16 Nonuse Periods - "Rie power cord of the appli
ance should be unplugged from the outlet when
left unused for a long period of time.
17 Object and Liquid Entry - Care should be taken
so that objects do not fall and liquids are not
spilled into the enclosure through openings.
18 Damage Requinng Service • The appliance
should be serviced by qualified service person
nel when:
A. The power-supply cord or the plug has been
damaged: or
B Objects have fallen, or liquid has spilled into
the appliance, or
C TTte appliance has been exposed to ram, or
D The appliance does not appear to operate
normally or exhibits a marked change in
performance, or
E The appliance has been dropped, or the
enclosure damaged.
19. Servicing ■ The user should not attempt to service
the appliance beyond that described in the
operating instructions. AH other servicing should
be referred to qualified sen/ice personnel.
FIG.A
EXAMPLE OF ANTENNA GROUNDING
ACCORDING TO THE NATIONAL ELECTRIC CODE INSTRUCTIONS
CONTAINED IN ARTICLE 810 • ’RADIO AND TELEVISION EQUIPMENT
SERVICE ENTRANCE
EQUIPMENT
POWER SERVICE
GROUNDING ELECTRODE SYSTEM
(0 g interior metal water pipe)
OPTIONAL ANTENNA GROUNDING ELECTRODE
DRIVEN 8 ft (2 44 m) INTO THE EARTH
IF REQUIRED BY LOCAL CODES
SEE NEC SECTION 810-21 (I)
(a) Use No. 10 AWG (5 3 mm^) copper,
No. 8 AWG (8 4 mm^) aluminum.
No. 17 AWG (lOmm^) copper-clad steel or
bronze wire, or larger, ground wire.
(|) Secure the antenna lead-in and ground wires to
the house v/ith stand-off insulators spaced from
4-6 feet (1 22-1.83 m) apart
(c) Mount the antenna discharge unit as dose as
possible to where the lead-in wire enters the
house.
(g) Use jumper wire no! smaller than No. 6 AWG
(13 3 mm2) copper, or the equivalent, when a
separate antenna-grounding electrode Is used
See NEC Section 810-21 (J)
TO EXTERNAL ANTENNA
TERMINALS OF PRODUCT
GROUND WIRE®®
GROUND CLAMPS
STAND-OFF
INSULATORS®
—ANTENNA
LEAD-IN WIRE
ANTENNA DISCHARGE
UNIT®
AC POLARIZED PLUG
NOTE TO THE CATV SYSTEM INSTALLER:
This reminder Is provided to call the CATV system installer's attention to Article 820-22 of the NEC that provides
guidelines for proper grounding and. In particular, specifies that the cable ground shall be connected to the
grounding system of the building, as close to the point of cable entry as practical
Page 4

operating Instructions
INSTALLATION
• In the base of the unit there is a red transit
protection clannp. This clamp serves to secure the
mechanism of the CD changer to protect it during
transport. Remove the red transit protection clamp
and store it in the hole © on the rear, see Rg. 2.
• Should you wish to transport the unit again, the
mechanism must be secured once more in order to
prevent damage.
• Always remove the CDs from the tray before
moving the unit.
• Do not cover any vents and make sure that there
is severai centimetres ventiiation room around the
unit.
• Do not place the unit in direct sunlight or cióse to
radiators, heaters, etc. This will help prevent over
heating.
CONNECTIONS AND CONTROLS
Fig. 2
© Jack for remote controi {not on ali versions)
This jack can be connected to the remote jack of
another unit. An optional cord is available from
your dealer.
® CD OUT jacks
For connection to the CD iN or AUX iN jacks on
the amplifier.
© Hole for storing the transport clamp.
© Jack for power supply cord (on some versions a
fixed cord)
Connect the power suppiy cord supplied with the
CD changer to this jack.
Warning: Do not connect the player to the power
supply without first checking that the voitage
stated on the type plate (and/or the setting of the
voltage selector © corresponds to the local
voltage. If this is not the case, consultyour deaier.
The type plate is on the rear of the player.
© Voltage selector (not on all versions)
Use a screw driver or something simiiar to set the
voltage selector to the local voltage.
Fig. 1
O POWER on/off switch. To disconnect the setfrom
the power completely, withdraw the power plug
from the wall outlet.
© CD tray.
© DISC SELECT buttons - for selecting the disc.
© Display.
© PROGRAM - for storing the tracks of a program,
© REViEW - causes aii the programmed track
numbers to appear in the display.
© INTROSCAN - to play the first few seconds of all
tracks of all CDs in the tray.
® PREVSEARCH
• during PLAY mode:
- press briefiy to play the current track again.
When pressed briefly again the piayer goes to the
previous track,
- hoid down for rapid backward playback.
• in the STOP position:
-press briefiy to jump to the previous track
number (e.g. when programming).
© SEARCH NEXT:
• during PLAY mode:
- press briefly to jump to the next track
- hold down for rapid search forward.
• in the STOP position:
- press briefiy to display the next number (e.g.
when programming).
® PLAY/PAUSE - for starting play of a track, or for
interrupting play.
® OPEN/CLOSE - for opening/closing the CD tray.
©STOP for stopping play. When the CD is stationa
ry the highest track number is displayed.
® CLEAR PROGRAM - for clearing a programmed
selection, or clearing the programmed tracks of
a specific CD, when pressing the relevant DISC
SELECT button © immediately thereafter.
® REPEAT: to continuously repeat all CDs, a
programmed selection, or the SHUFFLE
program. Press again to cancel the Repeat
function.
© SHUFFLE button for piaying all tracks of all CDs
in a random order.
® LOAD button - to rotate the disc turntable in the
tray.
® IR - sensor for remote control (not on all versions).
© STAND BY indicator (not on all versions).
REMOTE CONTROL UNIT, Fig. 6
(not on ail versions)
[T] STAND BY: to switch off.
(T] CLEAR: to clear a program.
0 SCAN: same function as © of the CD piayer.
Q — DISC +: to select a disc.
[7] PREV/NEXT: same as PREV/NEXT function of©
and © of the CD piayer.
[7] <M SEARCH t>t>: same as SEARCH function of ©
and © of the CD piayer.
0 PLAY/PAUSE: same function as © of the CD
player.
0 STOP: same function as ® of the CD piayer.
0 REPEAT: same function as ©of the CD player.
Page 5

03 SHUFFLE; same function as ©of the CD player.
Oi] REVIEW: same function as © of the CD player.
03 PROGRAM: same function as © of the CD
player.
OPERATION
Changing discs during play
• Press OPEN/CLOSE @ to open the CD tray
@. Two discs can now be changed.
• Press the LOAD button @ to rotate the
turntable in the tray, after which the other two
discs can be changed.
Warning
• Check that you have removed the red transit
protection clamp on the underside of the player (but
refit it during further transport).
• Always remove the CDs from the tray before
moving the unit.
TO PLAY DISCS
• Switch on the CD changer using the POWER on/off
switch ©.
• Press OPEN/CLOSE ® to open the CD tray ©
• Holding the disc between the thumb and fingers of
the outstretched hand, remove it from the packaging
(Fig. 3) and place it with the label uppermost in the
tray © (Rg. 5). Both standard
(CD singles) can be used.
• Use the PREFERRED POSITION in the tray, when
you insert only one disc.
• When you wish to insert more discs, press the
LOAD button © to rotate the turntable in the tray.
• Press the OPEN/CLOSE button ©to close the tray
© or push the tray to close.
• Press the PLAY/PAUSE button © The CD of the
preferred position will now be played.
• To play another CD. select the desired disc
number with one of the DISC SELECT buttons ©
Play begins automatically within a few seconds. In
display ©you can always see which disc and which
track are being played. Play will stop after the last
disc.
Important
If an E (for Error) appears in the display, the CD-player
cannot read the disc. Possible causes are:
- you inserted the CD the wrong way: the label should
face up (Rg. 5);
- the surface of the disc is badly scratched or dirty,
see 'Maintenance';
- the lens is steamed up because of a sudden
transition from a cold into a warm environment; do not
clean the lens, but let the set acclimatize for a while.
5" discs and 3" discs
Selecting a different disc during play
• Press the desired number of the DISC SELECT
buttons ®.
In display ©the disc number will appearand shortly
afterwards the first track of the chosen disc will start
to play.
Selecting a different track during piay
• Press SEARCH NEXT © (or PREV SEARCH ©)
until the required track number appears in the
display.
- Shortly after this, the chosen track will start playing.
Starting again with the track that is currently
playing
• Press PREV SEARCH © once.
- The track will be started again from the beginning.
Searching for a passage during play
• Hold SEARCH NEXT © or PREV SEARCH ©
pressed down to search for the required passage. If
you release the button, play will continue.
Repeating play
• During play press REPEAT © The REPEAT
indication lights up.
- All discs are played and then repeated.
• Press REPEAT again to stop the repeat function.
The REPEAT indication goes out.
- Play continues as normal.
• REPEAT can also be used during a PROGRAM,
SHUFFLE, and INTROSCAN.
Introscan
The INTROSCAN function can be used in both STOP
and PLAY modes by pressing the INTROSCAN
button © SCAN will then appear in the display.
The INTROSCAN function causes the first few
seconds of evety track of all CDs to be played (in
PLAY mode only the rema/n/ng tracks). After playing
the opening seconds of a track the CD player jumps
Page 6

to the beginning of the next track. The corresponding
track number appears in the display ©.
• Pressing the PLAY/PAUSE button ©cancels the
INTROSCAN function. The CD plays normally from
the current track onwards.
• If you press the SEARCH NEXT button © or the
PREV SEARCH button © the unit remains in the
INTROSCAN function and the first fewseconds of the
next track or the previous track respectively are
played.
• If the INTROSCAN function is not cancelled by
pressing the PLAY/PAUSE button @ or the STOP
button ©. the CD player automatically reverts to the
STOP position at the end of the last CD.
Shuffle play
• Press SHUFFLE © before or during play. The
SHUFFLE indication lights up and a 'shuffle logo’
appears in the display.
- All tracks will now be played in a random order.
During play you can use SEARCH NEXT© to select
a following random track, or PREV SEARCH © to
play the same track again.
• Press SHUFFLE again if you wish to return to
normal play.
Interrupting play
• Press PLAY/PAUSE®
- PAUSE appears in the display.
• Press PLAY/PAUSE again to end pause.
- Play will be resumed where it was stopped.
Stopping play
• Press STOP © if you wish to stop. The disc and
track number which can be played will now appear
in the display.
• Press OPEN/CLOSE © to remove the CDs.
you wish to store tracks using the DISC SELECT
buttons ©.
• Press SEARCH NEXT © (or PREV SEARCH ®)
until the required track number appears in the
display.
• Store the required number using PROGRAM ©.
- Each time you store a track, a P will appear and the
display will blink another 5 seconds.
• Repeat this procedure for the other tracks to be
programmed.
• If you program track numbers which do not exist,
these will be ignored during play and erased from the
memory.
• During normal playback (PLAY or SHUFFLE), you
can program the number of the current track into the
memory by pressing the PROGRAM button ©twice.
Reviewing the program
• Press REVIEW ©.
- All track numbers and CD numbers appear in the
programmed order in the display.
Erasing the program.
• If you wish to erase the program, press CLEAR
PROGRAM ©
• The program of a particular CD will be erased if you
press CLEAR PROGRAM © and the relevant DISC
SELECT button © immediately thereafter.
Playing the program
• Beginning from the STOP mode, press PLAY/
PAUSE ©
- Play begins with the first item in the program.
PROGRAMMING
By programming the player, you can play up to
50 tracks in any desired order. If you exceed the
maximum of 50 tracks, F will appear in the display.
• Press PROGRAM ®.
- PROGFiAM appears blinking for 5 seconds in the
display together with the disc number. A further
selection must be done
blinking period, otherwise you have to press
PROGRAM © again.
• Select the disc number - if necessary - from which
within the 5 seconds
Page 7

Page 8

GENERAL INFORMATION
Maintenance
The disc
If you handle the discs carefully, cleaning will not be
necessary. Dust or dirt can be removed using a soft,
lint-free cloth. Always wipe the cloth in a straight line
from the center to the edge of the disc (Rg. 4).
Never use cleaning agents such as are used for
conventional grammophone records.
Never write on the disc label or on a sticker which has
been placed on the label. This can cause irreparable
damage to the music tracks.
The player
Never oil or lubricate the CD mechanism. Keep the
CD compartment free of dust. The CD tray should
therefore never be left open unnecessarily.
Page 9

Page 10

LIMITED WARRANTY
AUDIO PRODUCTS
• One (1) Year Carry-In Labor Warranty
• One (1) Year Carry-In Service Parts Warranty
This warranty gives you specific legal rights, and you may also have other rights which vary from state to state.
Replacement Parts and Service Labor
For one (1) year from the date of purchase, an Authorized Ser-ice
Center Will replace any part found defective and will repair any product
defect wthout charge to you for parts or labor.
Replacement parts installed dunng the warranty period are warranted
only for the balance of the onginal warranty penod.
Who Is Protected?... Where?
This warranty is extended to №e onginal retail purchaser for products
purchased and used in the U.S A. Puerto Rico and the Virgin Islands.
If you move within these areas, an Authorized Service Center in your
area will honor this warranty for the remainder of the original warranty
period
What the Purchaser Must Do
Beforeyou call for service, check your operating instruction booklet. A
slightadjustment of the customer controls discussed inyour instruction
booklet may save you a service call.
How to Get Warranty Service
To obtain Warranty Senrice you must deliver your Audio Unit, with
ewdence of the purchase date, to an Authorized Service Center for
repair if serw'ce is required during the warranty period. When repair is
completed, you must pick up the unit at the Serrice Center.
* For purchases outside the U.S., see applicable warranty from country of purchase.
Warranty Exclusions
Your Warranty Does Not Cover:
- Labor charges for installation or set-up. adjustment of customer or
preference controls, and installation or repair of audio antenna systems
outside the unit
-Productrepairand/orpartreplacementbecause of misuse, accident,
unauthorized repair or other cause not within the control of Philips
Consumer Electronics Company
-Receptionproblems caused by signalcondilionsoranlenna systems
outside the unit
- An Audio Unit purchased, used orserwced outside the U S A. Puerto
Rico and the Virgin Islands, or used for commercial or institutional
purposes (included but not limited to products used for rental pur
poses).
- Incidental or consequential damages resulting from the product or
use of the product Some states do not allowthe exclusion of incidental
or consequential damages, so the above exclusion may not apply to
you
Aa IMPUEO WARRANTIES INCLUDING IMPUED WARRANTIES OF
MERCHANTABIUTY AND FITNESS FOR A PARTICULAR PURPOSE.
ARE UMITED IN DURATION TO THE DURATION OF THIS EXPRESS
WARRANTY. Some states do not allow limitations on how long an
implied warranty lasts, so the above limitation may not apply to you
Important Reminder
Please fill out and mail your Warranty Registration Card promptly. It will
be easier for us to nolfy you if it should ever be required The return of
ttie Warranty Registration Card is not a condition to Warranty Coverage
Philips Service Company
P.O. Box 55 - Jefferson City - Tennessee TN 37760
S (615) 475-0317
How To Get Service On Your Audio Unit Through Philips Factory Service
To obtain expedient IN or OUT-of-warranty repair:
1 Contact the nearest Philips Factory Serw'ce Center, listed to the nght,
to obtain the costofout-of-warrantyrepairforyour model product. *
2 Pack your Audio Unit in a suitable carton for safe shipment
3 Ship the product to the nearest Factory Serwce Center along with a
letter inside the carton descnbmg the problem. Be sure that the letter
includes your name, address and telephone number. Enclose your
check or morrey order in the amount quoted you by the Factory
Service Center.
4 When your product is receared, it will be repaired in a manner that
meets Philips’ high quality standards and returned to you by prepaid
transportation
* IN or OUT-of-warranty service can also be obtained by delivering the
Audio Unit to a Service Center in your area.
EL 3709-6
Philips Consumer Electronics Company
A Division of North American Philips Corporation
3103 30613032
Philips Factory Service Centers
Atlanta -1898 Leland Dnve,
Marietta. GA 30067 ...............................
Boston -41 Second Avenue.
Burlington. MA 01803
Chicago - 500 East Touhy Avenue.
Des Plaines. IL 60018
Cleveland - 24090 Detroit Avenue - Rear,
WesUake. OH 44145
Connecticut - 77 Grassmere Avenue.
West Hartford. CT 06110 . .
Dallas -1413 Bradley Lane.
Carrollton, TX 75007 ...........................
Los Angeles -12889 Moore Street.
Cemtos. CA 90701 . ...
Miami - 2099 West Atlantic Boulevard.
Pompano Beach. FL33069 ..
New Jersey -178 Manor Road,
East Rutherford. NJ 07073
New Yoi1< -116 Charlotte Avenue.
Hicksville. NY 11801 ...................
Philadelphia - 3599 Meadow Lane,
Cornwell Heights. PA 19020 ..
Tennessee -112 Polk Street,
Greeneviile, TN 37743 .. . .
...................
..........................
..........................
ffl (404) 952-3279
ffl (617) 272-4825
«(708)827-9405
.«(216)899-2(740
«(203)233-5151
«(214)323-8335
«(213)637-7293
«(305)978-0467
«(201)935-0600
«(516)933-1780
«(215)638-7500
«(615)636-5802
89/10
1/0590
 Loading...