

Page 1
.......
.......... ..........- ....
..:' Xl> Reprbcluctor *C<^pact Disc' 34 '
.........
27
PHILIPS
CD Lettore Compaat Disc
@) Compact Disc-Afspi!fer
CD Compact Disc-Spelare 57
@) Compact Disc-Soitin
□ Q a
a 0 z 4 4 1
PHILIPS
42
50
64
Page 2

Page 3

México
Es necesario que lea cuidadosamente su instructivo de
manejo.
PRECAUCION - ADVERTENCIA
I MO ABRIR, RIESGO DE CHOQUE ELECTRICO I
ATENCION
I
VERIFIQUE QUE EL VOLTAJE DE ALIMENTACION
I
SEA EL REQUERIDO PARA SU APARATO
PARA EVITAR EL RIESGO DE CHOQUE ELECTRICO, NO QUITE LA TAPA;
EN CASO DE REQUERIR SERVICIO, DIRIJASE AL PERSONAL AUTORIZADO DE PHILIPS.
I
I
N0M
® Norge
Typeskilt finnes bak pS apparaten.
— I
@) English
I Technical data......................................................................page 72 c
(F) Français
Caractéristiques techniques.
(d) Deutsch
Technischen Daten.
.......................................................................
.....
page 4
.page 12 ,ю
..page 72 n
.Seite 19 .g
..Seite 72
£
M
D)
Ш
n
O'
lil
ю
S
О
Australia
Guarantee and service..........................................................page 75
New Zealand
Guarantee and service..........................................................page 75
Nederlands.
Technische gegevens................
(T) Español.
Datos técnicos
..............
CD Italiano.
Dati tecnici
L
@) Dansk
Tekniske data
...................
.....................................
......................................................................
.pagina 27
...pagina 73
.página 34 *5
...página 73
.pagina 42 о
.pagina 73 я
............side 50
side 74
Ш
Ш
a
Z
IC
(О
ш
c
M
c
я
(D Svenska.
Tekniska data.
Suomi
Tekniset tiedot.
.sida 57 ^
Ю
..sida 74 >
.sivu 64
..sivu 74 ^
W
c
E
о
Page 4
<|D INSTALLATION
Thank you for selecting the Philips CD 951 Compact
Disc Player.
A Compact Disc Player of the state-of-the-art Philips 900
series, the CD 951 combines supreme playback quality with
a high degree of user-friendliness.
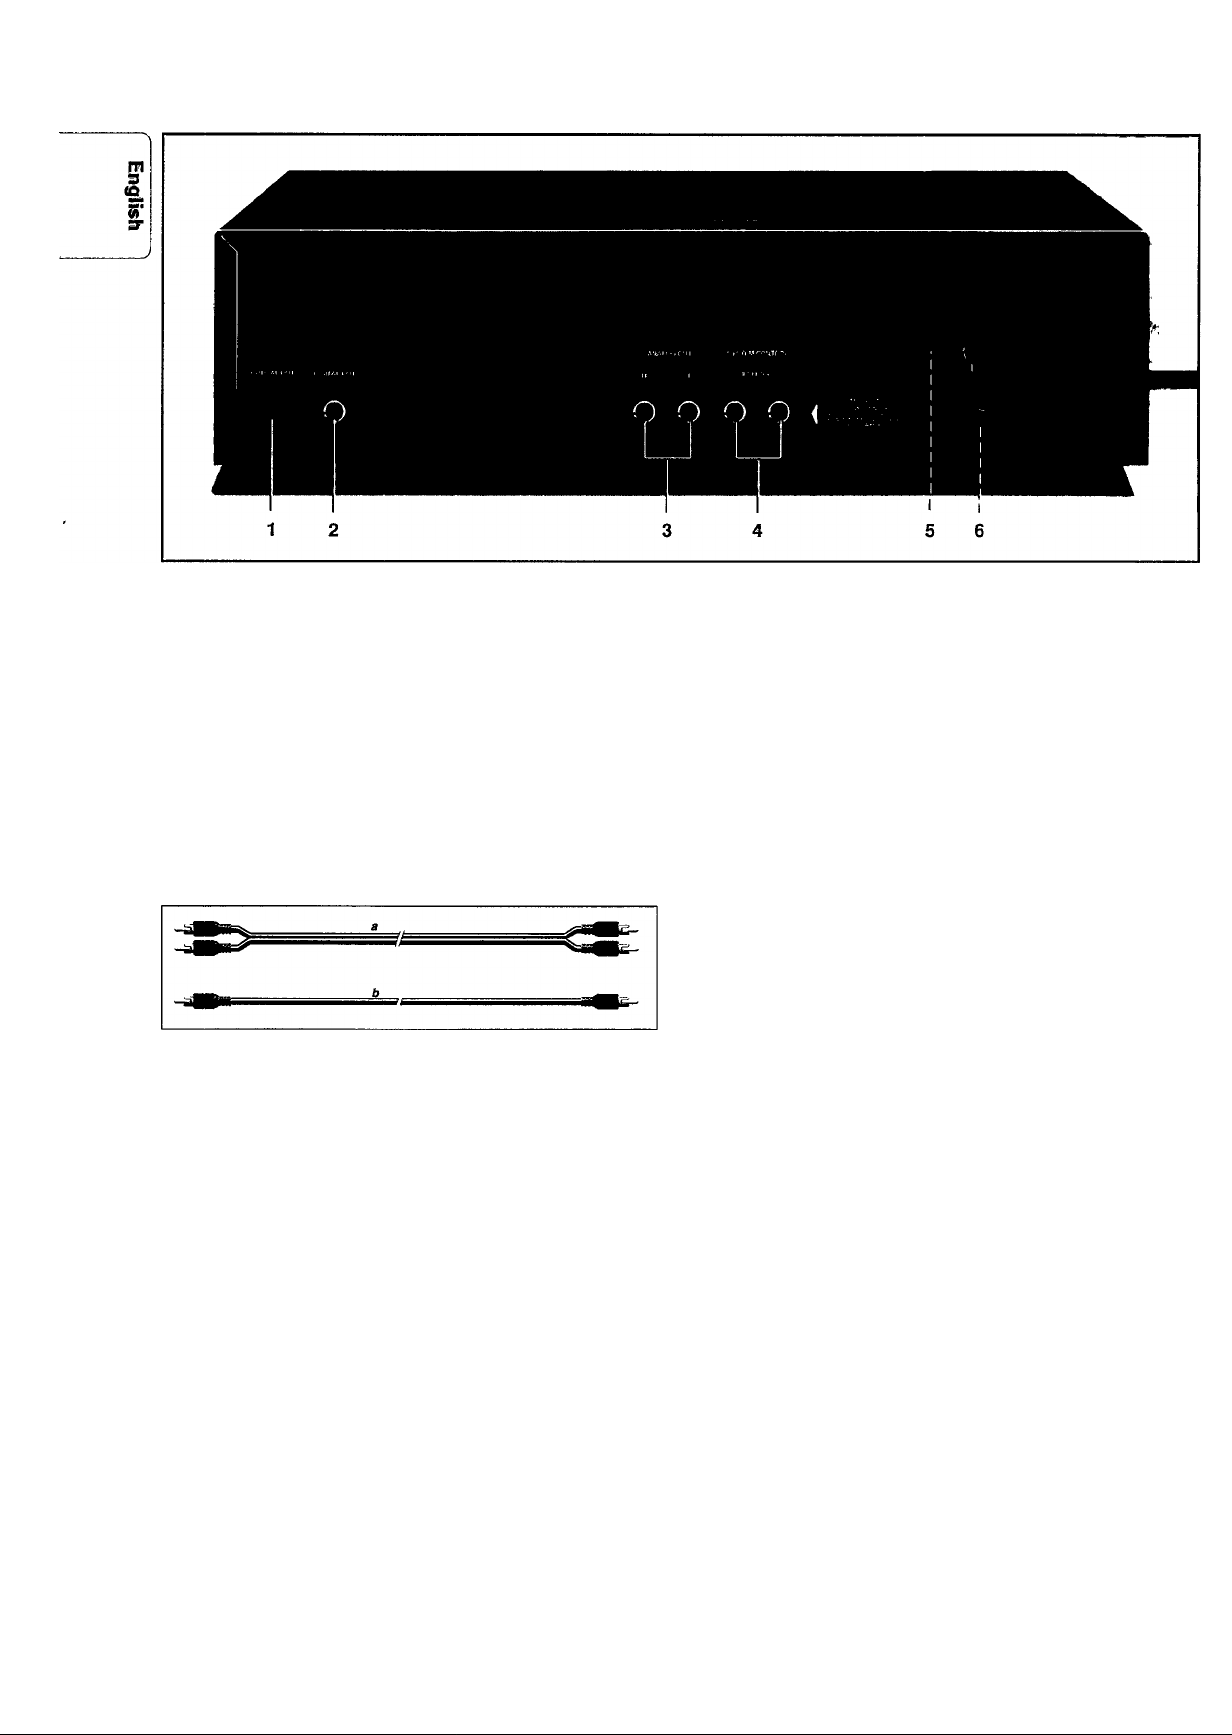
ACCESSORIES
With this player are supplied:
- a connection cable, a (ANALOG OUT);
- a cinch lead, b (DIGITAL OUT);
- a remote control;
- batteries for the remote control.
POWER SUPPLY SETTING
Check that the type plate on the rear of your player indicates
the correct supply voltage.
If your mains supply voltage is different, consult your dealer
or our Service Organisation.
Certain versions of this player are equipped with a voltage
selector (5), which enables you to set the player to the
correct mains voltage yourself. When changing the voltage
setting, it is also necessary to change the mains fuse (6) to
one of the correct rating:
T200 mA (slow blow fuse) for 110/127 V;
T125 mA (slow blow fuse) for 220 V - 230 V/240 V.
CONNECTIONS
OPTICAL OUT
This output supplies a digital signal via an optical path; for
this reason it can only be connected to a Digital Analog
Converter (DAC), a Compact Disc Recorder (CDR), a Digital
Compact Cassette deck (DCC), an amplifier with an optical
digital input or a digital sound processor.
For this use an optical lead.
The output is covered with a protective cap which should
only he removed when the output is in use.
DIGITAL OUT
This output supplies a digital signal and can therefore only
be connected to an input which is suitable for this signal.
Use here the cinch lead supplied (b).
Never connect this socket to a non-digital input of an
amplifier, such as AUX, CD, TAPE, PHONO, etc!
ANALOG OUT
For the connecting cable (a) to the amplifier.
Insert a red plug into the 'R' socket and the other plug into
the 'L' socket.
Insert the two other plugs into the corresponding sockets of
the CD or AUX input of your amplifier.
You can also use the TUNER or TAPE IN connection, but
never the PHONO input!
ESI BUS (Enhanced System Intelligence)
For connecting up the equipment when you are incorpo
rating the player in a HiFi system with ESI BUS connection
(e.g. the PHILIPS 900 series).
When connecting the ESI BUS to the ESI BUS of the HiFi
system the CD player should be sw itched off.
Voltage selector (not all versions)
See ‘Power supply setting'.
Mains fuse holder (not all versions)
See 'Power supply setting'.
Page 5
INSTÄLLÄTIOISl
OPERATION (ID
FITTING A MAINS PLUG (U.K. only)
This apparatus is fitted with an approved moulded 13 Amp plug.
To change a fuse in this type of plug proceed as follows;
• Remove fuse cover and fuse.
• Fix new fuse which should be a BS1362 5A, A.S.T.A. or
BSI approved type.
• Refit the fuse cover.
If the fitted plug is not suitable for your socket outlets, it should
be cut off and an appropriate plug fitted in its place.
If the mains plug contains a fuse, this should have a value of 5A.
If a plug without a fuse is used, the fuse at the distribution board
should not be greater than 5A.
NOTE
The severed plug must be disposed to avoid a possible
shock hazard should it be inserted into a 13A socket
elsewhere.
HOW TO CONNECT A PLUG
The wires in the mains lead are coloured in accordance with
the following code:
BLUE -'NEUTRAL' ('N')
BROWN - 'LIVE' CL')
As these colours may not correspond with the colour markings
identifying the terminals in your plug, proceed as follows:
• The BLUE wire must be connected to the terminal which is
marked with the letter 'N' or coloured BLACK.
• The BROWN wire must be connected to the terminal which
is marked with the letter 'L' or coloured RED.
• Do nof connect either wires to the earth terminal in the plug
which is marked by the letter 'E' or by the safety earth
symbol or coloured green or green-and-yellow.
Before replacing the plug cover, make certain that the cord
grip is clamped over the sheath of the lead - not simply over
the two wires.
FRONT OF PLAYER
1 POWER STANDBY/OFF - Switching on and off.
2 l(nfra) R{ed) SENSOR- Receives the signals from the
remote control.
3 Display - Informs you about the functioning of the player.
4 OPEN/CLOSE - Opening and closing the CD compartment.
5 PHONES - Connecting headphones.
6 LEVEL - Adjusting the volume when listening with headphones.
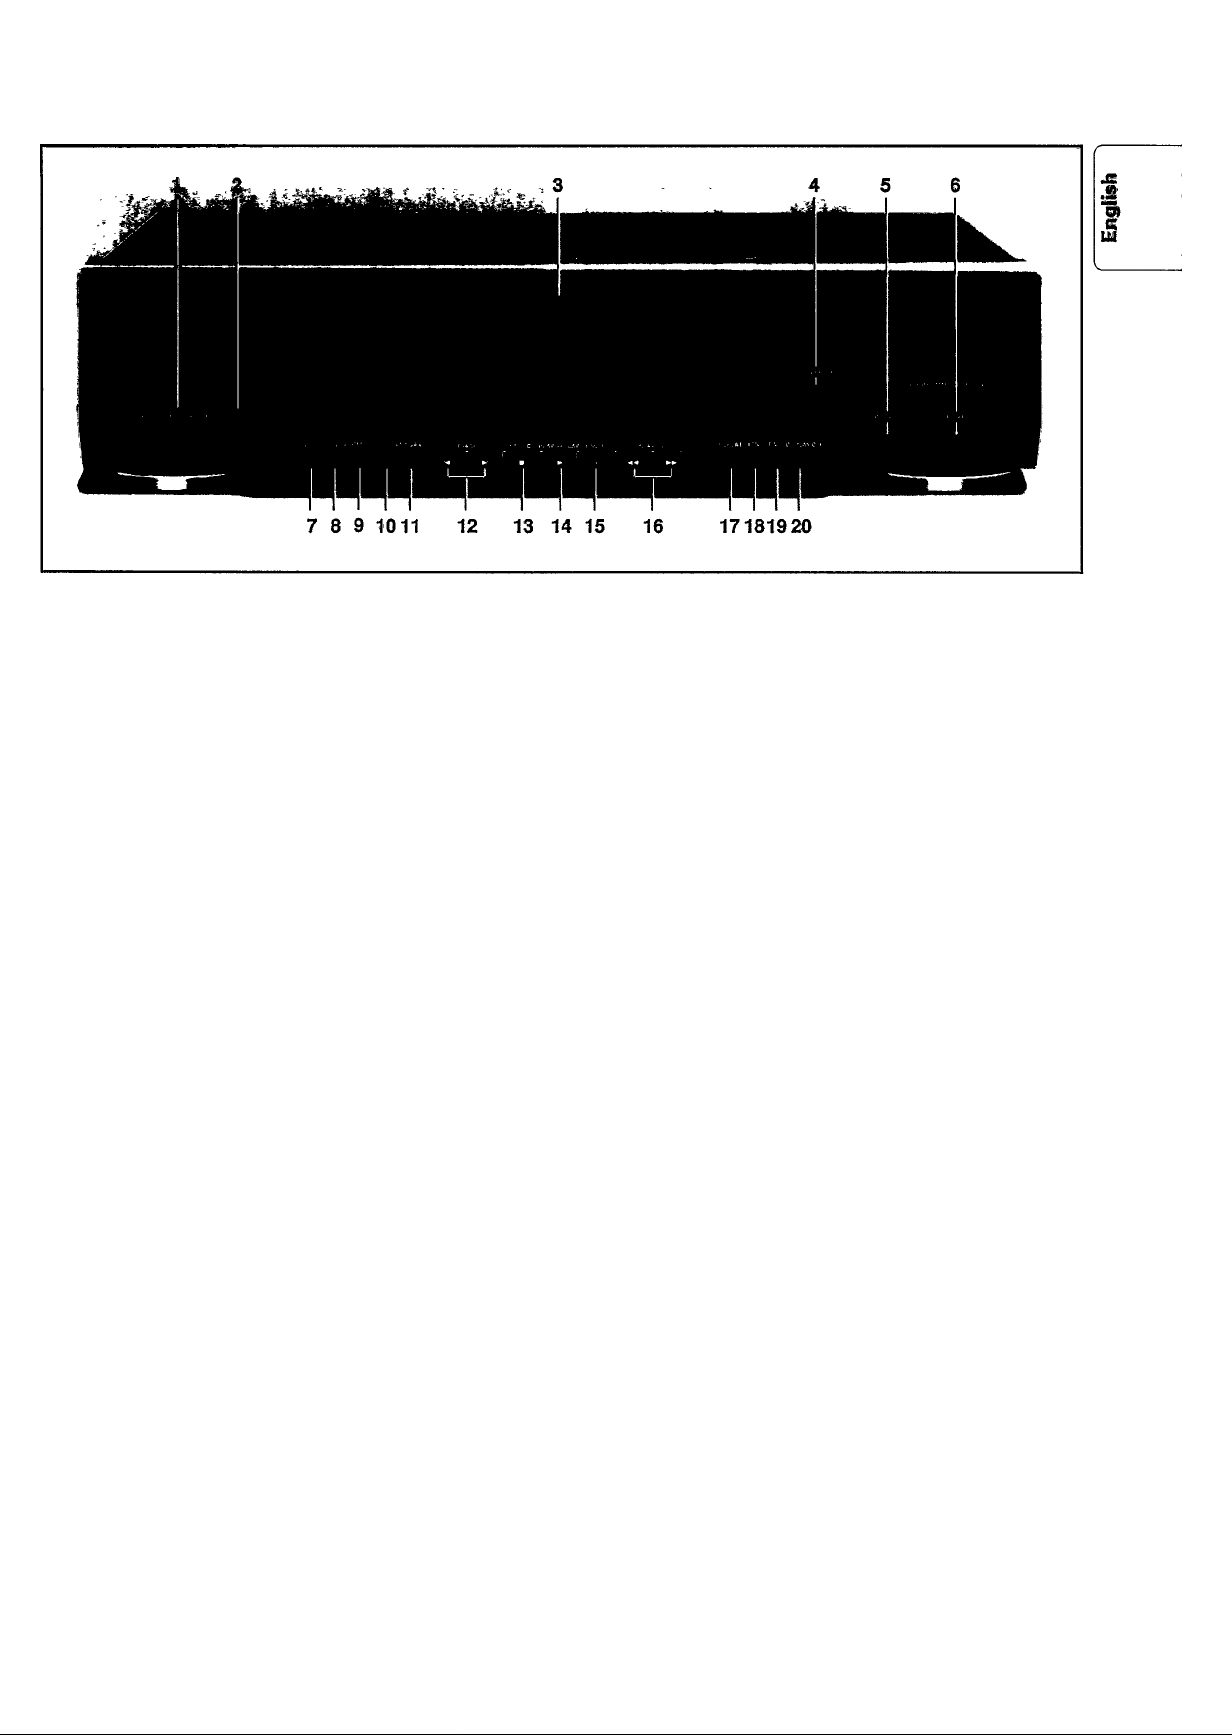
7 PROG(ramme)
- Opening and closing the memory when compiling a programme.
- Storing a programme in the FTS memory.
The P button on the remote control has the same function.
8 REVIEW - Checking a programme.
9 CANCEL
- Erasing track numbers from a programme.
- Erasing favourite track selections and names from the FTS
memory.
The C button on the remote control has the same function.
10 SHUFFLE - Playing in random order.
11 SCAN - Automatically playing the beginning of each track.
12 !◄ TRACKS
- Selecting another track during play.
- Selecting a track to start play with.
13 STOP/CP
- Stopping play.
- Erasing a programme (CP = Clear Programme).
14 PLAY/REPLAY
- Starting play.
- Returning to the beginning of a track.
15 PAUSE - Interrupting play.
16 ◄ ◄ SEARCH ► ► - Fast search to a particular passage
during play.
17 REPEAT - Repeating play.
18 FTS - Activating the FTS memory (FTS = Favourite Track
Selection).
19 TIME - Selecting the time information you want to see.
20 DISPLAY OFF - Switching the display on and off.
The red led above the button serves as on/off indication.
Page 6
(H) OPERATION
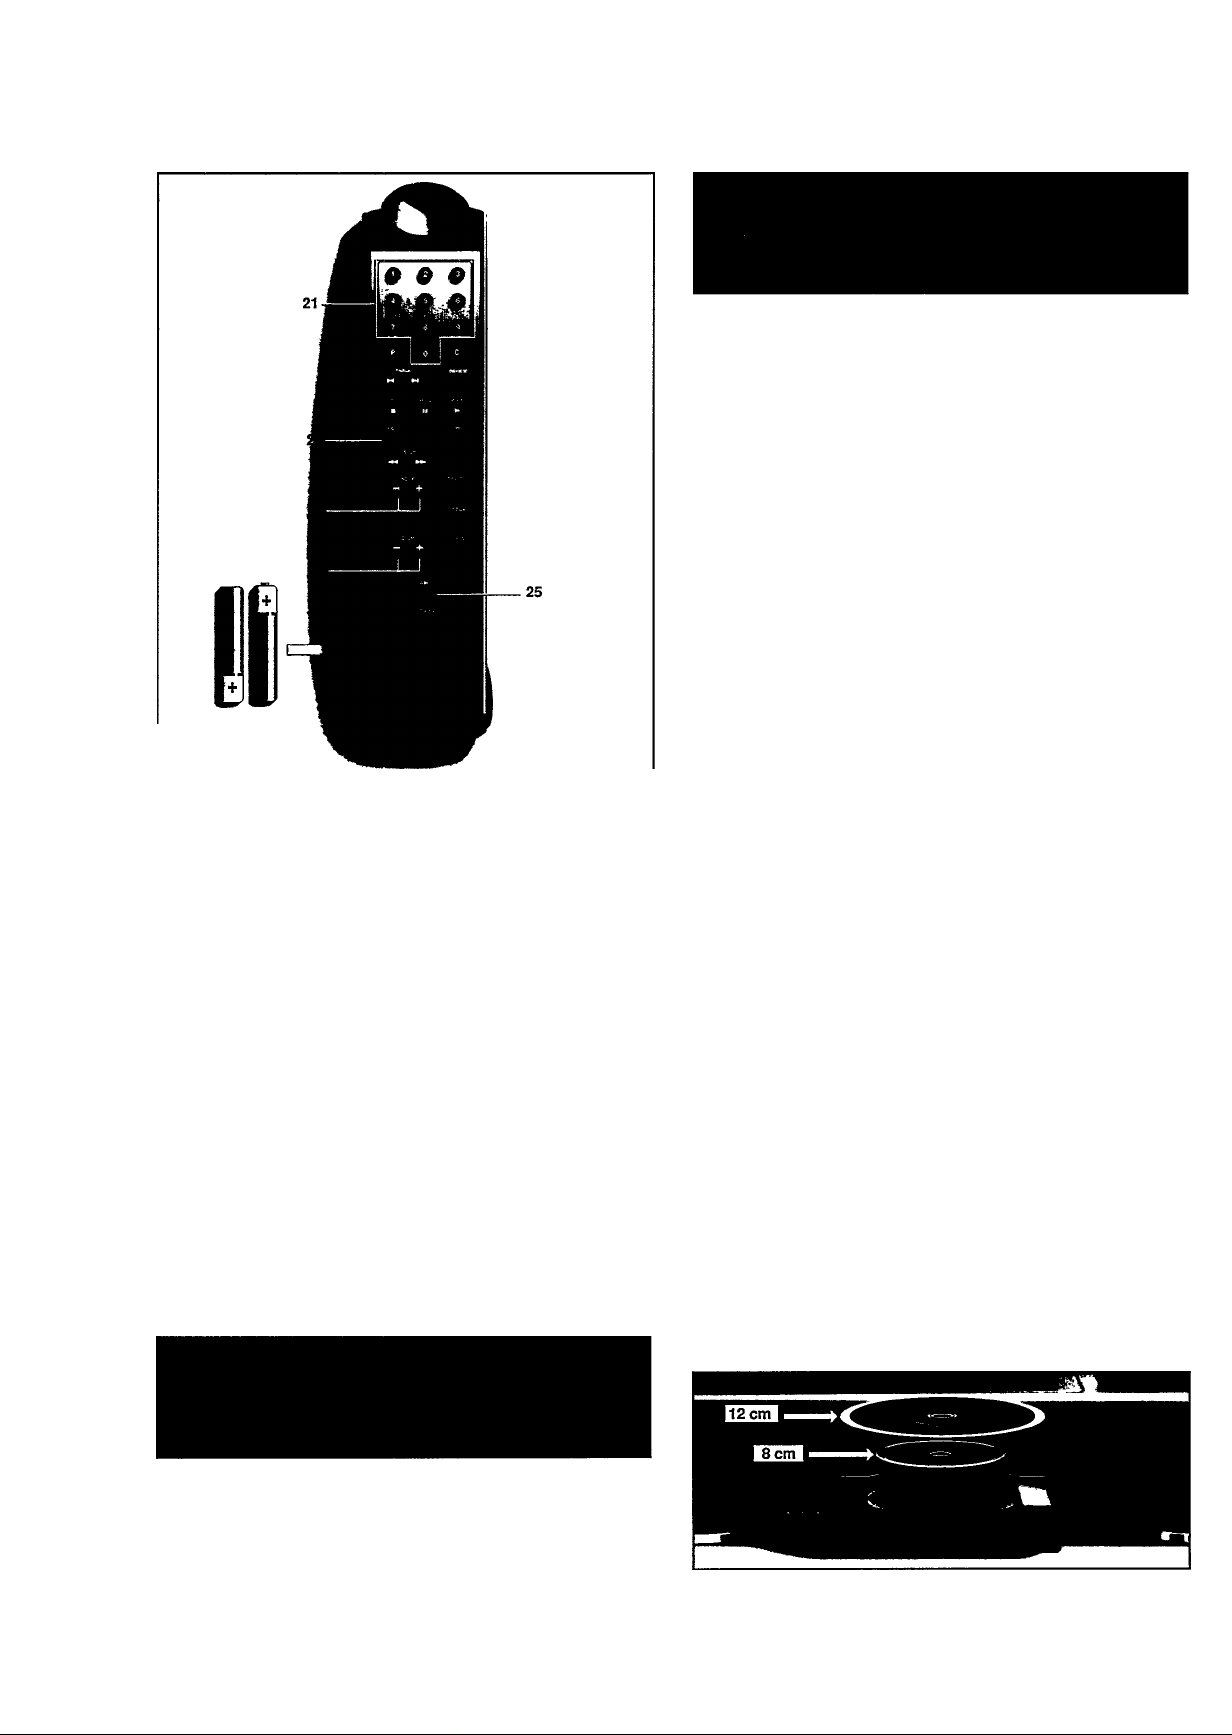
REMOTE CONTROL
m
3
w'
3"
2 X 1.5 V
R03 / UM4 / AAA
21 0-9 digit keys
- Selecting another track during play.
- Selecting a track to start play with.
- Selecting tracks when compiling a programme.
22 FAST - Increasing the search speed when searching for a
particular passage.
23 - INDEX+
- Selecting another index number during play.
- Selecting an index number to start play with.
24 - VOLUME + - Adjusting the sound level when the player
is connected to an amplifier or HiFi system without its own
remote control.
25 A ► B - Setting the starting and stopping point of a
passage to be repeated.
FTS
- Flashes after the FTS key has been pressed.
- Lights up when an FTS programme is played.
A -* B - Lights up when a passage is repeated.
SHUFFLE - Lights up when the tracks are played in random order.
PROGRAM
- Flashes when a programme is being compiled.
- Lights up when a programme is being played.
TRACK - Indicates;
- what track is being played;
- the number of tracks on the CD or in a programme.
TRACK TIME - Indicates the elapsed playing time of the track
being played.
REM(aining) TRACK TIME - Indicates the remaining playing
time of the track being played.
TOTAL REM(aining) TIME - Indicates the remaining playing
time of the CD or a programme.
TOTAL TIME - Indicates the total playing time of the CD or a
programme.
1-20 track number indicator - Shows the number of tracks
on the CD.
+20 - Lights up when there are more than 20 tracks on the CD.
PAUSE - Lights up when play is interrupted.
AUTOSPACE - Lights up when an extra pause is inserted
between the various tracks in the CD DUBBING mode.
READING - Lights up when the CD's contents list is being
scanned.
LOADED - Lights up when you press STOP/CP during the
scanning of the CD's contents list.
N0 DISC - Lights up when you try to start play while there is
no CD in the compartment.
ER R O R - Lights up if you;
- try to start play when the CD is inserted with the printed
side facing down or if the CD is damaged.
- select a non-existent index number.
GO TO PLAT - Lights up if you try to activate a function for
which you must first start play.
GO TO STOP - Lights up if you try to activate a function for
which you must first stop play.
NOTE!
When the CD player is incorporated in a HiFi system with
ESI BUS connection the player can be operated with the
remote control of the system. When connecting the ESI
BUS of the CD player to the ESI BUS of the HiFi system the
CD player should be sw itched off.
PLAYBACK (PLAY/REPLAY)
REPEAT - Lights up when you repeat a CD or a programme.
REPEAT 1 - Lights up when you repeat a track.
(((O - Lights up when the player receives a command from the
remote control (only if no ESI BUS connection has been
made).
PLAYBACK (PLAY/REPLAY)
NOTE!
Use only audio CDs only; no CD-ROM, CD-
Press POWER STANDBY/OFF to switch the player on.
READING lights up, followed by NO DISC.
Open the CD compartment by pressing OPEN/CLOSE.
OPEN lights up.
Insert an audio CD, printed side up, and close the
compartment by pressing OPEN/CLOSE.
or CDV.
Page 7

- CLOSE lights up, followed by READING.
- The number of tracks and the playing time of the CD are
shown on the display.
• Press PLAY/REPLAY to start play.
- The number indicator shows how many tracks are on the
CD; when a track has been played, its number disappears.
- The track being played is always shown under TRACK and
its elapsed playing time is shown under TRACK TIME.
- Play will stop after the last track.
• Press POWER STANDBY/OFF to switch the player off.
OPERATION (ID
STARTING WITH A PARTICULAR TRACK (0-9)
• Key in the required number using the 0-9 digit keys on the
remote control (numbers consisting of two figures must be
keyed in within 2 seconds).
- Play starts from the selected track.
You can also select the number by using TRACK ► ! or
!◄ TRACK and then pressing PLAY/REPLAY.
STARTING WITH A PARTICULAR INDEX NUMBER
(STOP/CP, !◄ TRACK W, - INDEX + and PLAY/REPLAY)
JS
.¡S
"oj
c
U1
NOTE!
- You can also press PLAY/REPLAY immediately after in
serting the CD; the compartment then closes automatically.
- The CD-compartment also closes when the front is
pressed briefly; playback will then start automatically.
- You can interrupt playback by pressing PAUSE; PAUSE
then lights up. Press PLAY/REPLAY to restart; if you first
press PAUSE again and then PLAY/REPLAY, the current
track will start again from the beginning.
- If you press PLAY/REPLAY during play, the current track
will start again from the beginning.
- You can stop playback by pressing STOP/CP or OPEN/CLOSE.
SELECTING ANOTHER TRACK DURING PLAY (0-9)
• Key in the desired number using the 0-9 digit keys on the
remote control (numbers consisting of two figures must be
keyed in within 2 seconds).
- The music stops and a moment later the selected track
begins to play.
You can also select the number by using TRACK W or !◄ TRACK.
SELECTING ANOTHER INDEX NUMBER DURING PLAY
(~ INDEX +)
NOTE!
Index numbers are not indicated specifically on the display.
If the parts of a track have index numbers, this will be
specified in the track list in the CD holder.
• Press INDEX +or- INDEX (on the remote control) until the
required index number appears on the display.
- The music stops and a moment later the selected index
number begins to play.
EF FOF: will light up if the index number selected does not
exist. Play will then start again at the beginning of the current
track.
• Press STOP/CP.
• Select the track number you wish to start with using
TRACK H or !◄ TRACK.
• Then press INDEX + or - INDEX (on the remote control)
until the desired index number appears on the display.
• Press PLAY/REPLAY again.
- Play starts from the selected index number.
ER R O R will light up if you select a non-existent index number.
Play then starts at the beginning of the selected track.
SE LECT TRRCK will light up if you have not selected a track
number first.
SCANNING A CD (SCAN)
• Press SCAN before or during play.
- If the CD compartment was open, it will now close.
- SCAN lights up and the first 10 seconds of each track are
played in turn.
- 10 seconds are counted down each time under REM(aining)
TRACK TIME.
- SlHN lights up before each new track.
• When the player reaches a track which you wish to hear in
full, press SCAN again or PLAY/REPLAY.
PLAYING THE CD IN RANDOM ORDER (SHUFFLE)
• Press SHUFFLE before or during play.
- If the CD compartment was open, it will now close.
- SHUFFLE lights up and all the tracks are now played in a
random order.
- SHUFFLE lights up before each new track.
• Press SHUFFLE again if you wish to return to normal play.
If you press K TRACK, you will return to a track which has
already been played.
If you press TRACK ► !, you will select any one of the following
tracks.
If you press REPEAT twice, the tracks will be repeated in a
different order each time, although the first track played will
always be the same.
SEARCHING FOR A PASSAGE DURING PLAY
SEARCH ► ► )_________________________________________
• Hold ◄ ◄ down to search backwards to the beginning.
• Hold ► ► down to search forwards to the end.
The searching speed is determined by how long a key is
pressed:
- the first 2 seconds fairly slowly, with sound;
- then at the maximum speed, with no sound.
If you reach the end of the last track and release ► ► , play will
resume a few seconds before the end of the CD.
Fast search for a passage:
• Press FAST (on the remote control).
- FAST lights up.
• Press ◄ ◄ orI
At this search speed no sound is audible.
REPEATING A PASSAGE (A ► B)
* •
• During play press A ► B (on the remote control) at the
required starting point.
- A — lights up.
• Press A ► B again at the required stopping point.
- A B lights up.
- The passage between points A and B will now be replayed
continuously.
• Press A ► B again if you wish to return to normal play.
To find the starting and stopping points quickly, you can use
the ◄ ◄ SEARCH ► ► keys.
Page 8

@) OPERATION
PROGRAMMING
REPEATING A TRACK (REPEAT)
m
• Press REPEAT before or during playback.
3
<s
- REPEAT 1 lights up; the track will now be repeated continuously.
W
• Press REPEAT twice to stop the track being repeated.
REPEATING THE CD (REPEAT)
• Press REPEAT twice before or during playback.
- REPEAT lights up; the CD will now be repeated continuously.
• Press REPEAT again to stop the CD being repeated.
CALLING UP OTHER TIME INFORMATION (TIME)
• Press TIME whenever you want to know the remaining
playing time of the track being played (REM TRACK TIME).
• Press TIME again if you wish to know the remaining piaying
time of the entire CD (TOTAL REM TIME).
• Press TIME again if you wish to return to the elapsed playing
time indication of the current track (TRACK TIME).
ADJUSTING THE SOUND LEVEL (-VOLUME +)
IMPORTANT!
- Use the - VOLUME + keys (on the remote control) only if
the player is connected to an amplifier or HiPi system
without its own remote control.
- The setting chosen with - VOLUME +will remain stored
in the player's memory, even if the player is switched off.
Hold - VOLUME pressed down.
l-'OLLlflE lights up.
The output signal from the player will now decrease
gradually.
The successive steps are shown on the dispiay.
• Release the key as soon as the required sound ievel is
obtained.
• Hold VOLUME + pressed down.
- l-'0LUt1E lights up.
- The output signal will now increase again gradualiy to the
maximum level.
• Release the key as soon as the required sound level is
obtained.
SWITCHING THE DISPLAY ON AND OFF (DISPLAY OFF)
• Press DISPLAY OFF to switch the dispiay off.
• Press DISPLAY OFF again to switch the display back on
again.
LISTENING WITH HEADPHONES (PHONES)
• Connect headphones with a 6.3 mm jack plug to the
PHONES socket.
• The sound level is adjusted with the LEVEL control.
______________
STORING A PROGRAMME (0-9 and PROGRAMME)
You can store 30 tracks from each CD in any required
sequence in a programme.
• In STOP mode, press PROG(ramme) to open the memory.
- PROGRAM lights up and PROGRAM starts flashing.
• Key in the required numbers, using the 0-9 digit buttons on
the remote control; every number you key in will be included
immediately in the programme.
- Each time you key in (= store) a track number, the number of
tracks and the playing time of your programme will be
shown under TRACK and TOTAL TIME.
- The track number indicator always shows which numbers
have been stored.
• Press PROG(ramme), STOP/CP or PLAY/REPLAY to quit the
PROGRAM mode.
You can aiso select the numbers by using TRACK N or
!◄ TRACK.
FU LL will light up if you exceed the maximum of 30 tracks.
CHECKING THE PROGRAMME (REVIEW)
• Press REVIEW prior to, during or after programmed play.
- REl-'IEU lights up.
- All the numbers appear in the programmed sequence under
TRACK.
- Under TRACK TIME you will see the playing time of each
track.
NO PROGRAM will light up if no track numbers have yet been
stored.
With REVIEW you can proceed more rapidly to the next block
of information.
PLAYING THE PROGRAMME (PLAY/REPLAY)
• Press PLAY/REPLAY.
- Playback starts with the first number of the programme.
The PROG(ramme), CANCEL and FTS buttons cannot be used
during programmed play; search for a particular passage is only
possible within the track being played.
ERASING A PROGRAMME (STOP/CP or OPEN/CLOSE)
• Press STOP/CP twice or, if the CD has already stopped, just
once; you can also press OPEN/CLOSE straightaway.
- The programme has now been erased.
ERASING A TRACK FROM THE PROGRAMME (CANCEL)
• Press REVIEW before or after programmed play (STOP
mode).
- REl-'IEU lights up.
- All the numbers appear in the programmed sequence under
TRACK.
• Press CANCEL as soon as the number you wish to erase
appears.
- The number disappears from the number indicator; it has
now been erased.
- The display shows the remaining programme time for a few
seconds.
NO PROGRAM will light up if no track numbers have yet been
stored.
PR ESS R El-'IEU will light up if you have not pressed
REVIEW first before cancelling.
___________
________________
•
Page 9

FAVOURITE TRACK SELECTIONS
A programme can also be stored in the payer's permanent
(FTS) memory. Vbur favourite trade selection of a given CD
can ^en be cellbd up end pltiyed vyhenever you wish.
The selection \лЖ1 remain stored in the FTS memory even if
you play the entlfe CO or compile a differem programme
from it.
The number of which can be ^red in the FTS memory
depends on the number of tracks in each programme
NOTBI
The FTS buttoiTinuet always be ^dK^etter with other
buttons. ДЛег pressing PIS, the itiBssage FTS PROGRAM-
PLRY-SHUFFLE-C^CEL appears on the display twice.
Press the next button Ш« Urns dvs message is
dtspleyed, otherwtee therpteyer vytll go back to the STOP
mode.
STORING A FAVOURITE SELECTION
(FTS and PROGRAMME)
• Press FTS.
- FTS starts flashing.
- FTS F'RuGRAM"PLAT "SHUFFLE-CANCEL appears on
the display twice.
• Press PROG(ramme) to open the memory.
• Compile your programme as described in the
'PROGRAMMING' section.
• Press PROG(ramme) again.
- FTS lights up, with next to it the ranking number of this
programme.
- The selection is now stored in the FTS memory under this
number.
NOWl
- You can also compile your programme fiiat and then store
it in the FTS memory by pressing FTS and then
PROG(ramm^.
- If a aelaetion of a particular CD has already been stored,
than it la automatically araeed and the new selection is
stored under the old ranking number.
- If MO SPACE appears, ttien die FTS memory is full: you
must erne one or more old FTS progremmes to make
. room to store the new programme.
ERASING A FAVOURITE TRACK SELECTION
(FTS and CANCEL)
• Press FTS.
- FTS starts flashing.
- FTS PROGRAN-PLAY-SHUFFLE-CANCEL appears on
the display twice.
• Press CANCEL
- CLR GOO lights up.
• Select the ranking number of the selection you wish to
erase, by using TRACK ► ! or !◄ TRACK.
• Press CANCEL again.
- FTS CANCELLED lights up.
- The selection has now been erased.
If you do not know the ranking number:
• Load the CD and close the CD compartment.
• Press FTS.
- FTS starts flashing and FTS PROGRAN-PLAY-SHUFFLECANCEL appears on the display twice.
• Press CANCEL.
- CLR lights up with next to it the ranking number of this
selection.
• Press CANCEL again.
- FTS CANCELLED lights up.
- The selection has now been erased.
NO FTS PROGRAN will light up if no favourite selection has
been stored.
ERASING THE ENTIRE FTS MEMORY
(FTS, REPEAT and CANCEL)
• Press FTS.
- FTS starts flashing and FTS PRDGRAN-PLAY-SHUFFLECANCEL appears on the display twice.
• Press REPEAT and CANCEL simultaneously.
- CLR ALL lights up.
• Press Cancel again.
- CANCEL lights up, followed by FILL FTS CANCELLED.
- The entire FTS memory has now been erased.
NO FTS PRDGRAN will light up if no favourite selections have
been stored.
FTS fiC TIT'E will light up if you press a 'wrong' key while
erasing.
•
oi
e
Ш
FTS PROGRAMMED PLAY (FTS and PLAY/REPLAY)
• Press FTS.
- FTS starts flashing and FTS PRDGRAN-PLAY-SHUFFLECANCEL appears on the display twice.
• Press PLAY/REPLAY.
- The chosen selection will now be played.
• Press STOP/CP twice if you wish to revert to normal play.
If NO FTS PRDGAN appears, no favourite selection has been
stored.
The PROG(ramme), CANCEL and FTS buttons cannot be used
during FTS programmed play; search for a passage is only
possible in the track which is being played.
___________
Page 10

SYSTEM ASPECTS
ENHANCED SYSTEM INTELLIGENCE (ESI)
m
3
;
If the player is connected via the ESI BUS sockets to the
ESI BUS sockets of a HiFi system (e.g. the PHILIPS 900
5‘ i
3"
series), the player can be operated via the remote control of
the system. In addition, the functions mentioned below are
then accessible (if available in the system);
NOTE!
When connecting the ESI BUS to the ESI BUS of the HiFi
system the CD player should be switched off.
CD DUBBING (synchronized recording)
• Set the player to the STOP mode.
• Select the TD mode (if available) on the cassette deck.
• Press CD SYNC. (CD DUBBING) on the cassette deck.
- Playback starts but nothing is being recorded yet; you can
nov\T adjust the recording level.
• Press PLAY on the deck.
- Recording starts and after 6 seconds play starts again at the
beginning of the CD or the programme.
- After each track an extra pause of 4 seconds (AUTO SPACE)
will be inserted.
- AUTOSPACE lights up.
- At the end of side A of the tape, synchronized recording will
stop, except when the ID mode has been selected on the
cassette deck; the CD player will then go into PAUSE mode.
The tape travel direction for side B will be selected
automatically and the current track will be recorded again on
side B of the tape.
- After the last track synchronized recording will stop.
STAND BY
• With the STAND BY button on the remote control of the
system you can set the player to STAND BY mode.
The player will go to STAND BY mode automatically if the
whole system is set to STAND BY mode.
- If the CD compartment was open, it will now close.
- Any programme present will be erased.
• Press any of the following buttons to cancel the STAND BY
mode:
PLAY/REPLAY, STOP/CP, SCAN, SHUFFLE, 0-9,
OPEN/CLOSE, !◄ TRACKS, FTS or PROG(ramme).
TIMER
• Using the tuners TIMER function you can have playback
(of a CD or a programme) started at a particular time; for this
refer to the operating instructions of the tuner (e.g FT930).
- TIMER CANCELLED will light up if there is no CD in the
CD compartment at the moment playback is supposed to
start or if you press any button during playback in the TIMER
mode.
NOTE!
As soon as you start recording, the other player functions
(except TIME and REVIEW) will temporarily be switched
off to prevent the recording being interfered with;
CD-DUBBING flCTIi-'E lights up if you press one of the
other buttons during play/recording.
You can stop playbacIVrecording by pressing STOP/CP or
OPEN/CLOSE; CD-DUBBING CANCELLED then lights
up.
During dubbing the volume set with - VOLUME + will be
cancelled and returned to the sound level set on the
amplifier.
The-VOLUME + keys may not be used during dubbing
as they affect the strength of the signal from the player.
After dubbing the sound level will be returned to the level
set with - VOLUME +.
The CD DUBBING function will be cancelled if the CD
player (or the system) is set to STAND BY mode
AUTOMATIC SOURCE SELECTION
If the AUTO SELECT button on the amplifier is pressed, the
CD player will automatically be activated as soon as you press
PLAY/REPLAY, 0-9, SCAN or SHUFFLE.
AUTOMATIC STOP
If the AUTO SELECT button on the amplifier is pressed, the
CD player will automatically go into the PAUSE mode as soon
as another source in the system is selected (except when CD
DUBBING is active).
10
Page 11

MAINTENANCE
The CDs
• Never write on the printed side of a CD.
• Do not attach any stickers to the CD.
• Keep the shiny surface of the disc clean. Use a soft lint-free
cloth and always wipe the disc in a straight line from centre
to edge.
• Never use cleaning agents for conventional records.
• Detergents or abrasive cleaning agents should not be used
either.
The player
• A chamois leather slightly moistened with water is sufficient
for cleaning the player.
• Do not use cleaning agents containing alcohol, spirits,
ammonia or abrasives.
FAULTS AND THEIR LIKELY CAUSES
If a fault occurs, run through the points listed below before
taking your player for repair. Check whether:
- condensation has formed on the lens of the laser due to a
dramatic change in temperature; this will disappear
automatically after some time;
- the CD has been inserted correctly with the printed side up
and that there is a CD in the compartment;
- the CD is dirty, badly scratched or warped;
- the player has been connected to the PHONO socket of the
amplifier;
- the sound level of the CD player has been set at normal
level. See 'ADJUSTING THE SOUND LEVEL' to change the
setting.
If the fault remains, try to clear it by switching the player off
and on again. If this also fails to help, consult your dealer.
ADDITIONAL INFORMATION ®
£
"5
LU
c
Under ne circumstances should you repair the player
yourself as thh will invalidate the guarantee!
11
Page 12

NOTES
71
Page 13

TECHNICAL DATA
TECHNiSCHE PATEN (typisch)
___________________________
(g)
Typical Audio Performance
Frequency range;..............................................................2 Hz - 20 kHz
Amplitude linearity:
.......................................
0.03 dB (20 Hz - 20 kHz)
Phase linearity:.....................................................0.5° (20 Hz - 20 kHz)
Dynamic range:................................................................100 dB (1kHz)
Signal-to-noise ratio;......................................................115 dB (1 kHz)
Channel separation;
.......................................................
115 dB (1 kHz)
Total harmonic distortion:.............................................0.001 % (1 kHz)
D/A conversion:
Bitstream conversion (128 x oversampling, 1 bit, 3rd order noise
shaper), in differential mode
Audio output level:.....................................................................2
Impedance PHONES socket:..........................................30 - 600 ohms
Power suppiy
Mains voltage and frequency:
see the type plate on the rear of the player
Power consumption;
Safety requirements:
Cabinet
.................................................................
...................................................................
< 10 W
lEC 65
Material/finish:...............................................................................metal
Dimensions (w x h x d):.......................................435 x 122 x 300 mm
Weight;................................................................................4 kg approx.
Subject to modification
This Compact Disc player complies with radio interference
requirements as laid down in EC regulations.
Frequenbereich:
Amplitudenlinearität:
..............................................................
....................................
0,03 dB (20 Hz - 20 kHz)
2 Hz - 20 kHz
Phasenlineantät:..................................................0,5° (20 Hz - 20 kHz)
Dynamikbereich:
Störabstand:
..............................................................
.....................................................................
100 dB (1kHz)
115 dB (1kHz)
Kanaltrennung:.................................................................115 dB (1kHz)
Klirrfaktor:......................................................................0,001% (1kHz)
Digital/Analog-Umsetzung:
Bitstream-Umsetzung (128fach Oversampling, 1 Bit, 3rd order
noise shaper), im Differentialverfahren
Audio-Ausgangssignal:.
Kopfhörer-Impedanz:
..............................................................
......................................................
30 -600 Ohm
2 Vgff
Stromversorgung
Netzspannung und -frequenz: siehe Typenschild auf der
Rückseite des CD-Spielers.
Leistungsaufnahme:..................................................................< 10 W
Sicherheitsanforderungen;
......................................
entspricht lEC 65
Gehäuse
Material:........................................................................................Metall
Abmessungen (B x H x T):
...................................
435 x 122 x 300 mm
Gewicht:..................................................................................ca. 4 kg
Änderungen Vorbehalten
Dieses Gerät entspricht den Rundfunkentstörvorschriften
der Europäischen Gemeinschaft.
CARACTERISTIQUES TECHNIQUES
Caractéristiques audio (typiques)
Bande passante:
...............................................................
____________________
2 Hz - 20 kHz
®
Linéarité d'amplitude;...................................0,03 dB (20 Hz - 20 kHz)
Linéarité de phase:
.............................................
0,5° (20 Hz - 20 kHz)
Dynamique:.....................................................................100 dB (1kHz)
Rapport signal/bruit:......................................................115 dB (1 kHz)
Séparation des voies:......................................................115 dB (1 kHz)
Distorsion harmonique totale:......................................0,001 % (1 kHz)
Conversion numérique/analogique:
convertiseur Bitstream, en mode différentiel
(128 X suréchantillonage, 1 bit, 3rd order noise shaper)
Signal de sortie audio:
Impédance du casque à raccorder:
Alimentation
...........................................................................
...............................
30 - 600 ohms
Tension d'alimentation et fréquence du secteur;
reportez-vous à la plaquette signalétique à l'arrière du lecteur
Consommation électrique:.........................................................< 10 W
Conditions de sécurité:.............................................................C.E.I. 65
Boitier
Matière/finition:.............................................................................métal
Dimensions (I x h x p):
Poids:
.....................................................................................
.......................................
Sous réserve de modifications
435 x 122 x 300 mm
env. 4 kg.
Hiermit wird bescheinigt, daß dieses Gerät in Überein
stimmung mit den Bestimmungen der Amtsblattverfügung
1046/1984 funkentstört ist.
Der Deutschen Bundespost wurde das Inverkehrbringen
dieses Gerätes angezeigt und die Berechtigung zur
Überprüfung der Serie auf Einhaltung der Bestimmungen
eingeräumt.
2 Vgff
Ce lecteur de disques compacts satisfait aux prescriptions
de la CE en matière de déparasitage radio.
72
Page 14

TiCHNISCHE GEGEVENS________________________________®
DATI TECNICI (X>
Audto*$pecifieet!es (typisoh)
Frequentiegebied;..................................................................2 Hz - 20 kHz
Amplitude-lineariteit:
Fise-lineariteit:
Dynamisch bereik:
Signaal/ruisverhouding:
Kanaalscheiding:
Totale harmonische vervorming:
Digitaal/eneloogK)mzetting:
Bitstrearrvomzetting, differential mode (128 x over sampling,
1 bit, 3rd order noise shaper)
Audio-uitgangssignaal:.................................................................... 2 V^g
Impedantie PHONES-uitgang:
.........................................
..........................................................
.................................................................
.........................................................
...................................................................
...........................................
................................................
0,03 dB <20 Hz - 20 kHz)
0,5® (20 Hz - 20 kHz)
100 dB (1 kHz)
115 dB (1 kHz)
115 dB (1 kHz)
0,001 % (1 kHz)
30 - 600 onm
Voeding
Netspanning en -frequende:
zie het tvфeplaвtjв op de echterkant van de speler
Opgenomen vermögen:...................................................................< 10 W
Veiligheidseisen:
Behuizing
Materiaal/afwerking:..........................................................................metaal
Afmetingen (b x h x d):..............................................435 x 122 x 300 mm
Gewicht:..........................................................................................ca. 4 kg
Daze Compact Disc-speler voldoet aan de radiostoringseisen
zoals daze door da EG zijn opgelegd.
..............................................................................
Wijztgingen voorbehouden
lEC 65
Specificazioni audio (tipiche)
Risposta in frequenza:......................................................2 Hz - 20 kHz
Amplitudine-linearità:
Fase-linearità:
....................................
0,03 dB (20 Hz - 20 kHz)
.......................................................
0,5° (20 Hz - 20 kHz)
Gamma dinamica:...........................................................lOOdB (1 kHz)
Rapporto segnale/disturbo:...........................................115 dB (1 kHz)
Separazione dei canali:...................................................115 dB (1 kHz)
Distorsione armonica totale:
........................................
0,001 % (1 kHz)
Conversione D/A:
conversione Bitstream (128 x sovracampionamento, 1 bit, 3rd
order noise shaper), in maniera differenziale
Uscita audio:
Impedenza uscita PHONES:
Alimentazione
...............................................................................
............................................
30 - 600 Onm
2 Vr^g
Tensione e frequenza di rete: ved. la targhetta sul retro del
lettore
Potenza assortoita:
....................................................................
< 10 W
Norme di sicurezza:......................................................................lEC 65
Mobile
Materiale/finitura:.......................................................................metallo
Dimensioni (I x a x p):..........................................435 x 122 x 300 mm
Peso:........................................................................................4 kg circa.
Tutti i diritti di modifìche riservati
Questo lettore di Compact Disc risponde alle esigenze
imposte dalie normative della C.E. circa le interferenze radio.
DATOS TÉCNICOS CD
Especificaciones (nominales) de audio
Margen de frecuencias:....................................................2 Hz - 20 kHz
Linealidad de la amplitud:
ünealidad de la fase:
Margen dinámico;
.............................
............................................
0,03 dB (20 Hz - 20 kHz)
0,5° (20 Hz - 20 kHz)
..........................................................
100 dB (1 kHz)
Relación señal/ruido:......................................................115 dB (1 kHz)
Separación de canales:...................................................115dB (1 kHz)
Distorsión armónica total:............................................0,001 % (1 kHz)
Conversión digital/analógica:
transformación Bitstream en modo diferencial (transformación
del conjunto de bits, 128 x sobremuestreos, 1 bit, 3rd order
noise shaper)
Señal salida de audio:..................................................................2 V^^^g
Impedancia de la salida PHONES;
Alimentación
....................................
30 - 600 ohm
Tensión y frecuencia de red:
ver la placa de tipo detrás del reproductor
Consumo de potencia:................................................................< 10 W
Normas de segundad:
..................................................................
lEC 65
Caja
Material/acabado:..........................................................................
Dimensiones (an x al x pr):
................................
435 x 122 x 300 mm
metal
Peso:........................................................................................unos 4 kg
Salvo modificaciones
NORME DI SICUREZZA
Questo apparecchio corrisponde alle norme di sicurezza VDE
0860 e quindi alle norme internazionali lEC 65 risp. le CEE 1.
L'apparecchio è conforme a! DM-04-1989 (Direttiva
CEE/87/308) sulla soppressione dei radiodisturbi.
Este reproductor de discos compactos cumple las normas
para interferencias de radio establecidas por la CE.
Este aparato lleva los elementos antiparasitarios necesarios
para cumplir con las normas que se establecen en el Anexo
5 del Reglamento sobre Perturbaciones Radioeléctricas e
Interferencias aprobado por el Real Decreto 138/1989 (B.O.E.
de 9 de Febrero 1989).
73
Page 15

TEKNISKE DATA
TEKIMISET TIEDOT
Lyd performance (typisk)
Frekvensgang;
.........................................................
2 Hz - 20 kHz
Amplitude liniaritet:.......................................0,03 dB (20 Hz - 20 kHz)
Fase liniaritet:.......................................................0,5° (20 Hz - 20 kHz)
Dynamik:
...........................................................................
100 dB (1 kHz)
Signal/stoj:..........................................................................115 dB (1 kHz)
Kanaladskillelse:
Total harmonisk forvrængning:
................................................................
...................................
0,001% (1 kHz)
115 dB (1 kHz)
D/A-konvertering:
Bitstream konvertering (128 x oversampling, 1 bit, 3rd order
noise shaper), differental funktion
Lydudgangsniveau:....................................................................2
Impedans for PHONES-bosning:......................................30 - 600 ohm
Stromforsyning
Lysnetspænding og -frekvens:
Se typeskiltet pâ bagsiden af afspilleren
Stromforbrug;.............................................................................< 10 W
Sikkerhedskrav:
Kabinet
............................................................................
lEC 65
Materiale/finish;.............................................................................Metal
Dimensioner (b x h x d):......................................435 x 122 x 300 mm
Vægt:...........................................................................................ca. 4 kg
Ret til ændringer forbeholdes
Dette apparat overholder det gældende EF-direktiv
vedrerende radiost0j.
Àânentoisto (tyypillinen)
Taajuusalue;
......................................................................
2 Hz - 20 kHz
Amplitudilineaarisuus:...................................0,03 dB (20 Hz - 20 kHz)
Vaihelineaarisuus:.................................................0,5° (20 Hz - 20 kHz)
Dynamiikka:...................................................................100 dB (1 kHz)
Signaali-kohinasuhde:......................................................115dB (1 kHz)
Kanavaerotus:..................................................................115dB (1 kHz)
Harmoninen sard:..............................................................0,001% (1 kHz)
D/A-muunto:
Bittivirtamuunto (128 xylinaytteitys, 1 bitti, 3rd order noise
shaper), differentiaalitoiminnassa
Âanen lâhtôtaso:...................................................................... 2
PHONES-liitannân impedanssi:.....................................30 - 600 ohmia
VIrtalahde
Verkkojannite ja -taajuus: katso soittimen takana olevasta
arvokilvesta
Tehontarve:............................................................................. <10 W
Turvallisuusnormit:
Kotelo
...................................................................
lEC 65
Matenaali/viimeistely:............................................................. metalli)
Mitât (I X k X s):
...................................................
435 x 122 x 300 mm
Paino:.......................................................................................nom 4 kg
Oìkeus muutoksün varataan
Luokan I laserlaite
Klass 1 laserapparat
TEKNISKA DATA (s)
Ljuddefen
Frekvensomf^ng;..............................................................2 Hz - 20 kHz
Amplitudavvikelse:
Fasawikelse:
........................................
0,03 dB (20 Hz - 20 kHz)
.........................................................
0,5° (20 Hz - 20 kHz)
Dynamik:............................................................................100 dB (1 kHz)
Signal/brusforhSllande:....................................................115 dB (1 kHz)
Kanalseparation:
................................................................
115 dB (1 kHz)
Harmonisk distortion THD:...........................................0,001% (1 kHz)
D/A-omvandling:
Bitstream-omvandling (128 x oversampling, 1 bit, 3rd order noise
shaper), differentialkoppling
Utsignal:..................................................................................................2 V^ms
Utimpedans PHONES:
Natdelen
........................................................
30 - 600 ohm
Natspanning och natfrekvens:
se typskylten p¿ apparatens baksida
Effektfdrbrukning:..................................................................................< 10W
Sakerhetsfdreskrifter:
Allmanna data
...............................
enligt SEMKO och lEC 65
Material:.........................................................................................metall
Dimensioner (b x h x d):......................................435 x 122 x 300 mm
Vikt:.........................................................................................cirka 4 kg
Reservation for eventuella andringar.
Klass 1 laserapparat
74
Page 16

Australia
<@) New Zealand
Guarantee and Service valid for Australia
The benefits given to the purchaser by this warranty are in
addition to all other rights and remedies, which, under the Trade
Practices Act or other Commonwealth or State law, the purchaser
or owner has in respect of the product.
The Philips product carries the following warranties:
-C-series HiFi-systems 12 months.
-Compact Disc Players: 12 months.
-Home Audio Systems: 6 months.
-Clock radios, portable radios, cassette recorders, cassette
players and radio recorders: 90 days.
Any defect in materials or workmanship occurring within the
specified period from the date of delivery, will be rectified free of
charge by the retailer from whom this product was purchased.
Note: Please retain your purchase docket to assist prompt
service.
Conditions of this warranty
1. AII claims for warranty service must be made to the retailer
from whom this product was purchased. All transport charges
incurred in connection with warranty service or replacement will
be paid by the purchaser.
2. These warranties do not cover batteries and extend only to
defects in materials or workmanship occurring under normal use
of the product where operated in accordance with our instruc
tions.
Philips Consumer Products Division,
Technology Park
Figtree Drive, Australia Centre
Homebush 2140,
New South Wales
Guarantee and Service for New Zealand
Thank-you for purchasing this quality Philips product.
Philips New Zealand Ltd guarantees this product against
defective components and faulty workmanship for a period of 12
months. Any defect in materials or workmanship occurring within
12 months from the date of purchase subject to the following
conditions will be rectified free of charge by the retailer from
whom this product was purchased.
Conditions
1. The product must have been purchased in New Zealand. As
proof of purchase, retain the original invoice or cash receipt
indicating the date of purchase.
2. The guarantee applies only to faults caused by defective com
ponents, or faulty workmanship on the part of the manufacturer.
S.The guarantee does not cover failures caused by misuse,
neglect, normal wear and tear, accidental breakage, use on the
incorrect voltage, use contrary to operating instructions, or
unauthorised modification to the product or repair by an
unauthorised technician.
4. Reasonable evidence (in the form of a sales docket or com
pleted guarantee card) must be supplied to indicate that the
product was purchased no more than 12 months prior to the
date of your claim.
5. In the event of a failure. Philips shall be under no liability for any
injury, or any loss or damage caused to property or products
other than the product under guarantee.
This guarantee does not prejudice your rights under common law
and statute, and is in addition to the normal responsibilities of the
retailer and Philips.
How to claim
Should your Philips product fail within the guarantee period,
please return it to the retailer from whom it was purchased. In
most cases the retailer will be able to satisfactorily repair or
replace the product.
However, should the retailer not be able to conclude the matter
satisfactorily, or if you have other difficulties claiming under this
guarantee, please contact
The Guarantee Controller
Philips New Zealand Ltd.
BP.O. Box 41.021
Auckland
®(09) 84 44160
75
Page 17

CD 951
310411521161
Printed in Singapore
 Loading...