

Page 1
PHILIPS
CD 7mill CD Player
□ '□□□□□Q □05360
Instructions for use
Руководство no эксплуатации
Instrukcja obstugi
N^vod na pouzitie
Hasznaiati utmutatd
N^vod к obsluze
PHILIPS
Page 2

INDEX
MAGYARORSZAG
1 English pages
Русский
page 13
i Polski page 23
Cesky page 33
Slovensky page 43
Magyar page 53
CESKA REPUBLIKA
Vystraha!
Tento pfistroj pracuje s laserovfm paprskem. Pfi nesprévné
manipolaci s prfstrojem (v rozpom s timto névodem) mOze
dojit k nebezpednému ozdFeni. Proto pfistroj za chodu
neotevirejte ani nesntmejte jeho kryty. Jakoukoli opravo vidy
svSfte specializovanému seivisu.
Nebezpecil
Pfi sejmuti krytO a odjiSténi bezpeCnostnfch spinaiu hrozi
nebezpeSf neviditeiného laserového zàfenl!
Chrante se pred pfimym zasahem laserovébo paptsku.
Zaruka
Tento pfistroj byl vyroben s nejvStSi peElivosti
a nejmodemSjSImi virobnfmi metodami. Jsme pfesvSdEeni, ie
vdm bode bezchybnS slouSt, poked budete dodiTovat pokyny
V ndvodu. V pfipadS jakékoli zàvady se laskavS obrafte na svého
obchodnika nebo pfimo na servisni organizaci finmy Philips.
Dbejte té2. aby vdm prodàvajici KdnS vypinil zàniEnf list
Pokud by v5ak byly na pfistroj! shleddny cizi zàsahy, nebo byl
obsluhovén V rozporu s pokyny v nàvodu, zàruEni nàroky
zanikaji. ZàniEni doba je dvanàct mSsicO ode dne prodeje.
Pokud byste z jakétiokoli dùvodu pfistroj demontovali, \idy
nejdh've vytàhndte sifovou zdstrCku.
Pfistroj chraftte pfed jakoukoli vlhkosti i pfed kapkami vody.
Minôségtanüsitâs
A garanciajegyen feltiintetett forgalombahozó véllaiat a 2/1934.
(111.10.) BkM-lpM egyuttes rendelet értelmében taniisitja, bogy
ezen készülék megfelel a mOszaki adatokban megadott értékeknek.
FIgyeletn!
A meghibâsodott készüléket - beleértve a hdiózati csatlakozót is csak szakember (szerviz) javithatja.
Ne tegye ki a készüléket esónekvagy nedvesség hatésénak!
Garancia
A forgalombahozó véllaiat a termékre 12 hónap garanciét véllal.
Névieges feszultség
Bemes mQkSdéshez
Névieges frekvencia.
Teljesitmény
Érintésvédelmi osztély II.
Tómeg
Befoglaló méretek (szélesség, raagasség, mélység)
...................................
.....................
maximélis
névieges
készeniéti éllapotban.
szélesség
magasség.........................................74 mm
mélység.........................................263 mm
...
.....
...................
.......................................
.2 x AAA/R03/Utvl-4
..50 Hz (vagy 50-60 Hz|
230 V
..14 W
....
8W
....2W
.435 mm
Page 3

CONTENTS
PAGE
INSTALLATION
Fitting a mains plug (U.K. only)..........................4
Power supply setting
Connections.........................................................4
Connecting headphones (CD721 only)
FUNCTIONAL OVERVIEW
Front of player
Remote control (CD721 only).............................5
Display.................................................................6
Display messages
PLAYBACK
Normal playback..................................................7
Selecting another track
Searching for a passage
Starting with a particular track.............................8
Playing the CD in random order..........................8
Repeating play
Calling up other time information
Searching the loudest passage...........................9
Setting the fade-in and fade-out time
Scanning a CD ICD721 only)
Adjusting the sound level (CD721 only)
PROGRAMMING
Storing a programme
Playing the programme
Erasing a programme........................................10
ADDITIONAL INFORMATION
Maintenance
Recycling
Technical data...................................................11
Troubleshooting
..................................................
...........................................
..............
.............................
.....................................................
...............................................
.....................................................
.......................................
.....................................
....................................................
........................
..................
.............................
.............
..............................................
........................................
.....................................
.........................
.....................................................
..........................................................
..............................................
5-6
7-9
11
11
4
4
4
5
6
8
8
8
8
9
9
9
10
10
10
11
12
Page 4
INSTALLATION
FITTIIMG A MAINS PLUG (U.K. only) POWER SUPPLY SETTING
This apparatus is fitted
with an approved
moulded 13 Amp plug.
To change a fuse in
this type of plug
proceed as follows:
• Remove fuse cover
and fuse.
• Fix new fuse which should be a BS1362 5A,
A.S.T.A. or BSl approved type.
• Refit the fuse cover.
If the fitted plug is not suitable for your socket
outlets, it should be cut off and an appropriate
plug fitted in its place.
If the mains plug contains a fuse, this should have
a value of 5A. If a plug without a fuse is used, the
fuse at the distribution board should not be
greater than 5A.
NOTE
The severed plug must be disposed to avoid a
possible shock hazard should it be inserted
into a 13A socket elsewhere.
HOW TO CONNECT A PLUG
The wires in the mains lead are coloured in accor
dance with the following code:
BLUE - "NEUTRAL" ("N") and BROWN - "LIVE" ("L").
As these colours may not correspond with the colour
markings identifying the terminals in your plug, pro
ceed as follows:
• The BLUE wire must be connected to the ter
minal which is marked with the letter °N" or
coloured BLACK.
• The BROWN wire must be connected to the
terminal which is marked with the letter °L° or
coloured RED.
• Do not connect either wires to the earth termi
nal in the plug which is marked by the letter "E°
or by the safety earth symbol or coloured green
or green-and-yellow.
Before replacing the plug cover, make certain that
the cordgrip is clamped over the sheath of the
lead - not simply over the two wires.
Check that the type plate at the bottom of your
player indicates the correct supply voltage.
If your mains supply voltage is different, consult
your dealer or our Service Organisation.
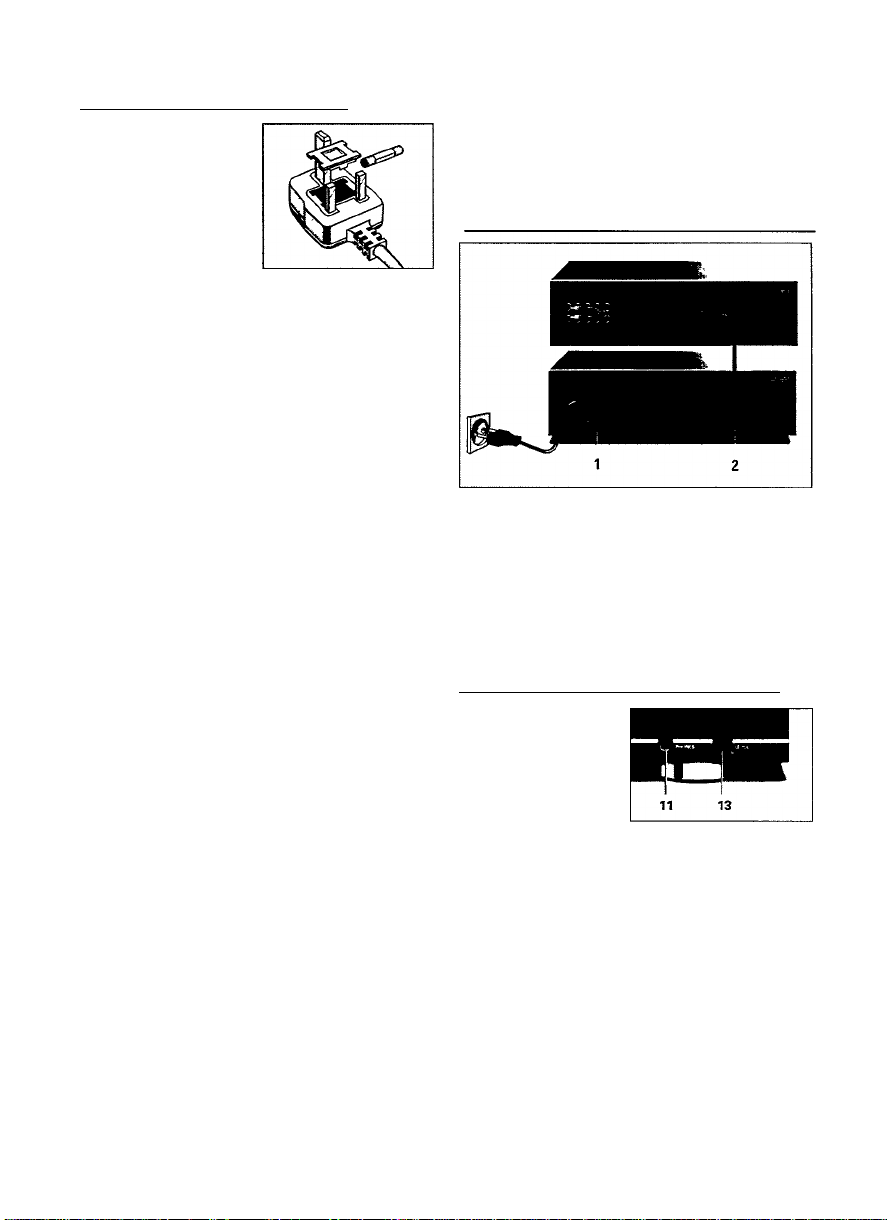
CONNECTIONS
1 Mains connection
• Connect the mains lead to your mains supply.
2 Connecting cabie to the amplifier
• Insert the red plug (right channel) and the white
plug (left channel) into the corresponding sock
ets of the CD or AUX input of your amplifier.
You can also use the TUNER or TAPE INconnection, but never the PHONO input!
CONNECTING HEADPHONES (CD721 only)
• Connect headphones
with a 6.3 mm jack
plug to the PHONES
socket n.
• The sound level is
adjusted with the
LEVEL control 13.
Page 5
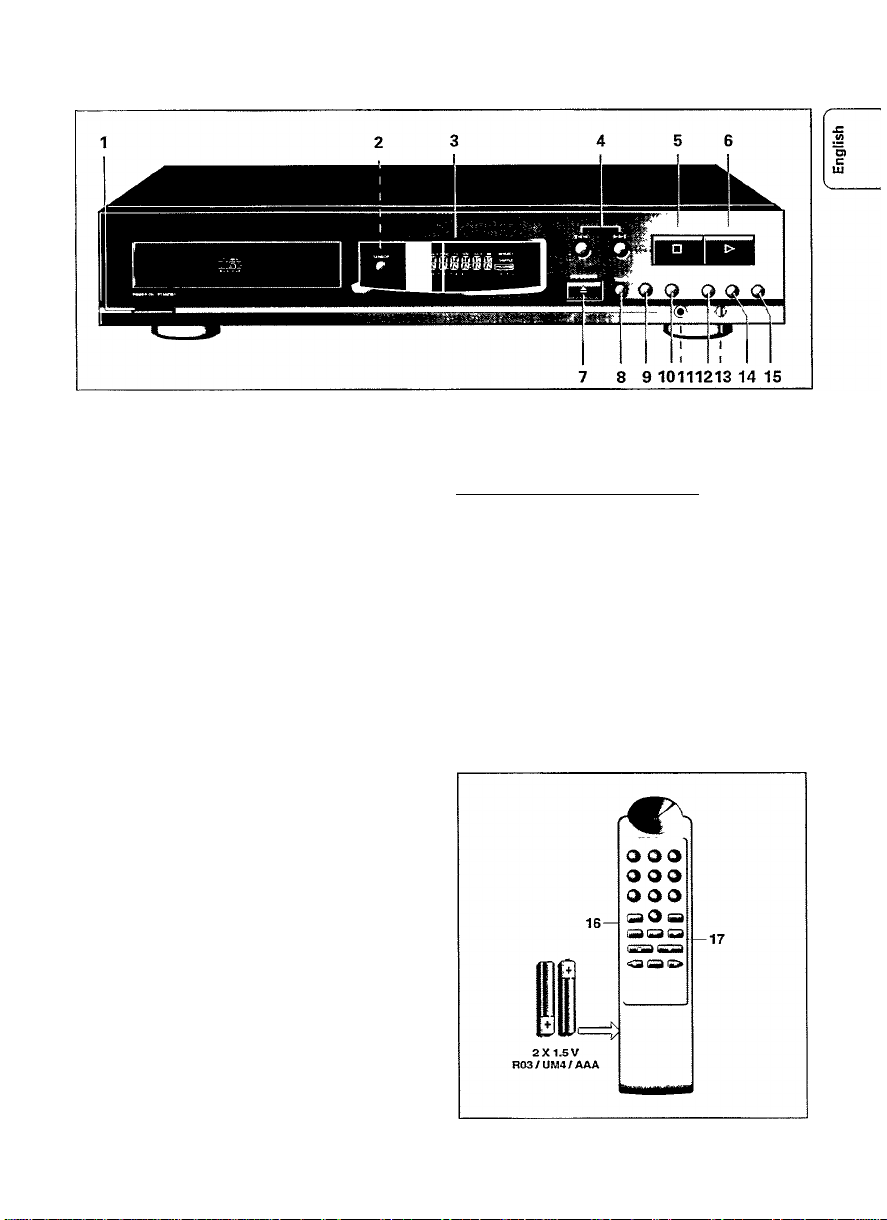
FUNCTIONAL OVERVIEW
FRONT OF PLAYER
POWER ON/STANDBY - Switching on and
1
off.
2 Knfra) R(ed) SENSOR
Receives the signals from the remote control.
3 DISPLAY - Informs you about the functioning
of the player.
4 and
- Selecting another track.
- Selecting a track to start play with.
- Fast search to a particular passage during play.
5 STOP/CP
- Stopping play.
- Erasing a programme (CP = Clear Programme).
6 PLAY/REPLAY
- Starting play.
- Returning to the beginning of a track.
7 OPEN/CLOSE - Opening and closing the CD
compartment. The compartment also closes
when the front is pressed briefly.
8 TIME - Selecting the time information you
want to see.
9 PEAK SEARCH - Searching the loudest pas
sage (peak) on a CD or in a programme when
making a tape recording.
FADER - Fading in and out during play.
10 PROGRAM
- Opening the memory when compiling a pro
gramme.
- Storing tracks in a programme.
11 PHONES (CD721 only)
Connecting headphones.
12 REPEAT - Repeating play.
13 LEVEL (00721 only) - Adjusting the volume
when listening with headphones.
14 SHUFFLE - Playback in random order.
15 PAUSE - Interrupting play.
REMOTE CONTROL (00721 only)
- The life of the batteries of the remote control is
around one year. For replacement only use
batteries of the type R03, UM4 or AAA.
- The buttons on the remote control have the same
functions as the corresponding ones on the player.
____________
- Extra buttons:
16 SCAN - Automatically playing the beginning
of each track.
17 -VOLUME+ -Adjusting the sound level
when the player is connected to an amplifier
or HiFi system without its own remote control.
18 1-0 DIGIT KEYS
- Selecting another track.
- Selecting a track to start play with.
Page 6

FUNCTIONAL OVERVIEW
DISPLAY
rAusE (77 ¡77 177 (77 ¡77/ ¡77(
TRACK REAK TOTAL REM TRACK TIME REREAT 1
iA( lAL m IA\: lAi m
PAUSE
Lights up when play is interrupted.
(«0
Lights up when the player receives a command
from the remote control.
TRACK - Indicates:
- what track is being played;
- the number of tracks on the CD or in a
programme.
PEAK
- Flashes when the loudest passage (peak) on a
CD or in a programme is being searched.
- Lights up when the loudest passage (peak) has
been found.
TRACK TIME
Indicates the elapsed playing time of the track
being played.
REM(aining) TRACK TIME
Indicates the remaining playing time of the track
being played.
TOTAL REM(aining) TIME
Indicates the remaining playing time of the CD or a
programme.
TOTAL TIME
Indicates the total playing time of the CD or a pro
gramme.
REPEAT
Lights up when you repeat a CD or a programme.
REPEAT 1
Lights up when you repeat a track.
SHUFFLE
Lights up when the tracks are played in random
order.
- Flashes when a programme is being compiled.
- Lights up when a programme has been stored
in the player memory.
1-15 track number indicator
Shows the number of tracks on the CD.
DISPLAY MESSAGES
REHIi
Lights up when the CD's contents list is being
scanned.
n o I! i 5 C
Lights up when there is no CD in the CD compart
ment.
no RIJinO lilSC
Scrolls on the display when insert a non audio CD
(CD-ROM, CD-I or CDV).
lilRDRC TRRCK
Scrolls on the display if you select a non-existent
track number.
CD TO PLRy
Scrolls on the display if you try to activate a func
tion for which you must first start play.
CD TO 5TDP
Scrolls on the display if you try to activate a func
tion for which you must first stop play.
Lights up when there are more than 15 tracks on
the CD.
Page 7

PLAYBACK
NORMAL PLAYBACK (PLAY/REPLAY)
NOTE! Use only audio CDs; no CD-ROM, CD-1 or CDV.
• Press POWER ON/STANDBY 1 to switch the player on.
• Open the CD compartment by pressing OPEN/CLOSE 7.
- OPEN lights up.
• Insert an audio CD, printed side up, and close the compartment by pressing
OPEN/CLOSE 7.
CLOSE lights up, followed by READ. The number of tracks and the playing time of the CD
are shown on the display.
WACX TOTAt. tac
I
C.b _t: T U
4 S -9
749 19 41 42
• Press PLAY/REPLAY 6 to start play.
You can also press PLAY/REPLAY immediately after inserting the CD; the compartment
then closes automatically.
You can also close the CD compartment by pressing its front; playback will then start
automatically.
- The number indicator shows how many tracks are on the CD; when a track has been
played its number disappears.
1 2 3 4 5 6 7 •9 ‘10 'll 12 '7 -8 S ‘10 'll '12
The track being played is always shown under TRACK and its elapsed playing time is
shown under TRACK TIME.
□ cr C u n
3 SH5
S 4 7 4 9 to <1 42
- Play will stop after the last track.
• Press POWER ON/STANDBY 7 to switch the player off.
You can interrupt playback by pressing PAUSE 75; PAUSE then lights up.
Press PLAY/REPLAY 6to restart; if you first press PAUSE again and then PLAY/REPLAY,
the current track starts again from the beginning.
You can also restart play by pressing SCAN 16 (on the remote control - CD721 only) or
SHUFFLE 14.
If you press PLAY/REPLAY during play, the current track starts again from the beginning.
You can stop playback by pressing STOP/CP 5 or OPEN/CLOSE 7.
Page 8

PLAYBACK
SELECTING ANOTHER TRACK (!◄◄ ►►!)
• Press ►►14 or
4 (less than 0.5
seconds) untill the
desired track number ■■
appears under TRACK.
- The music stops and a moment later the
selected track begins to play.
You can also enter the number by using the 1-0
digit keys 18 (on the remote control).
Numbers consisting of two figures must be keyed
in within 2 seconds.
SEARCHING FOR A PASSAGE (!◄◄ ►►))
• Hold 4 down to search backwards to the
beginning.
• Hold ►►! 4 down to search forwards to the
end.
The searching speed is determined by how long a
key is pressed:
- the first 2 seconds fairly slowly, with sound:
- then at the maximum speed, with no sound.
If you reach the end of the last track and release
►►I, play will resume a few seconds before the
end of the CD.
STARTING WITH A PARTICULAR TRACK
«◄◄►►I)
• Press ►►14 or
4 (less than 0.5
seconds) untill the
desired track number ■■
appears under TRACK.
• PressPLAY/REPLAYa
- Play starts from the selected track.
You can also enter the number by using the 1-0
digit keys 18 (on the remote control).
Numbers consisting of two figures must be keyed
in within 2 seconds.
In this case you do not have to press
PLAY/REPLAY; play will automatically start from
the selected track.
PLAYING THE CD IN RANDOM ORDER
(SHUFFLE)___________________________
• Press SHUFFLE 14 before or during play.
- If the CD compartment was open, it will now
clos6.
- SHUFFLE lights up
and all the tracks are
now played in a
random order.
• Press SHUFFLE again if you wish to return to
normal play.
If you press 4, you will return to a track
which has already been played.
If you press ►► 4, you will select any one of the
following tracks.
If you press REPEAT 12, twice the tracks will be
repeated in a different order each time, although
the first track played will always be the same.
REPEATING PLAY (REPEAT)
Repeating a track:
• Press REPEAT 72 before or during play.
- REPEAT 1 lights up;
the track will now
be repeated
continuously.
• Press REPEAT twice to stop the track being
repeated.
Repeating the CD:
• Press REPEAT 12 twice before or during play.
- REPEAT lights up;
the CD will now be
repeated
continuously.
• Press REPEAT again to stop the CD being
repeated.
_____________
CALLING UP OTHER TIME INFORMATION
(TIME)____________
• Press TIME 8
whenever you want
to know the remain
ing playing time of
the track being played (REM TRACK TIME).
Page 9

PLAYBACK
• Press TIME again if
you wish to know
the remaining playing
time of the entire CD
(TOTAL REM TIME).
• Press TIME again if
you wish to return to
the elapsed playing
time indication of the
current track (TRACK TIME).
SEARCHING THE LOUDEST PASSAGE
(PEAK SEARCH)
• In STOP mode, press PEAK SEARCH 9.
_____________________
- PEAK starts flashing
and the CD or the
programme will now
be scanned for the
loudest passage (the peak).
- The display shows the track being scanned and
its elapsed playing time.
- When the loudest
passage has been
ifound it will be
repeated continuous
ly (from 2 seconds before the peak until 2 sec
onds after the peak)
• You can now adjust your recording device.
• You can stop the search by pressing STOP/CP
5 or OPEN/CLOSE 7; if you press
PLAY/REPLAY 6, the CD or the programme will
be played from the beginning.
The following functions can only be operated
NOTE!
using the remote control ICD721 only).
SCANNING A CD (SCAN)
• Press SCAN 75 before or during play.
- If the CD compartment was open, it will now
close.
- SCAN lights up for
2 seconds and the
first 10 seconds of
each track are played
in turn; 10 seconds are counted down each
time under REM TRACK TIME.
• When the player reaches a track which you
wish to hear in full, press SCAN again or
PLAY/REPLAY 6.
ADJUSTING THE SOUND LEVEL (-VOLUME +)
NOTE!
- Use the - VOLUME + keys only if the player is
connected to an amplifier or HiFi system with
out its own remote control.
- The setting chosen with - VOLUME + will be
cancelled when-the player is switched off.
• Hold - VOLUME 77 pressed down.
- VOL lights up; the output signal from the player
will now decrease gradually.
- The successive steps are shown on the display.
SETTING THE FADE- IN AND FADE-OUT
TIME (FADER)__________________________
• During play press FADER 9.
- The sound level will now gradually decrease
(FADE OUT), after which the player will go into
the PAUSE mode.
FFÌSEE FRUE r
FRSE-
• Press FADER again.
- Play continues and the sound level will increase
again to the originally set level (FADE IN).
FRUE.
FRJjE z
FRUEE
yOLE- yDLE_
yOLE
yOL =
II n 1
V u 1____
Release the key as soon as the required sound
level is obtained.
Hold VOLUME + 77 pressed down.
VOL lights up; the output signal will now
increase again gradually to the maximum level.
The successive steps are shown on the display.
it n 1
y U 1
______
yOLE_ yDLEz
yOLz
yOLE
lini z z
MU!
________
Release the key as soon as the required sound
level is obtained.
Page 10

PROGRAMMING
STORING A PROGRAMME (PROGRAM and
You can store 30 tracks from each CD in any required sequence in a programme.
FULL lights up if you exceed the maximum of 30 tracks.
• In STOP mode, press PROGRAM 10 to open the memory.
- PROGR lights up and starts flashing.
• Press or l-^h^ 4 (less than 0.5 seconds) untill the first desired track number
appears under TRACK.
E IS'5
• Press PROGRAM 10 again.
- The track number has now been stored in the player's memory.
• Select the other track numbers required and store each track by pressing PROGRAM.
- The number of tracks and the playing time of your programme will be shown under
TRACK and TOTAL TIME.
- The track number indicator always shows which numbers have been stored.
PLAYING THE PROGRAMME (PLAY/REPLAY) ERASING A PROGRAMME
• Press PLAY/REPLAY 6.
- Playback starts with the first number of the pro
gramme.
All keys (except PROGRAM 70and PEAK SEARCH
S) can be used during programmed play.
Search for a particular passage is only possible
within the track being played.
(STOP/CP or OPEN/CLOSE)
During play:
• Press OPEN/CLOSE 7 or STOP/CP 5 (twice).
In STOP mode:
• Press OPEN/CLOSE 7oror STOP/CP 5 (once).
- The programme has now been erased.
10
Page 11

ADDITIONAL INFORMATION
MAIIMTENAIMCE
The CDs
• Never write on the printed side of a CD.
• Do not attach any stickers to the CD.
• Keep the shiny surface of the
of the disc clean.
Use a soft lint-free cloth and
always wipe the disc in a
straight line from centre to
edge.
• Never use cleaning agents
for conventional records.
• Detergents or abrasive cleaning agents should
not be used either.
The player
• A chamois leather slightly moistened with
water is sufficient for cleaning the player.
• Do not use cleaning agents containing alcohol,
spirits, ammonia or abrasives.
RECYCLING
Please observe the local regulations regarding the
disposal of packing materials, exhausted batteries
and old equipment.
1. All redundant packaging material has been
omitted. We have done our utmost to make
the packaging easy separable into three mono
materials:
- cardboard (box)
- expandable polystyrene (buffer)
- polyethylene (bags, protective foam sheet)
2. Your set consists of materials which can be
recycled if disassembled by a specialized com
pany.
3. Do not dispose of exhausted batteries with
your household waste.
TECHNICAL DATA______________________
Typical Audio Performance
Frequency range:.............................2 Hz - 20 kHz
Amplitude linearity:
Phase linearity:
Dynamic range:
Signal-to-noise ratio:
Channel separation:
Total harmonic distortion:
Audio output level:
Impedance PHONES socket (CD721 only):
.......................................................
Power supply
Mains voltage and frequency:
see the type plate on the rear of the player
Power consumption:
Safety requirements:
Cabinet
Material/finish:...................metal and polystyrene
Dimensions (w x h x d):
Weight:
...............................................
This Compact Disc player complies with
radio interference requirements as laid
..........
.......................
................................
Subject to modification
down in EC regulations.
0.3 dB (20 Hz - 20 kHz)
4° (20 Hz - 20 kHz)
....................
.........................
......................................
....................
...................................
........
90 dB (1 kHz.)
.............
0.003% (1kHz)
< 10 W approx.
435 x 74 x 263 mm
90 dB (1kHz)
90 dB (1kHz)
2 Vrms
30 - 600 ohms
lEC 65
4 kg approx.
11
Page 12

TROUBLESHOOTING
If a fault occurs, run through the points listed below before taking your player for repair.
If the fault remains, try to ciear it by switching the piayer off and on again, if this aiso fails to help,
consult your dealer.
Under no circumstances should you repair the player yourself as this will invalidate the
guarantee!
SYMPTOM
- Playback of the CD does not
start or interruption of play
back.
- Sound skips (at the same
part).
- The CD skips tracks.
- Playback does not start from
the first track.
- No sound or bad sound.
- No sound or bad sound on
headphones (CD721 only).
POSSIBLE CAUSE
- The CD has been loaded
upside down.
- No CD inserted.
- The CD is badly scratched or
dirty.
- Moisture condensation on
the lens.
- The CD is dirty.
- The CD is damaged or dirty.
- PROGRAM or SHUFFLE
activated.
- Loose or wrong connections.
- Strong magnetic fields near
the CD player.
- Level control set to - posi
tion.
- Headphones plug is dirty.
REMEDY
• Reload the CD, label side up.
• Insert a CD, label side up.
• Clean the CD with a soft,
lint-free cloth.
• Leave the CD player in a
warm environment until the
moisture evaporates.
• Clean the CD with a soft,
lint-free cloth.
• Replace or clean the CD.
• Switch off SHUFFLE or dear
programme.
• Check connections.
• Find another place for the
unit or change connections.
• Set level control
• Clean plug.
- Remote control does not
function fCD727 only).
- Remote control commands
are not properly received
(CD721 only).
12
- Batteries are empty.
- The distance between
remote control and
CD player is larger than 10
metres.
• Replace the batteries.
• Use remote control receiver
EM 2200/2201.
• Reduce the distance
between remote control and
CD player.
Page 13

Page 14

"Meet PHILIPS at the internet
http://www.philips.com"
CD 711/721
3139 116 16411
TL-9670/34-06
 Loading...