

Page 1

liüiïiül CONSUMER ELECTRONICS
□ iioaaQo 003874
CD 614
PHILIPS
Compact Disc Player
Lecteur de Disques Compacts
Page 2

English
; Illustrations
Installation ........................................................pages
Operation ....................................................page 5-7
Programming
Other possibilities
Additional information
Technical data
...............................................
.............................................................
..................................................
..........................................
....................................
..............................................
pages
pages
page 8
page 9
page 9
page 10
Français
Illustrations
Mise en service
Utilisation ................................................page 11-14
Programmation........................................page 14-15
Autres possibilités
Informations complementaires .......................page 16
Caractéristiques techniques............................page 16
............................................
....................................................
..............................................
...........................................
page 11
pages
page 11
page 15
This digital apparatus does not exceed the
Class B limits for radio noise emissions from
digital apparatus as set out in the Radio Interfer
ence Regulations of the Canadian Department of
Communications.
Le présent appareil numérique n’émet pas de
bruits radioélectriques dépassant les limites
applicables aux appareils numériques de Clas
se B prescrites dans le Règlement sur le Brouil
lage Radioélectrique édicté par le Ministère des
Communications du Canada.
Page 3
g
I I 1 1 I I ^1 I INI
7 8 9 10 11 12 13 14151617 18
Page 4

Page 5

English
INSTALLATION
POWER SUPPLY SETTING
• Check that the type plate on the rear of your player
indicates the correct power voltage.
• If not, consult your dealer.
Certain versions of this player are equipped with a
voltage selector (2). which enables you to set the
player to the correct power voltage yourself. When
changing the voltage setting, it is also necessary to
change the fuse to one of the correct rating: 200 mA
for 110/127 V and 100 mA for 220/240 V.
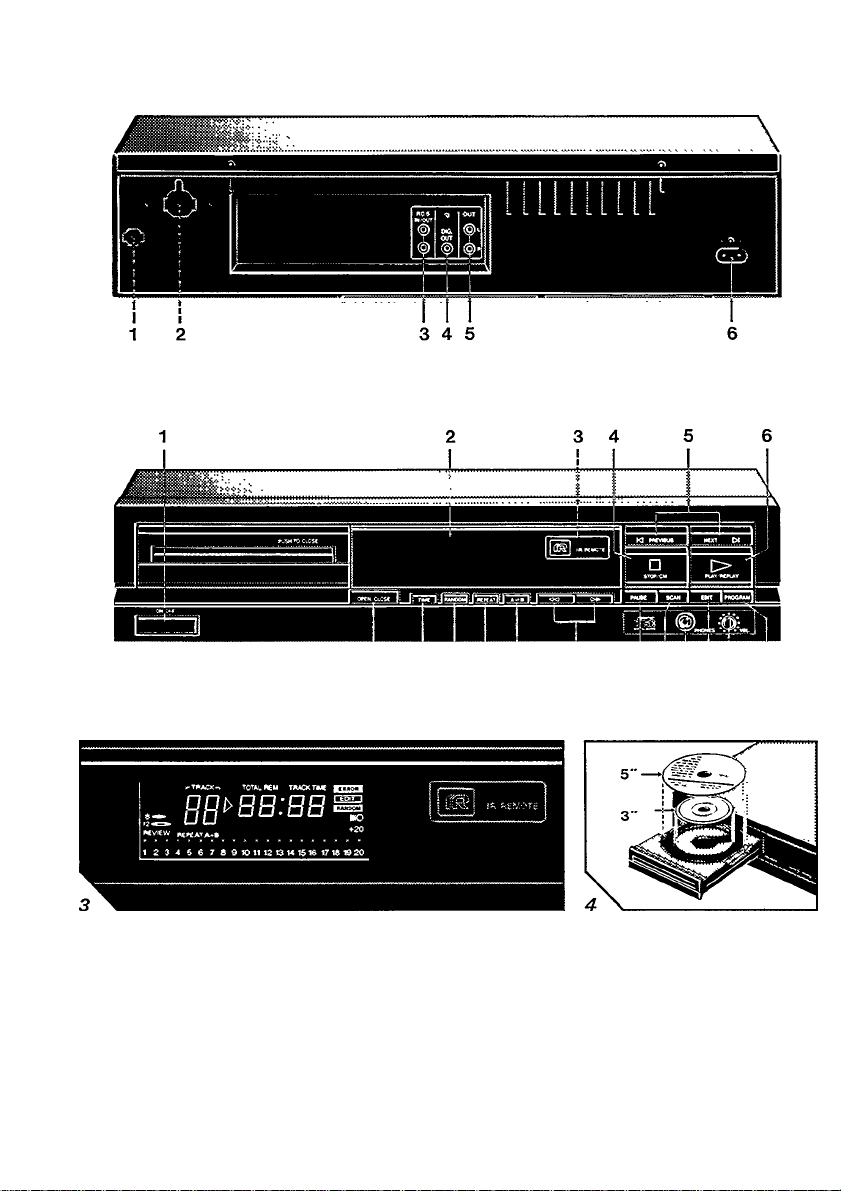
CONNECTIONS (Fig. 1)
1 Fuse holder (not all versions)
See 'Power supply setting’.
2 Voltage selector (not all versions)
See 'Power supply setting’.
3 RC5 IN/OUT
Use these jacks for connecting the player to a
PHILIPS HiR system with compatible RC5IN/OUT
jacks.
4 DIG(rrAL) OUT
For digital signal processing or future applications
such as CD-I. This output supplies a digital signal
and can therefore only be connected to an input
which is suitable for this signal.
Weverconnect this jack to a non-digital input of an
amplifier, such as AUX, CD, TAPE, PHONO, etc!
5 OUT L/R
For connecting to the amplifier.
• Insert a red plug into the 'R' jack and the other plug
into the 'L' jack.
• Insert the two other plugs into the corresponding
jacks of the CD or AUX input of your amplifier.
You can also use the TUNER or TAPE IN connec
tion, but never the PHONO input!
6 Inlet for the power cord
OPERATION
FRONT OF PLAYER (Fig. 2)
1 ON/OFF
Switching on and off.
2 DISPLAY
Informs you about the functioning of the player.
3 IR REMOTE
Receives the signals from the remote control.
4 STOP/CM
- Stopping play.
- Erasing a program ('CM' = 'Oiear Memory’).
5 PREVIOUS and NEXT
- Selecting the recording time when making a tape
recording (EDfT).
- Selecting another track during play.
- Selecting a track to start play with.
- Selecting tracks when compiling a program.
(PREVIOUS from high to low and NEXT from low
to high.)
6 PLAY/REPLAY
- Starting play.
- Returning to the beginning of a track.
7 OPEN/CLOSE
Opening and closing the CD compartment.
8 TIME
For selecting the time informationyou wantto see.
9 RANDOM
Playing in random order.
10 REPEAT
Repeating play.
11 A-B
Setting the starting and stopping point of a
passage to be repeated.
12 41 W>
Fast search for a passage; 41 backwards and M>
forwards.)
13 PAUSE
interrupting piay.
14 SCAN
Automatically playing the beginning of each track.
15 PHONES
For connection of headphones.
16 EDIT
Selecting EDfT mode to enter the recording time
when making a tape recording.
Page 6

OPERATION
17VOL(UME)
For adjusting the volume when listening with
headphones.
18 PROGRAM
- Storing tracks in a program.
- Erasing tracks from a program.
- Checking the program.
REMOTE CONTROL
- The life of the batteries of the remote control is
around one year; for replacement only use bat
teries of the AAA type.
- O TRACK D = PREVIOUS and NEXT.
- <] SEARCH D = <N W>.
- Use the ’1-0’ digit keys, instead of PREVIOUS and
NEXT, for d/recf selection of:
the recording time when making a tape recording
(EDfD;
another track during play;
a track to start play with;
tracks when compiling a program.
Two-figure numbers must be entered within 2
seconds!
DISPLAY (Fig. 3)
’
---------------on.
8 - Ughts up when a 8-cm CD is inserted.
12 - Ughts up when a 12-cm CD is inserted.
REVIEW - Ughts up v,/hen you check a program.
TRACK
- Indicates the track number being played.
- Shows how many tracks there are on the CD.
REPEAT - Ughts up when the entire CD ora program
is repeated.
A-B - Ughts up when a passage is repeated.
_________________________
____________________________
’ - Lights up when you switch the player
>
- Ughts during play.
- Rashes when play is interrupted (PAUSE).
TRACK TIME- Indicates the elapsed playing time of
the track being played.
REM TRACK TIME - Indicates the remaining playing
time of the track being played.
TOTAL REM TIME - Indicates the remaining playing
time of a disc or a program.
TOTAL TIME - Indicates the total playing time of a
disc or a program.
1-20 track number indicator - Shows the number of
tracks on the CD.
+20 - Ughts up when there are more than 20 tracks
on the CD.
RANDOM - Lights up when the tracks are played in
random order.
ERROR - Ughts up if you:
- make an error in operating the player;
- try to start play when the CD is inserted v/ith the
printed side facing down, is not inserted at all or Is
damaged.
(KO - Lights up when the player receives a command
from the remote control.
EDIT - Ughts up when the player is put in the EDfT
mode.
’—’ - Ughts up when the first 10 seconds of each
track are played (SCAN).
SWITCHING ON AND OFF (ON/OFF)
• Press ON/OFF to switch the player on.
• Press ON/OFF again to switch the player off.
PLAYBACK (PLAY/REPLAY)
• Open the CD compartment by pressing OPEN/
CLOSE.
• Insert a CD in the CD compartment, printed side
up (Fig. 4).
• Press PLAY/REPLAY.
- The CD compartment closes, !> and 8 or
12CS5 light up and a moment later playback
starts.
You can also close the CD compartment by
pressing its front; playback will then start automati
cally.
- The track number indicator shows how many
tracks there are on the CD.
- The track being played is always shown under
TRACK and its elapsed playing time is shown
under TRACK TIME.
- Each time a track has been played, the corre
sponding number goes out on the number in
dicator.
- After the last track play stops.
- The display shows the number of tracks and the
playing time of the CD (TOTAL TIME).
CALLING UP OTHER TIME INFORMATION (TIME)
• Press TIME whenever you want to know the
remaining playing time of the track being played
(REM TRACK TIME).
• Press TIME again If you wish to know the remaining
playing time of the entire disc (TOTAL REM TIME).
• Press TIME again if you wish to return to the
elapsed playing time indication (TRACK TIME).
____________
Page 7

OPERATION
GOING BACK TO THE BEGINNING OF A TRACK
(PLAY/REPLAY)
• Press PLAY/REPLAY.
- The track starts again from the beginning.
SELECTING ANOTHER TRACK DURING PLAY
(NEXT and PREVIOUS)
• Press NEXT or PREVIOUS until the desired track
number appears under TRACK.
- The music stops and a moment later the selected
track begins to play.
SEARCHING FOR A PASSAGE DURING PLAY
(<M M>)________________________ ______________
• Hold <M down to search backwards.
• Hold M> down to search forwards.
The searching speed is determined by how long a
key is pressed:
- the first 2 seconds fairly slowly, with sound;
- then at maximum speed, with no sound.
If you reach the end of the last track of the CD and
release W>, play will resume a few seconds before
the end.
STARTING WITH A PARTICULAR TRACK
(NEXT, PREVIOUS and PLAY/REPLAY)
• Close the CD compartment by pressing OPEN/
CLOSE,
- The display shows the number of tracks and the
playing time of the CD.
• Press NEXT or PREVIOUS until the required track
number appears under TRACK.
• Now press PLAY/REPLAY within 8 seconds.
- Play starts from the selected track.
PLAYING IN A RANDOM ORDER (RANDOM)
• Press RANDOM before or during play.
- RANDOM lights up.
- If the CD compartment was open it will now close.
- The tracks are now played in a random order.
• Press RANDOM again if you wish to revert to
normal play.
If you press PREVIOUS, you will return to a track
which has already been played.
If you press NEXT, you are selecting any other track.
If you press REPEAT, the tracks will be repeated in a
different order each time.
_____________________________
_______________________
__________
SCANNING A CD (SCAN)
• Press SCAN before or during play.
- If the CD compartment was open, it will now close.
- ’—’ lights up and the first 10 seconds of each
track are played in turn.
• When the player reaches a track which you wish to
hear in full, press SCAN again.
During scanning, the PREVIOUS and NEXT keys can
be used.
INTERRUPTING PLAY (PAUSE)
• Press PAUSE.
- /> starts to flash.
• Press PAUSE again to restart.
REPEATING A PASSAGE (A-B)
• During play press A-B at the required starting
point.
- A lights up.
• Press A-B again at the required stopping point.
- -B lights up.
- The passage between points A and B will now be
replayed continuously.
• Press A-B again if you wish to return to normal
play.
To find the starting and stopping points quickly, you
can use the <M W> keys.
REPEATING A CD (REPEAT)
• Press REPEAT before or during play.
- REPEAT lights up and the CD will now be repeated
again and again.
• Press REPEAT again to stop the REPEAT function.
STOPPING PLAY (STOP/CM or OPEN/CLOSE)
• Press STOP/CM if you merely wish to stop.
• Press OPEN/CLOSE if you wish to stop and take
out the CD.
Page 8

PROGRAMMING
You can store 20 tracks from each CD in any required
sequence in a program. If you exceed the maximum
of 20 tracks, ERROR lights up.
STORING A PROGRAM
(NEXT, PREVIOUS and PROGRAM)
• Close the CD compartment by pressing OPEN/
CLOSE.
- The display shows the number of tracks and the
playing time of the CD.
• Press NEXT or PREVIOUS until the first track
number you wish to program appears under
TRACK.
• Now press PROGRAM within 8 seconds.
- The playing time of the program will be shown
under TOTAL TIME (for 2 seconds).
- After the number a 'P'(for Program) will appear; the
number has now been stored in the player’s
memory.
• Select the other track numbers required and store
each track by pressing PROGRAM.
- The number indicator always shows which num
bers have been stored.
STORING A PROGRAM USING SCAN
(SCAN and PROGRAM)
• Press SCAN before or during play.
- If the CD compartment was open, it will now close.
- ’—’ lights up and the first 10 seconds of each
track are played in turn.
• Press PROGRAM at each track you wish to include
in the program.
- The player Immediately starts to play the first 10
seconds of the next track.
• Press PLAY/REPLAY to play the program.
_______________________
_____________
ERASING A PROGRAM
(STOP/CM or OPEN/CLOSE)
• Press STOP/CM twice, or, if the CD has already
stopped, just once; you can also press OPEN/
CLOSE straight away.
- The program has now been erased.
ERASING A TRACK FROM A PROGRAM
(NEXT, PREVIOUS and PROGRAM)
• Press NEXT or PREVIOUS, before or after
programmed play (STOP mode), until the number
you wish to erase appears under TRACK.
• Press PROGRAM within 8 seconds.
- The number disappears from the display and from
the number indicator; it has now been erased.
CHECKING THE PROGRAM (PROGRAM)
• Press PROGRAM before, during or after program
med play.
- REVIEW lights up and all the track numbers appear
in the programmed sequence on the display.
PLAYING THE PROGRAM (PLAY/REPLAY)
• Press PLAY/REPLAY.
- Play begins with the first number of the program.
All keys can be used during programmed play
(except EDIT).
Searching for a passage is limited to within the track
being played.
________
Page 9

OTHER POSSIBILITIES
LISTENING WITH HEADPHONES (PHONES) MAINTENANCE
• Connect headphones with a 6.3 mm jack plug to
the PHONES jack.
- The sound level is adjusted with the VOL(UME)
control,
RECORDING FROM YOUR CD PLAYER (EDIT)
In the EDIT mode you can store the recording time of
the tape in the player memory. This will then
determine which tracks fit on one side of the tape and
a pause will automatically be inserted after the last
track.
• Press EDIT (in STOP mode).
- EDIT lights up.
- 90 lights up under TIME.
• With NEXT and PREVIOUS you can now select the
required recording time: 46, 60 or 90 minutes.
• You can now record the entire CD ora program out
of it; the program must be stored in advance.
• Press PLAY/REPLAY.
- The track number indicator shows which numbers
fit onto side A of the tape; these numbers will be
played one after the other.
- Play will stop after the last track.
- t> starts flashing,
• Turn the tape over.
- The track number indicator now indicates the
tracks for side B.
• Press PAUSE.
- The remaining tracks will now be played.
NOTE!
- You can also start playback with RANDOM; the
numbers will then be recorded in a random order.
- As soon as you press PLAY/REPLAY or RANDOM,
the other player functions (except TIME and
REVIEW) will temporarily be switched off to prevent
the recording being interfered with.
- Should the CD or the program be longer than the
total recording time of the tape, a pause will then
again be inserted after the last track on side B. The
track number indicator then shows the remaining
unplayed track numbers.
The CDs
The player
whether:
- condensation has formed on the lens of the laser
- the CD has been inserted correctly with the printed
- the CD is dirty, badly scratched or warped;
- the player has been connected to the PHONO jack
ADDITIONAL INFORMATION
• Never write on the printed side of a CD.
• Do not attach any stickers to the CD.
• Keep the shiny surface of the CD clean.
Use a soft lint-free cloth and always wipe the disc
in a straight line from centre to edge.
• Never use cleaning agents for conventional
records.
• Detergents or abrasive cleaning agents should not
be used either.
• A chamois leather slightly moistened with water is
sufficient for cleaning the player.
• Do not use cleaning agents containing alcohol,
spirits, ammonia or abrasives.
PROBLEMS AND THEIR LIKELY CAUSES
If a problem occurs, run through the points listed
below before taking your player in for repair. Check
due to a dramatic change in temperature; this will
disappear automatically after some time;
side up and that there is a CD in the compartment;
of the amplifier.
If the problem remains, try to clear it by switching the
player off and on again.
If this also fails to help, consult your dealer.
Under no circumstances should you repair the
player yourself, as this will invalidate the guaran
tee!
Page 10

TECHNICAL DATA
Typical Audio Performance
Frequency range; 20-20,000 Hz
Amplitude linearity: ±0.1 dB
Phase linearity: ±0.5° (20-20,000 Hz)
Dynamic range; > 90 dB
Signal-to-noise ratio; > 100 dB
Channel separation: 95 dB
Total harmonic distortion; 0.0169b
D/A conversion; quadruple oversampling
(176.4 kHz) with digital filter and two 16-blt D/A-converters
Audio output level: 2
Impedance PHONES jack; 8-1000 ohms
Power supply
Power voltage and frequency: see the type plate on
the rear of the player
Power consumption; 12 W approx.
Safety requirements: CSA
Cabinet
Material/finish: metal and polystyrene with
decorative trim
Dimensions (w x h x d):
16'%2" ;c 3?b" X 10%" (420 x 90 x 280 mm)
Weight: 8.82 lbs (4kg) approx.
Specifications are subject to change without
notice
10
Page 11

Page 12

3104115 20072
Printed in Belgium 1B5942-1 790/1
 Loading...