

Page 1
CD 608/618
(||) Compact Disc Player
CE) Lecteur de CD
Cs) Compact Disc-Spieler
Compact Disc-Speler
CD Reproductor 'Compact Disc'
CD Lettore di Compact Disc
<5g) Compact Disc-Afspiller
CD Compact Disc-Spelare
(|f) Compact Disc-Soitin
4^
9^
14 >
19 ^
24 y
29 >
34 ►
39 ^
44 ^
PHILIPS
Page 2
(Ц) English.............
Illustrations
Technical data
Guarantee and service.............................page 52-54
......................................................
...........................................
...
.
page 4 (T) Italiano.
page 3
page 49-51
.................
Illustrazioni.....................................................pagina 3
Dati tecnici..............................................pagina 49-51
Garanzia e servizio
................................
pagina 29
pagina 52-54
® Français
Illustrations
Caractéristiques techniques
Garantie et service après-vente
......................................................
® Deutsch
Abbildungen......................................................Seite 3
Technische Daten
Garantieleistung und Service
(NL) Nederlands........ ...pagina 19 (SF) Suomi
Afbeeldingen
Technische gegevens
Garantie en service................................pagina 52-54
..................................................
CD Español
Ilustraciones...................................................página 3
Datos técnicos
Garantía
.................................................
PRECAUCION - ADVERTENCIA
I NO ABRIR. RIESGO DE CHOQUE ELECTRICO i
VERinOUE QUE EL VOLTAJE DE AUMENTACION
PARA EVITAR EL RIESGO DE CHOQUE ELECTRICO. NO QUITE LA TAPA:
EN CASO DE REQUERIR SERVICIO. DIRUASE AL PERSONAL AUTORIZADO DE PHtUPS.
Es necesario que lea cuidadosamente su instructi
vo de manejo.
............ ...
.....................
...............
...........
....................................
..................
............................
......... ....
.......................................
ATENCION
SEA EL REQUERIDO PARA SU APARATO
ÑÜM
page 9 (@) Dansk
page 3
page 49-51
page 52-54
Figurer...............................................................side 3
Tekniske data
Garanti og service
....Seite 14 ® Svenska
Figurer...............................................................sida 3
Seite 49-51
Seite 52-54
pagina 3
pagina 49-51
........
página 49-51
página 52-54
Tekniska data..............................................sida 49-51
Garanti och Service
Kuvat..................................................................sivu 3
Tekniset tiedot............................................sivu 49-51
Takuu ja huolto...........................................sivu 52-54
página 24 CD Norge
Typeskilt finnes bak pá apparaten.
Garanti og service
НОМ
............... .....
.............................................
......................................
side
side 49-51
side 52-54
................ ................
...................................
.................. ....
............................
sida 52-54
sivu 44
..side 52-54
34
39
Page 3
4 56
.............
..............—-------------------------
N
10 11 12 13 14 15 16 17181920 21
Page 4

INSTALLATION
POWER SUPPLY SETTING
Check that the type plate on the rear of your
player indicates the correct supply voltage.
If your mains supply voltage is different, con
sult your dealer or our Service Organisation.
Certain versions of this player are equipped
with a voltage selector (2), which enables you
to set the player to the correct mains voltage
yourself. When changing the voltage setting, it
is also necessary to change the mains fuse (1)
to one of the correct rating; T300 mA (slow
blow fuse) for 110/127 V; T125 mA (slow blow
fuse) for 220 V - 230 V/ 230 V - 240 V.
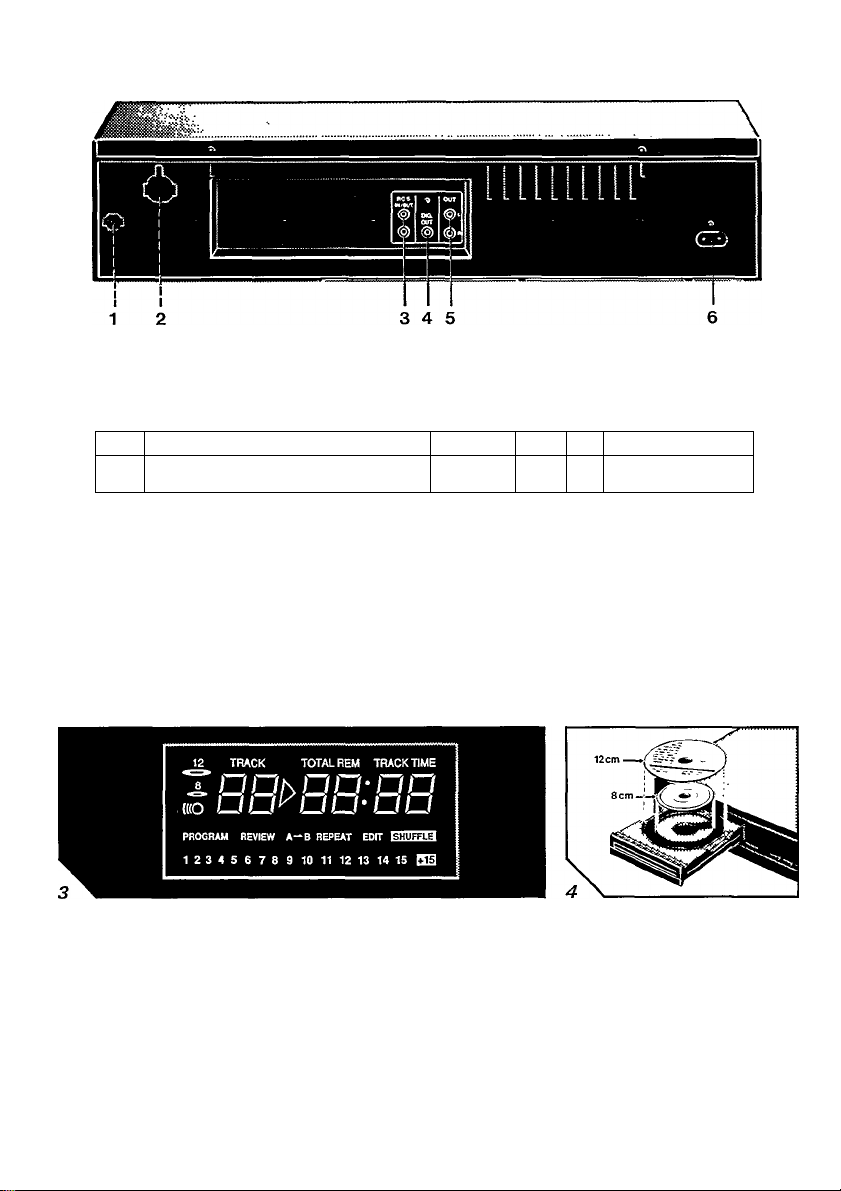
CONNECTIONS (Fig. 1)
Mains fuse holder (not all versions)
See 'Power supply setting'.
Voltage selector (not all versions)
See 'Power supply setting'.
RC5 IN/OUT
For connecting up the equipment when you are
incorporating the player in a PHILIPS HiFi sys
tem with its own remote control system.
For connecting the remote control receiver EIVI
2200, available as an accessory (not available
in the U.K.).
DIG(ital) OUT
For digital signal processing or future applica
tions such as CD-I. This output supplies a digital
signal and can therefore only be connected to
an input which is suitable for this signal.
Afeirer connect this socket to a non-digital input
of an amplifier, such as AUX, CD, TAPE,
PHONO, etc!
OUT L/R
For the connecting cable to the amplifier.
Insert a red plug into the 'R' socket and the
other plug into the 'L' socket.
Insert the two other plugs into the correspon
ding sockets of the CD or AUX input of your
amplifier. You can also use the TUNER or TAPE
IN connection, but neverthe PHONO input!
Connection for the mains lead
FITTING A MAINS PLUG ¡U.K. only)
The wires in the mains lead are coloured in accor
dance with the following code;
Blue - Neutral; Brown - Live.
As the colours of the wires may not correspond
with the terminal identification in your plug, pro
ceed as follows:
• Connect the brown wire to the terminal marked
'L' or coloured brown or red.
• Connect the blue wire to the terminal marked
'N' or coloured blue or black.
No connection should be made to the earth
terminal of the plug!
For 13 A plugs, conforming to BS1363, use a 3
A fuse.
For other plugs, use a 5 A or lower fuse in the
plug, adaptor or at the distribution board.
This Compact Disc player complies with ra
dio interference requirements as laid down
In EC regulations.
I/
Page 5

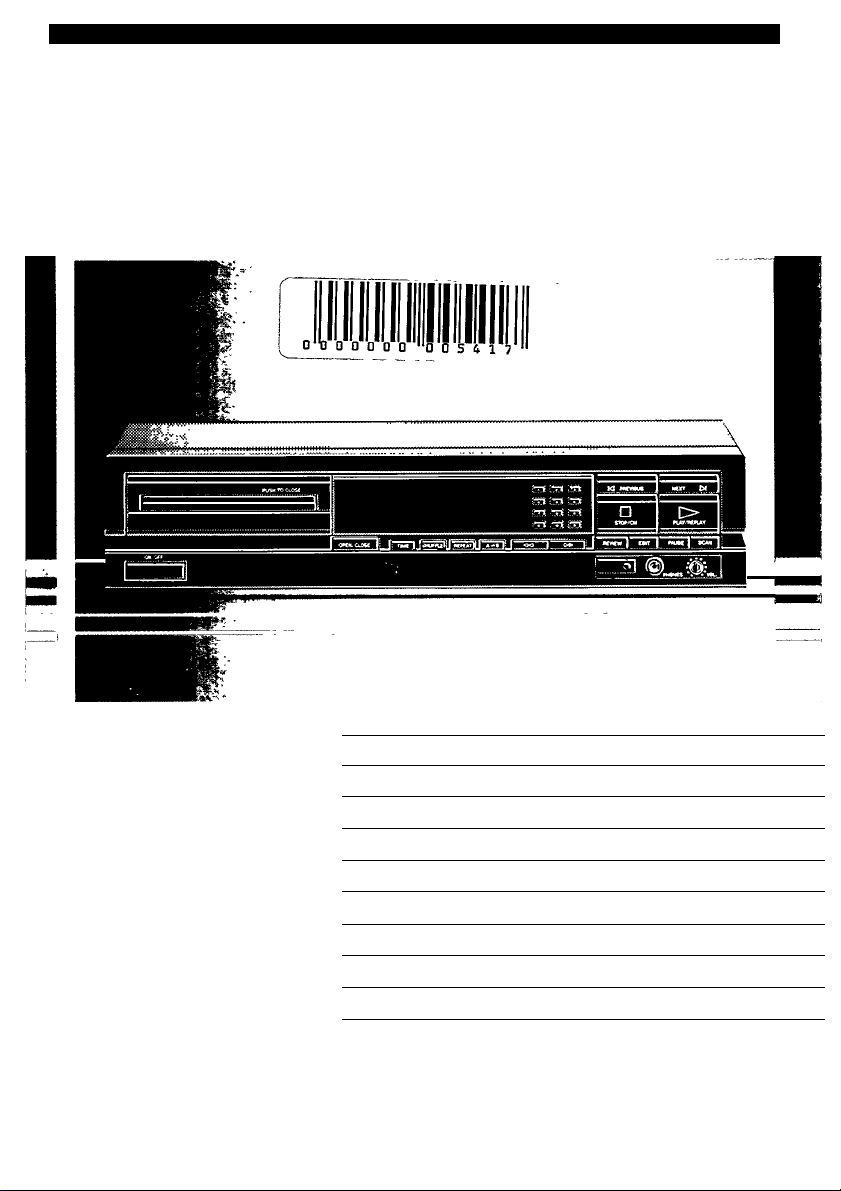
FRONT OF PLAYER (Fig. 2}
1 ON/OFF - Switching on and off.
2 Display - Informs you about the functioning of
the player.
3 C(ancel) - Erasing tracks from a programme.
4 1-0 digit keys
- Entering the tape length when making a tape
recording (EDIT).
- Selecting another track during play.
- Selecting a track to start play with.
- Selecting tracks when compiling a programme.
5 S(tore) - Storing tracks in a programme.
6 STOP/CM
- Stopping play.
- Erasing a programme (CM = Clear Memory).
7 PREVIOUS and NEXT
- Selecting the tape length when making a tape
recording (EDIT).
- Selecting another track during play.
- Selecting a track to start play with.
- Selecting tracks when compiling a programme.
8 PLAY/REPLAY
- Starting play.
- Returning to the beginning of a track.
9 OPEN/CLOSE - Opening and closing the CD
compartment.
10 TIME - Selecting the time information you
want to see.
11 SHUFFLE - Playing in random order.
12 REPEAT - Repeating play.
13 A-B - Setting the starting and stopping point
of a passage to be repeated.
14 «11» - Fast search for a passage.
15 REVIEW - Checking the programme.
16 Remote eye (CD 618 only}- Receives the
signals from the remote control.
17 EDIT - Selecting EDIT mode to enter the
recording time when making a tape recording.
18 PHONES - For connection of headphones.
19 PAUSE - Interrupting play.
20 VOL(ume) - For adjusting the volume when
listening with headphones.
21 SCAN - Automatically playing the beginning
of each track.
REMOTE CONTROL (CD 618 only)
- The buttons on the remote control have the
same functions as the corresponding buttons
on the player.
______________
OPERATION
- The life of the batteries of the remote control is
around one year; for replacement only use bat
teries of the type R03, UM4 or AAA.
DISPLAY (Fig. 3}
player on.
8
12
ed.
(((O- Lights up when the player receives a com
mand from the remote control.
TRACK - Indicates the track number being play
ed: shows how many tracks there are on the CD.
>
- Lights during play;
- Flashes when play is interrupted (PAUSE).
TRACK TIME - Indicates the elapsed playing time
of the track being played.
REM(aining) TRACK TIME - Indicates the remain
ing playing time of the track being played.
TOTAL REM(aining) TIME - Indicates the re
maining playing time of a disc or a programme.
TOTAL TIME - Indicates the total playing time of
a disc or a programme.
PROGRAM - Lights up when a programme is be
ing stored.
REVIEW - Lights up when you check a program
me.
A-B - Lights up when a passage is repeated.
REPEAT - Lights up when the entire CD or a pro
gramme is repeated.
EDIT - Lights up when the player is put in the
EDIT mode.
SHUFFLE - Lights up when the tracks are played
in random order.
1-15 track number indicator - Shows the num
ber of tracks on the CD; +15 lights up when there
are more than 20 tracks on the CD.
-------
track are played (SCAN).
ERRfor) - Lights up if you:
- make an error in operating the player;
- try to start play when the CD is inserted with
the printed side facing down, is not inserted at
all or is damaged.
PLAYBACK (PU\Y/REPLAY)
• Press ON/OFF to switch the player on.
• Open the CD compartment by pressing
OPEN/CLOSE.
• Insert a CD in the CD compartment, printed
side up (Fig. 4).
• Close the CD compartment by hand or by
pressing OPEN/CLOSE.
- Press PLAY/REPLAY.
- ¿>and 8 or 12 CS5 light up and a mo
ment later playback starts.
- Lights up when you switch the
■ Lights up when a 8-cm CD is inserted.
- Lights up when a 12-cm CD is insert-
Lights up when the first 10 seconds of each
____________________
o
c
u
Page 6

You can also press PLAY/REPLAY immediately
(A
after inserting the CD; the CD compartment
3
"
then closes automatically.
- The track number indicator shows how many
tracks there are on the CD.
- The track being played is always shown under
TRACK and its elapsed playing time is shown
under TRACK TIME.
- Each time a track has been played, the corre
sponding number goes out on the number indi
cator.
- After the last track play stops.
- The display shows the number of tracks and
the playing time of the CD (TOTAL TIME).
• Press ON/OFF to switch the player off.
You can interrupt playback by pressing PAUSE; />
then starts flashing. Press PLAY/REPLAY to re
start.
If you press PLAY/REPLAY during play, the cur
rent track starts again from the beginning.
You can stop playback by pressing STOP/CM or
OPEN/CLOSE.
CALLING UP OTHER TIME INFORMATION
(TIME)
_____________________________________
• Press TIME whenever you want to know the
remaining playing time of the track being
played (REM TRACK TIME).
• Press TIME again if you wish to know the re
maining playing time of the entire disc (TOTAL
REM TIME).
• Press TIME again if you wish to return to the
elapsed playing time indication (TRACK TIME).
SELECTING ANOTHER TRACK DURING
PLAY (1-0 or NEXT and PREVIOUS)
_____________
• Key in the desired track number (numbers con
sisting of two figures must be keyed in within
2 seconds!) or press NEXT or PREVIOUS until
the number appears under TRACK.
- The music stops and a moment later the selec
ted track begins to play.
FAST SEARCH FOR A PASSAGE (« M>)
• Hold <M down to search backwards.
• Hold t» down to search forwards.
The searching speed is determined by how long a
key is pressed:
- the first 2 seconds fairly slowly, with sound;
- then at maximum speed, with no sound.
If you reach the end of the last track of the CD
and release w>, play will resume a few seconds
before the end.
OPERATION
STARTING WITH A PARTICULAR TRACK
(1-0 or NEXT and PREVIOUS and PLAY/REPLAY)
• Close the CD compartment by hand or by
pressing OPEN/CLOSE.
- The display shows the number of tracks and
the playing time of the CD.
• Key in the desired number (numbers consisting
of two figures must be keyed in within 2 sec
onds!) or press NEXT or PREVIOUS until the
number appears under TRACK.
• Now press PLAY/REPLAY within 8 seconds.
- Play starts from the selected track.
PLAYING IN A RANDOM ORDER (SHUFFLE)
• Press SHUFFLE before or during play.
- If the CD compartment was open it will now
clos6
- SHUFFLE lights up.
- The tracks are now played in a random order.
• Press SHUFFLE again if you wish to revert to
normal play.
If you press PREVIOUS, you will return to a track
which has already been played. If you press
NEXT, you are selecting any other track.
If you press REPEAT, the tracks will be repeated
in a different order each time.
SCANNING THE DISC (SCAN)__________________
• Press SCAN before or during play.
- If the CD compartment was open, it will now
close. — lights up and the first 10 seconds of
each track are played in turn.
• When the player reaches a track which you
wish to hear in full, press SCAN again or
PLAY/REPLAY.
During scanning, the 1-0 digit keys and PREVI
OUS and NEXT can be used.
REPEATING A PASSAGE (A-B)_________________
• During play press A-B at the required starting
point.
- A lights up.
• Press A-B again at the required stopping point.
- -B lights up. The passage between points A and
B will now be replayed continuously.
• Press A-B again if you wish to return to normal
play.
To find the starting and stopping points quickly,
you can use the «t» keys.
REPEATING A CD (REPEAT)___________________
• Press REPEAT before or during play.
- REPEAT lights up and the CD will now be re
peated again and again.
• Press REPEAT again to stop the REPEAT func
tion.
Page 7

PROGRAMMING
You can store 20 tracks from each CD in any re
quired sequence in a programme. If you exceed
the maximum of 20 tracks,
STORING A PROGRAMME
(1-0 or NEXT and PREVIOUS and STORE)
• Close the CD compartment by hand or by
pressing OPEN/CLOSE.
- The display shows the number of tracks and
the playing time of the CD.
• Key in the first track number you wish to store
or press NEXT or PREVIOUS until the number
appears under TRACK.
• Now press S(tore) within 8 seconds.
- The playing time of the programme will be
shown under TOTAL TIME (for 2 seconds).
- After the number a P(for Programme) will ap
pear; the number has now been stored in the
player's memory.
• Select the other track numbers required and
store each track by pressing S(tore).
- The number indicator always shows which
numbers have been stored.
STORING A PROGRAMME USING SCAN
• Press SCAN before or during play.
- If the CD compartment was open, it will now
close.
--------
lights up and the first 10 seconds of each
track are played in turn.
• Press S(tore) at each track you wish to include
in the programme.
- The player immediately starts to play the first
10 seconds of the next track.
• Press PLAY/REPLAY to play the programme.
CHECKING THE PROGRAMME (REVIEW)
• Press REVIEW before, during or after program
med play.
- REVIEW lights up and all the track numbers ap
pear in the programmed sequence under
TRACK.
ERR(or) lights up.
________
ERASING A PROGRAMME
(STOP/CM or OPEN/CLOSE)
• Press STOP/CM twice, or, if the CD has already
stopped, just once; you can also press
OPEN/CLOSE straight away.
- The programme has now been erased.
ERASING A TRACK FROM A PROGRAMME
(REVIEW and CANCEL)
• Press REVIEW, before or after programmed
play (STOP mode).
- REVIEW lights up and all the track numbers ap
pear in the programmed sequence under
TRACK.
• Press C(ancel) within 2 seconds as soon as
the number you wish to erase, appears.
- The number disappears from the number indi
cator; it has now been erased.
_______________________
O)
c
u
PLAYING THE PROGRAMME (PLAY/REPLAY)
• Press PLAY/REPLAY.
- Play begins with the first number of the pro
gramme.
All keys can be used during programmed play (ex
cept EDIT and CANCEL).
Searching for a passage is limited to within the
track being played.
Page 8

OTHER POSSIBILITIES
ADDITIONAL INFORMATION
RECORDING FROM YOUR CD PLAYER (EDIT)
m
3
In the EDIT mode you can store the tape length
<n_
in the player memory. This will then determine
5)'
3
"
which tracks fit on one side of the tape and a
pause will automatically be inserted after the
last track.
Press EDIT (in STOP mode).
EDIT lights up.
90 lights up under TIME.
With NEXT and PREVIOUS you can now select
the required tape length: 30,46, 60 or 90 min
utes.
Other tape lengths can be selected using the 10 digit keys.
You can now record the entire CD or a pro
gramme out of it; the programme must be
stored in advance.
Press PLAY/REPLAY.
The track number indicator shows which num
bers fit onto side A of the tape; these numbers
will be played one after the other.
Play will stop after the last track.
>starts flashing.
The track number indicator now indicates the
tracks for side B.
Turn the tape over.
Press PLAY/REPLAY.
The remaining tracks will now be played.
NOTE!
- You can also start playback with SHUFFLE;
the numbers will then be recorded in a ran
dom order.
- As soon as you press PLAY/REPLAY or
SHUFFLE, the other player functions (except
TIME) will temporarily be switched off to pre
vent the recording being interfered with.
- Should the CD or the programme be longer
than the total tape length, a pause will then
again be inserted after the last track on side
B. The track number indicator then shows
the remaining unplayed track numbers.
MAINTENANCE
The CDs
• Never write on the printed side of a CD.
• Do not attach any stickers to the CD.
• Keep the shiny surface of the CD clean.
Use a soft lint-free cloth and always wipe the
disc in a straight line from centre to edge.
• Never use cleaning agents for conventional rec
ords.
• Detergents or abrasive cleaning agents should
not be used either.
The player
• A chamois leather slightly moistened with wa
ter is sufficient for cleaning the player.
• Do not use cleaning agents containing alcohol,
spirits, ammonia or abrasives.
FAULTS AND THEIR LIKELY CAUSES
___________
If a fault occurs, run through the points listed be
low before taking your player for repair. Check
whether:
- condensation has formed on the lens of the
laser due to a dramatic change in temperature;
this will disappear automatically after some
time;
- the C;D has been inserted correctly with the
printed side up and that there is a CD in the
compartment;
- the CD is dirty, badly scratched or warped;
- the player has been connected to the PHONO
socket of the amplifier.
If the fault remains, tiy to clear it by switching the
player off and on again.
If this also fails to help, consult your dealer.
Under no circumstances should you repair
the player yourself, as this will invalidate
the guarantee!
LISTENING WITH HEADPHONES (PHONES)
• Connect headphones with a 6.3 mm jack plug
to the PHONES socket.
- The sound level is adjusted with the VOL(ume)
control.
Page 9

TECHNICAL DATA (§D
Typical Audio Performance
Frequency range;...................................2 Hz - 20 kHz
Amplitude linearity:
Phase linearity:..........................0.5° (20 Hz - 20 kHz)
Linearity on - 90 dB:..............................................0 dB
Dynamic range:.........................................................92 dB
Signal-to-noise ratio:
Channel separation:..................................................95 dB
Total harmonic distortion:
D/A conversion:
Bitstream conversion (256 x oversampling, 1 bit)
Audio output level:
Impedance PHONES socket:
Power supply
Mams voltage and frequency:
see the type plate on the rear of the player
Power consumption:..............................16 W approx.
Safety requirements:...............................................lEC 65
.............
0.35 dB (20 Hz - 20 kHz)
................
............................................
100 dB (A-weighted)
.............................
.............
8 -1000 ohms
0.0025%
2 V^^ns
TECHNISCHE PATEN (typisch)
Frequenzumfang:...................................2 Hz -20 kHz
Amplitudenlinearität:
Phasenlinearität:
Linearität bei - 90 dB:............................................0 dB
Dynamikumfang;.......................................................92 dB
Störabstand:
Kanaltrennung:
Klirrfaktor:....................................................0,0025 %
Digital/Analog-Umsetzung:
Bitstream-Umsetzung (256fach Oversampling,
1 bit)
Audio-Ausgangssignal:
Kopfhörer-Impedanz:...........................8-1000 Ohm
Stromversorgung
Netzspannung und -frequenz:
siehe Typenschild an der Rückseite des Spielers.
Leistungsaufnahme:......................................ca. 16 W
Sicherheitsanforderungen:....entsprechend lEC 65
..........
.......................
............................
.........................................................
...............................................
_____________
0.35 dB (20 Hz - 20 kHz)
0.5° (20 Hz - 20 kHz)
100 dB (A-gewichtet)
®
95 dB
2 Vgff
Cabinet
Material/finish:
metal and polystyrene with decorative trim
Dimensions (w x h x d):
Weight:
..................................................
CARACTERISTIQUES TECHNIQUES
Caractéristiques audio (typiques)
Bande passante:
Linéarité d'amplitude:.........0.35 dB (20 Hz - 20 kHz)
Linéarité de phase:....................0.5° (20 Hz - 20 kHz)
Linéarité à - 90 dB:
Dynamique:.......................................................
Rapport signal/bruit:
Séparation des voies:
Distorsion harmonique totale;
Conversion numérique/analogique:
convertiseur Bitstream (256 x suréchantillonage,
1 bit)
Signal de sortie audio:
Impédance du casque à raccorder: .8 -1000 ohms
Alimentation
Tension d'alimentation et fréquence du secteur:
reportez-vous à la plaquette signalétique à l'arrière
du lecteur
Consommation électrique;..........................env. 16 W
Conditions de sécurité:
Boîtier
Matière/finition;
métal et polystyrène avec enjoliveurs
Dimensions (I x h x p):
Poids;
..........................................................
Sous réserve de modifications
..............
420 x 90 x 280 mm
Subject to modification
....................................
..............................................
...................
.......................................
........................................
...............
100 dB (ponderé-A)
......................
..................................
420 x 90 x 280 mm
4 kg approx.
__________
2 Hz - 20 kHz
0 dB
92 dB
95 dB
0,0025%
2 Vgff
C.E.l. 65
env. 4 kg
Gehäuse
Material/Ausführung:
Metall und Polystyrol, mit Zierteilen
Abmessungen (B x H x T);
Gewicht;
........................................................
.........
420 x 90 x 280 mm
Änderungen Vorbehalten
®
TECHNISCHE GEGEVENS <NL)
Audiospecificaties (typisch)
Frequentiegebied: 2 Hz - 20 kHz
Amplitude-Iineariteit; 0,035 dB (20 Hz - 20 kHz)
Lineariteit bij - 90 dB: 0 dB
Fase-Iineariteit: 0,5° (20 Hz - 20 kHz)
Dynamisch bereik: 92 dB
Signaal/ruisverhouding: 100 dB (A-gewogen)
Kanaalscheiding; 95 dB
Totale harmonische vervorming; 0,0025%
Digitaal/analoog-omzetting: Bitstream-omzetting
(256 X Oversampling, 1 bit)
Audio-uitgangssignaal:
Impedantie PHONES-uitgang:
Voeding
Netspanning en -frequentie:
zie het typeplaatje op de achterkant van de speler
Opgenomen vermögen;................................ca. 16 W
Veiligheidseisen:
Behuizing
Materiaal/afwerking: metaal en polystyreen met
siermaterialen
Afmetingen (b x h x d);
Gewicht:
.........................................................
Wijzigingen voorbehouden
...............................................
.............
8 -1000 onm
...............................................
...............
420 x 90 x 280 mm
ca. 4 kg
2 N/^^3
lEC 65
ca. 4 kg
49
Page 10

DATOS TÉCNICOS________________________®
Especificaciones (nominales) de audio
Margen de frecuencias:
Linealidad de la amplitud: 0,35 dB (20 Hz - 20 kHz)
Linealidad de la fase:
Linealidad con - 90 dB:.........................................0 dB
Margen dinámico:.....................................................92 dB
Relación señal/ruido:
Separación de canales:............................................95 dB
Distorsión total armónica:
Conversión digital/analógica:
transformacón Bitstream (transformacón del con
junto de bits, 256 X sobremuestreos, 1 bit)
Señal salida de audio:
Impedancia de la salida PHONES: ....8-1000 опт
Alimentación
Tensión y frecuencia de red:
ver la placa de tipo detrás del reproductor
Consumo de potencia:
Normas de seguridad:
Caja
Material/acabado:
metal y poliestireno con materiales decorativos
Dimensiones (an x al x pr):
Peso:...........................................................unos 4 kg
Salvo modificaciones sin previo aviso
.........................
................
.............
100 dB (A-ponderada)
............................
....................................
..............................
............................................
..........
2 Hz - 20 kHz
0,5" (20 Hz - 20 kHz)
0,0025%
2 Vj-r^s
unos 16 W
420 x 90 x 280 mm
lEC 65
TEKMISKE DATA
Lyd performance (typisk)
Frekvensgang:.......................................2 Hz - 20 kHz
Amplitude liniaritet:
Fase liniaritet:............................0,5" (20 Hz - 20 kHz)
Liniaritet om - 90 dB:
Dynamik:...................................................................92 dB
Signal/st0j:
Kanaladskillelse:
Total harmonisk forvroengning:
D/A-konvertering:
Bitstream konvertering (256 x oversampling,
1 bit)
Lydudgangsniveau:
Impedans for PHONES-bosning:
Stromforsyning
Lysnetspaending og -frekvens:
Se typeskiltet pS bagsiden af afspilleren
Stromforbrug:...............................................Ca. 16 W
Sikkerhedskrav:
Kabinet
Materiale/finish:
Metal og polystyren med profiler
Dimensioner (b x h x d):.............420 x 90 x 280 mm
Vffigt:
..............................................................
_________________________
............
0,35 dB (20 Hz - 20 kHz)
............................................
.......................................
......................................................
....................................................
......................................................
Ret til aendringer forbeholdes
100 dB (A-vejet)
...................
.........
®
0 dB
95 dB
0,0025%
2 V^r^g
8 -1000 ohm
lEC 65
ca. 4 kg
DAT! TECNICI
Specificazioni audio (tipiche)
Risposta in frequenza:...........................2 Hz - 20 kHz
Amplitudine-linearità:
Fase-linearità:
Linearità à - 90 dB:
Gamma dinamica:
Rapportosegnale/disturbo:..100 dB (A-ponderato)
Separazione dei canali:
Distorsione armonica totale:
Conversione D/A:
conversione Bitstream (256 x sovracampionamento, 1 bit)
Uscita audio:...................................................2
Impedenza uscita PHONES:
Alimentazione
Tensione e frequenza di rete:
ved. la targhetta sul retro del lettore
Potenza assorbita:.....................................16 W circa
Norme di sicurezza:................................................lEC 65
Mobile
Materiale/finitura;
metallo e polistirene con profili decorativi
Dimensioni (larghezza x altezza x profondità):
...................................................420 x 90 x 280 mm
Peso;
50
___________________________
.........
...........................
.........................................................
Tutti i diritti di modifiche riservati
0,35 dB (20 Hz - 20 kHz)
................................................OdB
....................................................
0,5" (20 Hz - 20 kHz)
............................................
........................
...............
8 -1000 Ohm
CD
92 dB
95 dB
0,0025%
4 kg circa.
TEKNISKA DATA
Ljuddelen
Frekvensomf^ng:
Amplitudawikelse:
Fasawikelse:
Wikelse pa - 90 dB:...............................................0 dB
Dynamik:.................................................................92
Signal/brusforhallande;
Kanalseparation;
Harmonisk distortion THD:...........................0,0025%
D/A-omvandling:
Bitstream-omvandling (256 x oversampling, 1 bit)
Utsignal:
Utimpedans PHONES;.........................8 -1000 ohm
Natdelen
Natspanning och natfrekvens:
se typskylten pa apparatens baksida
Effektforbrukning:.......................................cirka 16 W
Sakerhetsforeskrifter: ....enligt SEMKO och lEC 65
Allmanna data
Material:...........metall och polystyrene med profiler
Dimensioner (b x h x d);.............420 x 90 x 280 mm
Vikt:..............................................................cirka 4 kg
Reservation for eventueila andringar.
__________________________
...................................
..............
.............................
...............................................
...........................................................
Klass 1 laserapparat
0,35 dB (20 Hz - 20 kHz)
...................
2 Hz - 20 kHz
0,5" (20 Hz - 20 kHz)
100 dB (A-kurva)
©
95 dB
2 Vr^s
Page 11

TEKNISETTIEDOT_________________________@
Âânentoisto (tyypillinen)
Taajuusalue:
Amplitudilineaahsuus:
Vaihelineaarisuus:
Lineaarisuus - 90 dB:............................................0 dB
Dynamiikka:
Signaali-kohinasuhde:
Kanavaerotus:...........................................................95 dB
Harmoninen sarò:.........................................0,0025%
D/A-muunto:
Bittivirtamuunto (256 x ylinâytteitys, 1 bitti)
Àanen lahtôtaso:
PHONES-liitannàn impedanssi:
Virtalâhde
Verkkojannite ja -taajuus:
katso soittimen takana olevasta arvokilvestë
Tehontarve:.............................................................noin 16W
Turvallisuusnormit:..................................................IEC 65
Kotelo
Materiaali/viimeistely:
Mitât {IX к X s):..............................420 x 90 x 280 mm
Paino:
..........................................
........
0,35 dB (20 Hz - 20 kHz)
.....................
..............................................................
...........................................................
Oikeus muutoksiin varataan
............
100 dB (A-painotettu)
.............................................
.............
metalli ja polystyreeni
Luokan I laserlaite
2 Hz - 20 kHz
0,5° {20 Hz - 20 kHz)
........
8-1000 o)imia
92 dB
2
noin 4 kg
51
Page 12

GUARANTEE AND SERVICE FOR UNITED KINGDOM
Philips sell this product subject to the understanding that if any defect in manufacture
or material shall appear in it vnUtin 12 months from the date of consumer safe, die
dealer from vAom the product v;as purchased will arrange for such defect to be recti
fied without charge, provided:
1. Reasonable evidence is supplied that dte product v.-as purchased within 12 months
prior to the date of claim
Z The defect is not due to use of the product for other than domestic purposes, or on
an incomect voltage, or contrary to the Company's operating instructions, or to acci
dental damage (v.iiether in transit or otherwise), misuse, neglect or inexpert repair
Products sent for service should be adequately packed as no liability can be accepted
for damage or loss in transit, and name and address must be enclosed
Facts about free service
When service is required, apply to the dealer from whom the product v/as purchased.
Should any difficulty be experienced m obtaining Service, e.g in the event of the deal
er having ceased to trade, you are advised to contact Philips Service.
These statements do not affect the statutory rights of a consumer.
if you have any questions which your dealer cannot answer, please vmte to
Philips ConsumerBelations,^P.0, Box298,420London Road,
CROYDON CR93QR, or Э (01) 689-2166 Consumer Advice.
Please retain this card Produce if service is required
GUARANTEE AND SERVICE VAUD FOR IRELAND
TTiis apparatus is made of high quality material and great care has been taken in its
manufacture.
Philips, therefore, give you a guarantee on parts against failures arising from faulty
workmanship or material for 12 months after dale of purchase. This guarantee is valid
on the condition that this certificate is completed and signed immediately on delivery
of the apparatus. In case of failure ask your dealer for further information.
If you have any questions wliich your dealer cannot answer, you may apply to
Philips Electrical (Ireland) Ltd., Service Department Newstead, Clonskeagh,
DUBUN14,*S 693355.
GUARANTEE AND SERVICE VAUD FOR AUSTRAUA
The benefits given to die purchaser by this v/amanty are in addition to all other rights
and remedies, v^ich. under the Trade Practices Act or other Commonwealth or State
law. the purchaser or ovmer has m respect of the product
The Philips product carries the following v/arranties
C-senes HiFi-systems 12 months. Compact Disc Players* 12 months. Home Audio Sys
tems 6 mondis. Clock radios, portable radios, cassette recorders, cassette pla>ers
and radio recorders SO days.
Any defect m materials or v/orkmanship occurring within the specified period from the
date of delivery, will be rectified free of charge by the retailer from whom this product
v.ra$ purchased.
Note Please retain your purchase docket to assist prompt service
Conditions of this warranty
1. All claims for v/arranty service must be made to the retailer from \*Л1от this prod
uct vras purchased. All transport charges incurred m connection with Viiarranty ser-^
vice or replacement \‘л11 be paid by the purchaser.
Z These v^arranties do not cover batteries and extend only to defects m materials or
workmanship occurring under normal use of the product v^iere operated in accor
dance With our instructions
Philips Consumer Products Division, Technology Park, Figtree Drive,
Australia Centre, HOMEBUSH 2140, New South Wales
GUARANTEE AND SERVICE FOR NEW ZEALAND
Thank-you for purchasing this quality Philips product The document you are now
reading is your guarantee card
Guarantee.
Philips New Zealand Ltd guarantees this product against defective components and
faulty workmanship for a period of 12 months. Any defect in matenals or v/orkman-
ship occurring \‘л1Ь1п 12 months from the date of purchase subject to the following
conditions will be rectified free of charge tr/ the retaifer from v^iom this product v/a$
purchased
Conditions.
1. The product must have been purchased in New Zealand, and this guarantee card
completed at time of purchase (this is your proof of the date of purchase)
Z The guarantee applies only to faults caused by defective components, or faulty
workmanship on the part of the manufacturer
3. The guarantee does not cover failures caused Iry misuse, neglect, normal wear and
tear, accidental breakage, use on the incorrect voltage, use contrary to operating in
structions. or unauthorised modification to the product or repair by an unauthorised
technician
4. Reasonable evidence (m the form of a sales docket or completed guarantee card)
must be supplied to indicate that the product v;as purchased no more than 12
months prior to the date of your claim
5. In the event of a failure. Philips shall be under no liability for any injury, or any loss
or damage caused to property or products odier than die product under guarantee.
This guarantee does not prejudice your rights under common law and statute, and is
rn addition to the norma! responsibilities of the retailer and Philips
How to claim.
Should your Philips product fail within the guarantee period, please return it to the re
tailer from v^iom it v.ias purchased. In most cases the retailer will be able to satisfac
torily repair or replace the product
However, should the retailer not be able to conclude the matter satisfactonly, or И you
have other difficulties claiming under this guarantee, please contact
the Guarantee Controller, Philips New Zealand Ш,
^P.O. Box 1041, AUCKLAND(09) 605-914
_________________________________________________________
GARANTIE EN SERVICE IN NEDERUND
• Watwordtgegarandeerd?
Philips Nederland В V garandeert dat dit apparaat kostefcos v.ordt herstefd indien bij normaal particulier gebruikvolgens de gebru ksaanwjjzmg - b nnen 12 maanden na
aankoopdatum fabncage- en/of matenaalfcuten cplreden
• Wie voerl de garantie uit?
De zorg voor de uib-'oermg van de garantie beaist bij de handelaar die u bet apparaat
verkocht heeft De handelaar kan daarbij eventueel een tercep dcen op een der
Philips Service vestgingen.
« Uw aankoopbon + de identifîcatiekaart
De identifìcatiekaart is uw garantiebs'wijs U kunt alleen een beroep dcen op de tovenomschreven garantie tegen O'.'erleggmg van de aankoopbon (factuur. kassabon cf
kv/itantie). in combinata met de identificatiekaart. waarop t>penumrrer en serienammer zijn vermeld Uit de aankoopbon dienen dudelijk de aankoopdatum en de raam
\an de handelaar le blijken Mocht het noodzakelijk öeze dccutrenten aan u-.v
handelaar af te ge\en. dan kunt и hem daatv’oor een cnt\angsttewijs\Tagen
De garantie veivalt indien op de gencemde documenten lets is veranderd, doorgehaafd. veavijderd of onfeesbaar gemaakt De garantie veaalt e'.eneens indien het
typenummer en/of senenumrrer op het apparaat is veranderd. doorgehaald. veaMjderd of onleesbaar gemaakt
• Hoe te handeien bij een storing?
Om onnodige kosten te voorkomen, raden wij u aan bij stonngen eerst nauwkeung de
gebruiksaanwijzing te lezen Indien de gebruiksaanv/ijzing daann geen uitkomst b edt.
kunt и m.v handelaar raadplegen en/of hem het apparaat ter reparatie aanbieden
• „.en bij Problemen?
Bij Problemen om^t de garantie-uitvoering laint u Zich in verbinding stellen rret
Philips Nederland B.V. Afdeling Consumentenbelangen Antwoordnummer500,5600 VB fWDtfO VfWipostzegel met nodig). of g 040-781178.
GARANTIE FÜR DIE SCHWEIZ
Philips-Geräte sind aus emv^ndfreiem Material und mit groSe; Sorgfalt hergestelit
worden Dieses Gerat wird Ihnen gute Dienste leisten, sofern es sachgemiS bedient
und unterhalten wird Trotz alfer Sorgfalt ist das Auftreten \ on fehlem nicht ganz auszuschlieSen Im Falle emes Defektes wenden Sie sich bitte unter Verlage des Ein
kaufsbeleges und des Gerätepasses an das Fachgeschäft, in welchem Sie das Gerat
eavorben haben
GARANTIE POUR LA SUISSE
Les appareils Philips ont été fabriqués au moyen de matériaax de toute premére qual
ité et avec beauwup de soins, (^t appareil vous donnera encore plus de satisfaction
si l’utilisation et l'entretien sont suivis selon le mode d'emploi. Malgré tous les soins
apportés. l'apparition de défauts n'est pas exclue Dans ce cas. nous vous serions re
connaissants de b en vouloir vous adresser directement chez votre vendeur muni du
passeport de l'appareil ainsi que de la facture s’y reportant
GARANZIA PER LA SVIZZERA
Gli apparecchi Philips sono prodotti con materiali di poma qualità e assemblati con la
massima cura Essi Vi offriranno un ottimo seivizio. in camb o di un aocurato uso e
manutenzione Malgrado tutti i nostri sforzi, non è escluso che possano avvenire dei
guasti In caso di difetto Vi preghiamo di nvo'geAü al Vostro fornitore specializzato,
portando con Voi ¡I passaporto assieme ai documenti d'acquisto
GARANTIE EN SERVICE IN BELGIË EN LUXEMBURG
In Belgiê en Luxemburg gelden uitsluitend de garantietepalingen die m het dcor ir.v
handelaar verslrekte garanti ebewijsstaan aangegeven
• VoorBelgië:lni\en u na de aankoop van een of ander Philips apparaat Problemen
heeft met bijv de vraarborg. de vverking, of het gebruik ervan. en indien de verdeier
die u deze apparaten verkocht heeft moeitijkheden ondeMndt om deze prob’emen op
te lossen. stell u zieh dan telefonisch of schnftelijk in verbmdmg met onze dranst
’Klanîen Kontakt, de Brouckèreplein Z1000 BRUSSEL-^S 02/2119111
GARANTIE EN BELGIQUE ET LUXEMBOURG
Pour (es conditions de garantie en Belgique et Laxemtourg veuillez vous référer à (a
carte de garantie que le revendeur doit vous rem.ettre.
• Pour la BelgiquerSi après l'achat de l'un ou l'autre appareil Philips vous avez des
problèmes concernant par exemple la garantie, le fonctionnement ou Tutilisation de
l’appareil et que le distributeur qui vous a vendu ces appareils éproir.o des difficultés
pour les résoudre, prenez contact soit par téléphone, soit par écrit avec notre sen,',ce
'Contact Clientèle’, Place de BrouckèreZ 1000BRUXELLES02/2119111
GARANTIE IN ÖSTERREICH
In Österreich ist die Gevrährleistung für Verträge rwisch en Handler und Käufer gesetz
lich geregelt Zur Geltendmachung des Gevrabrleistungsanspruches dient der Kauf
beleg
Oie Österreichische Philips IrdusUie GmbH unterstützt die Gevrahrleistungsverpflichtung Ihres Händlers für Neugerate, die der Handel über die Osterrexhische Philips In
dustrie GmbH bzvv Homy Vertnebsgmbh bezogen hat dadurch, daß für den Käufer in
nerhalb von $ Monaten ab Verkaufsdatum ftjnktionsmaiîgel (fabnfcatons- oder Matenalfehler) in einer unserer Service-filialen kostenlos, d h ohne Verrechnung von Ar
beitszeit und Material, behoben werden.
Schäden, die durch äußere Einflüsse, unsachgemäße Behandlung oder unsacJigemäßen Fremdeingriff entstanden sind, sm.vie Gehäusefeh'er oder Glasbruch, smd von
dieser Zusage ausgeschlossen
Philips Zentrale Kundeninformation:
- 1101 WIEN, Triesterstraße 64,'S 0222-60101-DW1620 oder 1563
- 6020 INNSBRUCK, Klostergasse 4, ^ 05222-74694
- 9020KLAGENFURT, Villacher Straße 161,^S0463-22397-DW94
Philips Service-Organisation: 1232 WIEN, Ketzergasse 120,*S 0222-8662-0
____________________________
52
Page 13

GARANTIE ET SERVICE APRES-VENTE EN FRANCE
Cet appareil a été fabriqué avec le souci de vous donner entière satisfaction
PHILIPS fournira gratuitement au vendeur les pièces détachées nécessaires à sa ré
paration pendant les périodes suivantes, chacune prenant effet à compter de la date
de vente
^ 6 mois pour les magnétophones à cassette portatifs, les récepteurs radio portatifs,
les radiocassettes. les radio-réveils et les électrophones.
- 12 mois pour les radiocassettes équipés de la fonction Compact Disc et les bala
deurs Compact Disc.
“ 12 mois pour les appareils entrant dans la composition d'une chaîne électro-acous
tique, Y compris les chaînes compactes stationnaires équipés d’au moins deux
sources sonores,
sauf St la détérioration résulte d'une cause étrangère à l'appareil ou du non respect
des prescriptions d'utdisation
Vous bénéficierez en tout état de cause des dispositions des art 1641 et Suivants du
Code Civil relatifs à la garantie légale
Pour tout conseil ou inteaention, adressez-vous à votre vendeur.
Pour tout renseignement complémentaire, vous pouvez vous adresser à la succursale
Philips la plus proche
Soucieux d'améliorer continuellement la qualité de nos produits, nous nous réseamns
le droit d'en modifier à tout moment les caractéristiques
PHILIPS Électronique Domestique • Société en nom coUectif
RCS NANTERRE B 333 760833
64, Rue Carnot-^B.P. 306-92156SURESNESCédex
informations Consommateurs:*S (16-1)64805454
GARANTIE FUR DIE BUNDESREPUBUK DEUTSCHLAND UND WEST-BERUN
Philips-Gerate smd Markenartikel, die mit grôSter Präzision nach modernsten f^rtigungsmethoden und mit einem Höchstmaß an Sorgfalt hergestellt werden Das
Gerat v;ird Ihnen gute Dienste leisten, vorausgesetzt daß Sie es sachgemäß bedienen
und unterhalten Trotz aller Sorgfalt ist das Auftreten von Fehlem nicht auszuschließcn Ihr Partner fur die Behebung derartiger Fehler »st Ihr Fachhändler, bei dem das
Gerat erworben wurde Falls ein Reklamationsfall emtntt wenden Sie sich bitte unter
Vorlage des Einkaufsbeleges und des Geratepasses an Ihren Fachhändler.
GARANZIA E ASSISTENZA VAUDE PER L'ITAUA
Questo apparecchio è stato realizzato con matenali di prima qualità e costruito con la
massima cura La Philips comunque fornisce all'acquirente una Garanzia di buon fun
zionamento secondo le condizioni stabilite dalI'AAf/E
Tale Garanzia decorre dalla data di acquisto ed ha la durata di 6 mesi. Per aver diritto
alla Garanzia è necessario che questo certificato riporti i dati di Modello e Matricola
deti’apparecchio, la data di acquisto ed il timbro del riv’enditore, inoltre per tutti gli
apparecchi per i quali è prevista la Vice'/uta fiscale’ (o altro documento di consegna) il
documento stesso do'.Tà essere conservato con questo certificato a certificazione del
la data d'acquisto
In caso di necessità il prodotto dovrà essere fatto pei\’enire al Centro di Assistenza
più vicino il CUI recapito è pubblicato sugli elenchi telefonici della zona di residenza
alla voce Philips
Per questo apparecchio Philips offre un Abbonamento all'Assistenza Tecnica. Per in
formazioni rivolgersi ai Centri di Assistenza o al servizio Consumatori Philips
Philips S.pA, Viale le Fulvio Testi327,20162MILANO, 1678-20026
CONDIÇÔES VÁUDAS PARA PORTUGAL
A Philips Portuguesa. SA. assegura ao comprador deste aparelho garantía contra
qualquer deferto de material ou fabrico, pelo prazo de 6 meses, contado a partir da
data de aquisiçao As agulhas de fonocaptores nao tém qualquer garantía.
A Philips Portuguesa. SA. anula a garantía ao aparelho desde que se verifique ser a
dcíiciéncia motivada por acídente, utilizaçao incorrecta, causas externas, ou nos ca
sos em que apresente vestigios de ter sido violado, ajustado ou reparado por entidade
nüo autorizada Também será considerada nula a garantía se este certificado apresen
tar rasuras ou alteraço es
A Philips Portuguesa, SA. obnga-se a prestar a garantía referida somente nos seus
Serviços Técnicos ou nos Concessionános de Sen,'iço autorizados As despesas e
riscos de transporte de e para as oficinas serlo sempre da responsabilidade do com
prador
Nota Para que o aparelho seja assistido ao abrigo da garantía, é indíspensável que
seja apresentado este certificado, devidamente preenchido e autenticado, por vende
dor autorizado, aquando da sua aquisiçao
Se sobre esta garantía necessitar algum esclarecimento que o vendedor nao Ihe pos
sa dar. deve dingir-se a Philips Portuguesa, SA,
- Outurela - Carnaxide -2795LINDA A VELHA -“34180077/9
- /?. Eng. Ezequiei de Campos, 182 - 4100 PORTO - 3 672613_______________________
GARANTI OG SERVICE FOR DANMARK
De er nu ejer af et apparat, hvis konstruktion er baseret pä erfanng og lang tids forskning Philips garanterer for kvaliteten. og hvert Icd i fabnkationen er underkastet stadig kontrol Alle henvendelser om fejl under garantien skal rettes til den forhandler.
der har udleveret og underskrevet garantibeviset. hvorpl de gældende garantibestemmelser iillige er anfert. Garantien er kun gældende i kcbslandet
GARANT! I NORGE
De er nS eier av et apparat som er basert pä lang tids forskning og erfaring
Philips garanterer for kvahteten, men hvis en feil skulle oppstä bes De ta kontakt med
den forhandler som har utlevert og underskrevet garantibeviset Garantien gjelder kun
I kjcpslandet hvor de gjeldende garaniibestemmelser mä folges.
Hvis De trenger ytterligere opplysnmger utover de forhandleren kan gi Dem. kan De
henvende Dem til Norsk A/S Philips, Avd. Audio/VIdeo,
Sandstuveien 70, OSLO6-302-680200
_______________
_________________________
TAKUUJA HUOLTO
Taman tuoíteen rakenne on pitkáaikaisen. kokemuksella teh^n tuíkimustybn tufos,
Jatkuvan en tuotantovaiheissa tehiaran faatutarkkailun vuoksi Philips takaa tuotteen-
sa faadun
Tarkemmat tiedot takuuehdoista saat Philips-nr/Yjàlta tai alia olevasta osoitteesta.
Oy Philips AB, SinikalHontie 3,02630 ESPOO -3 (358-0Ì-5O261
В Oy Philips AB, P.O. Box 75,02631ESPOO_______________________________________
GARANTÍA PARA MÉXICO
Este aparato está fabricado con materiales de alta calidad y ha sido cuidadosamente
verificado Philips, por lo tanto, da a usted una garantía de 12 meses a partir de su
fecha de compra
La garantiá ampara la reposición de las piezas defectuosas debidas a fallas en su
montaje o en los materiales, ineluv'endo la mano de obra necesaria para su reemplazo
en nuestras Sucursales o talleres autonzados.
En caso de fallas en su aparato le rogamos se sirva poner en contacto con su dis
tribuidor
Esta garantía no cubrirá las averías que resulten como consecuencia de una insta
lación incorrecta del aparato, manifiesto maltrato o uso inadecuado del mismo
Philips se obliga a reparar y devolv’er a usted su aparato en un p’azo no mayor de 30
días hábiles contados a partir de la fecha de haber ingresado su aparato a unoi de
nuestros talleres
Para que esta garantía sea válida, es necesario que el certificado que figura en la
parte posterior de esté instructwo haya sido debidamente llenado en el momento de
la compra del aparato
En caso de extravío del certificado con !a presentación de la factura o remisión de su
aparato podrá hacer efectiva la garantía correspondente.
Si usted tiene alguna duda o pregunta que no le pueda solucionar su distribuidor, por
favor ponerse en contacto con Ofícinas Centrales de Servicio,
Av. Coyoacán No. 1051, Col. del Valle, 03100 MÉXICO, D.F.
3 5-75-20-22o 5-75-01-00____________________________________________________
PHIUPS IBÉRICA, SAL
Garantiza este aparato durante 6 meses, a partir de la fecha de adquisición, de la for
ma siguiente;
1. Cubriendo cualquier defecto de fabricación o vicio de origen, así como la totalidad
de sus componentes, ineluy’endo la mano de obra necesari para el reemplazo de
las piezas defectuosas, por nuestros talleres autorizados
2. Esta garanifa ro cubrirá la avería, si es consecuencia de incorrecta instalación del
aparato, manifiesto mal trato o uso inadecuado del mismo La calificación de las
averías corresponderá únicamente a los servicios técnicos de los talleres autoriza
dos Philips.
3. Las reparaciones que pudieran producirse durante el período de vigencia de la pre
sente garantía se efectuarán, bien en el domicilio del usuario, bien en los talleres
autorizados Philips, a libre elección y criterio de ésta última
4. Transcurrido un mes desde la fecha de adquisición de! aparato, todos los gastos de
desplazamiento del personal técnico para proceder al examen y/o reparación del
aparato correrán por cuenta del usuario de acuerdo con las tarifas establecidas
para este concepto
5. En todas las reparaciones se deberá acompañar al aparato factura de compra y la
presente garantía debidamente cumplimentada, con la indicación exacta de la
fecha de venta del aparato'
6. En todo caso, el titular de la garantía tiene los derechos mínimos reconocidos por
la Ley
Titular (Comprador)
Domicilio
ПЛНРОФОР1Е2: ПА SERVICE KAIЕГТУНХН ZTHN ЕЛЛАДА
H CTuoKeüti er/.a eXe^dei ахоХосстка. r\ ?xuovp7ia iiii; eivai apioin
raí Хоуо; ctvnraxaaxaaEco; xtig 5ev лроштса ere Kctppia яерпстохл!
vet rrpoKuxei. Av opox;, metp' aDxa, rancio e^apxiipa 5ev ?£ixocpVn<rei, xo é^apxnpcc acto raí r\ еруаспа emoceciii; napexovxai cato
xnv exaipia Swpeocv. H npooKopi^ojievri yice еякукеол аоатеъл npenei
va GOVoSevexai cotapaixrjxa caco xo ДЕЛТ10 AIANIKH2 TliiAHSEQS,
Il (pcoTOxoma xoo, rai xo Jiapov evxono aujinXtipcopevo кса ctppccpo-
pevo coto xo raxaoxnpct or/opco; xou.
H £rf{ùì\ci\ VT/joa. yia ENA ero;, cato xiqv iipepopnvia crcpai;. H trf-
YOìiOTì 5ev icxDsi oxi? itctparaxò) mepucxiooeii;:
аГш oviopoAia oxi coto pXxxPii xn«; caxjKeorii;, оЯЯа ало tpdopa т)
рХарп. iiov тгрок^я^пке coto xpixoo; ti ало pexapoXri xiii; xaoeox;
xoi) Tiy^CTpiKoi) pevpaxo;.
p. Па ccv'copoXia Xo^to eXaxxíopaxiKni; еукохаохааесос xtii; cfoaKeotií;.
V 'Oxav o opidpo^ raxaaiceüxni; xiv; ODOKeoti; exei o^uodei.
5. Па ке(роЛе<;7пк-сог raí piKpo^tovct.
H epyaoia emioKEuiii; yivexai oxa Epyaoxnpict xqg Exaipioi;. слои o
^eXaxiii; rtpeitei va pexa<pepei xn о\)сгш)т1 pe 6iiai xoo Scatccvii.
Kav'ev'ot^ ovximpoocono; 6ev ey.a xo Sirauopa cúAoyni; xtov opiov ryуиоеоу Meta щ Хт]|п xou xpovou е-у/илегсеод, ’pa rade mpopXtipct
ouvxiipn<rco>;, ешакеип«; т| ouppouXi)^, ooi; cruvioxoupe va cotoxeiveode oxa гахахолои? Sen/ice xrii; Exoipioi;.
Aieúvvvffii KevrpiKúiv SERVICE PHILIPS:
25r\q Morpnou 15,177 78 Tavpog -3 4894.911
TcipioKtj 62,546 93 ©еооаЯоуг КП ~ ^ 260.621
_________________________
53
Page 14

Guarantee certificate
Identificatiekaart
Garantibeviset
Type no. of product;
No. de type du produit:
Typennummer des Gerätes:
Typenr. van het apparaat:
Tipo no. del producto:
Certificat de garantie
Certificado de garantía
Takuutodistus
Garantieschein
Certificato di garanzia
Eyyutioti
Date of purchase - Date d'achat-Kaufdatum-Koopdatum-Fecha de compra
to - InkSpsdato - Ostopaiva - Hpepopiivia ayopa?
Dealer's name, address and signature
Nom, adresse et signature du revendeur
Name, Anschrift und Unterschrift des Händlers
Naam, adres en handtekening van de handelaar
Nombre, direccidn y firma del distribuidor
Nome, indirizzo e firma del fornitore
Nome, morada e assinatura da loja
Forhandlerens navn, adresse og underskrift
Äterförsäljarens namn, adress och namnteckning
Myyjan nimi, osoite ja aliekirjoitus
OvopoVEncovopo AvTijrpoceonou
3104115 20372
Printed in Belgium
Data da compra - Data di acquisto ■ Kobsdato Kjopeda-
19
03 91/1
 Loading...