

Page 1
Owner's Man,_a!
Page 2
Onceyour PHILIPSMAGNAVOX purchase isregistered,you're eligible to receive all the privileges
of owning a PHILIPSMAGNAVOX product Socomplete and return the Warranty Registration
Card enclosedwith your purchase at once.And take advantage of theseimportant benefits.
Know these
$afetysymbols
PHILIPS
Congratulations on your purchase, and
welcome to the "_amilyt. "
Dear PHILIPS MAGNAVOX product owner:
Thank you for your confidence in PHILIPS MAGNAVOX.You've
selected,one of the best-built,best-backedproducts availabletoday.
And we II do everythingin our power to keep you happywith your
purchasefor many years to come.
As a member of the PHILIPSMAGNAVOX "family" you're entided
to protection by one of the most comprehensive warranties and
outstanding service networks in the industry.
What's more, your purchaseguarantees you'll receive all the infor-
mation and special offers for which you qualify,pluseasyaccess to
accessories froifl our convenient home shoppingnetwork.
And most importantly you cancount on our uncompromising
commitment to your total satisfaction.
All of this is our way of sayingwelcome-and thanks for investing in
a PHILIPSMAGNAVOX product.
Sincerely,
Robert Minkhorst
President and Chief Executive Officer
RS. Remember, to get the most from your PHIUPS
MAGNAVOX product, you must return your
Warranty Registration Card within I 0 days.So
please mail it to us right now]
A This "bolt of lighming" indicates
uninsulatedmaterial within your
unitmay causeanelectricalshock.For
the safetyof everyoneinyour house-
hold, please do not remove product
€ovedn&
_kThe "exclamation point" calls
attention to fimtures for which
you shouldreadthe e_closedtit-
erature closely to prevent operating
andmaintenance problems.
WARNING: TO PREVENT FIRE OR
SHOCK HAZARD, DO NOT EXFOSE
THIS EQUIPMENT TO RAIN OR
MOISTURE
CAUTION:To preventelectricshock.
matchwide bladeof plugto wide slot,
andfully insert
ATTENTION: Pour _viter les chocs
61ectdqu_, introduire la lame la plus
de la fiche dartsla borne corre-
_ndante de la prise et pousser
asqu'aufond.
For Customer Use
Enterbelowthe SerialNo.
whichis locatedonthe rear
of the cabinet.Retainthis
informationfor future refer-
ence.
Hodel No.
SerialNo,
Page 3
Introduction3
Welcome to yourTV/VCR owner's manual,
This manualhassixsections: SettingUpYour"I'V/VCR;Descriptionof Controls;BasicOperations;Recording
Options;PlayingOptions;and InformationYou May Need.The instructionsexplainall of theTV/VCR's fea-
tures, which are listedbelow.
Features
A-13 Repeat Play
Automatic Channel Setup
Automatic Operation Features
Automatic Tracking Adjustment
Closed Caption
Daylight-SavingTime
High Quality (HQ) System
On-Screen displaysin Englishor Spanish
On-Screen Menu Programming, accessible with remote control
or front panel buttons
One-Touch Recording
Real-Time Counter
Remote Control
Repeat Play
SleepTimer
SmartCIock TM
Special Effects Playback: Forward and Reverse Searching;,Still
Timer Recording
Safety Precautions
Warning.To prevent fire or shock hazard, do not expose this
equipment to rain or moisture.
FCC Warning.Any unauthorized changes or modifications to this
equipment void the user's authority to operate it,
ThisTV/VCR, equipped with a High Quality (HQ) system, is com-
patible with existingVideo Home System (VHS) equipment
Philips Consumer Electronics Company recommends that
you use only video cassette tapes that have been tested and
inspected for use in two, four, six, and eight hour VCRs, and which
are labeled with the _ The use of tapes that have not
been inspected for use in _vo, four, six, and eight hourVCRs may
result in poor picture quality and excessive deposits on the video
heads, which may not be covered by the warranty if damage
OCCURS.
Note to the CableTV System Installer:This reminder is pro-
videdto callthe Cable'lV systeminstallersattentionto Article
820-40 of the National ElectricalCode, which providesguidelinas
for proper grounding- in particular,specifyingthat the cable
groundshallbe connectedto the groundingsystemof the buildin_
as dose to the point of cableentryaspossible.
SmartCIock TM is a trademark of Philips Consumer Electronics
Company.
Copyright 1998 Philips Consumer Electronics Company. All rights
reserved.
j• Beforedoinganythingelse,record
theT1//VCR'smodel'andserialnum-
bersinthe sDacesprovidedonpage
two.Thesenumberswillhelpus
assistyou ifyouevercallforhelp,
Page 4
4 TableofContents
Setting UpYour TV/VCR
Introduction .......................................................... 3
Table of Contents ...................................................... 4
Before Using the TV/VCR ................................................ 5
Hooking Up the TV/VCR .............................................. 6 - 7
Turning On the TV/VCR ................................................. 8
LanguageSelection ..................................................... 9
Automatic Channel Setup ........................................... 10 - II
Setting the Clock .................................................. 12 - 17
Daylight-Saving Time ................................................... 18
Time Zone .......................................................... 19
Description of Controls
Front Panel .......................................................... 20
Rear Panel ........................................................... 2 I
Remote Control Buttons ............................................ 22 - 23
Adjusting the Picture Controls ....................................... 24 - 25
On-Screen Status Displays............................................... 26
Reminder ........................................................... 27
Basic Operations
Playing .............................................................. 28
Recording ........................................................... 29
Recording Options
One-Touch Recording .................................................. 30
Rerecording (Tape Duplication) ........................................... 3I
Timer Recording .................................................. 32 - 35
Defeat Recording ..................................................... 36
Playing Options
Setting the SleepTimer ................................................. 37
Closed Caption ................................................... 38 - 39
Volume Bar ........................................................... 40
Repeat Play ...;. ..................................................... 4 I
A - B Repeat Play .................................................. 42 - 43
Real-Time Counter Memory ............................................. 44
Automatic Operation Features ........................................... 45
PlaybackOptions ..................................................... 46
InformationYou May Need
Specifications/ Glossary ................................................ 47
Helpful Hints ..................................................... 48 - 49
LimitedWarranty ..................................................... 50
Index ............................................................... 5 I
SuppliedAccessories ................................................... 52
Page 5

BeforeUsingtheTV/VCR5
Putting Batteries in the Remote Control
Remove the battery compartment lid on the bottom of
the remote control by sliding it in the direction of the
arrow.
2 2
Place two AA batteries inside the battery compartment
with their + and - ends aligned as indicated.
3
Replace the battery compartment lld.
Erasure Prevention
Video cassette tapes have record tabs to ensure that recordings
are not accidentally erased.
I
I
To prevent accidental erasure, break off the tab with a
screwdriver.
2 z
To record again, cover the hole with cellophane tape.
Using the Remote Control
• Pointthe remote control at theTWVCR's remote sensor.
• Do not put objectsbetweenthe remote control andthe
"I'VNCI_
VCR Maintenance
a In thisTV/VCR, useonlytapes with the _ mark.
• Nake sureanylightadhesivesUck-onnotes are removed from
the video cassettetape beforeputtingthe tape intheTV/VCR.
Removablelabelslikethesecanjam theTV/VCR.
• Periodicmaintenance is required to maintainyourTV/VCR's
excellentperformance.ThisTV/VCR hasanautomatichead
cleaningsystem.However,the video headswill eventuallyrequire
cleaningor replacement Cleaningor replacementof the video
headsshouldbe performedby an authorizedservicecenter.
Page 6
6 H001dngUpTheTV/VCR
I
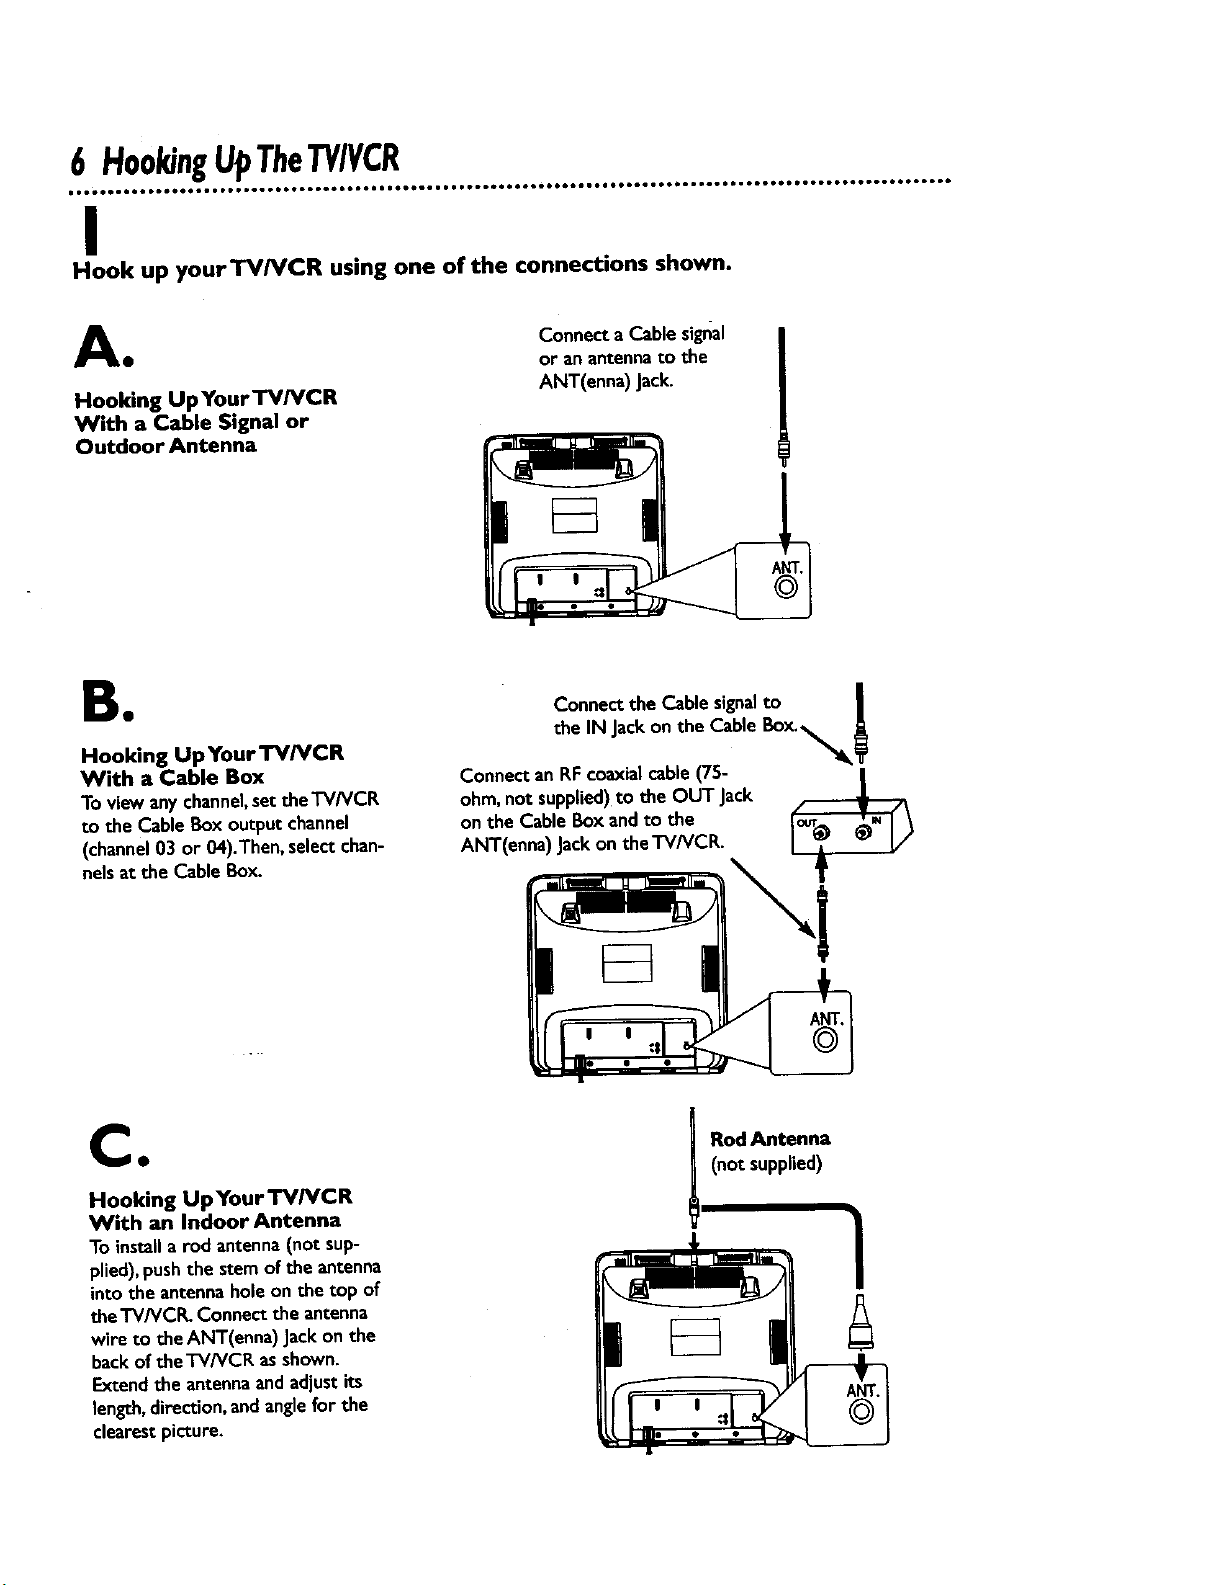
Hook up yourTV/VCR using one of the connections shown.
A Connecta Cable signal
• or a/1 antenna to the
Hooking UpYourTV/VCR ANT(enna) Jack.
With a Cable Signal or
Outdoor Antenna
B•
Hooking UpYour "FVNCR
With a Cable Box
To viewanychannel,settheTV/VCR
to the Cable Boxoutput channel
(channel03 or 04).Then,select chan-
ne)sat the Cable Box.
CO
Hooking Up Your'I'V/VCR
With an Indoor Antenna
To installa rod antenna(not sup-
plied),pushthe stemof the antenna
into the antennaholeonthe top of
the'I'V/VCR. Connectthe antenna
wire to the ANT(enna) Jackon the
backofthe'l-V/VCK asshown.
Extendthe antennaandadjustits
length,direction,andanglefor the
clearestpicture.
|
the IN Jackon the Cable Box.
Connect the Cable signalto , l
Connectan RFcoaxialcable (75-
ohm,not supplied)to the OUT Jack
on the CableBoxand to the
ANT(enna) Jackonthe TV/VCR.
(not supplied)
I RodAntenna
Page 7
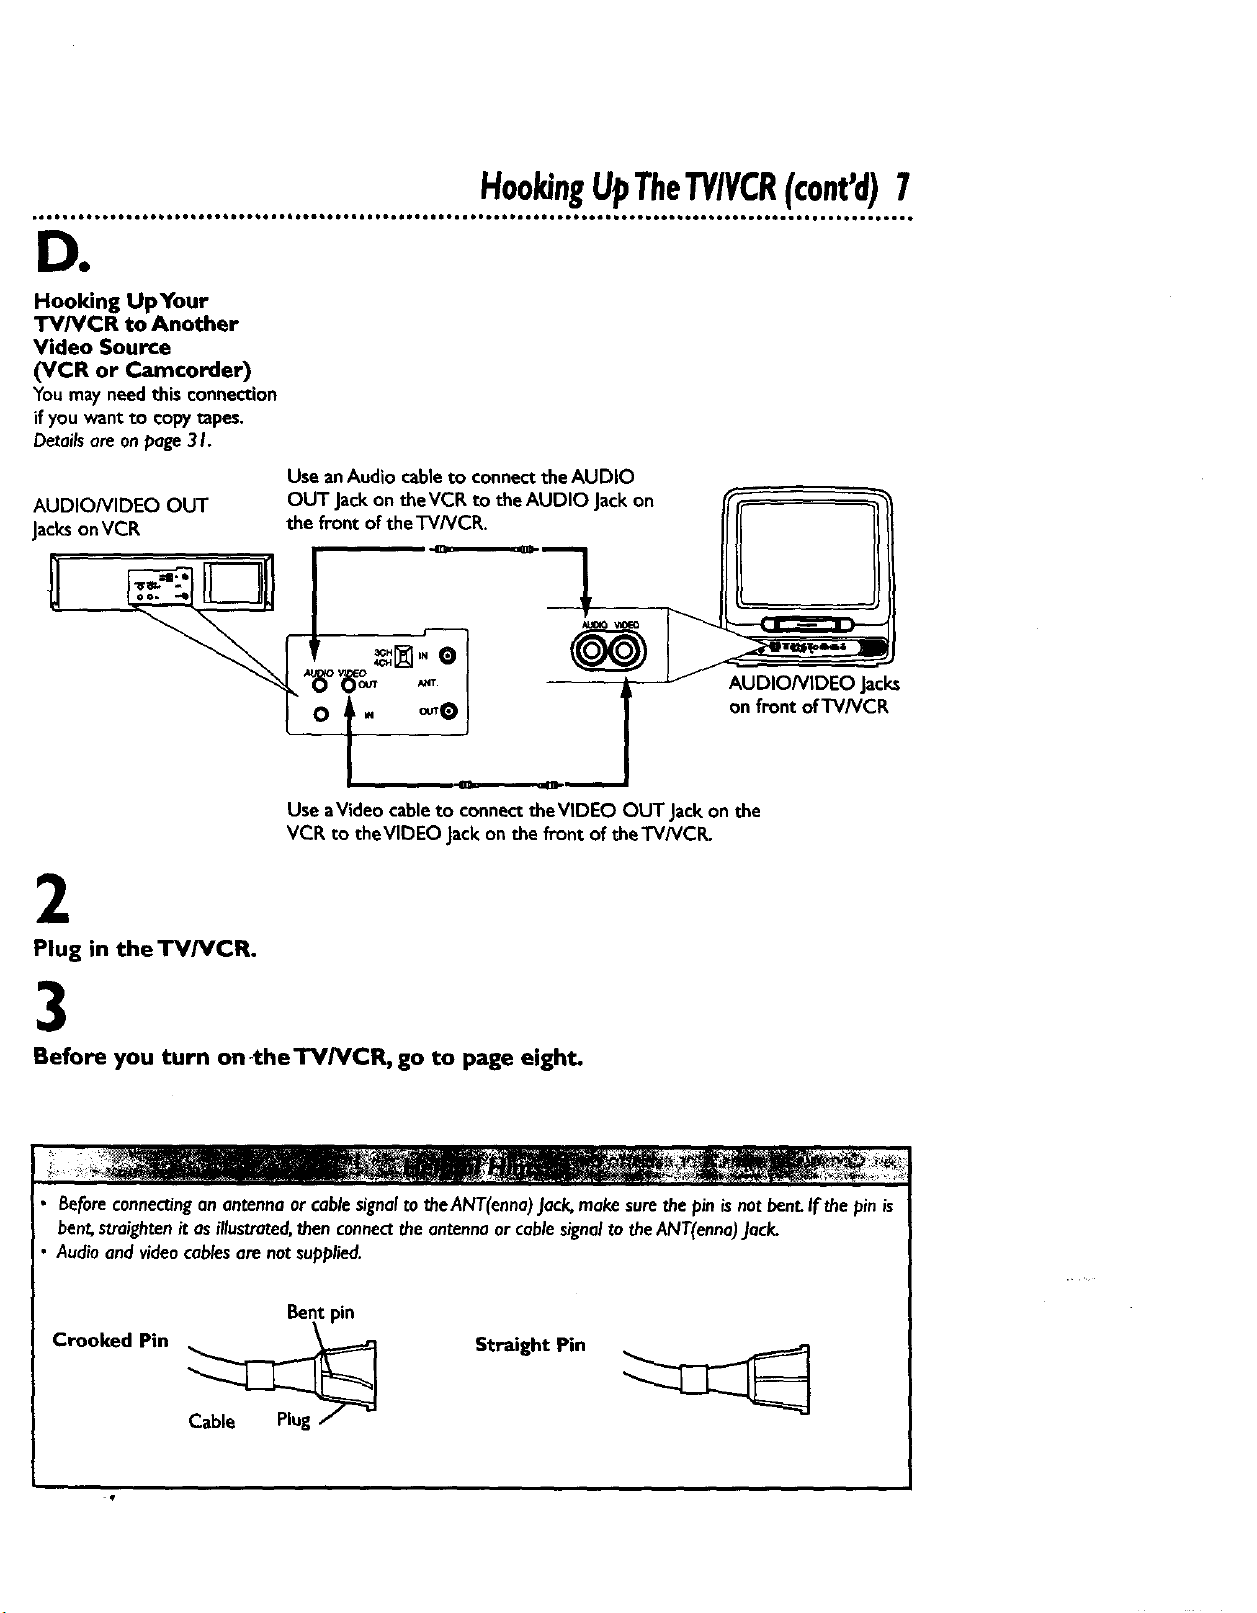
DO
Hooking UpYour
TV/VCR to Another
Video Source
(VCR or Camcorder)
Youmayneedthis connection
if youwant to copytapes.
Detailsareonpage.3I.
AUDIO/VIDEO OUT
JacksonVCR
H00kingUpTheTY/VCR(cant'd)7
Use anAudio cable to connect the AUDIO
OUT Jackon the VCR to the AUDIO Jack on
the front of the TV/VCR.
AUDIONIDEO Jacl_
on front of TV/VCR
Use aVideo cableto connecttheVlDEO OUTJack on the
VCR to theVlDEO Jackon the front of the TV/VCR.
2
Plug in the TV/VCR.
3
Before you turn on-the'rV/VCR, go to page eight.
Beforeconnectinganantennaorcablesignalto theANT(enna)Jack,makesurethepin isnotbent.If the pinis
bent,straightenit as illustrated,thenconnectthe antennaorcablesignalto theANT(enna).lack.
Audioandvideocablesare notsupplied.
Bent pin
Crooked Pin
Straight Pin
Page 8
8 TurningOntheTV/VCR
• • • • • • • * • • • • • • • • • • • • • • • • • • • • • • • • • • • • • • • • • o• • • • • • • • • • • • • • • • • • • • • • • • • • • • • • • • • • • • • • • • • • • • • • • • • • • • • • • • • • • • • • • • • • • • •
Beforeyou turn on theTV/VCR, makesurethere are batteriesin
the remote control andtheTV/VCR is hookedupcorrectly.
The instructionsonthis pagework only when youturn on the
TV/VCR for the firsttime.
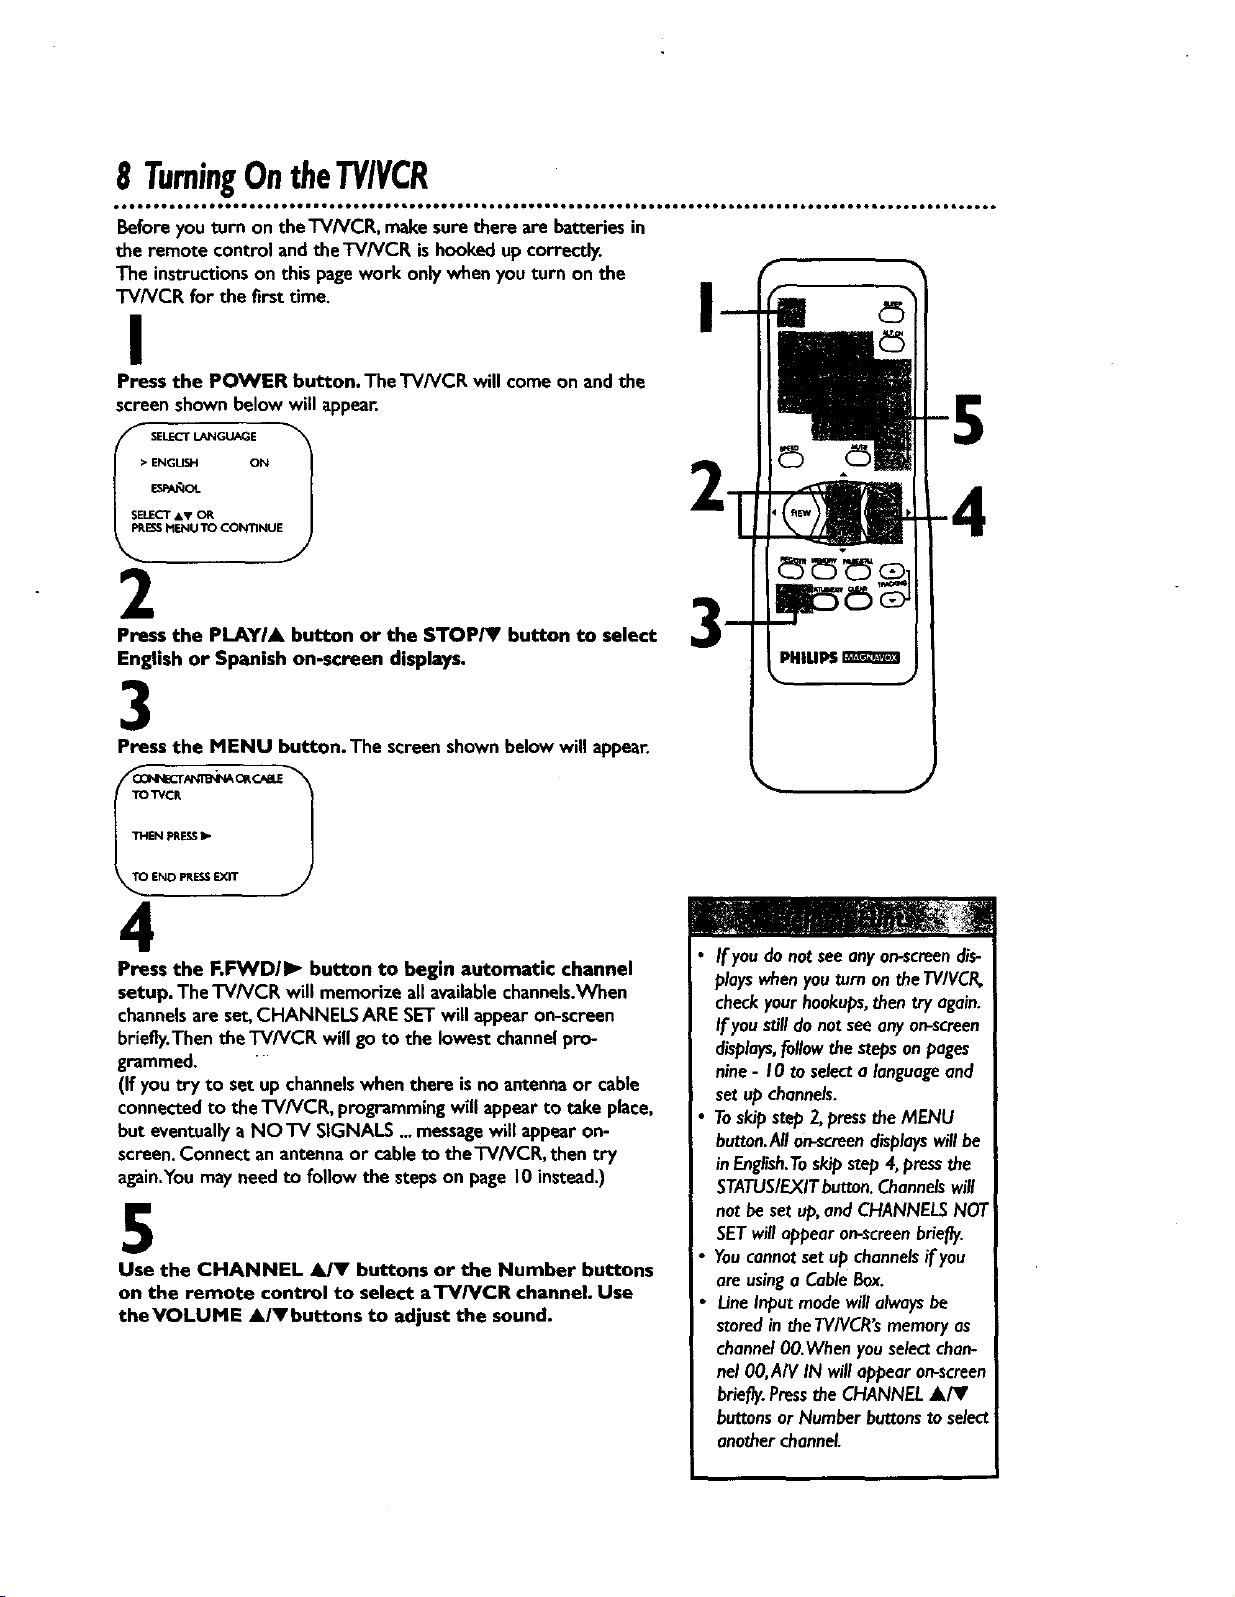
I
Press the POWER button.TheTV/VCR will come on and the
screenshownbelowwill appear.
• ENGUSH ON
SELECT &V OR
i-I
ESSMENU TO CONTINUE
2
Press the PLAYIA button or the STOP/I' button to select
English or Spanish on-screen displays.
3
Press the MENU button. The screenshownbelowwill appear.
TO'_CR
4
Press the F.FWD/I_ button to begin automatic channel
setup. The'I-V/VCP,will memorizeall availablechannels.When
channelsare set,CHANNELS ARESETwill appear on-screen
briefly.Thenthe TV/VCE willgo to the lowestchannelpro-
grammed.
(If youtry to setup channelswhenthere isno antennaor cable
connectedto theTV/VCR, programmingwill appearto take place,
but eventuallyaNO TV SIGNALS...messagewill appear on-
screen.Connectan antennaor cableto theTVh/CR, then try
again.Youmayneedto follow the steps on page10instead.)
5
Use the CHANNEL AIY buttons or the Number buttons
on the remote control to select aTV/VCR channel. Use
theVOLUME A/Vbuttons to adjust the sound.
If youdo notseeanyon-screendis-
playswhenyouturn on theTV/VCR,
checkyour hookups,then try again.
Ifyou_11do not seeany on-screen
displays,followthe stepsonpages
nine- 10to selecta languageand
set up channels.
Toskipstep 2,presstheMENU
button.Anon-screendisplayswill be
inEnglish.Toskipstep4,pressthe
STATUS/EXITbutton.Channelswill
not beset up,andCHANNELSNOT
SETwill appearon-screenbriefly.
Youcannotsetup channelsif you
are usinga CableBox.
LineInputmodewillalwaysbe
storedintheTVIVCR'smemoryas
channel00.Wbenyouselectchan-
nel 00,AIV IN willeppear on-screen
briefly.Pressthe CHANNELA/Y
buttonsor Number buttonsto select
anotherchannel.
Page 9
Followthe stepsbelowto changethe languageof the on-screen
displays.
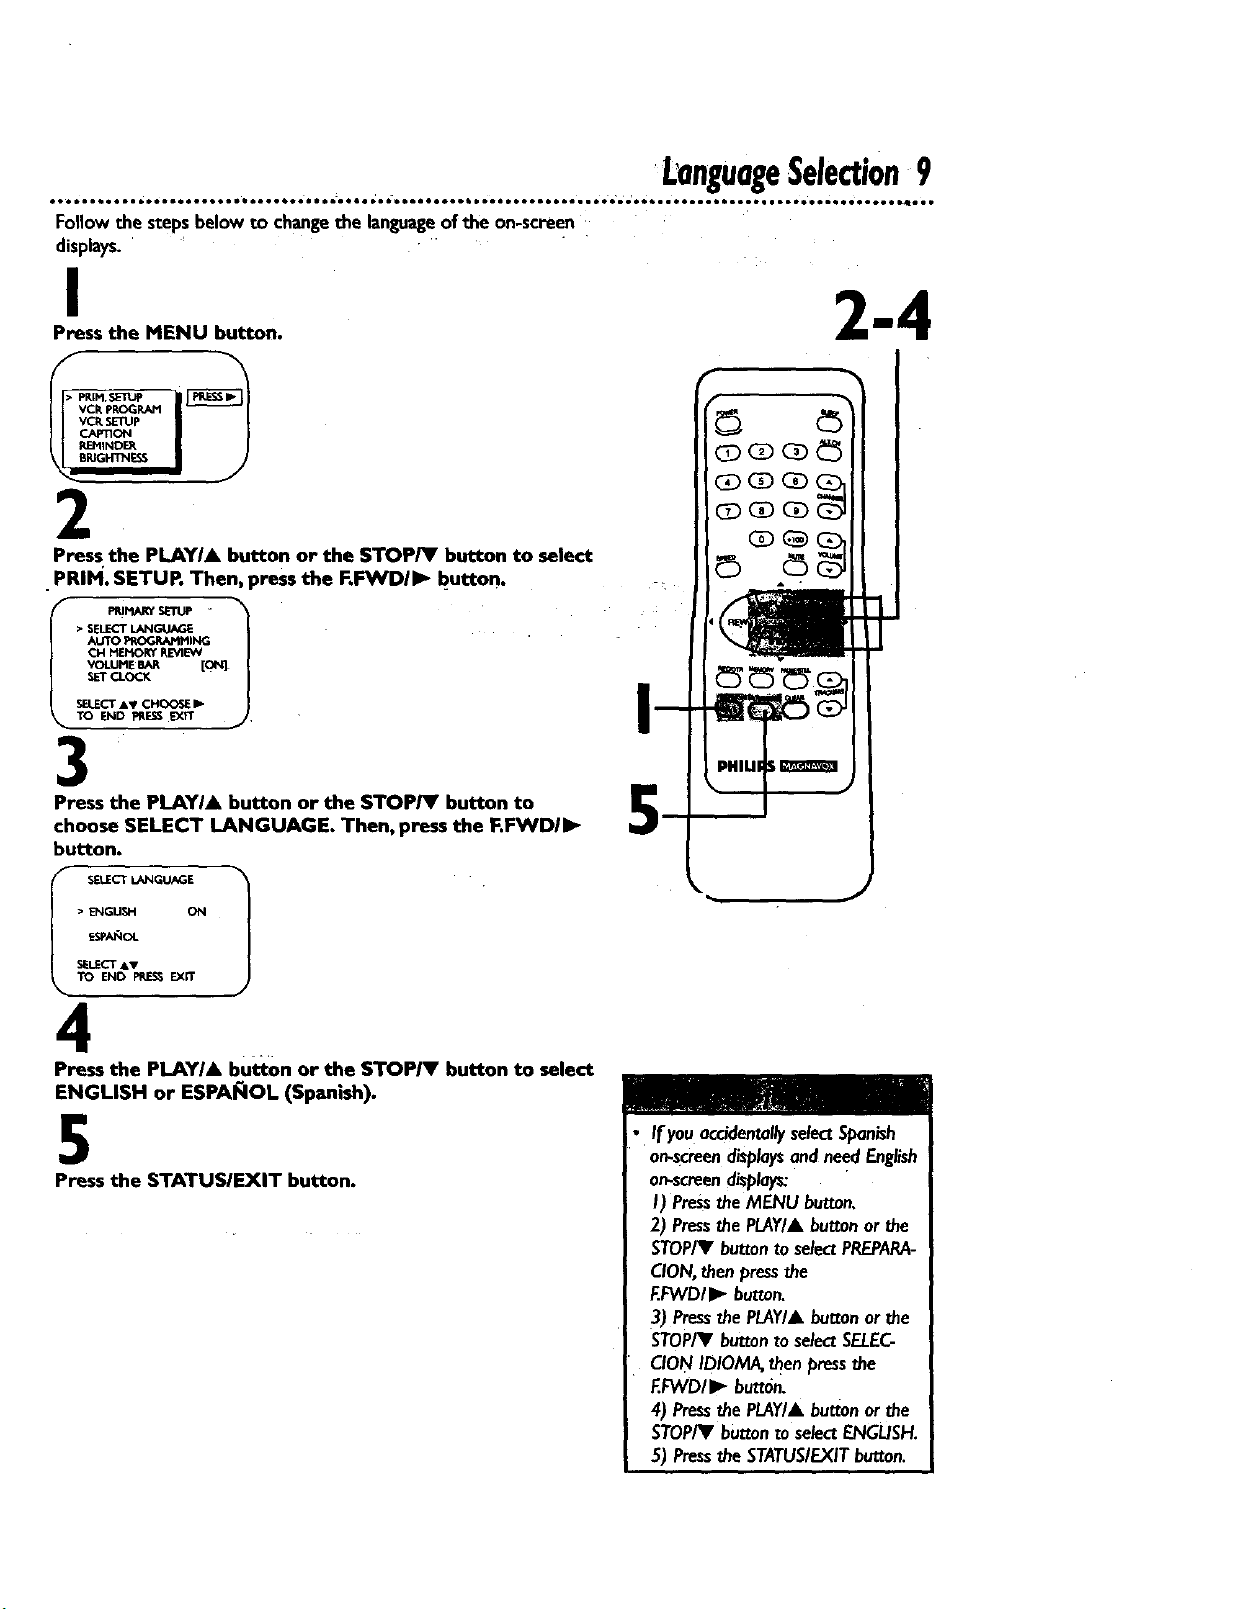
I
Press the MENU button.
VCRpROGRAM
_E_IINDE_.
2
Press the PLAYI& button or the STOP/Y button to select
PRIM. SETUR Then, press the RIWVDII_ button.
• SELECTL_I_.JA_
I P_F_RY SETUP -
TO END _.r_ _rr
LanguageSelection9
3
Press the PLAYI& button or the STOP/Y button to
choose SELECT LANGUAGE. Then, press the F.FWDII_
button.
• ENGtI._I-I INN
SELECT AV
4
Press the PLAYI& button or the STOPIV button to select
ENGLISH or ESPA_IOL (Spanish).
5
Press the STATUSIEXIT button.
• If youaccidentallyselectSpanish
• or_screendisplaysandneedEnglish
on-screendisplays:
I) Pressthe MENU button,
2) PressthePLAY/&button or the
STOP/_I'buttonto selectPREPARA-
CION,thenpressthe
EFWD/I_ button.
3) PressthePLAY/&button orthe
STOP/_Fbuttonto selectSELEC-
CIONIDIOMA,thenpressthe
EFVVDII_ button.
4) PressthePLAY/&buttonorthe
STOP/Y buttontose/ectENGL/SH.
5) Pressthe STATUS/EXITbutton.
Page 10
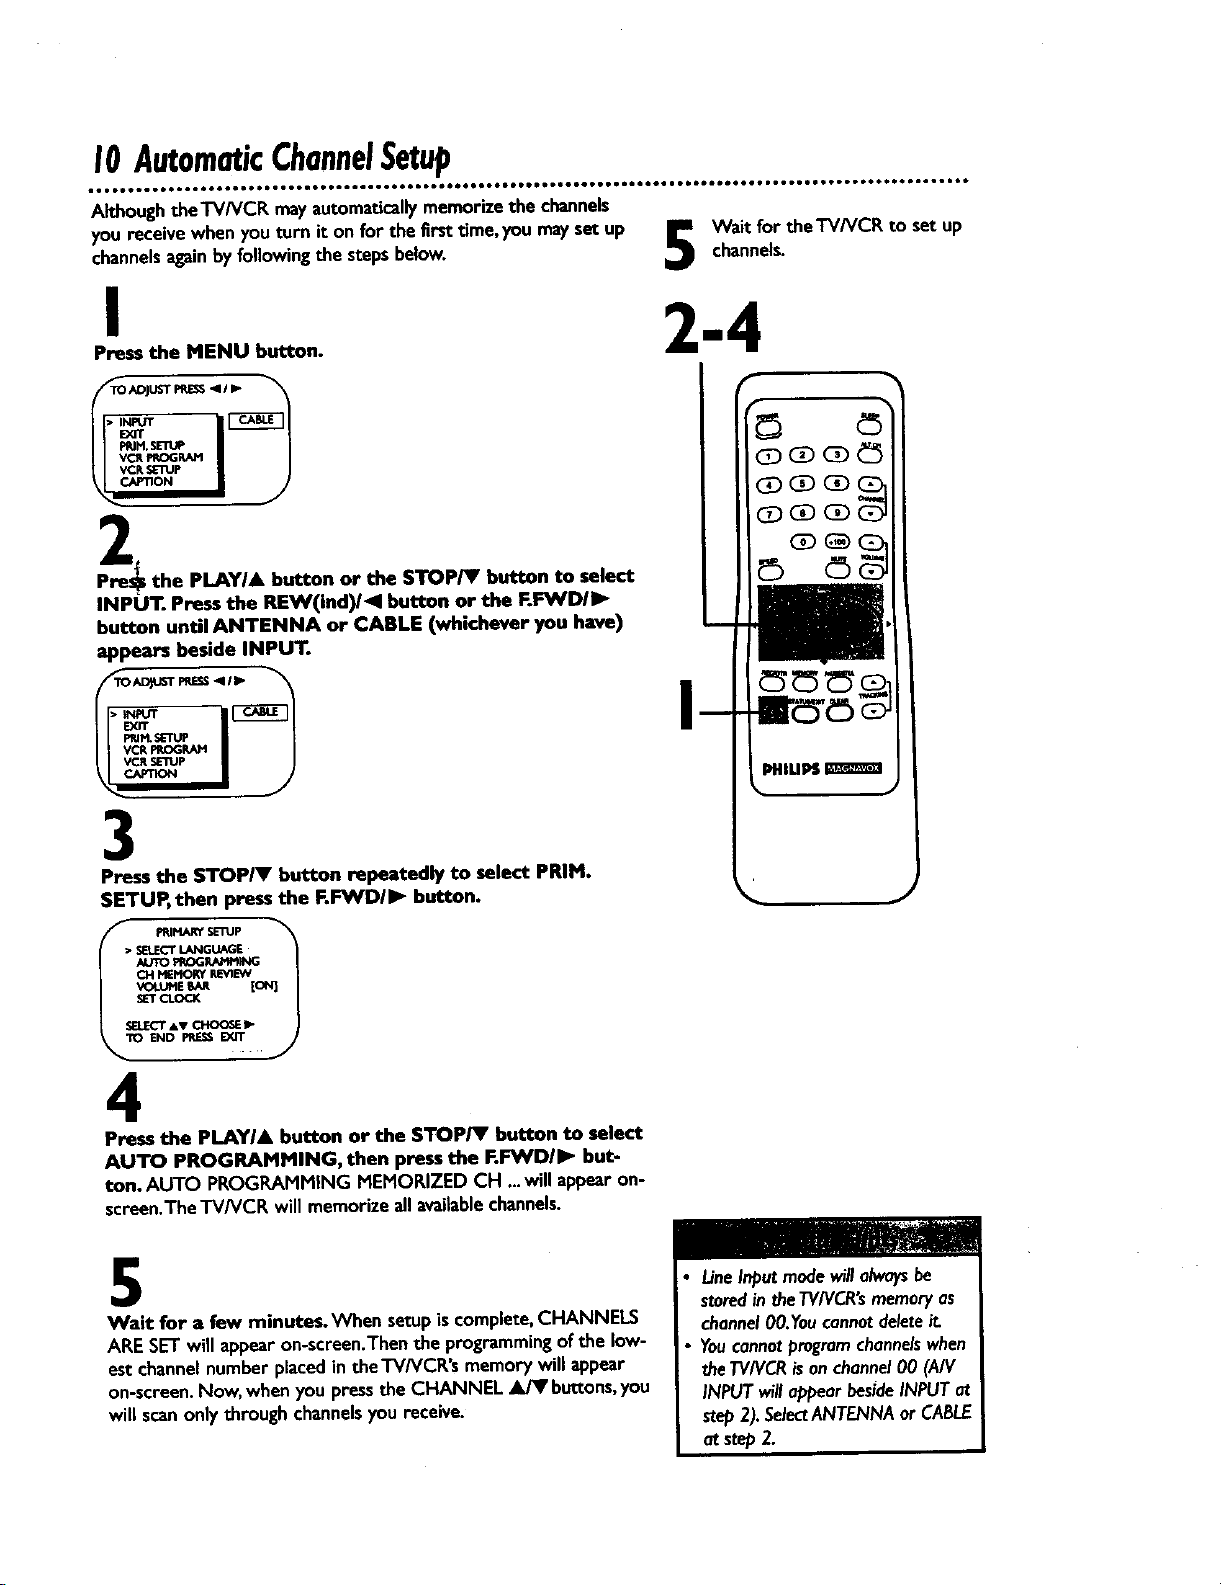
I0 AutomaticChannelSetup
AlthoughtheTV/VCR mayautomaticallymemorize the channels
you receivewhenyou turn it on for the first time,you mayset up
channelsagainbyfollowingthe stepsbelow.
I
Press the MENU button.
TO ADJUST PRE_ -ql I I_
2
J
Pre_ the PLAYI& button or the STOPTV' button to select
INPUT. Press the REW(ind)/_I button or the F.FWD/I_
button until ANTENNA or CABLE (whichever you have)
appears beside INPUT.
AD_T F_ESS_q/_ "_
channels.
Wait for theTV/VCR to set up
2-4
_pVCR _IV_ I J
3
Press the STOP/V button repeatedly to select PRIM•
SETUP, then press the F.F_NDII_ button.
• SELECTLANGUAGE
AUTO_ROG_Mt_NG
CH MEMORYREVIEW
I_ PRIMARYsE'nJP
SELECT_sv CHOO_ _-
END PRE_ _.
4
Press the PLAYIA button or the STOP/V button to select
AUTO PROGRAMMING, then press the F.FWDII_ but-
ton. AUTO PROGRAMMING MEMORIZED CH ...will appearon-
screen.The "/'V/VCRwill memorize a/Iavailablechannels.
5
Wait for a few minutes._/hen setupis complete,CHANNELS
ARE SETwill appearon-screen.Thenthe programmingof the low-
est channelnumber placedin the'l'V/VCR's memorywill appear
on-screen.Now, when you pressthe CHANNEL _ buttons,you
willscanonlythrough channelsyou receive.
LineInputmodewill alwaysbe
storedin theTV/VCR'smemoryas
channel00.Youcannotdeleteit.
Youcannotprogramchannelswhen
theTV/VCRisonchannel00 (A/V
INPUTwillappearbesideINPUTat
step2).SelectANTENNAor CABLE
at step2.
Page 11
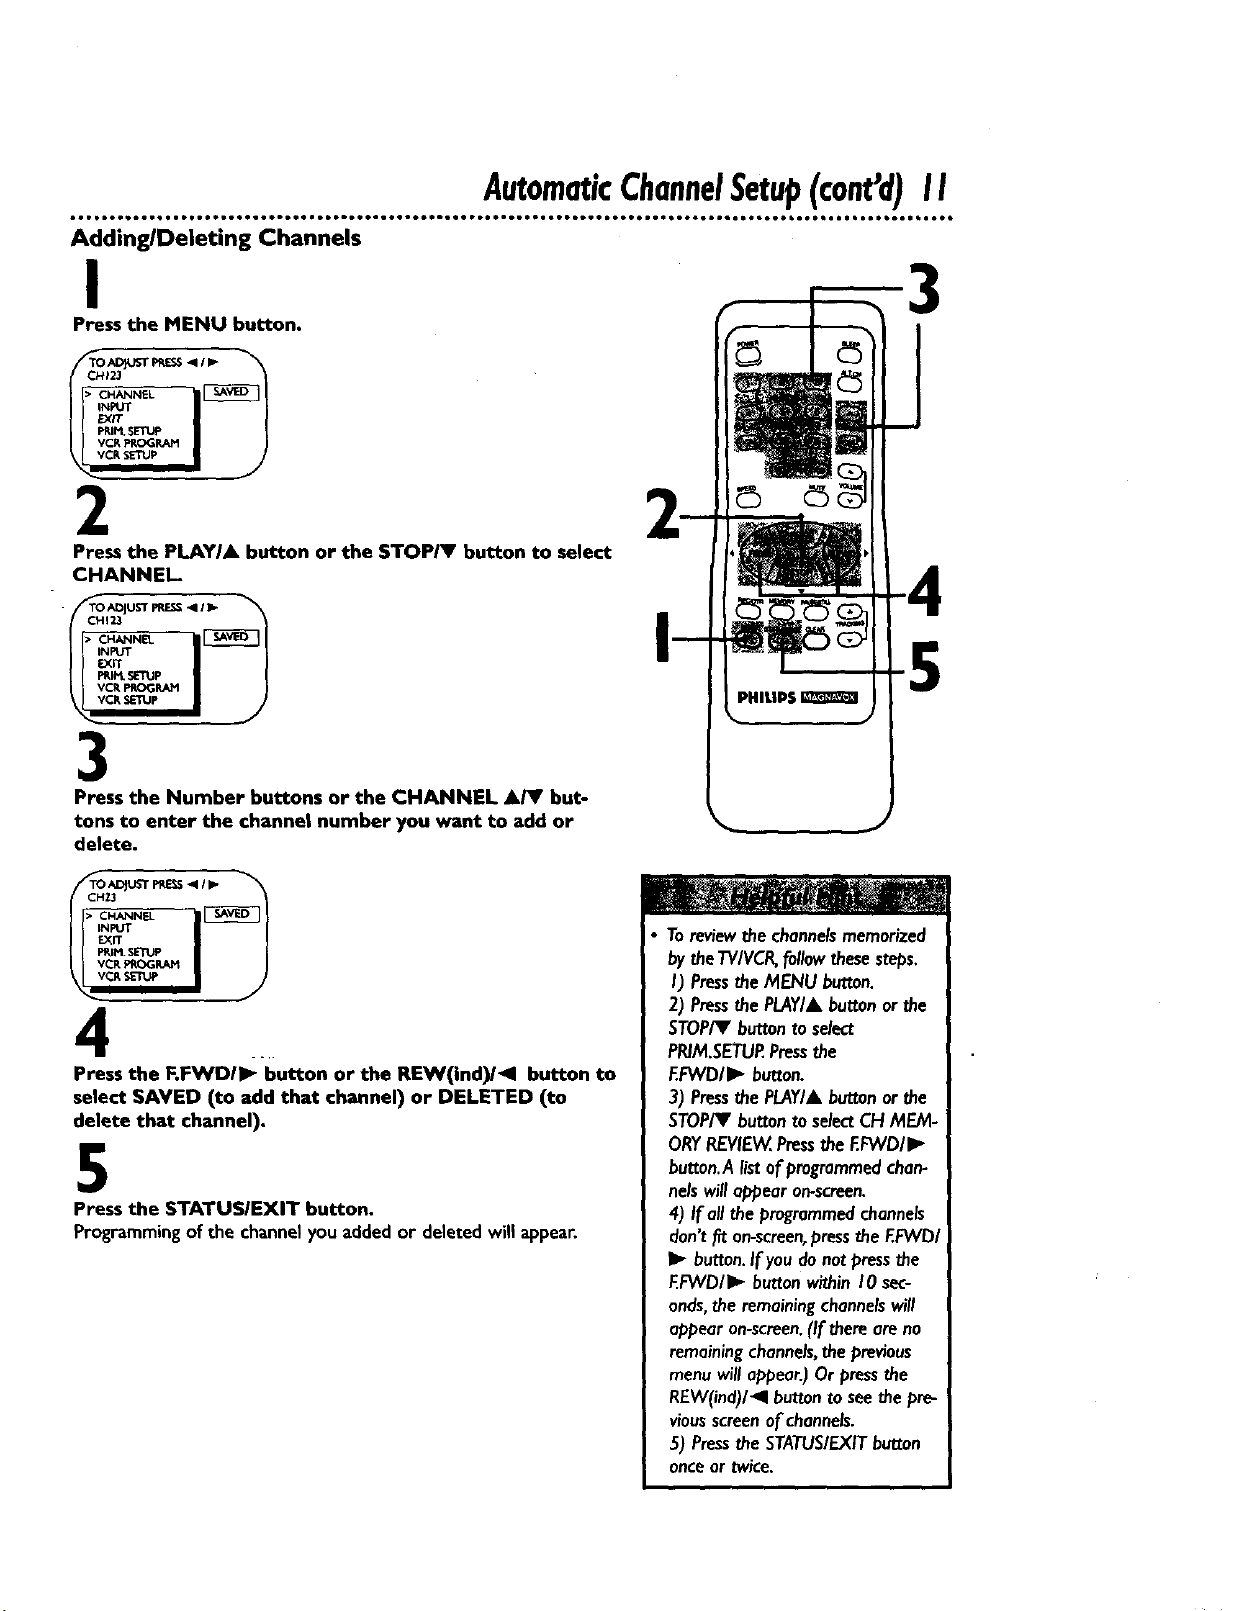
AutomaticChannelSetup(cant'd)I I
Adding/Deleting Channels
I
Press the MENU button.
2
Press the PLAY/A button or the STOP/V button to select
CHANNEL
TO ADJUST PRE_ _111_
CHI23
• ICN_L_NEL
3
Press the Number buttons or the CHANNEL A/V but-
tons to enter the channel number you want to add or
delete.
5
4 ..
Press the F.FWDII_ button or the REW(ind)/411 button to
select SAVED (to add that channel) or DELETED (to
delete that channel).
5
Press the $TATUSIEXIT button.
Programming of the channel you added or deleted will appear.
Toreviewthe channelsmemorized
bytheTVIVCR,followthesesteps.
I) Pressthe MENU button.
2) PressthePLAY/&buttonorthe
STOP/Y buttonto select
PR/M.SETUP.Pressthe
F.FWDII_ button.
3) Pressthe PLAY/Abuttonorthe
STOP/V buttontoselectCH MEM-
ORYREVIEW,Pressthe EFVVD/I_
hutton.Alistofprogrammedchan-
nelswill appear on-screen.
4) If all the programmedchannels
don'tfit on-screen,pressthe EFVVDI
I1_button.If youdonotpressthe
EFWD/I_ buttonwithinI0 sec-
onds,the remainingchannelswill
appear on-screen.(If there are no
remainingchannels,the previous
menuwill appear.)Orpressthe
REW(ind)/_l buttonto seethe pre-
viousscreenof channels.
5) Pressthe STATUSIEXITbutton
onceor twice.
Page 12

12SettingtheClock
There are three waysto set the clock:Manually,withAutomatic
PBSChannelSelection,or with HanualPBSChannelSelection.
With manualclocksettin_ youtell the'FV/VCR the current time.
With Automatic or ManualPBSChannelSelection,the'I'V/VCR
getsthe time from your localPBSstation.If you useeither Manual
PBSChannelSelection or Automatic PBSChannelSelection,follow
the stepson page 19 to havethe'i-V/VCR maintainthe clock
accordingto yourTime Zone.
To set the clock manually,follow the stepson pages12-13.To set
the clockusingAutomaticPBSChannelSelection,follow the steps
on pages14- 15.Toset the clockusingHanualPBSChannel
Selection,follow the stepson pages16- 17.
Before you begin,makesure:
• TheTV/VCR ishookedup andturned on.
• Channelsare set up.
• Youmakeeachentry within60 secondsof the previousentry.
Manual Clock Setting
I
Press the MENU button.
I
VCR_E_.M
REMINDER
f
_lGiq'rNEr_
2
Press the PLAY/A button or the STOP/V button to select
PRIM, SETUR Then, press the FoFWD/_ button.
VOLUMEEAR [
SELECTAV CH_ I_
..r
3
Press the PLAYIA button or the STOP/T button to select
SET CLOCK.Then, press the F.FWD/I_ button.
SET CLOCK
• AUTO CLOCK [ON]
SET MANUAL CLOCK
DAYIJGHT SVG.TIME [ON]
SET 33MEZONE
[AUTO]
TO CONTINUE PRESSMENU
SELECT &V CHOO_E
END PRESS Exn"
J
Entriesthat do notmatchthe
"I'V/VCR'scalendarwillcausea
questionmark (7.)to appearonthe
screen.
Tomake toffee'donswhileyouare
settingthe clock,pressthe CLEAR
buttonuntJIthespacei0r the num-
beryouwantto correctisflashing.
Thenenterthe correctnumber.
Page 13

4
If ON appears beside AUTO CLOCK, press the F.FVYDIII_
button so that OFF appears to the fight of AUTO
CLOCK, then press the MENU button. If OFF appears
beside AUTO CLOCK, press the MENU button.
DATE --/--/--
SettingtheCIockIcon d) 13
_ IANUAL CLOCK
END PRESSEXIT
-]
5
" Press two Number buttons for the hour(s) and two
Number buttons for the minute(s).Then press I forAM
or 2 for PM. For example,for 9:30 PM,press09, 30,2.
TIME 09:30 PM
TO CORRECT_J_ CLEAR
_ ENOF_ESSEXIT
J
6
Press two Number buttons for the month, two Number
buttons for the day,and two Number buttons for the year.
For example,for July I, 199_ press07, 0I, 98.The dayof the week
will appearautomatically.
11tlE 09:30 Ptl
DATE 07101 19Q
VVEDNESDAy
_ MANUALCLOCK t
TO CORRECTFRESSC1_AP.
ENDPMSSEYJT
7
Press the $TATUSIEXIT button.
Page 14

14Se_ngtheClock(cont'd)
Automatic PBS Channel Selection
I
Press the MENU button.
VCR _OG_I
• PRIM,SETUP
2
Press the PLAYIA button or the STOP/I' button to select
PRIM. SETURThen, press the F.F_fD/I_ button.
_E _ [
r_.LE_r AV _ _
3
Press the PLAYIA button or the STOP/V button to select
SET CLOCK.Then, press the I=.I:_NDII_ button.
SET CLOCK "_
• AUTOCI.OCK [ON]
SET M_'qUAL CLOCK
DAYLIGHTSVC_TIME [ON]
s_-r "i'IME ZONE
[AUTO]
TO CO_TIN_E PRESSMFJqU
SELECTAV CHOOSEI,"
TO END _ EXIT
I
4
If ON appears beside AUTO CLOCK, press the MENU
button. If OFF appears beside AUTO CLOCK, press the
F.FWDII_ button so that ON appears to the right of
AUTO CLOCK,then press the MENU button.
AUTO CLOCK IJ_ES
FSSCHANNEL DATA
• S_PBSCH. AUTO
SET PBSCH. MANUAL
ITO _ CI.OCK 1
SEL.r'cT&,V CHOOSE I_
ENID PRESS EXiT
Page 15
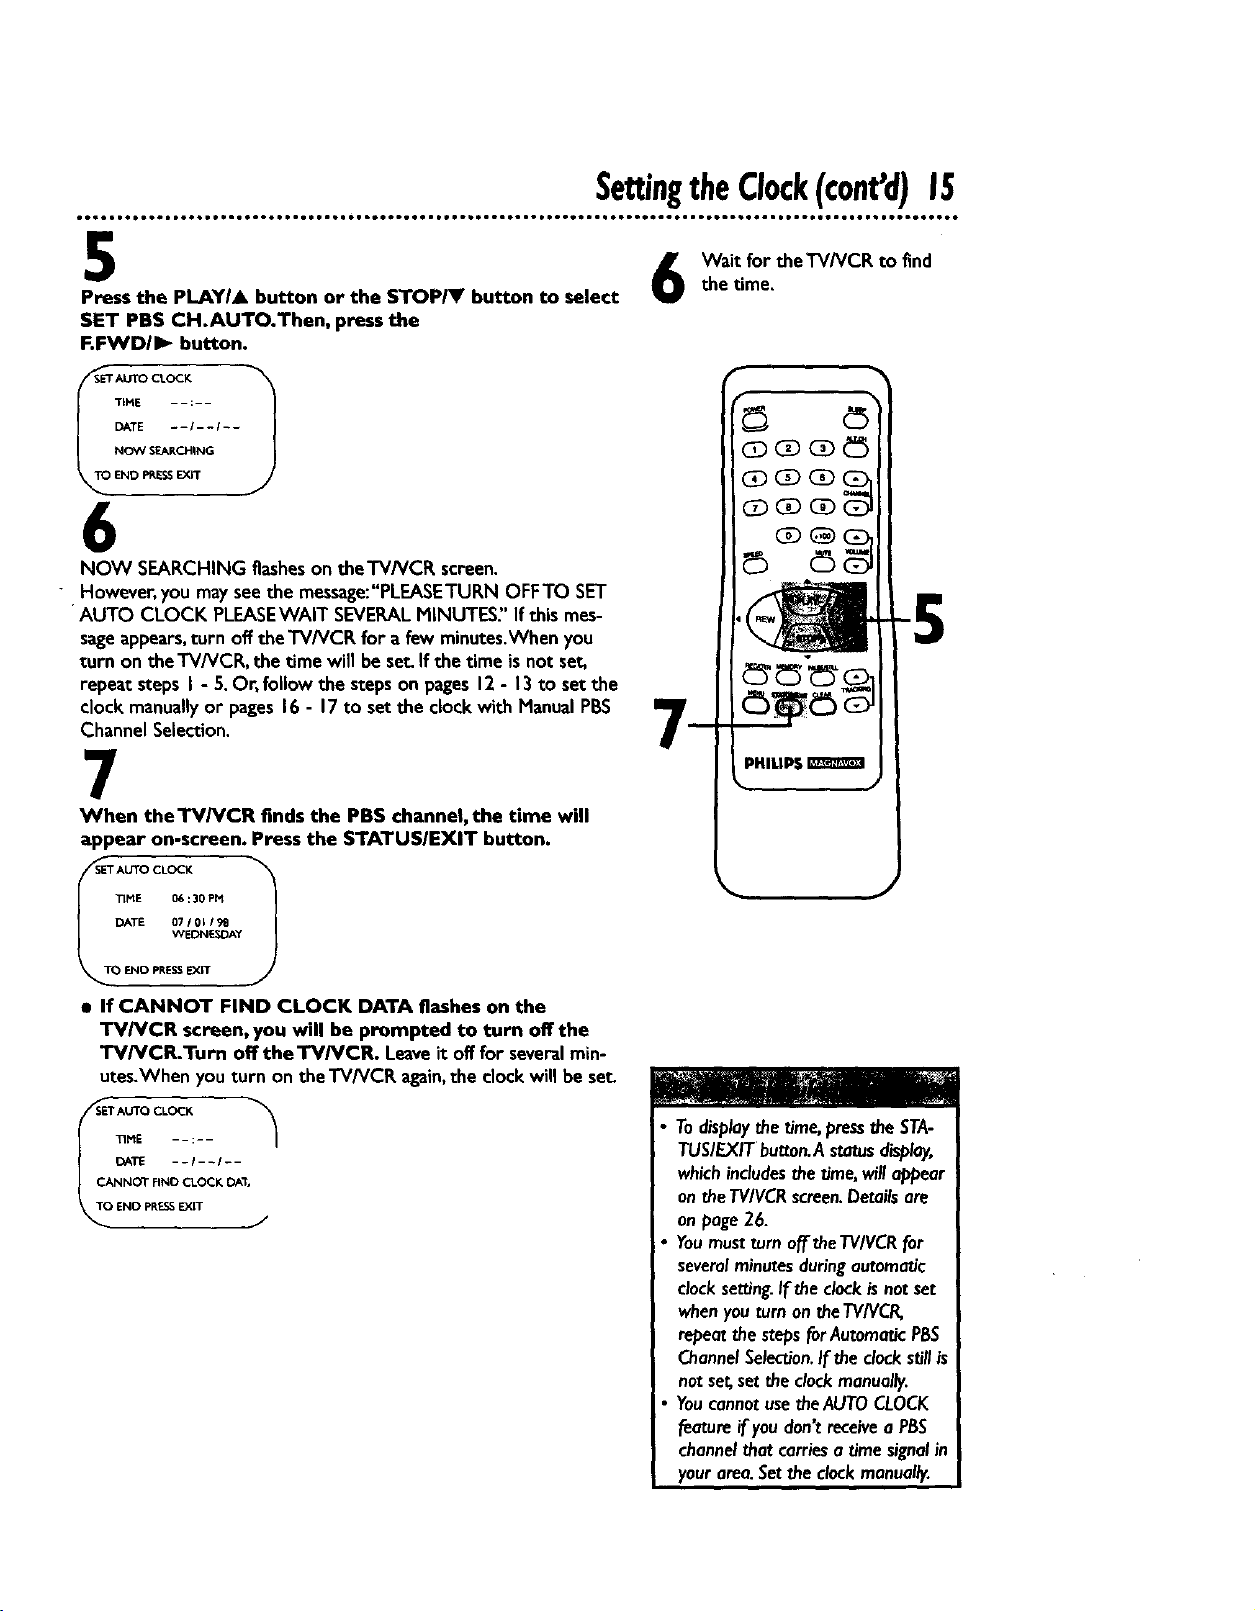
SettingtheClock(cant'd)15
5
Press the PLAYI. button or the STOP_t' button to select
SET PBS CH.AUTO.Then, press the
F.FWD/I_ button.
TiME - - :- -
DATE - - I - - I - -
NO_' SEARCHING
END PRESSEXiT
6
NOW SEARCHING flasheson theTVNCR screen.
However, you may see the message:"PLEASETURN OFFTO SET
AUTO CLOCK PLEASEWAiT SEVERAL MINUTES" If this mes-
sage appears, turn off the TV/VCP, for a few minutes.When you
turn on the TV/VCR, the time will be set. If the time is not set,
repeat steps I - 5. Or, follow the steps on pages 12- 13 to set the
clock manually or pages 16 - 17 to set the clock with Manual PBS
Channel Selection.
7
When theTV/VCR finds the PBS channel, the time will
appear on-screen. Press the STATUSIEXIT button.
the time.
Wait for theTV/VCR to find
r
mm®
CD C]DC_ _
(Z) CZ)(E)
TIME 06:30 PH
DATE 07/01/9B
WEDNE_3AY
1
ENO PRESSEXiT
• If CANNOT FIND CLOCK DATA flashes on the
TV/VCR screen, you will be prompted to turn offthe
TV/VCR.Turn off the'W/VCR. Leaveit offfor severalmin-
utes.Whenyou turn on the TV/VCR again,the clockwill be set.
r AUTO CLOCK
TIMDA :;,
|
CJ ClNNOT FIND CLOCK [3At,
ENO pRESSEXIT J
Todisplaythe time,pressthe STA-
TUSIEXITbutton.A statusdisplay,
which includesthe time,will appear
on theTVIVCRscreen.Details are
on page26.
Youmustturn off theTV/VCRfor
severalminutesduringautomatic
clocksetting.If the clockisnotset
whenyou turn on theTV/VCR,
repeatthestepsforAutomaticPBS
ChannelSelection.If the clock stillis
notset,setthe clock manually.
YoucannotusetheAUTOCLOCK
feature if you don't receivea PBS
channelthatcarriesa time signalin
yourarea.Setthe clockmanually.
Page 16
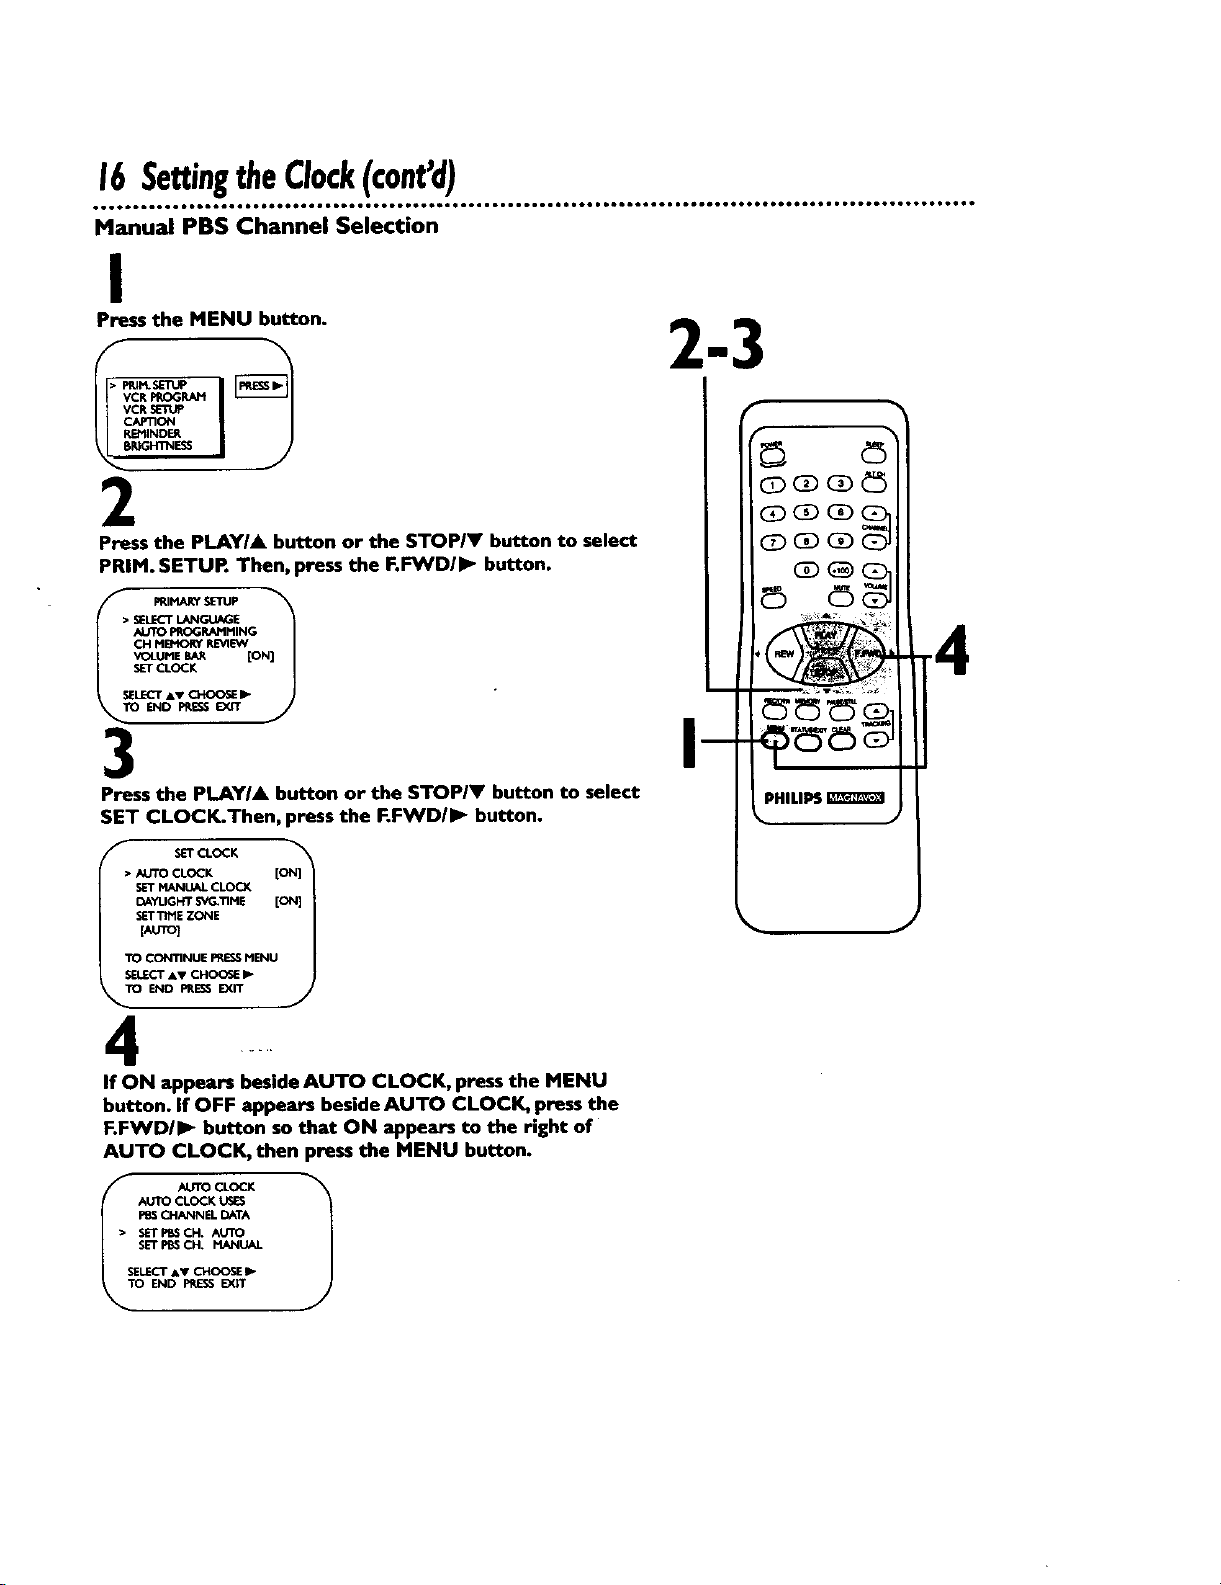
16SettingtheClock(cont'd)
Manual PBS Channel Selection
I
Press the MENU button.
REMINDER
B_NIN_I
2
Press the PLAY/A button or the STOP/V button to select
PRIM. SETUR Then, press the F._D/IP. button.
• SELECTL_K_[
AI3TO PROGRAMMING
CH MB<_'_ R_4_
VOLUMEBAR [ON]
SET CLOCK
SELECTAT CI-_OOSlEI_"
END PRESS EXIT
3
Press the PLAYIA button or the STOPIY button to select
SET CLOCK.Then, press the F.FWDII_- button.
f
SETCL<X:K
• AUTO CLOCK
OAYUG_r _ME [ON]
SETTtNE ZONE
[AUTO]
TO CONTINUE PRESSMENU
TO END PRESSEXIT
......
If ON appears beside AUTO CLOCK, press the MENU
button. If OFF appears beside AUTO CLOCK, press the
F.FWD/I_ button so that ON appears to the right of
AUTO CLOCK, then press the MENU button.
._.rro CLOCK LisES
CHANNEL DATA
• SETPI_SCH. AUTO
SET PBSCH. MANUAL
SELECT &V CHOOSE !_
ISTO UTO CLOCK 1
END PPJESSEX,'T
Page 17

SettingtheClock(cant'd)17
• • * * • • • • • • • • • • • • • • • • • • • • • • • • • • • • • • • • • • • • • • • • • • • • • • • • • • • • • • • • o• • • • • • • • • • • • • • • • • • • • • • • • • • • • • • • • • • • • • • • • • • • • •• • D• •
5
SET PBS CH. MANUAL.Then, press the F.FWDII_ but- findthe time.
Press the PLAYIA button or the STOPIV button to select 7 Wait for the TV/VCR to
ton.
TIME - - : - -
DATE --/--I--
TO CLOCK (PBS) CH - - 1
SELECT CHANNEL NUMEER
E_O l_-_ EX_
6
Use the Number buttons to select your PBS station. If you
make a mistake,pressthe CLEAR button,then enter the correct
number.
TIME --:--
DATE --I--l--
NOW SEARCHING
TO END PRESSEXIT
7
NOW SEARCHING flasheson the'rV/VCR screen.
8
When theTV/VCR finds the clock data, the time will
appear on-screen. Press the STATUSIEXIT button.
OATE 07101190
WE_Y
E 06:30 PM
ENO PPJES5EXIT
• If CANNOT FiND CLOCK DATA flashes on the
TV/VCR screen and you know another PB$ channel,
press the PLAY/A button or the STOP/V button to
choose SELECT NEW PBS CH.Then, press the F.FWD/
I_ button. Repeat step 6.
i If CANNOT FiND CLOCK DATA flashes on the
TV/VCR screen and you do not know another channel,
press the PLAYIk button or the STOP/V button to
select SET PBS CN. AUTO. Then, press the F.I=VYD/IIP
button. The TVNCR will searchfor the PBSchannelautomati-
cally.
• If the PBSchannelis found, the time will appearon-screen.
Pressthe STATUS/EXITbutton.
• If the PBSchannelisnot found,youwill be prompted to turn
offthe TVNCR. Leaveit off for several minutes.When you turn
on theTV/VCR again,the time will be set.
If youhaveanAntennahookup,you
mayselectchannels2 - 69 at step
6.If youhave a cableconnection,
you mayselectchannelsI - 125 at
step 6.Detailsaboutavailable
memorizedchannelsare on page
II.
Todisplaythe time,pressthe STA-
TUSIEXITbutton.A statusdisplay,
which includesthetime,will appear
on theTV/VCRscreen.Detailsare
an page26.
Page 18

18 Daylight-SavingTime
• • • • • • • • • • • • • • • • • • • • • • • • • • • • • • • • • • • • • • • • • • • • • • • • • • • • • • • • • • • • • • •• • • • • • • • • • • • • • • • • • o• • • • • • • • • • • • • • • • • • • • • • • • • • • • •
VVhen the Daylight-Saving'l'imefeatureisON, the TV/VCR clock
will automaticallymoveforward one hour on the first Sundayin
April and move backone hour on the lastSundayinOctober.
To turn Daylight-Saving'limeON or OFF,followthe stepsbelow.
I
Press the MENU button.
VCR PROGRAM
VCR SLri_Ip
CAPTION
REt_NDER
ERIGHTNESS
_r
2
Press the PLAY/A button or the STOP/Y button to select
PRIM. SETURThen, press the RFWDII_ button.
J
AI.ITO PRJDG_INING
VOLUME BAR [ON]
SET CLOCX
SELECT AV CHOOSE I_
END PRES_ EXiT
5
3
Press the PLAY/A button or the STOPI¥ button to select
SET CLOCK.Then, press the F.IWVDII_ button.
• AUTO C1_(_21€.
/f SETCLOCK
_YLIGHT SVG._ME [ON]
[AUTO]
TO CONTINUEPRESS_
SEL_'T AV CHO0_ I_ '
ETTIMEZONE
END _1_
4
Press the PLAYIA button or the STOPI¥ button to select
DAYLIGHT SVG.TIME.Then, press the RFWD/I_ button
so that ON or OFF appears beside DAYLIGHT SVG.TIME
(Daylight Saving Time).
5
Press the STATUS/EXIT button.
Page 19

TimeZone19
When youset the clockusingAUTO CLOCK, specifyatime zone in whicha local PBSchannelis located.
The'I'V/VCR will maintain the clockaccordingto your Umezone.
I
Press the MENU button.
VCR PROGRAM
REMINDE_
IGHTN_
2
Press the PLAYIA button or the STOPI_F button to select
PRIM. SETUR Then, press the F._D/P- button.
• _ LAI'IGU_E
AUTO PROGP.A_IMING
SELECT a• CHOOSE
END _ EXff
3
Press the PLAYI& button or the STOPIV button to select
SET CLOCK.Then, pressthe F.FWD/I_ button.
_S_ _ SETCLC_-K
SETMANUALCLOCK,
DAYUGHTSVG;_IME [ON]
SET.ME ZONE
[AUTO]
TO CONTINUE PRESSMENU
• CLOCK [04
SELECT•• CHOOSEI_
END PRESE_<ff J
4
Press the PLAYIA button or the STOP/Y button to select
SETTIME ZONE.Then, press the F.FWDII_ button.
_'SSET TIME ZONE
• _STO [ON]
A'rtANTIC
EASTERN
CENTRAL
MOUNTAIN
PACIFIC
AU_KA
HAWAJ[
SELECT AY
TO CONTINUE PRESS MENU
J
5
Press the PLAY/A button or the STOPIY button to select
a time zone.
6
Press the MENU button, then press the STATUS/EXIT
button.
IfyouselectAUTOat step5._e
TVNCR_11setthe clockaccording
to the time zonedata0fthe PBS
stationit pnds.
YoucannotselectSETTIMEZONE
at step# if_,LITOCLOCKissetto
OFF.
Page 20

20 FrontPanel
Cassette Compartment
Inserta video cassettetape here.
Wireless Remote Sensor
Receivesasignalfrom your remote control
soyou canoperate theTV/VCR from a dis-
tance.
STOP/EJECT Button
Pressonce to stopthe tape.When playbackis
stopped,pressto ejectthe tape.Pressto
selectan item inthe popup menu.
VIDEO Jack
Connect thisjackto the videoout jackof a
camcorderor aVCR. Detailsareonpage3 I.
AUDIO Jack
Connectthis iack to the audioout iackof a
camcorderor aVCR. Detailsareonpage3I.
EARPHONE Jack
Connectearphones(not supplied)here for
personallistening.
REW(ind) Button
When tapeplaybackisstopped,pressto
rewindthe tape at highspeed. Duringplay-
back,pressto rewind the tape while the pic-
ture stayson-screen.Pressto changea setting
ofa pop up menuitem (for example,to adjust
the BRIGHTNESSsetting).
PLAY Button
Pressto playa tape. Detailsareonpage28.
Pressto release Searchor Stillmode and
return to normal playbaclcDetailsareonpage
46, Pressto selectan item in the popup
menu.
F.FWD Button
when tape playbackis stopped, pressto fast
forwardthe tape at highspeed.During play-
back,pressto fastforward the tape while the
picturestayson-screen.Pressto changea set-
ting of a pop up menu item (for example,to
adjustthe BRIGHTNESSsetting).
REC(ord)/OTR Button
Pressonceto start a recording. Detailsare on
page29. Pressrepeatedly to start a One-
TouchRecording (an immediatetimed
recording, 30 minutes to eighthourslong) of
the channelyouare watching.Detailsareon
page30.
RECORD Light
Appearsduringa recording. It flasheswhenthe
TV/VCR power isturned off to set a timer recording
or when arecording ispaused.It flashesrapidly if the
"rv/VCR power is turned offto seta timer recording
anda tape is not in the TV/VCR.
Buttons
Pressto adjustthe
soundlevel.
Pressthe CHANNEL
• button andthe
VOLUME • button
on the TV/VCR at
the same time to
displaythe popup
menu. Pressagainto
remove the menu.
-CHANNEL
Buttons
Pressto scanthrough
the'P/iVCR channels.
During tape playback,
pressto adjustthe
tracking. Detailsare on
page 45.
Pressthe CHANNEL
• button and the
VOLUME • button
on theTV/VCR at
the same time to
displaythe pop up
menu. Pressagainto
remove the menu.
POWER Button
Pressto turn the power on or off.
Page 21

RearPanel21
AC Power Cord Connect your antennaor cablehere,
Connect to a standardAC outlet to
supplypower to the TV/VCR.
@ ©
ANT(enna) Jack
Detailsoreonpagessix- seven.
Antenna Hole
Connect the stem of anindoor antenna
here.Detailsoreonpagesix.
Page 22

22 RemoteControlButtons
• • • • • • • • • • • • • • • • • • • • • • • • • t • • • • • * • • • • • • • • • • • • • • • • • • • • • • • • • • • • • • • • • • • • • • • • • I• • • • • • • • • • • • • • • • • • • • • • • • • • • • • • • • • • • • •
SLEEP Button
Pressto setthe sleeptimer. Detailsare onpage37.
POWER Button
Press to turn on or off the'I'V/VCR.
Number Buttons
Useto selectchannelsandto program'l'V/VCR functions(such
assettingthe clock).
• Channels I - 9
To select,press0, then pressthe channelyouwant. For exam-
ple,to selectchannel7,press0, 7.
• Channels 100 and above
To select,pressthe +100 bu_con,then pressthe lasttwo digits
of the channelyou want. For example,to selectchannel117,
pressthe +100 button, 1,7.
SPEED Button
Pressto selectthe recording speed(SP,LP,or SLP).
PLAYIA Button
Pressto playa tape.Detailsareonpage28.Pressto release
Searchor Stillmode and return to normal playback.Detailsare
onpage46. Pressto selectanitem in the on-screenmenu.
REW(ind)/_l Button
When tape playbackisstopped,pressto rewind the tape at high
speed. During tape playback,pressto rewind the tape while the
picturestayson-screen.Detailsare onpage 46.
Pressto changea settingof a popup menu itemor to return to
a previousmenu screen.Pressto adjustthe picturecontrols.
Detailsare on pages24 - 25.
REC(ord)IOTR Button
Pressonceto start a recording. Detailsareonpage29.Or, press
repeatedly to start a One-Touch Recording(animmediatetimed
recording, 30 minutes to eight hourslong)of the channelyou
are watching. Detailsareonpage 30.
MENU Button
Pressto displaythe pop upmenu.Youmayalsousethe buttons
on the front panelof the'I'V/VCR to accessthe pop up menu.
Detailsareonpage20.
STATUSIEXIT Button
Pressto seethe statusdisplay.Pressagainto remove the status
display.Detailsareonpage26. Pressto exit the on-screenmenu.
Page 23

RemoteControlButtons{c0nt'd)23
ALT. CH (Alternate Channel) Button
Pressto return to the"IV channelyou were viewingimmediately
beforeswitchingto your current channel.
CHANNEL A/Y Buttons
Pressto scanthrough the'rV/VCR's channels,
VOLUME A/_' Buttons
Pressto adjustthe soundlevel.If you presstheVOLUME JJY
buttons when the soundismuted,the soundwill be restored.
MUTE Button
Pressto eliminatethe TV/VCR's soundPressagainto return to
the previousvolumelevel.
F.FWD/I_ Button
When tape playbackisstopped,pressto fastforwardthe tape at
highspeed. During tape playback,pressto fastforward the tape
whilethe picturestayson-screen.Detailsare onpage46.
Pressto changethe settingofan item in the on-screenmenuor
pressto proceedto the next menu.Pressto adjustthe picture
controls.Detailsareonpages24 - 25.
STOPIY Button
Pressto stopthe tape. Pressto selectanitem in the on-screen
menu.
PAUSE/STILL Button
During recording,pressto temporarily stop the recording. Press
againto resume recording. Detailsare onpage29. Youcannot
pausea One-Touch Recording.
During tapeplayback,pressto freezethe picture(still).Eachtime
you pressthe PAUSE/STILLbutton,the noiselineswill change
positionon-screen.Detailsareonpage46.
MEMORY Button
Pressto memorizea tape positionat which the real-time counter
was setto 0:00:00.Detailsareonpage44. Or, pressto memorize
the startand end positionon a tape when settingupA-B Repeat
Play.Detailsareonpages42 - 43.
CLEAR Button
Pressto eraseincorrectdatawhen programming'l'V/VCl_func-
tions. Also,pressto reset the real-timecounterto 0:00:00. Details
areonpage44.
TRACKING &IV Buttons
Pressduringtape playbackto adjustthe tracking.
Detailsareonpage45.
'1 "TB_tt°r_ _'_at are shaded it| _he illustr_'_°n light up ;or "=_e s_onds _Nhen you press any button on the remote "/
I =ol(C Iglon ). I
Page 24

24AdjustingthePictureControls
• • • • • • • • • • • • • • • • • • • • • • • • • • • • • • • • o• • • • • • • • • • • .*• • • • • • • • • • • • • • • • • • • • • • • • • • • • • • • • • • • • • • • • • • • • • • • • • • • • • • • • • • • • • • • • • •
Followthese stepsto adjusttheTV/VCR's brightness,picture,
color, Unt, and sharpness.
I
Press the MENU button.
2
Press the PLAYIA button or the STOP/V button to select
the desired control (BRIGHTNESS, for example).
3
Press the REW(ind)/_l button or the RFWDII_ button to
adjust the picture control• (Refer to the chart on page25.)
4
When you finish, press the STATUSIEXIT button.
Theon-screenmenusshownan
page25 willdisappearif no adjust-
mentsaremadewi_in 60 seconds.
Theoriginalsettingswillprobably
giveyouthebestpicture quality.
Toresetthe picturecontrolsto the
originalsettings,pressthe MENU
button,then pressthe PLAYIAbut-
tonorthe STOPIVbuttonto select
TVRESET,then pressthe EFWD/I_
button.TVRESETCOMPLETEDwill
appearon-screenbriefly.
Page 25

AdjustingthePictureControls(cont'd)25
BRIGHTNESS
PICTURE
COLOR
TINT
SHARPNESS
Pressthe
REW(ind)/_l button
to decrease a picture
control. Press the
F.FWD/I_ button to
increase a picture
control
Decrease
decreasedbrightness
decreased contrast
paler
more purple
softer
Increase
increased brightness
increased contrast
more brilliant
more green
dearer
TO ADJUST PRES_<11 lip TO ADJUST PR_ 4111_ TO ADJUST PRESS <111_
Uillllllillll _ F BRIGHTNE_ _ 11_
4 , > FICTURE IIHIIl.nuH
II _-- I /_11 _,_- I /_1! _,_- I "1
• tAP.tESS iiiilUnln u •
I1!_ III i IIRII iiiii iiiiiii ii i_m__
I TiNT _ '_ ' • •
Press the STOP/V
Button
Press the PLAY/A
Button
,,,.
,.,}
Page 26

26 On cmenStatusDisplays
A statusdisplaywill appearwhenyou pressthe STATUS/EXITbut-
ton or certain functionbuttons.The contentsof the statusdisplay
will vary.Tochoosethe statusdisplaymode,followthe steps
below.
If you select STATUS ON, then select COUNTER ONLY
OFF:
• Whenever you pressthe STOP/Y button or the PLAYIA but-
ton, the statusdisplaywill appearfor five seconds.
If you select STATUS ON, then select COUNTER ONLY
ON:
• Whenever you pressthe PLAYIA button,the statusdisplaywill
appearfor five seconds.Afterfive seconds,only the counterwill
remain on-screen.
If you select STATUS OFF:
• The statusdisplaywill not appearwhenyou pressfunction but-
tons.You must pressthe STATUS/EXITbuttonto seethe status
display.
I
Press the MENU button.
2
Press the PLAYIA, button or the STOPIY button to select
VCR SETUP, then press the F.FWDII_ button.
Function
Channel Button
Time Pressed
AMcHI0 S
Jo1
SLP M 1:23:45
_J I
I I
Tape Counter
Speed and
Counter
Memory
3
Press the PLAYI& button or the STOPIY button to select
ON-SCREEN MODE, then press the F.FWD/I_ button.
4
Press the PL&YI& button or the STOPIY button to select
STATUS, then press the F.FWDII_ button so that ON or
OFF appears beside STATUS.
STATUS [O
SELECT AV CHOOSE IP
END PRESSr_(IT
5
If you set STATUS to OFF, go to step 6. If you set STATUS
to ON, press the PLAY/& button or the STOP/V button
to select COUNTER ONLY, then pressthe F.FWD/I_ but-
ton so that ON or OFF appears beside it.
6
Press the STATUSIEXIT button.
i" if the channelyou select has no
bmedcas_thescreenwill be solid
blue.
You cannot view closedcap_onsdur-
_ngrecording or tape playback if
COUNTER ONLY is set to ON.
Details are on pages 38 - 39.
Page 27

Reminder27
• • • • • • • • • • • • • • • • • • • • • • • • • • • • • • • • • • • • • • • • • • • • • • • • • • • • • • •1 • • • • • • • • • • • • • • • • • • • • • e• • • • • • • • • • • • • • • • • • • • • • • • • • • • • • • • •
The channelnumber will remain on-screenat alltimeswhen you
set REMINDER to ON inthe pop up menu.The exceptionisdur-
ingtape playback,Forwardand ReverseSearchingandStillmodes,
andwhen closedcaptioningis selected(CAPTION in the pop up
menu).
SetREMINDERto ON or OFF by followingthe stepsbelow.
I
Press the MENU button.
ic: I
3
I)
2
Press the PLAYI& button or the STOP/V button to select
REMINDER.
}_>T_p_j_E IESs• REMINDE s
COLOR
3
Press the REW(ind)l<l button or the F.I:VVDII_ button to
select ON or OFF. Eachpressofthe REW(ind)/<1 buttonor
the F.FWD/I_ button turnsREMINDER ON or OFE
4
Press the STATUSIEXIT button.
Page 28

28 Playing
Followthe stepsbelowto playatape.
I
Insert a tape in theTV/VCR.The power will come on.If the
tape's record tab hasbeenremoved,playbackshouldstartauto-
matically.
2
If playback does not start automatically, press the PLAY/A
button to start playback.
3
Press the STOPIY button on the remote control or the
STOP/EJECT button on the TV/VCR once to stop play-
back.
4
Press the REW(ind)/_ button to rewind the tape.
Inserta tape in the TV/VCR.
on the TV/VCP_
Pressthe STOP/EJECTbutton
5
When the tape has finished rewinding, press the
STOP/EJECT button on theTV/VCR to remove the tape.
If the tapeyouwantto play is
alreadyintheTVIVCR,turnonthe
TVIVCRpower,thenpressthe
PLAY/Abutton.
Playbackfeaturesand optionsare
on pages41 - 46.
Page 29

Recording29
• • • • • • • • • • • • • • • • • • • • • • • • • • • • • • • • • • • • • • • • • • • • • • • • • • • • • • • • • • • • • • • • • • • • • • • • • • • • • • • • • • • • • • • •• • • • • • • • • • • • • • • • • • • • • • o
Readandfollow the steps below to record aTV program.
I
Place a tape with its record tab intact (see page five) in
the'rV/VCR. The power will comeon.Or, if the tape is
already in the TV/VCR, press the POWER button.
2
Press the SPEED button until the desired tape speed
appears on the TV/VCR screen. Detailsabouttopespeedare
givenbelow.
3
Use the CHANNEL _ buttons or the Number buttons
to select the channel to be recorded. (Channelscannotbe
changedduringrecording.)
4
Press the REC(ord)/OTR button once to start recording.
The RECORD lightwill glow.
• if there isnot a tape in theTV/VCR, NO C/_SSET-FEflasheson-
screenbriefly,
• Ifthe tape doesnot havea record tab, PROTECTEDCASSETTE
CANNOT RECORD flasheson-screenbriefly.TheTV/VCR will
ejectthe tape. Insertanother tape.
5
To pause the recording (for example, during commer-
cials), press the PAUSE/STILL button, The RECORD light
will flash.To resume recording, press the PAUSE!STILL
button again or the REC(ord)/OTR button. The RECORD
lightwill glow.
6
To stop recording, press the STOP_P" button.
Tape Speeds
Thischart showsthe recording/playback time for three types of
videocassettes(TI60,TI20, andT60).There are three playback
speeds:SP,LP,andSIP.During playback,theVCR selectsthe tape
speedautomatically.Whenrecordin& you canchangethe tape
speedusingthe SPEEDbutton(see page22).
Tape Speed
I T)lpe
SP
(StandardPlay)
LP
(LongPlay)
SLP
(SuperLongPlay)
Maximum Record/PlaybackTime
TI60 TI20 T60
2 hrs.
I40 rains.
5 hrs.
20 rains.
8 hrs. 6 hrs. 3 hrs.
2 hrs. I hr.
4 hrs. 2 hrs.
• Youcannotrecordonechannelwhile
watchinganother.
• Recordingoptionsareonpages30
- 36.
• Youcannotrecordif DEFEAT
RECORDINGisset to ON.(REC
DEFEATEDwill flashon-screen.)
' Detailsare on page36.
• If you pauseo recordingfor more
than fiveminutes,the TVIVCRwill
switchto Stopmodeautomatically
to protectthe v_deocassettetope
fromdamage.
• Youcanchangethe topespeedwith
the SPEEDbuttonwhilearecording
isin progress,butsomedistortion
may appearonthetape.
Page 30

30 One-T0uchRecording
The One-TouchRecording(OTR) functionallowsyouto program
an immediatetimed recordingfrom 30 minutes to eighthourslong
without settingthe timer.
Beforeyou begin,makesure:
• Channelsare set up.
• There is a tape in theTV/VCR.The recordtab mustbe intact.
I
Use the CHANNEL &/T buttons or the Number buttons
to select the channel you want to record.
Pressthe STOP/EJECTbuttonon theTV/VCR to stop the
OTR.
2
Press the SPEED button until the desired recording speed
(SP,LP, or SLP) appears on-screen. Detailsareonpage29.
3
Press the REC(ord)IOTR button repeatedly untilthe desired
recording lengthappearsin the upperright cornerof the screen.
Recordingwill beginimmediately.TheRECORD lightwillappear.
C:-112
LENGTH : PRESSOTR
R LENGTH 0_301
NCEL : PRESSCLEAR
4
To stop an OTR before recording is finished, press the
STOPIEJECT button on the"rvNcEL
Or, press the REC(ord)IOTR button, then pressthe
CLEAR button, then press the STOP/V button on the
remote control.
I
Tocheckthe time remainingfor an
OTRaftertheOTRhasbeenset,
pressthe STATU.SIEXITbutton.
Tochangetherecordinglengthwhile
an OTRisinprogress,pressthe
REC(ord)IOTRbutton untilthe
desiredrecordinglengthappearson-
SCreen.
Youcannotpausean OTR.
Tocancelan OTRbutcontinue
recording,pressthe REC(ord)IOTR
button,then pressthe CLEARbut-
ton.
Youcannot recordif DEFEAT
RECORDINGissetto ON. Details
areon page36.
Youcanchangethe tapespeedwith
theSPEEDbuttonwhilearecording
isin progress,butsomedistortion
mayappearonthe tape.
Page 31

Rerecording(TapeDuplication)31
AUDIO andVIDEO OUT Jacksonsourceunit
(VCR or Camcorder)
AudioCable(white)from
AUDIOOUTtoAUDIO
_" "'_ AUDIO andVIDEO
Video Cable (yellow) lrom JacksonTVNCR
VIDEO OUT tOVIDEO
I
Make the connections shown above, using audio and video
cables. (Make sure the source unit is connected to a
power source.)
2
The source unit (VCR or camcorder)will playyourtape. Insert a
prerecorded tape in the source unit. If playbackbegins,press
the STOPbutton on the unit.
3
The TV/VCR will record yourtape.Insert a blank tape in the
TV/VCR. Make sure the tape's record tab is intact.TheTV/VCR
powerwill turn on automatically.
4
Point theTV/VCR remote control at theTVNCR. Press
Number buttons 0;0 so that A/V IN appears on-screen.
5
Point the TV/VCR remote control at the TV/VCR. Press
the SPEED button until the desired tape speed (SP,LP, or
SLP) appears on-screen.
6
Press the pLAY button on the source unit and the
REC(ord)/OTR button on yourTV/VCR at the same time.
Copying will begin.
7
To stop copying, press the STOPIEJECT button on the
TV/VCR, then stop the tape on the source unit (VCR or
cameorder_.
Unauthorizedrecordingofcopy-
rightedtelevisionprograms,video
tapes,orothermateria/smay
infringeon therightsofcopyright
ownersendviolatecopyrightlaws.
Differentbrandsofequipmentmay
operatedifferent.
Make sureallconnectJonsare
secure.0therwise,youmaynot
recordbothpictureandsound,
Audioandvideocablesarenot
included.
Page 32

32TimerRecording
Followthe stepsbelow to programtheTV/VCR to record TV pro-
gramswhile you'reawayfrom home.TheTV/VCR willturn itself
on,record, andturn itselfoff automatically.Beforeyoubegin,make
SUre:
• The clockisset. If not, CLOCK MUST BESET appears.
• Channelsare set up.
• There is a tape inthe TV/VCR. (Hake surethe tape'srecord tab
isintactand the tape is longenoughto recordthe program.)
Complete each step within 60 seconds of completing the
previous step. If you don't, you may start again at step I.
I
Press the MENU button.
VC_ PROGRAM
• PRIM._EruP I_
2
Press the PLAYIA button or the $TOPIV button to select
VCR PROGRAM, then press the F.FWDII_ button.
>ONCE
DAILy(MON.FRI)
VVEEKLY
PROGRAMREVIEW
VCR PROGRAH 1
SELECTaT C400SE b-
TO END PRE_ EXIT
._
Press the PLAYI& button or the STOP/Y button to select
a ONCE, DAILY, ORWEEKLY recording.Then, press the
F.FVVDII_ button.
• ONCE: TheTV/VCR will record aTV program on any dayyou
choose,upto i2 months away.
• DAILY:TheTV/VCR will record everydayfrom Monday to
Friday- startingatthe sametime andrecordingthe samechannel
for the samelengthof time.
• WEEKLY: The'W/VCR will record the samechannelon the
sameclay,at the sametime,and for the samelengthof time
everyweel_
/_LY PRoc_M_o_)
Recording
(example)
Daily _ -tz34s_78-
SELECT PP,OGRAH NUMEI_I_
END PRESS EXIT
If the power fai/s,programmed
timer recordingswillberestored
whentheclockisreset,(Theclock
will resetitselfautumaticallyif you
areusingtheAUTOCLOCKfeature.
Detailsare onpages14 - 17. If
youarenot usingtheAUTOCLOCK
feature,resetthe clockmanually.
Detailsoreonpages12 - 13.)The
timer recordingwillnotoccuronlyif
the timerrecordingwasscheduled
to takeplaceduringthepowerfail-
ure.
Youcannotseta timer recordingif
DEFEATRECORDINGissettoON.
Detailsareonpage36.
Page 33

TimerRecording(cont'd)33
4
Use the Number buttons (I - 8) to select a position in
which to store the timer recording. Flashingnumbers indi-
cate anopenposition(one inwhicha timer recording hasnot yet
been stored).
NOTE:Ifyouselecta numberthathasalreadybeenusedtostorea
tJmerrecording,PREVIOUSLYSETPROGRAMwillappearon-screenfor a
few seconds.TheninformatJonaboutthe programin thatpositionwill
appearon-screen.If this happens,pressthe STATUSIEXITbutton.Then
usethe Numberbuttonstoselectanotherpasition.
5
• Enterthe channelof the'IV programyouwant to record (you
mustenter a 0 before all single-digitchannels).
• If youare recording from lineinput,press0,0. A/V INwill
appearon-screen.
• Ifyou are recording usingaCable BOy.enter the Cable Box
outputchannel(03 or 04).Besure to selectthe channelof the
TV programat the Cable Box and leavethe Cable Boxon for
the timer recording.
CHANNEL _ -
"i'O END PP.ESSEXIT
6
Press two Number buttons for the hour(s) you want the
recording to begin. Press two Number buttons for the
minute(s) you want the recording to begin. Press I forAM
or 2 for PM. For example,for _.30 PM,press09, 30,2.
PROG_,t I
CHANNEL 10
TIME ON --:--
7
Follow the instructions in step 6 to set the recording's
step time. (AM or PM will be set automatically.)
e_ONETIME PROGRAM
CHANNEl. 10
TIME ON 09"_0 PM
TIME OFF --;--
Instructions continue on page 34.
• If the numbersentereddonot
matchthe'rVIVCR'scalendar,the
entrywillbe rejectedanda question
markwiltappearon-screen.
• Tomakecorrectionswhileyou are
programmingatimer recording,
pressthe CLEARbuttonuntilthe
cursorisflashingonthe item you
wantto change.Thenenterthe cor-
rectinformotJon.
Page 34

34TimerRecording(cont'd)
8
Press the Number I button to record in SP speed, press
the Number 2 button to record in LP speed, or press the
Number 3 button to record in SLP speed. Detai/sabouttape
speedareon page29. You cannotusethe SPEEDbutton at this
time.
lONE TIME F_OGRAt'I _"
PROGRAM I
CHANNEL 10
TIME ON 09:30
TIME OFF I1:00
REC SPEED SLP
_1 LP_2 SLP=3
TO CORRECT FItE_ CLEAR
TO END PItESSEXIT
9
Press two Number buttons for the month and two
Number buttons for the day you want the program to
record. For example,for July 10, 1998,press07, 10.The dayof
the week andthe yearwill be displayedautomatically.(You cannot
programtheTVNCR to record more than oneyearin advance.)
i_ONETIMEPROGRAI_
PROGRAM I
CHANNEL 10
T_ME ON 09:30 FI'I
TIME OFF I I:00 PM
REC SFIEED SLP
STAF_TOATE 07110/98
FP.IDAY
I
I
TO CORRECT PP-ESSCLEAR
TO END FRESSEXIT
10
Press the STATUSIEXIT button. PROGRAMWAS COM-
PLETEDPLEASETIJI_N OFF FOR TIMER RECORDING will
appearon-screen,
• Ifthere is not a tape in theTV/VCR, PLEASEINSERTCASSETTE
also appearson-screen.
• Ifthere isatape without a record tab in theTVNCR, PLEASE
REMOVECASSETTEalso appears on-screen.If this happens,
inserta differenttape.
• If PROGRAM NOT COMPLETED appears,start againat step I.
II
Turn off the TV/VCR power. The RECORD lightwill flash.If
you forget to turn off theTV/VCR, PLEASETURNOFF FOR
TIMER RECORDING appearson the TV/VCR screen two minutes
before a timer recording starts.
TheTV/VCR must be
otTfor a timer record-
ing! Make sure there is
a tape in theTV/VCR.
PROGRAMNOTCOMPLETED/
CLASHmayappearon-screenwhen
youfinishsettinga timer recording.
Thismeansthatthe timerrecording
youjust programmedandanother
timer recordingoverlap,andthus
the currenttimer recordingwill not
be carriedout.
Tostopa startedtimer recording,
pressthe STOPIEJECTbutton on
theTVIVCR.
Please see page 48 for more
Helpful Hints.
Page 35

Checking or Clearing Timer Recordings
I
With theTV/VCR on, press the MENU button.
2
Press the PLAYIA button or the STOPIV button to select
VCR PROGRAM, then press the F.FWDIII_ button.
3
Press the PLAYIA button or the STOPIY to select PRO-
GRAM REVIEW, then press the F.FWDII_ button. The
• timer recording informationfor the programin the lowest num-
beredpositionwill appearon-screen.If no timer recordings are
programmed,nothing will happenwhen you selectPROGRAM
REVIEW.
4
Press the RFWDIII_ button to display information about
the next programmed timer recording. (If youdo not press
a button within 10 seconds,informationaboutthe next pro-
grammedtimer recording will appear.)Thiswill continueuntil all
positionshavebeen displayed.Then,the menuwilldisappear.You
can exit the ProgramReviewat anytime by pressingthe STA-
TUS/EXIT button.
TimerRecording(cont'd)35
C_GD _
5
To cancel the timer recording displayed, press the CLEAR
button. Either the displaywill disappearor informationabout
other timer recordings will appear.If you do not pressany other
buttons,the displaywill disappearafter alltimer recordings have
been displayed.
6
Repeat steps I - 4 to make sure you have cleared the
correct position,
Page 36

36 DefeatRecording
Follow the steps below to prevent accidental recording.
I
Press the MENU button.
V_R SETUP
REMINDEP.
• PR_M. SE-PUP i_
_WrNEr_
2
Press the PLAYIA button or the STOPIT button to select
VCR SETUP, then press the F.FWDI I_ button.
III_.AT ,wAy
DEFEAT RECORDING {OFF]
• ONETLMEPLAY [ON l
f v_ SETUr 1
SELECT A'V CHOOSE I_
_. TO END pRESS EXiT
3
Press the PLAYIA button or the STOPIY button to select
DEFEAT RECORDING,then pressthe F.FWD/I_ button
sothat ON appears beside DEFEAT RECORDING.
4
Press the STATUSIEXIT button.
. H
Now, REC DEFEATED will flash on-screen when you press
the REC(ord)IOTR button.
EC DEFEATED
IfyousetDEFEATRECORDINGto
ON after a timer recordinghas
been set, the timer recording will not
Occur.
You can not program a timer record-
ing if DEFEATRECORDINGis setto
ON.
• Toset DEFEAT RECORDING to OFF,
repeatsteps I - 2 above.Atstep 3,
pressthe PLAYI&button orthe
STOP/T buttontoselectDEFEAT
RECORDING, then press the
EFWDII_ bu_on so that OFF
appears besideDEFEATRECORD-
ING on-screen.Pressthe
STATUS/EXITbutton.
Page 37

Usethe sleeptimer to programtheTV/VCR ix)shutoff ina cer-
tain amount of time.
I
Press the SLEEP button. The sleeptimer displaywill appear
on-screen.(Youcan not setthe sleeptimer duringa recording.)
2
Within five seconds, press the SLEEP button repeatedly
to select 30 minutes, 60 minutes, 90 minutes, or 120 min-
utes. In a few seconds,the displaywill disappear.ThentheTV/VCR
willshut itselfoff after the specifiedamount of time.
One minutebeforethe'rV/VCR shutsitselfoff,the secondswill
countdown on-screen.
GOOD HIGHT appearsonthe TV/VCR screen 10secondsbefore
theTV/VCR shutsitselfoff.
SettingtheSleepTimer37
F
r
I SLEEP I0 SEC 1
GOOD NIGHT
• To see how much time remains until theTV/VCR shuts itself off,
press the SLEEP button once.The dme remaining will appear on-
screen briefly.You cannot do this during a recording.
• To cancel a sleep timer setting, press the SLEEPbutton until 0
HIN appears on-screen.The on-screen displaywill disappear in a
few seconds.You cannot cancel the sleep timer during a record-
ing.
J
Finishallrecordingsbef0mthe
TV/VCRshutsitselfo_..If a record-
ingisinprogress,the sleeptimer
willbecancelled.
A timer recordingwillnotbegin
unlesstheTV/VCRpoweris off.Two
minutesbeforeatimer recording
starts,PLEASETURN OFFFOR
TIMERRECORDINGflasheson-
screen,if youseethis message,turn
offthe TV/VCR.
If the powerfails,youmight/osethe
sleeptimersetting.
Page 38

38 ClosedCaption
When you watch a programthat isbeingbroadcastwith closed
captions,you canaccesson-screenboxescontainingthe pro-
gram'sdialogue(for example,what a characterissaying),dialogue
in a foreign language,or information(suchasa channelguide,
schedule,or announcements).Followthe stepsbelowto select
closedcaptions.
Not all"IV programsand commercials are broadcastwith closed
captions.Similarly,all types of closedcaptions(secondlanguage,
half-screentext, etc.) are not alwaysbroadcast,if closedcaption-
ingis not broadcast.youcannotreceive itThis doesnot indicate
a problemwith the TV/VCR. Referto your area'sTV programlist-
ingsfor the shows offeredwith closedcaptions.
I
Press the MENU button.
_'I_IND_R
> PRIM. SE'I'U_ i_
G_
I
2
Press the pLAYIA button or the STOPIY button to select
CAPTION.
_.
Press the REW(ind)l_l button or the F,FWDII_ button to
select your desired mode.
The selectedclosedcaption mode will appear besideCAPTION
on-screen,
• CAPTION I displaysstandard closedcaptions(what a character
issaying).
• CAPTION2 displaysforeign languageclosed captions(foreign
languagewords showing what acharacter is saying).
• TEXTI andTEXT2 display haft-screentext (suchasa channel
guide,schedule,or announcement).
• OFFturns closed captions off, Captions will not appear on-
screen.
TO ADJUST PRESS • I I_
• CAPnON CAPTION I
IBRKEHTNESS Menu
PICTURE
coLo_ Screen
Ex--:
I )
Page 39

4
Press the STATUSIEXIT button. The type of closedcaptions
you selected at step 3 will appearon-screen.
StandardClosed Captions
ClosedCaption(cant'd)39
F
Half-screen text
ingrecordingortapeplaybackif
COUNTERONLYis sett_ ON.
i oucannotviewclosedceptionsdur-
Abbrevia_ons,symbols,andother
gremmatJcalshortcutsareoften
usedinorderto keeppacewith the
on-screenaction.Thisdoesnotindi-
catea problemwiththeTYPlCR.
Tocancelclosedcaptions,tallow
stepsI - 2 onpage38.Atstep3,
pressthe REW(ind)/_qbuttonor
theF..FWDIII_buttontoselectOFF.
Pressthe STATUS/EXITbutton.
Whenyou changechannels,the
closedcaptionsmay be delayedfor
a fewseconds.
i" When youadjustthe volumeor
mute thevolume,closedcaptions
maybedelayedfora fewseconds.
Page 40

40VolumeBar
Usualb/.the volume b_r appears when you press _eVOLUHE
k/_' buttons, ff you do not need it, set r_eVOLUHE BAR to OFF
position. For example, v/nen you watch a program that is being
broadcastwith closedcaptions,you maychooseto settheVOL-
UblE BAR to OFF sothe captionscanremain on-screen.Thecap-
tionswill remain on-screenevenwhen you pressthe VOLUME
buttonsor the MUTE button.
I
Press the MENU button.
VCP.PROGRAM
m'N_
2
Press the PLAY/A button or the STOP/V button to select
PRIM• SETUP. Then. press the F._D/I_ button•
mm
VOLUMEBAR [ON]
"to ENO Fe_._ D_r
3
Press the PLAYIA, button or the STOPiY button to select
VOLUME BAR, then press the F.FVYDII_ button. Each
pressofthe F.FWD/I_ button will turn theVOLUHE BARON
or OFE
.
Press the STATUS/EXIT button.
Page 41

I
Press the MENU button.
VCR_R/_t
_ SETUp
_qlON
PRIM.SETUP I_
2
Press the PLAYIA button or the STOPPV button to select
VCR SETUP, then press the F.FWDII_ button.
ONE TIttE PLAY [ON]
ON-SCREENMODE
OB_.ATRECORDING[OFF]
_> VCR SE_JP 1
SELECT AV CHOOSE _-
END PRE_ Ex_'r
RepeatPlay41
3
Press the PLAYIA button or the STOPIV button to select
REPEAT PLAY, then press the F.FWDII_ button so that
ON appears beside REPEAT PLAY.
ONETIMEFLAY
• REPEATPLAY [ON]
ON-SCREENHOOE
DEFEATRECORDING[OFFJ
VCR SETUP 1
END PRI_ _rr
4
Press the STATUSIEXIT button. Now, whena tape hasfin-
ishedplaying,the TV/VCR will rewind it andstart playbackagain,
('i'V programmingwill appearwhilethe tape is rewinding.)
TheTVIVCRwillstay in RepeatPlay
modeuntilyouset ONETIME PLAY
to ON,eveniftheTVIVCRistumod
o_To set ONETIMEPLAYto ON,
followsteps I - 2 above.Then,press
the PLAYIAbutton or the STOP/Y
button to selectONETIMEPLAY.
Pressthe EFWD/I_ buttonsothat
ON appearsbesideONETIME
PLAY.Then,pressthe STATUS/EXIT
button.
Thereal-timecountermemorywill
not functionduringRepeatPlay
mode.
Page 42

42A. BRepeatPlay
Followthe stepsbelowto programthe'rV/VCK to playthe mater-
ial be'cweentwo specified points (A and B) on a tape over and II Insert a tape in the TV/VCP,.
over again.
I
I
Insert a tape in the'rV/VCR.
2
Press the MENU button.
VCR SETUp
• pPdM. SETIJp I_
REMINDER
GHI'N_
3
Press the PLAYIA button or the STOP/Y button to select
VCR SETUP, then press the F.F_AfD/I_ button.
• ONETIME PLAY [ON]
ON_CREN_I _'K_t3E
DEIT_AT RECORDING [OFFj
5E_CT AV CHOOSE lib
END _ _rt
4
Press the PLAYIA button or the STOPIY button to select
REPEAT PLAY.
ONETIME Pt.AY [ON]
ON-SCREEN FqOOE
DEFEAT RECORDING [OFF'J
I > REFEA'r FLAY
3
_*_ _T_ END PRESS EXIT ./
5
Press the F.FWDII_ button repeatedly so thatA.B
appears beside REPEAT PLAY.
ONE "riME PLAY
REPEAT I_.AY [A-B1
DEFEAT RECORDING [OFF]
_> VCR SETUP 1
_Sro N-SCREEN MODE
TocancelA-BRepeatP/ay,setONE
TIME PLAYto ON.TosetONETIME
PLAYto ON,followsteps2 - 3
above.Then,pressthePLAY/Abut-
tonortheSTOP/V buttonto select
ONETIME PLAY..PresstheF..FWD/
I_ buttonso that ON appears
besideONETIMEPLAY.Then,press
theSTATUS/EXITbutton.
Theendposi_on(B) mustbe later
onthe tapethan the start position
(A).
Page 43

A- BRepeatPlay(cont'd)43
6
Press the STATUS/EXIT button to remove the display. A-B
REPEATwill appearon-screen.Beneathit, the le_er A will flash
besidethe real-rime counter.
I 1
• A-BREPEAT
7
Play, fast forward, or rewind the tape to the position at
which you want to begin playback. Stop the tape, then
press the MEMORY button to set the start position (A).
The flashingAwill becomea flashingB.
I • A-B REPEAT 1
8
Play or fast forward the tape to the position at which you
want playback to end. Stop the tape, then press the MEM-
ORY button to set the end position (B).
• The lengthof time betweenthe start position (A) andthe end
position(13)mustbe at leastthree minutes.
9
8
The TV/VCR will immediatelyrewind the tape to the start position
(A) and repeat playbackto the end position(B) over andover.
(TV programmingwill appearwhile the tape is rewinding)
Thecountercannotbememodzed
orresetwhenyouare usingthis
feature.
PositionsA andBwillbeerased
whena tapeisejectedorwhenyou
t_ressthe REC(ord)IOTRbutton.
A-BREPEATwill notapi_or 0n-
screenat step6 ira tape isnotin
theTV/VCR.NO CASSETTEwill
flashon-screenbrie_.
Youcannotrewindorfastforward
beyondpointsAor Bwhenyouare
usingthis feature.
Page 44

44 Real.TimeCounterMemory
• • •... • • •. • • • • • • •. • • • • to * * • • • • • •.. • •. * • • • •. •. • • • • • • •.... • • • • • • *. * * • • • • • * •.. • • • • *... • • • • • • • • • • • •.. * • • • • • • • • • • • • •
Follow the steps below to reset the real-time counter to zero at a
tape location you want to refer to later.
I
Play, fast forward, or rewind a tape to the location that
you would like to refer to later. Stop the tape.
2
Press the STATUSIEXIT button. The real-time counter will
appear on-screen.
© 95
3
While the counter remains on-screen, press the CLEAR
button to reset the real-tlme counter to zero.
I 0:00:00
4
While the counter remains on-screen, press the MEMORY
button so that M appears on-screen. To erasea real-rime
counter memory,pressthe MEMORY button sothat the Ivtdisap-
pearsfromthe screen.
5
To go to a tape location where the real-time counter was
reset tO zero, press the REW(ind)/_l button or the
F.FWD/I_ button when playback is stopped.When the
tape reaches the point at which the counter was set to
zero, the tape will stop. Press the PLAY/A button to
watch the tape.
3
j• Thereo/-timecountermemorywill
notfunctionduringRepeatP/ay
j mode. Detailsareonpage4 I.
• Youmayon/)'setonereo/-time
countermemoryat o time. Ifyou
trytoset the rea/-timecounterto
zeroat a secondlocation,the previ-
ousreo/-timecounterto zerosetting
will be lost.
Page 45

AutomaticOperationFeatures45
• • • • • _••.Boe.. JOe. OOOett•O•OIDDODee,•eeOOODee,,DeODB JOQ.OOOOIOOeeDt•eOeOOOt •eOtOtO.IOODOeeOO,ee•,•••••.••••,•••
The followingplaybackfeatureswillalwaysoperate.
Automatic Playback
When you put a tape in the'l'V/VCR, the power will comeon
automatically.Ifthe tape's record tab ismissing,playbackwill
begin.Ifatimer recording is set,the powerwill not comeon auto-
matically when you inserta tape with the record tab intact.If a
timer recording issetandtheTVNCR power isoff,theTV/VCR
will eject the tape if the record tab is missing.
Automatic Rewind, Eject, Off
When a tape is played,fast forwarded,or recorded to itsend,the
TV/VCR will rewind the tape, stop,turn itselfoff,andejectthe
tape. Ifa real-time countermemory isset,the'FV/VCR will only
rewind the tapeto the pointat which the counterwasset to zero,
then stop.TheTV/VCR will not turn itselfoff or eject the tape.
Memory Rewind, Power Off
When the POWER button is pressedwhile theTV/VCR isrewind-
inga tape, REVV-_ POWER OFFwill appearon-screen.The
TV/VCR will turn itselfoff when the tape hasfinishedrewinding.
if a real-time countermemory isset,theTV/VCR mayonlyrewind
the tape to the point at which the counterwas setto zero,then
turn itselfoff.
Tape Eject
A tape can be ejectedwith the'I-V/VCR power on or off (butthe
"I-V/VCRmust be pluggedin). If a timer recording is programmed,
a tape can not beejectedwhen the poweris off. Turn on the
TV/VCR power,then ejectthe tape. Be sure to insertatape and
turn off the'FV/VCR power for the timer recording.
Automatic Tracking Adjustment
The'FV/VCR automaticallyadjuststhe tracking to giveyouthe
bestpossiblepicturequality.With somerecordings,however,you
mayget a better pictureusingthe manual_rackingcontrols(see
below).
Manual Tracking
To adjustthe trackingmanually,pressthe CHANNEL _ but-
tons on the'FV/VCR or theTRACKING A/V buttonsonthe
remote control.
Tracking returns to AutomaticTrackingAdjustmentwhen a tape is
inserted or when the STOP/V buttonispressed.
Tracking Tracking
Adjustment Adjustment
Page 46

46 PlaybackOptions
Forward and Reverse Searching (SP/LP/SLP)
I
Duringtape playback,pressand release the EFVVD/I_ button or
the EE'_/(ind)/_l button.A fastforwardor reverse picturesearch
will begin.
2
To return to normalplayback,pressthe PLAY/& button.
Super High Speed Searching (LP/SLP)
I
Duringtape playback,pressthe EFWD/I_ button or the
REVV(ind)/_lbutton,then pressagain.The'l'V/VCRwill now
searchin superhighspeed.
2
To return to normal playback,press the PLAY/A button.
Viewing a Still Picture
I
r
C_ GD(3DG_
Duringtapeplayback,pressthe PAUSE/STILLbutton.A still picture
will appearon-screen.Thenoise lineswill move eachtime you
pressthe PAUSE/STILLbutton.
To releasethe stillpictureand return to normalplayback,press
the PLAY/A, button.
Stillmadewillautomaticallyswitch
to Stopmadeafter fiveminutesto
protect theTV/VCRand the tape
fromdamage.
SP/LP/SLPmeansthis featurewill
workwithtopesrecordedin
StandardPlay,LongPlay,or Super
LongPlay.Fordetailsabouttape
speed,seepage29.
io
LP/SLPmeansthisfeature willwork
with tapesrecordedinLongPlay
and SuperLongPlay.Fordetailson
tape speed,seepage29.
Duringforwardandreversesearch-
ing,horizontalnoisebarswill
appear ontheTV/VCRscreen.
Page 47

Specifications/Glossary47
Specifications
General
CRT:19-inch in line gun
Televisionsystem:NTSC-N
Closedcaptionsystem:Section15.119,FCC
(FederalCommunicationsCommission)Standard
Video Heads:Twoheads
Tapewidth: I/2 inch(12.65 mm)
Tapespeed
SP:33.35 mm/sec.
LP:16.67mm/sec.
SL_ 11.12 mm/sec.
Oper_ngTemperatur_ 41_F(S'C) to 104"F(40"C)
Relative Humidity:.10%to 75%
Power requirement:AC 120V,60Hz
Power consumption:90W
Sound output=IW
Dimensions:
19-11/16"(H) x 19-7/16" (VV)x 18-5/16"(D)
500mm x 494mm x 465mm
Weight_44,I Ibs (20 kg)
Tuner Broadcast Channels
VHF 2-13,UHF 14-69
Cable TV Channels
Midpand:A- I
Superband:J-W
Hyperband:A-S- A- t
SpecialChannel:SA
Ultraband:37- 94, 100- 125
Terminals
Antenna IN:VHF/UHF 75 ohms unbalanced
Video IN: P,CA connector
Audio IN: RCA connector
Earphone: 3.5 turn CES
Electrical Specifications
Video input level:0.S-2.0Vp-p
Audio inputlevel:- IOdBv
Video S/N ratio
SP:More than42dBp
Audio S/N ratio
SP."More than 38rib
Designsandspeciticationsaresubjectto changewi_out
noticeandwithoutourlegalobligation.
Glossary
: AUDIO laclc jack locatedon the front of the
: "rv/vcR whichis usedto record audiofrom anoth- ';
er source.
Automatic Channel S_t_4p: processinwhich the
i "I'V/VCR,scansallavailablechannelsandplacesthe
onesyou receivein itsmemory.Then, when you
" pushthe CHANNEL A/_ buttons,you onlyscan
i through channelsyoureceive.
_ settingsthat allowyou to tune channels.
: • Antenna -VHF (very highfrequency;channels2
" - 13)and UHF (ultrahighfrequency;,channels14-
i 69).
: • Cable I all standard channelscan be received
without a Cable Box.
i i_B_dgb.tg!e=is.'."adjustingincreasesor decreasesthe
brightnessofthe color on-screen,
i -_ adjustingpalesor brightenstheTV/VCR color,
_ copyinga tape usingaVCR.
i HO: highquality;a featurein the'I'V/VCR circuitry
: which providesenhancedpicturedetail.
i _The channelto whichyou set your
! TV/VCR duringdubbing.The line inputchannelis
i alwayschannel00 (A/V IN).
_ aTV/VCR operation.
OTR: One-TouchRecording;programminga timed
: recording that startsimmediatelyandrecords for
: 30 minutes to eighthours,whicheveryouspecify.
_ adjustto increaseor decreasethe con-
trast of the pictureon-screen.
adjustingsoftens or clarifiesthe picture
on-screen.
Ta_e Speeds: how fastthe tape travels during
: playbackor recording.
• • SP (standardplay)- fastesttape speed(record-
ingtime for aTI20 tape is approximatelytwo
hours);bestpicturequality.
LP (longplay)- averagetape speed(recording
time for aTI20 tape isapproximatelyfour
hours),
SLP (superlongplay)- slowesttape speed
(recordingtime for aT I20 tape isapproximately
six hours).
Tint adjustingchangesthe tintsofthe pictureon the
TV/VCR from purpleto green.
VCR: videocassetterecorder.
VIDEO lack; jack located on the front ofthe
TV/VCR which is usedto record video from anoth-
er source.
Page 48

48 HelpfulHints
Ifyou are havingproblemswith your product,checkthis list of problemsandpossiblesolutionsbefore
requesting service.Youmaybeableto solvethe problemyourself.
If you need to calla customerservicerepresentative,pleaseknow the modelnumberandserialnumber
of your productbeforeyou call.This informationisdisplayedon the backof the product.Also,pleasetake
a moment to identifythe problemyou are having,andbe preparedto explainthisto the representative. If
you believethe representative will need to helpyou with operations,pleasestaynear the product.Our
representatives will be happyto assistyou.
Location
Forsafeoperationandsatisfactoryperformanceof yourTV/VCR, remember the following:.
• Shieldit from directsunlightand keep it awayfrom sourcesof intenseheat.
• Avoiddustyor humidplaces.
• Avoid placeswith insutficientventilation.Do not blockthe ventilationopeningsat the top and bottom
ofthe TV/VCR. Do not placetheTV/VCR on a carpet_asthis will blockthe ventilationopenings.
• Avoid locationssubjectto strongvibredons.
• Do not placetheTV/VCR near strongmagneticfields.
• Do not movetheTV/VCR from a coldplaceto a hot place,or vice versa.
Electrical ShockAnd Fire Hazards
• Do not handlethe power cord with wet hands.
• Do not pull the powercord when disconnectingthe'rV/VCR fromthe AC (alternatingcurrent)wall
outlet.Grasp it bythe plug.
• If water is spilledon the'I-V/VCR, unplugthe powercord immediatelyandtake the'I'V/VCR to an
authorizedservicecenter.
• Do not put your fingersor objectsintotheTV/VCR cassettecompartment.
• Do not placeanythingon top of theTV/VCR.
DewWarning (Moisture Condensation)
• Moisture maycondenseinsidethe unitwhen it ismoved from a cold placeto awarm place,afterheat-
inga cold room, or when the humidityishigh.Thereis no warning that moisturehasaccumulatedin
your TV/VCR. If youtry to playa tapein aTV/VCR in whichmoisturehasaccumulated,the tape and
theTV/VCR couldbe damaged.If you think moisture mayhaveaccumulatedinsidetheTV/VCR, keep
theTV/VCR power on (but do not playatape) for at leasttwo hours.Thiswill allow theTV/VCR to
dry.
TV/VCR will not perform a timer recording.
• Make surethe recording start andstoptimesare set correctly(pages32 - 35). Midnight is 12 _m.
Noon is 12 p.m.
• Make surethe'[V/VCR power is off.
• Make surethe clock is set (pages12 - 17).
• Makesurethere isa tape in theTV/VCP,.The tapemusthavearecord tab.
• If the powerfails,programmedrimer recordings will be restored whenthe clockisreset. ('[he clock
will reset itselfautomaticallyifyou are usingthe AUTO CLOCK feature.Detailsare on p_ges14- 17.If
you are not usingtheAUTO CLOCK feature,reset the clockmanually.Detailsare on pages12- 13.)
The timer recording will not occuronlyIf the timer recording wasscheduledto take placeduringthe
power failure.
• Makesure DEFEATRECORDING isset to OFF (page36),
TV/VCR will not record.
• Makesurethe tape hasa record tab (pagefive).
• Makesure DEFEATRECORDING issetto OFF (page36).
• Plugthe power cord into anactiveAC outlet (pageseven).
• Checkyour hookups(pagessix- seven).
• Setup the channels(pageI0).
Page 49

HelpfulHints(cant'd)49
• • • • • • • • • • • • • • • • • • • • • • • • • • • • • • • • • • • • • • • • • • • o• • • • • • • • • • • • to • • • • • • • • • • • • • • • • • • • • • • ,o • • • • • • • • • • • • • • • • • • • • • • • • • • • • •
The remote control is not available, or the remote control will not accessthe pop up menu.
• Usethe buttonson the front panelof theTV/VCR to accessthe pop up menu (page20).Youcannot
enter numbers(for example,to programatimer recording) usingthe front panelbuttons.
TV/VCR has no power.
• Make sure the power plugis completelyconnectedto anAC (alternatingcurrent) outlet.
TV/VCR power shuts off after 15 minutes.
• To saveenergy,theTV/VCR will shutitselfoffafter 15minutes when it is on a channelthat isnot receiv-
inga broadcastsignal(for example,astationthat hasgone offthe air for the night).This isnormal.
Channel reception is poor,
• Check connections,then set up the channelsagain(page10).
TV/VCR does not have a picture.
• Adjustthe antenna(pagesix).
• AdjusttbeTV/VCR picture controls(pages24 - 25).
TV/VCR has poor sound or no sound.
• Adjust the votume.
• Pressthe MUTE button to restore the volume.
Tiupe playback is poor or tape is destroyed.
• Adjustthe tracking. Detailsareonpage45.
• If moisture hasaccumulatedin YOur'I-V/VCR,keepthe power on for at leasttwo hours,butdo not try
to playa tape.Detailsareonpage48.
TV/VCR does not display closed captions.
• MakesureCounter Only is set to OFE Detailsoreonpage26.
• Makesure closedcaptioningisavailablefor the program.Referto the'IV listingsinyour localnewspaper.
Remote control does not operate TV/VCR.
• Aim the remote control directlyat the TV/VCR's remote sensor.Deta_ areonpagesfiveand20.
• Removeallobstaclesbetweenthe remote control andtheTV/VCR.
• Inspectandreplace the batteriesinthe remote control.Detai/sareonpagefive.
Number buttons won't work for channels above 69.
• SelectCABLEfrom the INPUT sectionof the pop up menu,then let the'I'V/VCR set upthe channels.
Detailsareonpage I0.
TV/VCR can't receive channels above 13.
• Select CABLEfrom the INPUT sectionof the pop up menu,then let the TV/VCR set upthe channels.
DetailsareonpageIO.
A tape can't be inserted into the'I'V/VCR.
• Insertthe tapewindow side up,with the record tab facingyou.
• Makesurea tape is_t alreadyintheTV/VCR by pressingthe STOP/EJECTbutton on the TV/VCR.
• Gent/)-pushon the center of the tape.Never force atape intothe "/_V/VCR.
• Ifatimer recording is set andthe'I-V/VCR power is off,theTV/VCR will ejectthe tapeifthe record tab
ismissing.
A tape can't be removed from theTV/VCR.
• Makesurethe power plugis completelyconnectedto anAC (alternatingcurrent)outlet.
• Ifa timer recording is programmed,turn onthe TV/VCR power,then ejectthe tape.Be sureto inserta
tape andturn offtheTV/VCR power for the timer recording.
TV/VCR ejects the tape when you try to start a recording.
• Makesurethe tape hasa record tab. Detailsareonpagefive.
The cylinder rotates when tape playback is stopped.
• Toenablethe quickp(aymechanism,the cylinderwill rotate for about f'rveminutes.This is normal.The
quick playmechanismswitchesthe tape mechanismfrom Stopto Playin justonesecond.
Page 50

50 Lim edWa anty
I"V/VCR COMBINATION
90 Days FreeLabor/OneYearFreeParts Exchange(TwoYearsFree ExchangeonColorPictureTube)
Thisproduct must be carried in for repair.
WHO IS COVERED?
You must haveproof of purchase to receive warranty
service.A salesreceipt or other document showing
that you purchasedthe product isconsidered proof
of purchase.
WHAT IS COVERED?
Warranty coverage begins the day you buy your prod-
uct. For90 daysthereafter, all parts will be repaired or
replaced, and labor is free. From 90 daysto one year
from the day of purchase, all parts will be repaired or
replaced, but you payfor all labor charges.Fromone_0
two yearsfrom the day of purchase,you pay for the
replacement or repair of all parts except the picture
tube, and for all labor charges.After two yearsfrom the
day of purchase, you pay for the replacement or repair
of all parts,and for all labor charges.
All parts, including repaired and replaced parts, are
covered only for the original warranty period.When
the warranty on the product expires, the warranty on
all replaced and repaired parrsalso expires.
WHAT IS EXCLUDED?
Your warranty does not cover:
• tabor charges for installation or setup of the prod-
uct, adjustment of customer controls on the prod-
uct, and installation or repair of antenna systems
outside of the product.
• product repair and/or part replacement because of
misuse, accident, unauthorized repair or other
cause not within the control of Philips Consumer
Electronics Company.
• reception problems caused by signal conditions or
cable or antenna systems outside the unit.
• a product that requires modification or adaptation
to enable it to operate in any country other than
the country for _'h!ch it was designed, manufac-
tured, approved and/or authorized, or repair of
products damaged by these modifications.
• incidental or consequential damages resulting from
the product. (Some states do not allow the exclu-
sion of incidental or consequential damages, so the
above exclusion may not apply to you.This
includes, but is not limited to, prerecorded materi-
al, whether copyrighted or not: copyrighted.)
• damage caused by the use of non-VHS tapes or
tapes that have not been tested and labeled for use
in two, four, six, and eight hourVHS recorders.
• a product that is used for commercial or institu-
tional purposes.
WHERE IS SERVICE AVAILABLE?
Warranty service is availablein all countries where
the product is officially distributed by Philips
Consumer Electronics Company. In countries where
Philips Consumer Electronics Company does not dis-
tribute the product, the local Philipsservice organiza-
tion will a_cemptto provide service (although there
may be a delay if the appropriate spare parts and
technical manual(s) are not readily available).
MAKE SURE YOU KEER..
Please keep your sales receipt or other document
showing proof of purchase.A_ach it to this owner's
manual and keep both nearby.Also keep the original
box and packing material in caseyou need to return
your product.
BEFORE REQUESTING SERVICE...
Please check your owner's manual before requesting
service.Adjustments of the controls discussedthere
may saveyou a service call.
TO GET WARRANTY SERVICE IN U.S.A., PUERTO
RICO OR U.S. VIRGIN ISLANDS...
Take the product to a Philips factory service center
(see enclosed list) or authorized service center for
repair.When the product has been repaired, you must
pick up the unit at the center. Centers may keep
defective parts.
(In U.S.A., Puerto Rico and U.S.Virgin Islands,all
implied warranties, including implied warranties of
merchantability and fitnessfor a particular purpose,
are limited in duration to the duration of this express
warranty. But, because some states do not allow limi-
tations on how long an implied warranty may last,this
limitation may not applyto you.)
TO GET WARRANTY SERVICE IN CANADA...
Please contact Philips at:
1-800-66 I-6162 (French Speaking)
1-800-363-7278 (EnglishSpeaking)
(In Canada, this warranty is given in lieu of all other
warranties. No other warranties are expressed or
implied, including any implied warranties of mer-
chantability or fitnessfor a particular purpose.Philips
is not liable under any circumstancesfor any direct,
indirect, special,incidental or consequential damages,
howsoever incurred, even if notified of the possibility
of such damages.)
REMEMBER...
Please record below the model and serial numbers
found on the product.Also, please fill out and mail
your warranty registration card promptly. It will be
easier for usto notify you if necessary.
MODEL#
SERIAL #
This warranty gives you specific legal rights.Youmay hove
other rightswhich vary from state to state.
EL4963E004/ MAC 61081 1-98
Page 51

Index51
a-b repeat play ....... .42 - 43
accessories............... 52
ant(enna)jack ........... 6, 21
audiojack ........... 7, 20,3I
automatic
playback.............. .45
rewind ............... .4S
batteries .................. 5
brightness,adjusting .... 24 - 25
channel
above IO0 ............. 22
adding ................ I I
deleting ............... I I
reviewing .............. I I
setup ................. I0
A/_ buttons ..... 20, 23, 45
clear button .............. 23
clock ................ 12- 17
closedcaptionsystem ...38 - 39
color,adjusting ........ 24 - 25
connections ............ 6 - 7
contents,table of ........... 4
controls
remote ............ 22 - 23
tv/vcr ............. 20 - 2I
counter only mode ......... 26
daylight-savingtime ......... i8
defeatrecording ........... 36
duplication ............... 31
earphonejack ............. 20
erasureprevention .......... 5
fastforward search........ .46
f.fwd button ......... 20,23,46
front panel ............... 20
glossary ................. 47
helpfulhints .......... 48 _49
hookups ............ 6 - 7, 31
languageselection.......... .9
line input mode ...... IO,3I,47
long play .............. 29,47
Ip ................... 29,47
memory
button .......... 23,42 -44
real-time counter ........ 44
rewind,power off ....... .45
menu
button ................ 22
front panel button access . .20
mute button .............. 23
numberbuttons ........... 22
one-touchrecording........ 30
pause/stiUbutton ........ 23,46
picture,adjusting....... 24 - 25
playbutton ............ 20, 22
playbackoptions .......... .46
playing .................. 28
power
button ............. 20, 22
cord ................... 7
real-rime counter memory ...44
rear panel ................ 21
rec/otr button .......... 20, 22
record light .............. 20
recording .............. ..29
reminder . :: ............. 27
remote
control
buttons ......... 22 - 23
using ................ 5
sensor ................ 20
repeat play ............... 4 I
rerecording ............... 3I
rew(ind) button ...... 20, 22, 46
rewinding ................ 46
safety precautions ........... 3
searching ................ 46
sensor (remote) ........... 20
sharpness,adjusting ..... 24 - 2S
sleep timer ............... 37
sip ................... 29. 47
smartclock ........... i4- 17
sp ................... 29, 47
standard play ........... 29, 47
status display ............. 26
status/ex'_ button .......... 22
still picture .............. .46
stop button .............. 23
stop/eject button .......... 20
super high speed searching .. ,46
super long play ......... 29, 47
table of contents .......... .4
tape
duplication ............. 3I
speed .............. 29,47
time
se_ing............. 12- 17
zone .................. 19
timer recording
cancelling.............. 35
reviewing .............. 35
setting............. 32 - 34
tint, adjusting........... 24 - 25
tracking ................ .45
videojack ........... 7,20,3 I
volumebar ............... 40
warranty ................. 50
Page 52

0
Check to be sure the items on this page are packed
with your TY/VCR. These accessories are provided to
help you use or set up your TV/VCR.
" - :Lighted Re'mote Conm_-4ror CCZ 191 (4835 218 37228)
RemoteControl (.or_CC_ 192 (4835 218 37216)
TwoAA Batteries (4835 138 17012)
if any of these items are not included, or if you need
to replace an item, contact Philips Service Solutions
Group at the address below.
Philips Service Solutions Group
P.O. Box 967
Greeneville, TN 37744-0967
Or, call 1-800-851-8885.
IBB027T001
0EMN01353 I B7960UL. B7964UQ _' * '_'_ "
F_m_l In Mexico
 Loading...