

Page 1
SOPHO
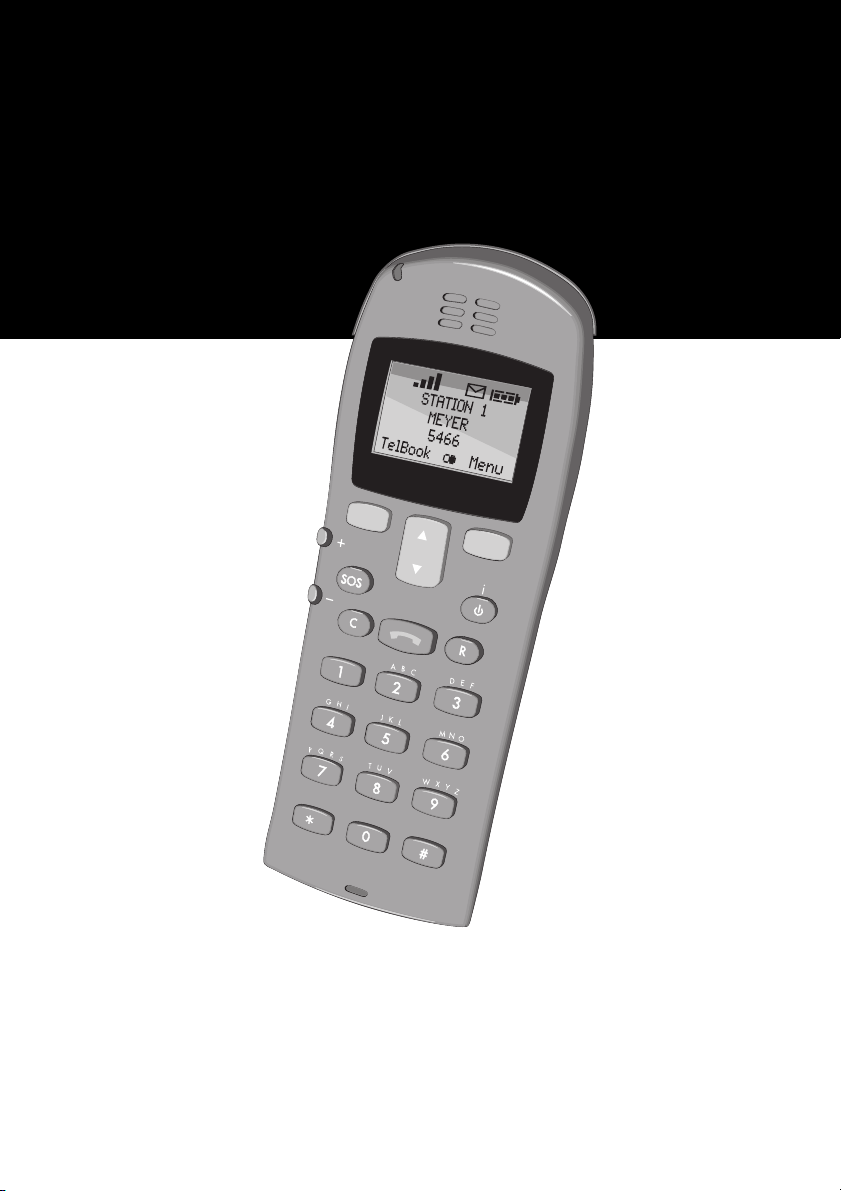
Cordless Telephone C922
User Guide
PHILIPS
Page 2

A Publication of:
PHILIPS COMMUNICATION SYSTEMS
HILVERSUM, THE NETHERLANDS
Order No.: 9600 013 33100
User Guide C922 INT
Date: November 1998
Great care has been taken to ensure that the
information contained in this User Guide is
accurate and complete. If, however, you should
find a mistake or an omission, or you have a
suggestion aimed at improving this User Guide,
then please inform us at the following address:
PHILIPS COMMUNICATION SYSTEMS
PHILIPS BUSINESS COMMUNICATIONS
PRODUCT QUALITY & SUPPORT
P. O . B O X 32
1200 JD HILVERSUM
THE NETHERLANDS
© Philips Communication Systems B.V. 1998
All rights reserved. Reproduction in whole or in
part is prohibited without the written consent of
the copyright owner.
0188
Page 3

Contents
Contents ........................................... 1
Important Safety Information............. 3
Power Supply....................................... 3
Safety Precautions................................. 3
Usage ................................................. 3
Installation ....................................... 4
Installation Location............................... 4
Battery Installation/ Removal.................. 4
Charger Installation............................... 5
Important Battery Information ........... 5
Charging and Discharging .................... 6
Charging the Battery......................... 6
Initial Operation ................................... 6
Spare Battery Pack Charging ................. 6
Charging and Operating Times.............. 7
Charge Display .................................... 7
Charge Warning.................................. 7
Initial Setup and Operation ............... 7
Handset Registration ............................. 7
Keys and Displays ............................ 8
Display Arrangement ............................ 9
Icon Line.............................................. 9
Text Lines............................................. 9
Softkey Line.......................................... 9
Illumination .......................................... 9
Softkeys and Cancel Key................. 10
Softkey: Arrow Key ............................. 10
Softkey: OK ....................................... 10
Softkey: Next ..................................... 10
Softkey: Esc ....................................... 10
Cancel Key........................................ 11
Example: Menu .................................. 11
Example: Telephone Book.................... 11
Example: Entering a Telephone Number 11
Calling ........................................... 12
Operating Procedures ......................... 12
Handset On/Off................................. 12
Key Lock On/Off................................ 12
Handset Volume ................................. 12
Muting .............................................. 12
Making a call..................................... 12
Making a Call from the
Redial Stack .......................................13
Making a Call from the Telephone Book 13
Making a Call Using the SOS Key ........14
Making a Call from the Caller List .........14
Answering a Call ................................14
Enquiry Call/ Call Transfer...................14
The Menus: Operating Procedures ...15
Abbreviation ......................................15
Example.............................................15
Menu Timer ........................................15
Menu: Telephone Options................ 16
Key Click On/Off ...............................16
Immediate Message Display.................16
Message Memory Overwrite ................16
Automatic Call Answering....................16
Silent Charging...................................16
Programming the SOS/
Emergency Number.............................16
Changing the Language.......................17
Coverage Warning .............................17
User Name.........................................17
Charge Counter..................................17
Menu: Ringer Settings .....................17
Melody: Internal Call...........................17
Melody: External Call ..........................17
Melody: Normal Message Call.............18
Melody: Urgent Message Call ..............18
Ringer Signal Off: Silence ....................18
Ringer Signal On: Short Melody (Chirp).18
Ringer Signal On: Full Melody..............18
Ringer Signal: Volume .........................18
Ringer Signal: via Buzzer.....................18
Ringer Signal: in Headset.....................19
Ringer Signal via Vibrator ....................19
Menu: Security Functions ................. 19
Read Only On/Off.............................. 19
Changing the PIN ...............................19
Resetting the Handset ..........................19
Menu: Caller List .............................20
Calling...............................................20
1
Page 4

Menu: Telephone Book Settings ....... 20
Adding a New Entry ........................... 21
Deleting an Entry ................................ 21
Editing an Entry .................................. 21
Deleting All Entries.............................. 21
Adding Numbers to the Telephone Book 21
Entering Characters/Names................. 22
Menu: System Settings .................... 22
Registration Code ............................... 22
Registering the Handset
with the DECT System.......................... 23
Selecting the DECT System................... 23
Automatic System Search..................... 23
Deleting a System ............................... 24
Editing a System Name and
Telephone Number ............................. 24
Handset ID......................................... 24
Service Settings ..................................24
Menu Shortcuts............................... 24
Buzzer Off/ On.................................. 24
Silent Charging On; Off ......................24
User Name ........................................ 24
Registering/ Deregistering ................... 24
Messages ....................................... 25
Urgent Messages................................ 25
Normal Messages............................... 25
Acknowledgement of receipt ................ 26
Message Memory Full..........................26
Menu: Messages ............................. 27
Creating a New Message ....................27
Changing a Message ..........................28
Sending a Message.............................28
Reading a Message.............................28
Deleting a Message.............................28
Deleting All Messages .........................28
Accessories..................................... 29
Attaching/using the Belt Clip................29
Connecting the Headset (optional).........30
Docking Station (optional) ....................30
Connecting the Docking Station ............31
Connecting the Handset.......................31
Note..................................................31
Handsfree Operation...........................31
Headset Operation..............................32
Speed Dialling Keys ............................32
Operation with a PC............................32
Charger Rack (optional).......................32
Mounting the Chargers ........................33
Desktop Installation..............................33
Wall Installation..................................33
Power Connection...............................33
Accessory Overview:...........................33
Care and Maintenance.................... 34
2
Page 5

Important Safety Information
Only use this product in countries where the proper authorities
have issued the corresponding approval.
The CE marking on the product certifies its conformity to the
technical regulations for user safety and electromagnetic disturbance, which were applicable on the date of approval in
accordance with European directive No. 91\263\EEC.
Please also use and refer to all documentation, which is supplied with any part(s) of your telephone system.
Power Supply This product requires a 230 V alternating current power sup-
ply.
The power can only be disconnected from this product by
removing the AC adapter plug from the mains socket.
Safety
Precautions
• Do not open the handset, the charger, the charger rack or
docking station (Accessories). This could expose you to high
voltages. All repairs must be carried out by authorized service personnel.
• Do not allow the charger and battery contacts to come into
contact with conductive items such as keys, paper clips,
rings or bracelets.
• Do not allow the handset and charger to come into contact
with water or chemicals.
• Only use the AC adapter and battery type supplied.
• Do not use an AC adapter that shows any signs of damage
(breaks or cracks in the housing), and keep the cooling apertures of the AC adapter free from obstruction.
• Do not operate the handset in vehicles or in areas or rooms
where there is a danger of explosion.
• This product contains magnetic material. Be aware that
small metallic objects may stick for example to the earpiece.
This may deteriorate the audio quality and can be harmfull.
Usage This handset, like any cordless telephone, operates using
radio signals, which cannot guarantee the setup of a connection in all conditions. Therefore, you should never rely solely
upon any cordless telephone for essential communication (e.g.
medical emergencies).
3
Page 6
Installation
Installation
Location
Battery
Installation/
Removal
Place the charger on a flat, even surface, or attach it securely
to the wall.
Do not place the charger, handset or the accessories (refer to
page 29) in the vicinity of:
• Water, moisture or damp areas.
• Heat sources, direct sunlight or inadequately ventilated areas.
• Devices which produce strong magnetic fields, electrical
appliances, fluorescent lamps, computers, radios, TVs, fax
machines and telephone terminals.
• Areas where the equipment may be covered, its ventilation
impaired, or where fluids could penetrate into it.
• Areas where there is excessive dust, and areas which are subjected to vibration, shock or extreme temperature fluctuations.
Place and/or store the handset and its accessories out of the
reach of small children.
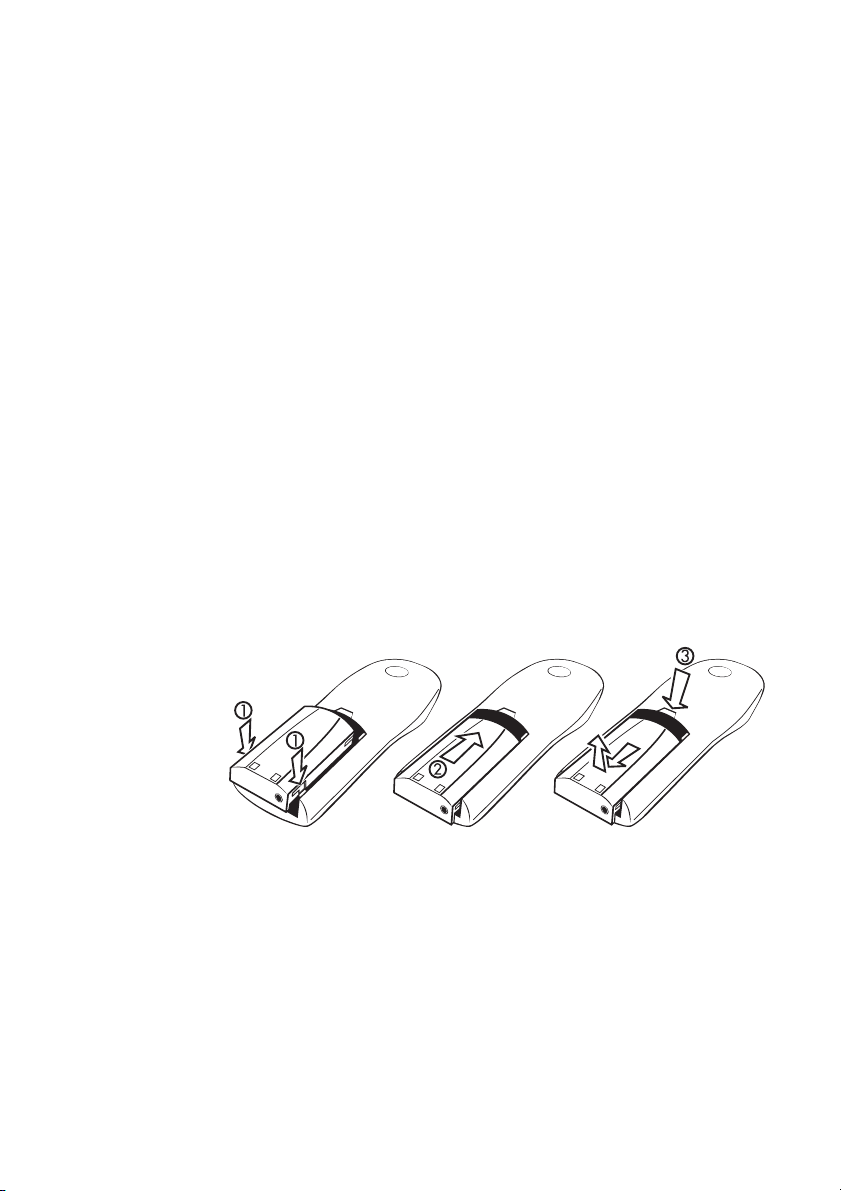
The battery pack is installed in the back of the handset housing. Be sure to place the battery pack in the compartment from
above. (Do not attempt to slide the pack from the bottom or
side of the compartment.)
• Place the pack into the battery compartment by first positioning it above the guide pegs (1) as illustrated. (The lower end
of the pack should stick out approximately 1 cm over the
lower edge of the handset.)
• Slide the pack upwards into the compartment until it clicks
into place (2).
To remove the battery pack:
• Push the release button (3).
• At the same time slide the battery pack approximately 1 cm
out of the compartment.
• Lift and remove the battery pack from the handset.
4
Page 7
Charger
Installation
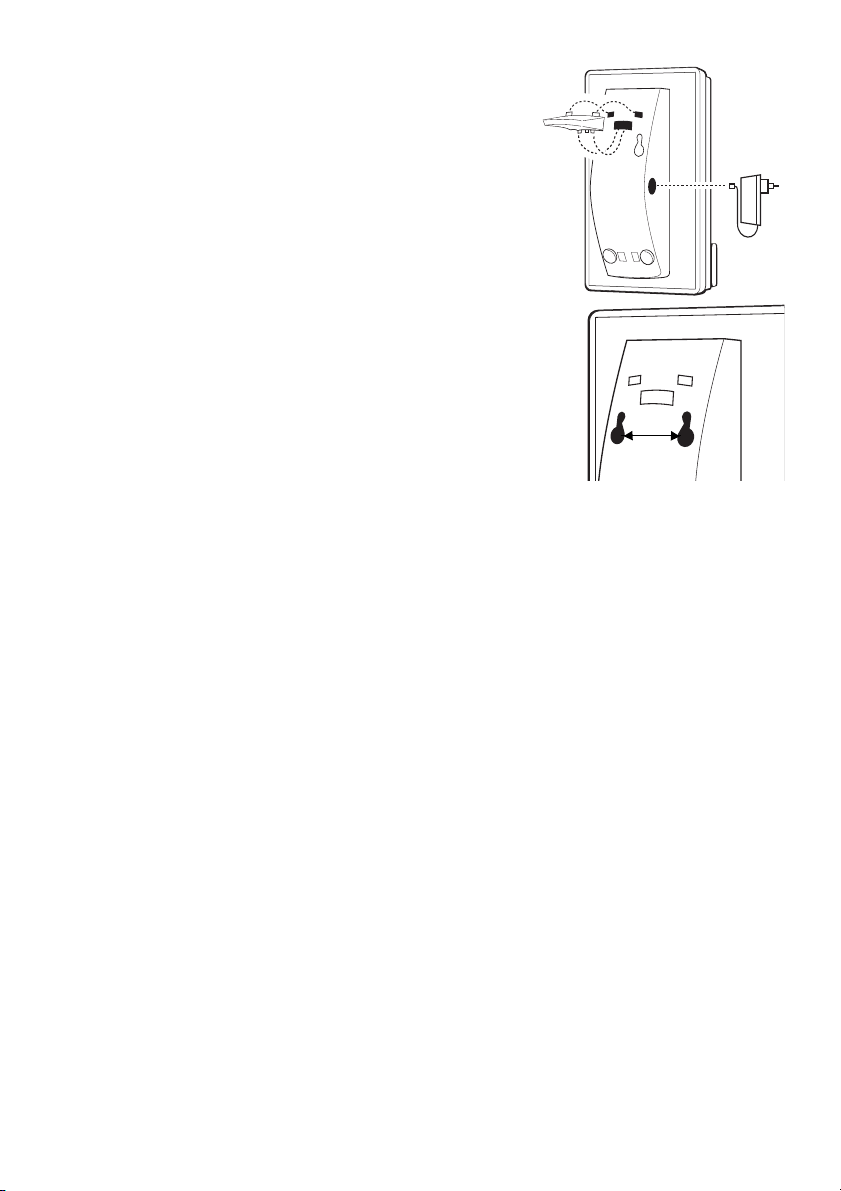
To operate the charger you will
need a mains connection with
230 V alternating current. To
use the charger as a desktop
installation, attach the stand to
the charger by inserting it in
the holes provided at the rear
of the charger, and then slide
it into place.
For a wall installation, install
two screws, max. dia. 4 mm, in
the wall at a distance of 34 mm
from each other. Make sure
that the screw heads protrude
by 2.5 to 3 mm. Finally, hang
the charger on the screws.
Connect the power supply
cable to the connector at the side of the charger, then plug the
AC adapter into the mains socket.
34 mm
Important Battery Information
Note: Only use the battery for its specifically intended purpose. Never use a battery which is damaged or exhausted.
Heat or cold reduce the capacity and life of the battery. The
environmental operating temperature should be between 15
and 25 degrees Celsius. A handset which has a hot or cold
battery can be temporarily out of operation, even if the battery
is fully charged.
Dispose of exhausted batteries in accordance with local authority
regulations. Where possible, hand them in for recycling.
Do not throw the batteries in a fire.
5
Page 8

Charging and
Discharging
The battery can be charged and discharged hundreds of
times. However, a time will come when it has reached the end
of its useful life. If the operating time (i.e. talk and standby
time) is noticeably shorter than normal, then it is time to
replace the battery.
If, for any reason, you do not use the charger for a long
period of time, disconnect it from the power source. Do not
leave the battery in the charger for any period longer than one
week, as over-charging can reduce the life of the battery. If left
unused, a fully charged battery will discharge itself in about
one week at room temperature.
To maintain optimum operating times, you should discharge
the battery from time to time. To discharge the battery, leave
the handset switched on and do not put it in the charger, then
wait until it switches itself off. Do not use any other method for
discharging the battery.
Extreme temperatures affect the battery charging capability.
Charging the Battery
Initial
Operation
Spare Battery
Pack Charging
6
Before you use your handset for the first time, charge the battery for a minimum of 8 hours. This helps to increase the life of
the battery. Regularly place the handset in the charger to
obtain the optimum level of battery charge.
To charge a spare battery, open the cover on the inside of the
charger (1). Place the spare battery in the compartment provided (2), then close the cover (3).
Page 9

Charging and
Operating
Times
Charging time to full capacity (discharged battery): 8 hours
for handset, approx. 24 hours for spare battery in the charger.
During charging, the handset is fully functional.
Talk tim e: approx. 8 hours (with fully charged battery)
Standby time: approx. 80 hours (with fully charged battery)
Charge Display The charge status of the battery is shown by the A icon in the
display. This indicates:
A Battery fully charged
A Battery half charged
a Battery almost empty – left-hand segment flashes
A Battery empty
A Charge status is being determined –
border flashes (e.g. after battery change)
When the handset is in the charger, the flashing segments indicate the charging process.
Charge
Warning
Handset
Registration
When the capacity of the battery is almost empty, you will
receive a warning. If you are not in a conversation, a short
“beep“ sound is produced by the buzzer every minute. During
a conversation, you will hear three short “beep” signals every
minute. You then have approx. five minutes talking time left.
If the battery is nearly empty when you power on the handset,
the display may switch on and off directly after that.
Initial Setup and Operation
Your handset can be operated with a maximum of 10 different
DECT systems. For this to happen, it must be registered with
each DECT system respectively.
Register your handset with a DECT system as described on
page 23.
7
Page 10
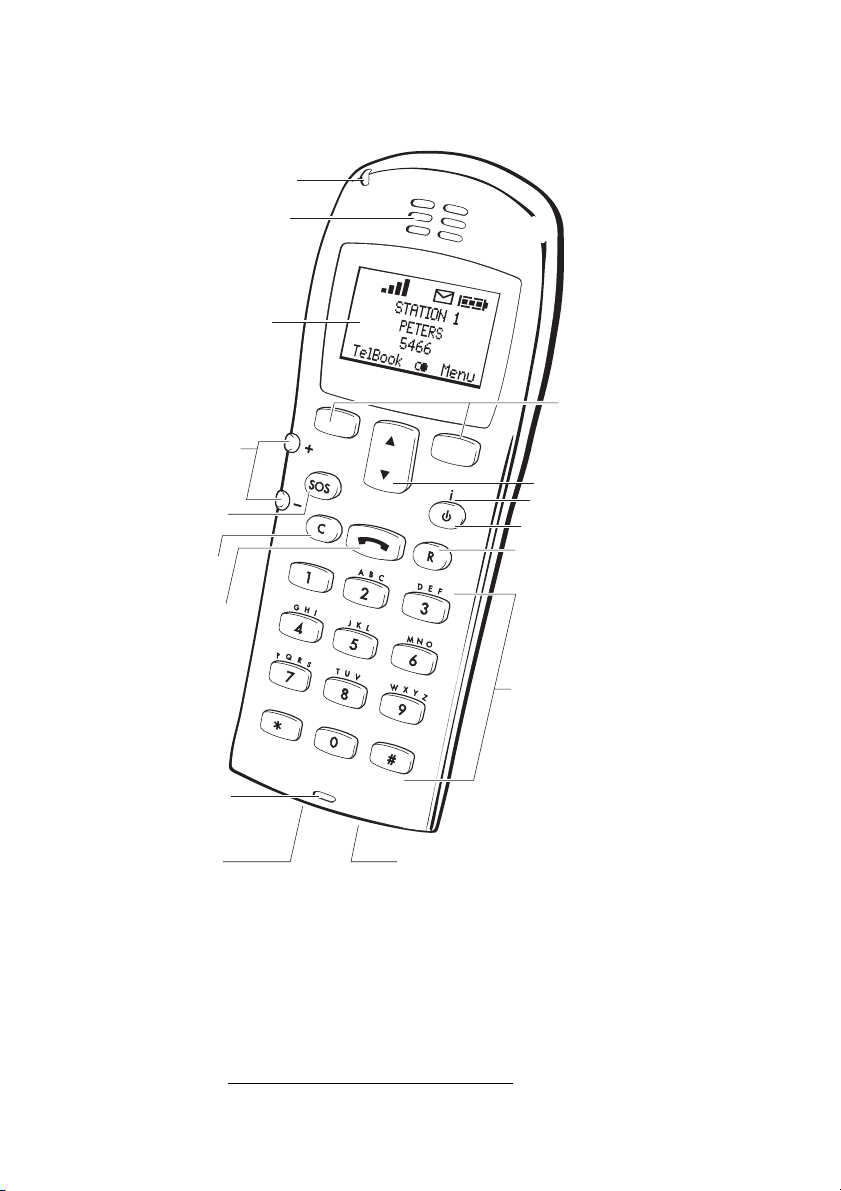
signals calls
and messages
refer to page 9
Adjusts the
volume of received-
telephone number
speech
Dials stored
(emergency)
Cancel or
Delete key
Hook
on/off
Keys and Displays
LED
Earpiece
Display
Softkeys
for the control of
functions and
features
Arrow key (softkey)
for menu
selection
Internal call *
On/Off
R- for recall
Keypad
for the input of digits
and letters
Microphone
for docking station/PC
(in battery)
8
Headset connectionContact
Size:
Height: 154 mm
Width: 57 mm
Depth: 25 mm
Weight:
140 g
*
* This function can not be used if you use your handset
in combination with a PABX.
Page 11
Display
Arrangement
G B H M A
STATION 1
PETERS
5466
TelBook% Menu
Icon line
3 text lines
Softkey line
Icon Line
G Buzzer deactivated
B Good radio signal with at least two columns
Bad radio signal: the left-hand column flashes
H On: Handset in connection
Flashing: Incoming call
M On: One or more not read messages in memory
Flashing: Message memory full
*
*
A Charge status of the battery (refer to page 7)
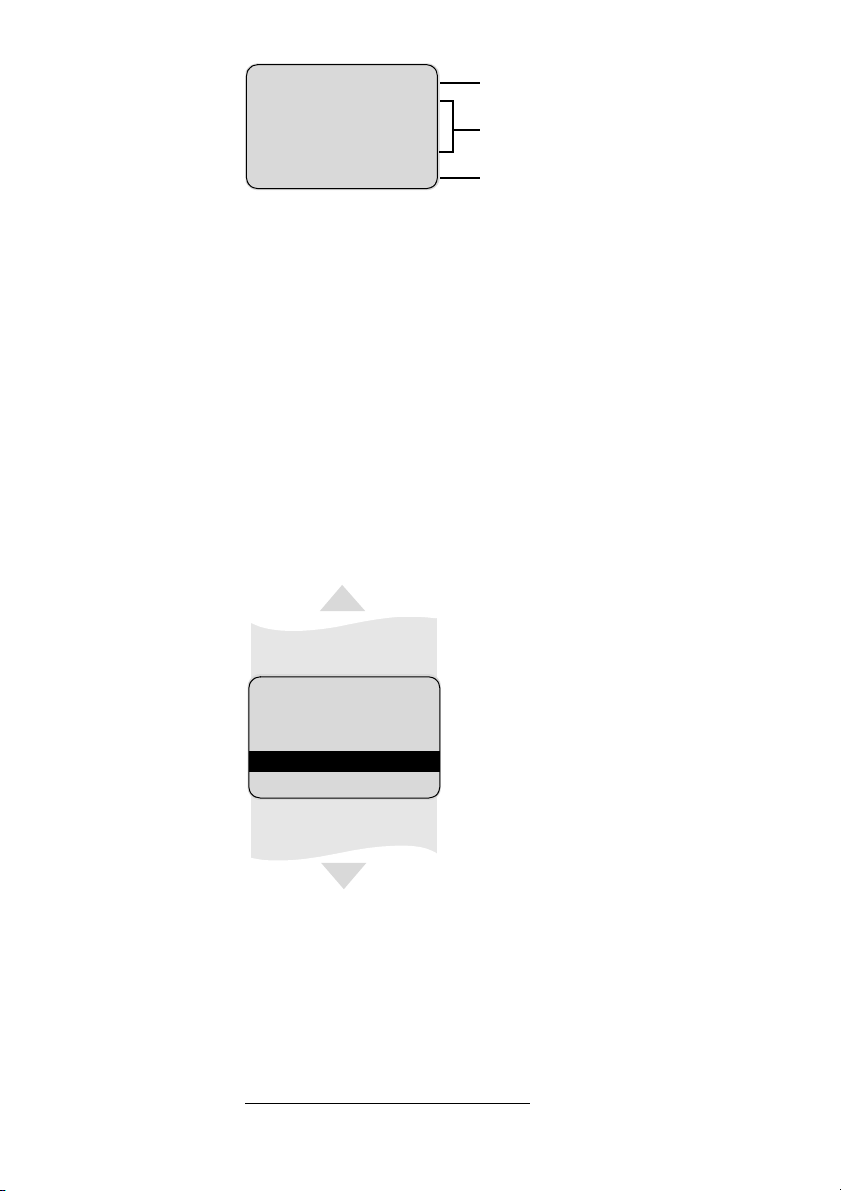
Text Lines The text lines show information related to the current status of a
connection, lists or menu texts. In idle, you will see the system
name, your programmed name and the telephone number of
the handset.
Key Lock
Caller List
G B H M A
Messages
Ringer Settings
Telephone Book
OK > Esc
System
Telephone
Options
Selection lists (e.g. telephone book)
and the features menu are shown in
the display as a three-line excerpt.
Using the arrow key, the lines of
text can be scrolled up or down. A
selectable entry is shown inversely,
with a dark background.
Softkey Line The text and icons in this line correspond to the respective key
below each item. The content of this line changes according to
the operating status.
Illumination The display is automatically illuminated when an incoming call is
received or when you press a key. The display illumination is
automatically extinguished after 10 seconds if no key is pressed.
* Applicable only if this function is supported by your telephone system
9
Page 12

Softkeys and Cancel Key
Softkey: Arrow
Key
G B H M A
MILLER
NEWMAN
PETERS
Search > Next
C
Above the arrow key you will see an icon which indicates the
respective arrow key function:
$ If a continuous text is shown (e. g. message text
display, you can use the arrow key to scroll the text up
or down.
> If a selection list (e. g. TelBook or Menu) is shown in the
display, you can use the arrow key to control the position of the cursor to select the desired entry.
% Enables selection from the redial stack.
< Provides an option to change the left-hand and right-
hand softkey assignment.
& When entering telephone numbers or names, you can
make changes by moving the position of the cursor. The
arrow key moves the cursor to the beginning or to the
end of the entry.
The three coloured keys (including
the arrow key) below the display
are known as softkeys. The functions associated with these keys are
shown in the bottom line of the display. The function of the keys
changes automatically, corresponding to the respective operating state
of the handset.
*
) in the
Softkey: OK Using OK you confirm the selected function.
Softkey: Next Using the right-hand softkey Next you can change the assign-
ment of the left-hand softkey.
Softkey: Esc Using the softkey Esc you can exit the menu displayed. The dis-
play then returns to the options in the previous menu branch or
the current operating status (idle state or status of current connection).
* Applicable only if this function is supported by your telephone system
10
Page 13

Cancel Key c cancels your menu selection, without saving the last entry.
When entering digits/letters, it deletes the last character
respectively. Prolonged pressure on c deletes the complete
entry.
Example: Menu Press Menu. Using the arrow key,
G B H M A
Key Lock
Caller List
Messages
OK > Esc
scroll through the list and select the
desired function with
OK.
C
Example:
Telephone
Book
Example:
Entering a
Telephone
Number
G B H M A
MILLER
NEWMAN
PETERS
Search > Next
C
G B H M A
Enter Number:
1234_
OK & Esc
C
If you have opened the telephone
book (softkey
select a name with the arrow key,
and then start dialling with h.
If you want to edit, delete or make
a new entry, use the softkey
change the function of the left-hand
softkey: You will see a different
function each time you press the
softkey (
Using the arrow key, you can move
the position of the cursor to the
beginning or to the end of the
entry. Additional characters are
always inserted in front of the flashing cursor. Use
entry, c deletes individual characters or the complete entry (c
prolonged pressure).
Delete, New, Edit, Del. All).
TelBook), you can
Next to
OK to confirm your
11
Page 14

Calling
Operating
Procedures
Handset
On/Off
Key Lock
On/Off
Handset
Volume
In the following illustrations, a list of all the functions of the left
and right-hand softkeys is given at the bottom of the display,
which you can choose with the arrow key or softkey
Switch the handset on with I. It can take some seconds before
the handset is completely operational. Switch it off by pressing
I for more than two seconds when the handset is idle.
You can lock the keypad to prevent the inadvertent pressing of
keys: Press softkey
and confirm with OK. To unlock the keypad, enter (as shown in
the display) 1 and #.
When the Key Lock is active, you can answer calls as normal
and use all keys during the call. However, Key Lock is then
reactivated at the end of the call.
You can change the volume of received speech for the handset
with +/-. When the minimum or maximum value is
reached, you will hear a beep.
Menu, use the arrow key to select $Key$Lock$
Muting If the softkey Mute is displayed during a call, you can deacti-
vate the microphone of your handset.
microphone.
UnMute reactivates the
Next.
Making a call Dialling:
12
G B H M A
03061040
&Menu
C
C: You can move the cursor position to the beginning or end
of the telephone number.
Menu activates the Menu list (refer to page 15).
Note: If you dial more than 12 digits, the display automatically
switches to a smaller resolution (max. 24 digits in two lines).
Press h and dial the telephone
number
Pre-dialling:
Enter the telephone number, then
press h.
Correcting an entry in pre-dialling:
c: Deletes the last digit; prolonged pressure deletes the telephone number
Page 15

Making a Call
from the
Redial Stack
G B H M A
MILLER
PETERS
03099887
TelB ook > Menu
C
Pre-dialling:
If you press h for longer than two seconds, the selected
telephone number is entered into dial preparation. Using C
you can switch to the beginning or end of the telephone number and, if required, add digits to the telephone number displayed. To dial, press h. Press c for a long time to
interrupt the dial preparation.
TelBook enters the telephone number in the telephone book
(refer to page 21).
Menu activates the Menu list (refer to page 15).
Selection:
In idle, press the C key (repeatedly,
if necessary). A list appears showing the last 10 telephone numbers
dialled.
Dialling:
Press h, the telephone number
selected is dialled.
Making a Call
from the Tele-
phone Book
G B H M A
ANDREW
BILL
CLOUDE
Search > Next
C
Search allows you to search for an entry by entering a single
letter (refer to page 22 for the keypad assignment). The search
automatically starts after input of the character. If the search
was successful, the entries will be displayed in alphabetical
order. If no entry is found, please press
Next changes the function of the left-hand softkey. The functions
displayed are described on page 20.
Selection: In idle, press the softkey
TelBook. The list is displayed in the
sequence of your programmed
entries. Use the C key to select an
entry.
Dialling: Press h, the telephone
number selected is dialled.
Pre-dialling: If you press h for
longer than two seconds, the
selected telephone number is
entered into dial preparation.
Esc .
13
Page 16

Making a Call
Using the
SOS Key
Press S and a frequently dialled number or an emergency
services number is dialled. You store the telephone number as
described on page 16. The telephone number cannot be
dialled if the Key Lock is active.
Making a Call
from the Caller
List
Answering
aCall
Enquiry Call/
Call Transfer
Your telephone saves the numbers of the last 10 callers in the
Caller List (provided your telephone network transmits the
number). All telephone numbers are saved, irrespective of
whether or not the call was answered.
Using the Caller List, you can call back directly, or enter a telephone number into your telephone book (refer to page 21).
G B H M A
PETERS
Reje ct Menu
C
Reject rejects the call.
Menu activates the Menu list (refer to page 15).
G B H M A
0306104
Recall < Mute
TelB ook Menu
C
Mute/UnMute deactivates/reactivates the microphone of your
handset.
When you receive a call, the telephone number of the caller is
shown in the display (if transmitted). If this telephone number is
also included in your telephone
book, you will see the name of the
caller instead of the number. Press
h to accept the call.
During a connection you can
change the softkey function by
pressing the C-key.
Recall or R holds your first call.
Now dial another telephone
number. Press
to return to the first caller (press
Recall or R repeatedly to speak
alternately with the other parties).
h transfers your first call to the
enquiry call party.
Recall or R again
14
TelBook enters the telephone number in the telephone book
(refer to page 21).
Menu activates the Menu list (refer to page 15).
Page 17

The Menus: Operating Procedures
In this and subsequent sections, all features are activated with
the softkey
given in abbreviated format, which includes:
Abbreviation Z Input of digits or letters
C Operate the arrow key
Menu Text shown in display font represents a softkey
$SOS$Number$ Text shown inversely indicates the
h Operate the hook key
Example Program a SOS telephone number (in the sections that follow,
all operating procedures are shown in the same format).
Menu C $Telephone$Options$ OK C $SOS$Number$ OK Z Tel no . OK c
Menu. The individual operating procedures are
menu option to be selected
G B H M A
System
TelephoneOptions
Security
OK > ESC
G B H M A
Auto Answer
Silent Charging
SOS Number
OK > ESC
G B H M A
Edit Number
427_
OK & Esc
In the example, press
then use the arrow key to select
$Tel.ephone$Options$.
Confirm the selection with the
softkey
OK.
Now use the arrow key to select
$SOS$Number$. Confirm again with
OK.
Now enter the SOS telephone
number. During this task, you can
move the cursor to the first or last
digit entered using the arrow key.
Press c to delete a digit, press
and hold c to delete the com-
Menu first and
plete telephone number. Confirm
your entry with
OK. Use c to exit
the Menu.
Menu Timer If you do not make an input within 45 seconds, the menu will
be left automatically.
15
Page 18

Menu: Telephone Options
You commence all entries in this section by pressing the following softkeys...
Menu C $Telephone$Options$ OK C
Subsequently, select one of the options...
Key Click
On/Off
Immediate
Message
Display
Message
Memory
Overwrite
Automatic Call
Answering
$Key$Click$ OK C $On$ / $Off$ OK c
You can activate/deactivate a key click beep.
$Message$Options$ OK C $Display$ OK C $On$ / $Off$ OK c
You can determine whether normal messages received are
immediately displayed (
$Message$Options$ OK C $Overwrite$ OK
$On$ / $Off$ OK c
C
The message memory contains a maximum of six messages.
You can select whether each additional new message should
delete the oldest message respectively (
message should not be stored in the list (
$Auto$Answer$ OK C $On$ / $Off$ OK c
Your handset will automatically answer an incoming call after
one ring (
matically be disconnected. If you use a headset, you can make
hands-free calls.
On). If the caller hangs up, your connection will auto-
On) or not (Off), see page 25
On), or whether the new
Off), see page 26.
Silent Charging $Silent$Charging$ OK C $On$ / $Off$ OK c
As long as the handset is in the charger you cannot make calls
and the handset will not signal any calls or messages
are signalled and can be made again, as soon as it is removed
from the charger. It can take some seconds until the handset is
completely operational. “Silent Charging” is a useful function,
especially if you place your handset in the charger rack. Note
that your handset is detached from the DECT system if “Silent
Charging” is active.
*
.
*
. Calls
*
Programming
the SOS/Emergency Number
16
$SOS$Number$ OK Z Telephone number OK c
Using this function, you program a frequently dialled or an
emergency telephone number, which you can dial using S.
* Applicable only if this function is supported by your telephone system
Page 19

Changing the
Language
$Language$ OK C $English$ OK c
Use this function to set the desired display language.
Coverage
Warning
$Coverage$Warning$ OK C $On$ /$Off$ OK c
You will hear a warning tone at impending loss of the radio
signal. Set this warning to On or Off, as required.
User Name $User$Name$ OK Z Name OK c
Using this function, you save the name of the telephone user.
This name is displayed when the handset is idle. For further
information on entering letters and characters, refer to page 22.
Charge
Counter
The option $$Charge$Counter$$ can not be used if you use your
handset in combination with a PABX.
Menu: Ringer Settings
You can assign each type of call (internal call, external call,
normal messages
lody. Moreover, you can also specify whether each type of call
is signalled via the buzzer, vibrator and/or the headset
(accessory). All calls are signaled by the LED regardless of the
alert setting.
You commence all entries in this section by pressing the following softkeys...
Menu C $Ringer$Settings$ OK C
Subsequently, select one of the options...
*
, urgent messages*) its own individual me-
Melody:
Internal Call
Melody:
External Call
$Ringer$Melodies$ OK C $Intern$ OK C or Z 0...9 OK c
Select the ring melody for internal calls by entering a digit
0...9 or use C.
$Ringer$Melodies$ OK C $Extern$ OK C or Z 0...9 OK c
Select the ring melody for external calls by entering a digit
0...9 or use C.
* Applicable only if this function is supported by your telephone system
17
Page 20

Melody:
Normal
Message Call
$Ringer$Melodies$ OK C $Normal$Message$ OK
C or Z 0...9 OK c
Select the ring melody for normal messages by entering a digit
0...9 or use C.
*
Melody:
Urgent Mes-
sage Call
Ringer Signal
Off: Silence
Ringer Signal
On: Short
Melody (Chirp)
Ringer Signal
On: Full
Melody
Ringer Signal:
Volume
$Ringer$Melodies$ OK C $Urgent$Message$ OK
C or Z 0...9 OK c
Select the ring melody for urgent messages by entering a digit
0...9 or use C.*
$Ringer$Type$ OK C $Silence$ OK c
This setting allows you to switch off all signalling (buzzer, headset
and vibrator). The bell symbol G appears in the display. To switch
on the call signalling, you have to activate menu point
$Full$Melody$ or $Chirp$ (see next menu points).
$Ringer$Type$ OK C $Chirp$ OK c
This function switches the ringer signal with short melody On
(Chirp). Calls are signaled with only a single ring.
$Ringer$Type$ OK C $Full$Melody$ OK c
This function switches the ringer signal with full melody On.
$Ringer$Volume$ OK C or Z 1...7 OK c
You can change the volume level of the ringer signal (buzzer
and/or headset) by entering a digit 1...7 or use C.
Ringer Signal:
via Buzzer
18
$Ringer$Device$ OK C $Buzzer$ OK C $On$ / $Off$ OK c
This function switches the buzzer On/Off. The bell symbol G
appears in the display when switched off.
* Applicable only if this function is supported by your telephone system
Page 21

Ringer Signal:
in Headset
$Ringer$Device$ OK C $Headset$ OK
C $On$ / $Off$ OK c
This function switches the signalling of the ring melody in the
headset (accessory) On/Off.
Ringer Signal
via Vibrator
Read Only
On/Off
$Ringer$Device$ OK C $Vibrator$ OK
C $On$ / $Off$ OK c
This function switches the vibrator On/Off.
Menu: Security Functions
The Menu: Security functions are protected by a PIN.
Entry of the PIN is only necessary if Read Only is active. In its
delivery state, the PIN is set to 0000. For reasons of security,
when you enter the PIN,
delete digits entered using c. Please consult your system administrator if you have forgotten your PIN.
You commence all entries in this section by pressing the following softkeys...
Menu C $Security$ OK Z Enter PIN C
Subsequently, select one of the options...
$Read$Only$ OK C $On$ / $Off$ OK c
If read only is active, you can still use all features in the Menu.
However, alteration of the settings is not possible.
**** is shown on the display. You can
Changing the
PIN
Resetting the
Handset
$Change$PIN$ OK Z Enter old PIN OK
Enter new PIN OK Z Enter new PIN OK c
Z
For security reasons, you must enter the new PIN twice. The
digits of the PIN are displayed by
$Reset$ OK $Sure?$ OK c
All functions, with the exception of the telephone book, the
PIN and the system registrations are deleted and the handset
is reset to its delivery status.
**** .
19
Page 22

Menu: Caller List
If you receive a call and the telephone number is transmitted,
then it will be entered in your Caller List. If the caller is already
entered in your telephone book, his/her name will appear.
Only the last 10 telephone calling numbers are entered into
the list. Thus, each subsequent telephone number overwrites
the oldest entry. Multiple calls from the same telephone
number are only stored once.
Calling Menu C $Caller$List$ OK C Selection of a telephone number...
Dialling: Press h, the telephone number selected is dialled.
Pre-dialling: Press h for longer than two seconds, the
selected telephone number is entered into dial preparation. If
required, you can add digits (e.g. an area code). Press h
to dial the telephone number.
Delete $Really$Delete?$ OK deletes the entry selected.
TelBook enters the telephone number in the telephone book
(refer to page 21).
20
Menu: Telephone Book Settings
You can store a maximum of 40 telephone numbers and names
in the telephone book.
Note: In the telephone-book list, you must scroll forward or
back between the first and last entry. The list is not in alphabetical order.
If a caller’s name and number was entered in the telephone book
and his/her telephone number was transmitted during a call, then
his/her name appears in the display. Please note: If you operate
your handset from a docking station (Accessories, refer to page
30), the first five entries of the telephone book are related with the
Speed Dialling keys of the docking station. You commence all settings in this section by pressing the following softkeys...
Menu C $Telephone$Book$ OK ...
Page 23

Adding a
New Entry
C select entry position Next Repeatedly until softkey
New
Z Telephone number OK Z Name OK c
Before you press
select an existing entry before which the new entry should
appear. It is not possible to save a telephone number without
an associated name. When entering the name, the keypad is
automatically set to character input (refer to page 22).
New to enter a new entry, use the arrow key to
Deleting an
Entry
Editing an
Entry
Deleting All
Entries
Adding
Numbers to
the Telephone
Book
C select entry Next Repeatedly until softkey
Delete
$Really$Delete?$ OK c
Use the arrow key to select the entry to be deleted, before you
Delete .
press
C select entry Next Repeatedly until softkey
Edit
c Short/long Z New digits OK
c Short/long Z New characters OK c
Use the arrow key to select the entry to be edited, before you
press
Edit . To make a change, you can use the arrow key to
move the position of the cursor to the beginning or to the end
of the entry. Press
name.
Next Repeatedly until softkey Del.All $Really$Delete$All?$ OK c
This function deletes all entries.
You can add any diallable number to your telephone book.
The softkey
the handset status. If you press
is immediately stored in the second-to-last memory location of
the telephone book and treated as a new entry:
TelBook OK Z Name OK
It is not possible to save a telephone number without an associated name. Press
number (refer to page 22). Confirm with
OK if you do not want to edit the number or
TelBook is available for this purpose, depending on
TelBook, the telephone number
OK and allocate a name to the telephone
OK.
21
Page 24

Entering Char-
acters/Names
When entering characters, you can move the position of insertion to the beginning or the end of the entry with the arrow
key.
Registration
Code
Softkey
You can enter the following characters by repeatedly pressing
the respective number keys. The position of insertion is automatically advanced after you enter a new character or if, for a
short period of time, you do not make any input.
Key Character Key Character
1 1?!,.:"‘&()/%- 6 MNO6СЦТУФХШ
2 ABC2ДЕАБГЖЗ 7 PQRS7ß
3 DEF3ÈÉÊË 8 TUV8ÜÙÚÛ
4 GHI4ÌÍÎÏ 9 WXYZ9
5 JKL5 0 0¬(space)
Esc cancels the input of the entry.
Menu: System Settings
Your handset can be operated with a maximum of 10 DECT
systems. Before you can make a call via the DECT system, you
must register the handset with each system respectively. Under
certain circumstances, e.g. overlapping DECT networks, you
will need a Portable Access Rights Key (PARK). You always
need an Authentication Code for registration. Ask your system
administrator for the valid code.
22
You commence all entries in this section by pressing the following softkeys...
Menu C $System$ OK
Subsequently, select one of the options...
Page 25

Registering the
Handset with
the DECT
System
$Subscriptions$ OK Next Repeatedly New
Z PARK OK Z Authentication Code OK
Z System name OK Z Local telephone number OK c
During registration, you must make the following entries:
Enter PARK: You only need to enter the PARK if your handset is
to be operated in a specific DECT system (e.g. in locations
where the radio signals of two DECT systems overlap). If not
necessary, press
Enter Authent. Code: You register your handset with this code.
Enter Name: Enter the name of the DECT system with which you
OK to skip this setting.
are going to be registered. This is always shown when the display is at idle. For entering characters, refer to page 22.
Enter Local Number: Some DECT systems transmit your reserved
telephone number. If this is not the case, you can enter it here
(refer to your system administrator for the telephone number).
Selecting the
DECT System
Automatic
System Search
$Subscriptions$ OK C Select system Next
Repeatedly Select
c
If you have registered the handset with several DECT systems,
you can select which one your handset should use. Use the
arrow key to select the system before you press
$Automatic$Search$ OK C ON / Off OK c
Select .
If you have registered your handset with several DECT systems
and this function is active, then the handset will select one of
the DECT systems automatically. Thus, your handset is automat-
ically “logged-in” to another of your registered DECT systems,
as soon as you move out of the effective range of the current
system.
23
Page 26

Deleting a
System
$Subscriptions$ OK C Select system Next Repeatedly
Delete
$Really$delete?$ OK c
Using this function, you remove your registration to a DECT
system. Consequently, the handset can only be used on this
system again after completion of the registration process. Use
the arrow key to select the system, before you press
Delete .
Editing a
System Name
and Telephone
Number
$Subscriptions$ OK C Select system Next Repeatedly
Edit
Z System name OK Z Local telephone number OK c
You can select a system and then edit the name of the system
and your telephone number.
Handset ID $IPEI$ OK c
You can read the international handset identification (IPEI).
Service
Settings
Under the System Settings menu, you will find the menu option
$Configuration$. This option can not be used if you use your
handset in combination with a PABX.
Menu Shortcuts
Several frequently used menu items can also be activated with
shortcuts, so you do not have to scroll through the menu.
When the handset is idle, press one of the following key combinations within 3 seconds:
Buzzer Off/ On R1 switches the buzzer signalling off. The bell symbol G
appears in the display (refer to page 18);
R2 switches the buzzer signalling back on.
Silent Charging
On; Off
R4 switches on your handset for “Silent Charging”
(page 16),
R3 switches it off.
User Name R5 allows you to change the user name (page 17).
Registering/
Deregistering
24
R6 activates the registration menu (for registering/deregistering the handset with the DECT system, page 23).
Page 27

Messages*
Handsets can send and receive text messages. There are normal
messages and urgent messages; these are signalled to the receiver in different ways. All messages are saved in a list, which can
hold up to six entries. The menu item "Message Memory Overwrite" (page 16) allows you to set the way in which the handset
behaves if more than six messages are received.
Messages can also be sent and received during a connection. Be
aware that an incoming call must be handled before handling an
incoming message.
Normal and urgent messages can be signalled to the user via different melodies and ringer types (see Menu: Ringer Settings).
Messages cannot be sent and received if the handset is switched off, is out of coverage or is in the charger while "silent
charging" is switched on. Also messages can not be received
while an incoming call has not yet been answered (means that
your handset is ringing). When, in general, it is not possible to
deliver a message, the sender will get a audio signal. If a message is received while you are using the menu, the menu action
is interrupted and any unsaved inputs are lost. Also already prepaired telephone numbers and text of an own created message
will be lost at the time of receiving a message.
*
Urgent
Messages
Normal
Messages
Urgent messages are messages which must be acknowledged by
you. If the key lock is on, the receipt of a message temporarily
deactivates the lock so that the receipt can be acknowledged.
When you receive an urgent message, this is indicated immediately by the call LED and the message is shown on the display. If you use the buzzer or the headset you will hear the
melody for urgent messages. The volume of the buzzer signal
will increase until it reaches the maximum. If you receive an
urgent message during a voice call, you will hear an indication tone every ten seconds.
Normal messages are messages which cannot be acknowledged by you. Using the setting "Immediate Message Display"
(page 16), you can choose whether or not you wish to have a
normal message displayed immediately. If the display setting
is switched off when you receive a normal message, the static
M icon is displayed.
* Applicable only if this function is supported by your telephone system
25
Page 28

If you use the buzzer or a headset, you will hear the melody
for normal messages for five seconds. If you receive a normal
message during a call, you will hear a short indication tone.
Acknowledge-
ment of receipt
Message
Memory Full
When you receive an urgent message, you must acknowledge
it. Normal messages, however, cannot be acknowledged.
G B H M A
MEETING HAS BEEN
POSTPONED UNTIL
11:00
OK $ Delete
C
OK acknowledges the receipt of an
urgent message.
Delete acknowledges the receipt of
an urgent message and deletes the
message.
All other keys are blocked until you
acknowledge the message with
OK
or Delete.
G B H M A
10 Mar 98
12:31
PETERS
OK $ Delete
C
C changes the display. You then
*
see the time and date
the message
was sent. The sender’s telephone
number or name is also displayed
(the name only appears if the sender is listed in your telephone
book).
If the message list already contains six entries, whether or not
a received message can be stored depends on the setting of
the menu item "Message Memory Overwrite" (see page 16):
26
If the setting
$Overwrite$ $On$ is active, the oldest message will
be deleted before the new message is stored.
If the setting
$Overwrite$ $Off$ is active, the message will not be
stored.
If the M icon in the display flashes, it means the message
memory is full.
* If this function is not supported by your telephone system or by the sender
you will see question marks instead of the time and no date indication is displayed.
Page 29

Menu: Messages*
Your handset can send and receive text messages that can be
saved in a list containing up to six entries. There are normal
messages and urgent messages; the two types are signalled to
the receiver in different ways (see page 25). The first part of
each message is displayed in the message list. Using the
softkey, you can display the complete message. The following
symbols to the left of the message indicate its status:
\ an urgent message
] a normal message that has been read
[ a normal message that has not been read
# a sent message that has been acknowledged
^ a sent message that has not yet been acknowledged
x a sent message that could not be sent successfully.
You begin all inputs in this chapter by pressing the softkeys...
Menu C $Messages$ OK
Then select...
Read
*
Creating a
New Message
Next repeatedly until you reach the softkey...
c short/long Z new text OK c short/long
New
Z new telephone number OK
$Normal$message$ / $Urgent$message$ OK c
C
If the message list is not full, you can use the
New function and
enter a new text up to a maximum of 48 characters. The key
assignment for entering characters is given on page 22.
After entering your text and pressing
OK, you are shown the
telephone number, which you can change or delete and reenter. After pressing
normal or an urgent one. Pressing
message. If you press
OK again, select whether the message is a
OK after that will send the
ESC the message is not sent but the mes-
sage text is saved in a temporary buffer.
* Applicable only if this function is supported by your telephone system.
27
Page 30

Changing a
Message
Changing text or telephone number:
C moves the cursor to the beginning or end of the text or tele-
phone number; pressing c deletes one character at a time;
prolonged pressure on c deletes the complete entry. The key
assignment for entering characters is given on page 22.
Sending a
Message
Reading a
Message
C select message Next repeatedly until you reach the softkey...
Send
OK OK C $Normal$ / $Urgent$ OK c
If the message list is not full, you can use the
Before pressing
Send, select the desired message using the
Send function.
arrow keys. The complete message is then displayed. If you
wish, you can change the text at this point.
After pressing
OK, you are shown the telephone number to
which the message will be sent (you can change this, too). You
can then choose whether the message to be transmitted is a
normal or an urgent one. The message is sent by pressing
OK a
second time. In the displayed message list, you can see from
the symbols whether the transmission was successful. If you
send an urgent message, the handset waits maximum 60
seconds for an acknowledgement from the receiver. You
cannot send or receive another message during this time.
C select message Read C OK / Delete c
Before pressing
Read, select the desired message using the
arrow keys. The complete message is displayed. You can use
the arrow keys to switch to the time and date the message was
sent. The telephone number or name of the sender is also displayed.
Deleting a
Deleting All
Messages
28
Message
C select message Next repeatedly until you reach the softkey...
Delete
$Really$Delete?$ OK c
Before pressing
Delete, select the desired message using the
arrow keys. After that you delete the message. If you have deleted the message because there was no memory space available
for new messages, the flashing M icon is switched off.
C select message Next repeatedly until you reach the softkey...
Del.All
$Really$Delete$All?$ OK c
This deletes all messages.
Page 31

Accessories
Attaching/
using the
Belt Clip
Install the belt clip on the back side of the handset.
Note: The adapter ring will be fixed permanently to the hand-
set; it cannot be removed again.
Attaching the Adapter:
• Release the round cap by pressing and turning it clockwise
(1) with your thumb and then remove it (2).
• Insert the adapter ring with the fasteners in the opening (3)
and then turn it a quarter-circle counter-clockwise until it
snaps into place (4).
Attaching the Belt Clip
• Press the upper ends of the belt clip together, as illustrated
(5), slide it onto the belt and release the clip ends.
Attaching the Handset to the Clip
• Use the adapter ring to fasten the handset into the belt clip
until it snaps into place (6).
Removing the Handset from the Belt Clip
• Push the release button (7) and pull the handset up out of the
belt clip (8).
29
Page 32

Connecting the
Headset
(optional)
To connect the headset,
insert the plug connector
in the jack located at the
base of the handset.
Once the headset is connected, the microphone
and loudspeaker of the
handset are automatically
deactivated. If you desire,
you can also switch off
the buzzer and activate
signalling via the headset (refer to page 19). Furthermore, it is possible to accept and
answer calls without touching the keypad (refer to page 16).
If there is a switch in the headset cord, you can use this to
answer a call or to release a call.
Docking
Station
(optional)
Using the docking station
(accessory), you can
expand the functionality of
your handset to that of a
desktop terminal. The docking station provides handsfree operation (via loudspeaker and microphone),
Speed Dialling keys,
charging facilities. Provision is also made for the
connection of a headset
and a serial data interface
to your PC.
1: Handsfree key/headset
2: Speed Dialling keys
3: LED shows call status
30
Page 33

Connecting the
Docking Station
Insert the pedestals in the holes provided in the base of the
docking station (1), and slide them into place. Insert the connecting cable of the AC adapter supplied in the jack (2). Plug
the AC adapter into the 230 V mains socket.
If you are using a PC together with the docking station, connect
the V.24 connection jack (3) to a free COM port interface of your
PC (cable supplied). A headset is connected to the jack (4).
Connecting the
Handset
Note Please use the docking station either with a headset or in
Handsfree
Operation
When you place the handset in the charger of the docking station, make sure that the contacts in the charger make correct
contact with those of the handset. If the display lights up briefly
a secure contact is made. Once the handset is placed in the
docking station, you will be able to use all of its functions.
handsfree mode.
Use <to select the loudspeaker. The L icon LED is then illuminated. To make a call, leave the handset in the docking station
and press h. The microphone and loudspeaker are activated. You can now dial a telephone number. If you receive a
call, press h. The loudspeaker and microphone are activated.
The volume of the loudspeaker can be controlled by pressing
the +/- keys on the handset.
Please do not cover the microphone, which is located at the
forward edge of the docking station.
The H LED indicates the connection status.
If you remove the handset from the docking station during a
connection, you will be able to continue your conversation
without any form of interruption.
31
Page 34

Headset
Operation
Use <to select the headset. The K icon LED is then illumi-
nated. Additional handset settings are not necessary. To make
a call, leave the handset in the docking station and press
h. The microphone and earphones of the headset are activated. You can now dial a telephone number.
If you receive a call, press h. The headset is activated.
If there is a switch in the headset cord, you can use this to
answer a call or to release a call.
The H LED indicates the connection status.
You can also connect the headset directly to the handset, if the
handset is not in the docking station.
Speed Dialling
Keys
Operation
with a PC
Charger Rack
(optional)
The first five entries of your telephone book are related with
the keys 1...5.
Press a Speed Dialling Key. The telephone number is dialled.
Refer to the Operating Instructions supplied with the PC software.
The charger rack consists of several chargers. A maximum of
eight handsets and eight spare batteries can be charged simultaneously in the battery compartments.
32
Page 35

Mounting the
Chargers
• Remove the charger pedestals by pushing them in slightly
against the lower catch hook and then lifting them out.
• Remove the protective covers of the charge contacts of the
charger rack by pushing them apart in the direction of the
arrow (1).
Do not touch or deform the contact springs!
• Hang the chargers as shown with their hanger holes on the
bolts (2) and press them straight down until they snap into
place (do not tilt them sideways).
Desktop
Installation
If you use the charger rack on your desktop, you can use the
pedestals (3) included in the delivery and slide them into place
on the back of the rack.
Wall Installation To mount the charger racks on the wall, use the cross-recess
screws (included in the delivery). Using the drilling template
included in the delivery, mark the drill holes (6 mm diameter).
The screw heads should protrude 2-3 mm out of the dowels.
Hang the charger rack on the screws and tighten the screws
through the holes from the front.
Power
Connection
Accessory
Overview:
Connect the power pack (4) to the charger rack and insert it
into the socket (230 V).
• Carrying case with belt clip and transparent protective cover
(keys can be pressed through the cover).
•Belt clip
• Headset
• Charger rack
• Docking station
Only use equipment and accessories approved by the supplier
of your handset. The use of any type, other than that which is
approved, invalidates your right to claim under warranty.
You can order accessories from the supplier of your handset.
33
Page 36

Care and Maintenance
Your telephone is a product of the highest quality design and
workmanship and, therefore, should be treated with care. The
suggestions that follow will help you get the most out this product for a considerable length of time.
Observe all safety precautions on page 3 and on page 4.
These instructions apply similarly for the handset, the charger
and the batteries (the complete telephone), as well as for the
accessories.
Before you clean the telephone, disconnect the charger from
the mains. Wipe it with an anti-static cloth or a soft, lightly
damp leather cloth, then with a dry cloth.
Note: Never spray your telephone with cleaning agent or solvent.
Clean the charging contacts of the handset and the charger
with a lint-free cloth.
Note: Any form of approval or warranty related to this telephone is invalidated if the product is not used for the specific
purpose for which it was designed and in accordance with the
User Guide.
Please contact the Customer Service department of your supplier, if your telephone or one of its accessories does not function correctly.
34
Page 37

Cordless Telephone C922
Quick Reference Guide
Handset
On/Off
Key Lock
On/Off
Making a Call
Making a Call
from the Telephone Book
Making a Call
from the Caller
List
Making a Call
from the Redial
Stack
Answering a
Call
Enquiry Call/
Toggle
= On I Prolonged pressure = Off
I
Menu C $Key$Lock$ OK = On
/ 1 # = Off
h Z
TelBook C h or
TelBook
Menu C $Caller$List$ OK C Tel. no.
Tel. no. or Z Tel. no. h
Search Z Character h
h
Tel. no. h
C
Answer h End
h
Recall or R Z Tel. no. /
with Recall or R Toggle
Call Transfer
Muting
Handset
volume
Buzzer On/Off
Silent Charging On/Off
Change User
Name
Registering/
Deregistering
Enquiry call h
Mute /UnMute
+/-
R1
R4
off; R2 on
on; R3 off
R5
R6
Page 38

Menu
C
Key Lock
OK
12
Caller List
OK
C
hDial
Delete
TelBook
* not applicable
20
Messages
OK
C
Next
Read
Send
New
Delete
Del.ete
27
All
Ringer Melodies
OK
C
Intern OK
Extern OK
Normal
Message OK
Urgent
Message OK
Ringer Type
OK
C
Silence OK
Full
Melody OK
Chirp OK
C
OK
Ringer Settings Telephone Book
OK
17
C
Next
Search
Delete
New
Edit
Del.
All
hDial
Ringer Volume
OK
C
System
OK
Telephone Options
C
Automatic Search OK
Subscriptions OK
Configuration OK
IPEI OK
Ringer Device
OK
C
Buzzer OK
Headset OK
Vibrator OK
OK
C
Key Click OK
Message
Auto
*
Answer OK
Silent
Charging OK
SOS
Number OK
Charge Counter OK
Coverage Warning OK
User
Name OK
Language OK
Security
19
Read-Only OK
Change
PIN OK
Reset OK
162220
Options OK
Cordless Telephone C922
Quick Reference Guide Menu
OK
C
*
 Loading...