

Page 1
ENGLISH
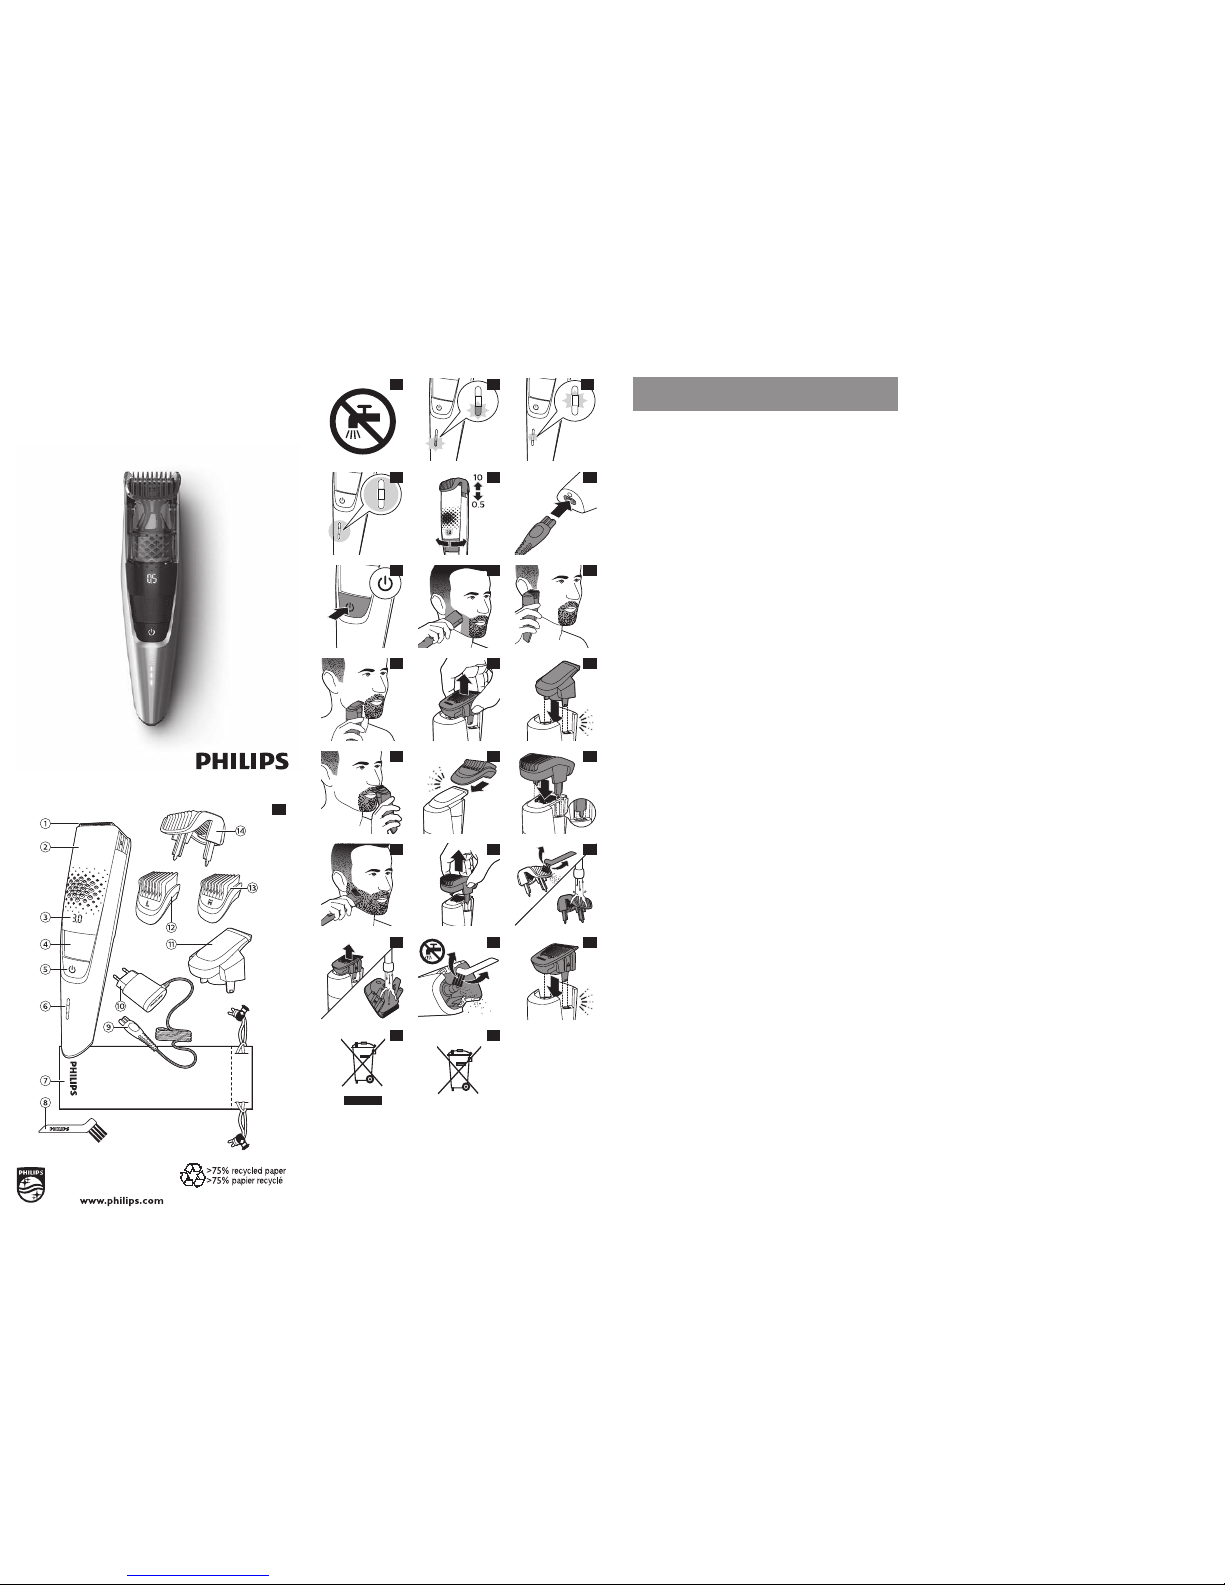
General description (Fig.1)
1 Cutting element
2 Vacuum system
3 Length settings
4 Zoom wheel
5 On/o button
6 Battery status indicator
7 Pouch
8 Cleaning brush
9 Small plug
10 Supply unit (adapter)
11 Precision trimmer
12 Detail comb 5mm (L)
13 Detail comb 3mm (M)
14 Beard and stubble comb
Important safety information
Read this important information
carefully before you use the
appliance and its accessories
and save it for future reference.
The accessories supplied may
vary for dierent products.
Danger
- Keep the supply unit dry (Fig. 2).
Warning
- The supply unit contains a
transformer. Do not cut o
the supply unit to replace
it with another plug, as this
causes a hazardous situation.
- Only charge the appliance
with the supply unit
provided (HQ8505).
- This appliance can be used
by children aged from 8 years
and above and persons with
reduced physical, sensory
or mental capabilities or
lack of experience and
knowledge if they have
been given supervision or
instruction concerning use
of the appliance in a safe
way and understand the
hazards involved. Children
shall not play with the
appliance. Cleaning and user
maintenance shall not be
made by children without
supervision.
- Always check the appliance
before you use it. Do not
use the appliance if it is
damaged, as this may cause
injury. Always replace a
damaged part with one of
the original type.
- Do not open the appliance
to replace the rechargeable
battery.
Caution
- This appliance is not
washable. Never immerse the
appliance in water and do not
rinse it under the tap (Fig. 2).
- Only use this appliance for
its intended purpose as
shown in the user manual.
- For hygienic reasons, the
appliance should only be
used by one person.
- Never use compressed air,
scouring pads, abrasive
cleaning agents or
aggressive liquids such as
petrol or acetone to clean
the appliance.
- Do not use the supply unit
in or near wall sockets that
contain or have contained
an electric air freshener to
prevent irreparable damage
to the supply unit.
Electromagnetic elds (EMF)
- This Philips appliance complies with all
applicable standards and regulations regarding
exposure to electromagnetic elds.
4222.002.8664.1
BT722x
Register your product and get support at
www.philips.com/welcome
1
161514
2
5
8
11
17
20
23
3
6
9
12
18
21
24
4
7
10
13
19
22
Page 2

General
- The appliance is suitable for mains voltages
ranging from 100 to 240 volts.
- The supply unit transforms 100-240 volts to a
safe low voltage of less than 24 volts.
Display
Battery status indications
When the battery is almost empty, the bottom light
ashes orange (Fig. 3).
When the appliance is charging, rst the bottom
charging light ashes white, then the second
charging light (Fig. 4), and so on. When the
battery is fully charged, all lights light up white
continuously (Fig. 5).
Note: The lights switch o automatically after
30 minutes.
Remaining battery capacity
The battery charge is indicated by the lights of the
battery charge indicator that light up continuously.
Hair length indications
The selected hair length setting will show on the
digital display when you select the desired length
setting with the zoom wheel (Fig. 6).
Charging
Charging takes approx. 1 hour. Charge the appliance
before you use it for the rst time and when the
display indicates that the battery is almost empty.
1 Make sure the appliance is switched o.
2 Put the adapter in the wall socket and put the
small plug in the appliance (Fig. 7).
3
After charging, remove the adapter from the wall
socket and pull the small plug out of the appliance.
When the appliance is fully charged, it has a
cordless operating time of up to 80 minutes.
Using the appliance
Note: This appliance can be used without cord
or directly from the power outlet.
You can use this appliance for a stubble and
a short beard. This appliance has an integrated
vacuum system that catches cut beard hair for
a less mess trimming experience.
The vacuum system is activated automatically as
soon as you switch on the appliance.
Note: Switch o and clean the appliance after
each use.
Switching the appliance on and o
Press the on/o button once to switch the
appliance on or o (Fig. 8).
Trimming without comb
- You can use the appliance without beard and
stubble comb to trim hair close to the skin or
to contour the neckline and sideburns. To trim
hair close to the skin, place the at side of the
trimming head against your skin and make
strokes in the desired direction (Fig. 9).
- For contouring hold the trimming head
perpendicular to the skin and move the
trimming head upwards or downwards with
gentle pressure (Fig. 10).
- You can use the precision trimmer to create
ne lines and contours around your facial style,
close to the skin (Fig. 11). Simply pull the cutting
element straight o (Fig. 12) and insert the
precision trimmer (Fig. 13).
Trimming with comb
Note: When you trim for the rst time, start at
the highest length setting to familiarise yourself
with the appliance.
- You can use the beard and stubble comb
attached to the cutting element to groom your
beard and moustache in your preferred style. For
the beard and stubble comb, you can turn the
zoom wheel to choose from 20 length settings
ranging from 0.5mm to 10mm in steps of 0.5mm
(Fig. 6).
- You can use the precision trimmer with a detail
comb attached for precision trimming of your
sideburns, moustache or beard (Fig. 14). This
appliance comes with 2 dierent detail combs:
5mm (L) and 3mm (M).
1 Attach the detail comb (Fig. 15) or the beard
and stubble comb onto the appliance (Fig. 16).
2 Switch on the appliance.
3 To trim most eectively, move the appliance
against the hair growth direction (Fig. 17). Make
sure that the surface of the comb always stays
in contact with the skin.
Cleaning and maintenance
Cleaning the appliance
Note: Only the cutting element and the comb
can be cleaned with water.
We advise you to empty the hair-collection chamber
after each trimming session. When you trim long,
dense beards, it may also be necessary to empty the
hair-collection chamber during the trimming session
in order to maintain optimal suction performance.
1 Switch o the appliance and disconnect it from
the power outlet.
2
Wipe the housing of the appliance with a dry
cloth.
3
Remove the comb (Fig. 18) and clean it with the
cleaning brush and/or rinse it under the tap (Fig. 19).
4 Remove the cutting element and clean it under
the tap (Fig. 20). Shake o excess water and
leave to dry completely.
Caution: Never dry the cutting element with
a towel or tissue, as this may damage the
trimming teeth.
5 Shake and/or brush out the hairs that have
collected in the hair chamber (Fig. 21).
6 After cleaning, reattach the cutting element
(Fig. 22) and comb (Fig. 16) to the appliance.
Recycling
- This symbol means that this product shall not
be disposed of with normal household waste
(2012/19/EU) (Fig. 23).
- This symbol means that this product contains a
built-in rechargeable battery which shall not be
disposed of with normal household waste
(Fig. 24) (2006/66/EC). We strongly advise you
to take your product to an ocial collection
point or a Philips service centre to have a
professional remove the rechargeable battery.
- Follow your country’s rules for the separate
collection of electrical and electronic products
and rechargeable batteries. Correct disposal
helps prevent negative consequences for the
environment and human health.
Guarantee and support
If you need information or support, please visit
www.philips.com/support or read the separate
worldwide guarantee leaet.
DANSK
Generel beskrivelse (g. 1)
1 Skærenhed
2 Sugesystem
3 Længdeindstillinger
4 Zoomhjul
5 On/o-knap
6 Batteristatusindikator
7 Etui
8 Rensebørste
9 Lille stik
10 Strømforsyningsenhed (adapter)
11 Præcisionstrimmer
12 Præcisionskam 5 mm (L)
13 Præcisionskam 3 mm (M)
14 Skæg- og stubbekam
Vigtige
sikkerhedsoplysninger
Læs disse vigtige oplysninger
omhyggeligt igennem, inden
apparatet og tilbehøret tages i
brug, og gem dem til eventuel
senere brug. Det medfølgende
tilbehør kan variere for
forskellige produkter.
Fare
- Hold Strømforsyningsenheden
tør (g. 2).
Advarsel
- Strømforsyningsenheden
indeholder en transformator.
Klip ikke strømforsyningsenheden af og udskift den med et
andet stik, da dette vil føre til
farlige situationer.
- Brug kun den medfølgende
strømforsyningsenhed
(HQ8505) ved opladning af
apparatet.
- Dette apparat må bruges af
børn fra 8 år og opefter og
personer med reducerede
fysiske, sensoriske eller
mentale evner eller
manglende erfaring og viden,
hvis de er blevet instrueret
i sikker brug af apparatet
og forstår de medfølgende
risici. Lad ikke børn lege
med apparatet. Rengøring
og vedligeholdelse må ikke
foretages af børn uden opsyn.
- Kontroller altid apparatet,
inden du anvender det.
Anvend ikke apparatet, hvis
det er beskadiget, da dette kan
forårsage personskade. Udskift
altid en beskadiget del med en
tilsvarende original type.
- Apparatet må ikke åbnes i
forbindelse med udskiftning
af det genopladelige batteri.
Forsigtig
- Dette apparat er ikke
vaskbart. Apparatet må
aldrig lægges ned i vand eller
skylles under vandhanen (g.
2).
- Brug kun apparatet til det
tilsigtede formål som vist i
brugervejledningen.
Page 3

SUOMI
Laitteen osat (kuva 1)
1 Teräyksikkö
2 Imujärjestelmä
3 Pituuden asetukset
4 Zoomausrengas
5 Virtapainike
6 Akun latauksen ilmaisin
7 Pussi
8 Puhdistusharja
9 Pieni liitin
10 Virtalähde (verkkolaite)
11 Tarkkuustrimmeri
12 Tarkkuuskampa 5 mm (L)
13 Tarkkuuskampa 3 mm (M)
14 Parta- ja sänkikampa
Tärkeitä turvallisuustietoja
Lue nämä tärkeät tiedot
huolellisesti ennen laitteen
ja sen lisäosien ensimmäistä
käyttökertaa ja säilytä ne
myöhempää käyttöä varten.
Toimitukseen sisältyvät
lisäosat voivat vaihdella
tuotekohtaisesti.
Vaara
- Suojaa virtalähde
kosteudelta (kuva 2).
Varoitus
- Virtalähteessä on
jännitemuuntaja. Älä
katkaise virtalähteen johtoa
ja vaihda siihen toista
pistoketta, koska tämä
aiheuttaa vaaratilanteen.
- Käytä laitteen lataamiseen
vain mukana toimitettua
virtalähdettä (HQ8505).
- Laitetta voivat käyttää
myös yli 8-vuotiaat lapset
ja henkilöt, joiden fyysinen
tai henkinen toimintakyky
on rajoittunut tai joilla ei
ole kokemusta tai tietoa
laitteen käytöstä, jos heitä on
neuvottu laitteen turvallisesta
3 Det bedste trimmeresultat opnås ved at
bevæge apparatet imod hårenes vækstretning
(g. 17). Sørg for, at kammens overade altid
forbliver i kontakt med huden.
Rengøring og vedligeholdelse
Rengøring af apparatet
Bemærk: Kun skærhoved og kam kan rengøres
med vand.
Vi anbefaler, at du tømmer skægkammeret efter hver
trimning. Når du trimmer langt, kraftigt skæg, kan det
være nødvendigt at tømme skægkammeret i løbet af
trimningen for at bevare den fulde sugeeekt.
1 Sluk for apparatet, og tag stikket ud af
stikkontakten.
2 Tør apparatets ydersider af med en tør klud.
3 Fjern kammen (g. 18), og rengør den med
rensebørsten, og/eller skyl den under
vandhanen (g. 19).
4 Fjern skærenheden, og rengør den under
vandhanen (g. 20). Ryst overskydende vand
af, og lad apparatet tørre helt.
Forsigtig: Skæreenheden må aldrig tørres med
et håndklæde eller en køkkenrulle, da dette
kan beskadige trimmerens tænder.
5 Ryst og/eller børst hårene, der samler sig i
skægkammeret (g. 21), væk.
6 Efter rengøringen skal du sætte skæreenheden
(g. 22) og kammen (g. 16) på apparatet igen.
Genanvendelse
- Dette symbol betyder, at dette produkt ikke
må bortskaes sammen med almindeligt
husholdningsaald (2012/19/EU) (g. 23).
- Dette symbol betyder, at dette produkt
indeholder et indbygget genopladeligt
batteri, som ikke må bortskaes sammen
med almindeligt husholdningsaald (g. 24)
(2006/66/EF). Vi anbefaler på det kraftigste, at du
aeverer produktet på et ocielt indsamlingssted
eller hos en Philips-forhandler, hvor du kan få en
fagmand til at tage det genopladelige batteri ud.
- Følg den nationale lovgivning om særskilt
indsamling af elektriske og elektroniske
produkter og genopladelige batterier. Korrekt
bortskaelse er med til at forhindre negativ
påvirkning af miljøet og menneskers helbred.
Reklamationsret og support
Hvis du har brug for hjælp eller support, bedes du
besøge www.philips.com/support eller læse i den
separate folder „World-Wide Guarantee“.
1 Kontroller, at apparatet er slukket.
2 Sæt adapteren til stikkontakten, og sæt det lille
stik i apparatet (g. 7).
3 Efter opladning skal du tage adapteren ud af
stikkontakten og tage det lille stik ud af apparatet.
Når apparatet er fuldt opladet, har det en
ledningsfri brugstid på op til 80 minutter.
Sådan bruges apparatet
Bemærk: Dette apparat kan bruges uden
ledning eller tilsluttet en stikkontakt.
Du kan bruge dette apparat til skægstubbe og
et kort skæg. Dette apparat har et indbygget
sugesystem, der fange afklippede skæghår, så du
får en renere trimmeoplevelse.
Sugesystemet aktiveres automatisk, når du tænder
apparatet.
Bemærk: Sluk og rengør apparatet efter hver
brug.
Sådan tændes og slukkes apparatet
Tryk på tænd/sluk-knappen én gang for at tænde
eller slukke (g. 8) apparatet.
Trimning uden kam
- Du kan bruge apparatet uden skæg- og
stubbekammen til ekstra kort trimning tæt
mod huden eller for at tilrette nakkehår og
bakkenbarter. Hvis du vil trimme håret tæt
ved huden, skal du placere den ade side af
trimmerhovedet ind mod din hud og bevæge
apparatet i strøg i den ønskede retning (g. 9).
- Hvis du vi lave konturtrimning, skal du holde
trimmerhovedet vinkelret på huden og bevæge
trimmerhovedet opad eller ned ad, mens du
anvender et let tryk (g. 10).
- Præcisions-trimmeren er ideel til ne linjer
og konturer omkring din ansigtsstil konturer
tæt på huden (g. 11). Du skal bare trække
præcisions-skærenheden lige af (g. 12)
og sætte præcisionstrimmeren (g. 13) i.
Trimning med kam
Bemærk: Når du trimmer første gang, skal du
starte med den højeste længdeindstilling for at
gøre dig fortrolig med apparatet.
- Du kan bruge skæg- og stubbekammen sat
på skærenheden til at rette dit skæg eller
overskæg til i din foretrukne stil. For skæg- og
stubbekammen kan du dreje på zoomhjulet og
vælge mellem 20 længdeindstillinger fra 0,5 mm
til 10 mm i trin på 0,5 mm (g. 6).
- Du kan bruge præcisionstrimmeren med
præcisionskammen monterer, når du vil trimme dine
bakkenbarter, dit overskæg eller dit skæg (g. 14)
nøjagtigt. Dette apparat leveres med 2 forskellige
præcisionskamme. 5 mm (L) og 3 mm (M).
1 Sæt præcisionskammen (g. 15) eller skæg- og
stubbekammen på apparatet (g. 16).
2 Tænd for apparatet.
- Af hygiejniske grunde bør
apparatet kun anvendes af
en og samme person.
- Brug aldrig trykluft,
skuresvampe eller skrappe
rengøringsmidler, som f.eks.
benzin, acetone eller lignende,
til rengøring af apparatet.
- Brug ikke strømforsynings-
enheden i eller i nærheden
af stikkontakter, som
indeholder eller har
indeholdt en elektrisk
luftfrisker, for at forhindre
uoprettelig beskadigelse af
strømforsyningsenheden.
Elektromagnetiske felter (EMF)
- Dette Philips-apparat overholder alle
branchens gældende standarder og regler
angående eksponering for elektromagnetiske
felter.
Generelt
- Apparatet kan tilsluttes netspændinger mellem
100 og 240 V.
- Strømforsyningsenheden omformer 100-240 Volt
til en lav sikkerhedsspænding under 24 Volt.
Display
Batteristatusindikatorer
Når batteriet næsten er tomt, blinker den nederste
indikator orange (g. 3).
Når apparatet oplader, blinker først den nederste
opladningsindikator hvidt, hvorefter den næste
opladningsindikator (g. 4) og så videre. Når
batteriet er fuldt opladet, lyser alle indikatorer for
batteriniveau konstant (g. 5) hvidt.
Bemærk: Lyset slukker automatisk efter
30 minutter.
Resterende batterikapacitet
Den resterende batterikapacitet angives af
lysdioderne i batteriopladningsindikatoren, der lyser
konstant.
Indikatorer for hårlængde
Den valgte hårlængdeindstilling vises på det
digitale display, når du vælger den ønskede
længdeindstilling med zoomhjulet (g. 6).
Opladning
En fuld opladning tager ca. 1 time. Oplad
apparatet, før du bruger det første gang, og når
displayet viser, at batteriet næsten er tomt.
Page 4

5 Poista säiliöön (kuva 21) kertyneet partakarvat
ravistamalla tai harjaamalla.
6
Puhdistuksen jälkeen kiinnitä teräyksikkö (kuva 22)
ja kampa (kuva 16) laitteeseen.
Kierrätys
- Tämä merkki tarkoittaa sitä, että tätä tuotetta ei
saa hävittää tavallisen kotitalousjätteen mukana
(2012/19/EU) (kuva 23).
- Tämä merkki tarkoittaa, että tuote sisältää
kiinteän ladattavan akun, jota ei saa hävittää
tavallisen kotitalousjätteen (kuva 24) mukana
(2006/66/EY). Suosittelemme, että viet laitteen
viralliseen keräyspisteeseen tai Philipsin
valtuuttamaan huoltoliikkeeseen, jossa
ammattilaiset irrottavat ladattavan akun.
- Noudata oman maasi sähkö- ja elektroniikka-
laitteiden sekä akkujen ja paristojen kierrätystä ja
hävittämistä koskevia sääntöjä. Asianmukainen
hävittäminen auttaa ehkäisemään ympäristölle ja
ihmisille koituvia haittavaikutuksia.
Takuu ja tuki
Jos haluat tukea tai lisätietoja, käy Philipsin
verkkosivuilla osoitteessa www.philips.
com/support tai lue erillinen kansainvälinen
takuulehtinen.
NORSK
Generell beskrivelse (g. 1)
1 Klippeelement
2 Vakuumsystem
3 Lengdeinnstillinger
4 Zoomhjul
5 Av/på-knapp
6 Batteristatusindikator
7 Etui
8 Rengjøringsbørste
9 Liten kontakt
10 Forsyningsenhet (adapter)
11 Presisjonstrimmer
12 Detaljkam 5 mm (L)
13 Detaljkam 3 mm (M)
14 Skjegg- og skjeggstubbkam
Viktig sikkerhetsinformasjon
Les denne viktige informasjonen
nøye før du bruker apparatet
og tilbehøret, og ta vare på den
for senere referanse. Tilbehøret
som følger med, kan variere for
de ulike produktene.
Fare
- Hold strømadapteren tørr
(Fig. 2).
Laitteen virran kytkeminen ja katkaiseminen
Kytke tai katkaise (kuva 8) laite virta painamalla
virtapainiketta kerran.
Käyttö ilman ohjauskampaa
- Ilman parta- ja sänkikampaa laitteella voi
trimmata parran hyvin lyhyeksi tai muotoilla
kaulan rajoja ja pulisonkeja. Jos trimmaat läheltä
ihoa, aseta ajopään litteä puoli ihoa vasten ja
liikuta laitetta haluttuun suuntaan (kuva 9).
- Muotoillessasi pidä laitetta siten, että ajopää on
ihoa vasten, ja liikuta ajopäätä ylös- tai alaspäin
kevyesti painaen (kuva 10).
- Tarkkuustrimmerillä voit luoda tarkan rajan
lähelle ihoa (kuva 11). Vedä teräosa suoraan irti
(kuva 12) ja aseta tarkkuustrimmeri (kuva 13).
Käyttö ohjauskammalla
Huomautus: Kun käytät laitetta ensimmäistä
kertaa, totuttele sen ominaisuuksiin käyttämällä
suurinta asetusta.
- Voit käyttää parta- ja sänkikampaa
leikkauspäässä, kun siistit partaa ja viiksiä.
Valittavanasi on 20 leikkausasetusta 0,5 ja 10
mm:n väliltä 0,5 mm (kuva 6):n askelin, kun
käytät parta- ja sänkikampaa.
- Voit käyttää tarkkuustrimmeriä ja tarkkuuskampaa,
kun trimmaat pulisonkeja, viiksiä tai partaa (kuva
14). Laitteen mukana toimitetaan 2 ohjauskampaa:
5 mm (L) ja 3 mm (M).
1 Kiinnitä tarkkuuskampa (kuva 15) tai parta- ja
sänkikampa laitteeseen (kuva 16).
2 Käynnistä laite.
3 Parhaiten trimmaaminen onnistuu liikuttamalla
laitetta partakarvojen kasvusuuntaa (kuva 17)
vastaan. Varmista, että ohjauskampa koskettaa
ihoa koko ajan.
Puhdistus ja huolto
Laitteen puhdistaminen
Huomautus: Vain teräyksikön ja kamman voi
puhdistaa vedellä.
Saat parhaan tuloksen, kun tyhjennät
partakarvasäiliön aina käytön jälkeen.
Kun leikataan pitkää, tuuheaa partaa,
partakarvakammio on ehkä tyhjennettävä välillä
käytön aikana, jotta imuteho säilyy hyvänä
1 Katkaise laitteesta virta ja irrota virtajohto
pistorasiasta.
2 Puhdista laitteen ulkopuoli kuivalla liinalla.
3 Irrota kampa (kuva 18) ja puhdista se harjalla tai
huuhtele se juoksevalla vedellä (kuva 19).
4 Irrota teräyksikkö ja huuhtele se hanan (kuva 20)
alla. Ravistele vesi pois ja anna laitteen kuivua
täysin.
Varoitus: Älä kuivaa terää pyyheliinalla tai
paperipyyhkeellä, sillä se saattaa vahingoittaa
trimmerin sakaroita.
- Älä käytä paineilmaa,
naarmuttavia tai syövyttäviä
puhdistusaineita tai
-välineitä (kuten bensiiniä
tai asetonia) laitteen
puhdistamiseen.
Sähkömagneettiset kentät (EMF)
- Tämä laite (Philips) vastaa kaikkia
sähkömagneettisille kentille (EMF) altistumista
koskevia standardeja ja säännöksiä.
Yleistä
- Laite soveltuu 100–240 voltin verkkojännitteelle.
- Virtalähde muuttaa 100–240 voltin jännitteen
turvalliseksi alle 24 voltin jännitteeksi.
Näyttö
Akun tilan ilmaisimet
Kun akku on lähes tyhjä, alin latausvalo vilkkuu
oranssina (kuva 3).
Kun laite latautuu, ensin vilkkuu alin latausvalo
valkoisena, seuraavaksi toinen latausvalo (kuva 4)
ja niin edelleen. Kun akku on ladattu täyteen, kaikki
latausvalot palavat (kuva 5) valkoisina.
Huomautus: Merkkivalot sammuvat
automaattisesti 30 minuutin kuluttua.
Akun jäljellä oleva varaus
Akun latauksen ilmaisimen yhtäjaksoisesti palavat
merkkivalot osoittavat akun jäljellä olevan varauksen.
Partakarvan pituuden osoittimet
Valittu leikkauspituus näkyy digitaalinäytössä, kun
valitset leikkauspituutta zoomausrenkaalla (kuva 6).
Lataaminen
Lataus kestää noin tunnin. Lataa laite ennen
ensimmäistä käyttökertaa tai, kun näytön
varauslukemat osoittavat, että akku on lähes tyhjä.
1 Varmista, että laitteesta on katkaistu virta.
2 Kytke verkkolaite pistorasiaan ja työnnä pieni
liitin laitteeseen (kuva 7).
3 Irrota lataamisen jälkeen verkkolaite
pistorasiasta ja pieni liitin laitteesta.
Kun akku on ladattu täyteen, sitä voi käyttää
enintään 80 minuuttia ilman johtoa.
Käyttö
Huomautus: Tätä laitetta voi käyttää sekä ilman
johtoa että suoraan verkkovirralla.
Voit käyttää tätä laitetta hyvin lyhyeen ja lyhyeen
partaan. Laitteessa on integroitu imujärjestelmä,
joka imee leikatun partakarvan pitäen ympäristön
siistinä.
Imujärjestelmä aktivoituu heti, kun kytket
laitteeseen virran.
Huomautus: Katkaise laitteesta virta ja puhdista
laite jokaisen käytön jälkeen.
käytöstä tai tarjolla on
turvallisen käytön edellyttämä
valvonta ja jos he ymmärtävät
laitteeseen liittyvät vaarat.
Lasten ei pidä leikkiä laitteella.
Lasten ei saa antaa puhdistaa
tai huoltaa laitetta ilman
valvontaa.
- Tarkista laite aina ennen
kuin käytät sitä. Älä
käytä laitetta, jos se on
vaurioitunut, koska sen
käyttö saattaa tällöin
aiheuttaa vammoja.
Vaihda vahingoittuneen
osan tilalle aina alkuperäisen
tyyppinen osa.
- Älä avaa laitetta akun
vaihtamista varten.
Varoitus
- Tätä laitetta ei voi pestä.
Älä koskaan upota sitä
veteen äläkä huuhtele sitä
vesihanan alla (kuva 2).
- Käytä tätä laitetta vain
tarkoituksenmukaisesti
käyttöoppaassa esitetyllä
tavalla.
- Hygieniasyistä laitetta
suositellaan vain yhden
henkilön käyttöön.
- Älä käytä virtalähdettä
sellaisissa pistorasioissa tai
sellaisten pistorasioiden
lähellä, joissa on tai joissa on
ollut sähköisiä ilmanraikastimia,
sillä virtalähde voi vahingoittua
pysyvästi.
Page 5

Vi anbefaler at du tømmer hårkammeret etter hver
trimmeøkt. Når du trimmer langt, tett skjegg, kan det
også være nødvendig å tømme hårkammeret under
trimmeøkten for å opprettholde optimal sugeeekt.
1 Slå av apparatet, og koble det fra stikkontakten.
2 Tørk av utsiden av apparatet med en tørr klut.
3 Fjern kammen (Fig. 18) og rengjør den med
rengjøringsbørsten og/eller skyll den under
springen (Fig. 19).
4 Fjern klippeelementet og rengjør det under
springen (Fig. 20). Rist av overødig vann og la
apparatet tørke helt.
Forsiktig: Tørk aldri klippeelementet med
et håndkle eller tørkepapir. Det kan skade
tennene på trimmeren.
5 Rist og/eller børst ut hårene som har samlet seg
i hårkammeret (Fig. 21).
6 Etter rengjøring setter du på igjen
klippeelementet (Fig. 22) og kammen (Fig. 16)
på apparatet.
Resirkulering
- Dette symbolet betyr at dette produktet ikke må
avhendes i vanlig husholdningsavfall (2012/19/EU)
(Fig. 23).
- Dette symbolet betyr at dette produktet
inneholder et innebygd oppladbart batteri som
ikke skal kastes i vanlig husholdningsavfall
(Fig. 24) (2006/66/EC). Vi anbefaler deg å ta
med produktet til et oentlig innsamlingssted
eller til et Philips-servicesenter, slik at det
oppladbare batteriet kan fjernes av en faglært.
- Følg nasjonale bestemmelser om
avfallsdeponering av elektriske og elektroniske
produkter samt oppladbare batterier. Riktig
avfallshåndtering bidrar til å forhindre negative
konsekvenser for helse og miljø.
Garanti og støtte
Hvis du trenger informasjon eller hjelp, kan du
gå til www.philips.com/support eller lese det
medfølgende garantiheftet med global gyldighet.
SVENSKA
Allmän beskrivning (bild 1)
1 Trimsax
2 Vakuumsystem
3 Längdinställningar
4 Zoomhjul
5 På/av-knapp
6 Indikator för batteristatus
7 Fodral
8 Rengöringsborste
9 Liten kontakt
10 Strömförsörjningsenhet (adapter)
11 Precisionstrimmer
12 Tillbehörskam 5 mm (L)
13 Tillbehörskam 3 mm (M)
14 Skägg- och stubbkam
Bruke apparatet
Merk: Dette apparatet kan brukes uten ledning
eller direkte fra stikkontakten.
Du kan bruke dette apparatet for skjeggstubber og
et kort skjegg. Dette apparatet har et integrert
vakuumsystem som fanger klippet skjegghår
for mindre sølete trimming.
Vakuumsystemet aktiveres automatisk når du slår
på apparatet.
Merk: Slå av og rengjør apparatet etter hver
gangs bruk.
Slå apparatet av eller på
Trykk på av/på-knappen én gang for å slå
apparatet på eller av (Fig. 8).
Trimming uten kam
- Du kan bruke apparatet uten skjegg- og
skjeggstubbkammen for å trimme håret kort
eller for å trimme nakkehårene og kinnskjegget.
Du trimmer hår nær huden ved å plassere den
ate siden av trimmehodet mot huden og gjøre
bevegelser i ønsket retning (Fig. 9).
- For konturering holder du trimmehodet vinkelrett
i forhold til huden og ytter trimmehodet oppover
eller nedover med varsomt trykk (Fig. 10).
- Du kan bruke presisjonstrimmeren til å skape ne
linjer og konturer rundt hårfasongen, nær huden
(Fig. 11). Dra ganske enkelt klippeelementet rett av
(Fig. 12) og sett inn presisjonstrimmeren (Fig. 13).
Trimming med kammen
Merk: Når du trimmer for første gang, begynner
du med den høyeste lengdeinnstillingen, slik at
du blir kjent med apparatet.
- Du kan bruke skjegg- og skjeggstubbkammen
festet til klippeelementet for å stelle skjegget
og barten i ønsket stil. For skjegg- og
skjeggstubbkammen kan du rotere zoomhjulet
for å velge blant 20 lengdeinnstillinger fra
0,5 mm til 10 mm i trinn på 0,5 mm (Fig. 6).
- Du kan bruke presisjonstrimmeren med en
detaljkam festet til presisjonstrimming av
kinnskjegget, barten eller skjegget (Fig. 14).
Dette apparatet leveres med to ulike
detaljkammer: 5 mm (L) og 3 mm (M).
1 Fest detaljkammen (Fig. 15) eller skjegg- og
skjeggstubbkammen på apparatet (Fig. 16).
2 Slå på apparatet.
3 Du trimmer mest eektivt ved å bevege
apparatet mot hårets vekstretning (Fig. 17).
Kontroller at overaten på kammen alltid er
i kontakt med huden.
Rengjøring og vedlikehold
Rengjøre apparatet
Merk: Bare klippeelementet og kammen kan
rengjøres med vann.
- Apparatet bør bare brukes
av én person av hygieniske
årsaker.
- For å unngå skader som ikke
kan repareres, skal du ikke
bruke strømadapteren i eller
i nærheten av vegguttak som
inneholder eller har inneholdt
elektriske luftfriskere.
- Ikke bruk trykkluft,
skurebørster, skuremidler
eller væsker som bensin
eller aceton for å rengjøre
apparatet.
Elektromagnetiske felt (EMF)
- Dette Philips-apparatet overholder alle aktuelle
standarder og forskrifter for eksponering for
elektromagnetiske felt.
Generelt
- Apparatet kan brukes med nettspenninger fra
100 til 240 volt.
- Strømadapteren omformer 100–240 V til en
sikker lavspenning på under 24 V.
Skjerm
Indikatorer for batteristatus
Når batteriet nesten er tomt for strøm, blinker den
nederste lampen oransje (Fig. 3).
Når apparatet lades, blinker først den nederste
ladelampen hvitt. Deretter blinker den andre
lampen (Fig. 4), og så videre. Når batteriet er
fulladet,
lyser alle lampene kontinuerlig (Fig. 5) hvitt.
Merk: Lampen slukkes automatisk etter
30 minutter.
Gjenværende batterikapasitet.
Den gjenværende batterikapasiteten vises ved at
lysene på batterinivåindikatoren lyser kontinuerlig.
Indikasjoner for hårlengde
Den valgte hårlengdeinnstillingen vises på
det digitale displayet når du velger ønsket
lengdeinnstilling med zoomhjulet (Fig. 6).
Lading
Charging takes approx. 1 hour. Du må lade
apparatet før du bruker det for første gang, og når
displayet viser at batteriet nesten er tomt for strøm.
1 Make sure the appliance is switched o.
2 Sett adapteren i vegguttaket og sett den lille
kontakten i apparatet (Fig. 7).
3
Etter ladingen trekker du ut adapteren fra
stikkontakten, og den lille kontakten ut av apparatet.
Når apparatet er fulladet, har det en trådløs
driftstid på opptil 80 minutter.
Advarsel
- Strømadapteren inneholder
en omformer. Ikke skjær av
strømadapteren for å erstatte
den med et annet støpsel.
Da kan det oppstå en farlig
situasjon.
- Lad kun opp apparatet med
strømadapteren som følger
med (HQ8505).
- Dette apparatet kan brukes
av barn over 8 år og av
personer med nedsatt
sanseevne eller fysisk eller
psykisk funksjonsevne, eller
personer med manglende
erfaring eller kunnskap, hvis
de får instruksjoner om sikker
bruk av apparatet eller tilsyn
som sikrer sikker bruk, og hvis
de er klar over risikoen. Barn
skal ikke leke med apparatet.
Barn skal ikke rengjøre eller
vedlikeholde apparatet uten
tilsyn.
- Sjekk alltid apparatet før
du bruker det. Ikke bruk
apparatet hvis det er
skadet, da dette kan føre til
personskade. Bytt alltid ut en
ødelagt del med tilsvarende
originaldel.
- Ikke prøv å åpne apparatet
for å bytte det oppladbare
batteriet.
Forsiktig
- Dette apparatet kan ikke
vaskes. Apparatet må aldri
senkes ned i vann eller skylles
under springen (Fig. 2).
- Bruk bare dette apparatet til
beregnet formål som vist i
brukerhåndboken.
Page 6

- Du kan använda skägg- och stubbtillbehöret
på trimsaxen när du vill trimma ditt skägg
och mustasch i din egen stil. För skägg- och
stubbkammen kan du använda zoomhjulet för
att välja bland 20 längdinställningar från 0,5
mm till 10 mm i steg om 0,5 mm (Bild 6).
- Du kan använda precisionstrimmern med en
tillbehörskam om du vill precisionstrimma
polisongerna, mustaschen eller skägget (Bild
14). Den här apparaten levereras med två
tillbehörskammar: 5 mm (L) och 3 mm (M).
1 Sätt fast tillbehörskammen (Bild 15) eller skägg-
och stubbkammen på apparaten (Bild 16).
2 Slå på apparaten.
3 Trimma på bästa sätt genom att föra trimmern
mot hårets växtriktning (Bild 17). Se till att
kammens yta alltid kommer i kontakt med
huden.
Rengöring och underhåll
Rengöring av apparaten
Obs! Endast trimsaxen och kammen kan
rengöras med vatten.
Vi rekommenderar att du tömmer
håruppsamlingsbehållaren efter varje
trimningstillfälle. Om du klipper ett långt,
tätt skägg behöver du eventuellt tömma
håruppsamlingsbehållaren under själva trimningen
för att bibehålla optimal uppsugningsprestanda.
1 Stäng av rakapparaten och dra ur nätsladden.
2 Torka av apparatens hölje med en fuktig trasa.
3 Ta bort kammen (Bild 18) och rengör den med
hjälp av borsten och/eller skölj den under
kranen (Bild 19).
4 Ta bort trimsaxen och rengör den under kranen
(Bild 20). Skaka av överödigt vatten och låt
apparaten torka helt.
Varning! Torka aldrig av trimsaxen med en
handduk eller papper, eftersom det kan skada
trimningständerna.
5 Skaka och/eller borsta bort håren som har
samlats upp i hårbehållaren (Bild 21).
6 Sätt tillbaka trimsaxen (Bild 22) och kammen
(Bild 16) på apparaten efter rengöringen.
Återvinning
- Den här symbolen betyder att produkten inte
ska slängas bland hushållssoporna (2012/19/EU)
(Bild 23).
- Den här symbolen betyder att produkten
innehåller inbyggda laddningsbara batterier och
därför inte får kasseras i vanliga hushållssopor
(Bild 24) (enligt EG-direktivet 2006/66/EG). Vi
rekommenderar att du lämnar produkten till en
lokal återvinningsstation eller till ett auktoriserat
Philips-servicecenter för att de laddningsbara
batterierna ska tas om hand på korrekt sätt.
- Följ ditt lands regler för återvinning av elektriska
och elektroniska produkter samt uppladdningsbara
batterier. En korrekt hantering bidrar till att
förhindra negativ påverkan på miljö och hälsa
.
Återstående batterikapacitet
Den återstående batterikapaciteten indikeras av
batteriladdningsindikatorns lampor som lyser med
fast sken.
Indikatorer för hårlängd
Den valda hårlängdsinställningen visas på
den digitala displayen om du väljer önskad
längdinställning med hjälp av zoomhjulet (Bild 6).
Laddning
Laddningen tar ungefär 1 timme. Ladda apparaten
innan du använder den för första gången och när
teckenfönstret visar att batteriet nästan är tomt.
1 Kontrollera att apparaten är avstängd.
2 Anslut adaptern till vägguttaget och sätt i den
lilla kontakten i apparaten (Bild 7).
3 Dra ur adaptern ur vägguttaget efter laddning
och lossa den lilla kontakten från apparaten.
När apparaten är fulladdad har den en sladdlös
drifttid på upp till 80 minuter.
Använda apparaten
Obs! Den här apparaten kan användas sladdlöst
eller direkt från ellutaget.
Du kan använda den här apparaten till stubb och
ett kort skägg. Den här apparaten har ett
inbyggt vakuumsystem som samlar upp avklippt
skägghår så att trimupplevelsen blir mindre stökig.
Vakuumsystemet aktiveras automatiskt direkt när
du sätter på apparaten.
Obs! Stäng av och rengör apparaten efter varje
användningstillfälle.
Sätta på och stänga av apparaten
Tryck på på/av-knappen en gång för att sätta på
eller stänga av (Bild 8) apparaten.
Trimma utan kam
- Du kan använda apparaten utan skägg- och
stubbkammen när du trimmar hår nära huden
eller när du konturklipper hår i nacken eller
polisongerna. När du vill trimma hår nära huden
ska du placera den platta sidan av trimhuvudet
mot huden och sedan föra den i önskad riktning
(Bild 9).
- Vid konturklippning ska du hålla trimhuvudet
vinkelrätt mot huden och föra trimhuvudet
uppåt eller nedåt och trycka (Bild 10) försiktigt.
- Du kan använda precisionstrimmern till
att forma na linjer och konturer runt din
ansiktsbehåring, nära huden (Bild 11). Dra helt
enkelt loss trimsaxen rakt av (Bild 12) och sätt
fast precisionstrimmern (Bild 13).
Trimma med kam
Obs! När du trimmar första gången ska du börja
med den högsta inställningen så att du kan
bekanta dig med apparaten.
- Öppna inte apparaten för att
byta ut det laddningsbara
batteriet.
Varning!
- Den här apparaten är inte
tvättbar. Sänk aldrig ned
apparaten i vatten och skölj
den inte under kranen (Bild 2).
- Använd endast apparaten
för de ändamål som framgår
av användarhandboken.
- Av hygieniska skäl bör
apparaten endast användas
av en person.
- Använd inte strömförsörj-
ningsenheten i eller nära
vägguttag där det nns eller
har funnits en elektrisk luftrenare eftersom detta kan ge
upphov till permanenta skador på strömförsörjningsenheten.
- Använd aldrig tryckluft,
skursvampar, slipande
rengöringsmedel eller vätskor
som bensin eller aceton för
att rengöra enheten.
Elektromagnetiska fält (EMF)
- Den här Philips-apparaten uppfyller alla
tillämpliga standarder och regler gällande
exponering av elektromagnetiska fält.
Allmänt
- Apparaten är avsedd för nätspänningar på
100–240 volt.
- Strömförsörjningsenheten omvandlar 100–
240 V till en säker låg spänning under 24 V.
Teckenfönster
Batteristatusindikatorer
När batteriet nästan är tomt blinkar den nedersta
lampan orange (Bild 3).
När apparaten laddas blinkar först den nedre
laddningslampan vitt och sedan den andra
laddningslampan (Bild 4) och så vidare. När
batteriet är fulladdat lyser alla laddningslamporna
med ett fast vitt sken (Bild 5).
Obs! Lamporna släcks automatiskt efter
30 minuter.
Viktig säkerhetsinformation
Läs den här viktiga
informationen noggrant innan du
använder apparaten och dess
tillbehör. Spara det här häftet för
framtida bruk. Olika tillbehör kan
medfölja olika modeller.
Fara
- Blöt inte ned strömförsörj-
ningsenheten (Bild 2).
Varning
- Strömförsörjningsenheten
innehåller en transformator.
Modiera inte Strömförsörjningsenheten med någon
annan typ av kontakt, eftersom det kan medföra risker.
- Ladda apparaten endast
med den medföljande
strömförsörjningsenheten
(HQ8505).
- Den här apparaten kan
användas av barn från 8 år
och uppåt och av personer
med olika funktionshinder,
eller som inte har kunskap
om hur apparaten används,
så länge de övervakas och
får anvisningar om säker
användning och förstår vilka
risker som föreligger. Barn
ska inte leka med apparaten.
Rengöring och underhåll
ska inte utföras av barn utan
övervakning.
- Kontrollera alltid aparaten
innan du använder den.
Använd inte apparaten om
den är skadad eftersom
det kan medföra risk för
personskador. Skadade
delar ska alltid bytas ut mot
originaldelar.
Page 7

Not: Her kullanımdan sonra cihazı kapatın ve
temizleyin.
Cihazın açılması ve kapatılması
Cihazı açmak veya kapatmak (Şek. 8) için açma/
kapama düğmesine bir kez basın.
Tarak kullanmadan düzeltme
- Tüyleri cilde yakın kesmek veya ense ve favori
hatlarını belirlemek için cihazı sakal ve kirli salak
tarağı olmadan kullanabilirsiniz. Tüyleri cilde
yakın kesmek için, düzeltme başlığının düz
tarafını cildinize yerleştirin ve istenen yönde
(Şek. 9) hareketler yapın.
- Hatları belirlemek için, düzeltme başlığını cilde dik
tutun ve düzeltme başlığını haf bir basınç (Şek. 10)
uygulayarak yukarı veya aşağı hareket ettirin.
- Hassas düzelticiyi yüz stilinizin çevresinde, cilde
(Şek. 11) yakın ince çizgiler ve hatlar oluşturmak için
kullanabilirsiniz. Kesme ünitesini doğrudan çekip
çıkarın (Şek. 12) ve hassas kesiciyi (Şek. 13) takın.
Tarak ile düzeltme
Not: İlk kez düzeltme işlemi yapıyorsanız cihaza
alışmak için en yüksek ayardan başlayın.
- Sakalınızı ve bıyığınızı istediğiniz stilde
düzeltmek için, sakal ve kirli sakal tarağını
kesme ünitesine takarak kullanabilirsiniz. Sakal
ve kirli sakal tarağı için, yakınlaştırma tekerleğini
döndürerek 0,5 mm ile 10 mm arasında değişen
20 uzunluk ayarından 0,5 mm‘lik (Şek. 6)
adımlarla seçim yapabilirsiniz.
- Favorilerinizi, bıyığınızı veya sakalınızı (Şek. 14)
hassas düzeltme ile şekillendirmek için,
hassas düzelticiyi bir detay tarağı takarak
kullanabilirsiniz. Bu cihaz ile birlikte 2 farklı
detay tarağı verilir: 5 mm (L) ve 3 mm (M).
1 Detay tarağını (Şek. 15) veya sakal ve kirli sakal
tarağını cihaza (Şek. 16) takın.
2 Cihazı açın.
3 En etkili düzeltme için, cihazı sakal uzama
yönünün (Şek. 17) tersine hareket ettirin. Tarak
yüzeyinin cildinizle her zaman tam temas
ettiğinden emin olun.
Temizlik ve bakım
Cihazın temizliği
Not: Yalnızca kesme ünitesi ve tarak suyla
temizlenebilir.
Her düzeltme işleminden sonra sakal toplama
haznesini boşaltmanızı tavsiye ederiz. Uzun ve sık
sakalları düzeltirken, optimum emiş performansı
sağlamak için düzeltme işlemi sırasında da sakal
toplama haznesini boşaltmanız gerekebilir.
1 Cihazı kapatın ve elektrik prizinden çıkarın.
2 Cihazın muhafazasını kuru bir bezle silin.
3 Tarağı (Şek. 18) çıkarın ve temizleme fırçası ile
temizleyin ve/veya musluk (Şek. 19) altında
durulayın.
4 Kesme ünitesini çıkarın ve musluk (Şek. 20)
altında temizleyin. Kalan suyu silkeleyerek
çıkarın ve tamamen kuruması için bırakın.
- Cihazı temizlemek için
kesinlikle basınçlı hava,
ovalama bezleri, benzin
veya aseton gibi aşındırıcı
temizlik ürünleri ya da zarar
verici sıvılar kullanmayın.
Elektromanyetik alanlar (EMF)
- Bu Philips cihaz, elektromanyetik alanlara
maruz kalmaya ilişkin geçerli tüm standartlara
ve düzenlemelere uygundur.
Genel
- Cihaz 100 ile 240 volt arasındaki şebeke
gerilimlerine uygundur.
- Besleme ünitesi 100-240 volt’u güvenli seviye
olan
24 volt’tan daha düşük değerlere çevirmektedir.
Ekran
Pil durum göstergeleri
Pil bitmek üzereyken, alttaki ışık turuncu (Şek. 3)
yanıp söner.
Cihaz şarj olurken, önce alttaki şarj ışığı, ardından
ikinci şarj ışığı (Şek. 4) beyaz yanıp sönmeye başlar
ve böyle devam eder. Pil tamamen şarj olduğunda,
tüm ışıklar devamlı (Şek. 5) beyaz yanar.
Not: Işıklar 30 dakika sonra otomatik olarak
kapanır.
Kalan şarj seviyesi
Pil şarj göstergesinde sürekli olarak yanan ışıklar
kalan pil seviyesini gösterir.
Sakal uzunluk göstergeleri
İstenen uzunluk ayarını yakınlaştırma tekerleği
(Şek. 6) ile seçtiğinizde, seçilen sakal uzunluk ayarı
dijital ekranda gösterilir.
Şarj etme
Şarj olma süresi yaklaşık 1 saattir. Cihazı ilk
kullanımdan önce ve ekranda pilin bitmek üzere
olduğu görüntülendiğinde şarj edin.
1 Cihazın kapalı olduğundan emin olun.
2 Adaptörü prize takın ve küçük şi cihaza (Şek. 7)
takın.
3 Şarj ettikten sonra, adaptörü prizden çıkarın ve
küçük şi cihazdan çekin.
Tıraş makinesi tam olarak şarj edildiğinde,
80 dakikaya kadar kablosuz olarak kullanılabilir.
Cihazın kullanımı
Not: Bu cihaz kablosuz olarak veya doğrudan
elektrik p
rizine takılarak kullanılabilir.
Bu cihazı kirli sakal ve kısa sakal için
kullanabilirsiniz. Bu cihaz, kesilen sakal tüyünü
yakalayarak daha düzenli bir düzeltme
deneyimi sağlayan entegre bir vakum sistemine
sahiptir.
Cihazı açtığınız anda vakum sistemi otomatik olarak
devreye girer.
tarafından kullanımı sadece
bu kişilerin nezaretinden
sorumlu kişilerin bulunması
veya cihazın güvenli kullanım
talimatlarının bu kişilere
sağlanması ve olası tehlikelerin
anlatılması durumunda
mümkündür. Çocuklar cihazla
oynamamalıdır.
Temizlik ve kullanıcı bakımı
gözetim olmadan çocuklar
tarafından yapılmamalıdır.
- Cihazı kullanmadan önce
her zaman kontrol edin.
Yaralanmaya yol açabileceği
için, hasarlı veya bozuksa
cihazı kullanmayın. Zarar
görmüş bir parçayı mutlaka
orijinal yedek parçalarla
değiştirin.
- Şarj edilebilir pili yenisiyle
değiştirmek amacıyla cihazı
açmayın.
Dikkat
- Bu cihaz yıkanamaz. Cihazı
asla suya batırmayın veya
musluk altında durulamayın
(Şek. 2).
- Bu cihazı yalnızca kullanım
amacına uygun olarak,
kullanım kılavuzunda
gösterildiği gibi kullanın.
- Hijyenik nedenlerden
dolayı cihaz sadece bir kişi
tarafından kullanılmalıdır.
- Besleme ünitesini, üniteyi
telasi mümkün olmayan
hasarlardan korumak için
elektrikli oda spreyi içeren
(halihazırda/önceden) duvar
soketlerinde ya da bunların
yakınında kullanmayın.
Garanti och support
Om du behöver information eller support kan du
besöka oss på www.philips.com/support eller läsa
garantibroschyren.
TÜRKÇE
Genel açıklama (Şek. 1)
1 Kesici ünite
2 Vakum sistemi
3 Uzunluk ayarları
4 Yakınlaştırma tekerleği
5 Açma/kapama düğmesi
6 Pil durumu göstergesi
7 Kılıf
8 Temizleme fırçası
9 Küçük ş
10 Besleme birimi (adaptör)
11 Hassas düzeltici
12 Detay tarağı 5 mm (L)
13 Detay tarağı 3 mm (M)
14 Sakal ve kirli sakal tarağı
Önemli güvenlik bilgileri
Cihazı ve aksesuarlarını
kullanmadan önce bu önemli
bilgileri dikkatlice okuyun ve
gelecekte başvurmak üzere
saklayın. Cihazla birlikte
verilen aksesuarlar ürünlere
göre farklılık gösterebilir.
Tehlike
- Besleme ünitesi kuru
tutmaya dikkat edin (Şek. 2).
Uyarı
- Besleme ünitesi içinde bir
transformatör bulunur.
besleme ünitesini kesip
başka bir şle değiştirmeyin,
aksi takdirde cihazı
kullanmak tehlikeli hale gelir.
- Cihazı sadece cihazla
beraber verilen besleme
ünitesi (HQ8505) ile şarj edin.
- Bu cihazın 8 yaşın üzerindeki
çocuklar ve ziksel, duyusal
ya da zihinsel becerileri
gelişmemiş veya bilgisi ve
tecrübesi olmayan kişiler
Page 8

Σημείωση: Οι λυχνίες σβήνουν αυτόματα μετά από
30 λεπτά.
Υπολειπόμενη ισχύς μπαταρίας
Η υπολειπόμενη ισχύς της μπαταρίας υποδεικνύεται
από τις λυχνίες της ένδειξης φόρτισης της μπαταρίας, οι
οποίες ανάβουν σταθερά.
Ενδείξεις μήκους τριχών
Η επιλεγμένη ρύθμιση μήκους μαλλιών θα εμφανίζεται
στην ψηφιακή οθόνη, όταν επιλέγετε τη ρύθμιση
επιθυμητού μήκους με τη ροδέλα (Εικ. 6) μεγέθυνσης.
Φόρτιση
Η φόρτιση διαρκεί περίπου 1 ώρα. Φορτίστε τη συσκευή
πριν τη χρησιμοποιήσετε για πρώτη φορά και κάθε
φορά που η οθόνη δείχνει ότι η μπαταρία είναι σχεδόν
άδεια.
1 Βεβαιωθείτε ότι η συσκευή είναι απενεργοποιημένη.
2 Συνδέστε το τροφοδοτικό στην πρίζα και τοποθετήστε
το μικρό βύσμα στη συσκευή (Εικ. 7).
3 Μετά τη φόρτιση, αποσυνδέστε το μετασχηματιστή
από την πρίζα και το μικρό βύσμα από τη συσκευή.
Όταν η συσκευή είναι πλήρως φορτισμένη, διαθέτει
αυτονομία λειτουργίας έως και 80 λεπτά.
Χρήση της συσκευής
Σημείωση: Αυτή η συσκευή μπορεί να χρησιμοποιηθεί
χωρίς καλώδιο ή απευθείας από την πρίζα ρεύματος.
Μπορείτε να χρησιμοποιήσετε αυτή τη συσκευή για
κοντά γένια και κοντή γενειάδα. Αυτή η συσκευή έχει ένα
ενσωματωμένο σύστημα απορρόφησης που πιάνει τις
κομμένες τρίχες των γενιών για περιοριστεί το χάος κατά
το τριμάρισμα.
Το σύστημα απορρόφησης ενεργοποιείται αυτόματα μόλις
ενεργοποιήσετε τη συσκευή.
Σημείωση: Απενεργοποιείτε και καθαρίστε τη
συσκευή μετά από κάθε χρήση.
Ενεργοποίηση/απενεργοποίηση της συσκευής
Πατήστε το κουμπί ενεργό/ανενεργό μία φορά για να
ενεργοποιήσετε ή να απενεργοποιήσετε (Εικ. 8) τη συσκευή.
Τριμάρισμα χωρίς χτένα κοπής
- Μπορείτε να χρησιμοποιείτε τη συσκευή με χτένα γενιών
και κοντών γενιών για να κόψετε τα γένια κοντά ή για να
διαμορφώσετε το περίγραμμα στο λαιμό και τις φαβορίτες.
Για να κόψετε τα γένια κοντά στο δέρμα, τοποθετήστε
την επίπεδη πλευρά της κεφαλής τριμαρίσματος πάνω
στο δέρμα σας και κάνετε διαδοχικές κινήσεις προς την
κατεύθυνση (Εικ. 9) που θέλετε.
- Για να διαμορφώσετε το περίγραμμα, κρατήστε την
κεφαλή κοπής κάθετα προς το δέρμα και μετακινήστε
την κεφαλή κοπής προς τα πάνω ή προς τα κάτω
ασκώντας απαλή πίεση (Εικ. 10).
- Μπορείτε να χρησιμοποιήσετε τον κόφτη ακριβείας
για να δημιουργήσετε λεπτές γραμμές και
περιγράμματα γύρω από το στυλ του προσώπου σας,
κοντά στο δέρμα (Εικ. 11). Απλά τραβήξτε τον κόφτη
απευθείας εκτός (Εικ. 12) και εισαγάγετε τον κόφτη
(Εικ. 13) ακριβείας.
- Μην ανοίγετε τη συσκευή
για να αντικαταστήσετε την
επαναφορτιζόμενη μπαταρία.
Προσοχή
- Η συσκευή αυτή δεν καθαρίζεται
με νερό. Μη βυθίζετε ποτέ τη
συσκευή σε νερό και μην την
ξεπλένετε στη βρύση (Εικ. 2).
- Χρησιμοποιείτε τη συσκευή
μόνο για το σκοπό που
προορίζεται και σύμφωνα με τις
οδηγίες στο εγχειρίδιο χρήσης.
- Για λόγους υγιεινής, η συσκευή
θα πρέπει να χρησιμοποιείται
μόνο από ένα άτομο.
- Μην συνδέετε το τροφοδοτικό
σε επιτοίχιες πρίζες στις
οποίες έχει ή είχε τοποθετηθεί
αποσμητικό χώρου και μην το
χρησιμοποιείτε κοντά σε τέτοιες
πρίζες, για να αποτρέψετε την
πρόκληση ανεπανόρθωτης
βλάβης στο τροφοδοτικό.
- Μη χρησιμοποιείτε ποτέ
πεπιεσμένο αέρα, συρμάτινα
σφουγγαράκια, στιλβωτικά
καθαριστικά ή υγρά όπως
πετρέλαιο ή ασετόν για τον
καθαρισμό της συσκευής.
Ηλεκτρομαγνητικά πεδία (EMF)
- Αυτή η συσκευή Philips συμμορφώνεται με όλα τα
ισχύοντα πρότυπα και τους κανονισμούς σχετικά με
την έκθεση σε ηλεκτρομαγνητικά πεδία.
Γενικά
- Η συσκευή είναι κατάλληλη για τάση ρεύματος που
κυμαίνεται από 100 έως 240 V.
- Το τροφοδοτικό μετατρέπει τα 100-240 V σε ασφαλή
χαμηλή τάση, μικρότερη των 24 V.
Οθόνη
Ενδείξεις κατάστασης μπαταρίας
Όταν η μπαταρία είναι σχεδόν άδεια, η κάτω λυχνία
αναβοσβήνει με πορτοκαλί χρώμα (Εικ. 3).
Όταν η συσκευή φορτίζεται, στην αρχή αναβοσβήνει
λευκό φως η κάτω λυχνία φόρτισης, στη συνέχεια η
δεύτερη λυχνία (Εικ. 4) φόρτισης κ.ο.κ.. Όταν η μπαταρία
φορτιστεί πλήρως, όλες οι λυχνίες ανάβουν με λευκό φως
συνεχόμενα (Εικ. 5).
Τα παρελκόμενα που παρέχονται
μπορεί να διαφέρουν για
διαφορετικά προϊόντα.
Κίνδυνος
- Διατηρείτε το τροφοδοτικό
περιλαμβάνει (Εικ. 2).
Προειδοποίηση
- Το τροφοδοτικό περιλαμβάνει ένα
μετασχηματιστή. Μην αφαιρέσετε
το τροφοδοτικό προκειμένου
να το αντικαταστήσετε με
άλλο βύσμα, καθώς μπορεί να
προκληθεί κίνδυνος.
- Η φόρτιση της συσκευής θα
πρέπει να γίνεται αποκλειστικά
με το τροφοδοτικό που
παρέχεται (HQ8505).
- Αυτή η συσκευή μπορεί να
χρησιμοποιηθεί από παιδιά
ηλικίας 8 ετών και άνω, καθώς
και από άτομα με περιορισμένες
σωματικές, αισθητήριες ή
διανοητικές ικανότητες ή χωρίς
εμπειρία και γνώση, με την
προϋπόθεση ότι τη χρησιμοποιούν
υπό επίβλεψη ή έχουν λάβει
οδηγίες σχετικά με την ασφαλή
της χρήση και ότι κατανοούν
τους ενδεχόμενους κινδύνους. Τα
παιδιά δεν πρέπει να παίζουν με
τη συσκευή. Ο καθαρισμός και η
συντήρηση από το χρήστη δεν θα
πρέπει να πραγματοποιούνται από
παιδιά που δεν εποπτεύονται.
- Να ελέγχετε πάντα τη συσκευή
πριν τη χρησιμοποιήσετε. Μη
χρησιμοποιείτε τη συσκευή, εάν
έχει υποστεί φθορά, καθώς μπορεί
να προκληθεί τραυματισμός. Να
αντικαθιστάτε πάντα τα φθαρμένα
εξαρτήματα με γνήσια.
Dikkat: Düzeltme aparatının dişleri hasar
görebileceğinden dolayı kesme ünitesini
kesinlikle havlu veya kağıt mendil ile
kurulamayın.
5 Sakal haznesinde (Şek. 21) toplanan sakalları
sallayarak ve/veya fırçayla çıkarın.
6 Temizlikten sonra, kesme ünitesini (Şek. 22) ve
tarağı (Şek. 16) cihaza tekrar takın.
Geri dönüşüm
- Bu simge, bu ürünün normal evsel atıklarla
birlikte atılmaması gerektiği anlamına gelir
(2012/19/EU) (Şek. 23).
- Bu simge, bu üründe normal ev atıklarıyla
(Şek. 24) birlikte atılmaması gereken yerleşik
bir şarj edilebilir pil bulunduğu anlamına
gelir (2006/66/EC). Şarj edilebilir pilin bir
profesyonel tarafından çıkartılması için ürünüzü
resmi bir toplama noktasına veya bir Philips
servisi merkezine götürmenizi önemle tavsiye
ederiz.
- Elektrikli ve elektronik ürünlerin ve şarj edilebilir
pillerin ayrı olarak toplanmasına ilişkin ülkenizde
yürürlükte olan yönetmeliklere uyun. İmha
işleminin doğru şekilde yapılması çevreyi ve
insan sağlığını olumsuz etkileyecek sonuçların
önlenmesine yardımcı olur.
Garanti ve destek
Bilgi veya desteğe ihtiyaç duyarsanız, lütfen
www.philips.com/support adresini ziyaret edin
veya dünya çapında garanti kitapçığını okuyun.
ΕΛΛΗΝΙΚΑ
Γενική περιγραφή (Εικ.1)
1 Κόφτης
2 Σύστημα απορρόφησης
3 Ρυθμίσεις μήκους
4 Ρυθμιστική ροδέλα
5 Κουμπί ενεργοποίησης/απενεργοποίησης
6 Ένδειξη κατάστασης μπαταρίας
7 Θήκη
8 Βουρτσάκι καθαρισμού
9 Μικρό βύσμα
10 Τροφοδοτικό (μετασχηματιστής)
11 Κόφτης ακριβείας
12 Χτένα λεπτομέρειας 5 mm (L)
13 Χτένα λεπτομέρειας 3 mm (M)
14 Χτένα γενιών και κοντών γενιών
Σημαντικές πληροφορίες για
την ασφάλεια
Διαβάστε αυτές τις σημαντικές
πληροφορίες προσεκτικά πριν
χρησιμοποιήσετε τη συσκευή και
τα παρελκόμενά της και φυλάξτε
τις για μελλοντική αναφορά.
Page 9

Ανακύκλωση
- Αυτό το σύμβολο υποδεικνύει ότι το παρόν προϊόν
δεν πρέπει να απορριφθεί μαζί με τα συνηθισμένα
οικιακά σας απορρίμματα (2012/19/ΕΕ) (Εικ. 23).
- Αυτό το σύμβολο δηλώνει ότι το προϊόν αυτό περιέχει
ενσωματωμένη επαναφορτιζόμενη μπαταρία, η οποία
δεν πρέπει να απορριφθεί μαζί με τα συνηθισμένα
οικιακά απορρίμματα (Εικ. 24) (2006/66/ΕΚ). Σας
συμβουλεύουμε να μεταφέρετε το προϊόν σας σε
επίσημο σημείο συλλογής ή κέντρο επισκευών της
Philips για να αφαιρέσει την επαναφορτιζόμενη
μπαταρία ένας επαγγελματίας.
- Ακολουθήστε τους εγχώριους κανονισμούς για την
ξεχωριστή συλλογή ηλεκτρικών και ηλεκτρονικών
προϊόντων και των επαναφορτιζόμενων μπαταριών.
Η σωστή μέθοδος απόρριψης συμβάλλει στην
αποφυγή αρνητικών επιπτώσεων για το περιβάλλον
και την ανθρώπινη υγεία.
Εγγύηση και υποστήριξη
Αν χρειάζεστε υποστήριξη ή πληροφορίες, επισκεφτείτε
τη διεύθυνση www.philips.com/support ή διαβάστε το
ξεχωριστό παγκόσμιο φυλλάδιο εγγύησης.
Τριμάρισμα με χτένα κοπής
Σημείωση: Όταν πρόκειται να τριμάρετε τις τρίχες
σας για πρώτη φορά, ξεκινήστε με την υψηλότερη
ρύθμιση, ώστε να εξοικειωθείτε με τη συσκευή.
- Μπορείτε να χρησιμοποιήσετε τη χτένα γενιών και
κοντών γενιών που είναι προσαρτημένη στο στοιχείο
κοπής για να περιποιηθείτε τα γένια και το μουστάκι
σας με το στυλ που προτιμάτε. Για τη χτένα γενιών
και κοντών γενιών, μπορείτε να στρέψετε τη ροδέλα
μεγέθυνσης για να επιλέξετε μεταξύ 20 ρυθμίσεων
μήκους που κυμαίνονται από 0,5 mm έως 10 mm σε
βήματα των 0,5 mm (Εικ. 6).
- Μπορείτε να χρησιμοποιήσετε τον κόφτη ακριβείας
με μια χτένα ακριβείας προσαρτημένη για τριμάρισμα
ακριβείας των φαβοριτών σας, του μουστακιού ή
των γενιών (Εικ. 14). Αυτή η συσκευή συνοδεύεται
από 2 διαφορετικές χτένες λεπτομέρειας: 5 mm (L)
και 3 mm (M).
1 Τοποθετήστε τη χτένα (Εικ. 15) λεπτομέρειας ή τη
χτένα γενιών και κοντών γενιών στη συσκευή (Εικ. 16).
2 Ενεργοποιήστε τη συσκευή.
3 Για τριμάρισμα με τον πιο αποτελεσματικό τρόπο,
μετακινήστε τη συσκευή αντίθετα από τη φορά
(Εικ. 17) των τριχών. Βεβαιωθείτε ότι η επιφάνεια της
χτένας βρίσκεται πάντα σε επαφή με το δέρμα.
Καθαρισμός και συντήρηση
Καθαρισμός της συσκευής
Σημείωση: Μόνο ο κόφτης και η χτένα μπορούν να
καθαριστούν με νερό.
Σας συμβουλεύουμε να αδειάζετε το θάλαμο συλλογής
τριχών μετά από κάθε τριμάρισμα. Όταν τριμάρετε
μακριά, πυκνά γένια, μπορεί να χρειαστεί επίσης να
αδειάσετε το θάλαμο συλλογής τριχών και κατά τη
διάρκεια του τριμαρίσματα προκειμένου να διατηρήσετε
βέλτιστη απόδοση απορρόφησης.
1 Απενεργοποιήστε τη συσκευή και αποσυνδέστε την
από την πρίζα.
2
Καθαρίστε το περίβλημα της συσκευής με ένα στεγνό
πανί.
3 Αφαιρέστε τη χτένα (Εικ. 18) και καθαρίστε την με τη
βούρτσα καθαρισμού ή/και ξεπλύντε την κάτω από τη
βρύση (Εικ. 19).
4
Αφαιρέστε τον κόφτη και καθαρίστε τον κάτω από τη
βρύση (Εικ. 20). Τινάξτε τη συσκευή για να απομακρύνετε
το νερό και αφήστε τη να στεγνώσει πλήρως.
Προσοχή: Ποτέ μη στεγνώνετε τον κόφτη
με πετσέτα ή χαρτομάντηλο, καθώς αυτό
μπορεί να προκαλέσει ζημιά στα δοντάκια του
εξαρτήματος κοπής.
5 Ταρακουνήστε ή/και βουρτσίστε να φύγουν οι τρίχες
που έχουν συγκεντρωθεί στο θάλαμο (Εικ. 21) τριχών.
6 Μετά το καθάρισμα, επανατοποθετήστε τον κόφτη
(Εικ. 22) και τη χτένα (Εικ. 16) στη συσκευή.
 Loading...