

BeardTrimmer
フィリップ ス
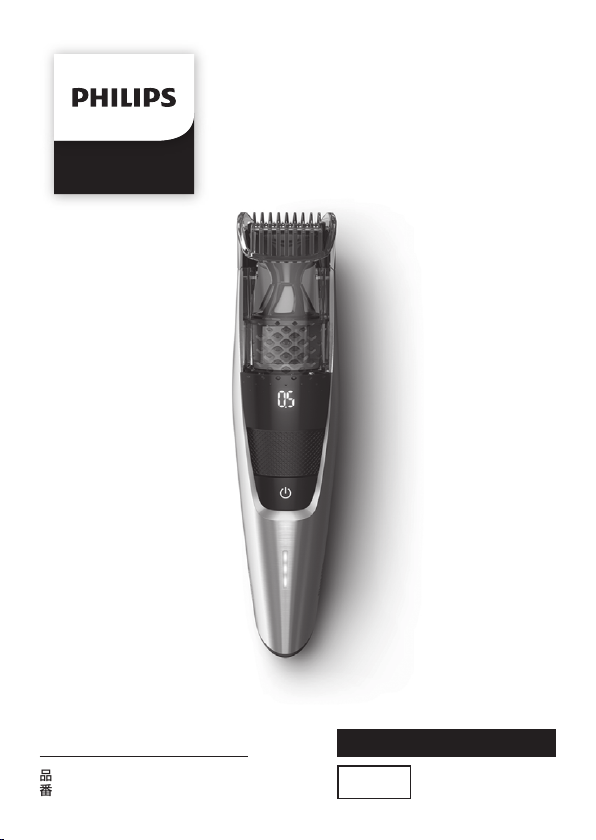
バキュー ムヒゲトリマー
品番
BT7220/15
保証書付
取扱説明書
保 証 書 は 、こ の 取 扱 説 明 書 の 最 終
ページに ついておりますの で販売店
で記 入を 受けてく ださ い。

フィリップ ス バキュームヒゲトリマーをお買い上げいただき、まこ
とにありがとうございます。長い間ご愛用いただくために、ご使用前
にこの取扱説明書をよくお読みのうえ、正しくお使いください。
また、お読みになった後は、お使いになる方がいつでも見られると
ころに 必 ず 保 管してくだ さ い 。
商品のご確認
細部用トリマー
クリー ニ ング ブラシ
本体 ソ フト ポ ー チ
クリ ー ニ ン グ ス ティッ ク
※改良の為、仕様を予告なく変更することがあります。
商品をご確認ください
コーム
細部用コーム
(
5mm
充電ア ダプタ
)
細部用コーム
(
)
3mm
1
●
はじめに
●
ご使用方法
目 次
商品のご確認
目次
2
必 ず お 守 りくだ さ い
各部の名称
充電の仕方/基本的な使い方
トリミングの仕方/ごく短くカットする
より細かなトリミングの仕方
お手入れ方法
刃の交換
1
3・4
5・6
7・8
10
11
12
9
●
廃棄について
●
困ったとき
●
英文解説
●
保
製品を廃棄するとき
故障かな?と思ったら
Guidance in English
保証とアフター サ ービス
証
仕様
32
無料修理規定
保証書
13・14
15
17〜29
31
34
最終ページ
2
必ずお守り
ください
安全上のご注意
●ここに示した注意事項は、安全に関する重要
な内容ですので、必ず守ってください。
●誤った取扱いをしたときに想定される内容を
「警告」と「注意」とに区分けしています。
○絵表示について
○絵表示の例
● 本体ならびに充電アダプタは改造し
ないでください。また、製品を廃棄す
るとき以外は、絶対に分解したり修
理をしな いでください。火災、感電、
ケガの原因となります。修理はお買
い上げの販売店または小泉成器修
理センターにご相 談ください。
● お手入れの際は必ず充電アダプタ
の 電 源 プ ラ グ 部 を コ ン セ ント か ら 抜
いてください。また、濡れた手で抜き
差 し し な い で く だ さ い 。感 電 や ケ ガ を
するこ とが ありま す 。
● 充 電 ア ダ プ タ が 傷 ん だ り 、コ ン セ ン ト
の差込みが緩いときは使用しないで
ください。感電・ショート・発火の原
因に なりま す 。
記号は、「危険、警告、注意」を示します。
図の中や近くに具体的な注意内容を示します。
人が死亡または重傷を負う可能性が想定される内容。
警告
人が傷害を負う可能性及び物的損害のみの発生が想
注意
定される内容。
・記号は、してはいけない「禁止」を示します。図の中や近くに
具体的な禁止内容(左図の場合は分解禁止)を示します。
・ 記号は、必ずしていただく「強制」を示します。図の中や近くに
具体的な強制内容(左図の場合は電源プラグ部をコンセントか
ら 抜 く こ と )を 示 し ま す 。
警 告
● 本 体・充 電 アダ プ タを 水 に つ けた り、
水 を か け た り し な い で く だ さ い 。故 障
や、ショート・感電の原因になります。
● 充電アダプタを傷付けたり、電源
コードを無 理に 曲げ たり、引っ張った
り、ねじったり、たば ねたり、重 い 物を
載せたり、挟み込んだり、加工したり
し な い で く だ さ い 。電 源 コ ー ド が 破
損し、火災・感電の原因となります。
● 乳幼児の手の届くところに本製品を
置かないでください。
● 充電アダプタには変圧器が内蔵さ
れています。充電 アダプタを切り離
して別のプラグに接続するのは危険
ですのでおやめください。
3
注 意
● 充電アダプタの電源プラグ部を抜
くときは、電源コ ード部を持た ずに
必ず先端の電源プラグ部を持って
引き抜いてください。感電やショー
トして 発 火 す ること が あ りま す 。
● 充電・交流使用時以外は、充電アダ
プタをコンセントから抜い てくださ
い。ケガややけど、絶縁劣化による感
電・漏電・火災の原因となります。
● 充電アダプタは付属の専用アダプ
タを使用してください。また付属の
専用アダプタで他の商品を充電し
ないでください。ショート、異常発熱
による発火の原因になります。破
損、故障した場合は、事故を避ける
ために必ずフィリップス社製の同型
部品をお求めください。
● 刃やコームが破損または故障した
場合は、本製品を使用しないでくだ
さい。ケガの原因になります。交換
の際には必ずフィリップス社製の同
型部品とお取り替えください。
● 電源コネクタ受部にピンやごみを
付着させないでください。感電・
ショート・発火の原因になります。
● 本製品を浴室やシャワー中に使用
し な い で く だ さ い 。感 電 す る こ と が
あります。
● 本製品は、ヒゲ、もみあげ、襟足の
カット専用です。それ以外の目的で
使用しないでください。
● 刃は強く押さえないでください。
破損して肌を傷 つけることがあり
ます。
使 用 上 の ご 注 意
本体は水洗いできません。水や液体の中に浸けないようご注意ください。また、水ですすが
1 .
ないでください。
本製品の使用、充電、保管は室温5℃〜35℃の環境下で行ってください(尚、低温や高温で
2 .
充電すると、充電池の寿命が短くなります)。
室温、気圧、湿度が急激に変化する状況でご使用になる場合は、本製品をその環境下で
3 .
分ほど慣らしてからお使いください。
刃の掃除やコームの着脱は必ず電源スイッチを切ってから行ってください。
4 .
切れ味が衰えてきたり、刃やコームが破損した場合は、使用せず必ず新しい同型部品と交
5 .
換してくだ さ い 。
極端に高温または低温の場所、直射日光の当たる場所には保管しないでください。夏場、
6 .
車の中に放置しないでください。
乳幼児の手の届かないところに保管してください。
7 .
本製品は、使用の都度、掃除をしてください。
8 .
プラグ式消臭・芳香剤を使用しているコンセントあるいはその近くのコンセントに充電
9 .
アダプタを接続しないでください。充電アダプタを傷める原因となります。
30
4

各部の名称
ヒゲ吸 引システム
ズームロック
長さ 調 整リング
電 源 ス イッチ
本体
刃
長さ設定目盛(デジタル)
※ 電 源 スイッ チをONにすると
表示さ れます。
充電表示ランプ
電源コネクタ受部
充電アダプタ
電源プ ラグ部
電源コネクタ部
5

コーム ▶
P.9
細部用トリマー ▶
P.1 0
細部用コーム ▶
P.1 0
クリー ニ ン グブラシ ▶
クリ ー ニ ン グ ス テ ィッ ク ▶
(
5mm
) (
3mm
)
ヒゲ吸引システムについて
本製品にはトリミング後のヒゲクズを回収してくれるヒゲ吸引システムが内
蔵されており、本体の電源スイッチを
的に作動します。これにより外に飛び散ったヒゲクズの後片付けを大幅に省
くことができ、手軽にトリミングをすることができます。
にす るとヒゲ 吸 引 システム が自 動
ON
吸い込み口
〈ヒゲ吸引システム 〉
6
P.1 1
P.1 1
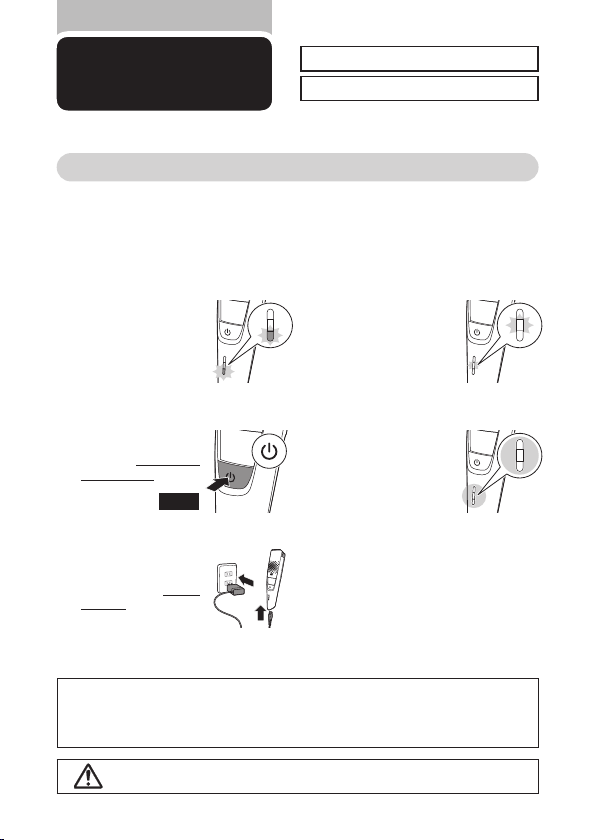
充電の仕方
お客様による充電池の交換はできません。
本製品は通常1時間充電です。
充電式(コードレス)で使う場合
初めてお使いになるときや、長い間ご使用にならなかったときは、充電しないと使用できません。ご使
用前に充電してください。初めての充電時間は約
間コードレスでご使用になれます。海外(
形状や電圧など現地で充分お確かめのうえご使用ください。
※本製品はリチウムイオン電池を使用しているため、ご使用の都度充電をしても充電池の寿命には
影響ありません。
時間です。本製品は完全に充電した状態で、約80分
1
100〜240V
)でのご使用も可能です。ただし、コンセントの
充電表示ランプの一番
1
下が オレンジ 色 に点 滅
し た ら 、充 電 が 少 な く
なっています(残りの使
用時間は約
で、本製品を充電する
必 要 が ありま す 。
充電する際には、電源
2
スイッ チを 必ず
してください 。
分 で す )の
5
OFF
に
OFF
充電アダプタの 電源コ
3
ネクタ部 を 本 体 の 電 源
コネクタ 受 部に 奥まで
差し込 み 、充 電 ア ダ プ タ
の電源プ ラグ 部を コン
セントに差し込みます。
ポ イ ント
●
充電中、テレビ等に雑音が入る場合、別のコンセントで充電してください。
充電中は本体・充電アダプタが多少熱くなりますが、異常ではありません。
●
● 充電池の寿命は使用・保管などの状態により大きく異なります。
専用の充電アダプタ以外での充電はしないでください。
注意
充電中は、充電表示ラ
4
ンプの一番下がまず白
色に点滅し、次に真ん
中の充電ランプが点滅
します 。
充 電 が 完 了 し た ら 、全 て
5
の充電表示ランプが白
色に点灯します。
※ 満充電後、約30分経過す
ると充電表示ランプは消
えます。
充電後、充電アダプタの電源プラグ部を
6
コンセントから抜き、電源コネクタ部を
本体から外してください。
7
交流式(充電アダプタをつなげたまま)で使う場合
10
●交流式でお使いの時に、充電残量がない状態でご使用されますと、作動しません。充電アダプタを接
続した状態で約
●充電アダプタはご使用の都度コンセントから抜いてください。
電 源 ス イッチ が
1
なって いることを 確 か
めてください。
分程度待ってから、ご使用ください。
3
に
OFF
OFF
充電アダプタの 電源コ
2
ネクタ部 を本体 の 電 源
コネクタ受 部に 差し込
み 、充 電 ア ダ プ タ を コ ン
セントに差し込みます。
本体を水や液体の中に浸したり、水道
水ですすいだりしないでください。
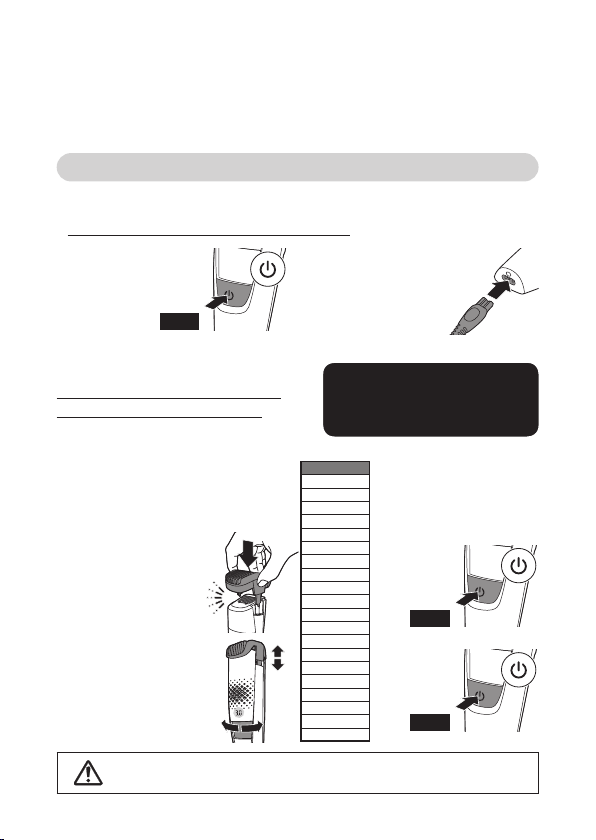
トリミングの準備
1
トリミングを始める前に、必ず目の 細かい
クシでヒゲの流れを整えてください。
長さの設定
2
ガイドの溝に沿って
コー ムを 本 体 に取り付
け ま す 。ズ ー ム ロ ッ ク 長
さ 調 整 リング を 回して 、
ヒゲ の 長 さ を 設 定しま
す。ヒゲの長さは右の
表の通りです。仕上がり
の 長 さ は、
ら
10mmまで0.5mm
間隔で20段階の長さ
調節 ができます 。
警告
か
0.5mm
●浴室やシャワー中に使用しないでください(感電することがあります)。
ヒゲトリマー本体は水や液体の中に浸けないでください(故障の原因となります)。
●
0.5
基本的な使い方
ヒゲの長 さ
0 .5 mm
1 .0 mm
1 .5 mm
2 .0 mm
2 .5 mm
3 .0 mm
3 .5 mm
4 .0 mm
4 .5 mm
5 .0 mm
5 .5 mm
6 .0 mm
6 .5 mm
7 .0 mm
7 .5 mm
8 .0 mm
8 .5 mm
9 .0 mm
9 .5 mm
8
10 mm
3
電 源 ス イッチ のON/
電源スイッチを一度押す
と
、もう一度押すと
ON
になります 。
OFF
OFF
ON
OFF

トリミングの仕方
上 手 にト リ ミ ン グ す る に は
1
上 手 にトリミング する に は 、ヒゲ の 流 れ に 逆らってヒ ゲトリマー を 動
かします。コーム表面が常に肌に触れているようにしてください。
ポイント〈初めてご使用になる時は〉
●
初めてトリミングをするときは慎重に行ってください。ヒゲトリマーはゆっくりと、滑らかに優しく動かすようにしましょう。
●使い始めは最も長い設定である
ヒゲは様々な方向にはえていますので、ヒゲの流れに逆らって様々な方向にヒゲトリマーを動かしてください。
●
●肌やヒゲが乾いている状態でご使用されることをおすすめします。
ご使用後は毎回必ずお手入れをしてください。
2
お手入れの仕方は
を参 照くだ さい 。
P.1 1
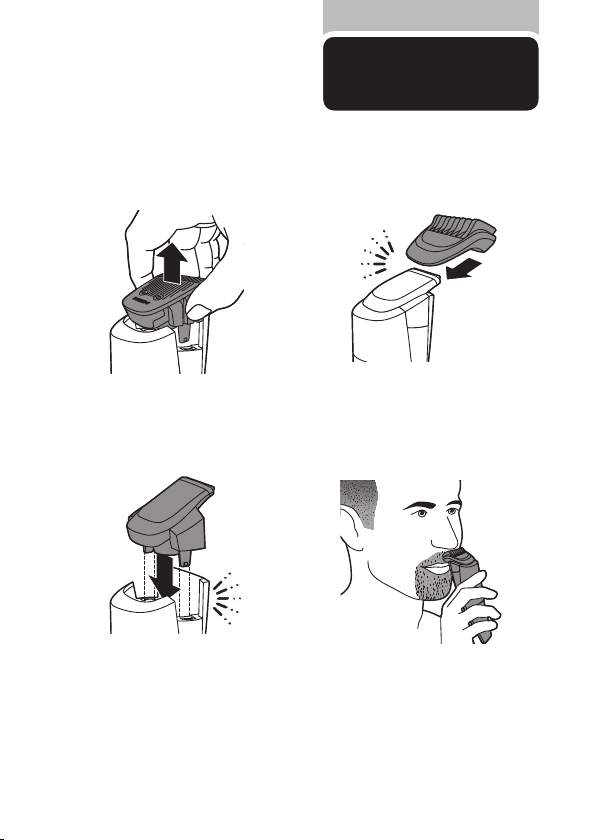
ご く 短 く カ ット す る
からご使 用 されること をお すす めします 。
10mm
あごひげや口ひげ、もみ あげ、襟足などをごく短く
カットしたい場合は、コームをはずしてヒゲトリ
マーを使います。
コー ムを 取り外
1
します 。
ヒ ゲト リ マ ー の
2
電 源 ス イッ チ を
ON
にしま す 。
ON
注意
ヒ ゲ ト リ マ ー を 軽 く カ ット
3
したい部分にあて、丁寧
に動 かして い き ます 。
ポ イ ント
●刃 の 平らな 部 分 を肌
にあ て ながら 動 かす と
滑らかに 動か せま す。
●コームをはずして使用する時は、刃にふれた全 ての毛 がカットされますので
ご注 意くだ さ い 。
●コームの取り外しは、コーム先端にある可動部分 を引っ張らず、必 ず両サイ
ドを 持って 引くようにしてくださ い 。
▶細部用トリマーを使った
細かなスタイリング………
9
●輪郭部分をカットする
場合は刃を肌に垂 直
にあ てな がら上 下 に
動かし てくだ さ い 。
P.1 0
参照
もみあげ、口ひげ、あごひげをより細かくカットし
たい場合は、本体についている刃をはずして細部
用トリマーを使います。
より細 か な
トリミングの仕方
本体についている刃を取り外します。
1
※ 電 源 スイッ チが
かめ てくださ い 。
本 体 に 細 部 用ト リ マ ー を 取 り 付 け ま す 。
2
になって いること を確
OFF
細部用トリマーに細部用コームを取り
3
付けます。
※ 細部コームは
と
3mmの2
ありま す。
もみあげ、口ひ げ、あごひげなどフェイ
4
スラインの細かい部分をお好みのスタ
イ ル にト リ ミ ン グ す る こ と が で き ま す 。
5mm
種類が
10

※
お手入れ方法
お手入れの際は必ず充電アダプタの電源プラグをコンセントから抜いてください。
警告
また、濡れた手で抜き差ししないでください。感電やケガをすることがあります。
●本製品に潤滑剤を使う必要はありません。
●圧縮空気、研磨パッド、研磨洗浄剤、ペトロールやアセトンなどの刺激性の
注意
ご使用のたびに、本体内部を掃除することをお勧めします。また、長いヒゲや濃いヒゲをトリミングする
場合、吸引性能を維持するために、使用途中でもヒゲクズがたまったら本体内部を掃除してください。
強い液体は絶対に使わないでください。
●充電アダプタは絶対に濡らさないでください。
刃を傷める場合がありますので、タオルやティッシュペーパーなどで水分を拭き取らないでください。
●
●本体は乾いた布で拭いてください。
本製品はご使用のたびに掃除をしてください。
本体のお手入れ方法
コームを取り外し
1
ます。
コ ー ム は クリ ー ニ
2
ングブラシで 掃 除
す る か 、水 で す す ぎ
洗 いしま す 。
※ 刃とコ ーム の み 水 洗
い可能です。
刃 を 取 り 外 し 、水 で
3
すす ぎ 洗 いします。
洗 い 終 わ っ た ら 、水
分 を 振 り 払 い 、完 全
に乾燥させます。
※ 刃とコ ーム の み 水 洗
い可能です。
電 源 ス イッ チ が
※
になって い ることを
確かめてください 。
OFF
本体 内 部 のヒゲク
4
ズ を クリー ニ ン グ
ブ ラ シ ま た は クリー
ニ ン グ ス テ ィッ ク な
どで 取り除 きま す 。
※ 本 体 内 部 の フィル
掃除後、本体に刃
5
を取り付 けます。
本体にコームを取
6
り付けます。
11
ター を 破 か な い よう
に注意してください。

刃の交換
部品の取り替え
刃が破損した場合や切れ味が落ちた場合は、お買い上げの販売店または小泉成器部品センターで
取扱いしているフィリップス社製の同型部品をご注文していただき、交換してください。
刃の両サイドを持って、矢印の方向に引くようにし
1
て刃を取り外します。
※ 電源が
2
カチッと音がするまで、刃を本体に押し込みます。
3
になっていることを確かめてください。
OFF
新しい刃の突起を本体の溝に合わせます。
12

製品を
廃棄するとき
リチウムイオン電池のリサイクルについて
このヒゲトリマー はリチウムイオン電 池を使 用しています。
リチウムイオン電池はリサイクル可能な貴重な資源です。
ご使用済みの製品の廃棄に際しては、リチウムイオン電池を
取り出し、各自治体の処理方法に従い、リサイクル協力店に
お持 ちくださ い 。
●製品を廃棄するとき以外は、絶対に本体を分解しないでください。
注意
●本体内部の金具は鋭いので、ご注意ください。
充電池の取り外し方
電 源 ス イッチ をONにして、完全に動作しなくなるまで充電池を放電させてから、行ってください。
※ お客様による充電池の
修理交換はできません。
Li-ion
ドライバーを使い、小 さい前面カバーを
1
取り外しま す。
前面と底部のねじ2本を外します。
2
底 の ねじを 外しま す 。
3
ドライバーをこじ入れて、側面カバーを2
4
枚 取り外し 、前 面カ バ ー を 外しま す 。
13

プリント回路基板のねじ2本を外します。
5
プリント回路基板から電池を取り外しま
7
す。
プリント回路基板 のピンを外します。
6
プリント回路基板と電池の接続部分を工
8
具 で カット し ま す 。
※充電池を取り外した後は、通電しないでください。
14

故 障 か な?
と思ったら
故 障 か な?と 思 っ た ら 、
お調べください。
充電しても使用時間が極端に短い
▶刃の掃除はしていますか?
ヒゲトリマーが完全に止まるまで作動させてからもう一度約1時間充電してください。
▶
それでも改善されないときは、充電池の寿命です。
だんだん切れ味が悪くなった
▶刃が損傷または摩耗していませんか?
刃の寿命は1回約15分 、週2回の使用で約4年が目安ですが使用時間・回数により異なります。
電源スイッチを入れても作動しない
▶刃の掃除はしていますか?
充 電 はし ま し た か?
▶
約1時間、充電をしてください。
交流式でご使用の場合、充電残量がない状態でご使用されますと、作動しません。充電アダプタを
接続した状態で約
▶刃と本体が正しくセットされていますか?
分程度待ってから、ご使用ください。
3
異常な音がする
▶刃に傷が付いていませんか?
▶刃が正しくセットされていますか?
充電できない
▶充電アダプタの電源コードが断線していませんか?
新しい充電アダプタ(
▶充電アダプタの電源プラグ部はコンセントにきちんと差し込まれていますか?
本体の電源コネクタ受部に充電アダプタの電源コネクタ部がきちんと差し込まれていますか?
確認してください。
▶ スイッ チ がONの状態で充電していませんか?
充 電 する 際 に は スイッチ を 必 ず
)をお買い求めください。
HQ8505
OFF
にしてから充電してくださ い。
以上の点検により、正常な状態に戻らない場合は、
お買い求めの販売店か小泉成器修理センターへお問い合わせ願います。
15

16

English
BT7220/15
17

1
15
2
14
3
13
4
12
5
6
11
10
7
8
9
18

English
General description (Fig.1)
1 Cutting element
2 Vacuum system
3 Length settings
4 Zoom wheel
5 On/o button
6 Battery status indicator
7 Pouch
8 Cleaning brush
9 Cleaning sponge
10 Small plug
11 Supply unit (adapter)
12 Precision trimmer
13 Detail comb 5mm (L)
14 Detail comb 3mm (M)
15 Beard and stubble comb
Important safety information
Read this important information carefully before
you use the appliance and its accessories and
save it for future reference. The accessories
supplied may vary for dierent products.
Danger
- Keep the supply unit dry.
Warning
- To charge the battery, only use the detachable
supply unit (type HQ8505) provided with the
appliance.
- The supply unit contains a transformer. Do not
cut o the supply unit to replace it with another
19

plug, as this causes a hazardous situation.
- This appliance can be used by children aged
from 8 years and above and persons with
reduced physical, sensory or mental capabilities
or lack of experience and knowledge if they
have been given supervision or instruction
concerning use of the appliance in a safe way
and understand the hazards involved. Children
shall not play with the appliance. Cleaning and
user maintenance shall not be made by
children without supervision.
- Always check the appliance before you use it.
Do not use the appliance if it is damaged, as
this may cause injury. Always replace a
damaged part with one of the original type.
- Do not open the appliance to replace the
rechargeable battery.
Caution
- This appliance is not washable. Never immerse
the appliance in water and do not rinse it under
the tap.
- Only use this appliance for its intended purpose
as shown in the user manual.
- For hygienic reasons, the appliance should only
be used by one person.
- Never use compressed air, scouring pads,
abrasive cleaning agents or aggressive liquids
such as petrol or acetone to clean the
appliance.
- Do not use the supply unit in or near wall
sockets that contain an electric air freshener to
prevent irreparable damage to the supply unit.
Electromagnetic elds (EMF)
- This Philips appliance complies with all
applicable standards and regulations regarding
exposure to electromagnetic elds.
20
English

English
General
- The appliance is suitable for mains voltages
ranging from 100 to 240 volts.
- The supply unit transforms 100-240 volts to a
safe low voltage of less than 24 volts.
Display
Battery status indications
When the battery is almost empty, the bottom light
ashes orange.
When the appliance is charging, rst the bottom
charging light ashes white, then the second
charging light, and so on.
When the battery is fully charged, all lights light up
white continuously.
Note: The lights switch o automatically after 30
minutes.
Remaining battery capacity
The remaining battery charge is shown by the
lights of the battery charge indicator that light up
continuously.
21

Hair length indications
10
The selected hair length setting will show on the
0.5
digital display when you select the desired length
setting with the zoom wheel.
Charging
Charging takes approx. 1 hour. Charge the
appliance before you use it for the rst time and
when the display indicates that the battery is
almost empty.
1 Make sure the appliance is switched o.
2 Put the adapter in the wall socket and put the
small plug in the appliance.
3 After charging, remove the adapter from the
wall socket and pull the small plug out of the
appliance.
When the appliance is fully charged, it has a
cordless operating time of up to 80 minutes.
Using the appliance
Note: This appliance can be used without cord or
directly from the power outlet.
You can use this appliance for a stubble and
a short beard. This appliance has an integrated
vacuum system that catches cut beard hair for
a less mess trimming experience.
The vacuum system is activated automatically as
soon as you switch on the appliance.
Note: Switch o and clean the appliance after
each use.
English
22

English
Switching the appliance on and o
Press the on/o button once to switch the
appliance on or o.
Trimming without comb
- You can use the appliance without beard and
stubble comb to trim hair close to the skin or
to contour the neckline and sideburns. To trim
hair close to the skin, place the at side of the
trimming head against your skin and make
strokes in the desired direction.
- For contouring hold the trimming head
perpendicular to the skin and move the
trimming head upwards or downwards with
gentle pressure.
- You can use the precision trimmer to create
ne lines and contours around your facial style,
close to the skin.
1 Simply pull the cutting element straight o
23

2 Then, insert the precision trimmer.
10
Trimming with comb
Note: When you trim for the rst time, start at the
highest length setting to familiarise yourself with
the appliance.
- You can use the beard and stubble comb
0.5
attached to the cutting element to groom your
beard and moustache in your preferred style.
For the beard and stubble comb, you can turn
the zoom wheel to choose from 20 length
settings ranging from 0.5mm to 10mm in steps
of 0.5mm.
- You can use the precision trimmer with a detail
comb attached for precision trimming of your
sideburns, moustache or beard. This appliance
comes with 2 dierent detail combs: 5mm (L)
and 3mm (M).
English
1 Attach the detail comb or the beard and
stubble comb onto the appliance.
2 Switch on the appliance.
24

English
3 To trim most eectively, move the appliance
against the hair growth direction. Make sure that
the surface of the comb always stays in contact
with the skin.
Cleaning and maintenance
Cleaning the appliance
Note: Only the cutting element and the comb can
be cleaned with water.
We advise you to empty the hair-collection
chamber after each trimming session. When you
trim long, dense beards, it may also be necessary
to empty the hair-collection chamber during the
trimming session in order to maintain optimal
suction performance.
1 Switch o the appliance and disconnect it from
the power outlet.
2 Wipe the housing of the appliance with a dry
cloth.
3 Remove the comb.
4 Clean the comb with the cleaning brush and/or
rinse it under the tap.
25

English
5 Remove the cutting element and clean it under
the tap. Shake o excess water and leave to dry
completely.
Caution: Never dry the cutting element with a
towel or tissue, as this may damage the trimming
teeth.
6 Shake and/or brush out the hairs that have
collected in the hair chamber.
7 After cleaning, reattach the cutting element to
the appliance.
8 Attach the comb to the appliance.
26

English
Recycling
- Do not throw away the product with the normal
household waste at the end of its life, but hand
it in at an ocial collection point for recycling.
By doing this, you help to preserve the
environment.
- This product contains a built-in rechargeable
battery which shall not be disposed of with
normal household waste. We strongly advise
you to take your product to an ocial collection
point or a Philips service centre to have a
professional remove the rechargeable battery.
- Follow your country’s rules for the separate
collection of electrical and electronic products
and rechargeable batteries. Correct disposal
helps prevent negative consequences for the
environment and human health.
Battery removal
Only remove the rechargeable battery
when you discard the shaver. Before you
remove the battery, make sure that the
shaver is disconnected from the wall socket
and that the battery is completely empty.
Take any necessary safety precautions
when you handle tools to open the shaver
and when you dispose of the rechargeable
battery.
1 Remove the small front panel with screwdriver.
27

English
2 Unscrew both screws in the front and on the
bottom.
3 Unscrew the screw in the bottom.
4 Break and remove the side panels to be able to
remove the front cover.
5 Unscrew both screws in the printed circuit
board.
6 Disconnect the printed circuit board from inlet
pin.
28

English
7 Disconnect batteries from the printed circuit
board.
8 Cut the connection between the printed circuit
board and battery with plier.
Guarantee and support
If you need information or support, please visit
www.philips.com/support or read the separate
worldwide guarantee leaet.
293031


保証と
アフター サービス
保証書と修理サービスについて
(必ずお読みください)
〈保証書・最終ページに付属〉
● 保証書は、必ず「お買い上げ日・販売店名」等の記入
をお確かめのうえ、販売店から受け取っていただき
内容をよくお読みの あと大切に保 管してください。
【補修用性能部品の保有期間】
● 補修用性能部品の保有期間は製造打ち切り後6年です。
性能部品とは、その製品の機能を維持するために必要な部品です。
●
保証
お買い上げ日から
期間
本体、充電アダプタ(コーム、
細部用トリマー、細部用コーム、
対象
部分
クリー ニン グブ ラシ 、クリー ニ ング
スティック、ソフトポー チを 除く)
年間
2
【ご不明な点や修理に関するご相談は】
● 修理に関するご相談ならびにご不明な点は、お買い上げの販売店または、
小泉成器修理センターにお問い合わせください。
【修理を依頼されるときは】
● 修理をご依頼される前に、この取扱説明書をよくお読みいただき、再度点検ください。
尚、異常のあるときはご使用を中止し、お買い上げの販売店へご依頼ください。
【保証期間中は】
● 製品に保証書を添えてお買い上げの販売店にご持参ください。
保証書の記載内容により無料修理いたします。
【保証期間が過ぎているときは】
● 修理によって製品の機能が維持できる場合は、補修用性能部品の保有期間内であれば、
ご希望により有料で修理させていただきます。
【海外での本製品の保証及びアフターサービスについて】
● 本製品の保証は海外においても有効です。(同シリーズ製品の取り扱いがある国に限ります)
日本国以外のフィリップスサービス部門においても保証期間内及び保証期間の経過後の
●
アフターサービスを受けることができますが、この場合多少日数を要することもあります。
海外にてアフターサービスを受けられる場合は、現地のフィリップスサービス部門に
●
お問い合わせください。尚、お困りの点がございましたら下記までご連絡ください。
Philips Consumer Lifestyle Service Department P.O.Box 20100 9200 CA DRACHTEN
The Netherlands Fax:+31 51 259 2785
【お客様の個人情報のお取り扱いについて】
● お受けしましたお客様の個人情報は、株式会社フィリップスエレクトロニクスジャパンのホー
ムページ
http://www.philips.co.jp/
についての当社の方針」に基づき適切に管理いたします。
に掲載されている「お客様の個人情報の取り扱い

便利メモ
お買い上げ日 年
月
日
お買い上げ
店 名
ご使用の時、このような症状はありませんか?
●
本体にさわると時々電気を感じる。
● こげくさい臭いがする。
● 電源 コ ード部を動か すと通 電したり、しな かったりする 。
● その他の異常、故障がある。
このような症状の時は、故障や事故防止のため、スイッチを
切り、充電アダプタをコンセントから外して、必ず販売店に
ご相談ください。
仕 様
TEL.
( )
品 番
電源方式
充電アダプタ品番
消費電力
定格電圧
本体質量
充電時間 約1時間
※改良の為、仕様を予告なく変更することがあります。
株式会社 フィリップ ス エ レ クト ロ ニ ク ス ジャパン
充電・交流式(専用充電アダプタ使用)
BT7220/15
HQ8505
9W(AC100V
AC1 00 -24 0V(50/60Hz
約
(コーム 含ま ず)
162g
32
充電時)
)

33

キリトリ線
無料修理規定
〈無料修理規定〉
取扱説明書、本体貼付ラベル等の注意書に従った正常な使用状態で保証期間
1.
内に故障した場合には、無料修理します。
保証期間内に故障して無料修理をお受けになる場合には、商品と保証書をご
2.
持参、ご提示のうえ、お買い上げの販売店にご依頼ください。なお、商品を直接
メーカーへ送付した場合の送料等はお客様の負担となります。
ご贈答、ご転居でお買い上げの販売店に修理を依頼できない場合は、小泉
3.
成器修理センターにご依頼ください。
保証期間内でも次の場合には有料修理になります。
4.
1
使用上の誤り及び不当な修理や改造による故障及び損傷。
○
2
お買い上げ後の輸送、移動、落下等による故障及び損傷。
○
3
火災、地震、水害、落雷、その他の天災地変、公害や異常電圧による故障及び損傷。
○
4
一般家庭以外(例えば、業務用の長時間使用)に使用された場合の故障及び損傷。
○
5
保証書の提示がない場合。
○
6
保証書にお買い上げ年月日、お客様名、販売店名の記入のない場合、或は字句を書き
○
換えられた場合。
※ 保証書は、本書に明示した条件のもとにおいて無料修理をお約束するもの
です。従って保証書を発行している者(保証責任者)、及びそれ以外の事業者
に対するお客様の法律上の権利を制限するものではありません。
保証期間経過後の修理についてご不明の場合は、お買い上げの販売店または
小泉成器修理センターにお問い合わせください。
※
保証期間経過後の修理・補修用性能部品の保有期間について詳しくは取扱
説明書の保証とアフターサービスの項目をご覧ください。
※
お客様にご記入いただいた個人情報(保証書の控え)は保証期間内のサービス
活動及びその後の安全点検活動のために利用させていただく場合がございま
キリトリ線
す。ご了承ください。また個人情報は、株式会社フィリップスエレクトロニクス
ジャパンのホームページ
「お客様の個人情報の取り扱いについての当社の方針」に基づき適切に管理
いたします。
http://www.philips.co.jp/
に掲載されている
34

フィリップ ス バキュームヒゲトリマー 保証書
持込修理
CERTIFICATE OF PURCHASE
この保証書は、「無料修理規定」記載内容で無料修理を行うことをお約束するものです。
お買い上げの日から下記期間中に故障が発生した場合は、本書をご提示のうえ、お買い
上げの販売店に修理をご依頼ください。
お客様にご記入いただいた個人情報(保証書の控え)は、株式会社フィリップスエレクトロ
ニクスジャパンのホームページ
客様の個人情報の取り扱いについての当社の方針」に基づき適切に管理いたします。
品名バキュー ムヒゲトリマー
品番
保証期間お買い上げ日より2年
対象部分
お買い上げ日
お客様
★販売店
★ 保証書は再発行しませんので、大切に保管してください。
ご販売店様へ この保証書はお客様へのアフターサービスの実施と責任を明確にする
★
ものです。贈答品、記念品の場合も含めて必ず記入捺印してお客様にお渡しください。
★
製品に関するお問い合わせ
フィリップスお客様情報センター
ナビダイヤル(全国共通)
0570(07)6666
★
修理に関するお問い合わせ
小泉成器修理センター
ナビダイヤル(全国共通)
0570(09)8888
★
部品に関するお問い合わせ
小泉成器部品センター
ナビダイヤル(全国共通)
http://www.philips.co.jp/
BT7220/15
本体、充電アダプタ(コーム、細部用トリマー、細部用コーム、
クリー ニ ング ブラシ 、クリー ニ ング スティック 、ソフトポー チ を 除く)
年 月 日
ご住所 〒
ご芳名
電話番号
販売店名・住所・電話番号
ナビダイヤルにかからない 時は
TEL 06(6261)8230 FAX 06(6268)1432
日本販売代理店 小泉成器株式会社
〒
〒
〒
〒
大阪市中央区備後町
541-0051
ナビダイヤルにかからない 時は
小泉成器東日本修理センター
埼玉県春日部市水角
344-0127
小泉成器西日本修理センター
ナビダイヤルにかからない 時は
TEL 06(6613)3211
大阪市住之江区南港中1丁目3番98号
559-0033
大阪市住之江区南港中1丁目3番98号
559-0033
に掲載されている「お
3-3-7
TEL 048(718)3340
1190
TEL 06(6613)3145
0570(09)2222
受付時間:平日9:00〜17:30 (土・日・祝日・夏期休暇・年末年始を除く)
この印刷物は再生紙を使用しております。
©2017 Philips Electronics Japan, Ltd.
4222.002.8715.2(01/17
キリトリ線
キリトリ線
)
 Loading...