

Philips BRL140, BRL130 User Manual
234
BRL140, BRL130
5
1
2
67891011121314
© 2015 Koninklijke Philips N.V.
All rights reserved
4222.003.0150.1 (11/2015)
>75% recycled paper
>75% papier recyclé
English
1
6
5
4
9
10
11
2
3
12 13
BRL140
7
8
1
Introduction
Congratulations on your purchase and welcome to
Philips! To fully benefit from the support that
Philips offers, register your product at
www.philips.com/welcome.
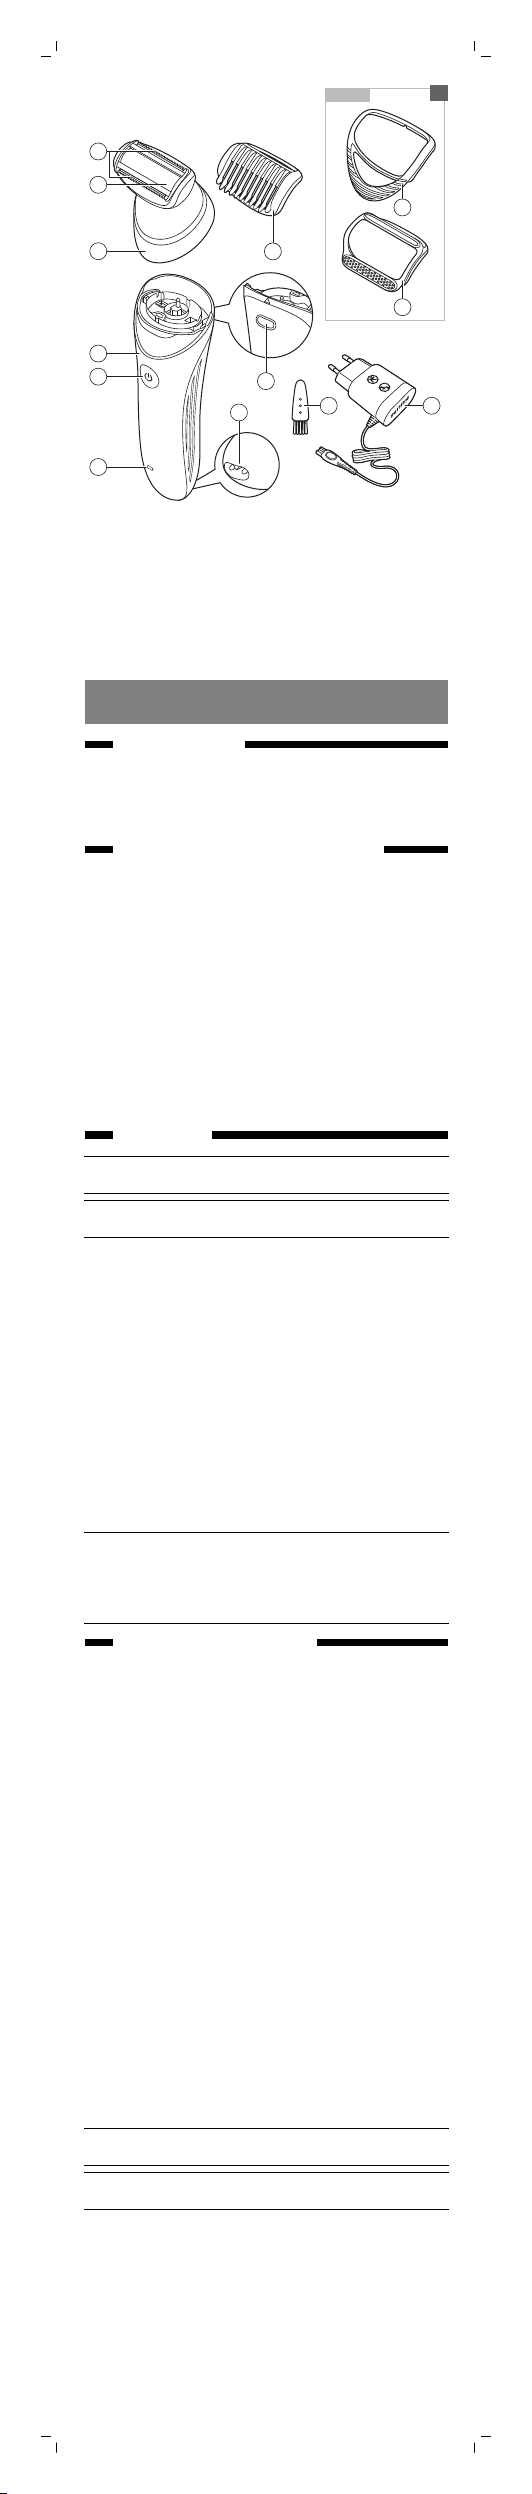
General description (Fig. 1)
1 Handle
2 On/off button
3 Charge indicator
4 Release button
5 Socket for small plug
6 Shaving head
7 Foil
8 Trimmers
9 Trimming comb
10 Skin stetcher cap (BRL140 only)
11 Soft glide cap (BRL140 only)
12 Cleaning brush
13 Adapter
Not shown: Pouch (BRL140 only)
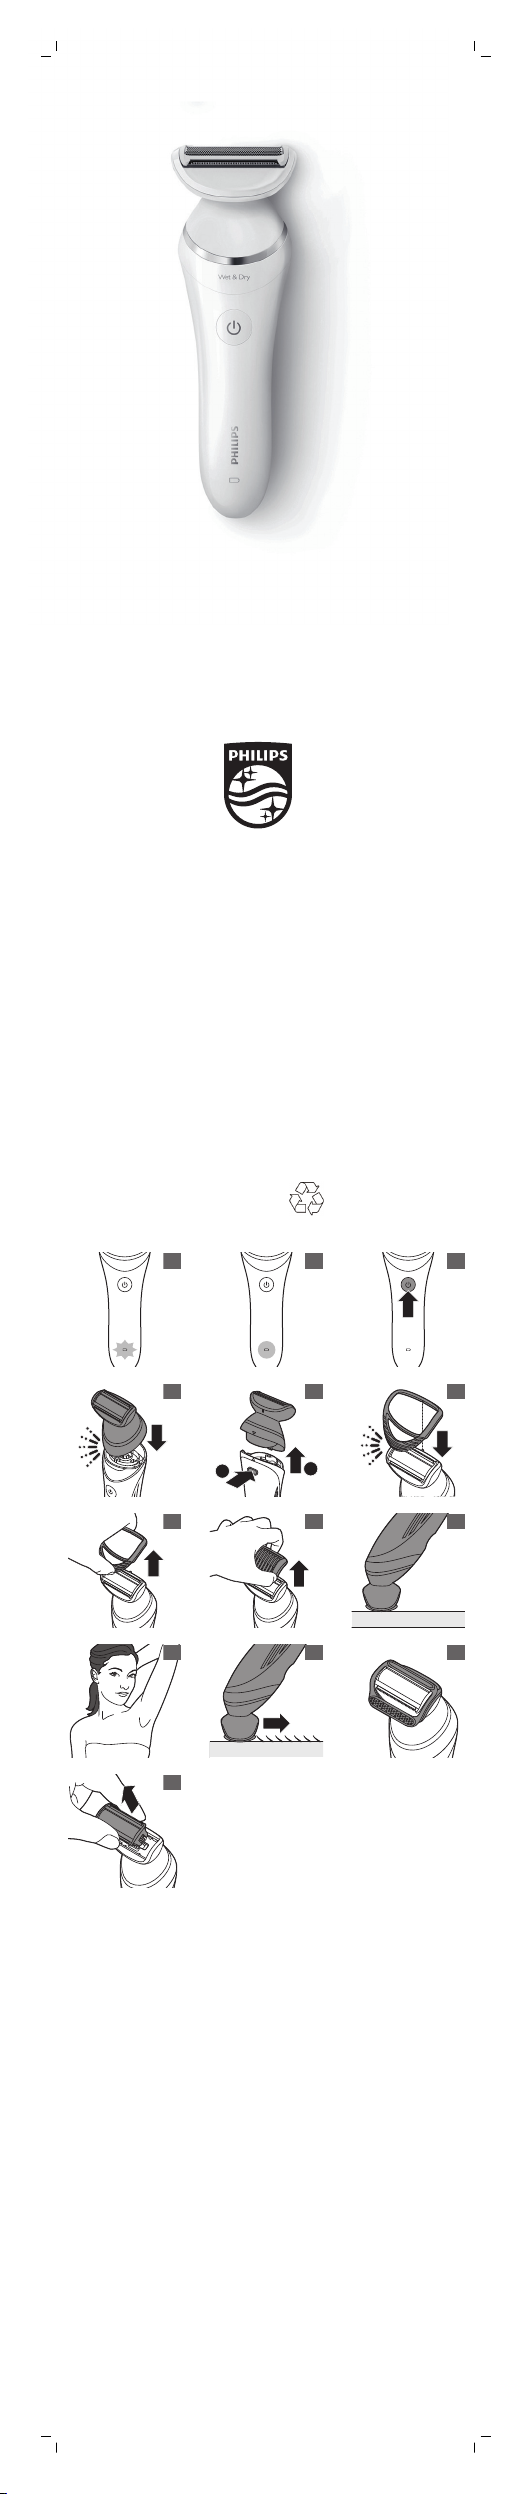
Charging
Note: Charge the appliance fully before you use it
for the first time.
Note: This appliance can only be used without
cord.
To charge the appliance, insert the small plug into
the socket in the bottom of the appliance and put
the adapter in the wall socket.
- The charge indicator flashes white (Fig. 2): the
appliance is charging. Charging takes up to 8
hours.
- The charge indicator lights up white
continuously (Fig. 3): the appliance is fully
charged and has a cordless operating time up
to 60 minutes.
- The charge indicator does not light up when the
appliance is switched on: the appliance
contains enough energy to be used.
- The charge indicator flashes orange (Fig. 2): the
battery is almost empty and needs to be
charged.
Note: If the appliance is fully charged but still
connected to the mains, the charging light flashes
a few times when you press the on/off button. This
indicates that you should disconnect the appliance
from the mains before you can switch it on.
Using the appliance
Switching the appliance on and off
1 To switch on the appliance, press the on/off
button once (Fig. 4).
2 To switch off the appliance, press the on/off
button once more.
Attaching and detaching heads
1 To attach a head, press it onto the handle
('click') (Fig. 5).
2 To detach a head, press the release button on
the back of the appliance (Fig. 6).
Attaching and detaching accessories
1 To attach an accessory, align the indent in the
accessory with the notch on the attachment.
Then snap the accessory onto the attachment
('click') (Fig. 7).
2 To detach an accessory, grab its front and back
and pull it upwards off the attachment. (Fig. 8)
To detach a comb, do not pull at the front and
back but at the sides (Fig. 9).
Shaving and trimming
The appliance is suitable for use in the bath or
shower, but you can also use it dry. If you want to
use creams or body lotion, apply them after you
have used the appliance.
Note: The appliance can only be used without
cord.
Note: When you use the appliance to trim hairs,
use it dry for the best result.
1 Place the appliance on your skin in such a way
that the attachment or accessory is in full
contact with the skin (Fig. 10).
2 When you use the appliance on sensitive areas,
stretch the skin with your free hand. When you
use the appliance on your underarms, raise
your arm and put your hand on the back of
your head to stretch the skin (Fig. 11).
3 Move the appliance slowly against the direction
of hair growth (Fig. 12).
Note: If you move the appliance over your skin too
fast, you may not obtain a smooth result.
Shaving head
You can use the shaving head to shave your legs
and body.
Note: The appliance can be moved in two
directions, for easier shaving of underarms.
Note: Always check the foil before use. If it is
damaged in any way, replace the cutting unit right
away (see 'Replacement').
Trimming comb
You can attach the trimming comb onto the
shaving head to trim hairs to a length of 3mm.
Skin stretcher cap (BRL140 only)
You can attach the skin stretcher cap onto the
shaving head to make the hairs stand upright
during shaving. This makes it easier to remove
them.
Soft glide cap (BRL140 only)
You can attach the soft glide cap onto the shaving
head to cover the back trimmer of the shaving
head for extra safety in curvy areas. The smooth
material makes it glide effortlessly over your skin.
Make sure that you attach the soft glide cap in
such a way that the back trimmer of the shaving
head is covered (Fig. 13).
Cleaning and storage
Keep the adapter dry.
1 Switch off the appliance.
2 Use the cleaning brush to brush away any hairs
that have collected under the trimmers of the
shaving head.
3 Pull the cutting unit out of the shaving head
(Fig. 14).
4 Clean all parts of the shaving head with the
cleaning brush, except the foil.
5 Rinse the cutting unit, shaving head and
accessories under the tap. Shake them firmly to
remove water drops.
6 Let all parts dry completely.
7 Place the cutting unit back into the shaving
head ('click').
8 Put the trimming comb on the shaving head to
prevent damage to the shaving head when you
store it.
9 BRL140 only: Store the appliance, its heads and
accessories in the pouch.
Note: Lubricate trimmer teeth and foils with a drop
of sewing machine oil every six weeks for optimal
performance.
Replacement
To buy accessories or spare parts, visit
www.shop.philips.com/service or go to your Philips
dealer. You can also contact the Philips Consumer
Care Centre in your country (see the worldwide
guarantee leaflet for contact details)
For optimal performance, we advise you to replace
the cutting unit of the shaving head every two
years. If you use the shaving head twice or more
times a week, replace the cutting unit more often.
Always replace the cutting unit with one of the
original type (BRL384).
Tiếng Việt
Giơi thiêu
Chúc mừng bạn đa mua hang và chào mừng bạn
đến với Philips! Để có được lợi ích đầy đủ từ sự hỗ
trợ do Philips cung cấp, hãy đăng ký sản phẩm tại
www.philips.com/welcome.
Mô ta tông quat (Hinh 1)
1 Tay cầm
2 Nut on/off (bât/tăt)
3 Chỉ báo sạc
4 Nút ấn tháo
5 Ổ cắm cho phích cắm nhỏ
6 Đầu cạo
7 Lá
8 Đầu tỉa
9 Lược tỉa
10 Nắp kéo da (chỉ dùng cho BRL140)
11 Nắp trượt mềm (chỉ dùng cho BRL140)
12 Ban chai lam sach
13 Bộ điều hợp
Không được hiển thị: Bao da (Chỉ dùng cho
BRL140)
Cách sạc pin
Lưu ý: Sạc đầy pin cho thiết bị trước khi sử dụng
thiết bị lần đầu.
Lưu ý: Thiết bị này chỉ có thể được sử dụng không
dây.
Để sạc thiết bị, cắm phích cắm nhỏ ở đáy thiết bị
vào ổ cắm và cắm bộ nối tiếp vào ổ điện.
- Chỉ báo sạc nhấp nháy màu trắng (Hinh 2) cho
biết: thiết bị đang sạc. Thơi gian sac pin mât tối
đa 8 giơ.
- Chỉ báo sạc pin sáng liên tục màu trắng (Hinh 3):
đã sạc đầy thiết bị và thời gian hoạt động không
dây lên đến 60 phút.
- Chỉ báo sạc pin sẽ không sáng đèn khi thiết bị
được bật: thiết bị đã chứa đủ năng lượng để sử
dụng.
- Chỉ báo sạc nhấp nháy màu cam (Hinh 2) cho
biết: Pin sắp hết điện và cần được sạc.
Lưu ý: Nếu thiết bị đã sạc đầy pin nhưng vẫn
được nối với nguồn điện, đèn sạc sẽ nhấp nháy một
vài lần khi bạn nhấn nút bật/tắt. Hiện tượng này chỉ
ra rằng bạn nên ngắt nguồn điện kết nối với ứng
dụng trước khi có thể bật nó lên.
Sư dung thiết bị
Bật và tắt thiết bị
1 Để bật thiết bị, nhấn nút on/off (bật/tắt) một lần
(Hinh 4).
2 Để tắt thiết bị, nhấn nút on/off (bật/tắt) thêm
lần nữa.
 Loading...