

Philips BRL140, BRL130 User Manual [tr]
234
BRL140, BRL130
5
1
2
67891011121314
© 2015 Koninklijke Philips N.V.
All rights reserved
4222.003.0145.1 (11/2015)
>75% recycled paper
>75% papier recyclé
English
1
6
5
4
9
10
11
2
3
12 13
BRL140
7
8
1
Introduction
Congratulations on your purchase and welcome to
Philips! To fully benefit from the support that
Philips offers, register your product at
www.philips.com/welcome.
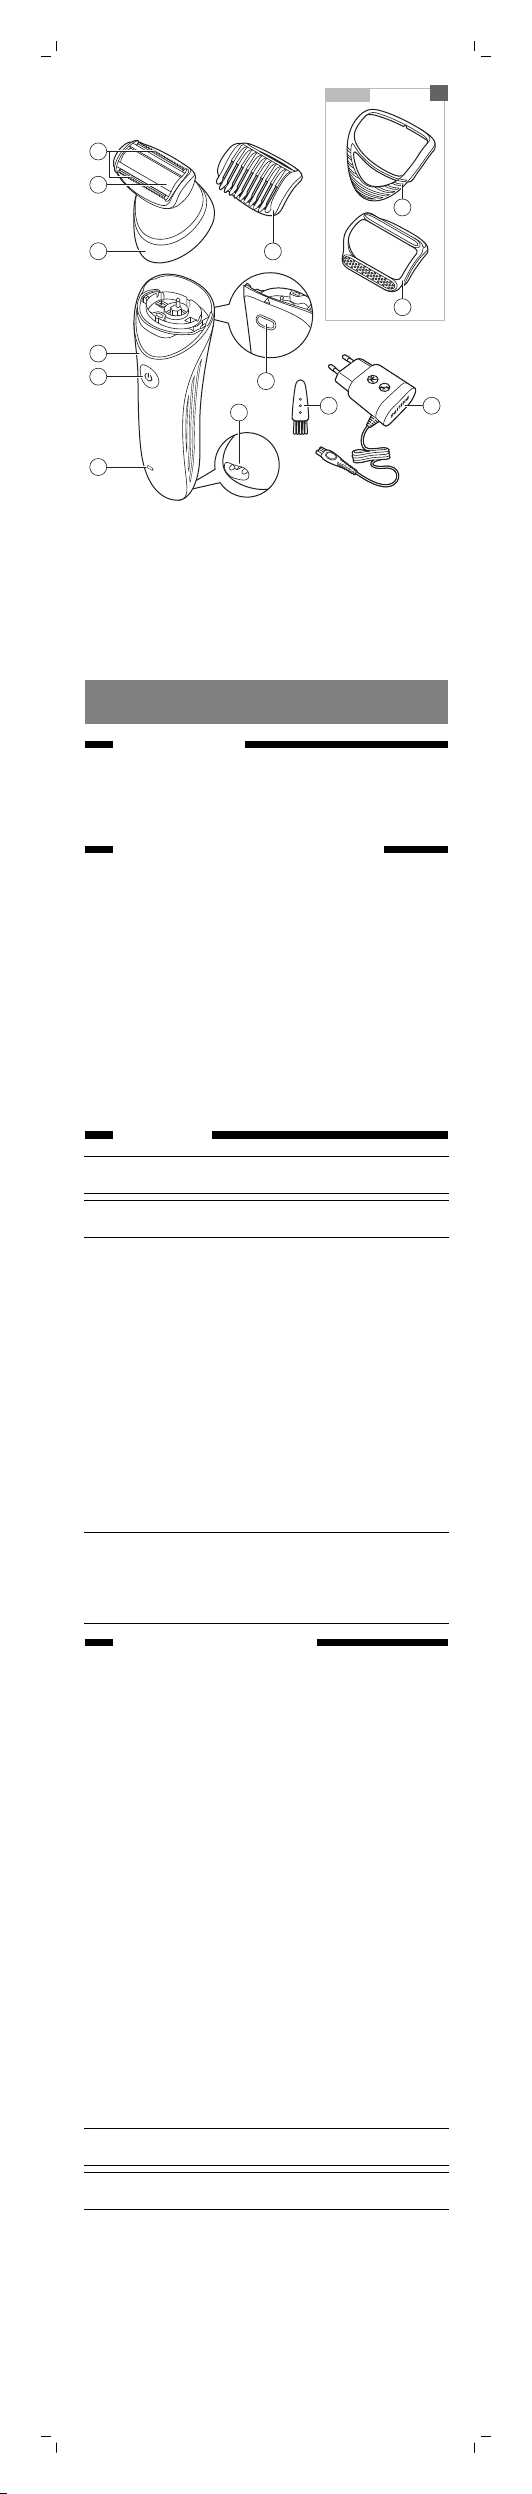
General description (Fig. 1)
1 Handle
2 On/off button
3 Charge indicator
4 Release button
5 Socket for small plug
6 Shaving head
7 Foil
8 Trimmers
9 Trimming comb
10 Skin stetcher cap (BRL140 only)
11 Soft glide cap (BRL140 only)
12 Cleaning brush
13 Adapter
Not shown: Pouch (BRL140 only)
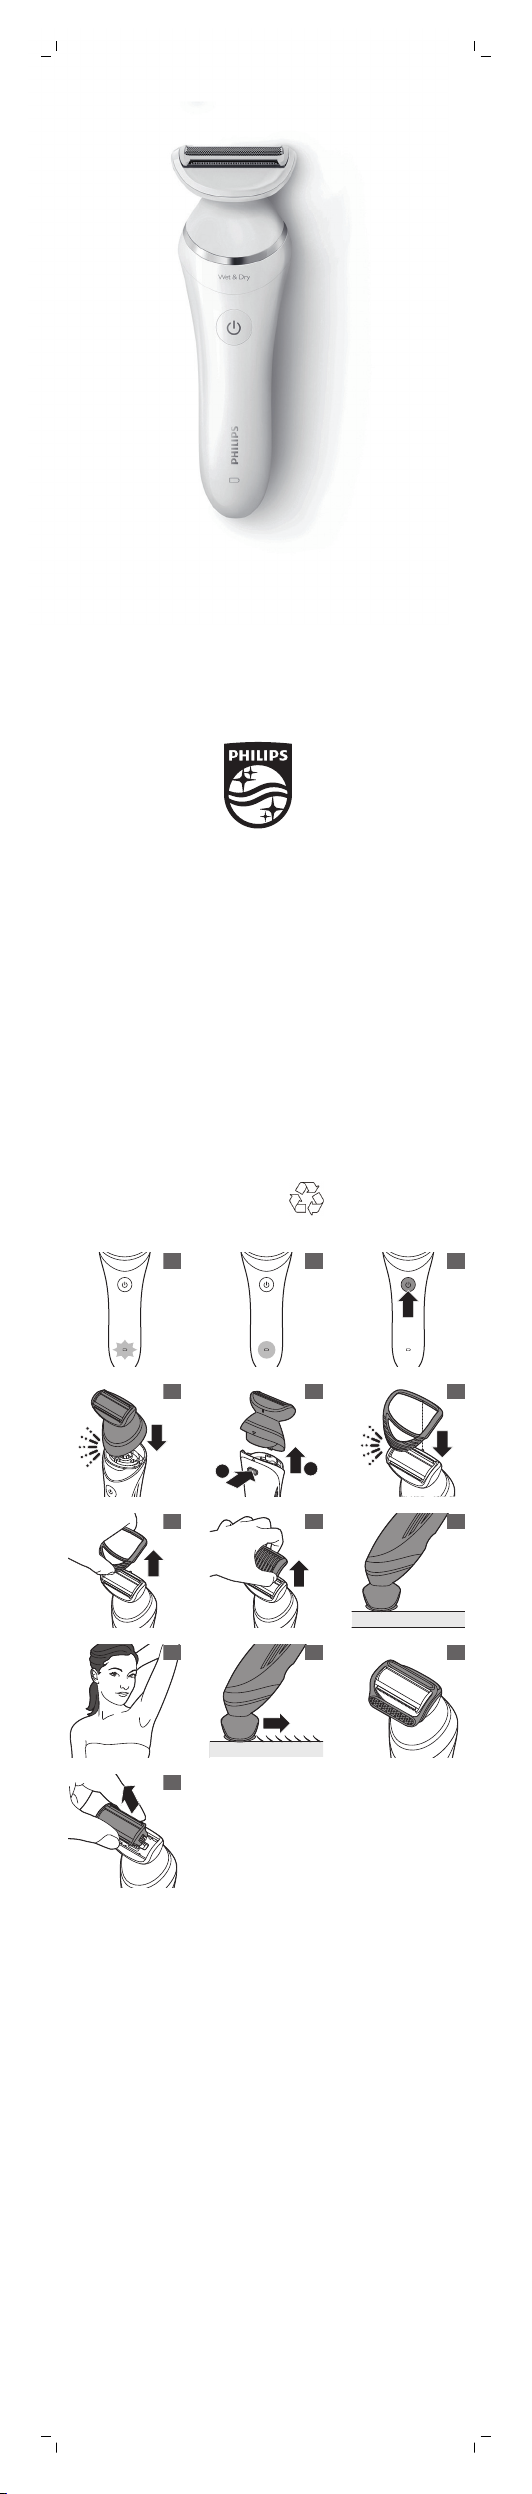
Charging
Note: Charge the appliance fully before you use it
for the first time.
Note: This appliance can only be used without
cord.
To charge the appliance, insert the small plug into
the socket in the bottom of the appliance and put
the adapter in the wall socket.
- The charge indicator flashes white (Fig. 2): the
appliance is charging. Charging takes up to 8
hours.
- The charge indicator lights up white
continuously (Fig. 3): the appliance is fully
charged and has a cordless operating time up
to 60 minutes.
- The charge indicator does not light up when the
appliance is switched on: the appliance
contains enough energy to be used.
- The charge indicator flashes orange (Fig. 2): the
battery is almost empty and needs to be
charged.
Note: If the appliance is fully charged but still
connected to the mains, the charging light flashes
a few times when you press the on/off button. This
indicates that you should disconnect the appliance
from the mains before you can switch it on.
Using the appliance
Switching the appliance on and off
1 To switch on the appliance, press the on/off
button once (Fig. 4).
2 To switch off the appliance, press the on/off
button once more.
Attaching and detaching heads
1 To attach a head, press it onto the handle
('click') (Fig. 5).
2 To detach a head, press the release button on
the back of the appliance (Fig. 6).
Attaching and detaching accessories
1 To attach an accessory, align the indent in the
accessory with the notch on the attachment.
Then snap the accessory onto the attachment
('click') (Fig. 7).
2 To detach an accessory, grab its front and back
and pull it upwards off the attachment. (Fig. 8)
To detach a comb, do not pull at the front and
back but at the sides (Fig. 9).
Shaving and trimming
The appliance is suitable for use in the bath or
shower, but you can also use it dry. If you want to
use creams or body lotion, apply them after you
have used the appliance.
Note: The appliance can only be used without
cord.
Note: When you use the appliance to trim hairs,
use it dry for the best result.
1 Place the appliance on your skin in such a way
that the attachment or accessory is in full
contact with the skin (Fig. 10).
2 When you use the appliance on sensitive areas,
stretch the skin with your free hand. When you
use the appliance on your underarms, raise
your arm and put your hand on the back of
your head to stretch the skin (Fig. 11).
3 Move the appliance slowly against the direction
of hair growth (Fig. 12).
Note: If you move the appliance over your skin too
fast, you may not obtain a smooth result.
Shaving head
You can use the shaving head to shave your legs
and body.
Note: The appliance can be moved in two
directions, for easier shaving of underarms.
Note: Always check the foil before use. If it is
damaged in any way, replace the cutting unit right
away (see 'Replacement').
Trimming comb
You can attach the trimming comb onto the
shaving head to trim hairs to a length of 3mm.
Skin stretcher cap (BRL140 only)
You can attach the skin stretcher cap onto the
shaving head to make the hairs stand upright
during shaving. This makes it easier to remove
them.
Soft glide cap (BRL140 only)
You can attach the soft glide cap onto the shaving
head to cover the back trimmer of the shaving
head for extra safety in curvy areas. The smooth
material makes it glide effortlessly over your skin.
Make sure that you attach the soft glide cap in
such a way that the back trimmer of the shaving
head is covered (Fig. 13).
Cleaning and storage
Keep the adapter dry.
1 Switch off the appliance.
2 Use the cleaning brush to brush away any hairs
that have collected under the trimmers of the
shaving head.
3 Pull the cutting unit out of the shaving head
(Fig. 14).
4 Clean all parts of the shaving head with the
cleaning brush, except the foil.
5 Rinse the cutting unit, shaving head and
accessories under the tap. Shake them firmly to
remove water drops.
6 Let all parts dry completely.
7 Place the cutting unit back into the shaving
head ('click').
8 Put the trimming comb on the shaving head to
prevent damage to the shaving head when you
store it.
9 BRL140 only: Store the appliance, its heads and
accessories in the pouch.
Note: Lubricate trimmer teeth and foils with a drop
of sewing machine oil every six weeks for optimal
performance.
Replacement
To buy accessories or spare parts, visit
www.shop.philips.com/service or go to your Philips
dealer. You can also contact the Philips Consumer
Care Centre in your country (see the worldwide
guarantee leaflet for contact details)
For optimal performance, we advise you to replace
the cutting unit of the shaving head every two
years. If you use the shaving head twice or more
times a week, replace the cutting unit more often.
Always replace the cutting unit with one of the
original type (BRL384).
Dansk
Introduktion
Tillykke med dit køb, og velkommen til Philips! For
at få fuldt udbytte af den support, Philips tilbyder,
skal du registrere dit produkt på
www.philips.com/welcome.
Generel beskrivelse (fig. 1)
1 Håndgreb
2 On/off-knap
3 Opladningsindikator
4 Udløserknap
5 Lille strømstik
6 Shaverhoved
7 Skær
8 Trimmere
9 Trimmekam
10 Hudstrammerkappe (kun BRL140)
11 Kappe til hudvenlig barbering (kun BRL140)
12 Cleaning brush
13 Adapter
Ikke vist: Etui (kun BRL140)
Opladning
Bemærk: Før apparatet bruges første gang, skal det
være helt opladet.
Bemærk: Dette apparat kan kun bruges uden
ledning.
Apparatet oplades ved at sætte det lille stik i
indgangen i bunden af apparatet og sætte
adapteren i stikkontakten.
- Opladningsindikatoren blinker hvidt (fig. 2):
Apparatet oplades. Opladningen kan tage op til
otte timer.
- Opladningsindikatoren lyser hvidt (fig. 3):
Apparatet er fuldt opladet og har en ledningsfri
brugstid på op til 60 minutter.
- Opladningsindikatoren lyser ikke, når apparatet
tændes: Apparatet er opladet og klar til brug.
- Opladningsindikatoren blinker orange (fig. 2):
Batteriet er næsten afladet og skal oplades.
Bemærk: Hvis apparatet er helt opladet, men
stadig sluttet til stikkontakten, blinker
opladningsindikatoren et par gange, når der
trykkes på tænd/sluk-knappen. Dette angiver, at
du skal frakoble apparatet fra stikkontakten, før du
kan bruge det.
Sådan bruges apparatet
Sådan tændes og slukkes apparatet
1 Apparatet tændes ved at trykke én gang (fig. 4)
på tænd/sluk-knappen.
2 Tryk på tænd/sluk-knappen igen for at slukke
apparatet.

Montering og afmontering af hoveder
1 Hovedet monteres ved at trykke det fast på
håndtaget (der høres en kliklyd) (fig. 5).
2 Hovedet afmonteres ved at trykke på
udløserknappen bag på apparatet (fig. 6).
Montering og afmontering af tilbehør
1 Tilbehør monteres ved at rette dets indhak ind
efter hovedets tap. Sæt derefter tilbehøret på
hovedet (der høres en kliklyd) (fig. 7).
2 Tilbehør afmonteres ved at tage fat om dets
for- og bagside og trække det af hovedet (fig.
8). Når en kam skal afmonteres, skal der ikke
trækkes i dens for- og bagside, men derimod i
siderne (fig. 9).
Barbering og trimning
Apparatet er velegnet til brug i badet (badekar eller
brusebad), men kan også bruges, når kroppen ikke
er våd. Hvis du vil bruge cremer eller bodylotion,
skal disse påføres, når du er færdig med at bruge
apparatet.
Bemærk: Apparatet kan kun bruges uden ledning.
Bemærk: Når du bruger apparatet til trimning af
hår, skal du bruge det tørt for at opnå det bedste
resultat.
1 Hold apparatet på en sådan måde, at hovedet
eller tilbehøret er i direkte kontakt med huden
(fig. 10).
2 Når du bruger apparatet på følsomme områder,
skal du stramme huden med den anden hånd.
Når du bruger apparatet til armhulen, skal du
løfte armen og føre hånden om til nakken for at
stramme huden (fig. 11).
3 Bevæg apparatet med langsomme bevægelser
imod hårenes vækstretning (fig. 12).
Bemærk: Hvis du bevæger apparatet for hurtigt
hen over huden, får du muligvis ikke et glat resultat.
Shaverhoved
Du kan bruge shaverhovedet til barbering af
kroppen og benene.
Bemærk: Apparatet kan bevæges i to retninger for
at gøre det nemmere at barbere armhulerne.
Bemærk: Kontrollér altid skæret inden brug. Hvis
det på nogen måde er beskadiget, skal
skærhovedet udskiftes med det samme (se
"Udskiftning").
Trimmekam
Du kan sætte trimmekammen på shaverhovedet
for at trimme hårene til en længde på 3 mm.
Hudstrammerkappe (kun BRL140)
Du kan sætte hudstrammerkappen på
shaverhovedet for at få hårene til at rejse sig under
barberingen. Det gør det lettere at barbere hårene
af.
Kappe til hudvenlig barbering (kun BRL140)
Du kan sætte kappen til hudvenlig barbering på
shaverhovedet for at dække den bageste trimmer,
så du ikke risikerer at skære dig de steder, hvor
huden runder. Det bløde materiale sikrer, at skæret
glider let hen over huden.
Sørg for at montere kappen til hudvenlig barbering
på en sådan måde, at shaverhovedets bageste
trimmer er dækket (fig. 13).
Rengøring og opbevaring
Hold adapteren tør.
1 Sluk for apparatet.
2 Brug rensebørsten til at fjerne de hår, der har
samlet sig shaverhovedets trimmere.
3 Træk skærenheden ud af shaverhovedet (fig.
14).
4 Rengør alle dele af shaverhovedet med
rensebørsten, undtagen skæret.
5 Skyl skærenheden, shaverhovedet og tilbehøret
under vandhanen. Ryst delene grundigt for at
fjerne vanddråber.
6 Lad alle delene tørre helt.
7 Sæt skærenheden tilbage i shaverhovedet (der
høres en kliklyd).
8 Sæt trimmekammen på shaverhovedet, så det
ikke bliver beskadiget under opbevaring.
9 Kun BRL140: Opbevar apparatet, dets hoveder
og tilbehør i etuiet.
Bemærk: Smør trimmerens tænder og skær med en
dråbe symaskineolie hver sjette uge for at sikre
optimal funktionsevne.
Udskiftning
Du kan købe tilbehør og reservedele på
www.shop.philips.com/service eller hos din
Philips-forhandler. Du kan også kontakte det
lokale Philips-kundecenter (du kan finde
kontaktoplysninger i folderen "World-Wide
Guarantee").
For at få optimal ydeevne anbefaler vi, at du
udskifter shaverhovedets skærenhed hvert andet
år. Hvis du bruger shaverhovedet to gange om
ugen eller mere, skal du udskifte skærenheden
oftere. Udskift altid skærenheden med en af den
oprindelige type (BRL384).
Suomi
Johdanto
Onnittelut ostoksestasi – ja tervetuloa Philipskäyttäjien joukkoon! Saat parhaan mahdollisen
hyödyn Philipsin palveluista rekisteröimällä
tuotteesi osoitteessa www.philips.com/welcome.
Laitteen osat (kuva 1)
1 Runko
2 Virtapainike
3 Latauksen merkkivalo
4 Vapautuspainike
5 Liitäntä pienelle liittimelle
6 Ajopää
7 Teräverkko
8 Trimmerit
9 Ohjauskampa
10 Ihon venytinosa (vain BRL140)
11 Pehmeä suojus (vain BRL140)
12 Cleaning brush
13 Verkkolaite
 Loading...