

Page 1
Register your product and get support at
www.philips.com/welcome
BDP7600/93
EN User manual 9
ZH-CN Ⴌ߀൱Ҭ 33
Page 2

EN
ZH-CN
Before you connect this Blu-ray disc/ DVD player, read and understand all accompanying instructions.
ঙඵְޝޝ௯/DVD ӎۄࡱሏಏĩೊྗᅩ٢Ӌ๐ᄗܚם؇ฌd
Page 3
Register your product and get support at
TOP
DISC /
POP-UP
MENU
OK
www.philips.com/welcome
BDP7600
1
HDMI
F
DE
ABC
GH
I
O
MN
JKL
PQRS
WXYZ
TUV
AU
DI
O
SUBTITLE
( )
LAN
2CH/SURROUND REAR
&+
EN User manual
VIDEO
5.1CH
COAXIAL OPTICAL
2CH 5.1CH
7.1CH
3
Page 4
2
2CH/SURRO
UND
A
R
1 HDMI
2 VIDEO+2 CH
2CH/SURROUND REAR
RE
4
Page 5
/
SURRUND
OPTICAL
COAXIAL
HDMI
7.1 CH
2CH/SURROUND2CH
5.1 CH
5.1CH
5.1CH
5
Page 6

3
4
6
5
1
2
SOURCE
TV
Page 7
6
EF
ABC
EF
ABC
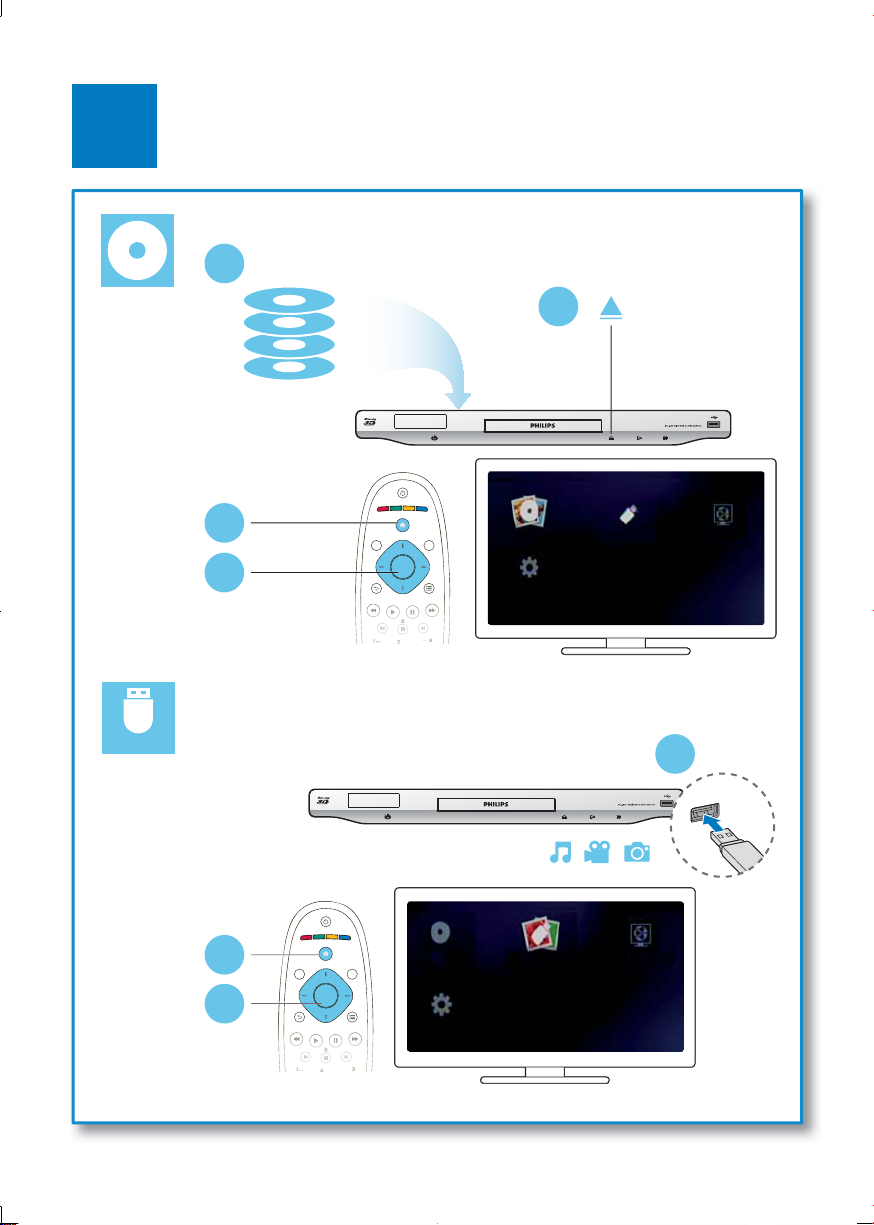
2
BD/BD 3D
DVD/VCD/CD
DivX Plus HD/MKV
MP3 / JPEG
1
USB
3
4
TOP
DISC /
POP-UP
MENU
OK
Setup
DEF
ABC
browse USBplay Disc
browse PC
1
2
3
TOP
DISC /
POP-UP
MENU
OK
Setup
DEF
ABC
browse USBplay Disc
browse PC
7
Page 8

Page 9
Contents
1 Hookup and play 2-7
2 Use your Blu-ray disc/ DVD player 10
Basic play control 10
Video, audio and picture options 11
DivX videos 13
RMVB or RM files 13
Play a musical slideshow 14
BonusView on Blu-ray 14
BD-Live on Blu-ray 14
Play a Blu-ray 3D video 15
Set up a network 15
iPhone 16
Browse PC (DLNA) 17
Set up surround sound 17
Use Philips EasyLink 18
3 Change settings 19
Picture 19
Sound 20
Network (installation, status) 20
Preference (languages, parental control...) 20
Advanced options (clear memory...) 21
4 Update software 22
Update software via the Internet 22
Update software via USB 22
English
5 Specifications 23
6 Troubleshooting 25
7 Safety and important notice 28
9EN
Page 10
2 Use your Blu-ray disc/ DVD player
Congratulations on your purchase, and welcome to Philips! To fully benefit from the suppor t that Philips
offers (e.g. product software upgrade), register your product at www.philips.com/welcome.
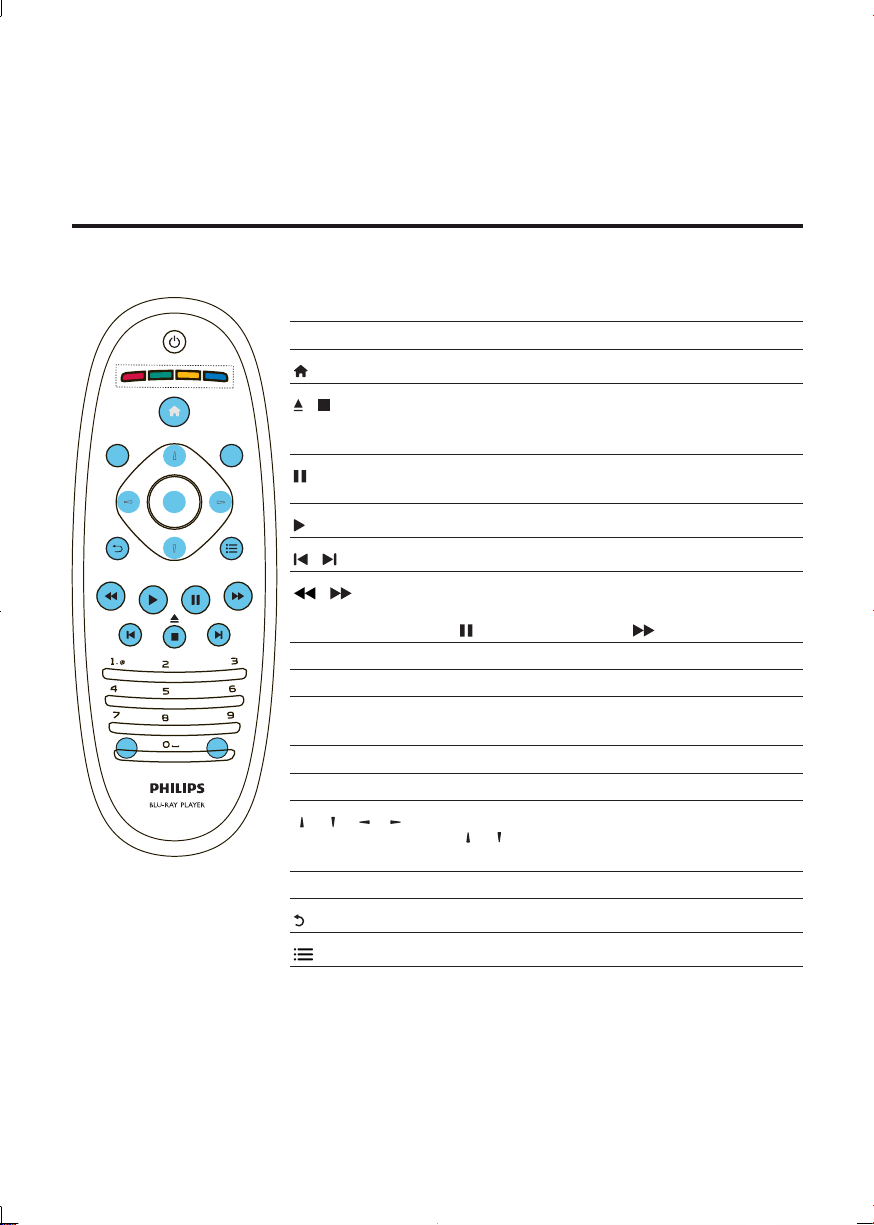
Basic play control
During play, press the following buttons to control.
Button Action
Access the home menu.
Stop play.
Press and hold (more than 4 seconds) to open or
close the disc compar tment.
Pause play.
Press repeatedly to slow forward frame by frame.
Star t or resume play.
Skip to the previous or next track, chapter or file.
Fast backward or forward.
Press repeatedly to change the search speed.
Press
once, and then press to slow forward.
Access or exit the disc menu.
Navigate the menus.
Press
/ to rotate a picture clockwise or
counter-clockwise during slideshow.
Return to a previous display menu.
Access more options during play.
DISC /
POP-UP
GHI
AUDIO
PQRS
OK
/
TOP
MENU
/
/
DEF
ABC
MNO
JKL
WXYZ
TUV
SUBTITLE
AUDIO Select an audio language or channel.
SUBTITLE Select a subtitle language.
DISC /
POP-UP
TOP MENU Access the main menu of a video disc.
Color buttons Select tasks or options for Blu-ray discs.
/ / /
OK Confirm a selection or entry.
EN
10
Page 11
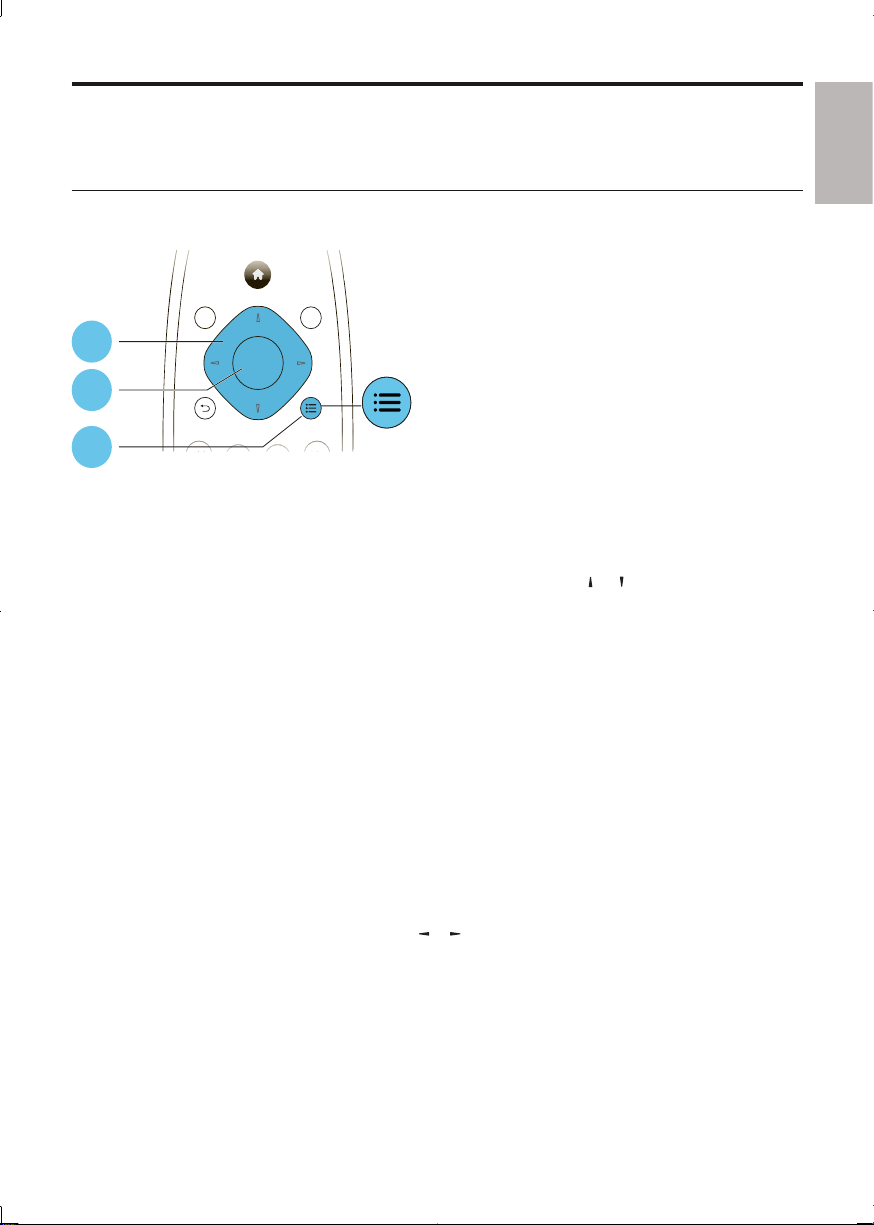
Video, audio and picture options
More options are available for video or picture play from a disc or USB storage device.
Video options
OK
TOP
MENU
DISC /
POP-UP
2
3
1
Access more options during video play.
• [Audio Language]: Select an audio language.
• [Subtitle Language]: Select a subtitle language.
• [Subtitle Shift]: Change the subtitle position on the screen. Press
position.
• [Info]: Display play information.
• [Character Set]: Select a character set that supports the DivX video subtitle (only for DivX
videos).
• [Time Search]: Skip to a specific time via the numeric buttons on the remote control.
• [2nd Audio Language]: Select the second audio language (only for Blu-ray discs that suppor t
BonusView).
• [2nd Subtitle Language]: Select the second subtitle language (only for Blu-ray discs that suppor t
BonusView).
• [Titles]: Select a title.
• [Chapters]: Select a chapter.
• [Angle List]: Select a camera angle.
• [Menus]: Display a disc menu.
• [PIP Selection]: Display a picture-in-picture window (only for Blu-ray discs that support
BonusView).
• [Zoom]: Zoom into a video picture. Press
• [Repeat]: Repeat a chapter or title.
• [Repeat A-B]: Mark two points within a chapter for repeat play, or turn off repeat mode.
• [Picture Settings]: Select a predefined color setting.
• [User]: Select a personalized picture setting (activated only when [User] under [Picture
Settings] is selected).
/ to select a zoom factor.
/ to change the subtitle
English
11EN
Page 12

Note
Available video options depend on the video source. •
Picture options
OK
TOP
MENU
DISC /
POP-UP
2
3
1
Access more options during slideshow.
• [Rotate +90]: Rotate a picture 90 degrees clockwise. Press
• [Rotate -90]: Rotate a picture 90 degrees counter-clockwise. Press
• [Zoom]: Zoom into a picture. Press
slideshow.
• [Info]: Display picture information.
• [Duration per slide]: Set a display interval for a slideshow.
• [Slide Animation]: Select a transition effect for a slideshow.
• [Picture Settings]: Select a predefined color setting.
• [Repeat]: Repeat a selected folder.
Audio options
OK
/ to select a zoom factor. Press to continue
to continue slideshow.
to continue slideshow.
Press repeatedly to cycle through the following options.
Repeat the current track.•
Repeat all the tracks on the disc or folder.•
Play audio tracks in a random loop.•
Turn off a repeat mode.•
EN
12
Page 13
DivX videos
You can play DivX videos from a disc, or a USB storage device.
VOD code for DivX
Before you purchase DivX videos and play them on this player, register this player on www.•
divx.com using the DivX VOD code.
Display the DivX VOD code: press •
Code].
DivX subtitles
Press • SUBTITLE to select a language.
If the subtitle is not displayed correctly, change the character set that suppor ts the DivX •
subtitle. Select a character set: press
Character set Languages
[Standard] English, Albanian, Danish, Dutch, Finnish, French, Gaelic, German, Italian, Kurdish
(Latin), Norwegian, Portuguese, Spanish, Swedish and Turkish
[Chinese] Simplified Chinese
[Chinese-
Tradit ional]
[Korean] English and Korean
Note
To play DivX DRM protected files from a USB storage device, connect this player to a TV through HDMI. •
To use the subtitles, make sure that the subtitle file has the same name as the DivX video file name. For •
example, if the DivX video file is named “movie.avi”, save the subtitle file as “movie.srt”, or “movie.sub”.
This player can play subtitle files in the following formats: .srt, .sub, .tx t, .ssa, and .smi.
•
Traditional Chinese
, and select [Setup] > [Advanced] > [DivX® VOD
, and select [Character Set].
English
RMVB or RM files
You can play RMVB or RM files from a disc or a USB storage device.
An Real Media Variable Bitrate (RMVB) and RealMedia (RM) file contains both audio and video. You can
copy an RMVB or RM file from your computer onto a recordable disc or USB storage device. And play
them from this player.
Note
Make sure that the file extension must be “.RMVB”, “.RMV”, or “.RM”. •
13EN
Page 14
Play a musical slideshow
Play music and pictures simultaneously to create a musical slideshow.
1 From a disc or connected USB storage device, play a music file.
2 Press , and go to the picture folder.
3 Select a picture from the same disc or USB, and press OK to start slideshow.
4 Press to stop slideshow.
5 Press again to stop music play.
BonusView on Blu-ray
View special content (such as commentaries) in a small screen window.
This feature is only applicable to Blu-ray discs compatible with BonusView (also known as picture in
picture).
1 During play, press .
The options menu is displayed. »
2 Select [PIP Selection] > [PIP], and press OK.
PIP options [1]/[2] depend on the video contents. »
The secondary video window is displayed. »
3 Select [2nd Audio Language] or [2nd Subtitle Language], and press OK.
BD-Live on Blu-ray
Access exclusive online services, such as movie trailers, games, ringtones and other bonus contents.
This feature is only applicable to Blu-ray discs that are BD-Live enabled.
1 Prepare the Internet connection and set up a network (see “Set up a network ”).
2 Connect a USB storage device to this player.
A USB storage device is used to store the downloaded BD-Live content.•
To delete the BD-Live previously downloaded on the USB storage device for memory •
release, press
and select [Setup] > [Advanced] > [Clear memory].
3 Play a disc that is BD-Live enabled.
4 On the disc menu, select the BD-Live icon, and press OK.
BD-Live starts to load. The loading time depends on the disc and the Internet connection. »
5 On the BD-Live interface, select an item to access.
Note
BD- Live ser vices vary from discs and countries. •
When you use BD-Live, data on the disc and this player are accessed by the content provider •
Use a USB storage device with at least 1GB of free space to store the download. •
EN
14
Page 15
Play a Blu-ray 3D video
Before you start, make sure that:
the TV is 3D compliant, and is connected to this player through HDMI•
the disc is a Blu-ray 3D disc•
you have 3D glasses compatible with the TV.•
1 Make sure that 3D output is turned on: press , and select [Setup] > [Video] > [Watch 3D
video]> [Auto].
2 Play a Blu-ray 3D video.
3 Put on the 3D glasses for 3D effects.
To play 3D video in 2D, turn off Blu-ray 3D output (press •
> [Watch 3D video]> [Off]).
, and select [Setup] > [Video]
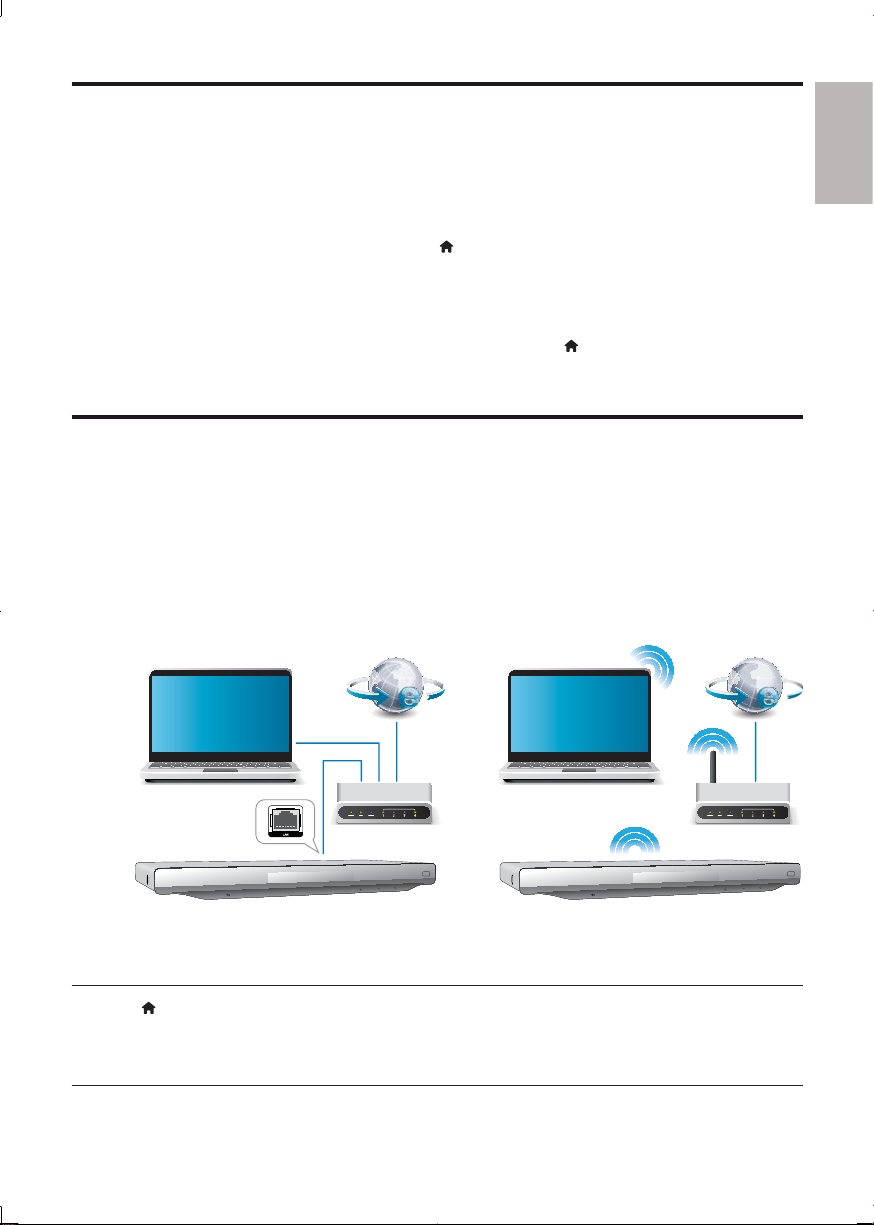
Set up a network
Connect this player to a computer network and the Internet to access the services:
• Browse PC (DLNA): play photos, music and video files streamed from your computer.
• Update software: update the sof tware of this player via the Internet.
• BD-Live: access online bonus features (applicable to Blu-ray discs that are BD-Live enabled).
1 Connect this player to a computer network and the Internet, through wired (Ethernet) or
wireless connection.
This player has a built-in Wi-Fi for a wireless connection.•
PC (DLNA) PC (DLNA)
English
2 Perform the network installation.
1), Press .
2), Select [Setup], and press OK.
3), Select [Network] > [Network Installation], and press OK.
4), Follow the instructions on the TV screen to complete the installation.
15EN
Page 16

Caution
Before you connect to a network, familiarize yourself with the network router, media server software for •
DLNA , and net working principles. If necessary, read documentation accompanying network components.
Philips is not responsible for lost, damaged or corrupt data.
iPhone
With an iPhone screen as a remote control, you can browse and play media files of a disc or USB
storage device in this player.
What you need
Download the smar tphone control application for Philips from the iTunes store to your iPhone.•
Connect this player to a home network (see “Set up a network”).•
Connect your iPhone to the same home network (see the user manual of the iPhone for •
details).
iPhone control
1 Insert a disc or USB storage device into this player.
2 On the iPhone screen, tap the smar tphone control icon.
If the control icon is not displayed, download the smartphone control application for Philips •
to the iPhone.
After a search, the name of this player is displayed.•
3 Select this player from the iPhone screen.
The iPhone used as a remote control for this player is enabled. »
The control buttons are displayed on the iPhone screen, and control functions can vary from »
play modes.
4 From the iPhone screen, touch the source tab, and then select the DISC or USB option.
The folders in the disc or USB storage device are displayed. »
5 Open a folder, and select a file to play.
6 Tap the control buttons on the iPhone screen to control the play.
To exit the application, press the home button on the iPhone.•
EN
16
Page 17
Browse PC (DLNA)
With this DLNA-certified player connected to a computer network, you can play video, music, and
photo from a computer.
Note
To browse a PC, make sure that a DLNA media ser ver software (such as Windows Media Player 11 or •
higher) is installed on the PC.
1 Connect this player to a computer network (see “Set up a network”).
2 On the PC, in the software of the DLNA media ser ver (such as Windows Media Player 11 or
higher), you need to set:
a Share my media to this player (see “Help” document in the media server software).
b Share files or add files to the library (see “Help” document in the media server
software).
3 Press .
4 Select [browse PC], and press OK.
A content browser is displayed. »
5 Select a file, and press OK to play.
You may control play with the disc play features.•
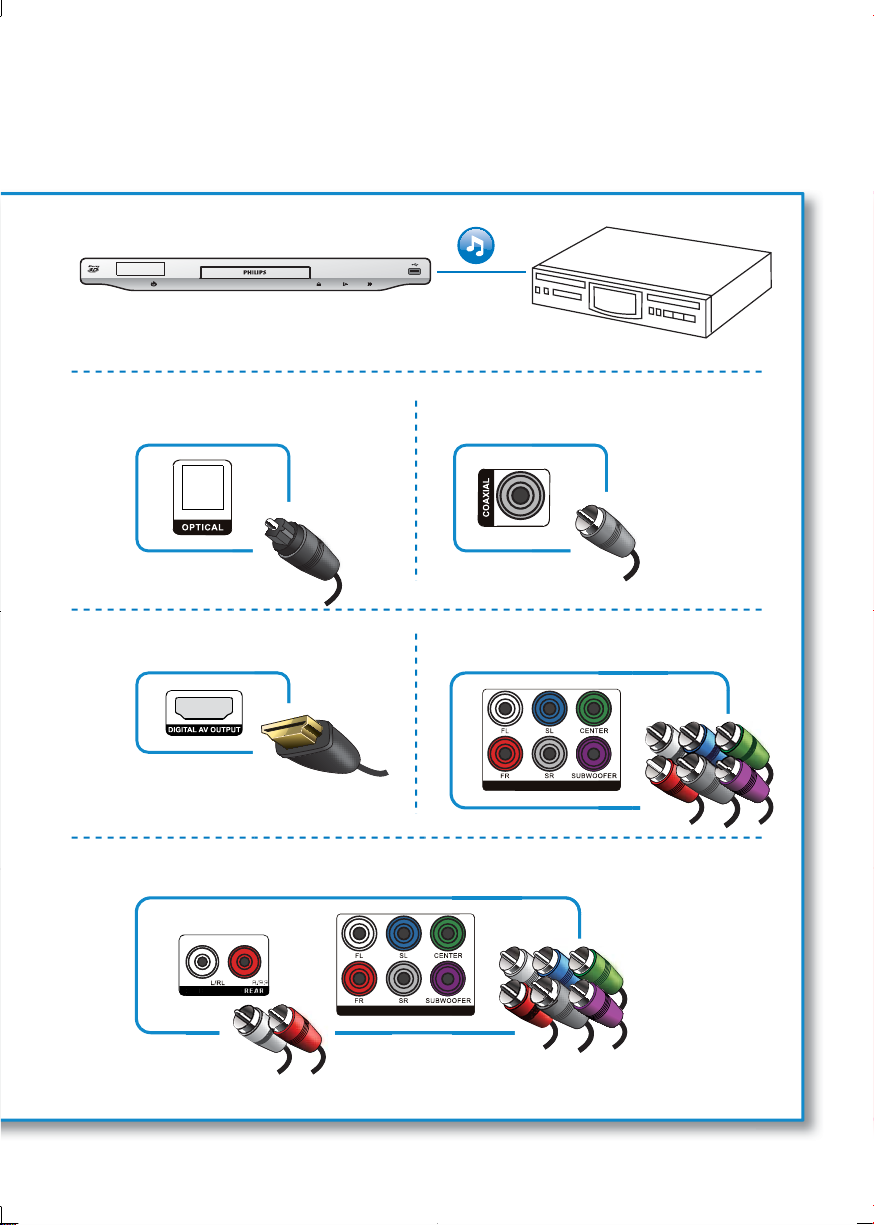
Set up surround sound
This player can connect to a 7.1 channel or 5.1 channel AV receiver for surround sound output.
1 See the illustration on page 5. Connect 7.1 or 5.1 channel audio cables (not supplied) to:
• 7.1 C H (or 5.1 CH) connectors on this player.
the corresponding AUDIO connectors on the receiver.•
2 Connect a set of speakers (not supplied) to the AV receiver (refer to the user manuals for the
AV receiver and the speakers).
3 Press , and select [Setup] > [Audio] > [Channels] > [7.1 channel] or [2 channel & 5.1
channel].
If this player is connected to a 7.1 channel AV receiver, select • [7.1 channel].
If this player is connected to a 5.1 channel AV receiver, select • [2 channel & 5.1 channel].
4 Optimize surround sound output: press again, and select [Setup] > [Audio] > [Speaker
Setup].
Enter the distance for each speaker, and then listen to the test tones and adjust the •
volume. Experiment a little with the speaker positions to find the ideal setting.
English
17EN
Page 18

Use Philips EasyLink
This player supports Philips EasyLink which uses the HDMI CEC (Consumer Electronics Control)
protocol. You can use a single remote control to control EasyLink compliant devices that are connected
through HDMI. Philips does not guarantee 100% interoperability with all HDMI CEC devices.
1 Connect the HDMI CEC compliant devices through HDMI, and turn on the HDMI CEC
operations on the TV and other connected devices (see the user manual of the TV or other
devices for details).
2 Press .
3 Select [Setup]> [EasyLink].
4 Select [On] under the options: [EasyLink], [One Touch Play] and [One Touch Standby].
EasyLink function is turned on. »
One Touch Play
When you play a disc on this player, the TV automatically switches to the correct video input
source.
One Touch Standby
When a connected device (for example TV) is put to standby with its own remote control, this
player is put to standby automatically.
EN
18
Page 19

3 Change settings
This section helps you to change the settings of this player.
browse USBplay Disc
Setup
browse PC
Note
You cannot change a menu option that is grayed out. •
To return to the previous menu, press • . To exit the menu, press .
Picture
Press .
1
2 Select [Setup] > [Video] to access the video setup options.
• [TV Display]: Select a picture display format to fit the TV screen.
• [HDMI Video]: Select an HDMI video resolution.
• [HDMI Deep Color]: Display colors with more shades and hues when the video content is
recorded in Deep Color and the T V suppor ts this feature.
• [Picture Settings]: Select a predefined color setting.
• [User]: Select a personalized picture setting. This option is activated only when [User] under
[Picture Settings] is selected.
• [Watch 3D video]: Set to 3D or 2D output when playing a Blu-ray 3D disc. The player must be
connected to a 3D TV through HDMI.
English
Note
If you change a setting, make sure that the TV supports the new setting. •
For set tings related to HDMI, the T V must be connected through HDMI. •
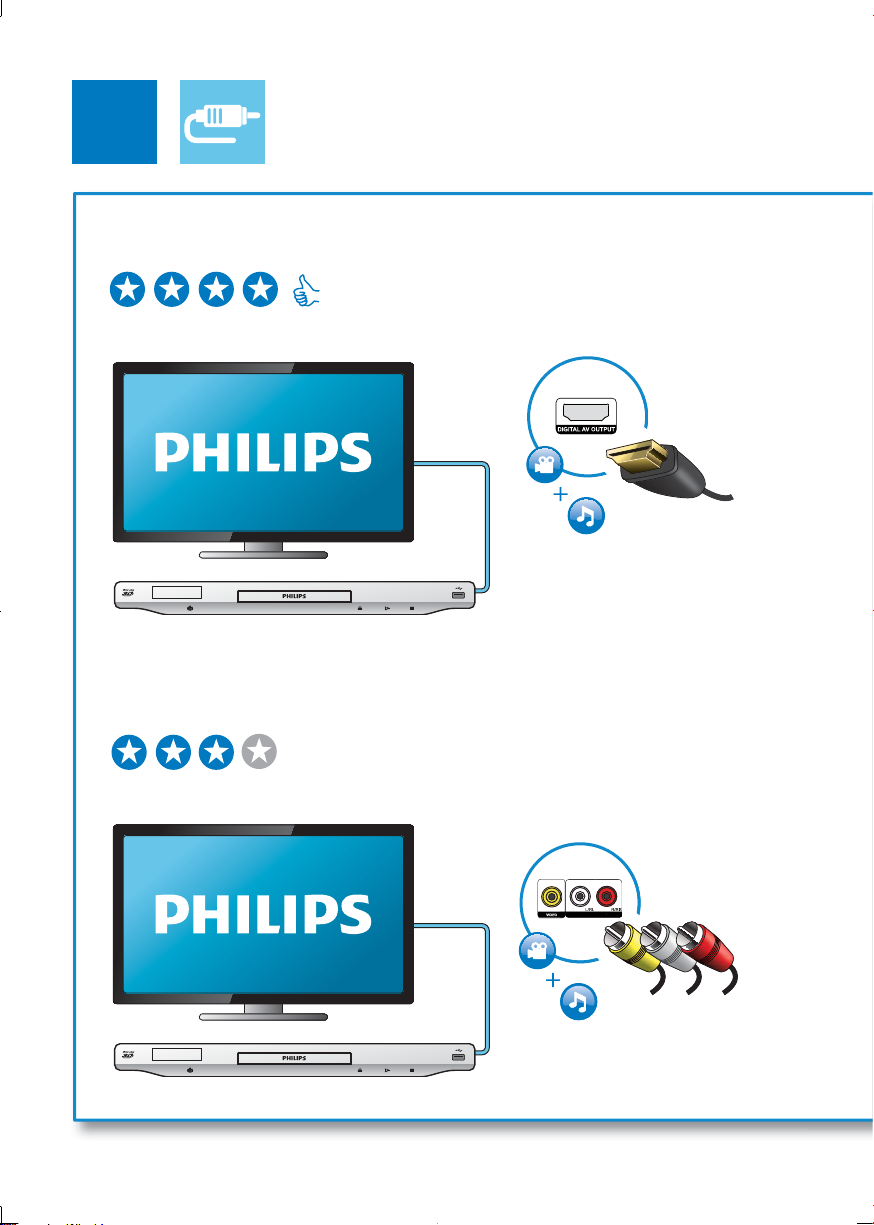
For the composite connection (via the • VIDEO connector), select a video resolution of 480i/576i or
480p/576p under [HDMI Video] to enable video output.
19EN
Page 20

Sound
Press .
1
2 Select [Setup] > [Audio] to access the audio setup options.
• [Night Mode]: Select quiet or full dynamic sound. Night mode decreases the volume of loud
sound and increases the volume of sof t sound (such as speech).
• [Neo 6]: Enable or disable a surround sound effect which is converted from 2.0 channel audio.
• [HDMI Audio]: Set an HDMI audio format when this player is connected through HDMI.
• [Digital Audio]: Select an audio format for the sound output when this player is connected
through a digital connector (COAXIAL or OPTICAL).
• [PCM Downsampling]: Set the sampling rate for PCM audio output when this player is
connected through a digital connector (COAXIAL or OPTICAL).
• [Channels]: Select 7.1 channel sound, or 2 channel / 5.1 channel sound according to multi-
channel connection.
• [Speaker Setup]: Set the volume level and distance of each speaker to obtain the best possible
surround sound.
Note
For set tings related to HDMI, the T V must be connected through HDMI. •
Night mode is only available for Dolby encoded DVD and Blu-ray discs. •
Network (installation, status)
Press .
1
2 Select [Setup] > [Network] to access the network setup options.
• [Network Installation]: Start a wired or wireless installation to make the network work.
• [View Network Settings]: Display the current network status.
• [View Wireless Settings]: Display the current Wi-Fi status. :
• [Name your product:]: Enable to re-name this player for display when this player is connected
to a network (only for iPhone control).
Preference (languages, parental control...)
Press .
1
2 Select [Setup] > [Preference] to access the preference setup options.
• [Menu language]: Select an onscreen display menu language.
• [Audio]: Select an audio language for video.
• [Subtitle]: Select a subtitle language for video.
• [Disc Menu]: Select a menu language for a video disc.
• [Parental Control]: Restrict access to discs that are encoded with ratings. Input “0000” to
access the restriction options. To play all discs irrespective of the rating, select level “8”.
EN
20
Page 21

• [Screen Saver]: Enable or disable screen saver mode. If enabled, the screen enters idle mode
after 10 minutes of inactivity (for example, in pause or stop mode).
• [Auto Subtitle Shift]: Enable or disable subtitle shift. If enabled, the subtitle position is changed
automatically to fit the TV screen (this feature works with some Philips TVs only).
• [Change Password]: Set or change a password to play a restricted disc. Input “0000” if you do
not have a password or if you have forgotten your password.
• [Display Panel]: Change the brightness of the display panel of the player.
• [Auto Standby]: Enable or disable auto standby. If enabled, the player switches to standby after
30 minutes of inactivity (for example, in pause or stop mode).
• [Fast wake up]: Enable or disable the player to wake up faster from standby. If fast wakeup is
turned off, less power is consumed during standby.
• [VCD PBC]: Display or skip the content menu for VCD and SVCD.
Note
If your preferred language is not available for disc language, audio or subtitle, you can select • [Other] from
the menu options and input 4-digit language code which can be found at the back of this user manual.
If you select a language which is not available on a disc, this player uses the default language of the disc.
•
Advanced options (clear memory...)
Press .
1
2 Select [Setup] > [Advanced] to access the advanced setup options.
• [BD-Live Security]: Restrict or allow access to BD-Live (only for non-commercial, user-created
BD-Live discs).
• [Software Update]: Select to update software from a network or from USB storage device.
• [Clear memory]: Delete the previous BD-Live download on the USB storage device. A
“BUDA” folder is automatically created to store the BD-Live download.
• [DivX® VOD Code]: Display the DivX® registration code or the deregistration code for this
player.
• [Version Info.]: Display the software version of this player.
• [Restore default settings]: Reset this player to the default settings made at the factory, except
for password and parental control level.
English
Note
You cannot restric t Internet access on commercial Blu-ray discs. •
Before you purchase DivX videos and play them on this player, register this player on www.divx.com with •
the DivX VOD code.
21EN
Page 22

4 Update software
Before you update the software of this player, check the current software version:
Press •
, and then select [Setup] > [Advanced] > [Version Info.], and press OK.
Update software via the Internet
Connect the player to the Internet (see “Set up a network”).
1
2 Press , and select [Setup].
3 Select [Advanced] > [Software Update]> [Network].
If an upgrade media is detected, you are prompted to start the update. »
4 Follow the instructions on the TV screen to update the software.
When the update is complete, this player automatically turns off. »
Update software via USB
Check the latest software version on www.philips.com/support.
1
Search for your model and click on “Software and drivers”.•
2 Download the software into a USB storage device.
a Unzip the download, and make sure that the unzipped folder is named “UPG_ALL”.
b Put the “UPG_ ALL” folder in the root directory.
3 Connect the USB storage device to the (USB) connector on this player.
4 Press , and select [Setup].
5 Select [Advanced] > [Software Update]> [USB].
If an upgrade media is detected, you are prompted to start the update. »
6 Follow the instructions on the TV screen to update the software.
When the update is complete, this player automatically turns off. »
Caution
Do not turn off the power or remove the USB storage device when the software update is in progress •
because you might damage this player.
EN
22
Page 23

5 Specifications
Note
Specifications are subject to change without notice •
Region code
This player can play discs with the following region codes.
DVD Blu-ray Countries
China
English
Playable media
BD-Video, BD 3D•
DVD-Video, DVD+R/+RW, DVD-R /-RW, DVD+R/-R DL (Dual Layer)•
VCD/SVCD•
Audio CD, CD-R/CD-RW, MP3 media, WMA media, JPEG files•
DivX (Ultra)/DivX Plus HD media, MKV media•
USB storage device•
File format
Video: .avi, .divx, .mp4, .mkv, .wmv, .rmvb, .rm•
Audio: .mp3, .wma, .wav•
Picture: .jpg, .gif, .png•
Video
Signal system: PAL / NTSC•
Composite video output: 1 Vp-p (75 ohm)•
HDMI output 480p, 576p, 720p, 1080i, 1080p, 1080p24•
Audio
2 Channel analog output•
Audio Front L + R : 2 Vrms (> 1 kohm)•
7.1 Channel analog output•
Audio Front L + R : 2 Vrms (> 1 kohm)•
Audio Surrond L + R : 2 Vrms (> 1 kohm)•
Audio Center : 2 Vrms (> 1 kohm)•
Audio Subwoofer : 1.15 Vrms (> 1 kohm)•
Audio Rear L + R: 2 Vrms (> 1 kohm)•
Digital output: 0.5 Vp-p (75 ohm)•
Optical, Coaxial•
HDMI output•
C
23EN
Page 24

Sampling frequency:•
MP3: 32 kHz, 44.1 kHz, 48 kHz•
WMA: 44.1 kHz, 48 kHz•
Constant bit rate:•
MP3: 112 kbps - 320 kpbs•
WMA: 48 kpbs - 192 kpbs•
USB
Compatibility: Hi-Speed USB (2.0)•
Class support: USB Mass Storage Class•
File system: FAT16, FAT32•
Support HDD (a por table hard drive disc): an external power source may be needed.•
Main unit
Power supply rating: AC 110V - 240V~, 50Hz / 60Hz•
Power consumption: 18 W•
Power consumption in standby mode (fast wakeup disabled): < 0.15 W•
Dimensions (w x h x d): 435 x 43 x 236 (mm) •
Net Weight: 1.7 kg•
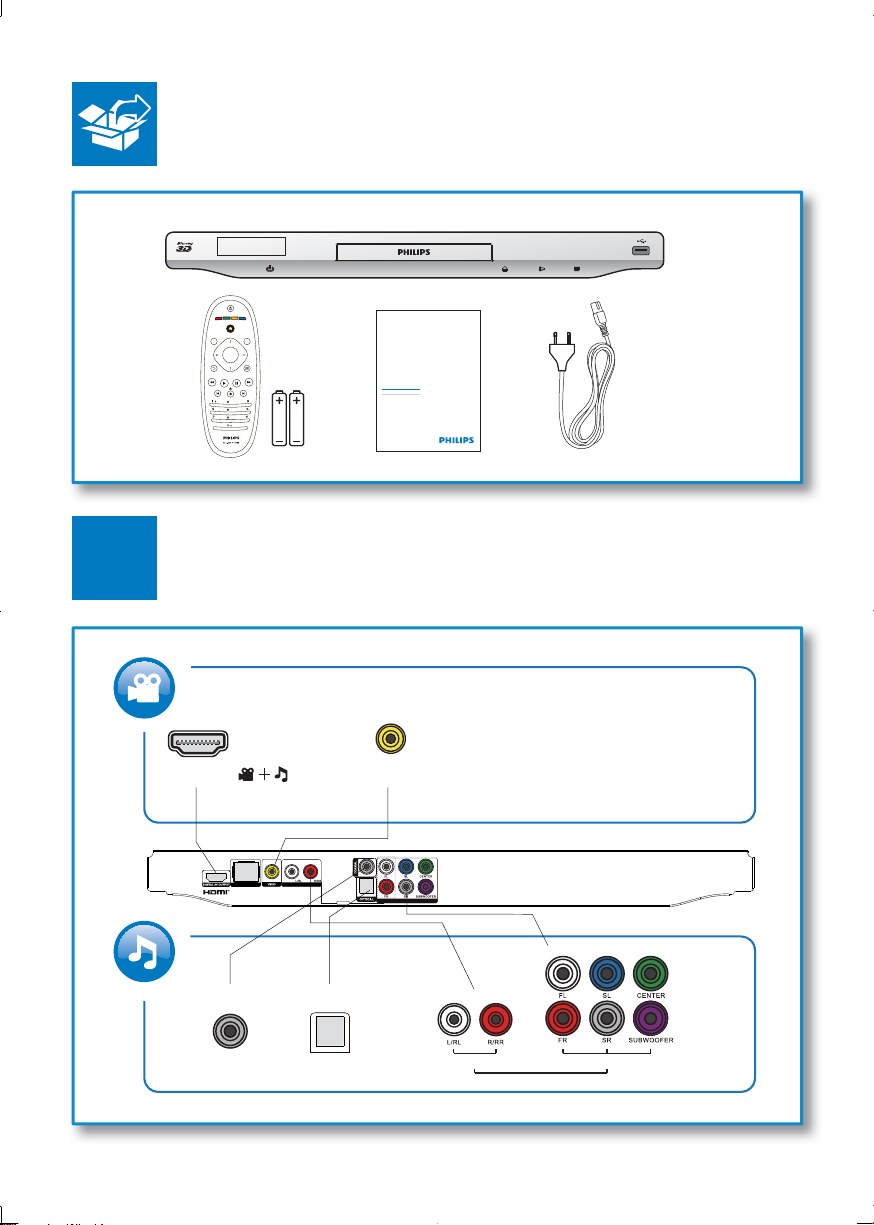
Accessories supplied
Remote control and batteries•
User manual•
AC power cable•
Laser Specification
Laser Type (Diode): AlGaInN (BD), AlGaInP (DVD/CD)•
Wave length: 400 ~ 410nm (BD), 650 ~ 663nm (DVD), 770 ~800nm (CD)•
Output power (Max ratings): 20mW (BD), 7mW (DVD), 7mW (CD)•
EN
24
Page 25

6 Troubleshooting
Warning
Risk of electric shock. Never remove the casing of the player. •
To keep the warranty valid, never try to repair the player yourself.
If you have problems using this player, check the following points before you request service. If you still
have a problem, register your player and get support at www.philips.com/welcome.
If you contact Philips, you will be asked for the model and serial number of this player. The model
number and serial number are on the back of this player. Write the numbers here:
Model No. __________________________
Serial No. ___________________________
Main unit
The buttons on this player do not work.
Disconnect this player from the power supply for a few minutes, and then reconnect.•
Picture
No picture.
Make sure that the TV is switched to the correct source input for this player.•
For the composite connection (via the • VIDEO connector) to the TV, on this player select a
video resolution of 480i/576i or 480p/576p under [HDMI Video] to enable video output.
No picture on HDMI connection.
Make sure that the HDMI cable is not faulty. If it is faulty, replace with a new HDMI cable.•
On the remote control, press •
and then press “731” (numeric buttons) to recover picture
display. Or wait for 10 seconds for auto recover y.
If this player is connected to an unauthorized display device with an HDMI cable, the audio and •
video signals may not be output.
The disc does not play high-definition video.
Make sure that the disc contains high-definition video.•
Make sure that the TV suppor ts high-definition video. •
English
Sound
No audio output from the TV.
Make sure that the audio cables are connected to the audio input of the TV.•
Make sure that the TV is switched to the correct source input for this player.•
No audio output from the loudspeakers of the external audio device (home theater or amplifier).
Make sure that the audio cables are connected to the audio input of the audio device. •
Switch the external audio device to the correct audio source input.•
25EN
Page 26

No 7.1 (or 5.1) channel audio from the loudspeaker of the audio system.
According to multi-channel connection, select correct sound output: press •
, and select
[Setup] > [Audio] > [Channels].
Make sure that the disc contains 7.1 (or 5.1) channel audio. •
Make sure that the audio device supports 7.1 (or 5.1) channel audio. •
Make sure that the audio format is supported by the disc and the connected audio device •
(amplifier/receiver).
For play of video files with DTS multi-channel audio from USB or DLNA, only 2 channel audio •
can be heard from multi-channel connection.
No sound on HDMI connection.
You may not hear any sound from the HDMI output if the connected device is non-HDCP •
compliant or only DVI-compatible.
No secondary audio output for Picture-in-Picture feature.
When • [Bitstream] under the [HDMI Audio] or [Digital Audio] menu is selected, interactive
sound like secondary sound for Picture-in-Picture feature is muted. Deselect [Bitstream].
Play
Cannot play a disc.
Clean the disc. •
Make sure that the disc is correctly loaded.•
Make sure that this player suppor ts the disc. See “Specifications”.•
Make sure that this player suppor ts the region code of the DVD or BD.•
For DVD±RW or DVD±R, make sure that the disc is finalized.•
Cannot play DivX video files.
Make sure that the DivX video file is complete. •
Make sure that the video file name extension is correct. •
To play DivX DRM protected files from a USB storage device or, connect this player to a TV •
through HDMI.
DivX subtitles do not display correctly.
Make sure that the subtitle file has the same name as the DivX video file. •
Make sure that the subtitle file has an extension name supported by this player (.srt, .sub, .tx t, •
.ssa, or .smi).
Cannot read the contents of a connected USB storage.
Make sure that the format of the USB storage device is compatible with this player. •
Make sure that the file system on the USB storage device is suppor ted by this player. •
For a por table hard drive disc (HDD), an external power source may be needed. •
‘No entry’ or ‘x’ sign is displayed on the TV.
The operation is not possible. •
EasyLink feature does not work.
Make sure that this player is connected to the Philips brand EasyLink TV, and the EasyLink •
option is turned on (see “Use your Blu-ray disc/ DVD player” > “Use Philips EasyLink”).
EN
26
Page 27

Cannot access BD-Live features.
Make sure that this player is connected to the network (see “Use your Blu-ray disc/ DVD •
player” > “Set up a network”).
Make sure that the network installation is made (see “Use your Blu-ray disc/ DVD player” > •
“Set up a network”).
Make sure that the Blu-ray disc suppor ts BD-Live features.•
Clear memory storage (see “Change settings” > “Advanced options (BD-Live security, clear •
memory...)”).
Network
Wireless network is not found or distorted.
Make sure that the wireless network is not disturbed by microwave ovens, DECT phones, or •
other neighboring Wi-Fi devices.
If the wireless network does not work properly, try a wired network installation (see “Set up a •
network”).
Browse PC works slowly.
Look in your wireless router’s user manual for information on indoor range, transfer rate and •
other factors of signal quality.
You need a high speed Internet connection for your router.•
3D videos
Cannot see 3D effects
Make sure that 3D output is turned on(see “Use your Blu-ray disc/ DVD player” > “Play a Blu-•
ray 3D video”).
Make sure that the disc title being played is Blu-ray 3D compliant.•
Make sure that the TV is 3D and HDMI compliant, and the T V is set to 3D mode (refer to the •
TV’s user manual).
Make sure that the 3D glasses are activated (refer to the TV’s user manual).•
English
27EN
Page 28

7 Safety and important notice
Read and understand all instructions before you use this Blu-ray disc/ DVD player. If damage is caused
by failure to follow the instructions, the warranty does not apply.
Safety
Risk of electric shock or fire!
Never expose the product and accessories to rain or water. Never place liquid containers, such •
as vases, near the product. If liquids are spilt on or into the product, disconnect it from the
power outlet immediately. Contact Philips Consumer Care to have the product checked before
use.
Never place the product and accessories near naked flames or other heat sources, including •
direct sunlight.
Never insert objects into the ventilation slots or other openings on the product.•
Where the mains plug or an appliance coupler is used as the disconnect device, the disconnect •
device shall remain readily operable.
Disconnect the product from the power outlet before lightning storms.•
When you disconnect the power cord, always pull the plug, never the cable.•
Risk of short circuit or fire!
Before you connect the product to the power outlet, ensure that the power voltage matches •
the value printed on the back or bottom of the product. Never connect the product to the
power outlet if the voltage is different.
Risk of injury or damage to the product!
Visible and invisible laser radiation when open. Avoid exposure to beam.•
Do not touch the disc optical lens inside the disc compartment.•
Never place the product or any objects on power cords or on other electrical equipment.•
If the product is transpor ted in temperatures below 5°C, unpack the product and wait until its •
temperature matches room temperature before connecting it to the power outlet.
Risk of overheating!
Never install this product in a confined space. Always leave a space of at least four inches •
around the product for ventilation. Make sure that curtains or other objects never cover the
ventilation slots on the product.
Risk of contamination!
Do not mix batteries (old and new or carbon and alkaline, etc.).•
Remove batteries if they are exhausted or if the remote control is not to be used for a long time.•
Batteries contain chemical substances, they should be disposed of properly.•
Risk of swallowing batteries!
The product/remote control may contain a coin type battery, which can be swallowed.•
Keep the battery out of reach of children at all times!•
CLASS 1
LASER PRODUCT
EN
28
Page 29

3D health warning
If you or your family has a history of epilepsy or photosensitive seizures, consult a medical •
professional before exposing yourself to flashing light sources, rapid image sequences or 3D
viewing.
To avoid discomfort such as dizziness, headache or disorientation, we recommend not watching •
3D for extended periods of time. If you experience any discomfort, stop watching 3D and do
not immediately engage in any potentially hazardous activity (for example driving a car) until
your symptoms have disappeared. If symptoms persist, do not resume watching 3D without
consulting a medical professional first.
Parents should monitor their children during 3D viewing and ensure they do not experience •
any discomfort as mentioned above. Watching 3D is not recommended for children under 6
years of age as their visual system is not fully developed yet.
Care for your product
Do not insert any objects other than discs into the disc compartment.•
Do not insert warped or cracked discs into the disc compartment.•
Remove discs from the disc compar tment if you are not using the product for an extended •
period of time.
Only use microfiber cloth to clean the product.•
Care of the environment
Your product is designed and manufactured with high quality materials and components, which can be
recycled and reused.
Never dispose of your product with other household waste. Please inform yourself about the local
rules on the separate collection of electrical and electronic products and batteries. The correct disposal
of these products helps prevent potentially negative consequences on the environment and human
health.
Your product contains batteries, which cannot be disposed of with normal household waste.
Please inform yourself about the local rules on separate collection of batteries. The correct disposal of
batteries helps prevent potentially negative consequences on the environment and human health.
Please visit www.recycle.philips.com for additional information on a recycling center in your area.
English
29EN
Page 30

Copyright
This item incorporates copy protection technology that is protected by U.S. patents and other
intellectual property rights of Rovi Corporation. Reverse engineering and disassembly are prohibited.
Open source software
Philips Electronics Singapore Pte Ltd hereby offers to deliver, upon request, a copy of the complete
corresponding source code for the copyrighted open source software packages used in this product for
which such offer is requested by the respective licenses.
This offer is valid up to three years after product purchase to anyone in receipt of this information. To
obtain source code, please contact
do not receive confirmation receipt within a week after mailing to this email address, please write to
“Open Source Team, Philips Intellectual Proper ty & Standards, P.O. Box 220, 5600 AE Eindhoven, The
Netherlands.” If you do not receive timely confirmation of your letter, please email to the email address
above.
Notes to End User :
By using this product with RealNetworks software and services, the end user agrees to the following
terms of REALNETWORKS, INC:
End User may only use the software for private, non-commercial use in accordance with the •
terms of RealNetworks EULA.
End User is not allowed to modify, translate, reverse engineer, decompile, dissemble or use •
other means to discover the source code or otherwise replicate the functionality of the Real
Format Client Code, except to the extent that this restriction is expressly prohibited by
applicable law.
RealNetworks Inc. disclaims all warranties and conditions other than those set forth in this •
Agreement which are in lieu of all other warranties, whether express and implied, including but
not limited to any implied warranties or conditions of merchantability and fitness for a particular
purpose; and effectively exclude all liability for indirect, special, incidental and consequential
damages, such as but not limited to lost profits.
open.source@philips.com
. If you prefer not to use email or if you
EN
30
Page 31

Trademarks
‘Blu-ray’, ‘Blu-ray Disc’, ‘Blu-ray Disc’ logo, ‘Blu-ray 3D’ and ‘Blu-ray 3D’ logo are the trademarks of
Blu-ray Disc Association.
HDMI, and HDMI logo and High-Definition Multimedia Interface are trademarks or registered
trademarks of HDMI licensing LLC in the United States and other countries.
DLNA®, the DLNA Logo and DLNA CERTIFIED® are trademarks, service marks, or cer tification
marks of the Digital Living Network Alliance.
The Wi-Fi CERTIFIED Logo is a certification mark of the Wi-Fi Alliance.
Manufactured under license from Dolby Laboratories. Dolby and the double-D symbol are
trademarks of Dolby Laboratories.
English
Manufactured under license under U.S. Patent #’s: 5,451,942; 5,956,674; 5,974,380; 5,978,762;
6,226,616; 6,487,535; 7,212,872; 7,333,929; 7,392,195; 7,272,567 & other U.S. and worldwide patents
issued & pending. DTS and the Symbol are registered trademarks, & DTS-HD, DTS-HD Master
Audio, and the DTS logos are trademarks of DTS, Inc. Product includes software. © DTS, Inc. All
Rights Reserved.
ABOUT DIVX VIDEO: DivX® is a digital video format created by DivX, Inc. This is an official DivX
Certified® device that plays DivX video. Visit divx.com for more information and software tools to
convert your files into DivX video.
ABOUT DIVX VIDEO-ON-DEMAND: This DivX Certified® device must be registered in order to
play purchased DivX Video-on-Demand (VOD) movies. To obtain your registration code, locate the
DivX VOD section in your device setup menu. Go to vod.divx.com for more information on how to
complete your registration.
31EN
Page 32

DivX®, DivX Certified®, DivX Plus™ HD and associated logos are registered trademarks of DivX,
Inc. and are used under license.
DivX Cer tified® to play DivX® and DivX Plus™ HD (H.264/MKV) video up to 1080p HD including
premium content.
BONUSVIEW™
‘BD LIVE’ and ‘BONUSVIEW’ are trademarks of Blu-ray Disc Association.
‘DVD Video’ is a trademark of DVD Format/Logo Licensing Corporation.
Real RMVB logo is a trademark or a registered trademark of RealNetworks, Inc.
Java and all other Java trademarks and logos are trademarks or registered trademarks of Sun
Microsystems, Inc. in the United States and/or other countries.
EN
32
Page 33

OOO O O O
XOO O O O
XOO O O O
XOO O O O
XOO O O O
O: Indicates that this toxic or hazardous substance contained in all of the homogeneous
materials for this part is below the limit requirement in SJ/T11363 – 2006.
X: Indicates that this toxic or hazardous substance contained in at least one of the
homogeneous materials used for this part is above the limit requirement in SJ/T11363 - 2006.
Environmental Protection Use Period
This logo refers to the period ( 10 years ) during which the toxic or hazardous substances or elements
contained in electronic information products will not leak or mutate so that the use of these [substances or
elements] will not result in any severe environmental pollution, any bodily injury or damage to any assets.
Battery labeling logo
Environmental Protection Use Period
This logo refers to the period ( 5 years ) during which the toxic or hazardous substances or elements
contained in the battery will not leak or mutate so that the use of these [substances or elements] will not
result in any severe environmental pollution, any bodily injury or damage to any assets.
55
Page 34

Abkhazian 6566
Afar 6565
Afrikaans 6570
Amharic 6577
Arabic 6582
Armenian 7289
Assamese 6583
Avestan 6569
Aymara 6589
Azerhaijani 6590
Bahasa Melayu 7783
Bashkir 6665
Belarusian 6669
Bengali 6678
Bihari 6672
Bislama 6673
Bokmål, Norwegian 7866
Bosanski 6683
Brezhoneg 6682
Bulgarian 6671
Burmese 7789
Castellano, Español 6983
Catalán 6765
Chamorro 6772
Chechen 6769
Chewa; Chichewa; Nyanja 7889
9072
Ё᭛
Chuang; Zhuang 9065
Church Slavic; Slavonic 6785
Chuvash 6786
Corsican 6779
Česky 6783
Dansk 6865
Deutsch 6869
Dzongkha 6890
English 6978
Esperanto 6979
Estonian 6984
Euskara 6985
6976
Faroese 7079
Français 7082
Frysk 7089
Fijian 7074
Gaelic; Scottish Gaelic 7168
Gallegan 7176
Georgian 7565
Gikuyu; Kikuyu 7573
Guarani 7178
Gujarati 7185
Hausa 7265
Herero 7290
Hindi 7273
Hiri Motu 7279
Hrwatski 6779
Ido 7379
Interlingua (International)7365
Interlingue 7365
Inuktitut 7385
Inupiaq 7375
Irish 7165
Íslenska 7383
Italiano 7384
Ivrit 7269
Japanese 7465
Javanese 7486
Kalaallisut 7576
Kannada 7578
Kashmiri 7583
Kazakh 7575
Kernewek 7587
Khmer 7577
Kinyarwanda 8287
Kirghiz 7589
Komi 7586
Korean 7579
Kuanyama; Kwanyama 7574
Kurdish 7585
Lao 7679
Latina 7665
Latvian 7686
Letzeburgesch; 7666
Limburgan; Limburger 7673
Lingala 7678
Lithuanian 7684
Luxembourgish; 7666
Macedonian 7775
Malagasy 7771
Magyar 7285
Malayalam 7776
Maltese 7784
Manx 7186
Maori 7773
Marathi 7782
Marshallese 7772
Moldavian 7779
Mongolian 7778
Nauru 7865
Navaho; Navajo 7886
Ndebele, North 7868
Ndebele, South 7882
Ndonga 7871
Nederlands 7876
Nepali 7869
Norsk 7879
Northern Sami 8369
North Ndebele 7868
Norwegian Nynorsk; 7878
Occitan; Provencal 7967
Old Bulgarian; Old Slavonic 6785
Oriya 7982
Oromo 7977
Ossetian; Ossetic 7983
Pali 8073
Panjabi 8065
Persian 7065
Polski 8076
Português 8084
Pushto 8083
Russian 8285
Quechua 8185
Raeto-Romance 8277
Romanian 8279
Rundi 8278
Samoan 8377
Sango 8371
Sanskrit 8365
Sardinian 8367
Serbian 8382
Shona 8378
Shqip 8381
Sindhi 8368
Sinhalese 8373
Slovensky 8373
Slovenian 8376
Somali 8379
Sotho; Southern 8384
South Ndebele 7882
Sundanese 8385
Suomi 7073
Swahili 8387
Swati 8383
Svenska 8386
Tagalog 8476
Tahitian 8489
Tajik 8471
Tamil 8465
Tatar 8484
Telugu 8469
Thai 8472
Tibetan 6679
Tigrinya 8473
Tonga (Tonga Islands) 8479
Tsonga 8483
Tswana 8478
Türkçe 8482
Turkmen
Twi 8487
Uighur 8571
Ukrainian 8575
Urdu 8582
Uzbek 8590
Vietnamese 8673
Volapuk 8679
Walloon 8765
Welsh 6789
Wolof 8779
Xhosa 8872
Yiddish 8973
Yoruba 8979
Zulu 9085
8475
56
Page 35

License Texts and Acknowledgements for any open source software used in
this Philips product
Instructions to obtain source code for this software can be found in the user manual, or in the supplied safety
leaet (if available).
1. U-boot
#
# (C) Copyright 2000 - 2008
# Wolfgang Denk, DENX Software Engineering, wd@denx.de.
#
# See le CREDITS for list of people who contributed to this
# project.
#
# This program is free software; you can redistribute it and/or
# modif y it under the terms of the GNU General Public License as
# published by the Free Software Foundation; either version 2 of
# the License, or (at your option) any later version.
#
# This program is distributed in the hope that it will be useful,
# but WITHOUT ANY WARRANTY; without even the implied warranty of
# MERCHANTABILITY or FITNESS FOR A PARTICULAR PURPOSE. See the
# GNU General Public License for more details.
#
# You should have received a copy of the GNU General Public License
# along with this program; if not, write to the Free Software
# Foundation, Inc., 59 Temple Place, Suite 330, Boston,
# MA 02111-1307 USA
#
A copy of the GPL is included below at item 2.
2. Linux kernel
NOTE! This copyright does *not* cover user programs that use kernel ser vices by normal system calls - this is
merely considered normal use of the kernel, and does *not* fall under the heading of “derived work ”.
Also note that the GPL below is copyrighted by the Free Sof tware Foundation, but the instance of code that it
refer s to (the linux kernel) is copyrighted by me and others who actually wrote it.
Also note that the only valid version of the GPL as far as the kernel is concerned is _this_ par ticular version of
the license (ie v2, not v2.2 or v3.x or whatever), unless explicitly otherwise stated.
----------------------------------------
GNU GENERAL PUBLIC LICENSE
Copyright (C) 1989, 1991 Free Software Foundation, Inc.
675 Mass Ave, Cambridge, MA 02139, USA
Ever yone is permitted to copy and distribute verbatim copies of this license document , but changing it is not
allowed.
The licenses for most soft ware are designed to take away your freedom to share and change it. By contrast,
the GNU General Public License is intended to guarantee your freedom to share and change free soft ware--to
make sure the software is free for all its users. This General Public License applies to most of the Free Software
Foundation’s sof tware and to any other program whose authors commit to using it. (Some other Free Software
Foundation software is covered by the GNU Library General Public License instead.) You can apply it to your
programs, too.
When we speak of free software, we are referring to freedom, not price. Our General Public Licenses are
designed to make sure that you have the freedom to dis tribute copies of fr ee soft ware (and charge for this
service if you wish), that you receive source code or can get it if you want it, that you can change the soft ware or
use pieces of it in new free programs; and that you know you can do these things.
Linus Torvalds
Version 2, June 1991
Preamble
1
Page 36

To protect your rights, we need to make restr ictions that forbid anyone to deny you these rights or to ask you
to surrender the rights. These restrictions translate to certain responsibilities for you if you distribute copies of
the sof tware, or if you modify it.
For example, if you distribute copies of such a program, whether gratis or for a fee, you must give the recipients
all the rights that you have. You must make sure that they, too, receive or can get the source code. And you
must show them these terms so they know their rights.
We protect your rights with two steps: (1) copyright the sof tware, and (2) offer you this license which gives you
legal permission to copy, distribute and/or modify the software.
Also, for each author ’s protection and our s, we want to make cer tain that everyone understands that there
is no warranty for this free sof tware. If the software is modied by someone else and passed on, we want its
recipients to know that what they have is not the original, so that any problems introduced by other s will not
reect on the original authors’ reputations.
Finally, any free program is threatened cons tantly by software patents. We wish to avoid the da nger that
redistributors of a free program will individually obtain patent licenses, in effect making the program proprietary.
To prevent this, we have made it clear that any patent must be licensed for everyone’s free use or not licensed at
all.
The precise terms and conditions for copying, distribution and modication follow.
TERMS AND CONDITIONS FOR COPYING, DISTRIBUTION AND MODIFICATION
0. This License applies to any program or other work which contains a notice placed by the copyright holder
saying it may be distributed under the terms of this General Public License. The “Program”, below, refers to
any such program or work, and a “work based on the Program” means either the Program or any derivative
work under copyright law: that is to say, a work containing the Program or a portion of it, either ver batim
or with modications and/or translated into another language. (Hereinafter, translation is included without
limitation in the term “modication”.) Each licensee is addressed as “you”.
Activities other than copying, distribution and modication are not covered by this License; they are outside
its scope. The act of running the Progr am is not restricted, and the output from the Program is covered only
if its contents constitute a work based on the Program (independent of having been made by running the
Program). Whether that is true depends on what the Program does.
1. You may copy and dis tribute verbatim copies of the Program’s source code as you receive it, in any medium,
provided that you conspicuously and appropriately publish on each copy an appropriate copyright notice
and disclaimer of war ranty; keep intact all the notices that refer to this License and to the absence of any
warranty; and give any other recipients of the Program a copy of this License along with the Program.
You may charge a fee for the physical ac t of transferring a copy, and you may at your option offer warranty
protection in exchange for a fee.
2. You may modify your copy or copies of the Program or any por tion of it, thus forming a work based on the
Program, and copy and distribute such modications or work under the terms of Section 1 above, provided that
you also meet all of these conditions:
a) You must cause the modied les to carry prominent notices s tating that you changed the les and the
date of any change.
b) You must cause any work that you distribute or publish, that in whole or in part contains or is derived
from the Program or any part thereof, to be licensed as a whole at no charge to all third parties under
the terms of this License.
c) If the modied program normally reads commands inter actively when r un, you must cause it, when
started running for such interactive use in the most ordinar y way, to print or display an announcement
including an appropriate copyright notice and a notice that there is no warranty (or else, saying that you
provide a warranty) and that users may redistribute the program under these conditions, and telling
the user how to view a copy of this License. (Exception: if the Program itself is inter active but does not
normally print such an announcement, your work based on the Progr am is not required to print an
announcement.)
These re quirements apply to the modified wor k as a whole. If identifia ble sections of that work are
not derived from the Program, and can be reasonably considered independent and separate wor ks in
themselves, then this License, and its terms, do not apply to those sections when you distribute them as
separ ate works. But when you distribute the same sections as part of a whole which is a work based on the
Program, the distribution of the whole must be on the ter ms of this License, whose permissions for other
licensees extend to the entire whole, and thus to each and every par t regardless of who wrote it.
GNU GENERAL PUBLIC LICENSE
2
Page 37

Thus, it is not the intent of this section to claim rights or contest your rights to work written entirely by you;
rather, the intent is to exercise the right to control the distribution of derivative or collective wor ks based
on the Program.
In addition, mere aggregation of another work not based on the Program with the Program (or with a work
based on the Program) on a volume of a storage or distribution medium does not bring the other work
under the scope of this License.
3. You may copy and dis tribute the Progr am (or a work ba sed on i t, un der Section 2) in objec t code or
executable form under the terms of Sections 1 and 2 above provided that you also do one of the following:
a) Accompany i t with the com plete co rrespond ing machine -readable sou rce code , which must b e
distributed under the terms of Sections 1 and 2 above on a medium customarily used for software
interchange; or,
b) Accompany it with a written offer, valid for at least three year s, to give any third party, for a charge no
more than your cos t of physically performing source distribution, a complete machine-readable copy
of the corresponding source code, to be distributed under the terms of Sections 1 and 2 above on a
medium customarily used for software interchange; or,
c) Accompany it with the infor mation you received as to the offer to distribute corresponding source
code. (This alternative is allowed only for noncommercial distribution and only if you received the
program in object code or executable form with such an offer, in accord with Subsection b above.)
The source code for a work means the preferred form of the work for making modications to it. For an
executable work, complete source code means all the source code for all modules it contains, plus any
associated interface def ini tion f iles, plus the scripts used to control compilation and installation of the
executable. However, as a special exception, the source code distributed need not include anything that is
normally distributed (in either source or binary form) with the major components (compiler, ker nel, and so
on) of the operating system on which the executable runs, unless that component itself accompanies the
executable.
If distribution of executable or object code is made by offering access to copy from a designated place, then
offering equivalent access to copy the source code from the same place counts as distribution of the source
code, even though third par ties are not compelled to copy the source along with the object code.
4. You may not copy, modify, sublicense, or distribute the Progr am except as expressly provided under this
License. A ny attempt other wise to copy, modif y, sublicense or distribute the Program is void , and will
automatically terminate your rights under this License. However, parties who have received copies, or rights,
from you under this License will not have their licenses terminated so long as such parties remain in full
compliance.
5. You are not required to accept this License, since you have not signed it. However, nothing else grants you
permission to modify or distribute the Program or its derivative works. These actions are prohibited by law if
you do not accept this License. Therefore, by modifying or distributing the Program (or any work based on the
Program), you indicate your acceptance of this License to do so, and all its terms and conditions for copying,
distributing or modif ying the Program or works based on it.
6. Each time you redistribute the Program (or any work based on the Program), the recipient automatically
receives a license from the original licensor to copy, distribute or modify the Program subject to these terms
and conditions. You may not impose any further restrictions on the recipients’ exercise of the rights granted
herein. You are not responsible for enforcing compliance by third parties to this License.
7. If, as a consequence of a court judgment or allegation of patent infringement or for any other reason (not
limited to patent issues), conditions are imposed on you (whether by court order, agreement or otherwise)
that contradict the conditions of this License, they do not excuse you from the conditions of this License.
If you cannot distribute so as to satisfy simultaneously your obligations under this License and any other
per tinent obligations, then as a consequence you may not distribute the Program at all. For example, if a
patent license would not permit royalty-free redistribution of the Program by all those who receive copies
directly or indirectly through you, then the only way you could satisfy both it and this License would be to
refrain entirely from distribution of the Program.
If any portion of this section is held invalid or unenforceable under any par ticular circumstance, the balance
of the section is intended to apply and the section as a whole is intended to apply in other circums tances.
It is not the purpose of this section to induce you to infringe any patents or other proper ty right claims or
to contest validity of any such claims; this sec tion has the sole purpose of protecting the integrity of the
free soft ware distribution system, which is implemented by public license prac tices. Many people have
made generous contributions to the wide range of software distributed through that system in reliance on
consistent application of that system; it is up to the author/donor to decide if he or she is willing to distribute
software through any other system and a licensee cannot impose that choice.
3
Page 38

This section is intended to make thoroughly clear what is believed to be a consequence of the rest of this
License.
8. If the distribution and/or use of the Pr ogram is res tricted in cer tain countries either by patents or by
copyrighted interfaces, the original copyright holder who places the Program under this License may add an
explicit geographical distribution limitation excluding those countries, so that distribution is permitted only
in or among countries not thus excluded. In such case, this License incorporates the limitation as if written in
the body of this License.
9. The Free Software Foundation may publish revised and/or new versions of the General Public License from
time to time. Such new versions will be similar in spirit to the present version, but may differ in detail to
address new problems or concerns.
Each version is given a distinguishing version number. If the Program specifies a version number of this
License which applies to it and “any later version”, you have the option of following the terms and conditions
either of that version or of any later version published by the Free Software Foundation. If the Program
does not specify a version number of this License, you may choose any version ever published by the Free
Software Foundation.
10. If you wish to incorporate parts of the Program into other free programs whose distribution conditions are
different, write to the author to ask for permission. For software which is copyrighted by the Free Software
Foundation, write to the Free Sof tware Foundation; we sometimes make exceptions for this. Our decision
will be guided by the two goals of preserving the free status of all derivatives of our free software and of
promoting the sharing and reuse of software generally.
NO WARRANTY
11. BECAUSE THE PROGRAM IS LICEN SED FREE OF CHARGE, THERE IS NO WARRANTY FOR THE
PROGR AM , TO THE EX TENT PERMITTED BY APPLIC ABLE L AW. EXC EPT WHEN OTHERWI SE
STATED IN WRI TI NG THE COPYRIGHT HOLDERS AN D/OR OT HE R PARTI ES PROVIDE THE
PROGR AM “AS IS” W ITHOUT WARR AN TY OF ANY KIND, EI THER E XPRESSED OR I MPLIED,
INCLUDI NG , BU T N OT LIMI TE D TO, THE IMP LI ED WARR A NT IES OF MERCHA NTA BIL IT Y
AN D FI TN ESS FOR A PARTICUL AR PURPOSE . THE ENTI RE RISK AS TO THE QUAL IT Y AND
PERFORMANCE OF THE PROGRAM IS WITH YOU. SHOULD THE PROGR AM PROVE DEFECTIVE,
YOU ASSUME THE COST OF ALL NECESSARY SERVICING, REPAIR OR CORRECTION.
12. IN NO EVENT UNLESS REQUIRED BY APPLICABLE LAW OR AGREED TO IN WRITING WILL ANY
COPYRIGHT HOLDER, OR ANY OTHER PARTY WHO MAY MODIF Y AND/OR REDISTRIBUTE THE
PROGR AM AS PERMITTED ABOVE, BE LIABLE TO YOU FOR DAMAGES, INCLUDING ANY GENER AL,
SPECIAL, INCIDENTAL OR CONSEQUENTIAL DAMAGES ARISING OUT OF THE USE OR INABILIT Y
TO USE THE PROGRAM (INCLUDING B UT NOT LIMITED TO LOSS O F DATA OR DATA BEING
RENDERED INACCURATE OR LOSSES SUSTAINED BY YOU OR THIRD PARTIES OR A FAILURE OF
THE PROGRAM TO OPERATE WITH ANY OTHER PROGR AMS), EVEN IF SUCH HOLDER OR OTHER
PARTY HAS BEEN ADVISED OF THE POSSIBILITY OF SUCH DAMAGES.
END OF TERMS AND CONDITIONS
Appendix: How to Apply These Terms to Your New Programs
If you develop a new program, and you want it to be of the greatest possible use to the public, the best way to
achieve this is to make it free sof tware which ever yone can redistribute and change under these terms.
To do so, attach the following notices to the program. It is safest to attach them to the start of each source le
to most effectively convey the exclusion of warranty; and each le should have at least the “copyright” line and a
pointer to where the full notice is found.
<one line to give the program’s name and a brief idea of what it does.>
Copyright (C) 19yy <name of author>
This program is free software; you can redistribute it and/or modify it under the terms of the GNU General
Public License as published by the Free Software Foundation; either version 2 of the License, or (at your option)
any later version.
This program is distributed in the hope that it will be useful, but WITHOUT ANY WARRANTY; without even
the implied warranty of MERCHANTABILIT Y or FITN ESS FOR A PARTICULAR PU RPOSE. See the GNU
General Public License for more details.
You should have received a copy of the GNU General Public License along with this program; if not, write to the
Free Software Foundation, Inc., 675 Mass Ave, Cambridge, MA 02139, USA.
Also add information on how to contact you by electronic and paper mail.
4
Page 39

If the program is interactive, make it output a shor t notice like this when it star ts in an interactive mode:
Gnomovision ver sion 69, Copyright (C) 19yy name of author
Gnomovision comes with ABSOLUTELY NO WARR ANTY; for details type `show w’.
This is free software, and you are welcome to redistribute it under certain conditions; type `show c’ for
details.
The hypothetical commands `show w’ and `show c’ should show the appropriate parts of the General Public
License. Of course, the commands you use may be called something other than `show w’ and `show c’; they
could even be mouse-clicks or menu items--whatever suits your program.
You should also get your employer (if you work as a programmer) or your school, if any, to sign a “copyright
disclaimer” for the program, if necessary. Here is a sample; alter the names:
Yoyodyne, Inc., hereby disclaims all copyright interest in the program `Gnomovision’ (which makes passes at
compilers) written by James Hacker.
<signature of Ty Coon>, 1 April 1989
Ty Coon, President of Vice
This General Public License does not permit incorporating your program into proprietar y progr ams. If your
program is a subroutine library, you may consider it more useful to permit linking proprietary applications with
the library. If this is what you want to do, use the GNU Librar y General Public License instead of this License.
3. Busybox, the Linux IR control package and SquashFS
Busybox, the Linux IR control package and SquashFS are subject to the GPL, a copy of which is included at item 2.
4. DirectFB, glibc, libusb-compat, libusb, e2fsprogs and mtd-utils
DirectFB glibc, libmtp, libusb and e2fsprogs are subject to the following license:
GNU LESSER GENERAL PUBLIC LICENSE
Version 2.1, February 1999
Copyright (C) 1991, 1999 Free Software Foundation, Inc.
59 Temple Place, Suite 330, Boston, MA 02111-1307 USA
Ever yone is permitted to copy and distribute verbatim copies of this license document , but changing it is not
allowed.
[This is the rst released version of the Lesser GPL. It also counts as the successor of the GNU Library Public
License, version 2, hence the version number 2.1.]
Preamble
The licenses for most software are designed to take away your freedom to share and change it. By contrast, the
GNU General Public Licenses are intended to guarantee your freedom to share and change free sof tware--to
make sure the software is free for all its users.
This license, the Lesser General Public License, applies to some specially designated sof tware packages--typically
libraries--of the Free Sof tware Foundation and other authors who decide to use it. You can use it too, but we
suggest you rst think carefully about whether this license or the ordinary General Public License is the better
strategy to use in any par ticular case, based on the explanations below.
When we speak of free software, we are referring to freedom of use, not price. Our General Public Licenses
are designed to make sure that you have the freedom to distribute copies of free software (and charge for this
service if you wish); that you receive source code or can get it if you want it; that you can change the software
and use pieces of it in new free programs; and that you are informed that you can do these things.
To protect your rights, we need to make restr ictions that forbid distributors to deny you these rights or to ask
you to surrender these rights. These restrictions translate to certain responsibilities for you if you distribute
copies of the library or if you modify it.
For example, if you distribute copies of the library, whether gratis or for a fee, you must give the recipients all the
rights that we gave you. You must make sure that they, too, receive or can get the source code. If you link other
code with the library, you must provide complete object les to the recipients, so that they can relink them with
the library after making changes to the library and recompiling it. And you must show them these terms so they
know their rights.
We protect your rights with a two-s tep method: (1) we copyright the library, and (2) we offer you this license,
which gives you legal permission to copy, distribute and/or modify the library.
To protect each distributor, we want to make it very clear that there is no warranty for the free library. Also,
if the libr ary is modied by someone else and passed on, the recipients should know that what they have is
5
Page 40

not the or iginal version, so that the original author’s reputation will not be affected by problems that might be
introduced by others.
Finally, software patents pose a constant threat to the existence of any free program. We wish to make sure that
a company cannot effectively restrict the users of a free program by obtaining a restrictive license from a patent
holder. Therefore, we insist that any patent license obtained for a ver sion of the library must be consis tent with
the full freedom of use specied in this license.
Most GNU software, including some libraries, is covered by the ordinary GN U General Public License. This
license, the GNU Lesser General Public License, applies to certain designated libraries, and is quite different
from the ordinary General Public License. We use this license for cer tain libraries in order to permit linking
those libraries into non-free programs.
When a program is linked with a library, whether statically or using a shared library, the combination of the two
is legally speak ing a combined work, a der ivative of the original library. The ordinar y Gener al Public License
therefore permits such linking only if the entire combination ts its criteria of freedom. The Lesser General
Public License permits more lax cr iteria for linking other code with the library.
We call this license the “Lesser” General Public License because it does Less to protect the user’s freedom than
the ordinary General Public License. It also provides other free software developers Less of an advantage over
competing non-free programs. These disadvantages are the reason we use the ordinary General Public License
for many libraries. However, the Lesser license provides advantages in certain special circumstances.
For example, on rare occasions, there may be a special need to encourage the widest possible use of a cer tain
library, so that it becomes a de-facto standard. To achieve this, non-free programs must be allowed to use the
library. A more frequent case is that a free library does the same job as widely used non-free libraries. In this
case, there is little to gain by limiting the free library to free software only, so we use the Lesser General Public
License.
In other cases, permission to use a particular library in non-free programs enables a greater number of people
to use a large body of free software. For example, permission to use the GNU C Library in non-free progr ams
enables many more people to use the whole GNU operating system, as well as its var iant , the GNU/Linux
operating system.
Although the Lesser General Public License is Less protective of the users’ freedom, it does ensure that the user
of a progr am that is linked with the Library has the freedom and the wherewithal to run that program using a
modied version of the Library.
The precise terms and conditions for copying, distribution and modication follow. Pay close at tention to the
difference between a “work based on the librar y” and a “wor k that uses the library”. The former contains code
derived from the library, whereas the lat ter must be combined with the librar y in order to run.
GNU LESSER GENERAL PUBLIC LICENSE
TERMS AND CONDITIONS FOR COPYING, DISTRIBUTION AND MODIFICATION
0. This License Agreement applies to any software library or other progr am which contains a notice placed by
the copyright holder or other authorized par ty saying it may be distributed under the terms of this Lesser
General Public License (also called “this License”).
Each licensee is addressed as “you”.
A “library” means a collection of software functions and/or data prepared so as to be conveniently linked
with application programs (which use some of those functions and data) to form executables.
The “Library”, below, refer s to any such software library or work which has been distributed under these
terms. A “work based on the Librar y” means either the Library or any derivative work under copyright law:
that is to say, a work containing the Library or a portion of it, either verbatim or with modications and/or
translated straightfor wardly into another language. (Hereinafter, translation is included without limitation in
the term “modication”.)
“Source code” for a work means the prefer red form of the work for making modications to it. For a library,
complete source code means all the source code for all modules it contains, plus any associated interface
denition les, plus the scripts used to control compilation and installation of the library.
Activities other than copying, distribution and modication are not covered by this License; they are outside
its scope. The act of running a program using the Librar y is not restricted, and output from such a program
is covered only if its contents constitute a work based on the Library (independent of the use of the Library
in a tool for writing it). Whether that is true depends on what the Library does and what the program that
uses the Library does.
1. You may copy and distribute verbatim copies of the Library’s complete source code as you receive it, in any
medium, provided that you conspicuously and appropriately publish on each copy an appropriate copyright
6
Page 41

notice and disclaimer of warranty; keep intact all the notices that refer to this License and to the absence of
any warranty; and distribute a copy of this License along with the Librar y.
You may charge a fee for the physical ac t of transferring a copy, and you may at your option offer warranty
protection in exchange for a fee.
2. You may modify your copy or copies of the Library or any portion of it, thus forming a work based on the
Library, and copy and distribute such modications or work under the terms of Section 1 above, provided
that you also meet all of these conditions:
a) The modied work must itself be a software library.
b) You must cause the les modied to carry prominent notices stating that you changed the les and the
date of any change.
c) You must cause the whole of the work to be licensed at no charge to all third par ties under the terms
of this License.
d) If a facility in the modied Library refers to a function or a table of data to be supplied by an application
program that uses the facility, other than as an argument passed when the facility is invoked, then you
must make a good faith effort to ensure that, in the event an application does not supply such function
or table, the facility still oper ates, and performs whatever part of its pur pose remains meaningful.
(For example, a function in a library to compute square roots has a purpose that is entirely well-dened
independent of the application. Therefore, Subsection 2d requires that any application-supplied function
or table used by this function must be optional: if the application does not supply it, the square root
function must still compute square roots.)
These requirements apply to the modied work as a whole. If identiable sections of that work are not
derived from the Library, and can be reasonably considered independent and separate works in themselves,
then this License, and its terms , do not apply to those sections whe n you distribute them as separate
works. But when you distribute the same sections as par t of a whole which is a work based on the Library,
the distr ibution of the whole must be on the terms of this License, whose per missions for other licensees
extend to the entire whole, and thus to each and every par t regardless of who wrote it.
Thus, it is not the intent of this section to claim rights or contest your rights to work written entirely by you;
rather, the intent is to exercise the right to control the distribution of derivative or collective wor ks based
on the Librar y.
In addition, mere aggregation of another work not based on the Librar y with the Library (or with a work
based on the Library) on a volume of a storage or distribution medium does not bring the other work under
the scope of this License.
3. You may opt to apply the terms of the ordinary GNU General Public License instead of this License to a
given copy of the Librar y. To do this, you must alter all the notices that refer to this License, so that they
refer to the ordinary GNU General Public License, version 2, instead of to this License. (If a newer version
than version 2 of the ordinary GNU General Public License has appeared, then you can specify that version
instead if you wish.) Do not make any other change in these notices.
Once this change is made in a given copy, it is irreversible for that copy, so the ordinary GNU General Public
License applies to all subsequent copies and derivative works made from that copy.
This option is useful when you wish to copy part of the code of the Librar y into a program that is not a
library.
4. You may copy and distribute the Library (or a portion or derivative of it, under Sec tion 2) in object code
or executable form under the terms of Sections 1 and 2 above provided that you accompany it with the
complete cor responding machine-readable source code, which must be distributed under the terms of
Sections 1 and 2 above on a medium customarily used for software interchange.
If distribution of object code is made by offering access to copy from a designated place, then offering
equivalent access to copy the source code from the same place satises the requirement to distribute the
source code, even though third parties are not compelled to copy the source along with the objec t code.
5. A program that contains no derivative of any por tion of the Library, but is designed to work with the Librar y
by being compiled or linked with it, is called a “work that uses the Library”. Such a work, in isolation, is not a
derivative work of the Library, and therefore falls outside the scope of this License.
However, linking a “work that uses the Library” with the Library creates an executable that is a derivative
of the Library (because it contains por tions of the Library), rather than a “work that uses the library”. The
executable is therefore covered by this License.
Section 6 states terms for distribution of such executables.
When a “work that uses the Libr ary” uses material from a header le that is part of the Library, the object
code for the work may be a derivative work of the Library even though the source code is not.
7
Page 42

Whether this is true is especially signicant if the work can be linked without the Library, or if the work is
itself a library. The threshold for this to be true is not precisely dened by law.
If such an object f ile uses only numerical par ameters, data str ucture layouts and accessors , and small
macros and small inline functions (ten lines or less in length), then the use of the object le is unrestricted,
regardless of whether it is legally a derivative work . (Executables containing this object code plus portions of
the Library will still fall under Section 6.)
Otherwise, if the work is a derivative of the Library, you may distribute the object code for the work under
the terms of Section 6.
Any executables containing that work also fall under Section 6, whether or not they are linked directly with
the Library itself.
6. As an exception to the Sections above, you may also combine or link a “work that uses the Library” with the
Library to produce a work containing portions of the Library, and distribute that work under terms of your
choice, provided that the terms per mit modication of the work for the customer’s own use and reverse
engineering for debugging such modications.
You must give prominent notice with each copy of the work that the Librar y is used in it and that the Librar y
and its use are covered by this License. You must supply a copy of this License. If the work during execution
displays copyright notices, you must include the copyright notice for the Library among them, as well as a
reference directing the user to the copy of this License. Also, you must do one of these things:
a) Accompany the work with the complete corresponding machine-readable source code for the Library
including whatever changes were used in the work (which must be distr ibuted under Sections 1 and 2
above); and, if the work is an executable linked with the Library, with the complete machine-readable
“work that uses the Library”, as object code and/or source code, so that the user can modify the Library
and then relink to produce a modied executable containing the modied Library. (It is understood
that the user who changes the contents of denitions les in the Librar y will not necessarily be able to
recompile the application to use the modied denitions.)
b) Use a suitable shared library mechanism for linking with the Library. A suitable mechanism is one that
(1) uses at run time a copy of the library already present on the user’s computer sys tem, rather than
copying libr ary functions into the executable, and (2) will operate properly with a modied version
of the librar y, if the user installs one, as long as the modied version is interface-compatible with the
version that the work was made with.
c) Accompany the work with a written offer, valid for at least three years, to give the same user the
materials specif ied in Subsection 6a, above, for a charge no more than the cost of performing this
distribution.
d) If distribution of the work is made by offering access to copy from a designated place, offer equivalent
access to copy the above specied materials from the same place.
e) Verify that the user has already received a copy of these materials or that you have already sent this user
a copy.
For an executable, the required form of the “work that uses the librar y” must include any data and utility
programs needed for reproducing the executable from it. However, as a special exception, the materials to
be distributed need not include anything that is normally distributed (in either source or binar y form) with
the major components (compiler, kernel, and so on) of the operating system on which the executable runs,
unless that component itself accompanies the executable.
It may happen that this requirement contradicts the license restrictions of other proprietary libraries that do
not normally accompany the operating system. Such a contradiction means you cannot use both them and
the Library together in an executable that you distribute.
7. You may place library facilities that are a work based on the Library side-by-side in a single library together
with other library facilities not covered by this License, and distr ibute such a combined library, provided that
the separate distribution of the work based on the Library and of the other library facilities is otherwise
permitted, and provided that you do these two things:
a) Accompany the combined library with a copy of the same work based on the Library, uncombined with
any other library facilities. This must be distributed under the terms of the Sections above.
b) Give prominent notice with the combined libr ary of the fact that part of it is a work based on the
Library, and explaining where to nd the accompanying uncombined form of the same work.
8. You may not copy, modify, sublicense, link with, or distribute the Library except as expressly provided under
this License. Any attempt otherwise to copy, modify, sublicense, link with, or distribute the Libr ary is void,
and will automatically terminate your rights under this License. However, parties who have received copies,
or rights, from you under this License will not have their licenses terminated so long as such par ties remain
in full compliance.
8
Page 43

9. You are not required to accept this License, since you have not signed it. However, nothing else grants you
permission to modify or distribute the Library or its derivative works. These ac tions are prohibited by law
if you do not accept this License. Therefore, by modifying or distributing the Librar y (or any work based
on the Librar y), you indicate your acceptance of this License to do so, and all its terms and conditions for
copying, distributing or modifying the Library or works based on it.
10. Each time you redistribute the L ibrary (or any work based on the Library), the recipient automatically
receives a license from the original licensor to copy, distribute, link with or modify the Librar y subject to
these terms and conditions. You may not impose any further restrictions on the recipients’ exercise of the
rights granted herein.
You are not responsible for enforcing compliance by third parties with this License.
11. If, as a consequence of a court judgment or allegation of patent infringement or for any other reason (not
limited to patent issues), conditions are imposed on you (whether by court order, agreement or otherwise)
that contradict the conditions of this License, they do not excuse you from the conditions of this License.
If you cannot distribute so as to satisfy simultaneously your obligations under this License and any other
per tinent obligations , then as a consequence you may not distribute the Libr ary at all. For example, if a
patent license would not permit royalty-free redistribution of the Librar y by all those who receive copies
directly or indirectly through you, then the only way you could satisfy both it and this License would be to
refrain entirely from distribution of the Library.
If any portion of this section is held invalid or unenforceable under any par ticular circumstance, the balance
of the section is intended to apply, and the section as a whole is intended to apply in other circumstances.
It is not the purpose of this section to induce you to infringe any patents or other property right claims
or to contest validity of any such claims; this section has the sole pur pose of protecting the integrity of
the free software distribution system which is implemented by public license practices. Many people have
made generous contributions to the wide range of software distributed through that system in reliance on
consistent application of that system; it is up to the author/donor to decide if he or she is willing to distribute
software through any other system and a licensee cannot impose that choice.
This section is intended to make thoroughly clear what is believed to be a consequence of the rest of this
License.
12. If the distribution and /or use of the Libr ary is restricted in cert ain countrie s either by patents or by
copyrighted interfaces, the original copyr ight holder who places the Library under this License may add an
explicit geographical distribution limitation excluding those countries, so that distribution is permitted only
in or among countries not thus excluded. In such case, this License incorporates the limitation as if written in
the body of this License.
13. The Free Soft war e Foundation may publish r evised and /or new ve rsions of the Lesser General Public
License from time to time. Such new versions will be similar in spirit to the present version, but may differ in
detail to address new problems or concerns.
Each version is given a distinguishing version number. If the Library species a version number of this License
which applies to it and “any later version”, you have the option of following the terms and conditions either
of that version or of any later version published by the Free Software Foundation . If the Library does
not specify a license version number, you may choose any ver sion ever published by the Free Software
Foundation.
14. If you wish to incorporate par ts of the Library into other free programs whose distribution conditions are
incompatible with these, write to the author to ask for permission. For software which is copyrighted by
the Free Software Foundation, write to the Free Software Foundation; we sometimes make exceptions for
this. Our decision will be guided by the two goals of preser ving the free status of all derivatives of our free
software and of promoting the sharing and reuse of soft ware generally.
NO WARRANTY
15. BECAUSE TH E LIBRARY IS LICENSED FR EE OF C HARGE, THERE IS NO WAR RA NT Y FOR T HE
LIBRARY, TO THE EXTENT PERMIT TED BY APPLICABLE LAW. EXCEPT WHEN OTHERWISE STATED
IN WRITING THE COPYRIGHT HOLDERS AND/OR OTHER PARTIES PROVIDE THE LIBRARY “AS IS”
WITHOUT WARR ANT Y OF ANY KIND, EITHER EXPRESSED OR IMPLIED, INCLUDING, BUT NOT
LIMITED TO, THE IMPLIED WARR ANTIES OF MERCHANTABILITY AND FITNESS FOR A PARTICULAR
PURPOSE. THE ENTIRE RISK AS TO THE QUALITY AND PERFORMANCE OF THE LIBR ARY IS WITH
YOU. SHOULD TH E LIBR ARY PROVE DEFECTIVE, YOU ASSUME THE COST OF ALL NECESSARY
SERVICING, REPAIR OR CORRECTION.
16. IN NO EVENT UNLESS REQUIRED BY APPLICABLE L AW OR AGREED TO IN WRITING WILL ANY
COPYRIGHT HOLDER, OR ANY OTHER PARTY WHO MAY MODIF Y AND/OR REDISTRIBUTE THE
LIBRARY AS PERMITTED ABOVE, BE LIABLE TO YOU FOR DAMAGES, INCLUDING ANY GENER AL,
SPECIAL, INCIDENTAL OR CONSEQUENTIAL DAMAGES ARISING OUT OF THE USE OR INABILIT Y
9
Page 44

TO USE TH E LI BR ARY (INCLU DI NG BUT N OT LI MITED TO LOSS OF DATA OR DATA BEING
RENDERED INACCURATE OR LOSSES SUSTAINED BY YOU OR THIRD PARTIES OR A FAILURE OF
THE LIBRARY TO OPERATE WITH ANY OTHER SOFT WARE), EVEN IF SUCH HOLDER OR OTHER
PARTY HAS BEEN ADVISED OF THE POSSIBILITY OF SUCH DAMAGES.
END OF TERMS AND CONDITIONS
How to Apply These Terms to Your New Libraries
If you develop a new library, and you want it to be of the greatest possible use to the public, we recommend
making it free software that everyone can redistribute and change. You can do so by permitting redistribution
under these terms (or, alternatively, under the terms of the ordinary General Public License).
To apply these terms, attach the following notices to the library. It is safest to attach them to the star t of each
source le to most effectively convey the exclusion of warranty; and each le should have at least the “copyright”
line and a pointer to where the full notice is found.
<one line to give the library’s name and a brief idea of what it does.>
Copyright (C) <year> <name of author>
This library is free sof tware; you can redistribute it and/or modify it under the terms of the GNU Lesser General
Public License as published by the Free Software Foundation; either version 2.1 of the License, or (at your
option) any later version.
This library is distributed in the hope that it will be useful, but WITHOUT ANY WARRANTY; without even the
implied warranty of MERCHANTABILITY or FITNESS FOR A PARTICUL AR PURPOSE. See the GNU Lesser
General Public License for more details.
You should have received a copy of the GNU Lesser General Public License along with this library; if not, write
to the Free Software Foundation, Inc., 59 Temple Place, Suite 330, Boston, MA 02111-1307 USA
Also add information on how to contact you by electronic and paper mail.
You should also get your employer (if you work as a programmer) or your school, if any, to sign a “copyright
disclaimer” for the library, if necessary. Here is a sample; alter the names:
Yoyodyne, Inc., hereby disclaims all copyright interest in the library `Frob’ (a library for tweaking knobs) written
by James Random Hacker.
<signature of Ty Coon>, 1 April 1990
Ty Coon, President of Vice
That’s all there is to it!
5. IJG: JPEG software decoder
The authors make NO WARRANTY or representation, either express or implied, with respect to this software,
its quality, accuracy, merchantability, or tness for a par ticular purpose. This sof tware is provided “AS IS”, and
you, its user, assume the entire risk as to its quality and accuracy.
This software is copyright (C) 1991-1998, Thomas G. Lane.
All Rights Reserved except as specied below.
Permission is hereby granted to use, copy, modif y, and distribute this software (or portions thereof ) for any
purpose, without fee, subject to these conditions:
(1) If any part of the source code for this software is distributed, then this README le must be included, with
this copyright and no-warranty notice unaltered; and any additions, deletions, or changes to the original les
must be clearly indicated in accompanying documentation.
(2) If only executable code is distributed, then the accompanying documentation must state that “this sof tware
is based in part on the work of the Independent JPEG Group”.
(3) Permission for use of this software is granted only if the user accepts full responsibility for any undesirable
consequences; the authors accept NO LIABILITY for damages of any kind.
6. WPA Supplicant
Copyright (c) 2003-2009, Jouni Malinen <j@w1.> and contributor s
All Rights Reserved.
Redistribution and use in source and binary forms, with or without modication, are permitted provided that
the following conditions are met:
10
Page 45

1. Redistributions of source code must retain the above copyright notice, this lis t of conditions and the
following disclaimer.
2. Redistributions in binary form must reproduce the above copyright notice, this list of conditions and the
following disclaimer in the documentation and/or other materials provided with the distribution.
3. Neither the name(s) of the above-listed copyright holder(s) nor the names of its contributors may be used
to endorse or promote products derived from this software without specic prior written permission.
TH IS SOFT WA RE IS PROVIDED BY THE COPYRI GH T HOLDERS AND CONTRI BU TORS “A S IS”
AND ANY EXPRESS OR IMPLIED WARR ANT IES , INCLUDING, BUT NOT LIMITED TO, THE IMPLI ED
WARRANTIES OF MERCHANTABILITY AND FITNESS FOR A PARTICULAR PURPOSE ARE DISCLAIMED.
IN NO EVENT SHALL THE COPYRIGHT OWNER OR CONTRIBUTORS BE LIABLE FOR ANY DIRECT,
INDIRECT, INCIDENTAL, SPECIAL , EXEMPLARY, OR CONSEQUENTIAL DAMAGES (INCLUDING, BUT
NOT LIMITED TO, PROCUREMENT OF SUBSTITUTE GOODS OR SERVICES; LOSS OF USE, DATA, OR
PROFITS; OR BUSINESS INTERRUPTION) HOWE VER CAUSED AND ON ANY THEORY OF LIABILIT Y,
WHETHER IN CONTRACT, STRICT LIABILITY, OR TORT (INCLUDING NEGLIGENCE OR OTHERWISE)
ARISING IN ANY WAY OUT OF THE USE OF THIS SOFTWARE, EVEN IF ADVISED OF THE POSSIBILITY
OF SUCH DAMAGE.
7. Unicode Bidirectional Algorithm
For the general privacy policy governing access to this site, see the Unicode Privacy Policy. For trademark usage,
see the Unicode Consortium® Trademarks and Logo Policy.
Notice to End User: Terms of Use
Carefully read the following legal agreement (“Agreement” ). Use or copying of the soft ware and/or codes
provided with this agreement (The “Sof tware”) constitutes your acceptance of these terms
Unicode Copyright.
Copyright © 1991-2009 Unicode, Inc. All rights reserved.
Cer tain documents and les on this website contain a legend indicating that “Modication is permitted.” Any
person is here by aut horized , without fee, to modify such documents and files to cr eate derivative works
conforming to the Unicode® Standard, subject to Terms and Conditions herein.
Any person is hereby authorized, without fee, to view, use, reproduce, and distribute all documents and les
solely for informational purposes in the creation of products supporting the Unicode Standard, subject to the
Terms and Conditions herein.
Further specications of rights and restrictions pertaining to the use of the par ticular set of data les known as
the “Unicode Character Database” can be found in Exhibit 1.
Each version of the Unicode Standard has further specications of rights and restr ictions of use. For the book
editions, these are found on the back of the title page. For the online edition, certain les (such as the PDF les
for book chapters and code charts) carry specic restrictions. All other les are covered under these general
Terms of Use. To request a permission to reproduce any par t of the Unicode Standard, please contact the
Unicode Consor tium.
No license is granted to “mirror” the Unicode website where a fee is charged for access to the “mirror” site.
Modication is not permitted with respect to this document. All copies of this document must be verbatim.
Restricted Rights Legend. Any technical data or software which is licensed to the United States of America, its
agencies and/or instrumentalities under this Agreement is commercial technical data or commercial computer
soft ware developed exclusively at private expense as dened in FAR 2.101, or DFAR S 252.227-7014 (June 1995),
as applicable. For technical data, use, duplication, or disclosure by the Government is subject to restrictions as
set forth in DFARS 202.227-7015 Technical Data, Commercial and Items (Nov 1995) and this Agreement. For
Software, in accordance with FAR 12-212 or DFARS 227-7202, as applicable, use, duplication or disclosure by the
Government is subject to the restrictions set for th in this Agreement.
Warranties and Disclaimers.
This publication and/or website may include technical or typographical errors or other inaccuracies . Changes
are per iod ically added to the informa tion her ein; the se changes will be incorpor ated in new editions of
the publication and/or website. Unicode may make improvements and/or changes in the produc t(s) and/or
program(s) described in this publication and/or website at any time.
If this le has been purchased on magnetic or optical media from Unicode, Inc. the sole and exclusive remedy for
any claim will be exchange of the defective media within ninety (90) days of original purchase.
EXCEPT AS PROVIDED IN SECTION C .2, THIS PUBLICATION AND/OR SOFTWARE IS PROVIDED “AS IS”
WITHOUT WARRANTY OF ANY KIND EITHER E XPRESS, IMPLIED, OR STATUTORY, INCLUDING, BUT
NOT LIMITED TO, ANY WARRANTIES OF MERCHANTABILITY, FITNESS FOR A PARTICULAR PURPOSE,
11
Page 46

OR NON-INFRINGEMENT. UNICODE AND ITS LICENSORS ASSUME NO RESPONSIBILITY FOR ERRORS
OR OMISSIONS IN THIS PUBLICATION AND/OR SOFT WARE OR OTHER DOCUMENTS WHICH ARE
REFERENCED BY OR LINKED TO THIS PUBLICATION OR THE UNICODE WEBSITE.
Waiver of Damages. In no event shall Unicode or its licensors be liable for any special, incidental, indirec t or
consequential damages of any kind, or any damages whatsoever, whether or not Unicode was advised of the
possibility of the damage, including, without limitation, those resulting from the following: loss of use, data or
prots, in connection with the use, modication or distribution of this information or its derivatives.
Trademarks.
Unicode and the Unicode logo are registered trademarks of Unicode, Inc.
This site contains product names and corporate names of other companies. All product names and company
names and logos mentioned herein are the trademarks or registered trademarks of their respective owners.
Other products and corporate names mentioned herein which are trademarks of a third party are used only for
explanation and for the owners’ benet and with no intent to infringe.
Use of third party products or information referred to herein is at the user’s risk.
Miscellaneous.
Jur isdiction and Venue. This server is operated from a location in the St ate of Califor nia, United States of
America. Unicode makes no representation that the materials are appropriate for use in other locations. If you
access this server from other locations, you are responsible for compliance with local laws. This Agreement,
all use of this site and any claims and damages resulting from use of this site are governed solely by the laws of
the State of California without regard to any principles which would apply the laws of a dif ferent jurisdiction.
The user agrees that any disputes regarding this site shall be resolved solely in the courts located in Santa Clara
County, California. The user agrees said cour ts have per sonal jurisdiction and agree to waive any right to tr ansfer
the dispute to any other forum.
Modication by Unicode Unicode shall have the right to modify this Agreement at any time by pos ting it to this
site. The user may not assign any part of this Agreement without Unicode’s prior written consent.
Taxes. The user agrees to pay any taxes arising from access to this website or use of the infor mation herein,
except for those based on Unicode’s net income.
Severabilit y. If any provision of this Agreement is declared invalid or unenforceable, the remaining provisions of
this Agreement shall remain in effect.
Entire Agreement. This Agreement constitutes the entire agreement between the par ties.
-------------------------------------------------------------------------------EXHIBIT 1
UNICODE, INC. LICENSE AGREEMENT - DATA FILES AND SOFTWARE
Unicode Data Files include all data files under the directories http://www.unicode.org/Public/, http://www.
unicode.org/re por ts/, and http://www.unicode.or g/cldr/data/ . Unicode Software includes a ny source code
published in the Unicode Standard or under the directories http://ww w.unicode.org/Public/, http://w ww.unicode.
org/repor ts/, and http://www.unicode.org/cldr/data /.
NOTICE TO USER: Carefully read the foll owing legal agre ement. BY DOWNLOADIN G, INSTALLI NG,
COPYING OR OTHERWISE USING UNICODE INC.’S DATA FILES (“DATA FILES”), AND/OR SOFTWARE
(“SOFTWARE”), YOU UNEQUIVOCALLY ACCEPT, AND AGREE TO BE BOUND BY, ALL OF THE TERMS
AND CONDITIONS OF THIS AGREEMENT. IF YOU DO NOT AGREE, DO NOT DOWNLOAD, INSTALL,
COPY, DISTRIBUTE OR USE THE DATA FILES OR SOFT WARE.
COPYRIGHT AND PERMISSION NOTICE
Copyright © 1991-2009 Unicode, Inc. All rights reserved. Distributed under the Terms of Use in http://www.
unicode.org/copyright.html.
Permission is hereby granted, free of charge, to any person obtaining a copy of the Unicode data les and any
associated documentation (the “Data Files”) or Unicode software and any associated documentat ion (the
“Software”) to deal in the Data Files or Software without restriction, including without limitation the right s
to use, copy, modif y, merge, publish, distribute, and/or sell copies of the Data Files or Sof tware, and to permit
per sons to whom the Data Files or Software are furnished to do so, provided that (a) the above copyright
notice(s) and this permission notice appear with all copies of the Data Files or Software, (b) both the above
copyright notice(s) and this permission notice appear in associated documentation, and (c) there is clear notice
in each modied Data File or in the Software as well as in the documentation associated with the Data File(s) or
Software that the data or software has been modied.
THE DATA FILES AND SOFTWARE AR E PROVIDED “AS IS”, WITHOUT WARRANTY OF ANY KIN D,
EXPRESS OR IMPLIED, INCLUDING BUT NOT LIMITED TO THE WARRANTIES OF MERCHANTABILIT Y,
FITNESS FOR A PARTI CULAR PURPOSE AND NONI NFRINGEM ENT O F THIRD PARTY R IGHTS . IN
NO EVENT SHALL THE COPYRIGHT HOLDER OR HOLDERS INCLUDED IN THIS NOTICE BE LIABLE
FOR ANY CLAIM, OR ANY SPECIAL INDIRECT OR CONSEQUENTIAL DAMAGES, OR ANY DAMAGES
12
Page 47

WHATSOEVER RESULTING FROM LOSS OF USE, DATA OR PROFITS, WHETHER IN AN ACTION OF
CONTR ACT, NEGLIGENCE OR OTHER TORTIOUS ACTION, ARISING OUT OF OR IN CONNECTION
WITH THE USE OR PERFORMANCE OF THE DATA FILES OR SOFT WARE.
Except as contained in this notice, the name of a copyright holder shall not be used in adver tising or otherwise
to promote the sale, use or other dealings in these Data Files or Sof tware without prior written authorization of
the copyright holder.
-------------------------------------------------------------------------------Unicode and the Unicode logo are trademarks of Unicode, Inc., and may be registered in some jurisdic tions. All
other trademarks and registered trademarks mentioned herein are the proper ty of their respective owners.
---------------------------------- -------------------------------------- --------
8. OpenSSL.
Open SSL is an Open Source toolkit implementing the Secure Sockets Layer (SSL v2/v3) and Transport Layer
Security (TLS v1) protocols as well as a full-strength gener al purpose cryptography librar y.
See http://www.openssl.org/, and in par ticular http://w ww.openssl.org/source/license.html.
The license conditions are copied below.
The OpenSSL toolkit s tays under a dual license, i.e. both the conditions of the OpenSSL License and the original
SSLeay license apply to the toolkit.
See below for the actual license texts. Actually both licenses are BSD-style
Open Source licenses. In case of any license issues related to OpenSSL, please contact openssl-core@openssl.
org.
OpenSSL License
---------------
/* =====================================================
* Copyright (c) 1998-2008 The OpenSSL Project. All rights reserved.
*
* Redistribution and use in source and binary forms, with or without
* modication, are permitted provided that the following conditions
* are met:
*
* 1. Redistributions of source code must retain the above copyright
* notice, this list of conditions and the following disclaimer.
*
* 2. Redistributions in binary form must reproduce the above copyright
* notice, this list of conditions and the following disclaimer in
* the documentation and/or other materials provided with the
* distribution.
*
* 3. All advertising materials mentioning features or use of this
* sof tware must display the following acknowledgment:
* “This product includes soft ware developed by the OpenSSL Project
* for use in the OpenSSL Toolkit. (http://www.openssl.org/ )”
*
* 4. The names “OpenSSL Toolkit” and “OpenSSL Project” must not be used to
* endorse or promote products derived from this software without
* prior written permission. For written permission, please contact
* openssl-core@openssl.org.
*
* 5. Products derived from this sof tware may not be called “OpenSSL”
* nor may “OpenSSL” appear in their names without prior written
* permission of the OpenSSL Project.
*
* 6. Redistributions of any form whatsoever must retain the following
* acknowledgment:
* “This product includes soft ware developed by the OpenSSL Project
* for use in the OpenSSL Toolkit (http://www.openssl.org/)”
*
* THIS SOFTWARE IS PROVIDED BY THE OpenSSL PROJECT ``AS IS’’ AND ANY
13
Page 48

* EXPRESSED OR IMPLIED WARRANTIES, INCLUDING, BUT NOT LIMITED TO, THE
* IMPLIED WARR ANTIES OF MERCHANTABILITY AND FITNESS FOR A PARTICULAR
* PURPOSE ARE DISCLAIMED. IN NO EVENT SHALL THE OpenSSL PROJECT OR
* ITS CONTRIBUTORS BE LIABLE FOR ANY DIRECT, INDIRECT, INCIDENTAL,
* SPECIAL, EXEMPLARY, OR CONSEQUENTIAL DAMAGES (INCLUDING, BUT
* NOT LIMITED TO, PROCUREMENT OF SUBSTITUTE GOODS OR SERVICES;
* LOSS OF USE, DATA, OR PROFITS; OR BUSINESS INTERRUPTION)
* HOWEVER CAUSED AND ON ANY THEORY OF LIABILITY, WHETHER IN
* CONTR ACT, STRICT LIABILITY, OR TORT (INCLUDING NEGLIGENCE OR
* OTHERWISE) ARISING IN ANY WAY OUT OF THE USE OF THIS SOFTWARE,
* EVEN IF ADVISED OF THE POSSIBILITY OF SUCH DAMAGE.
* ======================================================
*
* This product includes cr yptographic sof tware written by Eric Young
* (eay@cryptsoft.com). This product includes software written by Tim
* Hudson (tjh@cryptsoft.com).
*
*/
Original SSLeay License
-----------------------
/* Copyright (C) 1995-1998 Eric Young (eay@cryptsoft.com)
* All rights reserved.
*
* This package is an SSL implementation written
* by Eric Young (eay@cryptsoft.com).
* The implementation was written so as to conform with Netscapes SSL.
*
* This library is free for commercial and non-commercial use as long as
* the following conditions are aheared to. The following conditions
* apply to all code found in this distribution, be it the RC4, RSA ,
* lhash, DES, etc., code; not just the SSL code. The SSL documentation
* included with this distribution is covered by the same copyright terms
* except that the holder is Tim Hudson (tjh@cryptsoft.com).
*
* Copyright remains Eric Young’s, and as such any Copyright notices in
* the code are not to be removed.
* If this package is used in a product, Eric Young should be given attribution
* as the author of the parts of the library used.
* This can be in the for m of a textual message at program startup or
* in documentation (online or textual) provided with the package.
*
* Redistribution and use in source and binary forms, with or without
* modication, are permitted provided that the following conditions
* are met:
* 1. Redistributions of source code must retain the copyright
* notice, this list of conditions and the following disclaimer.
* 2. Redistributions in binary form must reproduce the above copyright
* notice, this list of conditions and the following disclaimer in the
* documentation and/or other mater ials provided with the distribution.
* 3. All advertising materials mentioning features or use of this sof tware
* must display the following acknowledgement:
* “This product includes cryptographic software wr itten by
* Eric Young (eay@cr yptsoft.com)”
* The word ‘cryptographic’ can be left out if the rouines from the librar y
* being used are not cryptographic related :-).
* 4. If you include any Windows specic code (or a derivative thereof ) from
* the apps directory (application code) you must include an acknowledgement:
* “This product includes soft ware wr itten by Tim Hudson (tjh@cryptsoft.com)”
*
* THIS SOFTWARE IS PROVIDED BY ERIC YOUNG ``AS IS’’ AND ANY E XPRESS OR
* IMPLIED WARR ANTIES, INCLUDING, BUT NOT LIMITED TO, THE IMPLIED
14
Page 49

* WARRANTIES OF MERCHANTABILITY AND FITNESS FOR A PARTICUL AR
* PURPOSE ARE DISCLAIMED. IN NO EVENT SHALL THE AUTHOR OR
* CONTRIBUTORS BE LIABLE FOR ANY DIRECT, INDIRECT, INCIDENTAL,
* SPECIAL, EXEMPLARY, OR CONSEQUENTIAL DAMAGES (INCLUDING, BUT
* NOT LIMITED TO, PROCUREMENT OF SUBSTITUTE GOODS OR SERVICES; LOSS
* OF USE, DATA, OR PROFITS; OR BUSINESS INTERRUPTION) HOWEVER
* CAUSED AND ON ANY THEORY OF LIABILITY, WHETHER IN CONTRACT,
* STRICT LIABILIT Y, OR TORT (INCLUDING NEGLIGENCE OR OTHERWISE)
* ARISING IN ANY WAY OUT OF THE USE OF THIS SOFTWARE, EVEN IF ADVISED
* OF THE POSSIBILITY OF SUCH DAMAGE.
*
* The licence and distribution terms for any publically available version or
* derivative of this code cannot be changed. i.e. this code cannot simply be
* copied and put under another distribution licence
* [including the GNU Public Licence.]
*/
9. Zlib general purpose compression library
See http://www.zlib.net/, and in particular http://ww w.zlib.net/zlib_license.html.
/* zlib.h -- interface of the ‘zlib’ general purpose compression library version 1.2.3, July 18th, 2005
Copyright (C) 1995-2005 Jean-loup Gailly and Mark Adler
This software is provided ‘as-is’, without any express or implied warranty. In no event will the authors be held
liable for any damages arising from the use of this software.
Permission is granted to anyone to use this sof tware for any purpose, including commercial applications, and to
alter it and redistribute it freely, subject to the following res trictions:
1. The origin of this software must not be misrepresented; you must not claim that you wrote the original
software. If you use this software in a product, an acknowledgment in the product documentation would be
appreciated but is not required.
2. Altered source versions must be plainly mar ked as such, and must not be misrepresented as being the
original software.
3. This notice may not be removed or altered from any source distribution.
Jean-loup Gailly jloup@gzip.org
Mark Adler madler@alumni.caltech.edu
*/
10. cURL
COPYRIGHT AND PERMISSION NOTICE
Copyright (c) 1996 - 2010, Daniel Stenberg, <daniel@haxx.se>.
All rights reserved.
Permission to use, copy, modify, and distribute this software for any purpose with or without fee is hereby
granted, provided that the above copyright notice and this permission notice appear in all copies.
THE SOF TWARE IS PROVIDED “AS IS”, WITHOUT WARRANT Y OF ANY KIND, EXPRESS OR IMPLIED,
IN CLU DI NG B UT N OT LIMITED TO THE WARR AN TIES OF MERCHANTABI LI TY, FIT NESS FOR A
PARTICULAR PURPOSE AND NONINFRINGEMENT OF THIRD PARTY RIGHTS. IN NO EVENT SHALL
TH E AU THORS OR COPYRIGHT HOL DERS BE LIABLE FOR AN Y CL AIM, DAMAGES OR OTHER
LIABILIT Y, WHETHER IN AN ACTION OF CONTRACT, TORT OR OTHERWISE, ARISING FROM, OUT OF
OR IN CONNECTION WITH THE SOFT WARE OR THE USE OR OTHER DEALINGS IN THE SOFTWARE.
Except as contained in this notice, the name of a copyright holder shall not be used in adver tising or otherwise
to promote the sale, use or other dealings in this Software without prior written authorization of the copyright
holder.
11. Freetype, a Free, High-Quality, and Portable Font Engine
The sof tware is based in part of the work of the FreeType Team.
See http://freetype.sourceforge.net/, and in particular http://freetype.sourceforge.net/FTL.TXT.
Portions of the relevant license conditions are copied below.
15
Page 50

The FreeType Project LICENSE 2006-Jan-27
Copyright 1996-2002, 2006 by David Turner, Robert Wilhelm, and Wer ner Lemberg
…
1. No Warranty
------------------
TH E FR EE TY PE PROJ EC T IS PROV IDED `AS IS’ W ITHOUT WARR AN TY OF ANY KIND , EITHER
EXPRESS OR IMPLIED, INCLUDING, BUT NOT LIMITED TO, WARR ANTIES OF MERCHANTABILITY
AND FITNESS FOR A PARTICULAR PURPOSE. IN NO EVENT WILL ANY OF TH E AUTHORS OR
COPYRIGHT HOLDERS BE LIABLE FOR ANY DAMAGES CAUSED BY THE USE OR THE INABILITY TO
USE, OF THE FREETYPE PROJECT.
2. Redistribution
-------------------
This license grants a worldwide, royalty-free, perpetual and irrevocable right and license to use, execute,
perform, compile, display, copy, create derivative works of, distribute and sublicense the FreeType Project (in
both source and object code forms) and derivative works thereof for any purpose; and to authorize others to
exercise some or all of the rights granted herein, subjec t to the following conditions:
…
o Redistribution in binary form must provide a disclaimer that states that the software is based in par t of
the work of the FreeType Team, in the distribution documentation. We also encourage you to put an
URL to the FreeType web page in your documentation, though this isn’t mandatory.
…
12. International Components for Unicode
COPYRIGHT AND PERMISSION NOTICE
Copyright (c) 1995-2009 International Business Machines Corporation and others
All rights reserved.
Permission is hereby granted, free of charge, to any person obtaining a copy of this software and associated
documentation les (the “Software”), to deal in the Software without restriction, including without limitation the
rights to use, copy, modify, merge, publish, distribute, and/or sell copies of the Software, and to permit persons
to whom the Software is furnished to do so, provided that the above copyright notice(s) and this per mission
notice appear in all copies of the Software and that both the above copyright notice(s) and this per mission notice
appear in suppor ting documentation.
THE SOF TWARE IS PROVIDED “AS IS”, WITHOUT WARRANT Y OF ANY KIND, EXPRESS OR IMPLIED,
IN CLU DI NG B UT N OT LIMITED TO THE WARR AN TIES OF MERCHANTABI LI TY, FIT NESS FOR A
PARTICULAR PURPOSE AND NONINFRINGEMENT OF THIRD PARTY RIGHTS. IN NO EVENT SHALL
THE COPYRIGHT HOLDER OR HOLDERS INCLUDED IN THIS NOTICE BE LIABLE FOR ANY CLA IM,
OR ANY SPECIAL INDIR ECT OR CONSEQUENTI AL DAMAGES , OR ANY DAMAGES WHATSOEVER
RESULTING FROM LOSS OF USE, DATA OR PROFITS, WH ETHER IN AN ACTION OF CONTRACT,
NEGLIGENCE OR OTHER TORTIOUS ACTION, ARISING OUT OF OR IN CONNECTION WITH THE USE
OR PERFORMANCE OF THIS SOFTWARE.
Except as contained in this notice, the name of a copyright holder shall not be used in adver tising or otherwise
to promote the sale, use or other dealings in this Software without prior written authorization of the copyright
holder.
13. Expat
Copyright (c) 1998, 1999, 2000 Thai Open Source Software Center Ltd and Clark Cooper
Copyright (c) 2001, 2002, 2003, 2004, 2005, 2006 E xpat maintainers.
Permission is hereby granted, free of charge, to any person obtaining a copy of this software and associated
documentation les (the “ Soft ware”), to deal in the Software without restriction, including without limitation
the rights to use, copy, modify, merge, publish, distribute, sublicense, and/or sell copies of the Sof tware, and to
permit persons to whom the Software is furnished to do so, subject to the following conditions:
The above copyright notice and this permission notice shall be included in all copies or substantial por tions of
the Sof tware.
16
Page 51

THE SOF TWARE IS PROVIDED “AS IS”, WITHOUT WARRANT Y OF ANY KIND, EXPRESS OR IMPLIED,
IN CLU DI NG B UT N OT LIMITED TO THE WARR AN TIES OF MERCHANTABI LI TY, FIT NESS FOR A
PARTICULAR PURPOSE AND NONINFRINGEMENT.
IN NO EVENT SH ALL TH E AUTHOR S OR CO PY RI GH T HOLDERS BE LIABL E FO R ANY CLAIM,
DAMAGES OR OTHER LIABILITY, WHETHER IN AN ACTION OF CONTRACT, TORT OR OTHERWISE,
ARISING FROM, OUT OF OR IN CONNECTION WITH THE SOFTWARE OR THE US E OR OTHER
DEALINGS IN THE SOFTWARE.
14. DNS Resolver
The DNS resolver code, taken from BIND 4.9.5, is copyrighted both by UC Berkeley and by Digital Equipment
Corporation. The DEC portions are under the following license:
Portions Copyright (C) 1993 by Digital Equipment Corporation.
Permission to use, copy, modify, and distribute this software for any purpose with or without fee is hereby
granted, provided that the above copyright notice and this permission notice appear in all copies, and that the
name of Digital Equipment Corporation not be used in advertising or publicity pertaining to distribution of the
document or software without specic, written prior permission.
THE SOFTWARE IS PROVIDED ``AS IS’’ AND DIGITAL EQUIPMENT CORP. DISCLAIMS ALL WARR ANTIES
WITH REGARD TO THIS SOFTWARE, INCLUDING ALL IMPLIED WARRANTIES OF MERCHANTABILITY
AND FITNESS. IN NO E VENT SHALL DIGITAL EQU IPMENT COR PORATION BE LIABLE FOR ANY
SPE CIAL, DIREC T, INDIRECT, OR CONSEQUENTIAL DAMAGES OR ANY DAMAG ES WHATSOEVER
RESULTING FROM LOSS OF USE, DATA OR PROFITS, WH ETHER IN AN ACTION OF CONTRACT,
NEGLIGENCE OR OTHER TORTIOUS ACTION, ARISING OUT OF OR IN CONNECTION WITH THE USE
OR PERFORMANCE OF THIS SOFTWARE.
15. getnameinfo, getaddrinfo
The les inet/getnameinfo.c and sysdeps/posix/getaddrinfo.c are copyright (C) by Craig Metz and are distributed
under the following license:
/* The Inner Net License, Version 2.00
The author(s) grant permi ssi on for redistr ibution and use in sour ce an d binar y forms , wi th or without
modication, of the software and documentation provided that the following conditions are met:
0. If you receive a version of the software that is specically labelled as not being for redis tribution (check the
version message and/or RE ADME), you are not permit ted to redistribute that version of the software in any
way or form.
1. All ter ms of the all other applicable copyrights and licenses must be followed.
2. Redistributions of source code must retain the authors’ copyright notice(s), this list of conditions, and the
following disclaimer.
3. Redis tributions in binar y form must reproduce the authors’ copyright notice(s), this list of conditions, and
the following disclaimer in the documentation and/or other materials provided with the distribution.
4. [The copyright holder has author ized the removal of this clause.]
5. Neither the name(s) of the author(s) nor the names of its contr ibutors may be used to endorse or promote
products derived from this software without specic pr ior written permission.
THIS SOFTWARE IS PROVIDED BY ITS AUTHORS AND CONTR IBUTORS ``AS IS’’ AND ANY EXPRESS
OR I MPLIED WARRA NTIES , INCLUDING, B UT N OT LIMITED TO, THE IMPLIED WAR RANTIES OF
MERCHANTABIL ITY AND FITNESS FOR A PARTICULA R PURPOSE AR E DISCLAIMED. IN NO EVENT
SHALL THE AU THORS OR CONTRIBUTORS BE LIABLE FOR ANY DIREC T, INDIREC T, INCI DENTAL,
SP EC IA L, EX EM PL ARY, OR CONSEQUENTIAL DAMAG ES (INCLUD IN G, BU T NOT LIMITED TO,
PROCU RE ME NT OF SUBS TI TU TE G OODS OR SERVICES; LOSS OF USE, DATA, OR PROFITS ; OR
BUSINESS INTERRUPTION) HOWE VER CAUSED AND ON ANY THEORY OF LIABILITY, WHETHER IN
CONTRAC T, STRICT LIABILITY, OR TORT (INCLUDING NEGLIGENCE OR OTHERWISE) ARISING IN
ANY WAY OUT OF THE USE OF THIS SOFT WARE, EVEN IF ADVISED OF THE POSSIBILITY OF SUCH
DAMAGE.
If these license terms cause you a real problem, contact the author. */
17
Page 52

16. libpng
This copy of the libpng notices is provided for your convenience. In case of any discrepancy between this copy
and the notices in the le png.h that is included in the libpng distribution, the latter shall prevail.
COPYRIGHT NOTICE, DISCLAIMER, and LICENSE:
If you modify libpng you may inser t additional notices immediately following this sentence.
This code is released under the libpng license.
libpng versions 1.2.6, August 15, 2004, through 1.2.41, December 3, 2009, are Copyright (c) 2004, 2006-2009
Glenn Randers-Pehrson, and are distributed according to the same disclaimer and license as libpng-1.2.5 with
the following individual added to the lis t of Contributing Authors
Cosmin Truta
libpng versions 1.0.7, July 1, 2000, through 1.2.5 - October 3, 2002, are
Copyright (c) 2000-2002 Glenn Randers-Pehrson, and are distribu ted according to the same disclaimer and
license as libpng-1.0.6 with the following individuals added to the list of Contributing Authors
Simon-Pierre Cadieux
Eric S . Raymond
Gilles Vollant
and with the following additions to the disclaimer:
There is no warranty against interference with your enjoyment of the library or against infr ingement. There
is no war ranty that our effor ts or the library will fulll any of your par ticular purposes or needs. This librar y is
provided with all faults, and the entire risk of satisfactory quality, per formance, accuracy, and effort is with the
user.
libpng versions 0.97, January 1998, through 1.0.6 , March 20, 2000, are Copyright (c) 1998, 1999 Glenn RandersPehr son, and are distributed according to the same disclaimer and license as libpng-0.96, with the following
individuals added to the list of Contributing Authors:
Tom Lane
Glenn Randers-Pehrson
Willem van Schaik
libpng versions 0.89, June 1996, through 0.96, May 1997, are Copyright (c) 1996, 1997 Andreas Dilger
Distributed according to the same disclaimer and license as libpng-0.88, with the following individuals added to
the list of Contributing Authors:
John Bowler
Kevin Bracey
Sam Bushell
Magnus Holmgren
Greg Roelofs
Tom Tanner
libpng versions 0. 5, May 1995, through 0.88, January 1996, are Copyright (c) 1995, 1996 Guy Eric Schalnat,
Group 42, Inc.
For t he purposes of this copyright a nd license, “Contributing Aut hor s” is defined as the following set of
individuals:
Andreas Dilger
Dave Mar tindale
Guy Eric Schalnat
Paul Schmidt
Tim Wegner
The PNG Reference Librar y is supplied “AS IS”. The Contributing Authors and G roup 42, Inc. disclaim all
warranties, expressed or implied, including, without limitation, the warranties of merchantability and of tness
for any purpose. The Contributing Authors and Group 42, Inc. assume no liability for direct, indirect, incidental,
special, exemplary, or consequential damages, which may result from the use of the PNG Reference Library,
even if advised of the possibility of such damage.
18
Page 53

Permission is hereby granted to use, copy, modify, and distribute this source code, or portions hereof, for any
purpose, without fee, subject to the following restrictions:
1. The origin of this source code must not be misrepresented.
2. Altered ver sions must be plainly marked as such and must not be misrepresented as being the original source.
3. This Copyright notice may not be removed or altered from any source or altered source distribution.
The Contributing Authors and Group 42, Inc. specically permi t, without fee, and encourage the use of this
source code as a component to suppor ting the PNG le format in commercial products. If you use this source
code in a product, acknowledgment is not required but would be appreciated.
A “png_get_copyright” function is available, for convenient use in “about” boxes and the like:
printf(“%s”,png_get_copyright(NULL));
Also, the PNG logo (in PNG format, of course) is supplied in the les “pngbar.png” and “pngbar.jpg (88x31) and
“pngnow.png” (98x31).
Libpng is OSI Cer tied Open Source Software. OSI Cer tied Open Source is a certication mark of the Open
Source Initiative.
Glenn Randers-Pehrson
glennrp at users.sourceforge.net
December 3, 2009
17. ezxml
This product contains ez xml, which is copyright 2004, 2005 Aaron Voisine.
18. SQLite
A l l o f t h e d e l i v e r a b l e c o d e i n S Q L i t e h a s b e e n d e d i c a t e d t o t h e H Y P E R L I N K
“http://en.wikipedia.org/wiki/Public_Domain”public domain by the authors. All code authors, and representatives
of the companies they work for, have signed afdavits dedicating their contributions to the public domain and
originals of those signed afdavits are stored in a resafe at the main ofces of HYPERLINK “http://www.hwaci.
com”Hwaci. Anyone is free to copy, modify, publish, use, compile, sell, or distribute the original SQLite code,
either in source code form or as a compiled binary, for any purpose, commercial or non-commercial, and by any
means.
The previous paragraph applies to the deliverable code in SQLite - those par ts of the SQLite library that you
actually bundle and ship with a larger application. Portions of the documentation and some code used as part
of the build process might fall under other licenses. The details here are unclear. We do not worry about the
licensing of the documentation and build code so much because none of these things are par t of the core
deliverable SQLite library.
All of the deliverable code in SQLite has been written from scratch. No code ha s been taken from other
projects or from the open internet. Every line of code can be traced back to its original author, and all of those
authors have public domain dedications on le. So the SQLite code base is clean and is uncontaminated with
licensed code from other projects.
19. aes-src
Copyright (c) 1998-2008, Brian Gladman, Worcester, UK . All rights reserved.
LICENSE TERMS
The redistribution and use of this software (with or without changes) is allowed without the payment of fees or
royalties provided that:
1. source code dist ributions include the above copyright not ice , this lis t of con ditions and t he follow ing
disclaimer;
2. binary distributions include the above copyright notice, this list of conditions and the following disclaimer in
their documentation;
3. the name of the copyright holder is not used to endorse products built using this software without specic
written permission.
19
Page 54

20. JSON-C
Copyright (c) 2004, 2005 Metaparadigm Pte Ltd
Permission is hereby granted, free of charge, to any person obtaining a copy of this software and associated
documentation les (the “ Soft ware”), to deal in the Software without restriction, including without limitation
the rights to use, copy, modify, merge, publish, distribute, sublicense, and/or sell copies of the Sof tware, and to
permit persons to whom the Software is furnished to do so, subject to the following conditions:
The above copyright notice and this permission notice shall be included in all copies or substantial por tions of
the Sof tware.
THE SOF TWARE IS PROVIDED “AS IS”, WITHOUT WARRANT Y OF ANY KIND, EXPRESS OR IMPLIED,
IN CLU DI NG B UT N OT LIMITED TO THE WARR AN TIES OF MERCHANTABI LI TY, FIT NESS FOR A
PARTI CUL AR PU RP OS E AND NO NI NFRIN GE ME NT. IN NO EVEN T SHALL THE AU TH OR S OR
COPYRIGHT HOLDERS BE LIABLE FOR ANY CLAIM, DAMAGES OR OTHER LIABILITY, WHETHER IN
AN ACTION OF CONTRACT, TORT OR OTHERWISE, ARISING FROM, OUT OF OR IN CONNECTION
WITH THE SOFTWARE OR THE USE OR OTHER DEALINGS IN THE SOFTWARE.
21. JSON parser
Copyright (c) 2005 JSON.org
Permission is hereby granted, free of charge, to any person obtaining a copy of this software and associated
documentation les (the “ Soft ware”), to deal in the Software without restriction, including without limitation
the rights to use, copy, modify, merge, publish, distribute, sublicense, and/or sell copies of the Sof tware, and to
permit persons to whom the Software is furnished to do so, subject to the following conditions:
The above copyright notice and this permission notice shall be included in all copies or substantial por tions of
the Sof tware.
The Sof tware shall be used for Good, not Evil.
THE SOF TWARE IS PROVIDED “AS IS”, WITHOUT WARRANT Y OF ANY KIND, EXPRESS OR IMPLIED,
IN CLU DI NG B UT N OT LIMITED TO THE WARR AN TIES OF MERCHANTABI LI TY, FIT NESS FOR A
PARTI CUL AR PU RP OS E AND NO NI NFRIN GE ME NT. IN NO EVEN T SHALL THE AU TH OR S OR
COPYRIGHT HOLDERS BE LIABLE FOR ANY CLAIM, DAMAGES OR OTHER LIABILITY, WHETHER IN
AN ACTION OF CONTRACT, TORT OR OTHERWISE, ARISING FROM, OUT OF OR IN CONNECTION
WITH THE SOFTWARE OR THE USE OR OTHER DEALINGS IN THE SOFTWARE.
20
2011_BDP5200/7600_V1.2_SG
Page 55

English
NOTICE
SOFTWARE END USER LICENSE AGREEMENT
THIS SOFTWARE END USER LICENSE AGREEMENT (“THIS AGREEMENT”) IS A LEGAL AND BINDING
AGREEMENT BETWEEN YOU (EITHER AN INDIVIDUAL OR ENTITY ) AND PHILIPS CONSUMER LIFEST YLE B.V.
A DUTCH LIMITED LIABILITY COMPANY, WITH ITS PRINCIPAL OFFICE AT HIGH TECH CAMPUS 37, 5656 AE
EINDHOVEN, THE NETHERLANDS AND ITS SUBSIDIARY COMPANIES (INDIVIDUALLY AND COLLECTIVELY
“PHILIPS”). THIS AGREEMENT GIVES YOU THE RIGHT TO USE CERTAIN SOFTWARE ( THE “SOFTWARE”)
INCLUDING USER DOCUMENTATION IN ELECTRONIC FORM WHICH MAY HAVE BEEN PROVIDED
SEPARATELY OR TOGE THER WITH A PHILIPS PRODUCT (THE “DEVICE”) OR A PC. BY DOWNLOADING,
INSTALLING OR OTHERWISE USING THE SOFTWARE, YOU ACCEPT AND AGREE TO BE BOUND BY ALL
OF THE TERMS AND CONDITIONS OF THIS AGREEMENT. IF YOU DO NOT AGREE TO THESE TERMS AND
CONDITIONS, DO NOT DOWNLOAD, INSTALL OR OTHERWISE USE THE SOFT WARE. IF YOU ACQUIRED THE
SOFTWARE IN TANGIBLE MEDIA E.G. CD WITHOUT THE OPPORTUNITY TO REVIEW THIS LICENSE AND DO
NOT ACCEPT THESE TERMS, YOU MAY RECEIVE A FULL REFUND OF THE AMOUNT, IF ANY, THAT YOU PAID
FOR THE SOFTWARE IF YOU RETURN THE SOFT WARE UNUSED WITH PROOF OF PAYMENT WITHIN 30 DAYS
FROM THE DATE OF PURCHASE.
1. Grant of License. This Agreement grants you a non-exclusive, nontransferable, non-sub licensable license to install
and use, on the Device or a PC, as applicable, one (1) copy of the specied version of the Software in object code
format as set out in the user documentation solely for your personal use. The Sof tware is “in use” when it is loaded
into the temporary or permanent memory (i.e. R AM, hard disk, etc.) of the PC or the Device.
2. Ownership. The Software is licensed and not sold to you. This Agreement grants you only the right to use the
Software, but you do not acquire any rights, express or implied, in the Software other than those specied in this
Agreement. Philips and its licensors retain all right, title, and interest in and to the Sof tware, including all patents,
copyrights, trade secrets, and other intellectual property rights incorporated therein. The Software is protected
by copyright laws, international treaty provisions, and other intellectual property laws. Therefore, other than as
expressly set forth herein, you may not copy the Sof tware without prior written authorization of Philips, except that
you may make one (1) copy of the Software for your back-up purposes only. You may not copy any printed materials
accompanying the Software, nor print more than one (1) copy of any user documentation provided in electronic
form, except that you may make one (1) copy of such printed materials for your back-up purposes only.
3. License Restrictions. Except as provided otherwise herein, you shall not rent, lease, sublicense, sell, assign, loan,
or otherwise transfer the Software. You shall not, and you shall not permit any third par ty, to reverse engineer,
decompile, or disassemble the Software, except to the extent that applicable law expressly prohibits the foregoing
restriction. You may not remove or destroy any product identication, copyright notices, or other proprietary
markings or restrictions from the Software. All titles, trademarks, and copyright and restricted rights notices shall be
reproduced on your back up copy of the Software. You may not modify or adapt the Software, merge the Software
into another program or create derivative works based upon the Software.
4. Termination of certain functionality. The Software may contain components of certain licensed software including
software licensed from Microsof t Corporation (“Microsoft”) which implements Microsoft’s digital rights management
technology for Windows Media. Content providers are using the digital rights management technology for Windows
Media (“WM-DRM”) to protec t the integrity of their content (“Secure Content”) so that their intellectual property,
including copyright, in such content is not misappropriated. Your Device may also use WM- DRM sof tware to transfer
or play Secure Content (“WM-DRM Software”). If the security of such WM-DRM Software is compromised,
Microsoft may revoke (either on its own or upon the request of the owners of Secure Content (“Secure Content
Owners”)) the WM -DRM Software’s right to acquire new licenses to copy, store, transfer, display and/or play Secure
Content. Revocation does not alter the WM-DRM Soft ware’s ability to play unprotected content. A list of revoked
WM-DRM Sof tware is sent to your PC and/or your Device whenever you download a license for Secure Content.
Microsoft may, in conjunction with such license, also download revocation lists onto your Device on behalf of Secure
Content Owner s, which may disable your Device’s ability to copy, store, display, transfer, and/or play Secure Content.
Secure Content Owners may also require you to upgrade some of the WM- DRM components distributed with this
Software (“ WM-DRM Upgrades”) before accessing their content. When you attempt to play Secure Content, WM DRM Software built by Microsoft will notify you that a WM-DRM Upgrade is required and then ask for your consent
before the WM-DRM Upgrade is downloaded. WM-DRM Software built by Philips may do the same. If you decline
Page 56

the upgrade, you will not be able to access Secure Content that requires the WM-DRM Upgrade; however, you
will still be able to access unprotected content and Secure Content that does not require the upgrade. WM-DRM
features that access the Internet, such as acquiring new licenses and/or performing a required WM-DRM Upgrade,
can be switched off. When these features are switched of f, you will still be able to play Secure Content if you have
a valid license for such content already stored on your Device. However, you will not be able to use cer tain of the
WM-DRM Sof tware features that require Internet access such as the ability to download content that requires the
WM-DRM Upgrade. All title and intellectual property rights in and to the Secure Content is the proper ty of the
respective Secure Content owners and may be protected by applicable copyright or other intellectual property
laws and treaties. This Agreement grants you no rights to use such Secure Content. To summarize, if the Software
contains Microsof t WM-DRM components – Secure Content you desire to download, copy, store, display,
transfer, and/or play is protected by the Microsoft WM-DRM components of the Software. Microsoft , Secure
Content Owners, or Secure Content distributors may deny you access, or restrict your access, to Secure
Content even after you have paid for, and/or obtained, it. Neither your consent nor the consent or approval of
Philips is necessary for any of them to deny, withhold or otherwise restrict your access to Secure Content. Philips
does not guaranty that you will be able to download, copy, store, display, transfer, and/or play Secure Content.
5. Open Source Software. (a) This software may contain components that are subject to open-source terms, as stated
in the documentation accompanying the Device. This Agreement does not apply to this software as such. (b) Your
license rights under this Agreement do not include any right or license to use, distribute or create derivative works of
the Sof tware in any manner that would subject the Software to Open Source Terms. “Open Source Terms” means
the terms of any license that directly or indirectly (1) create, or purport to create, obligations for Philips with respect
to the Software and/or derivative works thereof; or (2) grant, or purport to grant, to any third party any rights or
immunities under intellectual proper ty or proprietary rights in the Software or derivative works thereof.
6. Termination. This Agreement shall be effective upon installation or rst use of the Software and shall terminate (i) at
the discretion of Philips, due to your failure to comply with any term of this Agreement; or (ii) upon destruction of all
copies of the Software and related materials provided to you by Philips hereunder. Philips’s rights and your obligations
shall survive the termination of this Agreement.
7. U pgr ades . Philips may, at its sole option, make upgrades to the Software available by gener al posting on a website or
by any other means or methods. Such upgrades may be made available pursuant to the terms of this Agreement or
the release of such upgrades to you may be subject to your acceptance of another agreement.
8. Support Services. Philips is not obligated to provide technical or other support (“Support Services”) for the
Software. If Philips does provide you with Support Services, these will be governed by separate terms to be agreed
between you and Philips.
9. Limited Sof tware Warranty. Philips provides the Software ‘as is’ and without any warranty except that the Software
will perform substantially in accordance with the documentation accompanying the Software for a period of one year
after your rs t download, installation or use of the Sof tware, whichever occurs rst. Philips’ entire liability and your
exclusive remedy for breach of this warranty shall be, at Philips’ option, either (i) return of the price paid by you for
the Sof tware (if any); or (b) repair or replacement of the Software that does not meet the warranty set forth herein
and that is returned to Philips with a copy of your receipt. This limited warranty shall be void if failure of the Soft ware
has resulted from any accident, abuse, misuse or wrongful application. Any replacement Software will be warranted
for the remainder of the original warranty period or thirty (30) days, whichever is longer. This limited warranty shall
not apply to you if the Software was provided to you free of charge on an evaluation only basis.
10. NO OTHER WARRANTIES. EXCEPT AS SET FORTH ABOVE, PHILIPS AND ITS LICENSORS DO NOT
WARRANT THAT THE SOFTWARE WILL OPERATE ERROR FREE OR UNINTERRUPTED, OR WILL MEET
YOUR REQUIREMENTS. YOU ASSUME ALL RESPONSIBILITIES FOR SELECTION OF THE SOFTWARE TO
ACHIE VE YOUR INTENDED RESULTS, AND FOR THE INSTALLATION OF, USE OF, AND RESULTS OBTAINED
FROM THE SOFT WARE. TO THE MAXIMUM EXTENT PERMITTED BY APPLICABLE LAW, PHILIPS AND
ITS LICENSORS DISCL AIM ALL WARRANTIES AND CONDITIONS, WHETHER E XPRESS OR IMPLIED,
INCLUDING BUT NOT LIMITED TO THE IMPLIED WARR ANTIES OF MERCHANTABILITY, FITNESS FOR
A PARTICULAR PURPOSE, AND ACCUR ACY OR COMPLETENESS OF RESULTS WITH RESPECT TO THE
SOFTWARE AND THE ACCOMPANYING MATERIALS. THERE IS NO WARRANTY AGAINST INFRINGEMENT.
PHILIPS DOES NOT WARRANT THAT YOU WILL BE ABLE TO DOWNLOAD, COPY, STORE, DISPLAY,
TRANSFER , AND/OR PLAY SECURE CONTENT.
Page 57

11. LIMITATION OF LIABILITY. UNDER NO CIRCUMSTANCES WILL PHILIPS OR ITS LICENSORS BE LIABLE
FOR ANY CONSEQUENTIAL, SPECIAL, INDIRECT, INCIDENTAL OR PUNITIVE DAMAGES WHATSOEVER ,
INCLUDING, WITHOUT LIMITATION, DAMAGES FOR LOSS OF PROFITS OR REVENUES, BUSINESS
INTERRUPTION, LOSS OF BUSINESS INFORMATION, LOSS OF DATA, LOSS OF USE OR OTHER PECUNIARY
LOSS, EVEN IF PHILIPS OR ITS LICENSORS HAVE BEEN ADVISED OF THE POSSIBILITY OF SUCH DAMAGES.
IN NO EVENT SHALL PHILIPS’ OR ITS LICENSORS’ AGGREGATE LIABILITY FOR DAMAGES ARISING OUT OF
THIS AGREEMENT EXCEED THE GREATER OF THE PRICE ACTUALLY PAID BY YOU FOR THE SOFT WARE
OR FIVE POUNDS STERLING (5.00).
12. Trademarks. Certain of the product and Philips names used in this Agreement, the Software, and the printed user
documentation may constitute trademarks of the Philips, its licensor s or other third par ties. You are not authorized
to use any such trademarks.
13. Export Administration. You agree that you will not directly or indirectly, export or re-expor t the Software to
any country for which the United States Expor t Administration Act, or any similar United States law or regulation
requires an export license or other U.S. Government approval, unless the appropriate export license or approval has
rst been obtained. By downloading or installing the Software you agree to abide by this Export provision.
14. Governing law. This Agreement is governed by the laws of your country of residence , without reference to its
conic t of laws principles. Any dispute between you and Philips regarding this Agreement shall be subject to the nonexclusive jurisdiction of the courts of your country of residence.
15. General. This Agreement contains the entire agreement between you and Philips and supersedes any prior
representation, undertaking or other communication or adver tising with respect to the Software and user
documentation. If any par t of this Agreement is held invalid, the remainder of this Agreement will continue in full
force and effect. This Agreement shall not prejudice the statutory rights of any party dealing as a consumer.
EUL A-English (UK )
September 20 09
Page 58

© 2011 Koninklijke Philips Electronics N.V.
All rights reserved.
BDP7600_93_UM_V1.0_1113
 Loading...