

Page 1
Register your product and get support at
www.philips.com/welcome
BDP7200
EN Blu-Ray Disc Player 4
Page 2

Important notes for users in U.K.
Italia
Mains plug
This apparatus is fi tted with an approved 13
Amp plug. To change a fuse in this type of plug
proceed as follows:
1.
Remove fuse cover and fuse.
2.
Fix new fuse which should be a BS1362
5 Amp, A .S .T.A. or BSI approved type.
3.
Re t the fuse cover.
If the fi tted plug is not suitable for your socket
outlets, it should be cut off and an appropriate
plug fi tted in its place.
If the mains plug contains a fuse, this should have
a value of 5 Amp. If a plug without a fuse is
used, the fuse at the distribution board should
not be greater than 5 Amp.
Note: The severed plug must be disposed off to
avoid a possible shock hazard should it be inserted
into a 13 Amp socket elsewhere.
How to connect a plug
The wires in the mains lead are coloured with the
following code: blue = neutral (N),
brown = live (L).
•
As these colours may not correspond with
the colour markings identifying the terminals
in your plug, proceed as follows:
•
Connect the blue wire to the terminal
marked N or coloured black.
•
Connect the brown wire to the
terminal marked L or coloured red.
•
Do not connect either wire to the earth
terminal in the plug, marked E (or e) or
coloured green (or green and yellow).
Before replacing the plug cover, make certain
that the cord grip is clamped over the sheath of
the lead - not simply over the two wires.
Copyright in the U.K.
Recording and playback of material may require
consent. See Copyright Act 1956 and The
Performer’s Protection Acts 1958 to 1972.
DICHIARAZIONE DI CONFORMITA’
Si dichiara che l’apparecchio BDP7200, Philips
risponde alle prescrizioni dell’art. 2 comma 1 del
D.M. 28 Agosto 1995 n. 548.
Fatto a Eindhoven
Philips Consumer Electronics
Philips, Glaslaan 25616 JB Eindhoven,
The Netherlands
Norge
Typeskilt fi nnes på apparatens underside.
Observer: Nettbryteren er sekundert
innkoplet. Den innebygde netdelen er derfor
ikke frakoplet nettet så lenge apparatet er
tilsluttet nettkontakten.
For å redusere faren for brann eller elektrisk
støt, skal apparatet ikke utsettes for regn eller
fuktighet.
LASER
CAUTION:
USE OF CONTROLS OR ADJUSTMENTS OR
PERFORMANCE OF PROCEDURES OTHER
THAN THOSE SPECIFIED HEREIN MAY
RESULT IN HAZARDOUS RADIATION
EXPOSURE.
CAUTION:
VISIBLE AND INVISIBLE LASER RADIATION
WHEN OPEN AND INTERLOCK DEFEATED.
DO NOT STARE INTO BEAM.
LOCATION:
INSIDE, NEAR THE DECK MECHANISM.
2
Page 3
DK
Advarsel: Usynlig laserstråling ved åbning når
sikkerhedsafbrydere er ude af funktion. Undgå
utsættelse for stråling.
Bemærk: Netafbryderen er sekundært
indkoblet og ofbryder ikke strømmen fra
nettet. Den indbyggede netdel er derfor
tilsluttet til lysnettet så længe netstikket sidder i
stikkontakten.
Manufactured under license from Dolby
Laboratories. Dolby and the double-D symbol
are trademarks of Dolby Laboratories.
S
Klass 1 laseraparat
Varning! Om apparaten används på annat
sätt än i denna bruksanvisning specifi cerats, kan
användaren utsättas för osynlig laserstrålning,
som överskrider gränsen för laserklass 1.
Observera! Stömbrytaren är sekundärt kopplad
och bryter inte strömmen från nätet. Den
inbyggda nätdelen är därför ansluten till elnätet
så länge stickproppen sitter i vägguttaget.
SF
Luokan 1 laserlaite
Varoitus! Laitteen käyttäminen muulla kuin
tässä käyttöohjeessa mainitulla tavalla saattaa
altistaa käyttäjän turvallisuusluokan 1 ylittävälle
näkymättömälle lasersäteilylle.
Oikeus muutoksiin varataan. Laite ei saa olla
alttiina tippu-ja roiskevedelle.
Huom. Toiminnanvalitsin on kytketty
toisiopuolelle, eikä se kytke laitetta irti
sähköverkosta. Sisäänrakennettu verkko-osa on
kytkettynä sähköverkkoon aina silloin, kun
pistoke on pistorasiassa.
HDMI, and HDMI logo and High-Defi nition
Multimedia Interface are trademarks or
registered trademarks of HDMI licensing LLC.
Manufactured under license under U.S. Patent
#’s: 5,451,942; 5,956,674; 5,974,380; 5,978,762;
6,487,535 & other U.S. and worldwide patents
issued & pending. DTS and DTS Digital
Surround are registered trademarks and the
DTS logos and Symbol are trademarks of DTS,
Inc. © 1996-2007 DTS, Inc. All Rights Reserved.
Java and all other Java trademarks and logos are
trademarks or registered trademarks of Sun
Microsystems, Inc. in the United States and/or
other countries.
Windows Media and the Windows
logo are trademarks or registered trademarks of
of Microsoft Corporation in the United States
and/or other countries.
“Blu-ray Disc” and
is a trademark of DVD Format/Logo
are trademarks.
Licensing Corporation.
is a trademark of Blu-ray
Disc Association.
3
Page 4

Contents
1 Important 6
Safety and important notice 6
Recycle notice 6
Copyright notice 6
2 Your product 7
Features highlight 7
Symbols used in this user manual 8
Product overview 9
Front panel 9
Back panel 10
Remote control 11
Guide to on-screen display 14
3 Connect 15
Connect video cables 15
Option 1: Connect to HDMI socket 15
Option 2: Connect to component video
socket 16
Option 3: Connect to video socket 16
Connect audio cables 16
Route audio to other devices 17
Connect to analogue stereo system 17
Connect to digital amplifi er/receiver 17
Connect to multi channel amplifi er/ receiver
18
Connect to power outlet 18
5 Play 20
Information on playback 20
Playable discs and fi les 20
Colour Systems 20
Region codes 21
Hint for disc playback 21
Guide to fi le list 22
Basic playback 23
Play a BD or a DVD 23
Play an audio CD/MP3/WMA/JPEG fi les 24
Access title/disc menu 25
Special playback 25
Fast forward/reverse play 25
Slow forward play 25
Step-by-step play 26
Zoom in/out 26
Repeat play 26
A-B Repeat play 27
Slide show 27
PiP (Picture-In-Picture) (BONUSVIEW)
setting 28
Search 28
Title/Chapter search 28
Time search 29
Change audio and video format 29
Switch subtitles 29
Switch audio soundtrack 30
Switch camera angles 30
4 Get started 19
Find the correct viewing channel 19
How to insert a disc 19
4 EN
Page 5

6 Adjust settings 31
List of settings 31
[Language] settings 31
[Video Output] settings 32
[Audio] settings 34
[Parental] settings 35
[Others] settings 36
[Factory Default] settings 37
Set-up 37
Set TV screen display format 37
Set HDMI video resolution 38
Set HDMI audio output format 39
Set digital output format 40
Speaker Setup 41
Set parental lock 42
Activate EasyLink control 43
Reset to factory default 43
7 Additional information 44
Care 44
Specifi cations 45
8 Troubleshooting 46
English
Contents
9 Glossary 49
EN 5
Page 6
1 Important
Recycle notice
EW!=\!8Y
Safety and important notice
Warning!
Risk of fi re or electric shock!
Ensur e that air can circulate freely through the
•
ventilation holes on this unit. Allow at leas t 5~10 cm
clear ance around the unit.
•
Never expose this unit to direct sunlight, naked
fl ames or heat.
•
Never place this unit on other elec trical equipment.
•
Keep away from t his unit dur ing lightning storms.
•
Never r emove the casing of this uni t. Please leave all
maintenance work to qualifi ed personnel.
•
Keep this unit away from water, moisture and liquidfi lled objects.
Caution!
Remove batteries if they are exhausted or if the
•
remote control is not to be used for a long time.
•
Do not mix batteries (old and new or carbon and
alkaline, etc.).
•
Batteries cont ain chemical subs tances, they should
be disposed of properly.
•
Visible and invisible laser radiation when open.
Avoid exposure to beam.
•
Ensur e that t he power outlet is always wi thin r each.
If abnormal situations occur, fully disconnec t power
(unplug power cor d from the power outlet).
These symbols on the products, packaging, and/
or accompanying documents mean that used
electrical and electronic products and batteries
should not be mixed with general household
waste. For proper treatment, recovery and
recycling of old products and used batteries,
please take them to applicable collection points,
in accordance with your national legislation and
Directives 2002/96/EC and 2006/66/EC.
By disposing of these products and batteries
correctly, you will help to save valuable
resources and prevent any potential negative
effects on human health and the environment
which could otherwise arise from inappropriate
waste handling.
For more information about collection and
recycling of old products and batteries, please
contact your local municipality, your waste
disposal service or the point of sale where you
purchased the items.
Copyright notice
This product complies with the radio
interference requirements of the European
Community. This product complies with the
requirements of the following directives and
guidelines: 2006/95/EC, 2004/108/EC.
6 EN
This product incorporates copyright protection
technology that is protected by method claims
of certain U.S. patents and other intellectual
property rights owned by Macrovision
Corporation and other rights owners. Use of
this copyright protection technology must be
authorised by Macrovision Corporation, and is
intended for home and other limited viewing
uses only unless otherwise authorised by
Macrovision Corporation. Reverse engineering
or disassembly is prohibited.
Page 7

2 Your product
Congratulations on your purchase, and
welcome to Philips! To fully benefi t from the
support that Philips offers, register your product
at www.philips.com/welcome.
This Blu-ray disc player offers full high-defi nition
video playback up to 1080p resolution for an
amazing viewing experience. A highly detailed
picture and increased sharpness delivers a more
true-to-life picture.
Enjoy your content on different kinds of
media
Full backwards compatibility with DVD, CD
ensures that you can continue to enjoy your
current audio-video collection. Additionally, you
can view JPEG digital pictures or listen to MP3
or Windows Media™ Audio music fi les.
Listen to the rich multi-channel surround
sound
Multi-channel surround sound, which realises
real-to-life sound and makes you feel that you
are really there.
English
You r pro d uct
Features highlight
Blu-ray disc
Blu-ray Disc is a next generation optical video
disc which is capable of storing fi ve times more
data than a conventional DVD is. The large
capacity makes it possible to benefi t from the
features such as high-defi nition videos, multi-
channel surround sounds, interactive menus and
so on.
BD Java
With some BDs which support Java
applications, you can enjoy the interactive
functions such as games or interactive menus.
Upscale DVD for enhanced picture quality
Your current DVD will look even better than
before thanks to video upscaling. Upscaling will
increase the resolution of standard defi nition
DVD to high defi nition up to 1080p over an
HDMI connection. The picture will be less
jagged and more realistic for a near high
defi nition experience.
Intuitive user interface and remote control
The Philips logical user interface allows you to
easily navigate through your content and
settings, so you can quickly fi nd what you are
looking for.
Easy and simple connection to your HDTV via
HDMI
Connect your BDP7200 to your HDTV with
one single HDMI (High Defi nition Multimedia
Interface) cable. Philips recommends HDMI 1.3
(category 2) cable (also known as High Speed
HDMI cable) for better compatibility. The high
defi nition video output signal will be transferred
to your HDTV without conversion to analogue
signals, so you will get an excellent picture and
sound quality, completely free from noise.
Thanks to other multiple outputs, you can also
easily connect to your home theatre system or
amplifi er.
EN 7
Page 8
About EasyLink (HDMI Consumer Electronics
Control)
EasyLink (HDMI CEC) allows you to operate
the linked functions of this player with Philips
brand TV with EasyLink feature.
Note
Philips does not guarantee 100% interoperability
•
with all HDMI CEC devices .
PiP (Picture-In-Picture) (BONUSVIEW)
Some BD-videos have the PiP function which
enables you to display the secondary video in
the primary video. You can call up the
secondary video by pressing PIP whenever the
scene contains the secondary video.
HDMI 1080p/24 Output (BD only)
This unit supports the high-defi nition audio such
as Dolby Digital Plus, Dolby TrueHD and DTSHD. These audio format can provide you with
the higher audio quality than the traditional
DVD does. To make the most of their high
performance, connect this unit to an highdefi nition audio compatible AV receiver/
amplifi er with an HDMI cable. Refer to chapter
‘Adjust settings - List of settings’, change [HDMI
Audio] to [HDMI Normal].
Symbols used in this user manual
To specify for which media type each function
is, we put the following symbols at the
beginning of each item to operate.
Pop-up menu
Some BD-videos have pop-up menu which is a
navigation menu that can be called up and be
operated on the screen without interrupting
the playback. You can call up the pop-up menu
by pressing DISC MENU / POP-UP MENU.
Contents in the pop-up menu vary depending
on the disc.
HDMI Deep colour
Deep colour reduces the posterization effect of
the playback image. Refer to chapter ‘Adjust
settings - List of settings’ - [HDMI Deep Colour].
HDMI 1080p/24 Output (BD only)
This unit is equipped with the feature which can
provide the smooth movement in the playback
of fi lm originated material with the frame rate
of 24 frames per second with progressive.
(Available only when the display device is
connected by an HDMI cable). Refer to chapter
‘Adjust settings - List of settings’ - [HDMI
1080p/24].
Symbol Description
Note
DVD- RW/-R record ed in VR mode or non
•
compatible r ecording format are not playable.
•
If you do not fi nd any of the symbols listed above
under the function heading, the operation is
applicable to all media
Refer to BD-video
Refer to DVD-video
Refer to audio CD/dts CD
Refer to DVD±RW/±R and
CD-RW/-R with MP3 fi les
Refer to DVD±RW/±R and CDRW/-R with Windows Media™
Audio fi les
Refer to DVD±RW/±R and
CD-RW/-R with JPEG fi les,
Kodak Picture CD fi les included.
8 EN
Page 9
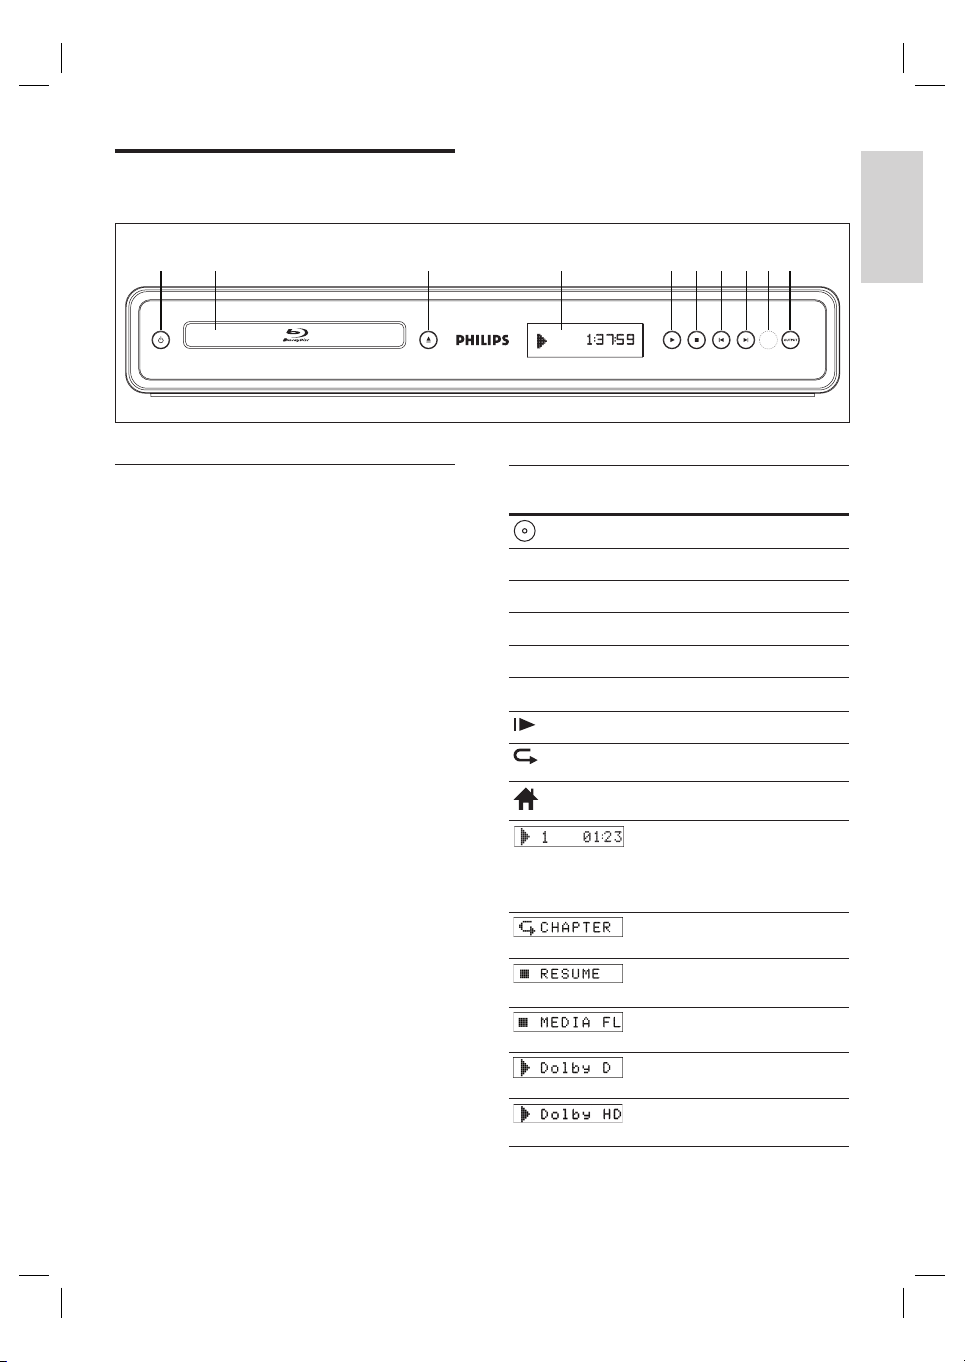
Product overview
ab c d efg jhi
English
You r pro d uct
Front panel
a 2
•
Press to turn the unit on and off.
b Disc tray
•
Place a disc when opening the disc tray.
c Z (Open/Close)
•
Press to open or close the disc tray.
d Front panel display
•
Display playback status icon and various
kinds of information. Refer to the table
next to it.
e B (Play)
•
Press to start or resume playback.
f x (Stop)
•
Press to stop playback.
g í (Previous)
•
Videos, music, pictures - Previous
h ë (Next)
•
Videos, music, pictures - Next
i Infrared sensor window
j OUTPUT
•
Press to change the resolution of HDMI
output. (Not available during the
playback of a BD-video or while
displaying the settings menu)
Front panel
display
B
x
X
M
m
Mode
Loading a disc.
Playback is in progress.
Stop mode.
Pause mode.
Fast forward mode.
Fast reverse mode.
Slow forward mode.
Repeat function is set.
Display the home menu.
Title is being played back.
Indicating the current chapter/
track/fi le number and the
elapsed playing time.
Current chapter is in chapter
repeat mode.
Playback is in Resume-OnStop mode.
Display the media fi lter
screen.
Dolby Digital audio is being
output.
Dolby TrueHD audio is being
output.
EN 9
Page 10

Back panel
bc d efa g
HDMI OUT
a VIDEO OUT socket
•
Use to connect a TV monitor, an AV
receiver/amplifi er or other device with
an RCA video cable.
b COMPONENT VIDEO OUT sockets
•
Use to connect a TV monitor with
component video inputs with a
component video cable.
c HDMI OUT socket
•
Use to connect to display with an
HDMI compatible port with an HDMI
cable.
d 5.1ch AUDIO OUT sockets
•
Use to connect to an AV receiver/
amplifi er with 5.1-channel audio cables.
e AUDIO OUT sockets
Use to connect a TV monitor, an AV
•
receiver/amplifi er or other device with
an RCA audio cable.
f DIGITAL OUT (COAXIAL/OPTICAL)
sockets
•
Use to connect an AV receiver/amplifi er,
Dolby Digital/DTS decoder or other
device with a digital audio coaxial/optical
input socket with a digital audio coaxial/
optical cable.
g AC IN Terminal
•
Use to connect to the AC outlet with
AC cord.
Note
Do not touch the inner pins of the socket s on
•
the back panel. Electrostatic dischar ge may cause
permanent damage to the unit.
•
This unit does not have the RF modulator.
10 EN
Page 11

Remote control
|
y
x
s
a
b
c
d
e
f
g
h
i
j
k
l
m
n
o
p
q
r
{
z
w
v
u
t
a 2 (Standby-On)
Press to turn the unit on and off.
•
b OPEN/CLOSE Z
Press to open or close the disc tray.
•
c PIP
Press to switch picture in picture feature
•
on/off. (only applicable to BD-video
which supports the PIP function)
d ZOOM
•
Zoom in or out the picture on the TV.
e Colour buttons
•
Press to activate short cut keys on some
BD-video function.
f HOME
•
Press to display the home menu.
g OK
Press to confi rm or select menu items.
•
h Cursor buttons ( )
Press to select items or settings.
•
i BACK
Press to return to the previously
•
displayed menu or screen function.
j PREV í
During playback, press once to return
•
to the beginning of the current title,
chapter or track.
During the JPEG playback, press to
•
return to the previous fi le.
During playback, press twice to return
•
to the previous title, chapter or track.
k PLAY B
Press to start playback or resume
•
playback.
l PAUSE X
Press to pause playback.
•
When playback is in pause mode, press
•
repeatedly to forward the playback step
by step.
English
You r pro d uct
EN 11
Page 12

m VOL +-
Press to adjust the TV volume (only
•
applicable to the PHILIPS brand TV).
n MUTE H
Press to mute the TV volume (only
•
applicable to the PHILIPS brand TV).
o REW m
During playback, press to fast reverse
•
the playback.
p Numeric buttons
Press to select a chapter during
•
playback.
Press to enter values in the input fi eld.
•
q SUBTITLE
Press to select subtitles on a disc.
•
r REPEAT
•
Press to toggle between various repeat
modes.
s REPEAT A-B
Press to play back a defi ned section
•
between point A and B repeatedly.
t AUDIO
Press to select the audio channel
•
(such as audio languages) on a disc.
u FFW M
During playback, press to fast forward
•
the playback.
When playback is in pause, press to
•
slow forward the playback.
v TV CH +-
Press to change the channel up and
•
down (only applicable to the PHILIPS
brand TV).
w STOP x
Press to stop playback.
•
x NEXT ë
During playback, press to skip to the
•
next chapter, track or fi le.
y DISC MENU / POP-UP MENU
BD: Press to display the pop-up menu.
•
DVD: Press to display the disc menu.
•
z INFO
Press to display the information display.
•
wj TOP MENU
BD: Press to display the top menu.
•
DVD: Press to display the title menu.
•
wk ANGLE
Press to select camera angles on a disc.
•
Press to rotate a picture (JPEG).
•
12 EN
Page 13

Installing the batteries in the remote control
Install the batteries (R6/AA x2) matching the
polarity indicated inside battery compartment
of the remote control.
1 Open the cover.
2 Insert batteries.
Make sure to match +and - on the
•
batteries to the marks indicated in the
battery compartment.
3 Close the cover.
Using a Remote Control
Keep in mind the following when using the
remote control:
Make sure that there are no obstacles
•
between the remote control and the
infrared sensor window on the unit.
Remote operation may become unreliable if
•
strong sunlight or fl uorescent light is shining
on the infrared sensor window of the unit.
Remote control for different devices can
•
interfere with each other. Avoid using
remote control for other device located
close to the unit.
Replace the batteries when you notice a fall
•
off in the operating range of the remote
control.
The maximum operable ranges from the
•
unit are as follows.
Line of sight: approx. 7m (23 feet)
•
Either side of the centre: approx. 5m
•
(16 feet) within 30°
Above: approx. 5m (16 feet) within 15°
•
Below: approx. 3m (10 feet) within 30°
•
30˚ 30˚
5m (16 feet) 7m (23 feet) 5m (16 feet)
English
You r pro d uct
Note
Incor rec t use of batteries can result in hazards such
•
as leakage and bur sting.
EN 13
Page 14

Guide to on-screen display
Home menu
When you turn on the unit, home menu
appears automatically. Otherwise, press HOME.
Blu-ray Disc Player
Disc Tray
Settings
Product info
[Disc Tray]
•
To access the track/fi le list or media
fi lter screen.
[Settings]
•
To access the settings menus.
[Product Info]
•
To access the product information.
Menu Screen
BD-Player
1
23
Settings
Quick Set-up
Advanced Set-up
Factory Default
Player menu
TV Shape
HDMI Video Resolution
1 Directory
•
Displays the current hierarchy.
Menus
2
Sub menus/Options
3
•
Displays sub menus or options for the
high-lighted item on the left whenever
available.
Tip
You can also download the latest fi rm ware fr om
•
the web site which is displayed in the [Product Info]
screen, and update the fi rm ware by yourself.
14 EN
Page 15
3 Connect
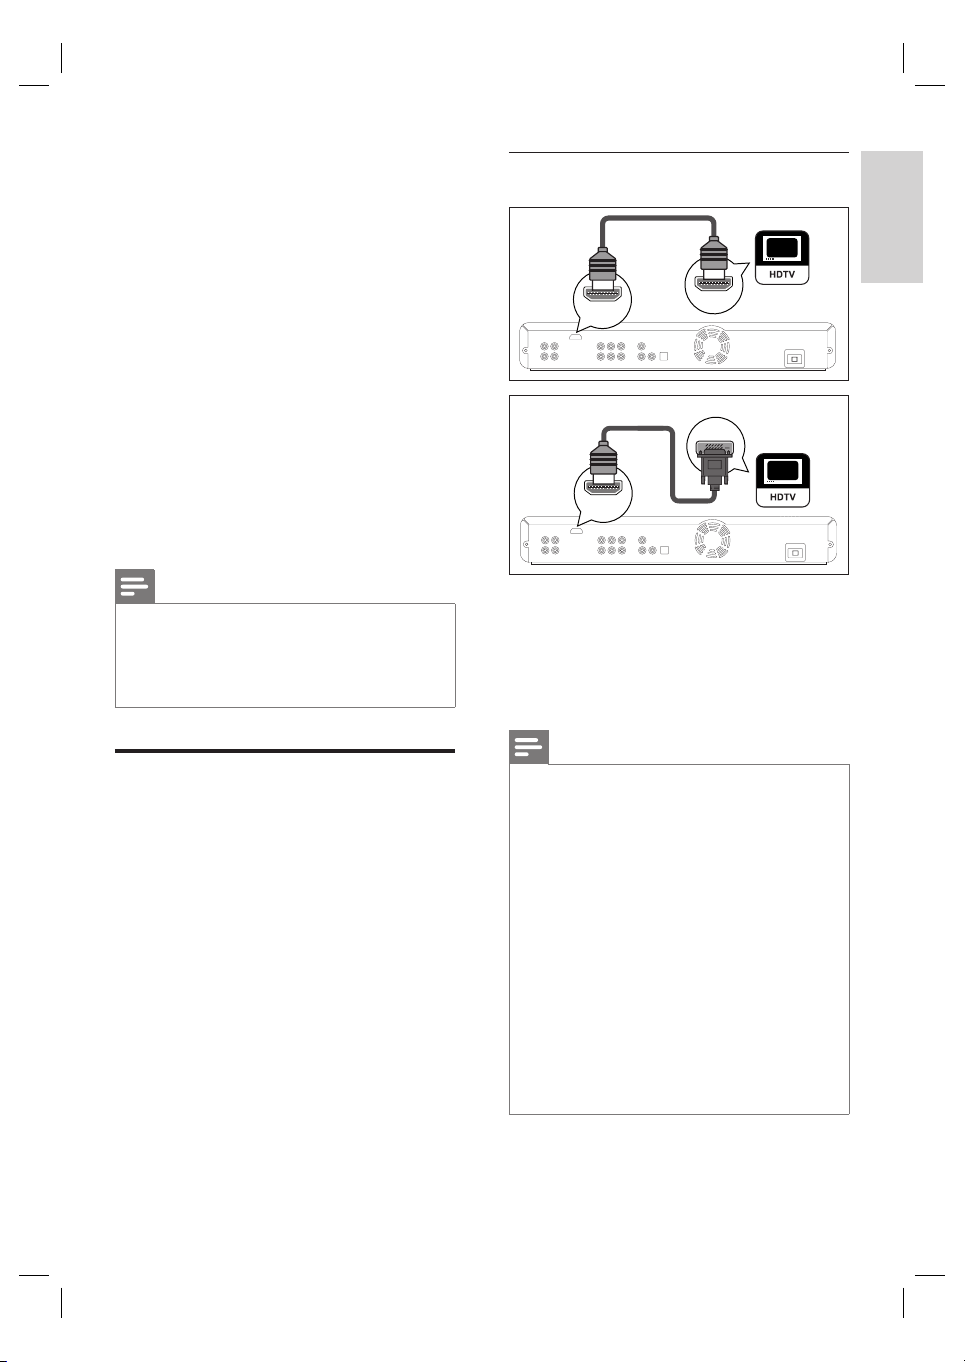
Option 1: Connect to HDMI socket
This section describes the basic connections
required for this Blu-ray disc player before it
can be used.
Basic connections - Connect to TV
•
Connect video cables
•
Connect audio cables
Optional connections:
•
Route audio to other devices
•
Connect to analogue stereo system
•
Connect to digital amplifi er/receiver
•
Connect to multi channel amplifi er/
receiver
Note
Refer to t he type plate at the rear or bottom of the
•
product for identifi cation and supply ratings.
•
Befor e you make or change any connections , ensure
that all the devices are disconnected from the power
outlet.
Connect video cables
Make one of the following connections,
depending on the capabilities of your existing
device.
•
Option 1: Connect to HDMI socket
(for a HDMI, DVI or HDCP-compliant TV).
•
Option 2: Connect to component video
socket (for a standard TV or Progressive
Scan TV).
Option 3: Connect to Video socket
•
(for a standard TV).
HDMI cable
HDMI OUT
HDMI IN
HDMI-DVI cable
DVI IN
HDMI OUT
1 Connect a HDMI cable (supplied) to
HDMI OUT socket on this unit and the
HDMI IN socket on your TV.
Use a HDMI-DVI adaptor in case your
•
TV has only a DVI connection.
Note
To optimise the video output , refer to chapter
•
‘Adjust settings - List of settings’ - [HDMI Video
Resolution] or press OUTPUT repeatedly to select
the best resolution your TV can suppor t.
•
Analogue audio connection is needed for HDM I-DVI
connection.
•
Philips recommends HDM I category 2 cable, also
known as High Speed HDMI cable, for optimal audio
/ video output.
•
A simple 1-cable connection with a device having an
HDMI (High-Defi ni tion Multimedia Inter face) socket
allows digital tr ansfer of the digit al pic tures/sounds of
BD-video, DVD-video and other devices.
•
To play back the digital video images of a BDvideo or DVD-video via an HDMI connec tion, it is
necessar y that both the player and the display device
(or an AV receiver / amplifi er) support a copyright
protection sys tem called HDCP (high-bandwidth
digital content protec tion s ystem).
English
Connect
EN 15
Page 16

Tip
This t ype of connec tions provide bes t picture quality.•
Option 2: Connect to component
video socket
Option 3: Connect to video socket
RCA video
cable
VIDEO
VIDEO
OUT
IN
Component
video cable
COMPONENT
VIDEO OUT
PR/CRY
PB/CB
COMPONENT
VIDEO IN
Y
PB/CB
PR/CR
1 Connect the component video cable
(not supplied) to the
VIDEO OUT
socket on this unit and the
component video input sockets on your
TV.
Tip
This unit is compatible with the progr essive scan
•
system. The feature provides you with the higher
quality pictures than traditional output system does.
To utilise this feature, make sure a progressive scan
TV is used. Refer to chapter ‘Adjust settings - List of
settings’ - [Component Output] for details.
•
The component video inpu t socket on your T V may
be labelled a s Y Pb/Cb Pr/Cr or YUV.
•
This t ype of connec tions provide good picture
quality.
COMPONENT
1 Connect a RCA video cable (supplied) to
the VIDEO OUT socket on this unit and
the video input socket on your TV.
Tip
The video input socket on your TV may be labelled
•
as A/V IN , VID EO IN, COMPOSITE or BASEBAN D.
•
This t ype of connec tions provide standard pic ture
quality.
Connect audio cables
AUDIO IN
LR
AUDIO
OUT
L
R
RCA audio cable
1 Connect an RCA audio cable (supplied) to
the AUDIO OUT sockets on this unit and
the AUDIO IN sockets on your TV.
16 EN
Page 17

Route audio to other devices
Connect to digital amplifi er/receiver
This section describes how you can route the
sound from this Blu-ray disc player to other
devices in order to enjoy sound output or
audio play with surround capabilities.
Connect to analogue stereo system
AUDIO IN
LR
AUDIO
OUT
L
R
RCA audio cable
1 Connect an RCA audio cable (supplied) to
the AUDIO OUT sockets on this unit and
the audio input sockets on the device.
DIGITAL AUDIO
INPUT
COAXIAL
OPTICAL
or
DIGITAL OU T
(PCM/BITSTREAM)
COAXIAL OPTICAL
1 Connect a coaxial cable (not supplied) to
the DIGITAL OUT (COAXIAL) socket
on this unit and the DIGITAL IN
(COAXIAL) socket on the device.
or
1 Connect an optical cable (not supplied) to
the DIGITAL OUT (OPTICAL) socket on
this unit and the DIGITAL IN (OPTICAL)
socket on the device.
English
Connect
EN 17
Page 18

Connect to multi channel amplifi er/
receiver
FRONT SURROUND
5.1ch AUDIO OUT
FL SL C
FR SR SW
CENTRE
SUBWOOFER
1 Connect a 5.1ch audio cables (not
supplied) to the 5.1ch AUDIO OUT
sockets on this unit and the audio input
sockets on the device.
Connect to power outlet
Caution!
Insert the cords secur ely. Incomplete connections
•
will result in the generation of noise .
AC IN
1 After you made all the necessary
connections, connect the AC cord to the
AC IN on this unit and to the AC power
outlet.
Tip
To set up the speakers, refer to chapter ‘Adjust
•
settings - L ist of settings’ - [Analogue Audio] for
details.
18 EN
Page 19

4 Get started
Find the correct viewing
channel
Blu-ray Disc Player
Disc Tray
Settings
Product info
English
1 After you have made all the necessary
connections, press 2 (STANDBY-ON) to
turn on the unit.
2 Turn on the TV.
3 Press the button on the TV’s remote
control that accesses the external input
channel.
•
It may be labelled SOURCE, AV or
SELECT (refer to your TV’s user
manual).
•
Or press ‘2’ on the TV’s remote
control, then press channel down
button repeatedly until you see the
PHILIPS splash screen.
•
This is the correct viewing channel
(external input channel).
If a certain amount of time has passed
•
since you turned on the unit, you may
see the home menu instead of the
PHILIPS splash screen.
How to insert a disc
Press Z to open the disc tray.
1
2 Place the disc on the disc tray with its label
side facing up.
•
Make sure the disc is compatible with
this unit. Refer to chapter ‘Play Information on playback’ for the list of
compatible discs.
3 Press Z to close the disc tray.
It may take a while to load the disc.
To eject the disc:
1 Press Z to open the disc tray.
2 Remove the disc.
3 Press Z to close the disc tray.
Get started
EN 19
Page 20

5 Play
Media
CD-RW/-R
Playable fi les
MP3
Information on playback
Playable discs and fi les
This unit is compatible to play back the
following discs. To play back a disc, make sure
that it meets the requirements for region codes
and colour systems as described below. You
can play back discs that have the following
logos. Other disc types are not guaranteed to
play back.
Logo
ReWritable
Recordable
Playable disc
BD Video (Single/Double layer)
BD-RE* ver.2 (Single/Double
layer)
BD-R* (Single/Double layer)
DVD Video
DVD±RW
(Finalised video mode discs only)
DVD±R (Single/Double layer)
(Finalised video mode discs only)
CD-DA (audio CD)
CD-RW
CD-R
Kodak Picture CD
DVD+RW/+R
Window Media
™ Audio
DVD-RW/-R JPEG
Note
This unit cannot play back the following discs:
Due to the intentional progression of the Blu-ray
•
disc format by its standard setting authority, Philips
cannot guar antee or war rant the playability of future
extensions of the B lu-ray disc format with this
product.
*BD -R or B D-RE recorded in BDAV mode or non
•
compatible recording format.
Disc content s protected by Windows Media™
•
Digital Rights Management (DRM).
•
DVD- R/DVD-RW recorded in VR mode or non
compatible recording format.
•
The sound on the high-density Super Audio C D layer
cannot be heard. Only the sound on the CD layer
can be heard.
•
Playability of dual discs are not guaranteed.
Colour Systems
BD and DVD are recorded in different colour
systems throughout the world. The most
common colour system, used primarily in the
U.K. and other EU countries, is PAL. This unit
uses the PAL system. However, it is also
possible to play back BD and DVD using other
colour systems, such as NTSC.
20 EN
DTS-CD
Page 21

Region codes
ALL
2
This unit has been designed to play back BDvideo with region ‘B’ and DVD-video with
region ‘2’ or ‘ALL’. You cannot play back BDvideo or DVD video that are labelled for other
regions. Look for the symbols on the right on
your BD-video or DVD-video. If these region
symbols do not appear on your BD-video or
DVD-video, you cannot play back the disc in
this unit. The letter or number inside the globe
refers to region of the world.
Region Region code
Europe
Hint for disc playback
The contents of disc are generally divided into
sections or folders (groups of titles/fi les) as
shown below.
BD-video, DVD-video
title 1
chapter 2chapter 1 chapter 3chapter 2chapter 1
title 2
‘Folders’ refers to the groups of fi les.
•
‘Tracks’ refers to the contents recorded on
•
the audio CD.
‘Files’ refers to the contents on a disc which
•
are recorded in MP3, Windows Media™
Audio, or JPEG fi le format.
Icon Description
Group (folder)
Group (folder) return
Music fi le
Note
Unrecognisable characters will be replaced by ‘□’
•
asterisks.
For DVD, this unit can recognize up to 999 groups
•
(folders), and 9999 tracks / fi les.
For CD, this uni t can recognize up to 999 groups
•
(folders), and 999 tracks / fi les.
English
Play
Audio CD
track 2track 1 track 5track 4track 3
MP3, Windows Media™ Audio, JPEG
folder (group) 1
folder (group)
2
file 3file 2file 1 file 2file 1
EN 21
Page 22

Guide to fi le list
Video/Music Mode File List
111 2
Audio CD track list
1
2
BD-Player
Music
9
8
Track 001
Track 002
Track 003
Track 004
Track 005
Track 006
Track 007
Track 008
14
0 : 00 : 39
CDDA
Track 001
0 : 03 : 40
Page Up Page Down
7
1 Total track number
2 Repeat status
3 Image
4 Elapsed playing time of the current track
5 Playing track number
6 Total time of the current track
7 Playing media
8 Track list
9 Playback status
BD-Player │Disc Tray │Music
10
9
8
3
4
5
6
7
MP3 File
MP3_1.mp3
MP3_2.mp3
MP3_3.mp3
MP3_4.mp3
MP3_5.mp3
MP3_6.mp3
MP3_7.mp3
3
Page Up Page DownMedia Filter
MP3
MP3_3.mp3
56
0:00:13
3
4
e.g., MP3 fi les
1 Number of contents in the current group
(folder)
2 Repeat status (music mode only)
3 Image
4 Elapsed playing time of the current track
5 Current fi le name
6 Media type
7 Group (folder) / fi le list
8 Playback status
9 Root folder
q; Group (folder) name
qa Directory
Picture Mode File List
123
22 EN
BD-Player │Disc Tray │Pictures
JPEG File
24
...
6
5
Page Up Page DownMedia Filter Slideshow
e.g., JPEG fi les
1 Directory
2 Group (folder) name
3 Number of contents in the group (folder)
4 Current fi le name
5 Group (folder) / fi le list (thumbnails)
6 Root folder
4
Page 23

How to navigate through the track/fi le list
Button Action
To move the highlight up
and down in the list.
To access the fi les in a group
(folder).
(Yellow/Blue
button)
(Red button)
To to back to the previous
screen.
Or highlight (
•
press OK.
To change the page of the
list.
To go back to the media
fi lter screen.
To go back to the home
menu.
), then
Basic playback
Play a BD or a DVD
1 Insert a disc.
2 Playback may start automatically. If not,
press PLAY .
•
Some discs may show a title or a disc
menu. In such case, refer to ‘Access
title/disc menu’.
Button Action
To pause playback.
To return to the normal playback.
To stop playback.
Playback will be in
•
Resume-On-Stop mode, and
the home menu appears.
When you press PLAY next
•
time, playback starts from
the point where it has been
stopped.
English
Play
Note
When you press HOME, play back stops and the
•
home menu appears.
•
For BD Java application, the Resume-On-Stop is not
available.
•
If you pr ess OK instead of PLAY , playback c an be
started from the beginning of the disc even if it was
in the Resume -On-Stop mode.
•
You can also s tart from the beginning of the disc if
you press í while the resume mess age is displayed.
•
The resume message can be r emoved by pressing
BACK.
•
Resume-On-Stop mode r emains in effect even af ter
power is turned off but will be canceled once the
disc is ejected.
EN 23
Page 24

Play an audio CD/MP3/WMA/JPEG
fi les
1 Insert a disc.
Audio CD: track list appears and
playback starts automatically.
MP3/WMA/JPEG fi les: Home menu
appears.
2 With [Disc Tray] selected, press OK.
Media fi lter screen appears.
Blu-ray Disc Player
Disc Tray
Settings
Product info
Button Action
To pause playback.
To return to the normal
playback.
To stop playback.
Playback will be in
•
Resume-On-Stop mode.
For audio CD, playback
•
starts from the point where
it is stopped next time you
press PLAY .
For MP3/WMA, playback
•
starts from the fi le being
played back last next time
you press PLAY .
To go back to the media fi lter
screen.
(Red button)
3 Select the type of the fi le you want to play
in the media fi lter screen, then press OK
to display the fi le list.
•
Select [Music] if you want to play back
music fi les such as MP3 or Window
Media™ Audio.
Select [Pictures] if you want to play
•
back the still images such as JPEG
pictures.
BD-Player
Disc Tray
Music
Pictures
Cancel
4 Select a group (folder) or track/fi le you
want to play, then press PLAY or OK
to start playback.
24 EN
Note
When you press HOME, playback stops and the
•
home menu appears.
•
If you pr ess OK instead of PLAY , playback c an
start from the beginning instead of resuming from
the stop point.
Recommended specifi cations:
MP3 / Windows Media™ Audio
Sampling frequency: 32 kHz, 44.1 kHz or 48 kHz
•
Constant bit rate: 112 kpbs - 320 kbps (MP3),
•
48 kpbs - 192 kpbs (WMA)
JPEG
Upper limit: 2,560 x 1,900 dots
•
(sub sampling is 4:4:4)
5,120 x 3,840 dots
(sub sampling is up to 4:2:2)
Lower limit: 32 x 32 dots
•
Maximum fi le size of a picture: 5 MB
•
Folder / fi le number limitations:
DVD: 999 folders (groups) and 9,999 fi les
•
CD: 999 folders (groups) and 999 tracks/fi les
•
Page 25

Access title/disc menu
Some BD-video or DVD-video may contain a
title menu which describes the contents of the
disc, or a disc menu which guides you through
the available functions in the disc. With such
discs, a title menu or a disc menu may appear
automatically when you insert the disc.
Otherwise, press TOP MENU or DISC MENU/
POP-UP MENU to call up the menu. Refer to
the disc’s manual on how to navigate through
the menu.
Note
Menus var y among discs . Refer to the information
•
accompanying the disc for details.
TOP ME NU or DISC MENU/POP-UP MENU may
•
not wor k with some discs.
Special playback
Fast forward/reverse play
1 During playback, press FFW M or
REW m repeatedly for fast forward or
fast reverse.
Every time you press FFW M or
•
REW m, it changes the playback
speed.
For BD and DVD, speed changes in fi ve
•
different levels.
For audio CD, MP3, Windows Media™
•
Audio, speed changes in three different
levels.
2 Press PLAY to return to the normal
playback.
Slow forward play
English
Play
1 During playback, press PAUSE X, then
press FFW M.
Every time you press FFW M, the
•
playback speed changes in three
different levels.
2 Press PLAY
normal playback.
Note
Only slow for ward is available.•
to return to the
EN 25
Page 26

Step-by-step play
1 In pause mode, press PAUSE X
repeatedly.
Every time you press PAUSE X,
•
playback advances one step at a time.
2 Press PLAY to return to the normal
playback.
Note
Only step-by-step forward is available.•
Zoom in/out
1 During playback, press ZOOM repeatedly.
•
Every time you press ZOOM, it
changes the zoom factor.
x1.2
2 You can move over the zoomed picture
using vVb B.
The grey box with an inner blue box
displayed at the right bottom corner of
the zoomed image is the position guide.
The inner blue box indicates the
zoomed area (not available for the
JPEG playback).
Note
For JPEG fi les, slide show of t he zoomed pic ture is
•
not possible .
•
For JPEG fi les, x4 zoom is not available.
•
For some DVD, x4 zoom is not available.
•
Zoom does not wor k dur ing the playback of the
BD-video.
•
Zoom does not wor k while DVD menu is displayed.
Repeat play
Available repeat function vary depending the
discs.
1 During playback, press REPEAT repeatedly
to select the desired repeat function.
26 EN
x2
Available media Repeat mode
BD-video /
DVD-video
Audio CD /
DTS CD / MP3
/ WMA
Audio CD /
DTS CD
Chapter/title Repeat
The current chapter/
•
title will be played back
repeatedly.
Track Repeat
The current track or
•
fi le will be played back
repeatedly.
All Repeat
All tracks in the media
•
will be played back
repeatedly.
Page 27

MP3 / WMA Group Repeat
The current group
•
(folder) will be played
back repeatedly.
Audio CD /
DTS CD
MP3 / WMA Random Repeat
Random Repeat
Repeat the random
•
playback.
Repeat the random
•
playback in a folder.
Slide show
1 Insert a disc.
Home menu appears.
2 With [Disc Tray] selected, press OK.
Media fi lter screen appears.
3 Select [Picture], then press OK.
4 Open the folder which contains the
desired JPEG fi les.
English
Play
Note
The repeat setting will be canceled when you s top
•
playback.
A-B Repeat play
You can play back the specifi c part (between
point A and point B) repeatedly.
1 During playback press REPEAT A-B once at
the point where you want to set point A.
2 During playback press REPEAT A-B again at
the point where you want to set point B.
As soon as you set the point B, the part
between point A and point B starts to
play repeatedly.
3 To cancel A-B repeat, press REPEAT A-B
repeatedly until ‘Off’ appears.
Note
Point B should be set within the same title or track
•
as point A.
BD-Player │Disc Tray │Pictures
JPEG File
24
...
Page Up Page DownMedia Filter Slideshow
5 Highlight a fi le, then press Green button.
Slide show starts from the fi le you
selected.
Button Action
To skip to the next fi le.
To skip to the previous fi le.
To stop the slide show.
Playback will be in
•
Resume-On-Stop mode.
To resume the slide show.
(Green
button)
To resume the normal playback.
To rotate the picture.
EN 27
Page 28

Note
Large-size JPEG fi les t ake a few moments to be
•
displayed.
Search
PiP (Picture-In-Picture)
(BONUSVIEW) setting
Some BD-videos have the PiP function which
enables you to display the secondary video in
the primary video. You can call up the
secondary video by pressing PIP whenever the
scene contains the secondary video.
Primary
video
Secondary
video
1 During playback, press PIP.
PiP information appears.
2 Press to select the secondary video
you want to show.
•
The secondary video will be displayed
with the secondary audio.
3 Press BACK to remove the PiP
information menu.
Tip
Refer to chapter ‘Change audio and video for mat
•
- Switch audio soundtrack’ on how to ou tput the
secondary audio.
Title/Chapter search
Use /
1 During playback, press NEXT ë to skip
the current title or chapter and move to
the next.
The title or chapter moves forward by
one at a time.
If there is no chapter in one title, the
•
current title may be skipped.
2 To go back to the beginning of the current
title or chapter, press PREV í.
•
Press PREV í repeatedly to go to the
previous title or chapter. The title or
chapter may move backward one at a
time.
Use
1 During playback, press INFO.
Disc
Title
Chapter
Playing Time
001/012
001/023
00:01:31
2 Press to select [Title] or [Chapter].
3 Press the number buttons or to
enter the title/chapter number.
4 Press OK.
Playback starts from the beginning of
the title/chapter.
28 EN
5 Press INFO to remove the disc information
menu.
Page 29

Use the number buttons (direct search)
Title search
1 In stop mode, enter the title number you
want to search using the number buttons.
Playback of the title starts in a few
seconds.
Chapter search
1 During playback of a title, enter the
chapter number you want to search using
the number buttons.
Playback of the chapter starts in a few
seconds.
Time search
1 During playback, press INFO.
Disc
Title
Chapter
Playing Time
001/012
001/023
00:01:31
2 Press to select [Playing Time].
3 Press the number buttons to enter the
time where you want to jump to.
•
E.g., to enter 1 hour 45 minutes and 15
seconds, press ‘14515’.
4 Press OK.
Playback starts from the desired time
count.
5 Press INFO to remove the information
display.
Change audio and video
format
Switch subtitles
Some BD-video or DVD-video may have
subtitles in one or more languages. For
commercially available discs, the supported
languages can be found on the disc case.
Follow the steps below to switch the subtitle
language during playback.
1 During playback, press SUBTITLE to bring
up the subtitle information bar.
Primary
English1
2 Press to select the desired subtitle
option.
Option Description
[Primary] Set the subtitle for the
primary video.
[Secondary] Set the subtitle for the
secondary video in the
primary video.
[Subtitle Style] Set the style for the subtitle.
3 Press or SUBTITLE repeatedly to
switch the subtitle language or style.
1 During playback, press SUBTITLE to bring
up the subtitle information bar.
2 Press or SUBTITLE repeatedly to
switch the subtitle.
English
Play
EN 29
Page 30

Switch audio soundtrack
Switch camera angles
When playing back a video material recorded
with two or more sound tracks (these are often
in different languages), you can switch them
during playback.
1 During playback, press AUDIO to bring up
the information bar.
Primary
English2
Dolby Digital 2ch
2 Press to select the desired audio
option.
Option Description
[Primary] Set the audio for the primary
video.
[Secondary] Set the audio for the
secondary video in the primary
video.
3 Press or AUDIO repeatedly to
switch the audio soundtrack or audio
channel.
Tip
Refer to chapter ‘Adjust settings - [Audio] settings’
•
- [Blu-ray Disc Audio] on how to output the
secondary audio.
Some BD-video or DVD-video have scenes
shot from 2 or more angles. Angle information
should be on the disc case if the disc contains
multi-angle scenes.
1 During playback, press ANGLE to bring up
the camera angle information bar.
The audio information menu is
displayed.
2 Press or ANGLE repeatedly to
switch the angle.
1 During playback, press AUDIO to bring up
the information bar.
2 Press or AUDIO repeatedly to
switch the audio soundtrack or audio
channel.
30 EN
Page 31

6 Adjust settings
[Language] settings
List of settings
In the settings menu, you can customise the
various kinds of settings as you prefer. Refer to
the following instruction to navigate through the
settings menus.
1 Press HOME to access the home menu.
2 Press to select [Settings], then
press OK.
3 Press to select [Advanced Set-up],
then press OK.
4 Press to move the highlight up and
down in the list.
Sub menus/options of the highlighted
•
item will be displayed in the list on the
right whenever available.
5 To make a selection or to access the sub
menus/options of an item, highlight the
desired item, then press OK.
6 Press HOME to exit.
Refer to the following table for the
•
types of settings you can customise.
Settings with (*) can be accessed from
•
the ‘Quick Set-up’ also.
•
The item highlighted in grey is the
default setting.
[Audio]
Option Description
[Default] Set the audio language for
BD-video or DVD-video
playback.
If you select [Default ],
List of available
languages.
[Subtitle]
Option Description
[Off] Set the subtitle language for
List of available
languages.
[Disc Menu]
Option Description
[English] Set the language for disc
List of available
languages.
[Player Menu*]
Options Description
[Auto] Set the language for player
[English] (*)
List of available
languages.
•
the disc’s original language
will be in effect.
BD-video or DVD-video
playback.
menu.
menu (OSD menu).
[Auto] option is available
•
only when ‘EasyLink
(HDMI CEC)’ is set to
‘On’. It activates the [Get
& Set Menu Language]
function. Refer to chapter
‘Set-up - Activate
EasyLink control‘ for
details.
Inside the parentheses
•
next to [Auto] will
be currently selected
language.
English
Adjust settings
EN 31
Page 32

[Video Output] settings
[TV Shape*]
Refer to chapter ‘Set-up - Set TV screen
•
display format’ for more information.
Option Description
[4:3 Letter
Box]
[4:3 Pan&Scan]
[16:9
Widescreen]
[16:9 Squeeze]
[HDMI 1080p/24]
•
This feature is available only when the
display device is connected by an HDMI
cable. Refer to chapter ‘Set-up - Set HDMI
video resolution’ for more information.
Option Description
[Auto] Output the picture in
Set the aspect ratio of the
playback image to fi t your
TV.
1080p/24 (1080 progressive
with 24 frames per second)
when it meets all the
conditions listed below:
•
The video resolution and
the frame rate of the
material is 1080p/24.
[HDMI Video Resolution]
•
setting is set to [108 0p].
The display device
•
supports the 1080p/24
output.
[HDMI Video Resolution]
This feature is available only when the
•
display device is connected by an HDMI
cable. Refer to chapter ‘Set-up - Set HDMI
video resolution’ for more information.
Option Description
[Auto] Set the resolution of the
[480p/576p]
[720p]
[1080i]
[1080p]
[HDMI Deep Colour]
•
This feature is available only when the
display device is connected by an HDMI
cable, and when it supports deep colour
feature.
Option Description
[Auto] Reduce the posterization
[Off] Output standard 8 bit colour.
video signal being output
from the HDMI OUT.
The selected resolution
•
must also be suppor ted
by your TV monitor.
effect by automatically
outputting the 10 bit colour
whenever the unit recognizes
the connected display device
supports deep colour feature.
[Off] Output the picture in 50 Hz
or 60 Hz.
32 EN
Page 33

[Component Output]
Option Description
[480i/576i] Set the resolution for the
[480p/576p]
[720p]
[1080i]
component output picture.
The selected resolution
•
must also be suppor ted
by your TV monitor.
Refer also to your TV’s
•
manual.
If you have selected the
•
resolution not supported
by your TV by mistake
and the picture gets
disturbed, press PLAY
and hold on the front
panel for 5 seconds to
change the setting back to
its default.
When HDMI cable
•
is connected, only
[480i/576i] and the
resolution selected in the
[HDMI Video Resolution]
will be available.
Note
With regard to the DVD Video with a copy
•
protection, the resolution will be set to 48 0p/576p
regardless of the setting here. If 480p/576p output is
not available, 480i/576i will be outpu t.
[Noise Reduction]
No available for BD-video.
•
Option Description
[Off] Deactivate the noise
reduction.
[MPEG NR.] Reduce the block noise seen
characteristically in the MPEG
fi les.
[3D NR.] Reduce the rough
background noise so that you
can feel the greater feeling of
depth.
[Combo
(3D+MPEG)]
Activate both [MPEG NR.]
and [3D NR.].
English
Adjust settings
[De-interlacing Mode]
Option Description
[Auto] Automatically detects the
fi lm or the video content,
and appropriately converts it.
[Video] Select this setting when the
picture is distorted when
using [Auto].
EN 33
Page 34

[Audio] settings
[Night Mode]
Option Description
[Auto] Activate the Night mode
only during playback of Dolby
TrueHD audio.
[On] Night mode compresses the
range between soft and loud
sounds. Select this setting for
quiet viewing at night.
[Off] Enjoy surround sound with a
full dynamic range.
[Down Sampling]
Set the sampling rate for output the PCM
•
audio from the digital output (coaxial/
optical).
Option Description
[On] Over 96kHz PCM audio will
be down sampled at 48kHz.
[Off] For BD or DVD recorded in
LPCM without copyright
protection, 2-channel audio
signals up to 96 kHz are
output as LPCM signals with
no conversion.
[Blu-ray Disc Audio]
Option Description
[Mix Audio
Output]
[Primary Audio
only]
The audio for the secondary
video and the interactive
application will be output
together with the audio for
the primary video.
Only the audio for the
primary video will be output.
When playing back a BDvideo which only contains the
primary audio, the audio
output will be the same as
case of [Primary Audio
Only] even if the [Blu-ray
Disc Audio] is set to [Mix
Audio Output]
[HDMI Audio]
This feature is available only when the
•
display device is connected by an HDMI
cable. Refer to chapter ‘Set-up - Set HDMI
audio format’ for more information.
Option Description
[HDMI
Normal]
[PCM]
[Off]
Set the audio format for the
sound output from the
HDMI OUT.
[Virtual Surround]
Option Description
[On] Select [On] to enjoy the
stereophonic virtual space
through your existing 2
[Off]
34 EN
channel stereo system during
playback of BD-video or
DVD-video.
Page 35

[Digital Out]
When HDMI cable is connected, make sure
•
[HDMI Audio] setting is set to [Off] before
you change this setting. Refer to chapter
‘Set-up - Set digital output format’ for more
information.
Option Description
[Bitstream] Set the audio format for the
[PCM]
sound output from the
DIGITAL OUT (COAXIAL/
OPTICAL).
[Parental] settings
[Rating Level]
Refer to chapter ‘Set-up - Set parental lock’
•
for more information.
Option Description
[All] Set the rating level for the
8 [Adult]
to
1 [Kid Safe]
disc playback.
English
Adjust settings
[Analogue Audio]
When HDMI cable is connected, make sure
•
[HDMI Audio] setting is set to [Off] before
you change this setting.
Option Description
[Speaker Setup] Set the speaker confi guration
to suite the size/number of
your speakers. Refer to
chapter ‘Set-up - Speaker
setup’ for more information.
You can also output
•
the test tone from each
speaker by pressing
button.
[Speaker
Distance]
[Speaker Level] Set the volume level for each
[Unit] : set the desired
•
measure system, default
setting is [Feet]. This
measure system will be
used for the speaker
distance setting.
Select the distance from
•
the listening point to the
speaker to get the ideal
delay time.
speaker to get the ideal audio
balance.
Red
[New PIN]
Option Description
Set the new password for
the [Parental] setting.
EN 35
Page 36

[Others] settings
[Auto Standby]
Option Description
[On] Set whether to turn off the
[Off]
[Front Panel Brightness]
Option Description
[Bright] Set the brightness of the
[Dim]
[Auto]
[Screen Saver]
Option Description
[On] Set whether to activate the
[Off]
unit (to the standby mode)
automatically after 25
minutes of no action since
the screen saver is activated.
If the screen saver is off, the
unit will be turned off after
30 minutes of no action.
front panel display. When
[Auto] is selected, the front
panel display automatically
goes dim during playback.
screen saver after 5 minutes
of no action on the unit.
[Slide Show Transition]
Option Description
[Cut In/Out] The pictures cut in and out
sharply as playback
progresses.
[Fade In/Out] The pictures fade in and out
as playback progresses.
[EasyLink (HDMI CEC)]
This feature is available only when the
•
display device is connected by an HDMI
cable, and when it supports EasyLink (HDMI
CEC) feature. Refer to chapter ‘Set-up Activate EasyLink control’ for more
information.
Option Description
[On] Set whether to utilise the
[Off]
EasyLink (HDMI CEC)
function. EasyLink (HDMI
CEC) function allows your
PHILIPS brand EasyLink TV
to act in conjunction with this
unit or vice versa.
[Slide Show Interval]
Option Description
[5sec] Set the amount of time for
[10sec]
36 EN
displaying one picture before
switching to the next one.
For example, select [5sec]
•
to switch the picture
every 5 seconds.
Page 37

[Factory Default] settings
Set-up
[Settings]
Option Description
[Yes] Reset all the settings to the
factory default, except for
[Parental] setting .
[No] Does not perform the
initialisation.
[Local Storage]
Option Description
[Yes] Initialise (clean up) the area
used for BD application.
[No] Does not perform the
initialisation.
Set TV screen display format
Use this feature to adjust the aspect ratio of the
video source which is different from your TV’s
ratio to fi t your TV monitor without distorting
the picture.
1 Press HOME.
2 Select [Settings] > [Advanced Set-up] >
[Video Output] > [TV Shape].
Option Description
[
4:3 Letter Box]
[4:3 Pan Scan]
[16:9 Wide
Screen]
To enjoy 16:9 picture on 4:3
monitor. 16:9 picture is
scaled down until the both
sides of the picture fi ts the
4:3 TV.
To enjoy 16:9 picture on 4:3
monitor. Both sides of the
picture are trimmed to fi t the
4:3 TV without distorting the
aspect ratio of the picture.
To enjoy 16:9 picture on
16:9 monitor. Select this
setting when you want to
enjoy 16:9 picture on the
16:9 TV.
English
Adjust settings
[16:9 Squeeze]
To enjoy 4:3 picture on 16:9
monitor. Use this setting to
display 4:3 picture on the
16:9 TV without distorting
the aspect ratio of the
picture.
EN 37
Page 38

Set HDMI video resolution
Set the resolution of the video signal being
output from the HDMI OUT.
1 Press HOME.
2 Select [Settings] > [Advanced Set-up] >
[Video Output] > [HDMI Video
Resolution].
When you make a selection, the TV
monitor temporarily goes blank and
then comes back again.
If it does not, press OUTPUT to
•
change the resolution or press and hold
PLAY on the front panel for 5
seconds to change the setting back to
its default.
Actual output resolution by Blu-ray disc
HDMI
Video
Resolution
setting
Source
480i/60Hz 480p/
720p/60Hz
1080i/60Hz
576i/50Hz 576p/
720p/50Hz
1080i/50Hz
720p/24Hz 480p/
1080p/24Hz
480p/
720p 1080i 1080p Auto
576p
720p/
60Hz
720p/
50Hz
720p/
60Hz
1080i/
60Hz
1080i/
50Hz
1080i/
60Hz
60Hz
50Hz
60Hz
1080p/
60Hz
1080p/
50Hz
1080p/
24Hz
or
60Hz
(*1)
The highest
resolution
supported by
your display
device will be
in effect
automatically
Actual output resolution by DVD
HDMI
Video
Resolution
setting
Source
480i/60Hz 480p/
576i/50Hz 576p/
480p/
720p 1080i 1080p Auto
576p
720p/
60Hz
720p/
50Hz
1080i/
60Hz
1080i/
50Hz
60Hz
50Hz
1080p/
60Hz
1080p/
50Hz
The highest
resolution
supported by
your display
device will be in
effect
automatically
Note
When H DMI cable is connected, only [480i/576i]
•
and the resolution selected in the [HDMI Video
Resolution] will be available for the [Component
Output].
•
Composite video out (VIDEO OUT) can only
output 480i/60 or 576i/50 .
•
When outputting 24Hz signal from the HDMI OUT,
no signal will be output from the CO MPONENT
VIDEO OUT and the VIDEO OUT.
•
The selected resolution must also be supported by
your display device.
•
If your T V and t he unit is connected by a DVI cable
and if you select [Aut o], [48 0p/576p] will be in effec t
automatically.
•
Pressing PLAY on the front panel for 5 seconds
changes the setting back to its default. ([Component
Output] setting will also be reset to default
[480i/576i]).
•
Refer also to your TV ’s manual.
(*1) To output the video in 24Hz, the connec ted
•
display device must support 24Hz output, and [HDMI
1080 p/24] should be set to [Auto]. Other wise, the
image will be output in 60Hz.
38 EN
Page 39

Set HDMI audio output format
1 Press HOME.
2 Select [Settings] > [Advanced Set-up] >
[Audio] > [HDMI Audio].
3 Refer to the table below to see which
setting you should choose.
[HDMI Audio]
setting
[Blu-ray Disc Audio]
setting
Media Audio source
BD-video Dolby DIgital Dolby Digital /
Dolby Digital Plus Dolby Digital Plus /
Dolby TrueHD Dolby TrueHD /
DTS DTS /
DTS-HD DTS-HD /
LPCM PCM /
DVD-video Dolby Digital Dolby Digital / PCM / Mute PCM / Mute Mute
DTS DTS / PCM / Mute PCM / Mute Mute
LPCM PCM / Mute PCM / Mute Mute
Audio CD/ MP3/
Window Media ™ Audio
DTS-CD DTS DTS / PCM / Mute PCM / Mute Mute
PCM 2ch PCM / Mute 2ch PCM / Mute Mute
[HDMI Normal] [PCM] [Off]
[Primary Audio
Only]
Which audio format can be output depends on the compatibility of the connected
device.
PCM /
Mute
Dolby Digital /
*1-1
/
PCM
Mute
Dolby Digital /
*2-1
PCM
/
Mute
PCM /
Mute
DTS /
*3-1
/
PCM
Mute
Mute
[Mix Audio
Output]
Dolby Digital /
PCM /
Mute
Dolby Digital /
*1-2
PCM
/
Mute
Dolby Digital /
*2-2
PCM
/
Mute
Dolby Digital /
PCM /
Mute
Dolby Digital /
*3-2
PCM
/
Mute
PCM /
Mute
[Primary
Audio Only]
PCM /
Mute
*1-1
PCM
/
Mute
*2-1
PCM
/
Mute
PCM /
Mute
*3-1
PCM
/
Mute
PCM /
Mute
[Mix Audio
Output]
PCM /
Mute Mute
*1-2
PCM
/
Mute Mute
*2-2
PCM
/
Mute Mute
PCM /
Mute Mute
*3-2
PCM
/
Mute Mute
PCM /
Mute Mute
Regardless
English
Adjust settings
•
(*1-1) Full decoded.
•
(*1-2) Only the independent substream is decoded.
•
(*2-1) Dolby TrueHD stream is decoded.
•
(*2-2) Only the Dolby Digital Substream is decoded.
•
(*3-1) Full decoded.
•
(*3-2) Only t he core substrea m is decoded.
Note
When playing back a BD -video which only contains
•
the pr imar y audio, the audio outpu t will be the same
as case of [Primary Audio Only]
Disc Audio] is set to [Mix Audio Output].
even if the [Blu-ray
EN 39
Page 40

Set digital output format
1 Press HOME.
2 Select [Settings] > [Advanced Set-up] >
[Audio] > [Digital Out].
3 Refer to the table below to see which
setting you should choose.
[Digital Out] setting
[Blu-ray Disc Audio]
setting
Media Audio source
BD-video Dolby Digital Dolby Digital Dolby Digital DownMix PCM DownMix PCM
Dolby Digital Plus Dolby Digital Dolby Digital DownMix PCM
Dolby TrueHD Dolby Digital Dolby Digital DownMix PCM
DTS DTS Dolby Digital DownMix PCM DownMix PCM
DTS-HD DTS Dolby Digital DownMix PCM
LPCM DownMix PCM DownMix PCM DownMix PCM DownMix PCM
DVD-Video Dolby Digital Dolby Digital DownMix PCM
DTS DTS DownMix PCM
LPCM DownMix PCM DownMix PCM
Audio CD/ MP3/
Window Media ™ Audio
DTS-CD DTS DTS DownMix PCM
•
(*1-1) Full decoded.
(*1-2) Only the independent substream is decoded.
•
(*2-1) Dolby TrueHD stream is decoded.
•
•
(*2-2) Only the Dolby Digital Substream is decoded.
•
(*3-1) Full decoded.
•
(*3-2) Only t he core substrea m is decoded.
PCM 2ch PCM 2ch PCM
[Primary Audio
Only]
[Bitstream] [PCM]
[Mix Audio
Output]
[Primary Audio
Only]
*1-1
*2-1
*3-1
[Mix Audio
Output]
DownMix PCM
DownMix PCM
DownMix PCM
Note
When playing back a BD -video which only contains
•
the pr imar y audio, the audio outpu t will be the same
as case of [Primary Audio Only]
Disc Audio] is set to [Mix Audio Output].
even if the [Blu-ray
*1-2
*2-2
*3-2
40 EN
Page 41

Speaker Setup
Set the speaker confi guration to suite the size/
number of your speakers.
1 Press HOME.
2 Select [Settings] > [Advanced Set-up] >
[Audio] > [Analogue Audio]> [Speaker
Setup].
3 Highlight the speaker you want to set in
the illustration on the right.
Speaker Setup
Speaker Distance
Speaker Level
If you press Red button, each speaker
•
outputs the test tone for 2 seconds in
rotation. You can move among the
speakers as illustrated below:
4 Press OK repeatedly to change the setting.
Option Suitable for
[Large] Large speakers with the capacity
for powerful low frequency
sound.
[Small] Small speakers which do not
bare the powerful low frequency
sound. *
[On] When subwoofer speaker is
connected.
[Off] No speakers.
•
(*) With regards to the low fr eque ncy sound which
is less t han 100Hz, the sound will be output from the
subwoofer.
Note
For subwoofer, only on/off is available. (You cannot
•
change the size of the subwoofer).
•
When the front speaker s are set to [Small],
subwoofer set ting remains [On] and cannot be
changed.
•
When subwoofer is set to [Off ], the front speaker
setting remains [Large] and cannot be changed.
English
Adjust settings
Front (L) Front (R)
Surround (L)
: [ ]
: [ ]
Center
Subwoofer
Surround (R)
: [ ]
: [ ]
EN 41
Page 42

Set parental lock
Some BD-video or DVD-video feature a
parental lock level. Playback stops if the ratings
exceed the levels you set, it requires you to
enter a password before the disc play. This
feature prevents your children from viewing
inappropriate material.
1 Press HOME.
2 Select [Settings] > [Advanced Set-up] >
[Parental], then press OK.
Enter your PIN
4 After entering the PIN code, [Rating
Level] appears. Select desired rating level
then press OK.
Rating Level All
New PIN 8 [Adult]
[All] Parental lock is inactive.
•
•
•
•
•
•
•
•
•
DVD sof tware of any grades can be played.
[8-Adult]
[7] [NC-17] No one under 17 admit ted.
[6] [R] Restric ted; under 17 requir es accompanying
parent or adult guardian.
[5] [PGR] Parental guidance recommended.
[4] [PG13] Unsuitable for childr en und er 13.
[3] [PG] Parental guidance suggested.
[2] [G] Gener al audience.
[1 Kid Safe]
Suitable for children.
7
6
5
4
3
2
If a PIN code has not been set:
3a Enter 4-digit PIN code using the number
buttons.
•
‘4737’ cannot be used.
•
Press Red button to return to the menu
screen.
If a PIN code has already been set:
3b Enter 4-digit PIN code using the number
buttons.
If you want to change the PIN code:
3c Enter 4-digit PIN code using the number
buttons. Then enter the new PIN code.
If you forget the PIN code:
3d Enter ‘4737’, then press OK. A warning
message appears, press OK again.
Current PIN code and the [Parental]
settings are now cleared.
Follow the above steps to create a new
•
PIN code.
To cancel parental lock temporarily
Some discs allow you to cancel the parental
lock temporarily.
1 With those discs, the message below
appears when you try to play them back:
[Please enter your PIN to unblock
content].
2 Follow the instruction which appears on
the screen to cancel the parental lock.
After entering the PIN code, [Rating
Level] appears.
3 Select desired rating level then press OK.
42 EN
Page 43

Activate EasyLink control
Reset to factory default
EasyLink (HDMI CEC) function allows your TV
(limited to PHILIPS brand EasyLink TV) to act in
conjunction with this unit, or vice versa.
1 Press HOME.
2 Select [Settings] > [Advanced Set-up] >
[Others] > [EasyLink (HDMI CEC)].
When [EasyLink (HDMI CEC)] setting is set to
[On], functions listed below will be available.
One touch play
When this unit is turned on, the TV also is
turned on and the appropriate external input
channel will be selected automatically. The
appropriate external input channel can also
be selected on your TV automatically when
you press PLAY , PREV í, NEXT ë,
number buttons, TOP MENU, HOME, INFO,
DISC MENU/POP-UP MENU, or of this unit
when the unit’s power is on.
Standby
When you press and hold 2 (Standby-On)
for 2 seconds, it turns off the power of the TV
fi rst and then turns off the power of this unit
also.
When the connected EasyLink (HDMI CEC)
compatible display device is turned off, this unit
may also turns off together.
You can reset the settings to default.
1 Press HOME.
2 Select [Settings] > [Factory Default], then
press OK.
3 Press to highlight the desired option,
then press OK.
Option Description
[Settings] All the settings will be reset
to default, except for the
[Parental] setting.
[Local Storage] Local storage used for BD-
Java will be re-formatted.
4 Press OK to go back to the settings menu,
or press HOME to go back to the home
menu.
English
Adjust settings
System Information
- Get & Set Menu Language
The unit recognises the OSD language set for
the TV and automatically sets the same language
as the player menu language (OSD menu
language) for this unit.
This feature is available only when [Auto] is
•
selected in the [Player Menu] in the settings
menu.
EN 43
Page 44

7 Additional
information
Care
Caution!
Never use solvents such as benzene, thinner,
•
cleaners available commercially, or anti-static sprays
intended for discs.
Clean discs
When a disc becomes dirty, clean it with a
cleaning cloth. Wipe the disc from the centre to
out. Do not wipe in a circular motion.
Clean disc lens
If this unit still does not perform properly
although you refer to the relevant sections and
‘Troubleshooting’ in this user manual, the laser
optical pickup unit may be dirty. Consult your
dealer or an Authorised Service Centre for
inspection and cleaning of the laser optical
pickup unit.
Disc handling
Handle the discs so that fi ngerprints and dust
do not adhere to the surfaces of the discs.
Always store the disc in its protective case
when it is not used.
Note that discs with special shapes
(heart-shaped discs, octagonal discs, etc.)
cannot be played back on this unit. Do not
attempt to play such discs, as they may damage
the unit.
Clean the cabinet
Wipe the front panel and other exterior
surfaces of the unit with a soft, slightly damp
cloth.
44 EN
Page 45

Specifi cations
Note
Specifi cation and design are subject to change
•
without notice.
Accessories supplied
•
Quick Start Guide
•
Remote control and batteries
•
HDMI cable (high speed)
•
RCA audio cable
•
RCA video cable
•
Power cable
•
User manual (CD-ROM)
Video
•
Signal system: PAL / NTSC
•
Composite video output: 1 Vp-p (75 ohm)
•
Component video output:
•
Y: 1 Vp-p (75 ohm)
•
Pb: 0.7 V-pp (75 ohm)
•
Pr: 0.7 V-pp (75 ohm)
•
HDMI output: 480p, 576p, 720p, 1080i, 1080p
Audio
•
2 Channel analogue output
•
Audio Front L+R: 2 Vrms ( > 1 kohm)
•
5.1 Channel analogue output
•
Audio Front L+R: 2 Vrms ( > 1 kohm)
•
Audio Surround L+R: 2 Vrms ( > 1 kohm)
•
Audio Centre: 2 Vrms ( > 1 kohm)
•
Audio Subwoofer: 1.15 Vrms ( > 1 kohm)
•
Digital output: 0.5 Vp-p (75 ohm)
•
Optical, Coaxial
•
HDMI output:
•
Sampling frequency:
•
MP3: 32 kHz, 44.1 kHz, 48 kHz
•
WMA: 44.1 kHz, 48 kHz
•
Constant bit rate:
•
MP3: 112 kbps - 320 kbps
•
WMA: 48 kbps - 192 kbps
Main Unit
•
Dimensions (w x h x d): 435 x 70 x 348 (mm)
•
Net Weight: 4.1 kg
Remote Control
•
Operating distance:
•
Line of sight: 7m (maximum)
•
Either side of centre: 5m within 30° (maximum)
•
Above: 5m within 15° (maximum)
•
Below: 3m within 30° (maximum)
Operating Environment
•
Operating temperature: 5ºC (41ºF) - 40ºC (104ºF)
•
Operating humidity: No condensation (< 80%)
Power consumption
Power supply rating: 110~240V ~AC, 50 Hz
•
Power consumption: 30W
•
Power consumption in standby mode: 0.2W
•
English
Additional information
EN 45
Page 46

8 Troubleshooting
General
No reaction to the remote
control.
Picture
No video signal on the
display device.
Warning!
Risk of electric shock . Never remove the casing of
•
this unit.
To keep the warranty valid, never try to repair the system yourself.
If you encounter problems when using this unit, check the following
points before requesting service. If the problem remains unsolved,
register your product and get support at www.philips.com/welcome.
•
Connect the product to the power outlet.
•
Point the remote control at the product.
•
Insert the batteries correctly.
Insert new batteries in the remote control.
•
•
Turn on the TV.
•
Set the TV to the correct external input.
•
Select the correct video resolution using OUTPUT on the front
panel.
•
Press and hold PLAY on the front panel for 5 seconds to
change the setting back to its default.
No video/audio signal on
the display device via HDMI
cable.
No high-defi nition video
signal on the TV.
46 EN
If the unit is connected to the unauthorised display device with an
•
HDMI cable, the audio/video signal may not be output.
•
Does the disc contain high-defi nition video? High-defi nition video
is not available when the disc does not contain it.
Does the TV support high-defi nition video? High-defi nition video
•
is not available when the TV does not support it.
Page 47

Sound
No audio signal from the
loudspeakers of the TV.
No audio signal from the
loudspeakers of the audio
system.
No 5.1-channel audio from
the loudspeakers of the
audio system.
Assign the audio input of the TV to the corresponding video
•
input.
Turn on the audio system.
•
Set the audio system to the correct external input.
•
Increase the volume level of the audio system.
•
•
Does the disc contain 5.1-channel audio? The 5.1-channel audio
is not available when the disc does not contain it.
•
Does the audio system support 5.1-channel audio? The
5.1-channel audio is not available when the audio system does
not contain it.
In the settings menu, set [HDMI Audio] to [Off].
•
Play
Cannot play back a disc. Make sure that the product supports the disc.
Cannot play back JPEG fi les
from a disc.
•
•
Make sure that the Blu-ray Disc player supports the region code
of the DVD or BD.
•
For DVD±RW or DVD
•
Clean the disc.
Make sure that the disc was recorded in the UDF, ISO9660 or
•
JOLIET format.
±R, make sure that the disc is fi nalised.
English
Tro u bles h ooti n g
Cannot play MP3 fi les and
Windows Media™ Audio
from a disc.
Cannot fi nd a JPEG fi le. Make sure that the selected group (folder) does not contain
•
Make sure that the disc was recorded in the UDF, ISO9660 or
JOLIET format.
•
Make sure that the bit rate of the MP3 fi les is between 112 and
320 kbps.
•
Make sure that the sample rate of the MP3 fi les is 32kHz,
44.1kHz or 48kHz.
•
Make sure that the sample rate of the Windows Media™ Audio
fi les is 44.1kHz or 48kHz.
•
more than 9,999 fi les for DVD, and 999 fi les for CD.
Make sure that the fi le extension is .jpg, .JPG, .jpeg or .JPEG.
•
EN 47
Page 48

Cannot fi nd an MP3 and
Windows Media™ Audio
fi le.
•
Make sure that the selected folder does not contain more than
9,999 fi les for DVD, and 999 fi les for CD.
•
Make sure that the fi le extension is .mp3 or .MP3, and .wma or
.WMA for Windows Media™ Audio.
‘X’ appears in the upper
right hand corner of the
screen.
Error message appears
when select [Auto] in the
[Player Menu].
The operation is not possible.•
•
Make sure that the unit is connected to the Philips brand
EasyLink TV and the [EasyLink (HDMI CEC)] is set to [On].
•
This error message may appear when your TV’s OSD language
is not supported by this unit.
48 EN
Page 49

9 Glossary
Analogue Audio
An electrical signal that directly represents sound.
Compare this to digital audio which can be an
electrical signal, but is an indirect representation
of sound.
Aspect Ratio
The width of a TV screen relative to its height.
Conventional TVs are 4:3 (in other words, the
TV screen is almost square); widescreen models
are 16:9 (the TV screen is almost twice as wide
as it is high).
Blu-ray Disc (BD)
Blu-ray Disc is a next generation optical video
disc which is capable of storing much more data
than a conventional DVD is. The large capacity
makes it possible to benefi t from the features
such as high-defi nition videos, multichannel
surround sounds, interactive menus and so on.
Chapter
Just as a book is split up into several chapters, a
title on a BD-video or DVD-video is usually
divided into chapters.
Component Video Output
Each signal of luminance (Y) and component
(PB/CB, PR/CR) is independent to output so
that you can experience picture colour as it is.
Also, due to compatibility with progressive
video (480p/576p), you can experience higherdensity picture than that in interlace (480i/576i).
Digital Audio
An indirect representation of sound by
numbers. During recording, the sound is
measured at discrete intervals (44,100 times a
second for CD audio) by an analogue-to-digital
converter, generating a stream of numbers. On
playback, a digital-to-analogue converter
generates an analogue signal based on these
numbers.
DTS (Digital Theatre System)
DTS is a multi channel surround sound system.
You can enjoy movie dynamic and realistic
sound like movie theatre. DTS surround sound
technologies were developed by DTS, Inc.
Dolby Digital
The system to compress digital sound
developed by Dolby Laboratories. It offers you
sound of stereo (2ch) or multichannel audio.
HDCP
High-bandwidth Digital Content Protection is a
specifi cation that provides a secure transmission
of digital contents between different devices (to
prevent unauthorised copyright).
HDMI (high defi nition multimedia interface)
A digital interface between audio and video
source. It can transmit component video, audio,
and control signal with one cable connection.
JPEG (joint photographic experts group)
JPEG is a method of compressing still picture
fi les. You can copy JPEG fi les on CD-RW/-R,
DVD-RW/-R or DVD+RW/+R from a
computer and play back the fi les on this unit.
MP3 (MPEG audio layer 3)
MP3 is a method of compressing fi les. You can
copy MP3 fi les on CD-RW/-R, DVD-RW/-R or
DVD+RW/+R from the computer and play
back the fi les on this unit.
PCM (pulse code modulation)
The most common system of encoding digital
audio, found on CD and DAT. Excellent quality,
but requires a lot of data compared to formats
such as Dolby Digital and MPEG audio. For
compatibility with digital audio recorders
(CD, MD and DAT) and AV amplifi ers with
digital inputs, this unit can convert Dolby Digital
and MPEG audio to PCM.
English
Glossary
EN 49
Page 50

Region Code
Regions associate discs and players with
particular areas of the world. This unit will only
play back discs that have compatible region
codes. You can fi nd the region code of your
unit by looking on the rear panel. Some discs
are compatible with more than one region (or
all regions).
Sampling Frequency
The rate which sound is measured by a
specifi ed interval to turn into digital audio data.
The numbers of sampling in one second defi nes
as sampling frequency. The higher the rate, the
better the sound quality.
Title
A collection of chapters on BD-video or DVDvideo.
Track
Audio CD use tracks to divide up the content
of a disc. The BD-video or DVD-video
equivalent is called a chapter.
Windows Media™ Audio
Windows Media™ Audio is the audio
compressing technology developed by
Microsoft. You can copy Windows Media™
Audio fi les on CD-RW/-R, DVD-RW/-R or
DVD+RW/+R from a computer and play them
back on this unit.
50 EN
Page 51

© 2008 Philips Consumer Lifestyle
All right reserved
1VMN26153
sgpjp-0829/en1
 Loading...