

Philips BDP5010/F7 Owner’s Manual
E5KI1UD EN.book Page 0 Tuesday, March 17, 2009 1:55 PM
Register your product and get support at
www. p hiIips.c o m/we Icome
f,
/_ Philipsvousremerciede
Need help fast?
Read your Quick Start Guide and/or
User Manual first for quick tips
that make using your Philips product
more enjoyable.
Register your product and
get support at
www.philips.com/welcome
or call
1-866-771-4018
while with your product
(and Model / Serial number)
Enregistrez votre produit et
/ Besoin d'une aidq
Le Guide rapide de d_but et
Manuel de I'utilisateur regorgent
d'astuces destinies d simplifier
I'utilisation de votre produit Philips.
acc_dez _ I'assistance sur
www.philips.com/welcome
1-800-661-6162 (Francophone)
1-866-771-4018
(English speaking)
Veillez _ avoir votre produit
port_e de main
(et model / serial hombre)
rapide?
ou formez le
BDPS010/F7 A
Graciaspor escogerPhilips
Necesita ayuda
inmediata?
Lea primero la Gala rdpida del
comienzo o el Manual del usuario,
en donde encontrara consejos que
le ayudaran a disfrutar plenamente
de su producto Philips.
Visite
www.philips.comlwelcome
para registrar su producto y
obtener informaci6n de
contacto y asistencia.
o Ilame al tel_fono
1-866-771-4018
y tenga a mano el producto
(y n_mero de model /
EN BLU-RAY DISC PLAYER
© 2009 P&F USA, Inc.
PHILIPS
WARNING:
TO REDUCETHERISKOFFIREOR ELECTRICSHOCK,DO NOT EXPOSETHIS
APPARATUSTO RAINORMOISTURE.
APPARATUSSHALLNOT BEEXPOSEDTO DRIPPINGORSPLASHINGAND NOOBJECTS
FILLEDWITH LIQUIDS,SUCHASVASES,SHALLBEPLACEDON THEAPPARATUS.
CAUTION
CAUTION:
TO REDUCE THE RISKOF ELECTRICSHOCK, DO NOT
REMOVE COVER(OR BACK). NO USERSERVICEABLE
PARTSINSIDE. REFERSERVICINGTO QUALIFIED
SERVICEPERSONNEL.
The important note and rating are located on the rear or bottom of the cabinet.
The lightning flash with arrowhead symbol, within an
equilateral triangle, isintended to alert the user to the
presence of uninsulated"dangerous voltage"within the
product's enclosure that may be of sumcient magnitude
to constitute a risk of electric shock to persons,
The exclamation point within an equilateral triangle is
intended to alert the user to the presence of important
operating and maintenance (servicing) instructions in
the literature accompanying the appliance,
IMPORTANT SAFETY INSTRUCTIONS
1. Read these instructions.
2. Keep these instructions.
3. Heed all warnings.
4. Followall instructions.
S. Do not usethis apparatus near water.
6. Clean only with dry cloth.
7. Do not block any ventilation openings. Install in
accordance with the manufacture's instructions.
8. Do not install near any heat sources such as radiators,
heat registers, stoves, or other apparatus (including
amplifiers) that produce heat.
9. Do not defeat the safety purpose of the polarized or
grounding-type plug. A polarized plug hastwo blades
with one wider than the other. A grounding type plug
has two blades and a third grounding prong. The wide
blade or the third prong are provided for your safety. If
the provided plug does not fit into your outlet, consult
an electrician for replacement of the obsolete outlet.
FCC WARNING
This equipment may generate or use radio frequency energy. Changes or modifications to this equipment may
cause harmful interference unless the modifications are expressly approved in the manual. The user could lose the
authority to operate this equipment if an unauthorized change or modification is made.
RADIO-TV INTERFERENCE
This equipment has been tested and found to comply with the limits for a Class B digital device, pursuant to Part
15 of the FCC Rules. These limits are designed to provide reasonable protection against harmful interference in a
residential installation. This equipment generates, uses, and can radiate radio frequency energy and, if not installed
and used in accordance with the instructions, may cause harmful interference to radio communications. However,
there is no guarantee that interference will not occur in a particular installation. If this equipment does cause harmful
interference to radio or television reception, which can be determined by turning the equipment off and on, the user
is encouraged to try to correct the interference by one or more of the following measures:
1) Reorient or relocate the receiving antenna.
2) Increase the separation between the equipment and receiver.
3) Connect the equipment into an outlet on a circuit different from that to which the receiver is connected.
4) Consult the dealer or an experienced radio/TV technician for help.
10. Protect the power cord from being walked on
or pinched particularly at plugs, convenience
receptacles, and the point where they exit from the
apparatus.
11. Only use attachments/accessories specified by the
manufacturer.
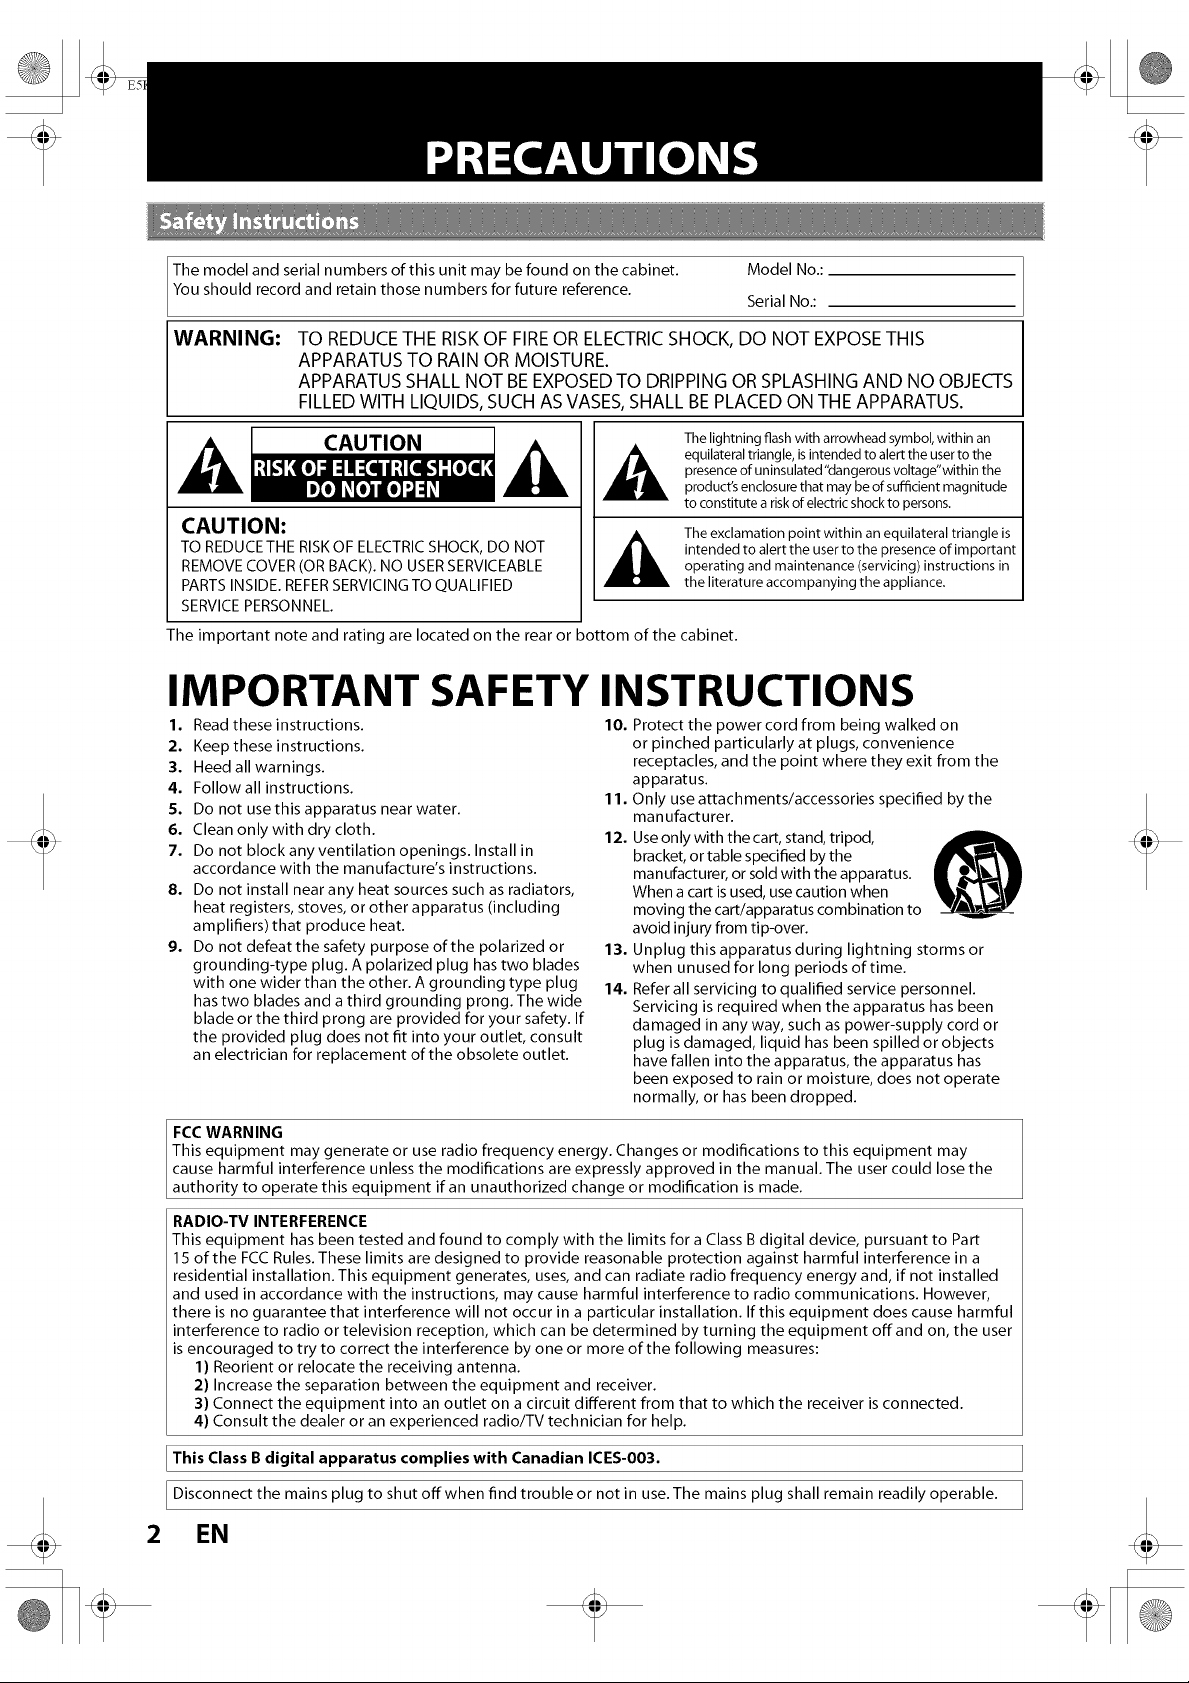
12. Useonly with the cart, stand, tripod,
bracket, or table specified by the
manufacturer, or sold with the apparatus.
When a cart is used, use caution when
moving the cart/apparatus combination to
avoid injury from tip-over.
13. Unplug this apparatus during lightning storms or
when unused for long periods of time.
14. Refer all servicing to qualified service personnel.
Servicing is required when the apparatus has been
damaged in any way, such as power-supply cord or
plug is damaged, liquid has been spilled or objects
have fallen into the apparatus, the apparatus has
been exposed to rain or moisture, does not operate
normally, or has been dropped.
This Class Bdigital apparatus complies with Canadian ICES-O03.
Disconnect the mains plug to shut offwhen find trouble or not in use. The mains plug shall remain readily operable.
2
EN
_ _I1UD EN.book
CAUTION: Danger of explosion if battery is incorrectly replaced. Replace only with the same or equivalent type.
WARNING: Batteries (Battery pack or battery installed) shall not be exposed to excessive heat such as sunshine, fire, or the like.
Page 3 Tuesday, March 17, 2009 1:55 PM
LASER SAFETY
This apparatus employs a laser. Only a qualified service person should remove the cover or attempt to service this
apparatus, due to possible eye injury.
CAUTION: Use of controls or adjustments or performance of procedures other than those specified herein may
result in hazardous radiation exposure.
CAUTION: Visible and invisible laser radiation when open and inter lock defeated. Do not stare into beam.
LOCATION: Inside, near the deck mechanism.
IMPORTANT COPYRIGHT INFORMATION
Unauthorized copying, broadcasting, public performance and lending of discs are prohibited. This product incorporates
copyright protection technology that is protected by U.S. patents and other intellectual property rights. Use of this
copyright protection technology must be authorized by Macrovision, and is intended for home and other limited
viewing uses only unless otherwise authorized by Macrovision. Reverse engineering or disassembly isprohibited.
Do not place the unit on the furniture that is capable of being tilted by a child and an adult leaning, pulling, standing
or climbing on it. A falling unit can cause serious injury or even death.
To Avoid the Hazards of Electrical Shock and Fire
• Do not handle the power cord with wet hands.
• Do not pull on the power cord when disconnecting it from an AC outlet. Grasp it by the plug.
• Do not put your fingers or objects into the unit.
Location and Handling
• Do not install the unit in direct sunlight, near strong magnetic fields, or in a place subject to dust or strong vibration.
• Avoid a place with drastic temperature changes.
• Install the unit in a horizontal and stable position. Do not place anything directly on top or bottom of the unit.
Depending on your external devices, noise or disturbance of the picture and/or sound may be generated if the unit is
placed too close to them. In this case,please ensure enough space between the external devices and the unit.
• Depending on the environment, the temperature of this unit may increase slightly. This is not amalfunction.
• Besureto remove the disc and unplug the AC power cord from the outlet before carrying the unit.
I
o
O
©
@
@
F
©
7i;("
@
Dew Condensation Warning
• Dew condensation may form inside the unit in the following conditions. If so,do not use this unit at least for afew
hours until its inside gets dry.
- The unit is moved from a cold place to a warm place.
- Under conditions of high humidity.
- After heating a cold room.
Note about Recycling
• This unit's packaging materials are recyclable and can be reused. Pleasedispose of any materials in
accordance with your local recycling regulations.
• Batteries should never be thrown away or incinerated but disposed of in accordance with your local
regulations concerning chemical wastes.
Notice for Progressive Scan Output
• Consumers should note that not all high definition television setsare fully compatible with this product and may
causeartifacts to be displayed in the picture. In case of picture problems with 525(480) progressive scan output,
it is recommended that the user switch the connectionto the 'standard definition' output. Ifthere are questions
regarding your TV set compatibility with this 525p(480p) BD/DVD player, please contactour customer service center.
Products that have earned ENERGY STAR ®are designed to protect the environment
through superior energy efficiency.
@
0
@
EN 3
_ _IIUD EN.book Page 4 Tuesday, March 17, 2009 1:55 PM
Servicing
• Please refer to relevant topics on "TROUBLESHOOTING"
on page 47 before returning the product.
• If you need to call a customer service representative,
please know the model number and serial number of
your product before you call. This information is
displayed on the back of the product. Also, please take a
moment to identify the problem you are having, and be
prepared to explain this to the representative. If you
believe the representative will need to help you with
operations, please stay near the product. Our
representatives will be happy to assist you. For online
reference, please visit our web site at
http://www.philips.com/welcome
Cleaning the cabinet
• Wipe the front panel and other exterior surfaces of the
unit with a soft, slightly damp cloth.
• Never use a solvent, thinner, benzene or alcohol to clean
the unit. Do not spray insecticide liquid near the unit.
Such chemicals may discolor the surface or damage the
unit.
Cleaning discs
• When a disc becomes dirty, clean it with a cleaning cloth.
Wipe the disc from the center to out. Do not wipe in a
circular motion.
• Do not use solvents such as benzine, thinner,
commercially available cleaners, detergent, abrasive
cleaning agents or antistatic spray intended for analog
records.
Cleaning the disc lens
• If this unit still does not perform properly although you
refer to the relevant sections and to "TROUBLESHOOTING"
in this user manual, the laser optical pickup unit may be
dirty. Consult your dealer or an Authorized Service Center
for inspection and cleaning of the laser optical pickup
unit.
Disc handling
• Handle the discs so that fingerprints and dust do not
adhere to the surfaces of the discs.
• Always store the disc in its protective case when it is not
used.
• Note that discs with special shapes (heart-shaped discs,
octagonal discs, etc.) cannot be played back on this unit.
Do not attempt to play such discs, as they may damage
the unit.
r'rl DOLBY
DIGITAL ]
Advanced Digital Out
H ml ,M
Java
POWERED
BONUS VIEW
B IVE
Manufactured under license
from Dolby Laboratories.
"Dolby" and the double-D
symbol are trademarks of
Dolby Laboratories.
Manufactured under license
under U.S. Patent #: 5,451,942;
5,956,674; 5,974,380; 5,978,762;
6,487,535 & other U.S.and
worldwide patents issued &
pending. DTS is a registered
trademark and the DTSIogos,
Symbol, DTS-HD and DTS-HD
Advanced Digital Out are
trademarks of DTS,Inc.© 1996-
2008 DTS, Inc.All Rights
Reserved.
HDMI,the HDMI logo and
High-Definition Multimedia
Interface aretrademarks or
registered trademarks of HDMI
Licensing LLC.
Java and all other Java
trademarks and Iogos are
trademarks or registered
trademarks of Sun
Microsystems, Inc. in the
United States and/or other
countries.
Windows Media andthe Windows
logo are trademarks or registered
trademarks of Microsoft
Corporation in the United States
and/or other countries.
DivX,DivX Certified, andassociated
Iogos are trademarks of DivX, Inc.
and are used under license.
"BONUSVlEW" is trademark of
Blu-ray Disc Association.
"BD-Live" logo is a trademark
of Blu-ray Disc Association.
Remote Control User Manual Quick Start
with Batteries Guide
(AAAx2)
Registration Card RCA Audio/
4 EN
"Blu-ray Disc" and ,,,_,_,_,_,are trademarks.
is a trademark of DVD Format/Logo Licensing
Corporation.
Video Cables
Precautions ................................................................... 2
Safety Instructions ....................................................................2
Contents ........................................................................ 5
Features ........................................................................ 6
Features ........................................................................................6
Product Info .................................................................................6
Symbols Used in this User Manual ......................................6
Functional Overview .................................................... 7
Front Panel ...................................................................................7
Rear Panel .....................................................................................7
Remote Control ..........................................................................8
Front Panel Display ................................................................10
Guide to On-Screen Display ...............................................11
List of settings ............................................................ 32
Setups ......................................................................... 38
-IV Shape .....................................................................................38
HDMI Video Resolution .........................................................38
HDMI Audio ...............................................................................39
Digital Out .................................................................................40
Speaker Setup ..........................................................................41
Parental .......................................................................................41
EasyLink (HDMI CEC) ..............................................................42
Network Connection .............................................................43
Software Upgrade ...................................................................46
Reset to Factory Default .......................................................46
o
0
©
0
@
Conn÷ctions
Connections ................................................................ 12
Connection to the -IV ............................................................12
Connection to an Audio System .........................................
Network Connection with LAN .........................................17
Basic Setup
Before You Start ......................................................... 18
Finding the Viewing Channel on Your TV .....................18
Information on Playback ........................................... 19
Information on Playback ......................................................19
Guide to File List .....................................................................21
Howto Insert a Disc ...............................................................21
Basic Playback ............................................................ 22
Playing Backa BD ora DVD ................................................22
Playing Back an Audio CD or a Disc with DivX®/
Windows Media TMAudio/JPEG Files .............................23
Reading the SD Memory Card ...........................................25
About DivX ®and DivX ®VOD ..............................................25
Playing Back a DivX ®with DivX ®External Subtitle .....26
Using the Title / Disc Menu .................................................26
Special Playback ......................................................... 27
Fast Forward / Fast Reverse ................................................27
Slow Forward Playback ........................................................27
Step by Step Playback ..........................................................27
Zoom ...........................................................................................27
Repeat Playback ......................................................................28
A-B Repeat ................................................................................28
Slide Show .................................................................................28
PiP (BONUSVIEW) Setting ....................................................28
Enjoying BD-Live Discs with Internet ..............................29
Title/Chapter Search ..............................................................29
Track Search .............................................................................30
Time Search ..............................................................................30
Switching Subtitles ................................................................30
Switching Audio Soundtrack .............................................31
Switching Camera Angles ...................................................31
Troubleshooting ........................................................ 47
Glossary ...................................................................... 49
Specifications ............................................................. 51
ONE (1) YEAR LIMITED WARRANTY .......................... 52
F
©
7i;("
@
O
@
I
EN 5
Watch movies in the highest picture quality available for your HDTV. The BDP5010 Blu-ray Disc player offers full high-definition
video playback up to 1080p resolution for an amazing viewing experience. A highly detailed picture and increased sharpness
delivers a more true-to-life picture.
Pop-up menu
Some BD-videos have a pop-up menu which is a navigation
Blu-ray Disc
You can enjoy Blu-ray Disc which is capable of storing five
times more data than a conventional DVD.
BD Java
With some BDs which support Java applications, you can
enjoy the interactive functions such as games or interactive
menus.
Upscale DVD for enhanced picture quality
Your current DVD will look even better than before thanks to
video upscaling. Upscaling will increase the resolution of
standard definition DVD to high definition up to 1080p over
an HDMI connection.The picture will be less jagged and more
realistic for a near high definition experience.
Enjoy your content on different kinds of media
Full backwards compatibility with DVD, CD and SD Card
ensures that you can continue to enjoy your current audio-
video collection. Additionally, you can view JPEG digital
pictures or listen to Windows Media TMAudio music files.
Listen to the rich multi-channel surround sound
Multi-channel surround sound, which realizes real-to-life
sound and makes you feel that you are really there.
Intuitive user interface and remote control
The Philips logical user interface allows you to easily navigate
through your content and settings, so you can quickly find
what you are looking for.
Easy and simple connection to your HDTV via HDMI
Connect your BDPS010 to your HDTV with one single HDMI
(High Definition Multimedia Interface) cable. Philips
recommends HDMI1.3 (category 2) cable (also known as High
Speed HDMI cable) for better compatibility. The high definition
video output signal will be transferred to your HDTV without
conversion to analog signals, so you will get an excellent
picture and sound quality, completely free from noise.
Thanks to other multiple outputs, you can also easily connect
to your home theater system or amplifier.
About EasyLink (HDMI CEC) (Consumer Electronics
Control)
EasyLink (HDMI CEC) allows you to operate the linked
functions of this player with Philips brand TV with EasyLink
feature.
Philips does not guarantee 100 % interoperability with other
brands of HDMI CEC compliant devices.
PiP (BONUSVIEW)
Some BD-videos have the PiP function which enables you to
display the secondary video in the primary video. You can call
up the secondary video by pressing [BONUSVIEW (PIP)]
whenever the scene contains the secondary video.
BD-Live
BD-Live (BD-ROM version 2 Profile 2.0) that allows interactive
functions to be used when this unit is connected to the
Internet in addition to the BONUSVIEW function. The various
functions differ depending on the disc.
menu that can be called up and be operated on the screen
without interrupting the playback. You can call upthe pop-up
menu by pressing [DISC MENU / POP-UP MENU). Contents in
the pop-up menu vary depending on the disc.
HDMI Deep Color
Deep Color reduces the posterization effect of the playback
image. Refer to "HDMI Deep Color" in the "LIST OF SETTINGS"
on page 33.
HDMI 1080p/24 output (BD only)
This unit is equipped with the feature which can provide the
smooth movement in the playback of film originated material with
the frame rate of 24 frames per second with progressive. (Available
only when the display device is connected by an HDMI cable.)
Refer to "HDMI 1080p/24" in the "LIST OF SETTINGS" on
page 33.
Playing back the contents in SD Memory Card
You can play backWMA/JPEGs stored in an SD Memory Card. You
can store picture-in-picture commentary, subtitles or other extras
for BD-ROM Ver. 2 (Profile 2.0/Profile 1.1) files in an SD Memory
Card and play back with the BD-video.
"Product Info" screen provides you with the information
on this unit's hardware and software version information.
You can also download the latest firm ware from the web
site which is displayed in the "Product Info" screen, and
update the firm ware by yourself.
To access "Product Info", select "Product Info" in the home
menu.
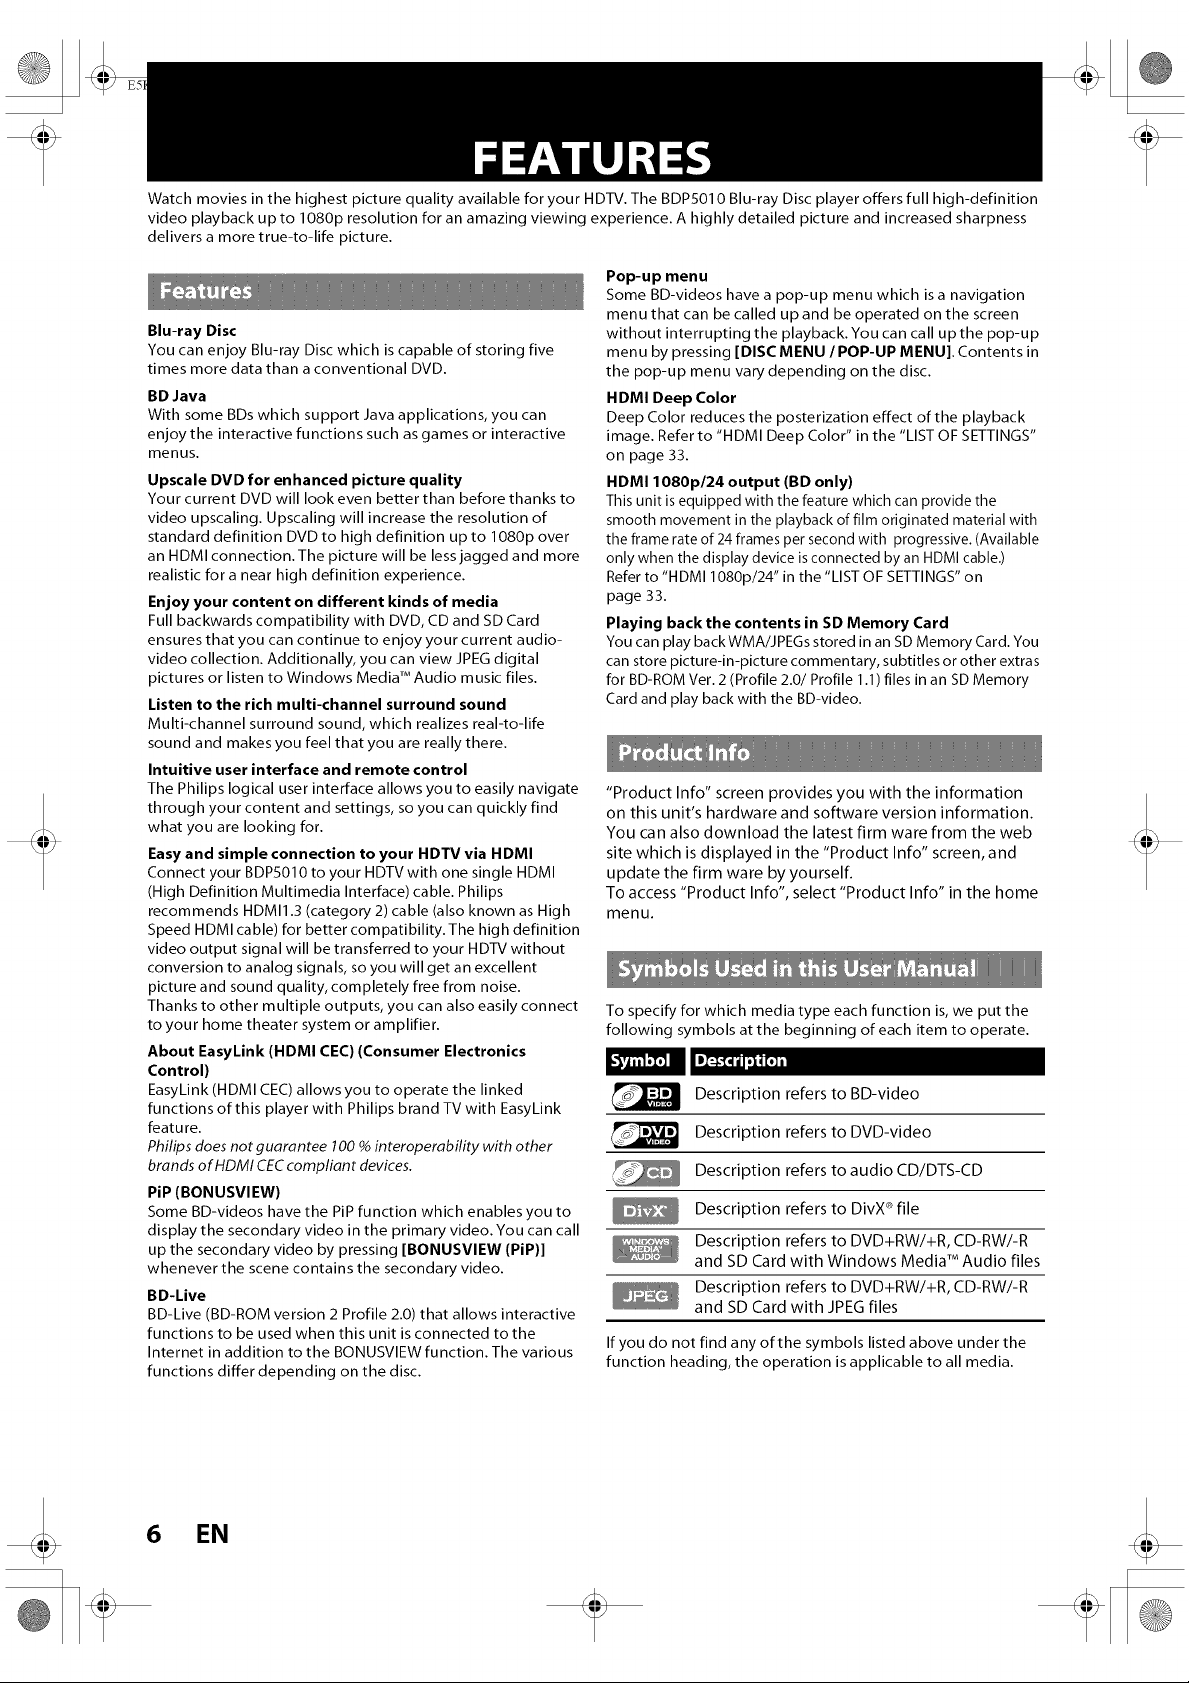
To specify for which media type each function is, we put the
following symbols at the beginning of each item to operate.
Description refers to BD-video
Description refers to DVD-video
Description refers to audio CD/DTS-CD
Description refers to DivX ®file
Description refers to DVD+RW/+R, CD-RW/-R
and SD Card with Windows Media TMAudio files
Description refers to DVD+RW/+R, CD-RW/-R
and SD Card with JPEG files
If you do not find any of the symbols listed above under the
function heading, the operation is applicable to all media.
6 EN
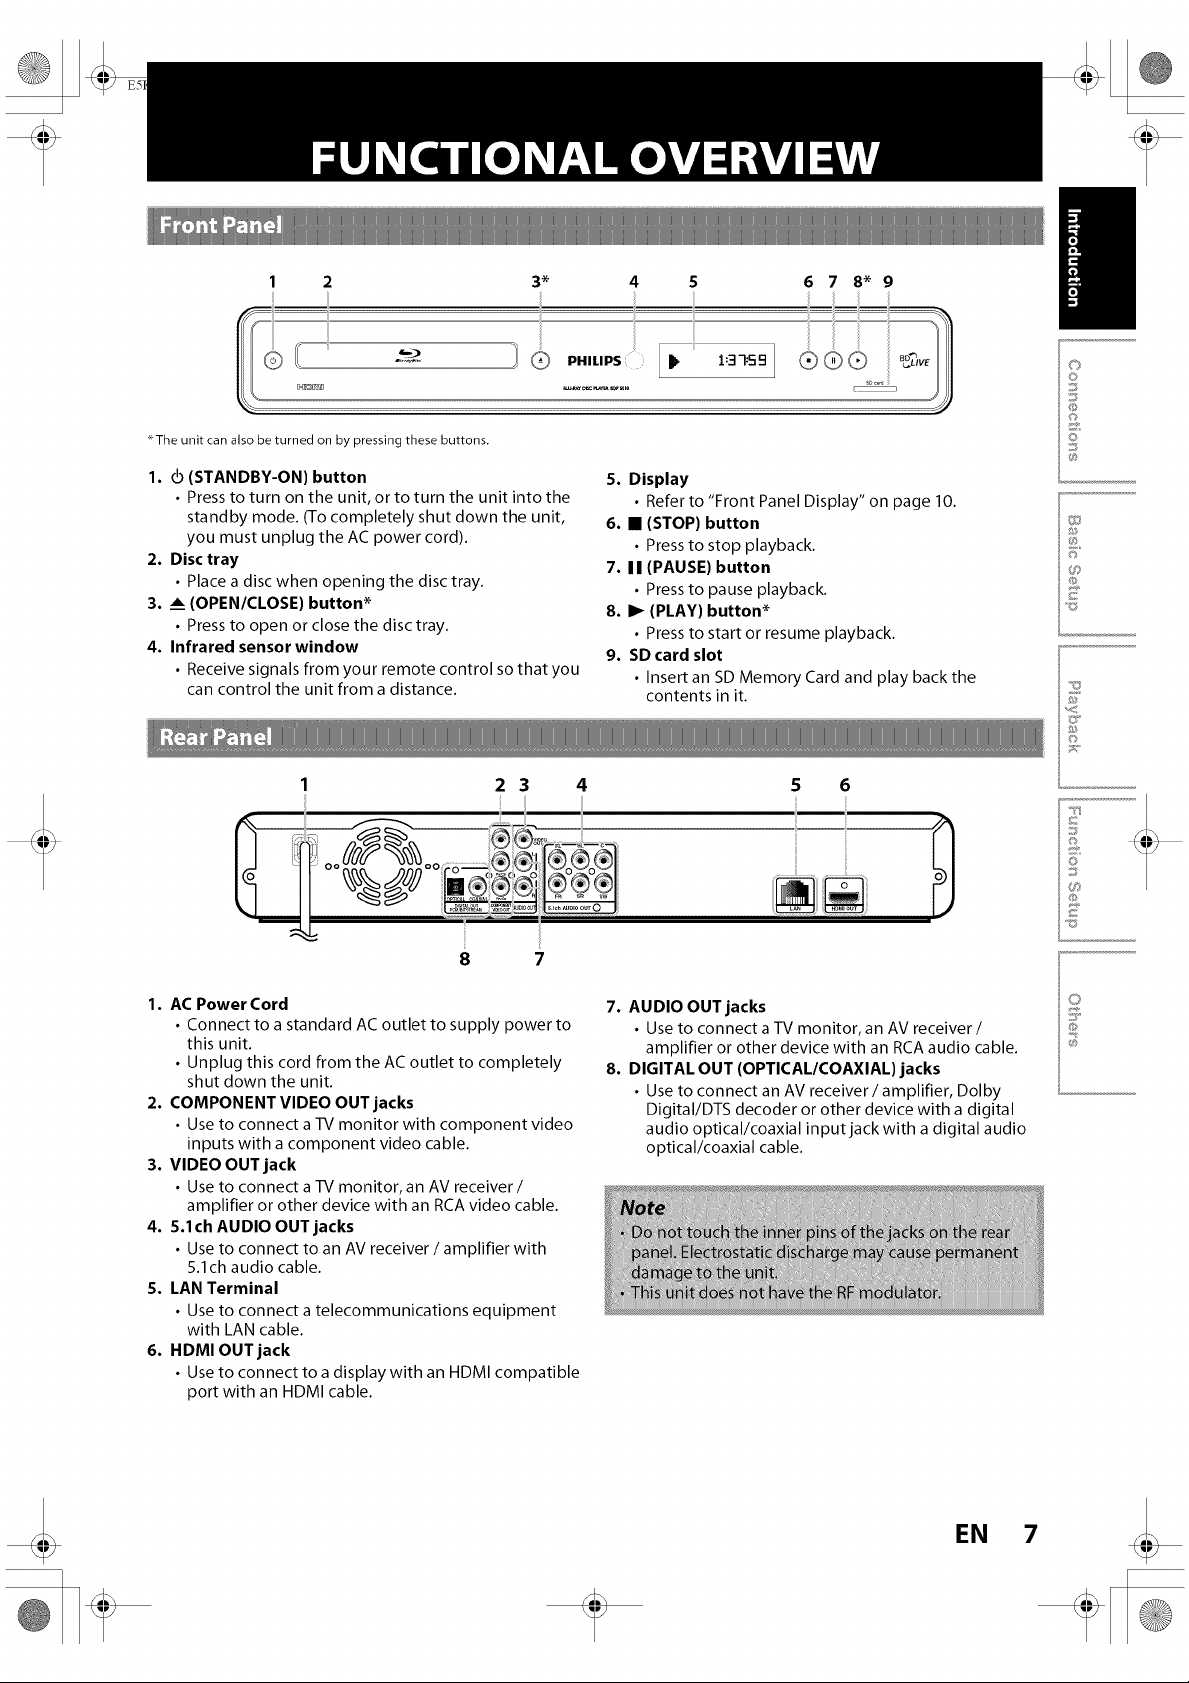
1 2 3" 4 5 678*9
The unit can also be turned on by pressing these buttons.
o
O
©
0
1. d) (STANDBY-ON) button
• Press to turn on the unit, or to turn the unit into the
standby mode. (To completely shut down the unit,
you must unplug the AC power cord).
2. Disc tray
• Place a disc when opening the disc tray.
3. _ (OPENICLOSE) button*
• Press to open or close the disc tray.
4. Infrared sensor window
• Receive signals from your remote control so that you
can control the unit from a distance.
2 3 4 5 6
8 7
1. AC Power Cord
• Connect to a standard AC outlet to supply power to
this unit.
• Unplug this cord from the AC outlet to completely
shut down the unit.
2. COMPONENT VIDEO OUT jacks
• Use to connect a TV monitor with component video
inputs with a component video cable.
3. VIDEO OUT jack
• Use to connect a TV monitor, an AV receiver /
amplifier or other device with an RCA video cable.
4. 5.1ch AUDIO OUT jacks
• Use to connect to an AV receiver / amplifier with
5.1ch audio cable.
S. I.AN Terminal
• Use to connect a telecommunications equipment
with LAN cable.
6. HDMI OUT jack
• Use to connect to a display with an HDMI compatible
port with an HDMI cable.
5. Display
• Refer to "Front Panel Display" on page 10.
6. • (STOP) button
• Press to stop playback.
7. I I (PAUSE) button
• Press to pause playback.
8. I_ (PLAY) button*
• Press to start or resume playback.
9. SD card slot
• Insert an SD Memory Card and play back the
contents in it.
7. AUDIO OUT jacks
• Use to connect a -IV monitor, an AV receiver/
amplifier or other device with an RCA audio cable.
8. DIGITAL OUT (OPTICAL/COAXIAL) jacks
• Use to connect an AV receiver / amplifier, Dolby
Digital/DTS decoder or other device with a digital
audio optical/coaxial input jack with a digital audio
optical/coaxial cable.
2
F ¸
©
7i;i"
@
0
@
I
EN
_ _IlI_TD EN.book Page 8 Tuesday, March 17, 2009 1:55 PM
FUNC"rlONAL OV£1Vl£W
3¸¸¸¸¸¸¸iiiiiiii ,.......2,
....i _ _ :,8
s ..............
6 !_" '_ ...........:,7
,
=!(t(0=)0)
10,I .....
" 1o ®®
IIi® ® ® ................I
16
17 ........
18
O G ¸
PHILIPS
BW-RA¥DISCPLAYER
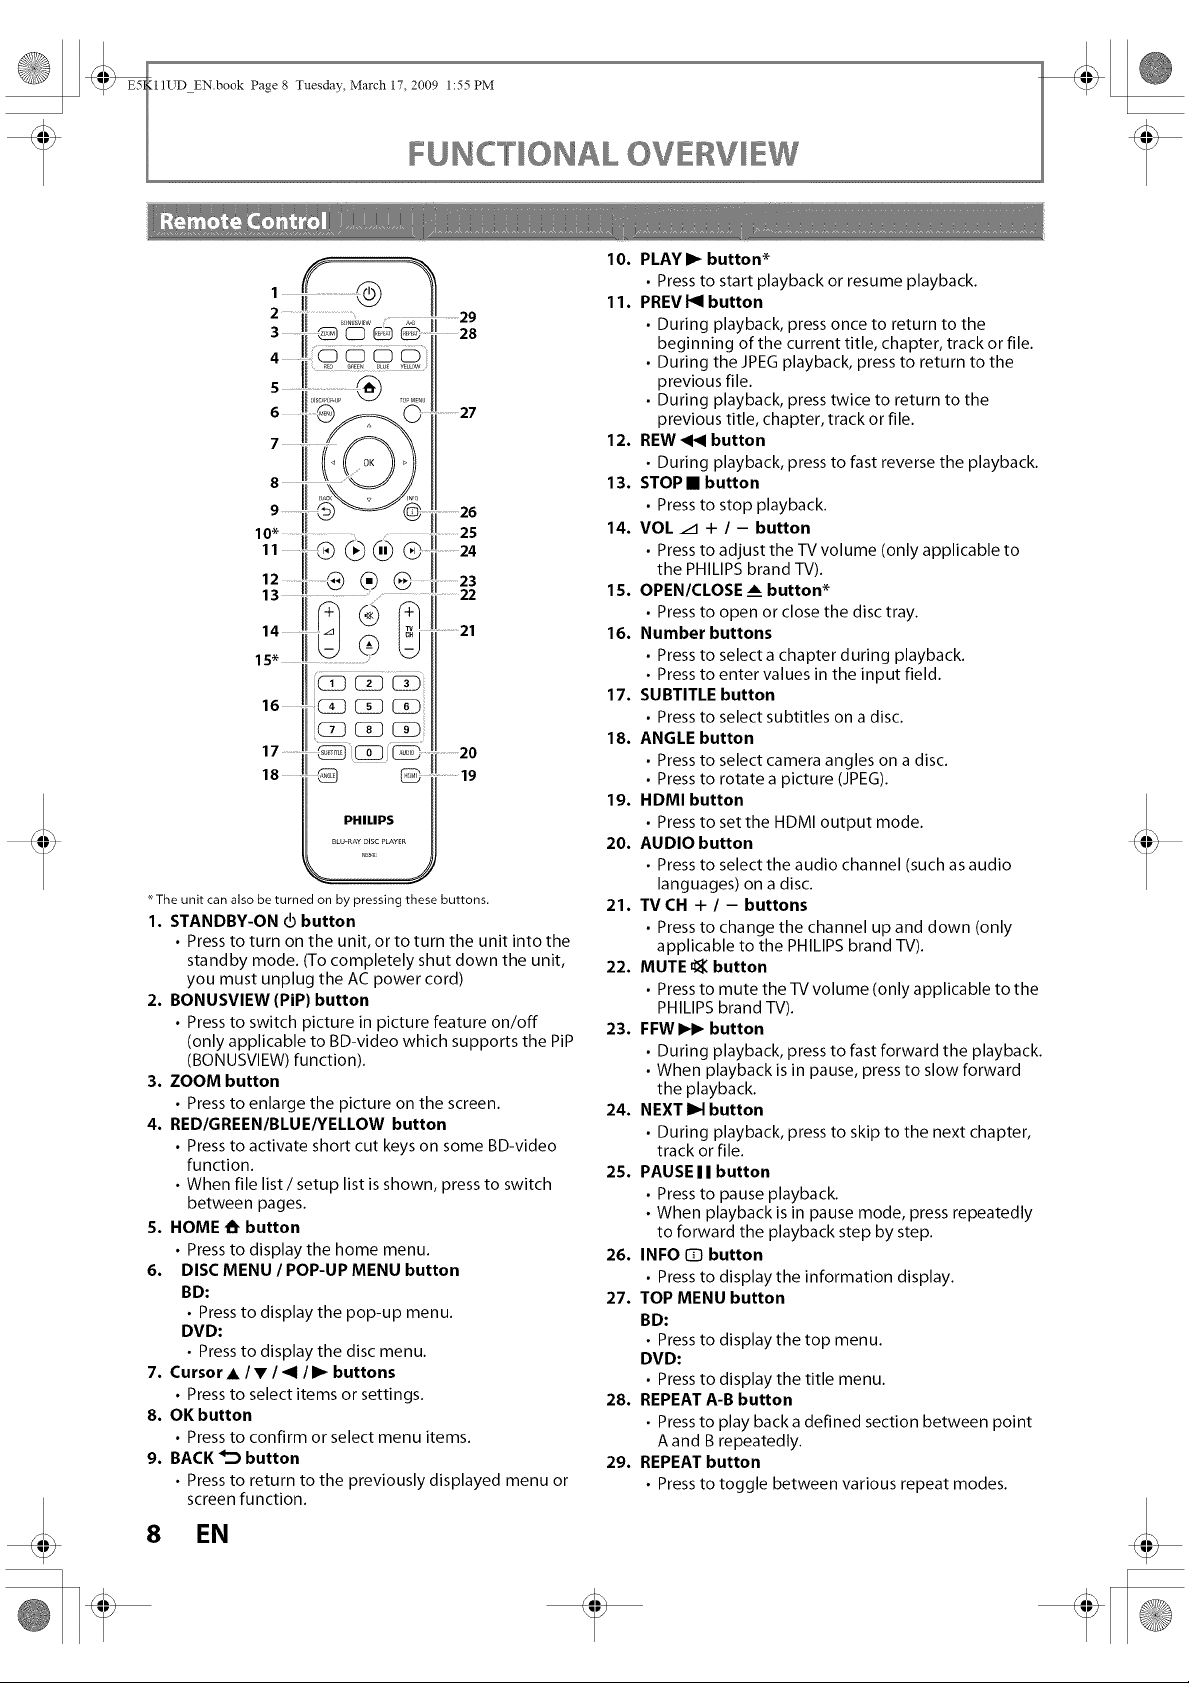
The unit can also be turned on by pressing these buttons.
1. STANDBY-ON _ button
• Press to turn on the unit, or to turn the unit into the
standby mode. (To completely shut down the unit,
you must unplug the AC power cord)
2. BONUSVIEW (PIP) button
• Press to switch picture in picture feature on/off
(only applicable to BD-video which supports the PiP
(BONUSVlEW) function).
3. ZOOM button
• Press to enlarge the picture on the screen.
4. RED/GREEN/BLUE/YELLOW button
• Press to activate short cut keys on some BD-video
function.
• When file list/setup list is shown, press to switch
between pages.
5. HOME _ button
• Press to display the home menu.
6. DISC MENU / POP-UP MENU button
BD:
• Press to display the pop-up menu.
DVD:
• Press to display the disc menu.
7. Cursor • / • / _1 / I_ buttons
• Press to select items or settings.
8. OK button
• Press to confirm or select menu items.
9. BACK _'_ button
• Press to return to the previously displayed menu or
screen function.
..........20
..........19
10. PLAY I_ button*
• Press to start playback or resume playback.
11. PREV I_1 button
• During playback, press once to return to the
beginning of the current title, chapter, track or file.
• During the JPEG playback, press to return to the
previous file.
• During playback, press twice to return to the
previous title, chapter, track or file.
12. REW _1_ button
• During playback, press to fast reverse the playback.
13. STOP • button
• Press to stop playback.
14. VOL /1 + / - button
• Press to adjust the TV volume (only applicable to
the PHILIPS brand TV).
15. OPEN/CLOSE ___button*
• Press to open or close the disc tray.
16. Number buttons
• Press to select a chapter during playback.
• Press to enter values in the input field.
17. SUBTITLE button
• Press to select subtitles on a disc.
18. ANGLE button
• Press to select camera angles on a disc.
• Press to rotate a picture (JPEG).
19. HDMI button
• Press to set the HDMI output mode.
20. AUDIO button
• Press to select the audio channel (such as audio
languages) on a disc.
21. TVCH + / - buttons
• Press to change the channel up and down (only
applicable to the PHILIPS brand TV).
22. MUTE u_ button
• Press to mute the TV volume (only applicable to the
PHILIPS brand TV).
23. FFWI_ button
• During playback, press to fast forward the playback.
• When playback is in pause, press to slow forward
the playback.
24. NEXT I_1 button
• During playback, press to skip to the next chapter,
track or file.
25. PAUSE I I button
• Press to pause playback.
• When playback is in pause mode, press repeatedly
to forward the playback step by step.
26. INFO [D button
• Press to display the information display.
27. TOP MENU button
BD:
• Press to display the top menu.
DVD:
• Press to display the title menu.
28. REPEAT A-B button
• Press to play back a defined section between point
A and B repeatedly.
29. REPEAT button
• Press to toggle between various repeat modes.
8 EN
_ _III_TD EN.book Page 9 Tuesday, March 17, 2009 1:55 PM
FUNC"rlONAL OV£1Vl£W
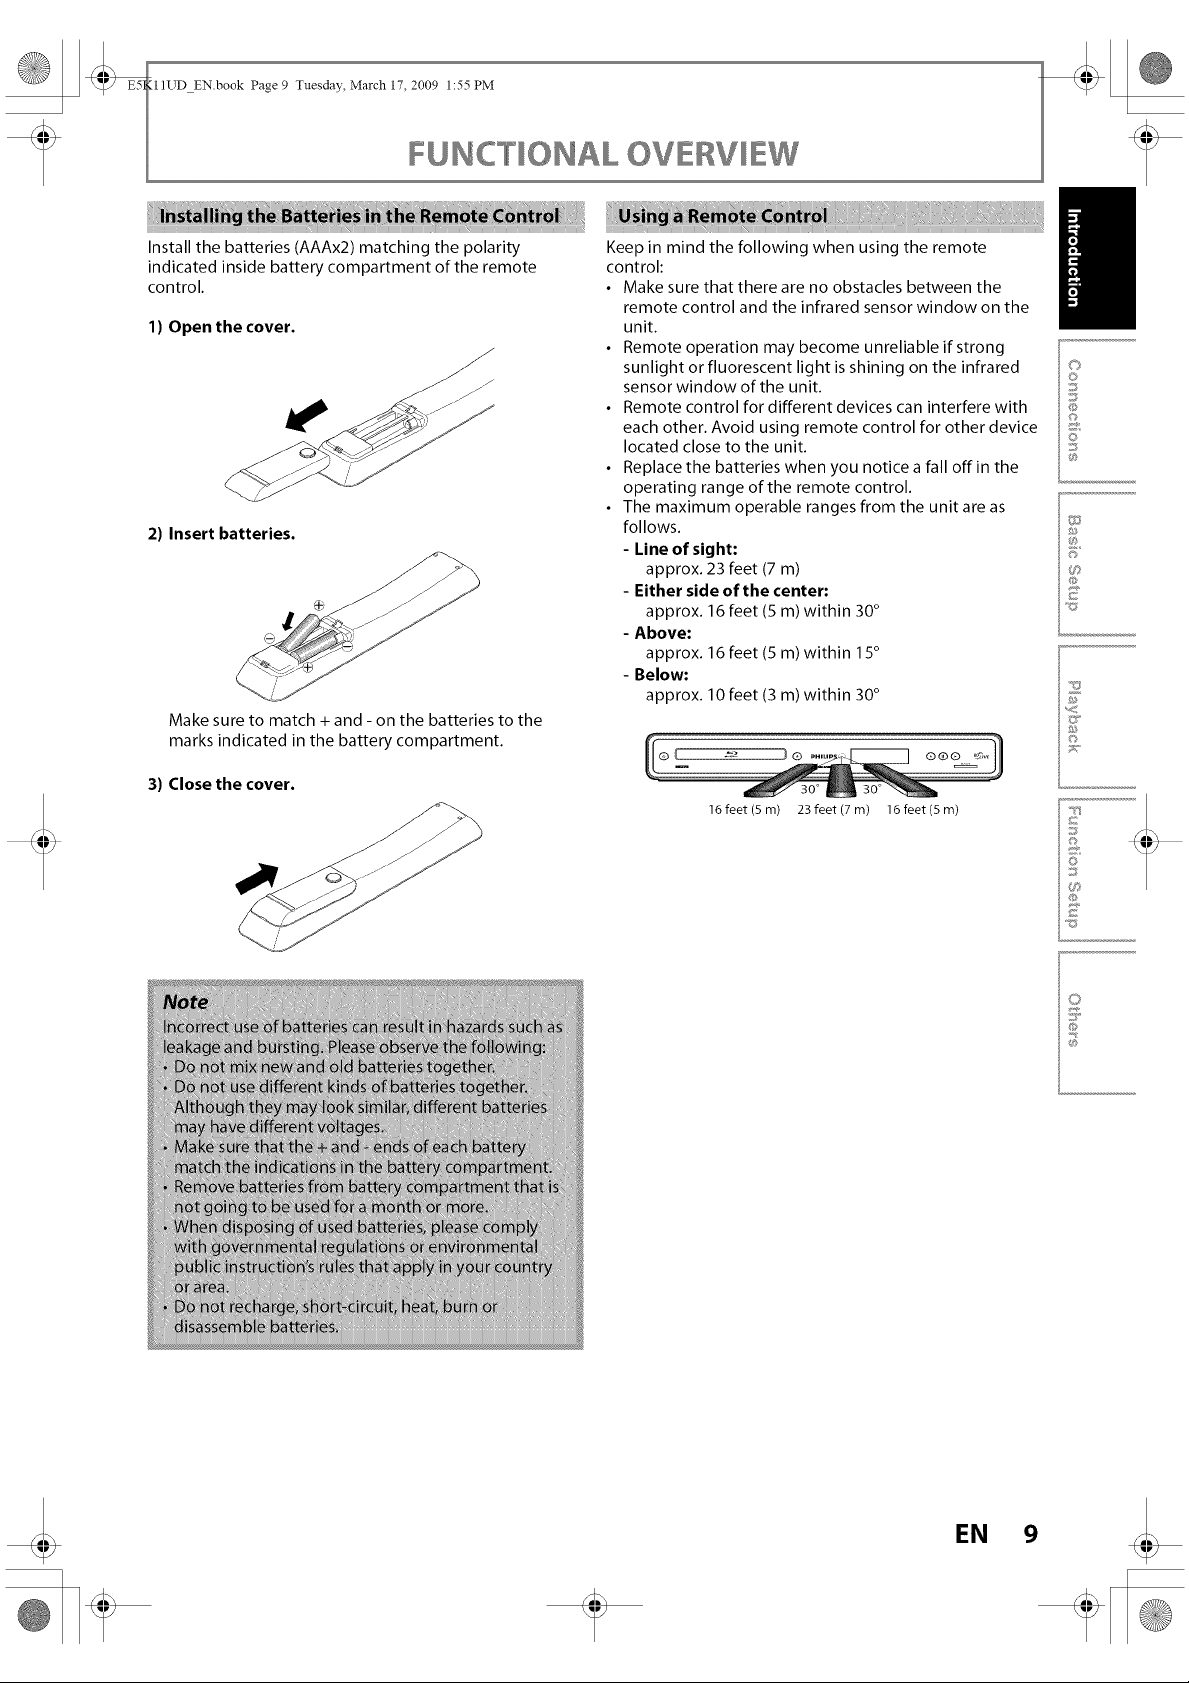
Install the batteries (AAAx2) matching the polarity
indicated inside battery compartment of the remote
control.
1) Open the cover.
J
2) Insert batteries.
Make sure to match + and - on the batteries to the
marks indicated in the battery compartment.
3) Close the cover.
Keep in mind the following when using the remote
control:
• Make sure that there are no obstacles between the
remote control and the infrared sensor window on the
unit.
• Remote operation may become unreliable if strong
sunlight or fluorescent light is shining on the infrared
sensor window of the unit.
• Remote control for different devices can interfere with
each other. Avoid using remote control for other device
located close to the unit.
• Replace the batteries when you notice a fall off in the
operating range of the remote control.
• The maximum operable ranges from the unit are as
follows.
- Line of sight:
approx. 23 feet (7 m)
- Either side of the center:
approx. 16 feet (5 m) within 30°
- Above:
approx. 16 feet (5 m) within 15°
- Below:
approx. 10 feet (3 m) within 30°
16 feet (5 m) 23 feet (7 m) 16 feet (5 m)
il
C)
0
©
}
@
@
F
©
7i_'("
_B
0
@
_7
EN 9
_ _III_TD EN.book Page 10 Tuesday, March 17, 2009 1:55PM
FUNC[IONAL OV£1Vl£W
1 2
mmmmmmmmmm immmh immmh • ImmR immR immmh immR immmh Immmh
mmmmmmmmmm mmmmm mmmmm mmmmm mmmmm mmmmm mmmmm mmmmm mmmmm
mmmmmmmmmm mmmmm mmmmm • mmmmm mmmmm • mmmmm mmmmm • mmmmm mmmmm
mmmmmmmmmm mmmmm mmmmm mmmmm mmmmm mmmmm mmmmm mmmmm mmmmm
mmmmmmmmmm mmmmm mmmmm • mmmmm mmmmm • mmmmm mmmmm • mmmmm mmmmm
mmmmmmmmmm mmmmm mmmmm mmmmm mmmmm mmmmm mmmmm mmmmm mmmmm
mmmmmmmmmm IIIIF immml IIIIF IIIIF IIIIF Immw • wmmw ummw
mmmmmmmmmm
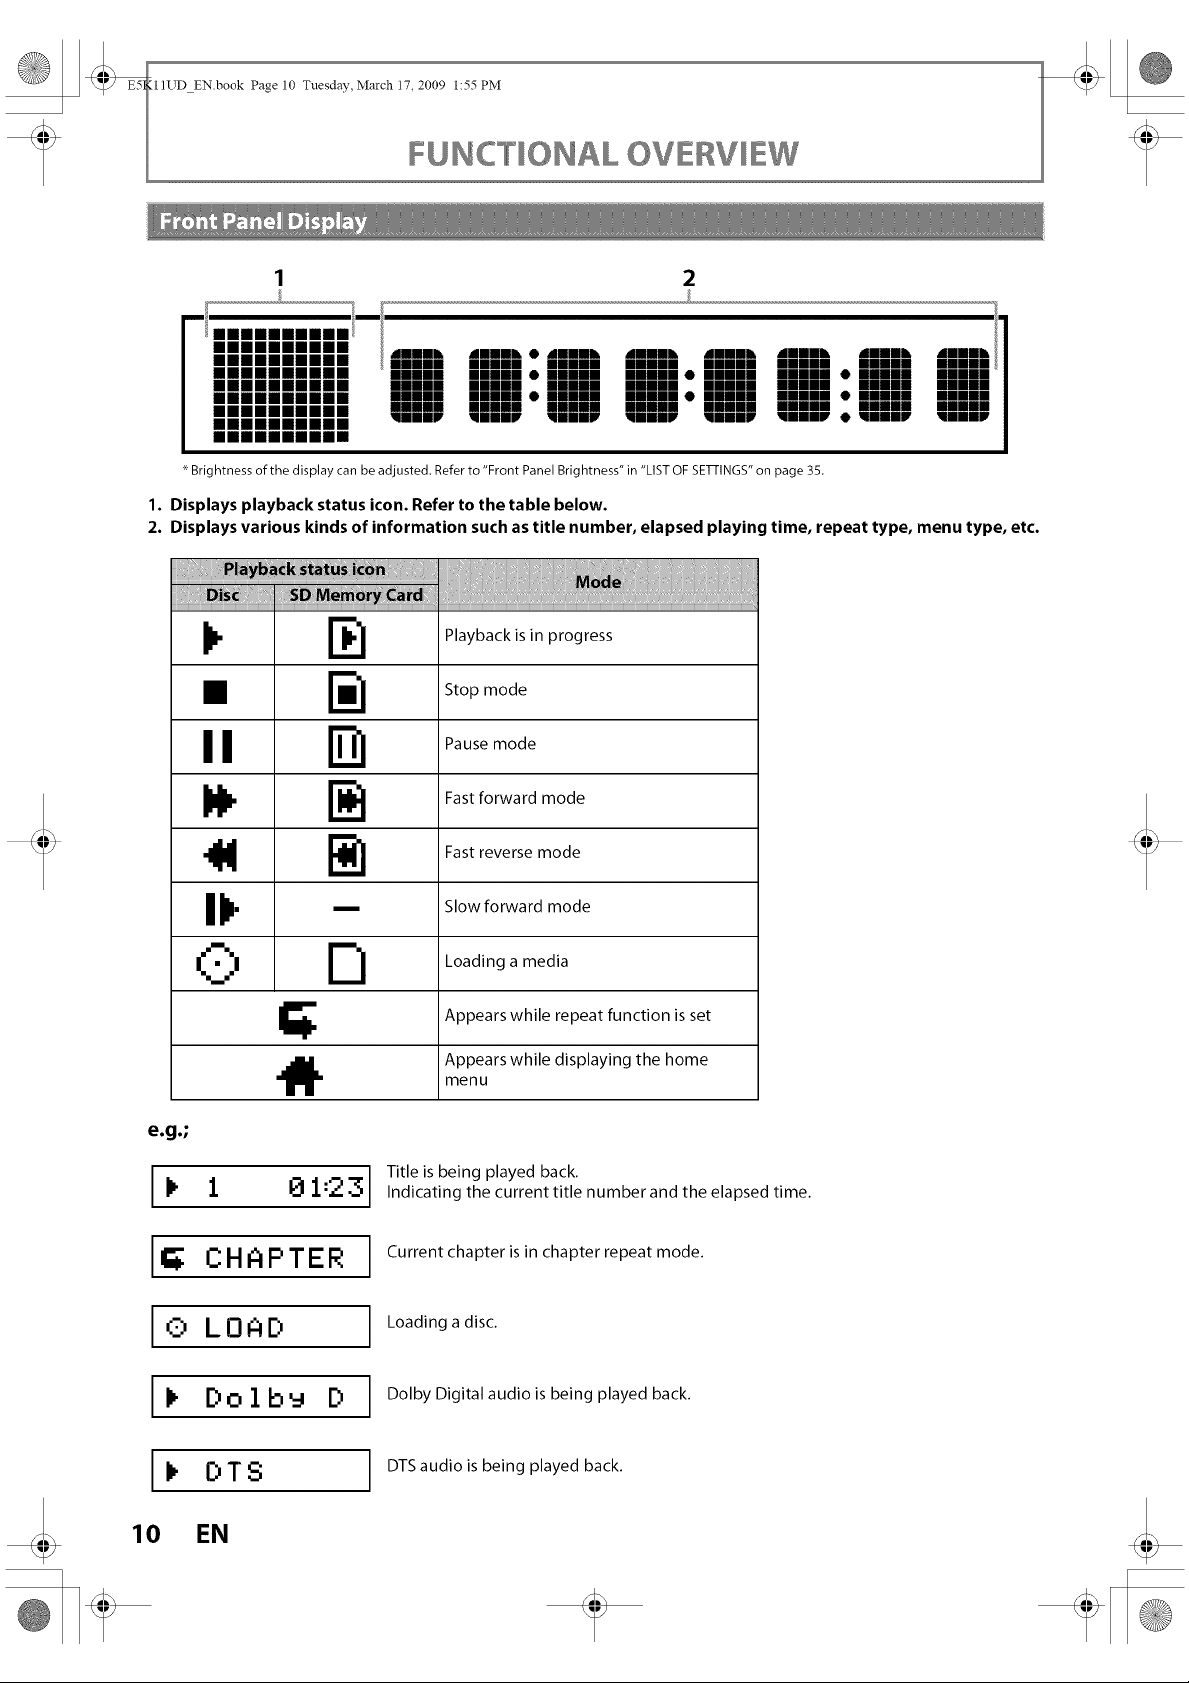
Brightness of the display can be adjusted. Refer to "Front Panel Brightness" in "LIST OF SETFINGS" on page 35.
1. Displays playback status icon. Refer to the table below.
2. Displays various kinds of information such as title number, elapsed playing time, repeat type, menu type, etc.
I
0 LOAD
I
10
1 81:23
CHAPTER
Dolb_ D
DTS
EN
Title is being played back.
Indicating the current title number and the elapsed time.
Current chapter is in chapter repeat mode.
Loading a disc.
Dolby Digital audio is being played back.
DTS audio is being played back.
11UD EN.book Page 11 Tuesday,,March 17, 2009 1:55PM
FUNC"rlONAL OV£IVl£W
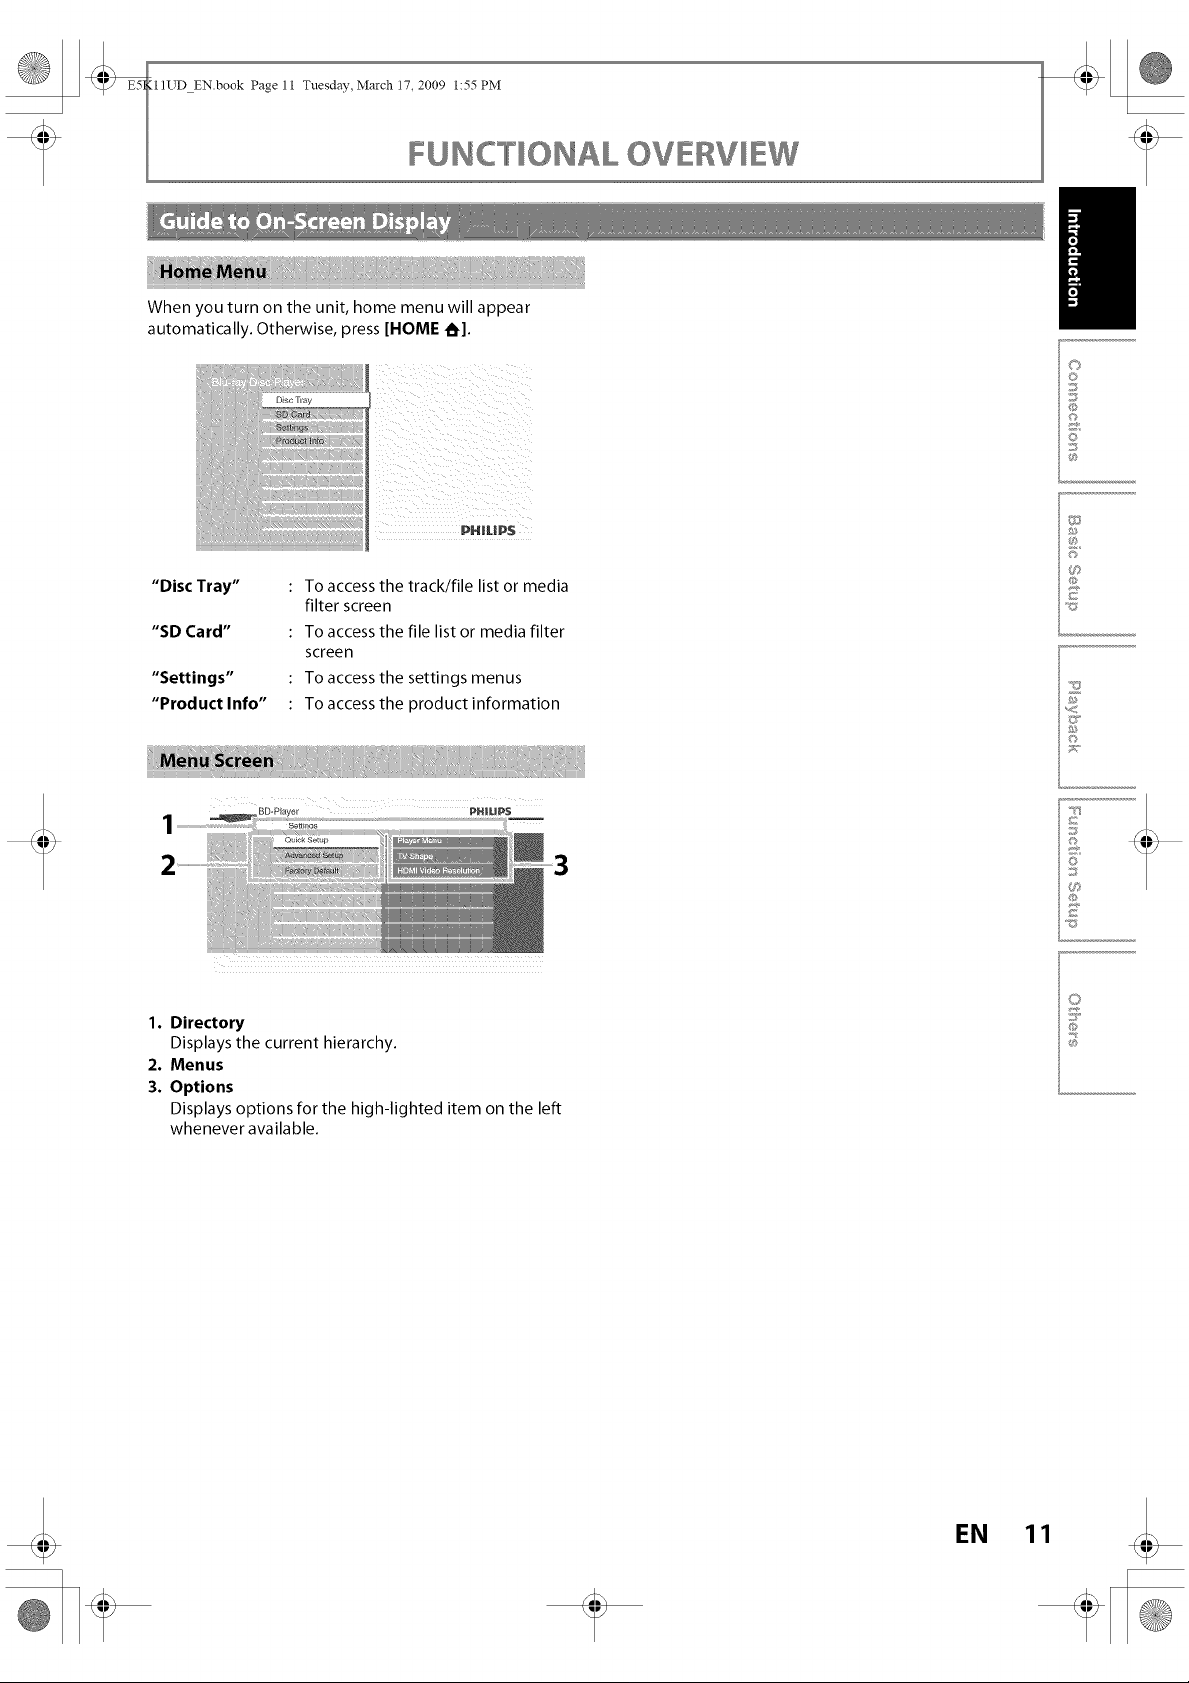
When you turn on the unit, home menu will appear
automatically. Otherwise, press [HOME _1.
PHIL|P$
il
C)
O
©
0
i
"Disc Tray"
"SD Card"
"Settings"
"Product Info"
1. Directory
Displays the current hierarchy.
2. Menus
3. Options
Displays options for the high-lighted item on the left
whenever available.
To access the track/file list or media
filter screen
To access the file list or media filter
screen
To access the settings menus
To access the product information
F
©
71;'("
_B
0
O
EN 11
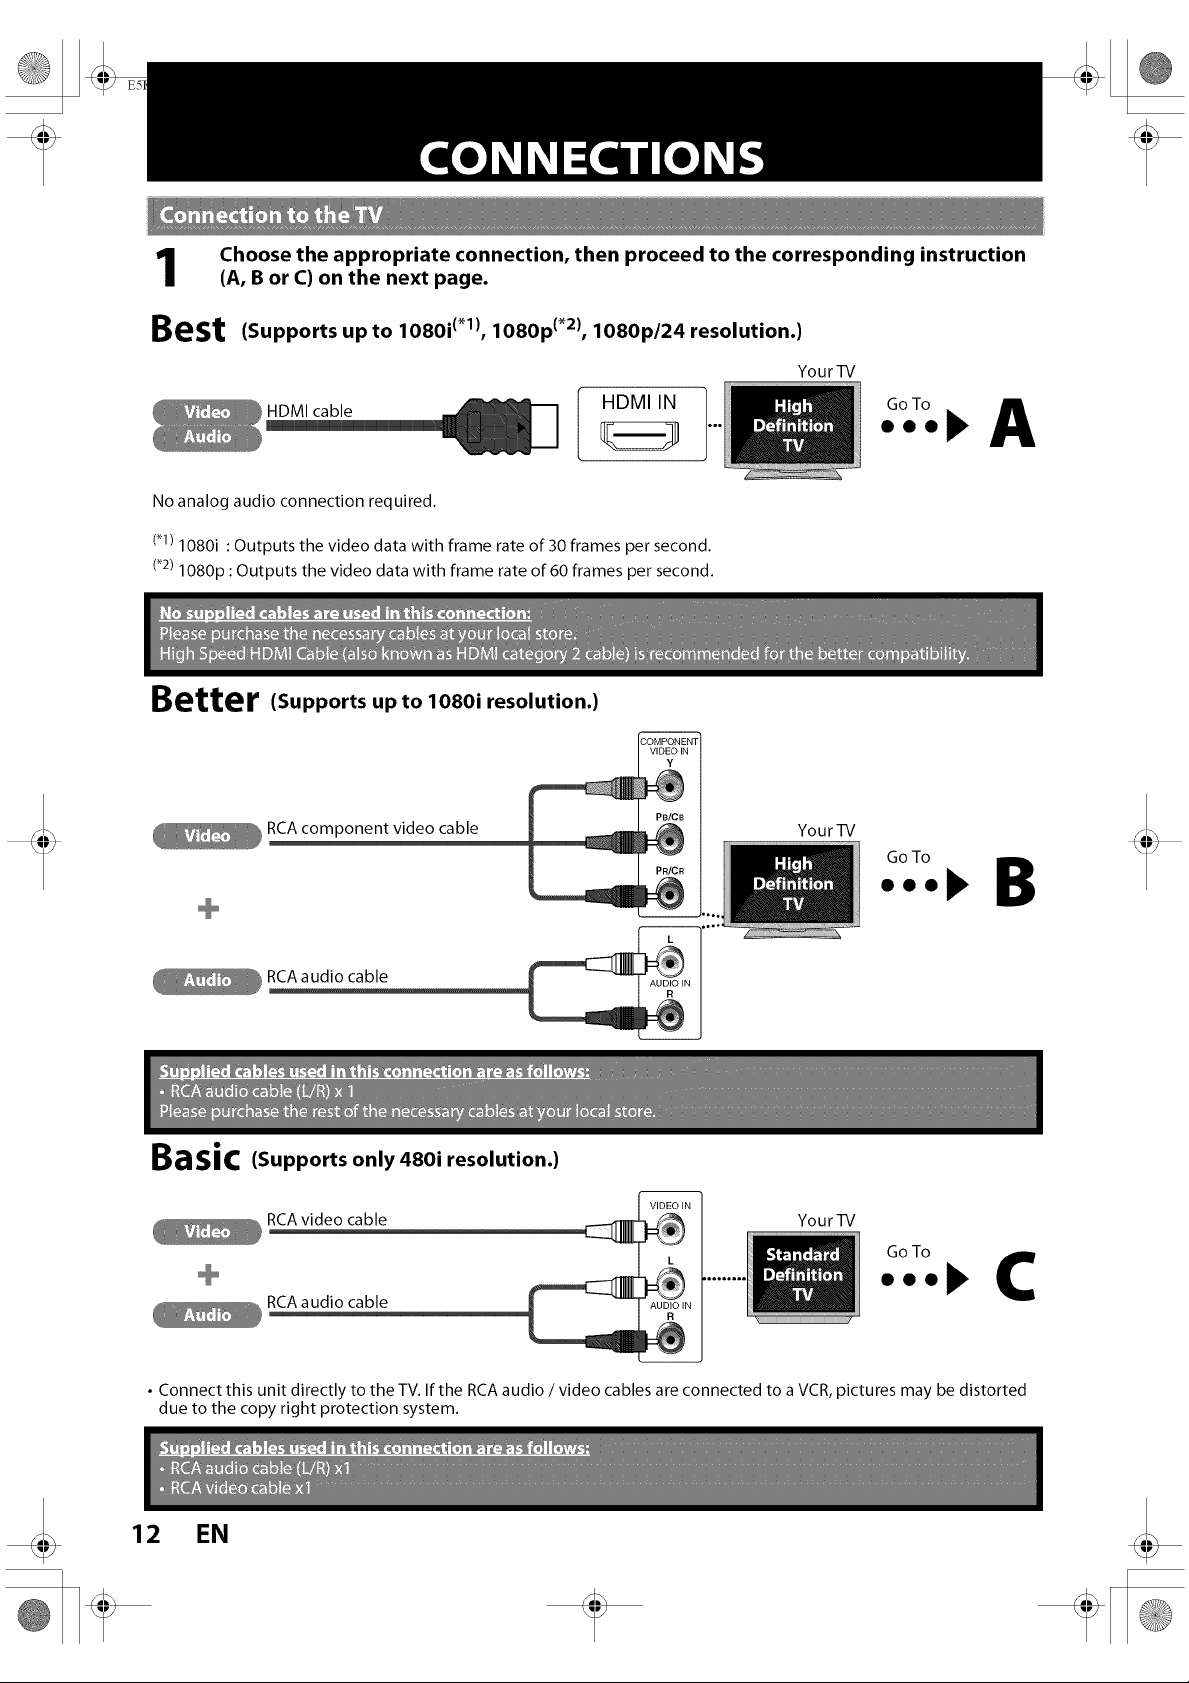
Choose the appropriate connection, then proceed to the corresponding instruction
(A, Bor C) on the next page.
t
Best
(Supports up to 1080i (_1), 1080p (_2), 1080p/24 resolution.)
HDMI cable I HDMI IN
L
No analog audio connection required.
(_1)1080i : Outputs the video data with frame rate of 30 frames per second.
(_2)1080p : Outputs the video data with frame rate of 60 frames per second.
Better (Supports up to 1080i resolution.)
PB/CB
RCA component video cable
PR/CR
YourTV
GoTo AOQO_,
YourTV
-- i...°
Basic(Supports only 480i resolution.)
YourTV
• Connect this unit directly to the TV. If the RCA audio / video cables are connected to a VCR, pictures may be distorted
due to the copy right protection system.
12 EN
_ _III_TD EN.book Page 13 Tuesday, March 17, 2009 1:55 PM
_ CONNEC"rlONS
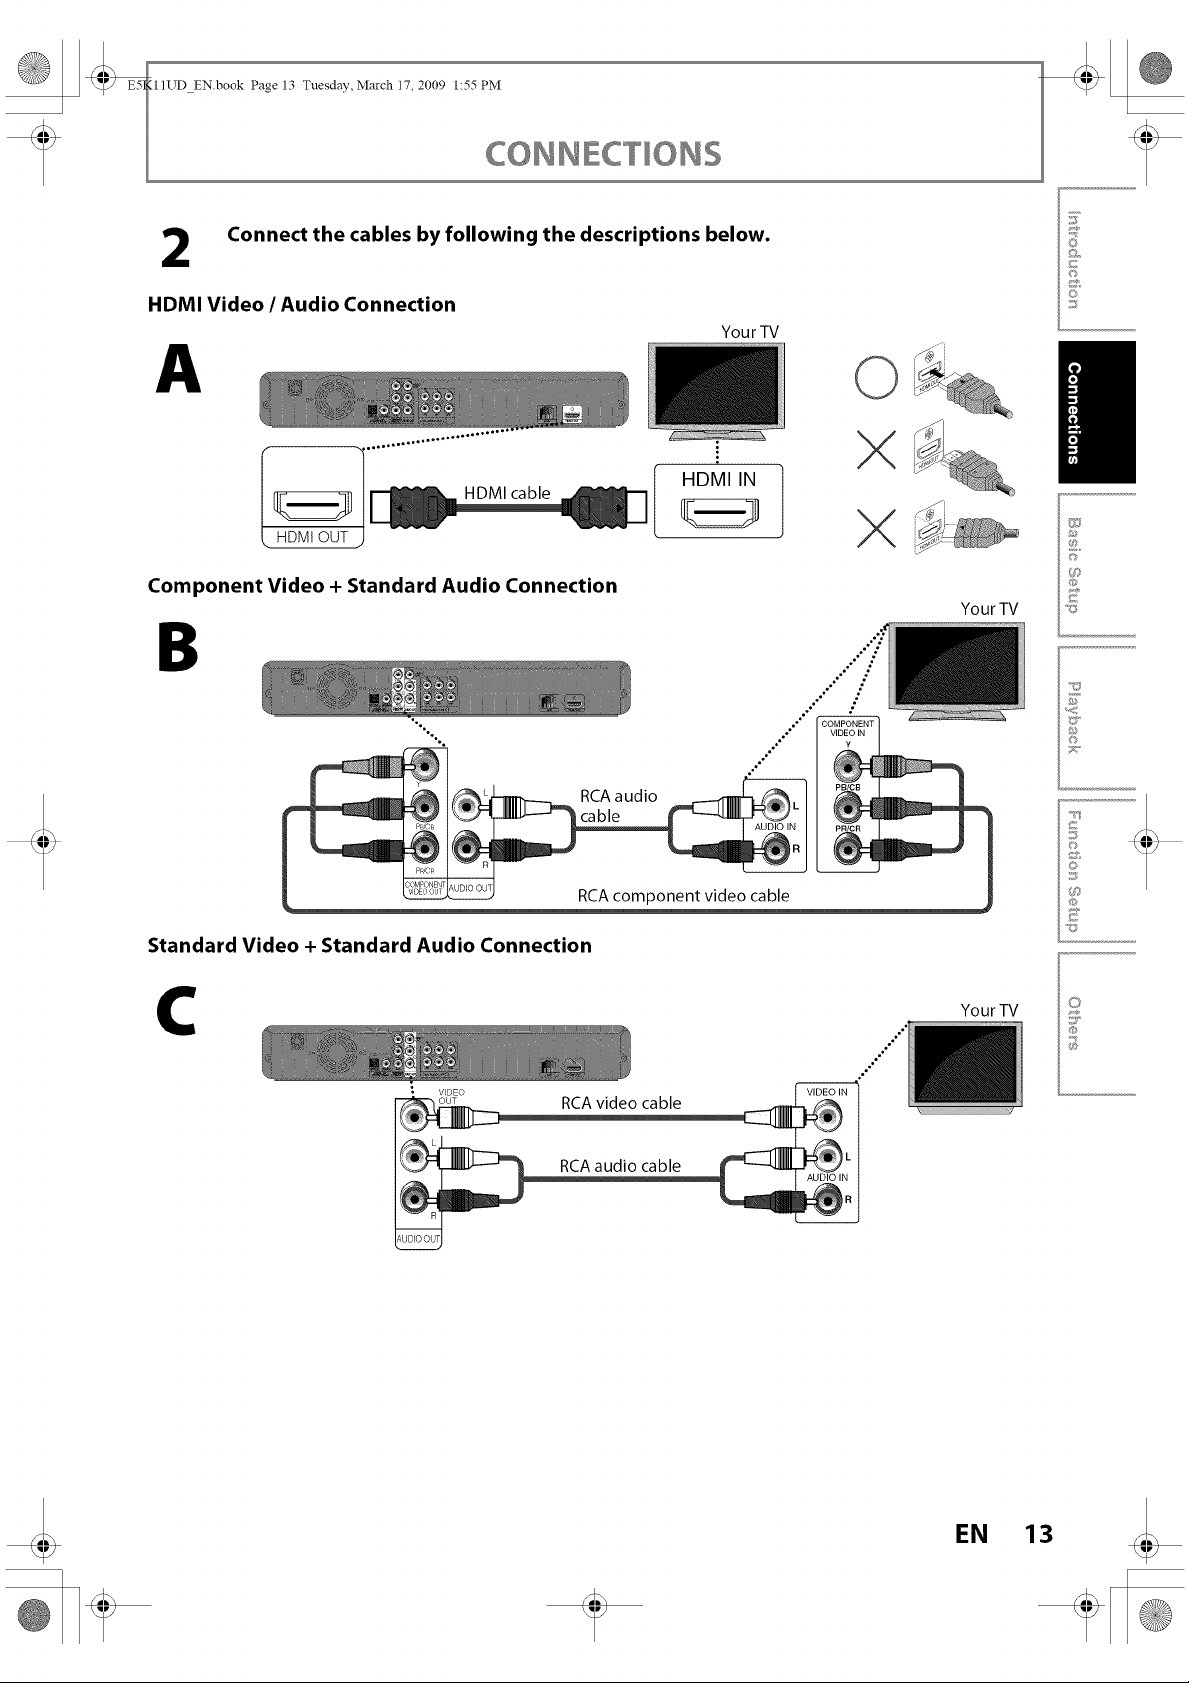
Connect the cables by following the descriptions below.
2
HDMI Video / Audio Connection
A
F
©
©
©
YourTV
II
HDMI cable
HDMt OUT
Component Video + Standard Audio Connection
B
RCA audio
PBICB
cable
®
Standard Video + Standard Audio Connection
C
RCA video cable
HDMI IN
.,*" /
..°* ."
°,,*° ,,"
°°°°
°.° ° ,, COMPONENTvIDEOyIN iii
®
PR/CR i
°°°"
©
YourTV
F
f:)3
_3
@
YourTV
°°°°
_J
@
EN 13
_ _III_TD EN.book Page 14 Tuesday, March 17, 2009 1:55 PM
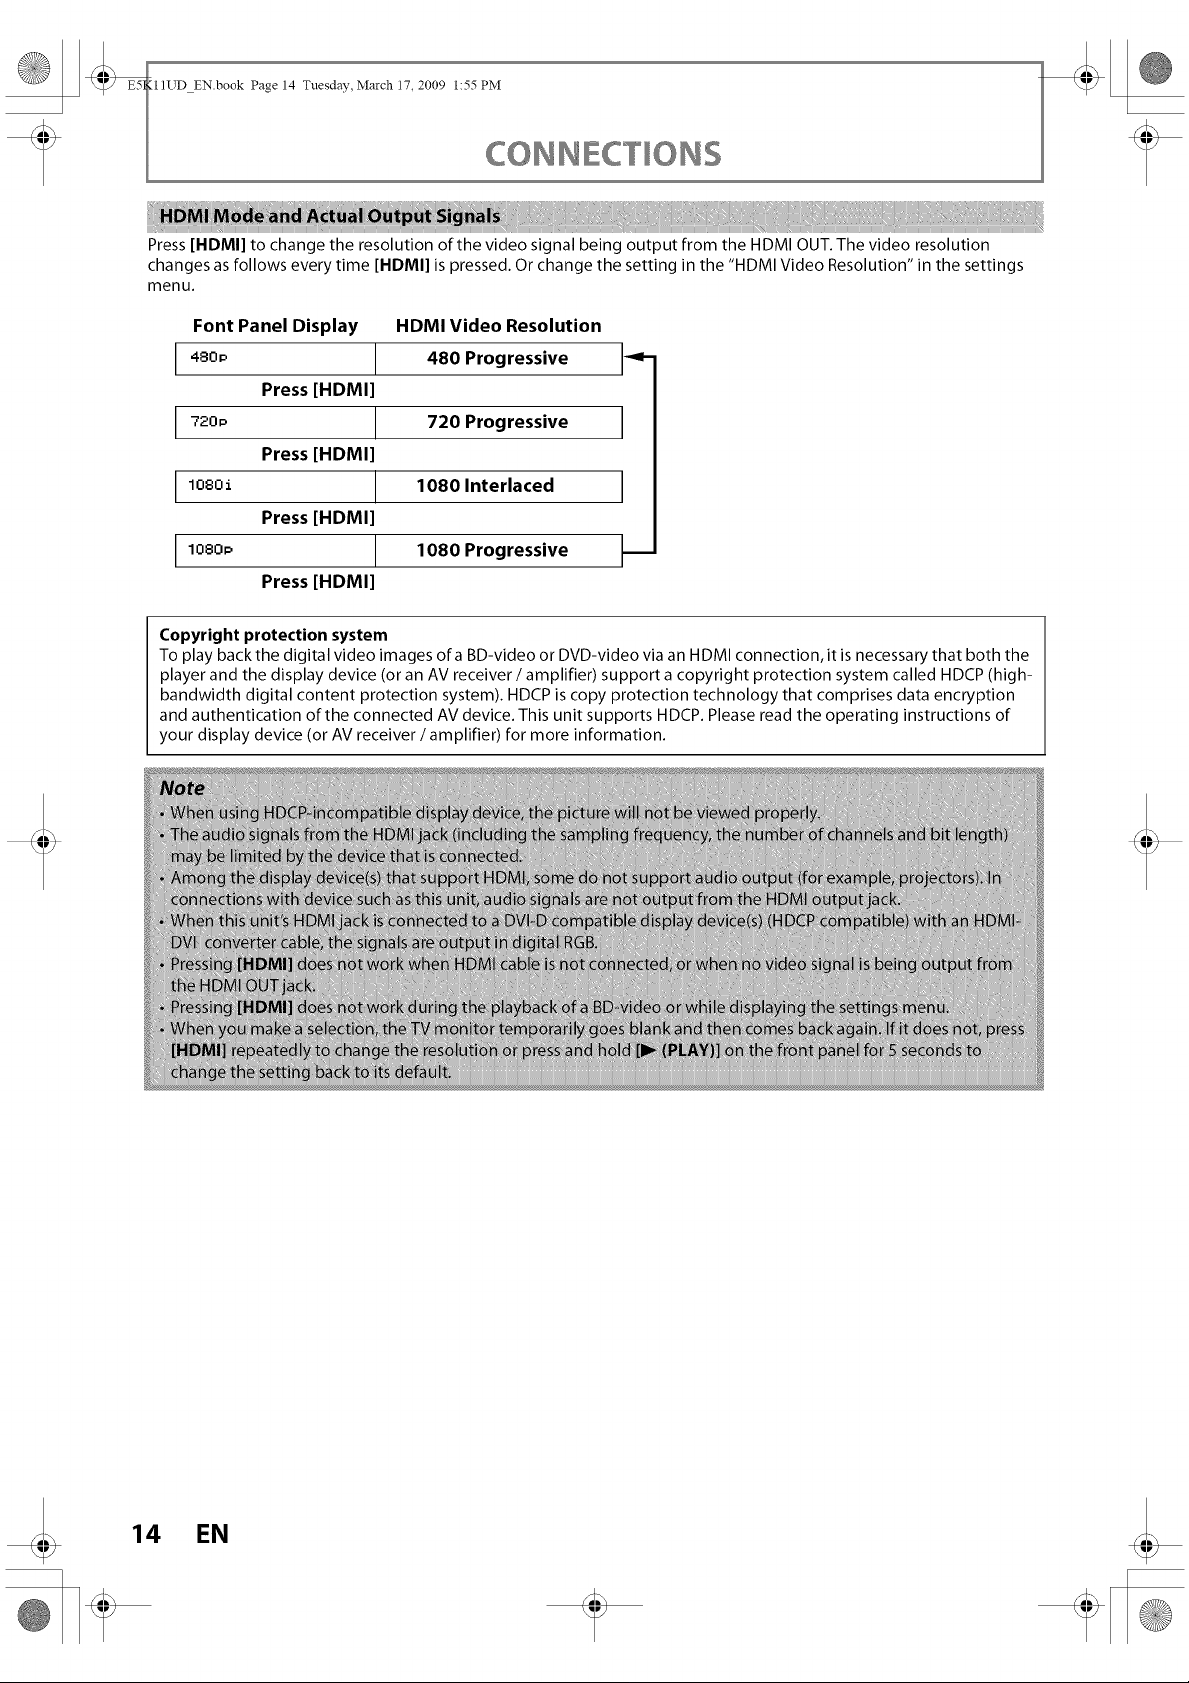
Press [HDMI] to change the resolution of the video signal being output from the HDMI OUT. The video resolution
changes as follows every time [HDMI] is pressed. Or change the setting in the "HDMI Video Resolution" in the settings
menu.
Font Panel Display HDMI Video Resolution
480p 480 Progressive -<-
Press [HDMI]
720p 720 Progressive
Press [HDMI]
1080i 1080 Interlaced
Press [HDMI]
1080_, 1080 Progressive
Press [HDMI]
Copyright protection system
To play back the digital video images ofa BD-video or DVD-video via an HDMI connection, it is necessary that both the
player and the display device (or an AV receiver/amplifier) support a copyright protection system called HDCP (high-
bandwidth digital content protection system). HDCP is copy protection technology that comprises data encryption
and authentication of the connected AV device. This unit supports HDCP. Please read the operating instructions of
your display device (or AV receiver / amplifier) for more information.
CONNEC"rlONS
14 EN
_ _III_TD EN.book Page 15 Tuesday, March 17, 2009 1:55PM
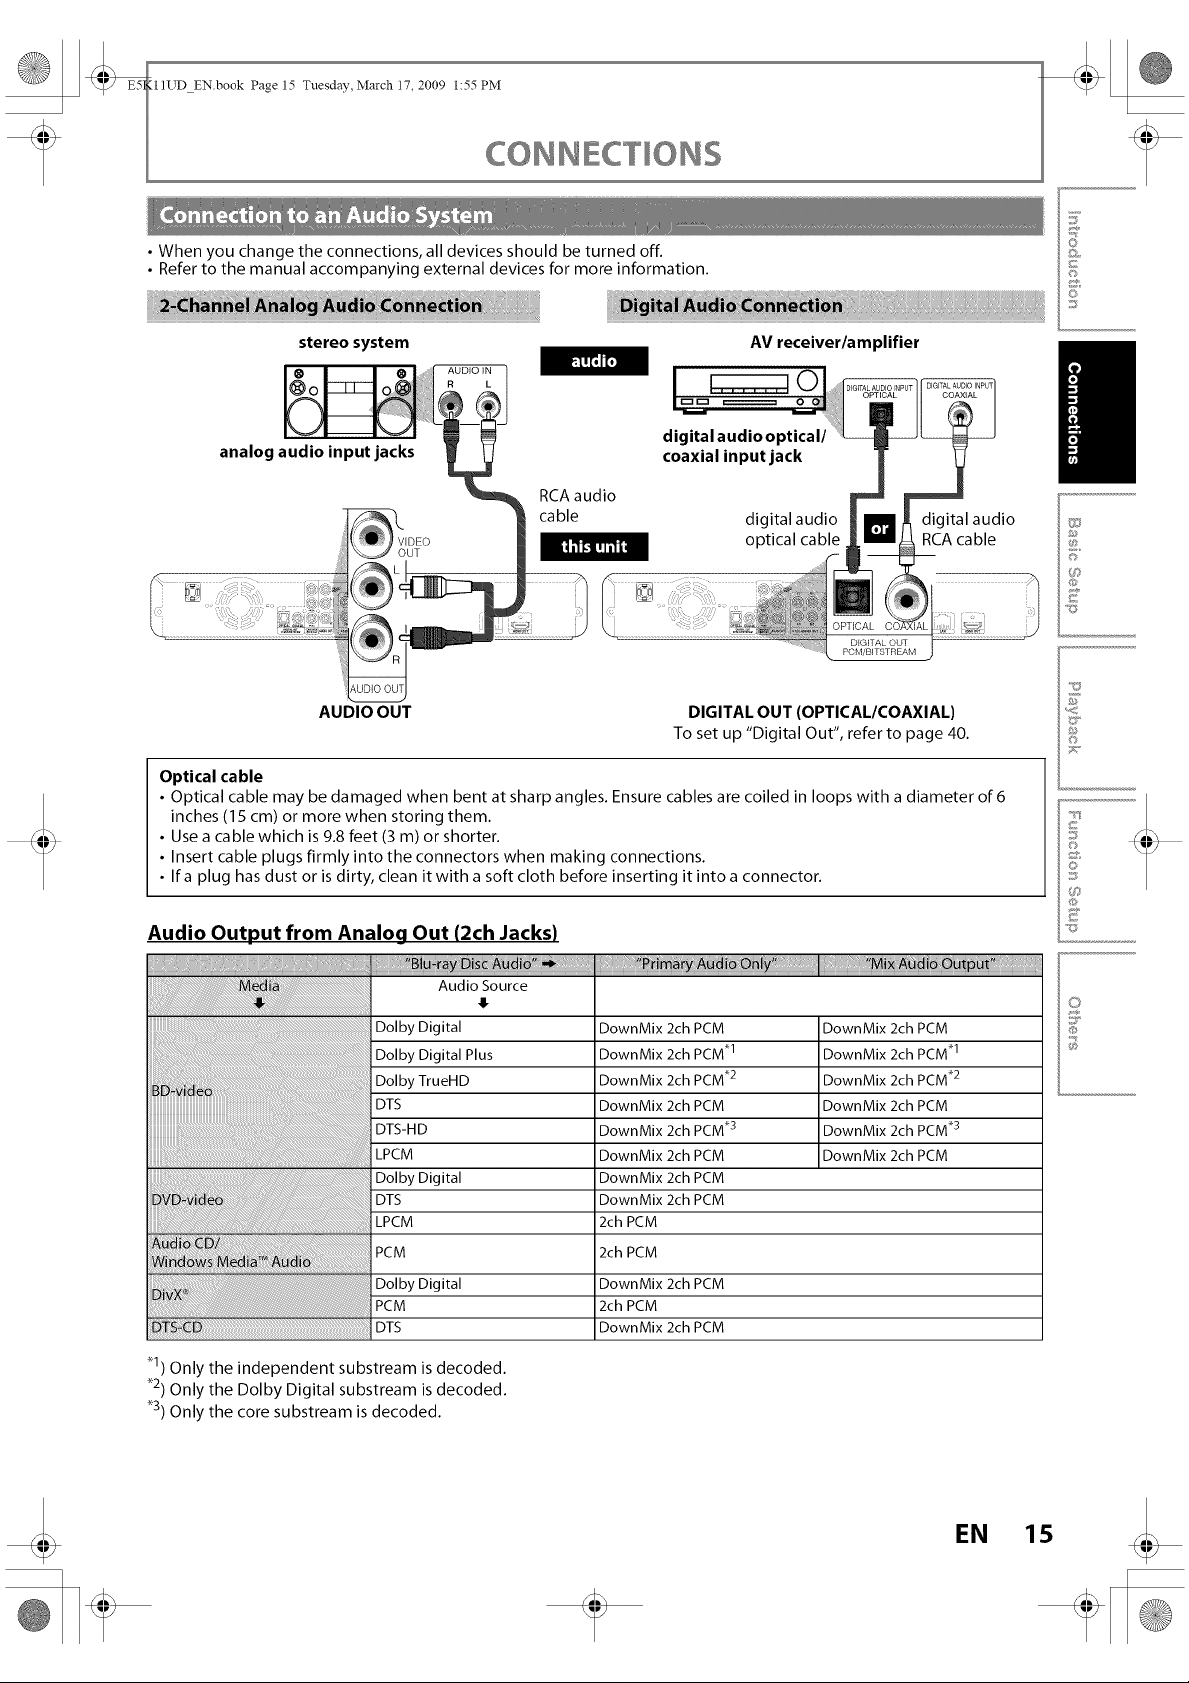
• When you change the connections, all devices should be turned off.
• Refer to the manual accompanying external devices for more information.
CONNEC'rlONS
J
W
©
©
©
stereo system
analog audio input jacks
AUDIO OUT
__rBrD_
digital audio optical/
coaxial input jack
RCA audio
cable
DIGITAL OUT (OPTICAL/COAXIAL)
AV receiver/amplifier
O
digital audio digital audio
optical cable RCA cable
.... i iili]i DEGITAL OUT
PCM/BITSTREAM
To set up "Digital Out", refer to page 40.
Optical cable
• Optical cable may be damaged when bent at sharp angles. Ensure cables are coiled in loops with a diameter of 6
inches (15 cm) or more when storing them.
• Use a cable which is 9.8 feet (3 m) or shorter.
• Insert cable plugs firmly into the connectors when making connections.
• Ira plug has dust or is dirty, clean it with a soft cloth before inserting it into a connector.
Audio Output from Analog Out (2ch Jacks)
I
Audio Source
II
©
£
c
o
c
_3
@
c
Dolby Digital
Dolby Digital Plus
Dolby TrueHD
DTS
DTS-H D
LPCM
Dolby Digital
DTS
LPCM
PCM
Dolby Digital
PCM
DTS D DTS
_1) Only the independent substream is decoded.
_2) Only the Dolby Digital substream is decoded.
_3) Only the core substream is decoded.
DownMix 2ch PCM
DownMix 2ch PCM .1
DownMix 2ch PCM .2
DownMix 2ch PCM
DownMix 2ch PCM _3
DownMix 2ch PCM
DownMix 2ch PCM
DownMix 2ch PCM
2ch PCM
2ch PCM
DownMix 2ch PCM
2ch PCM
DownMix 2ch PCM
DownMix 2ch PCM
DownMix 2ch PCM .1
DownMix 2ch PCM .2
DownMix 2ch PCM
DownMix 2ch PCM .3
DownMix 2ch PCM
EN 15
@
S
_ _III_TD EN.book Page 16 Tuesday, March 17, 2009 1:55 PM
_ CONNEC"rlONS
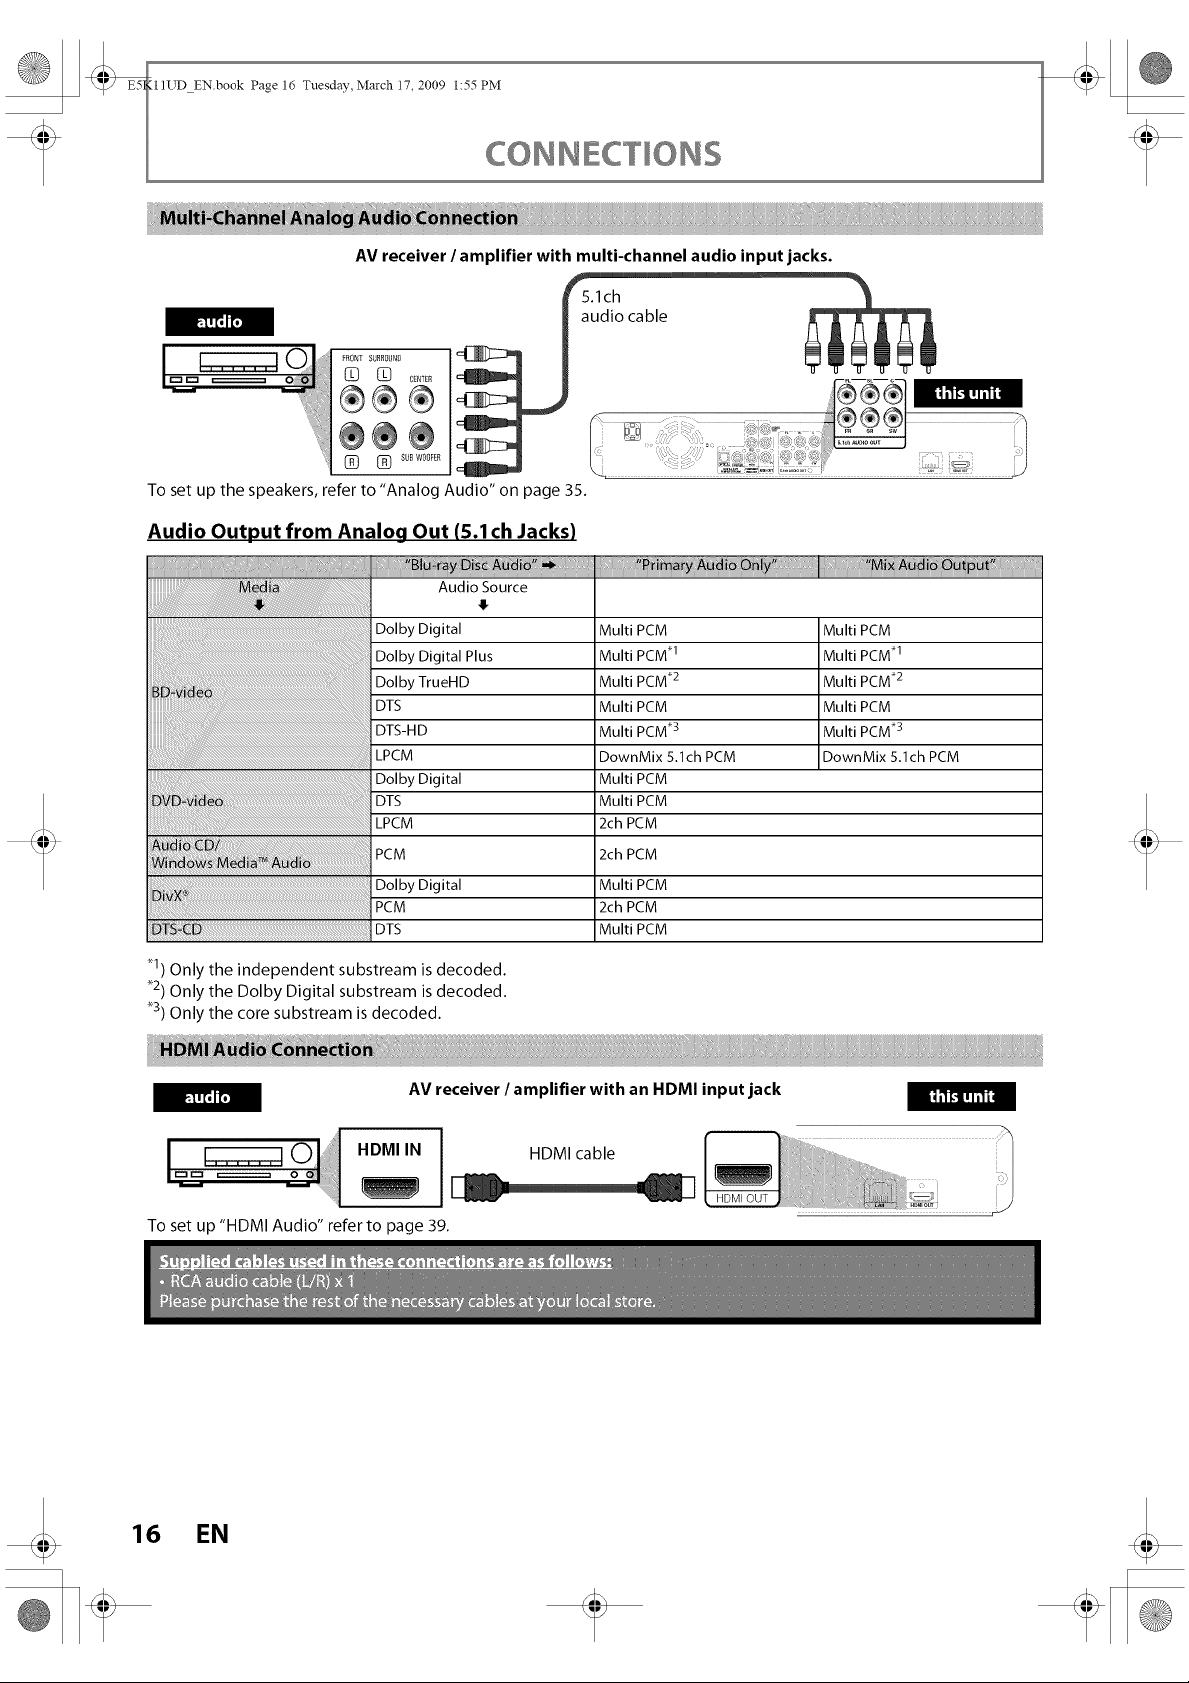
AV receiver / amplifier with multi-channel audio input jacks.
FFF._
-=" ii!I®®®
To set up the speakers, refer to "Analog Audio" on page 35.
....=Iii÷®÷
Audio Output from Analog Out (S.1ch Jacks)
Audio Source
4
Dolby Digital
Dolby Digital Plus
Dolby TrueHD
DTS
DTS-H D
LPCM
Dolby Digital
DTS
LPCM
PCM
Dolby Digital
PCM
_TS _ DTS
......................................... I
audio cable
Multi PCM
Multi PCM _1
Multi PCM _2
Multi PCM
Multi PCM _3
DownMix 5.1ch PCM
Multi PCM
Multi PCM
2ch PCM
2ch PCM
Multi PCM
2ch PCM
Multi PCM
Multi PCM
Multi PCM q
Multi PCM _2
Multi PCM
Multi PCM _3
DownMix 5.1ch PCM
_1) Only the independent substream is decoded.
_2) Only the Dolby Digital substream is decoded.
_3) Only the core substream is decoded.
FFF.R_
To set up "HDMI Audio" refer to page 39.
AV receiver / amplifier with an HDMI input jack
I
HDMIIN I HDMIcable
16 EN
[I,'II__lh'll
 Loading...