


Register your product and get support at
www.philips.com/support
User Manual
BDP1502
Blu-ray Disc™ /
DVD Player
For further assistance, call the customer
support service in your country.
• To obtain assistance, contact Philips Customer
Care Center;
In the U.S.A., Canada, Puerto Rico, or the U.S.
Virgin Islands; 1-866-202-5960

Contents
Introduction ....................................................... 3
Safety instruction .............................................................. 3
Included accessories ........................................................
Features .............................................................. 7
Features .............................................................................. 7
Version information ..........................................................
Symbols used in this owner's manual .......................... 8
Functional overview ........................................ 9
Front panel ......................................................................... 9
Rear panel ..........................................................................
Remote control ................................................................ 10
Guide to on-screen display ........................................... 12
Connections ...................................................... 13
Connection to a TV .......................................................... 13
Connection to an audio system .................................... 13
HDMI audio output ......................................................... 14
Before you start ............................................... 15
Initial setup ....................................................................... 15
Information on playback ...............................
Information on playback ............................................... 16
Guide to file list ...............................................................
How to insert a disc ....................................................... 20
16
19
Basic playback ................................................. 21
Playing back a disc ......................................................... 21
Playing back contents from a USB memory stick ....
Using the title / disc / pop menu ................................. 22
22
List of settings ................................................. 31
Setups ............................................................... 35
6
EasyLink (HDMI CEC) .................................................... 35
HDMI video resolution ..................................................
Parental control .............................................................. 37
8
Software update ............................................................. 38
Voice guide ...................................................................... 39
Restore default settings ............................................... 40
Troubleshooting .............................................. 41
9
Specifications .................................................. 44
Maintenance .................................................... 45
Trademark information ................................. 46
Glossary ............................................................ 47
Limited warranty ............................................ 49
36
Special playback ............................................ 23
Fast forward / fast reverse ........................................... 23
Slow forward playback .................................................
Step by step playback ................................................... 23
Repeat playback ............................................................. 24
Shuffle / random playback ........................................... 24
Slide show ........................................................................ 25
PiP (BONUSVIEWTM) setting ........................................ 25
Title / chapter search .................................................... 26
Track / file search ........................................................... 26
Time search ...................................................................... 27
Number select search ..................................................... 27
Switching subtitles ......................................................... 28
Switching audio soundtrack ......................................... 29
Switching camera angles .............................................. 30
Noise reduction ............................................................... 30
Closed caption ................................................................ 30
23
2EN
1. Introduction
Register online at www.philips.com/support
today to get the most benets from your purchase.
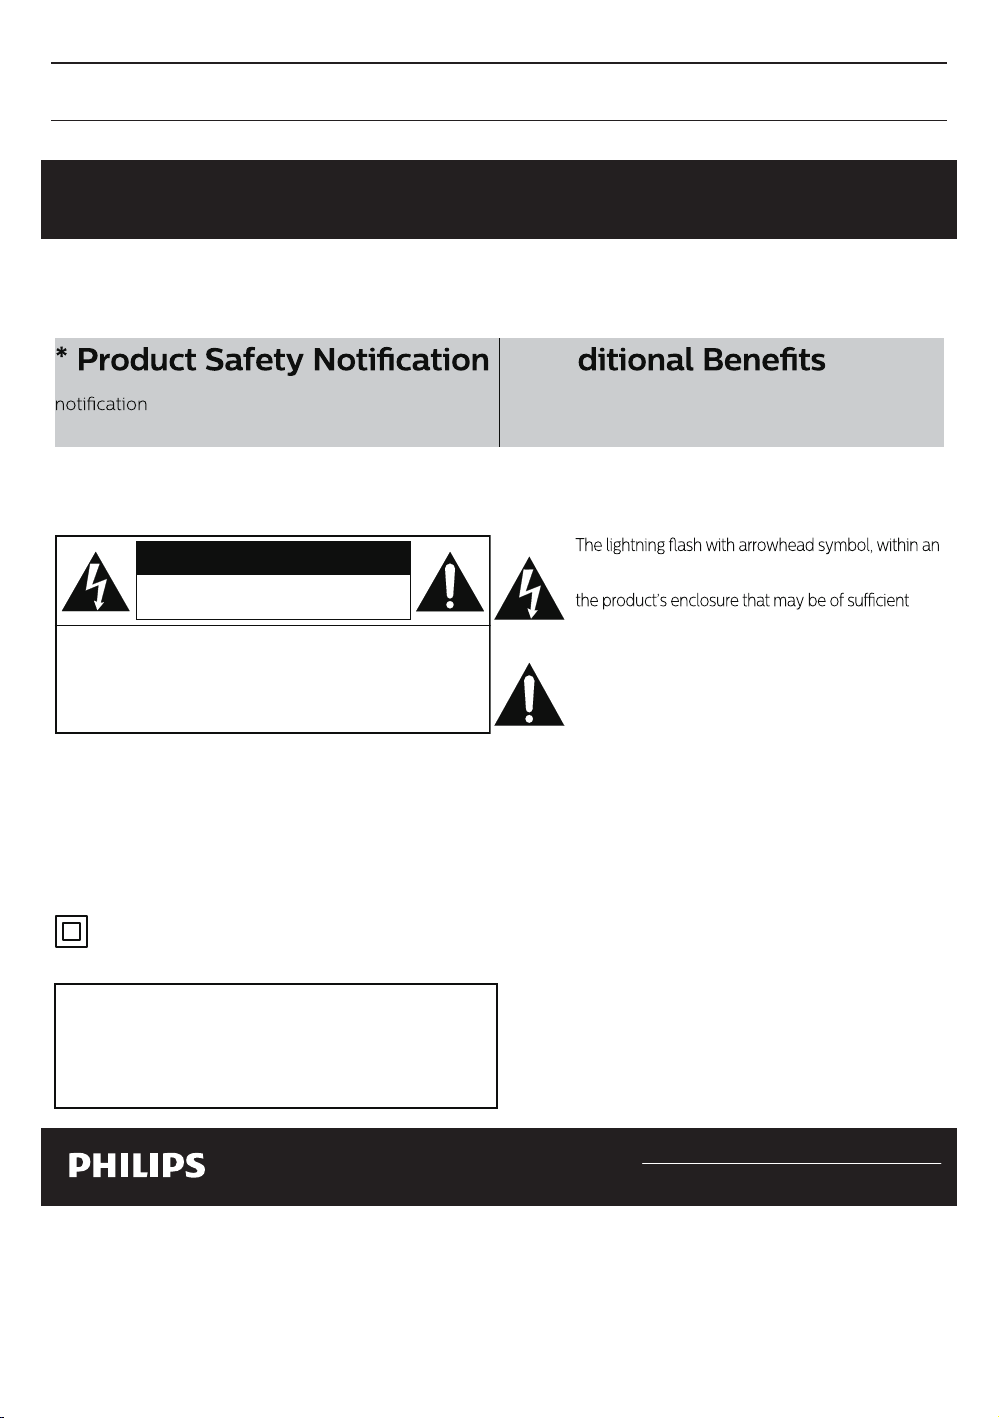
equilateral triangle, is intended to alert the user to the
presence of uninsulated “dangerous voltage” within
magnitude to constitute a risk of electric shock to
persons.
The exclamation point within an equilateral
triangle is intended to alert the user to the
presence of important operating and
maintenance (servicing) instructions in the
literature accompanying the appliance.
Know these
safety symbols
CAUTION
RISK OF ELECTRIC SHOCK
DO NOT OPEN
CAUTION:
TO REDUCE THE RISK OF ELECTRIC
SHOCK, DO NOT REMOVE COVER (OR BACK). NO
USER-SERVICEABLE PARTS INSIDE. REFER
SERVICING TO QUALIFIED SERVICE PERSONNEL.
* Ad
Registering your product guarantees that you'll
receive all of the privileges to which you're
entitled, including special money-saving oers.
By registering your product, you'll receive
- directly from the manufacturer - in
the rare case of a product recall or safety defect.
Registering your model with Philips makes you eligible for all of the valuable benefits
listed below, so don't miss out. Register online at www.philips.com/support to ensure:
The symbol for CLASS ll (Double Insulation)
WARNING
:
TO REDUCE THE RISK OF FIRE OR ELECTRIC SHOCK, DO NOT EXPOSE THIS APPARATUS
TO RAIN OR MOISTURE. APPARATUS SHALL NOT BE EXPOSED TO DRIPPING OR SPLASHING AND NO
OBJECTS FILLED WITH LIQUIDS, SUCH AS VASES, SHALL BE PLACED ON THE APPARATUS.
CAUTION: To prevent electric shock, match wide blade of plug to wide slot, fully insert.
ATTENTION: Pour éviter les chocs électriques, introduire la lame la plus large de la che dans la borne
correspondante de la prise et pousser jusqu'au fond.
The important note and rating are located on the rear or bottom of the cabinet.
For Customer Use
Model No. ___________________________________________________________
Serial No. ___________________________________________________________
Please write the model and serial number of your
unit (located on the cabinet) in the space below for
future reference.
For fastest support visit us online at www.philips.com/support
for chat and self service solutions.
1.1. Safety instruction
3EN

Important safety instructions
1. Read these instructions.
2. Keep these instructions.
3. Heed all warnings.
4. Follow all instructions.
5. Do not use this apparatus near water.
6. Clean only with dry cloth.
7. Do not block any ventilation openings. Install in accordance with the manufacturer's instructions.
8. Do not install near any heat sources such as radiators, heat registers, stoves, or other apparatus (including
ampliers) that produce heat.
9. Do not defeat the safety purpose of the polarized or grounding-type plug. A polarized plug has two blades
with one wider than the other. A grounding type plug has two blades and a third grounding prong. The wide
blade or the third prong are provided for your safety. If the provided plug does not t into your outlet, consult an
electrician for replacement of the obsolete outlet.
10. Protect the power cord from being walked on or pinched particularly at plugs, convenience receptacles, and the
point where they exit from the apparatus.
11. Only use attachments/accessories specied by the manufacturer.
12. Use only with the cart, stand, tripod, bracket, or table specied by the manufacturer, or sold with
the apparatus. When a cart is used, use caution when moving the cart / apparatus combination to
avoid injury from tip-over.
13. Unplug this apparatus during lightning storms or when unused for long periods of time.
14. Refer all servicing to qualied serv ice personnel. Servicing is required when the apparatus has
been damaged in any way, such as power-supply cord or plug is damaged, liquid has been spilled
or objects have fallen into the apparatus, the apparatus has been exposed to rain or moisture, does not operate
normally, or has been dropped.
FCC warning
This equipment may generate or use radio frequency energy. Changes or modications to this equipment may
cause harmful interference unless the modications are expressly approved in the manual. The user could lose
the authority to operate this equipment if an unauthorized change or modication is made.
This device complies with part 15 of the FCC Rules. Operation is subject to the following two conditions:(1) This
device may not cause harmful interference, and (2) this device must accept any interference received, including
interference that may cause undesired operation.
Radio-TV interference
This equipment has been tested and found to comply with the limits for a Class B digital device, pursuant to Part
15 of the FCC Rules. These limits are designed to provide reasonable protection against harmful interference in
a residential installation. This equipment generates, uses, and can radiate radio frequency energy and, if not
installed and used in accordance with the instructions, may cause harmful interference to radio communications.
However, there is no guarantee that interference will not occur in a particular installation. If this equipment does
cause harmful interference to radio or television reception, which can be determined by turning the equipment
o and on, the user is encouraged to try to correct the interference by one or more of the following measures:
1. Reorient or relocate the receiving antenna.
2. Increase the separation between the equipment and receiver.
3. Connect the equipment into an outlet on a circuit dierent from that to which the receiver is connected.
4. Consult the dealer or an experienced radio / TV technician for help.
To completely turn o the unit, you must unplug the AC power plug.
Disconnect the AC plug to shut the unit o when trouble is found or when not in use. The AC plug shall remain
readily available.
CAN ICES-3 (B)/NMB-3(B)
CAUTION: Danger of explosion if battery is incorrectly replaced. Replace only with the same or equivalent type.
WARNING: Batteries (Battery pack or battery installed) shall not be exposed to excessive heat such as sunshine,
re or the like.
Supplier's declaration of conformity
Trade name : PHILIPS
Responsible party : Funai Corporation, Inc.
Model : BDP1502/F7 A, BDP1502/F7 B
Address : 12489 Lakeland Road, Santa Fe Springs, CA 90670, USA
Telephone number : 1 866 202 5960
4EN
continued on next page

Important copyright information
Unauthorized copying, broadcasting, public performance and lending of discs are prohibited. This item
incorporates copy protection technology that is protected by U.S. patents and other intellectual property rights of
Rovi Corporation. Reverse engineering and disassembly are prohibited.
Never use a gas duster on this unit.
The gas trapped inside of this unit may cause ignition and explosion.
Do not place the unit on the furniture that is capable of being tilted by a child and an adult leaning, pulling, standing
or climbing on it. A falling unit can cause serious injury or even death.
In order to avoid interruption of ventilation, this unit should not be placed in built-in equipment such as a book
cabinet, rack, etc., and the vents of this unit should not be covered with anything such as a tablecloth, curtain,
newspaper, etc. Make sure to leave a space of 5.9 inches (15 cm) or more around this apparatus.
When installing this unit in a temperate environment, avoid a place with rapid temperature changes.
This unit should not be used in a tropical environment as it has not been evaluated under such conditions.
No objects should be placed directly on or under this unit, especially lighted candles or other aming objects.
Laser safety
This apparatus is classied as a CLASS 1 LASER PRODUCT.
This apparatus employs a laser. Only a qualied service person should remove the cover or
attempt to service this apparatus, due to possible eye injury.
CAUTION: Use of controls or adjustments or performance of procedures other than those specied herein may
result in hazardous radiation exposure.
CLASS 1 LASER PRODUCT
PRODUIT LASER DE CLASSE1
To avoid the hazards of electrical shock and fire
Do not handle the power cord with wet hands.
Do not pull on the power cord when disconnecting it from an AC outlet. Grasp it by the plug.
Do not put your fingers or objects into the unit.
Location and handling
Do not install the unit in direct sunlight, near strong magnetic fields or in a place subject to dust or strong vibration.
Avoid a place with drastic temperature changes.
Install the unit in a horizontal and stable position. Do not place anything directly on top or bottom of the unit. Depending
on your external devices, noise or disturbance of picture and/or sound may be generated if the unit is placed too close
to them. In this case, please ensure enough space between external devices and the unit.
Depending on the environment, the temperature of this unit may increase slightly. This is not a malfunction.
Be sure to remove the disc and unplug the AC power cord from the outlet before carrying the unit.
Dew condensation warning
Dew condensation may form inside the unit in the following conditions. If so, do not use this unit at least for a few hours
until its inside gets dry.
•
The unit is moved from a cold place to a warm place.
•
Under conditions of high humidity.
•
After heating a cold room.
continued on next page
5EN

Notice
Specifications are subject to change without notice. Trademarks are the property of Koninklijke Philips N.V. or their
respective owners. Funai Corporation reserves the right to change products at any time without being obliged to adjust
earlier supplies accordingly. The material in this manual is believed adequate for the intended use of the system. If the
product, or its individual modules or procedures, are used for purposes other than those specified herein, confirmation
of their validity and suitability must be obtained. Funai Corporation warrants that the material itself does not infringe
any United States patents. No further warranty is expressed or implied. Funai Corporation cannot be held responsible
for any errors in the content of this document, or for any problems as a result of the content in this document. Errors
reported to Funai Corporation will be adapted and published on the Funai Corporation support website as soon as
possible.
Warranty
No components are user serviceable. Do not open or remove covers to the inside of the product. Repairs may only be
done by Service Centers and official repair shops. Failure to do so shall void any warranty, stated or implied. Any
adjustments or assembly procedures not recommended or authorized in this manual, or any operation expressly
prohibited in this manual shall void the warranty.
Important
Registering your model with Philips makes you eligible for all of the valuable benefits listed below, so don't miss out.
Register online at
www.philips.com/support
to ensure:
Product safety notification
By registering your product you receive notification - directly from the manufacturer - in the rare case of a product recall
or safety defect.
Additional benefits of product ownership
Registering your product guarantees that you receive all of the privileges to which you're entitled, including special
money-saving offers.
For further assistance
For further assistance, call the customer support service in your country.
To obtain assistance in the U.S.A., Canada, Puerto Rico, or the U.S. Virgin Islands, contact Philips Customer Care Center
at 1-866-202-5960
Environmental care
The packaging of this product is intended to be recycled. Contact your local authorities for
information about how to recycle the packaging. For Product recycling information, please visit www.recycle.philips.com
Disposal of used batteries
In certain localities, disposing batteries with household waste is not permitted. Please ensure you dispose of batteries
according to local regulations.
1.2. Included accessories
•
Quick start guide
•
Remote control (NC098UL)
Note
•
An HDMI cable (not included) is necessary to connect the unit to a TV.
6EN

2. Features
2.1. Features
Blu-ray Disc™
You can enjoy Blu-ray Disc™ which is capable of storing
five times more data than a conventional DVD.
BD-Java
With some Blu-ray™ discs which contain Java
applications, you can enjoy interactive functions such as
games or interactive menus.
DVD upscaling for enhanced picture quality
Your current DVD will look even better than before thanks
to video upscaling. Upscaling will increase the resolution
of standard definition DVD to high definition up to 1080p
over an HDMI connection. The picture will be less jagged
and more realistic for a near high definition experience.
Enjoy your content on different kinds of media
Full backwards compatibility with DVD, CD and USB
memory stick ensures that you can continue to enjoy your
current audio-video collection. Additionally, you can
enjoy AVCHD (for DVD-RW/-R only) / photo files / music
files.
Listen to rich multi-channel surround sound
Multi-channel surround sound, which realizes real-to-life
sound and makes you feel that you are really there.
Easy and simple connection to your HDTV via HDMI
Connect this unit to your HDTV with one single HDMI
(High-Definition Multimedia Interface) cable. It is
recommended to use a High Speed HDMI cable for better
compatibility. The high definition video output signal will
be transferred to your HDTV without conversion to analog
signals, so you will get excellent picture and sound quality,
completely free from noise.
EasyLink (HDMI CEC)
This unit supports HDMI CEC, which allows integrated
system control over an HDMI cable and is part of the HDMI
standard. This function may not work properly on some
devices.
PiP (BONUSVIEW™)
Some BD-Videos have the PiP function which enables you
to display the secondary video in the primary video. You
can call up the secondary video by pressing [OPTIONS]
whenever the scene contains a secondary video.
Pop menu
Some BD-Videos have a pop menu which is a navigation
menu that can be called up and be operated on the TV
screen without interrupting playback. You can call up the
pop menu by pressing [POP MENU]. Contents in the pop
menu vary depending on the disc.
HDMI 1080p/24 output (Blu-ray Disc™ only)
This unit is equipped with the feature which can provide
smooth movement during playback of film originated
material with a frame rate of 24 frames per second with
progressive. (Available only when the display device is
connected with an HDMI cable.) Refer to “HDMI video
resolution” → (page 36).
Playing back contents from a USB memory stick
You can play back photo files / music files stored on a USB
memory stick. BD-ROM discs sometimes store picture-inpicture commentary, subtitles or other extras on a USB
memory stick for use during playback with the BD-Video.
Playing back AVCHD files
This unit supports playback of AVCHD format files (new
format for high definition video camcorders) recorded on
a disc / SD memory card using USB card reader. Your high
definition personal archive is playable in HD quality.
7EN
2.2. Version information
“Version Info” screen provides information about this unit's software version.
You can also download the latest software from the Philips website and update it yourself if it is newer than the version
currently on your unit. The current version of software on your unit can be seen on the “Version Info” screen.
To access “Version Info”, follow the procedure below.
1.
Press
Q (HOME) .
2.
Use to select “Setup”, then press [OK].
3.
Use
4.
Use to select “Version Info”, then press [OK].
to select “Advanced”, then press [OK].
2.3. Symbols used in this owner's manual
To specify which media type each function is applicable to, a combination of the symbols shown below will be depicted
next to that function's explanation.
Symbol Description
Description refers to BD-Video
Description refers to DVD-Video
Description refers to Audio CD / DTS-CD
Description refers to DVD-RW/-R with AVCHD files
Description refers to BD-RE/-R, DVD-RW/-R, CD-RW/-R and USB memory stick with photo
files
Description refers to BD-RE/-R, DVD-RW/-R, CD-RW/-R and USB memory stick with music
files
If you do not find any of the symbols listed above under the function heading, the operation is applicable to all media
types.
8EN
3. Functional overview
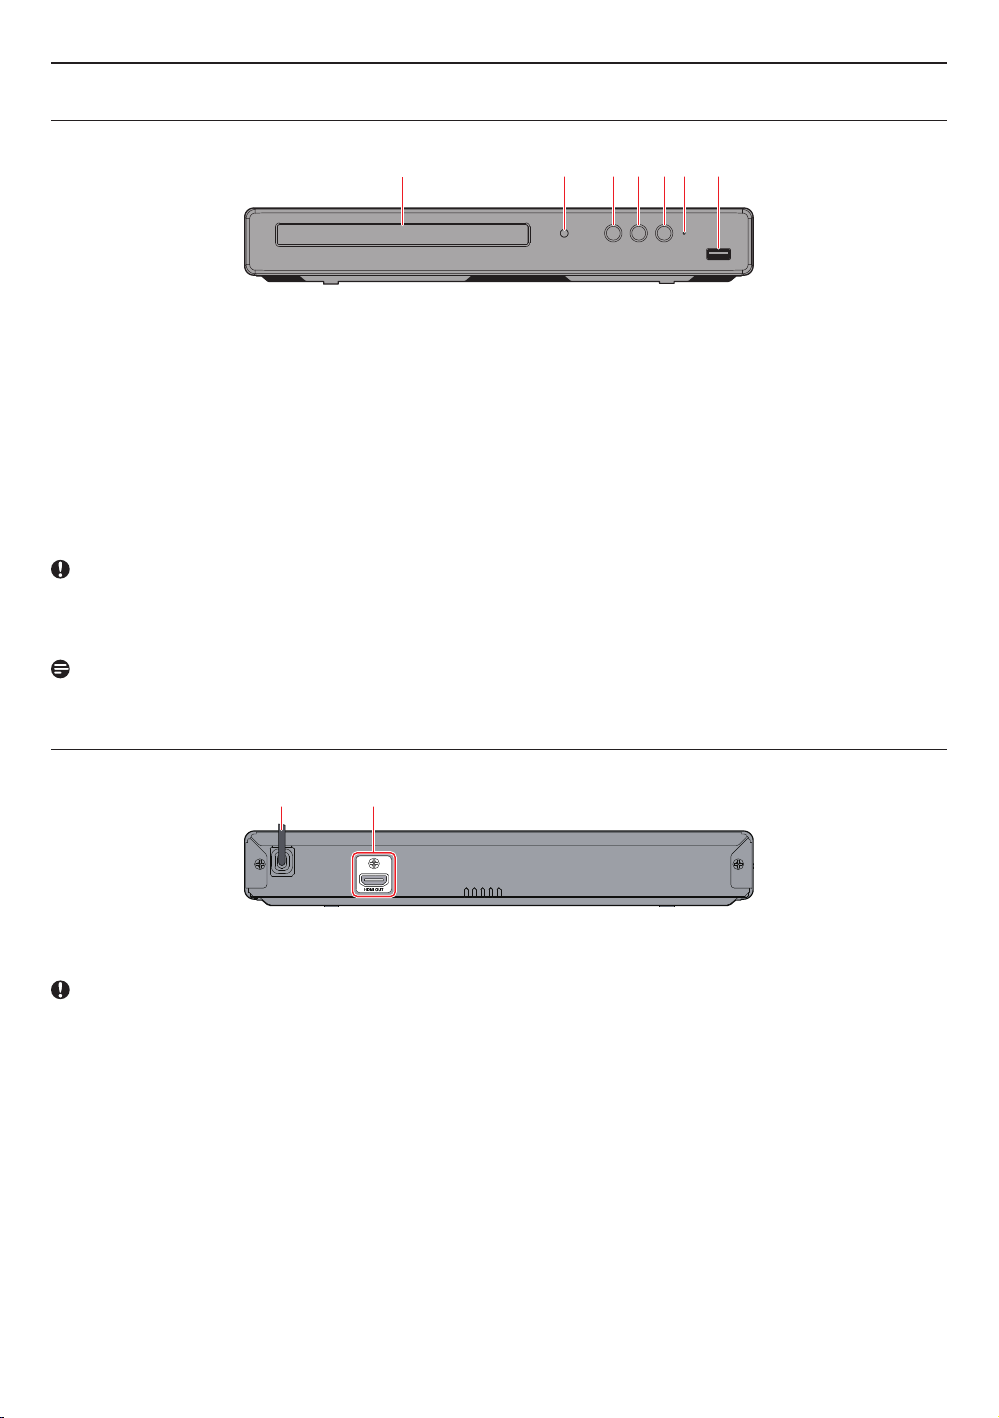
1 3* 4*2 5* 76
12
3.1. Front panel
* The unit can also be turned on by pressing this button.
1. Disc tray
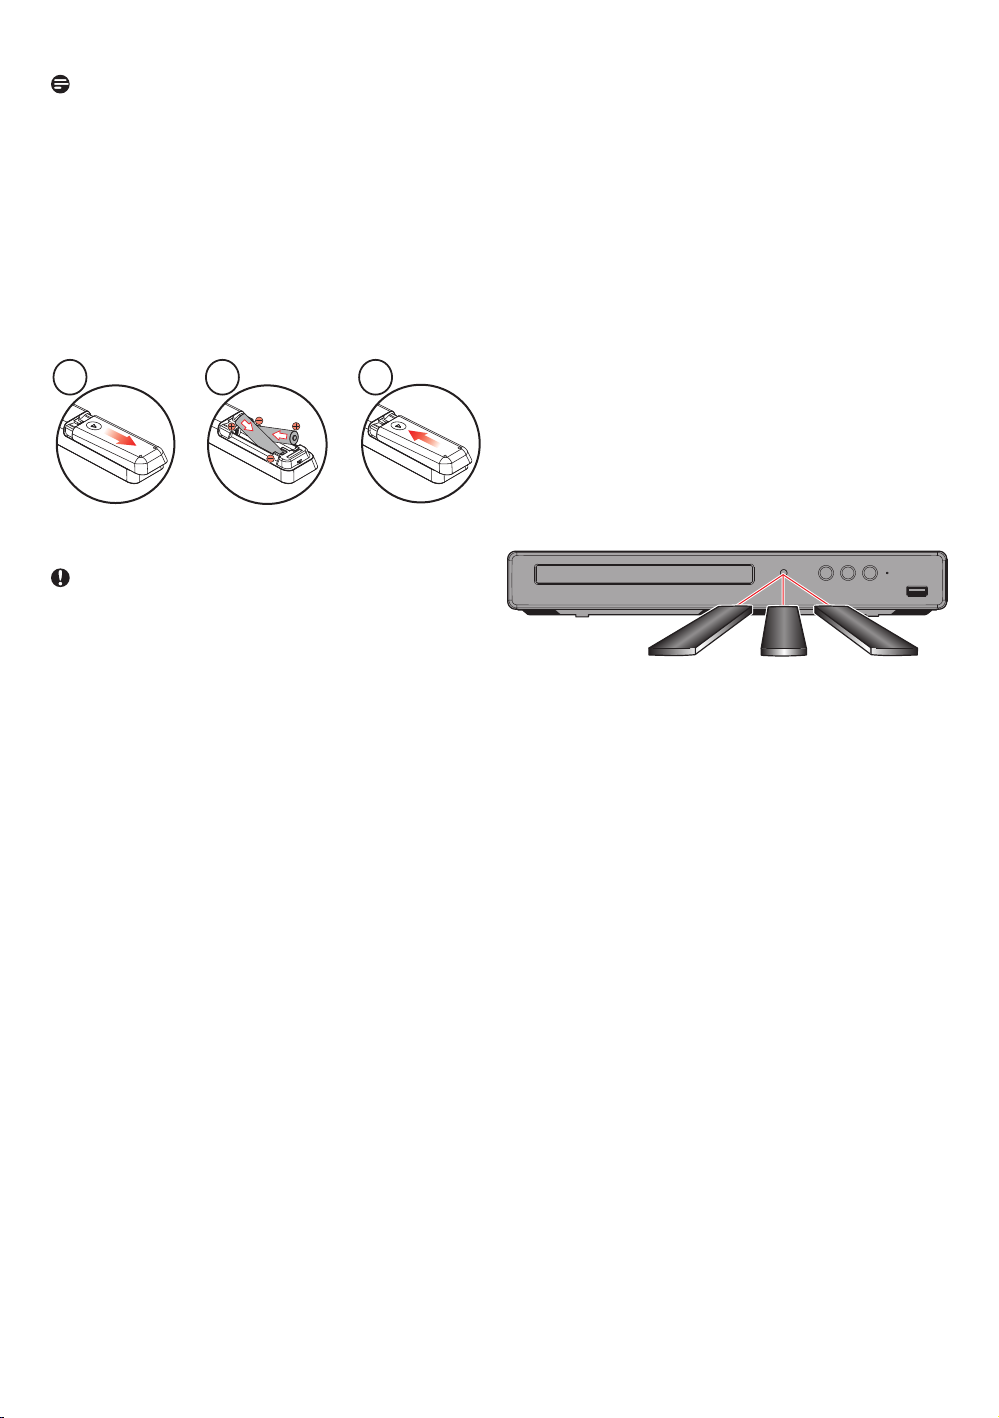
Infrared sensor window
2.
3. A (OPEN/CLOSE) button*
4. Kt (PLAY/PAUSE) button*
•
Press to start playback.
•
During playback, press to pause playback.
5. B (POWER) button*
6. Power-on indicator
7. USB input
Caution
•
Do not connect any device other than USB memory stick or USB card reader into the USB input. (e.g. PC, external
HDD, digital camera, keyboard, mouse, etc.)
•
When connecting a USB memory stick, connect it directly to the USB input. Do not use a USB extension cable.
Note
•
Due to new ENERGY STAR® requirements, this unit will automatically turn on the screen saver after 5 minutes of
inactivity and enter standby mode after 25 minutes of inactivity.
3.2. Rear panel
1. AC power cord
2.
HDMI OUT jack
Caution
•
Do not touch the inner pins of the jacks on the rear panel. Electrostatic discharge may cause permanent damage to
the unit.
•
This unit does not have a TV RF modulator.
9EN
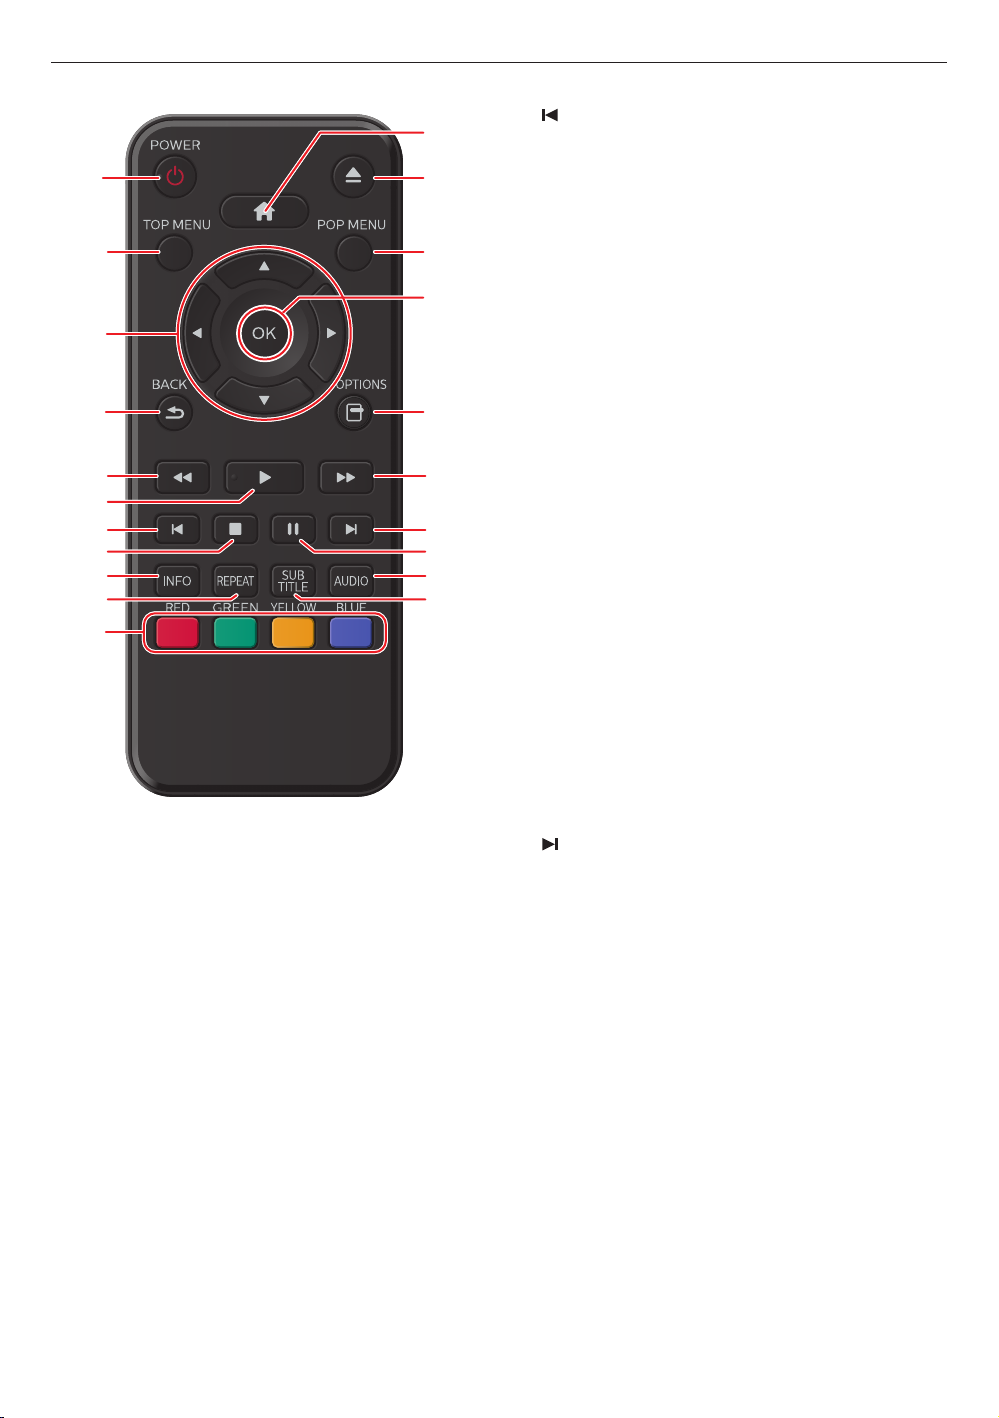
3.3. Remote control
1
17
3
4
*11
15
18
5
7
*6
20
21
9
10
2
8 19
16
14
13*
12
* The unit can also be turned on by pressing these
buttons.
1. B (POWER) button
•
Press to turn on the unit, or to switch the unit into
standby mode. (To completely turn off the unit, you
must unplug the AC power cord.)
TOP MENU button
2.
•
Blu-ray Disc™: Press to display the top menu.
•
DVD: Press to display the title menu.
3. H / I / J / K buttons
•
Press to select items or settings.
4. BACK button
•
Press to return to the previously displayed menu or
screen function.
5. E (REVERSE) button
•
During playback, press to Fast Reverse the
playback.
6. K (PLAY) button*
•
Press to start playback or resume playback.
7.
(SKIP) button
•
During playback, press once to return to the
beginning of the current title, chapter, track or file.
•
During playback, press twice to return to the
previous title, chapter, track or file.
•
During JPEG playback, press to return to the
previous file.
8. C (STOP) button
•
Press to stop playback.
9.
INFO button
•
Press to display the on-screen display menu.
10. REPEAT button
•
Press to play back a chapter, title or disc repeatedly.
11. RED / GREEN / YELLOW / BLUE buttons*
•
Press to activate shortcut keys on some BD-video
functions. When a file list is shown, press to switch
between pages.
12. Q (HOME) button
•
Press to display the home menu.
13. A (OPEN/CLOSE) button*
•
Press to open or close the disc tray.
14. POP MENU button
•
Blu-ray Disc™: Press to display the pop menu.
•
DVD: Press to display the disc menu.
15. OK button
•
Press to confirm or select menu items.
16. OPTIONS button
•
During playback, press to display the play menu.
17. D (FORWARD) button
•
During playback, press to fast forward the playback.
•
When playback is in pause, press to slow forward
the playback.
(SKIP) button
18.
•
During playback, press to skip to the next chapter,
track or file.
•
When playback is in pause mode, press to forward
the playback picture by picture.
19. t (PAUSE) button
•
Press to pause playback.
20.
AUDIO button
•
Press to select the audio channel (such as audio
languages) on a disc.
21. SUBTITLE button
•
Press to select subtitles on a disc.
continued on next page
10EN
Note
1 2 3
•
Use the included remote control. Remote-control
operation on any other remote control, such as a
universal remote control, is not guaranteed.
•
Make sure the component code on your universal
remote control is set to our brand. Refer to the
instruction book accompanying your remote control for
more details.
■ Installing the batteries in the remote control
Install 2 AAA (1.5 V) batteries matching the polarity
indicated inside battery compartment of the remote
control.
*Batteries not included.
Caution
Incorrect use of batteries can result in hazards such as
leakage and bursting. Please follow the guidelines below:
•
Lithium or ni-cad and ni-mh rechargeable batteries are
not recommended to use for remote control.
•
Do not mix different types of batteries such as alkaline
and standard (carbon-zinc).
•
Do not mix new and old batteries together.
•
Do not use different kinds of batteries together.
Although they may look similar, different batteries may
have different voltages.
•
Make sure that the + and - ends of each battery match
the indications in the battery compartment.
•
Remove batteries from battery compartment, when the
remote is not going to be used for a month or more.
•
When disposing of used batteries, please comply with
governmental regulations or environmental public rules
that apply in your country or area.
•
Do not recharge, short-circuit, heat, burn or
disassemble batteries.
■ Using the remote control
Remote control usage guidelines:
•
Make sure that there are no obstacles between the
remote control and the infrared sensor window on the
unit.
•
Remote operation may become unreliable if strong
sunlight or fluorescent light is shining on the infrared
sensor window of the unit.
•
Remote controls of different devices can interfere with
each other. Avoid using a remote control from another
device which is located close to the unit.
•
Replace the batteries when you notice a fall-off in the
operating range of the remote control.
•
The maximum operable ranges from the unit are as
follows.
–
Line of sight:
approx. 23 feet (7 m)
–
Either side of the center:
approx. 16 feet (5 m) within 30°
–
Above:
approx. 16 feet (5 m) within 15°
–
Below:
approx. 10 feet (3 m) within 30°
30° 30°
16 feet (5 m) 23 feet (7 m) 16 feet (5 m)
11EN

3.4. Guide to on-screen display
SetupUSBDisc
31 2
Audio
Preference
Video
Advanced
TV display
HDMI video
16:9Widescreen
Auto
O
Noise reduction
Accessibility
1
2
Options
Info
Search
Audio
Subtitle
Subtitle Style
Repeat
Angle
■ Home menu
When you turn on the unit, the home menu will appear automatically. Otherwise, press Q (HOME) .
1. “Disc”: Initiates playback of inserted disc, displays a list of tracks / files or the media filter menu.
2. “USB”: Displays a list of tracks / files on the connected USB memory stick or the media filter menu
3. “Setup”: Accesses the setup menu
■ Setup menu
For a list of supported file formats, refer to → (page 17).
1. Category
2. Menus / Options: Displays options for the highlighted item on the left whenever available
■ Play menu
During playback, press [OPTIONS] to display the play menu.
e.g.) Blu-ray Disc™
12EN
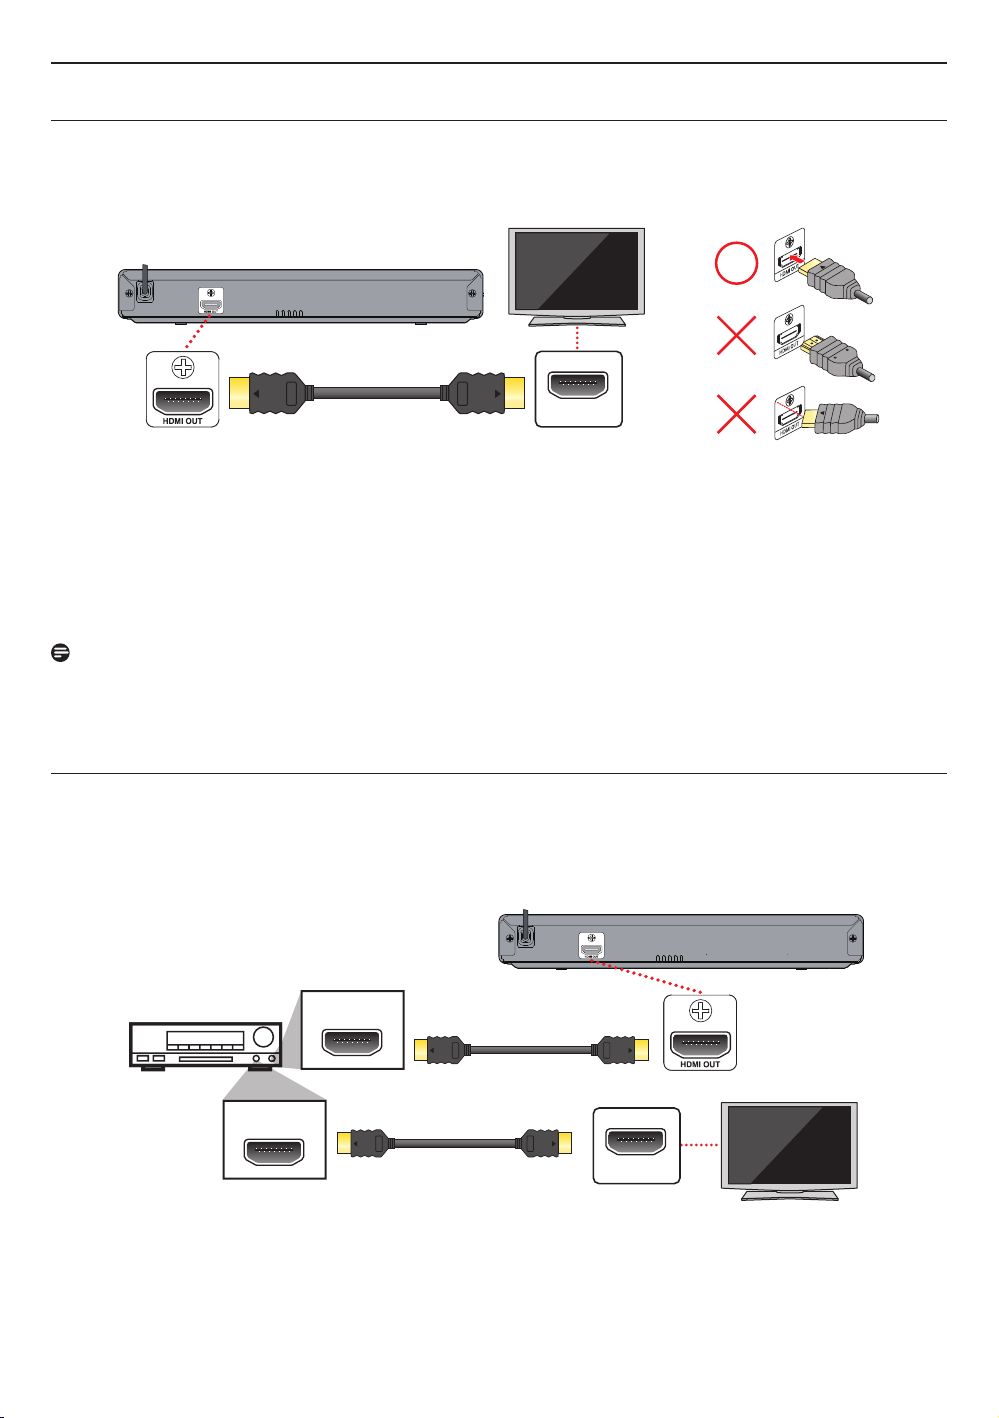
4. Connections
HDMI IN
HDMI IN
HDMI OUT
HDMI IN
4.1. Connection to a TV
■ HDMI connection (Supports up to 1080i(*1), 1080p(*2), 1080p/24(*3) resolution.)
Your TV
HDMI cable
(not included)
(*1) 1080i: Outputs video data with a frame rate of 30 frames per second.
(*2) 1080p: Outputs video data with a frame rate of 60 frames per second.
(*3) 1080p/24: Outputs video data with a frame rate of 24 frames per second.
•
Do not tilt the connector when inserting it into the HDMI jack, and make sure the shapes of the jack and the connector
are matched.
•
When connected to an HDCP incompatible display device, the picture will not be displayed properly.
•
Use an HDMI cable with the HDMI logo (a certified HDMI cable) for this connection. High Speed HDMI cable (also
known as HDMI category 2 cable) is recommended for better compatibility.
Note
•
If the TV receives no audio / video signal after properly connecting the unit and the TV with an HDMI cable, it may
be the TV. Please refer to the TV's user's manual.
•
If the TV receives no audio signal after properly connecting the unit and the TV with an HDMI cable, make sure the
TV input is not an HDMI-DVI input terminal.
4.2. Connection to an audio system
•
When you change the connections, all devices should be turned off.
•
When connecting the unit to an external audio system, refer to the user manual for setup / configuration help.
■ HDMI audio connection
AV receiver / amplifier with an
HDMI input jack
HDMI cable
(not included)
HDMI cable
(not included)
Your TV
13EN

4.3. HDMI audio output
“AUDIO” > “HDMI audio” setting
A
Bitstream LPCM Re-encode
Media Source
Dolby Digital Dolby Digital 2ch PCM Dolby Digital
Dolby Digital Plus Dolby Digital Plus 2ch PCM
Dolby TrueHD Dolby TrueHD 2ch PCM
Dolby Digital Plus
Dolby TrueHD
DTS DTS 2ch PCM DTS
BD
DTS-HD High Resolution
DTS-HD High
Resolution
DTS-HD Master Audio DTS-HD Master Audio
LPCM Multi LPCM Multi LPCM
2ch PCM
2ch PCM
*2
*2
DTS-HD High
Resolution
DTS-HD Master
Audio
Multi LPCM
Dolby Digital Dolby Digital 2ch PCM Dolby Digital
DVD
DTS DTS 2ch PCM DTS
MPEG Multi LPCM Multi LPCM Multi LPCM
PCM Multi LPCM Multi LPCM Multi LPCM
Audio CD LPCM 2ch PCM 2ch PCM 2ch PCM
DTS-CD DTS DTS 2ch PCM DTS
AVCHD
Dolby Digital Dolby Digital 2ch PCM Dolby Digital
LPCM Multi PCM Multi PCM Multi PCM
Audio File FLAC/WAV 2ch PCM 2ch PCM 2ch PCM
*1 If there is secondary audio or Interactive audio, it will be output in Dolby Digital.
*2
Only the core substream is decoded.
*3 If there is secondary audio or Interactive audio, it will be output in DTS.
Note
•
If the connected device is not compatible with HDMI Bitstream, audio will be output as multi LPCM or 2-channel
down-mixed LPCM depending on the capability of the connected device even if you select “Bitstream” in “HDMI
Audio” setting.
•
If
“HDMI Audio” is set to “Bitstream” and this unit is connected to a Bitstream compatible device, only primary audio
of the BD-Video will be output. (Secondary audio and button sounds will not be output.)
•
In order to configure “HDMI Audio” settings, the following conditions must be met:
–
“Voice Guide” is set to “Off”.
–
This unit is not in resume-on-stop mode.
If this unit is in resume-on-stop mode, remove the disc to enable configuration.
*1
*1
*3
*3
*1
14EN

5. Before you start
Please select your language. If you
want to use voice guide, please
select "English" or "Español".
Veuillez choisir votre langue pour
l'achage à l'écran.
Si vous voulez utiliser la fonction
Guide vocal, veuillez régler à
« English » ou « Español ».
Por favor, seleccione su idioma
para el menú en pantalla.
Si desea usar la función de Guía por
voz, ajuste "English" o "Español".
Français
English
Español
5.1. Initial setup
After you have completed all of the connections to your TV, review the steps below.
1.
Press 9(POWER) to turn on the unit.
2.
Turn on your TV.
3.
Language setup screen will appear. Use
4.
Voice guide setup screen will appear. Use to select “On” or “Off”, then press [OK].
■ How to reset the OSD language
You can reset the OSD language if you selected the wrong language.
1.
Press Q (HOME) to display the home menu.
2.
Use to select “ ”, then press [OK].
•
This item is “Setup” (English) / “Installation” (French) / “Instalación” (Spanish).
•
From here on, please select one of the following items you can find on screen:
3.
Use
to select “Preference” (English) / “Préférences” (French) / “Preferencias” (Spanish), then press
[OK].
4.
Use to select “Menu Language” (English) / “Langage du menu” (French) / “Menú Idioma” (Spanish),
then press [OK].
5.
Use
6.
If the items that were set are displayed in your desired language, then press
to select your desired language, then press [OK].
to select your language, then press [OK].
Q (HOME) to exit.
15EN
 Loading...