

Page 1
42” Wide LCD Color Monitor BDL4211. . . series
Service
PHILIPS
This manual covers the hardware of the BDL4211. . . monitor series. For software related documentation, please consult
your system supplier
Owners Manual
Table of Contents
Description Page
Important Safety Notice .........................................2
Technical Specifi cation .......................................3-8
Connecting The Monitor ...................................9-12
Control and Inputs ...........................................13-15
OSD User Mode ..............................................16-21
Warning Message .................................................22
Troubleshooting ..............................................23-24
Failure Mode of LCD Panel .................................25
Defi ntion of Pexel Defects ....................................26
Mechanical Instructions ..................................27-28
Dasplay Adjustment .........................................29-36
Safety Test Requirements .....................................37
DDC Instructions ............................................38-41
DDC Data ........................................................42-43
Repair Flow Chart ...........................................44-47
Spare Parts List .....................................................48
Identifi cation Label ...............................................49
Block Diagram ......................................................50
Wiring Diagram ....................................................51
Power diagram ......................................................52
I/O & Interface Diagram .......................................53
Video Decoder Diagram ........................................54
Scaler Diagram ......................................................55
LVDS Tx Diagram .................................................56
SDRAM Diagram ..................................................57
SAFETY NOTICE
ANY PERSON ATTEMPTING TO SERVICE THIS CHASSIS MUST FAMILIARIZE HIMSELF WITH THE CHASSIS AND BE AWARE
OF THE NECESSARY SAFETY PRECAUTIONS TO BE USED WHEN SERVICING ELECTRONIC EQUIPMENT CONTAINING HIGH
VOLTAGE.
Description Page
PC-Analog In Diagram ..........................................58
Scaler-Up Diagram ................................................59
Video Converter Diagram ......................................60
HDTV Decoder Diagram .......................................61
Painter Diagram .....................................................62
PC DVI_Digital Diagram .......................................63
TMDS_Rx Diagram ...............................................64
Audio Delay Diagram ............................................65
Audio Board Diagram-1 .........................................66
Audio Board Diagram-2 .........................................67
Key Control Board Diagram and C.B.A. ...............68
Audio Out Jack PCB and C.B.A. ...........................69
TV Box PCB (Video) Diagram .........................70-74
TV Box PCB (TV) Diagram .............................75-78
Scaler PCB C.B.A-1 and -2 ..............................79-80
Audio PCB C.B.A. .................................................81
TV Box PCB (TV) C.B.A. .....................................82
Power Circuit Diagram and C.B.A. ..................83-84
I/O Interface Diagram .......................................85-87
Control Diagram ...............................................88-89
Auxiliary power supply .........................................90
Lamp sensor ...........................................................91
Temperature sensor .................................................92
Esploded View ........................................................93
Horizontal frequencies
31 - 49 kHz
CAUTION: USE A SEPARATE ISOLATION TRANSFORMER FOR THIS UNIT WHENSERVICING
Published by CG 0503 R&D Dept. Printed in Italy © Copyright reserved Subject to modifi cation
FIMI SrL - PHILIPS
Via Saul Banfi ,1
21047 Saronno (VA)
ITALY
H
GB
4519 205 2004.1
Page 2
Importa nt Safety Notic e
P ro pe r s e rv ic e a n d repa ir is important to the safe, r e liable
ope r a tion of all P hilips C ompany** E quipme nt. T he s ervice
procedu r e s r e c o m me nde d by P h ilips a n d des c ribed in this
s ervice ma nual are effective methods of performing s ervice
opera tions . S ome of these se rvice opera tions require the use
of tools spe c ia lly des igned for the purpos e. T he s pe c ia l tools
should be used when and a s recommended.
It is importa nt to note that this manual c ontains v a rio u s
C A UT I O NS a nd NO T I C E S wh ic h sh o u ld be carefully rea d in
order to minimize the risk of pers ona l injury to se r v ic e
per s onnel. The pos s ibility ex is ts that imprope r se rv ic e
methods may damage the equipme nt. It is also importa nt to
unde rs ta nd th a t the s e C A U T IO N S a nd NO T IC E S A R E N O T
E XH A US T I V E . P hilips could not pos s ibly know, e v a lu a te an d
advis e the s e rvice tra de of all conce iva ble wa ys in which
s ervice might be done or of the pos s ible ha z a rdous
co n s eque nce s of e ac h wa y. C ons eque n tly, P hilips h a s not
undertaken any such broad evaluation. Accordingly, a
s ervice r who us e s a service proce dure or tool which is not
re c omme nde d by P h ilips mus t firs t sa tis fy hims e lf thoroughly
that neither his sa fety nor the s afe opera tion of the equipment
will be jeopardized by the s ervice method s elected.
* * H erea fter throu gh o u t this ma nu a l, P hilips l C ompa ny will
be refe rre d to a s P hilips .
WARN IN G
C ritical components having s pecia l safety characteristics are
identified with a by the R e f. N o. in the parts lis t a nd
enclosed within a broken line*
(whe re s e ve ra l critica l c ompone nts a re grouped in one area )
along with the sa fe ty s y mbol on the s chematics or
exploded views .
Us e o f subs titute replac e me nt parts which do not have the
same spe c ified sa fe ty c ha ra cteris tic s may crea te shock, fire ,
or other ha z a rds .
FOR PR ODUCTS CONTAINING LASER :
DANG E R -
CAUTION-
CAUTION-
TOENSURE THE CONTINUED RELIABILITY OF THIS
PRODUCT, USE ONLY ORIGINALMANUFACTURER'S
R E P LA C E ME NT PAR T S , WHIC H AR E L IS T E D W IT H THE IR
PART NUMBERS INTHE PARTS LIST SECTIONOF THIS
SERVICE MANUAL.
Invisible laser radiation when open.
AV OID DIRE CT EXP OSUR E TO BE AM.
Us e of controls or a djustments or
performanc e of proce dures other than
those s pecified herein may result in
haz a rdous radia tion e xpos ure.
T he us e of o ptica l i ns tru me nts with th is
product will incr e ase eye haz a rd.
Take care during handling the L C D module with backlight
unit
- Mus t mount the module us ing mounting holes a rra nged in four
corners.
- D o not pres s on the panel, edge of the frame s trongly or elec tric
shoc k as this will result in dama ge to the s c reen.
- Do not scratch or press onthe panel with any sharpobjects, such
a s pencil or pen as this may res ult in dama ge to the panel.
- P rotec t the module from the E S D a s it may damage the e lec tronic
circuit (C -MOS ).
- Ma k e certa in th a t tr e a tment pers on’ s bod y are gr ou nde d through
wris t ba n d.
- D o no t lea v e the mo du le in high tempe ra ture and in areas of high
humidity fo r a long time .
- Avoid c onta c t with wa te r as it may a s hort circu it within the module.
- If the surface of panel become dirty, please wipe it off with a soft
ma te r ia l . (C l e a ning with a dirty or rough c loth ma y da m a ge the
pa ne l. )
U n de r no c ir c ums tanc e s s hould the origina l des ign be
modified or a ltere d without writte n perm is s ion fro m P hilips .
P hilips a s s u m e s no lia bility, ex pr e s s or im plie d, aris ing out of
a n y una uthoriz ed modifica tion of de s ign.
S ervice r as s umes a ll liability.
* Bro ke n Line
Page 3

Technical Data
• TFT-DISPLAY FEATURES:
Technology TFT-LCD with S-IPS technology.
Active Screen size 42 inches (1067mm diagonal).
Outline Dimension Typical 1006 mm (H) x 610 mm (V) x 59 mm (D)
Pixels Format 1366H x 768V.
Pixel Pitch 0.227mm x 0.681mm x RGB
Color Depth 8 bit, 16.7 M colors.
Power Consumption Total 164 Watt.
Weight 12 Kg
Display Operating Mode Transmissive mode, normally black.
Surface Treatment Hard Coating (3H), Antiglare treatment of the front polarizer
Response Time 12ms
Color Coordinates Red x=0.639 y=0.342
Green x=0.282 y=0.610
Blue x=0.147 y=0.073
White x=0.281 y=0.293
Viewing angle 170° in both horizontal and vertical direction
For classifi cation of defects and acceptance limits referring to:
-LG Philips LCD’s Incoming Inspection Standard for LC420W Ver. 1.0 April 2004
BDL4211. . . 3
• PC INPUT
Analog RGB (Sync: H and V, H+V, Sync-on-Green)
Digital RGB (DVI)
• VIDEO INPUT
EXT: Analog RGB (Sync: Separate, composite and Sync-on-Green)
Composite: CVBS - PAL, SECAM and NTSC
S-Video: Y / C - PAL, SECAM and NTSC
Components Analog Components (Y Pr Pb; Sync-on-Y)
• CONNECTIONS
PC-VGA IN D-Sub 15 HD
PC DVI-D IN DVI
PC Audio IN 3.5mm mini-jack
RS-232 port D-Sub 9 - female
CVBS / S-Video + Audio IN 1 x RCA / 1 x mini-DIN 4pins + 2 x RCA
SCART 21pin full SCART
Components Y Pr Pb+ Audio IN 3 x RCA + 2 x RCA
Audio Line OUT 3.5mm mini-jack
Loudspeaker OUT 2 x 3.5mm mini-jack
• D-SUB Pin assignment
PIN No. SIGNAL PIN No. SIGNAL
1 Red 9 +5V (Supply from PC)
2 Green 10 Sync GND
3 Blue 11 GND
4 GND 12 Bi-directional data
5 Self test 13 H-sync
6 Red GND 14 V-sync
7 Green GND 15 Data clock
8 Blue GND
Page 4

BDL4211. . . 4
• DVI-D Pin assignment
Pin No. Description Pin No. Description
1 RX2- 13 GND
2 RX2+ 14 +5V
3 GND 15 GND
4 GND 16 Hot Plug Detect
5 GND 17 RX0-
6 DDC clock 18 RX0+
7 DDC data 19 GND
8 GND 20 GND
9 RX1- 21 GND
10 RX1+ 22 GND
11 GND 23 RXC+
12 GND 24 RXC-
Signal type: Digital interface with 4 channels TMDS signal
• PC Audio input with 3.5 Mini stereo jack
Audio L/R input
- Nominal : 0.5 V rms.
- Maximum : 1.5 V rms.
-Impedance > 10 k Ω.
Audio line-out with 3.5 mm stereo jack
Specifi cations : L/R Output
Nominal : 0.5 V rms.
Maximum : 1.5 V rms.
Impedance < 1 k Ω.
• D-Sub RS232 connector Pin assignment
PIN No. SIGNAL PIN No. SIGNAL
1 Not used 6 Not used
2 MTXD 7 Not used
3 MRXD 8 Not used
4 Not used 9 Not used
5 GND
• TV input /output connectors
HD / Component Y Pb Pr with RCA connector ( Video , Audio input )
Specifi cation
Video - Y : 700mV, Pb, Pr, : +/- 350mV,
- Impedance : 75Ω
Audio: L/R input
- Nominal : 0.5 V rms.
- Maximum : 1.5 V rms.
Impedance > 10 k Ω.
Note : the input will be overloaded when the signal > 1.5 V rms.
S-Video with S terminal ( Video , Audio input )
Specifi cation
Video - Y : 1Vpp , C : 300 mV pp
- Impedance : 75W.
Audio L/R input (share with Composite Audio input )
- Nominal : 0.5 V rms.
- Maximum : 1.5 V rms.
Page 5

-Impedance > 10 k Ω.
Note : the input will be overloaded when the signal > 1.5 V rms.
Composite with RCA Jack (Video , Audio input )
Specifi cation
Video - CVBS Source signal 1 Vpp
- Impedance : 75Ω.
Audio L/R input (share with S-Video Audio input )
- Nominal : 0.5 V rms.
- Maximum : 1.5 V rms.
-Impedance > 10 k Ω.
Note : the input will be overloaded when the signal > 1.5 V rms.
SCART ( Video , Audio input /output )
Specifi cation
Video - CVBS Source signal 1 Vpp
- Impedance : 75Ω.
Audio L/R input (share with S-Video Audio input )
- Nominal : 0.5 V rms.
- Maximum : 1.5 V rms.
-Impedance > 10 kΩ.
• VIDEO SIGNAL CHARACTERISTICS
PC input (VGA)
Input Frequency - Horizontal: 31 kHz ¸ 63 kHz
- Vertical: 56 Hz ¸ 75 Hz
Maximum Pixel Clock: 80 MHz
VESA Compatibility: DDC/2B
BDL4211. . . 5
Preset video modes
Mode Resolution Video Mode H freq.(kHz) V freq (Hz)
1 640 x 480 VGA VESA-60 31.469 - 59.940 -
2 640 x 480 VGA VESA-75 37.5 - 75 -
3 800 x 600 SVGA VESA-56 35.156 + 56.250 +
4 800 x 600 SVGA VESA-60 37.879 + 60.317 +
5 800 x 600 SVGA VESA-72 48.077 + 72.188 +
6 800 x 600 SVGA VESA-75 46.875 + 75 +
7 1024 x 768 XGA VESA-60 48.363 - 60.004 -
8 1024 x 768 XGA VESA-70 48.363 - 60 -
9 1024 x 768 XGA VESA-75 60 + 75 +
10 1280 x 768 WXGA 15:9 47.700 - 60.000 +
11 1366 x 768 WXGA 16:9 47.300 + 60.000 -
12 1366 x 768 WXGA 16:9 47.400 - 60.000 -
Video Inputs
Input Systems / Color Coding: PAL, SECAM, NTSC.
Input Frequency - Horizontal: 15.625 kHz (PAL/SECAM); 15.734 kHz (NTSC)
- Vertical: 50.00 Hz (PAL/SECAM); 59.94 Hz (NTSC)
•POWER SUPPLY
Mains voltage: 90Vac ÷ 264Vac
Mains frequency: 47 ÷ 63Hz.
Page 6

BDL4211. . . 6
Power consumption: 260W typical; < 6W Stand by.
Mains switch: Located on the rear.
• LED INDICATIONS
Green light: The monitor is in On-state.
Yellow light: General failure.
Red light: The monitor is in Stand by.
Blinking colour: The monitor is receiving a valid remote command
• CONTROLS
The main functions of the monitor can be controlled through the following interfaces:
♦ IR remote control; the monitor has a RC5-IR remote receiver (OSD assisted)
♦ Local keyboard (OSD assisted)
♦ RS232 serial port for remote monitor control
• BRIGHTNESS AND COLORIMETRY (PC MODE)
Reference instrument: Chroma LCD color analyzer mod. 7120
Conditions: Brightness = Factory adjustment.
Contrast = 90
Video input level = 700mV ( PC VGA )
ABC = Off
Color temperatures
Five color temperatures are selectable by the user
♦ Natural Backlight color temp. (11000°K typ.)
♦ Normal 6500°K
♦ Blue preset 9300°K
♦ Red preset 5500°K
♦ User Adjustable by the user
Output light and color coordinates
Pattern = white page.
Output light: 350cd/m2 ± 30cd/m2 measured in the centre.
Color temperature: 6500°K
Color coordinates: x = .313 ±.02
y = .329 ±.02
Color temperature: 9300°K
Color coordinates: x = .283 ±.02
y = .298 ±.02
Color temperature: 5500°K
Color coordinates: x = .332 ±.02
y = .348 ±.02
Contrast ratio
Pattern = white page. / raster
Contrast ratio min: > 300:1
Brightness adjustment
The brightness level is adjusted by dimming the backlight. The contrast ratio remains constant.
With brightness and contrast set to their maximum, light output is: > 400cd/m2
Typical dimming range 50% to 100% of light output value
• ABC CONTROL
An automatic brightness control allows the monitor to adjust automatically its brightness according to ambient light. See graph. Below.
Typical dimming range 50% to 100% of light output value
Page 7

BDL4211. . . 7
100
80
60
40
20
0
1 10 100 1000 10000
Ambient light (lux)
Bri gh tne s s %
User selectable.
• BRIGHTNESS AND COLORIMETRY (VIDEO MODE)
Pattern = white page.
Input: S-video; Ext; Composite; Components
Output light: >320cd/m2 measured in the centre.
Color temperature: 6500°K
Color coordinates: x = .313 ±.02
y = .329 ±.02
• AUDIO
The monitor is provided with a stereo power amplifi er.
Output power on 4O resistive load: 5WRMS +5WRMS @ 1% THD
• DIAGNOSTIC
The following items are monitored:
♦ Internal temperature (value in °C is available)
♦ Fans status (rotating = OK; rotor blocked = fault)
♦ Power supply status (+24V present = OK; voltage below 20V = fault)
♦ Backlight status (correct lighting of backlight lamps = OK; one or both lamps off = fault)
When the internal temperature rise over a safety threshold the backlight is switched off to reduce power consumption.
All data are available at serial interface.
• OPERATING CONDITIONS
Min. temperature : +5°C.
Max. temperature : +35°C
Altitude : 0 ¸ 14000ft; 4267m
Min. relative humidity : 10% RH.
Max. relative humidity : 90% RH (no condensation)
• DIMENSION
Width: 1035mm.
Height: 628mm.
Depth: 109mm
Bezel opening: 931mm x 524mm
Page 8
BDL4211. . . 8
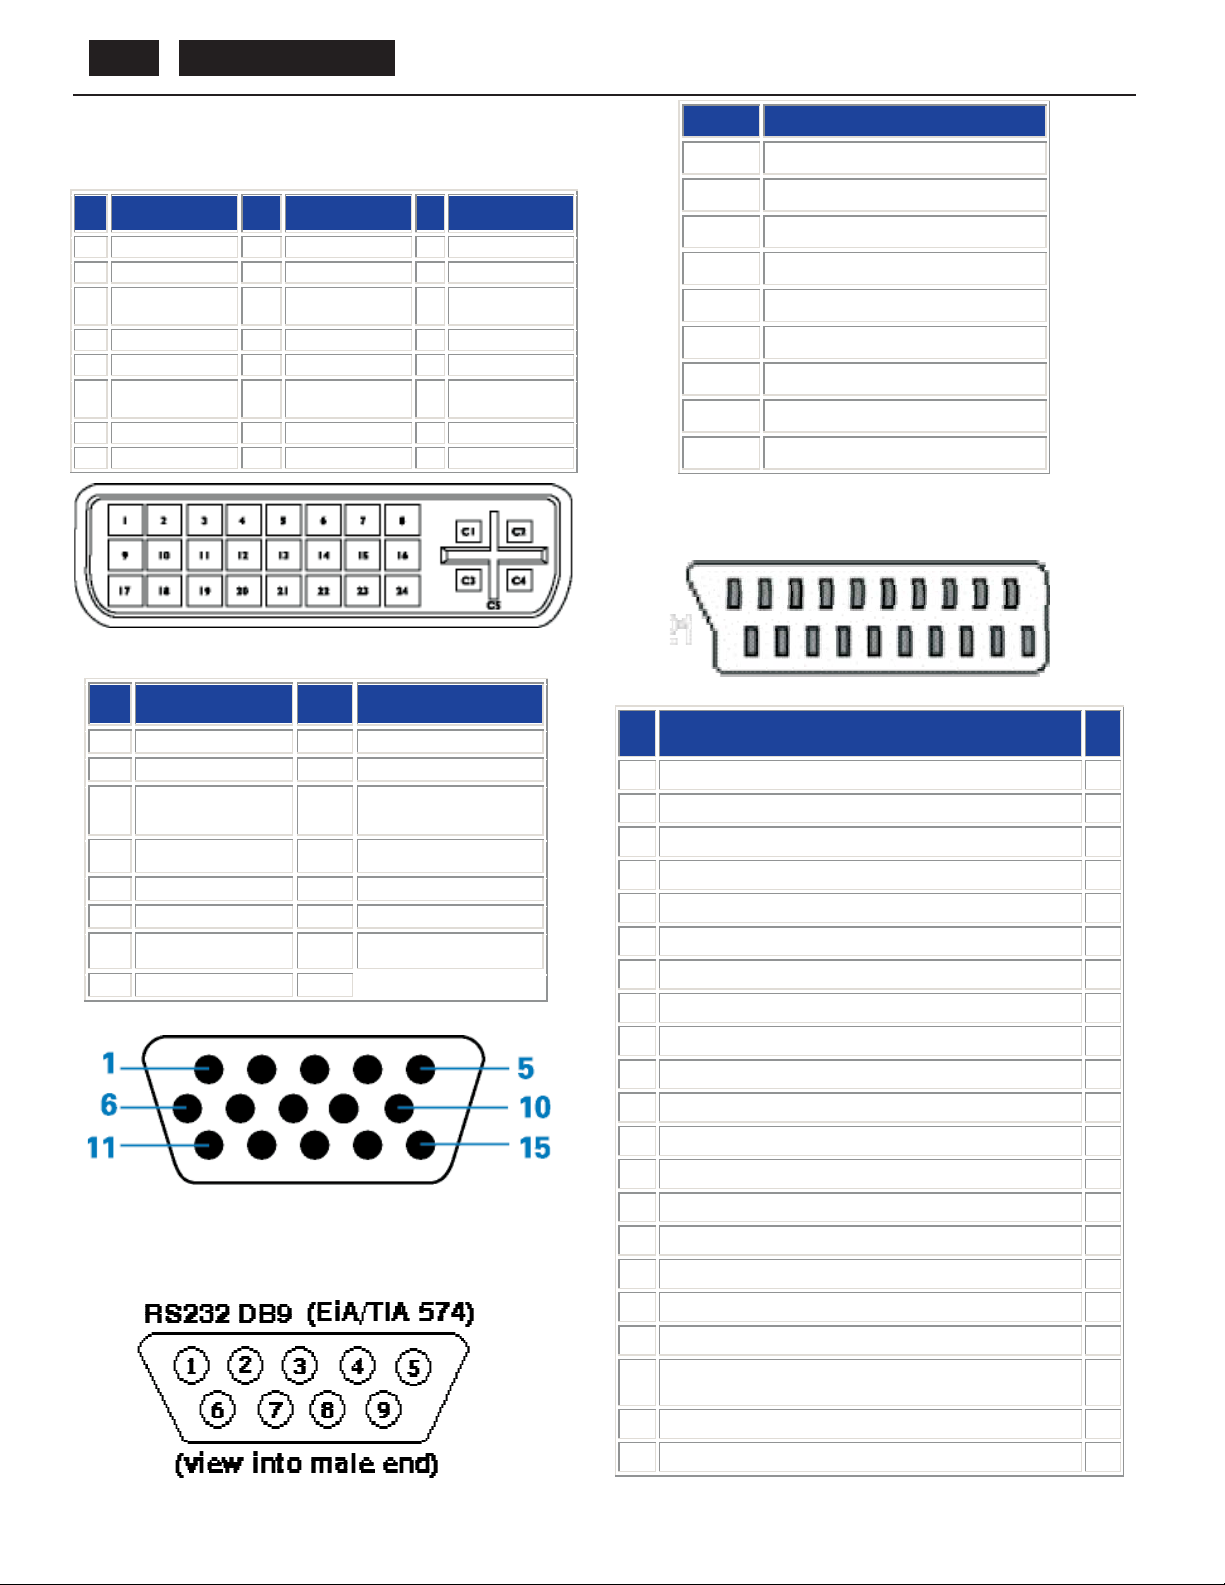
P in A ssignment
1. T he digital only conne ctor contains 24 s igna l c ontacts orga niz ed in
three rows of eight c ontacts . S ignal pin ass ignments are lis ted in the
following table:
Pin
S igna l As s ignment
No.
1 T.M.D.S . Data2 - 9 T.M.D.S. Data1 - 17 T.M.D.S . Data0-
2 T.M.D.S . Data2+ 10 T.M.D.S . Data1+ 18 T.M.D.S. Data0+
T.M.D.S. Data2/4
3
S hie ld
4 No connect 12 No connect 20 No connect
5 No connect 13 No connect 21 No connect
6 DDC C lock 14 +5V P owe r 22
7 DDC Data 15 Hot P lug Detect 23 T. M.D .S . Cloc k+
8 No connect 16 Ground(for +5V) 24 T.M. D. S . Clock -
Pin
S igna l As s ignment
No.
T.M.D.S. Data1/3
11
S hie ld
Pin
S igna l As s ignment
No.
T.M.D.S. Data0/5
19
S hie ld
T.M. D. S . C lock
S hie ld
2. T he 15-pin D-sub connector (male) of the signal cable:
Pin No. R S -232 (E IA-232-A) F unction
3 Trans mit Da ta (T D ) from DT E to DC E
2 R eceive Data (R D) from DC E to DT E
7RequesttoSend(RTS)
8CleartoSend(CTS)
6 DCE Ready (DSR)
5SignalGround(SG)
1 R eceived L ine S igna l Detector (DC D)
4 DTE Ready (DTR)
9 R ing I ndicator
4. S C A R T C onnector
Pin
No.
As s ignment
Pin
No.
As s ignment
1 R ed video input 9 DDC +5V
2 Green video input 10 C able detect
3 B lue video input 11
Ide ntic a l output,
connected to pin 10
4 Ground 12 Serialdata line (SDA)
5 NC 13 H. S ync / H+V
6 Red videoground 14 V. S ync
7 Green video ground 15 Da ta cloc k line (S C L)
8 B lue video ground
3. R S 232 Connector
D-s ub 9-pin ma le connector for communica tion with plas ma engine or
PC.
Pin
No.
1 A udio right channel output ( 0. 5 V rms, < 1K ohms) 2
2 A udio right channel input (0 . 5 Vrms, > 10K ohms) 1
3 A udio left cha nnel output ( 0.5 V rms , < 1K ohms) 6
4 Audio ground 4
5 B lue signal ground 5
6 A udio left cha nnel input (0. 5 V rms , > 1 0K ohms ) 3
7 B lue signal I/O (0. 7 V p-p, 75 ohms) 7
8 F unction s witching I/O (L: < 2V, H : > 10V, 10K ohms ) 8
9 Green signalground 9
10 I nte rcomm un ic a tion da ta lin e No. 1 10
11 G re en signal I/O ( 0.7 V p-p, 75 ohms ) 11
12 I nte rcommun ic a tion da ta lin e No. 2 12
13 Redsignalground 13
14 B lanking s ignal ground 14
15 R ed s ignal I/O (0.7 V p-p, 75 ohms ) 15
16 Blanking signal I/O (L: < 0.4V, H: >1.0V, 75 ohms) 16
17 C omposite vide o s igna l ground 18
18 B lanking s ignal ground 17
Composite video signal output (1 Vp-p, 75 ohms, sync:
19
nega tive)
20 C omposite vide o s igna l input ( 1 Vp-p, 75 ohms, s ync : nega tive) 19
21 P lug shie ld (common ground) 21
Signal Pin
No.
20
Page 9
Connecting The Monitor
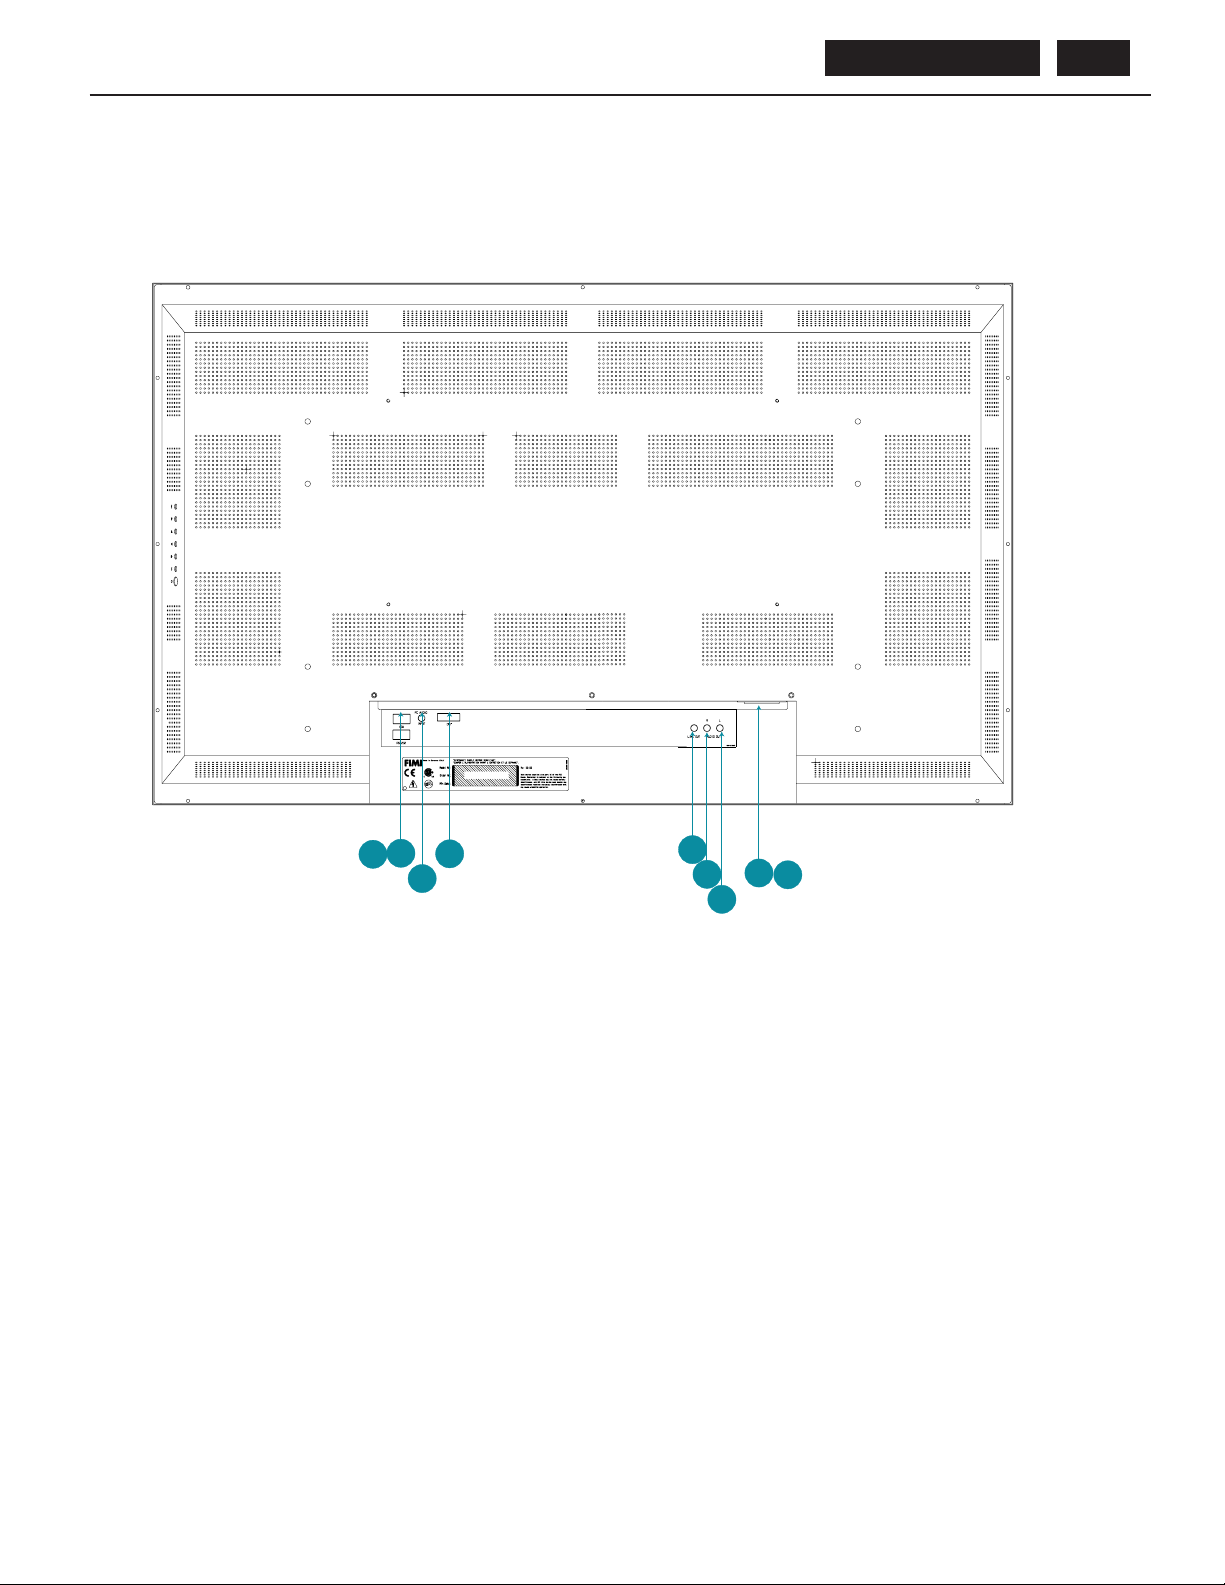
Connecting the monitor
Connect the cables to the rear of your monitor
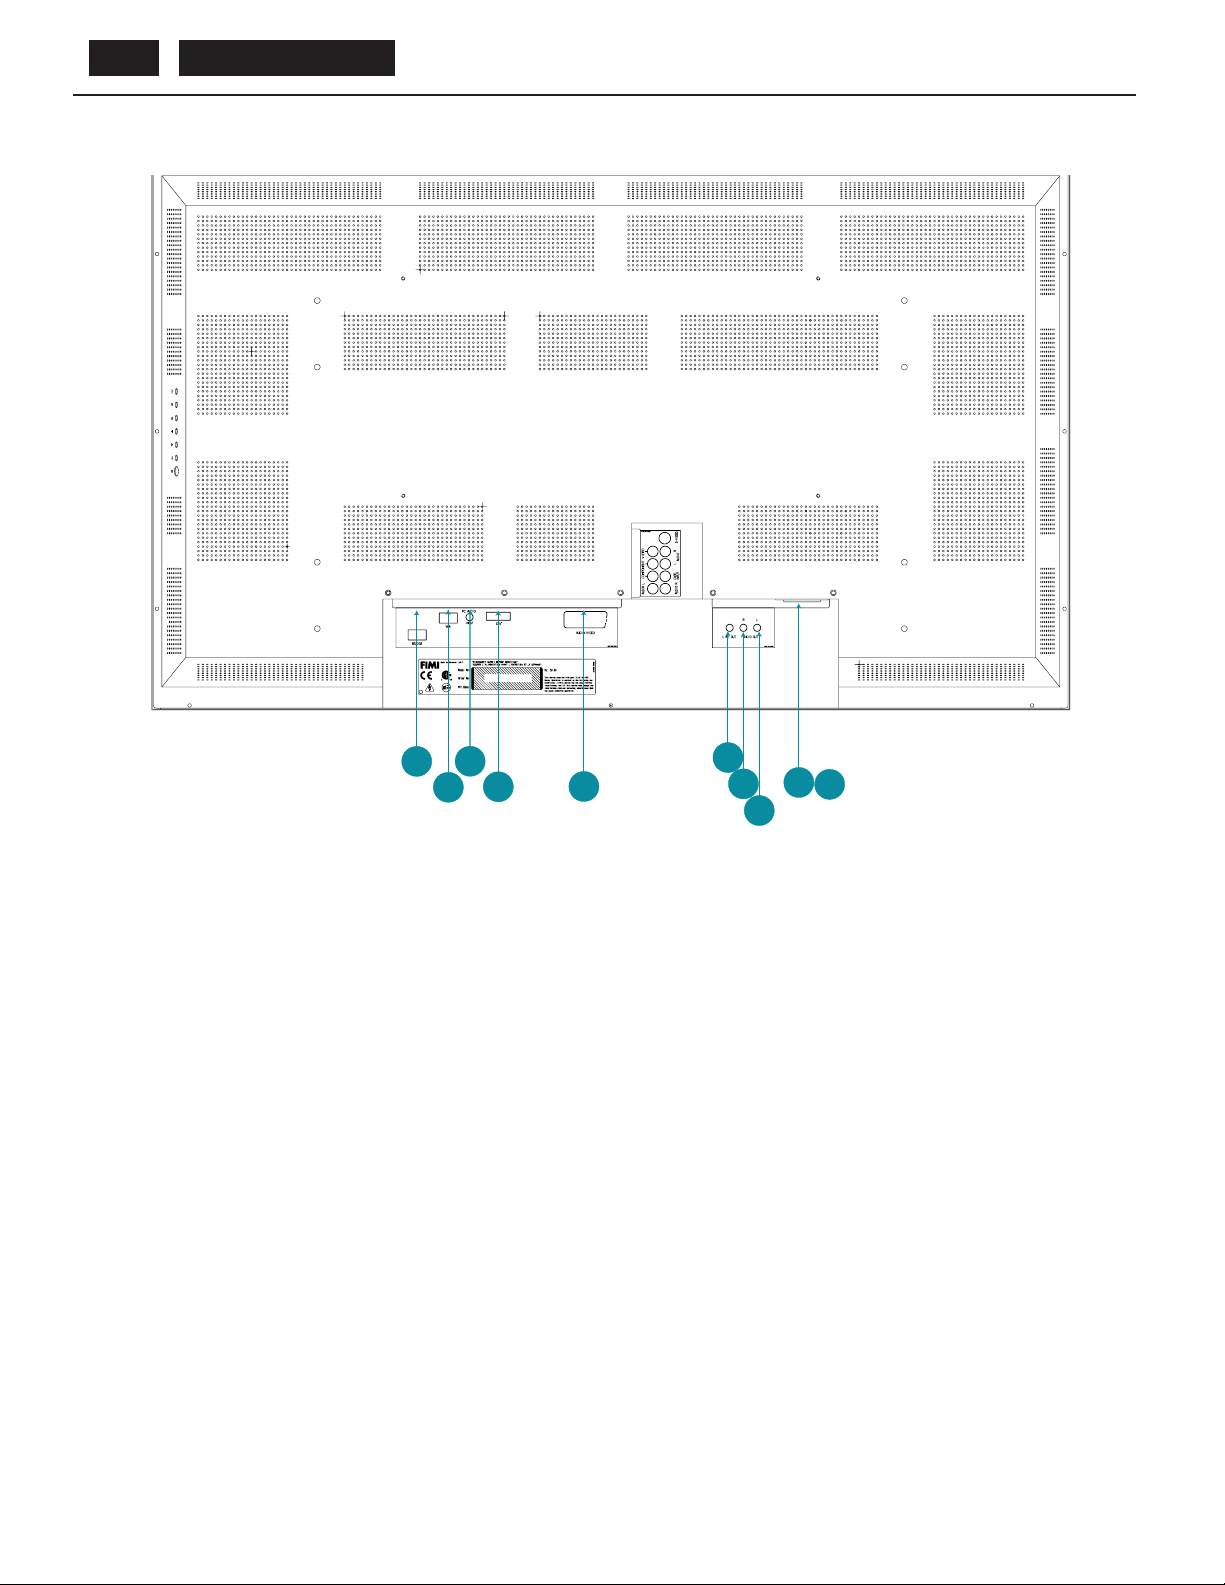
Back view (Basic version)
BDL4211. . . 9
6
3
5
4
9
1
8
7
2
1 AC IN AC power in (IEC 320/CEE 22 STANDARD)
2 AC Power AC power switch
3 D-Sub PC analog D-Sub Input (D-SUB 15Pins/female)
4 PC - Audio PC stereo input
5 DVI-D PC Digital Input (DVI-D female)
6 RS232 RS232 network connection (D-SUB 9Pins/female)
7 Audio (L) Output Audio (L) output for the detachable speacker (L)
8 Audio (R) Output Audio (R) output for the detachable speacker (R)
9 Line out Audio output for external speackers
Page 10
BDL4211. . . 10
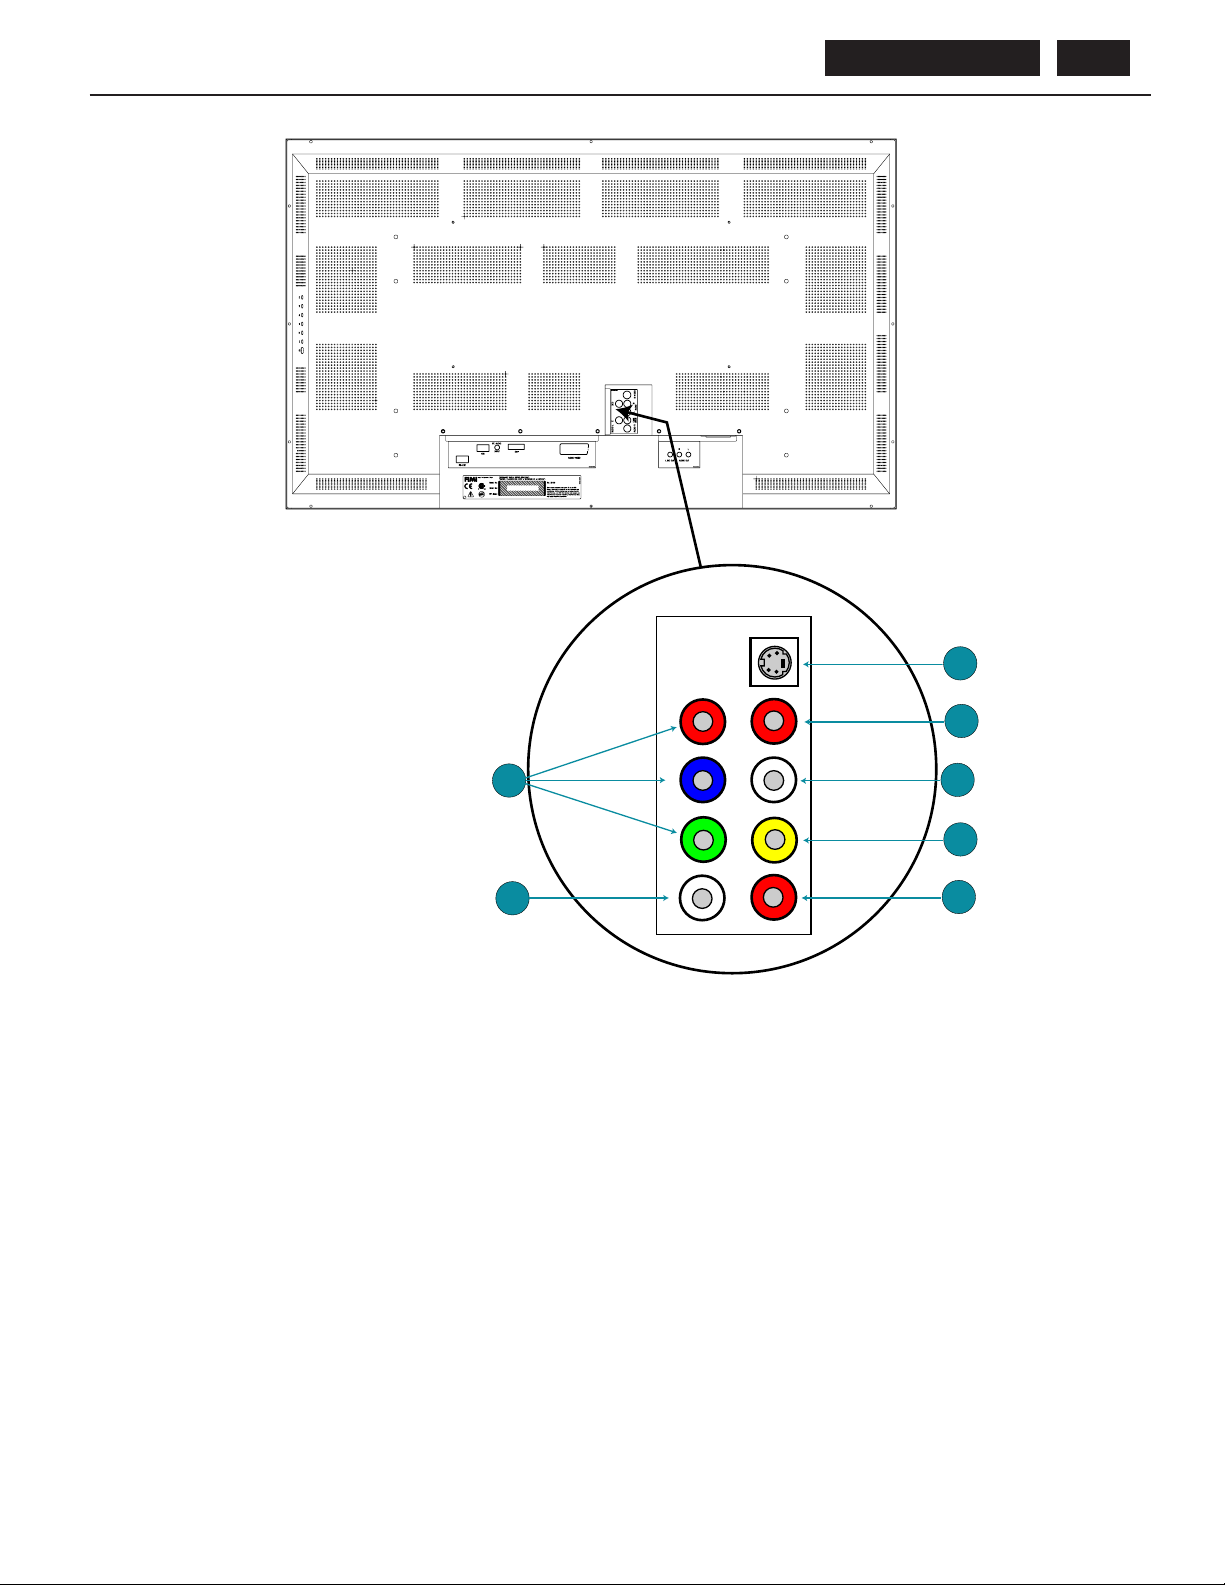
Back view (Video version)
4
6
5
3
10
9
1
8
7
2
1 AC IN AC power in (IEC 320/CEE 22 STANDARD)
2 AC Power AC power switch
3 D-Sub PC analog D-Sub Input (D-SUB 15Pins/female)
4 PC - Audio PC stereo input
5 DVI-D PC Digital Input (DVI-D female)
6 RS232 RS232 network connection (D-SUB 9Pins/female)
7 Audio (L) Output Audio (L) output for the detachable speacker (L)
8 Audio (R) Output Audio (R) output for the detachable speacker (R)
9 Line out Audio output for external speackers
10 External/EURO-AV SCART connection
Page 11
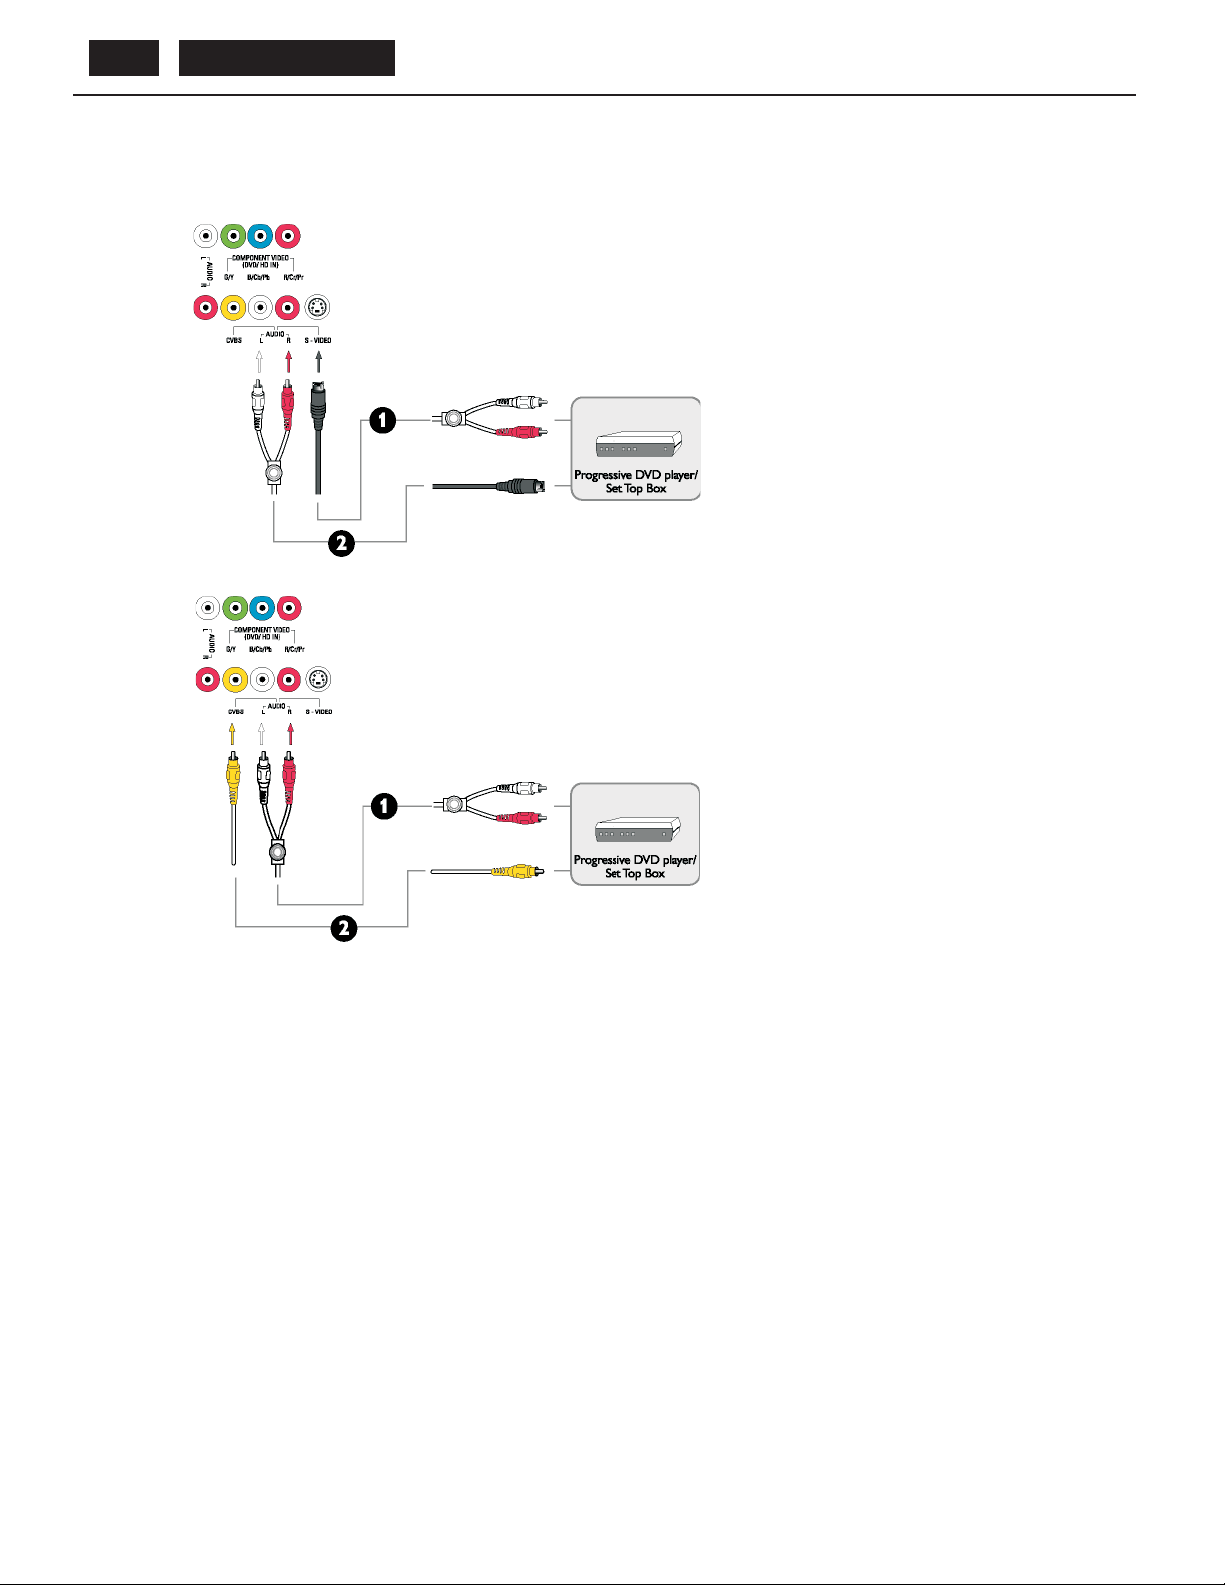
Back view (Video version)
BDL4211. . . 11
3
1
1 AUDIO (L) Audio (L) for component video
2 AUDIO (R) Audio (R) for component video
3 COMPONENT VIDEO Component video Y/Pb/Pr input
4 COMPONENT VIDEO Composite video CVBS input
7
6
5
4
2
5 AUDIO (L) Audio (L) for CVBS and S-Video
6 AUDIO (R) Audio (R) for CVBS and S-Video
7 S-Video S-Video input
Page 12
BDL4211. . . 12
Connecting The Monitor
Page 13
Control and Inputs
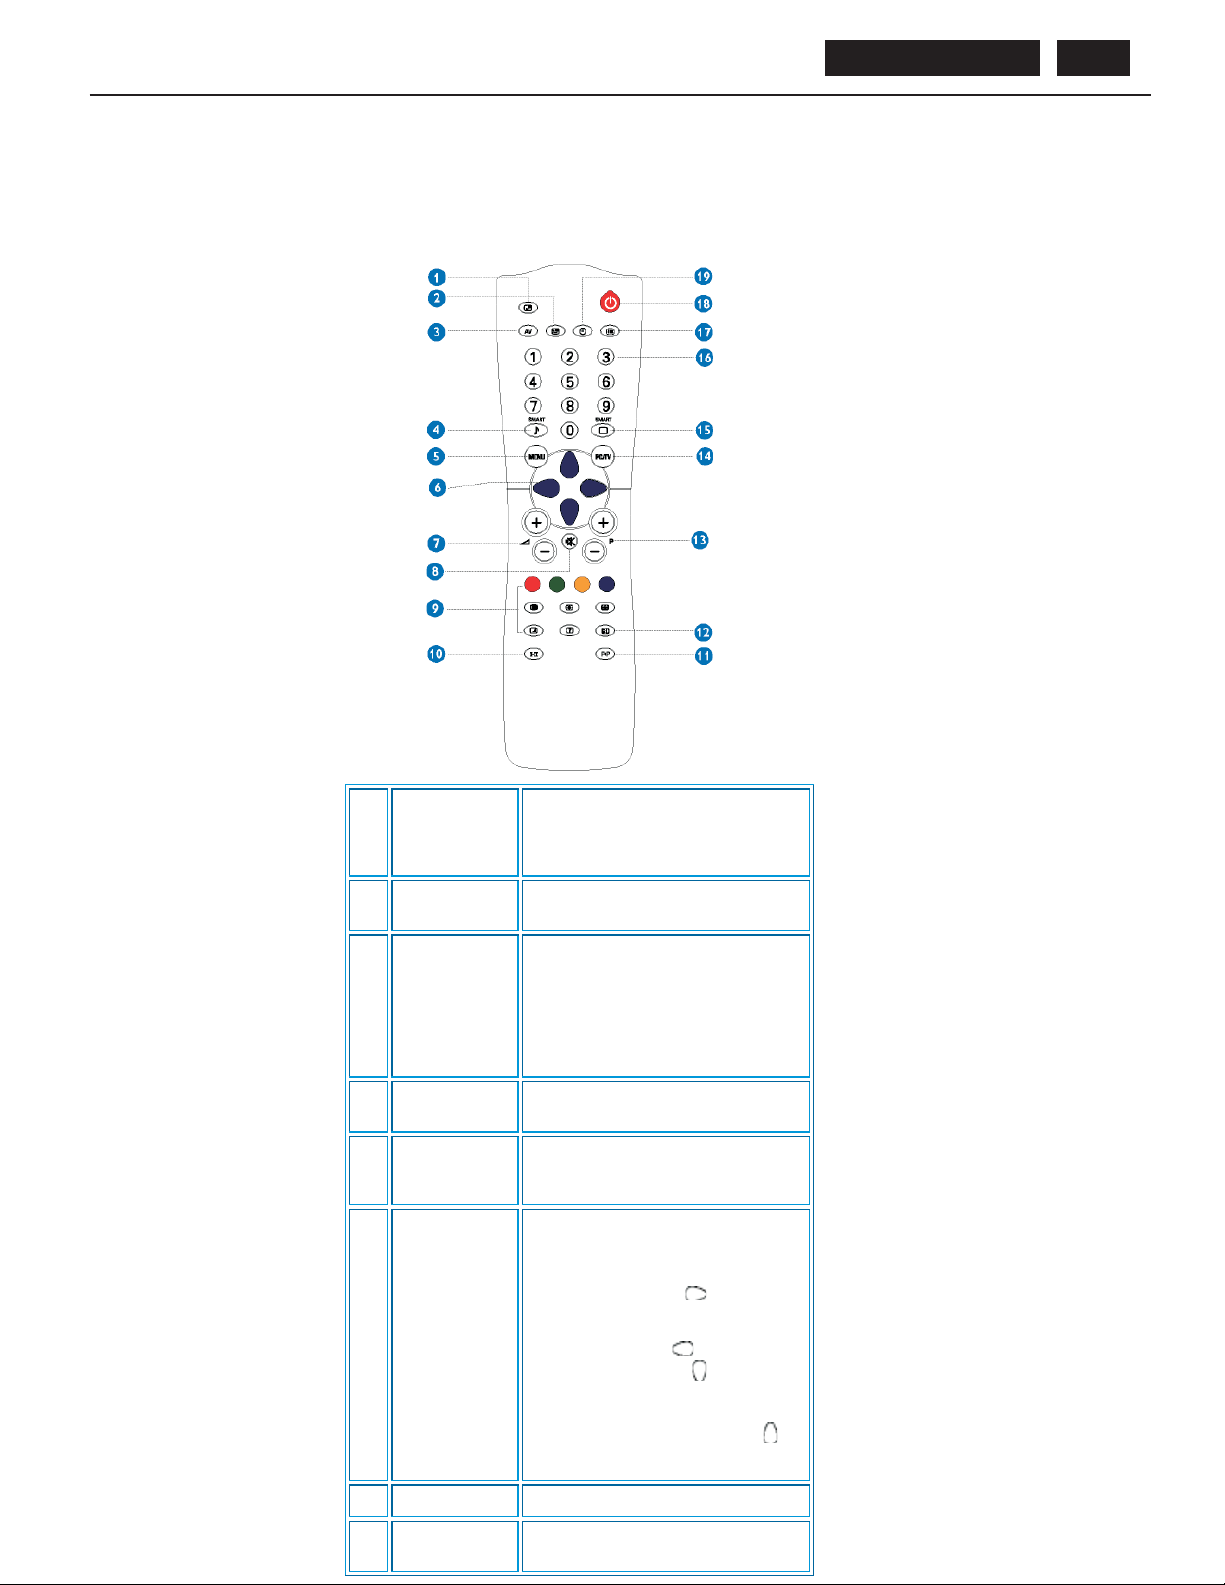
Remote Control
For Europe and most of Asia Pacific countries
BDL4211. . . 13
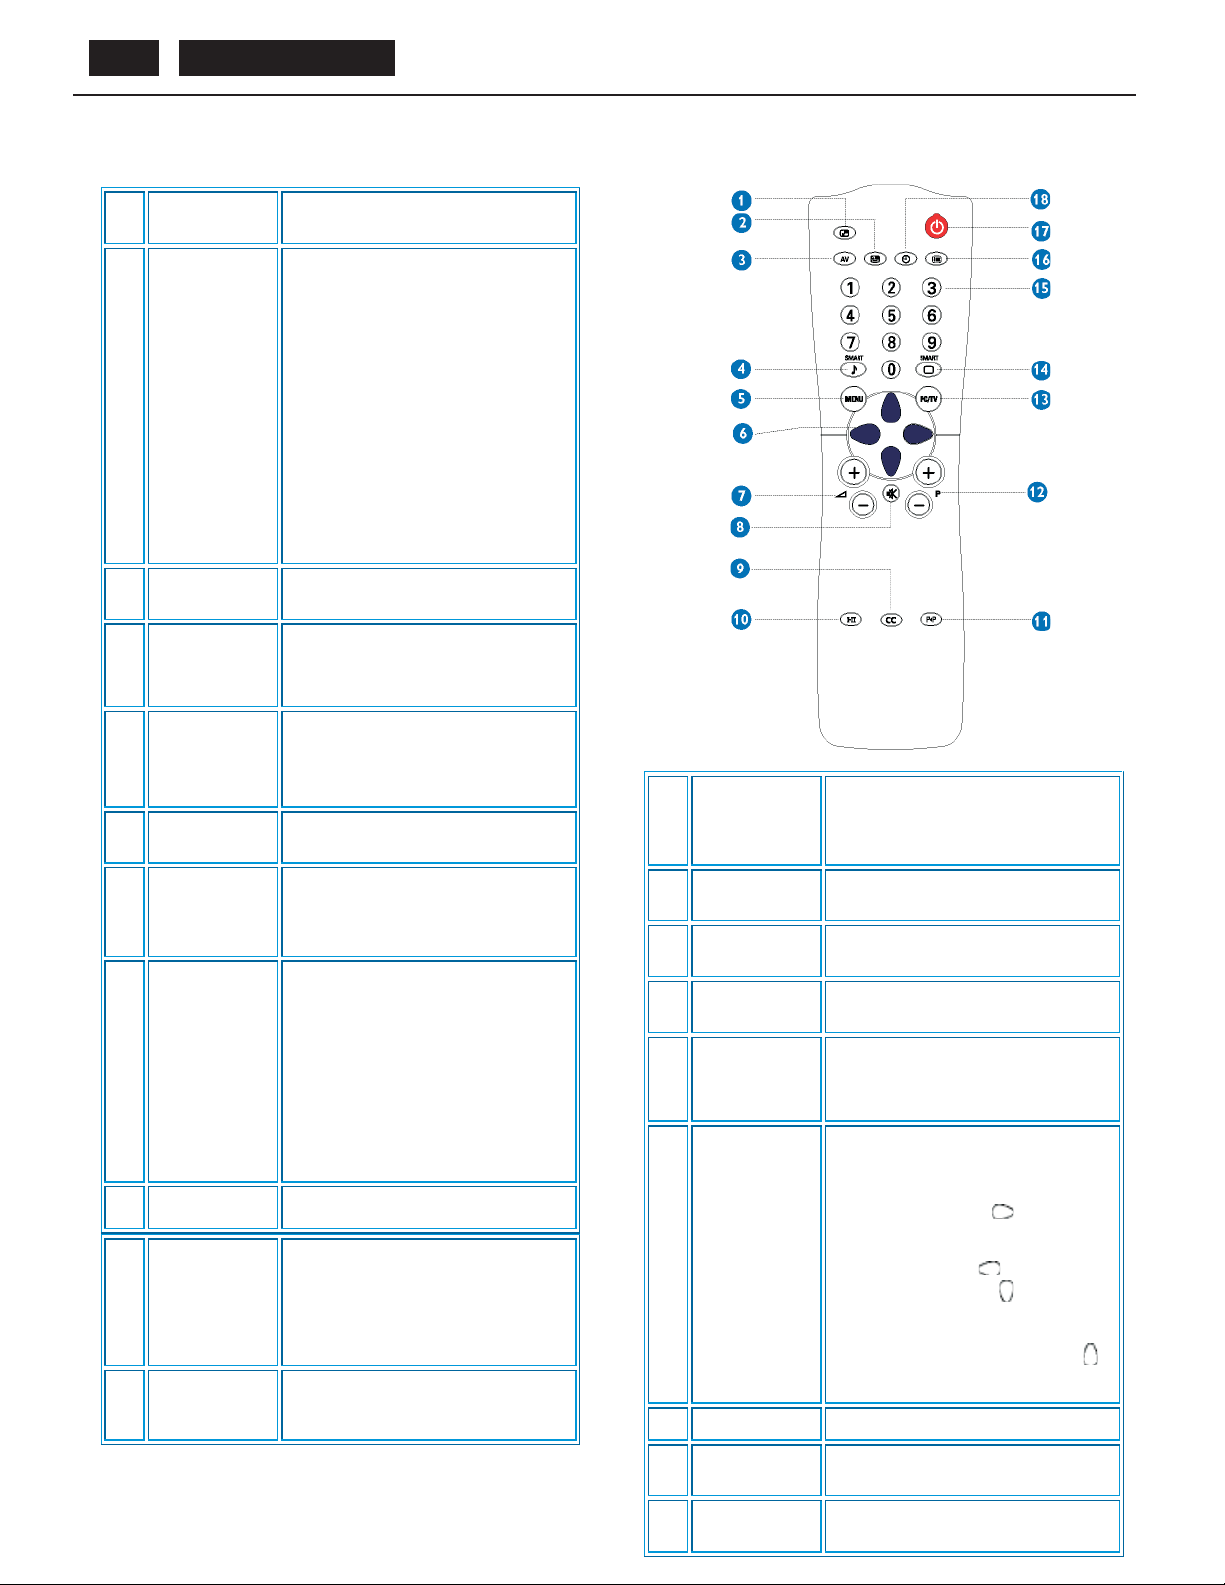
PIP On/Of f,
1
Size
2 PIP Shift
3 AV source
Smart sound
4
controls
5Menu
6 Cursor
To activate or close the 'Picture in
Picture' function in PC mode and to
enlarge or reduce the PIP window size
using the same button.
To change 'Picture in Picture' window
position in PC mode
To select TV/V ideo sources
in PIP mode and TV mode
If using TV 'ST ANDBY',
press this button to return to
'ON'
To access a series of settings: VOICE,
MUSIC, THEA TRE and PERSONAL
To turn on or off theOSD (On-Screen
Display).
To select function in OSD.
To move the cursor up /down/right/left
to scroll through a list of options
Cursor right
To access the sub-menus
and adjust the settings with
cursor left
Cursor down
To select the next item on
the menu, and return to the
last item with cursor up
7 Volume
8 Mute
To adjust the sound level
To disable sound. To restore sound,
press button again.
Page 14
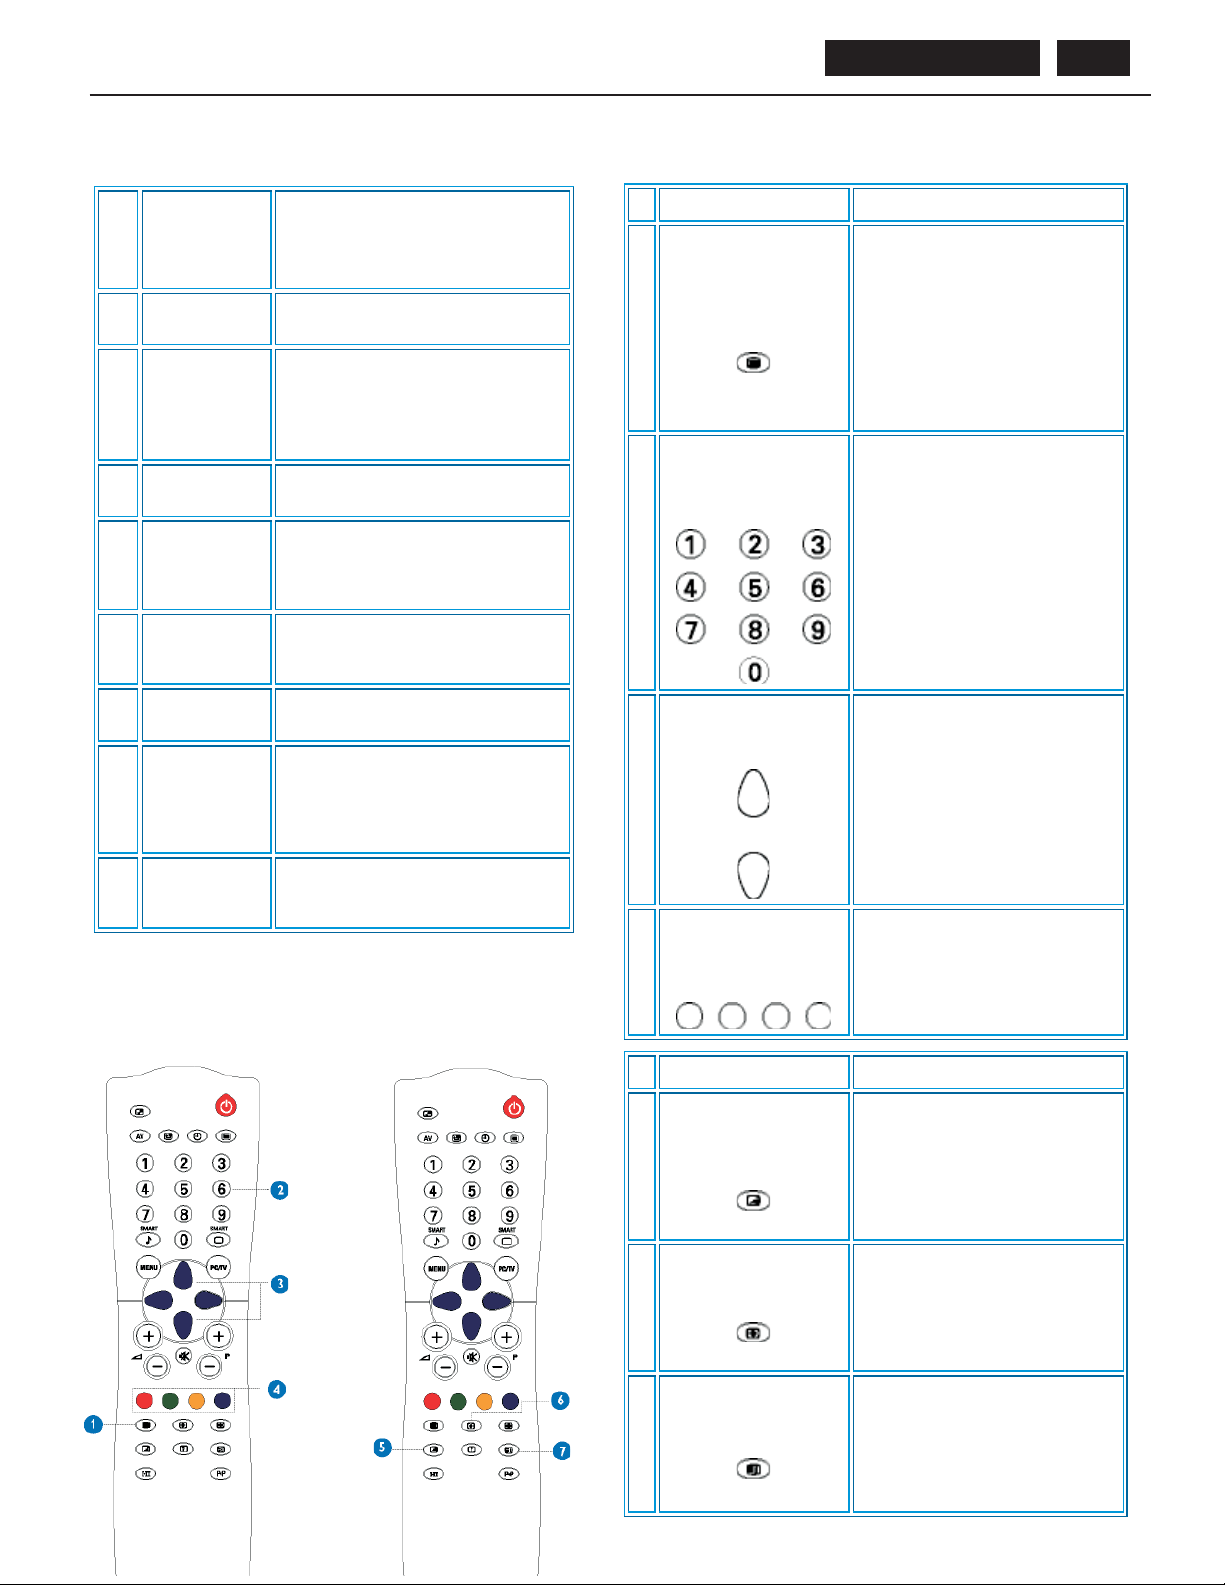
BDL4211. . . 14
C ontrol and Inputs
Teletext
9
fea ture s
10 S ound mode
Previous
11
programme
S creen
12
informa tion
SelectingTV
13
programmes
PC/TV mode
14
selection
Works only in area s where the Te letext
service is a va ila ble
To switch from STEREO to
MONO or to c hoos e between
Dual I and Dual II for
bilingual transmissions.
F o r T V s e ts fitte d with
NICAM reception, depending
on the tra ns mis sion, you ca n
switch from NICAM S TE R EO
to MO N O or choose between
NICAM DUAL I, NIC AM
DUAL II and MONO.
If using Teletext, press this
button to dis pla y dual page s
on s creen.
To a cc es s the las t progra mme viewed.
To dis play the progra mme number, the
videomodeandthesoundmode.
To move up or down a programme.
The number a nd the sound mode a re
displayed for a few seconds.
To s elect P C or T V mode.
1
PIP On/Off,
Size
To a c tiv a te o r cl os e 'P i c tur e in P ic ture '
function in PC mode and to enlarge or
reduce the P IP window s iz e using the
s a m e bu tton.
Smartpicture
15
controls
To select your desired picture setting
from 5 s e ttings : M O V IE S , S P OR T S ,
WE AK S IG N AL, MULTIMEDIA and
PER SONAL.
F or direct a ccess to
programmes
F or a 2-digit programme
number, the 2nd digit must
16
Numerical
keys
be entered before the dash
disappea rs .
If using TV 'S TAN DB Y ',
pres s any of number keys to
return to 'O N'
17 OS D
18 S tandby
19 S leep timer
For A mericas, Korea, Taiwan and Philippines
To s h ow O S D s ta tus .
To s e t the T V te mpor a rily to s ta nd by
mode . T o s witch on the T V s et, pres s
P rogramme button (p -, +), a ny digit
be tween 0 a nd 9 or AV s ource button
(T he amber light indica tes whe n se t is
in s tandby mode)
To selec t the period of time after whic h
the se t will s witch a utomatically to
s ta n dby mode ( up to 1 80 minutes )
2PIPShift
3AVsource
Smartsound
4
controls
5Menu
6Cursor
7Volume
8Mute
To change 'P ic ture in P ic ture' window
pos ition in PC mode .
To select TV/Video sources in PIP
mode and TV mode.
To access a series of settings: VOICE ,
MUSIC, THEATR E and P ER SONAL.
To turn on or off the OS D (On -S cree n
Display).
To s elect function in OS D.
To mov e th e c u rs o r up /do wn /rig ht/le ft
to s cro ll throu gh a lis t of opti on s
C urs or right
To a cces s the s ub -me nus
and adjust the s e ttings with
cursor left
Cursor down
To s e lect the ne x t item on
the menu, a nd return to
last item with c urs or up
To a djus t the sound level
To disable sound. To restore sound,
pres s button a ga in.
9
Closed
Caption
To disable or enable closed caption
function
Page 15
10 S ound mode
Previous
11
progra mme
SelectingTV
12
progra mme s
PC/TV mode
13
selection
Smartpicture
14
controls
Numerical
15
keys
C ontrol and Inputs
To choose MONO, S TE RE O and S AP
nd
audio programme) S ound system
(2
To a c ces s the la s t cha nne l viewed
To move up or down a progra mme .
T h e number, ( the name) and the sound
mode are displayed for a few s econds.
To s ele ct P C or TV mode .
To selectyour desired picture setting
from 5 s e ttings : MO V IE S , S P OR T S ,
WE AK S IGNAL, MULTIMEDIA and
PER SONAL.
For direct a ccess to channel. For a 2digit c ha nne l numbe r, the 2
be entered before the dash disappears.
nd
digit must
BDL4211. . . 15
Press button R es ult on S creen
Display or exit Teletext. The main
index pag e pres e nts a list of
On/OffTeletext
1
S e le c ting a Tele text
pa ge
2
subjects to which you haveaccess.
E a ch s ubjec t has a corres ponding
page number ( a lwa ys 3 digits ) .
Note: If selected T V channel does
not broa dc a s t Telete x t, P 100 is
displa yed and the sc reen rema ins
bla c k. E xit Tele text mode and
choos e another T V c ha nne l.
Keyinthe required Teletextpage (3
digits) . T he pa ge number is
displa yed in the top le ft-ha nd c orne r
of the s cre en. W he n the Teletext
pa ge is loca ted, the c ounter s tops
searching. If the counter keeps
s e a rc hing, it mea ns that the pa ge is
not a va ila ble for s elec tion. If yo u
make a mistake when keying in the
page number, y ou have to finis h
keying in the 3-digit numbe r before
re-keying the correct page number.
16 O S D
17 S ta ndby
18 S leep timer
Us ing the Teletext (for a reas where teletext s ervic e is available)
Tele text is an information sy s tem broa dca s t by ce r ta in T V channe ls .
Itcan be cons ulted in the same way as a news paper. It also provides
subtitles for the hard of hea ring or peo ple who a re unfamiliar with the
broa dca s t langua ge (c a ble T V n e twork, s a te llite cha nnels , etc. ).
To s how OS D s ta tus
To s et the T V temporarily to S TA N DB Y
mode . P re s s the butto n aga in to r e turn
to ON .
(T he amber lightindica tes s when se t is
in s tan dby mode)
To s e le c t the pe riod of time a fter which
the s et will a uto ma tic a ll y s witch to
standby mode ( up to 180 minutes)
Access ing a Teletext
pa ge
P r e s s the C U R S O R UP button to
3
Direct Access to an
item or corresponding
pa ge s
4
Press button R es ult on S creen
Mix
5
Enlarge
6
displa y the pre vious pa ge an d the
C U R S O R D O W N button to displa y
the next page.
T he 4-colour buttons allow you to
access directly an item or
corresponding pages .
Allo ws y o u to s u pe rimpos e the
Te letext pa ge ove r the T V
programme. P ress the button a
s e c ond time to re turn to Tele te x t
pa ge only.
P re s s the button onc e to enlarge
and view the top half of the page.
P r e s s the bu tton a s econd time to
enla rg e and view the botto m ha lf of
the pa ge . P re s s the button a th ir d
time to retur n to no rma l s iz e page .
Main Index
7
Press thebuttontoreturntothe
main index (generally on page 100).
Page 16
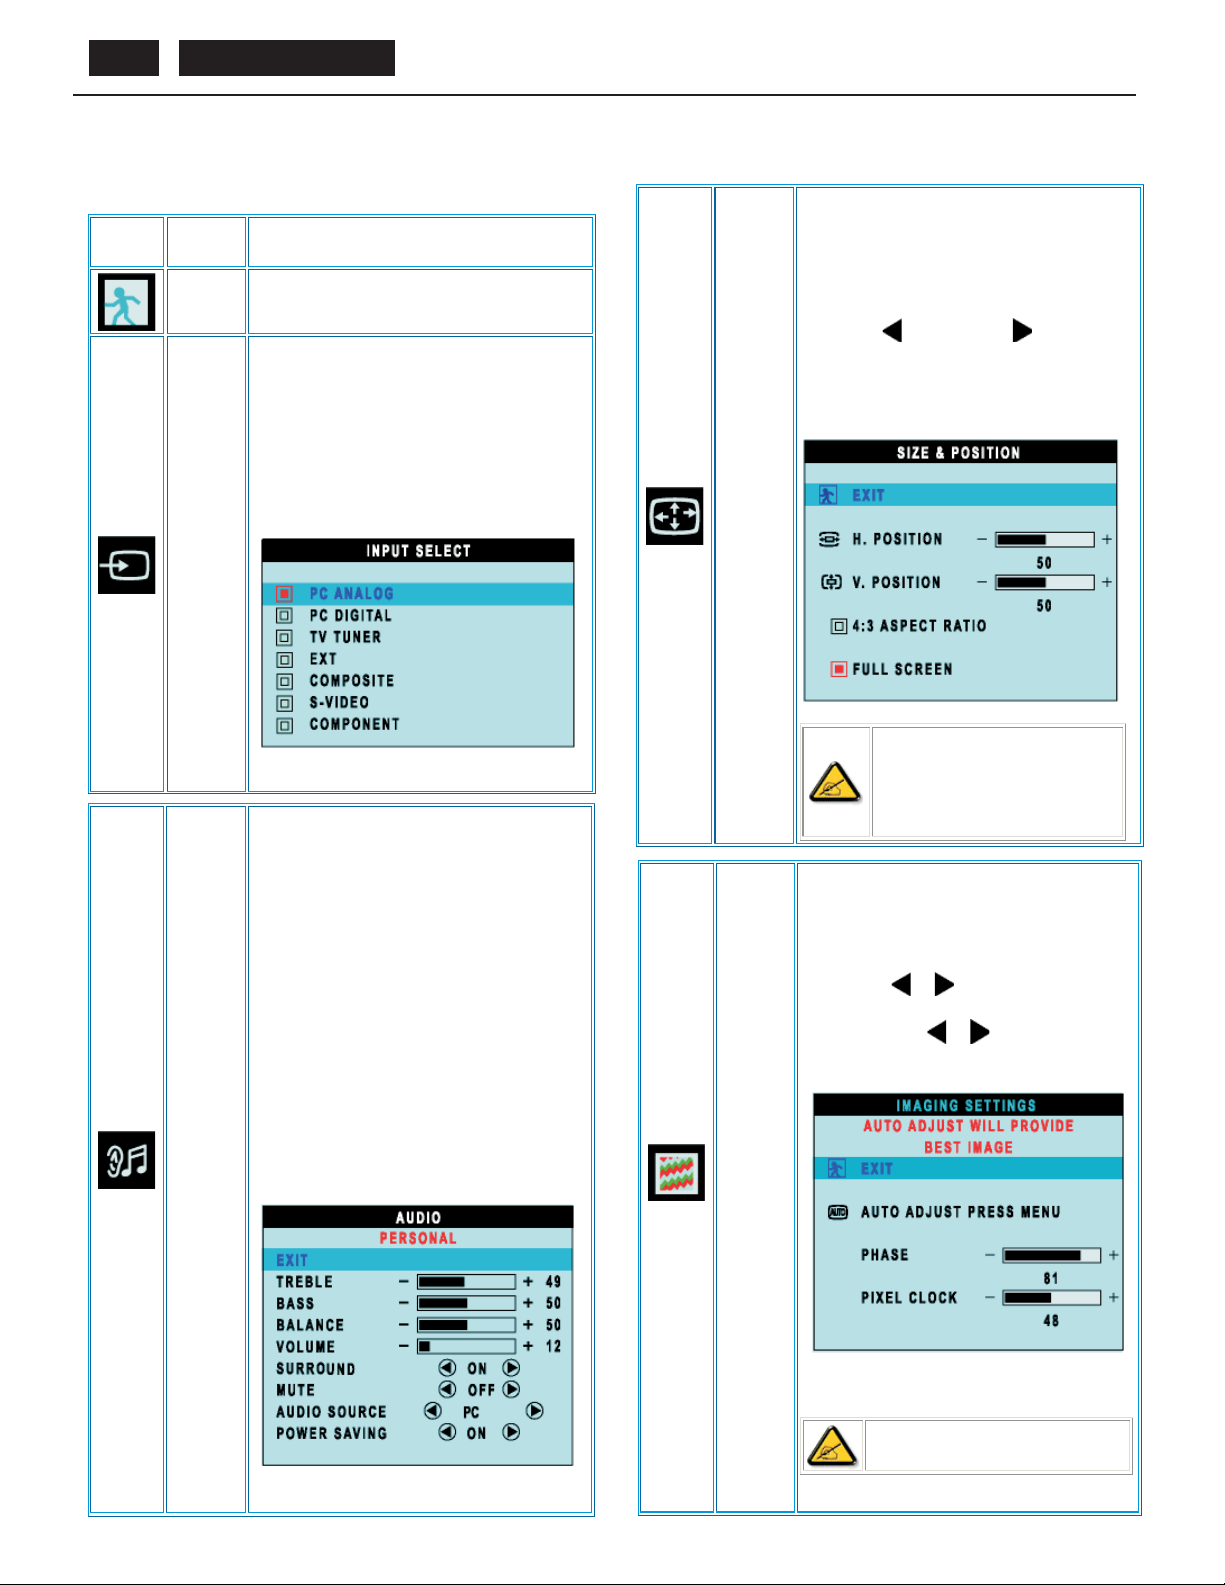
BDL4211. . . 16
OS D Us er Mode
PC Mode
Icon
Menu N ame
and S ub -
menus
EXIT
INP U T
SELECT
Description
T his is use d to e xit out of the Main me nu. .
S ele ct video s ource for ma in dis play:
P C AN ALO G : P C VGA input
PC DIGITAL: PC DIGITAL input
TV TUNER : Antenna or cable TV input
EXT: Scartinput
C OMP O S I TE : C ompos ite video input
S-VIDEO: S-video input
COMPONENT: Componentvideo input
S elec t your pre ferred function.
EXIT: Exit this menu
T R E B L E : A dju s ta ble from 0 to 1 0 0
BASS: Adjustable from0 to 100
BAL AN C E : Adjustable from 0 to 100
V O L U ME : Ad jus ta b le f rom 0 to 1 0 0
SIZE &
POSITION
P ositioning move s the vie wing a rea a round on the monitor
screen.
EXIT: Exitthis menu
H.P OS IT IO N /V.P O S IT ION: When making changes to either
the 'H or iz on tal ' o r 'V e rti ca l' s e tting s , the im a ge will s imply be
shifted in response to your s election/change.
Minimum is '0' (
4: 3 AS P E C T R ATIO : S elect 4:3 image dis pla y
FUL L S C R E E N: S elect full screen (16:9) image displa y
Toadjustthe image settings.
EXIT: Exit this menu
AU T O AD J U S T : P res s to s e le c t a u tomati c a dj us tme n t .
PHAS E :Usethe
). Maximum is '100' ( ).
NOTE :
1. When operating in DV I mode, the
pos ition ing a dju s tme nts are n ot a va i la ble .
2. The 4:3 As pect R a tio and F ull S creen
items a re not a vailable in WXG A 1280x768
modes .
and buttons to adjust from 0 to 100.
AUDIO
SU R R OU ND: ON/OFF
MUT E : ON/OF F
AUDIO SOUR C E : Only in P C TV/VIDEO mode
POWER SAVING:ON/OFF
IMAGIN G
SETTINGS
PIXEL CLOCK :Use the
100.
N ote : O p er a ting i n D V I m ode , the P ixe l C loc k
and P has e a djustments a re not ava ilable.
and butto ns to a dju s t fro m 0 to
Page 17
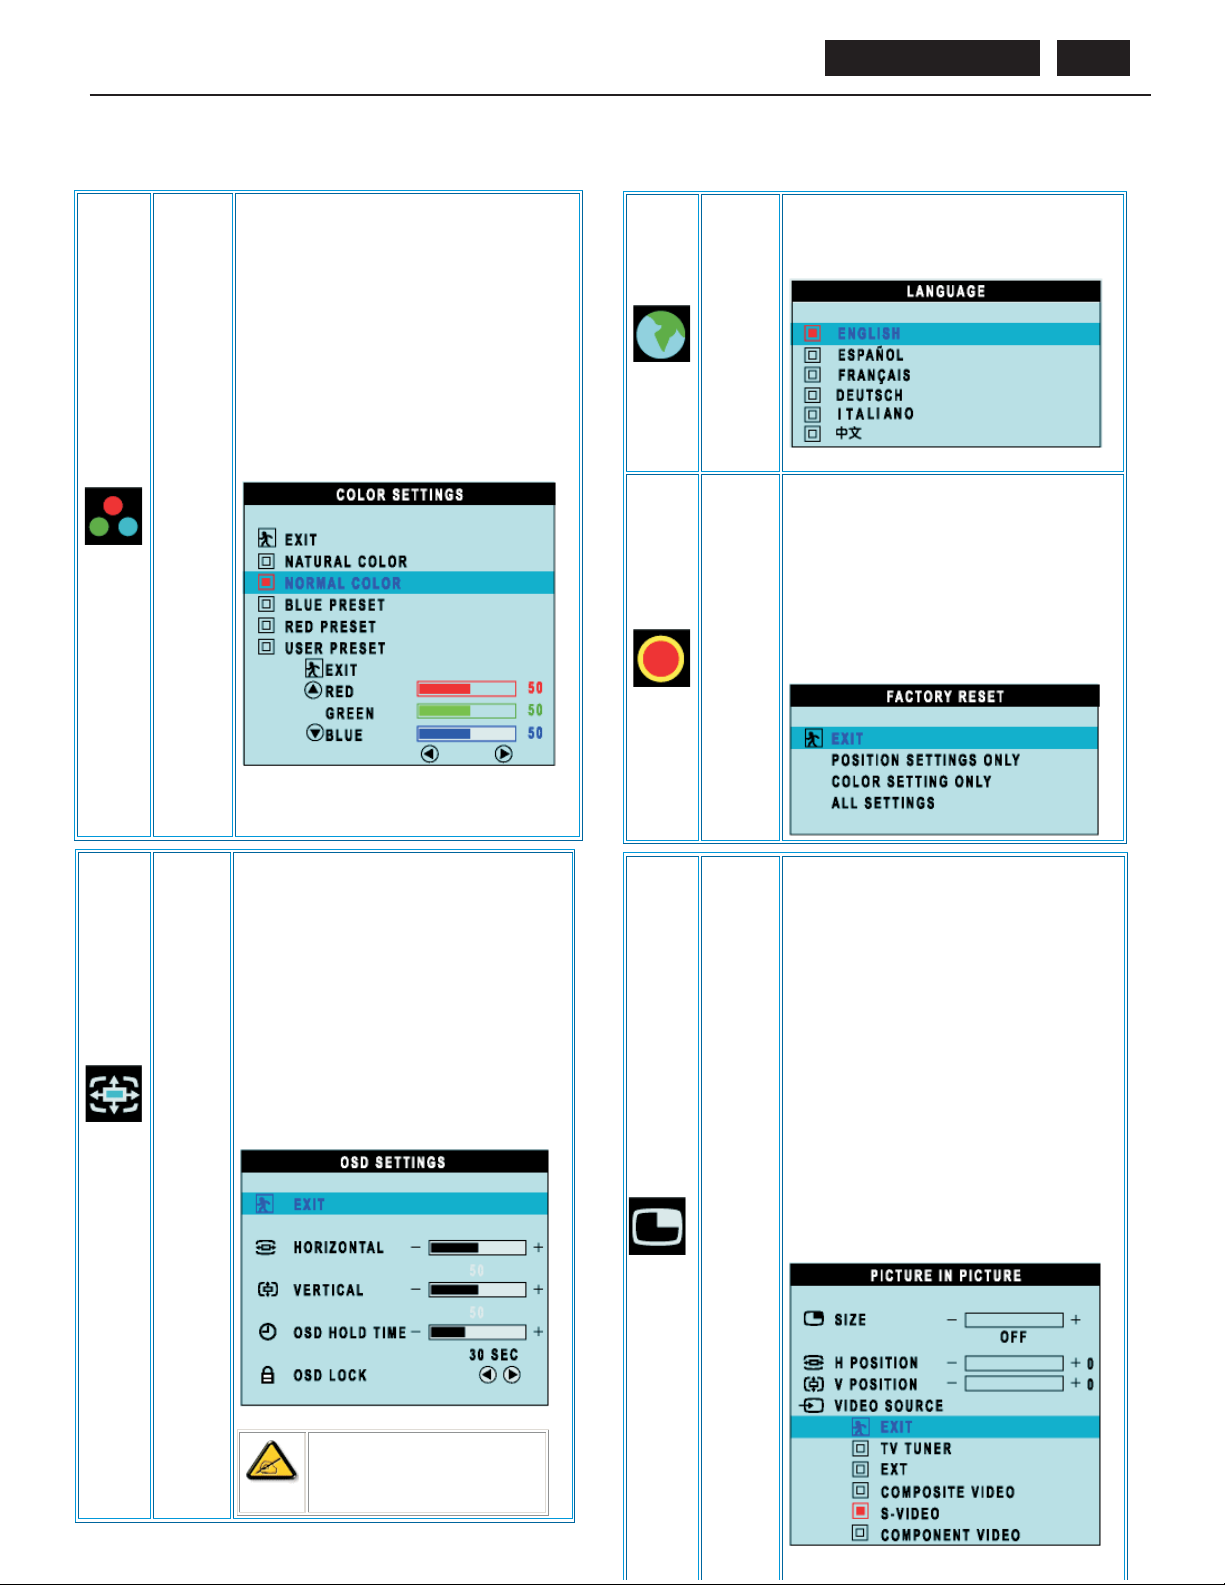
OS D User Mode
BDL4211. . . 17
COLOR
SETTINGS
C olor S ettings a dj us ts the c ol or te mper ature .
EXIT: Exitthis menu
NAT U R E CO L O R : E quiva lent to original pane l c olor.
NOR MAL CO LO R : 6500K (S ame as sR G B ) defaultfrom
FACTO R Y
BL UE PR E S E T: E quivalentto 9300K
R E D PR E S E T: E quivalentto 5700K
US E R PR E S E T: Adjustred, green, blue three colors from 0 to
100.
LANGUAGE
FACTOR Y
RESET
L a ngu a ge s e ts the O S D to d is pl ay in one of the f ive or s ix
langua ge s provided. T ha t is, E nglis h, S pa nis h, F renc h,
G erma n, Ita lian (n o t av a ila ble in NA F TA model) a nd S implifie d
Chinese(China models only).
R e s e t the s e ttin gs to th e fa c tor y de fa u lt va lu es .
EXIT: Exitthis menu
POSITIONSETTINGS ONLY:Resume positionsetting to
fac tory defa ult.
COL OR SE TT INGS ONLY:Res ume color settingto factory
defa ult.
All S E TT INGS :Load all factory defaultsettings.
OSD
SE TTING S
E a c h time the O S D ope ns , it dis play s in the sa me loc ation on
the s cr ee n. 'O S D S e ttin gs ' ( ho rizo nta l/v er tic a l) prov ide s co ntro l
ov er th is loc a tion .
EXIT: Exit this menu
HOR IZO NTAL: Adjustable from 0 to 100.
VE R T IC AL: Adjustable from 0 to 100.
OS D HO L D T I ME : T he O S D s tays active for a s long a s it is in
use. The range of time setting is from5 to 60 seconds.
OSD LOCK: Controls user access to adjustments. S howkey
icon afters electing lock.
PICTURE IN
PICTURE
Adjust picture in picture preferences.
S IZE : T urn off and se t the s ize of P I P. U s e rs can chos e your
preferred s ize.
OF F
SMALL
ME D IU M
LAR GE
H PO S IT ION : Adjust theHorizontal position of P IP.
V P OS IT IO N: Adjust the Vertical position of P IP.
VIDEO SOURCE :Selectvideo source ofPIP:
EXIT
TV TUNER
EXT
COMPOSITE VIDEO
S-VIDEO
COMPONENT VIDEO
Note: W hen the OS D is loc k e d, pres s ing
the m e nu bu tton a ga in a n d it w ill ta k e
user to OS D LOC K menu. P ress (+) to
unlock and allow user access toall
applic able s e ttings .
Page 18
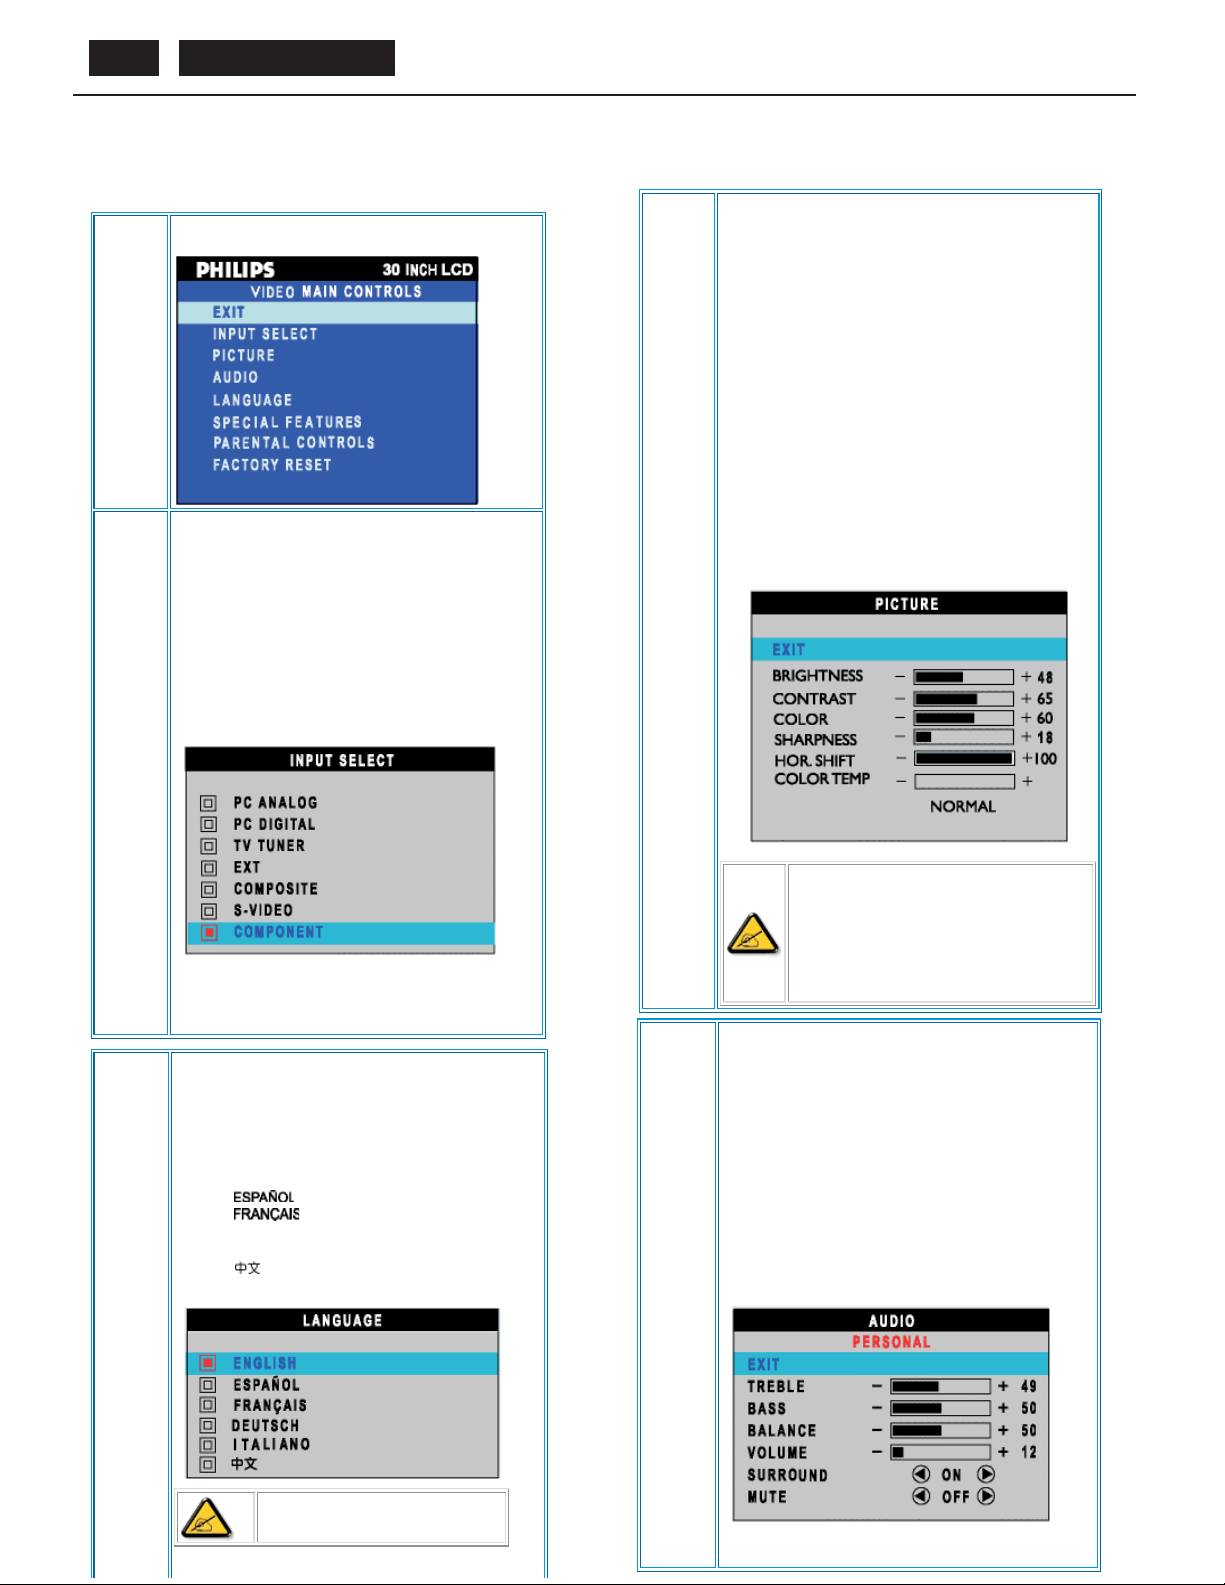
BDL4211. . . 18
OS D Us er Mode
Audio /Video Mode
E xit from this menu.
EXIT
Us e up a nd down arrow button to highlight the "IN P UT S E L E C T ".
S elec t video s ource for main dis pla y:
P C ANAL OG : PC VGA input
PC DIGITAL: PC DIGITAL input
T V TU NE R : Antenna or ca ble T V input
EXT: Scartinput
C O MP O S I TE : C omposite v ideo input
S-VIDEO: S-videoinput
COMPONENT: Component videoinput
INP U T
SELECT
PICTURE
Adjust picture characteristics to suit personal preference.
EXIT: Exit fromthis menu
B R IG H T NE S S : A dju s ta ble from 0 to 1 00
CONTRAST: Adjustable from 0 to 100
COLOR: Adjustable from 0 to 100
S HAR P NE S S : Adjustable from 0 to 100
T INT : No t a va ilable in component input in all mode ls .
Adjustable from 0 to 100
HOR IZONTAL S HIF T: Adjustable from 0 to 100
C OL OR T E MP : S elect from Normal, Cool or Warm by "-" and "+"
buttons.
LANGUAGE
Setlanguage for OSD.
There are 6 languages of OS D display.
ENGLISH
DE UT S C H
ITA L IAN O
AUDIO
NOTE :
1. "TINT " is not a vaila ble in c ompone nt input in a ll
models .
2. "TINT " is ava ilable in N AF T A model only.
3. "H OR S H IF T" only function in c ompone nt input.
Adjust a udio characteristics to suit personal preference.
EXIT: Exit fromthis menu.
TR E B L E : Adjustable from 0 to 100
B A S S : A dj us ta bl e fr om 0 to 1 00
BAL AN C E : Adjustable from 0 to 100
VO LU ME : Adjus table from 0 to 100
SURROUND: SwitchSurroundSoundOn/Off
MUT E : S witch Mute On/ Off
NO T E : I n AP /C hina models , S implified
Chinese is supported.
Page 19
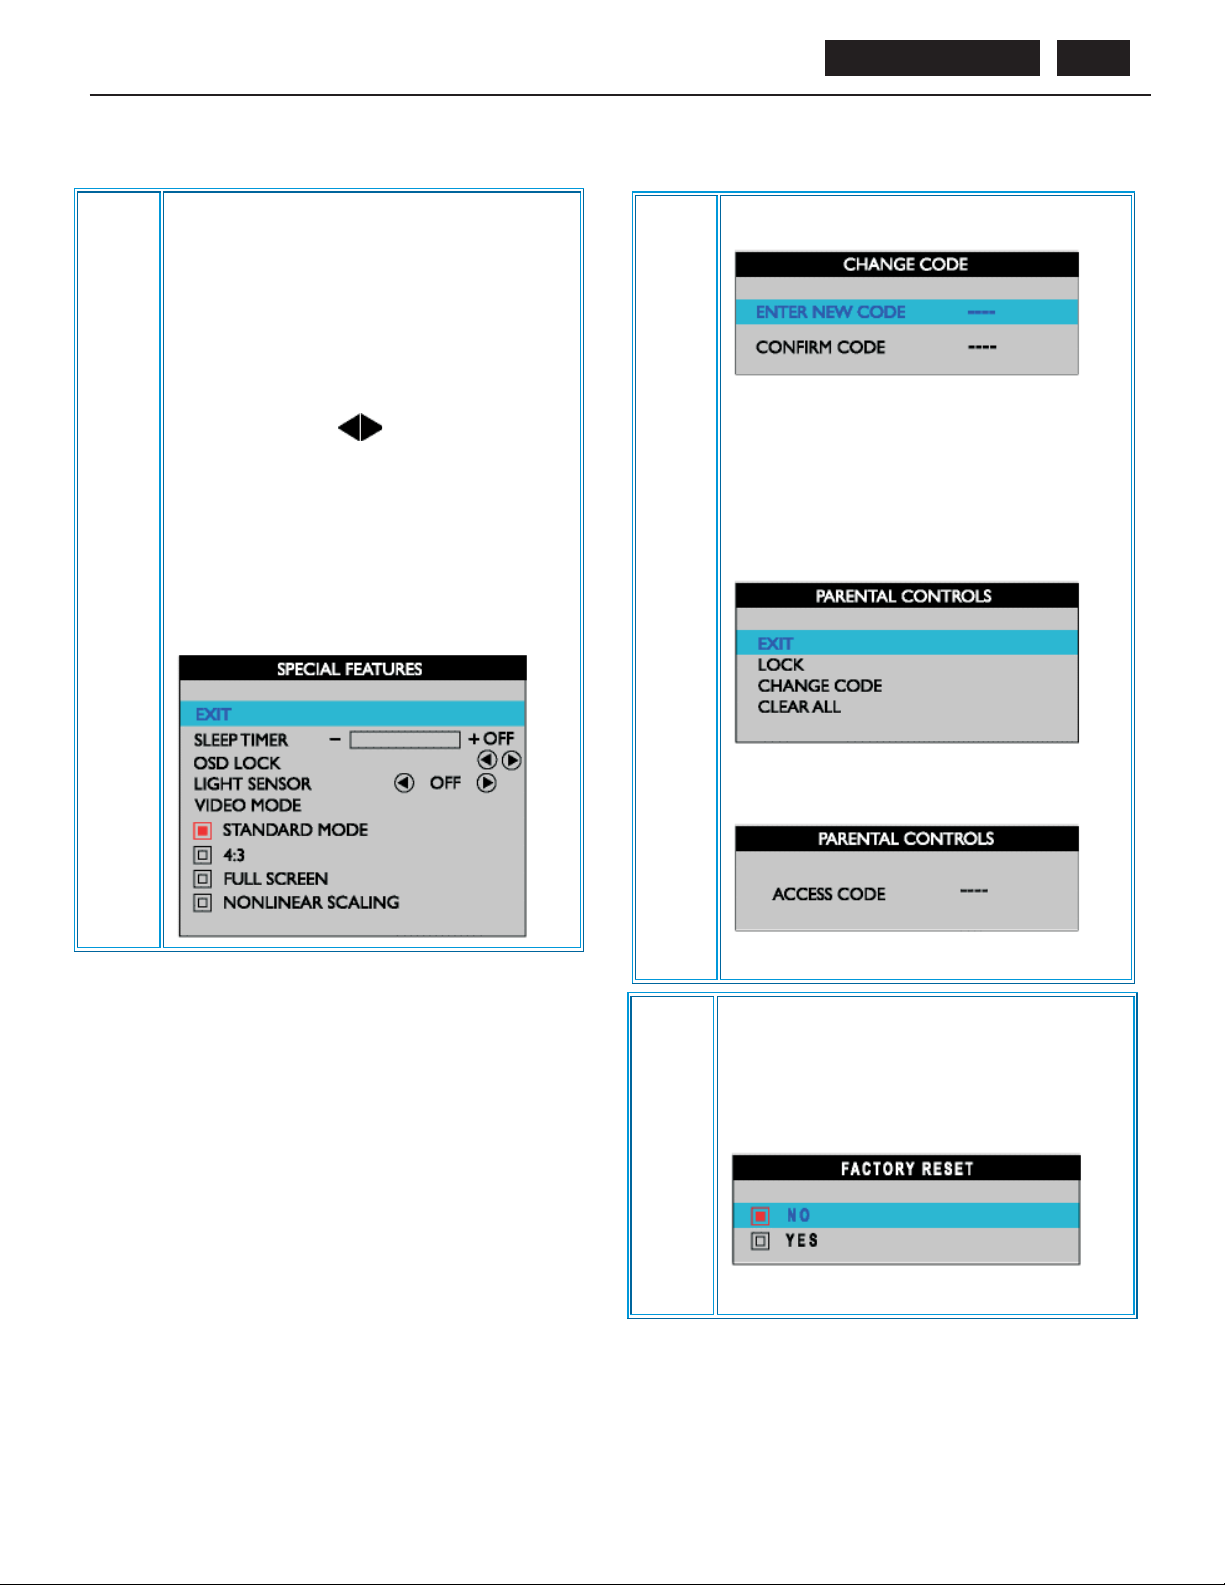
OS D User Mode
BDL4211. . . 19
SPECIAL
FEATURES
Acti va te s pe c ia l c on tro l fe a tur e s :
EXIT: Exitfromthis menu.
SLEEPTIMER:Slide bartoselect
off/15/30/60/90/120/150/180.
OS D LO C K : S how key icon after selecting lock.
LIGHT SE NS OR :Push the
Sensor function.
VIDE O MODE : S et the s creen s caling mode to s uitpersona l
preference:
buttons to to ggle Light
S TANDAR D MODE
4:3
FULL SCREEN
NONLINE AR SC ALING
PAR E NTAL
CONTR OLS
1) W hen users first enter the PAR E NTAL C ONT R O LS , the
s c re e n will sh o w the window a s king us e r k e y in the c o de .
2) U s e rs will s ee the window "Acc es s code" when they enter
this fu nc tio n.
EXIT
LOCK
CHANGE CODE
CLEAR ALL
FACTO R Y
RESET
3) E n ter Ma s ter code"0 7 11" twice or th e c ode ente r ed in
step 1.
R es et the s e tting to def a ult v a lues .
N O : K eep the s e tting a s c urre nt.
Y E S : L oad fa c tor y s e tting
Page 20
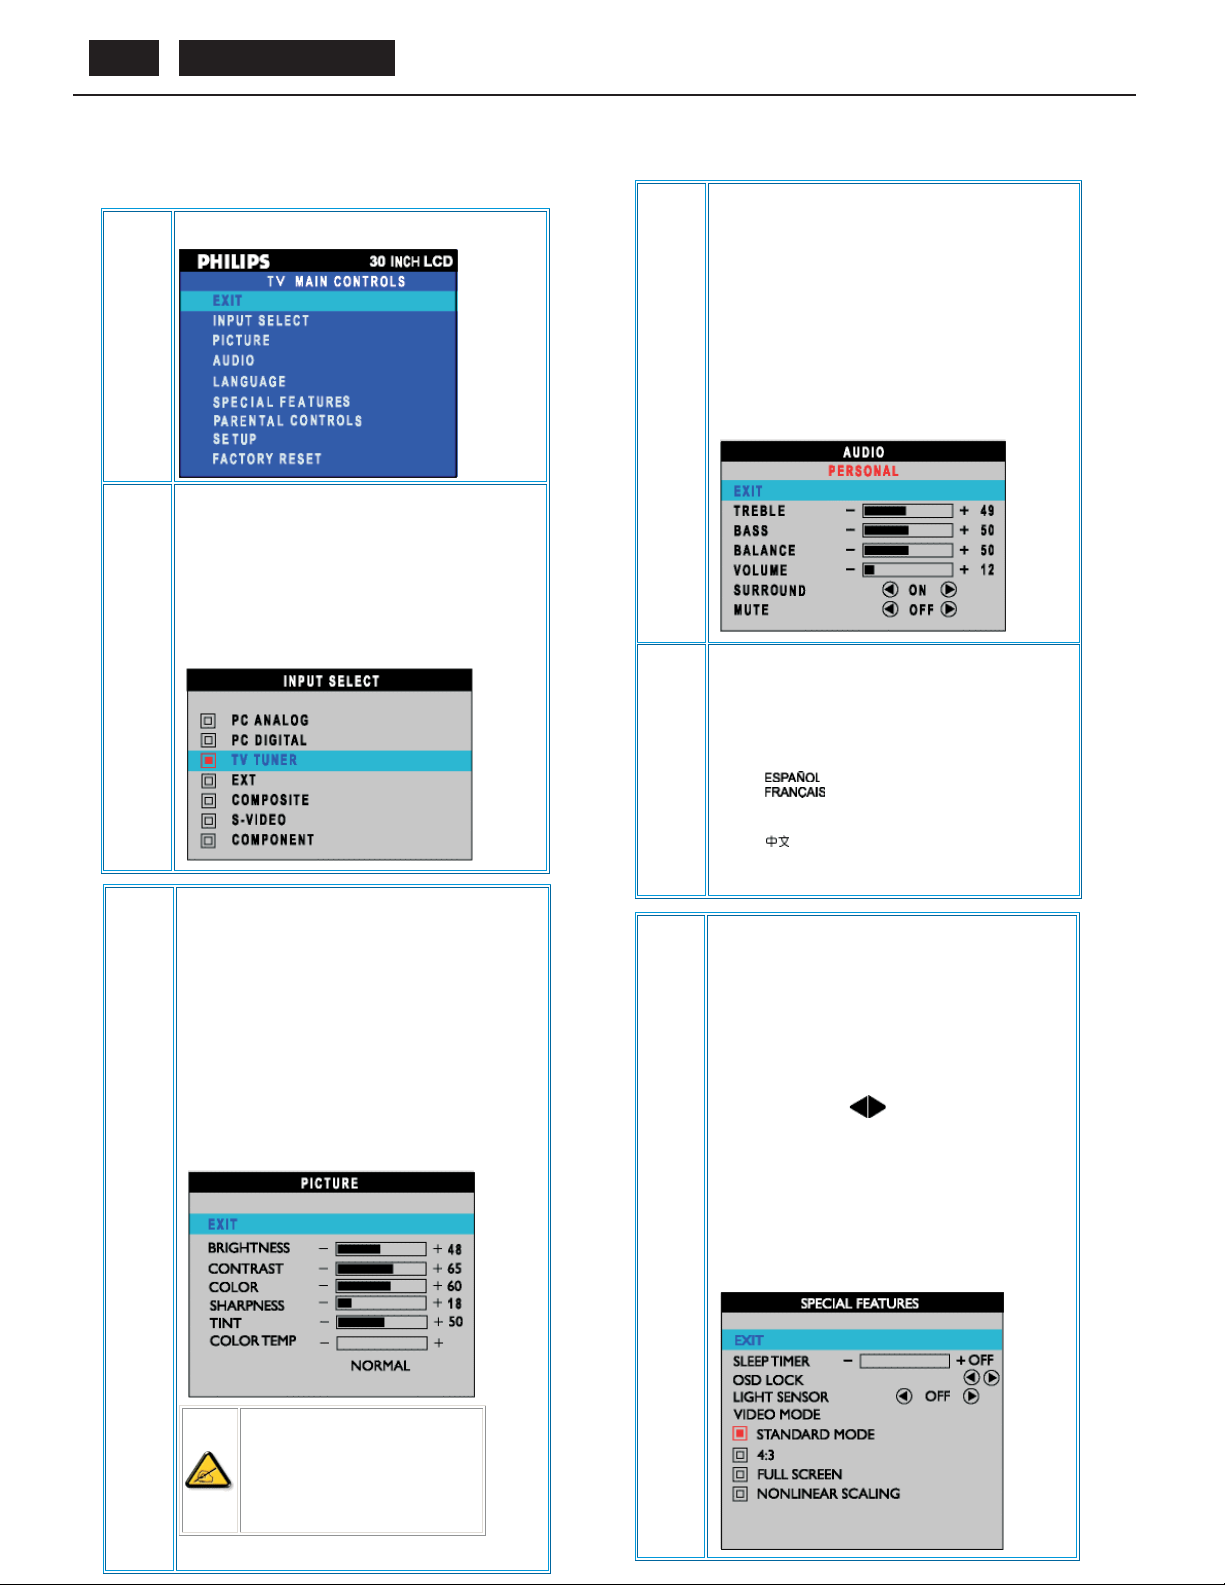
BDL4211. . . 20
OS D Us er Mode
TV Mode
EXIT
INP U T
SELECT
E xit from this menu
S ele ct video s ource for ma in displa y:
PC ANAL OG : P C V G A input
PC DIGITAL: PC DIGITAL input
TV TUNER : Antenna orcable TV input
EXT: Scartinput
C OMP O S IT E : Compo site vide o input
S-VIDEO: S-videoinput
COMPONENT: Component videoinput
AUDIO
LANGUAGE
Adjust a udio characteristics to suit personal preference.
EXIT: Exitfrom this menu.
T R E B L E : A dju s tab le fr om 0 to 100
B A S S : A dj us ta ble from 0 to 1 00
BALANCE: Adjustable from0 to100
V O L U ME : A dju s ta ble f rom 0 to 1 0 0
S UR R O UN D: S witch S urround S ound O n/ Off
MUT E : Switch Mute On/ O ff
Set language forOS D.
There are 6 languages of O S D display.
ENGLISH
DE UT S C H
ITA L IAN O
PICTUR E
Adjust picture characteristics to s uitpersonal preference.
EXIT: Exitfrom this menu
BRIGHTNESS: Adjustable from0 to 100
C O N T R A S T : A djus ta bl e fr om 0 to 1 0 0
CO L O R : Adjustable from 0 to 100
SHARPNESS: Adjustable from0 to 100
T INT: Not a va ilable in compo nent input.
Adjustable from 0 to 100
C OL OR TE MP : Se lect from Norma l, C ool or Warm by "-"
and "+" buttons .
NOTE :
1. "T I NT " is not ava ilable in com ponent input
in all models.
2. "T I NT " is a vaila ble in NAF T A mo del only.
SPECIAL
FEATURES
Ac tiv a te s pe ci a l co ntro l fea tu re s :
EXIT: Exitfromthis menu.
S LE E P T IME R : Slide ba r to s ele ct
off/15/30/60/90/120/150/180.
OS D LOC K: Show key icon after s electing lock.
LIGHT S E N S OR : Push the
S ens or function.
VIDEO MODE: Set the screenscaling mode to suit personal
preference:
butto ns to to ggl e L ig ht
S TANDAR D MODE
4: 3
FULL SCREEN
NO NLINE AR SCAL ING
Page 21
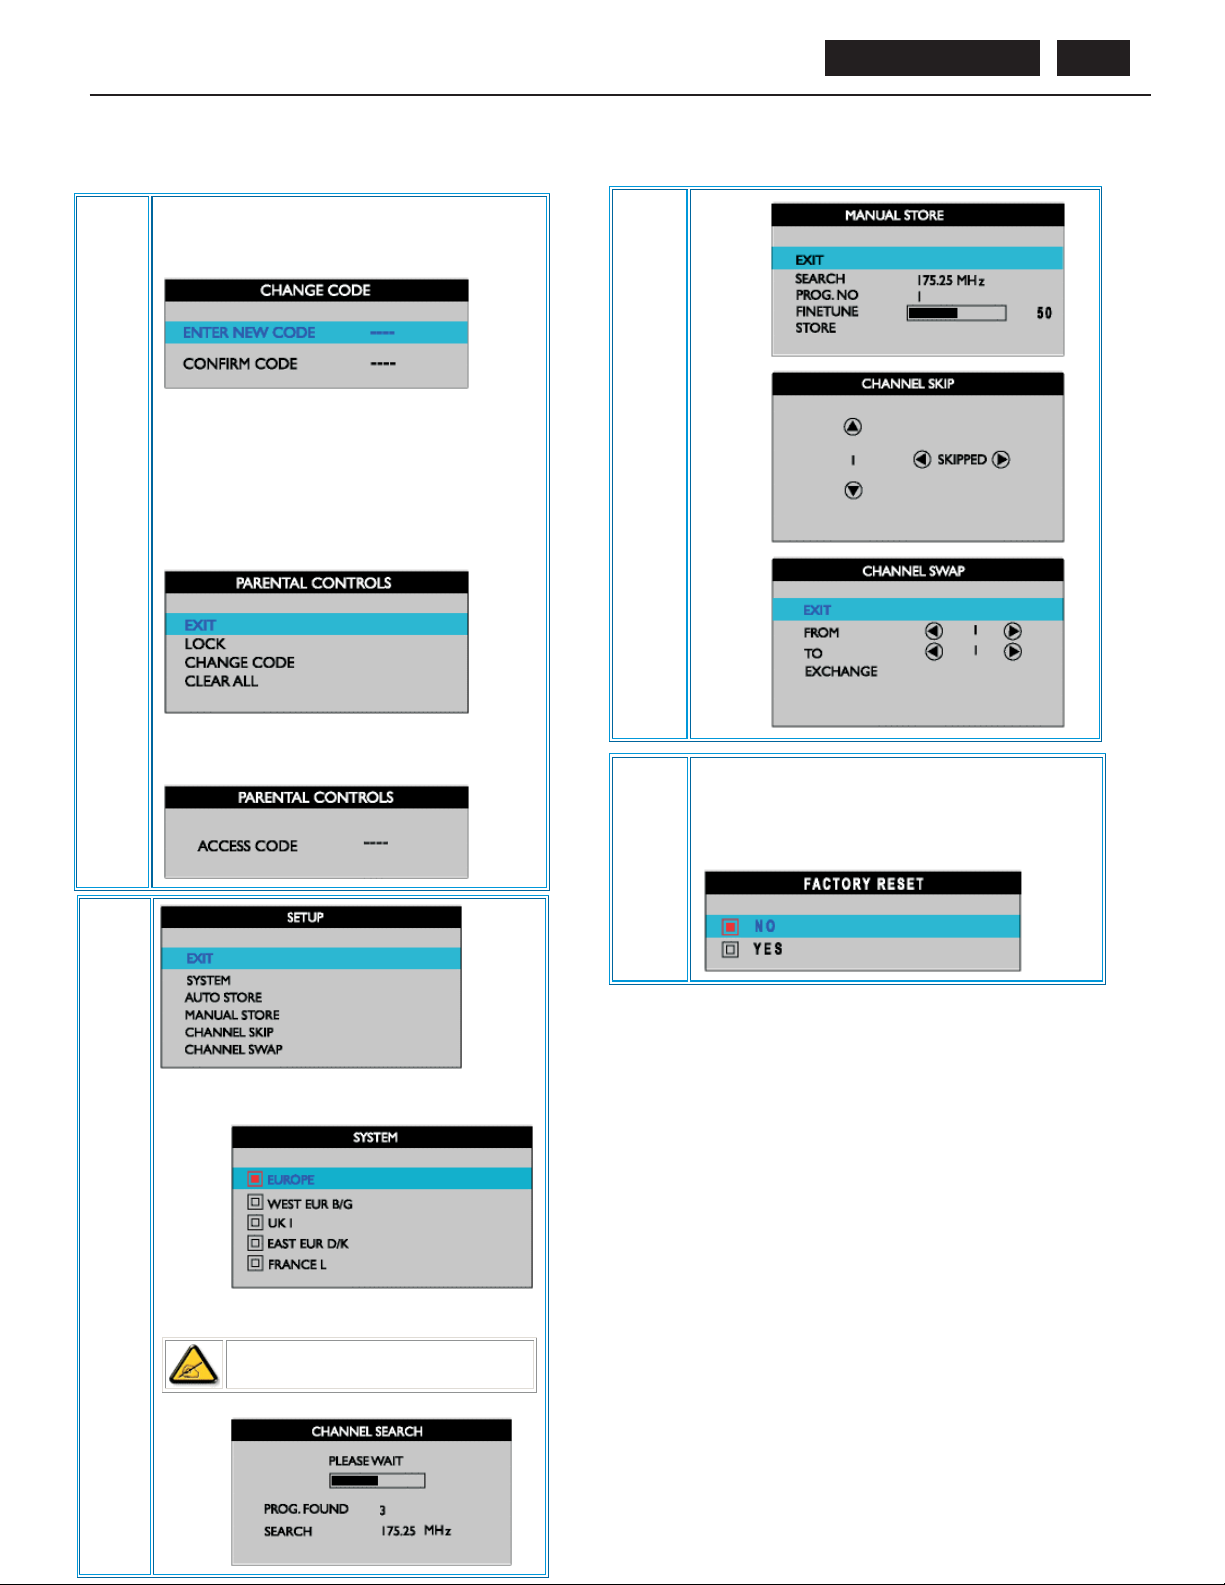
PARE NTAL
CONTROLS
OS D User Mode
1) W hen users first enterthe PAR E NTAL CO NTR OL , the
s c ree n will s how the win do w a s kin g us er ke y in the c o de .
2) Us ers will s ee the window" A cce ss code" when they e nter
this fou nda tion.
EXIT
LOC K
CHANGE CODE
CLEAR ALL
SETUP
MANU AL
STORE:
CHANNE L
SKIP:
CHANNE L
SWAP:
BDL4211. . . 21
SETUP
3) E nter Mas ter code "0711" twic e or the code entered in
step 1.
SYSTEM:
FACTOR Y
RESET
R e s e t the s etting to de fa ult v alue s .
N O: K e e p the s etti ng a s cur re nt.
YES: Load factory setting
CHANNEL
SEARCH:
NO T E : T he S Y S T E M item is only a va ilable in We s tern
Europe model.
Page 22
BDL4211. . . 22
Warning Message
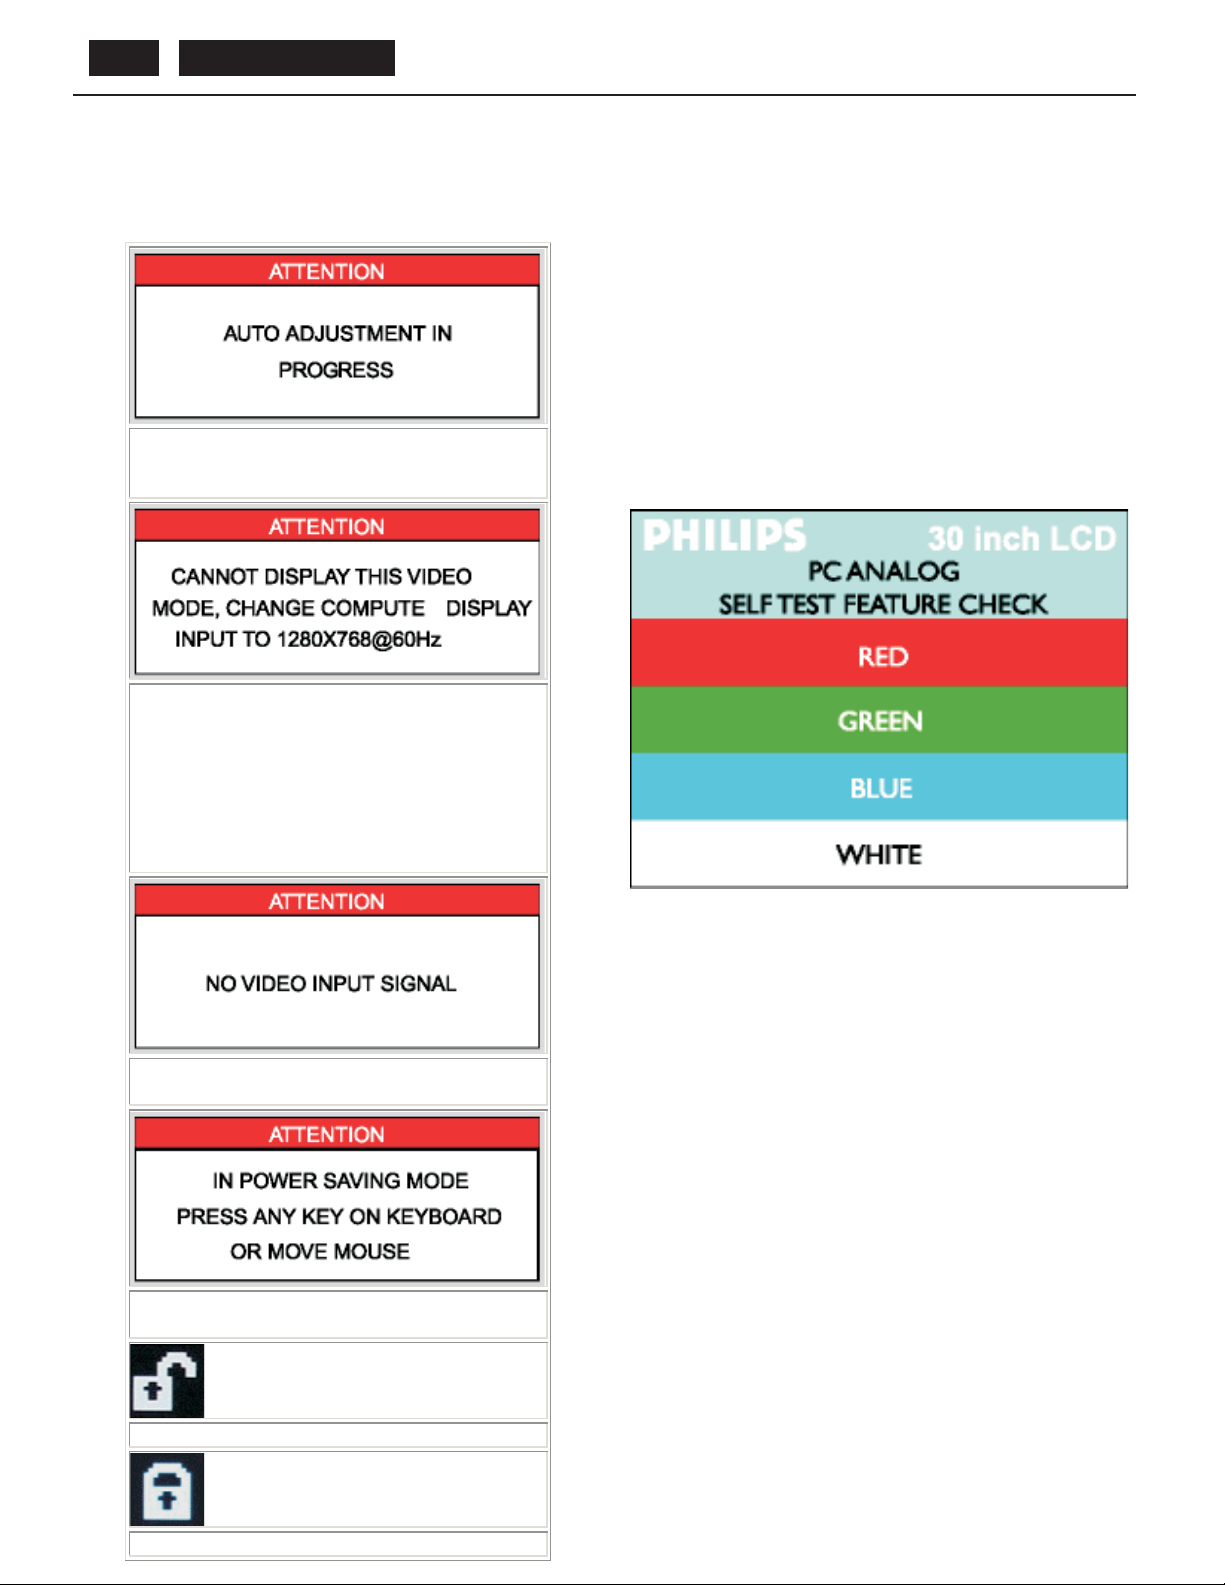
A warning mes s a ge may appear on the s creen indica ting the L C D
Monitor T V current s tatus.
When user sees this warning message, it
means that the LCD Monitor TV is in
adjustment process.
A warning message may appear on the screen
indicating that the LCD Monitor TV is out of
sync range.
S elf-Tes t F eature C hec k (ST F C )
Your the L C D Mo nitor T V wh e n us e d a s a computer dis pla y through
DV I and/or V G A c onnec tion provides a s e lf-test feature that allows you
to check whe th e r your the L C D M onitor T V is func tio ni ng properly. If
your the LC D Monitor T V and computer are properly connected but the
LC D Monitor TV s cre en remains da rk, run the LC D Monitor T V s elf-tes t
by performing the following s teps :
1. Turn off both your computer and the L C D Monitor TV.
2.Unplugthevideocablefromthebackofthecomputer.Toensure
proper S elf-Tes t opera tion, remove both Digital(white connector) a nd
the A nalog(blue connector) cables from the back of computer.
3. T ur n on the L C D M on ito r T V.
T he floating 'P hilips - s e lf-test F eature C he ck' dialog box s hould
appea r on- s cree n (aga inst a black background) if the LC D Monitor T V
cannot sense a video s igna l and is working correctly. While in s elf-test
mode, the power LE D re ma ins green and the s e lf-tes t pa ttern will s croll
through the sc reen continua lly.
See Specifications for the Horizontal and
Vertical frequency ranges addressable by this
the LCD Monitor TV. Recommended mo de is
1280x 768 @ 60Hz.
This message means that there is no video
input signal.
The LCD Monitor TV is in a power saving mode
(in PC mode).
T his box als o a ppea rs during normal s ystem ope ra tion if t he video
cable becomes disconnected or damaged.
4. Turn off your the L C D Monitor TV a nd rec onnect the video ca ble;
then turn on both your compute r a nd the L C D Monitor TV. If your the
LC D Monitor TV scre en re mains blank after you use t he pre vious
procedure, check your video controller and computer system; your
LC D Monitor TV is functioning properly.
The main OSD menu is unlocked.
The main OSD menu is locked.
Page 23

Troubles hooting
C ommon P r oblems
T h e following table conta ins ge ne ra l inform a tion a bou t com mon L C D T V proble ms you migh t en c ou nte r.
C O MMON S Y MP T O MS
No V ide o/ P owe r L E D off
WHAT YOU E XPER IENCE
No picture, L CD T V is dead
POSSIBLE SOLUTIONS
C he c k connec tion integrity at both e nds of the vide o c a ble
E le c tric outle t veri f ic a tion
E ns ure power button depres s e d fully
BDL4211. . . 23
No V ide o/ P owe r L E D on
PoorFocus
S ha k y /J i tte ry V id e o
Missing Pixels
Stuck-onPixels
B rightnes s P ro blems
G e ome tric Dis tortion
No picture or no brightness
P ic ture is fuzzy, blurry or ghos ting
Wavy picture or fine movement
LCD screen has s pots
LCD screen has brightspots
P ic ture too dim or too bright
S c re en not ce ntere d corre c tly
Inc re a s e brightnes s & c ontras t controls
Perform LC D TV self-test feature check
C he c k for bent or broke n pins
P u s h Au to adjus t bu tton
Adjus t P ha s e and C loc k c ontrols via O S D
E limin a te vide o e x te ns ion cable s
P e rform L C D TV res e t
L owe r vide o re s olution or inc re a s e font s iz e
Push Auto Adjust button
Adjus t P ha s e and C loc k c ontrols via O S D
P e rform L C D TV res e t
C he ck environmenta l fa c tors
R e loca te and te s t in othe r roo m
Cycle poweron-off
These are pixels that are permanently off andis a natural defect that
occurs in LC D technology
Cycle poweron-off
T he s e are pixe ls that a re permane ntly on a nd is a na tural de fec t that
occurs in LC D technology
P e rform L C D TV res e t
Push Auto Adjust button
Adjus t brightness & c ontra s t controls
N ote : W h e n o pe ra tin g in D V I mode, the co ntr a s t adju s tment is not
available.
P e rform L C D TV res e t on "P os ition S ettings O nly"
P us h a uto-adjus t button
Adju s t th e ce n te ring co ntr ols
EnsureLCDTV is inpropervideomode
Note: Whe n ope ra ting in D V I mode, the pos itioning adjus tments are
not a v a ila ble.
Horizontal/Vertical Lines
Sync Problems
LC D S cratched
S a fe ty R ela te d Is s ue s
Inte rmitte n t P roble m s
S creen has one or more lines
S c re e n is s c r a mble d or appea rs torn
S creen has scratches or s mudges
Visible signs ofsmoke orsparks
LCD TV malfunctions on & off
P e rform L C D TV res e t
Push Auto Adjust button
Adjus t P ha s e and C loc k c ontrols via O S D
Perform LC D TV self-test feature check and determine if thes e lines
are also in self-test mode
C he c k for bent or broke n pins
Note: Whe n ope ra ting in D V I mode, the P ixe l C loc k and P ha s e
adjustments are not available.
P e rform L C D TV res e t
Push Auto Adjust button
Adjus t P ha s e and C loc k c ontrols via O S D
Perform LC D TV self-test feature check to determine if scrambled
screen appears in self-testMode
C he c k for bent or broke n pins
Bootup in the"safe mode"
Turn LC D T V off and clean the screen
Do not perform any troubles hooting steps
L C D T V ne e ds to be r e pla c e d
EnsureLCDTV is inpropervideomode
E nsure video cable connectionto computer andto the flat panelis
secure
P e rform L C D TV res e t
Perform LC D TV self-test feature check to determine if the
intermittent proble m o c c urs in s e lf- tes t mode
Page 24

BDL4211. . . 24
T V a n d A u dio P roblem s
C O MMON
S Y MP T O MS
PoorTV signal reception
Troubleshooting
WHAT YOU E XPER IENCE POS SIBL E S OLUTIONS
Abnormal picture seen from the screen
T h e proximity of mo unta in s or high buildin gs ma y be re s pon s ible for
ghos t pictures , echoing or s ha dows . In this c a s e , try manually
adjusting your pictures: see 'fine tuning' or adjustthe directionof
the outside aerial. For Asia users in non-NTS C area: Does your
antenna ena ble you to rec e ive broadca s ts in this fre que ncy range
UHF or V HF band)? In the eventof difficultreception (s nowy
pi c tu re s ) switc h the NR o n th e P I C T U R E me nu to ON.
No T V picture
No sound
Video Problems
C O MMON S Y MP T O MS
No Video
L ow Q ua lity D V D play ba c k
No sound
R e mote C ontrol P roblems
REMOTE CONTROL
PROBLEMS
R e mote control does not
work pr ope rly
ProductSpecificProblems
S P E C IF IC S Y MP T OMS
Screenimage is tooSmall
C a nnot adjus t the LC D
T V with the buttons on
the front pa nel
No picture whe n T V input wa s s e lec ted
No s ound output whe n a program with
sound was playing
WHAT YOU E XPER IENCE
No signa l indic a tor is dis pla ye d.
P icture not crisp and some color
Dis tortion
S e e video but no a udio
WHAT YOU E XPER IENCE
No response fromLCD T V when
remote is pressed
WHAT YOU S EE
Image is cente red on screen, but
does notfill entire viewing area
OS D doe s not a ppea r on the s c re en
Ha ve you c onnected the aerial socke t properly? Have you chose n
the right s ys te m? P oorly c onne c ted S C A R T C a ble s or a e ria l
s oc ke ts a re ofte n the c a us e of picture or s ound problems
(s ome times the connectors can be come half disconne c ted if the
LC D T V s e t is move d or turned) . C he c k a ll c onne ctions .
E ns ure tha t the a udio cable s a re fir ml y connected to both the au dio
input c onnec tors on your L C D TV and a udio output c onnec tors on
your P C or Video player.
If on ce rtain T V cha nne ls you rec e ive a picture but no s o und, this
mea ns that you do not ha v e the c orre c t T V s ys tem. Modify the
SYSTEM setting.
POSSIBLE SOLUTIONS
C heck Video Input S election
C ompo s ite: Ye llow c olore d R C A ja c k
S - V ide o: Typic a lly a rou nd 4 pin ja c k
Component: Typically 3RCAjacks ofGreen,RedandBlue.
Check DVD connection
C ompo s ite giv e s good pic ture
S -Video gives better picture
C omponentgives best picture
Check ifTV volume is turnoff ofmuted
Connect the audio cable s ecurely
Audio ca ble is c o nne c ted in c or re c tly
Ve rify tha t the a udio sou rc e is se le c te d c or re c tly in the OS D
POSSIBLE SOLUTIONS
P oint the remote c ontrol directly a t the remote s e ns or on the L C D T V
R eplace bothbatteries withnew onesl
POSSIBLE SOLUTIONS
P e rform L C D TV res e t on "All S e ttings"
Turn the L C D T V off a nd unplug the power cord a nd then plug bac k
andpower on
Page 25
F ailure Mode of LC D Panel
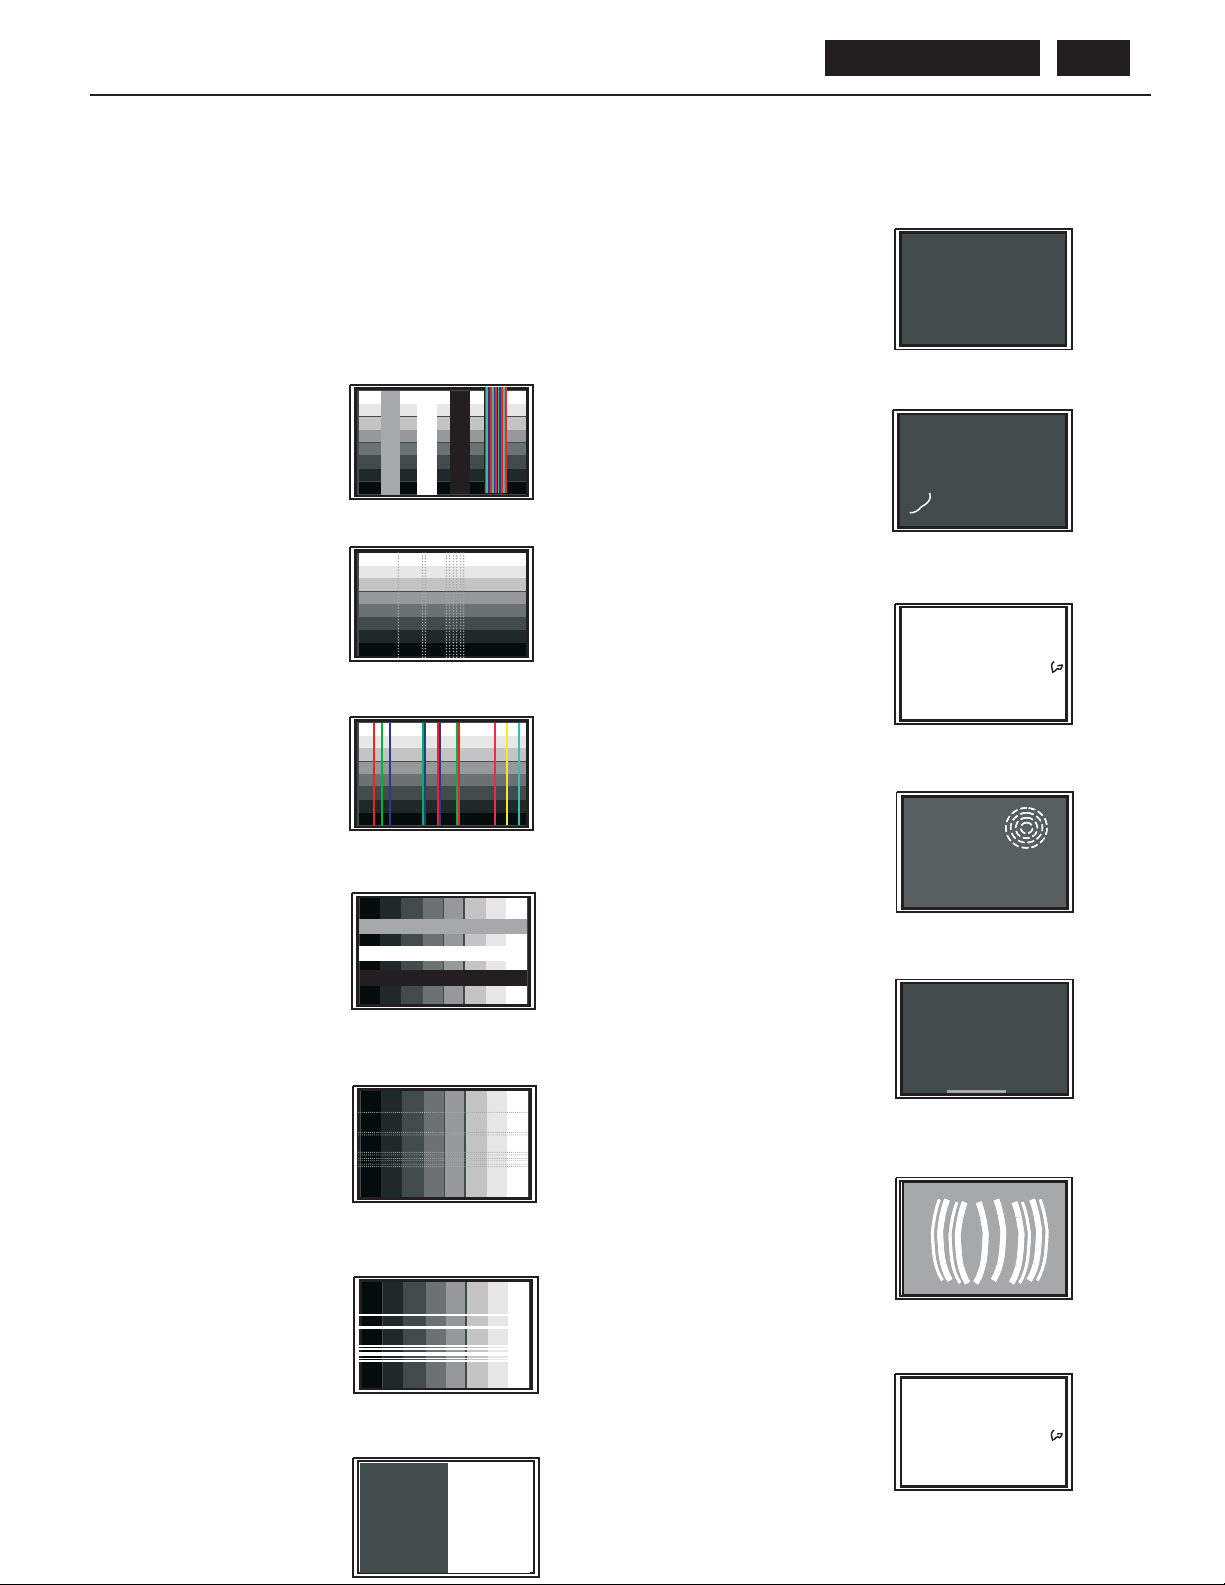
Quick reference for failure mode of L C D panel
T his pag e pres e nts problems that could be made by LC D pa ne l. It is
not nec e s s a ry to r e pair c ir c uit board. S imply follow the Me c h a nic a l
ins truction o n this ma nu a l to e limina te fa ilure by replac e LC D pa n e l
or ba c klight tubes .
F ailure des c ription P henome non
P ola riz er has bubbles
BDL4211. . . 25
..
Vertical block defect
Ve rtica l dim line s
Ve rtica l line s defect
(Always brightor dark
Horizontal block defect
P ola riz er has bubbles
. .. .
F ore ign ma teria l ins ide
polariz e r. I t s h o ws line a r or
dot s h a pe.
)
C onc e n tric circle fo r m e d
Ho r iz ontal dim lines
Ho r iz onta l line s de fec t
(Always brightor dark)
Has bright or dark pixel
Brightpixel
.
.
..
..
Dark pixel
.
.
.
.
.
.
B ottom ba ck light of L C D is
brighter than norma l
B acklight un-uni fo r mity
B ac klight has foreign ma teria l.
B lack or white color, linea r or
circular type
. .. .
Page 26
BDL4211. . . 26
Definition of Pixel Defects
0. General
This section explains the different types of pixel defects and
defines acceptable defect levels of each type. In order to qualify
for repair or replacement under warranty, the number of pixel
defects on a TFT LCD panel must exceed these acceptable levels.
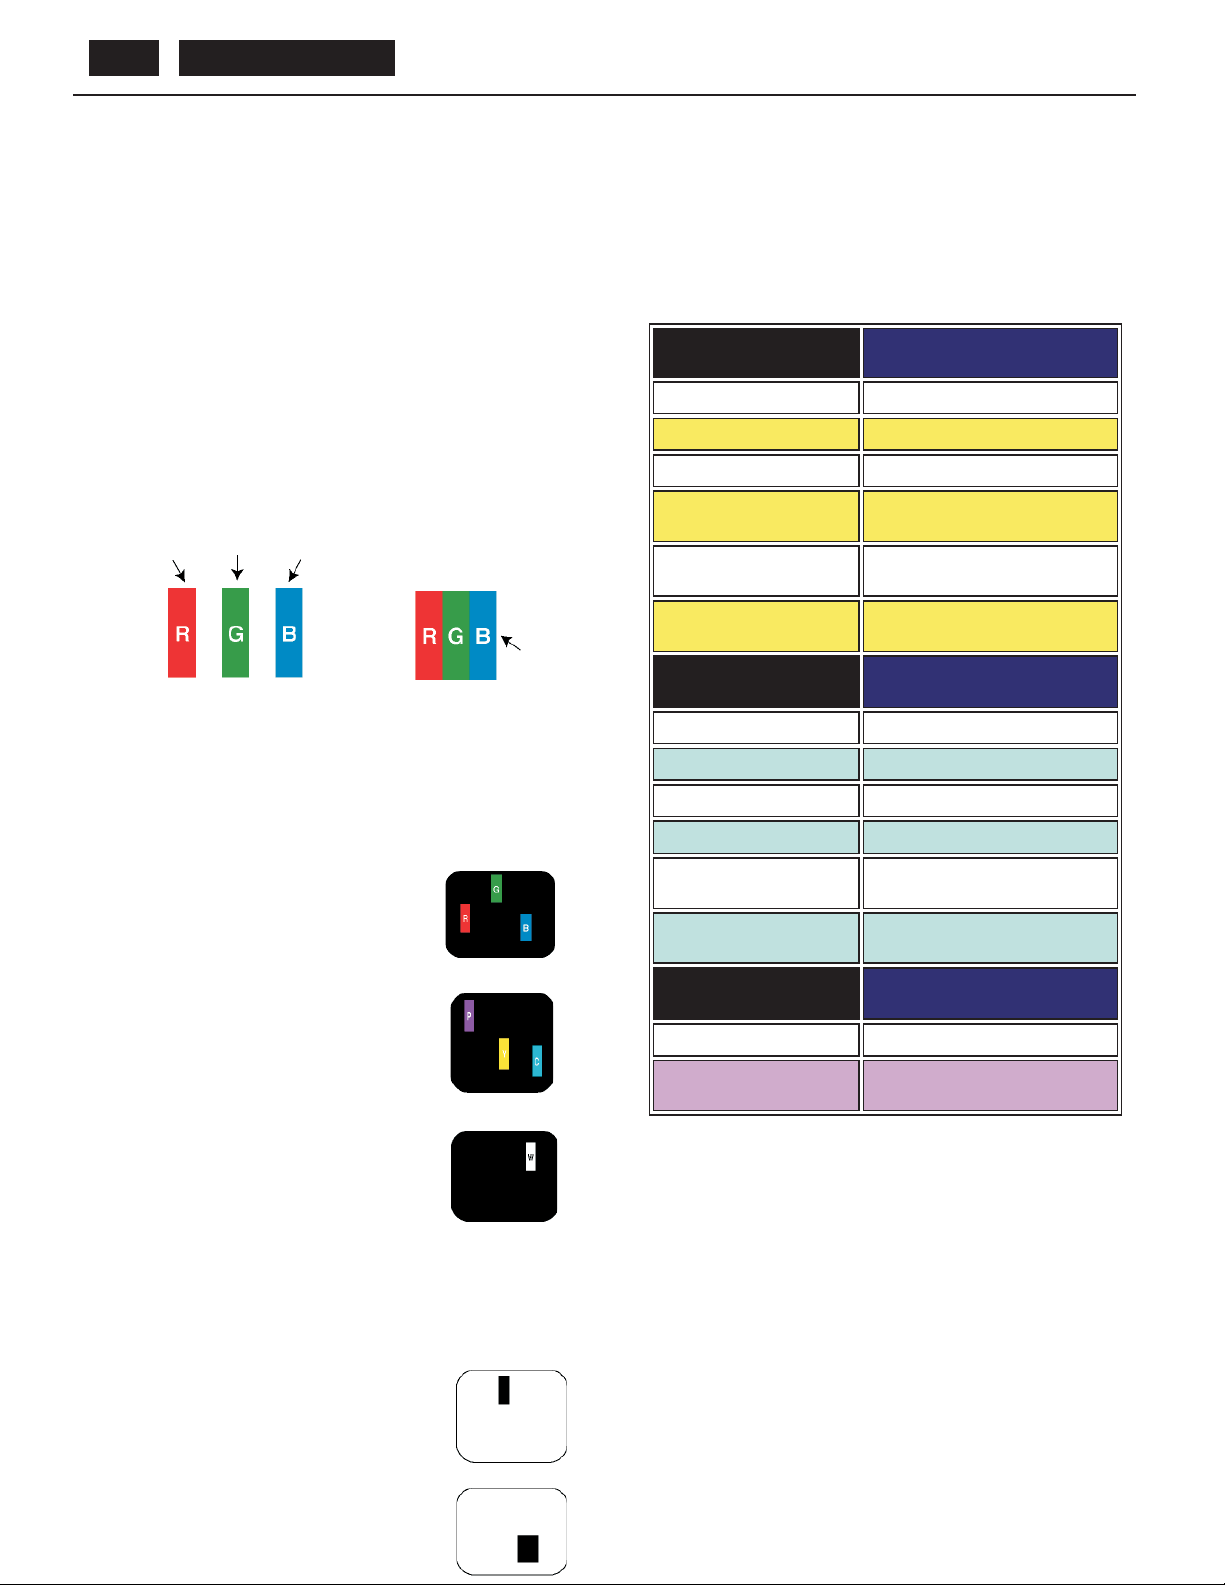
1. Definition of Pixels and Subpixels
A pixel, or picture element , is composed of three subpixels in the
primary colors of red, green and blue. Many pixels together from
an image. When all subpixels of a pixel are lit, the three colored
subpixels together appear as a single white pixel. When all are
dark, the three colored subpixels together appear as a single black
pixel. Other combinations of lit and dark subpixels appear as
single pixels of other colors.
Subpixel
Subpixel
Subpixel
Pixel
2. Types of Pixel Defects
Pixel and subpixel defects appear on the screen in different ways.
Bright dot defects
Bright dot defects appear as pixels or subpixels that are always lit
or "on"”. These are the types of bright dot defects:.
3. Pixel Defect Tolerances
In order to qualify for repair or replacement due to pixel defects
during the warranty period, a TFT LCD panel in a P HILIPS flat
panel monitor must have pixel or subpixel defects exceeding the
tolerances listed in the following tables.
BRIGHT DOT DEFECTS ACCEPT ABLE LEVEL
MODEL
1 lit sub pixel 3 or fewer
2 adjacent lit sub pixels 0
3 adjacent lit sub pixels
(one white pixel)
Distance between two
bright dot defects*
Total bright dot defects of
all types
BLACK DOT DEFECTS ACCEPT ABLE LEVEL
MODEL
1 dark sub pixel 5 or fewer
2 adjacent dark sub pixels 1 or fewer
3 adjacent dark sub pixels 0
L42W...
0
25 mm or more
2 or fewer
L42W...
One lit red, green or blue subpixel
Two adjacent lit subpixels:
- Red + B lue = P urple
- Red + G reen = Yellow
- Green + B lue = Cyan (Light Blue)
Three adjacent lit subpixels
(One white pixel)
Black dot defects
Black dot defects appear as pixels or subpixels that are always
dark or "off"”TThese are the types of black dot defects:
One dark subpixel
Distance between two
black dot defects*
Total black dot defects of
all types
TOTAL DOT DEFECTS ACCEPT ABLE LEVEL
MODEL
Total bright or black dot
defects of all types
Note: 1 or 2 adjacent subpixel defects = 1 dot defect
15 mm or more
5 or fewer
LW42...
5 or fewer
Two or three adjacent dark subpixels
Page 27
Mechanical Instruction
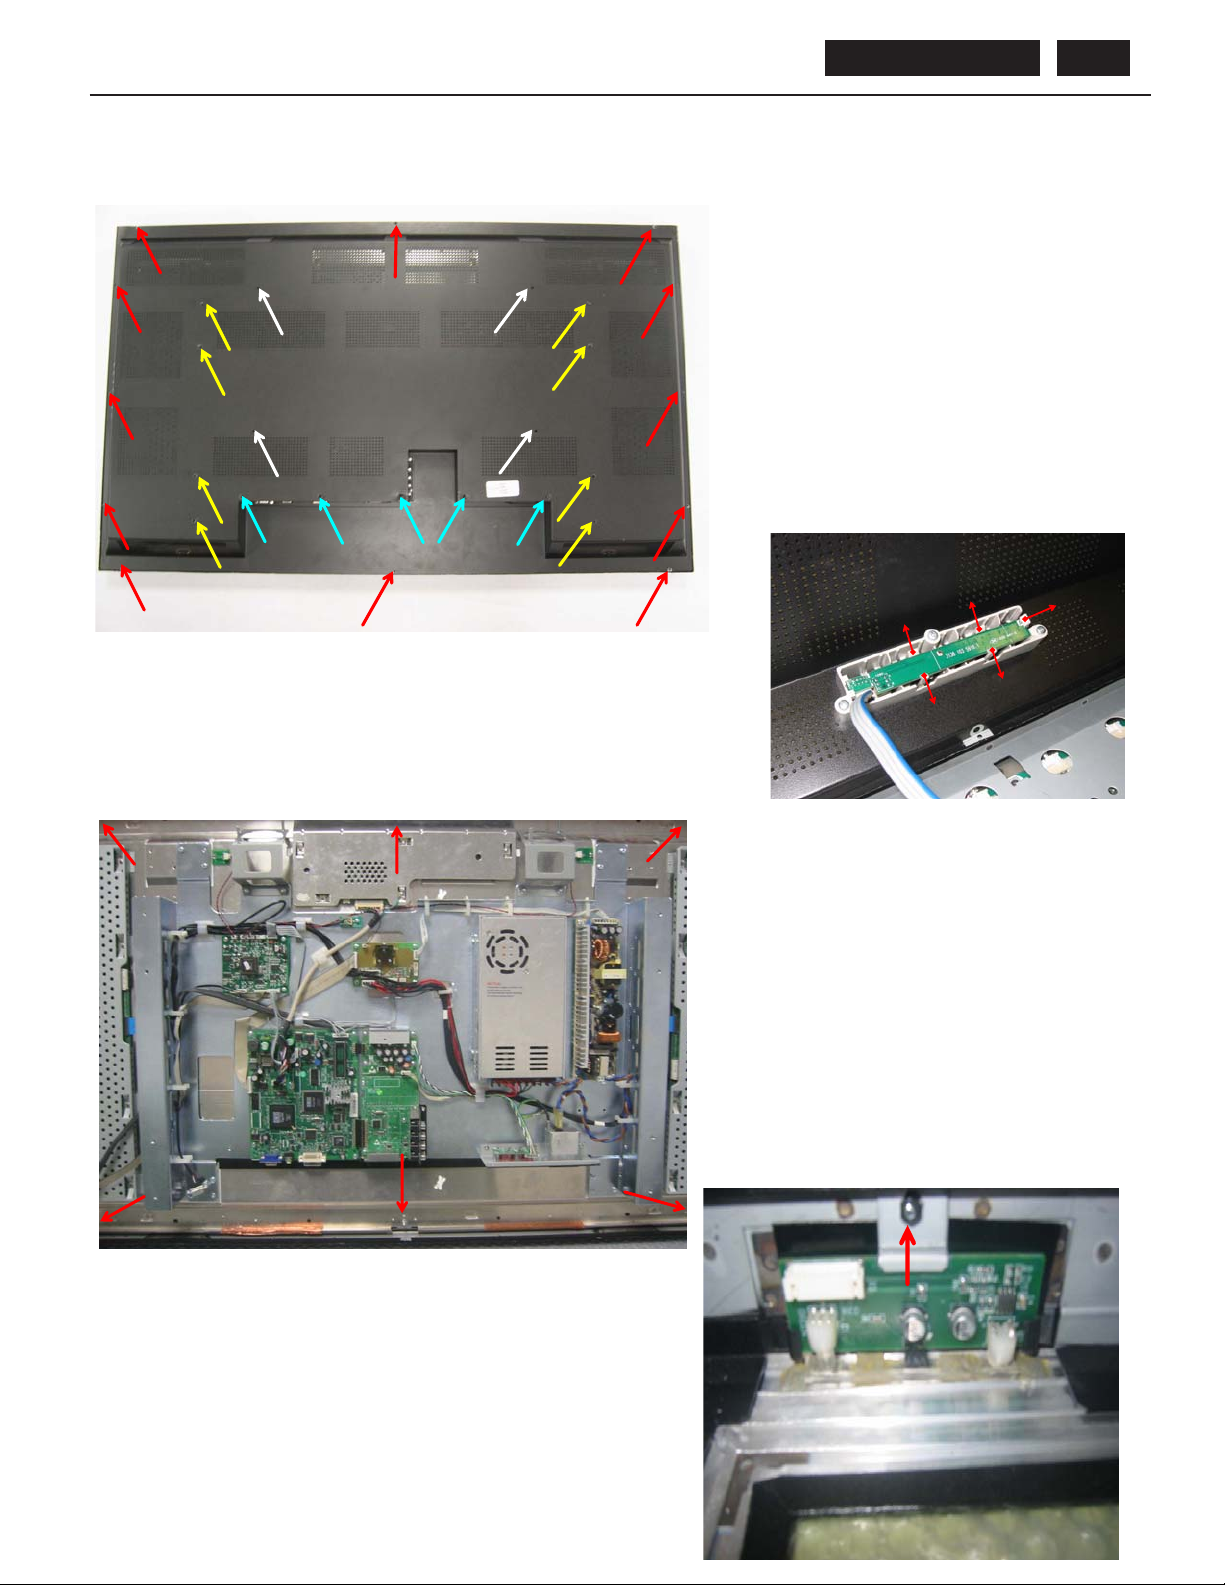
Remove back cover as Fig. 1:
a) Remove 12 screws (red)
b) Remove 8 screws (yellow)
c) Remove 5 screws (blue)
d) Remove 4 plastic screws (white)
WARNING:
Before removing the back cover completely,
the keyboard must be removed from back cover.
Fig. 2 unlock the keyboard from plastic support
BDL4211. . . 27
Remove front frame as Fig. 3 :
a) Remove back cover
b) loosen 6 nuts and remove LCD panel assy
Remove infrared sensor on front frame as Fig. 4 :
a) Remove front frame
b) loosen the nut and remove the bracket
Page 28
BDL4211. . . 28
Mechanical Instruction
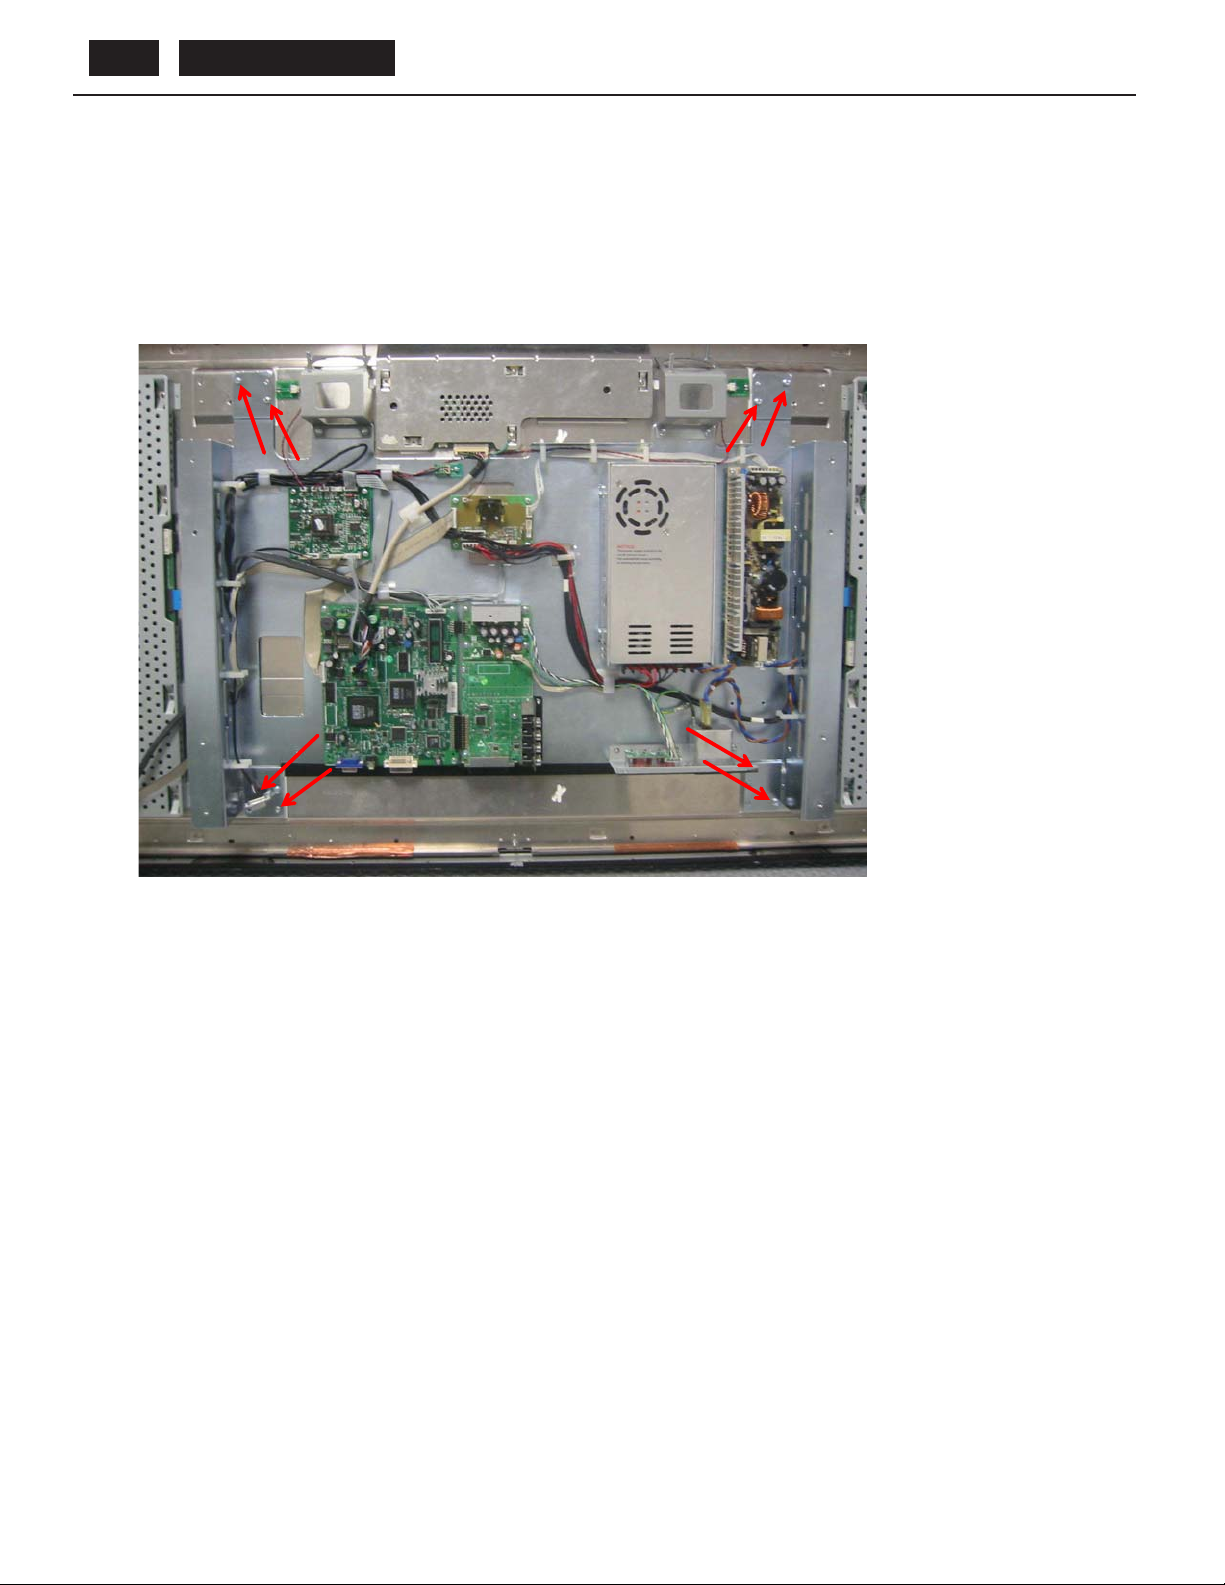
Remove metal frame from LCD panel as Fig. 5 :
a) Remove back cover
b) Remove 8 screws (red) and connecting cables.
Page 29

BDL4211. . . 29
DISPLAY ADJUSTMENT
• EQUIPMENTS
For the complete execution of the adjustment monitor, the following equipments have to be used:
a) Video Generator or PC with Graphic Board used to feed the appropriated timings and patterns to the monitors via D-SUB input and DVI
input
c) Minolta color analyzer CA210 for the measurement of the Colour Temperature and the Brightness.
d) Infra-Red RC5 Remote Control for making all the adjustments.
e) A PC with a communication program just like Docklight, a free serial port with an RS-232 cable connected to it and to the panel, and the
WinI
f) SP program
• PRELIMINARY SET UP
2 Pick-up the monitor without the back cover mounted.
3 Connect the Mains Plug to the Main Socket and supply the monitor with 230Vac.
4 Connect the PC to D-SUB input, connect the RS232 cable from PC to the serial input.
5 Switch-On the monitor.
6 Check the serial communication via Docklight sending the command: ESC$000E; and check for the right answer: ESC%00000;
7 Disable the remote control sending the command ESC$000MRC00; and wait for the ACK
8 Check the IO board fi rmware release sending the command: ESC$000MFW; (1.04 or greater)
9 Check the ISP (In System Programming) function sending the command ESC$000MPM; no answer is to be expected, to verify the
correctness of the command just type a “U” and check for a double echo
10 Switch OFF and then ON the panel
11 Launch the WinISP program from the PC, program the STATUS BYTE to 00, writing 00 in the STATUS BYTE box and pressing the WRITE
button
12 Switch OFF and then ON the panel with the main power switch and check that serial commands work fi ne sending an ESC$000E;.
• EEPROM PRESET
1 Disable the remote control sending the command ESC$000MRC00; and wait for the ACK
2 Reset the operating hours: ESC$000DRH; and wait for the ACK
3 Check the hours: ESC$000MOH; and wait for the correct answer: ESC%MOH000000; If the answer is not correct repeat point 2 and 3
4 Set temperature low threshold: ESC$000MTL28; (40°C) and wait for the ACK
5 Check temperature low threshold: ESC$000MTL?; and wait for ESC%000MTL28; If the answer is not correct repeat point 4 and 5
6 Set temperature high threshold: ESC$000MTH3C; (60°C) and wait for the ACK
7 Check temperature high threshold: ESC$000MTH?; and wait for ESC%000MTH3C; If the answer is not correct repeat point 6 and 7
8 Check the actual temperature value: ESC$000MTC; and wait for the answer ESC%000MTCxx; where xx shall be the ambient temperature
(HEX typical value from 0F to 24) otherwise check the temperature sensor (maybe is damaged).
9 Set monitor as slave: ESC$000DMT00; and wait for the ACK
10 Check monitor type: ESC$000DMT?; and wait for ESC%000DMT00; If the answer is not correct repeat point 9 and 10
11 Set LED status: ESC$000MLG00; and wait for the ACK
12 Check LED status: ESC$000MLG?; and wait for ESC%000MLG00; If the answer is not correct repeat point 11 and 12
13 Set Keyboard status: ESC$000MKA00; and wait for the ACK
14 Check Keyboard status: ESC$000MKA?; and wait for ESC%000MKA00; If the answer is not correct repeat point 13 and 14
15 Set Fan presence: ESC$000MFP00; and wait for the ACK
16 Check Fan presence: ESC$000MFP?; and wait for ESC%000MFP00; If the answer is not correct repeat point 15 and 16
17 Set Auto reset: ESC$000MPD06; and wait for the ACK
18 Check Auto reset: ESC$000MPD?; and wait for ESC%000MPD06; If the answer is not correct repeat point 17 and 18
19 Load light table: ESC$000DLI; and wait for the ACK
20 Enable light sensor I/O: ESC$000MAS01; and wait for the ACK
21 Check light sensor I/O: ESC$000MAS?; and wait for ESC%000MAS01; If the answer is not correct repeat point 20 and 21
22 Check the ambient light value: ESC$000MMS0A; and wait for the answer ESC%000MMSxx; where xx shall be the ambient light (HEX
typical value from 01 to 0A) otherwise check the light sensor (maybe is damaged).
23 Light the sensor at about 1,000lx and check again the light value: ESC$000MMS0A; and wait for the answer ESC%000MMSxx; where xx
shall be the new light source value (HEX typical value from AA to FF) otherwise check the light sensor (maybe is damaged).
24 Set Business Solution fl ag: ESC$000MBS01; and wait for the ACK
25 Disable the remote control sending the command ESC$000MRC00; and wait for the ACK
26 Check Business Solution fl ag: ESC$000MBS?; and wait for ESC%000MBS01; If the answer is not correct repeat point 24,25 and 26
Page 30
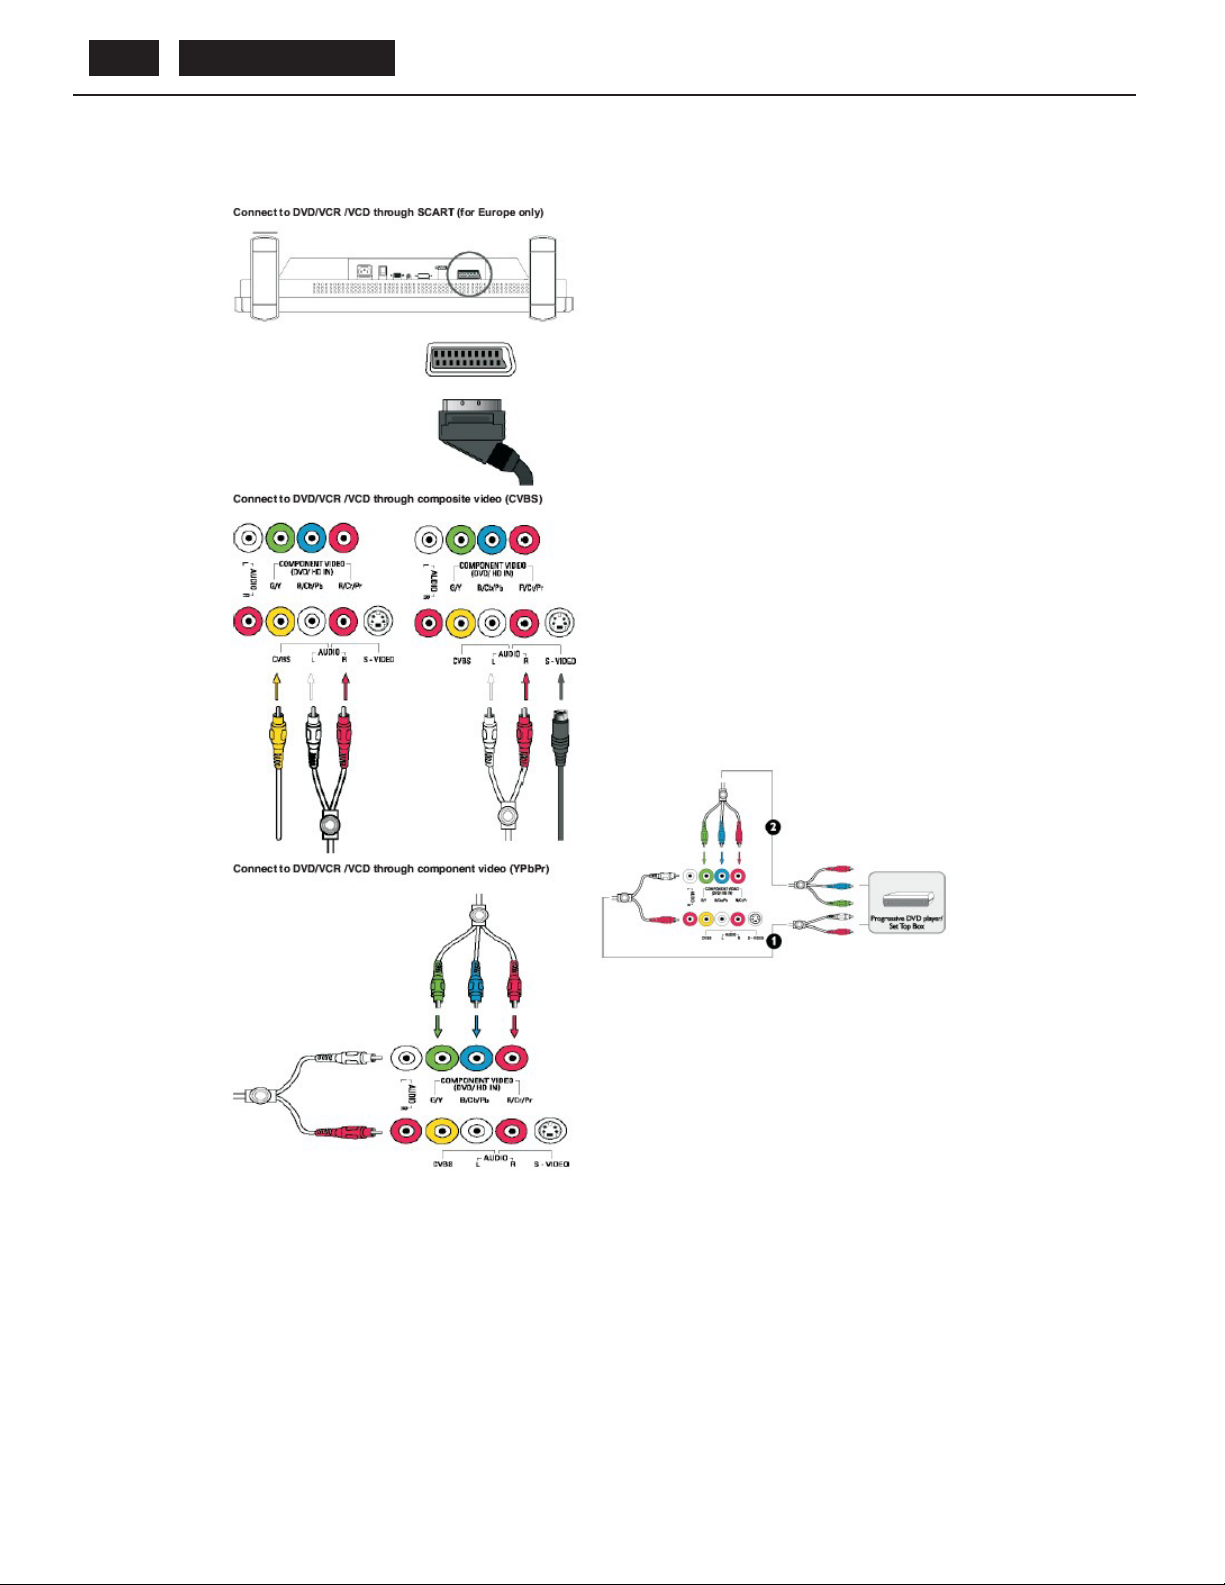
BDL4211. . . 30
• PRELIMINARY SET-UP
1. Perform about 20min of warm-up switching on the monitor, setting it to PC analog input with no signal attached and pressing L and R button
simultaneously on the keypad to enter the aging page (a white page with fl ying R,G,B OSD)
2. Then connect a Video Generator or a PC to D-SUB
• PC-VGA MODE ADJUSTMENT
1. Use the Video Generator or PC with Graphic Board set the native timing 1366 x 768 @ 60 Hz (Native Timing 1 see Appendix 2 for details)
and the SMPTE pattern.
2. Press the “Menu” key on RC; the OSD menu appears on the screen.
3. Press the “W” arrow key in order to enter in “Image Setting” menu.
4. Press the “W” until the “Auto Adjust”and press “Menu” to get an autoadjust.
5. Visually check the quality of video image:
The position on the screen must be centred in both horizontal and vertical direction.
6. Generate the Pixel On-Off pattern and verify that the Pixel Clock and Phase are correct, if not manually adjust the Pixel Clock and Phase
entering the “Image Setting” menu in the OSD.
7. Store the geometry and values using the following command via RS232:
ESC$000GST01; and wait for the ACK
Page 31

BDL4211. . . 31
8. Send the following timings by Video Generator or PC with Graphic Board:
DOS: 640x400 60Hz;
VESA: 640x480 60Hz; VGA.
VESA: 800x600 60Hz S-VGA.
VESA: 1024x768 60Hz XGA.
1280x768 @ 60Hz (See Appendix 1 Detailed Timing / Descriptor Block 1 for details)
9. For each of these timings, implements an AUTOADJUST command and verify the appropriate geometry in horizontal and vertical direction;
10. Use the Video Generator or PC with Graphic Board set the native timing 1366 x 768 @ 60 Hz (Native Timing 2 see Appendix 2 for details)
and the SMPTE pattern.
11. Press, on the local keyboard, both “left” and “right” buttons for 10sec: ( don’t care about the AUTOADJUST window) The OSD is in factory
preset mode. Verify the presence of red label: 420WA VIDEO V0.01.1 20041112
12. Press the “Menu” key on RC; the OSD menu appears on the screen.
13. Press the “W” arrow key in order to enter in “Image Setting” menu.
14. Press the “W” until the “Auto Adjust”and press “Menu” to get an autoadjust.
15. Visually check the quality of video image:
The position on the screen must be centred in both horizontal and vertical direction.
16. Generate the Pixel On-Off pattern and verify that the Pixel Clock and Phase are correct, if not manually adjust the Pixel Clock and Phase
entering the “Image Setting” menu in the OSD.
17. Select in “Color Setting” menu “NATURAL COLOR”
18. Select the red words area then press “Menu” and enter the “Factory adjust” menu.
19. Generate a fi ve white boxes pattern and select “AUTO-SUB”
20. Select in “Color Setting” menu “NORMAL COLOR”
21. Generate the White Page pattern 20% video level, Set BRIGHTNESS to 100, GAIN R G B to respectively 135, 125, 105 adjust OFFSET R
G B to get a brightness value between 10 cd/m2 and 14cd/m2 and the following colour coordinates:
x = 313 ± 15
y = 329 ± 15
22. Generate the White Page pattern 100% video level, adjust GAIN R G B to get a brightness value between 390 cd/m2 and 410cd/m2 and
the following colour coordinates:
x = 313 ± 15
y = 329 ± 15
23. Select in “Color Setting” menu “BLUE PRESET”
24. Adjust in “Factory adjust” menu GAIN R G B to get a brightness value between 390 cd/m2 and 410cd/m2 and the following colour coor-
dinates:
x = 283 ± 15
y = 298 ± 15
25. Select in “Color Setting” menu “RED PRESET”
26. Adjust in “Factory adjust” menu GAIN R G B to get a brightness value between 390cd/m2 and 410cd/m2 and the following colour coor-
dinates:
x = 332 ± 15
y = 348 ± 15
27. Select in “Color Setting” menu “NORMAL COLOR”
28. Generate the Raster page ( 0% video level ) and measure a brightness value less than 1.3 cd/m2
29. Set in “Factory adjust” menu “SUB-CON” to 75 and in “main controls” menu “Contrast” to 90
30. Adjust the “Brightness” in order to get a value between 340 ÷ 360 cd/m2
31. Switch off and switch on the monitor with lateral stand by button to exit from “Factory adjust” menu.
32. Disable remote control through the command ESC$000MRC00; and wait for the ACK
33. Store the geometry and picture value using the following commands via RS232:
ESC$000GST00; and wait for the ACK
ESC$000PST00; and wait for the ACK
34. Activate the ABC function through the following command
ESC$000MAS01; and wait for the ACK
ESC$000MLS01; and wait for the ACK
35. Display a white page, set the backlight to its max. value: ESC$000MPBFF; and wait for the ACK
36. Verify, after a few seconds, a brightness value greater than 300cd/m2
37. Display a white page, set the backlight to its min. value: ESC$000MPB00; and wait for the ACK
38. The brightness will decrease, verify, after a few seconds, a brightness value less than 200cd/m2
39. Disable the light sensor: ESC$000MLS00; and wait for the ACK
Page 32

BDL4211. . . 32
40. Enable remote control through the command ESC$000MRC01; and wait for the ACK
• EDID FILES
VGA INPUT
128 BYTES OF EDID CODE:
0 1 2 3 4 5 6 7 8 9
________________________________________
0 | 00 FF FF FF FF FF FF 00 41 0C
10 | 22 08 0A B1 05 00 08 0F 01 03
20 | 68 5D 34 78 E8 A5 F0 A3 57 48
30 | 9C 25 12 48 4B 27 CE 00 01 01
40 | 01 01 01 01 01 01 01 01 01 01
50 | 01 01 01 01 0E 1F 00 80 51 00
60 | 1E 30 40 80 37 00 A2 0B 32 00
70 | 00 1C 32 1E 58 E8 50 00 26 30
80 | 10 60 35 00 A2 0B 32 00 00 1A
90 | 00 00 00 FC 00 50 68 69 6C 69
100 | 70 73 20 34 32 30 57 0A 00 00
110 | 00 FD 00 38 4B 1F 3F 08 00 0A
120 | 20 20 20 20 20 20 00 6B ______________________________________________________________
(08-09) ID Manufacturer Name _____________ = PHL
(11-10) Product ID Code __________________ = 0822(“)
(12-15) Last 5 Digits of Serial Number _______ = 373002
(16) Week of Manufacture ______________ = 08
(17) Year of Manufacture _______________ = 2005
(10-17) Complete Serial Number ___________ = “508373002
(18) EDID Version Number _____________ = 1
(19) EDID Revision Number ____________ = 3
(20) VIDEO INPUT DEFINITION:
Analog Signal
0.700, 0.000 (0.700 Vp-p)
Separate Syncs
(21) Maximum Horizontal Image Size _____ = 930 mm
(22) Maximum Vertical Image Size _______ = 520 mm
(23) Display Gamma __________________ = 2,20
(24) Power Management and Supported Feature(s):
Stand-By, Suspend, Active Off/Very Low Power
Display Type = R/G/B Color
(25-34) CHROMA INFO:
Red X - 0,639 Green X - 0,282 Blue X - 0,147 White X - 0,281
Red Y - 0,342 Green Y - 0,610 Blue Y - 0,073 White Y - 0,293
(35) ESTABLISHED TIMING I:
640 X 480 @ 60Hz (IBM,VGA)
640 X 480 @ 75Hz (VESA)
800 X 600 @ 56Hz (VESA)
800 X 600 @ 60Hz (VESA)
(36) ESTABLISHED TIMING II:
800 X 600 @ 72Hz (VESA)
800 X 600 @ 75Hz (VESA)
1024 X 768 @ 60Hz (VESA)
1024 X 768 @ 70Hz (VESA)
1024 X 768 @ 75Hz (VESA)
(37) Manufacturer’s Reserved Timing:
None Specifi ed
Page 33

(38-53) Standard Timing Identifi cation:
Not Used
Not Used
Not Used
Not Used
Not Used
Not Used
Not Used
Not Used
_______________________________________________________________
(54-71) Detailed Timing / Descriptor Block 1:
1280x768 Pixel Clock: 79,50 MHz
_______________________________________________________________
Horizontal Image Size: 930 mm Vertical Image Size: 523 mm
Refreshed Mode: Non-Interlaced Normal Display - No Stereo
Horizontal:
Active Time: 1280 pixels Blanking Time: 384 pixels
Sync Offset: 64 pixels Sync Pulse Width: 128 pixels
Border: 0 pixels Frequency: 47,78 KHz
Vertical:
Active Time: 768 lines Blanking Time: 30 lines
Sync Offset: 3 lines Sync Pulse Width: 7 lines
Border: 0 lines Frequency: 59,87 Hz
BDL4211. . . 33
Digital Separate, Horizontal Polarity (-) Vertical Polarity (+)
_______________________________________________________________
(72-89) Detailed Timing / Descriptor Block 2:
1368x768 Pixel Clock: 77,30 MHz
_______________________________________________________________
Horizontal Image Size: 930 mm Vertical Image Size: 523 mm
Refreshed Mode: Non-Interlaced Normal Display - No Stereo
Horizontal:
Active Time: 1368 pixels Blanking Time: 232 pixels
Sync Offset: 16 pixels Sync Pulse Width: 96 pixels
Border: 0 pixels Frequency: 48,31 KHz
Vertical:
Active Time: 768 lines Blanking Time: 38 lines
Sync Offset: 3 lines Sync Pulse Width: 5 lines
Border: 0 lines Frequency: 59,94 Hz
Digital Separate, Horizontal Polarity (+) Vertical Polarity (-)
_______________________________________________________________
(90-107) Detailed Timing / Descriptor Block 3:
Monitor Name:
Philips 420W
_______________________________________________________________
(108-125) Detailed Timing / Descriptor Block 4:
Monitor Range Limits:
Min Vertical Freq - 56 Hz
Max Vertical Freq - 75 Hz
Min Horiz. Freq - 31 KHz
Max Horiz. Freq - 63 KHz
Pixel Clock - 80 MHz
Secondary GTF - Not Supported
Page 34

BDL4211. . . 34
(126) No Extension EDID Block(s)
(127) CheckSum OK
• DVI INPUT
128 BYTES OF EDID CODE:
0 1 2 3 4 5 6 7 8 9
________________________________________
0 | 00 FF FF FF FF FF FF 00 41 0C
10 | 22 08 0A B1 05 00 08 0F 01 03
20 | 81 5D 34 78 E8 A5 F0 A3 57 48
30 | 9C 25 12 48 4B 27 CE 00 01 01
40 | 01 01 01 01 01 01 01 01 01 01
50 | 01 01 01 01 0E 1F 00 80 51 00
60 | 1E 30 40 80 37 00 A2 0B 32 00
70 | 00 1C 32 1E 58 E8 50 00 26 30
80 | 10 60 35 00 A2 0B 32 00 00 1A
90 | 00 00 00 FC 00 50 68 69 6C 69
100 | 70 73 20 34 32 30 57 0A 00 00
110 | 00 FD 00 38 4B 1F 3F 08 00 0A
120 | 20 20 20 20 20 20 00 52
______________________________________________________________
(08-09) ID Manufacturer Name _____________ = PHL
(11-10) Product ID Code __________________ = 0822(“)
(12-15) Last 5 Digits of Serial Number _______ = 373002
(16) Week of Manufacture ______________ = 08
(17) Year of Manufacture _______________ = 2005
(10-17) Complete Serial Number ___________ = “508373002
(18) EDID Version Number _____________ = 1
(19) EDID Revision Number ____________ = 3
(20) VIDEO INPUT DEFINITION:
Digital Signal
VESA DFP 1.x Compatible
(21) Maximum Horizontal Image Size _____ = 930 mm
(22) Maximum Vertical Image Size _______ = 520 mm
(23) Display Gamma __________________ = 2,20
(24) Power Management and Supported Feature(s):
Stand-By, Suspend, Active Off/Very Low Power
Display Type = R/G/B Color
(25-34) CHROMA INFO:
Red X - 0,639 Green X - 0,282 Blue X - 0,147 White X - 0,281
Red Y - 0,342 Green Y - 0,610 Blue Y - 0,073 White Y - 0,293
(35) ESTABLISHED TIMING I:
640 X 480 @ 60Hz (IBM,VGA)
640 X 480 @ 75Hz (VESA)
800 X 600 @ 56Hz (VESA)
800 X 600 @ 60Hz (VESA)
(36) ESTABLISHED TIMING II:
800 X 600 @ 72Hz (VESA)
800 X 600 @ 75Hz (VESA)
1024 X 768 @ 60Hz (VESA)
1024 X 768 @ 70Hz (VESA)
1024 X 768 @ 75Hz (VESA)
Page 35

(37) Manufacturer’s Reserved Timing:
None Specifi ed
(38-53) Standard Timing Identifi cation:
Not Used
Not Used
Not Used
Not Used
Not Used
Not Used
Not Used
Not Used
_______________________________________________________________
(54-71) Detailed Timing / Descriptor Block 1:
1280x768 Pixel Clock: 79,50 MHz
_______________________________________________________________
Horizontal Image Size: 930 mm Vertical Image Size: 523 mm
Refreshed Mode: Non-Interlaced Normal Display - No Stereo
Horizontal:
Active Time: 1280 pixels Blanking Time: 384 pixels
Sync Offset: 64 pixels Sync Pulse Width: 128 pixels
Border: 0 pixels Frequency: 47,78 KHz
Vertical:
Active Time: 768 lines Blanking Time: 30 lines
Sync Offset: 3 lines Sync Pulse Width: 7 lines
Border: 0 lines Frequency: 59,87 Hz
BDL4211. . . 35
Digital Separate, Horizontal Polarity (-) Vertical Polarity (+)
________________________________________________________________
(72-89) Detailed Timing / Descriptor Block 2:
1368x768 Pixel Clock: 77,30 MHz
________________________________________________________________
Horizontal Image Size: 930 mm Vertical Image Size: 523 mm
Refreshed Mode: Non-Interlaced Normal Display - No Stereo
Horizontal:
Active Time: 1368 pixels Blanking Time: 232 pixels
Sync Offset: 16 pixels Sync Pulse Width: 96 pixels
Border: 0 pixels Frequency: 48,31 KHz
Vertical:
Active Time: 768 lines Blanking Time: 38 lines
Sync Offset: 3 lines Sync Pulse Width: 5 lines
Border: 0 lines Frequency: 59,94 Hz
Digital Separate, Horizontal Polarity (+) Vertical Polarity (-)
_______________________________________________________________
(90-107) Detailed Timing / Descriptor Block 3:
Monitor Name:
Philips 420W
_______________________________________________________________
(108-125) Detailed Timing / Descriptor Block 4:
Monitor Range Limits:
Min Vertical Freq - 56 Hz
Max Vertical Freq - 75 Hz
Min Horiz. Freq - 31 KHz
Max Horiz. Freq - 63 KHz
Page 36

BDL4211. . . 36
Pixel Clock - 80 MHz
Secondary GTF - Not Supported
(126) No Extension EDID Block(s)
(127) CheckSum OK
• TIMING FOR LCD 42”
Aspect ratio: 16 : 9
Timing identifi cation: 1366 * 768 @ 60 Hz
ITEMS UNIT
Pixel Rate MHz 72.287 77.300
Hor. Freq. kHz 47.37 48.363
Vert. Frame frequency Hz 60 60
Horiz. active Pixels 1366 1366
Vert. active (frame) Lines 768 768
H. total Pixels 1526 1600
H. blank Pixels 160 234
H. front porch Pixels 48 16
H. pulse width Pixels 32 96
V. total (frame) Lines 790 806
V. blank (frame) Lines 22 38
V. sync. delay (frame) Lines 2 3
V. sync. width (frame) Lines 5 5
Scan type Non interlaced Non interlaced
Sync. on green Y/N No No
Hor. sync. +/- Y/N - +
Vert. sync. +/- Y/N - -
TTL comp. Y/N no no
Page 37
S afety Tes t R equirements
BDL4211. . . 37
All units that are returned for service or repair must pass the
original manufactures safety tests. Safety testing requires both
and testing.Hipot G round C ontinuity
HI-POT TEST INSTRUCTION
1. A pplication requirements
1.1 All mains operated products must pass the Hi-Pot test as
described in this instruction.
1.2 This test must be performed again after the covers have
been refitted following the repair, inspection or modification
of the product.
2. Test method
2.1 Connecting conditions
2.1.1 The test specified must be applied between the parallel-
blade plug of the mainscord and all accessible metal
parts of the product.
2.1.2 Before carrying out the test, reliable conductive
connections must be ensured and thereafter be
maintained throughout the test period.
2.1.3 The mains switch(es) must be in the "ON" position.
3. E quipments and Conne ction
3.1. Equipments
For example :
- ChenHwa 9032 PROGRAMMABLE AUT O SAFETY
TESTER
- ChenHwa 510B Digital Grounding Continuity Tester
- ChenHwa 901 (AC Hi-pot test), 902 (AC, DC Hi-pot test)
Withstanding Tester
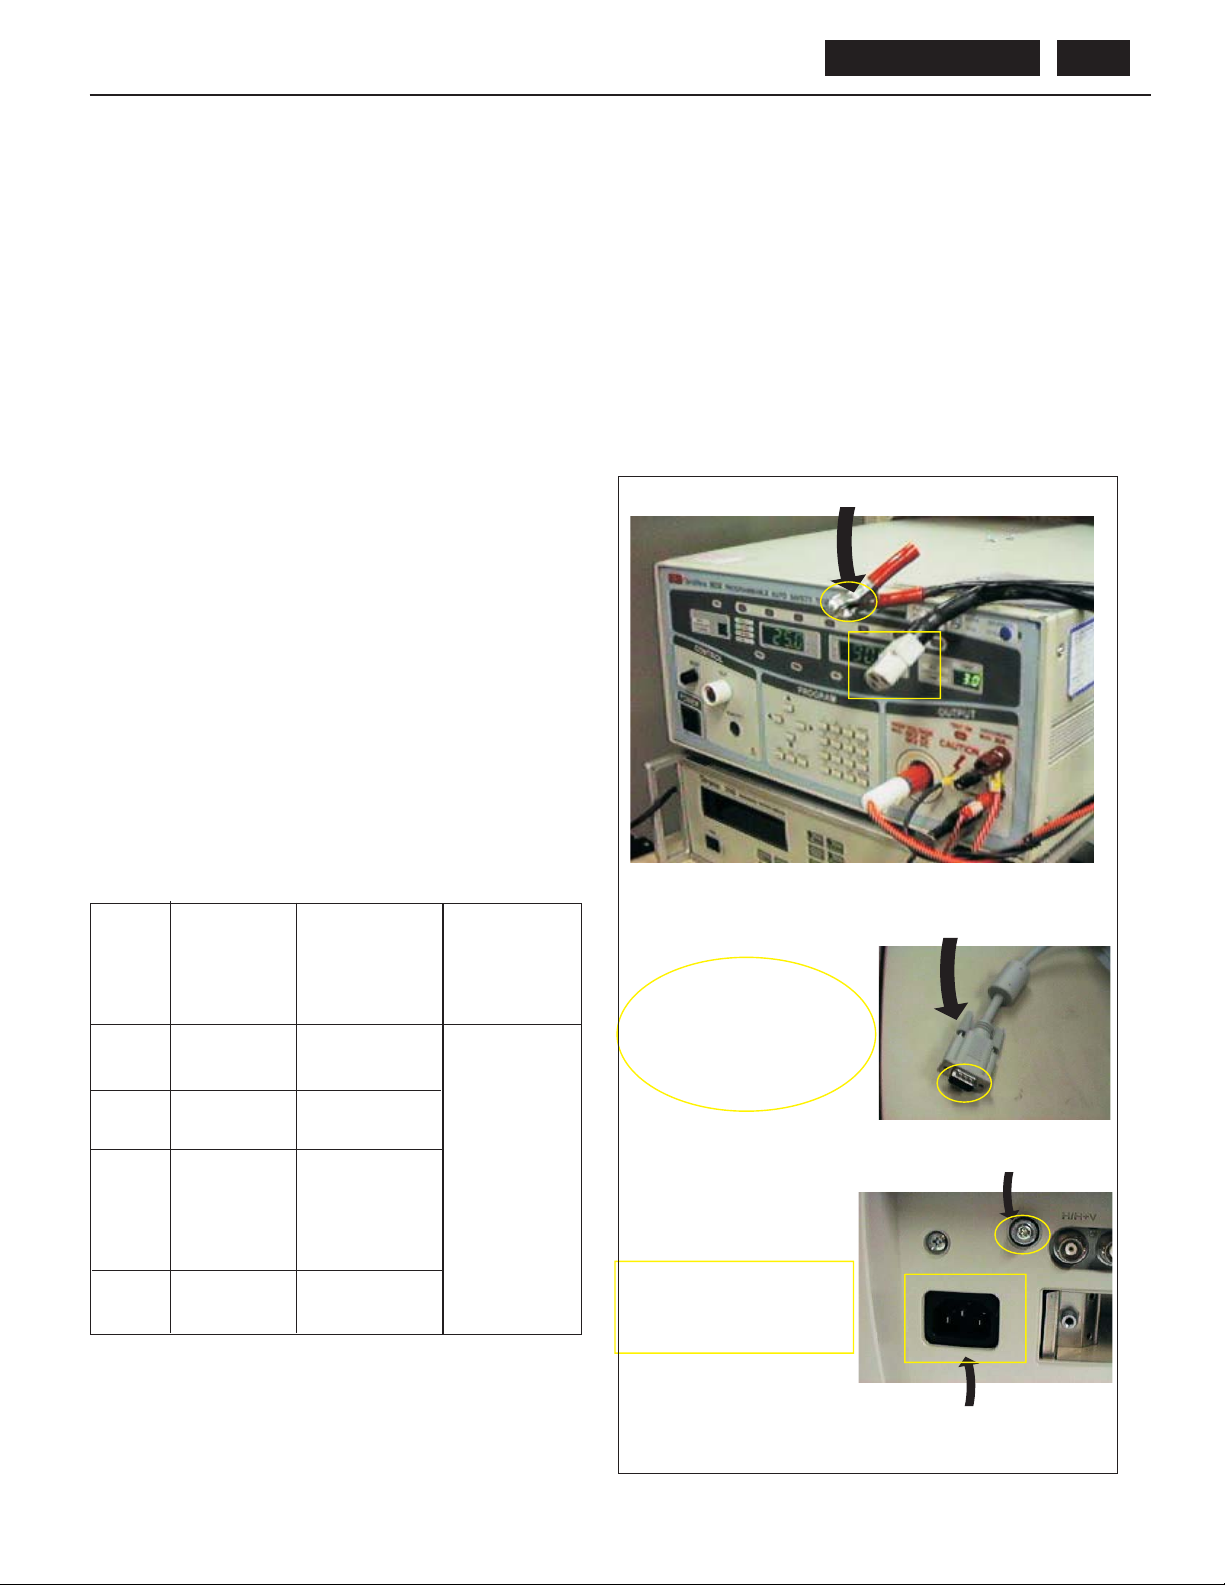
3.2. Connection
* T urn on the power switch of monitor before Hipot and
Ground Continuity testing.
Clip
Clip
2.2 Test Requirements
All products should be HiPot and Ground Continuity tested as
follows:
Condition HiPot Test for HiPot Test for Ground Continuity
products where products where Test requirement
the mains input the mains input is
range is Full 110V AC(USA
range(or 220V type)
AC)
Test 2820VDC 1700VDC Test current:
voltage (2000V AC) (1200V AC) 25A,AC
Test time:
Test time 3 seconds 1 second 3 seconds(min.)
(min.) Resistance
required:
T rip set at 100 uA 5 mA <=0.09+R ohm,
current for Max. R is the
(Tester) limitation; set resistance of
at 0.1 uA for the mains cord.
Min. limitation
Ramp set at 2
time seconds
2.2.1 The test with AC voltage is only for production purpose,
S erv ice center s ha ll use DC voltage.
(C henHwa 9032 tester)
Vide o c a b le
C onne c t the "video cable"
or "grounding s cre w"
to the C L IP on your tes ter.
Grounding screw
Connectthe powercord
to the monitor.
2.2.2 The minimum test duration for Quality Control Inspector
must be 1 minute. No breakdown during the test.
2.2.3 The test voltage must be maintained within the specified
voltage + 5%.
2.2.4 The grounding blade or pin of mains plug must be
conducted with accessible metal parts.
Power outlet
(R ear view of monitor)
4. R ecording
Hipot and Ground Continuity testing records have to be kept for
a period of 10 years.
Page 38
BDL4211. . . 38
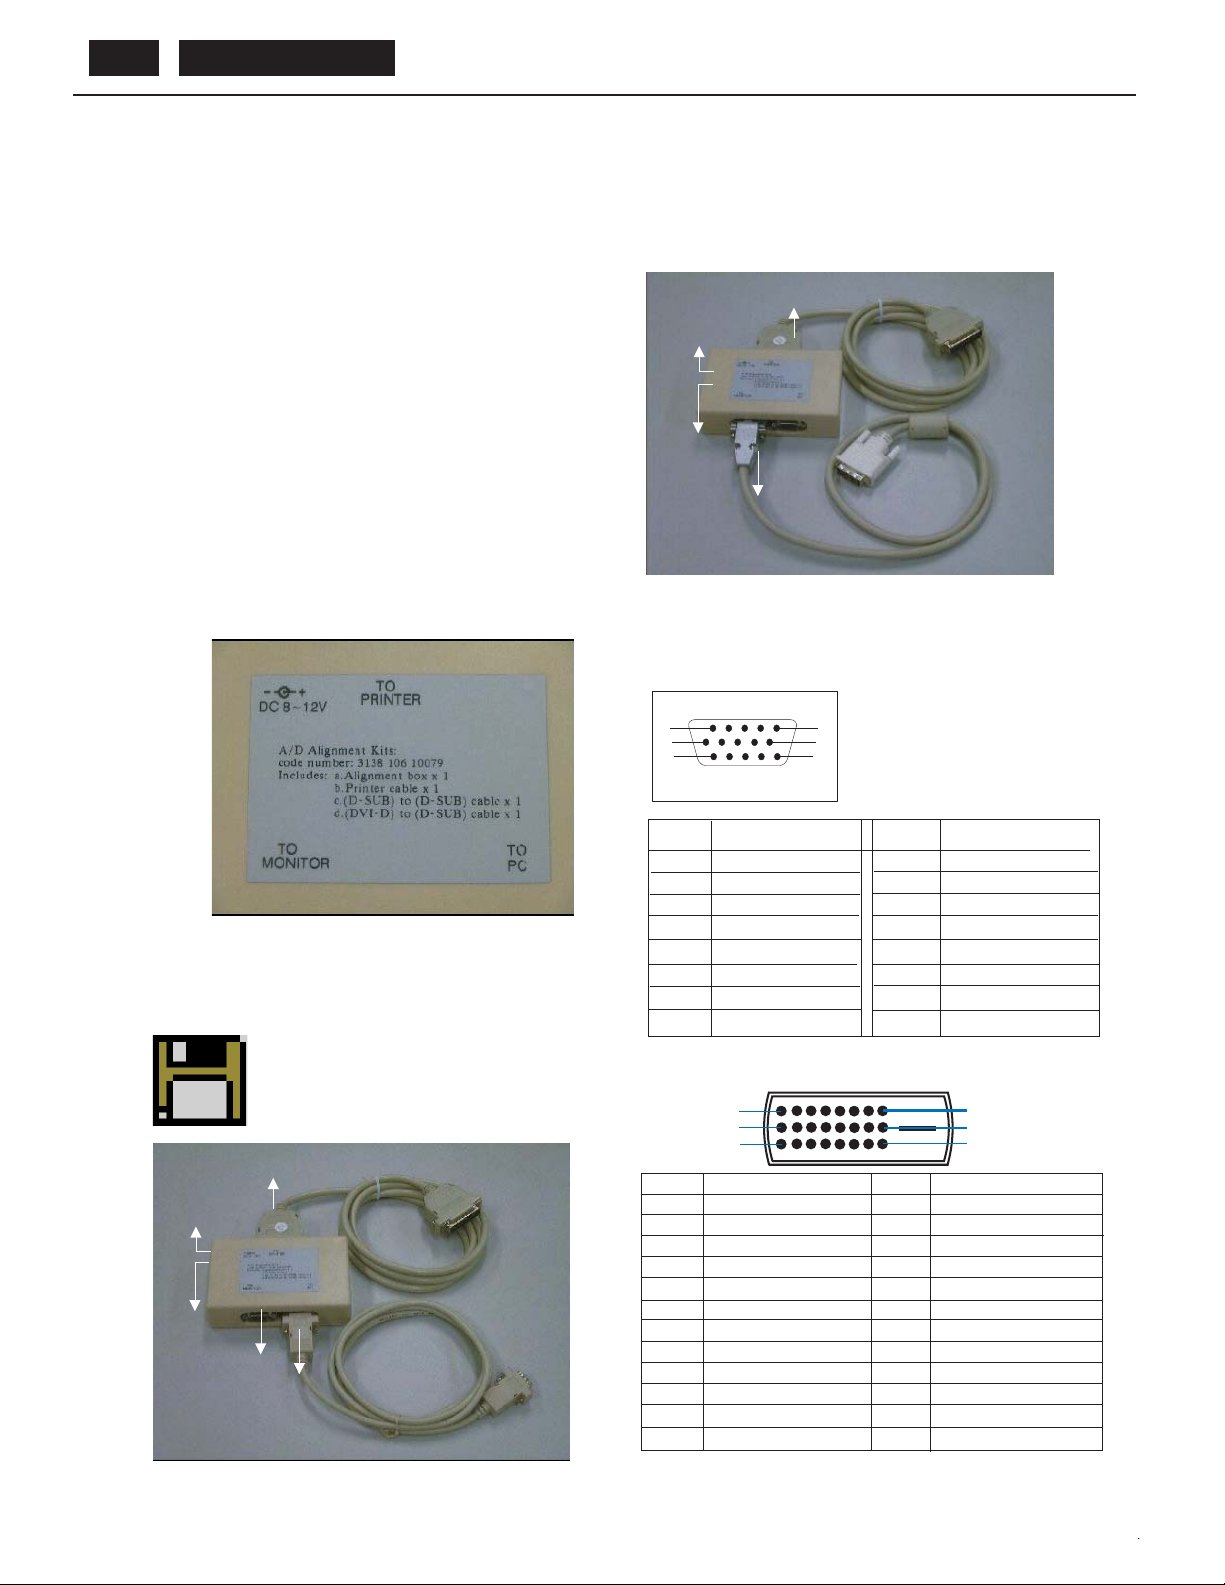
Video Card
A/D Alignment Kits - Analog connection
Fig. 2
Fig. 1
A/D Alignment Kits - Digital connection
DDC Ins tructions
G eneral
DDC Data R e-programming
In c as e the DD C data memory I C or ma in E E P R O M which storage all
fa c tor y s etting s we re re pla c e d due to a def ect, th e s eria l nu mb ers ha ve
to be re -progra mmed.
It is advised to re-soldered DDC IC and main E E P R O M from the old
board onto the ne w board if c ircuit board ha ve been replaced, in this
ca s e the DDC data does not nee d to be re-progra mmed.
Additional information
Additiona l information a bout D DC ( Dis pla y Data C ha nnel) may be
obtained from V ideo E lectronics S tandards Ass ociation (V E S A).
E xtended Dis pla y I dentification D ata(E DID) information ma y be a lso
obtained from VE S A .
DDC EDID s tructure
F or Ana log interfa c e: S tandard Ve rsion 3 .0
StructureVersion 1.2
F or D igital inferface: S tanda rd Vers ion 3 .0
StructureVersion 1.3
S y s tem and equipment requirements
1. An i4 86 (or above ) pers ona l computer or compatible.
2. Microsoft operation system Windows 95/98.
3. E D ID301.E X E program (3138 106 10103) a s shown in F ig. 1
4. A/D Alignment kits (3138 106 10079):
inclus ion : a . Alignme nt box x 1 ( as Fig. 2 )
Fig. 2
Note: The a lignmentbox has already build-in a batteries s ocket for
using batteries (9V ) a s power s ource. P ull out the socketby
remove four s crews at the rea r of box. Pleas e do not forget that
re move ba tterie s a f ter p ro gramming . T he e ne r gy of ba tterie s c a n
only drive c ircuits for a s hort pe riod of time.
To P rinter
DC 8V~12V
Power
indica tor
To Monitor
(D igital port)
A/D A lignment K its - Digital conne ction
Pin assignment
A. 15-pin D-S ub C o nnector
1
6
11
5
10
15
To P rinter
b. Printer c able x1
c. (D-S ub) to (D-S ub) cable x1
Note: T he E D ID301.E XE (R elease Version 1.58 20000818)is a
windows-based program, which cannot be run in MS-DOS .
EDID301. E XE
Ver:1.58
Dis k e tte with E D I D 3 01. E X E
DC 8V~12V
Power
indica tor
A/D Alignment Kits - Ana log c onne ction
Fig. 1
To P rinter
To Monitor
Video C ard
Pin No.
B . DVI-D Connec tor
Assignment
1
R e d vide o input
G reen video input
2
Blue video input
3
Ground
4
No Connected
5
6
Red videoground
Green video ground
7
8
B lue video ground
Pin No.
1
9
17
PinNo. Assignment PinNo. Assignment
1 TMDS D a ta 2- 13 TMD S D a ta 3+
2TMDSData2+ 14+5VPower
3 T MDS Data 2/4 S hield 15 G round (+5V)
4TMDSData4- 16HotPlugDetect
5 TMDS D a ta 4+ 17 T MD S D a ta 0-
6DDCClock 18TMDSData0+
7 DDC Data 19 T MDS Data 0/5 S hield
8 No connect 20 T MDS Data 5-
9 TMDS D a ta 1- 21 TMD S D a ta 5+
10 TMDS Da ta 1+ 22 T MDS C lock S hield
11 T MDS Data 1/3 S hield 23 T MDS Clock+
12 TMDS Da ta 3- 24 T MDS C lock-
Assignment
9
+5V
Ground
10
Ground
11
12
Serialdata line(SDA)
H.S ync
13
14
V.Sync(VCLK for DDC)
15
Data clock line(S C L )
8
16
24
Page 39
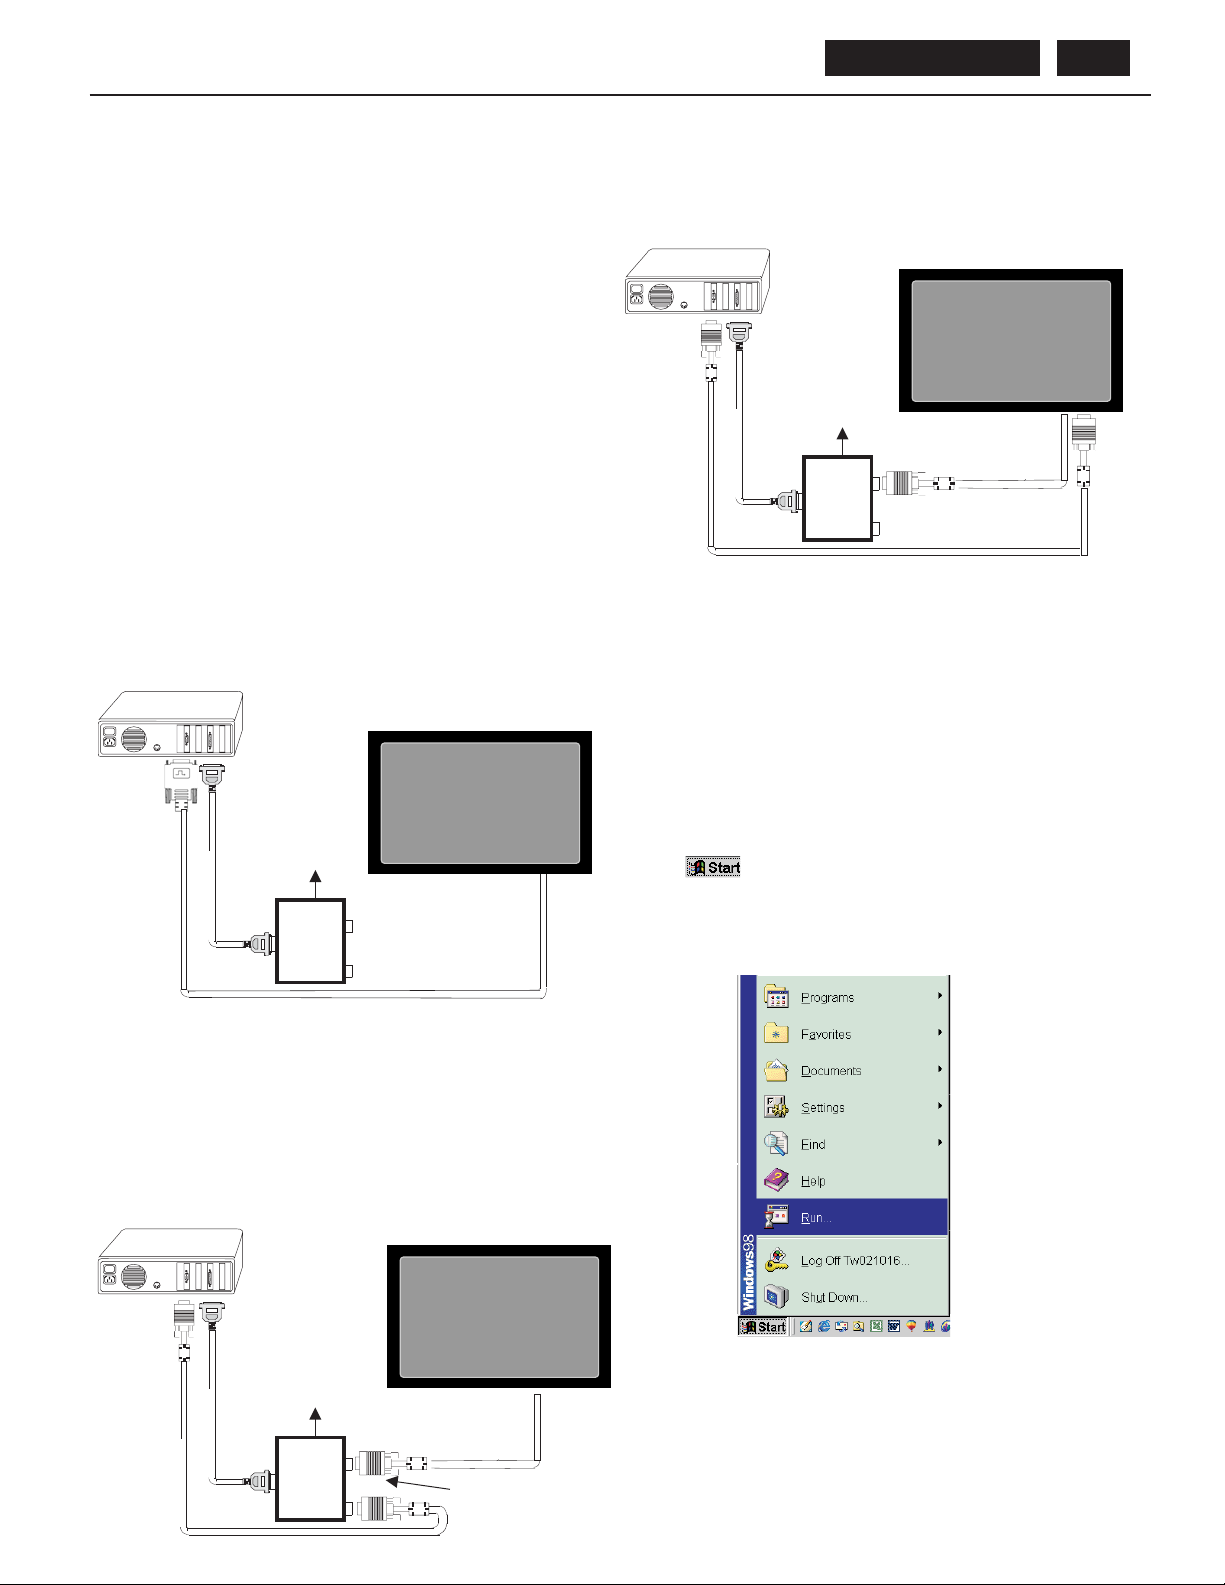
1. Configuration and procedure
BDL4211. . . 39
DDC Instructions
There are two ICs contained serial number on the circuit board,
Analog Flash ROM IC (7301), and main EEPROM (7302) which
storage all factory settings. Following descriptions are the
connection and procedure for Analog Flash ROM IC , the main
EEPROM can be re-programmed along with Analog IC by
enable factory memory data write function on the DDC
program (EDID301.EXE).
Initialize alignment box
In order to avoid that monitor entering power saving mode due to
sync will cut off by alignment box, it is necessary to initialize
alignment box before running programming software (EDID301.EXE).
Following steps show you the procedures and connection.
Step 1: Supply 8~12V DC power source to the Alignment box by
plugging a DC power cord or using batteries.
Step 2: Connecting printer cable and video cable of monitor as Fig. 1
Step 3: Run the EDID301.EXE program until the main menu appears.
This is for initialize alignment box.
PC
(LTP1)
DC Power
port
8~12 V
~
~
PHILIPS
PC
TP1)
DC Power
card
o video
T
port (L
To printer
8~12 V
Printer
Port
~
~
To
Monitor
To P C
D-sub
PHILIPS
DVI
DVI to D-sub cable
D-sub video cable
Fig. 3
2. DDC re-programming instructions
Start on DDC program
Start Microsoft Windows.
1. Insert the disk containing EDID301.EXE program into floppy disk
drive.
2. Click , choose Run at start menu of Windows 95/98.
To printer
Printer
Port
To
Monitor
To P C
Fig. 1
D-sub video cable
Re-programming DDC IC
Step 1: After initialize alignment box, connecting all cables and box as
Fig. 2 for analog DDC, Fig.3 for digital DDC
Step 2: Press and hold "Menu" and "Plus" buttons then power on the
monitor.
Step 3: Follow the steps on DDC re-programming instructions to staring
re-programming.
PC
card
To video
port (LTP1)
To printer
DC Power
8~12 V
~
~
To
Monitor
Printer
Port
To P C
PHILIPS
D-sub video cable
Fig. 2
Page 40
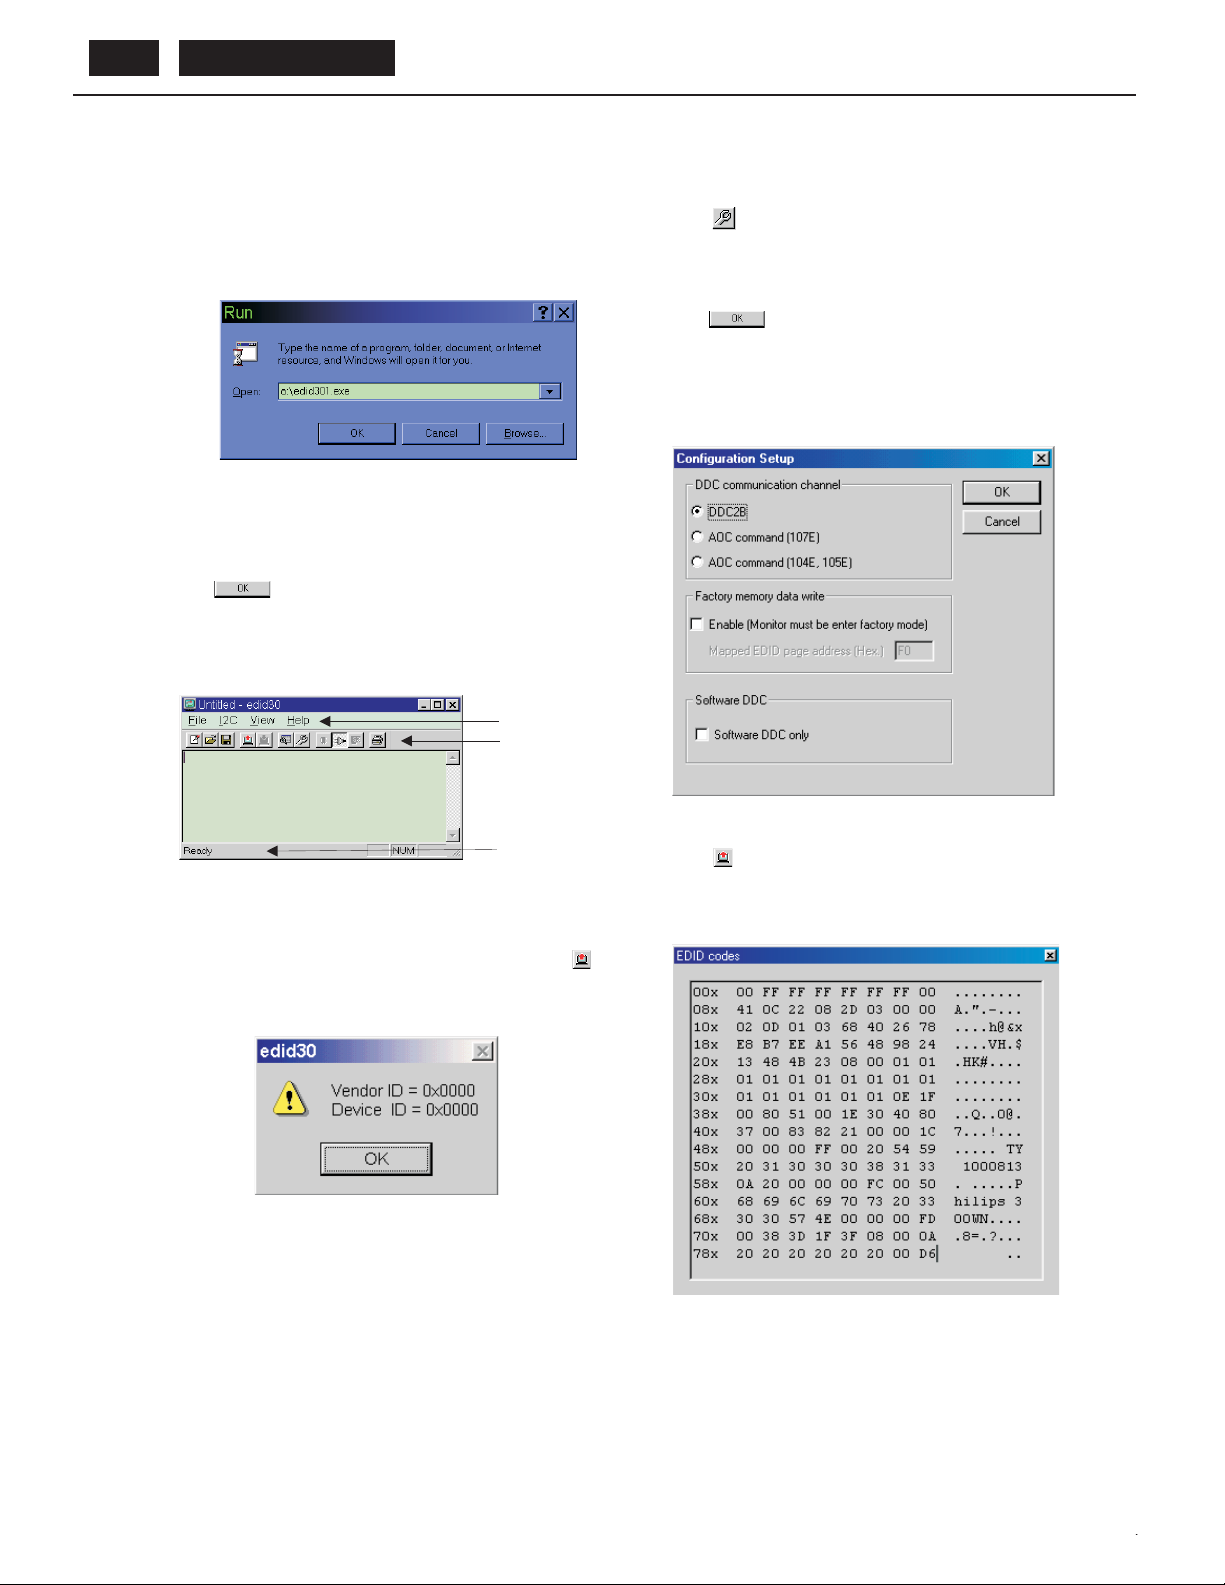
BDL4211. . . 40
DDC Ins tructions
3. At th e s ubme nu , typ e the le tter o f y our compu te r' s floppy dis k drive
followed by :E DID301 (for e xample, A:\E DID301.exe, )
as shown in F ig. 4.
Fig. 4
4. C lick button. The main menu appears (as shown on Fig. 5).
Co mmand bar
Tools bar
L oa ding DDC data fro m m on itor
1. C lick icon on the tools bar to bring up the C onfigura tion
Setup windows as Fig.6
2. S e lect the DD C 2B a s the c om munic a ti on ch a nn el.
3. E na ble Fac tory me mory data writ e function and fill in page addre ss
F 0 to th e blo ck.
4. D i s a bl e S oftwa r e DD C fun ction .
5. C lick button to confirm your s elec tion.
N ote : T h e F a c tor y mem or y da ta wri te fun ction will a llow E D I D 3 0 to
rewrite s erial numbers both Analog D D C IC a nd main E E P R O M
to m a ke sure both S /N a re e xactly the s a me . You ma y co nfi rm the
function by checking the S /N at P roduct information of the OS D
menu a fter restarting the monitor.
Fig. 5
Note:
If the conne ction is improper, you will s e e the following error
mes s age before entering the ma in menu. Mea nwhile, the
(re ad E D ID ) function will be disable . At this time , pleas e make
sure all cable s are connec ted correctly a nd fixedly, and the
Status bar
Fig. 6
6. C lick ic o n to re a d DD C E D I D da ta fro m moni tor. T h e E D I D
code s will dis play on s creen as following. (T he E DID c odes are
de pe nd o n th e mod e l. ) Me a n while , T h e sta tus bar will indic a te
00% to 100% when reading.
Fig. 7
Page 41
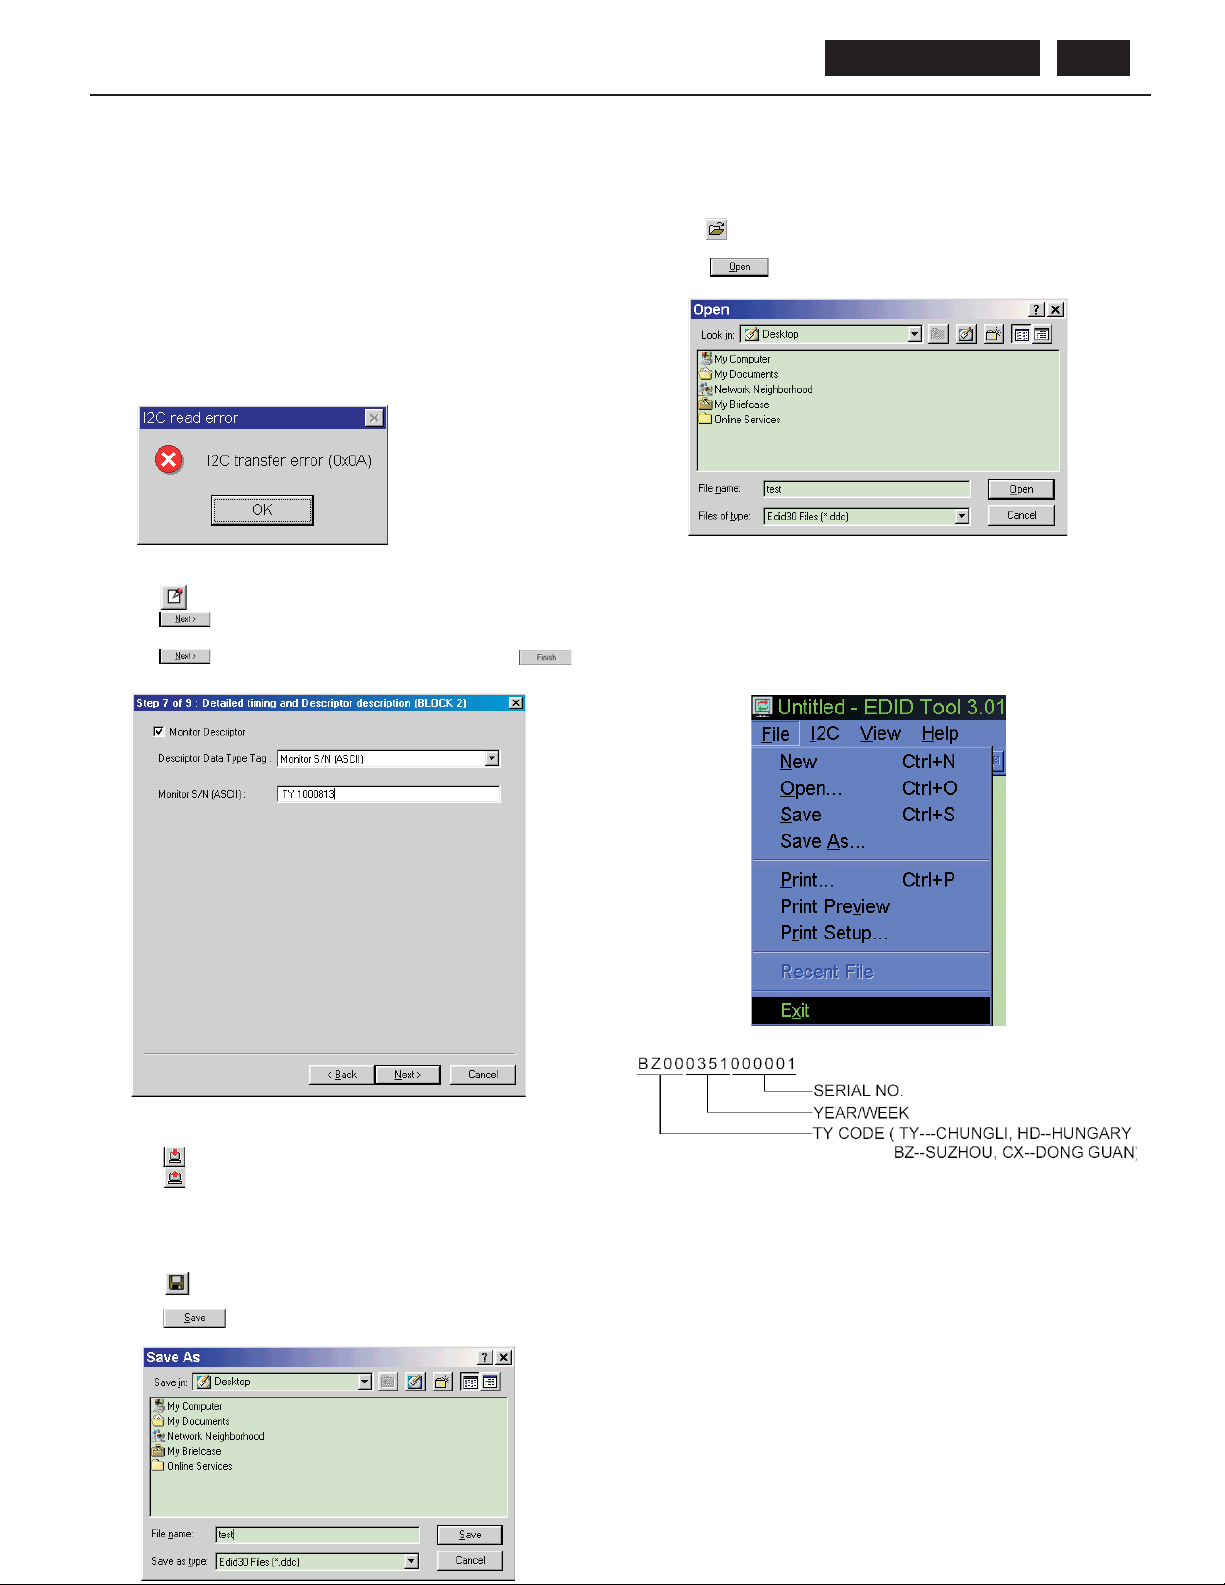
DDC Ins truc tions
BDL4211. . . 41
Note:
During the loading, E DID30 will verify the EDID da ta which just
loa de d from monito r be fo re pro ceed any fur the r fu nc tion, on c e the
data structure o f E DID c a n not be recognized, the following error
mes s a ge will a ppear on the s cree n (F ig. 8) . P lea s e confirm
following steps to avoid this mes s a ge .
1. The da ta structure of E DID was incorrect.
2. DDC I C tha t y ou a re trying to loa d da ta is e m pty.
3. Wrong communication channel ha s set a t configuration setup
Windows.
4. C able s loos ed or poor contact of connec tion.
Fig. 8
Modify D DC data (S eria l No.)
1. Click icononthe tooslbar.
2. C lic k till the S tep 7 of 9 window appea rs .
3. Type the new S e rial No. (for exa mple , TY 1000813).
4. C lic k till the las t s tep window appears, then click to
exit th e S te p wind ow.
L o ad DDC d ata from file
1. C lick from the tools ba r.
2. S ele ct the file you want to ope n.
3. C lic k . B utton.
4. Now you can re-programming D D C data which you just loaded
from a file, please be confirmed that model and serial number are
correct and match with the monitor you are trying to re-write.
E x it DDC program
1. C lick file command on the comma nd ba r t hen s e lect E xit.
Wr ite DD C data to mon ito r
1. C lic k ic o n from the too ls ba r to s ta rti ng re write DDC da ta .
2. C lic k for confirma tion.
S av e DDC data a s a file
S ometimes , y ou ma ybe ne e d to s a ve DDC d a ta a s a te xt fi le for us ing
on other DDC c hip. To sa ve DDC da ta, follow the steps below:
1. C lic k icon on the tools ba r and type a file name you like. T he
file format is ddc type which ca n be open by Micros oft W ordP ad.
2. C lic k button.
Definition of Serial Number:
Page 42

BDL4211. . . 42
DDC Data
**********************************************************************
Ana log E D ID log file
********************************************************************
Vendor/P roduct Identification
ID Manufacturer Name : PH L
ID P roductC ode : 0822 (H E X. )
ID SerialNumber : 1E240(HEX.)
Week of Manufacture : 48
Year of Manufacture : 2003
EDIDVersion, Revision
Version : 1
Revision : 3
B a s ic Displa y P ara me ters /F e a tures
V ideo I nput D e finition : A na log V ideo I nput
0.700V /0. 000V (0. 70Vpp)
without B la nk-to-B la ck S e tup
Separate Sync
wi th out C om po s ite S y nc
without S y nc on G re e n
no S e rra tion required
Maximum H Image S ize : 64
Maximum V Image S ize : 38
Dis pla y T ra ns fe r C ha ra c teris tic : 2. 2 (ga mma )
F e a ture S u ppor t (D P M S ) : S tan dby
Suspend
Active Off
Dis pla y Type : R G B color displa y
C olor C ha ra c ter is tics
R e d X coordinate : 0. 63 1
R e d Y coordinate : 0 . 33 9
G re e n X coordinate : 0. 28 2
G re e n Y coordinate : 0 . 5 97
B lue X c oordinate : 0. 14 4
B lue Y c oordinate : 0. 07 6
W hite X c oordina te : 0. 28 4
W hite Y coordinate : 0. 29 5
E s ta blis hed T imings
E s ta blished Timings I : 640 x 480 @ 60Hz (IB M,V G A)
800 x 600 @ 56Hz (V E S A )
800 x 600 @ 60Hz (V E S A )
E s ta blished Timings II : 1024 x 768 @ 60H z (V E S A)
Ma nufa c turer's timings :
S ta nd a rd T imin g I dentific a tion : U nu s e d
De taile d T imin g # 1
Pixel Clock(MHz) : 79.5
H A c tive (pixe ls ) : 128 0
H B lan k ing ( pix e ls ) : 38 4
V Ac tive (line s ) : 768
V B la nk ing ( lin e s ) : 3 0
HSyncOffset(FPorch)(pixels): 64
HSyncPulseWidth(pixels) : 128
V S yn c Offs e t (F P orch ) (line s ) : 3
V S yn c P uls e Width ( line s ) : 7
H I ma ge S iz e (mm) : 6 4 3
V Image S iz e (mm) : 3 8 6
HBorder(pixels) : 0
V B or de r ( lin e s ) : 0
Flags : Non-interlaced
:NormalDisplay,Nostereo
: Digital S e pa ra te s y nc .
: P os itive Ve rtic a l S ync .
: Ne ga tive Horiz onta l S ync .
Monitor Des criptor #2
S erial Number : T Y 123456
Monitor Des criptor #3
Monitor N a me : P hilips 30 0W N
Monitor Des criptor #4
Mo nitor R a n ge L imits
Min. Vt rate Hz : 5 6
Max. Vt ra te H z : 61
Min. H o riz. rate kH z : 31
Ma x. Horiz . rate kH z : 63
Max. S upporte d Pixel : 80
No s e c onda ry G T F timing formula supported.
ExtensionFlag : 0
Check sum : BD (HEX.)
**********************************************************************
E DID da ta (12 8 byte s )
**********************************************************************
0: 00 1: ff 2: ff 3: ff 4: ff 5: ff 6: ff 7: 00
8: 41 9: 0c 10: 22 11: 08 12: 40 13: e2 14: 01 15: 00
16: 30 17: 0d 18: 01 19: 03 20: 68 21: 40 22: 26 23: 78
24: e 8 25: b7 26: ee 27: a 1 28: 56 29: 48 30: 98 31: 24
32: 13 33: 48 34: 4b 35: 23 36: 08 37: 00 38: 01 39: 01
40: 01 41: 01 42: 01 43: 01 44: 01 45: 01 46: 01 47: 01
48: 01 49: 01 50: 01 51: 01 52: 01 53: 01 54: 0e 55: 1f
56: 00 57: 80 58: 51 59: 00 60: 1e 61: 30 62: 40 63: 80
64: 37 65: 00 66: 83 67: 82 68: 21 69: 00 70: 00 71: 1c
72: 00 73: 00 74: 00 75: ff 76: 00 77: 20 78: 54 79: 59
80: 20 81: 31 82: 32 83: 33 84: 34 85: 35 86: 36 87: 0a
88: 20 89: 20 90: 00 91: 00 92: 00 93: fc 94: 00 95: 50
96: 68 97: 69 98: 6c 99: 69 100: 70 101: 73 102: 20 103: 33
104: 30 105: 30 106: 57 107: 4e 108: 00 109: 00 110: 00 111: fd
112: 00 113: 38 114: 3d 115: 1f 116: 3f 117: 08 118: 00 119: 0a
120: 20 121: 20 122: 20 123: 20 124: 20 125: 20 126: 00 127: bd
Page 43

DDC Data
BDL4211. . . 43
**********************************************************************
Digita l E DID log file
********************************************************************
Vendor/P roduct Identification
ID Manufacturer Name : P H L
ID P roductC ode : 0822 (HE X.)
ID SerialNumber : 1E240(HEX.)
Week of Manufacture : 48
Year of Manufacture : 2003
EDIDVersion, Revision
Version : 1
Revision : 3
B a s ic Displa y P ara me ters /F e a tures
V ideo I nput D e finition : D igital V ideo I nput
C ompa tible with V E S A
DFP 1.x
Maximum H Image S ize : 64
Maximum V Image S ize : 38
Dis pla y T ra ns fe r C ha ra c teris tic : 2. 2 (gamma )
F e a ture S u ppor t (D P M S ) : S tandby
Suspend
Active Off
Dis pla y T ype : R G B co lor dis pla y
C olor C ha ra c ter is tics
R e d X coordinate : 0. 63 1
R e d Y coordinate : 0. 33 9
G re e n X coordinate : 0. 28 2
G re e n Y coordinate : 0 . 59 7
B lue X c oordinate : 0. 14 4
B lue Y c oordinate : 0. 07 6
W hite X c oordina te : 0. 28 4
W hite Y coordinate : 0.2 9 5
E s ta blis hed T imings
E s ta blished Timings I : 640 x 480 @ 60Hz (IB M,V G A)
800 x 600 @ 56Hz (V E S A )
800 x 600 @ 60Hz (V E S A )
E s ta blished Timings II : 1024 x 768 @ 60H z (V E S A)
Ma nufa c turer's timings :
S ta nd a rd T imin g I dentific a ti on : U nu s e d
De taile d T imin g # 1
Pixel Clock(MHz) : 79.5
H Active (pixels) : 1280
H B lan k ing ( pix e ls ) : 38 4
V Ac tive (line s ) : 768
V B la nk ing ( lin e s ) : 3 0
HSyncOffset(FPorch)(pixels): 64
HSyncPulseWidth(pixels) : 128
V S yn c Offs e t (F P orch) (line s ) : 3
V S yn c P uls e Width ( line s ) : 7
H I ma ge S iz e (mm) : 6 4 3
V Image S iz e (mm) : 3 86
HBorder(pixels) : 0
V B or de r ( lin e s ) : 0
Flags : Non-interlaced
:NormalDisplay,Nostereo
: Digital S e pa ra te s y nc .
: P os itive Ve rtic a l S ync .
: Ne ga tive H or iz o nta l S ync .
Monitor Des criptor #2
S erial Number : T Y 123456
Monitor Des criptor #3
Monitor N a me : P hilips 30 0 W N
Monitor Des criptor #4
Mo nito r R a ng e Limits
Min. Vt rate Hz : 56
Max. Vt ra te H z : 61
Min. H o riz. rate kH z : 31
Ma x. Horiz . rate kH z : 63
Max. S upporte d Pixel : 80
No s e c onda ry G T F timing formula supported.
ExtensionFlag : 0
Check sum : BD (HEX.)
**********************************************************************
E DID da ta (12 8 byte s )
**********************************************************************
0: 00 1: ff 2: ff 3: ff 4: ff 5: ff 6: ff 7: 00
8: 41 9: 0c 10: 22 11: 08 12: 40 13: e2 14: 01 15: 00
16: 30 17: 0d 18: 01 19: 03 20: 81 21: 40 22: 26 23: 78
24: e 8 25: b7 26: ee 27: a1 28: 56 29: 48 30: 98 31: 24
32: 13 33: 48 34: 4b 35: 23 36: 08 37: 00 38: 01 39: 01
40: 01 41: 01 42: 01 43: 01 44: 01 45: 01 46: 01 47: 01
48: 01 49: 01 50: 01 51: 01 52: 01 53: 01 54: 0e 55: 1f
56: 00 57: 80 58: 51 59: 00 60: 1e 61: 30 62: 40 63: 80
64: 37 65: 00 66: 83 67: 82 68: 21 69: 00 70: 00 71: 1c
72: 00 73: 00 74: 00 75: ff 76: 00 77: 20 78: 54 79: 59
80: 20 81: 31 82: 32 83: 33 84: 34 85: 35 86: 36 87: 0a
88: 20 89: 20 90: 00 91: 00 92: 00 93: fc 94: 00 95: 50
96: 68 97: 69 98: 6c 99: 69 100: 70 101: 73 102: 20 103: 33
104: 30 105: 30 106: 57 107: 4e 108: 00 109: 00 110: 00 111: fd
112: 00 113: 38 114: 3d 115: 1f 116: 3f 117: 08 118: 00 119: 0a
120: 20 121: 20 122: 20 123: 20 124: 20 125: 20 126: 00 127: a 4
Page 44
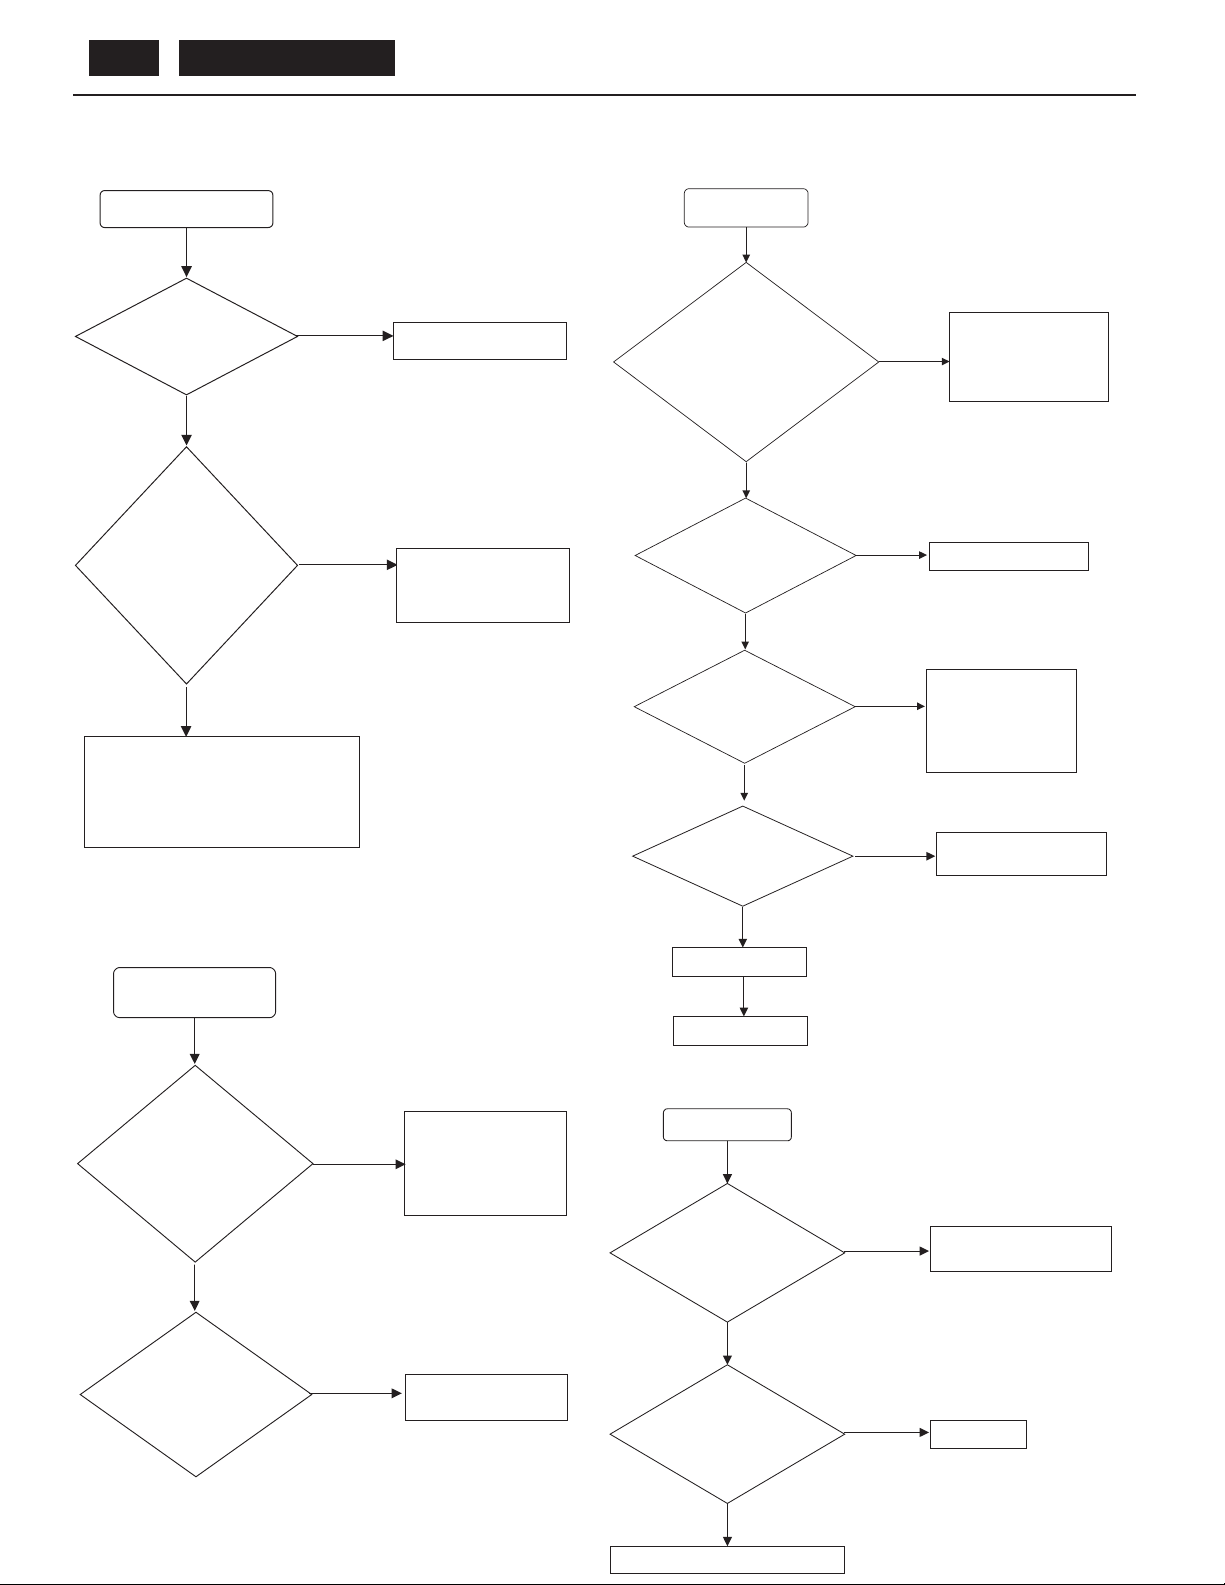
BDL4211. . . 44
Repair Flow Chart
1.No Work / LED is off
Check if
No
power switch
is normal
Yes
Check if AC
adaptor output
= 24V on 1102
No
and
=16V on 1103
Yes
Try to replace
7753 CPU or 7754 CPU’s flash ROM
7752 CPU’s EEPROM or
7701 Painter or
7722 Painter’s EEPROM
Replace power switch
Replace Power board
or go to troubleshoot
power board.
3.No picture / LED is
green
Check if working voltage
3V3, 2V5, 5V to
7402 JAGASM
7753 CPU
7754 CPU’S flash ROM
7752 CPU’s EEPROM
7701 Painter
7722 Painter’s EEPROM
Yes
Check if clock source
1401 output 14MHz
1753 output 22MHz
1702 output 12MHz
Yes
Check if scaler 7402
output 48 bits TTL
RGB, clk, H/V and
DE signal
Yes
Check resistorsnetwork
3481~3486
No
No
No
Check circuit around each
No
regulator and eliminate short
and open situation
7001 pin2=5V
7008 pin3=2V5
7009 pin2=3V3
Replace 1401, 1753 or 1702
Try to replace
7753 CPU or
7754 CPU’s flash ROM
7752 CPU’s EEPROM or
7701 Painter or
7722 Painter’s EEPROM
Replace bad resistorsnetwork 3481~3486
2.No raster / Picture
too dim
Check if 1102 on
power board
Pin 1,2,3=24V
Pin4=0~4.7V
Pin5=3.3V
Yes
Check if
inverter output =
738~1001Vrms
45K~75KHz
No
No
Check working
voltage, backlight
control signal and
brightness control
signal on scaler board
Replace LCD panel +
Inverter PCB
Yes
Replace LVDS cable
No
Replace LCD panel
4.No D-sub picture
Check if H/V
signals input to
Schmitt trigger
7203
Yes
Check if Schmitt
trigger 7203
output H/V signals
to JAGASM
No
No
Check input path from 1201
to 7203
Replace 7203
Yes
Go to 3. No picture / LED is green
Page 45
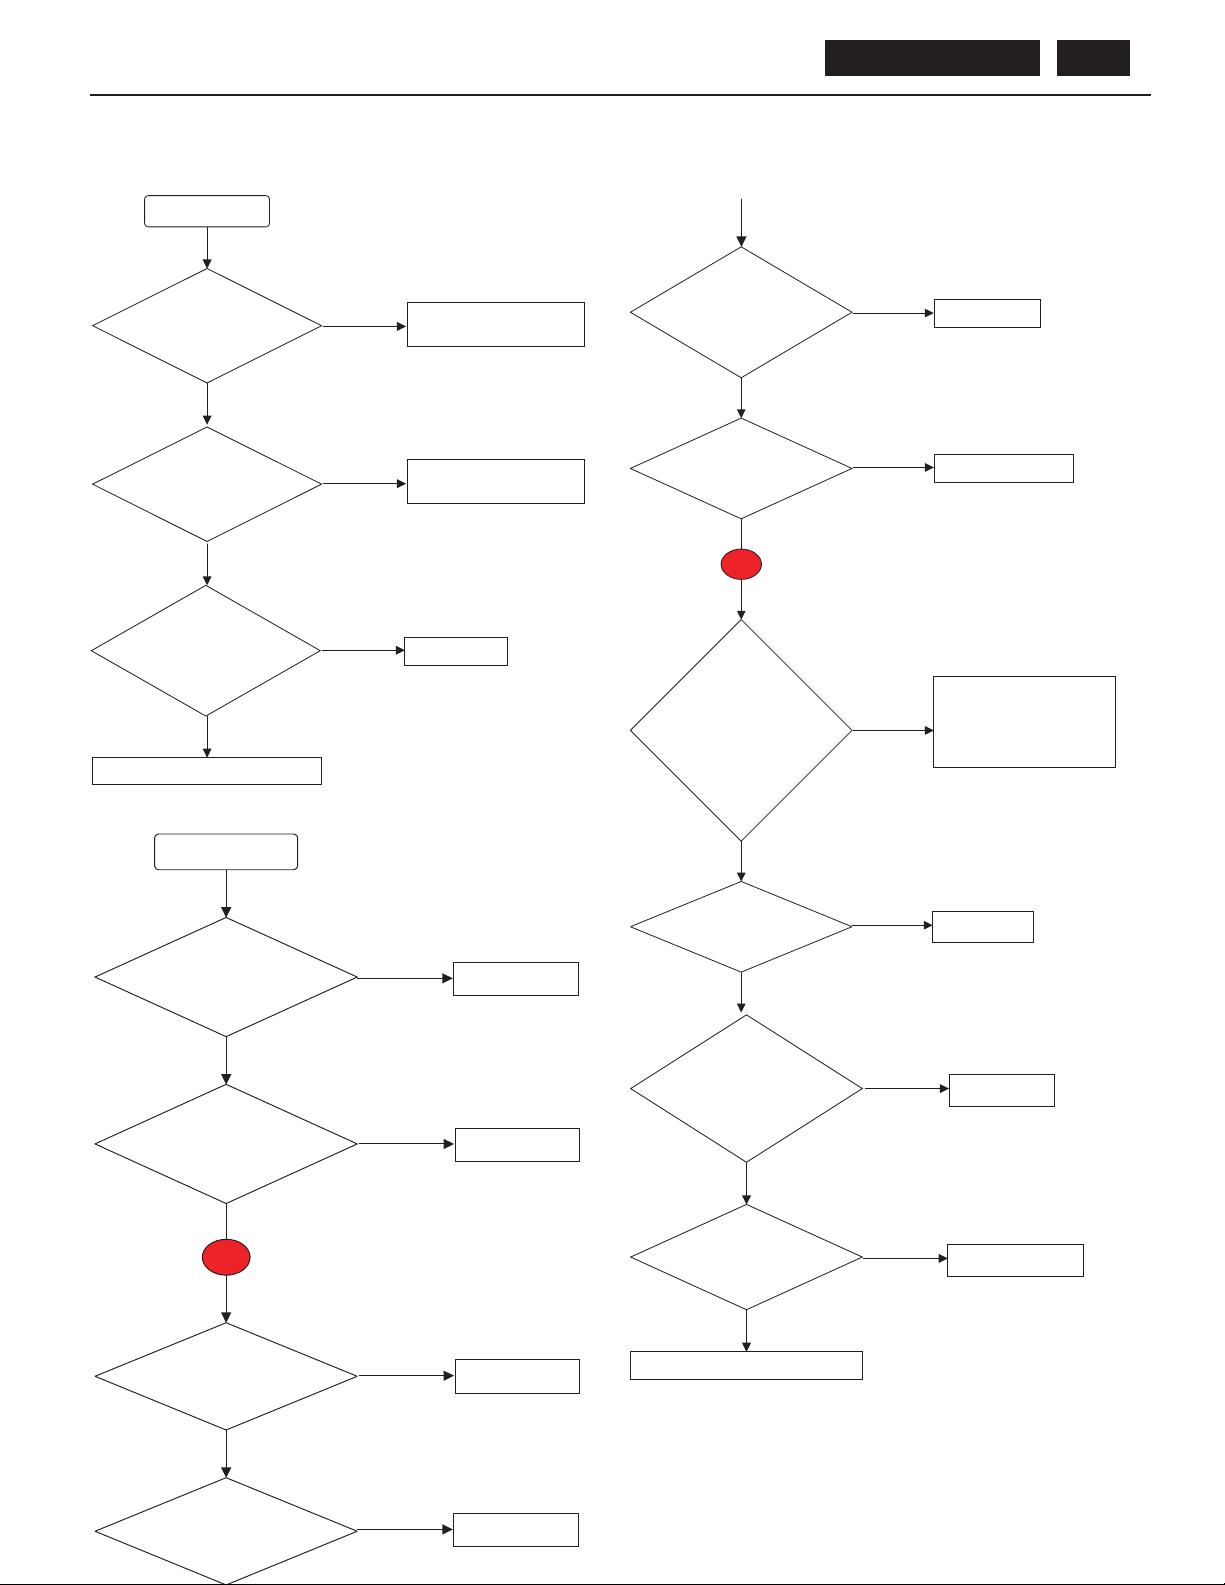
Repair Flow Chart
BDL4211. . . 45
5.No DVI picture
Check if DVI
signals input to
TMDS-Rx 7842
Yes
Check if DDC IC
7801 with correct
DVI EDID code
Yes
Check if TMDSRx 7842 output 24
bits signals to
JAGASM
Yes
Go to 3. No picture / LED is green
No
No
No
Check input path from 1801
to 7842
Put correct DVI EDID code
in 7801
Replace 7842
Yes
Check if video
decoder 7302
output 8 bits
digital signals
Yes
Check resistorsnetwork 3325,
3324
Yes
Check if
VDD-IO-3V3
VDD-CORE-1V8
PLL-1V8
DAC-1V8
DAC-3V3
To FLI2300 7351
Connector 2
No
No
No
Replace 7302
Replace 3325 or 3324
Check circuit around each
regulator and eliminate short
and open situation
7006 pin3=1V8
7009 pin2=3V3
6.No TV picture
Check if tuner
1501 pin 1 output
MM-CVBS signal
Yes
Check if connector
1601 pin 17 output
TUN-CVBS
signal
Yes
Connector 1
Check if 7301
pin 2=3.3V
No
No
No
Replace 1501
Replace 7501
Replace 7301
Yes
Check if 1351
output 13.5MHz
Yes
Check if video
converter 7351
output 24 bits
YCbCr signals
Yes
Check resistorsnetwork
3372~3377
Yes
Go to 3. No picture / LED is green
No
Replace 1351
No
Replace 7351
No
Replace 3372~3377
Check if 1302
output 24MHz
Yes
No
Replace 1302
Page 46
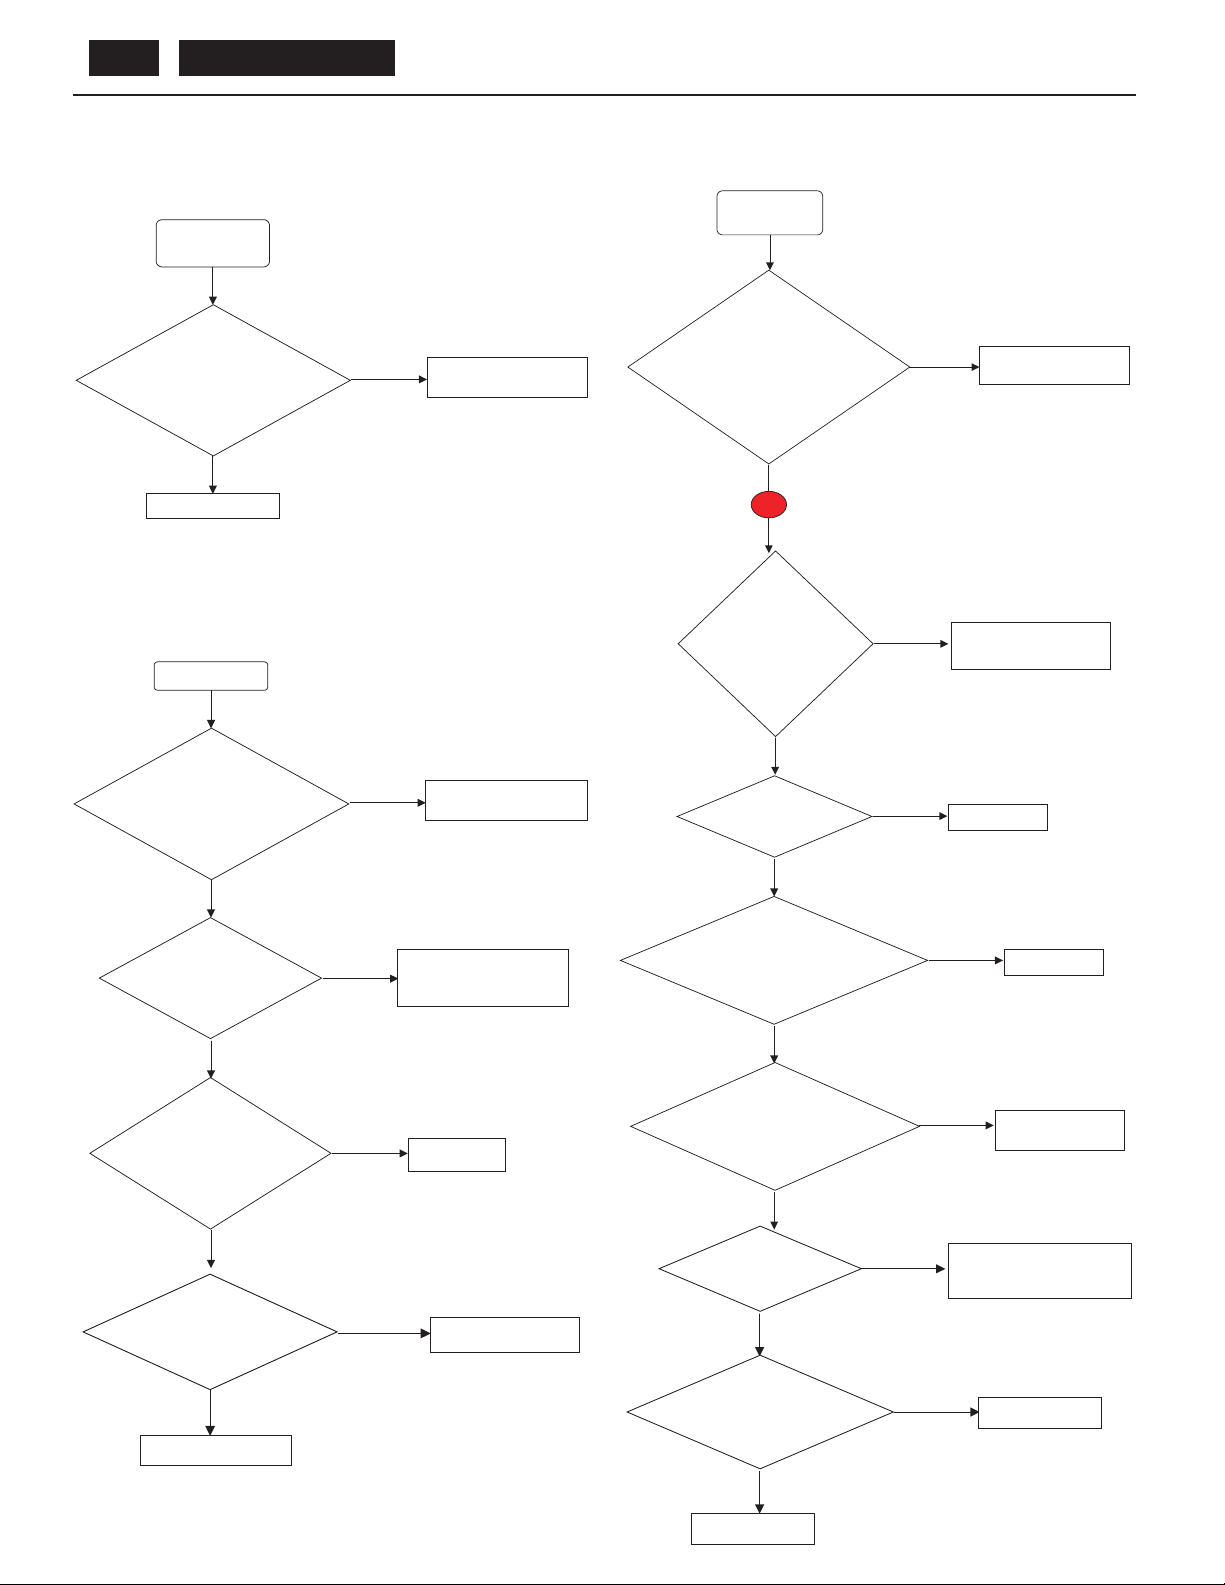
BDL4211. . . 46
7.No SVHS /
CVBS picture
Check connector 1601
Pin 20 output Y-SVHS
Pin 21 output C-SVHS
Pin 12 output AV -CVBS
signals
Repair Flow Chart
9.No PC / S-audio
/ CVI-audio sound
Check audio decoder 7901
Pin 35 input S-AUD-L
No
Check input path from 1642
and 1641 to 1601
Pin 36 input S-AUD-R
Pin 38 input CVI-AUD-L
Pin 39 input CVI-AUD-R
Pin 41 input PC-AUD-L
Pin 42 input PC-AUD-R
No
Check input path from 1641
and 1601to 7901
Yes
Go to connector 1
8.No HDTV picture
Check connector 1601
Pin 26 output G-Y
Pin 27 output B-Pb
Pin 25 output R-Pr
signals
Yes
Check ADC 7252
VDD=3V3
VD=3V3
PVD=3V3
Yes
Yes
Connector 3
Check if audio
decoder 7901
Pin 31=8V
Pin 10=5V
Pin 49=5V
Pin 63=5V
Yes
No
No
Check input path from 1641
to 1601
Check circuit around each
regulator and eliminate short
and open situation
Check if 1901
output 18MHz
Yes
Check if audio decoder 7901
Pin 20 output MSP-OUT-R
Pin 21 output MSP-OUT-L
signals
Yes
No
No
Eliminate short and open
situation
Replace 1901
No
Replace 7901
Check if ADC 7252
output 24 bits RGB
digital signal and
HDTV-HSYNV,
VSYNC, CLK
Yes
Check resistorsnetwork
3271~3277
Yes
Go to connector 2
Check if TDA1517 7941
Pin 1 input V(1517 in) L
No
Replace 7252
Pin 2 input V(1517 in) R
signals
Yes
Check if 7947
Pin7=16V
No
Replace 3271~3277
Yes
Checkif7947
Pin 4 output signal
No
No
Check circuit around
7949, 7950, 7951
Eliminate short and open
situation
No
Replace 7947
Pin 6 output signal
Yes
Replace speakers
Page 47
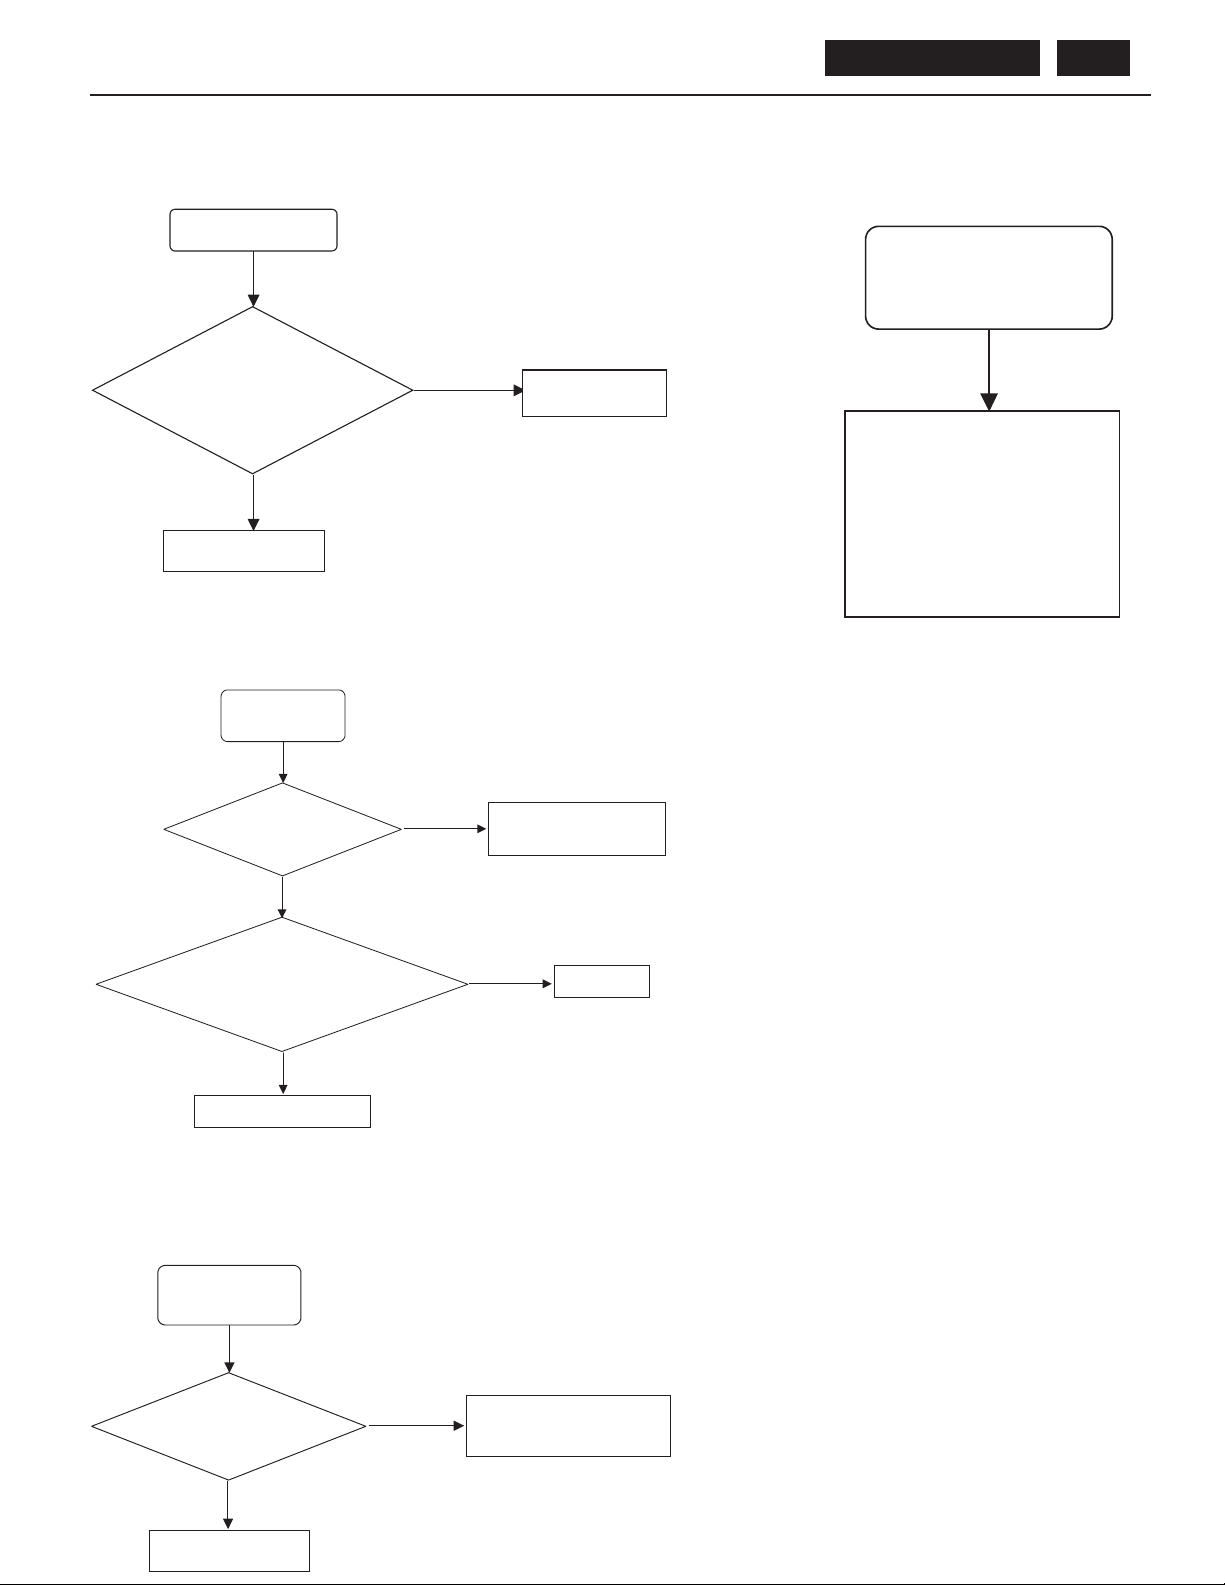
10.No TV sound
BDL4211. . . 47
Repair Flow Chart
13.LED and
function key poor
Check if tuner 1501
pin 10 output 2
nd
signal
Yes
Go to connector 3
11.No earphone
sound
Check if TDA1308
7953 pin 8=5V
Yes
-IF
No
No
Replace 1501
Check circuit around
control board and
cable between
control board and
scaler board
Eliminate short and open
situation
Check TDA1308 7953
Pin 7 output PHONE-OUT-R
Pin 1 output PHONE-OUT-L
signals
Replace Phone Jack board
12.No remote
function
Try another remote
control
No
Yes
Yes
No
Replace one good remote
control
Replace 7953
Check IR receiver
Page 48

BDL4211. . . 48
MECHANICAL PARTS:
9919 208 00051 FRONT FRAME ASSY
9919 201 00431 REAR ENCLOSURE
ELECTRICAL PARTS:
9919 206 51682 LC420W02-A4 LCD MODULE 42”
9919 208 52451 PCA MAIN ASSY *SLAVE-V*
9919 208 52461 PCA MAIN ASSY *SLAVE-B*
9919 158 55211 PCA KEY CONTROL ASSY
9919 208 52281 PCA REMOTE CONTROL ASSY
9919 208 52263 PCA I/O ASSY
9919 208 52252 PCA AUX POWER SUPPLY
9919 208 52223 PCA LAMP SENSOR ASSY
9919 208 52501 PCA SMPS ASSY
9919 208 52271 PCA TEMP. SENSOR
9919 158 59121 PCA TV BOX ASSY
9919 158 55061 PCA AUDIO ASSY
9919 158 55041 PCA AUDIO OUT JACK ASSY
9919 208 80041 FD126015LB FAN 12V 60X60X15
SPARE PARTS LIST
Page 49
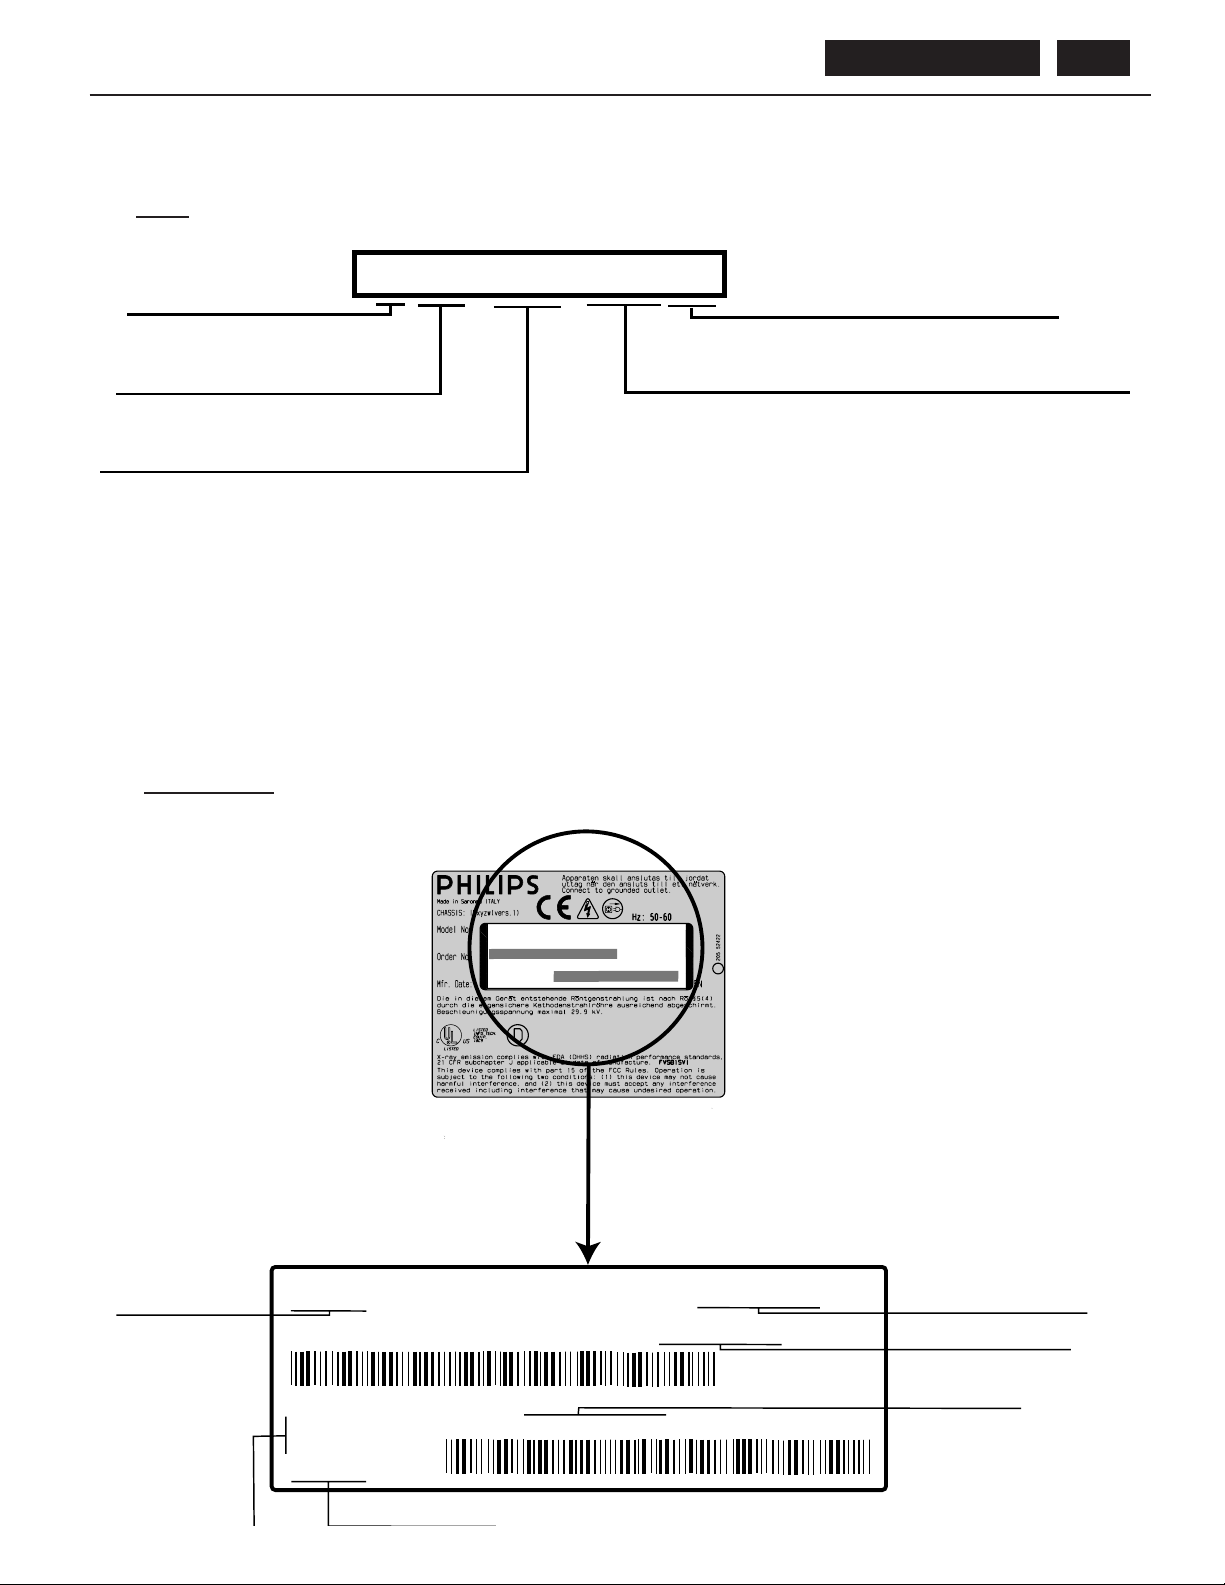
PCB
YY= Year (03=2003)
BDL4211. . . 49
IDENTIFICATION LABEL
YYWW 9999 6xxxx 00
00= Tecnical Level (00 to 99)
WW= Week (01 to 52)
Progressive serial number (0001 to 9999)
MONITOR
REAR LABEL
IDCSB3/1
Type Number: C29WSD000/25 PH 9919 310 xxxxx
FIMI via S. Banfi, 1
SARONNO
JUNE 2003
6xxxx= Last 5 digits of PCB code 3119 208 6xxxx
A: 1.9-1,0
Serial No: AN00 yyww001001
Model number
IDCSB3/1 A: 1.9-1.0
Type Number: C29WSD000/25 PH 9919 310 xxxxx
FIMI via S. Banfi, 1
SARONNO
JUNE 2003
Date of Manufactured
Serial No: AN00 yyww001001
Maximum current rating
Code number (12NC)
Serial number:
AN=Origin code (FIMI)
00 = Tecnical level
yy= Year (03=2003)
ww= Week (01 to 52)
001001= progressive number
Page 50
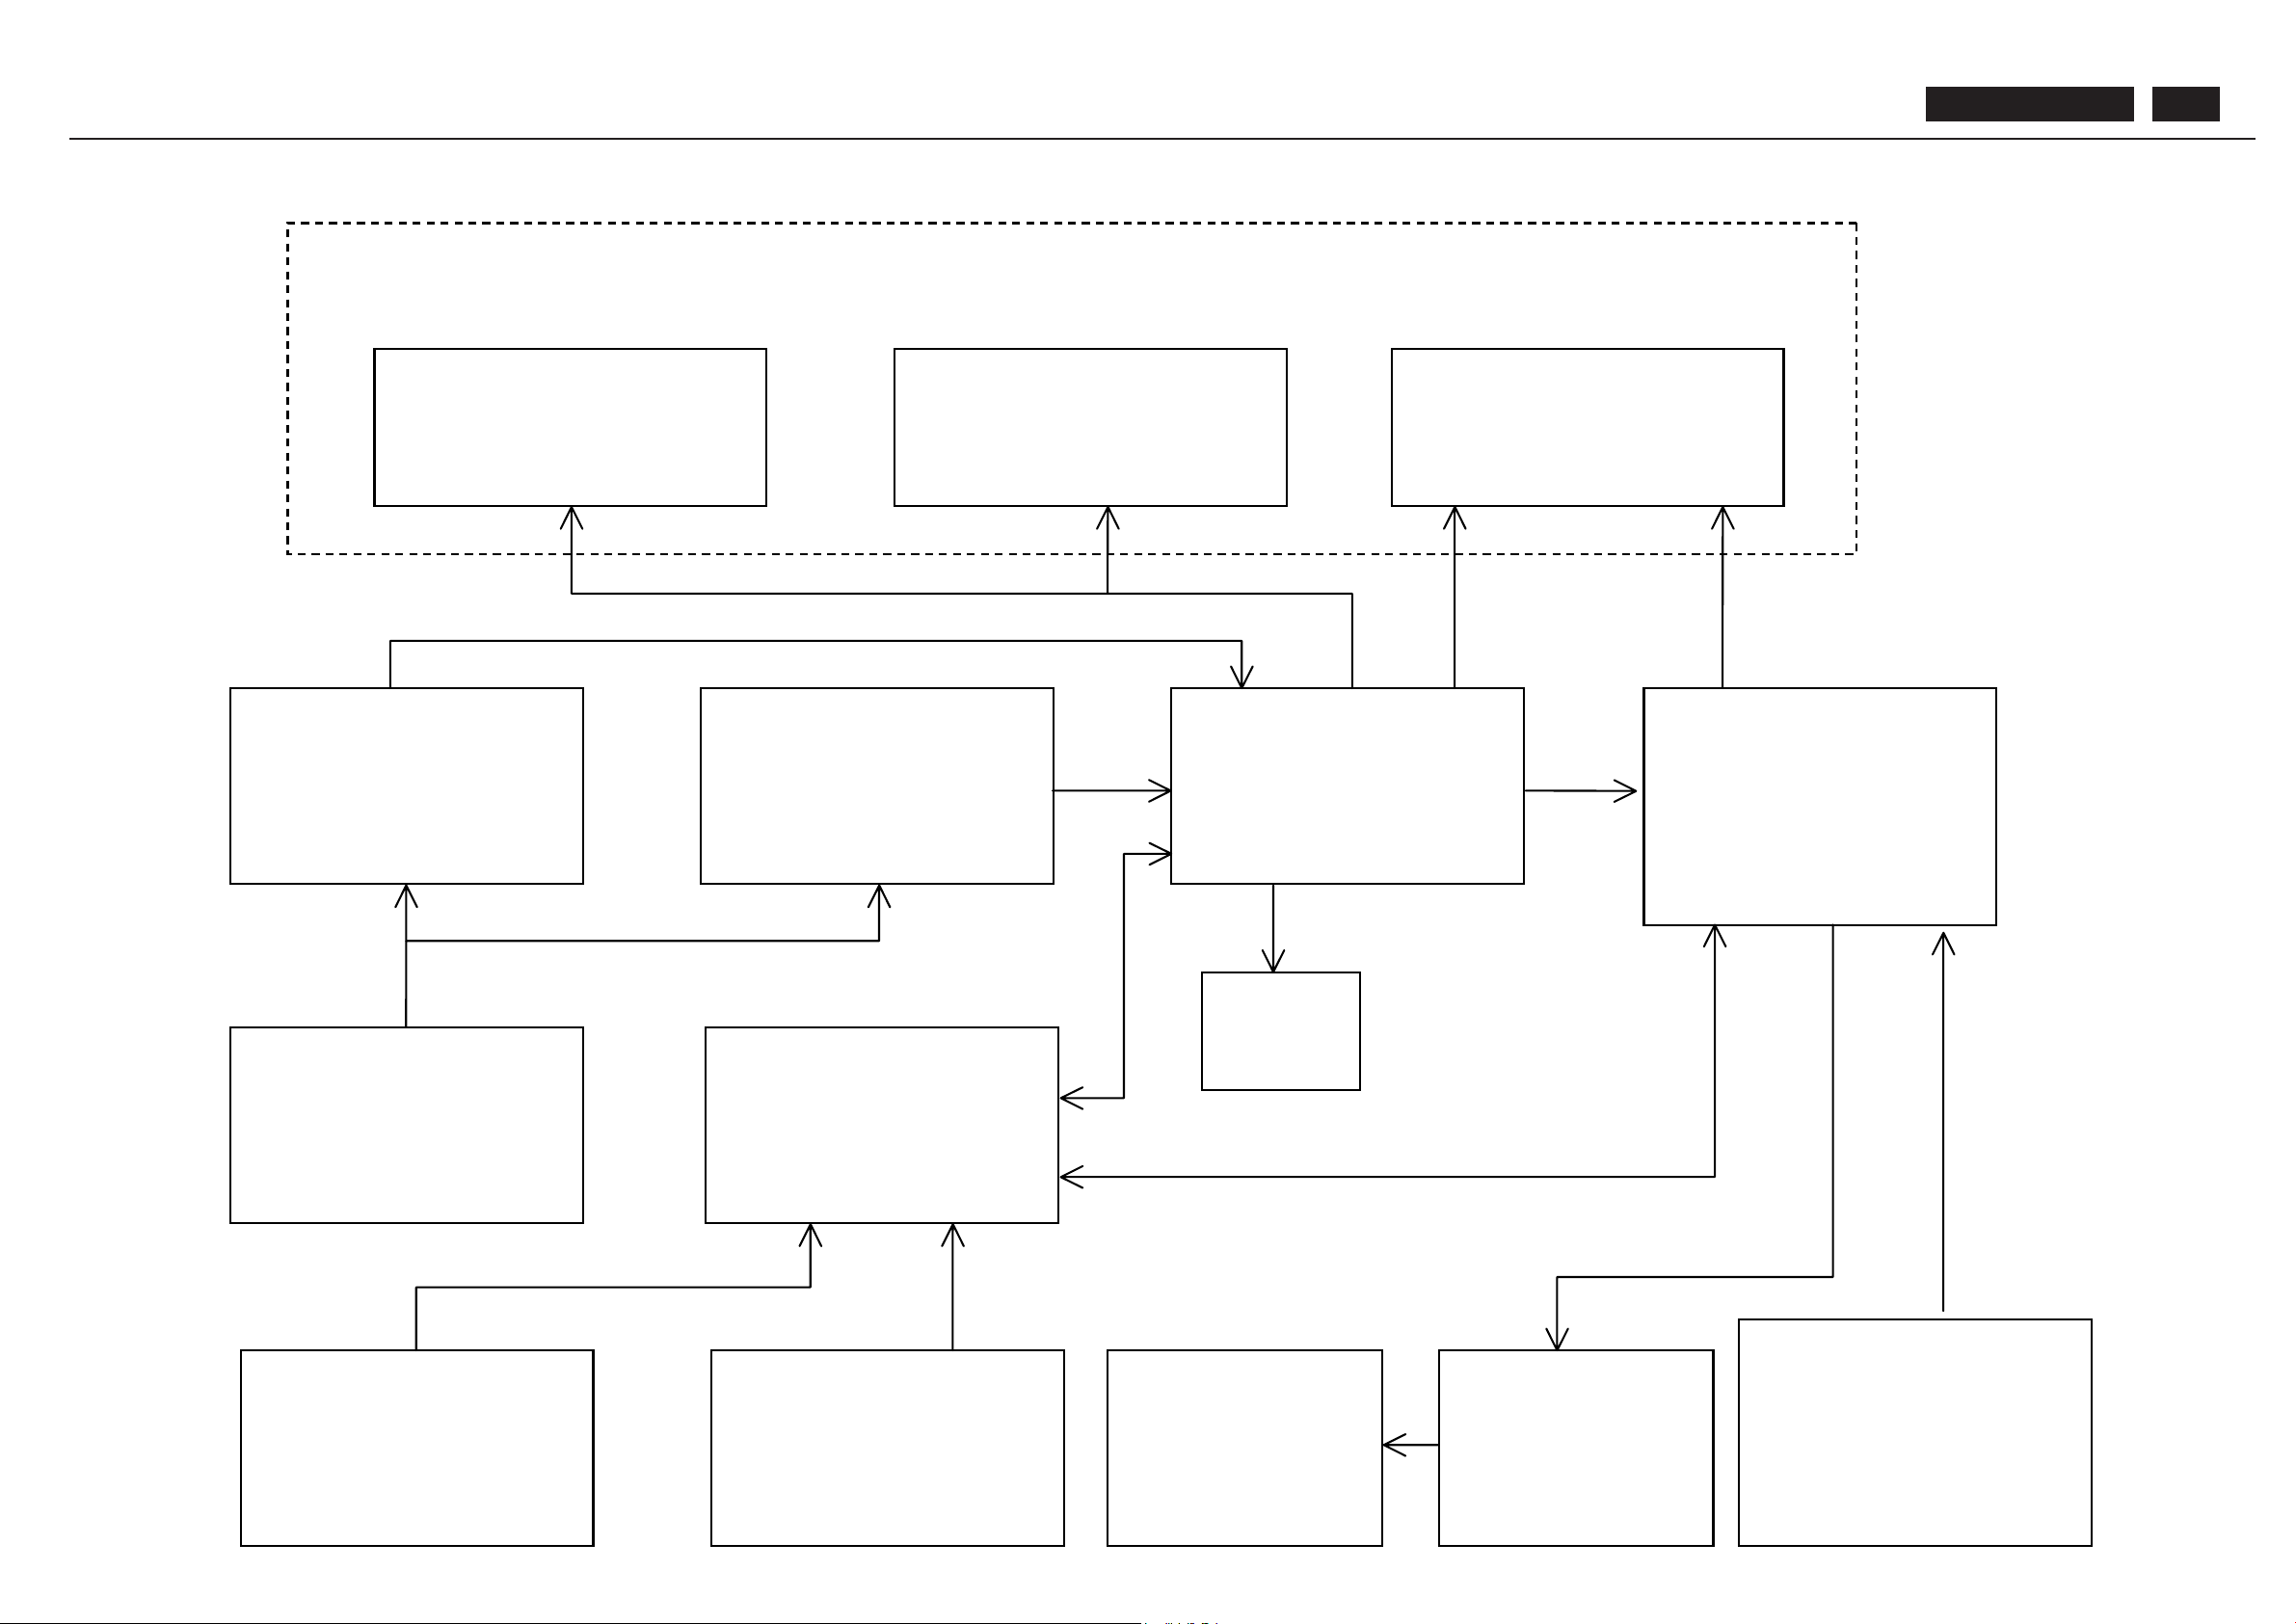
BDL4211. . . 50
BLOCK DIAGRAM OF 42” LCD SLAVE
SMPS B
24V
DC
/ 16VDC
SMPS A
24V
DC
AUXILIARY
POWER SUPPLY
MAIN BOARD
(SCALER)
PC VGA DVI
MAINS SOCKET
INPUT 90 ÷ 264VAC
FANS
I / O BOARD
CONTROL BOARD
KEYBOARD
SPEAKERS
LINE OUT
TV BOARD
CVBS, YC, YPbPr
L/R AUDIO
AUDIO
BOARD
LCD PANEL MOD: LC420W02
LCD INTERFACE
INVERTER A
INVERTER B
Page 51
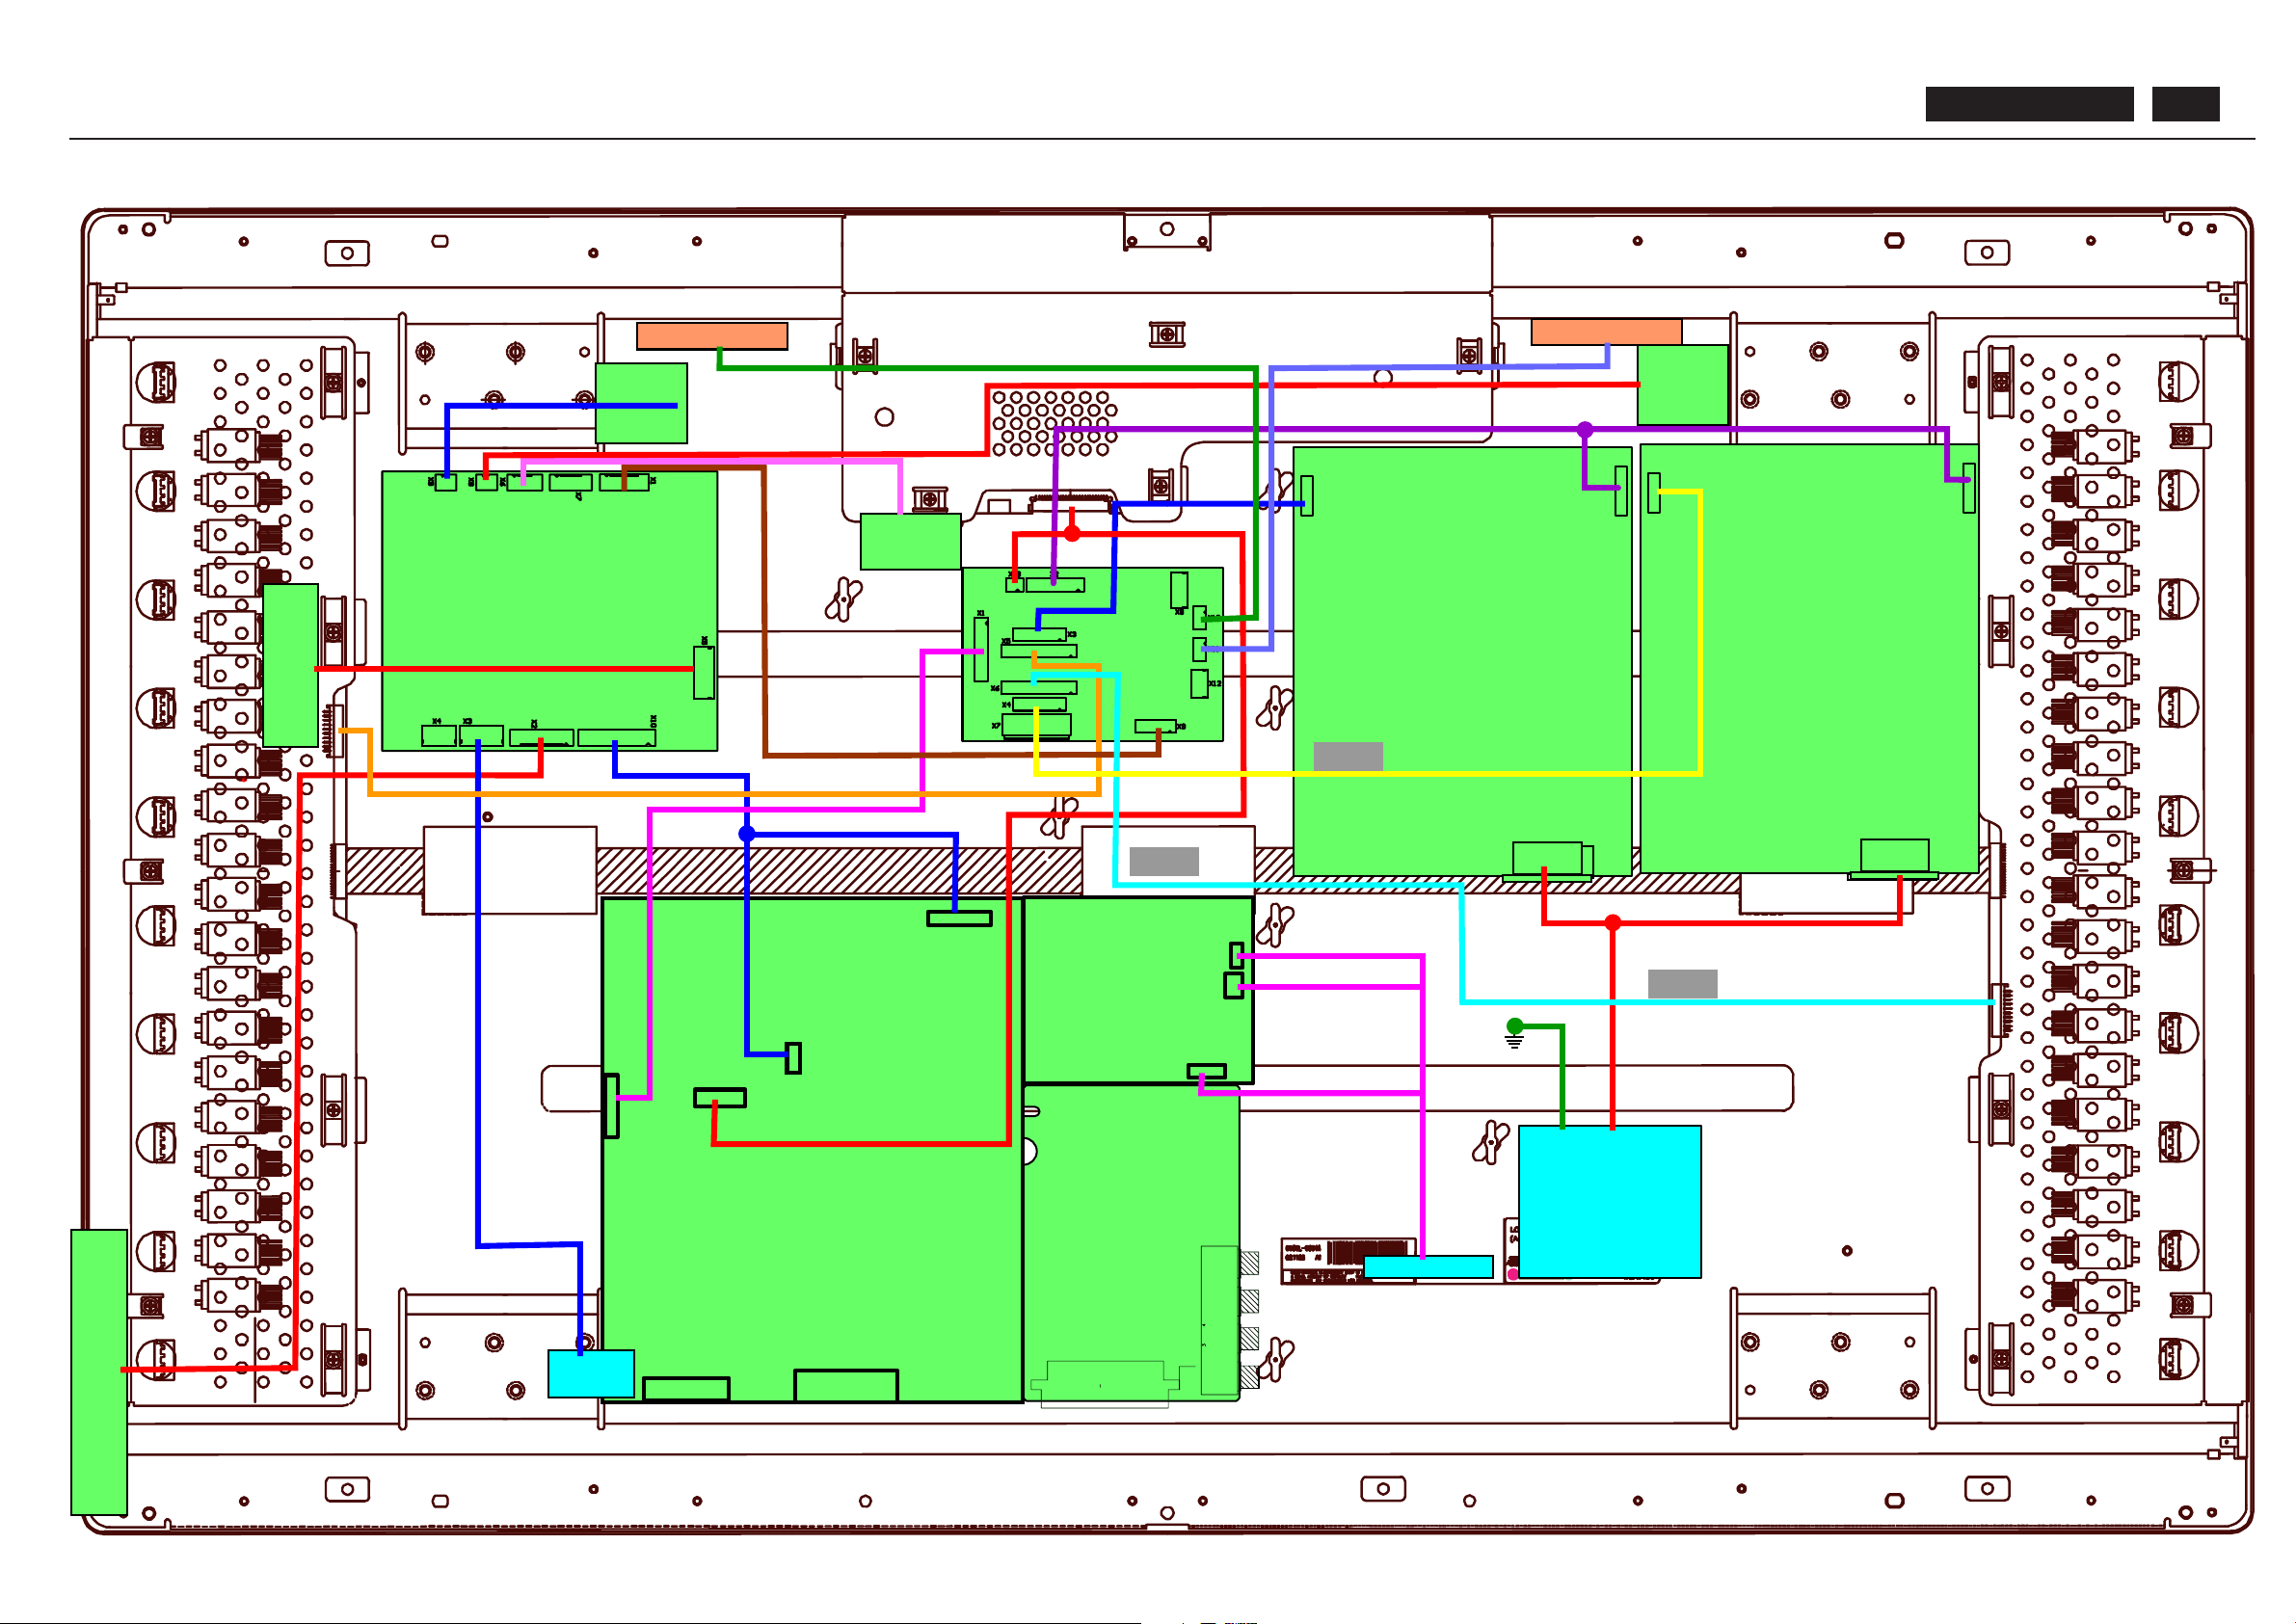
SCALER
1948
1947
1951
AUDIO
AUX
1102
1103
1102
1102
1103
SMPS
I/O BOARD
MAINS
FILTER
VIDEO
CONTROL BOARD
LAMP
SENSOR
RS232
TEMP.
SENSOR
AUX
LAMP
SENSOR
FAN
FAN
3073
3046
3082
3047
3072
3079
3079
3044
3097
3046
3096
3096
3073
3056
3098
3047
AUDIO
SMPS
3047
3047
3082
AUDIO OUT
1701
1402
1491
1752
1948
1947
1951
WIRING DIAGRAM
KEYBOARD
3095
3094
208 80041
BDL4211. . . 51
Page 52
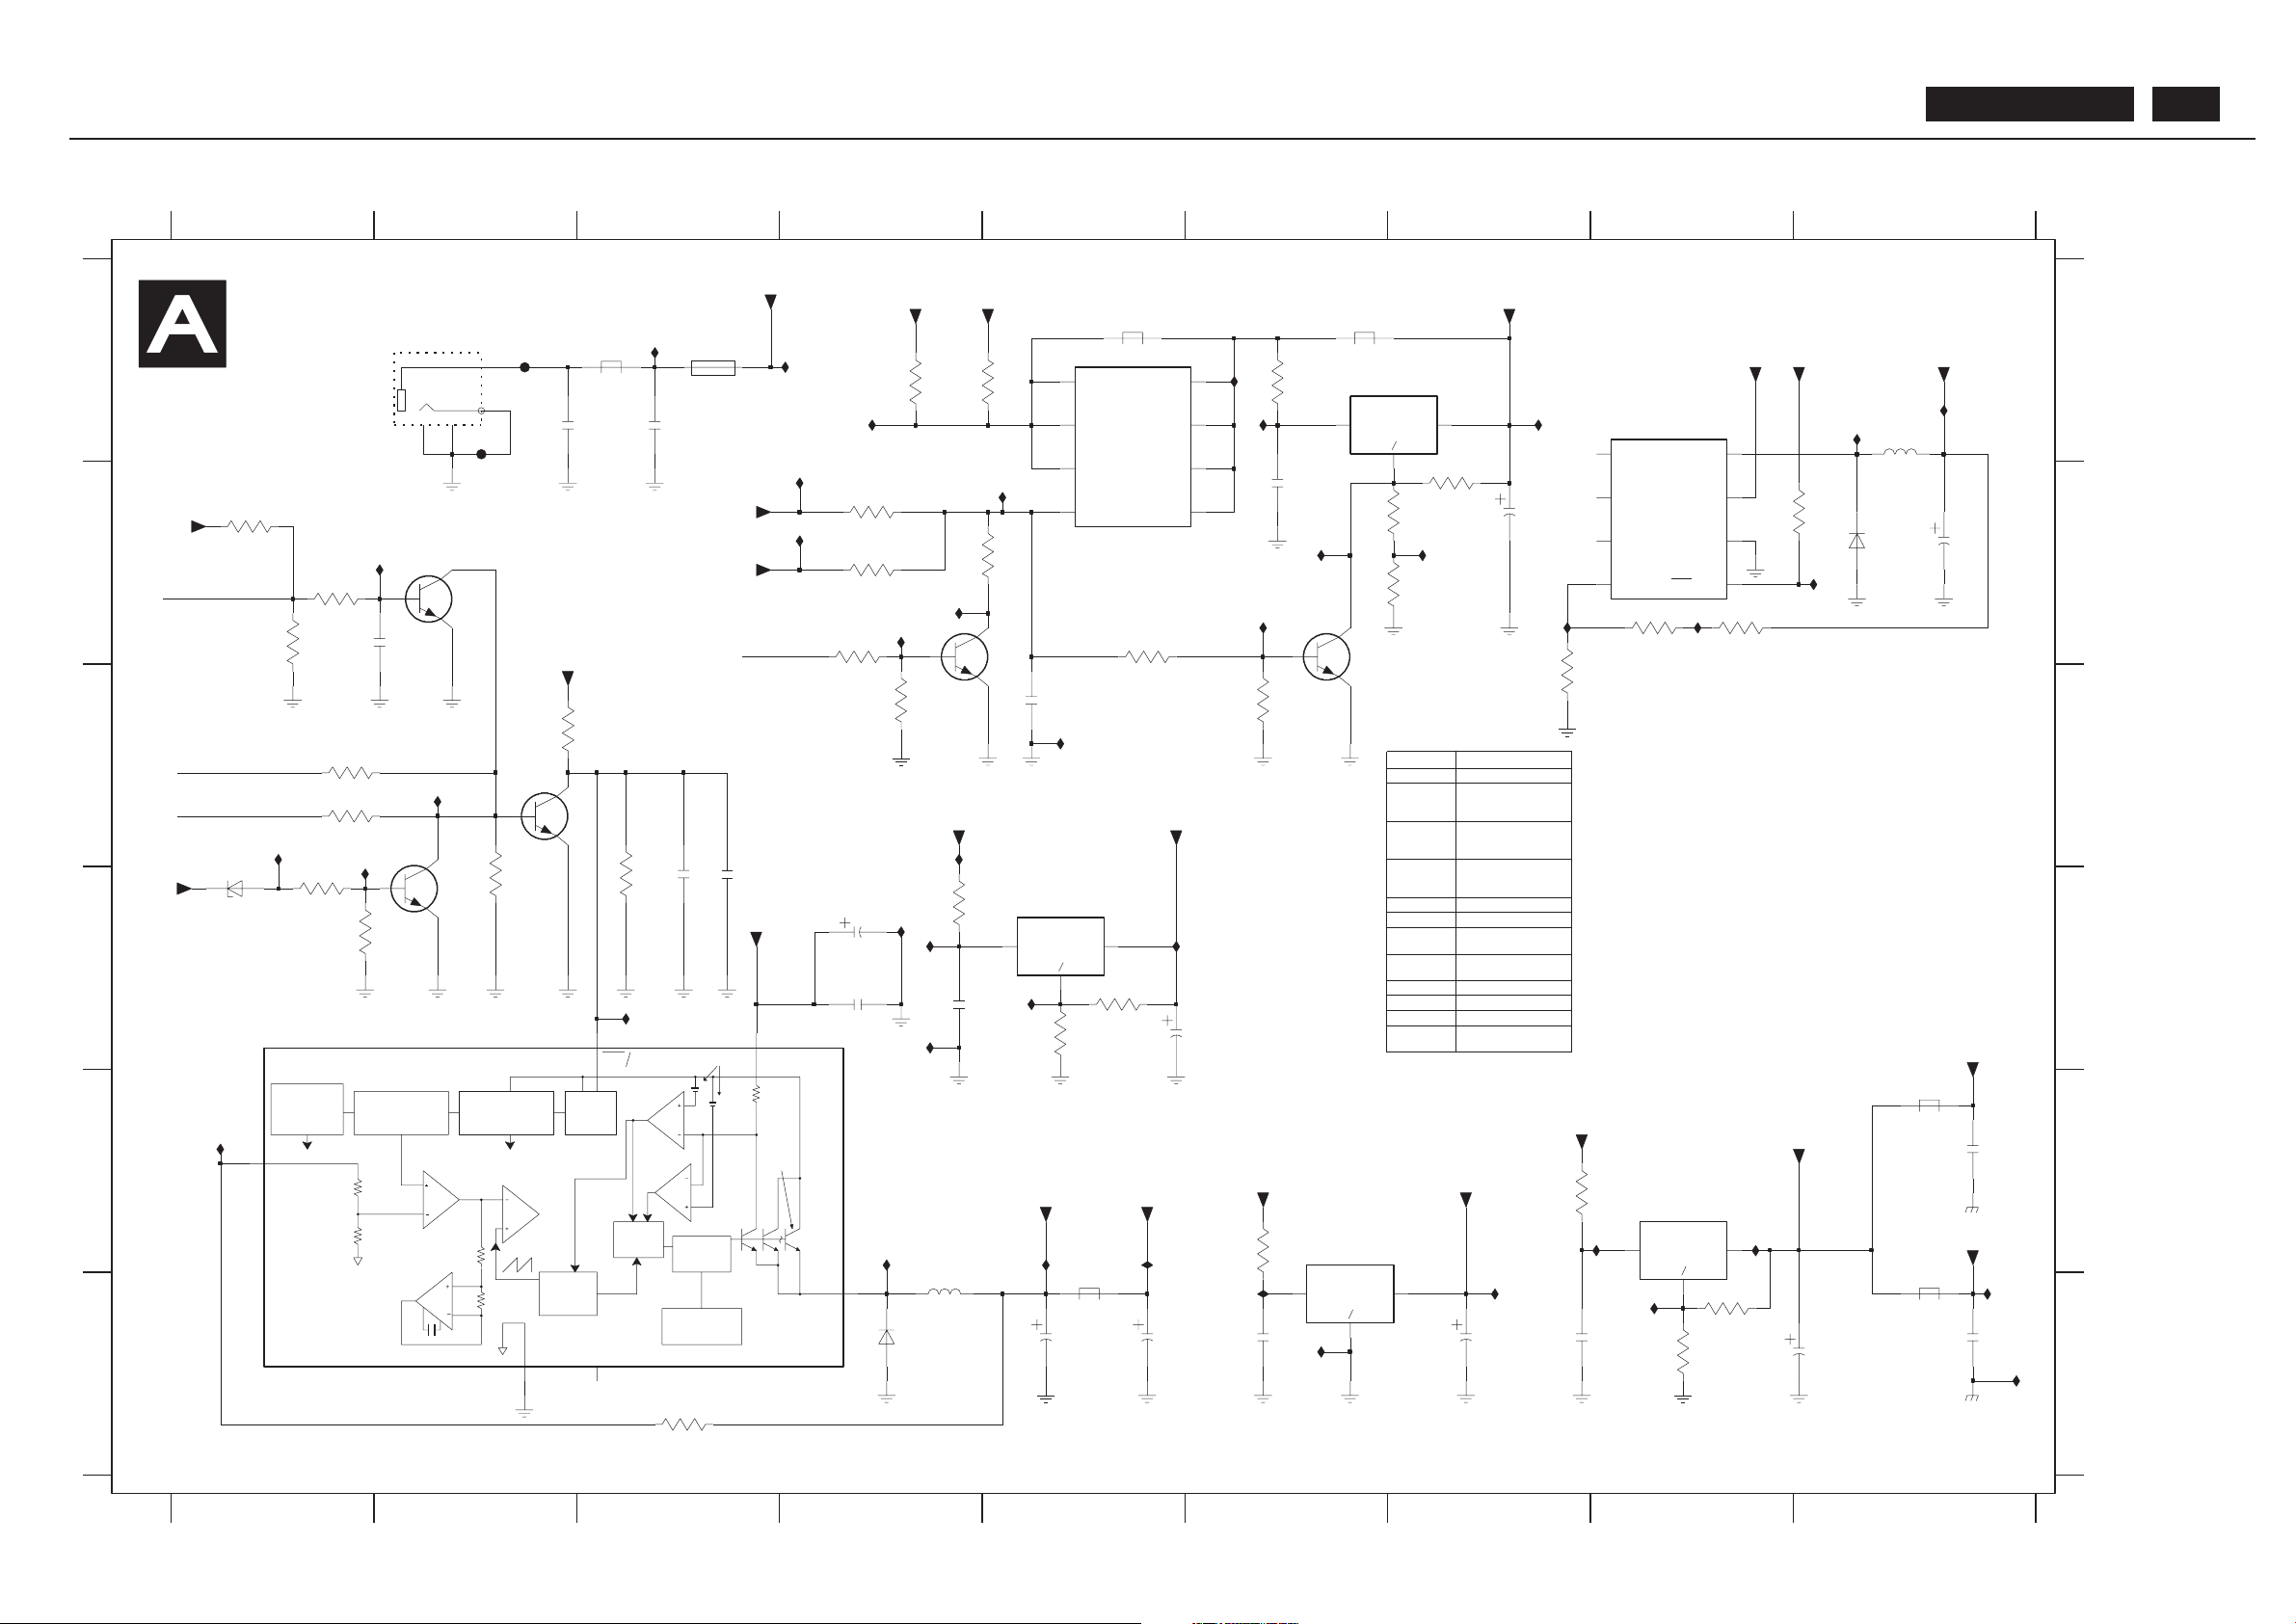
Power Diagram
ADJ
ADJ
ADJ
ADJ
RESET
150KHZ
+
CURRENT
LIMIT
3A
SWITCH
3.3V , R 2 = 4.2 K
5V,R2=7.6 K
12V , R 2 = 21.8 K
ADJ,R 2=0R
R1 = OPEN
OSC.
DRIVER
SOURCE
BIAS
2.5V
OP AMP
REGULA TO R
ST AR T
UP
CURRENT
GM
AMP
1.235V
REFERENCE
2.5V
LATCH
COMP .
220mV
+
COMP .
THERMAL
LIMIT
COMP .
OFF
R2
R1=2.5K
ACTIVE
CAP ACIT OR
FREQ.
SHIFT
TO ADAPTER
U309 B8
U310 B9
U338 A4
U339 B7
U618 B5
U619 A6
U620 D5
U621 B4
U625 F6
U633 E5
F7A
F001 A2
F002 B2
U132 F8
U133 E8
U134 D4
U159 B2
U160 A7
U161 A6
U162 B6
U234 B6
U235 B4
U239 E1
U274 B7
U275 A9
2238586198122001
BEAD
3. All devices should be placed as close as possible to the IC .
6001 D1
6002 F4
6098 B9
7001 D1
7002 D2
7003 C2
7004 C4
7005 A5
7006 D5
7008 E8
7009 E6
7010 A8
7011 A6
7012 B6
7013 B2
1W
2W
933967310685
SSQ7
24220861 10531002
2422026053091001
ReservedRef Des
3029 D4
3031 B5
3032 C6
3034 E7
3037 E6
3039 B8
3041 B8
3042 B8
3043 C7
3045 B1
3046 B1
3047 B1
5001 F4
5002 A5
5003 A6
BEAD
2009
50V
100n
MAIN PCB
W > 4mm
5005 F9
5006 E9
5007 A3
5011 F5
5013 A9
EXCEPT 1001,2006,2007,2013,2029,2097,2015,2018,2024,3022,3029,3034,3037,5001,5007,5013 WERE CHIP COMPONENTS.
3001 D1
3002 D1
3003 C1
3004 C1
3005 C2
3006 D3
3007 D5
3008 D5
3009 D2
3011 F8
3012 F8
3013 F3
3014 B4
3015 B4
3016 B4
3017 B4
3018 C4
3019 A4
3020 A4
3022 A6
3023 B6
3024 B6
3025 B7
2009 A2
2011 E 9
2013 F5
2014 F9
2015 F7
2016 F6
2017 F7
2018 F8
2021 C5
2024 D4
2026 D3
2027 D3
2028 B6
2029 B7
2097 B9
(2)
2W
(1)
W > 4mm
I27 E8
U12 B4
U19 A9
U73 C5
U75 D4
U81 F9
U82 F6
1001 A2
1002 A3
2001 A3
2002 D4
2. Keep loop area around IC very small .
[R]
1W
50V
223858619812
BEAD
3198021310303014
2004 B1
2005 D4
2006 D5
2007 F5
21221 1805674
5007
100n
3019 232272461007
3031 21221 1805678
47K
3032
I25 A3
22K
5002 313816874261
5003 313816874261
BC848C
2345678 9
12345678 9
A
B
A
B
C
D
E
F
I1 A4
I7 C2
I9 D5
I10 C1
I12 D4
I13 D3
I15 E4
I16 E5
I18 F7
I19 F9
I20 B4
I23 C4
I24 C1
SB: 59991 x1
BEAD
1. T race (except pin 5) both 7003 should be thick and short .
1
3013
510R
PB: 59591
243853598058
7012
C
D
E
F
7002
BC848C
U310
U162
3022
4R7
5002
U274
2007
1000u
16
+5
2024
470u
25
100R
3039
I23
LM217D2T
7008
GND
1
2
Vi n3Vout
U73
I16
+5
16
2005
100n
2015
1000u
16
7009
LD1085D2T33
1
GND
Vi n
3
Vout
2
F7A
1002
SSQ7
0R
3020
U620
3016
82K
200R
3042
3019
5007
3V3-STBY
I20
47K
3005
22K
3032
BC848C
7012
3008
620R
2021
10n
3037
0R82
10
10u
2014
I7
I10
U239
25
100u
2097
5001
68uH
16V
U75
+3V3
10u
2026
47K
3015
+5
U160
16
2016
100n
16V
F001
I25
U134
2013
100u
25
100u
5013
U161
5003
5K1
3024
22K
3006
U618
47K
3001
+2V5I
1K5
3041
SS34
6002
3023
160R
2029
100u
25
16V
+5
U12
50V
2002
100n
2011
10u
10
200625470u
+1V8
U159
100n
2017
16
+5
U621
U132
GND
1
2
Vi n3Vout
7006
LM217D2T
GND
1
Vi n2Vout
3
LM217D2T
7011
I27
3004
2001
100n
50V
U81
47K
F002
8K2
3002
BC848C
7003
50V
2009
100n
U82
5006
I9
2028
I1
3043
1K
50V
100n
620R
3012
U619
U19
3003
47K
I18
2R7
3029
16V
I24
7004
BC848C
16
2004
2u2
I15
I13
U234
U338
7010
LM2594M-ADJ
4
FB
6
GND
NC0
1
NC1
2
3
NC2
5
ON_OFF
8
OUTPUT
7
Vi n
5005
3007
270R
I19
5011
6001
BZX84-B16
3V3-STBY -ON
100u
25
2018
220K
3045
BC848C
7013
SI9433DY
7005
D1
8
D2
7
D3
6
D4
5
G
4
S1
1
S2
2
S3
3
100K
3017
16V
I12
U309
FEEDBACK
3
GND1 MT1
6
ON
5
OUTPUT
2
Vi n
1
3011
620R
3018
47K
7001
LM2596SX-5.0
4
0R82
3034
16V
6098
SFPJ-73V
620R
3025
3009
22K
16V
+2V5II
+2V5
PAN-VCC
16V
U339
U235
3014
+5
+5T
150K
3047
U633
U133
3046
100K
3031
47K
U625
U275
1001
MT1
MT2
1
2
3V3-STBY -ON
2027
10u
POW -CON-SCALER
PANEL-PWR-CTL
RESET -PAINTER
BDL4211. . . 52
Page 53
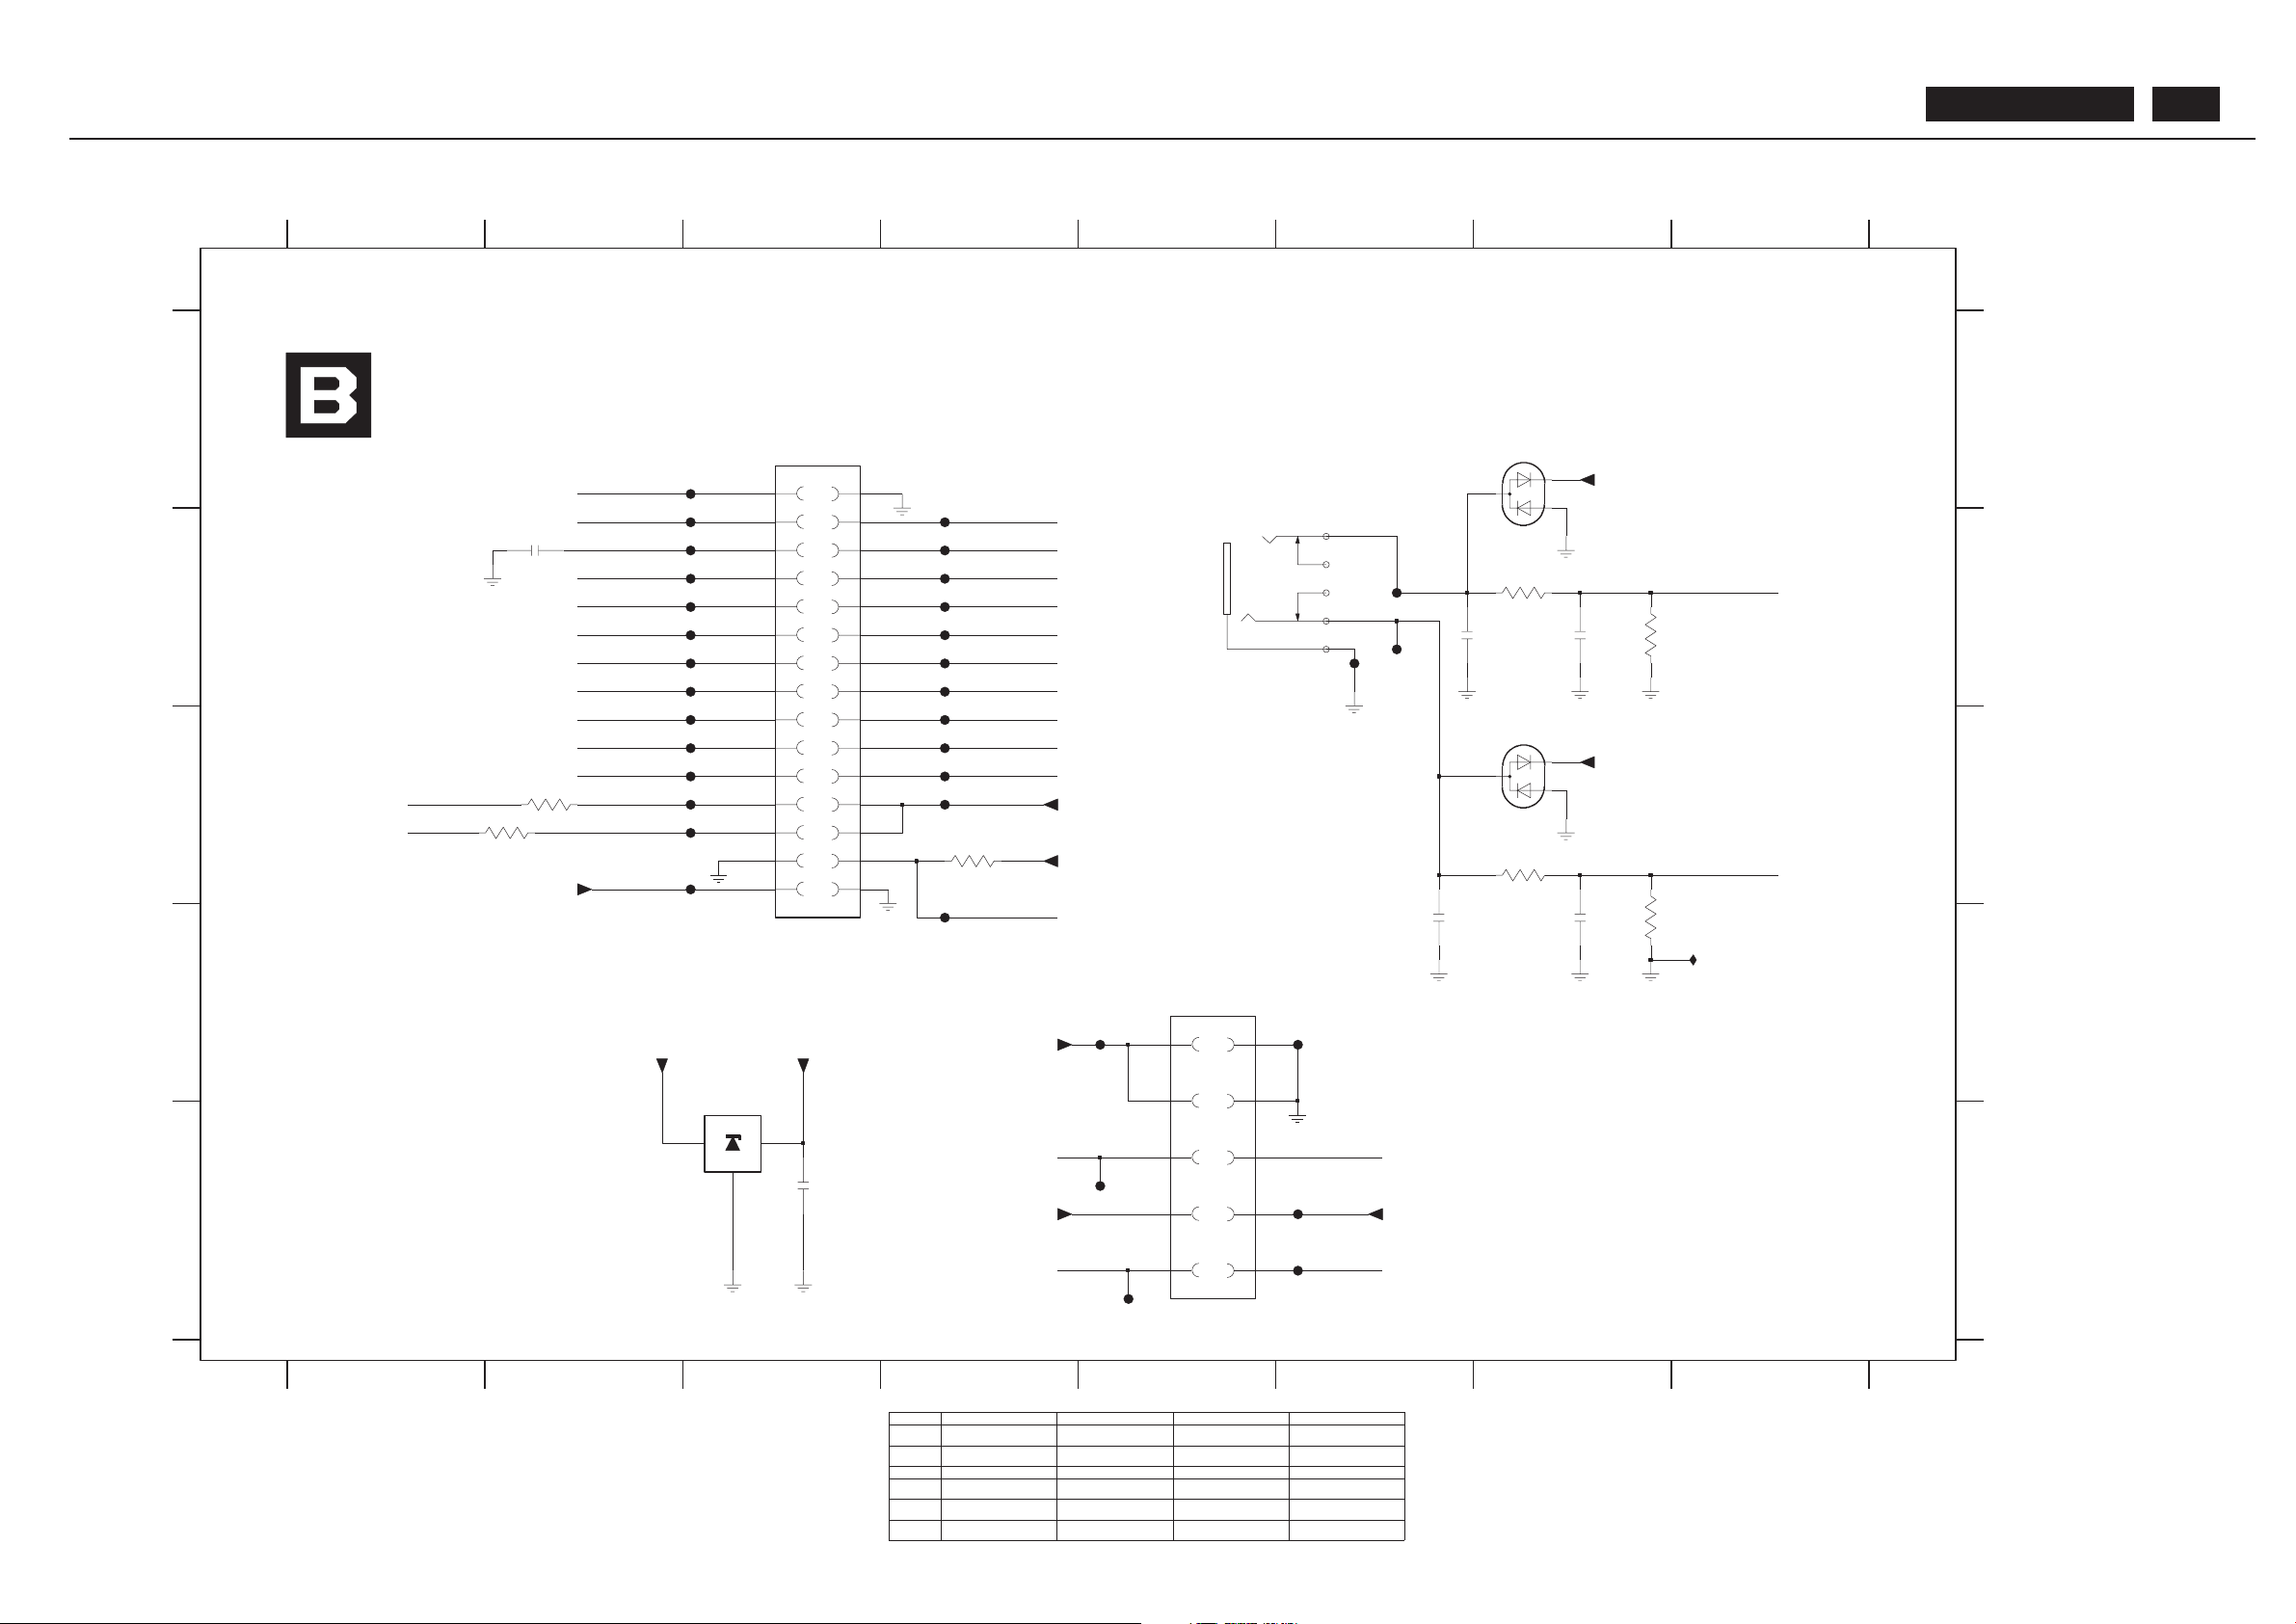
MC78L08ACPRA
933539650686
1681
WEVIDEO
823827713901NOT USED
NAFT A
Ref Des BASIC
2222241 19876
10u
2686 NOT USED
933539650686
MC78L08ACPRA
7681
NOT USEDNOT USED
223886715181
10u
2222241 19876
10u
2685 NOT USED 2222241 19876
NOT USED
0R
NOT USED
NOT USED NOT USED NOT USED
3688 21221 1805631
223886715181
3687 21221 1805631
0R
61198
933539650686
MC78L08ACPRA
61198
823827713901
61198
823827713901
223886715181
I/O & Interface Diagram
B
C
D
E
F66 B6
F69 B6
NI
678
123
NI
E
A
78
A
B
C
D
12345
2682 B6
2683 D6
2684 D7
2685 E3
2686 B2
3681 B7
TO AUDIO BD
SB: 59991 x1
456
3684 D7
3686 C4
3687 C2
3688 C2
6681 A6
6683 C7
7681 D3
F080 C3
F082 C4
F083 C3
F084 C3
F085 B3
F086 B4
1681 A3
1682 A6
1684 D5
2681 B7
F103 D4
F104 D5
F105 E5
F106 E6
F107 E4
F108 E6
TO TV_BOX BD
3682 B7
3683 C7
EXCEPT 1681,1682,1684,7681 WERE CHIP COMPONENTS.
MAIN PCB
F087 B3
F089 C3
F091 B4
F092 B4
F093 C4
F094 B3
F095 B3
F096 B4
F097 B4
F098 B3
F099 B4
F100 B4
F101 A3
F102 C4
F105
PB: 59591
F616 B6
U146 D8
U212 C4
U213 B3
U222 D6
U230 B3
U269 C3
U614 C3
0R
3688
27K
3682
3687
0R
F082
F099
1K
F108
+8V
3681
330p
2683
50
F094
+5
+5T
F085
F095
F083
6681
F086
F093
F69
47K
3686
+5T
F104
26
2728
29
3
30
4
56
78
9
1112
1314
1516
1718
19
2
20
21
22
2324
25
1681
61198
1
10
2682
330p
50
6683
330p
2681
50
F084
2686
2684
330p
50
+8V
F100
F106
+5T
U230
16V
+5T
MC78L08ACPRA
7681
GND
IN
OUT
F103
F092
U212
16V
F098
F089
3684
27K
+5
F080 F102
2685
10u
F091
F096
F66
F097
1K
3683
F087
U269
U614
F107
F616
U222
U213
1
5
2
4
3
1682
69086
8
9
F101
1684
60997
1
10
2
3
4
5
6
7
MSP-OUT -L
PC-AUDIO-R
PC-AUDIO-L
PHONE-DET
U146
I2S-DA-IN2
FBL-SC
SC-CVI-SW
AV-CVBS
ST -SC
PC-AUDIO-R
B-Pb
R-Pr
I2S-DA-OUT
TV -DET
C-SVHS
MSP-OUT -L
SOUND-ENABLE
MSP-OUT -R
I2S-DA-IN1
G-Y
SYNC-SC-CVI
PC-AUDIO-R
PC-AUDIO-L
MSP-OUT -R
PC-AUDIO-L
D4-DET
MSP-INT
TUN-CVBS
I2S-DA-CLK
SCL-TV1
SDA-TV1
Y-SVHS
BDL4211. . . 53
Page 54
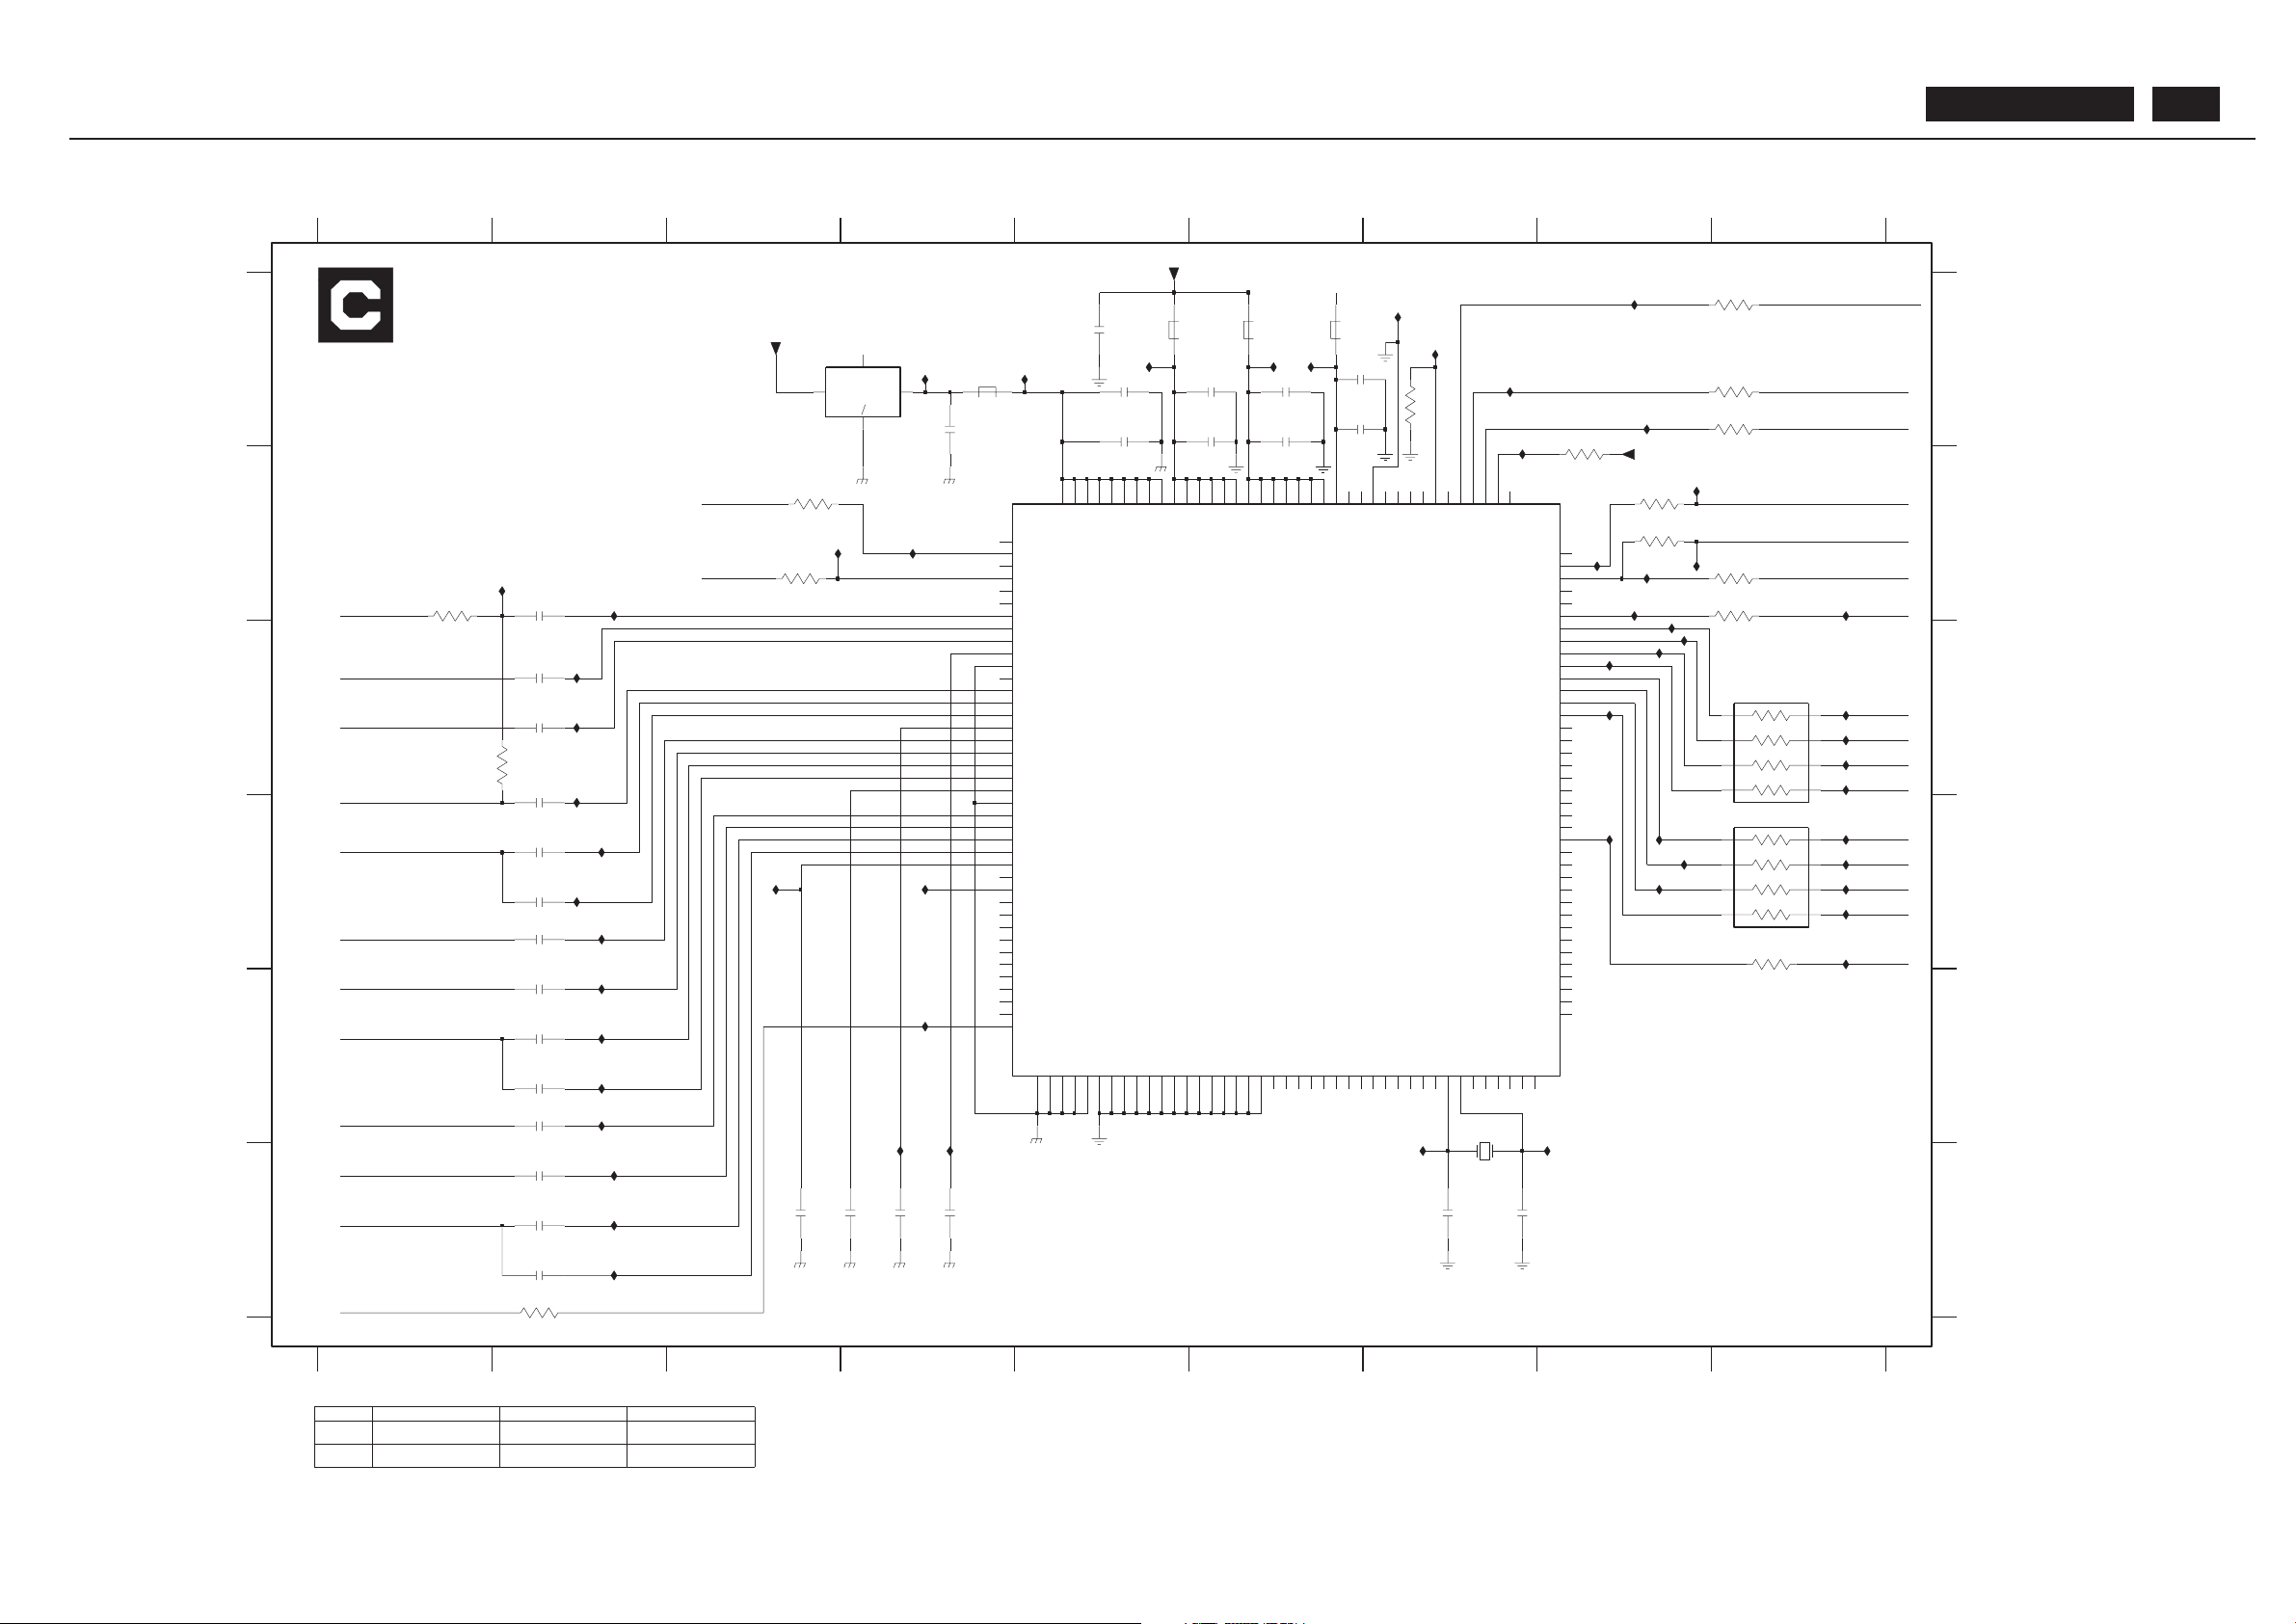
Video Decoder Diagram
R
R
R
R
R
R
R
R
GND
0R
21221 1805631
0R
NOT USED
Ref Des AP NAFT A
U129 D8
U130 C2
U246 C8
U247 C8
U248 C8
U311 D8
U312 D2
U313 D2
U314 E2
II302 C2
II303 E4
II304 F2
II305 B8
U121 B4
U122 A7
U123 D8
U124 A7
U125 C8
5302 A6
5303 A6
5304 A4
7301 A4
7302 C6
I301 D4
I302 C9
I303 C9
I304 C9
I305 C9
U126 A7
U127 C8
U128 D8
I319 B8
I321 E8
I322 E7
I326 A7
I327 A5
I328 A5
I330 D3
I332 A6
I333 B8
NOT USED 21221 1805631
0R
3304 21221 1805631
BEAD
BEAD
MAIN PCB
I334 B3
I335 B8
I350 A4
II301 B9
3318 A9
3319 A9
3321 B9
3322 B9
3324 D9
3325 C9
3326 D9
3332 B3
5301 A5
2314 E2
2315 F2
2316 F3
I306 D9
I307 D9
I308 D9
I309 D9
I310 D9
I314 F4
I315 A6
I317 A8
I318 B8
2329 A5
2331 A6
2332 A6
2333 A6
2334 F7
2335 F7
3303 B1
3304 C2
3305 F2
WE
3303 NOT USED
(6) "301" ~ "349"
C-"301" ~ "340"
BEAD
3307 B3
3313 A7
3314 A8
3315 B8
3316 B8
3317 A9
2304 B2
2305 E2
2306 D2
2307 D2
2308 C2
2309 D2
2311 E 2
2312 F2
2313 F2
BEAD
SB: 59991 x1
2317 F3
2318 F4
2319 F4
2321 A5
2323 A6
2324 A6
2326 A4
2327 A5
2328 A6
456789
123 4
U68 D2
1302 E7
2301 C2
2302 C2
2303 E2
E
F
A
B
C
D
E
F
U67 C2
* Delete this page for basic model
PB: 59591
56789
A
B
C
D
123
U315 E2
U316 E2
U317 E2
U318 F2
U324 F2
U326 F4
U354 A8
U366 B2
U367 B2
U248
U311
2317
47n
I330
U125
2304
47n
I304
U126
U124
100n
+5
A2
XT OUT
B11
XTRI
I319
2328
VXSS
A7
XCLK
XDQ
B7
A8
XPD0
B8
XPD1
A9
XPD2
B9
XPD3
A10
XPD4
B10
XPD5
A11
XPD6
XPD7
C11
XRDY
A6
C7
XRH
D8
XR V
A3
XT AL
B4
XT ALI
VSSA3C1VSSA4
D5
VSSE1
VSSE2
D9
D11
VSSE3
G11
VSSE4L4VSSE5L8VSSE6
L11
VSSE7
D7
VSSI1
D10
VSSI2
VSSI3
F11
J11
VSSI4L5VSSI5L9VSSI6
B3
VXDD
A4
VDDE1C9VDDE2
D12
VDDE3
VDDE4
H12
M4
VDDE5M8VDDE6
M11
VDDE7
C8
VDDI1
C10
VDDI2
F12
VDDI3
J12
VDDI4
VDDI5
M5
M9
VDDI6
M2
VSSA0J4VSSA1H3VSSA2
E4
TEST1
C14
TEST2
A13
TEST3
B12
TEST4
A12
TEST5
D6
TMS
C6
TRSTN
M3
VDDA0K4VDDA1
L1
VDDA1A
H4
VDDA2
VDDA2A
J1
F4
VDDA3
G2
VDDA3A
D4
VDDA4
E2
VDDA4A
C5
RES4C4RES5
C12
RES6
C13
RES7N1RES8N2RES9
P5
RESON
L10
R TCO
M10
R TS0
N10
R TS1
N9
SCL
SDA
P10
B6
TCK
B5
TDI
A5
TDO
P13
TEST0
D13
IGP0
K13
IGP1
K12
IGPH
K14
IGPV
P9
INT_A
N12
ITRDY
L12
ITRI
P4
LLC
N5
LLC2
B2
RES1
N3
RES10
RES1 1
N13
N14
RES12P2RES13
B13
RES2
B14
RES3
C3
HPD2
E12
HPD3
E14
HPD4
F13
HPD5
F14
HPD6
G13
HPD7
M14
ICLK
G14
IDP0
G12
IDP1
H11
IDP2
H14
IDP3
IDP4
H13
J14
IDP5
IDP6
J13
K11
IDP7
L13
IDQ
L14
AI41
AI42
D2
D1
AI43
E1
AI44
D3
AI4D
P12
ALRCLK
P11
AMCLK
M12
AMXCLK
M1
AOUT
N11
ASCLK
CE
N4
N6
CLKEXT
P3
EXMCLR
FSW
M13
D14
HPD0
E1 1
HPD1
E13
AI11
J2
K1
AI12
K2
AI13
AI14
L3
AI1D
K3
G4
AI21
G3
AI22
H2
AI23
J3
AI24
AI2D
H1
AI31
E3
F2
AI32
F3
AI33
G1
AI34
F1
AI3D
B1
7302
SAA71 18E/V1
N8
ADP0
P8
ADP1
ADP2
M7
L7
ADP3
P7
ADP4
N7
ADP5
L6
ADP6
M6
ADP7
P6
ADP8
C2
AGND
L2
AGNDA
100R
3307
II305
2334
15p
50
2313
47n
47n
2316
U354
1
2
3
45
6
7
8
U67
2329
3324
47R
U246
100n
3305
470R
5301
47n
2302
I321
U130
100R
2309
47n
100n
3322
100n
I315
2327
3313
4K7
2324
U128
U129
47n
U127
U123
2308
10u
I326
100n
2333
2321
II303
II304
II302
10u
10
2326
100R
3318
I350
3314
3K3
1302
24M576HZ
6C24500043
I309
I317
2
3
45
6
7
8
U314
U312
47R
3325
1
+3V3
U68
50
15p
2335
I333
U122
5302
I303
2312
47n
U318
U326
3321
47R
U317
U324
LM1117MPX-3.3
7301
ADJ
1
MT1
4
Vin
3
Vout
2
100R
3319
+3V3
2303
47n
U316
0R
3303
I314
U313
47n
47R
3315
2311
47n
2301
47n
2331
100n
47n
2306
2307
3304
I302
0R
47n
I335
2319
3316
47R
2315
47n
I305
U366
U367
I332
2305
47n
I334
I322
2318
47n
U121
2332
100n
5304
I301
3326
47R
5303
U315
I327
100R
3317
I310
I308
100n
2323
I307
I328
I318
U247
47R
3332
II301
2314
I306
DA-HSYNC
DA-CLK
SYNC-SC-CVI
47n
FB-R
SDA-TV1
SCL-TV1
FB
AV-CVBS
VS-OSD
DA-VSYNC
DA-DA TA6
DA-DA TA5
DA-DA TA4
DA-DA TA3
DA-DA TA2
DA-DA TA1
DA-DA TA0
FB-G
TUN-CVBS
G-Y
Y-SVHS
B-Pb
FB-B
C-SVHS
R-Pr
LLC2
INT -SCALER
DA-FID
HS-OSD
DA-DA TA7
BDL4211. . . 54
Page 55
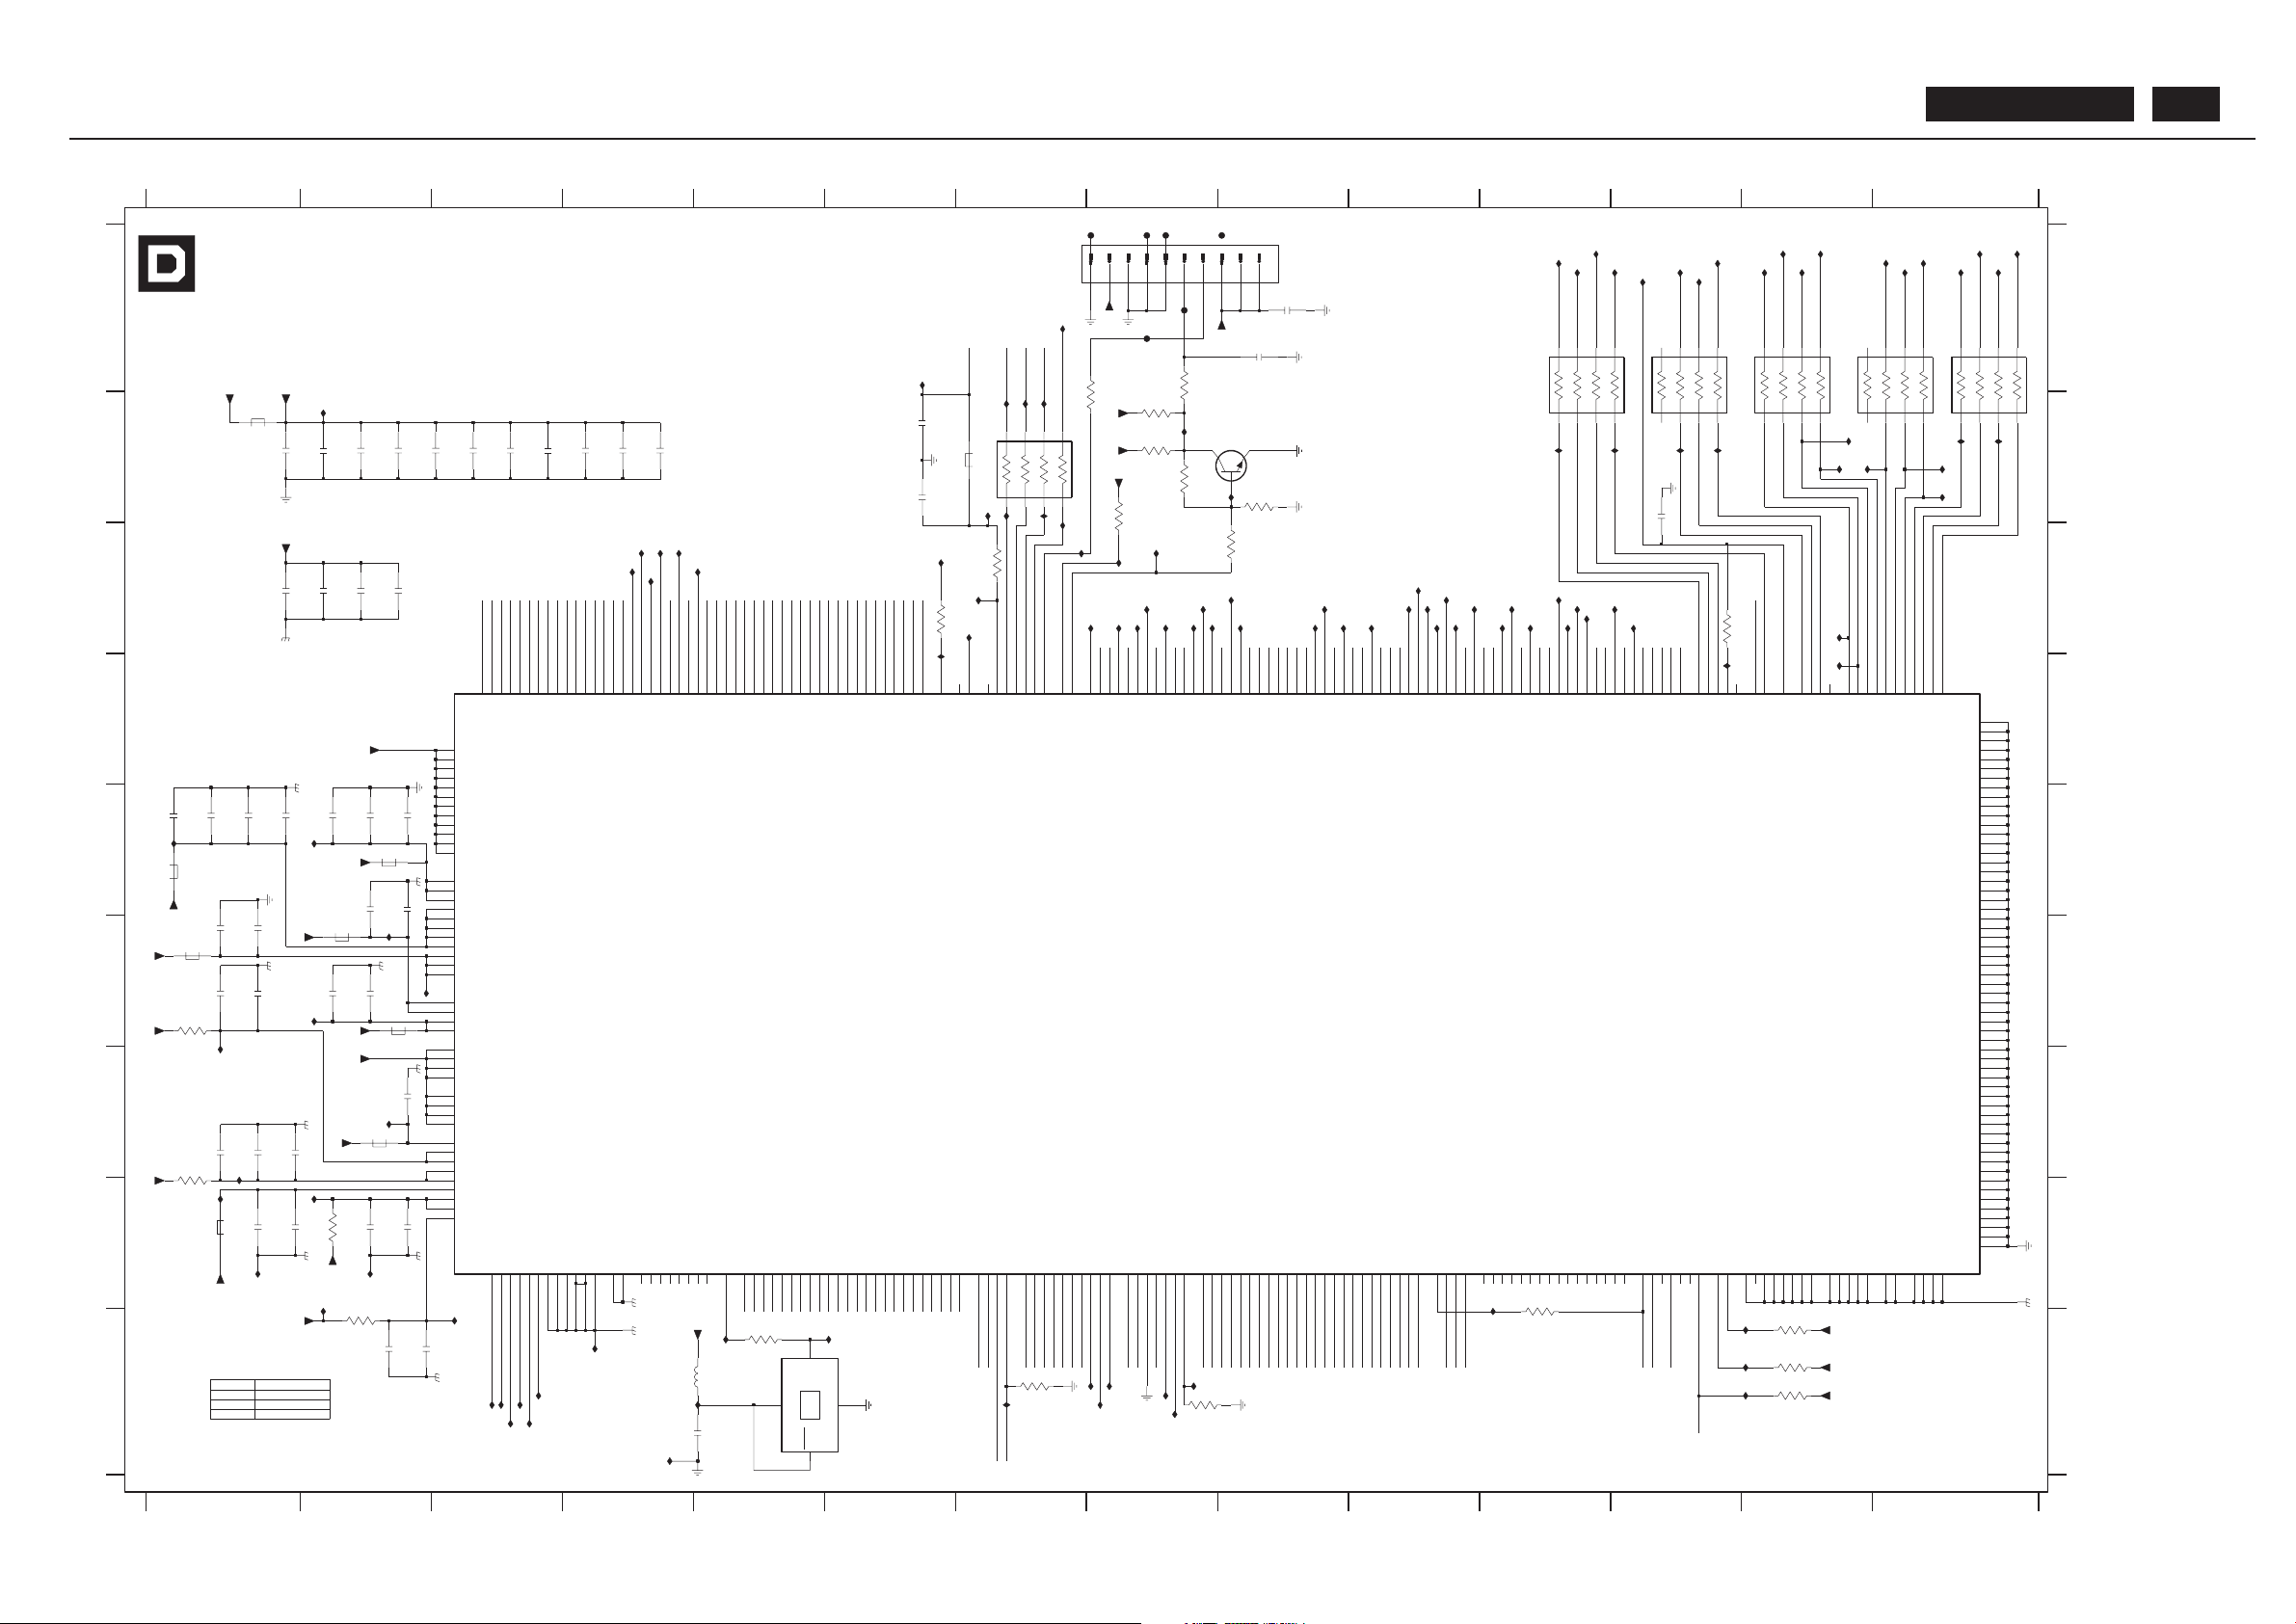
BLOCK DIAGRAM - MASTER (P.C.) VERSION
Scaler Diagram
R
R
R
R
R
R
R
R
R
R
R
R
R
R
R
R
R
R
R
R
OS
R
R
R
R
I
A
B
45678 910111213 14
1 234 5
D
E
F
G
H
2238867151092464
ReservedRef Des
U31 C9
U64 A11
1401 I5
1402-A A7
2401 C2
2402 C1
2403 C2
2404 C2
2405 B1
2407 B2
C
D
E
F
G
H
I
U1 B2
U2 I3
F40 A8
F41 A8
F42 A8
F43 A9
123
(8) "401 ~ "469"
2422 E1
2423 E1
2424 E1
2425 E2
2426 E2
2427 E1
2428 E2
2429 E2
2431 F1
2432 F1
2434 F2
6 7 8 9 10111213 14
A
B
C
MAIN PCB
2447 H2
2448 I2
2449 I2
2452 I4
2461 A9
2462 A9
2463 B6
2464 B6
2465 B12
3401 F1
3402 H1
2408 B2
2409 B2
2411 B4
2412 B3
2413 B4
2414 B3
2415 B2
2416 B3
2417 B4
2421 E2
3410
(
3413 B14
3414 B13
3415 B14
3416 C12
3417 I7
3422 B7
3424 B7
3427 C6
3428 C7
3429 C8
3431 A8
3432 B8
3433 B9
2435 F2
2436 F1
2437 F1
2439 G2
2441 G1
2442 G1
2443 G1
2444 H1
2445 H1
2446 H2
EXCEPT 1402 WERE CHIP COMPONENTS.
5408 H1
5411 I4
5412 B7
7402 F9
7403 B9
U105 B7
U115 D6
3403 H2
3404 I2
3405 I5
3406 I13
3407 I13
3408 I13
3409 I8
3410 B8
3411 B12
3412 B12
U243 C4
U244 C4
U245 C4
U258 C8
U284 A6
U286 I6
U327 H1 1
U328 I8
U392 B8
U419 C6
3434 C9
3435 B8
3437 H11
5401 B1
5402 E1
5403 E2
5404 F2
5405 F1
5406 F2
5407 G2
(NI)
U467 A14
U468 A14
U116 I3
U149 B7
U150 C7
U171 B7
U172 B7
U221 I13
U223 I13
U237 C5
U238 C4
U242 C4
(1)
(
U479 I4
U480 I4
U481 G1
U482 A7
U483 G2
U484 F2
U485 H1
U486 B14
U487 B14
U488 B13
U489 B13
U490 B13
U455 A1 1
U456 A1 1
U458 A12
U459 A12
U461 A12
U462 A13
U463 A13
U464 A13
U465 A13
U466 A14
319802190030
(
U501 C8
U502 C10
U503 C1 1
U504 C1 1
U505 E2
U506 C13
U507 D13
U469 A14
U470 A14
U471 A14
U472 A14
U473 I4
U474 H2
U475 H1
U476 H2
U477 G1
U478 E1
3435
O
(
U518 C8
U519 C10
U545 C8
U546 C12
U547 I7
U548 C10
U549 C9
U491 C10
U492 C1 1
U493 C1 1
U494 C1 1
U495 C12
U496 C8
U497 C8
U498 C8
U499 C10
U500 C8
(
(
TO POWER BOARD
U608 A12
U609 A12
U612 B8
U613 F3
U626 I13
U508 C9
U509 C7
U510 C9
U511 C 9
U512 C10
U513 C1 1
U514 C10
U515 C10
U516 C1 1
U517 C8
SB: 59991 x1
319802132240
(
U660 A8
U668 D12
u113 H2
u404 C7
u452 I3
u457 F2
u460 B7
(
U550 C8
U551 I8
U552 I8
U553 I8
U554 I8
U566 I3
U567 I3
U568 I3
U569 I3
U605 C7
U237
PB: 59591
U637 I5
U638 I7
U639 B14
U642 B14
U643 B12
U645 B12
U646 B1 1
U649 B1 1
U651 B7
U652 A8
u460
U1
2
1
2
U
U
3
U
U
U
U
U637
U6
U221
2
1
3
2
2
1
U1
U466
U507
U2
U327
+3V3_ASM
2
1
100n
2461
50V
8
+3
+2
7
5403
100MHZ
U31
U660
U6
U
U608
U455
U475
U500
U286
U484
U487
1
U505
5407
100MHZ
2
U463
9
1
2
U456
U482
0R05
3437
U485
1
2
2
U494
3404
150R
+2
2
1
1
2
U497
6
+3
U493
5
4
U503
4
3
F41
1
U5
3
1
4
1
2
3
4
5
6
7
8
+2
8
U419
4
3
1
2
3
4
5
6
7
2
1
2
1
1
2
100MHZ
5406
U514
U459
U472
U478
U513
U458
+2
4K7
3432
3
4
U481
u452
U483
U501
U471
u457
U480
3410
U490
U506
U499
U468
U510
3409
10K
1
2
2
1
U2
3402
10R
1
U243
2
1
5
2
1
2
1
D7
XVDD
U223
U491
R16
VSS50
T11
VSS51
T12
VSS52
T13
VSS53
T14
VSS54
T15
VSS55
T16
VSS56
R26
VSS6
AC26
VSS7
AF23
VSS8
VSS9
AF19
A
VDV
A6
X
A7
X
B
X
N14
VSS36
N15
VSS37
N16
VSS38
P11
VSS39
F26
VSS4
P12
VSS40
P13
VSS41
P14
VSS42
P15
VSS43
P16
VSS44
VSS45
R11
R12
VSS46
R13
VSS47
R14
VSS48
R15
VSS49
L26
VSS5
L11
VSS21
L12
VSS22
L13
VSS23
L14
VSS24
L15
VSS25
L16
VSS26
M11
VSS27
M12
VSS28
M13
VSS29
A23
VSS3
VSS30
M14
M15
VSS31
M16
VSS32
N11
VSS33
N12
VSS34
N13
VSS35
B22
VDDP1
C22
VDDP2
C1
VSS0
N1
VSS1
AF13
VSS10
AF8
VSS1 1
D4
VSS12
N4
VSS13
Y4
VSS14
G23
VSS15
VSS16
N23
W23
VSS17
AC22
VSS18
AC17
VSS19
AC5
VSS2
AC11
VSS20
Y26
VDD15
U26
VDD16
N26
VDD17
J26
VDD18
A26
VDD19
AC20
VDD2
AA1
VDD20
K1
VDD21
A5
VDD22
D21
VDD3
VDD4
AB23
T23
VDD5
K23
VDD6
D23
VDD7
AB4
VDD8
R4
VDD9
A
S
A
S
A
S
A
S
P
S
R
S
D19
SVDD
B
S
D
T
AC8
VDD0
VDD1
AC14
H4
VDD10
AF10
VDD1 1
AF16
VDD12
AF21
VDD13
AF26
VDD14
E
S
A
S
E
S
D
SDS
D
S
C
SCS
C
SCS
S
B
B
S
A
S
BSB
SAS
JSJ
SJSHS
H
SHS
AE
S
H
S
G
SGS
S
G
FSF
S
F
S
E
SES
AC
S
ASA
S
Y
SYS
Y
SWS
W
SWSLS
S
L
AD
S
L
SKS
KSK
S
T
S
R
S
P
S
M
S
AD
S
AE
S
A
SAS
1
A
SAS
S
A
ASA
SASAS
A
S
B
R
V
F
S
VSV
S
N
S
VSV
SUSUSUS
S
P
P
SNS
F
S
D
A
T
S
R
S
AF
P
AC
P
D20
PVDD1
B
P
AC
P
EPB
P
A1RA1
R
A1
R
R
A1
1
CRC
R
D14
RVDD1
D13
RVDD2
B
R
V
AE
P
AF
P
ACPAD
P
AE
P
AD
1
P
AE
1
P
AF
1
PACPADP
P
AE
AFPAF
P
AD
P
AE
P
B
P
AE
PADP
AE
PAFPACP
AD
PAEPAFPACPADP
P
AE
AF
PADPAEPACP
AD
P
ACPAD
P
AE
P
AF
P
ACPAD
P
AE
P
1
AD
PAEP
AF
P
P
AC
AD
P
AE
PAFPACPADP
A
P
1
APAPAPA
PAP
APAPA
PAP
P
A
AD
PAEPADPAEP
AF
P
R
PPPCPDPPPAPAPAPAPAP
P
A
APA
PAPAPAP
WPW
PVPVPVP
1
V
P
U
PUPUPUP
P
T
TPTPT
PRPRP
H1
P
A1
H2
P
A2
H3
P
A2
G1
P
A2
G2
P
A2
G4
P
AC
F
P
AH
F
P
AR
AD
G3
P
A
V
A
P
P
A
YPYPY
PWP
W
P
N3
P
A0
M1
P
A0
M2
P
A0
M3
P
A0
M4
P
A0
L
P
A0
L
P
A0
L
P
A1
L
P
1
K
PA1P
A1
K
K
P
A1
J
P
A1
J
P
A1
J
P
A1
J
P
A1
A4MCBMCA3MCB
MCCMCA2MC
DMCMD
MEMEM
E
M
T
M
P
A0
P
P
P
A0
N2
P
A0
D15
GVDD2
B
G
B
G
C
HS
A8IA9
I
CIC
I
D12
IVDD1
D11
IVDD2
B
I
B
1
I
B
MC
MC
B
CMCD5
MC
D8
CVDD2
B
CBC
MDM
D
D10
DVDD
B
D
G1
A1
A1
G1
A1
G2A1G2
C21
GPVDD
B
G
GR
C
C
GR
D16
GVDD1
C9
AVDD4
A
V
C
C
A
V
A2BA2
B
A1BA1
B
M
B
CBC
B
D18
BVDD1
D17
BVDD2
B
B
B
B
A1
C
D9
CVDD1
JAGASM-A4
7402
AVDD1
C10
C11
AVDD2
C8
AVDD3
F43
U6
U464
6
7
8
U519
4
3
1
2
3
4
5
3
1
2
+3
2
2
5
1
2
U462 U467
2
1
1
3417
10K
U515
U546
2
1
U545
U1
1
10K
3408
+2V5
1
2
U
U5
U508
0
5
1
1
2
1
3
+2
+3V3
U328
+2
U473
U465
100MHZ
5404
100MHZ
5401
U5
2
1
+2
U469
U498
+3V3
U2
U2
1
2
U1
F40
+3V3
U512
+3V3
U479
u113
U613
3407
10K
+2V5I
1
2
+3V3
U549U509
3
1
2
3
4
5
6
7
8
U492
U476
+5
4
1
2
+2
1
2
U5
BC848C
7403
2
3
2
1
3
1
2
2
1
U284
1
U554
+2V5I
3
2
1
1
2
+2
2
1
3401
10R
U495
U511
U470
F42
U609
U461
U477
U474
U1
U5
+3V3
3405
100R
U489
U516
U553
U504
5405
100MHZ
1
5
U550
C
1
GN
2
OU
3
V
4
U5
1
6
1
3
1
1
2
3
4
5
6
7
8
1
5
1
2
U518
211
U496
U517
U1
1
4
3
1
2
3
4
5
6
7
8
2
U486
U
1
3433
47K
U488
3406
U626
u404
1
2
10K
U502
3
U392
1
2
1
4
1
1
10
2462
10u
+3
2
1
U2
U548
U64
U238
U1
1
2
U1
1
U612
F
F
F
F
F
F
T
-
F
S
2
P
A2
HD
-
HTC
S
S
S
S
S
F
F
F
S
T
F
S
S
S
S
R
PA0PA0PA0PA0PA0PA0P
A0PA0PA0PA1
P1PA1PA1PA1P
A1PA1PA1PA1PA1PA2
PA2P
A2
T
T
T
T
T
T
T
B
T
S
S
S
S
S
S
S
S
S
S
S
S
T
T
T
B
P
A0
S
SSS
S1S
S
S
S
S
S
S
S
MC
MCMCMCMCMCMCMC
MC
MC
GRGRB
BBB
B
BBB
B
HD
-
HD
-
M
JRJ
M-M
R-R-R-R-R-R-R
-R-
G-G-G
-G-G-G-
G-G
-
F
F
F
F
F
F
F
F
F
F
F
F
F
V
V
V
S
S
S
S
S
S
S
S
S
S
S
S
SSS
F
S
S
S
S
S
R
I
-
S
S
S
SSS
S
S
S
SSS
S
S
S
S
S
S
S
S
S
S
S
S
S
S
S
S
S
S
S
S
T
T
T
TTT
T
F
P
AN
F
F
BDL4211. . . 55
Page 56
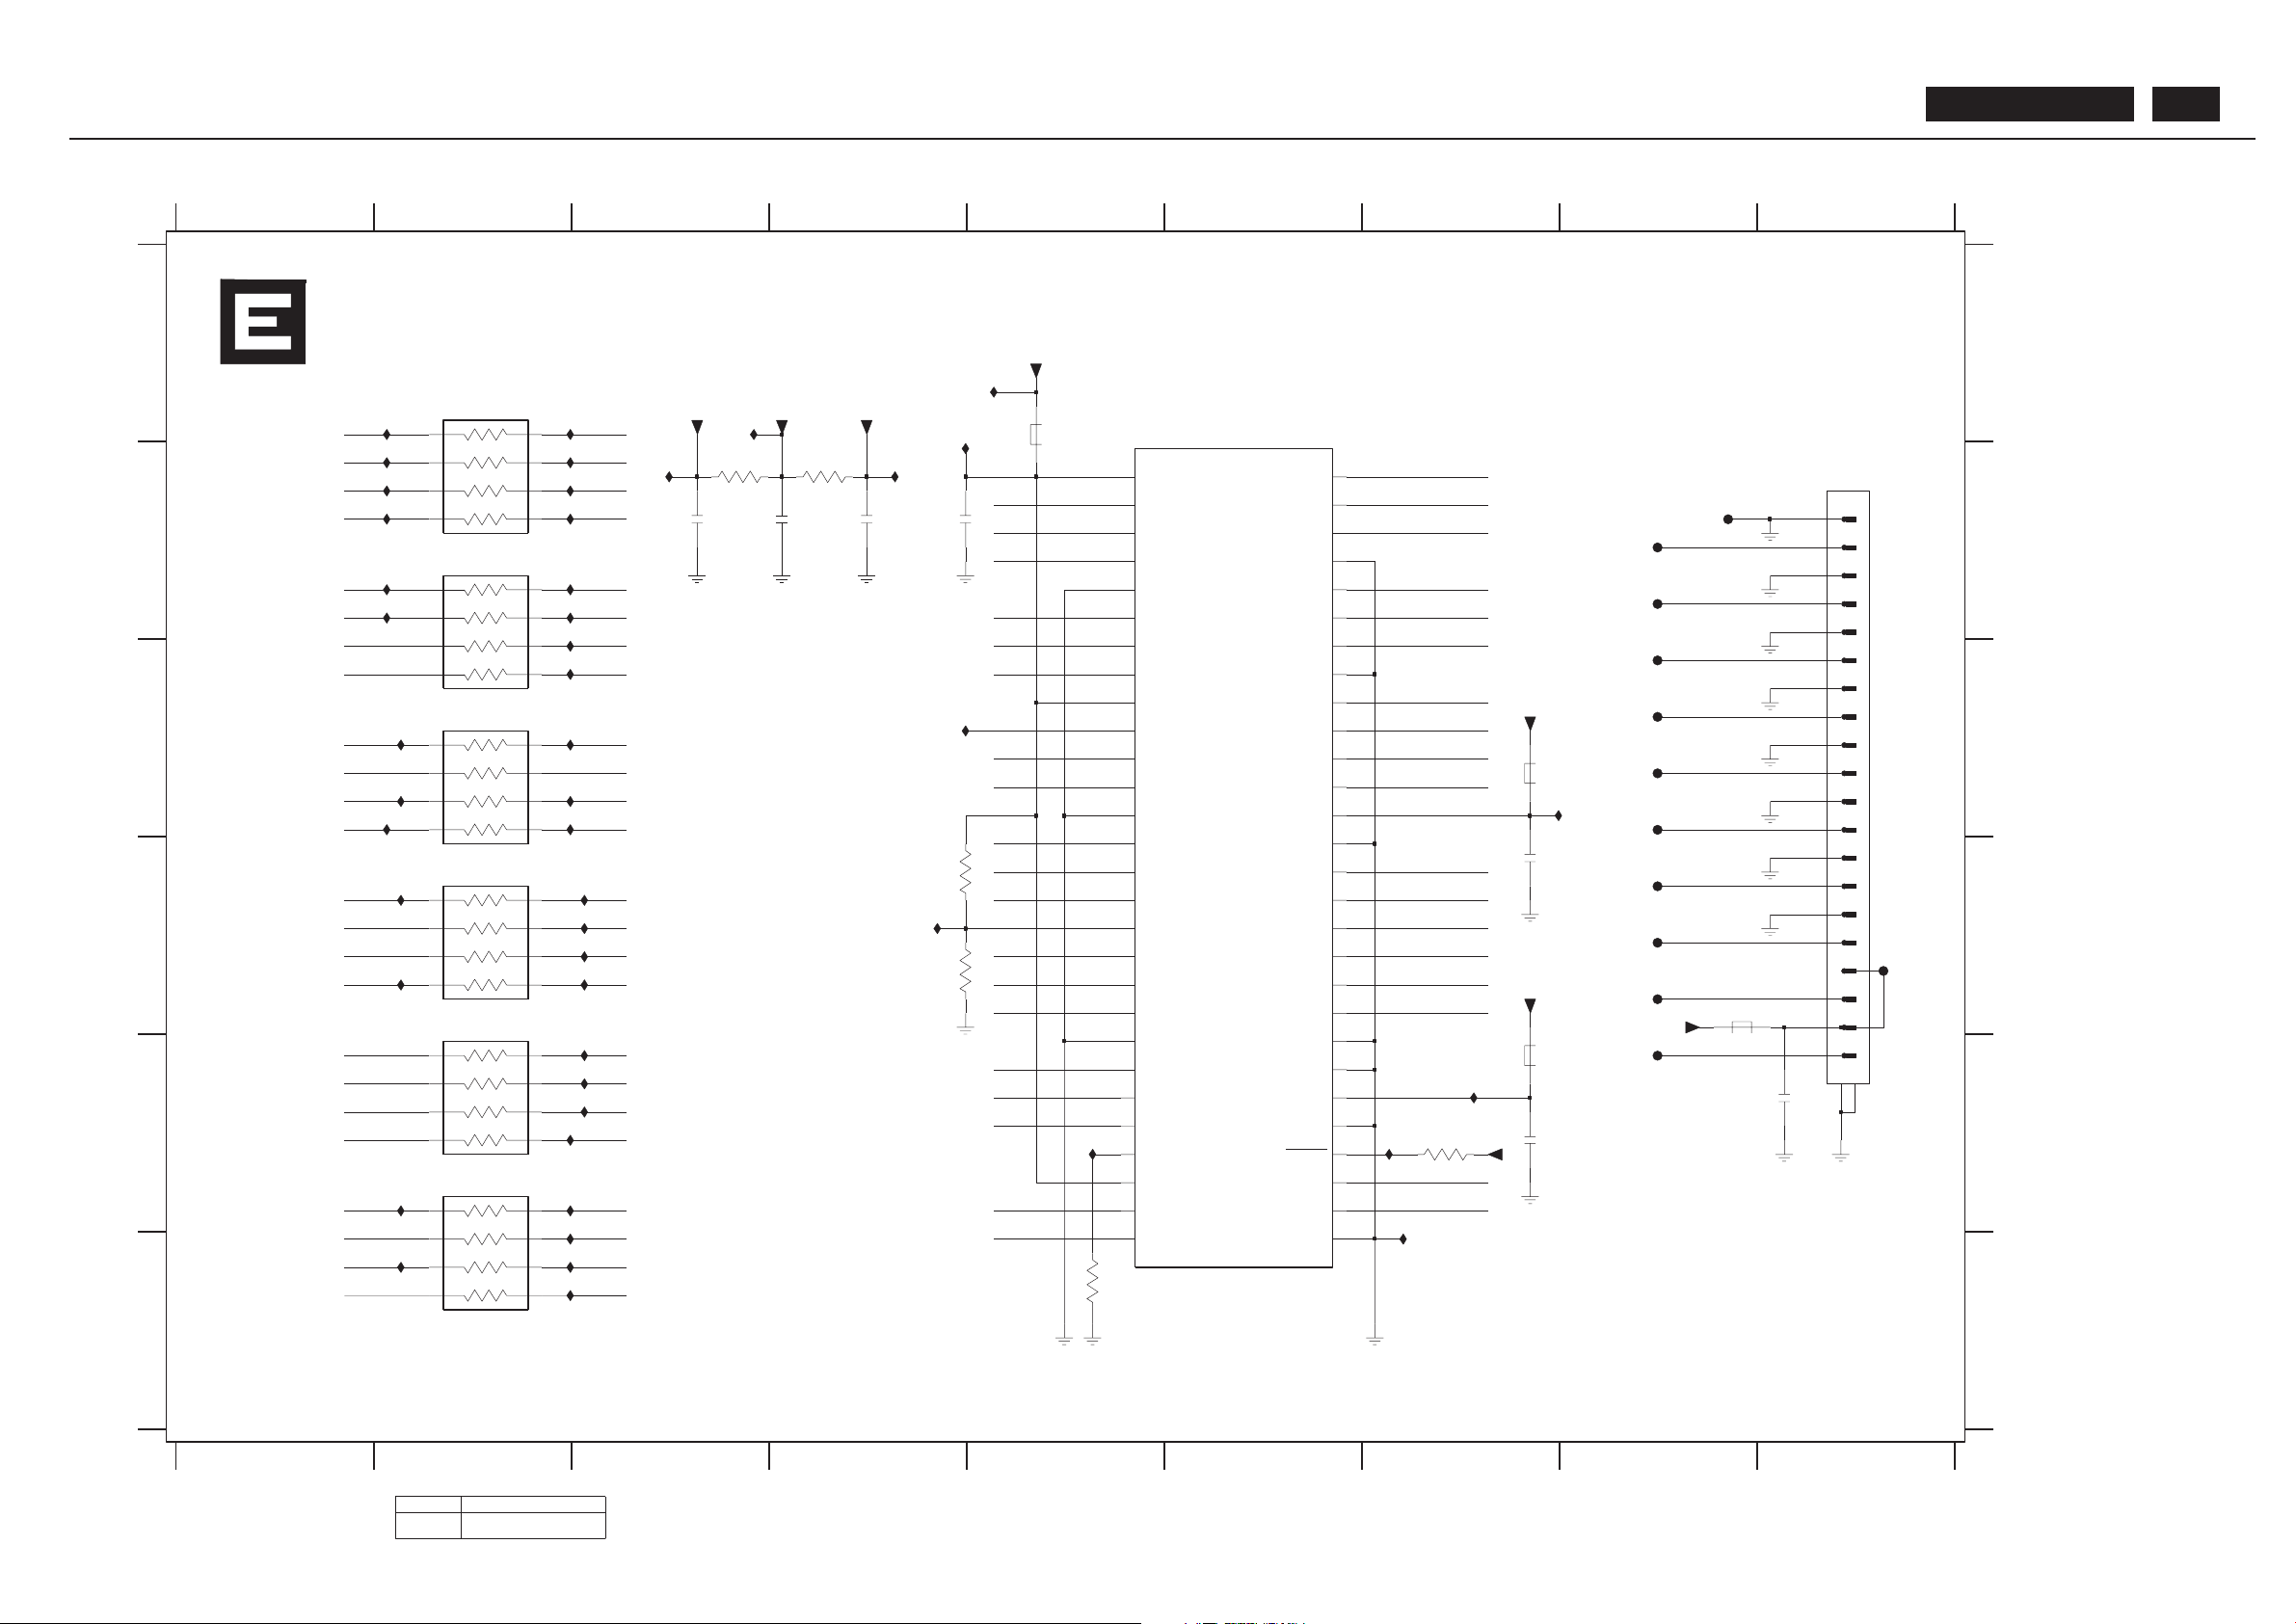
LVDS Tx Diagram
R
R
R
R
R
R
R
R
R
R
R
R
R
R
R
R
R
R
R
R
R
R
R
R
Ref Des
MAIN PCB
B
C
D
E
F
U5 B3
U6 B8
U8 B8
U9 B8
U10 C8
U11 C8
U13 C8
U14 C8
U15 D8
0R
21221 18056313492
123456789
12345
SB: 59991 x1
R- "481"~"499"
6789
A
B
C
D
E
F
A
TO PANEL
U17 E8
U22 D8
U24 A3
U32 A4
U33 D4
U34 A2
U92 B4
1491 B9
2492 B4
2493 B4
2494 B4
2495 B3
2496 D7
2497 E7
2499 E9
NI
3481 C2
3482 B2
3483 D2
3484 D2
3485 F2
3486 E2
3487 F5
3488 B3
3491 D4
3492 D4
3493 E7
5491 A5
5494 C7
5495 D8
5496 E7
7491 A6
U117 D9
U163 C2
U164 E2
U165 E2
U166 F2
U167 F2
"491"~"499"
U168 D3
U169 D2
U173 D3
U174 C2
U186 E2
U187 C8
U188 E7
U189 C4
U190 E7
U191 A5
U251 B2
U252 B2
Reserved
U18 D8
U253 B2
U254 B2
U255 B2
U256 E5
U259 A2
U325 E2
U329 F2
U330 D3
U331 C2
U356 C2
U357 B2
U628 E7
U635 B2
U636 B2
3489 B4
PB: 59591
U640 B2
U641 B2
U644 B2
U647 C2
U648 D3
U650 E3
U653 E3
U654 E3
U655 C2
U657 C2
U658 D2
3
45
6
7
8
100R
3481
1
2
U173
U174
U92
U186
U657
U658
0R
3491
U654
U655
U650
U653
U647
U648
U644
U640
U641
U635
U636
U628
U8
U188
U189
U5
U187
U15
10K
3487
U14
U9
BLM21
5491
5495
32161 1
U329
3
45
6
7
8
U325
2496
100n
100R3482
1
2
PAN-VCC
3483
100R
1
2
3
45
6
7
8
+3PLL
U164
U163
TD1
2
TD2
8
TD3
10
TD4
16
TD5
18
TD6
25
Vcc0
1
Vcc1
9
Vcc2
26
10u
2492
15
TB6
19
TC+
41
TC-
42
TC0
20
TC1
22
TC2
23
TC3
24
TC4
27
28
TC5
TC6
30
TCLK+
39
TCLK-
40
TD+
37
TD-
38
TD0
50
TA -
48
TA 0
51
TA 1
52
54
TA 2
TA 3
55
TA 4
56
TA 5
3
TA 6
4
TB+
45
TB-
46
6
TB0
TB1
7
TB2
11
TB3
12
TB4
14
TB5
31
GND0
5
GND1
13
GND2
21
29
GND3
GND4
53
LVDSGND0
36
LVDSGND1
43
LVDSGND2
49
LVDSVcc
44
PDWN
32
PLLGND0
33
PLLGND1
35
PLL Vcc
34
R_F
17
TA +
47
U32
7491
THC63L VDM83A
CLKIN
U13
U18
U11
2493
10u
U190
2497
100n
U254
U191
U252
U253
5
6
7
8
U34
3485
100R
1
2
3
4
U356
U357
U331
U165
3492
0R
U330
3489
10R
U117
U6
+3LVDS
2494 100n
2495
10u
U22
10K
3493
U168
U169
U166
U167
3
4
5
6
7
8
9
U251
1
10
11
12
13
14
15
16
17
18
19
2
20
2499
50
1491
63622
+3PLL
100n
U17
U33
+3V3
U24
+3V3
3
45
6
7
8
+3LVDS
5494
3486
100R
1
2
2
3
45
6
7
8
BLM21
+3V3
100R3484
1
U10
10R
3488
U259
U256
5496
BLM21
R7
R5
R4
0-
0+
2+
2-
1+
1-
CLK-
CLK+
3-
3+
G1
FR6
G1
U255
B4
B5
B7
B6
G2
G0
G3
G4
G6
G5
G7
R0
R2
R1
R3
R6
B0
B1
B3
B4
B5
B6
B7
R6
R5
R4
R3
R2
R0
0-
0+
1-
1+
2-
2+
3-
3+
CLK-
CLK+
B0
B2
B3
B1
FR5
FR7
FR2
FR4
FR3
FR1
FR0
FDE
R1
FHSYNC
FVSYNC
FSHFCLK
R7
G2
G3
G4
G0
G5
G6
G7
B2
FB4
FB6
FG0
FG2
FG1
FG3
FG6
FG4
FG5
FG7
FB5
FB7
FB3
FB2
FB1
FB0
BDL4211. . . 56
Page 57
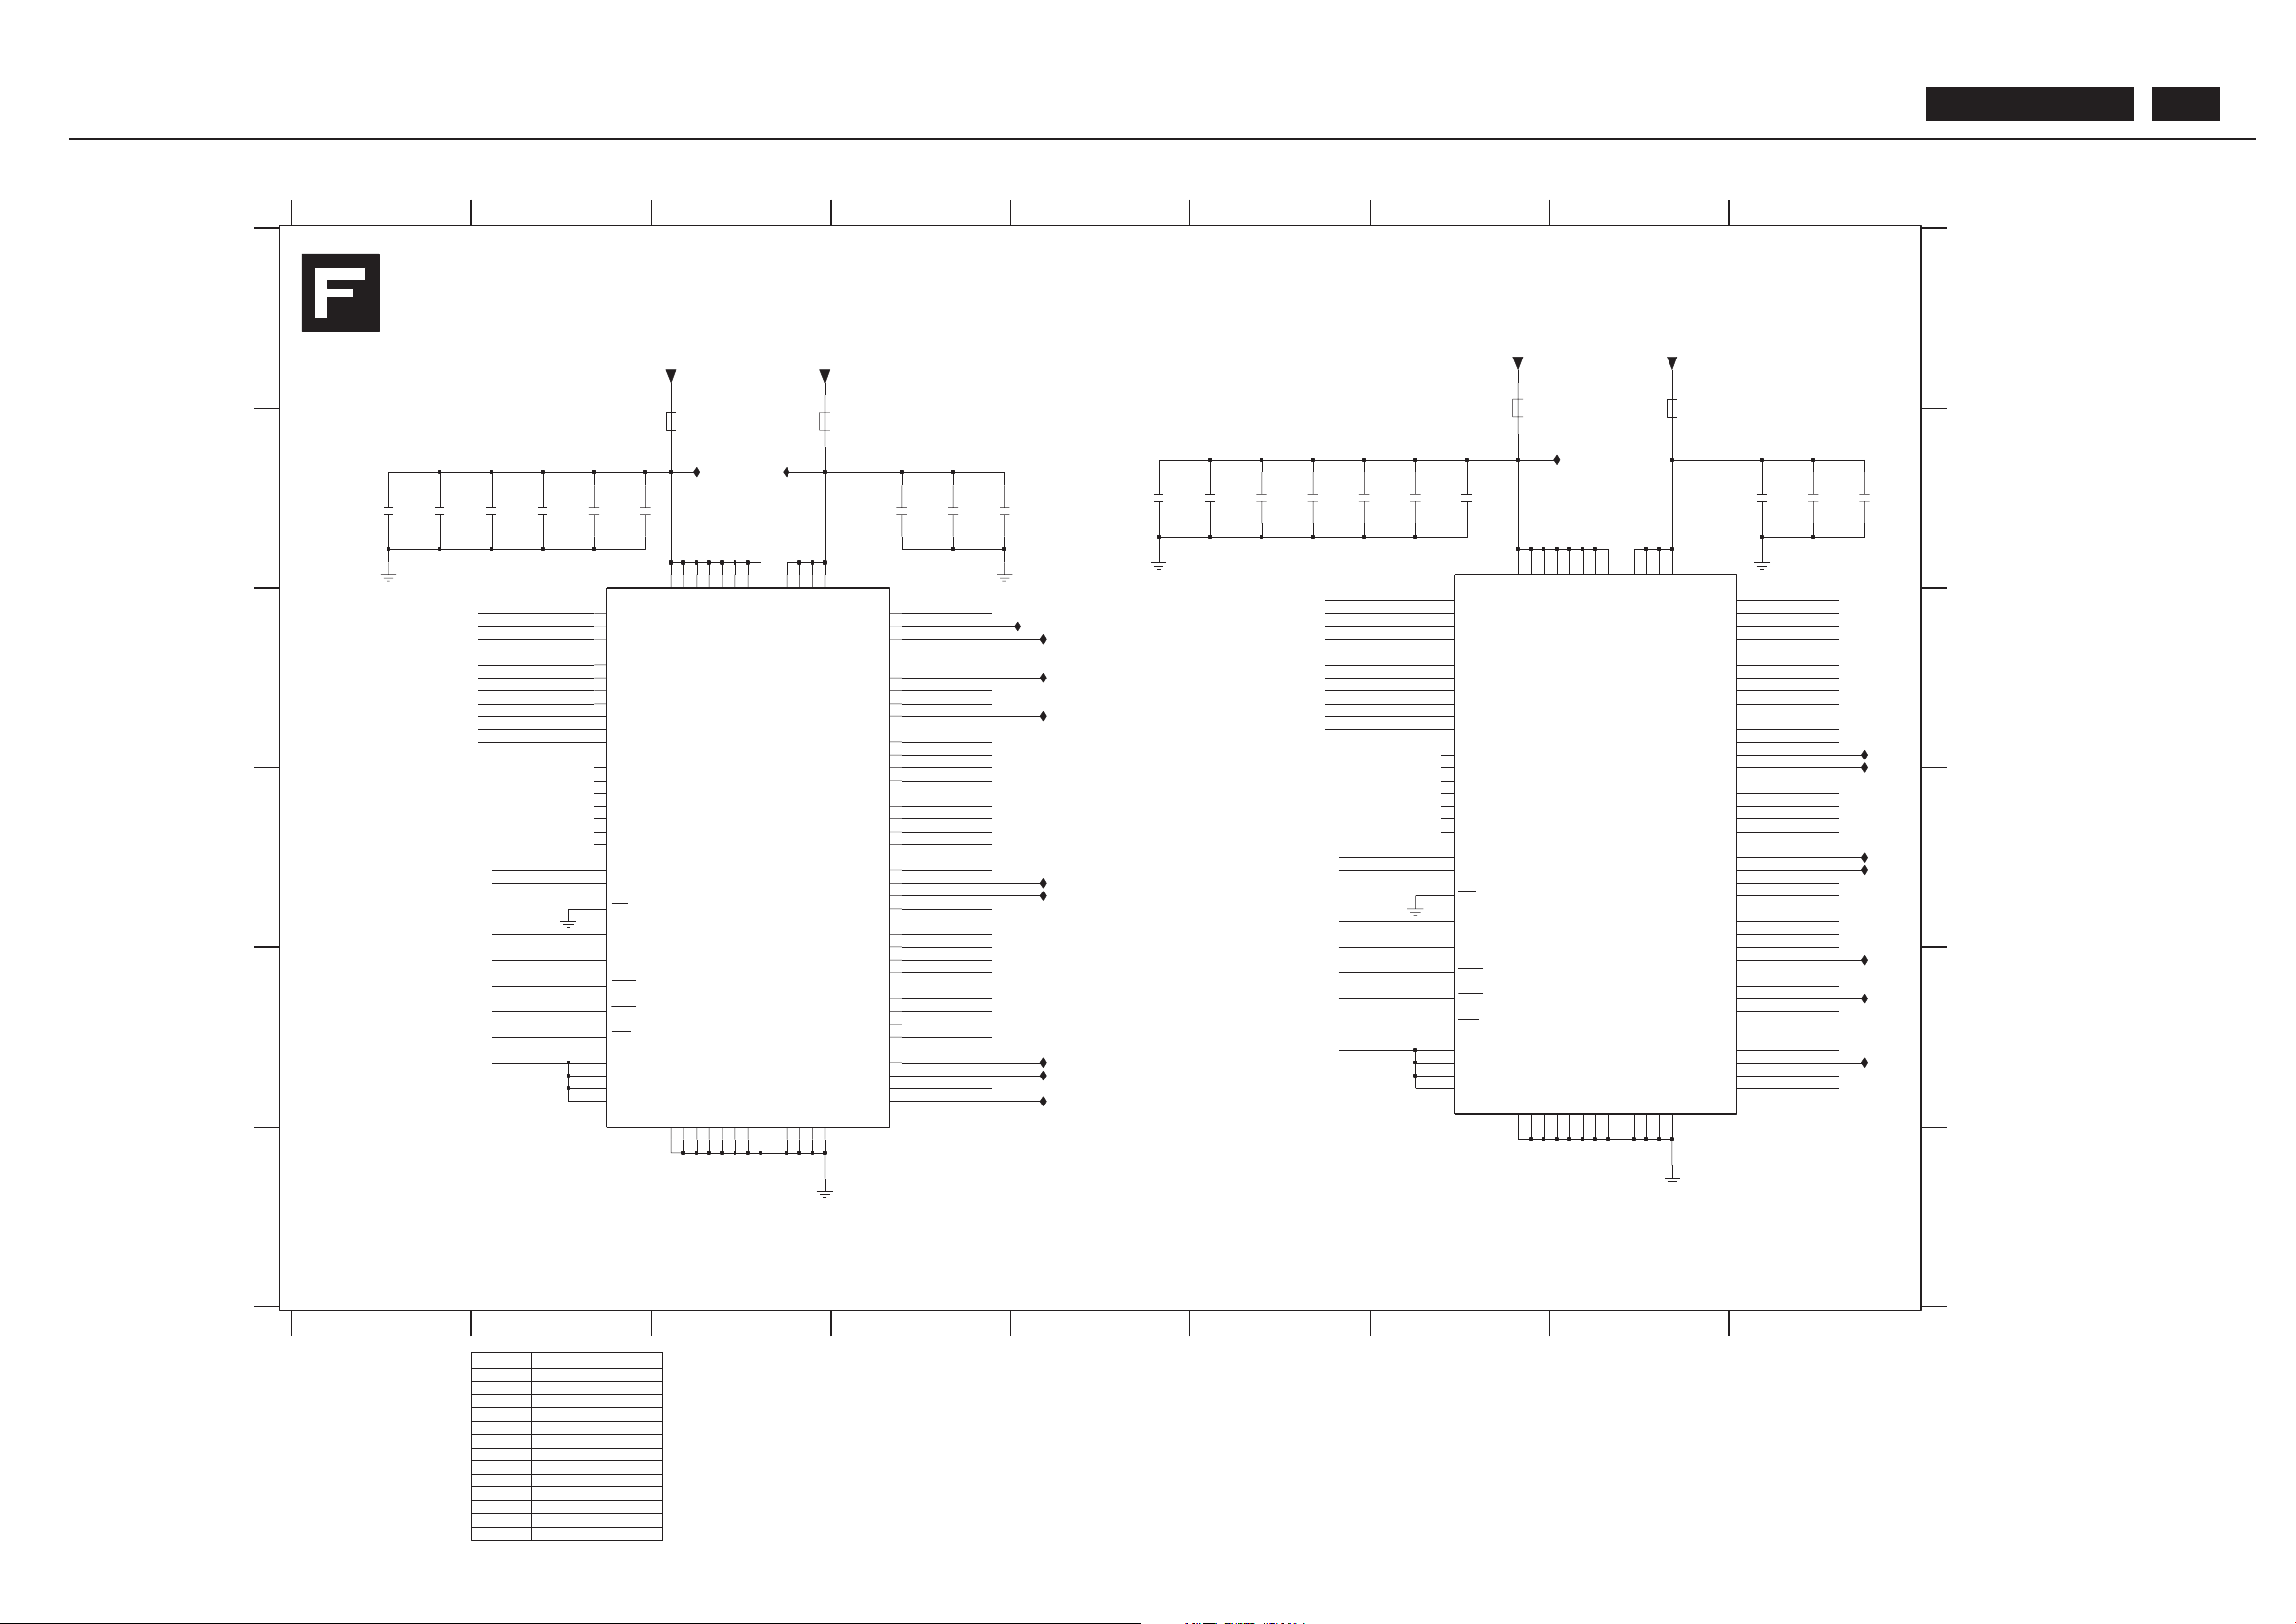
SDRAM Diagram
932217603668
NI
(9) "471" ~ "475"
NI
BEAD
BEAD
NI
NI
U399 E5
BEAD
BEAD
U409 D9
U410 D9
NI
NI
MAIN PCB
C -"471" ~ "495"
U415 E9
U600 C9
U601 C9
2490 223878615649
2491
313816874261
5472
NI
NI
NI
NI
5474 B3
U400 E5
U405 E5
U143 C5
U394 C5
U411 E 9
U412 E9
7472
313816874261
Ref Des Reserved
2008 223878615649
2010 223878615649
2019 223878615649
2480 223878615649
2481 223878615649
2483 223878615649
2484 223878615649
2489 223878615649
2485 B4
2486 B4
2487 B4
223878615649
5471
2491 B9
5471 A7
U397 D5
U398 D5
SB: 59991 x1
NI
NI
12
7471 D3
7472 D8
56
U395 C5
U396 C5
2008 B6
2010 B9
2019 B7
2471 B2
2472 B1
2474 B2
2475 B2
2477 B2
2478 B1
2480 B6
2481 B6
2483 B5
2484 B6
123
2489 B9
2490 B7
45
5472 A8
5473 B3
6789
A
B
C
D
E
F
A
B
C
D
E
F
U3 B3
U4 B3
U88 B8
2480
PB: 59591
34 789
5472
U412
U415
U410
U411
+3V3
U409
VSS058VSS172VSS286VSS3
6
VSSQ012VSSQ132VSSQ238VSSQ346VSSQ452VSSQ578VSSQ684VSSQ7
17
WE
NC5
73
NC6
19
RAS
1
VDD015VDD129VDD243VDD3
3
VDDQ0
9
VDDQ135VDDQ241VDDQ349VDDQ455VDDQ575VDDQ681VDDQ7
44
DQ31
8
DQ4
10
DQ5
11
DQ6
13
DQ7
74
DQ8
76
DQ9
16
DQM0
71
DQM1
28
DQM2
59
DQM3
14
NC0
21
NC1
30
NC2
57
NC3
69
NC4
70
DQ17
34
DQ18
36
DQ19
5
DQ2
37
DQ20
39
DQ21
40
DQ22
42
DQ23
45
DQ24
47
DQ25
48
DQ26
50
DQ27
51
DQ28
53
DQ29
7
DQ3
54
DQ30
56
A9
22
BA0
23
BA1
18
CAS
67
CKE
68
CLK
20
CS
2
DQ0
4
DQ1
77
DQ10
79
DQ11
80
DQ12
82
DQ13
83
DQ14
85
DQ15
31
DQ16
33
7472
25
A0
26
A1
24
A10_AP
27
A2
60
A3
61
A4
62
A5
63
A6
64
A7
65
A8
66
2010
5473
2484
2490
2481
2008
U88
U3 U4
100n
2486
5474
2487
100n
U601
+3V3
52
VSSQ678VSSQ7
84
WE
17
U600
VDDQ235VDDQ341VDDQ449VDDQ555VDDQ675VDDQ7
81
VSS044VSS158VSS272VSS3
86
VSSQ06VSSQ112VSSQ232VSSQ338VSSQ446VSSQ5
28
DQM3
59
NC0
14
NC1
21
NC2
30
NC3
57
NC4
69
NC5
70
NC6
73
RAS
19
VDD01VDD115VDD229VDD3
43
VDDQ03VDDQ1
9
47
DQ26
48
DQ27
50
DQ28
51
DQ29
53
DQ3
7
DQ30
54
DQ31
56
DQ4
8
DQ5
10
DQ6
11
DQ7
13
DQ8
74
DQ9
76
DQM0
16
DQM1
71
DQM2
77
DQ11
79
DQ12
80
DQ13
82
DQ14
83
DQ15
85
DQ16
31
DQ17
33
DQ18
34
DQ19
36
DQ2
5
DQ20
37
DQ21
39
DQ22
40
DQ23
42
DQ24
45
DQ25
27
A3
60
A4
61
A5
62
A6
63
A7
64
A8
65
A9
66
BA0
22
BA1
23
CAS
18
CKE
67
CLK
68
CS
20
DQ0
2
DQ1
4
DQ10
U143
7471
K4S643232E-TC50
A0
25
A1
26
A10_AP
24
A2
2485
100n
100n
2471
+3V3
2475
100n
2489
5471
2491
U405
+3V3
U399
U400
U397
U398
U395
U396
100n
2477
U394
2019
2483
100n
2478
2474
100n
2472
100n
SD37
SD38
SD39
SD40
SD41
SD62
SD63
BA1
BA1
SD1
SD2
SD48
SD42
SD49
SD50
SD51
SD34
SD52
SD53
SD54
SD55
SD56
SD57
SD58
SD59
SD60
SD61
SD35
SD36
TSA10
TSA2
TSA3
TSA4
TSA5
TSA6
TSA7
TSA8
TSA9
SD32
SD33
SD43
SD44
SD45
SD46
SD47
SD6
SD7
SD8
SD9
TSDQM
SD30
SD31
TSBA#
TSCAS#
TSCKE#
TSCLK
TSDQM
TSRAS#
TSWE#
TSA0
TSA1
SD17
SD18
SD19
SD20
SD21
SD22
SD23
SD24
SD25
SD26
SD27
SD28
SD29
SD3
SD4
SD5
TSBA#
TSCAS#
TSCKE#
TSCLK
TSRAS#
TSWE#
TSA0
TSA1
TSA10
TSA2
TSA3
TSA4
TSA5
TSA6
TSA7
TSA8
TSA9
SD0
SD10
SD1 1
SD12
SD13
SD14
SD15
SD16
BDL4211. . . 57
Page 58
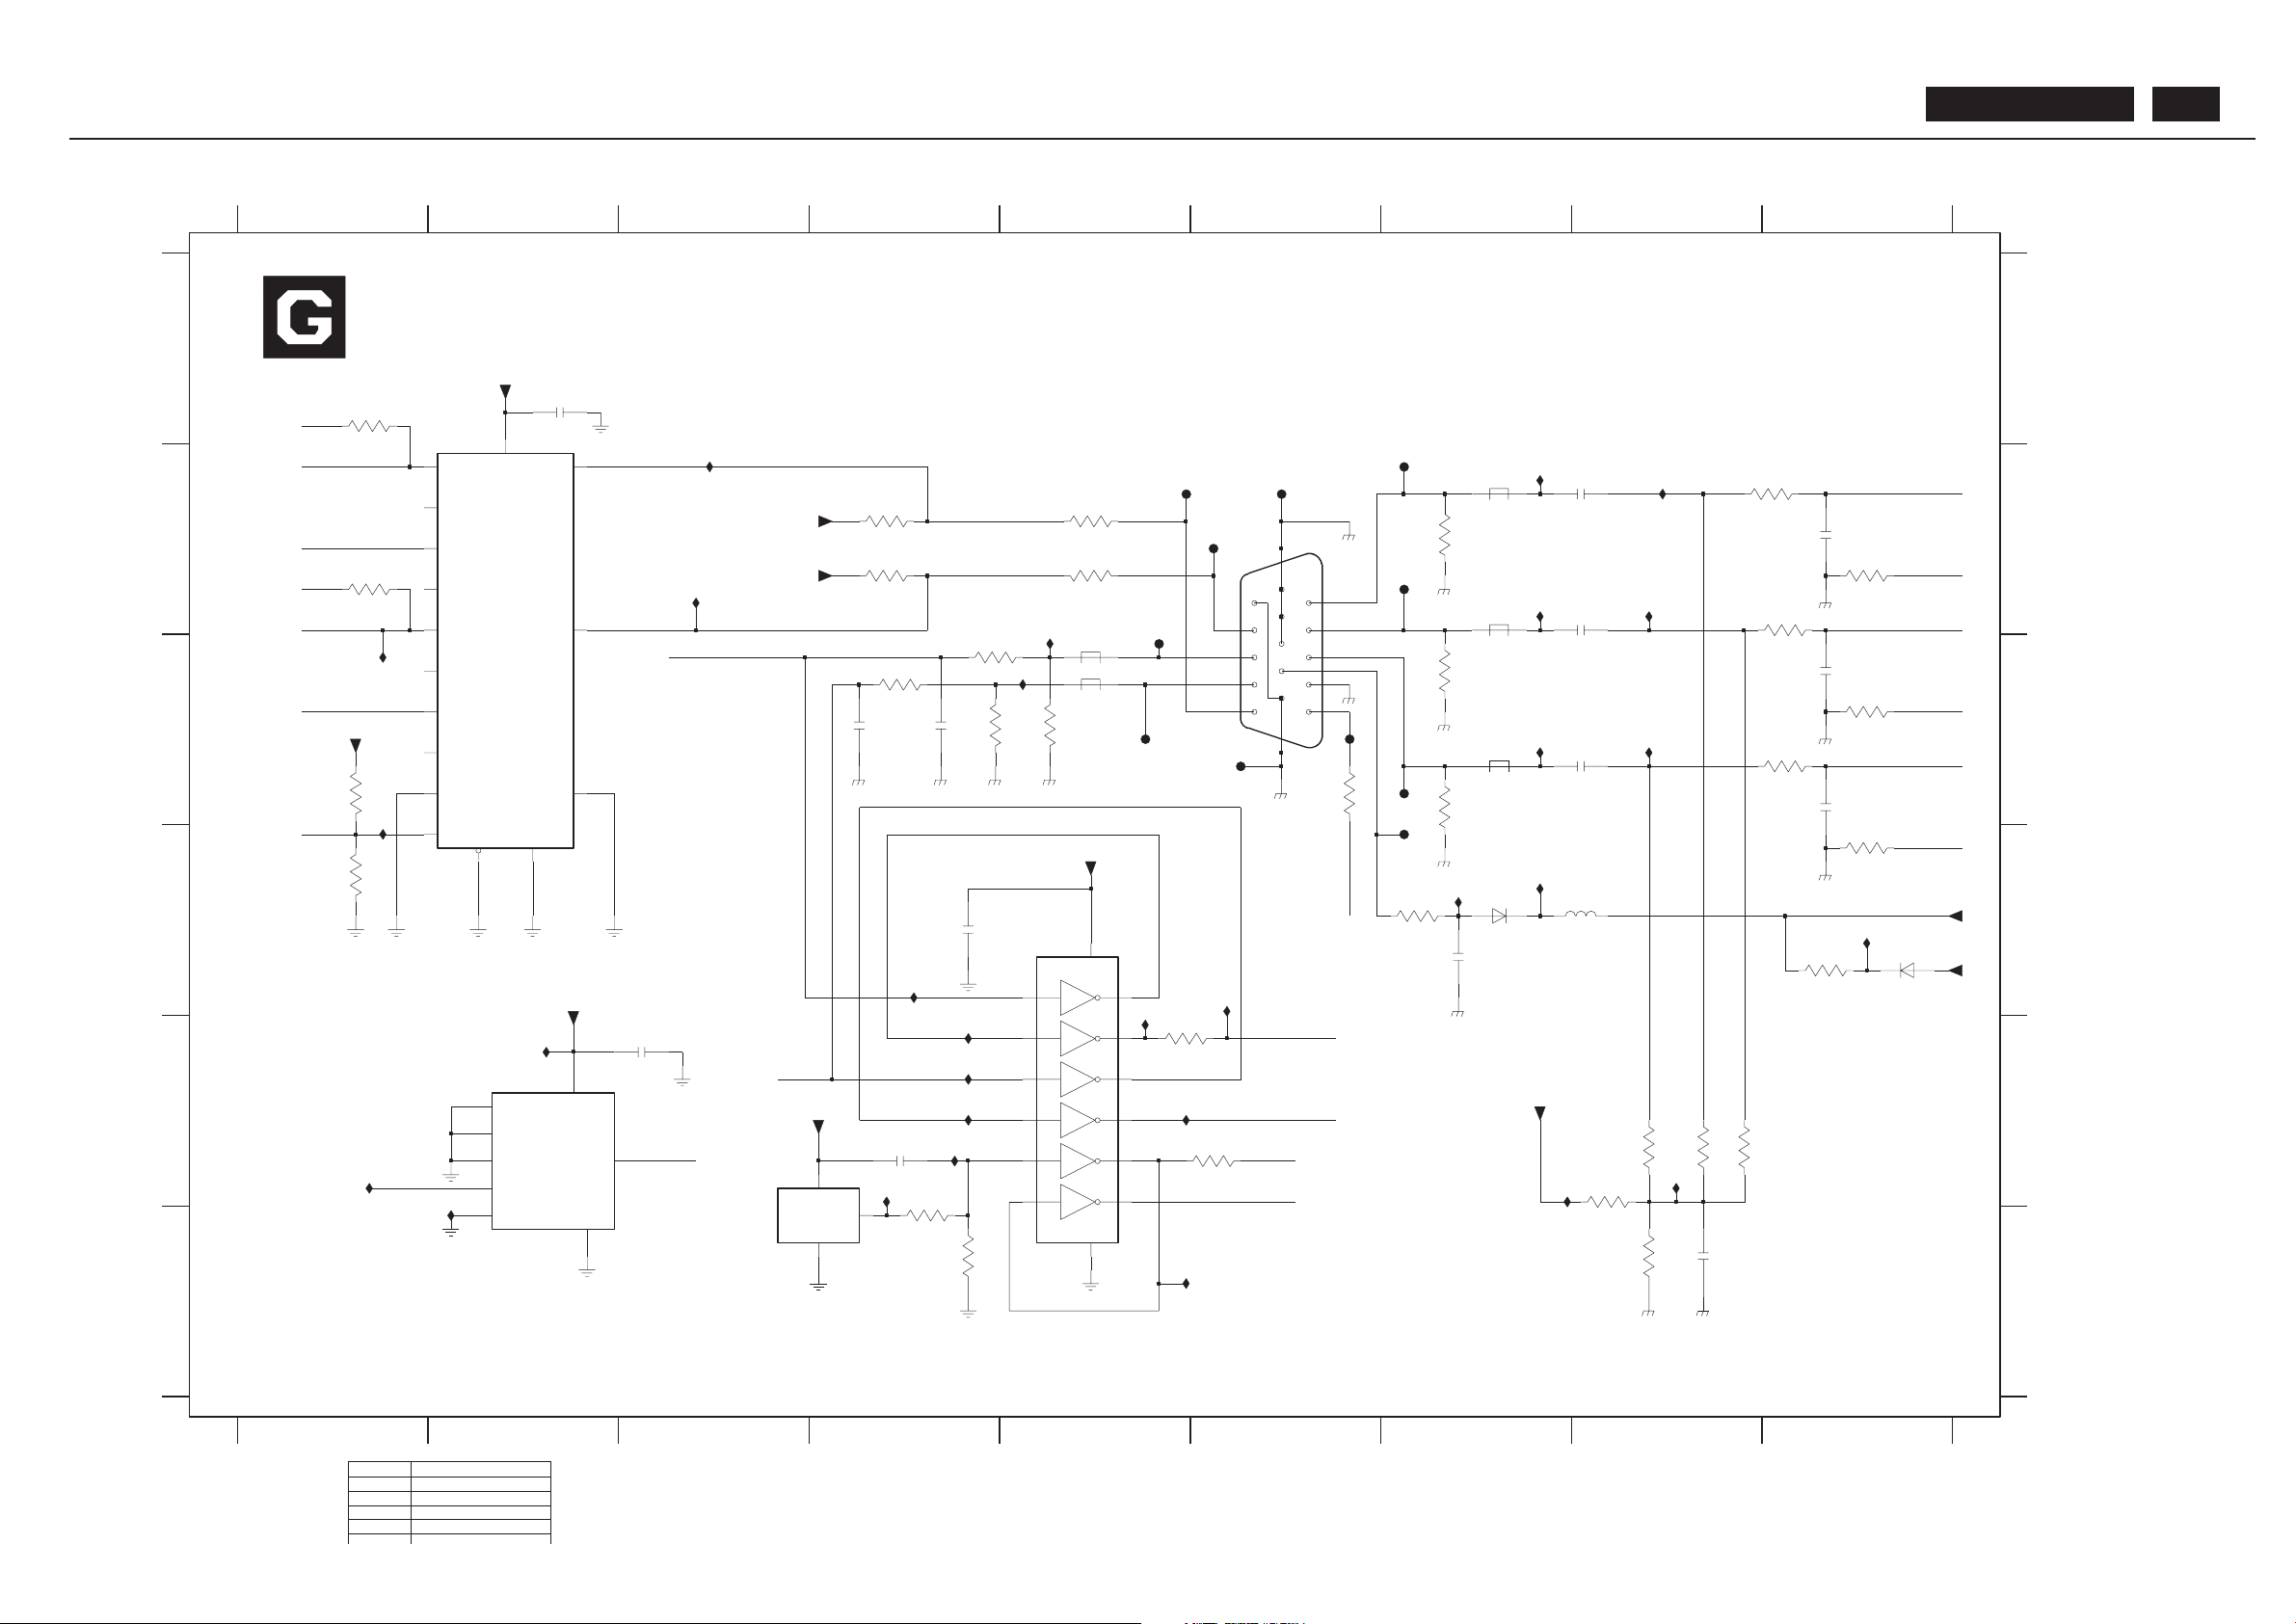
PC_Analog In Diagram
56789
123
SB: 59991 x1
789
A
B
C
D
E
F
A
B
C
D
E
2205 D4
2206 E3
2208 B8
2209 E4
2211 B8
2212 C9
2213 C8
2214 C9
F
F20 B5
F21 C5
F22 B5
F24 C6
F25 B6
F26 B6
F27 B7
F28 B7
1234
3211 B4
3212 B4
3213 C4
3214 C4
3215 B5
3216 B5
3217 B7
3218 C7
456
F29 C7
U49 C5
U50 E4
U51 E2
U52 D4
U53 E2
U56 B8
U58 C7
1201 B6
2202 B9
2203 C4
2204 C4
3201 319802134720
3224 C9
3225 B9
3226 D9
3227 C9
3228 B9
2215 D7
2218 F8
2221 A2
3201 C1
3202 D1
3203 F4
3205 C4
3206 C5
3207 F4
3208 E5
3209 E6
3237 E8
3238 E8
3239 A1
5201 B7
5202 B7
5203 C5
5204 C5
5205 C7
3221 D7
3222 C7
3223 B9
EXCEPT 1201 WERE CHIP COMPONENTS.
(3) "201" ~ "250"
319802134730
2221 223878615649
U268 C6
U276 C1
U334 E4
U335 C8
U336 B8
U337 B7
U433 B3
U434 B3
3229 D9
3230 B1
3231 C6
Reserved
2209
MAIN PCB
3234 E8
3235 E8
3236 F8
U436 E7
U437 E8
U570 D7
U571 B7
U572 D5
U573 E4
U574 D7
U663 E4
Ref Des
3202
5206 D8
6211 D7
6212 D9
7201 A2
7202 E2
7203 D5
7206 E3
F210 C7
I239 B5
U110 E5
U 111 D 6
U112 E4
U236 D9
U241 C1
U257 F5
3202
PB: 59591
2222241 19876
U435 E1
U49
2K2
3206
3215
100R
100R
3216
100n
2205
U58
F21
U110
F20
U573
0R
3203
U334
U335
2K2
3205
F210
0R
3209
+5
F28
100MHZ
5205
3208
100R
75R
3217
100MHZ
5201
U336
U433
U 111
U276
0R
3239
3230
0R
U574
DDC5V
5203
3234
7K5
F24
100MHZ
2206
100n
U56
3236
3K9
3221
150R
U572
3224
F27
3226
150R
100R
0u1
5206
F26
BAS32L
6211
U241
U257
U268
U236
6212
BAS32L
+2V5I
1u
2208
U570
I239
F25
3225
100R
U50
100R
3223
DDC5V
100R
3231
LM810M3X-4.0
7206
1
GND
2
RESET
3
VCC
3212
10K
U435
U337
U53
+5
U52
U51
220R
3213
DDC5V
2212
5p6
DDC5V
2221
U434
2211
1u
+3V3
0R
3227
F22
Y3
4
Zx
13
Zy
3
220R
3214
A
10
B
9
INH
6
VDD
16
VEE
7
VSS
8
X0
12
X1
14
X2
15
X3
11
Y0
1
Y1
5
Y2
2
3201
7201
22p
2203
22p
2204
3238
180K
2215
100n
2209
4
6
8
10
12
1u
2213
74LVC14APW -T
7203
7
GND
14
VCC
1
3
5
9
11
13
2
3218
75R
U436
100MHZ5204
3229
0R
5202
100MHZ
5p6
2202
180K
3235
U571
0R
3228
5p6
2214
U112
75R
3222
DDC5V
F29
M24C02
7202
E0
1
E1
2
E2
3
6
SCL
5
SDA
VCC
8
4
VSS
WC_
7
2
3
4
5
6
7
8
9
1201
16
17
1
10
11
12
13
14
15
180K
3237
10K
3211
U437
2u2
2218
4M7
3207
DDCSDA
+3V3
U663
DDCSCL
RESET
PC-HSYNC-ASM
DDCCTL
RXD
TXD
DDC-SCL
DDC-SDA
VGA-S-TEST
DDC-SCL
DDCSCL
DDC-SDA
DDCSDA
PC-VSYNC
REDP
GREENP
REDN
GREENN
BLUEN
PC-HSYNC
RESET#
PC-VSYNC-ASM
BLUEP
BDL4211. . . 58
Page 59
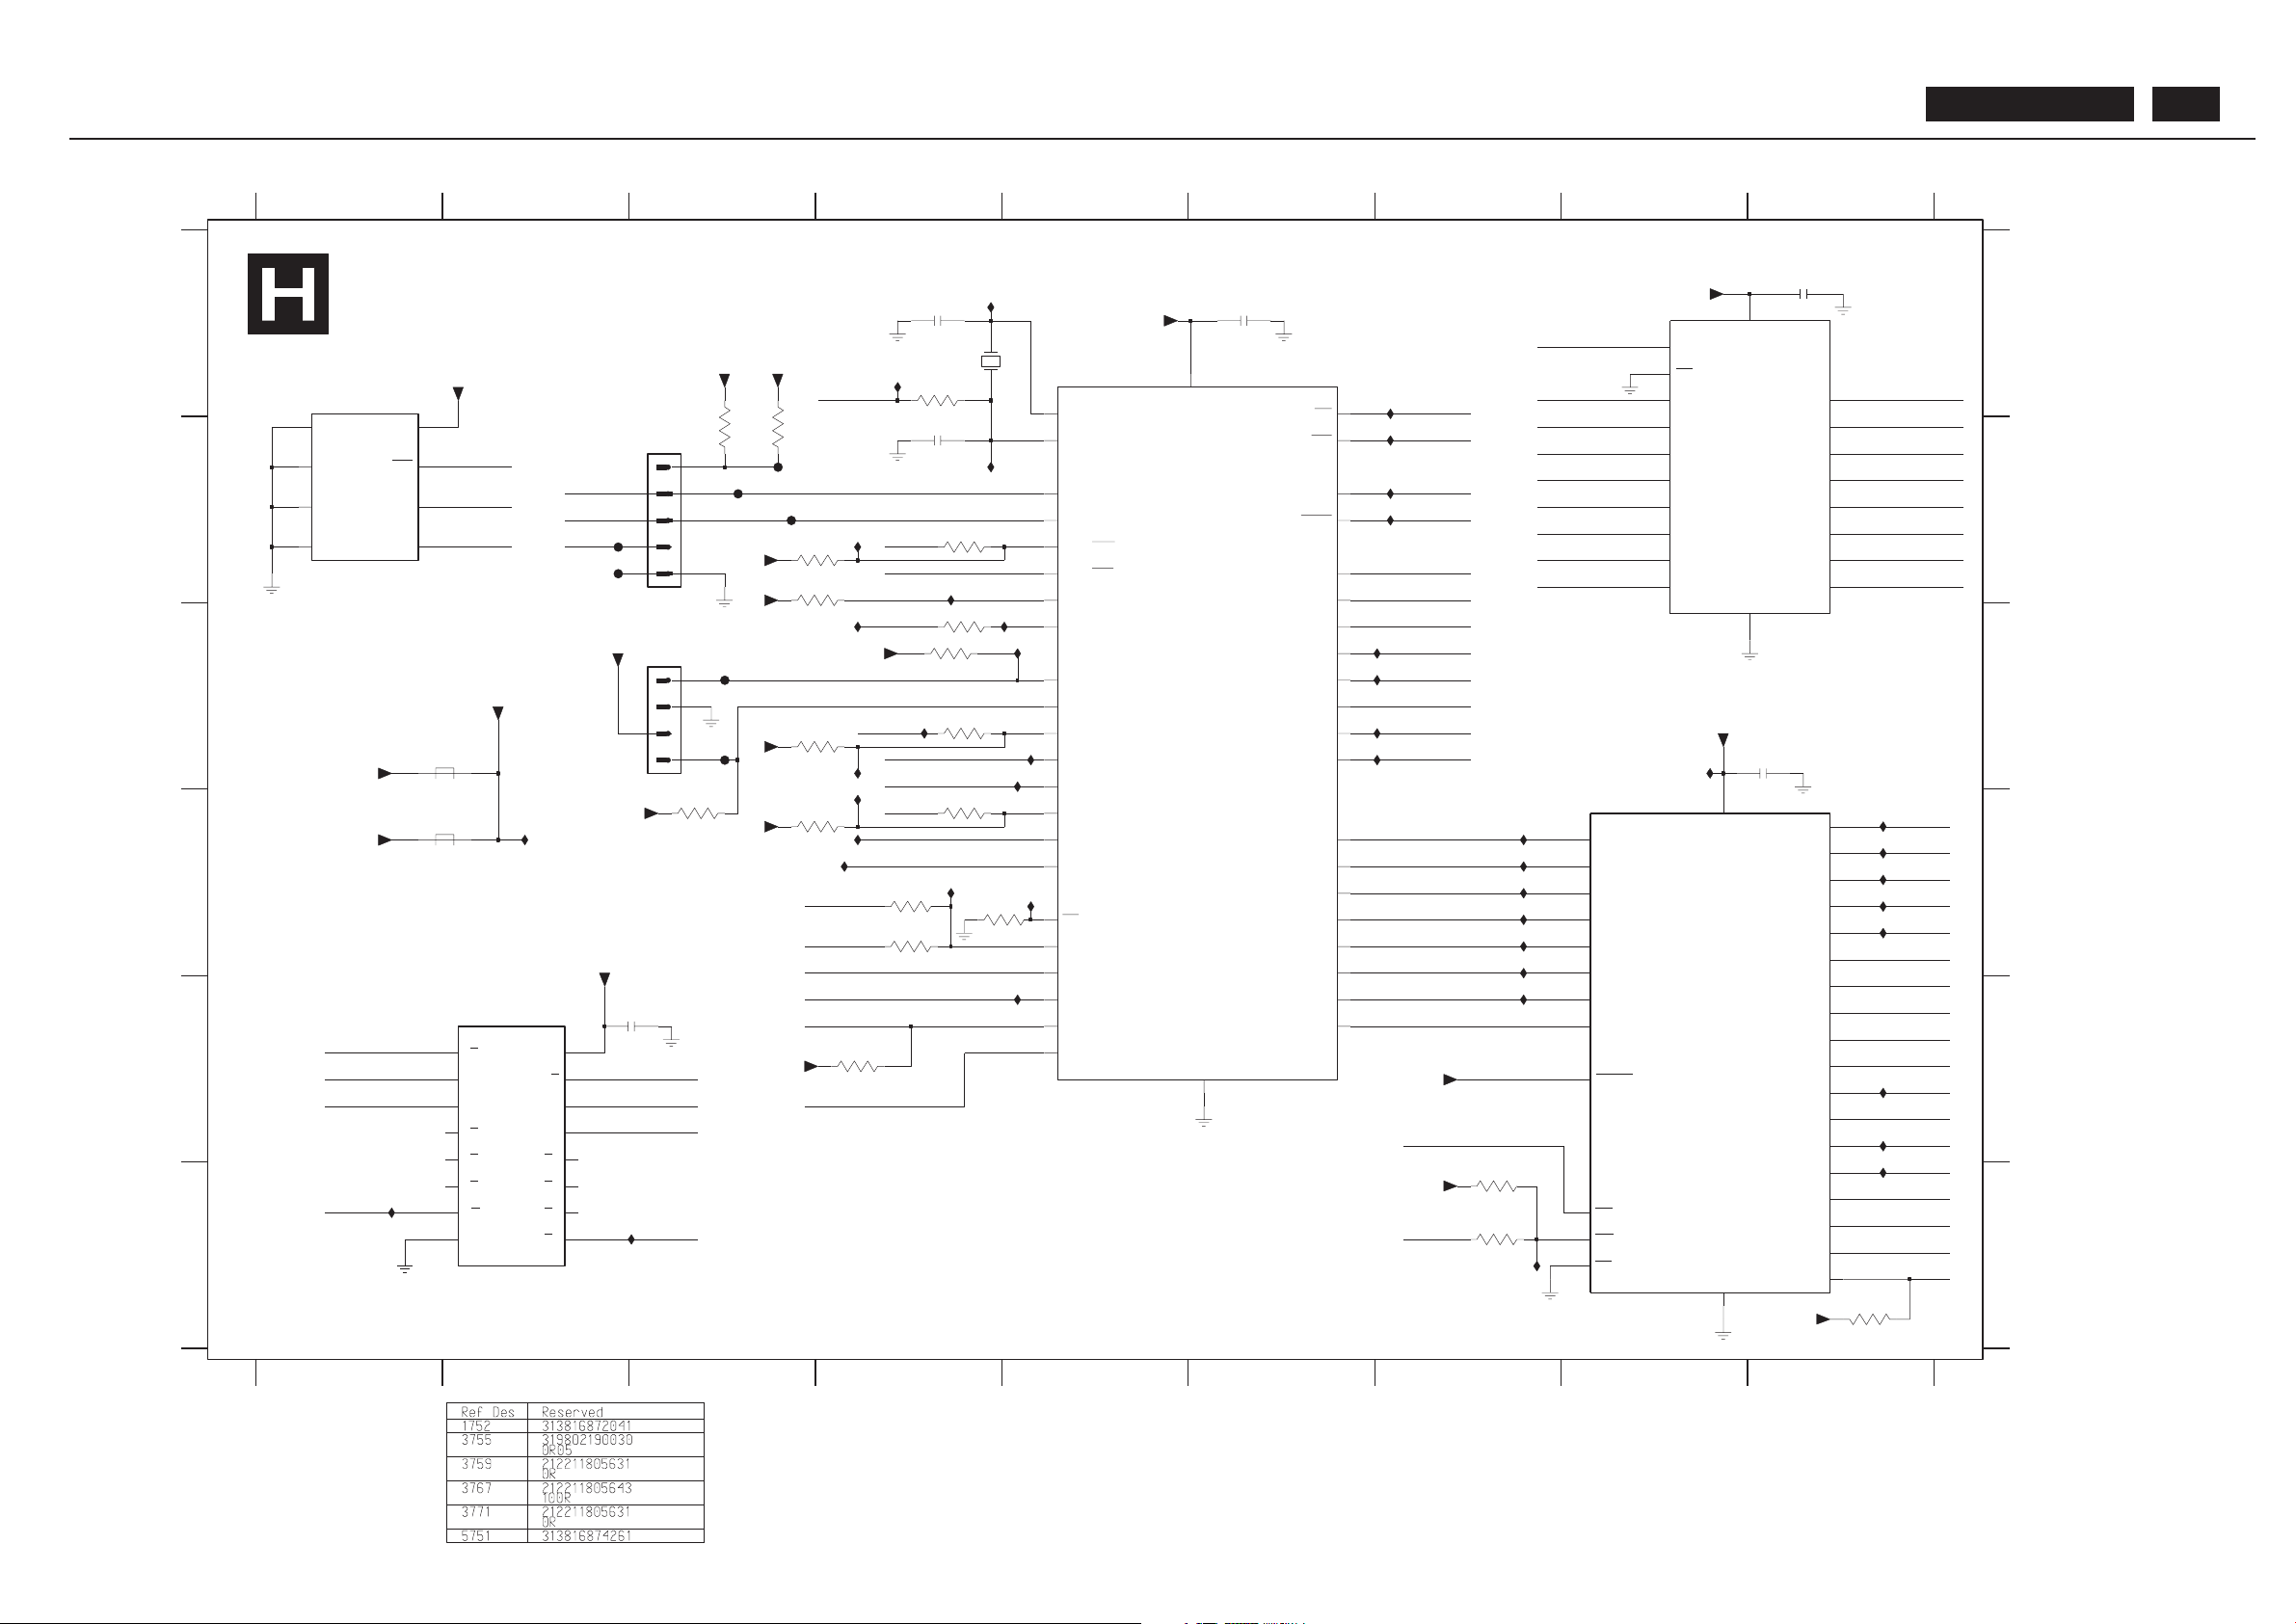
BDL4211. . . 59
Scaler_Up Diagram
C
D
NI
7752 A1
7753 C6
7754 D8
F753 B2
F754 B2
F755 C3
F756 C3
I771 D4
I773 C4
U109 C4
U204 D2
U240 D4
U391 D9
NI
U535 C5
U536 C5
U537 C7
B
U575 C7
U576 D9
U577 D9
EXCEPT 1751,1752,7752 WERE CHIP COMPONENTS.
NI
BEAD
5751 C2
5752 D2
7751 A9
7755 E2
F751 B3
F752 B3
3763 E4
3764 B4
3765 F9
3766 B3
3767 A4
3768 C4
3769 D4
3771 B3
3772 B3
U534 E7
E
F
U71 C8
U538 A4
U543 D7
U555 B4
2751 A9
2752 A6
2753 A4
2754 B4
2755 C9
2757 E3
3751 D3
3752 C4
3753 C4
3754 D4
3755 D4
3756 D4
3757 D5
3758 F7
3759 F7
3761 B4
3762 C4
21
U530 E9
U531 E9
U532 E9
6789
123456789
A
B
C
D
E
F
A
U453 F3
U454 F1
U520 C7
U521 C7
U522 D7
U523 C5
1751 B3
1752 C3
1753 A4
SB: 59991 x1
U525 D9
U526 D9
U527 D7
U528 D7
U529 D7
U533 D7
345
BEAD
U432 B7
U431 B7
U430 B7
U429 A7
U428 E5
U427 D5
U426 D4
U425 D4
U424 C4
U423 C5
PB: 59591
TO RS232 BD
U420 A4
U421 B5
U422 B4
U524 F7
MAIN PCB
"751" ~ "799"
22M1184HZ
1753
U524
U425
2752
10u
10
U391
3772
0R
+3V3
0R
3771
I771
+5
3V3-UP
15p
2753
U535
U429
U109
U533
3V3-UP
+5
U529
1752
1
2
3
4
FXXX
+5
3V3-UP
5752
3V3-STBY
3V3-UP
5751
1751
JFE6338V
1
2
3
4
5
0R
3762
0R
3759
F752
U240
+5
16V
100R
3753
U424
U522
+5
100R
3767
U430
4K7
3765
F753
3764
10K
U534
I773
U537
2755
10u
3V3-UP
U453
3V3-UP
10
U577
100n
2757
U525
3V3-UP
U531
U532
U520
U530
U432
U454
U575
U428
F756
U528
3V3-STBY
U431
3751
4K7
U526
100R
3754
3V3-UP
2754
15p
U527
U420
F754
U204
VSS
16
WE
31
F755
A6
5
A7
27
A8
26
A9
22
CE
I_O0
13
I_O1
14
I_O2
15
I_O3
17
I_O4
18
I_O5
19
I_O6
20
I_O7
21
OE
24
1
RESET
VCC
32
12
A0
A1
11
23
A10
25
A11
4
A12
28
A13
A14
29
3
A15
A16
2
A17
30
10
A2
9
A3
8
A4
7
A5
6
4K73766
AT49L V002NT -90JC
7754
15
P3.4_T0
16
P3.5_T1
17
P3.6_WR
18
P3.7_RD
19
P4.0_PWM0
23
P4.1_PWM1
34
P4.2_PWM2
1
P4.3_PWM3
12
PSEN
32
RESET
10
VDD1
44
VSS1
22
21
XT AL1
XT AL2
20
6
P1.5
7
P1.6_SCL
8
P1.7_SDA
9
P2.0_A8
24
P2.1_A9
25
P2.2_A10
26
P2.3_A1 1
27
28
P2.4_A12
P2.5_A13
29
P2.6_A14
30
31
P2.7_A15
P3.0_RxD0
11
P3.1_TxD0
13
P3.2_INT0
14
P3.3_INT1
ALE
33
EA
35
P0.0_AD0
43
P0.1_AD1
42
P0.2_AD2
41
P0.3_AD3
40
39
P0.4_AD4
P0.5_AD5
38
P0.6_AD6
37
36
P0.7_AD7
P1.0_T2
2
P1.1_T2EX
3
P1.2
4
P1.3
5
P1.4
16
Q6
19
Q7
20
VCC
+5
7753
MX10E8050XQC
D1
7
D2
8
D3
13
D4
14
D5
17
D6
18
D7
10
GND
11
LE
1
OE
2
Q0
5
Q1
6
Q2
9
Q3
12
Q4
Q5
15
3763
4K7
74LVC373APW -T
7751
D0
3
4
+5
+3V3
U555
4K7
3769
3758
10K
0R05
3755
0R
3756
0R
3757
+5
U71
6
1Y3
7
2A0
14
2A1
13
2E
15
2Y0
12
2Y1
11
2Y2
10
9
2Y3GND
8
16
VCC
U423
7755
74LVC139PW -T
1A0
2
3
1A1
1E
1
1Y0
4
1Y1
5
1Y2
3
E2
6
SCL
SDA
5
VCC
8
VSS
4
7
WC
100n
2751
7752
M24C16-WBN6
1
E0
2
E1
U521
U543
U421
3768
4K7
U538
U427
U536
0R
3761
U426
F751
U523
U576
U422
4K7
3752
MCA16
MCA17
RESET
WP-S
SOFT -RESET
MEMCLK
DDCCTL
DVI-S-TEST
DDC-SCL
RESET -P AINTER
VGA-S-TEST
INT -FLI
MCA17
PSEN#
MCWR#
MCINT -ASM
SCL-1
RXD
TXD
RESET
SDA-1
IICSCL
IICSDA
TV -IRQ
MCA1
MCA10
MCA1 1
MCA12
MCA13
MCA14
MCA15
MCA16
MCA2
MCA3
MCA4
MCA5
MCA6
MCA7
MCA8
MCA9
MCA15
MCWR#
JWR#
MCAD0
MCAD1
MCAD2
MCAD3
MCAD4
MCAD5
MCAD6
MCAD7
MCALE
MCA0
MCA1
MCA2
MCA3
MCA4
MCA5
MCA6
MCA7
MCA0
IICSCL
IICSDA
WP-S
MCALE
MCAD0
MCAD1
MCAD2
MCAD3
MCAD4
MCAD5
MCAD6
MCAD7
DDC-SDA
MCA8
MCA9
MCA10
MCA1 1
MCA12
MCA13
MCA14
MCA15
MCWR#
MCRD#
PSEN#
MCA14
MCA15
MCRD#
JRD#
MCA14
Page 60
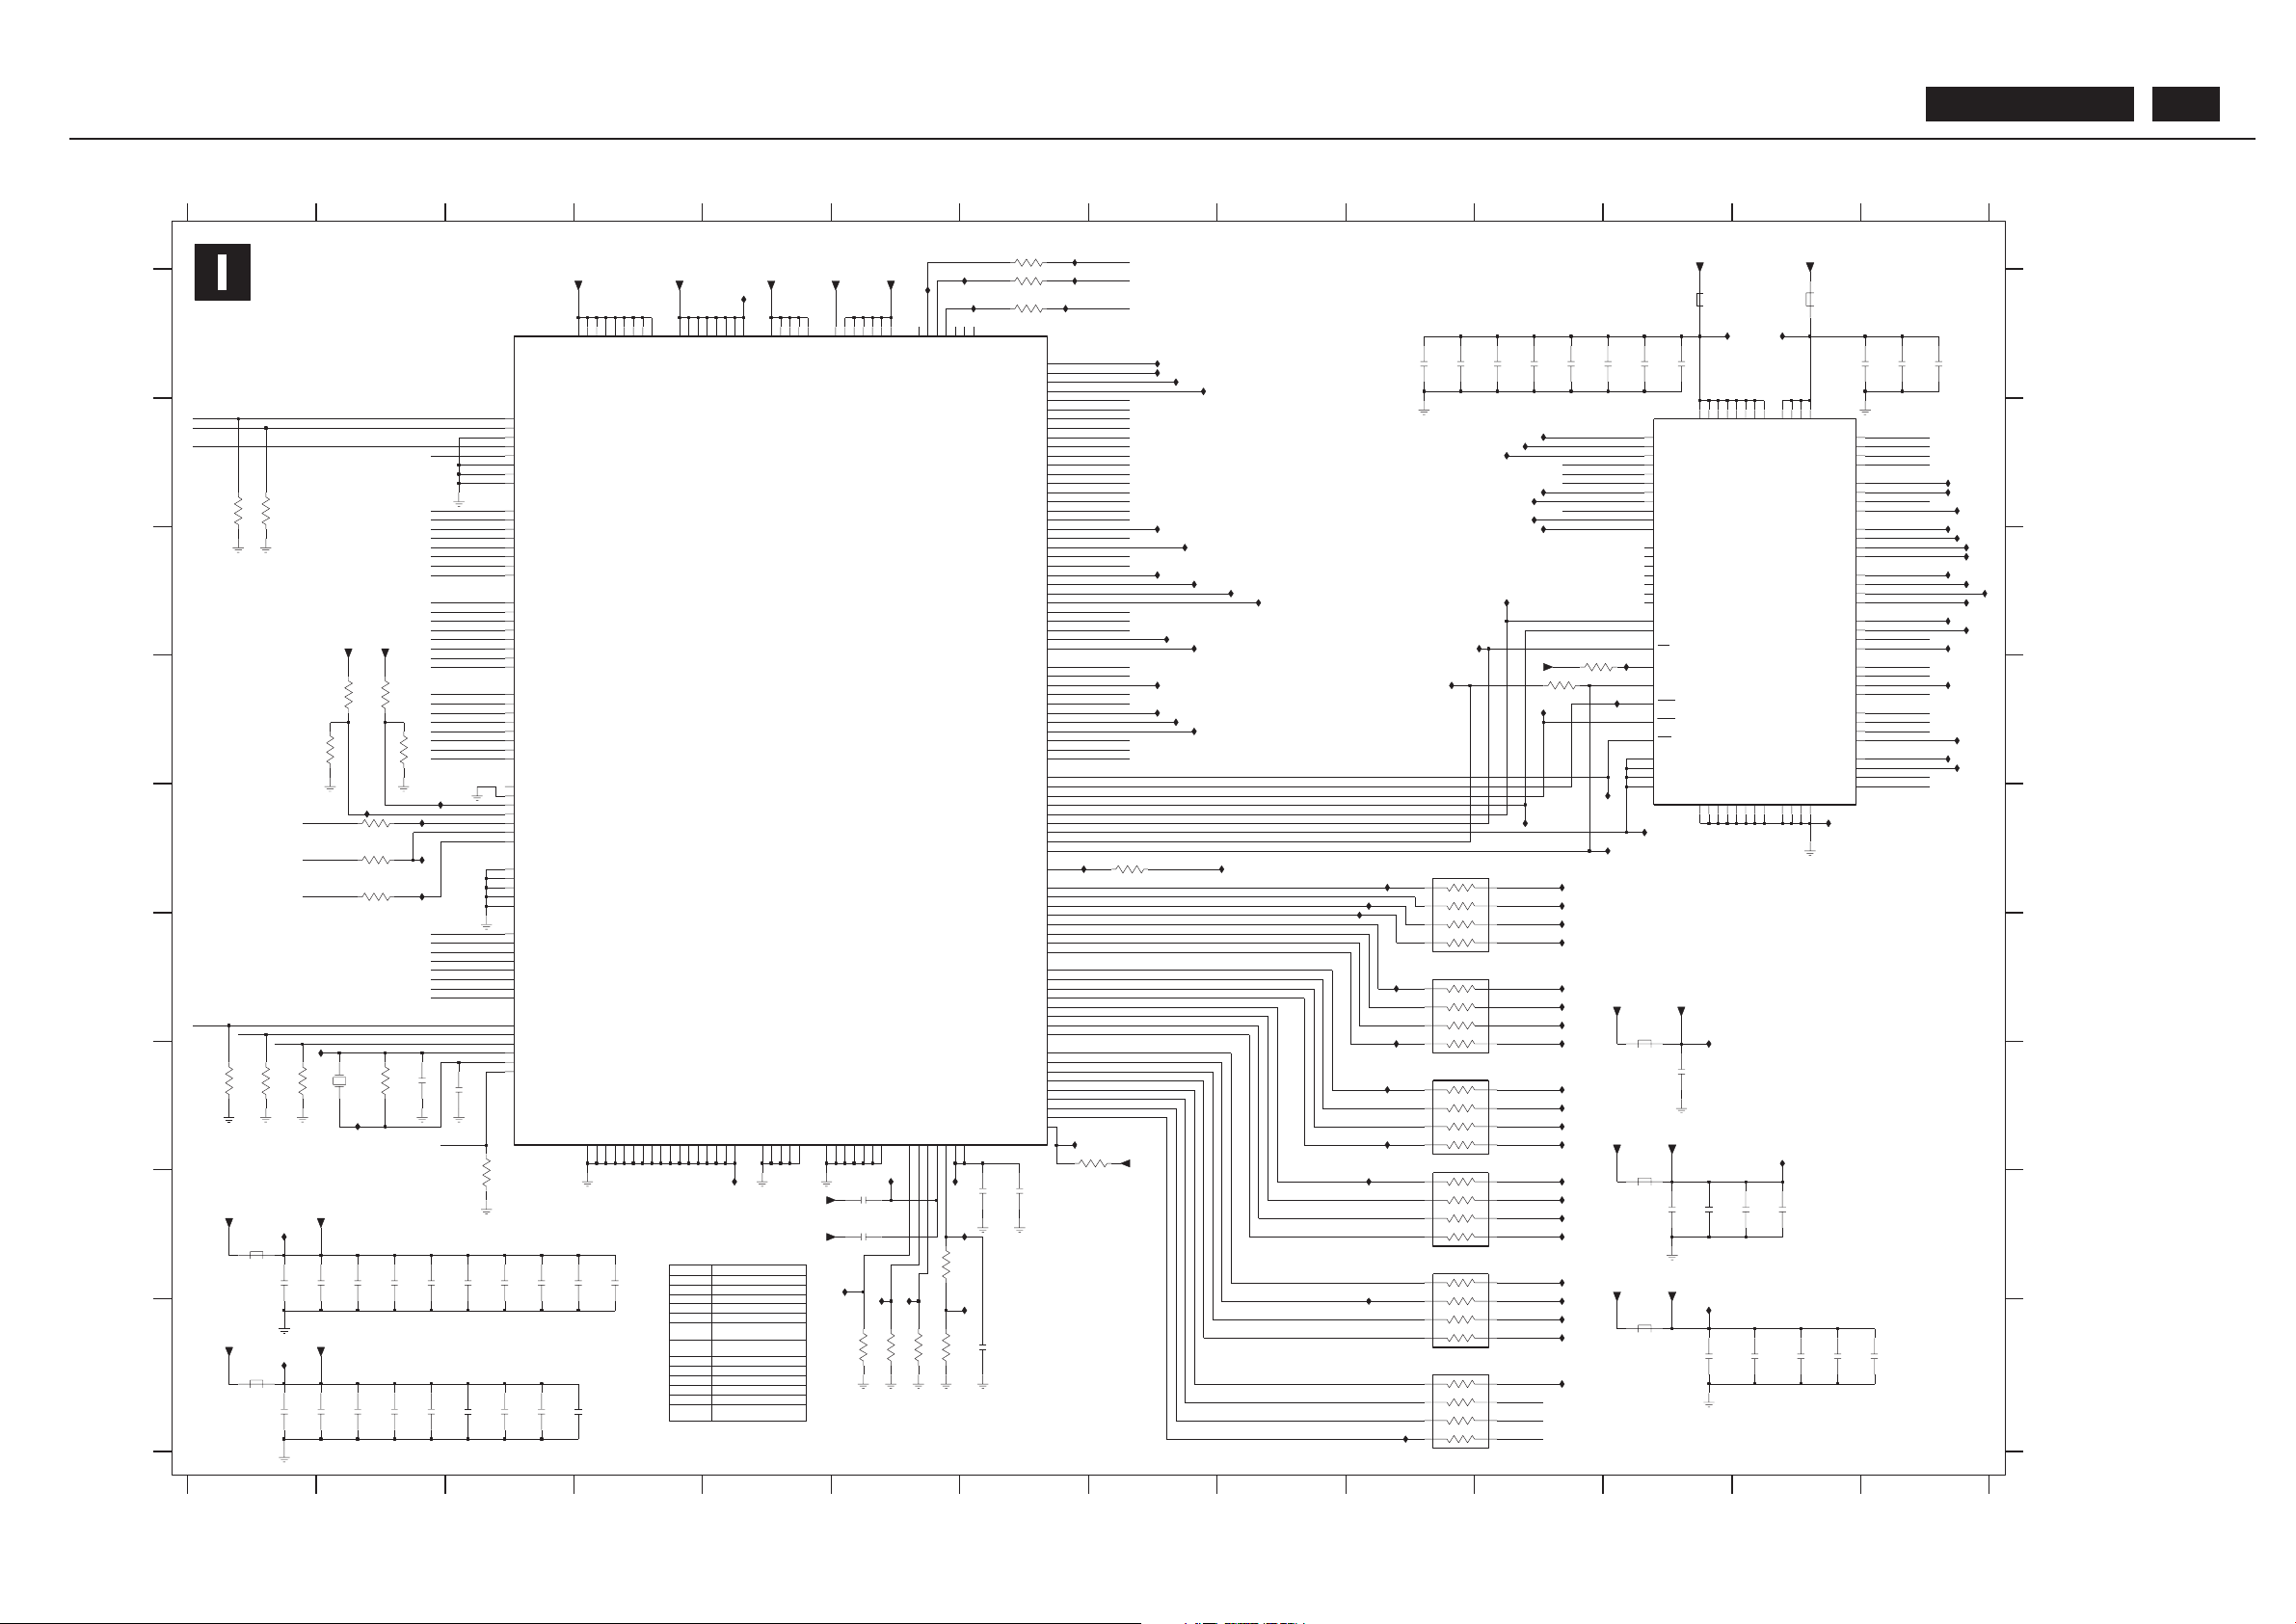
Video Converter Diagram
R
R
R
R
R
R
R
R
R
R
R
R
R
R
R
R
R
R
R
R
R
R
R
R
U441 E12
U442 E12
U443 D11
U444 C1 1
U445 B14
U446 B14
U447 C14
U448 C14
U449 C14
U450 C14
U561 C9
U562 C8
U563 C8
U564 D8
U565 D8
U578 E2
U373 H1 1
U374 H1 1
U375 H1 1
U376 G1 1
*Delete this page for basic model
U377 G1 1
U579 E2
U580 E2
U581 E2
U606 I11
U607 C14
U632 C14
U656 D14
U659 B14
U662 H1 1
U664 G10
U388 F12
U389 F1 1
U390 F1 1
U393 B1 1
U406 A8
U407 A8
U408 A8
U413 A8
U438 A12
U439 A13
U440 B14
U104 D12
U106 H5
U107 E13
U108 I7
U131 A7
U135 A7
U210 A5
U451 C14
U539 D12
U540 E2
U541 C14
U542 E1 1
U556 B8
U557 C8
U558 C9
U559 C8
U560 C8
U352 H6
U353 H6
U358 F10
U359 D14
U360 D14
U361 H6
U368 B1 1
U369 B1 1
U370 C14
U371 C14
U372 H1 1
7351 D5
7352 C13
I354 B1 1
I356 B1 1
U378 G1 1
U379 G1 1
U380 E1 1
U381 E1 1
U382 F1 1
U383 F1 1
U384 F1 1
U385 F1 1
U386 I11
U387 I12
I371 C1 1
I395 H7
I396 I1
II345 G2
II346 G2
II347 H7
II366 E9
II377 H10
II388 H10
II399 I10
U103 A7
3377 I10
3381 D11
3382 D11
3384 A7
"351" ~ "399"
U220 A7
U340 A7
U341 E10
U343 E10
U344 E10
U345 F10
U346 G10
U349 H1 1
U350 D14
U351 I11
3388 I6
3389 I6
3391 I6
3393 A7
5351 H1
5352 F12
5353 H12
5354 I12
5355 A12
5356 A13
5357 I1
3357 E2
3358 D2
3361 G1
3362 G1
3363 G1
3364 G2
3365 H6
3366 I6
3368 G8
3369 H3
3371 E8
NI
319802137590
3393
I358 B1 1
I370 B1 1
Ref Des Reserved
3376 H10
2386 A11
2387 A11
2388 A12
2389 A12
2392 A13
2393 A14
2394 A14
2395 H12
2396 G12
2397 H12
3350 D2
3385 A7
C -"341" ~ "399"
3355 B1
3356 E2
2368 H3
2369 H4
2371 I3
2372 I3
2373 I3
2374 I3
2375 H6
2376 H6
2377 H7
3372 E10
3373 F10
3374 G10
3375 H10
2375
2384 A11
2385 A11
2352 H1
2353 H1
2354 H2
2355 H2
2356 G2
2357 H2
2358 G3
2359 H3
2361 I1
2362 I1
2363 I2
3351 B1
3352 D2
3353 D2
3354 E2
MAIN PCB
3391
0R
212211805631
U27 G13
U28 H1
U29 G7
U30 H6
U36 E7
U38 D8
U39 D8
1351 G2
2338 I13
2339 I14
2342 I13
2378 I7
2379 H7
2382 A10
2383 A10
319802131810
3366 319802190030
3388 319802137590
3389 319802137590
14
12345 678 910
2364 I2
2365 I2
2366 H3
2367 H3
223878615649
2379 223878615649
3353 21221 1805669
10K
3358
U26 D10
12345 6
2343 I13
2345 H13
2346 I12
2347 H13
212211805669
10K
3365
SB: 59991 x1
11 12 13
F
G
H
I
A
B
C
D
E
F
G
11 12 13 14
2376 2222241 19876
2377 2222241 19876
2378
NI
78910
223878615649
A
B
C
D
E
U360
PB: 59591
H
I
TP1 A6
U25 E12
U350
3
1
I370
U349
1
2
U352
1
3
U346
U345
U664
U659
U662
U632
U656
U220
U343
U135
+1V8
II377
U131
0R
3384
1
2
U563
2
U408
U210
1
U359
3
2
2
1
U351
U560
II347
U361
II346
U358
U580
U578
2
1
U344
U341
U353
U340
U565
2
1
100MHZ
5357
U564
1
2
3
1
1
2
DAC-3V3
U413
U438
U607
U371
U369
3
U449
5353
100MHZ
PLL-1V8
1
2
3368
4K7
U561
DAC-3V3
1
2
+3V3
1
3
U388
470R
3356
PLL-1V8
DAC-3V3
2
3
45
6
7
8
U30
+1V8
47R 3376
1
47R
1
2
3
45
6
7
8
+3V3
1
2
3375
U541
U393
I395
U368
DAC-3V3
DAC-3V3
2
1
1
2
U559
II345
U558
U581
I356
U579
U26
U27
0R
3393
2
1
2
1
U389
2
1
U556
3
U108
3
2
1
VDD-IO-3V3
U104
6
1
1
U370
3357
470R
U447
V3V4V6V
6
V8V8V
9
V
2
VSYNC1_POR T1
6
VSYNC2_POR T1
207
VSYNC_POR T2
191
XTAL_IN
192
XTAL_OUT
U378
V6V8V
9
V1V
1
V
1
V
9
V1V
1
3
V1V
1
1V1V1
V1V
1
V
3
TEST1
190
TEST2
TEST3
115
TEST_IN
90
T
1
6
1
7
T
8
V
3V4
V6V8V
1
2
V
1
V
1
V
V
1
1V3
85
SDRAM_DA TA _29
53
SDRAM_DA TA_3
86
SDRAM_DA TA _30
87
SDRAM_DA TA _31
54
SDRAM_DA TA_4
55
SDRAM_DA TA_5
56
SDRAM_DA TA_6
57
SDRAM_DA TA_7
58
SDRAM_DA TA_8
59
SDRAM_DA TA_9
110
SDRAM_DQM
105
SDRAM_RASN
104
SDRAM_WEN
TEST
42
188
TEST0
189
SDRAM_DA TA _14
67
SDRAM_DA TA _15
70
SDRAM_DA TA _16
71
SDRAM_DA TA _17
72
SDRAM_DA TA _18
73
SDRAM_DA TA _19
52
SDRAM_DA TA_2
74
SDRAM_DA TA _20
75
SDRAM_DA TA _21
76
SDRAM_DA TA _22
77
SDRAM_DA TA _23
78
SDRAM_DA TA _24
79
SDRAM_DA TA _25
82
SDRAM_DA TA _26
83
SDRAM_DA TA _27
84
SDRAM_DA TA _28
SDRAM_ADDR6
94
SDRAM_ADDR7
93
SDRAM_ADDR8
92
SDRAM_ADDR9
108
SDRAM_BA0
107
SDRAM_BA1
106
SDRAM_CASN
114
SDRAM_CLKIN
111
SDRAM_CLKOUT
109
SDRAM_CSN
50
SDRAM_DA TA_0
51
SDRAM_DA TA_1
60
SDRAM_DA TA _10
61
SDRAM_DA TA _11
64
SDRAM_DA TA _12
65
SDRAM_DA TA _13
66
R_V_Pr_OUT_1
140
R_V_Pr_OUT_2
141
R_V_Pr_OUT_3
142
R_V_Pr_OUT_4
143
R_V_Pr_OUT_5
144
R_V_Pr_OUT_6
145
R_V_Pr_OUT_7
45
SCLK
46
SDA TA
103
SDRAM_ADDR0
102
SDRAM_ADDR1
91
SDRAM_ADDR10
101
SDRAM_ADDR2
100
SDRAM_ADDR3
99
SDRAM_ADDR4
98
SDRAM_ADDR5
95
IN_CLK2_POR T1
41
IN_SEL
156
OE
1
P
1
P
47
RESET_N
R_Cr_CbCr_0
21
R_Cr_CbCr_1
22
R_Cr_CbCr_2
23
R_Cr_CbCr_3
24
R_Cr_CbCr_4
25
R_Cr_CbCr_5
26
R_Cr_CbCr_6
27
R_Cr_CbCr_7
28
136
R_V_Pr_OUT_0
137
G_Y_Y_5
39
G_Y_Y_6
40
G_Y_Y_7
148
G_Y_Y_Y_OUT_0
149
G_Y_Y_Y_OUT_1
150
G_Y_Y_Y_OUT_2
151
G_Y_Y_Y_OUT_3
152
G_Y_Y_Y_OUT_4
153
G_Y_Y_Y_OUT_5
154
G_Y_Y_Y_OUT_6
155
G_Y_Y_Y_OUT_7
1
HSYNC1_POR T1
5
HSYNC2_POR T1
208
HSYNC_POR T2
4
IN_CLK1_POR T1
10
1
DA
1
1
DA
1
DA
DA
1
1
DA
44
DEV_ADDR0
43
DEV_ADDR1
3
FIELD_ID1_POR T 1
7
FIELD_ID2_POR T 1
206
FIELD_ID_POR T2
29
G_Y_Y_0
32
G_Y_Y_1
33
G_Y_Y_2
34
G_Y_Y_3
35
G_Y_Y_4
38
D1_IN7
1
DA
V
1
DA
V
1
DA
V
1
DA
V
1
DA
V
1
DA
V
1
DA
V
1
DA
V
DA
1
1DA1
DA
1
DA
V
1
DA
V
1
DA
1
DA
DA
B_U_Pb_C_OUT_6
135
B_U_Pb_C_OUT_7
CLKOUT
125
195
CLK_POR T2
C
181
9
C
1
C
C
1
1
C
196
D1_IN0
199
D1_IN1
200
D1_IN2
201
D1_IN3
202
D1_IN4
203
D1_IN5
204
D1_IN6
205
A
V
1
A
V
S
11
B_Cb_D1_0
12
B_Cb_D1_1
13
B_Cb_D1_2
14
B_Cb_D1_3
15
B_Cb_D1_4
18
B_Cb_D1_5
19
B_Cb_D1_6
20
B_Cb_D1_7
126
B_U_Pb_C_OUT_0
127
B_U_Pb_C_OUT_1
130
B_U_Pb_C_OUT_2
131
B_U_Pb_C_OUT_3
132
B_U_Pb_C_OUT_4
133
B_U_Pb_C_OUT_5
134
FLI2300-AB
7351
1
A
V
1
A
V
1
A
V
1
A
V
1
A
V
1
A
V
1
1
2
U385
1
2
U36
2
1
3
1
2
I371
1
2
5
1
1
2
1
2
2
1
U382
+1V8
1
2
U444
U380
U441
U442
U443
U450
U440
2375
2
1
1
2
3
45
6
7
8
I396
VDD-CORE-1V8
337347R
2
1
1
3
U451
U373
U557
U29
U539
U39
337747R
1
2
3
45
6
7
8
+3V3
5V7V8
V
6
V1V3V3V4V5V7V8V
17
WE
II366
70
NC5
73
NC6
19
RAS
1
V
1
V
2V4
V
3V9
V3V4V4V5V7V8V
4
V
56
DQ31
8
DQ4
10
DQ5
11
DQ6
13
DQ7
74
DQ8
76
DQ9
16
DQM0
71
DQM1
28
DQM2
59
DQM3
14
NC0
21
NC1
30
NC2
57
NC3
69
NC4
33
DQ17
34
DQ18
36
DQ19
5
DQ2
37
DQ20
39
DQ21
40
DQ22
42
DQ23
45
DQ24
47
DQ25
48
DQ26
50
DQ27
51
DQ28
53
DQ29
7
DQ3
54
DQ30
66
A9
22
BA0
23
BA1
18
CAS
67
CKE
68
CLK
20
CS
2
DQ0
4
DQ1
77
DQ10
79
DQ11
80
DQ12
82
DQ13
83
DQ14
85
DQ15
31
DQ16
7352
25
A0
26
A1
24
A10_AP
27
A2
60
A3
61
A4
62
A5
63
A6
64
A7
65
A8
DAC-1V8
U390
HY57V643220CT -6
U446
I358
2
1
3
VDD-IO-3V3
U106
U107
U407
U103
U379
3371
22R
U384
3381
22R
U383
TP1
1
2
2
3
3
1
2
1
U25
U377
1
2
1
1
2
2
3
4
+3V3
I354
U562
1
2
3
45
6
7
8
3354
470R
U374
47R 3374
II388
U375
0R
3385
II399
3
1
2
1
2
1
2
4K7
3382
U439
2
1
U386
2
7
8
1
5
47R 3372
1
2
3
45
6
2376
5351
100MHZ
U445
0
3
U38
VDD-IO-3V3
DAC-1V8
U28
2
1
VDD-IO-3V3
1
3
U376
+
1
2
2
U448
U381
3
0
U387
1
2
U406
U372
U540
100MHZ
5354
U542
100MHZ
5352
U606
DATA29
ADDR6
ADDR7
ADDR9
DATA16
G-Y -OUT4
DATA0
VDD-CORE-1V8
V2
V3
V4
V5
V6
V7
INT-FLI
HDTV -CLK
G-Y -OUT0
G-Y -OUT3
DATA27
DATA28
DATA20
DATA25
DATA24
DATA23
DATA26
DATA30
DATA31
DATA3
ADDR3
ADDR8
B-U-OUT2
B-U-OUT5
CLK-S23
Y0
V1
B-U-OUT3
B-U-OUT4
B-U-OUT6
B-U-OUT7
G-Y -OUT2
DATA 1
DATA 6
G-Y -OUT1
DATA 0
DATA 4
ADDR5
ADDR4
DATA14
DATA2
DATA1
DATA18 DATA 8
DATA 9
DATA10
DATA11
DATA12
DATA13
DATA15
R-V -OUT4
R-V -OUT5
R-V -OUT6
R-V -OUT7
R-V -OUT3
R-V -OUT2
R-V -OUT1
R-V -OUT0
B-U-OUT0
B-U-OUT1
V0
Y1
Y2
Y3
Y4
Y5
Y6
Y7
ADDR0
ADDR1
ADDR2
ADDR10
DATA 7
DATA 5
IICSCL
IICSDA
SOFT -RESET
HS-S23
VS-S23
G-Y -OUT7
G-Y -OUT5
G-Y -OUT6
DATA28
DATA29
ADDR10
ADDR9
ADDR7
ADDR6
ADDR2
ADDR1
ADDR0
DA-VSYNC
DA-FID
DATA6
DATA7
DATA8
DATA9
DATA10
DATA 11
DATA12
DATA13
DATA14
DATA15
DATA16
DATA17
DATA19
DATA21
DATA22
DATA27
DA-DA TA2
DA-DA TA3
DA-DA TA4
DA-DA TA5
DA-DA TA6
DA-DA TA7
U0
U1
U2
U3
U4
U5
U6
U7
DATA4
DATA5
DATA23
DATA24
DATA25
DATA26
DATA 3
DATA30
DATA31
DA-DA TA1
DA-CLK
DA-DA TA0
HDTV -HSYNC
HDTV -SOG
DA-HSYNC
HDTV -VSYNC
ADDR3
ADDR4
ADDR5
ADDR8
DATA17
DATA18
DATA19
DATA 2
DATA20
DATA21
DATA22
BDL4211. . . 60
Page 61
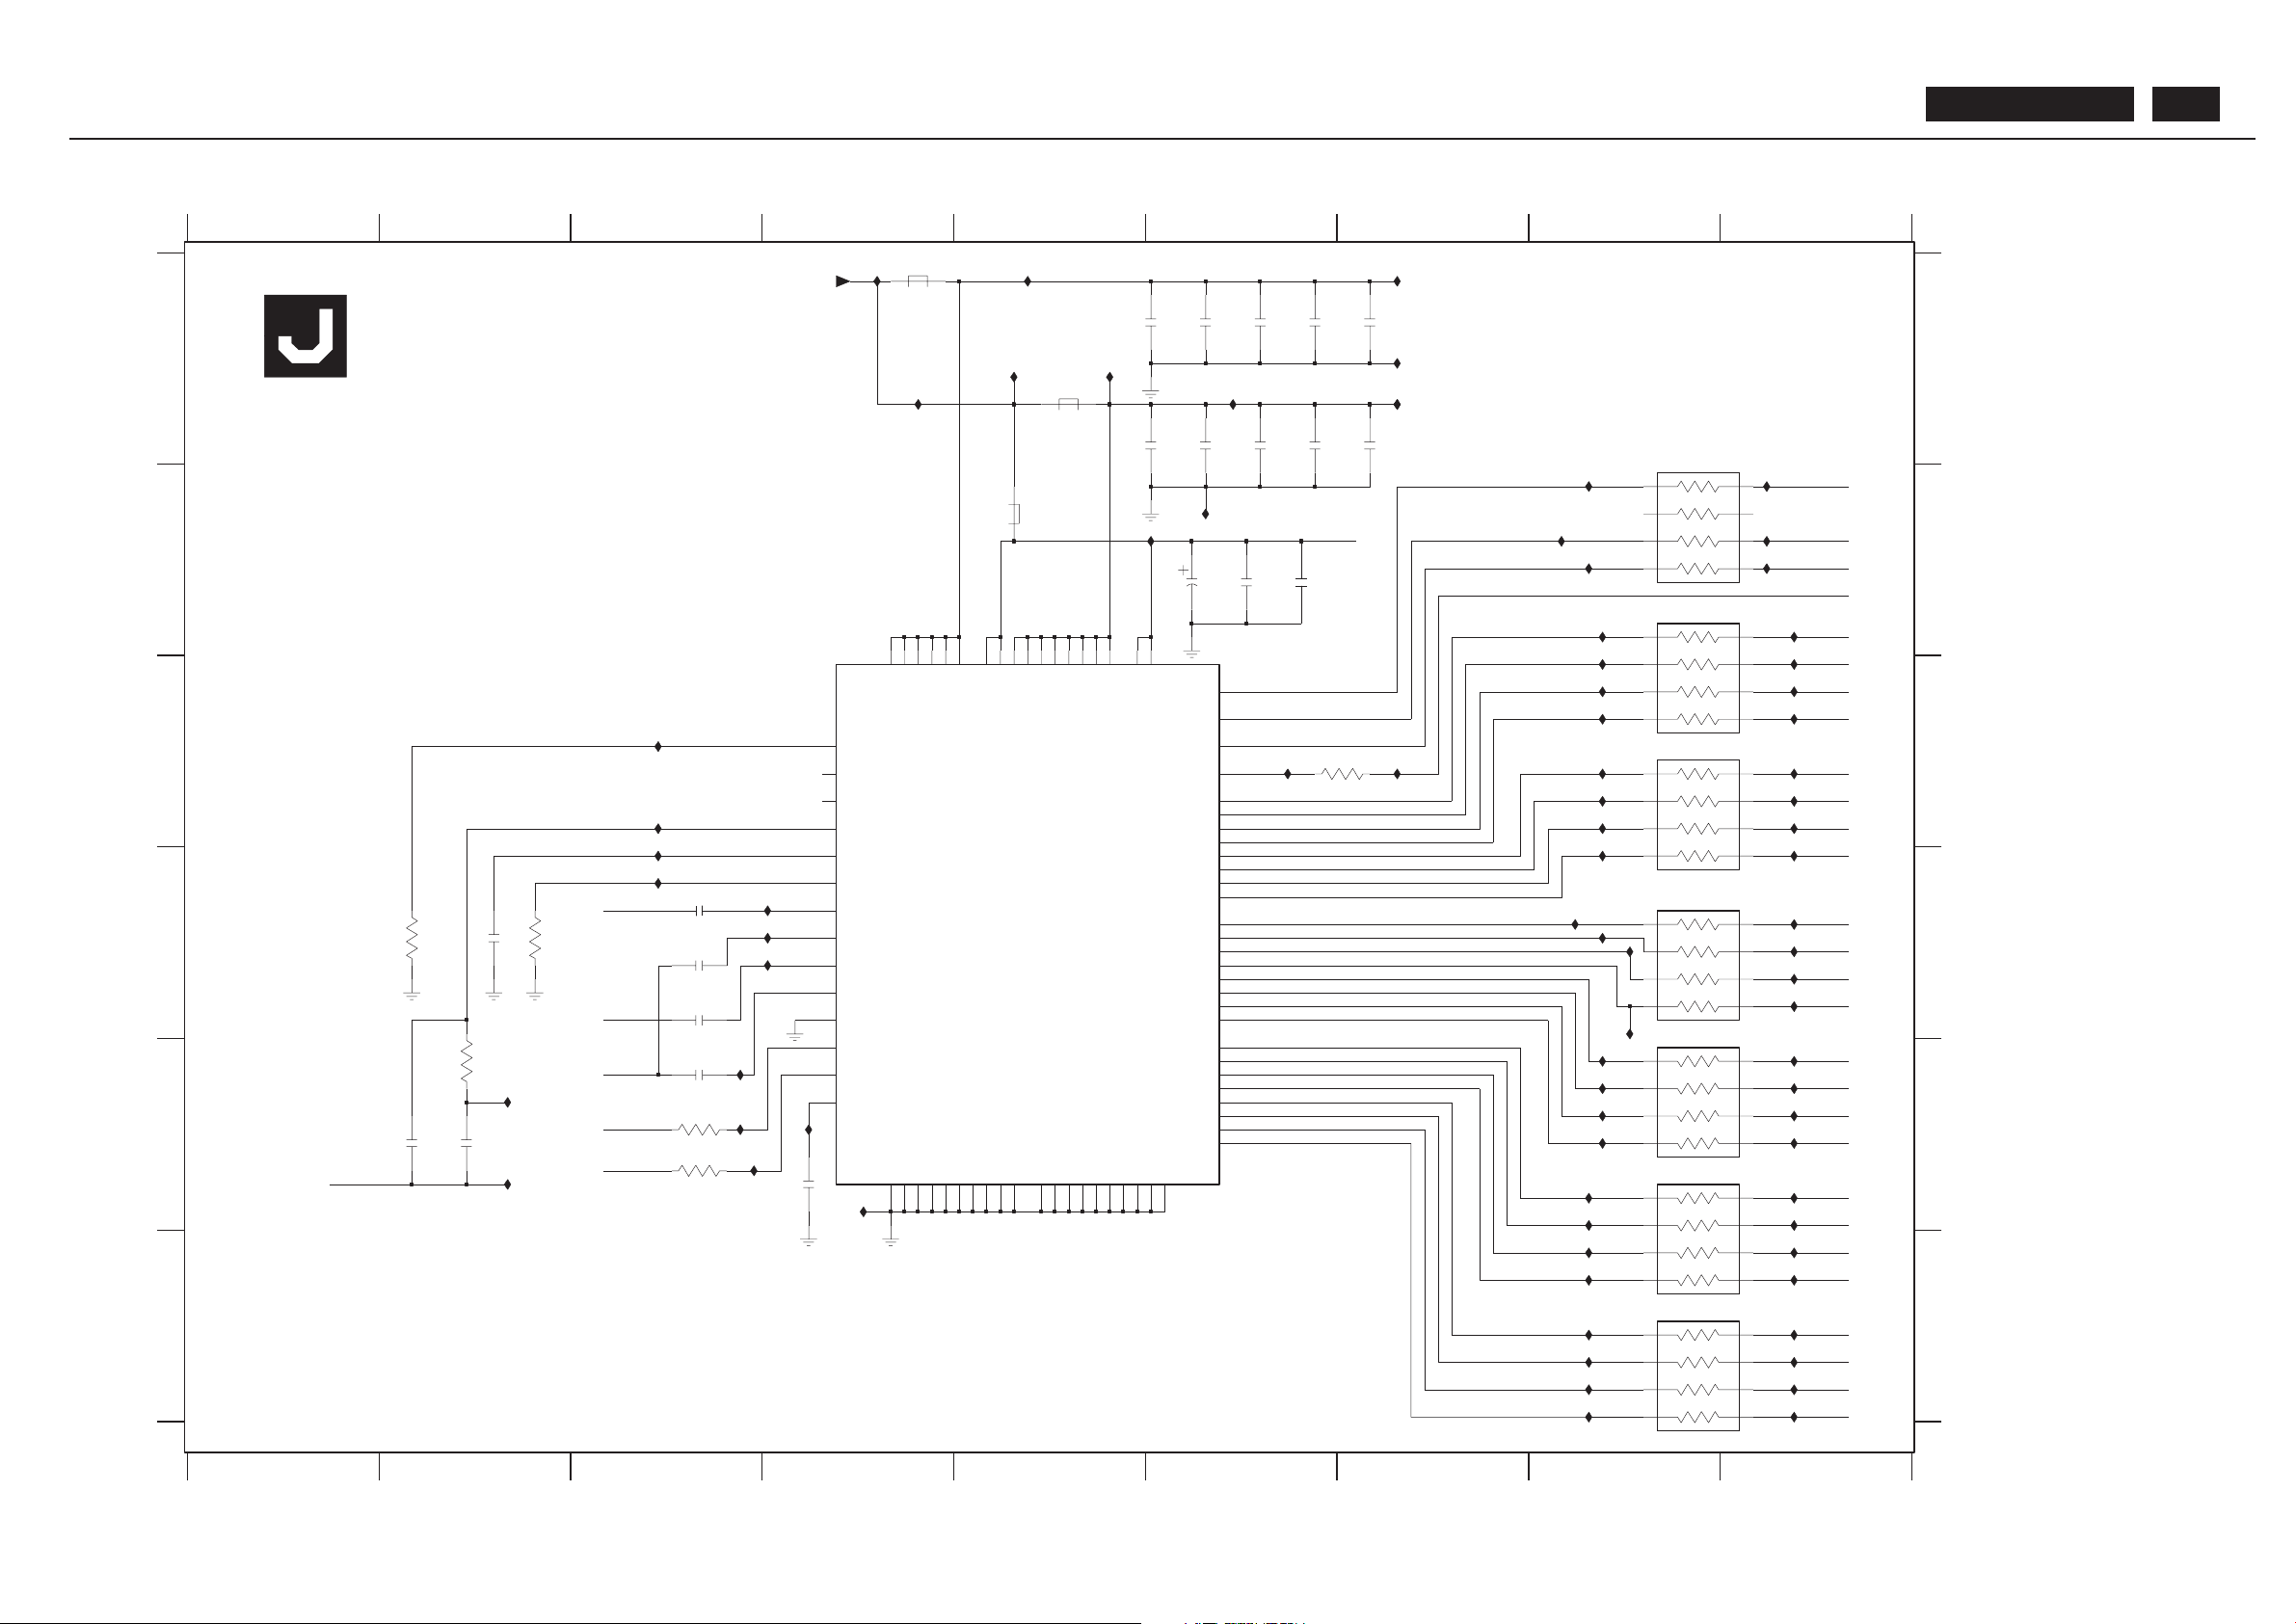
HDTV Decoder Diagram
R
R
R
R
R
R
R
R
R
R
R
R
R
R
R
R
R
R
R
R
R
R
R
R
R
R
R
R
BEAD
BEAD
*Delete this page for basic model
1234
456789
A
B
C
D
"251" ~ "299"
BEAD
U44 F9
U45 F9
U46 F9
U47 F9
U48 F9
U54 E9
U55 E9
U57 E9
U59 E9
U60 E9
U61 E9
U62 D9
U63 D9
56789
123
U79 C9
U80 C9
U83 C9
U84 C8
U85 C8
U86 C8
U87 C8
U89 C7
U90 A5
U91 B6
2251 E2
2252 D2
E
F
A
B
C
D
E
F
U37 B9
U40 F9
2278 A6
2279 A7
2281 A5
2283 A6
2284 A6
2285 A6
2287 A7
3261 D2
3264 E2
3265 D2
3266 E3
3267 E3
U65 D9
U66 D9
U69 D8
U70 D8
U72 D8
U74 D8
U77 C8
U78 C9
MAIN PCB
U100 C6
U101 C9
U102 C9
U114 C9
U120 B8
U156 A5
U157 A7
U158 A7
U192 B9
U193 B9
U194 B9
U195 A4
2253 E2
2254 D3
2255 E3
2256 D3
2257 D3
2258 E4
2263 B6
2264 B6
2265 B6
2271 A5
2275 A6
2276 A6
U291 D3
U292 E4
U293 E3
U294 E3
U295 E3
U296 D4
U297 D4
U298 D4
U299 E8
U300 E8
U301 F8
U302 E8
3271 C8
3272 D8
3273 F8
3274 A8
3275 D8
3276 E8
3277 B8
3278 C7
SB: 59992 x1
5251 A4
5257 B5
5258 A5
7252 D5
PB: 59592
U321 E4
U322 E8
U332 B8
U365 E2
U544 D8
U615 C8
U198 A4
U199 B5
U216 A7
U217 A5
U218 A7
U219 A6
U285 B8
U287 E2
5257
U288 C3
U289 C3
U290 C3
U303 E8
U304 E8
U305 F8
U306 F8
U307 F8
U308 F8
U319 F8
U320 B8
2279
100n
U544
U615
U332
U216
U120
U66
100n
2287
U44
U192
U158
U40
U322
U306
U79
U304
3
45
6
7
8
U78
1n
3277 47R
1
2
VD651VD752VD859VD9
62
VDD011VDD122VDD223VDD369VDD478VDD5
79
VSOUT
64
VSYNC
31
2255
RED4
73
RED5
72
RED6
71
RED7
70
REF_BYP ASS
58
Rain
54
SCL
56
SDA
57
SOGIN
49
SOGOUT
65
VD026VD127VD239VD342VD445VD5
46
GREEN2
7
GREEN3
6
GREEN4
5
GREEN5
4
GREEN6
3
GREEN7
2
Gain
48
HSOUT
66
HSYNC
30
MIDSCV
37
PVD034PVD1
35
RED0
77
RED1
76
RED2
75
RED3
74
GND1661GND1763GND1868GND19
80
GND220GND321GND424GND525GND628GND732GND836GND9
40
GREEN0
9
GREEN1
8
13
BLUE7
12
Bain
43
CLAMP
38
COAST
29
DATACK
67
FIL T
33
GND01GND1
10
GND1041GND1 144GND1247GND1350GND1453GND15
60
AD9883AKST -110
7252
A0
55
BLUE0
19
BLUE1
18
BLUE2
17
BLUE3
16
BLUE4
15
BLUE5
14
BLUE6
3272 47R
1
2
3
45
6
7
8
+3V3
5258
U69
U70
47R3274
1
2
3
45
6
7
8
U55
U54
100R
3266
U91
U89U100
3264
3K3
3
45
6
7
8
10u
2281
2278
47R3276
1
2
2271
10u
100n
U195
U80
U194
U86
U156 U157
U74
U321
3n9
2251
U298
U57
U59
U295
47R
1
2
3
45
6
7
8
U294
U62
3273
100n
3278
100R
3275 47R
1
2
3
45
6
7
8
2264
U219
U320
U287
U63
4n7
2256
U198
U199
U65
U101
U102
U319
U46
U307
U308
2253
39n
2257
220u
2263
2275
100n
4n7
U300
100R
3267
U299
100n
2265
U296
U297
U60
U61
100n
2258
U218
3261
2K2
U289
U217
U288
100n
2285
U90
U45
U285
U303
U302
U114
U37
U77
U84
U305
U72
U301
U87
U193
U83
U85
U365
4n7
2254
5251
U48
U291
U47
1
2
3
45
6
7
8
U290
100n
2276
47R3271
2K2
3265
U293
2252
100n
100n
U292
PVD
PVD
100n
2283
2284
U3
U4
U5
U6
U7
R-Pr
G-Y
B-Pb
HDTV -SOG
V6
V7
Y0
Y1
Y2
Y3
Y4
Y5
Y6
Y7
U0
U1
U2
HDTV -HSYNC
IICSDA
IICSCL
V0
V1
V2
V3
V4
V5
HDTV -CLK
HDTV -VSYNC
BDL4211. . . 61
Page 62
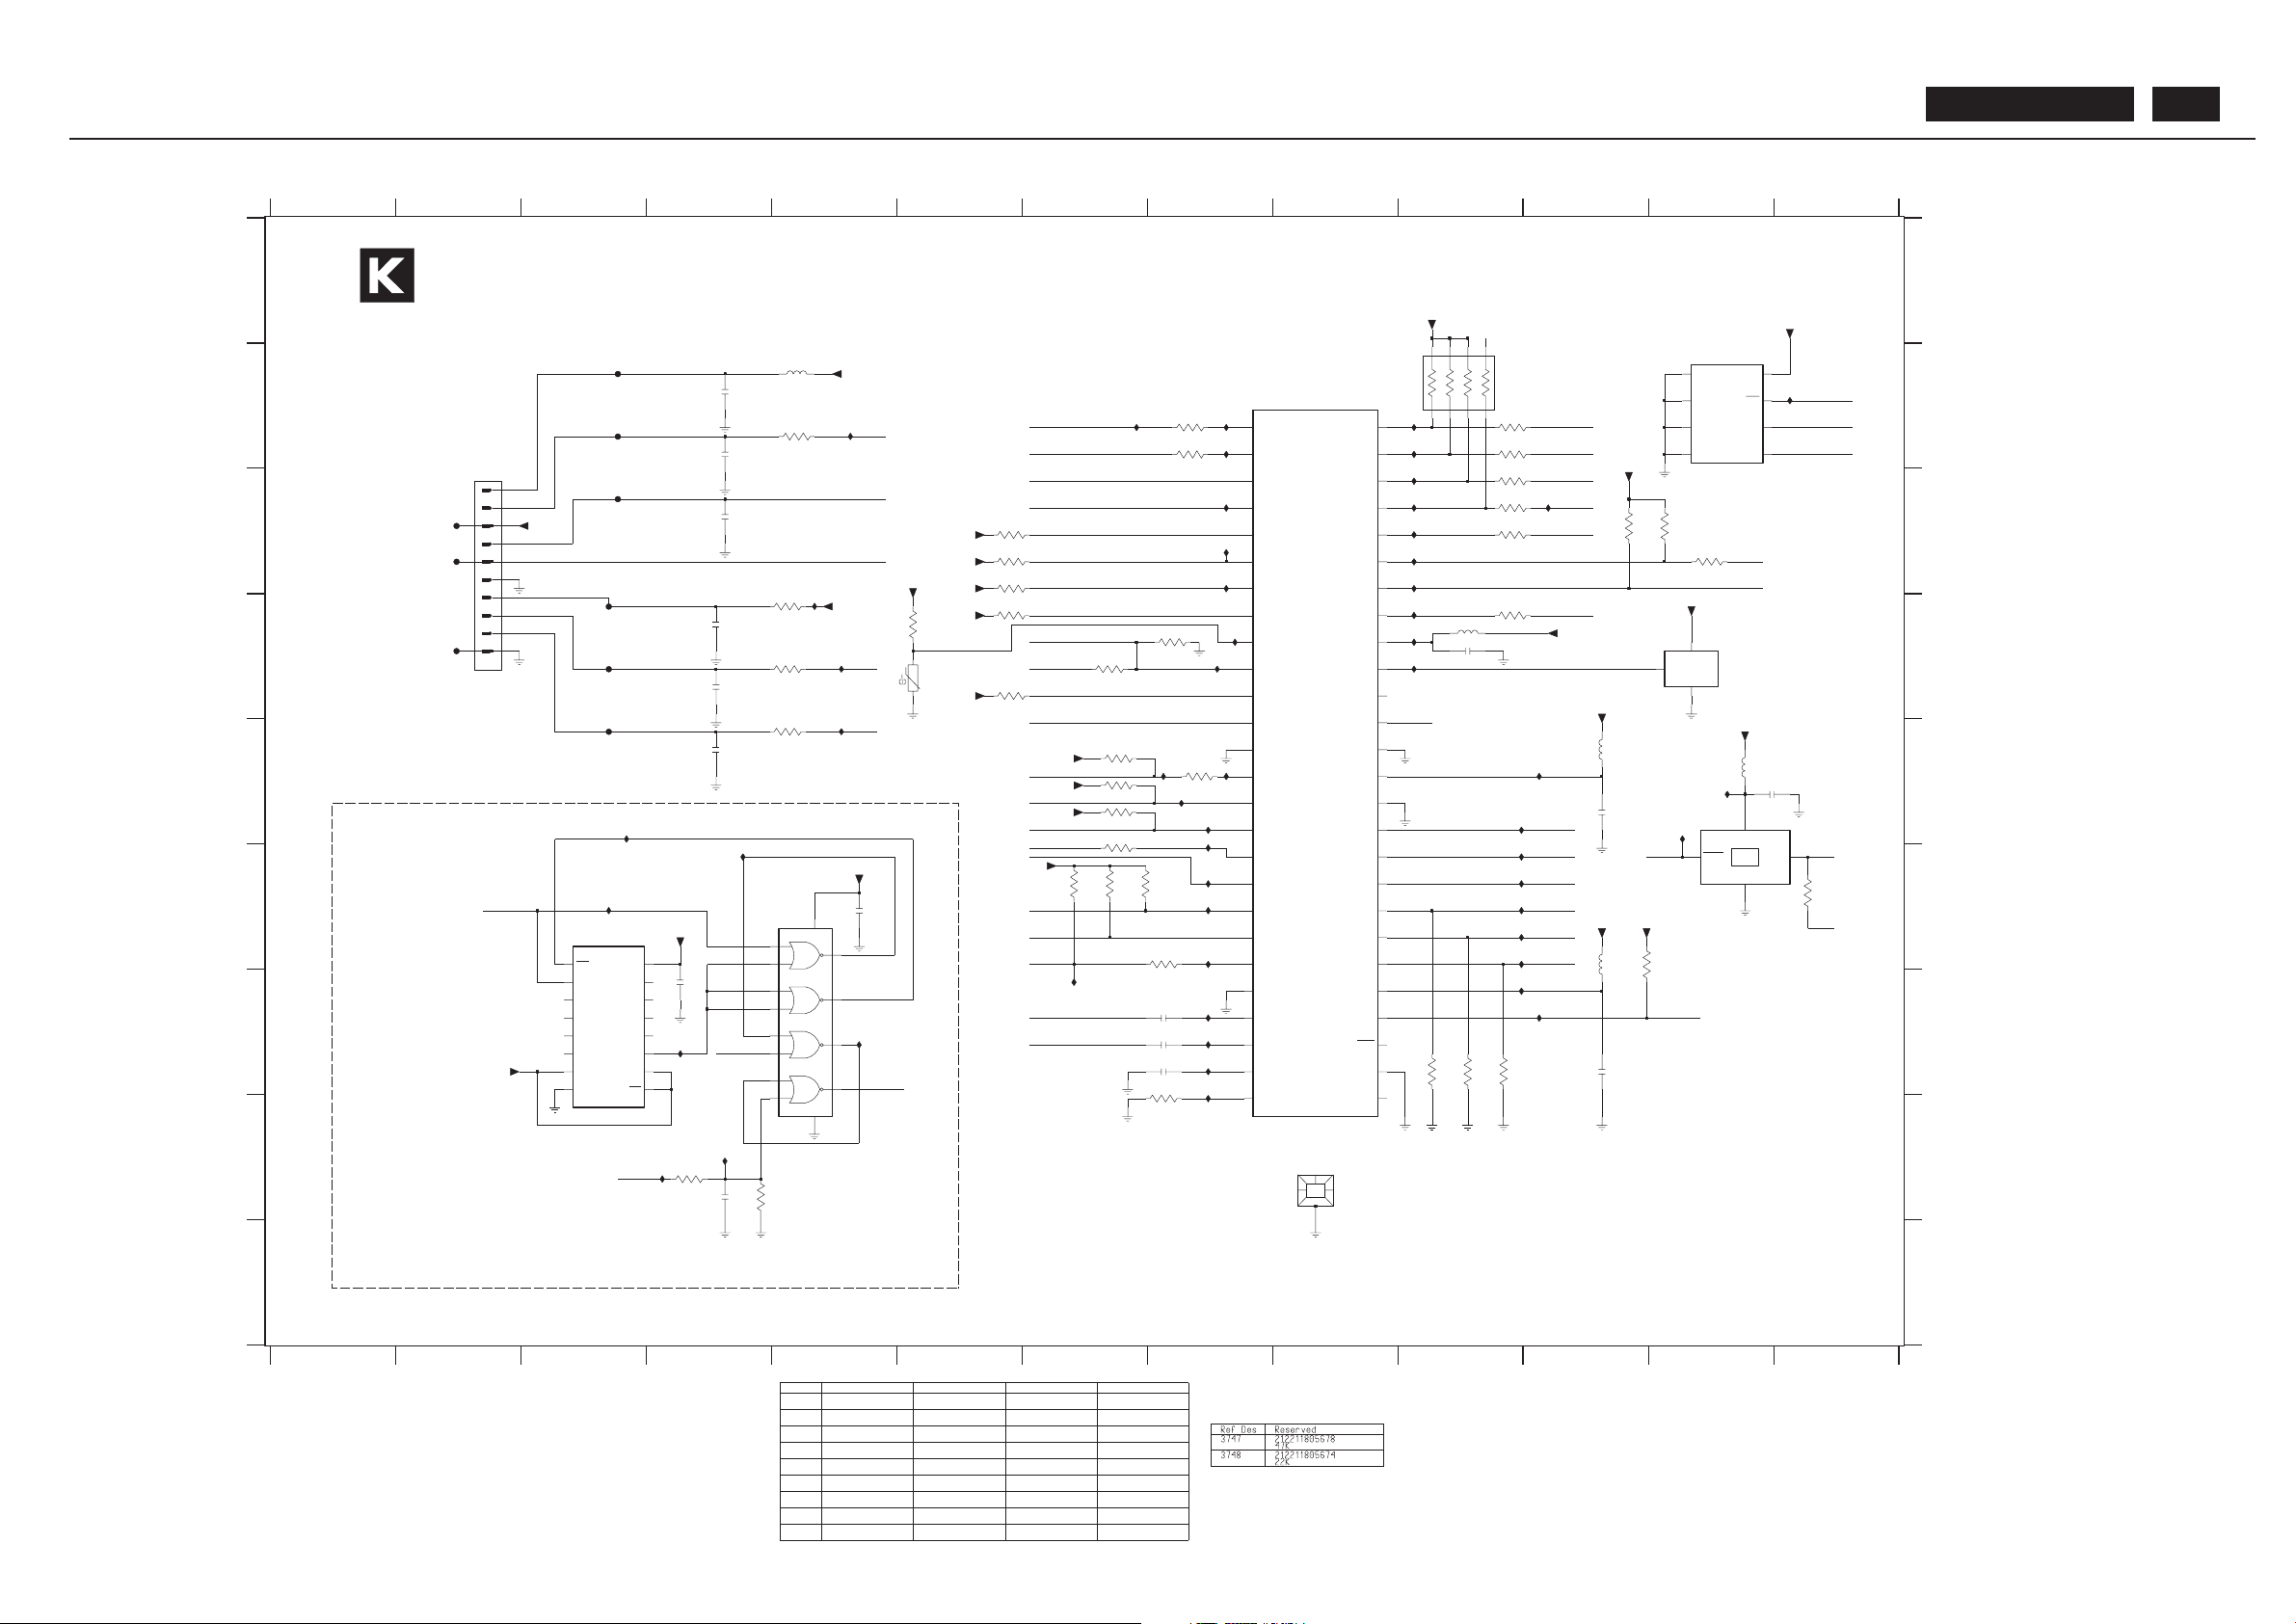
BDL4211. . . 62
Painter Diagram
OSC
R
R
R
R
8 9 10 11 12
TO IR
BD
& KEY
- CONTROL
BD
I
A
B
C
D
E
F
701 ~ 749
090 ~ 099
7
G
H
I
U20 E8
U21 C8
U23 D10
U76 E8
1234 567 13
1234 56
SB: 59991 x1
2718 G8
2721 G1 1
2722 E1 1
2723 H4
2725 G4
8 9 10 11 12 13
A
3720 C6
3721 F7
3722 F7
3723 F7
3724 E7
B
C
D
E
F
G
H
EXCEPT 1701,3704,4000,7701,7722, WERE CHIP COMPONENTS.
1701-A C2
1702 E12
2701 D4
2702 C4
2703 B4
2705 B4
2706 D4
2708 E4
2716 G8
2717 G8
NOT USED
3733 G10
3734 C1 1
3735 D10
3736 C12
2726 F5
2727 D10
2728 E12
3701 D5
3702 E5
3703 D6
3704 D6
Ref Des BASIC NAFT A
NOT USED2723 NOT USED 202055294421NOT USED
3705 B5
3708 D5
3709 E8
3711 B8
3712 B8
3713 C6
3715 D6
3717 E7
3718 E7
3719 C6
3747 D8
3748 D7
4000 H9
5701 B5
5721 F1 1
3725 F8
3726 F1 1
3727 G8
3728 E7
3729 D6
3731 G10
3732 G10
223878615649NOT USEDNOT USEDNOT USED
100n
3709
0R
212211805631
0R
212211805631
0R
NOT USED
VIDEO WE
NOT USED NOT USED 9352105501 18
74LVC163DB-T
7703
F136 C2
F137 D3
F138 B3
F139 E3
I149 D5
3737 C12
3738 B10
3739 C10
3740 C10
3741 C10
3742 B10
3743 B10
3744 H4
3745 H4
3746 F13
I169 C10
I170 D10
5722 E1 1
5723 D10
5724 E12
7701 B8
7702 F3
7703 F5
7721 D12
EMF ONL Y
NI FOR DAO & JAP AN
7722 B12
F130 B3
F132 D3
F134 D2
F135 C2
U208 F8
U209 B7
U233 E12
U582 E1 1
U583 G10
I156 B13
I162 B10
I164 B10
I165 C10
I166 C10
I167 C10
I168 C10
MAIN PCB
U597 F10
U598 F10
U599 F10
U602 F3
U603 G7
I174 E8
I189 D10
I192 H4
U139 H4
U140 E3
U141 G4
U142 E12
1K
NOT USED NOT USED
2122118056313746
212211805656NOT USED
U196 C3
U197 D8
U205 C8
U206 G1 1
U207 E8
U611 C 8
U629 D8
U630 E8
U631 G5
U634 F4
NOT USED 21221 1805643
100R
3745 NOT USED NOT USED
NOT USED NOT USED NOT USED 212211805631
0R
3744
U584 B5
U585 D5
U586 E5
U587 B8
U588 B8
U589 F8
U590 F8
U591 G8
U592 G8
U593 G8
U594 G8
U595 F10
U596 F10
PB: 59591
NOT USED 9352500001 18
74LVC02ADB-T
NOT USEDNOT USED2725
56p
2726
100n
7702 NOT USED
NOT USED 223878615649
NOT USED
U604 C1 1
U610 E10
3
4
6
I174
+5
U76
47K
3V3-STBY
3V3-STBY
1
E0
2
E1
3
E2
6
SCL
5
SDA
8
VCC
4
VSS
7
WC
3719
3
7722
M24C16-WBN6
U593
3V3-STBY
4
U592
F137
U207
U594
I189
33K
3715
35
VDS
28
VPE
22
VSSA
13
VSSC
VSSP
38
37
VSYNC
41
XTALIN
42
XTALOUT
2
1
4
P2.3_PWM2
5
P2.4_PWM3
6
P2.5_PWM4
7
P2.6_PWM5
8
P2.7_PWM6
P3.0_ADC0
9
10
P3.1_ADC1
11
P3.2_ADC2
12
P3.3_ADC3
30
P3.4_PWM7
34
R
43
RESET
25
SYNC_FIL TER
31
VDDA
39
VDDC
44
VDDP
18
P0.4
19
P0.5
20
P0.6
21
P0.7
45
P1.0_INT1
46
P1.1_T0
47
P1.2_INT0
48
P1.3_T1
51
P1.4_SCL1
52
P1.5_SDA1
49
P1.6_SCL0
50
P1.7_SDA0
1
P2.0_TPWM
2
P2.1_PWM0
3
P2.2_PWM1
SAA5564PS/M3/0257
7701
32
B
29
COR
23
CVBS0
24
CVBS1
27
FRAME
33
G
36
HSYNC
26
IREF
40
OSCGND
14
P0.0
15
P0.1
16
P0.2
17
P0.3
U139
8
100R
3735
U602
U585
I149
T
3
1
2
U583
U142
3V3-STBY
100R
3711
10
9
100R
3724
7
4
2
1
3
F132
100R
3712
U631
U634
U596
U209
3
4
8
3
U208
3
1B
1
1Y
2A
5
2B
6
2Y
4
8
3A
9
3B
10
3Y
4A
11
4B
12
4Y
13
7
GND
14
VDD
5
0
74LVC02ADB-T
7703
2
1A
1
2
3V3-STBY
3V3-STBY
U23
1701-A
U584
U20
0
3
U233
4
3
1
I166
9
PE
14
Q0
13
Q1
12
Q2
11
Q3
15
TC
16
VCC
2
74LVC163DB-T
7702
7
CEP10CET
2
CP
3
D0
4
D1
5
D2
6
D3
8
GND
1
MR
F135
U597
3729
47K
U591
3V3-STBY
3V3-STBY
1
2
+3V3
F136
3V3-STBY -ON
2716
100n
5723
0u1
R
4000
U598
U586
3
1
I192
5
3V3-STBY
U587
5
0
I162
U582
I164
3V3-STBY
3V3-STBY
I165
U611
2
1
U197
2718
100n
OUT
3
VDD
4
F130
3717
47K
1702
6N12000094
CONT
1
GND
2
3
4
F139
I156
100R
47K
3718
22K
3748
3743
U206
F138
3
4
3741
100R
3725
3V3-STBY
7721
LM810M3X-2.93
GND
1
2
RESET
VCC
3
100R
U603
U630
+5T
2
5
U629
100R
3739
I168
I167
I169
1
2
I170
3727
0R
3709
2717
24K
3V3-STBY
U196
100n
100R
3701
47K
3713
5701
3V3-STBY
U589
0u1
3
4
1
2
3
4
5
6
7
8
U141
1
2
3
4
3V3-STBY
U21
U588
F134
3V3-STBY
100R
3737
3V3-STBY
3V3-STBY
U599
U610
5
0
U590
2
1
3V3-STBY
U604
1
3
3V3-STBY
U205
3728
47K
47K
3720
3702
100R
100R
3740
47K
3747
3
1
100n
2
1
U140
2728
100R
3742
2727
10u
U595
100R
3744
3705
560R
3V3-STBY
1K
3708
DVI-S-TEST
RC5
LIGHT
OSC-CTL
NTC
ST -SC
OSC-CTL
OSC-OUT
OSC-OUT
OSC-12M
D4-DET
SC-CVI-SW
VGA-S-TEST
VGA-DVI-SW
R-KEY
HS-OSD
FB
FB-R
FB-G
FB-B
TV-DET
LLC2
OSC-12M
AV-CVBS
SDA-TV1
SCL-TV1
SDA-1
SCL-1
PC-HSYNC
SCL-TV1
SDA-TV1
WP-TV1
RC5
PC-VSYNC
VS-OSD
OSC-12M
P-LED
KEY
R-KEY
SOUND-ENABLE
POW -CON-SCALER
INT-SCALER
TUN-CVBS
OSC-CTL
FBL-SC
PHONE-DET
DVI-SCDT
P-LED
MSP-INT
WP-TV1
TV-IRQ
KEY
LIGHT
DVIPD
RESET -PAINTER
Page 63
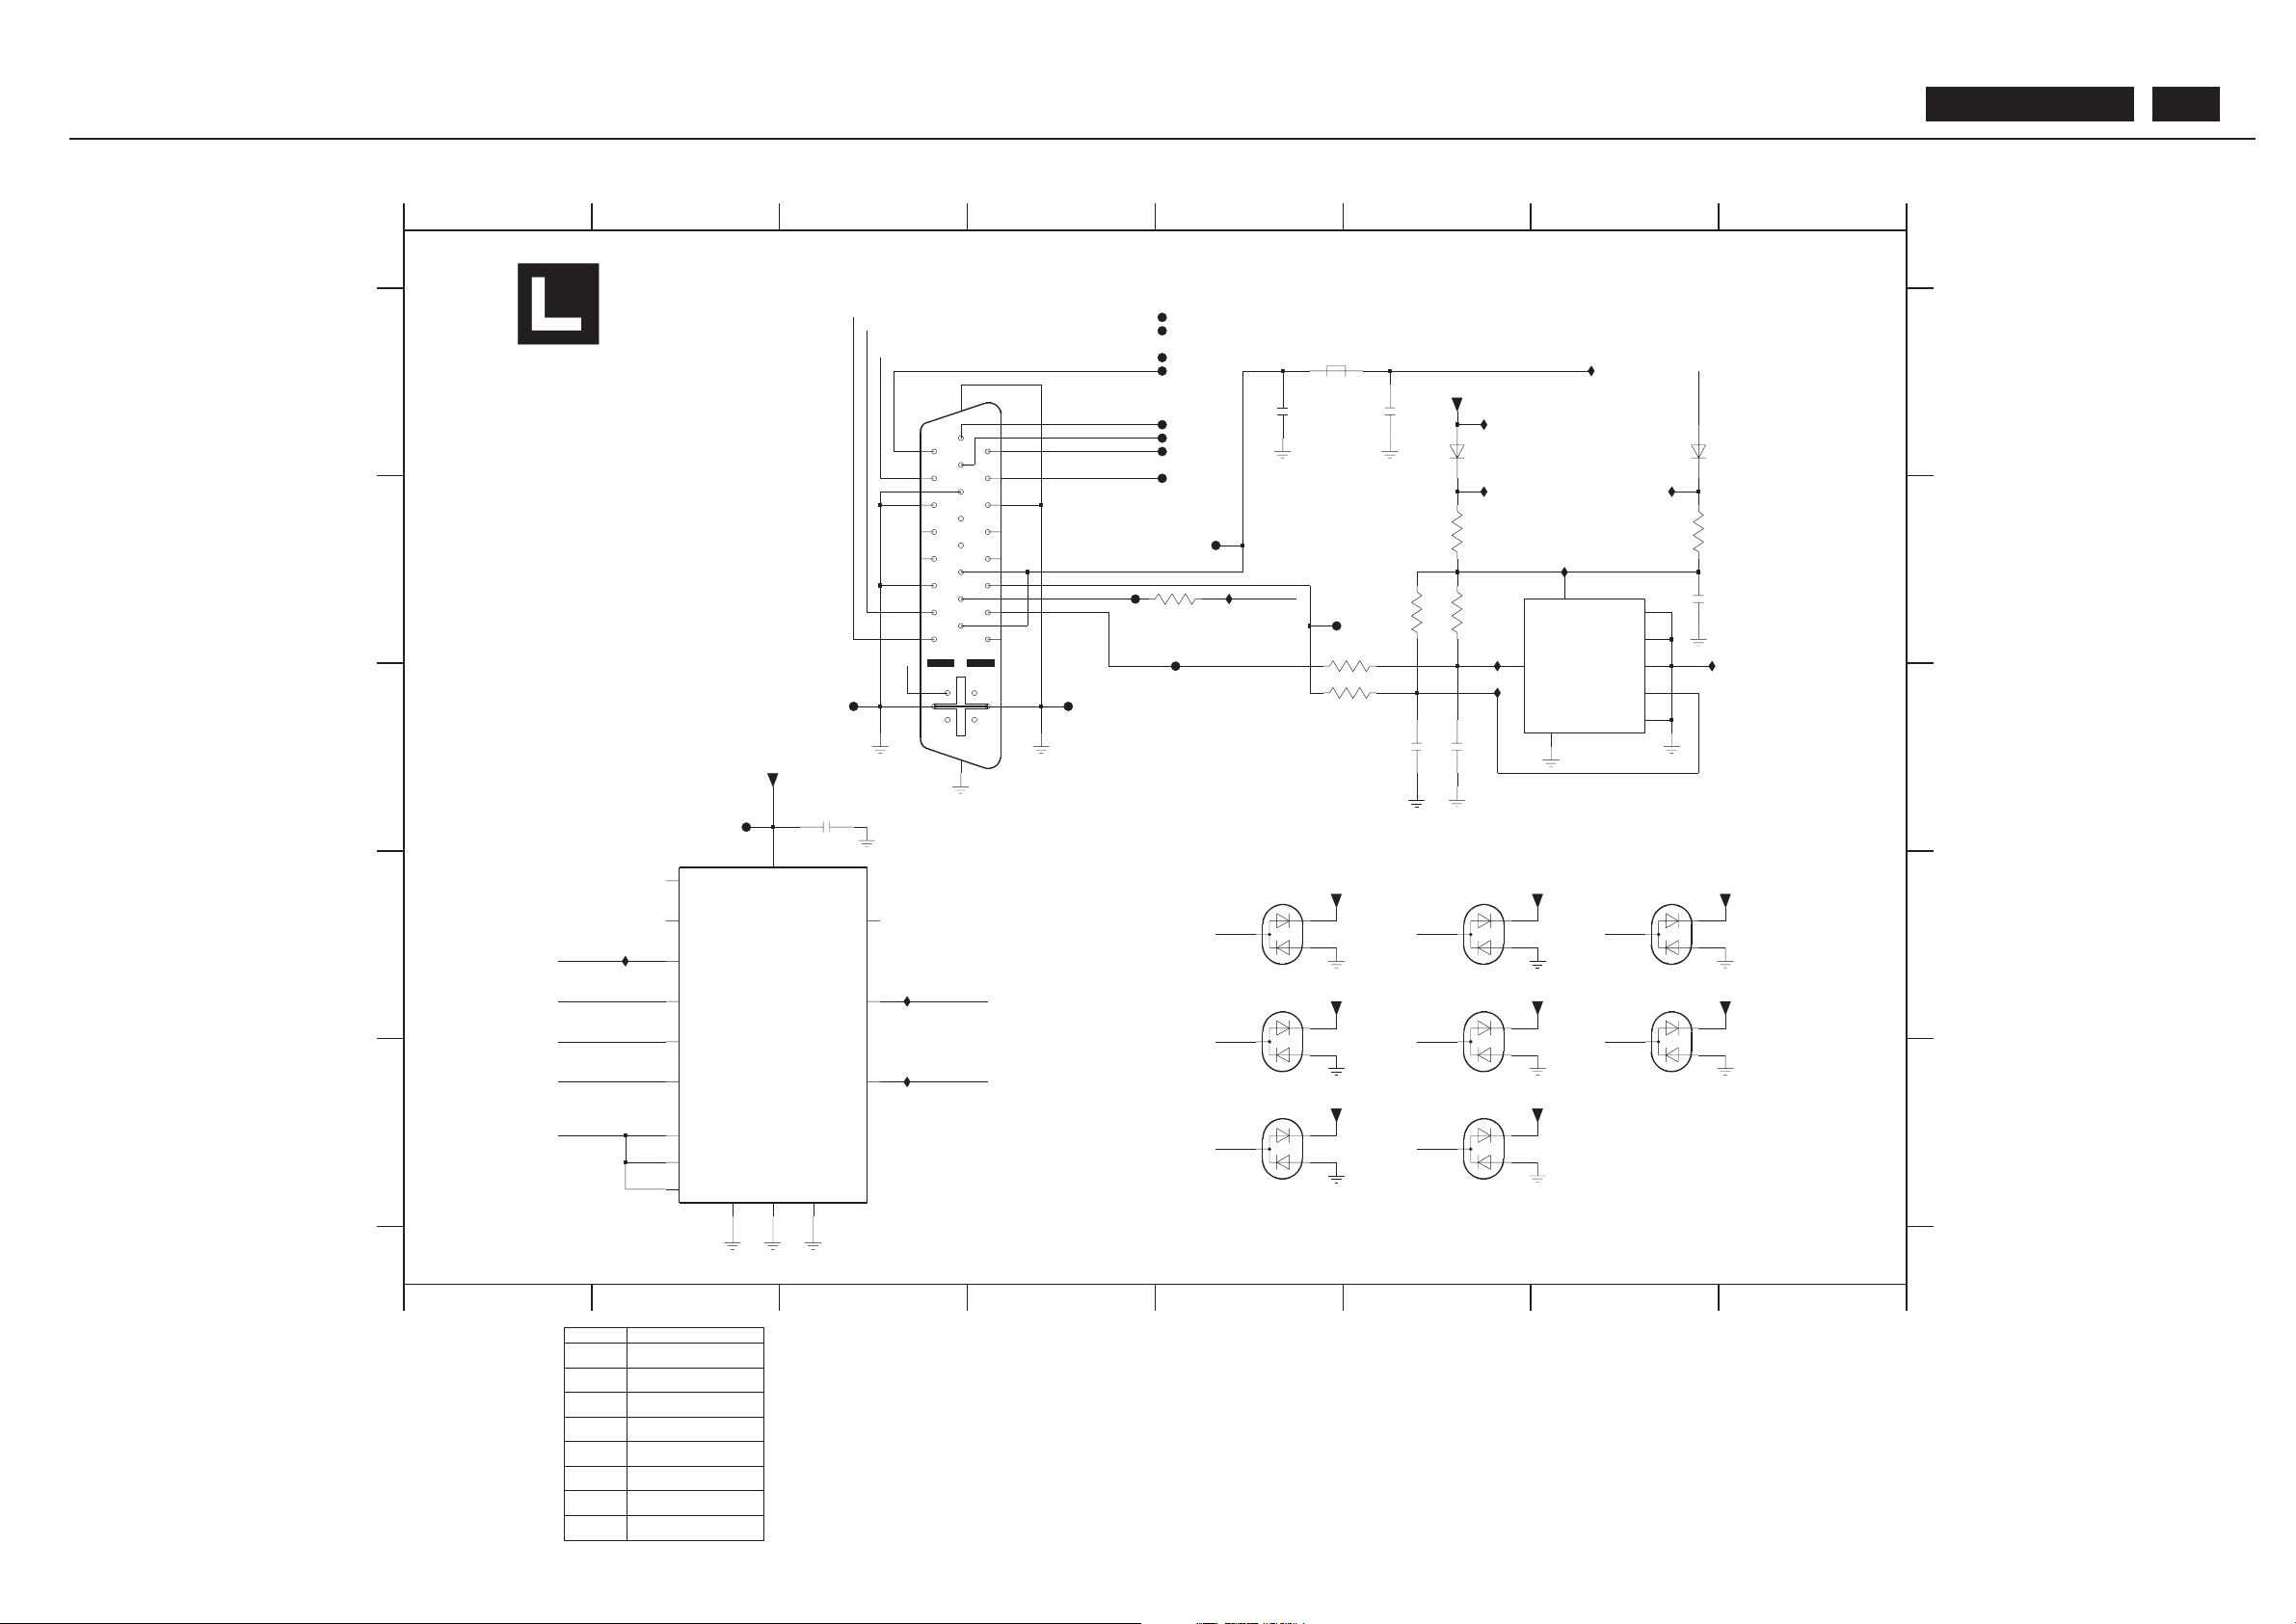
PC DVI_Digital Diagram
U282 C7
U283 A7
U617 E3
U627 D3
U661 B5
NI
Reserved
U118 A5
U119 A5
U136 A5
U137 A5
U138 A5
U144 A5
U145 A5
U147 B5
U148 C4
U211 C 3
U214 B6
U215 A6
6801
6806
BAV99
6802 933215370215
933215370215
Ref Des
933215370215
U231 D2
U267 B4
U278 A7
U279 C6
U280 B6
U281 B7
3804 C5
3805 B6
3806 B7
3807 B5
5801 A5
6801 D5
6802 D5
6803 E5
6804 D6
6805 D6
6806 D7
6807 E6
801 ~830
SB:59991 x1
NI
NI
6808 D7
6811 A6
6812 A7
7801 B7
7802 C2
U42 B5
U43 B5
1801 B4
2801 A5
2802 A6
2803 B7
2804 C6
2805 C6
2811 C3
3801 B6
3802 B6
3803 B5
BAV99
6807
BAV99
NI
NI
6805 933215370215
BAV99
6804
BAV99
45678
123
6808 933215370215
BAV99
EXCEPT 1801 WERE CHIP COMPONENTS.
U41 C2
123
933215370215
BAV99
NI
NI
NI
MAIN PCB
6803 933215370215
45678
A
B
C
D
E
A
B
C
D
E
U35 B5
BAV99
933215370215
U280
U281
PB:59591
U279
U118
280533p
U278
3V3-STBY
U661
U617
U627
U147
U148
U145
U231
6804
BAV99
6802
BAV99
2803
100n
BAV99
6801 6808
BAV99
3V3-STBY
2
0Z
5
1X
13
1Y
1
1Z
3
11
A
B
10
C
9
GND
8
INH
6
VCC
16
VEE
7
X-COM
14
Y-COM
15
Z-COM
4
3V3-STBY
TC74L VX4053FT
7802
0X
12
0Y
BAV99
6807
100n
2811
100n
3V3-STBY
3V3-STBY
6811
BAS32L
2802
3V3-STBY
3806
150R
3
4
5
6
7
8
9
3803 100R
10
11
12
13
14
15
16
17
18
19
2
20
21
22
23
24
1801
74320-1004
C1
25
C2
26
C3
27
C4
28
C5
29
C6
30
31
32
1
150R
3805
3V3-STBY
100n
2801
U267
100R3804
WC_
7
U136
U137
7801
M24C02
E0
1
E1
2
E2
3
SCL
6
SDA
5
VCC
8
VSS
4
+5T
U119
U214
380210K
U282
U283
U215
BAV99
6806
BAV99
U43
U35
6803
U42
BAV99
6805
U138
U144
U211
100R
3807
3V3-STBY
100MHZ
5801
2804
BAS32L
6812
10K 3801
33p
DVI-S-TEST
+3V3
U41
DVI-5V
RXC+
DVI-SCL
DVI-SDA
RX1+
RX1-
RXC+
RXC-
RX2+
RX2-
RX0+
RX0-
RXC-
RX0+
RX0-
RX1-
RX1+
RX2-
RX2+
TMDS-DE
PC-HSYNC-ASM
TMDS-VS
VGA-TMDS-VSPC-VSYNC-ASM
VGA-DVI-SW
VGA-TMDS-DE
BDL4211. . . 63
Page 64
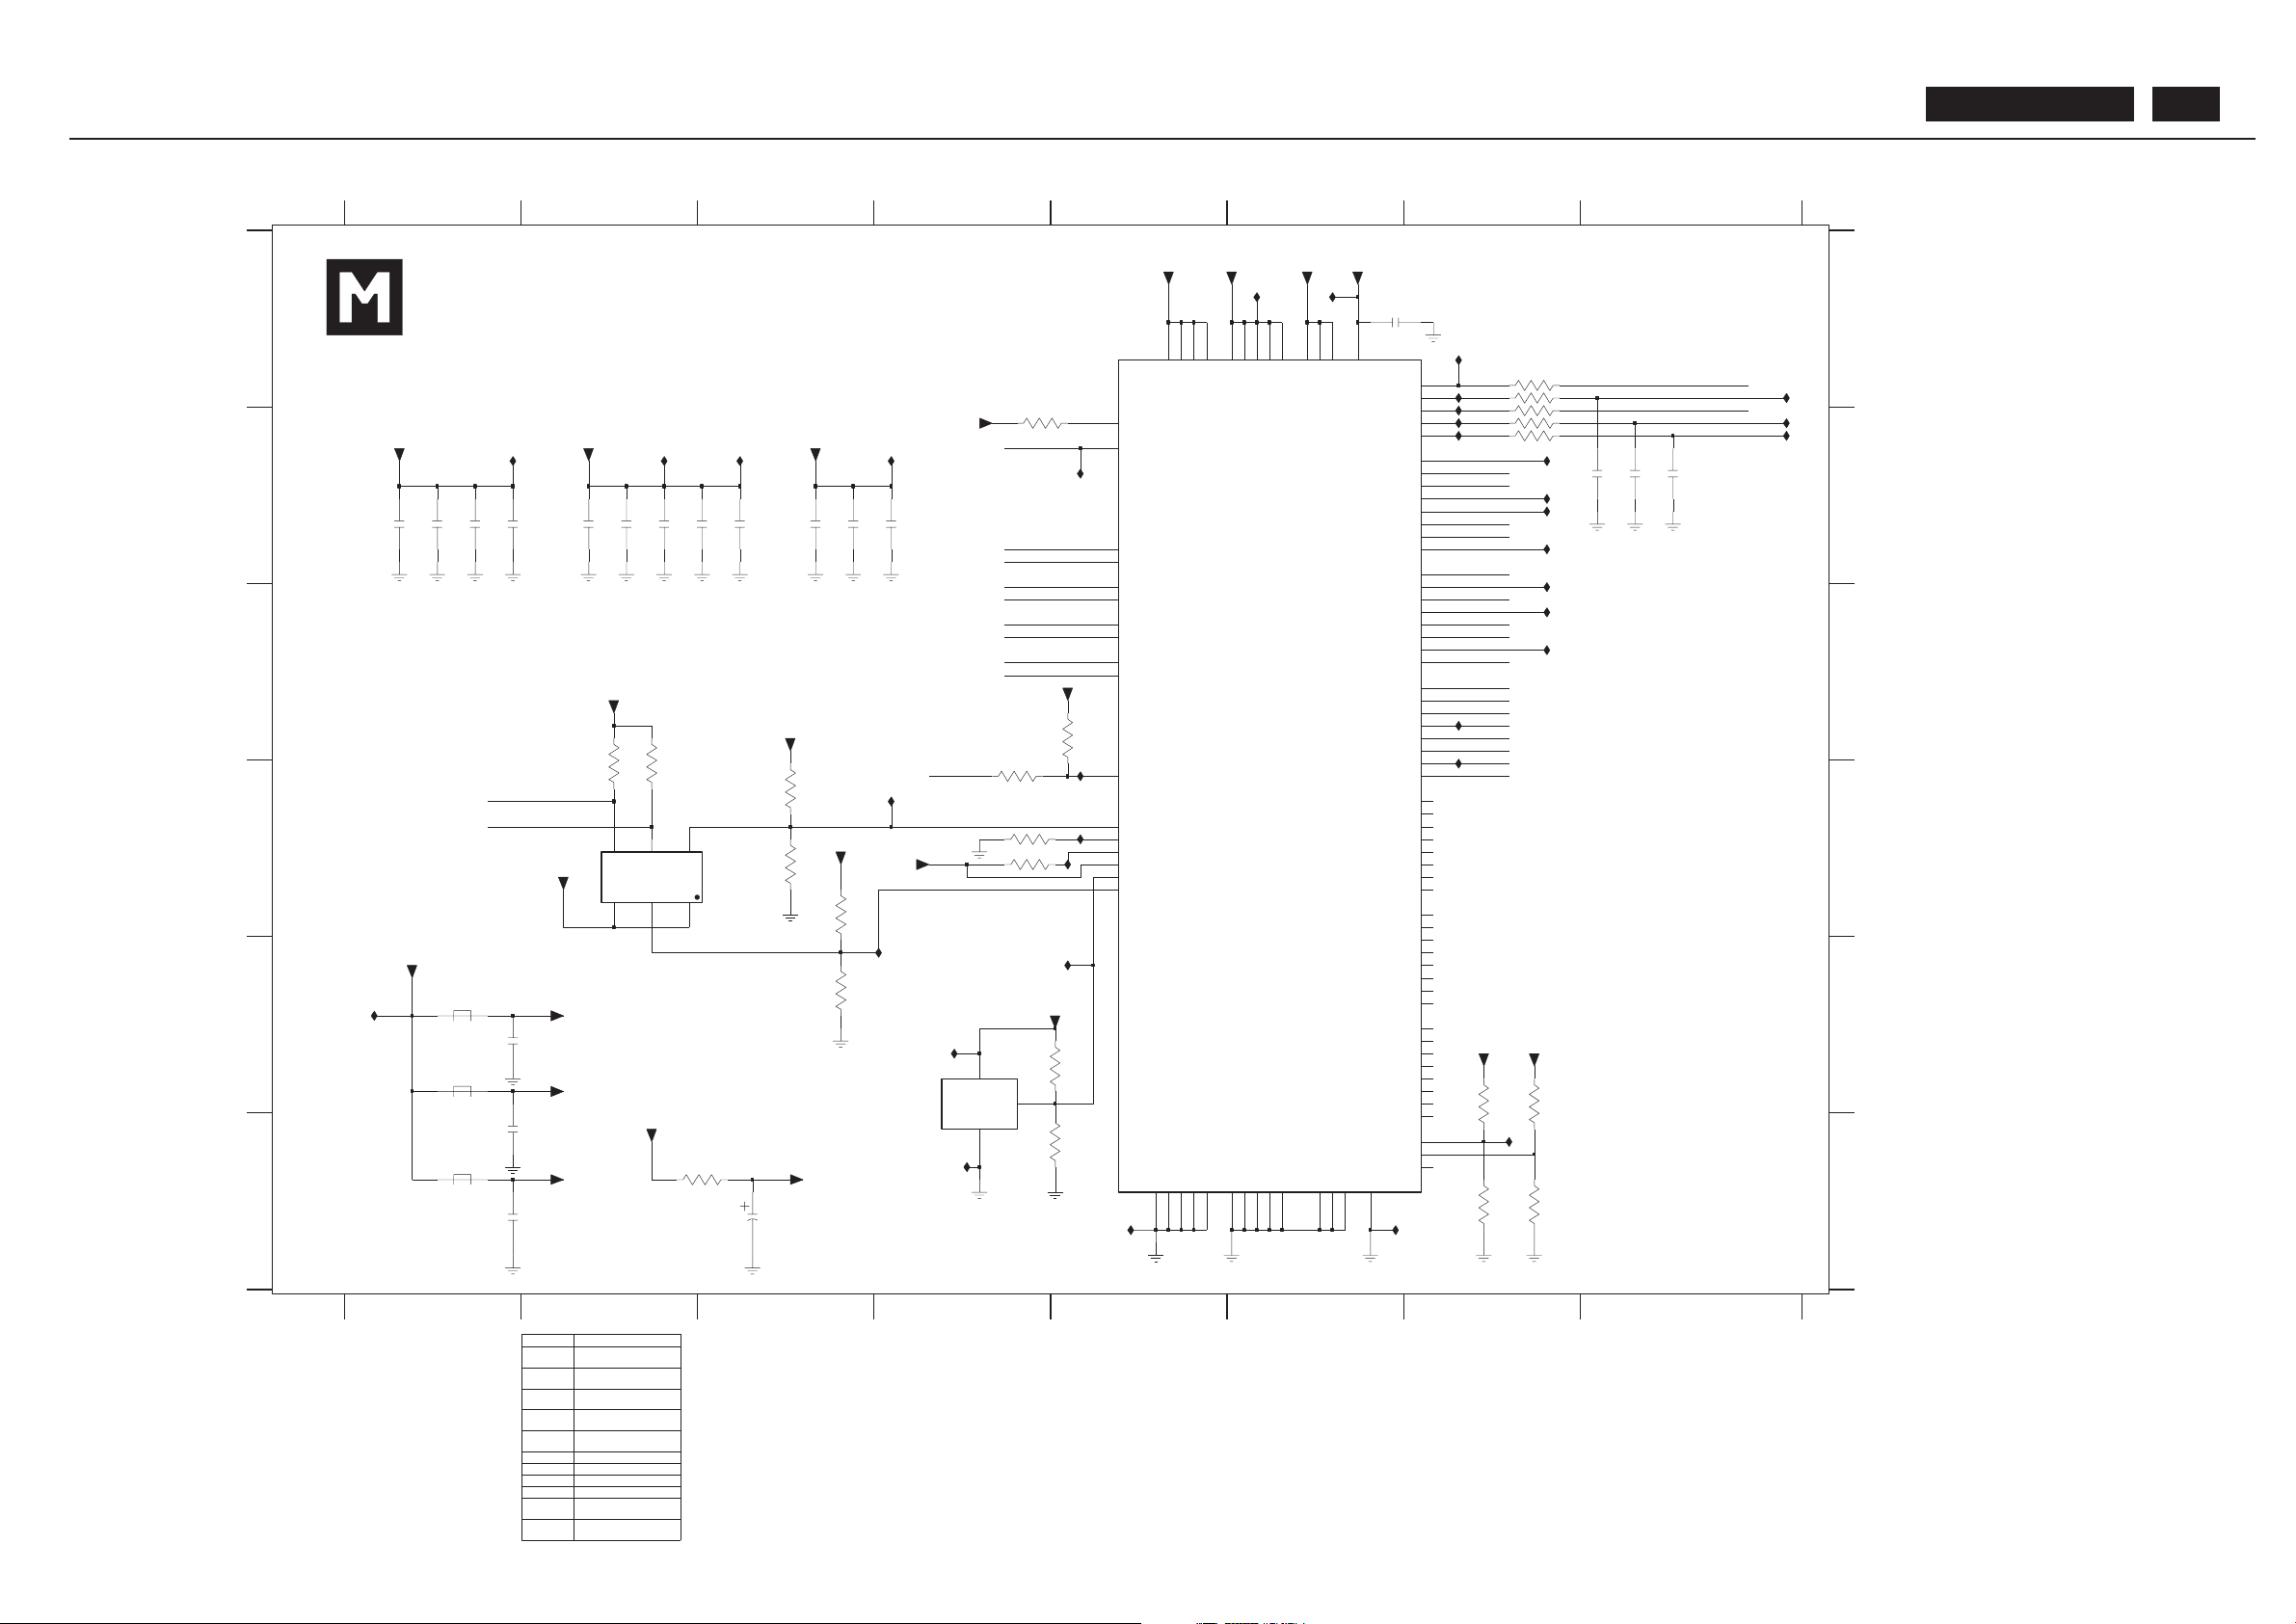
TMDS_Rx Diagram
EXCEPT 2855 WERE CHIP COMPONENTS.
U96 B5
B
3845
4K7
319802134720
NI
3853 319802131030
319802190030
7843
C
D
E
F
A
B
C
D
E
F
U0 A6
U7 A6
U16 F7
U93 F6
U94 D4
U95 A7
2849 B3
NI
NI
1234567 8
1234567 8
A
2864 B8
3843
NI
10K
319802131030
U97 B7
U98 B7
U99 B7
2841 B1
2842 B1
2843 B1
2844 B1
2845 B2
2846 B2
2847 B2
2848 B2
3865 B7
NI
841~
899
MAIN PCB
NI
Ref Des Reserved
3842 319802134720
4K7
2851 B3
2852 B3
2853 B4
2855 F3
2856 E1
2857 F1
2858 F1
2861 B8
2862 B8
2863 A6
U170 F5
NI
3841 B4
3842 D2
3843 D2
3844 D3
3845 D3
3846 C4
3847 C4
3848 D4
3849 D4
3851 D3
3852 E3
3853 E4
3854 F4
3855 E7
3856 F7
3858 F7
3861 A7
3862 A7
3863 B7
3864 B7
U265 B7
10K
3855 319802190030
3856 319802190030
LM810M3_t
9322193346857845
NDC7002N_t
tra_NDC7002N
3867 E7
3868 F3
5842 E1
5843 E1
5844 F1
7842 D6
7843 D2
7845 E4
U624 D5
SB:59991 x1
U175 D5
U176 B3
U177 B2
U178 B1
U179 B4
U180 C7
U181 C7
U182 E1
U183 E5
U184 F4
U185 E4
U260 B8
U261 A8
U263 A7
U264 A7
PB:59591
3858
3851 319802134720
4K7
319802190030
3867
NI
NI
NI NI
U266 B7
U277 B8
U401 B7
U402 C7
U403 C7
U414 B7
U622 D5
U623 E4
U261
470p2851
U260
100MHZ
470p2844
OVCC
5844
100MHZ
5842
100MHZ
5843
3852
0R05
CVCC
CVCC
4K7
3851
U402
0R05
3849
U176
U170
U185
U7
OVCC
2852 470p
3867
OVCC
3854
0R05
3V3-STBY
U177
OVCC
U16
U184
3848
0R05
7845
LM810M3_t
GND
1
RESET
2
VCC
3
OVCC
NDC7002N_t
7843
D1
6
D2
4
G1
1
G2
3
5
S1
S2
2
4K7
3843
+5T
2843 470p
470p2842
U96
U181
U0
U180
U178 U179
2861
33p
3863 47R
47R3865
2855
100u
U264
U265
U277
U263
AVCC
2863
100n
390R
3841
470p2853
OVCC
OVCC
RXC-
94
SCDT
8
ST
3
ST AG_OUT
7
VCC16VCC238VCC3
67
VSYNC
47
QO23
77
QO3
52
QO4
53
QO5
54
QO6
55
QO7
56
QO8
59
QO9
60
RSVD
99
RX0+
90
RX0-
91
RX1+
85
RX1-
86
RX2+
80
RX2-
81
RXC+
93
QO1
50
QO10
61
QO1 1
62
QO12
63
QO13
64
QO14
65
QO15
66
QO16
69
QO17
70
QO18
71
QO19
72
QO2
51
QO20
73
QO21
74
QO22
75
QE17
31
QE18
32
QE19
33
QE2
12
QE20
34
QE21
35
QE22
36
QE23
37
QE3
13
QE4
14
QE5
15
QE6
16
QE7
17
QE8
20
QE9
21
QO0
49
57
OVCC5
78
PD
2
PDO
9
PGND
98
PIXS
4
PVCC
97
QE0
10
QE1
11
QE10
22
QE1 1
23
QE12
24
QE13
25
QE14
26
QE15
27
QE16
30
5
GND239GND3
68
HSYNC
48
HS_DJTR
1
OCK_INV
100
ODCK
44
OGND119OGND228OGND345OGND458OGND5
76
OVCC118OVCC229OVCC343OVCC4
AGND179AGND283AGND387AGND489AGND5
92
AVCC182AVCC284AVCC388AVCC4
95
40
CT1
41
CT2
CT3
42
DE
46
EXT_RES
96
GND1
U98
7842
SiI151BCT100
U94
3V3-STBY
10K
U93
2846 470p
3845
3842
4K7
47R3862
3858
U99
U97
U95
470p2847
2848 470p
3856
OVCC
U623
U624
3847
10K
U622
33p
2864
2857
10u
AVCC
AVCC
2849 470p
10K
3853
PVCC
U182
CVCCAVCC
3861 47R
U414
OVCC
2841 470p
U401
3864 47R
3V3-STBY
2856
10u
2845
2p2
2862
3855
470p
U183
U403
2R2
3868
0R05
3846
OVCC
PVCC
4K7
3844
10u
2858
U175
U266
DVI-SCDT
DVIPD
DVI-SDA
DVI-SCL SCLS-DVI
DVI-SCDT
PA00
PA04
PA09
TMDS-HS
PA03
SDAS-DVI
RXC-
RXC+
RX0+
RX0-
RX1+
RX1-
RX2+
RX2-
TMDS-CLK
PA16
PA17
PA18
PA19
PA20
PA21
PA22
PA23
PA08
PA10
PA 11
PA12
PA13
PA14
PA15
PA01
PA02
PA05
PA06
PA07
TMDS-DE
TMDS-VS
BDL4211. . . 64
Page 65
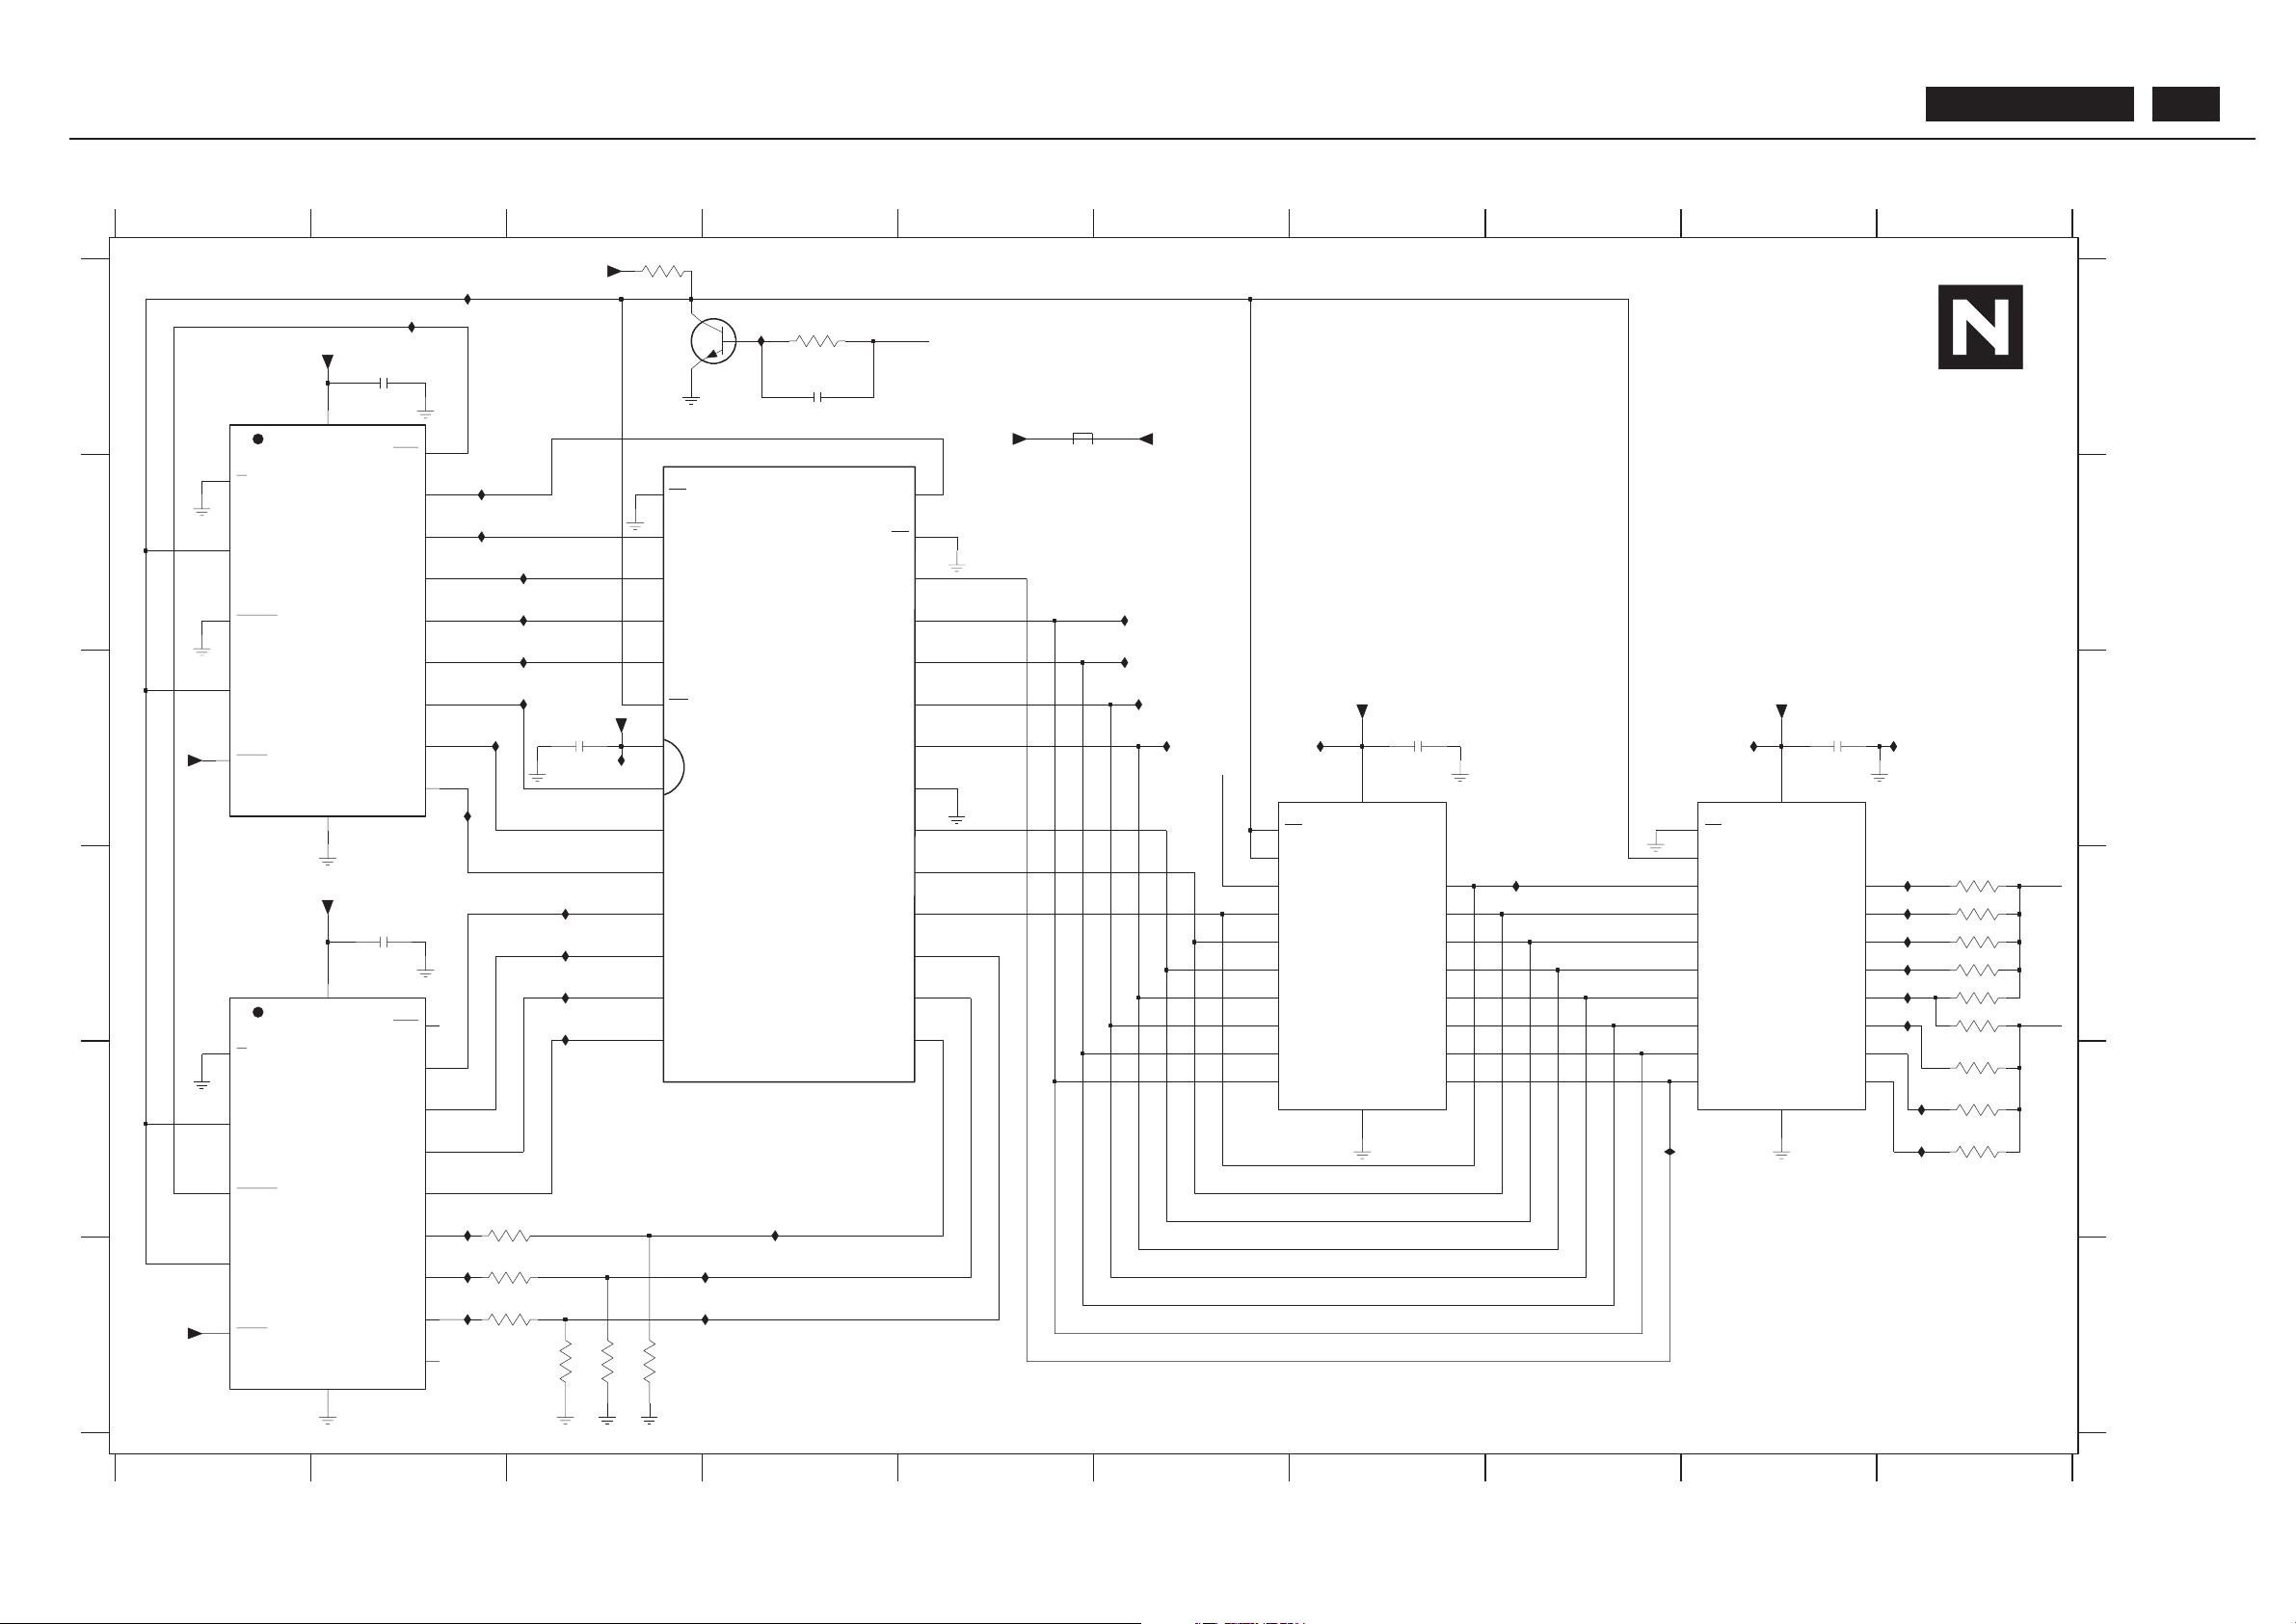
Audio Delay Diagram
* Delete this page for basic model
MAIN PCB
151 ~ 169
A
B
C
D
E
F
A
B
C
D
E
F
2821 A2
2822 D2
SB: 59991 x1
12345678910
12345678910
2823 A4
2824 C3
2825 C7
2826 C9
3811 A3
3812 A4
3813 E3
3814 F3
3815 F3
3816 F3
3817 F3
3818 F3
3821 D10
3822 D10
3823 D10
3824 D10
3825 D10
3826 D10
3827 E10
3828 E10
3829 E10
5821 A5
7821 A1
7822 B4
7823 D7
7824 D9
7825 D1
7826 A4
U151 B2
U152 C3
U153 C7
U154 C9
U155 C10
U200 A2
U201 D3
U202 A2
U203 E4
U224 C2
U225 C2
U226 C3
U227 B3
U228 B3
U229 A4
U232 B3
U249 D10
U250 D10
U262 D10
U270 D10
U271 D10
U272 D10
U273 E10
U323 E10
U333 F4
U342 D3
U347 D3
U348 D3
U355 F2
U362 F4
U363 F2
U364 E2
U416 B6
U417 B6
U418 C6
U616 C6
U665 B2
U666 D8
U667 E9
U201
PB: 59591
U151
U200
3812
47K
3817
3818
0R
3816
0R
3815
3821
U249
U250
U232
+5D
U228
3827
U227
3826
3825
+5D
2824
100n
U225
U226
+5D
U224
15p
U355
2823
MMBT2369AL
7826
3823
3811
1K
U262
5
QF
6
QG
QH
7
13
RCK
9
RCO
VCC
16
100n
2822
7825
M74HC590M
11
CCK
12
CCKEN
CCLR
10
14
G
GND
8
15
QA
1
QB
2
QC
3
QD
4
QE
+5D
100n
2826
+5D
0R
3829
+5D
3828
U154 U155
U152
U153
14
8
GND
QA
15
QB
1
QC
2
QD
3
QE
4
QF
5
QG
6
7
QH
RCK
13
RCO
9
16
VCC
M74HC590M
7821
CCK
11
CCKEN
12
10
CCLR
G
U333
+5D
0R
0R
3813
3824 0R
3814
5821
U202
U203
U323
U273
2825
100n
U271
U272
U270
U229
+5T
U666
U667
3822
U665
+5D
U616
+5D
U417
U418
U364
U416
U362
U363
15
Q5
14
Q6
13
Q7
12
VCC
20
100n
2821
D1
3
D2
4
D3
5
D4
6
D5
7
D6
8
D7
9
GND
10
LE
11
1
OE
Q0
19
Q1
18
Q2
17
Q3
16
Q4
16
Q3
15
Q4
14
Q5
13
Q6
12
Q7
20
VCC
7824
74HC573PW
D0
22
D0
3
D1
4
D2
5
D3
6
D4
7
D5
8
D6
9
D7
10
GND
11
LE
1
OE
19
Q0
18
Q1
17
Q2
15
I_O4
16
I_O5
17
I_O6
18
I_O7
19
OE
22
VCC
28
WE
27
74HC573PW
7823
A13
9
A14
10
A2
24
A3
25
A4
26
A5
1
A6
2
A7
3
A8
4
A9
5
CE
20
GND
14
I_O0
11
I_O1
12
I_O2
13
I_O3
7822
CY7C199-15ZC
A0
21
A1
23
A10
6
A11
7
A12
8
U347
U348
I2S-DA-CLK
I2S-DA-IN1
I2S-DA-IN2
U342
I2S-DA-OUT
BDL4211. . . 65
Page 66
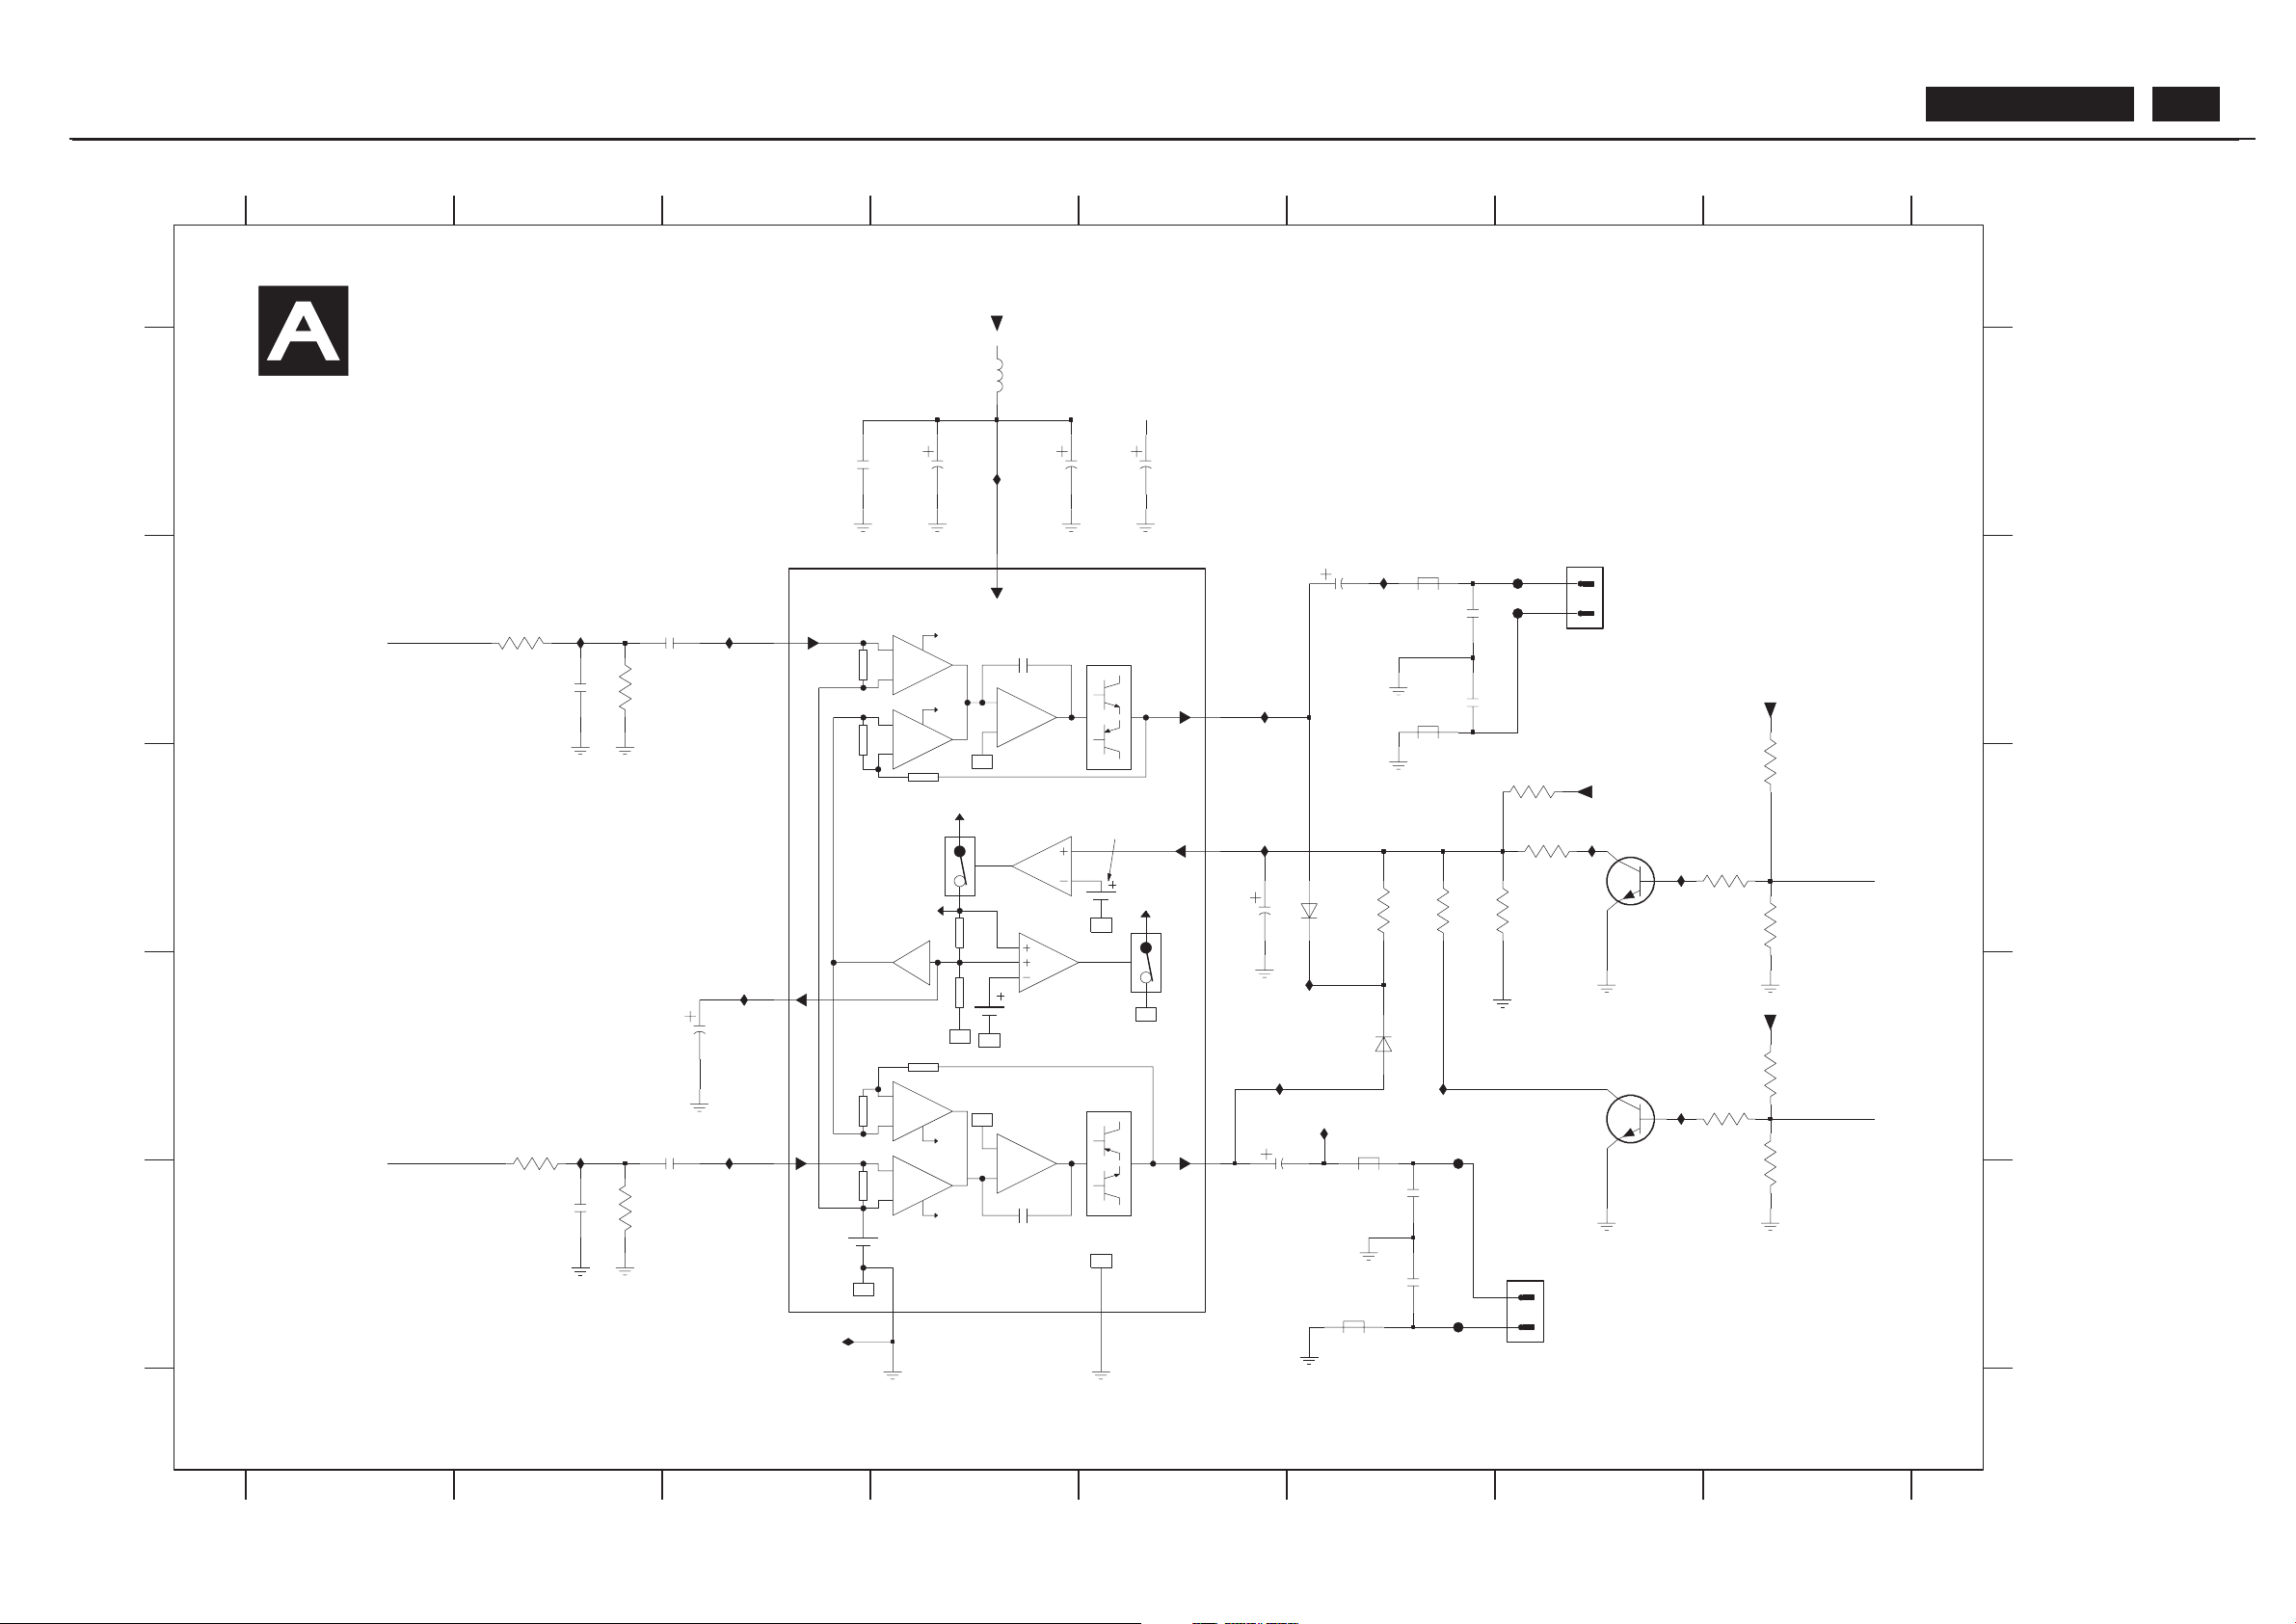
BDL4211. . . 66
Audio Board Diagram-1
18k
mute
reference
voltage
power
ground
(substrate)
signal
ground
2k
15k
mute switch
non-inverting
switch
output
X1
2k
18k
power stage
Vp
stand-by
switch
VA
15k
stand-by
stand-by
reference
voltage
mute
switch
supply
ripple rejection
/
non-inverting
input
reference
voltage
AV
mute switch
power stage
Cm
60k
60k
AV
Cm
input
*947......9999
[R]
U4 D3
U6 B6
F06 D6
B
C
D
E
A
B
C
D
E
U1 D6
U30 B3
1234
23456
*
EXCEPT 1947,1948,2958,2959,2960,2962,2963,2964,2965,5947,7947 WERE CHIP COMPONENTS.
F07 E6
F08 B7
F09 B7
PB: 59881
78
A
U23 B5
U24 C5
U25 D6
U26 D6
U27 D5
*
3974 B2
3975 B2
3976 C6
3977 E2
3978 D2
3979 D8
3980 C6
3981 C6
3982 C7
3983 E8
3984 D8
3985 C8
U31 D3
U38 C7
U44 D7
1947 A7
1948 E7
5678
1
2961 A3
2962 A4
2963 A4
2964 A5
2965 C5
V(1517 in )R
SB: 59871 x 9
V(1517 in )L
U10 C7
U11 B2
U12 A4
U19 E3
U21 D2
2966 D3
2967 E2
2973 B6
2974 E6
2990 B6
AUDIO PCB
2991 E6
5949 D6
5955 B6
5956 E6
6947 C6
6948 D6
7947 A3
7948 E7
7952 C7
3986 C7
3987 C8
3988 C8
5947 A4
5948 B6
2956 B3
2957 B2
2958 D3
2959 B6
2960 D5
2964
1000u 25
TO AUDIO OUT JACK PCB
TO AUDIO OUT JACK PCB
22K
220n
2956
U31
3979
U1
JFE63171
1948
1
2
200R
3976
+16V
1K
3975
2960
470u
25
U30
U24
25
100u
2958
2962
470u
25
5956
32161 1
+16V
1n
2990
2991
1n
U12
3983
2967
12K
U6
25
47u
2965
U4
BC848C
7948
5948
32161 1
3988
12K
+16V
2973
1n
7952
BC848C
3974
22K
U23
3977
22K
10u
5947
U10
3
voltage
JFE61 1V
1947
1
2
F09
7947
TDA1517
PGND
5
SGND
2
7
Vp
input1
1
input2
9
mute
8
output1
4
output2
6
3981
100p
2957
12K
6948
BAS32L
25
470u
2959
3984
2963
1000u 25
F06
U38
22K
3985
F07
2966
220n
BAS32L
6947
3982
10K
3980
0R
0R
3986
32161 1
5949
U25
U19
U11
U26
U21
32161 1
5955
U27
1n
2974
12K
3987
F08
+16V
U44
3978
1K
25
2961
100n
SOUND-ENABLE
MSP-OUT -L
MSP-OUT -R
PHONE-DET
Page 67
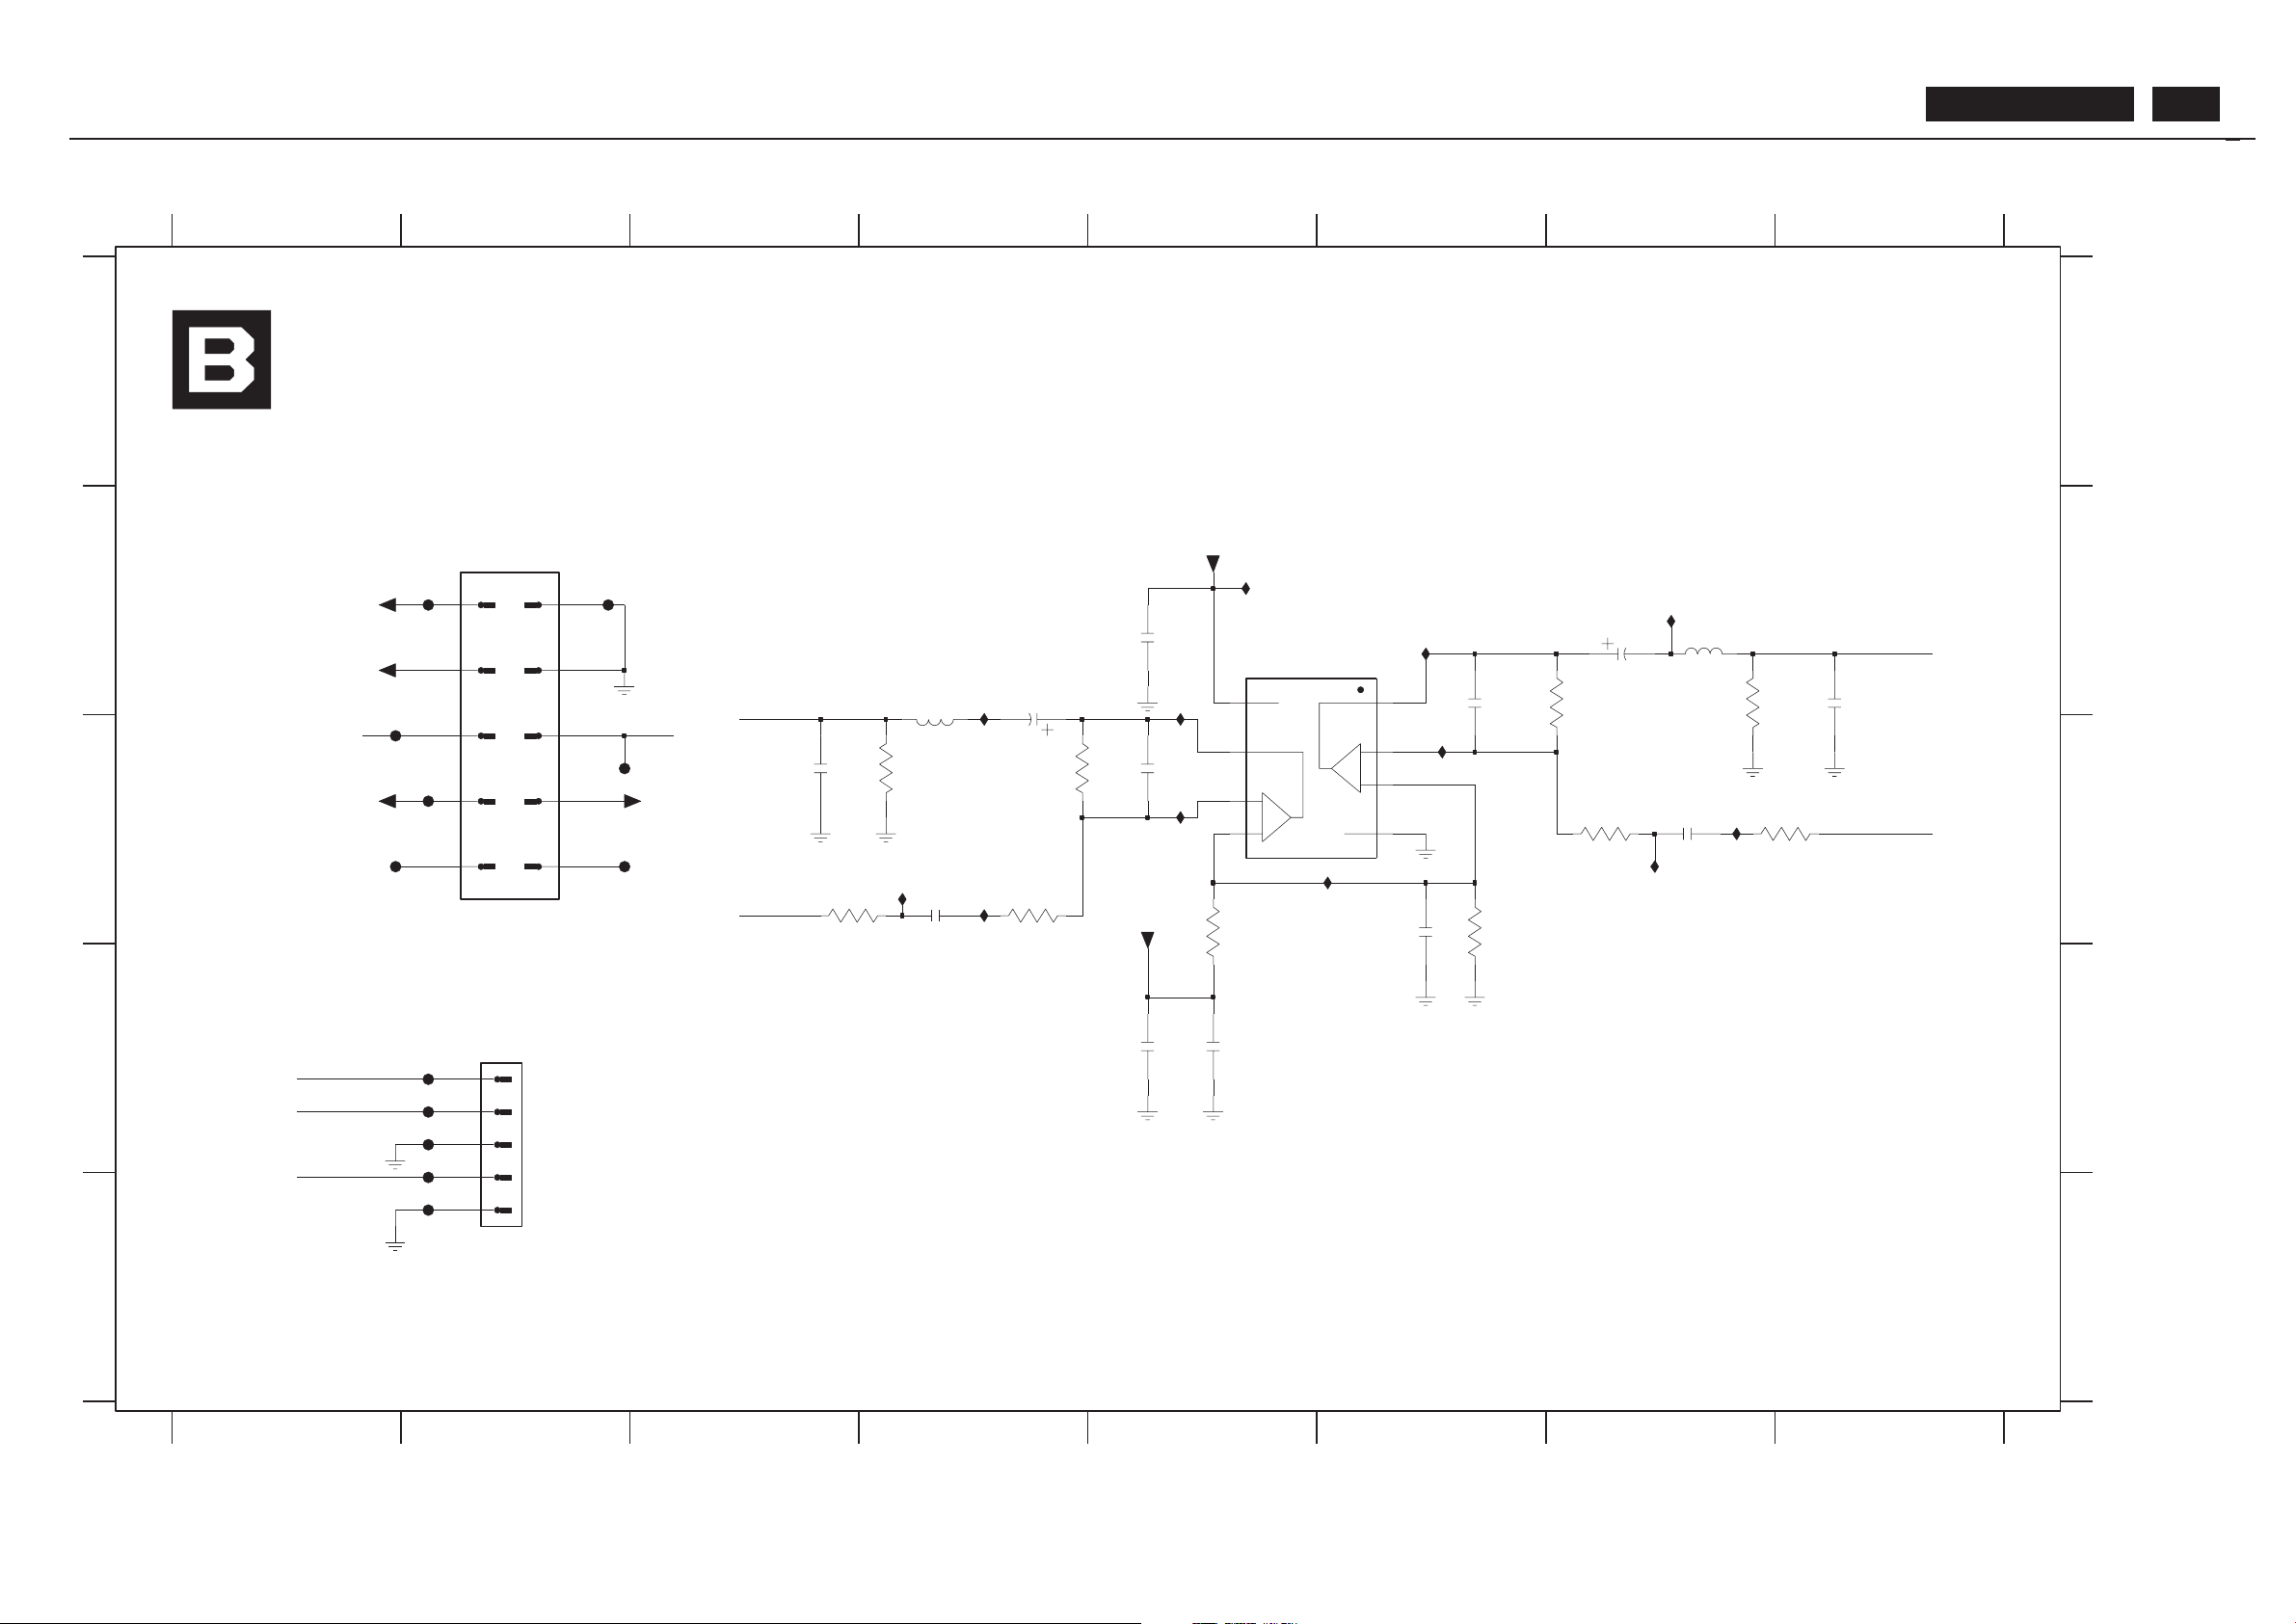
Audio Board Diagram-2
-
+
-
+
PB: 59881
F012 D2
F013 D2
F014 E2
SB: 59871x 9
2977 C5
2978 C4
2979 D5
2980 D5
2981 C6
2982 B6
2983 C7
2984 B7
2985 B8
2986 B5
3990 C4
3991 C4
3992 C4
3993 C3
3994 C5
3995 C6
3996 B6
3997 C7
3998 C8
3999 B7
5950 C4
5951 B7
7953 B5
F010 D2
F01 1 D2
AUDIO PCB
*
V(1308 in )R
2975 C3
2976 C4
V(1308 in )L
TO MAIN PCB
TO AUDIO OUT JACK PCB
*
U40 C5
U41 B6
U42 C6
U43 C7
U45 C4
U46 C6
u48 B5
u49 B7
u50 B4
u51 C4
u52 C7
1950 B2
1951 D2
EXCEPT 1950,1951,2976,2984,7953 WERE CHIP COMPONENTS.
12345678
12345678
A
B
C
D
E
A
B
C
D
E
F21 B2
F22 B2
F23 C1
F24 C1
F27 C2
F28 C3
F29 C2
U39 C5
100n
2986
25
5951
0u1
10n
2985
U46
U41
U39
U40
3994
3K3
3K3
3995
F010
F24
2982
100p
1
10
2
3
4
5
6
7
8
9
3998
0R
1950
69405
+5T
10K
3999
2981
10u
220u
16
2976
F29
F27
+5T
F22
F012
F013
2978
1u
TDA1308/N1
7953
2
INA_neg
3
INA_pos
6
INB_neg
5
INB_pos
1
OUT A
7
OUTB
8
VDD
4
VSS
F28
2980
16
+5T
U45
100n
U42
U43
2975
10n
3990
10K
0u1
5950
22K
F23
F21
3992
F014
+5T
3
4
5
F01 1
+16V
JFE6338V
1951
1
2
22K
3997
+16V
3996
22K
0R
3993
22K
3991
1u
2983
10u
2979
u52
u48
u49
u50
u51
100p
2977
2984
220u
16
MSP-OUT -R
SOUND-ENABLE
PHONE-OUT -R
PHONE-OUT -L
PHONE-DET
MSP-OUT -L
MSP-OUT -R
PHONE-OUT -L
PHONE-OUT -R
MSP-OUT -L
PHONE-DET
BDL4211. . . 67
Page 68
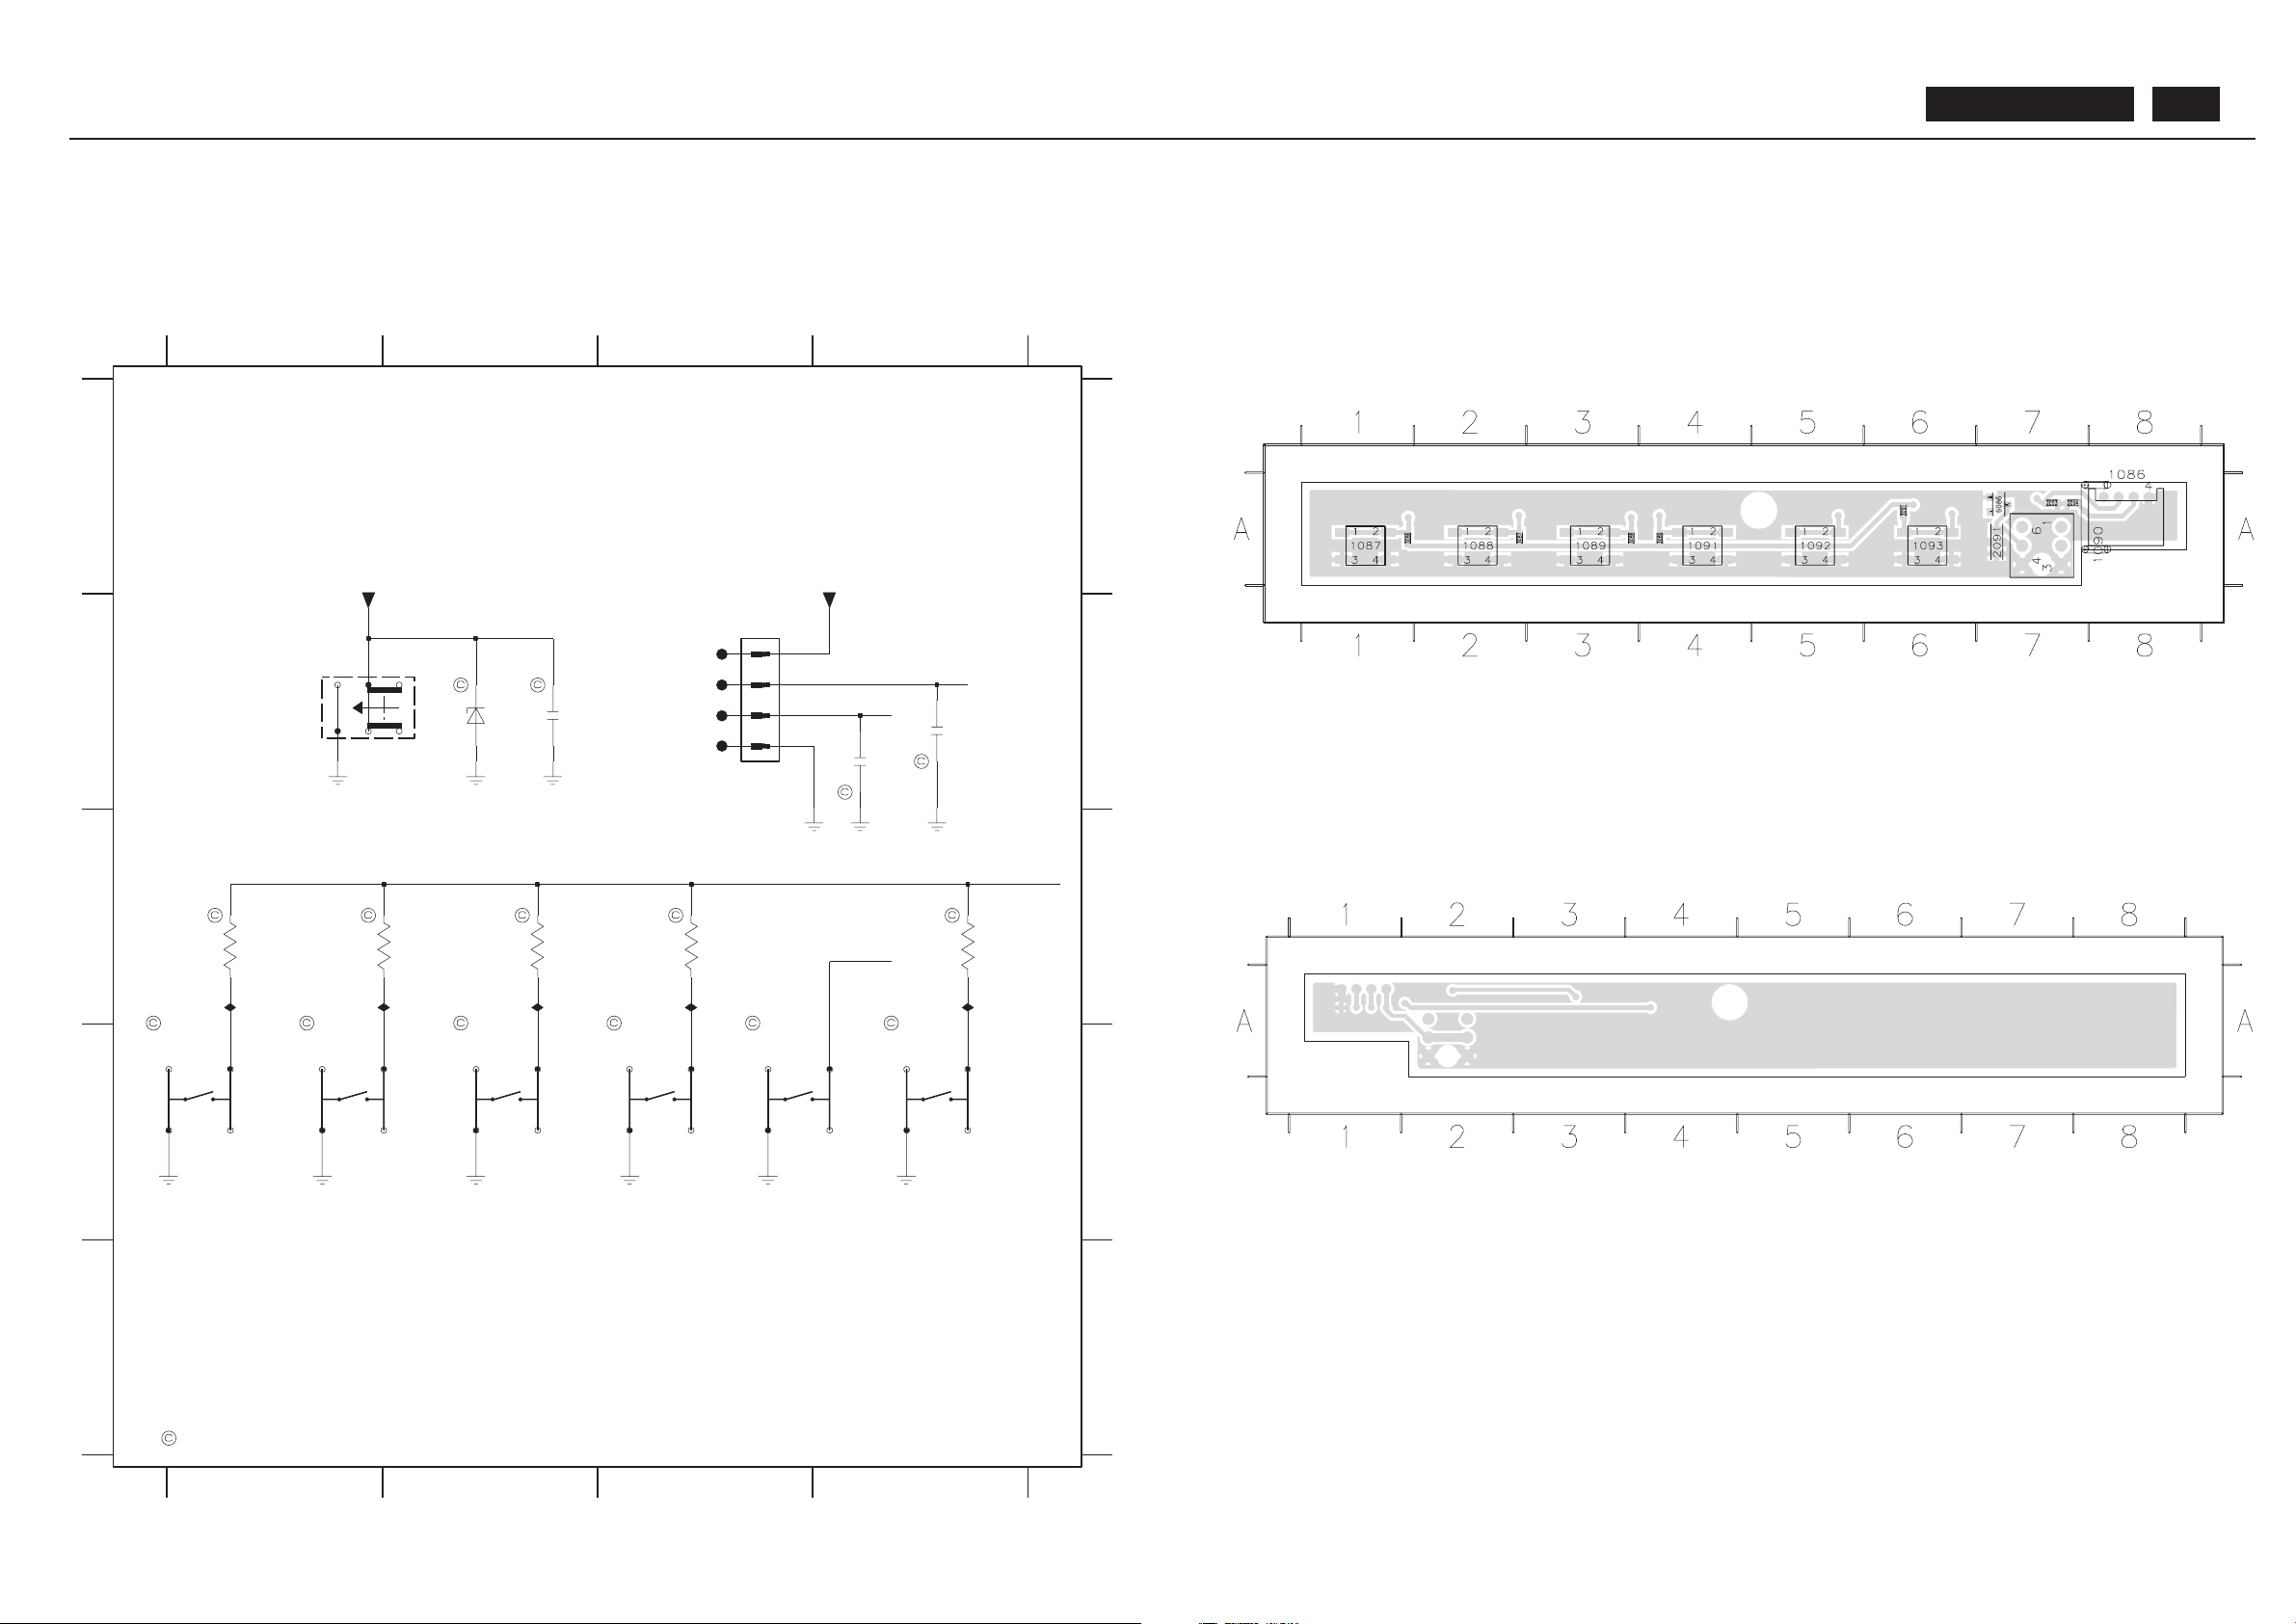
Key Control Board Diagram and C.B.A.
KEY CONTROL PCB
TO MAIN
PCB
1701
ST ANDS FOR CHIP COMPONENTS.
PB : 59191
1234
1234
A
B
C
D
E
A
2094 B4
3086 C1
3087 C1
3088 C2
3089 C3
3091 C4
6086 B2
D
U
L OSD
AV
R
SB : 59181 x32
2093 B4
4
B
C
D
E
F1 B3
F2 B3
F3 B3
F4 B3
1086 B3
1087 D1
1088 D1
1089 D2
1090 B1
1091 D3
1092 D3
1093 D4
2091 B2
1086
1
2
3
3091
100K
3089
12K
4
3087
51K
3088
27K
34
SKQGABE010
1092
12
3
2
34
1093
SKQGABE010
12
1
2
34
SKQGABE010
1091
1
1088
1
2
3
4
1089
SKQGABE010
3086
2K2
SKQGABE010
1087
SKQGABE010
12
34
3V3-STBY -ON
2091
10u
100n
100n
2094
2093
6086
BZX84-C4V7
I3
I4
I0
I1
I2
1090
1
2
3
4
5
6
F4
ESB64623
F2
F3
R-KEY
R-KEY
KEY
KEY
3V3-STBY -ON
F1
BDL4211. . . 68
Page 69
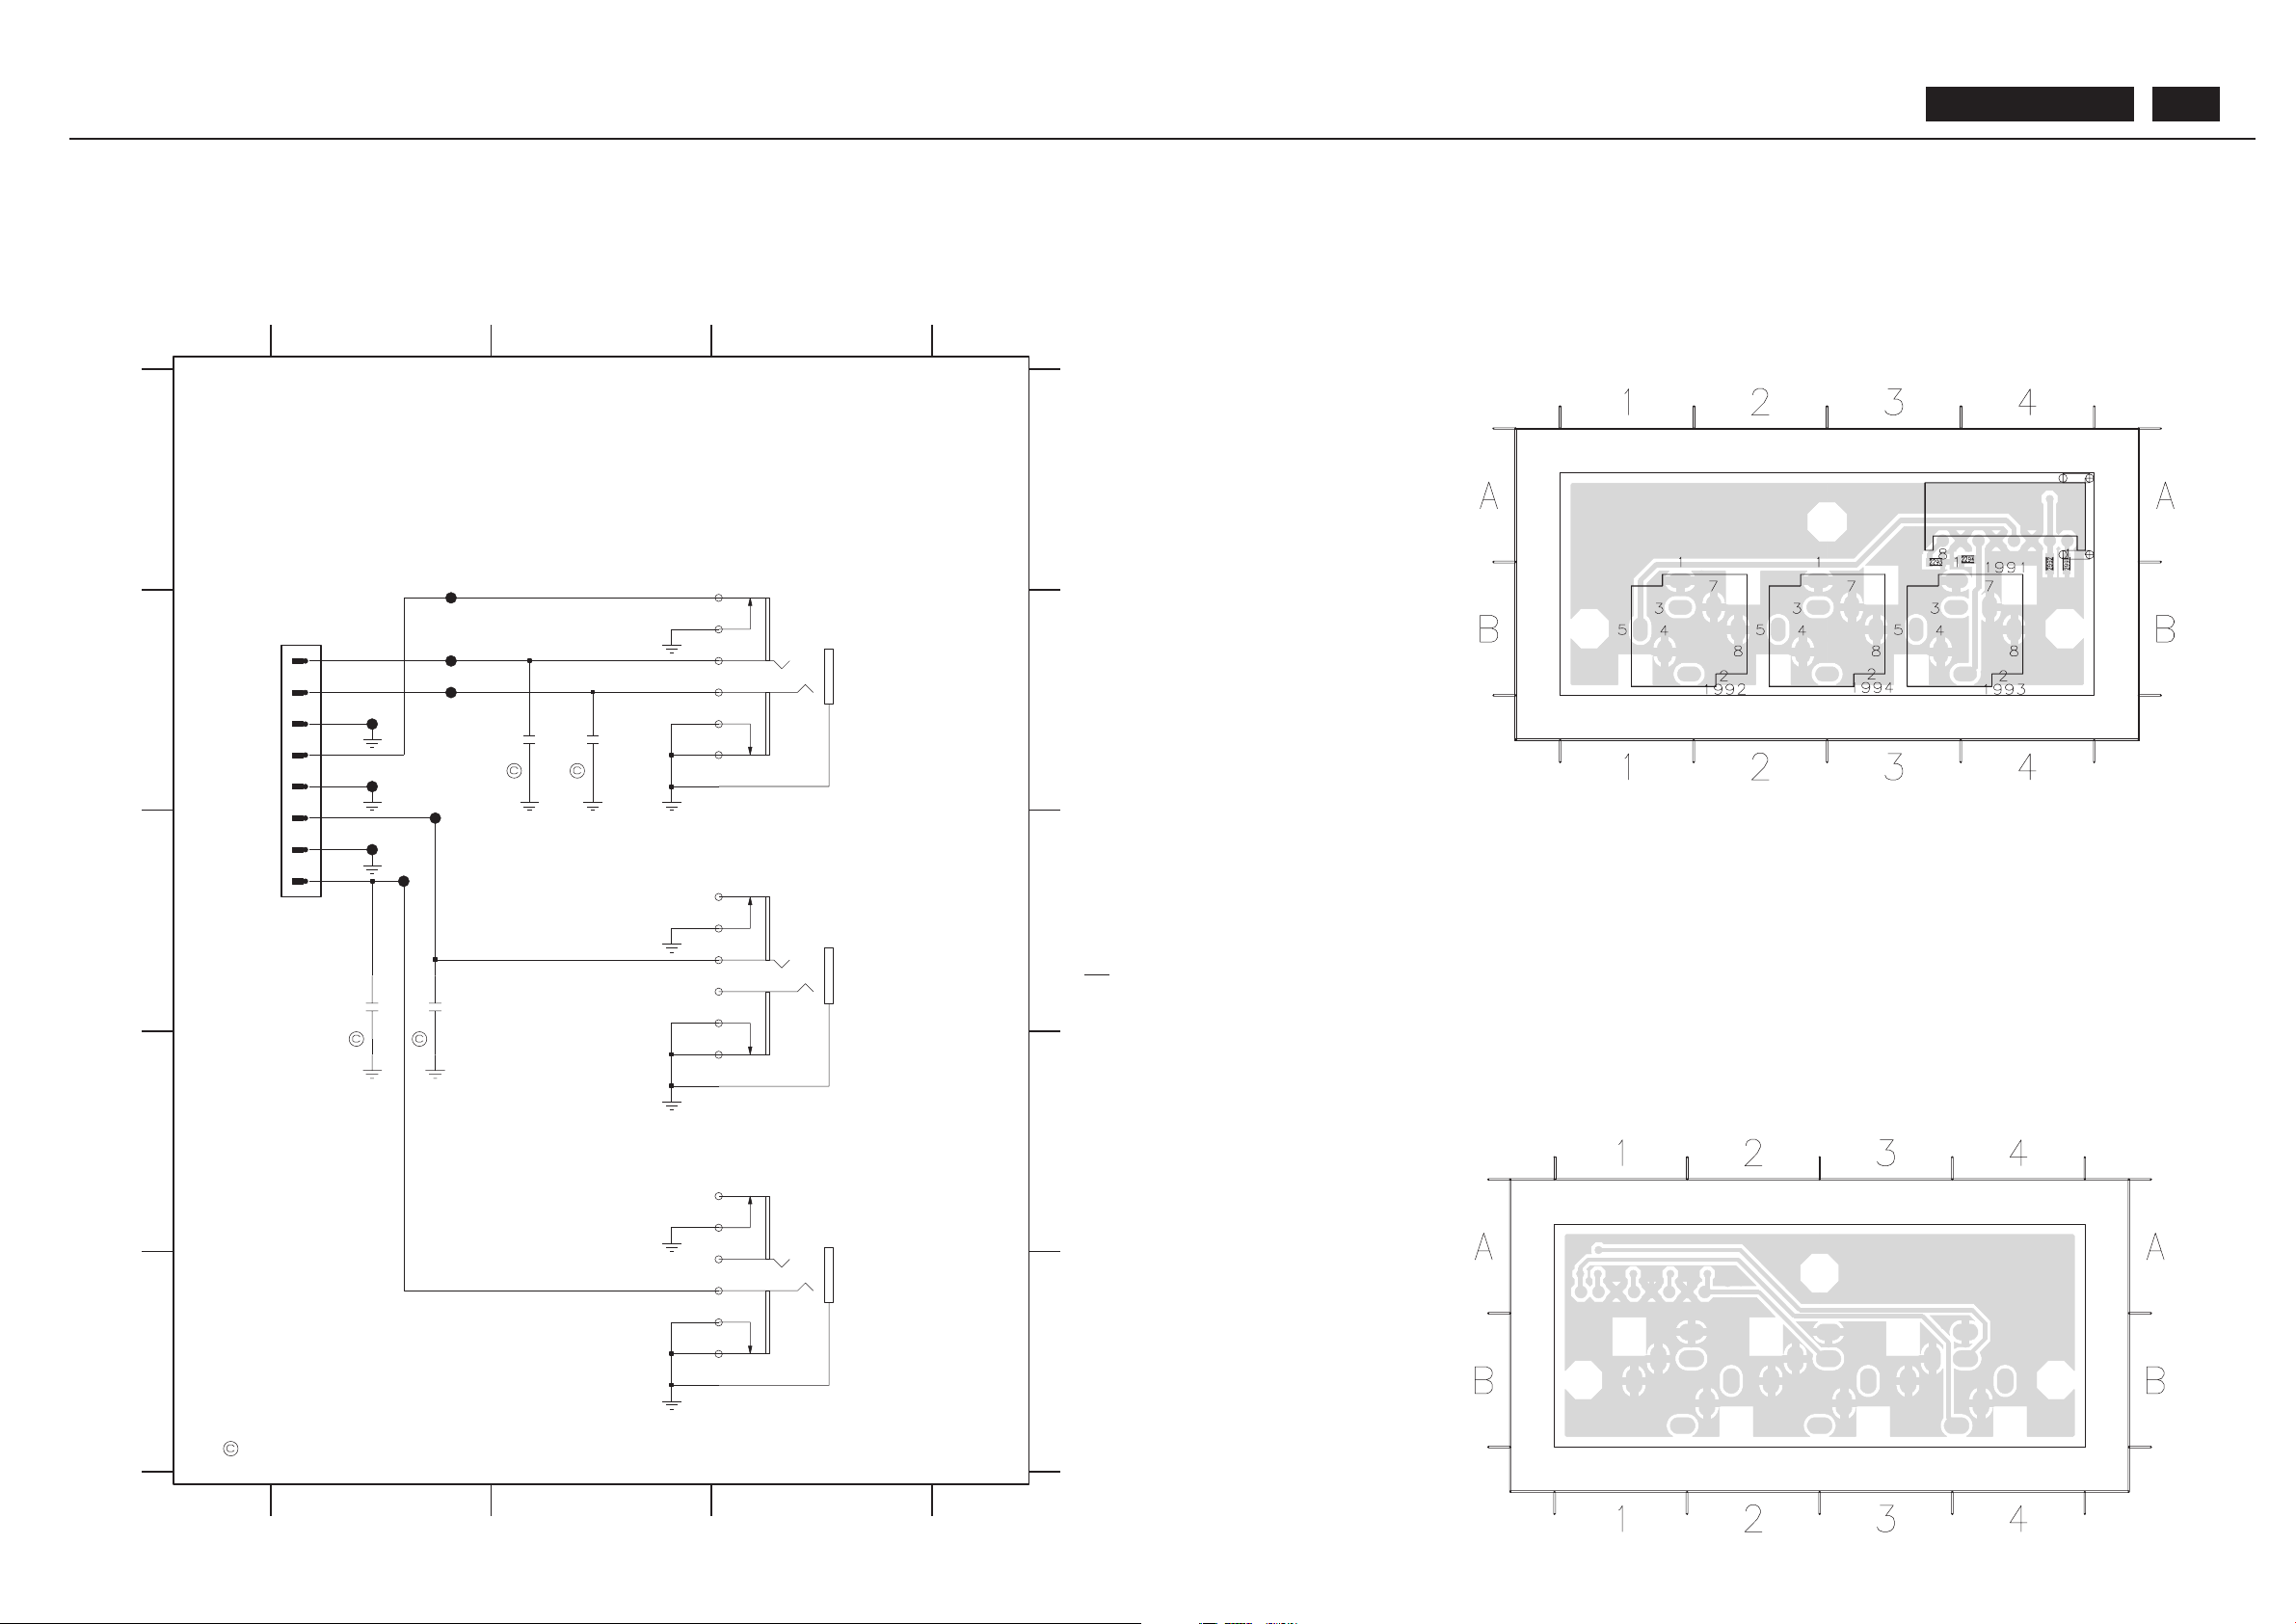
Audio Out Jack Board Diagram and C.B.A.
TO
AUDIO
BOARD
ST ANDS FOR CHIP COMPONENTS.
F4 B1
F5 C1
F6 B1
F7 B1
F8 C1
1991 B1
1992 B3
1993 C3
1994 D3
2293 C1
2294 C1
2991 B2
2992 B2F2 B1
F3 B1
123
123
D
E
A
Audio-R-OUT
PB : 5921 1
Line - OUT
SB : 59201 x32
AUDIO OUT JACK PCB
A
B
C
Audio - L - OUT
B
C
D
E
F1 A1
2294
1n
1n
2293
F7
F8
F5
F6
F4
F2
F3
2
3
4
5
6
7
8
F1
1991
1
2991
6n8
6n8
2992
3
4
5
7
8
1994
LGT1506-0125
1
2
1
2
3
4
5
7
8
5
7
8
LGT1506-0125
1993
1992
LGT1506-0125
1
2
3
4
BDL4211. . . 69
Page 70
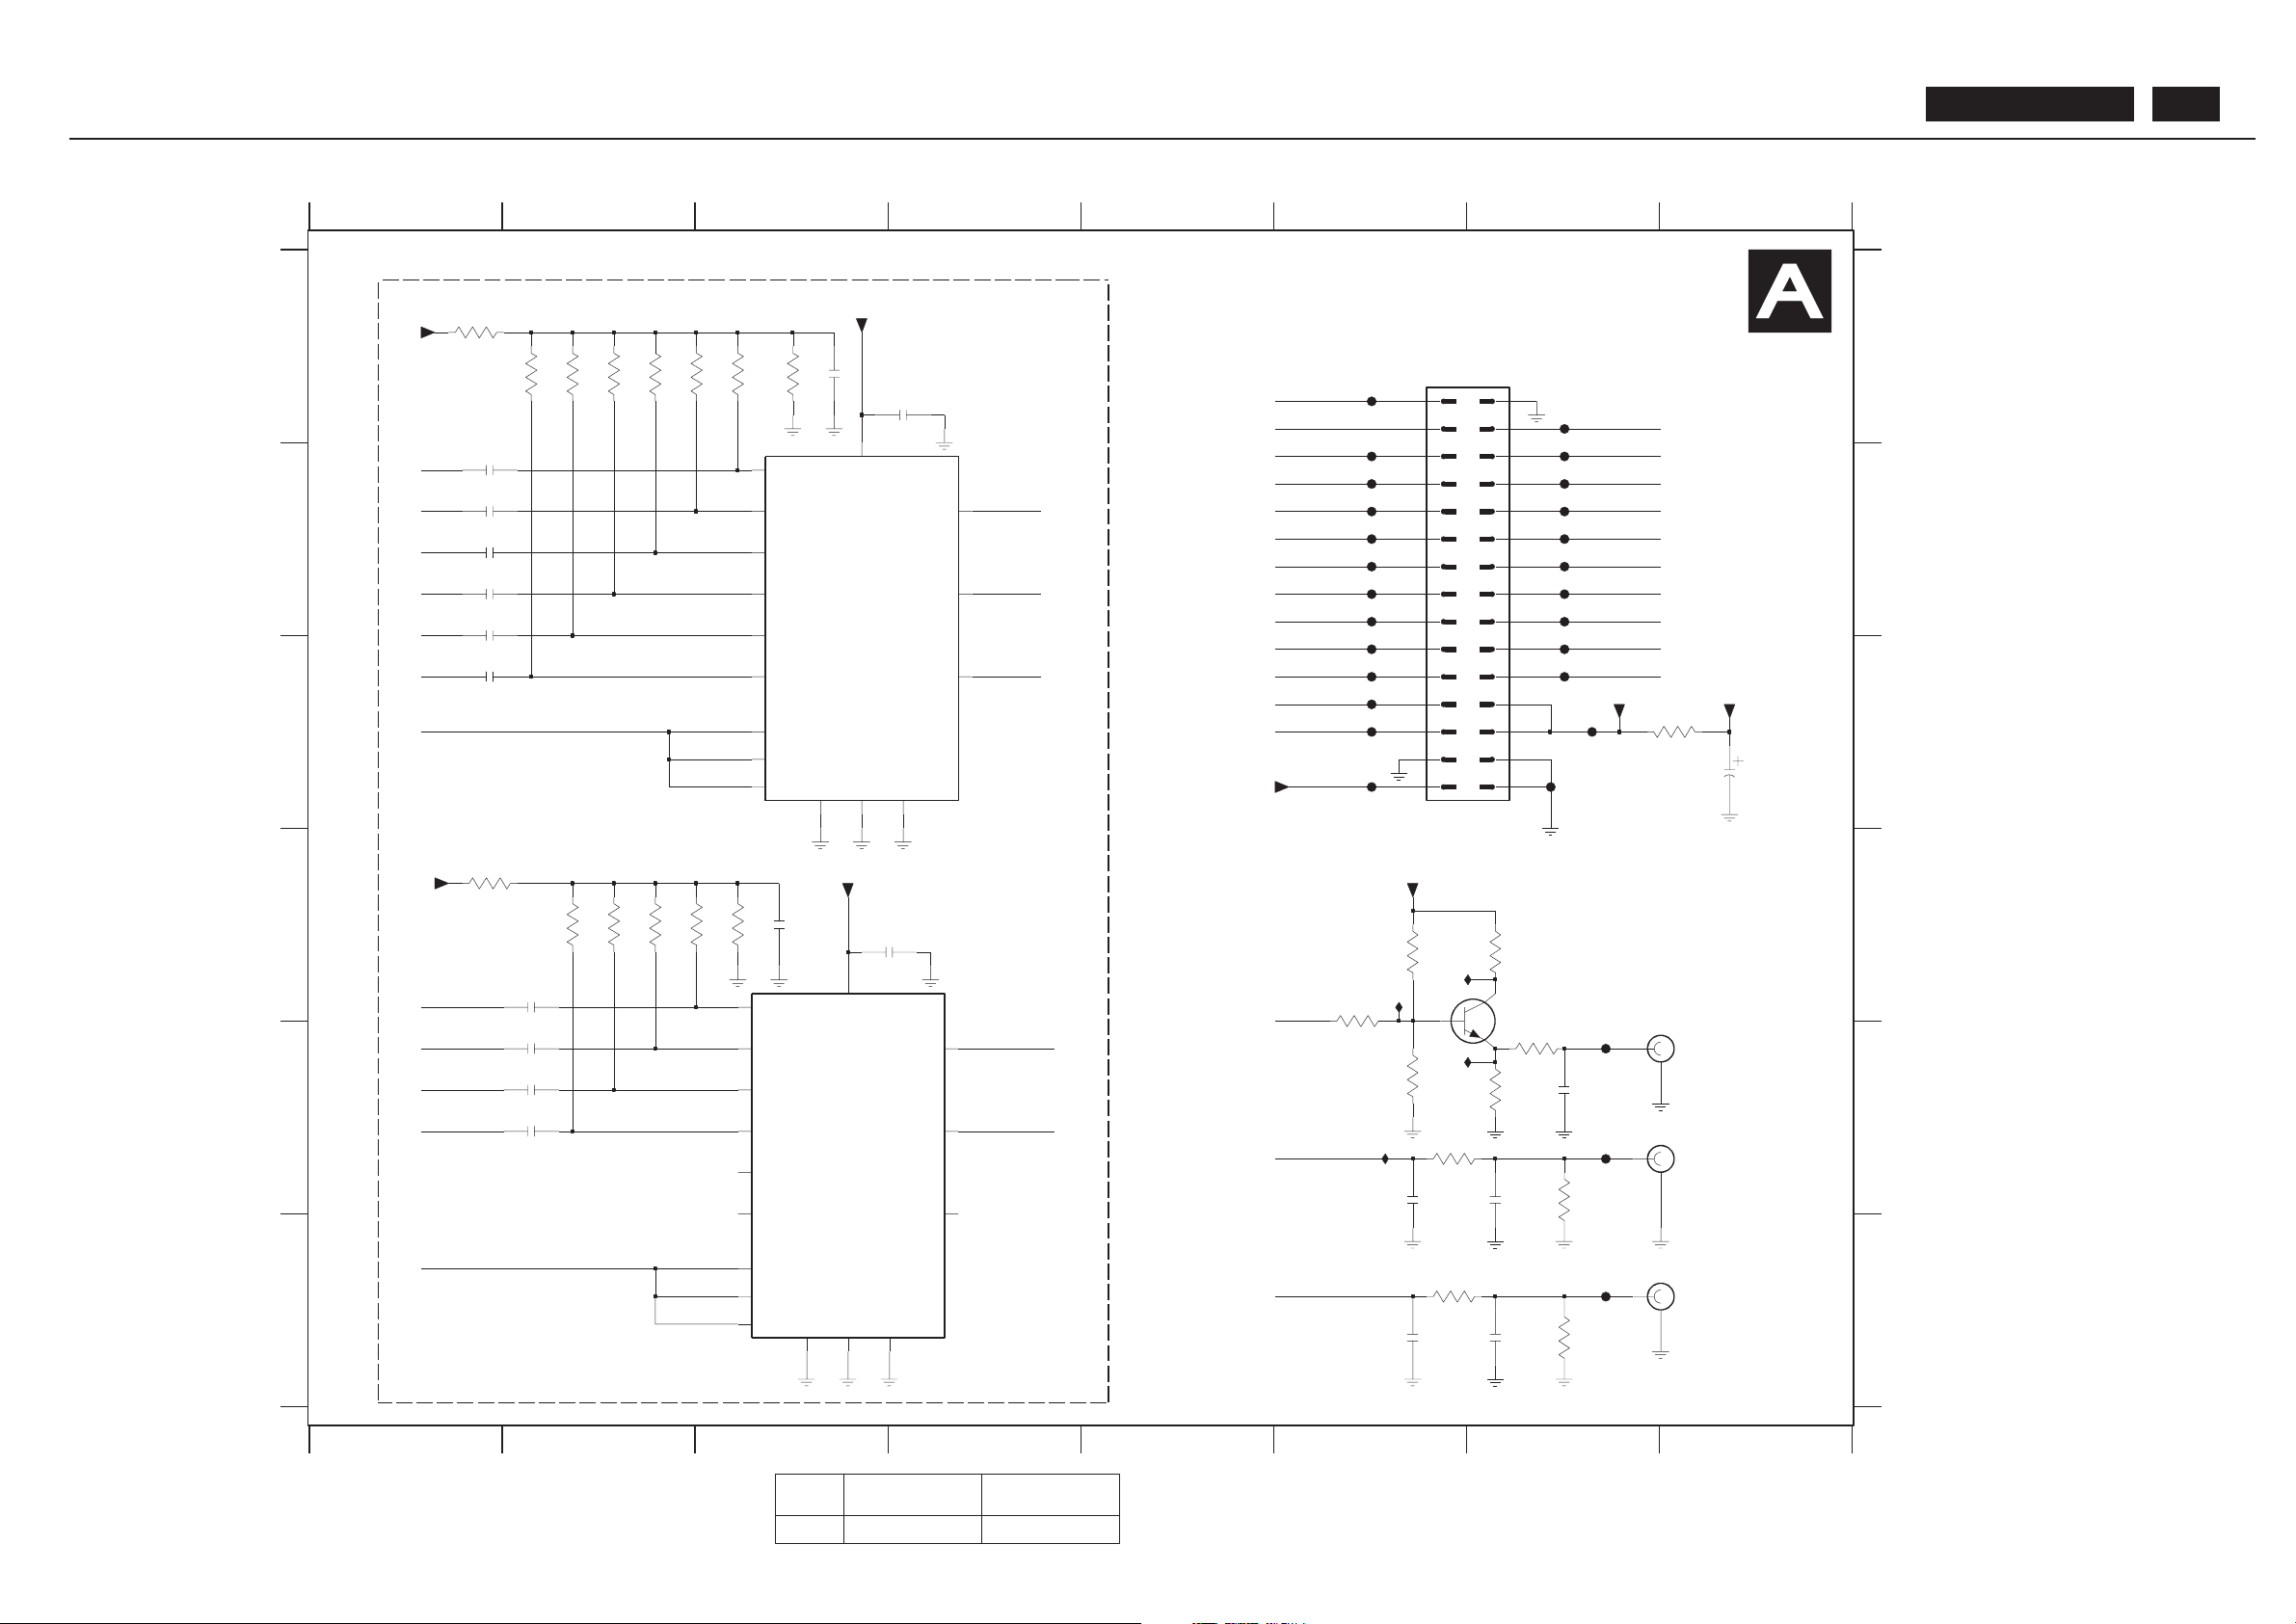
TV Box(V ideo) I/O Diagram
REF .
WE, AP,
NAFT A, CHINA, NAFT A VIDEO
WE VIDEO
1602 2422 026 05546 NOT USED
2 8
2625 F7
2624 F6
2623 E7
U8 D6
U6 E6
U5 D6
42
76
F023 C6
543
3629 F6
2622 E6
2621 E7
6
NI FOR AP , NAFT A, CHINA
7603 D7
1
2616 E2
5
C
3
3625 E6
3624 E7
8
A
B
A
7
7602 E3
U9 E6
1601 A6
3614 D2
SB: 58441 x2
3603 A2
3602 A2
3601 A1
7601 B3
F002 A7
3627 E6
3628 E7
2627 C8
3630 F7
3612 D3
3611 D1
3609 A3
3607 A3
1602-A E8
1602-B E7
1602-C F8
2601 A4
2602 B1
3632 C8
PB: 58451
3622 D7
3623 D6
E
F
3626 E7
2615 E2
F
F007 B6
F008 B7
F009 B6
F010 B7
F01 1 B 7
FOR WE,WE VIDEO
2604 B1
2603 B1
2608 A3
2607 C1
2606 B1
TV -BOX PCB
3621 D6
3616 D2
3615 D2
F001 A6
601 ~ 635
1W
F019 C7
B
C
D
3613 D2
F022 C7
2605 B1
2614 E2
1
F020 C6
F003 B6
F016 B7
F017 C6
2613 D2
2612 D4
2611 D3
F015 B6
F006 B7
F005 B6
F004 B7
D
E
F018 C7
3604 A2
3605 A2
3606 A2
NAFT A VIDEO
EXCEPT 1601,1602,2627,3632 WERE CHIP COMPONENTS.
F021 C6
F025 E7
F026 E7
F027 F7
F012 B6
F013 B7
F014 B6
F066 C6
F024 C7
F024
3622
10R
F008
F001
3615
47K
47K
3616
+5TUN
1u
2606
4K7
3625
3626
1K
0R82
3632
F013
F022
F026
47K
3606
100n
+5T
F004
2612
2613
1u
1u
2614
47K
3602
F003
1u
2604
3609
10K
F009
F021
220K
3628
1602-B
3
4
1X
1
1Y
3
1Z
11
A
10
B
9
C
8
GND
6
INH
16
VCC
7
VEE
14
X-COM
15
Y-COM
4
Z-COM
TC74L VX4053FT
7601
12
0X
2
0Y
5
0Z
13
F017
3611
10K
2607
1u
10u
2611
+5T
F002
+5T
2605
1u
3624
47R
F027
3603
47K
U6
U8
F025
2603
1u
1u
2602
U5
3630
220K
F020
F019
2608
10u
F012
F007
47K
3613
3614
47K
100n
2601
+5T
2624
330p
1u
2615
+5T
F016
F066
U9
10K
3601
1602-C
5
6
3623
100R
F010
2621
22p
3605
47K
10K
3612
6
7
8
9
+8V
330p
2622
2
20
21
22
23
24
25
26
27
28
29
3
30
4
5
1601
1
10
11
12
13
14
15
16
17
18
19
69415
F014
3621
4K7
F015
13
1Y
1
1Z
3
A
11
B
10
C
9
GND
8
INH
6
VCC
16
VEE
7
X-COM
14
Y-COM
15
Z-COM
4
7602
TC74L VX4053FT
0X
12
0Y
2
0Z
5
1X
F005
3607
47K
F01 1
1602-A
1
2
3629
100R
2616
1u
F023
F006
7603
BC848C
100R
3627
2623
330p330p
2625
+5T
47K
3604
16
1000u
2627
F018
SC-CVI-SW
SYNC-SC-CVI
SYNC-SC-CVI
SC-CVI-SW
AV-CVBS
FBL-SC
ST -SC
AV-CVBSAV-CVBS-RCA
AV-CVBS-SC
Y
I2S-DA-IN2
I2S-DA-OUT
AV-CVBS-SC
SCL-TV1
Y-SVHS
PC-AUDIO-R
D4-DET
Y
G-SC
Pr
R-SC
G-Y
B-Pb
R-Pr
Pb
B-SC
SC-CVI-SW
PC-AUDIO-L
TUN-CVBS
R-Pr
MSP-INT
PVR-OUT -R
PVR-OUT -L
MM-CVBS
MSP-OUT -L
B-PbG-Y
C-SVHS
I2S-DA-CLK
I2S-DA-IN1
MSP-OUT -R
SDA-TV1
DIAGRAM - I/O BOARD + BNC TERMINAL
BDL4211. . . 70
Page 71
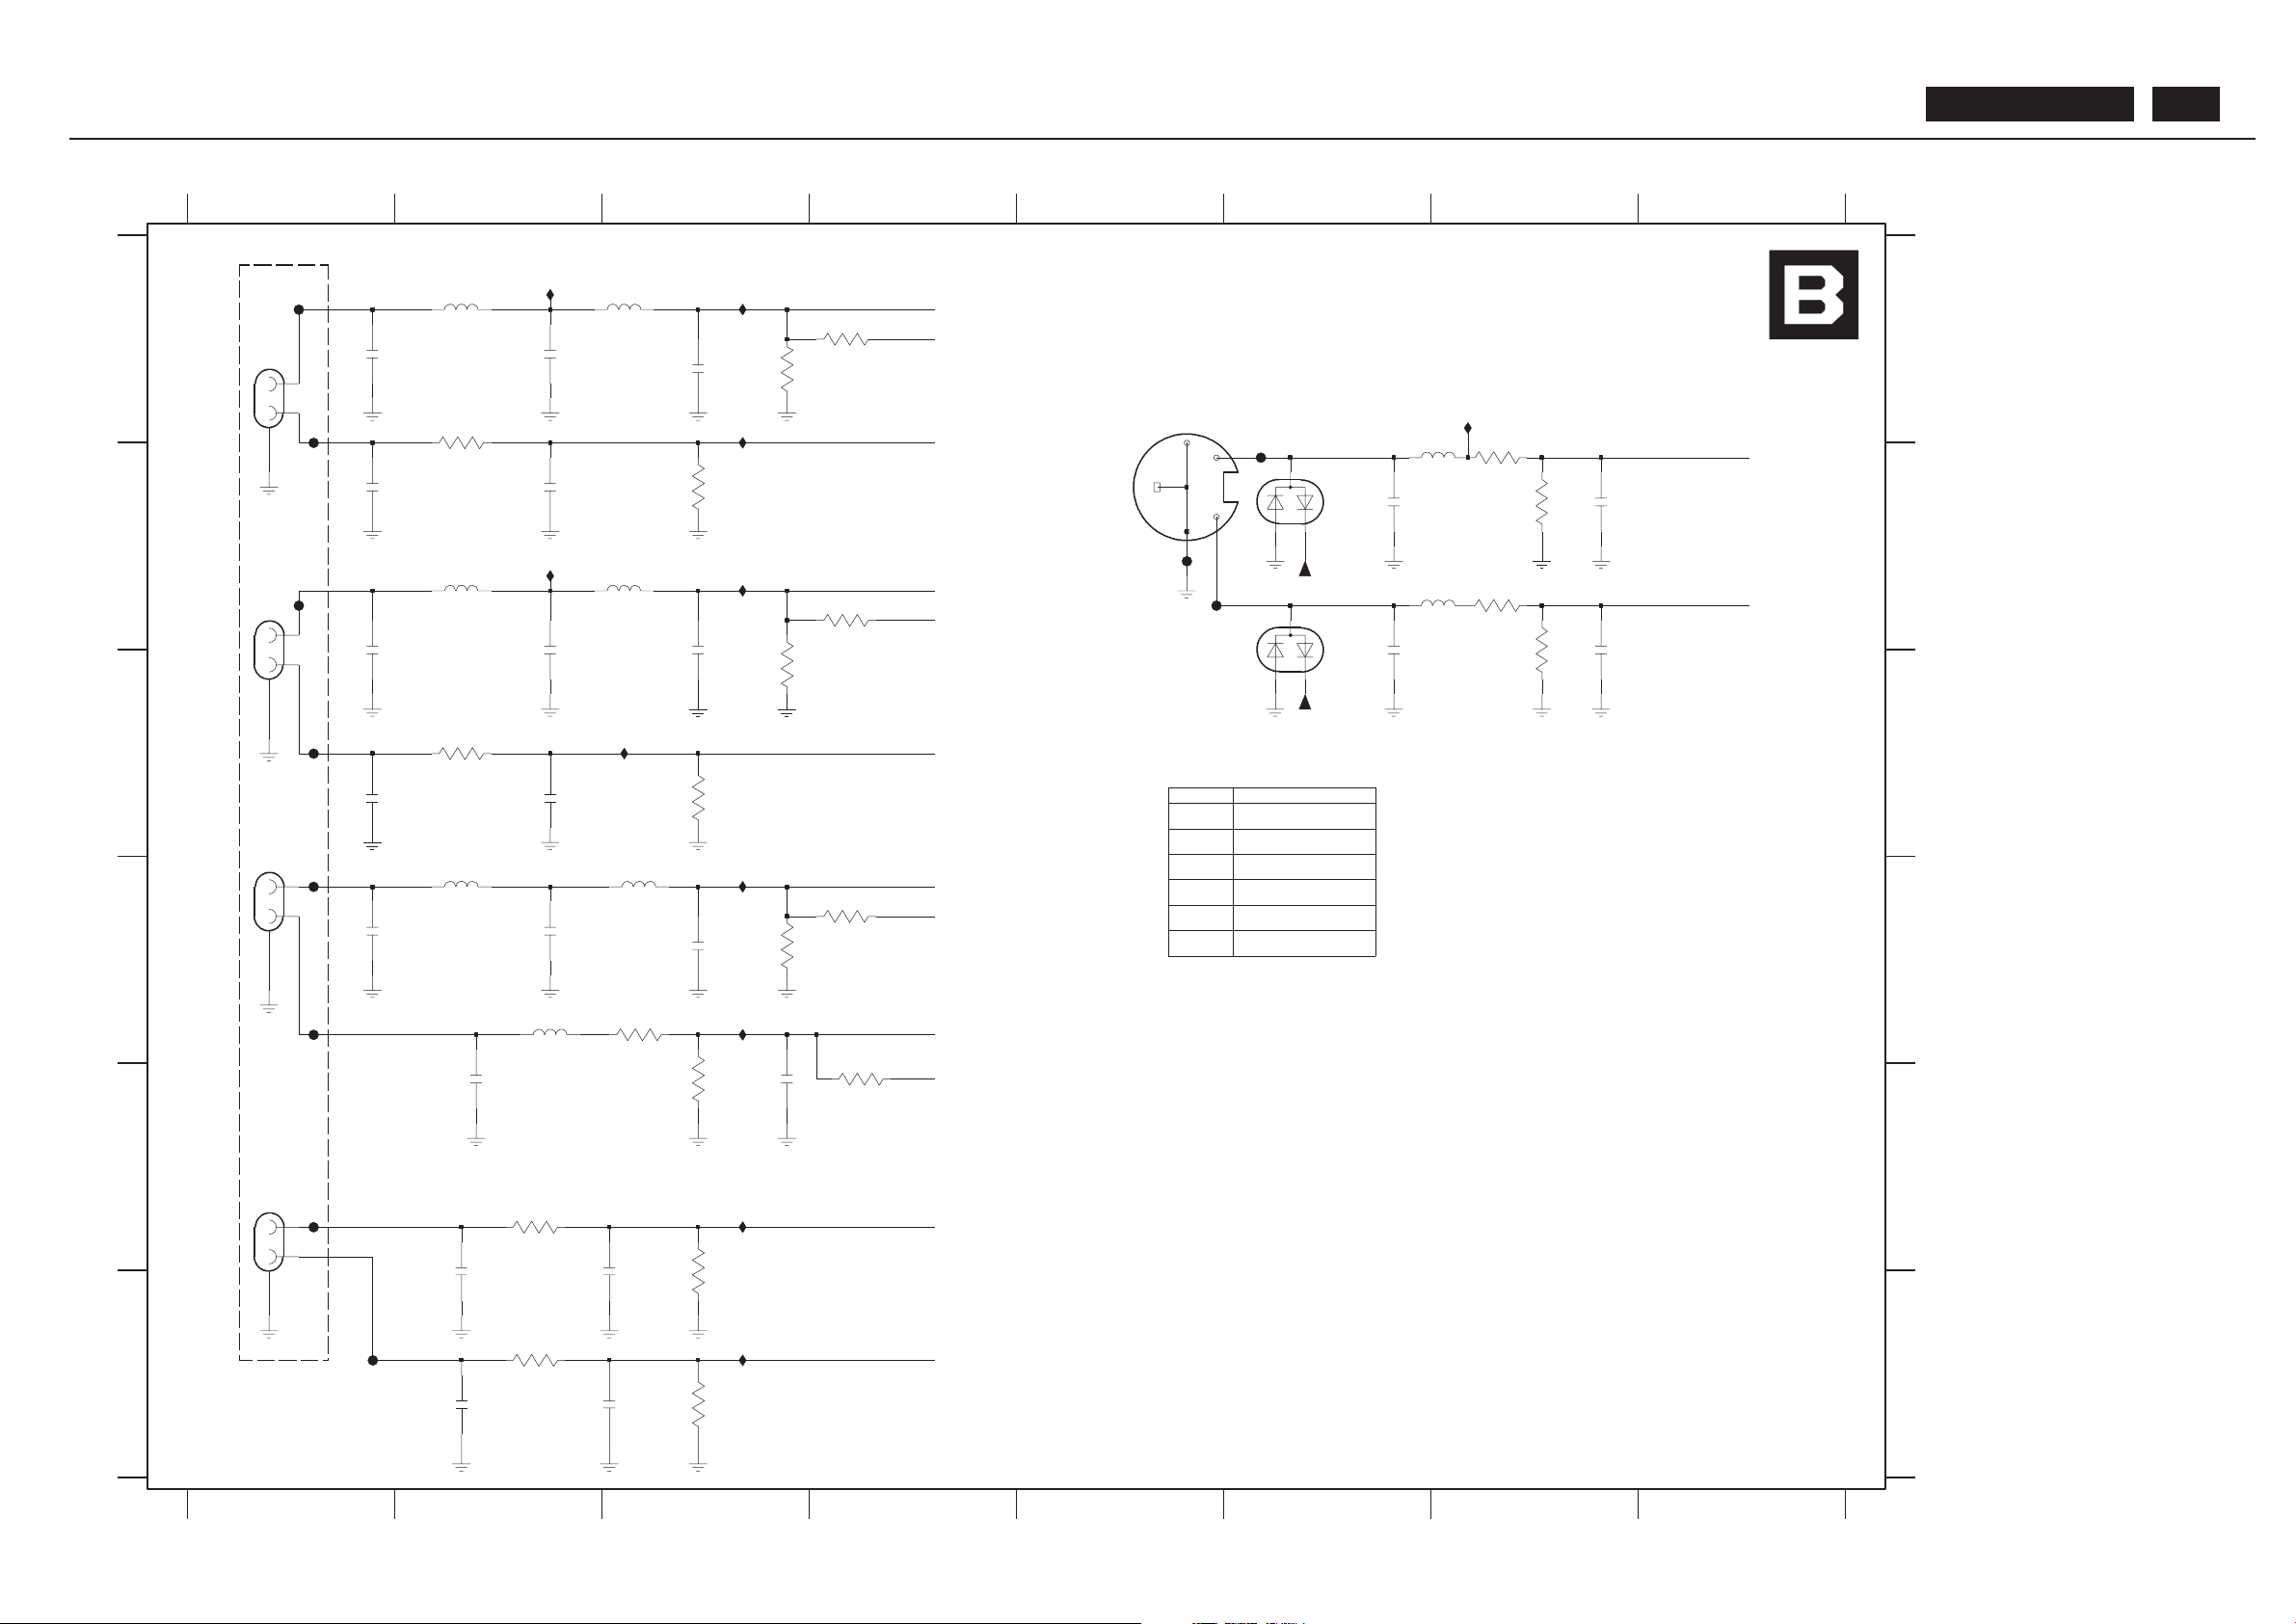
BDL4211. . . 71
TV Box(V ideo) CVI/S-V ideo Diagram
I005 B3
3664 B7
3663 B7
1642 A5
1641-C B1
2641 A1 I008 D3
I002 A7
I003 A3
I007 D3
I006 C3
3642 A3
5678
A
5647 D2
5648 D3
5649 D2
2656 E2
F
TV -BOX PCB
SB: 60451 x2
PB: 60461
3656 E3
5643 B7
F033 B6
2651 C1
I045 F3
I004 B2
I009 E3
I044 A2
F034 C1
F035 D1
F036 D1
F037 E1
F038 F1
I001 A3
2672 B7
EXCEPT 1641,1642 WERE CHIP COMPONENTS.
2673 C6
2674 C7
3641 A4
21
3643 A2
3648 C3
3650 E4
0R
6642 932205042685
BAV99L T1
6643 932205042685
BAV99L T1
3662 B7
3661 B7
3658 F3
321
2647 C2
2642 A2
2643 A3
2644 B1
2645 B2
2646 C1
1641-D A1
F030 B1
F031 B5
640 ~ 679
2648 C3
0R
3651 21221 1805631
2653 D1
2652 C2
2655 D3
2654 D2
5642 A3
43
2662 F2
2663 F2
2664 F2
2671 B6
F
1641-A E1
1641-B C1
F032 B1
87
3641 21221 1805631
0R
3645 21221 1805631
0R
3650 21221 1805631
3647 C2
3646 C3
3645 B4
3644 B3
C
3657 F2
A
3655 E2
3654 E3
3653 D3
3652 D3
3651 D4
5644 B7
5645 B2
5646 B3
B
C
D
E
6642 B6
Ref Des Reserved
F029 B6
F028 A1
6643 B5
B
2657 E3
2661 F2
120p
2647
E
D
5641 A2
456
0R
3650
F032
+5ESD
5645
0u56
3656
27K
I006
18R
3653
I004
F035
2672
22p
F038
F037
3661
18R
F031
I044
68p
2641
3641
0R
75R
3652
2663
330p
1K
3647
I045
F030
3644
27K
6643
BAV99L T1
5649
0u1
0u1
5643
330p
2661
I002
0u56
5648
I009
I003
I005
I001
I007
3663
18R
I008
100p
5644
0u1
2673
330p
2645
2644
330p
1641-B
69057
10
3
4
75R
0u56
5646
68p
2643
3646
5641
0u56
2662
330p
27K
3658
3655
1K
0u56
5642
3642
75R
68p
2655
2657
22p
F028
56R
3654
120p
2654
120p
2671
100p
2642
F036
3662
56R
1642
1
24
35
68
+5ESD
69015
2646
68p
2674
22p
1K
3657
F034
27K
330p
2652
3643
1K
3648
F029
F033
5
6
2651
330p
3645
0R
69057
1641-C
11
1641-A
69057
9
1
2
5647
0u56
2648
68p
BAV99L T1
6642
56R
3664
3651
0R
68p
2653
2656
100p
12
7
8
330p
2664
Pb
B-Pb
AV-CVBS-RCA
AV-CVBS
1641-D
69057
CVI-AUD-L
CVI-AUD-R
Y
G-Y
Pr
R-Pr
C-SVHS
Y-SVHS
S-AUD-R
S-AUD-L
Page 72
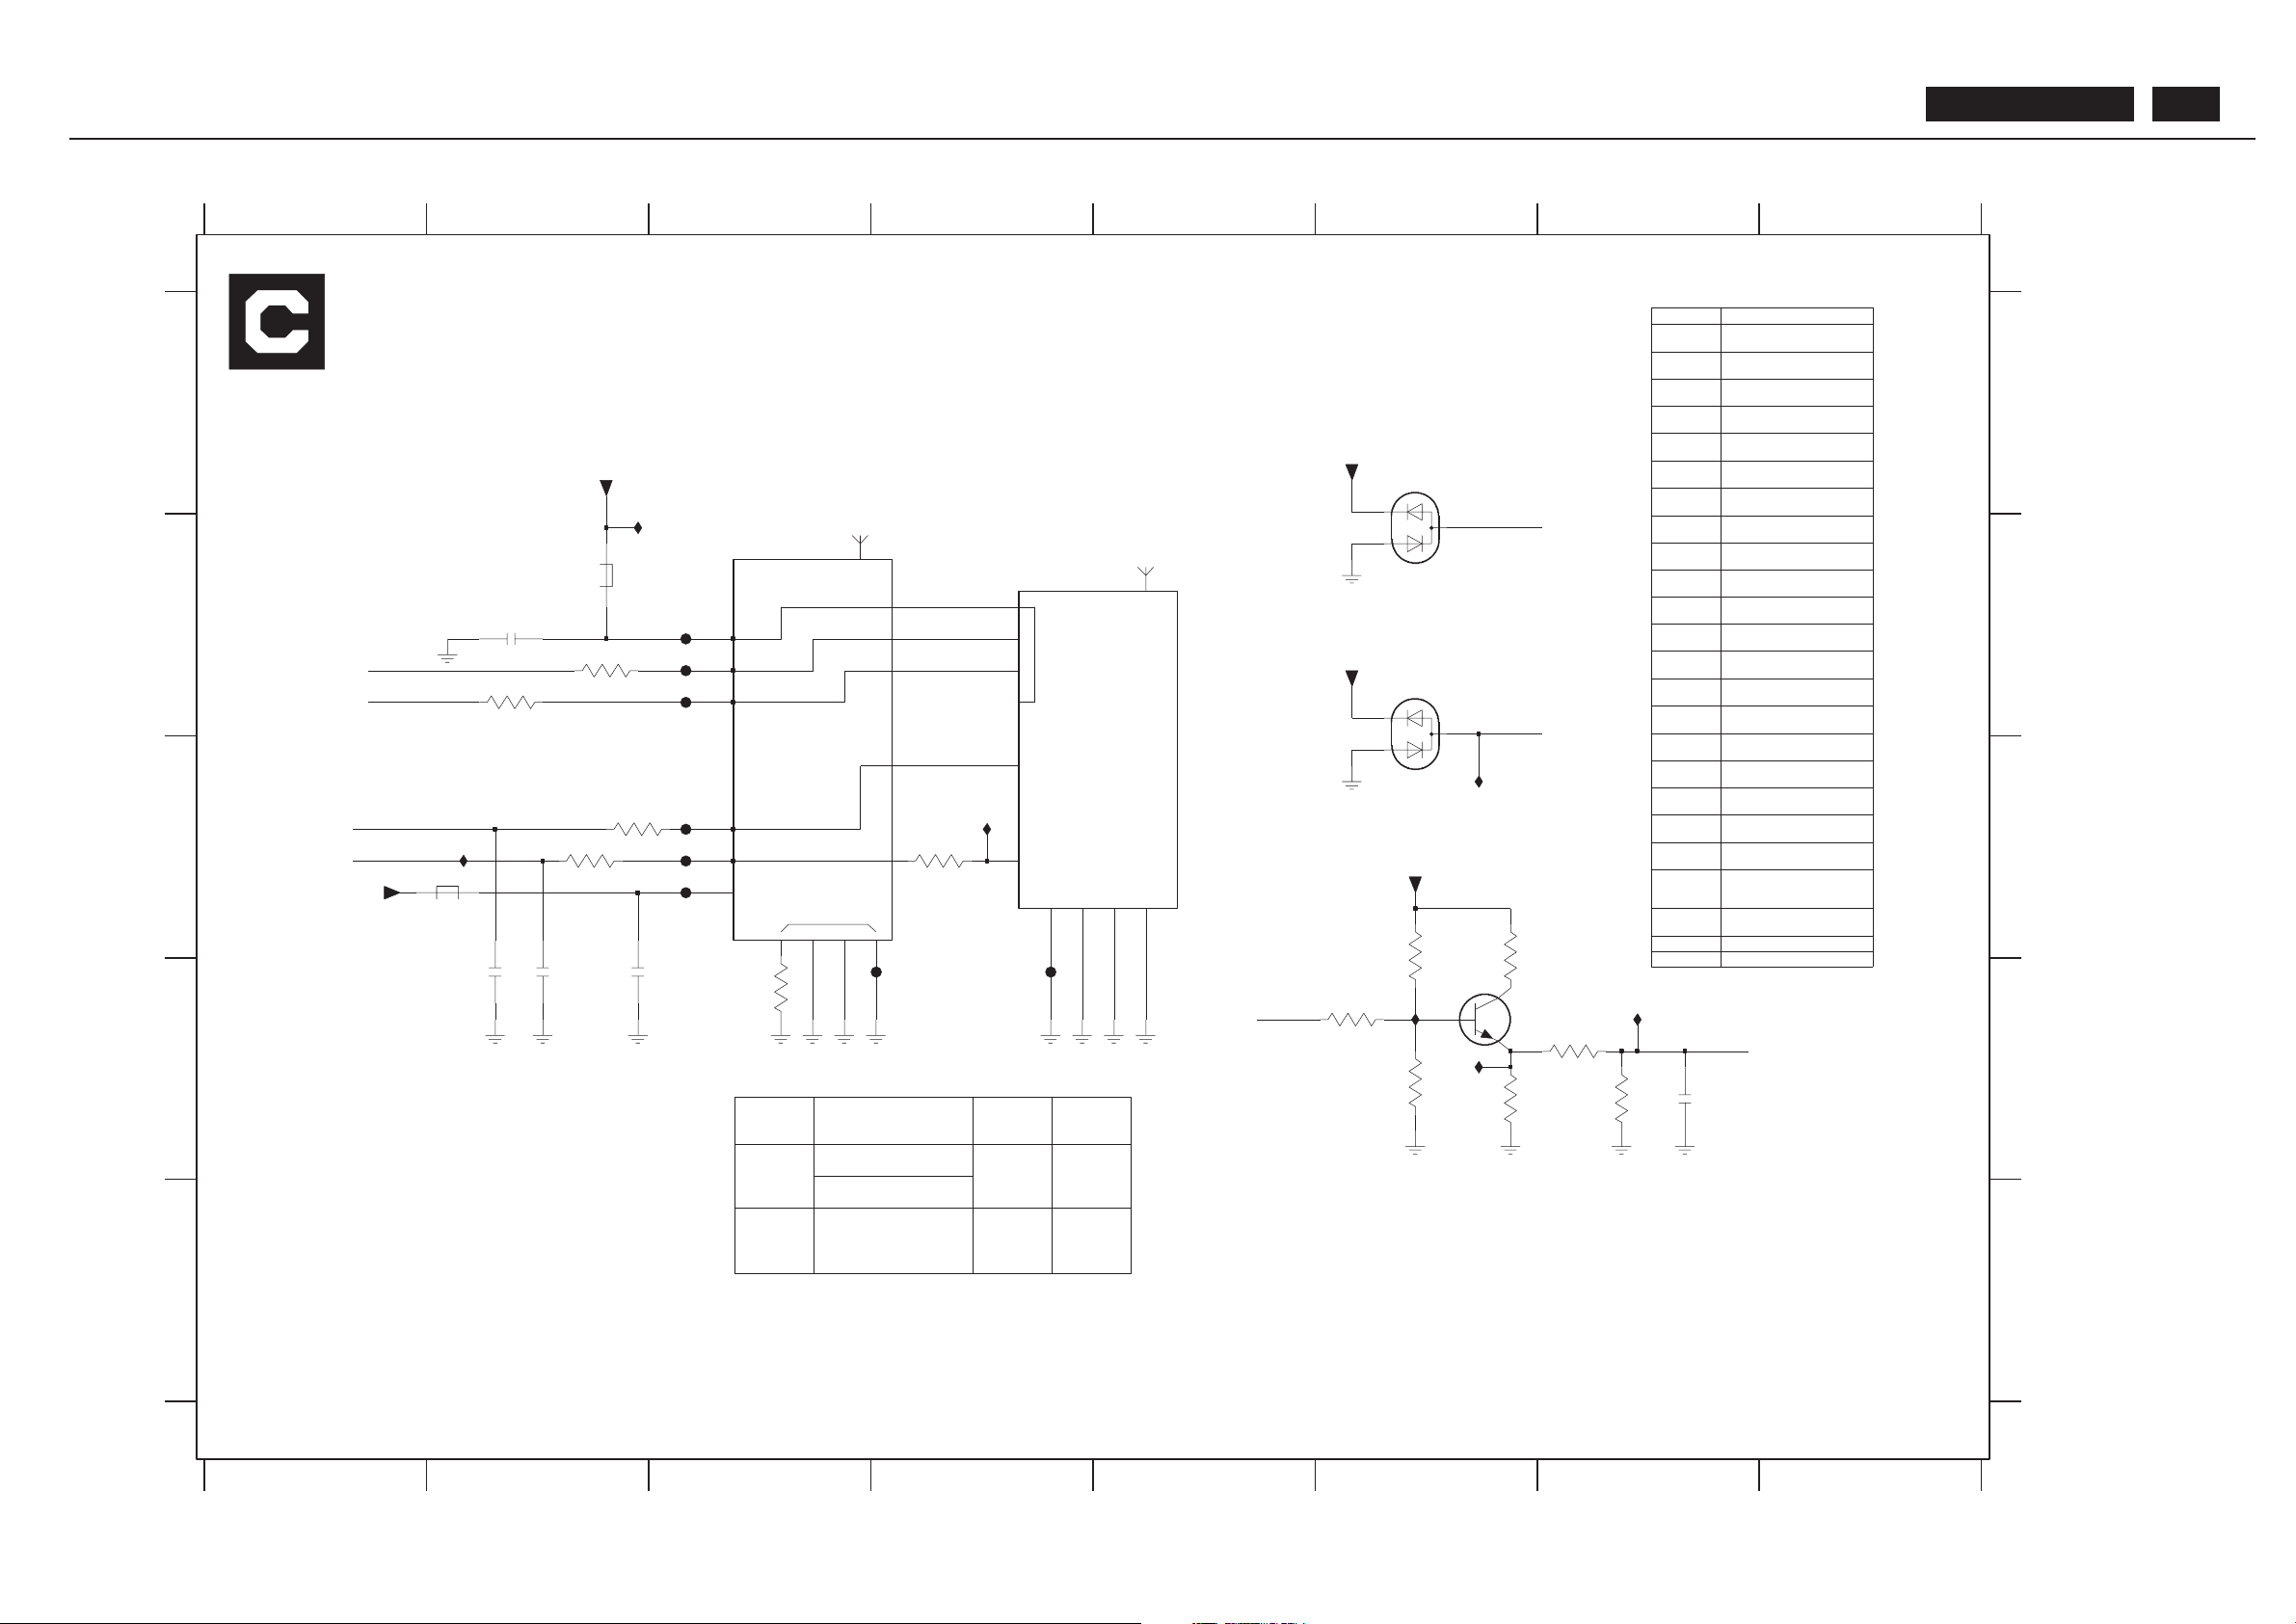
TV Box(V ideo) Tuner Diagram
MT
2345
REF .
TUNER
FQ1236 FOR EMF
FQ1216 FOR DAO
TSVN1-802FR
FOR DAO
[R]
3502 B2
7501 D6
F039 B3
F040 B3
F041 B3
501 ~ 530
A
7
3505 D3
3506 C4
3511 C 6
1
1501
21221 1805643
100R
3502 21221 1805643
100R
678
1
YN
B
1502
8
2501
SB: 60451 x2
TV -BOX PCB
1501 B3
U12 D6
C
D
E
U3 C4
U4 C6
2222241 19876
10u
2502 223886715479
47p
2503 202055294427
100p
2504 2222241 19876
10u
2511 223886715229
22p
3501
E
A
B
2503 D2
PB: 60461
N
C
2511 D7
2504 D2
1502 B4
2501 B2
2502 D2
tun_TSVN1-801
TSVN1-801FR
6502 B6
EXCEPT 1501,1502 WERE CHIP COMPONENTS.
D
56
3503 C2
3504 C2
[R]
3506
5502 C2
3501 B2
F044 C3
F045 D4
F046 D4
I010 A2
I011 C 2
I012 D7
I013 D6
Y
3505
Ref Des Reserved
1501 313914718351
FQ1236/FH-3
1502
F042 C3
F043 C3
6501 A6
234
3506 232270296001
0R
3511 21221 1805665
4K7
3512 21221 1805635
10R
3513 21221 1805643
100R
3514 21221 1805964
75R
3515 21221 1805665
4K7
3516 232270281 102
1K
3517 21221 1805964
3512 C6
3513 D6
3514 D7
3515 D6
3516 D6
3517 D7
5501 B2
THIS P AGE FOR NI
75R
5501 313816874261
32161 1
100MHZ
5502 313816874261
100MHZ
6501 932205042685
6502 932205042685
3503 21221 1805631
0R
3504 232270260189
18R
3505 21221 1805631
0R
0R
3503
0R
3506
3516
1K
3514
75R
4K7
3515
F043
F044
F042
100R
3502
F039
F040
2502
47p
100p
2503
2501
10u
I012
I013
I011
+5TUN
I010
+5T
F046
2511
22p
7501
BC848C
5501
100MHZ
32161 1
F041
6501
3513
100R
3511
4K7
3512
10R
+5TUN
6502
10
NC3
4
SCL
5
SDA
+5TUN
13
+5V_IF
11
2nd_IF_sound
AF_MPX
14 6
AS
CVBS
12
15
16
17
18
1
NC0
NC1
2
NC2
9
10u
FQ1236/F H-3
1501
3
+5
2504
U3
U4
U12
9
VIDEO_PUTPUT
0R
3505
+5
4
AFT_OUTPUT
7
AUDIO_OUTPUT
8
MT1
MT2
MT3
MT4
RF_AGC_OUTPUT
5
SCL
2
SDA
36
SIF_OUTPUT
1502
TSVN1-801FR
3504
18R
F045
100MHZ
5502
3501
100R
75R
3517
MM-CVBS
TUN-CVBS
2ND-IF
+5TUN
2ND-IF
MM-CVBS
SDA-TV1
SCL-TV1
TUN-CVBS
DIAGRAM - I/O BOARD + BNC TERMINAL
BDL4211. . . 72
Page 73
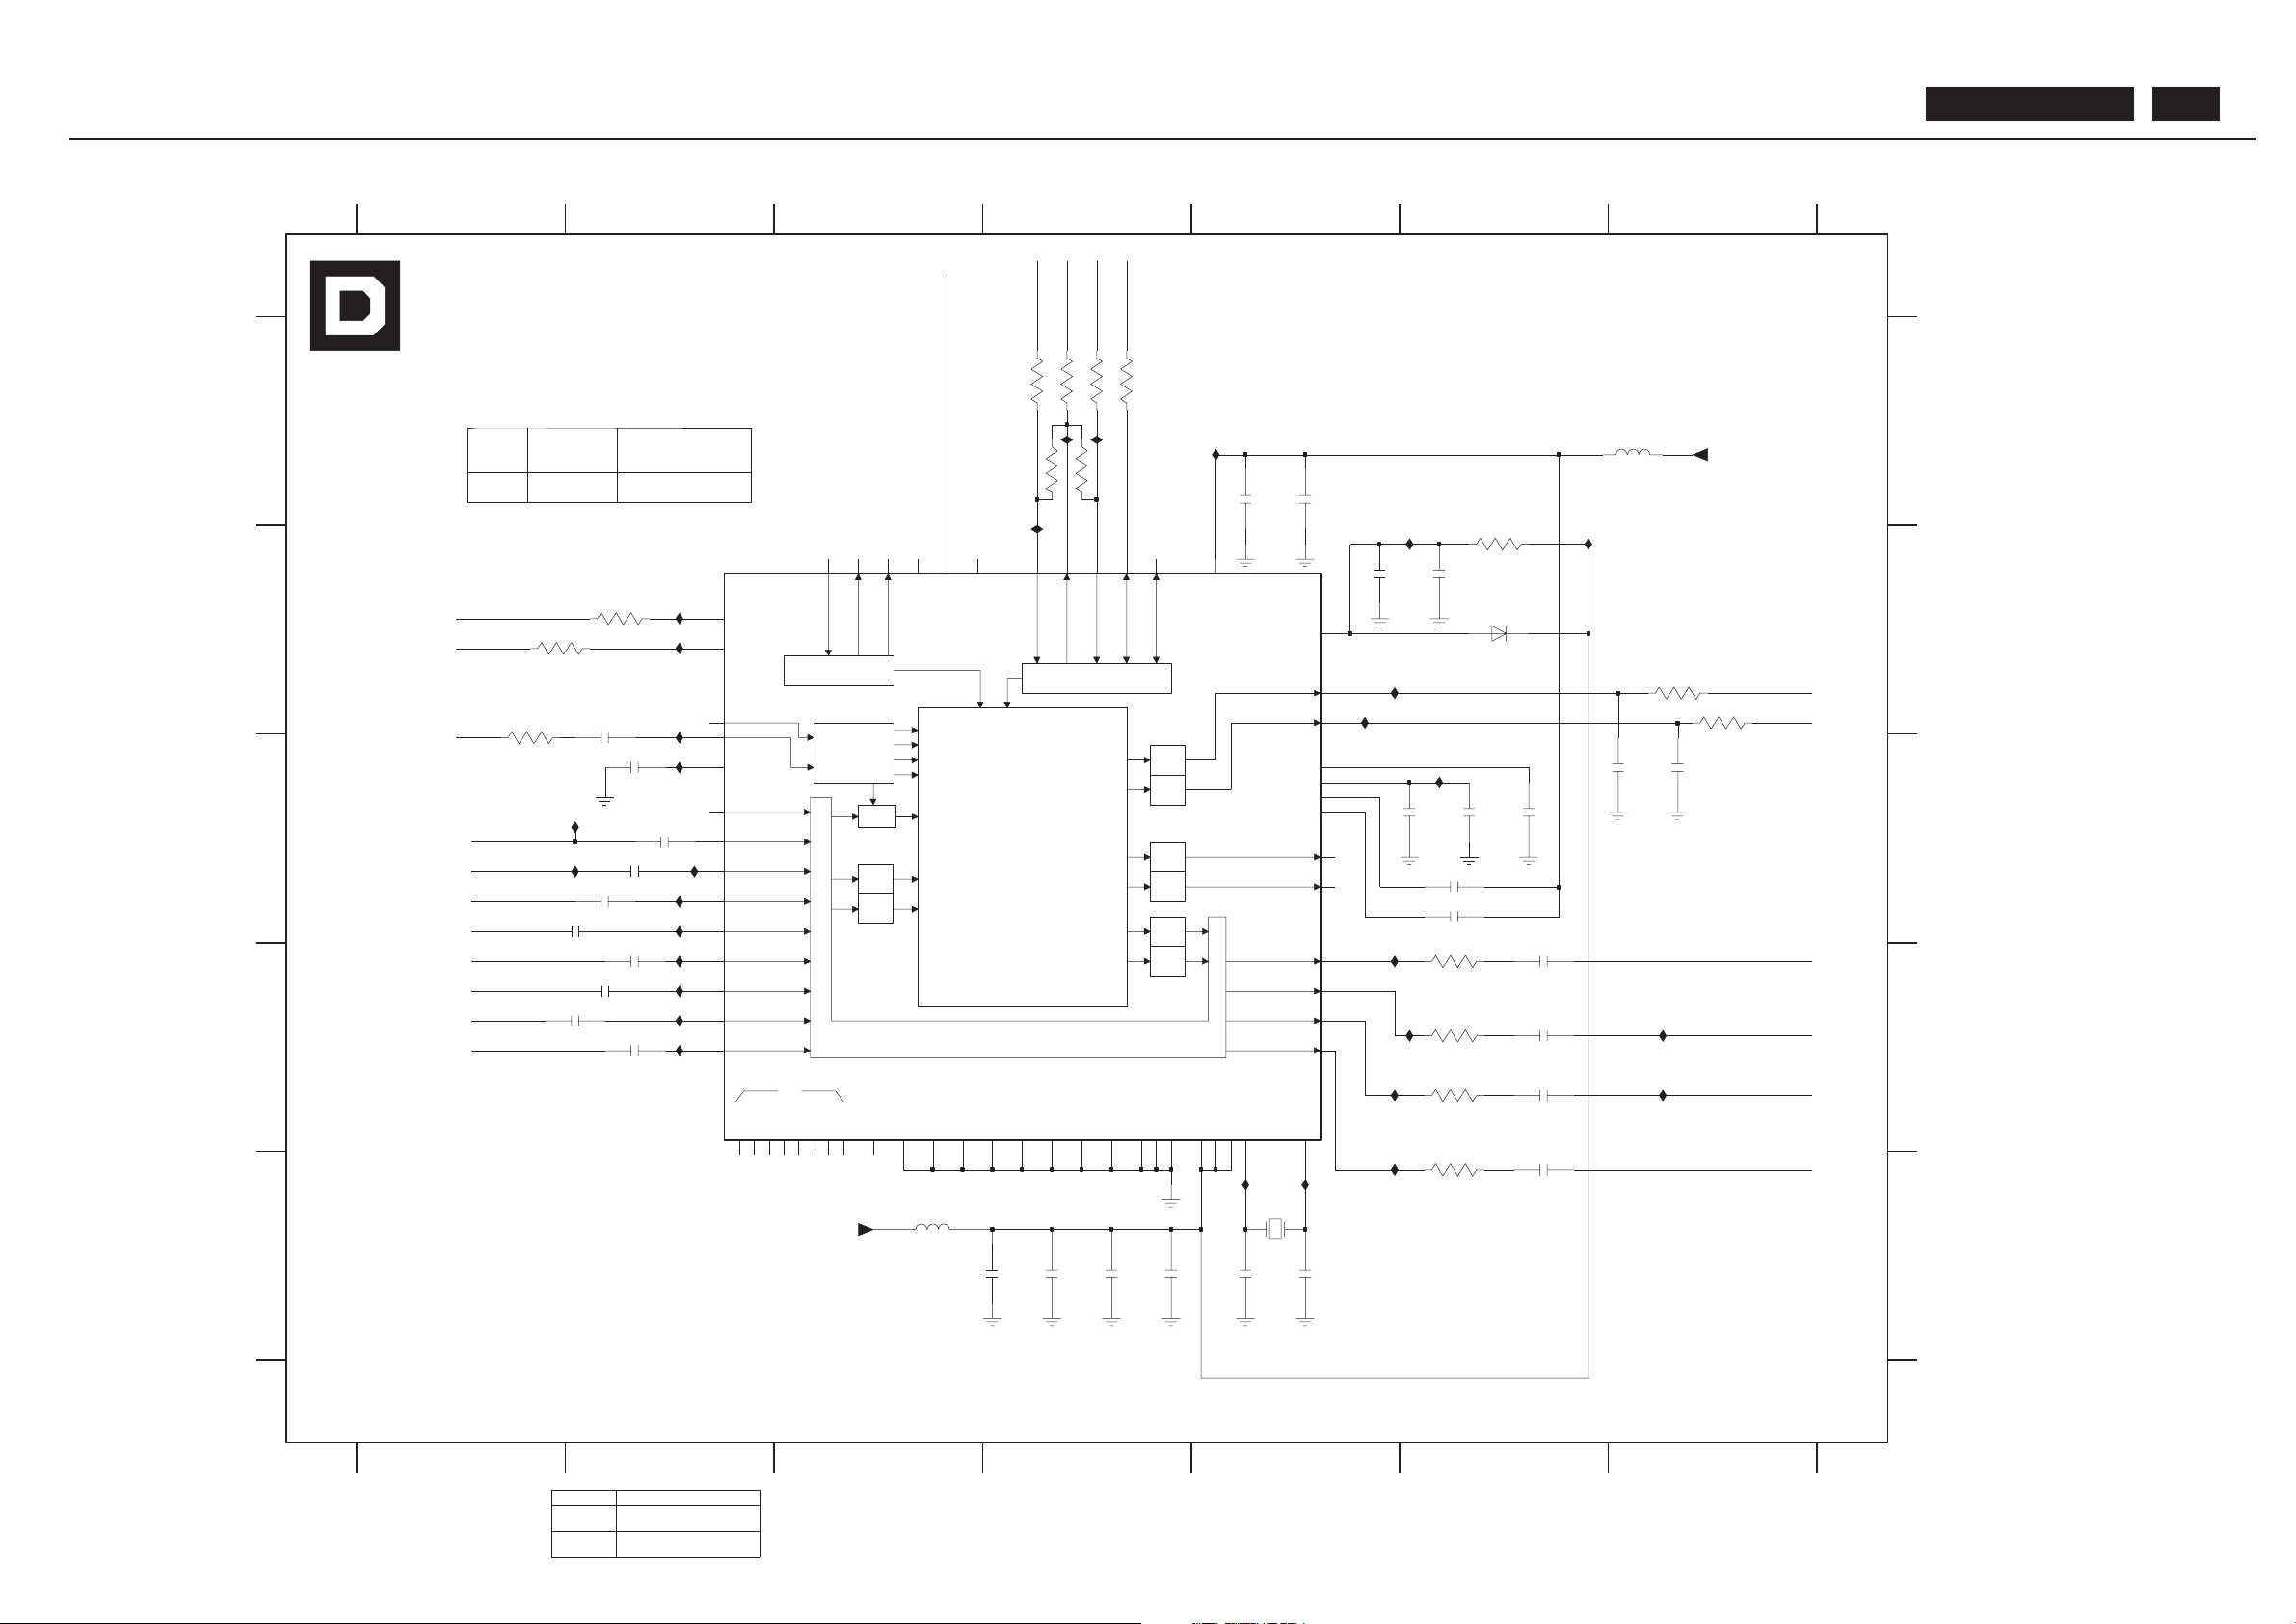
TV Box(V ideo) Audio Decoder Diagram
MONO
SCAR T 1
FM1
FM2
NICAM A
NICAM B
IDENT
SCAR T -L
SCAR T -R
S1 4 I2SL/R I2SL/R
LOUDSPEAKER R
HEADPHONE R
SCAR T -R
DSP
D/A
A/D
SCAR T Switching Facilities
DEMODULA TOR
IDENT
ADR interface
I2S interface
HEADPHONE
SCAR T 1
SCAR T 2
NC
LOUDSPEAKER
LOUDSPEAKER L
HEADPHONE L
SCAR T -L
D/A
D/A
D/A
D/A
D/A
A/D
SCAR T 2
SCAR T 3
SCAR T 4
12
2913 C6
2911 C 2
Ref Des Reserved
3942 21221 1805631
0R
3943 21221 1805631
0R
2904 C2
I041 E5
I042 E5
3916 D6
2924 C6
2925 E4
2926 E5
2927 E5
I020 B2
I019 B6
I018 B6
I017 B4
msp3410G msp3440G
901 ~ 935
2909 D2
34
7901
I016 A4
2934 C6
2914 D2
2915 D2
2916 C7
2917 B5
2918 B6
2919 C6
2903 C2
I032 D5
I033 D2
2928 A5
2929 A5
1
I015 A5
I021 B2
I022 B5
I023 B5
B
I037 D2
I036 D7
I035 D6
I034 D2
DAO
2923 E4
2931 D6
2932 D6
2933 C6
I030 C2
3911 B2
3912 B1
3913 B1
3914 D6
3915 E6
I031 C2
7901 B2
I014 A4
3943 A4
I027 C2
I028 C2
I029 C2
I024 B2
I025 C6
I026 C2
7
A
B
C
D
E
A
654
32
PB: 60461
2920 C5
2921 E3
2922 E4
765
C
D
E
U15 C2
1901 E5
2901 C2
I038 D7
I039 D5
I040 D5
3917 D6
3918 B7
3919 B7
3921 B6
3930 A4
3931 A4
3933 A4
3934 A4
3942 A4
5912 E3
5915 A7
6911 B6
2911
47p
EMF
2902 C2
2905 D2
2906 B2
2907 D6
2908 E6
TV -BOX PCB
SB: 60451 x2
I028
3919
100R
100R
3917
I034
1u
2909
100R
3918
2922
470p
5912
0u1
1u
15p
2927
1n
2913
2903
2934
10u
I035
100R
3915
I032
I019
1u
2914
10u
2921
I030
I023
I024
0R3930
I025
I039
3916
100R
I018
I015
100n
2923
10u
2919
100n
2920
0R
I017
0R
3943
3942
2915
1u
I027
19
VREFT OP
46
XT AL_IN
54
XT AL_OUT
55
I033
SC1_IN_L
SC1_IN_R
45
SC1_OUT_L
29
SC1_OUT_R
28
SC2_IN_L
41
SC2_IN_R
42
SC2_OUT_L
26
SC2_OUT_R
25
SC3_IN_L
38
SC3_IN_R
39
SC4_IN_L
35
36
SC4_IN_R
ST ANDBTQ
63
TESTEN
53
TP
56
VREF127VREF2
I2S_CL
3
I2S_DA_IN1
6
I2S_DA_IN2
12
I2S_DA_OUT
5
I2S_WS
4
MONO_IN
47
NC013NC114NC215NC322NC424NC558NC659NC7
64
RESETQ
16
44
AVSS
48
AVSUP
49
CAPL_A
30
CAPL_M
32
DACA_L
18
DACA_R
17
DACM_L
21
DACM_R
20
DACM_SUB
23
11
DVSS
DVSUP
10
D_CTR_IO_0
61
D_CTR_IO_1
60
I2C_CL
1
I2C_DA
2
ADR_CL
9
ADR_DA
7
ADR_SEL
62
ADR_WS
8
AGNDC
34
AHVSS
33
31
AHVSUP
ANA_IN-
51
ANA_IN1+
50
ANA_IN2+
52
ASG0
43
40
ASG1
ASG2
37
AUD_CL_OUT
57
100n
2925
MSP3410G-QI-B8V3
7901
1u
2901
18M432HZ
1901
100n
2928
3934
0R
2924
10u
0R3931
2932
1u
I021
I014
1u
2902
I026
220n
2917
I031
1u
2904
I038
I036
10u
2918
2905
1u
27K
3921
15p
2929
10u
+5T
I041
2926
I042
2931
1u
I016
100R
3911
3913
0R
I022
2906
15p
+8V
I029
100R
0R3933
1u
2908
3914
10u
1u
2907
U15
I040
2933
I020
I037
3912
100R
6911
2916
1n
S-AUD-L
SC-AUD-R
5915
0u1
BAS32L
PC-AUDIO-R
SC-AUD-L
2ND-IF
SDA-TV1
SCL-TV1
PVR-OUT -R
PVR-OUT -L
I2S-DA-CLK
I2S-DA-IN2
I2S-DA-OUT
I2S-DA-IN1
CVI-AUD-R
CVI-AUD-L
S-AUD-R
SC-OUT -L
SC-OUT -R
MSP-OUT -L
MSP-OUT -R
MSP-INT
PC-AUDIO-L
BDL4211. . . 73
Page 74
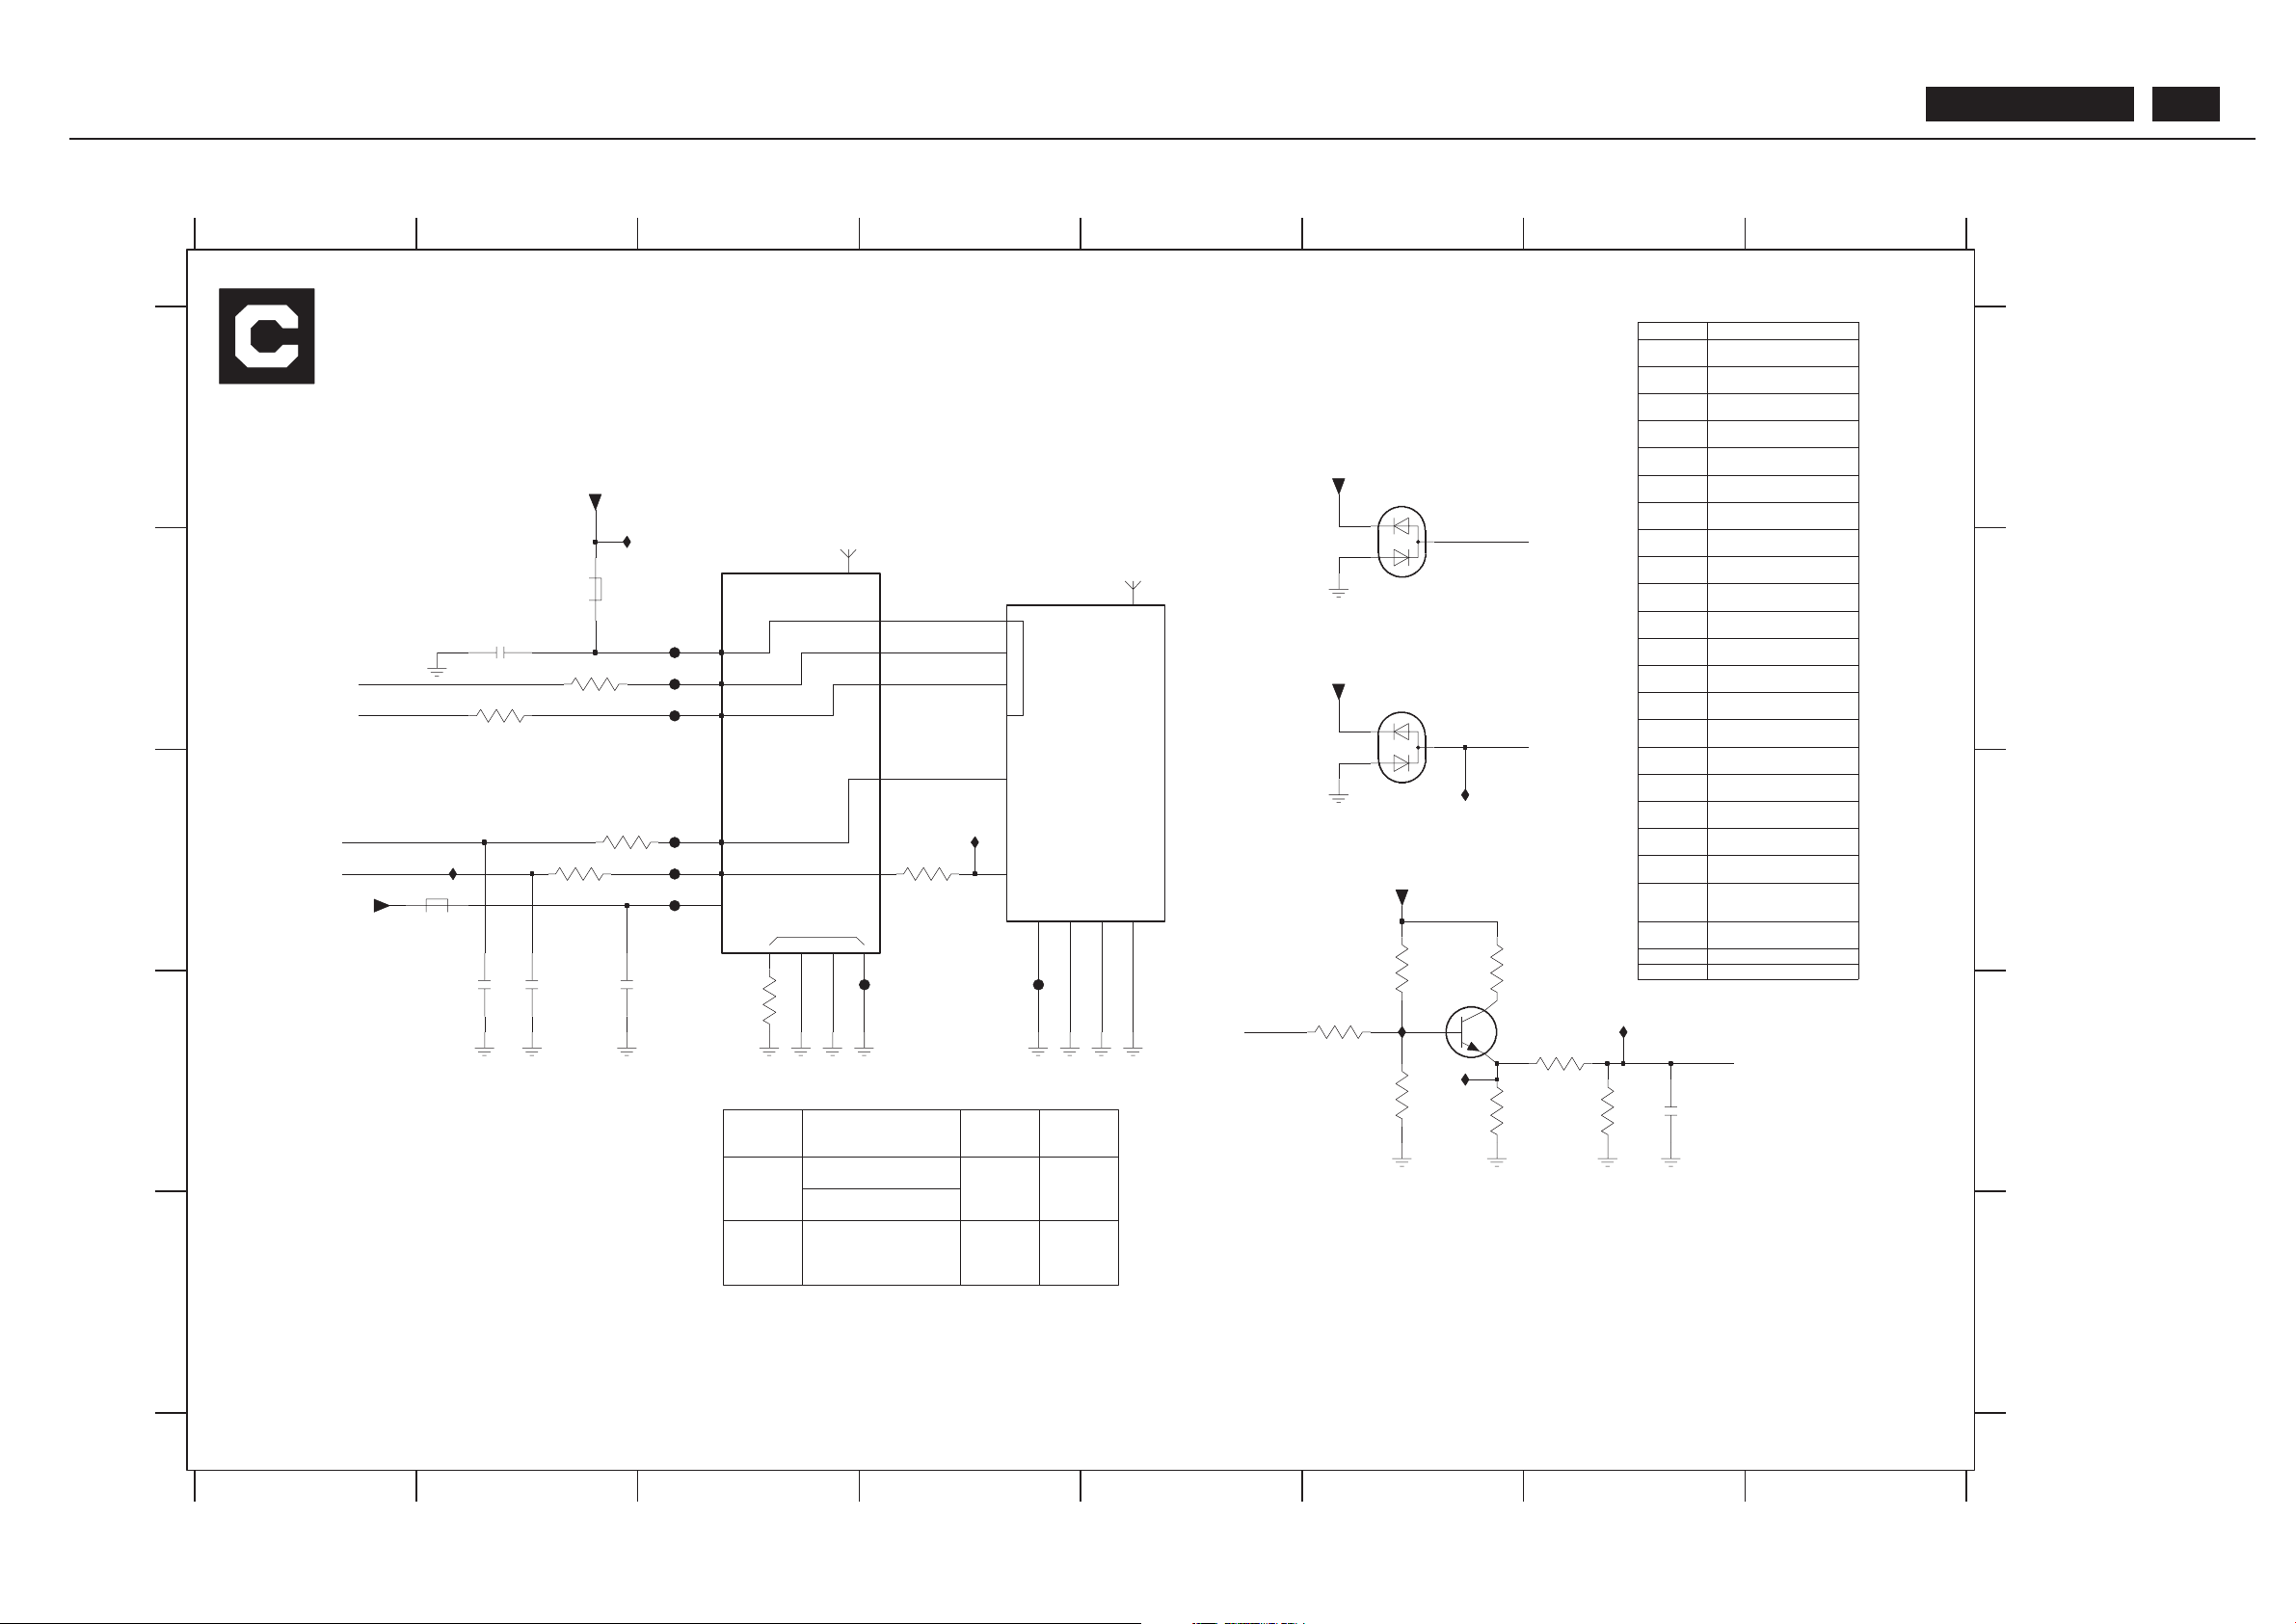
TV Box(V ideo) EMF Scart Diagram
MT
2345
REF .
TUNER
FQ1236 FOR EMF
FQ1216 FOR DAO
TSVN1-802FR
FOR DAO
[R]
3502 B2
7501 D6
F039 B3
F040 B3
F041 B3
501 ~ 530
A
7
3505 D3
3506 C4
3511 C 6
1
1501
21221 1805643
100R
3502 21221 1805643
100R
678
1
YN
B
1502
8
2501
SB: 60451 x2
TV -BOX PCB
1501 B3
U12 D6
C
D
E
U3 C4
U4 C6
2222241 19876
10u
2502 223886715479
47p
2503 202055294427
100p
2504 2222241 19876
10u
2511 223886715229
22p
3501
E
A
B
2503 D2
PB: 60461
N
C
2511 D7
2504 D2
1502 B4
2501 B2
2502 D2
tun_TSVN1-801
TSVN1-801FR
6502 B6
EXCEPT 1501,1502 WERE CHIP COMPONENTS.
D
56
3503 C2
3504 C2
[R]
3506
5502 C2
3501 B2
F044 C3
F045 D4
F046 D4
I010 A2
I011 C 2
I012 D7
I013 D6
Y
3505
Ref Des Reserved
1501 313914718351
FQ1236/FH-3
1502
F042 C3
F043 C3
6501 A6
234
3506 232270296001
0R
3511 21221 1805665
4K7
3512 21221 1805635
10R
3513 21221 1805643
100R
3514 21221 1805964
75R
3515 21221 1805665
4K7
3516 232270281 102
1K
3517 21221 1805964
3512 C6
3513 D6
3514 D7
3515 D6
3516 D6
3517 D7
5501 B2
THIS P AGE FOR NI
75R
5501 313816874261
32161 1
100MHZ
5502 313816874261
100MHZ
6501 932205042685
6502 932205042685
3503 21221 1805631
0R
3504 232270260189
18R
3505 21221 1805631
0R
0R
3503
0R
3506
3516
1K
3514
75R
4K7
3515
F043
F044
F042
100R
3502
F039
F040
2502
47p
100p
2503
2501
10u
I012
I013
I011
+5TUN
I010
+5T
F046
2511
22p
7501
BC848C
5501
100MHZ
32161 1
F041
6501
3513
100R
3511
4K7
3512
10R
+5TUN
6502
10
NC3
4
SCL
5
SDA
+5TUN
13
+5V_IF
11
2nd_IF_sound
AF_MPX
14 6
AS
CVBS
12
15
16
17
18
1
NC0
NC1
2
NC2
9
10u
FQ1236/F H-3
1501
3
+5
2504
U3
U4
U12
9
VIDEO_PUTPUT
0R
3505
+5
4
AFT_OUTPUT
7
AUDIO_OUTPUT
8
MT1
MT2
MT3
MT4
RF_AGC_OUTPUT
5
SCL
2
SDA
36
SIF_OUTPUT
1502
TSVN1-801FR
3504
18R
F045
100MHZ
5502
3501
100R
75R
3517
MM-CVBS
TUN-CVBS
2ND-IF
+5TUN
2ND-IF
MM-CVBS
SDA-TV1
SCL-TV1
TUN-CVBS
BDL4211. . . 74
Page 75
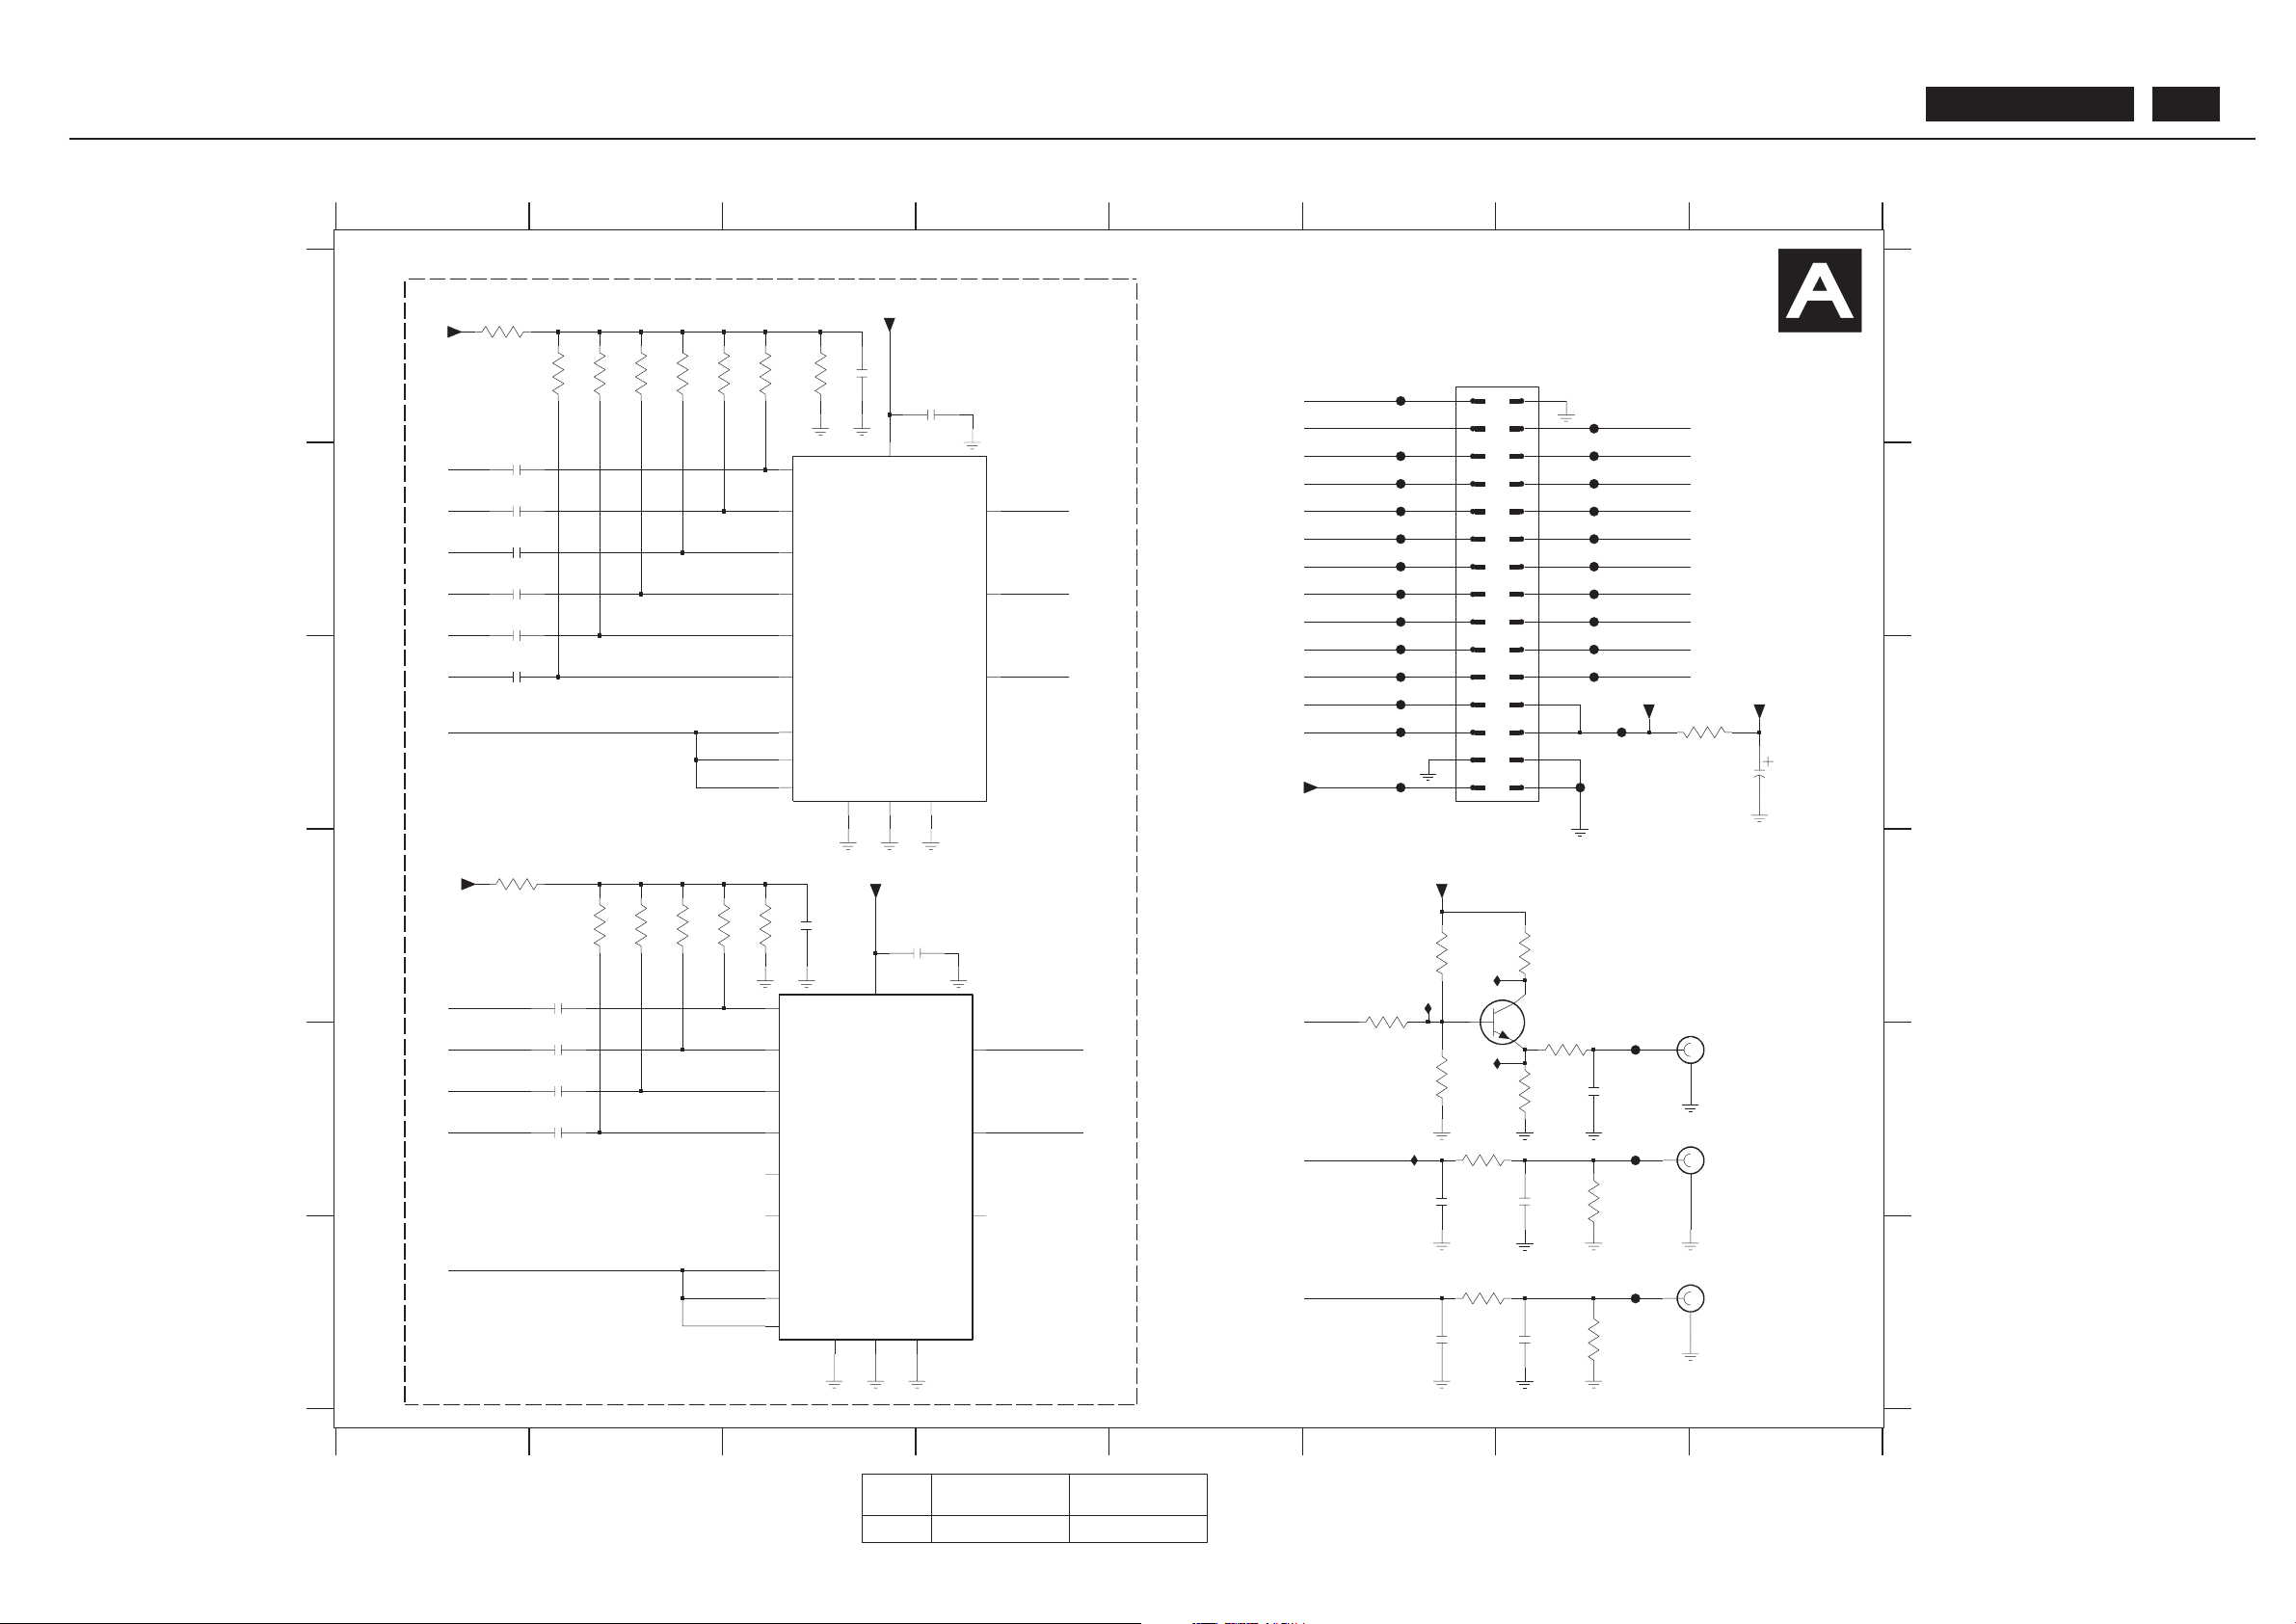
TV Box(TV) I/O Diagram
REF .
WE, AP,
NAFT A, CHINA, NAFT A VIDEO
WE VIDEO
1602 2422 026 05546 NOT USED
8
2625 F7
2624 F6
2623 E7
U8 D6
U6 E6
U5 D6
42
76
F023 C6
5
3629 F6
2622 E6
2621 E7
6
NI FOR AP , NAFT A, CHINA
7603 D7
1
2616 E2
5
C
3
3625 E6
3624 E7
8
A
B
A
7
7602 E3
U9 E6
1601 A6
3614 D2
SB: 58441 x2
3603 A2
3602 A2
3601 A1
7601 B3
F002 A7
3627 E6
3628 E7
2627 C8
3630 F7
3612 D3
3611 D1
3609 A3
3607 A3
1602-A E8
1602-B E7
1602-C F8
2601 A4
2602 B1
3632 C8
PB: 58451
3622 D7
3623 D6
E
F
3626 E7
2615 E2
F
F007 B6
F008 B7
F009 B6
F010 B7
F01 1 B 7
FOR WE,WE VIDEO
2604 B1
2603 B1
2608 A3
2607 C1
2606 B1
TV -BOX PCB
3621 D6
3616 D2
3615 D2
F001 A6
601 ~ 635
1W
F019 C7
B
C
D
3613 D2
F022 C7
2605 B1
2614 E2
F020 C6
F003 B6
F016 B7
F017 C6
2613 D2
2612 D4
2611 D3
F015 B6
F006 B7
F005 B6
F004 B7
D
E
F018 C7
3604 A2
3605 A2
3606 A2
NAFT A VIDEO
EXCEPT 1601,1602,2627,3632 WERE CHIP COMPONENTS.
F021 C6
F025 E7
F026 E7
F027 F7
F012 B6
F013 B7
F014 B6
F066 C6
F024 C7
F024
3622
10R
F008
F001
3615
47K
47K
3616
+5TUN
1u
2606
4K7
3625
3626
1K
0R82
3632
F013
F022
F026
47K
3606
100n
+5T
F004
2612
2613
1u
1u
2614
47K
3602
F003
1u
2604
3609
10K
F009
F021
220K
3628
1602-B
3
4
1X
1
1Y
3
1Z
11
A
10
B
9
C
8
GND
6
INH
16
VCC
7
VEE
14
X-COM
15
Y-COM
4
Z-COM
TC74L VX4053FT
7601
12
0X
2
0Y
5
0Z
13
F017
3611
10K
2607
1u
10u
2611
+5T
F002
+5T
2605
1u
3624
47R
F027
3603
47K
U6
U8
F025
2603
1u
1u
2602
U5
3630
220K
F020
F019
2608
10u
F012
F007
47K
3613
3614
47K
100n
2601
+5T
2624
330p
1u
2615
+5T
F016
F066
U9
10K
3601
1602-C
5
6
3623
100R
F010
2621
22p
3605
47K
10K
3612
6
7
8
9
+8V
330p
2622
2
20
21
22
23
24
25
26
27
28
29
3
30
4
5
1601
1
10
11
12
13
14
15
16
17
18
19
69415
F014
3621
4K7
F015
13
1Y
1
1Z
3
A
11
B
10
C
9
GND
8
INH
6
VCC
16
VEE
7
X-COM
14
Y-COM
15
Z-COM
4
7602
TC74L VX4053FT
0X
12
0Y
2
0Z
5
1X
F005
3607
47K
F01 1
1602-A
1
2
3629
100R
2616
1u
F023
F006
7603
BC848C
100R
3627
2623
330p330p
2625
+5T
47K
3604
16
1000u
2627
F018
SC-CVI-SW
SYNC-SC-CVI
SYNC-SC-CVI
SC-CVI-SW
AV-CVBS
FBL-SC
ST -SC
AV-CVBSAV-CVBS-RCA
AV-CVBS-SC
Y
I2S-DA-IN2
I2S-DA-OUT
AV-CVBS-SC
SCL-TV1
Y-SVHS
PC-AUDIO-R
D4-DET
Y
G-SC
Pr
R-SC
G-Y
B-Pb
R-Pr
Pb
B-SC
SC-CVI-SW
PC-AUDIO-L
TUN-CVBS
R-Pr
MSP-INT
PVR-OUT -R
PVR-OUT -L
MM-CVBS
MSP-OUT -L
B-PbG-Y
C-SVHS
I2S-DA-CLK
I2S-DA-IN1
MSP-OUT -R
SDA-TV1
BDL4211. . . 75
Page 76
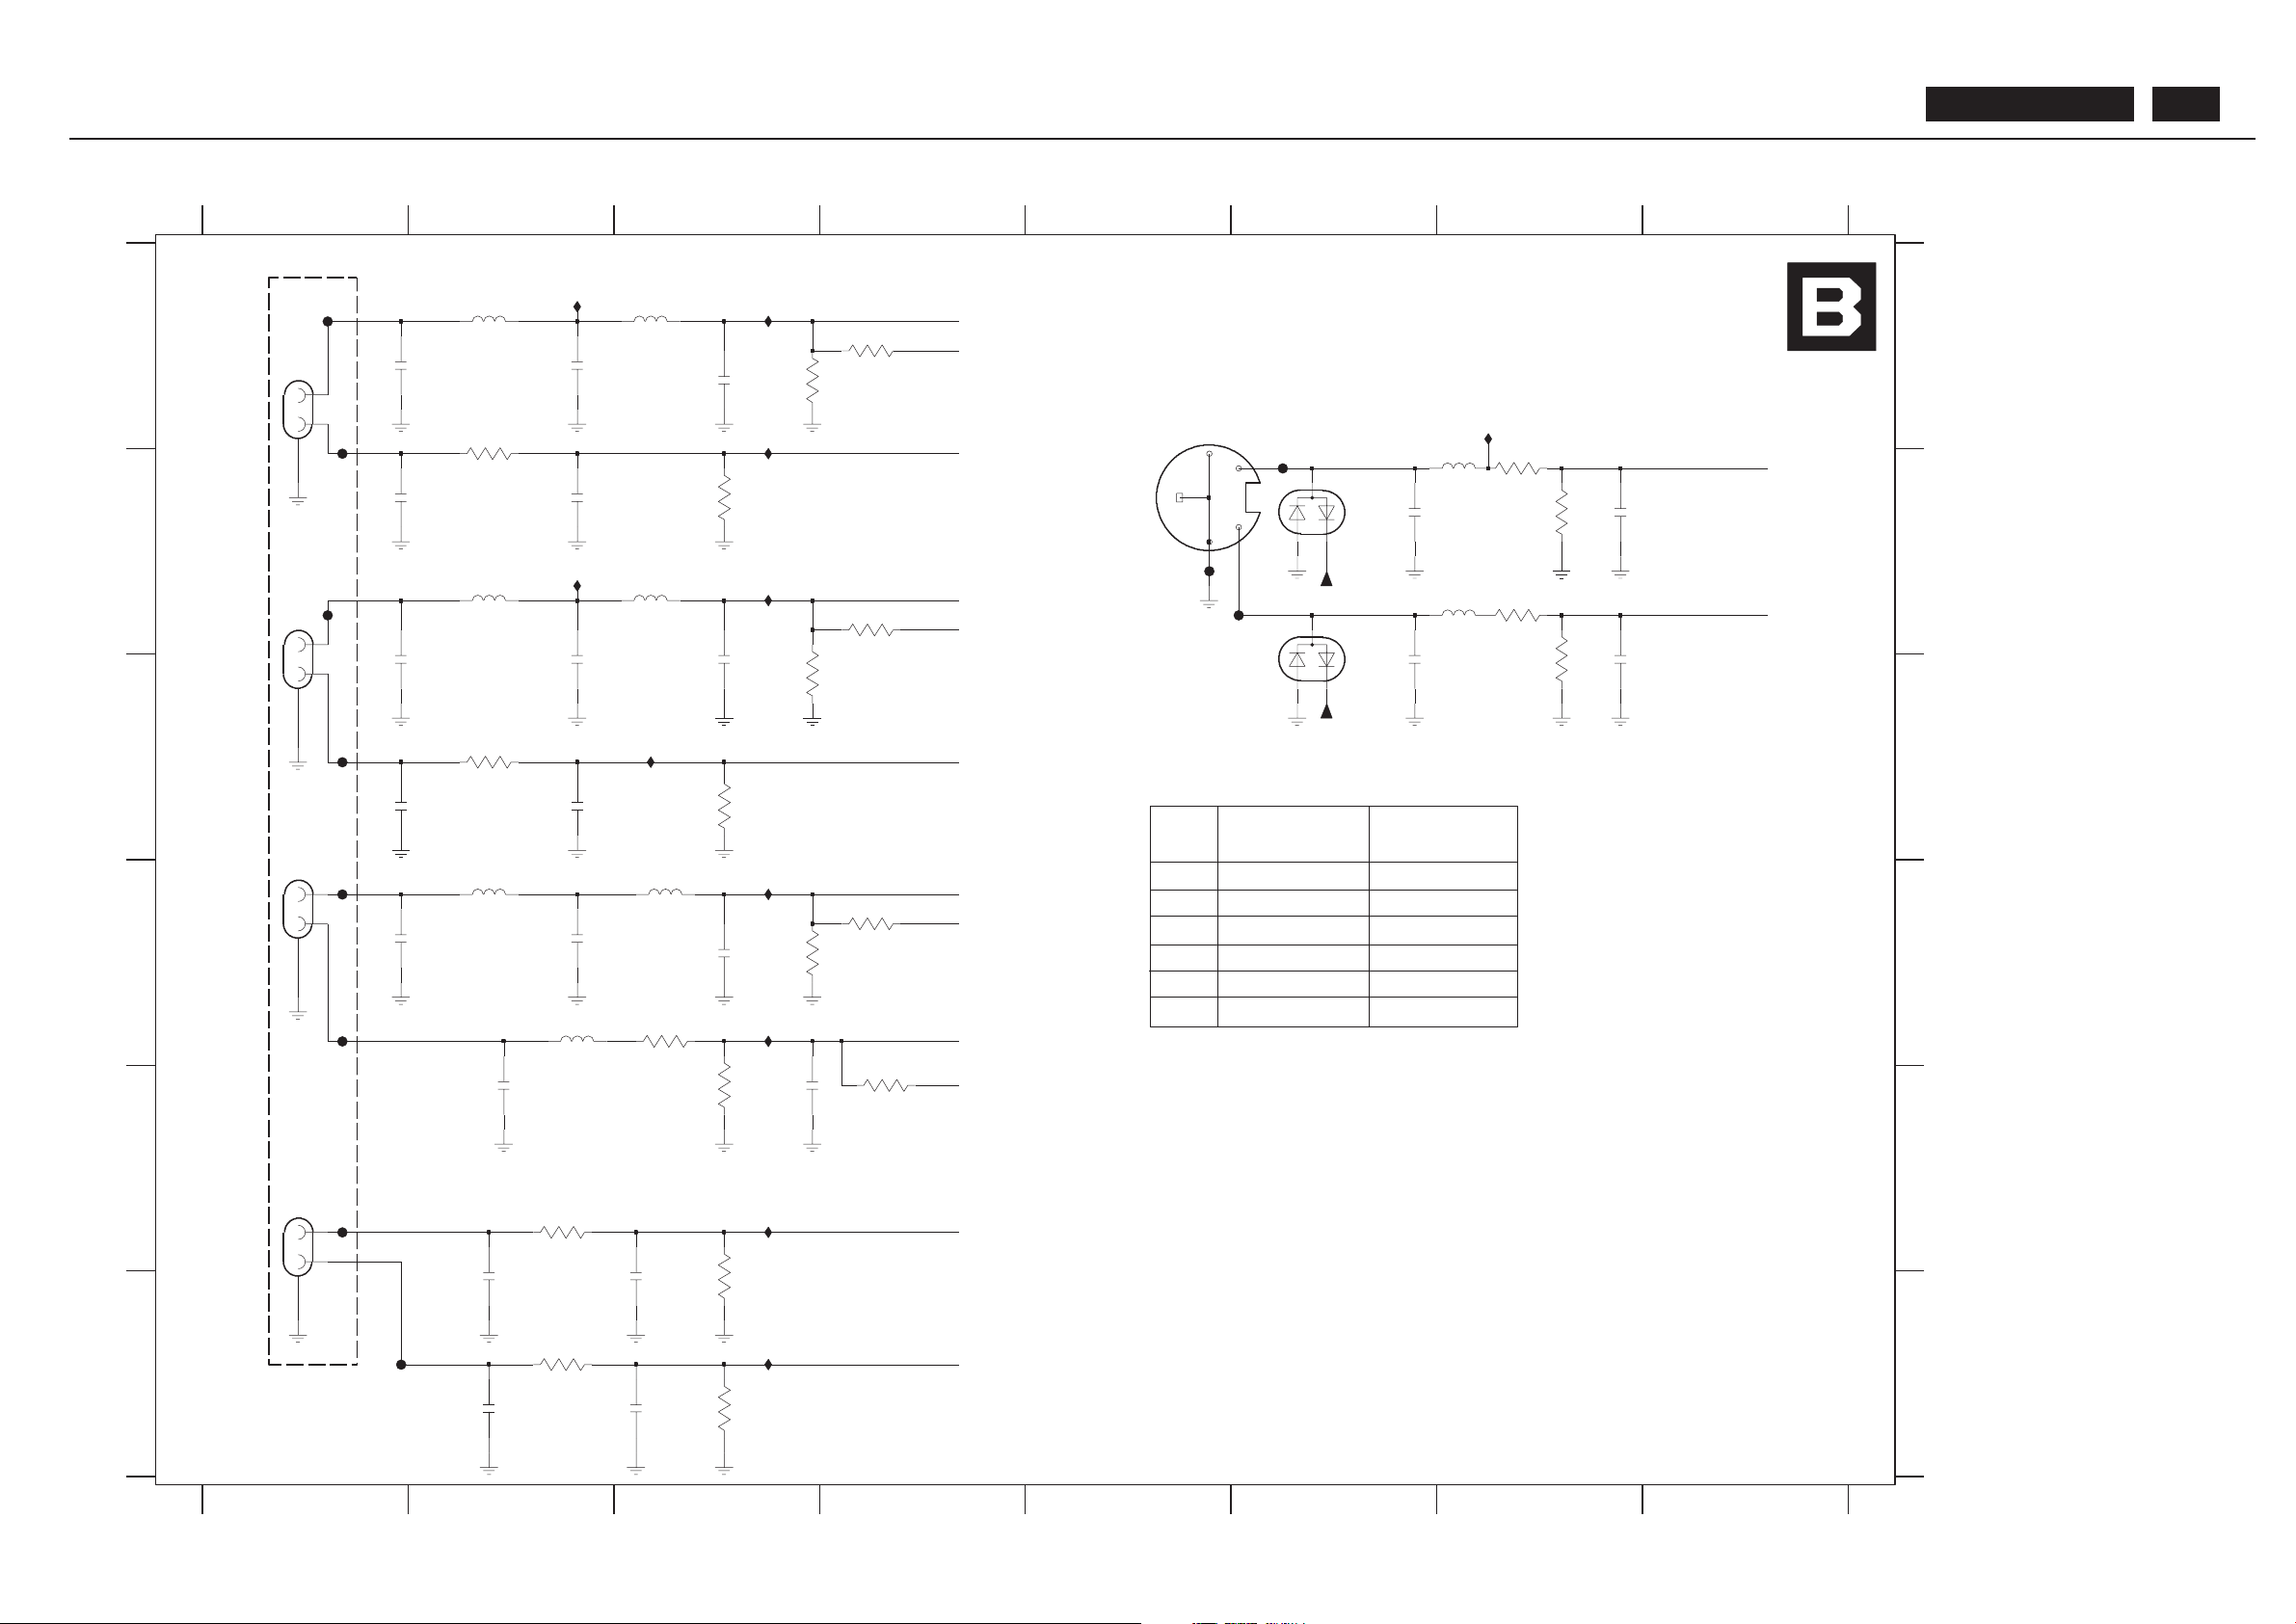
TV Box(TV) CVI/S-V ideo Diagram
NOT USED
3641 NOT USED 21221 1805631
I004 B2
I005 B3
I006 C3
I007 D3
I008 D3
PB: 58451
SB: 58441 x2
TV -BOX PCB
I009 E3
I044 A2
I045 F3
3645
3650
21221 1805631
0R
0R
5643 B7
5644 B7
5645 B2
5646 B3
5647 D2
6643 NOT USED
NOT USED
NOT USED
5648 D3
5649 D2
6642 B6
6643 B6
F028 A1
F029 B6
F030 B1
F031 B5
F032 B1
F033 B6
F034 C1
F035 D1
F036 D1
F037 E1
F038 F1
I001 A3
I002 A7
I003 A3
3654 E3
3655 E2
3656 F3
3657 F2
3658 F3
21221 1805631
0R
640 ~ 679
NOT USED
3661 B7
3662 B7
3663 B7
3664 C7
5641 A2
5642 A3
2663 F2
2664 F3
2671 B6
2672 B7
2673 C6
6642
3651
NOT USED
0R
21221 1805631NOT USED
2674 C7
3641 A4
3642 A3
3643 A2
3644 B3
3645 B4
3646 C3
3647 C2
3648 C3
3650 E4
3651 D4
3652 D3
3653 D3
1641-D A1
1642 A5
2641 A1
2642 A2
2643 A3
EXCEPT 1641,1642 WERE CHIP COMPONENTS.
2644 B1
2645 B2
2646 C1
2647 C2
2648 C3
2651 C1
2652 C2
2653 D1
2654 D2
2655 D3
2656 E2
2657 E3
2661 F2
2662 F3
REF .
12345678
12345678
A
B
C
D
E
F
A
B
C
D
E
F
1641-A E1
1641-B C1
1641-C B1
WE
120p
2647
WE VIDEO
NAFT A VIDEO
AP
NAFT A
CHINA
0R
3650
F032
+5ESD
5645
0u56
3656
27K
I006
18R
3653
I004
F035
2672
22p
F038
F037
3661
18R
F031
I044
68p
2641
3641
0R
75R
3652
2663
330p
1K
3647
I045
F030
3644
27K
6643
BAV99L T1
5649
0u1
0u1
5643
330p
2661
I002
0u56
5648
I009
I003
I005
I001
I007
3663
18R
I008
100p
5644
0u1
2673
330p
2645
2644
330p
1641-B
69057
10
3
4
75R
0u56
5646
68p
2643
3646
5641
0u56
2662
330p
27K
3658
3655
1K
0u56
5642
3642
75R
68p
2655
2657
22p
F028
56R
3654
120p
2654
120p
2671
100p
2642
F036
3662
56R
1642
1
24
35
68
+5ESD
69015
2646
68p
2674
22p
1K
3657
F034
27K
330p
2652
3643
1K
3648
F029
F033
5
6
2651
330p
3645
0R
69057
1641-C
11
1641-A
69057
9
1
2
5647
0u56
2648
68p
BAV99L T1
6642
56R
3664
3651
0R
68p
2653
2656
100p
12
7
8
330p
2664
Pb
B-Pb
AV-CVBS-RCA
AV-CVBS
1641-D
69057
CVI-AUD-L
CVI-AUD-R
Y
G-Y
Pr
R-Pr
C-SVHS
Y-SVHS
S-AUD-R
S-AUD-L
BDL4211. . . 76
Page 77
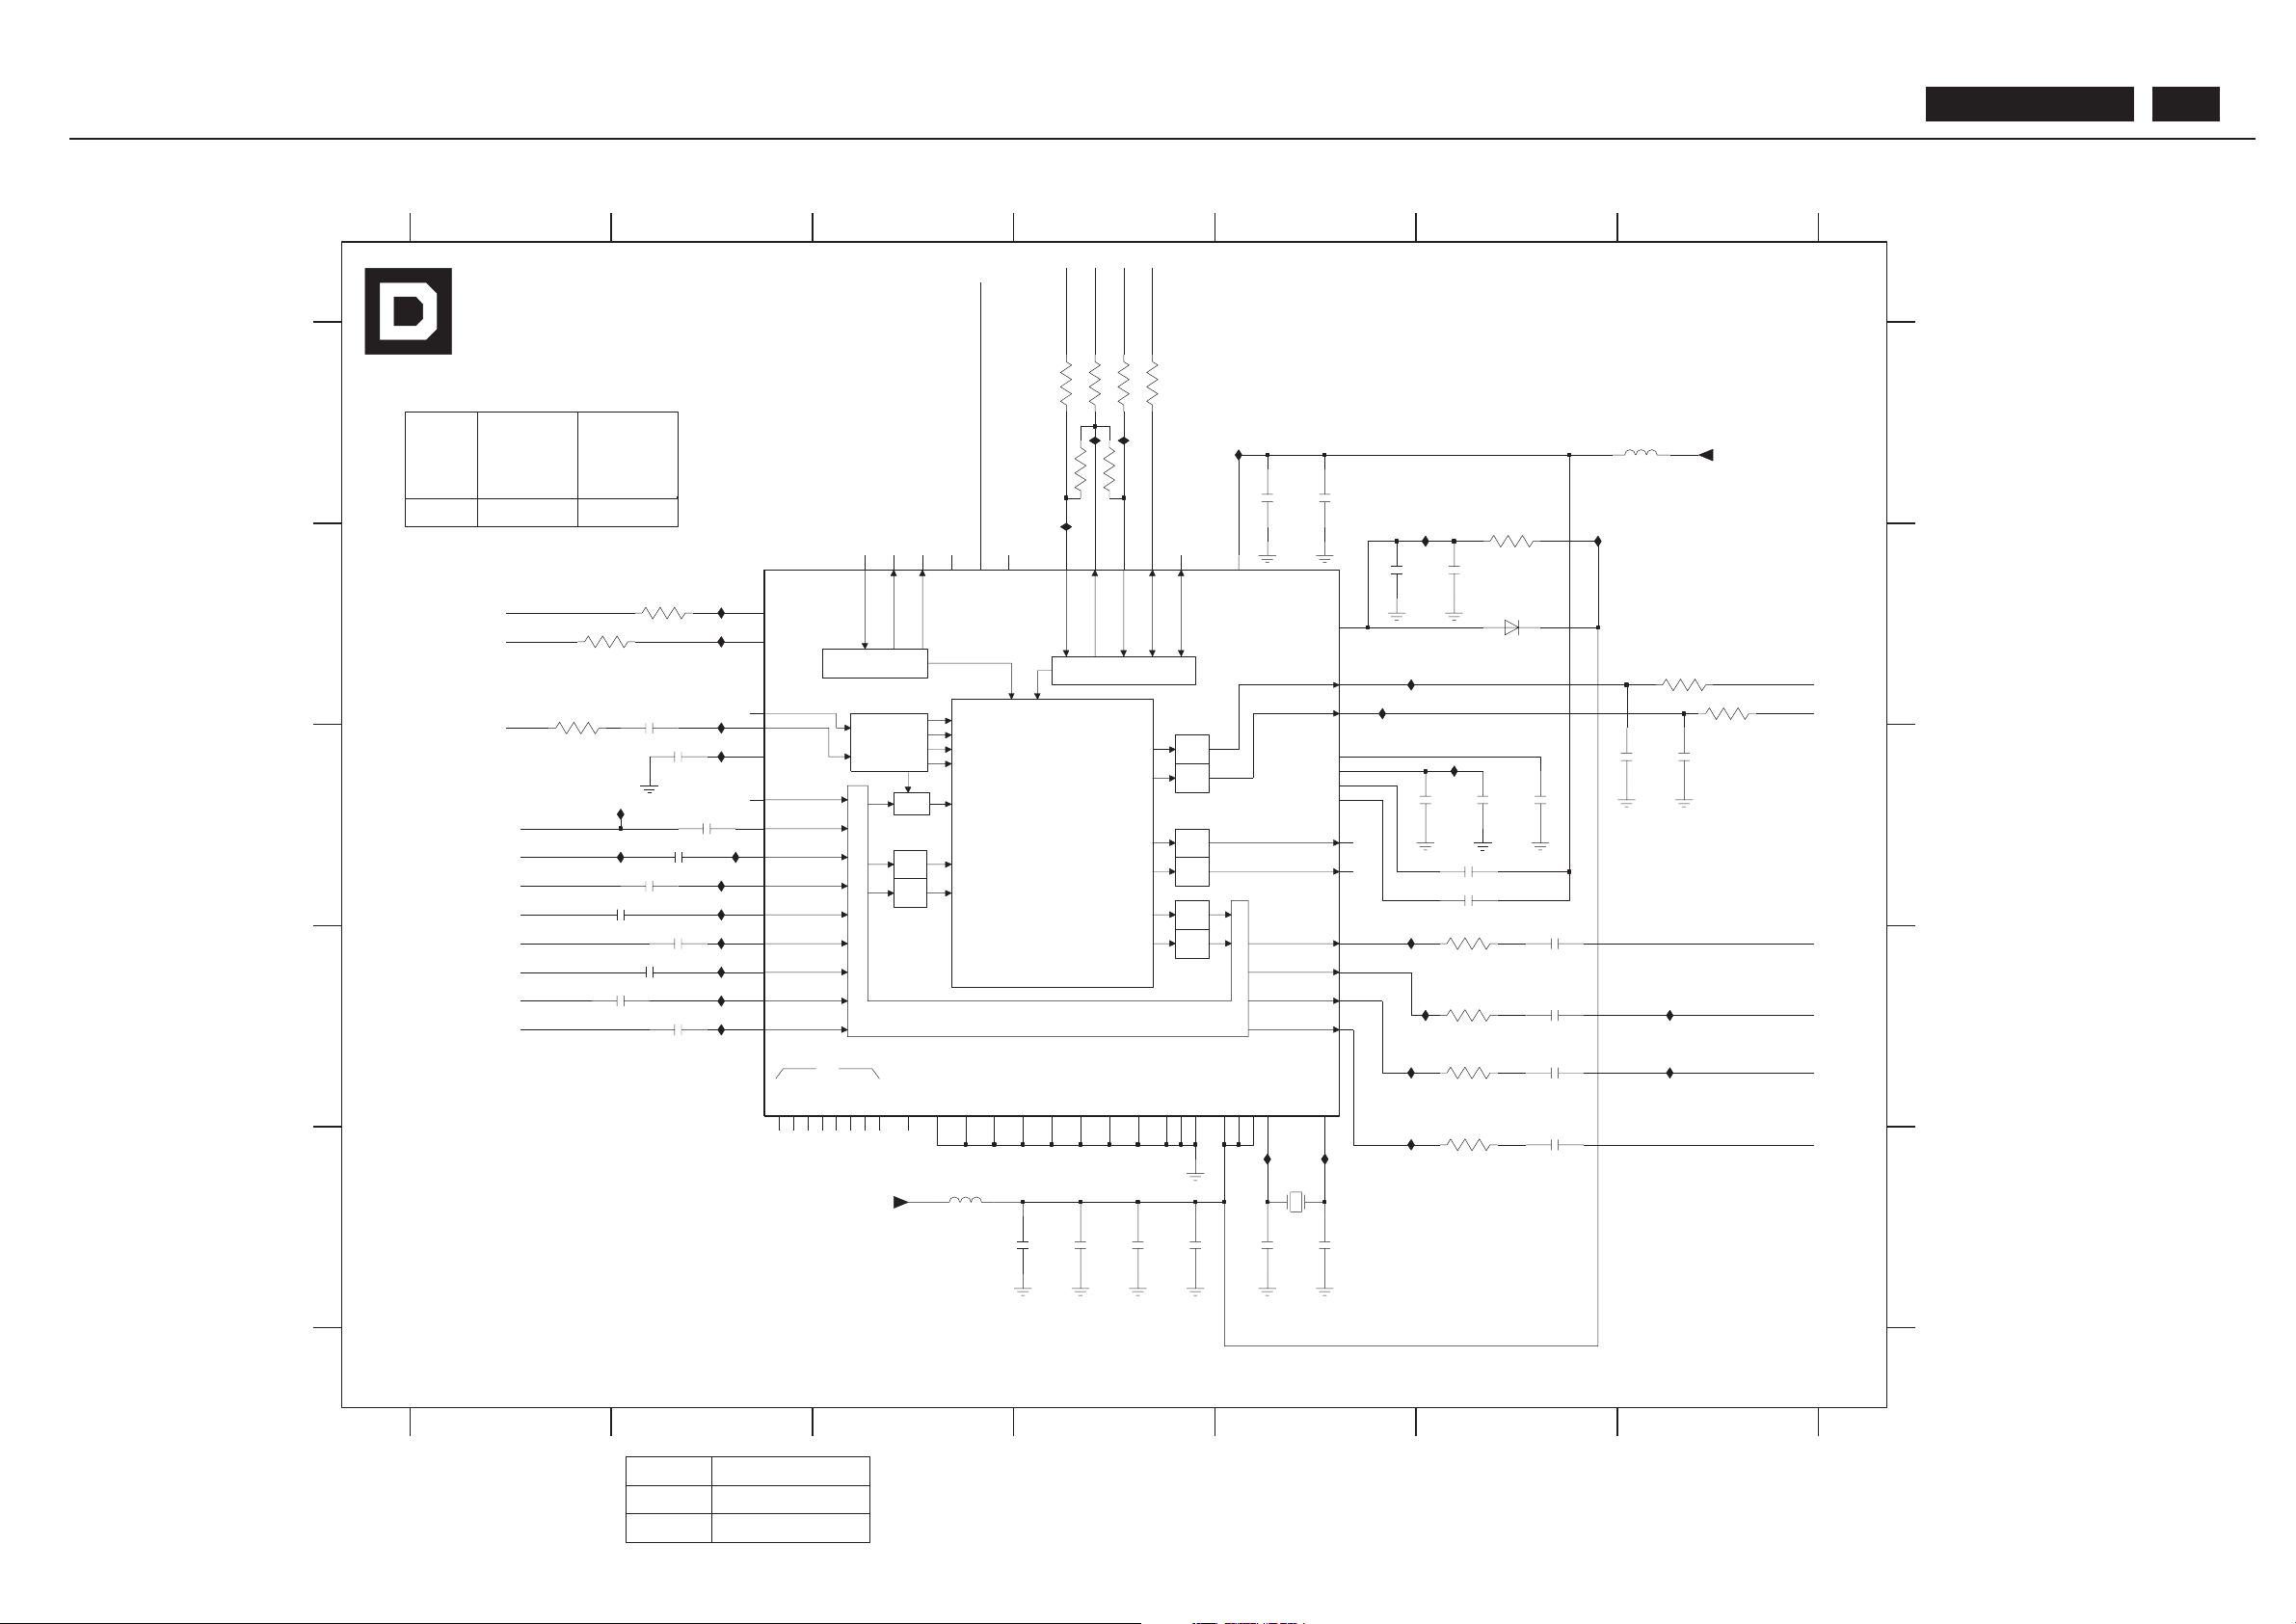
TV Box(TV) Audio Decoder Diagram
MONO
SCAR T 1
FM1
FM2
NICAM A
NICAM B
IDENT
SCAR T- L
SCAR T- R
S1 4 I2SL/R I2SL/R
LOUDSPEAKER R
HEADPHONE R
SCAR T- R
DSP
D/A
A/D
SCAR T Switching Facilities
DEMODULA TOR
IDENT
ADR interface
I2S interface
HEADPHONE
SCAR T 1
SCAR T 2
NC
LOUDSPEAKER
LOUDSPEAKER L
HEADPHONE L
SCAR T- L
D/A
D/A
D/A
D/A
D/A
A/D
SCAR T 2
SCAR T 3
SCAR T 4
3921 B6
3930 A4
3931 A4
3933 A4
3934 A4
3942 A4
5912 E3
5915 A7
6911 B6
7901 B2
I014 A4
3943 A4
I027 C2
I028 C2
I029 C2
I024 B2
I025 C6
I026 C2
21221 1805631
I019 B6
I018 B6
I017 B4
msp3410G msp3440G
901 ~ 935
2909 D2
3412
2913 C6
2911 C2
I038 D7
I039 D5
I040 D5
3917 D6
3918 B7
3919 B7
I016 A4
2934 C6
2914 D2
2915 D2
2916 C7
2917 B5
2918 B6
2919 C6
2903 C2
2904 C2
I041 E5
I042 E5
3916 D6
2924 C6
2925 E4
2926 E5
2927 E5
I020 B2
I015 A5
I021 B2
I022 B5
I023 B5
7901
2923 E4
2931 D6
2932 D6
2933 C6
I030 C2
3911 B2
3912 B1
3913 B1
3914 D6
3915 E6
I031 C2
I032 D5
I033 D2
2928 A5
2929 A5
1
C
D
E
A
654
32
B
3942
21221 1805631
0R
3943
I037 D2
I036 D7
I035 D6
I034 D2
Ref Des Reserved
2905 D2
2906 B2
2907 D6
2908 E6
TV -BOX PCB
SB: 58441 x2
PB: 58451
2920 C5
2921 E3
2922 E4
765
C
D
E
U15 C2
1901 E5
2901 C2
2902 C2
7
A
B
2911
47p
WE, AP,
CHINA
WE VIDEO
NAFT A VIDEO
NAFT A
REF .
0R
3917
I028
3919
100R
100R
3918
I034
1u
2909
0u1
100R
2922
470p
5912
2903
1u
15p
2927
10u
1n
2913
2934
I019
I035
100R
3915
I032
10u
2921
1u
2914
I023
I030
I025
I024
0R3930
I015
I039
3916
100R
I018
100n
2923
10u
2919
100n
2920
0R
I017
0R
3943
3942
2915
1u
I027
VREF127VREF2
19
VREFT OP
46
XT AL_IN
54
XT AL_OUT
55
I033
RESETQ
16
44
SC1_IN_L
SC1_IN_R
45
SC1_OUT_L
29
SC1_OUT_R
28
SC2_IN_L
41
SC2_IN_R
42
SC2_OUT_L
26
SC2_OUT_R
25
SC3_IN_L
38
SC3_IN_R
39
SC4_IN_L
35
36
SC4_IN_R
ST ANDBTQ
63
TESTEN
53
TP
56
1
I2C_DA
2
I2S_CL
3
I2S_DA_IN1
6
I2S_DA_IN2
12
I2S_DA_OUT
5
I2S_WS
4
MONO_IN
47
NC013NC114NC215NC3
22
NC424NC558NC659NC7
64
37
AUD_CL_OUT
57
AVSS
48
AVSUP
49
CAPL_A
30
CAPL_M
32
DACA_L
18
DACA_R
17
DACM_L
21
DACM_R
20
DACM_SUB
23
11
DVSS
DVSUP
10
D_CTR_IO_0
61
D_CTR_IO_1
60
I2C_CL
ADR_CL
9
ADR_DA
7
ADR_SEL
62
ADR_WS
8
AGNDC
34
AHVSS
33
31
AHVSUP
ANA_IN-
51
ANA_IN1+
50
ANA_IN2+
52
ASG0
43
40
ASG1
ASG2
100n
2925
MSP3410G-QI-B8V3
7901
2928
1u
2901
18M432HZ
1901
100n
3934
0R
2924
10u
0R3931
2932
1u
I021
I014
1u
2902
I026
220n
2917
I031
1u
2904
I038
I036
10u
2918
2905
1u
27K
3921
+5T
15p
2929
10u
I041
2926
I042
2931
1u
I016
100R
3911
3913
0R
I022
2906
15p
+8V
I029
100R
0R3933
1u
2908
3914
10u
1u
2907
U15
I040
2933
I020
I037
3912
100R
6911
2916
1n
S-AUD-L
SC-AUD-R
5915
0u1
BAS32L
PC-AUDIO-R
SC-AUD-L
2ND-IF
SDA-TV1
SCL-TV1
PVR-OUT -R
PVR-OUT -L
I2S-DA-CLK
I2S-DA-IN2
I2S-DA-OUT
I2S-DA-IN1
CVI-AUD-R
CVI-AUD-L
S-AUD-R
SC-OUT -L
SC-OUT -R
MSP-OUT -L
MSP-OUT -R
MSP-INT
PC-AUDIO-L
BDL4211. . . 77
Page 78
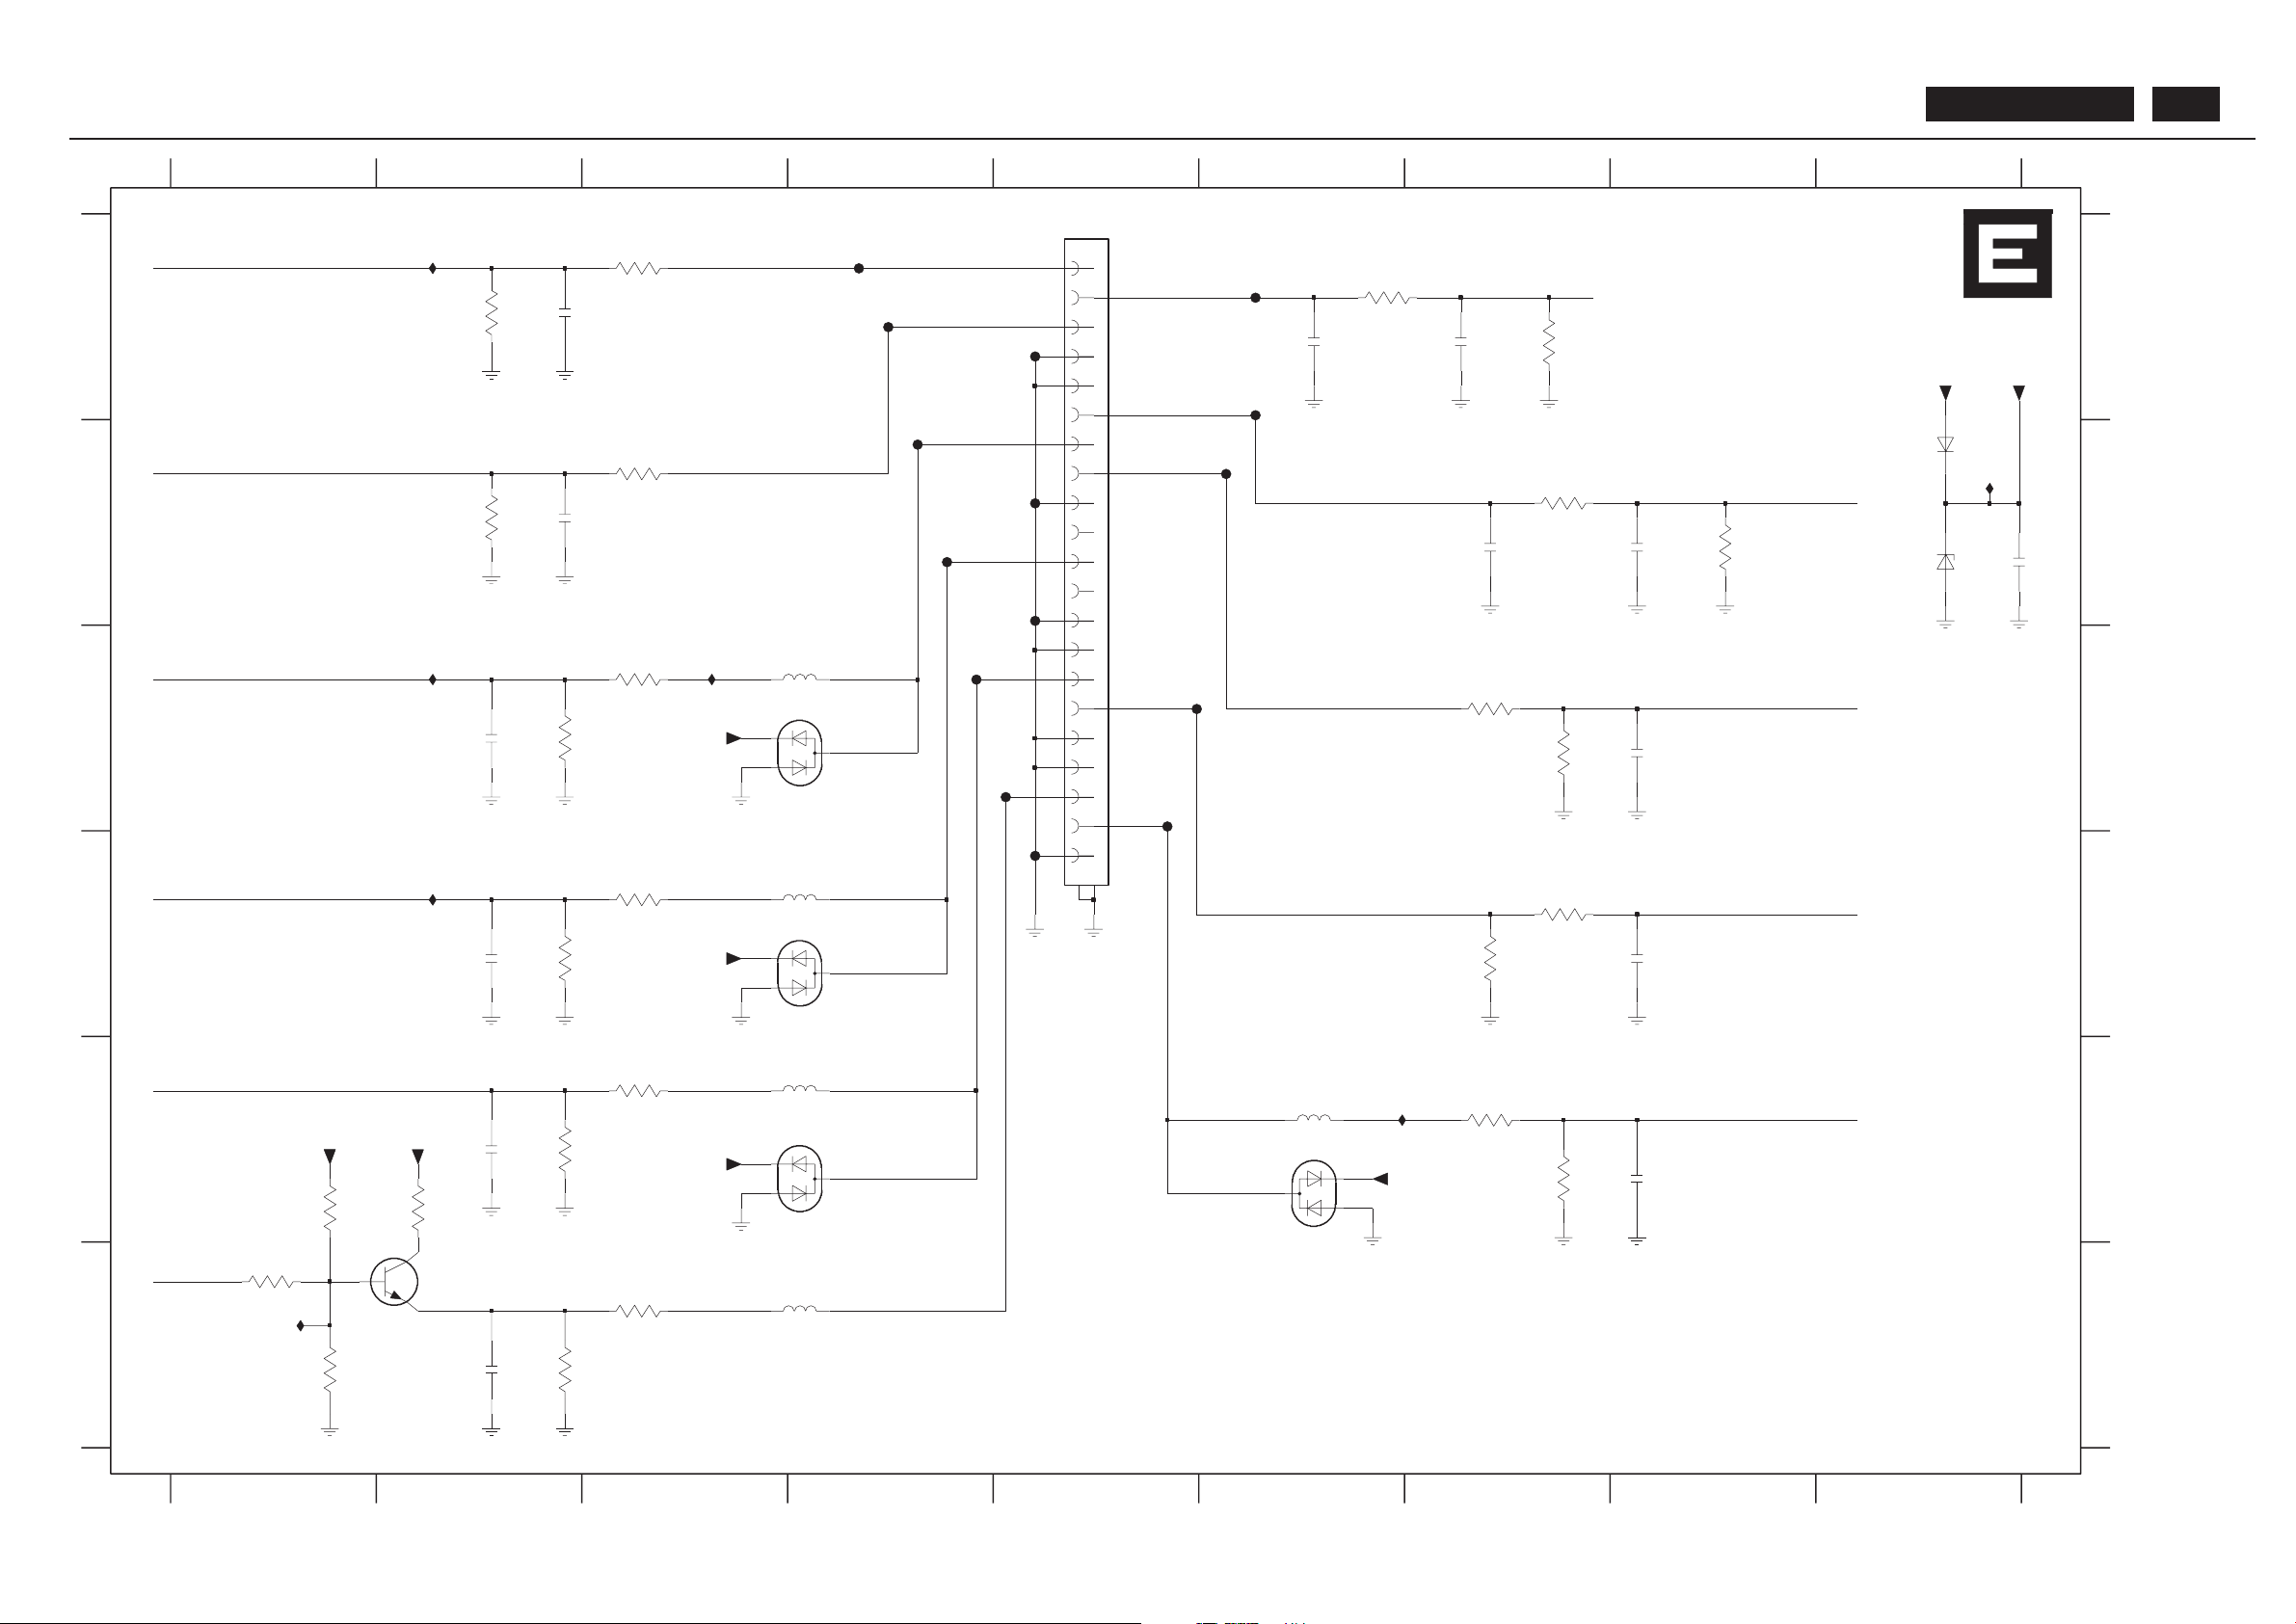
BDL4211. . . 78
I043 B9
1531 A5
2531 A2
2532 B2
2533 C2
2534 D2
2535 E2
2546 D8
2547 E8
2551 B9
3531 A3
3532 A2
3533 B3
6533 E3
6534 E6
F052 A6
F053 A4
F054 A5
F055 A6
F056 B4
F057 B6
234
F058 B5
F059 B4
F060 B5
F061 C4
F062 C5
F063 C5
U1 C3
U2 C2
FOR WE, WE VIDEO, NAFT A VIDEO ONL Y
NI FOR NAFT A, AP , CHINA
F064 C5
F065 D5
2536 F2
2541 A6
2542 A7
2543 B7
2544 B8
2545 C8
9
12
3534 B2
3535 C3
531 ~ 569
6536 B9
6537 B9
7531 F2
F051 A4
789
A
B
C
1
D
E
F
TV -BOX PCB
SB: 58441 x2
U10 E6
U11 F1
U13 A2
U14 D2
3541 E3
3542 E2
3543 E1
3544 E2
3545 F1
3546 F3
5678
3555 C7
3556 C7
3557 D7
D
E
F
A
B
C
3558 D7
PB: 58451
EXCEPT 1531 WERE CHIP COMPONENTS.
3559 E7
3561 E7
5531 C4
5532 D4
5533 E4
5534 F4
5535 E6
6531 C3
6532 D3
3536 C2
3537 D3
3538 D2
3547 F1
3548 F2
3551 A6
3552 A7
3553 B7
3554 B8
3456
330p
2542
1K
3551
47R
3546
6532
BAV99
22p
2535
U13
0u1
5532
U11
U10
3542
56R
3554
27K
22p
2533
5533
0u1
2534
22p
BAV99
6531
U14
5531
0u1
18R
3559
21
3
4
5
6
7
8
9
150R
3531
1
10
11
12
13
14
15
16
17
18
19
2
20
1531
HC021SINPS
330p
2543
3537
56R
3538
+5ESD
2545
330p
18R
+5ESD
6K8
3556
F065
2547
22p
F064
220K
3532
F052
+5T +5ESD
F051
2541
330p
F062
+5ESD
3534
220K
1K
3557
F063
U1U2
0u1
5534
+5ESD
3547
4K7
I043
BAV99
6533
3535
18R
F060
F061
+5ESD
3541
18R
100R
3545
F054
F055
56R
3561
56R
2544
330p
3536
3553
1K
F053
5535
0u1
2536
22p
1K
3548
6536
BAS32L
22p
2546
6537
BZX84-C4V7
2532
330p
10u
2551
3533
150R
27K
3555
+5ESD
F058
F059
BAV99
6534
1K
3558
330p
2531
F056
F057
4K7
3543
7531
BC848C
10R
3544
SC-AUD-L
ST -SC
FBL-SC
AV-CVBS-SC
1K
3552
SC-OUT -R
SC-OUT -L
B-SC
G-SC
R-SC
MM-CVBS
SC-AUD-R
Page 79
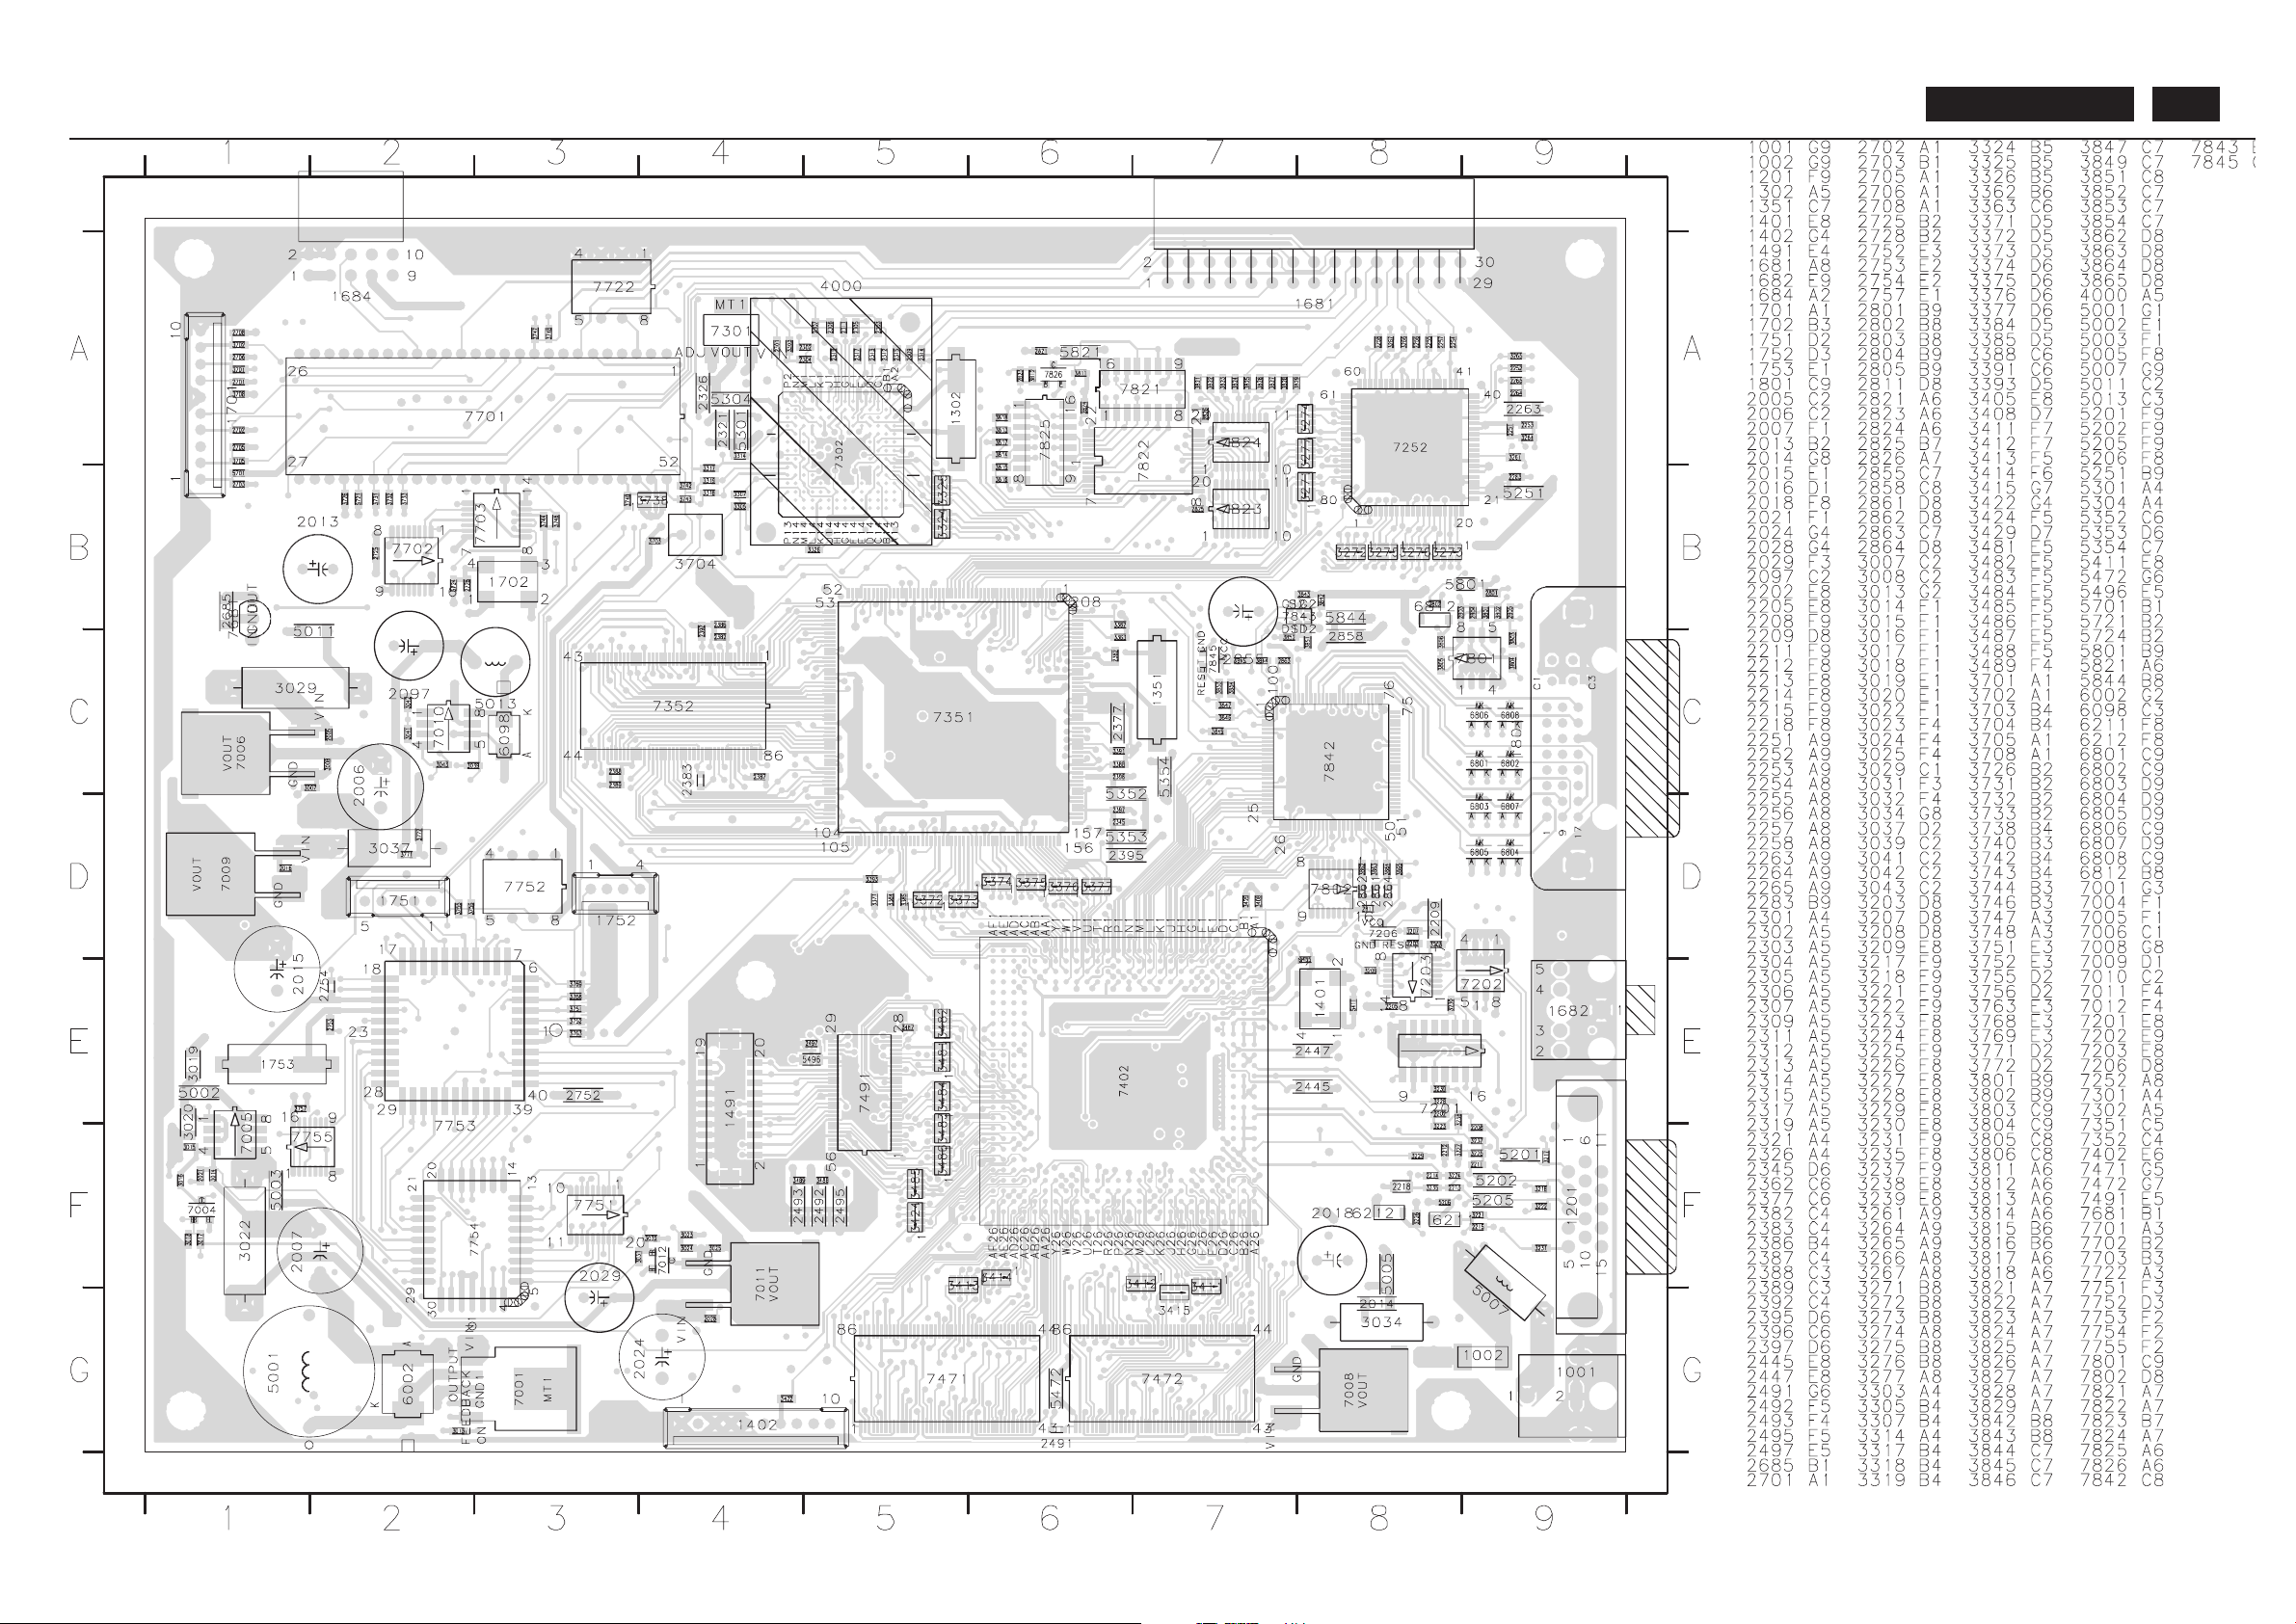
BDL4211. . . 79
Page 80
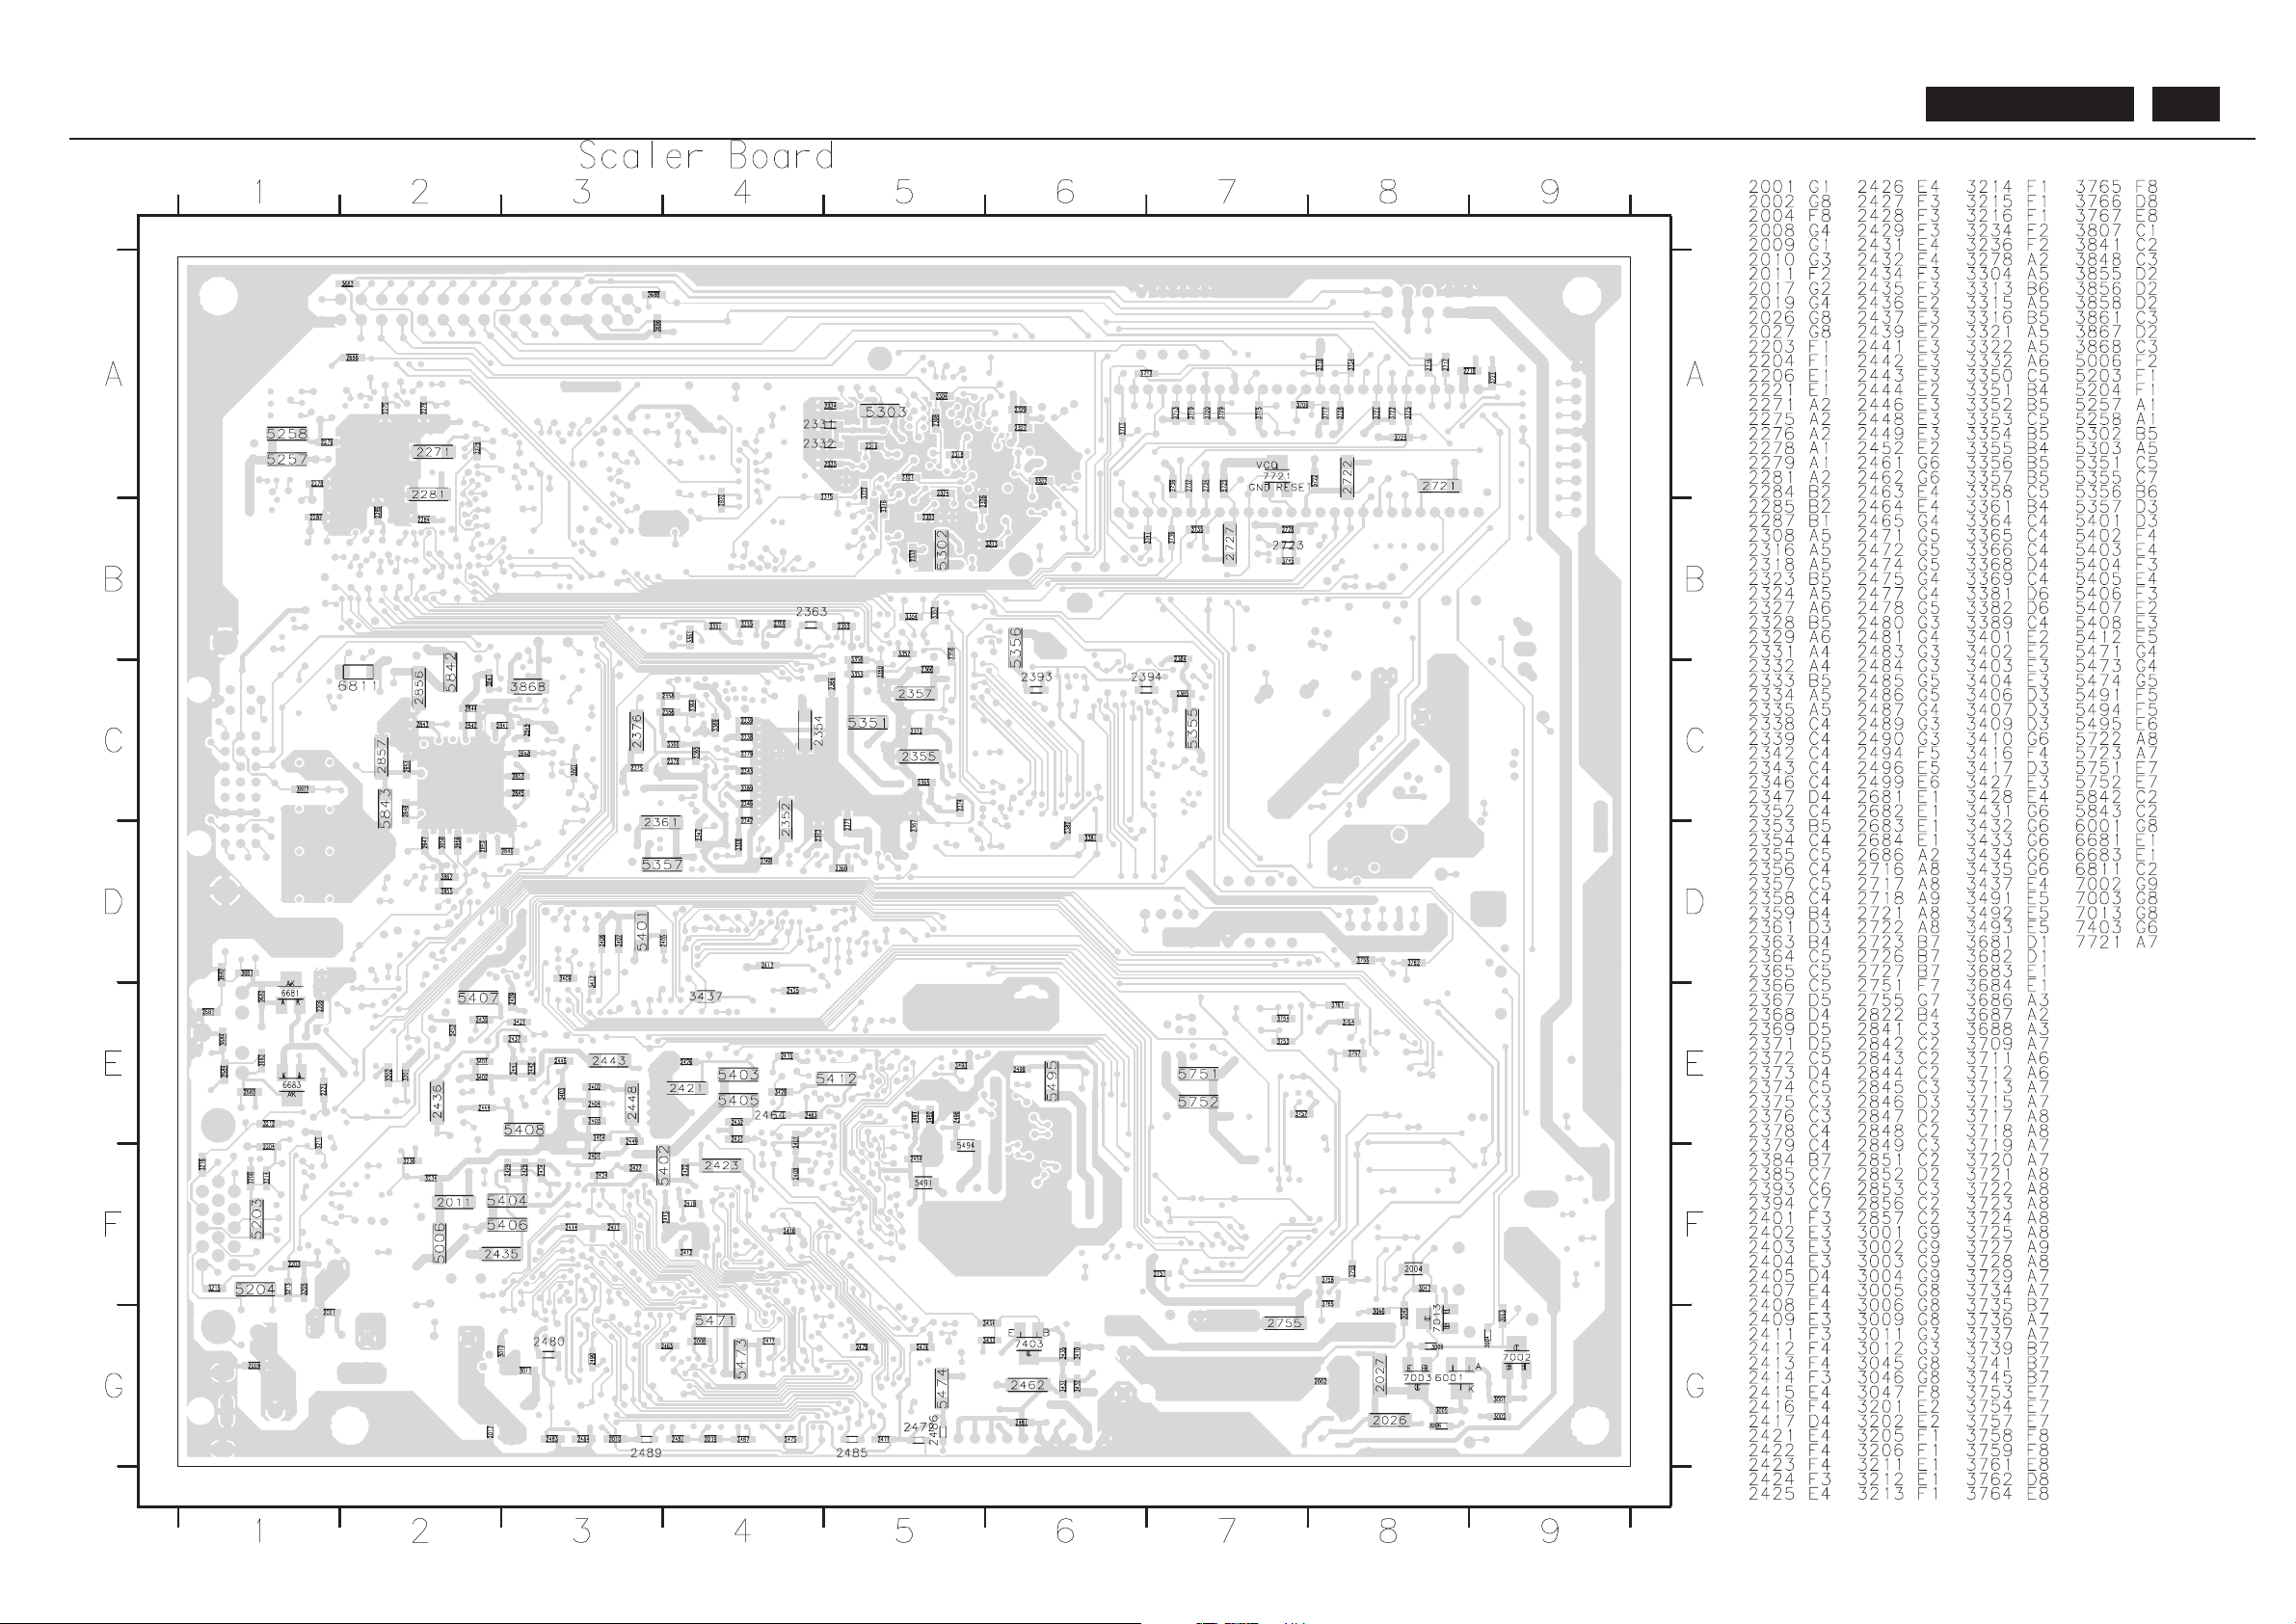
BDL4211. . . 80
Page 81
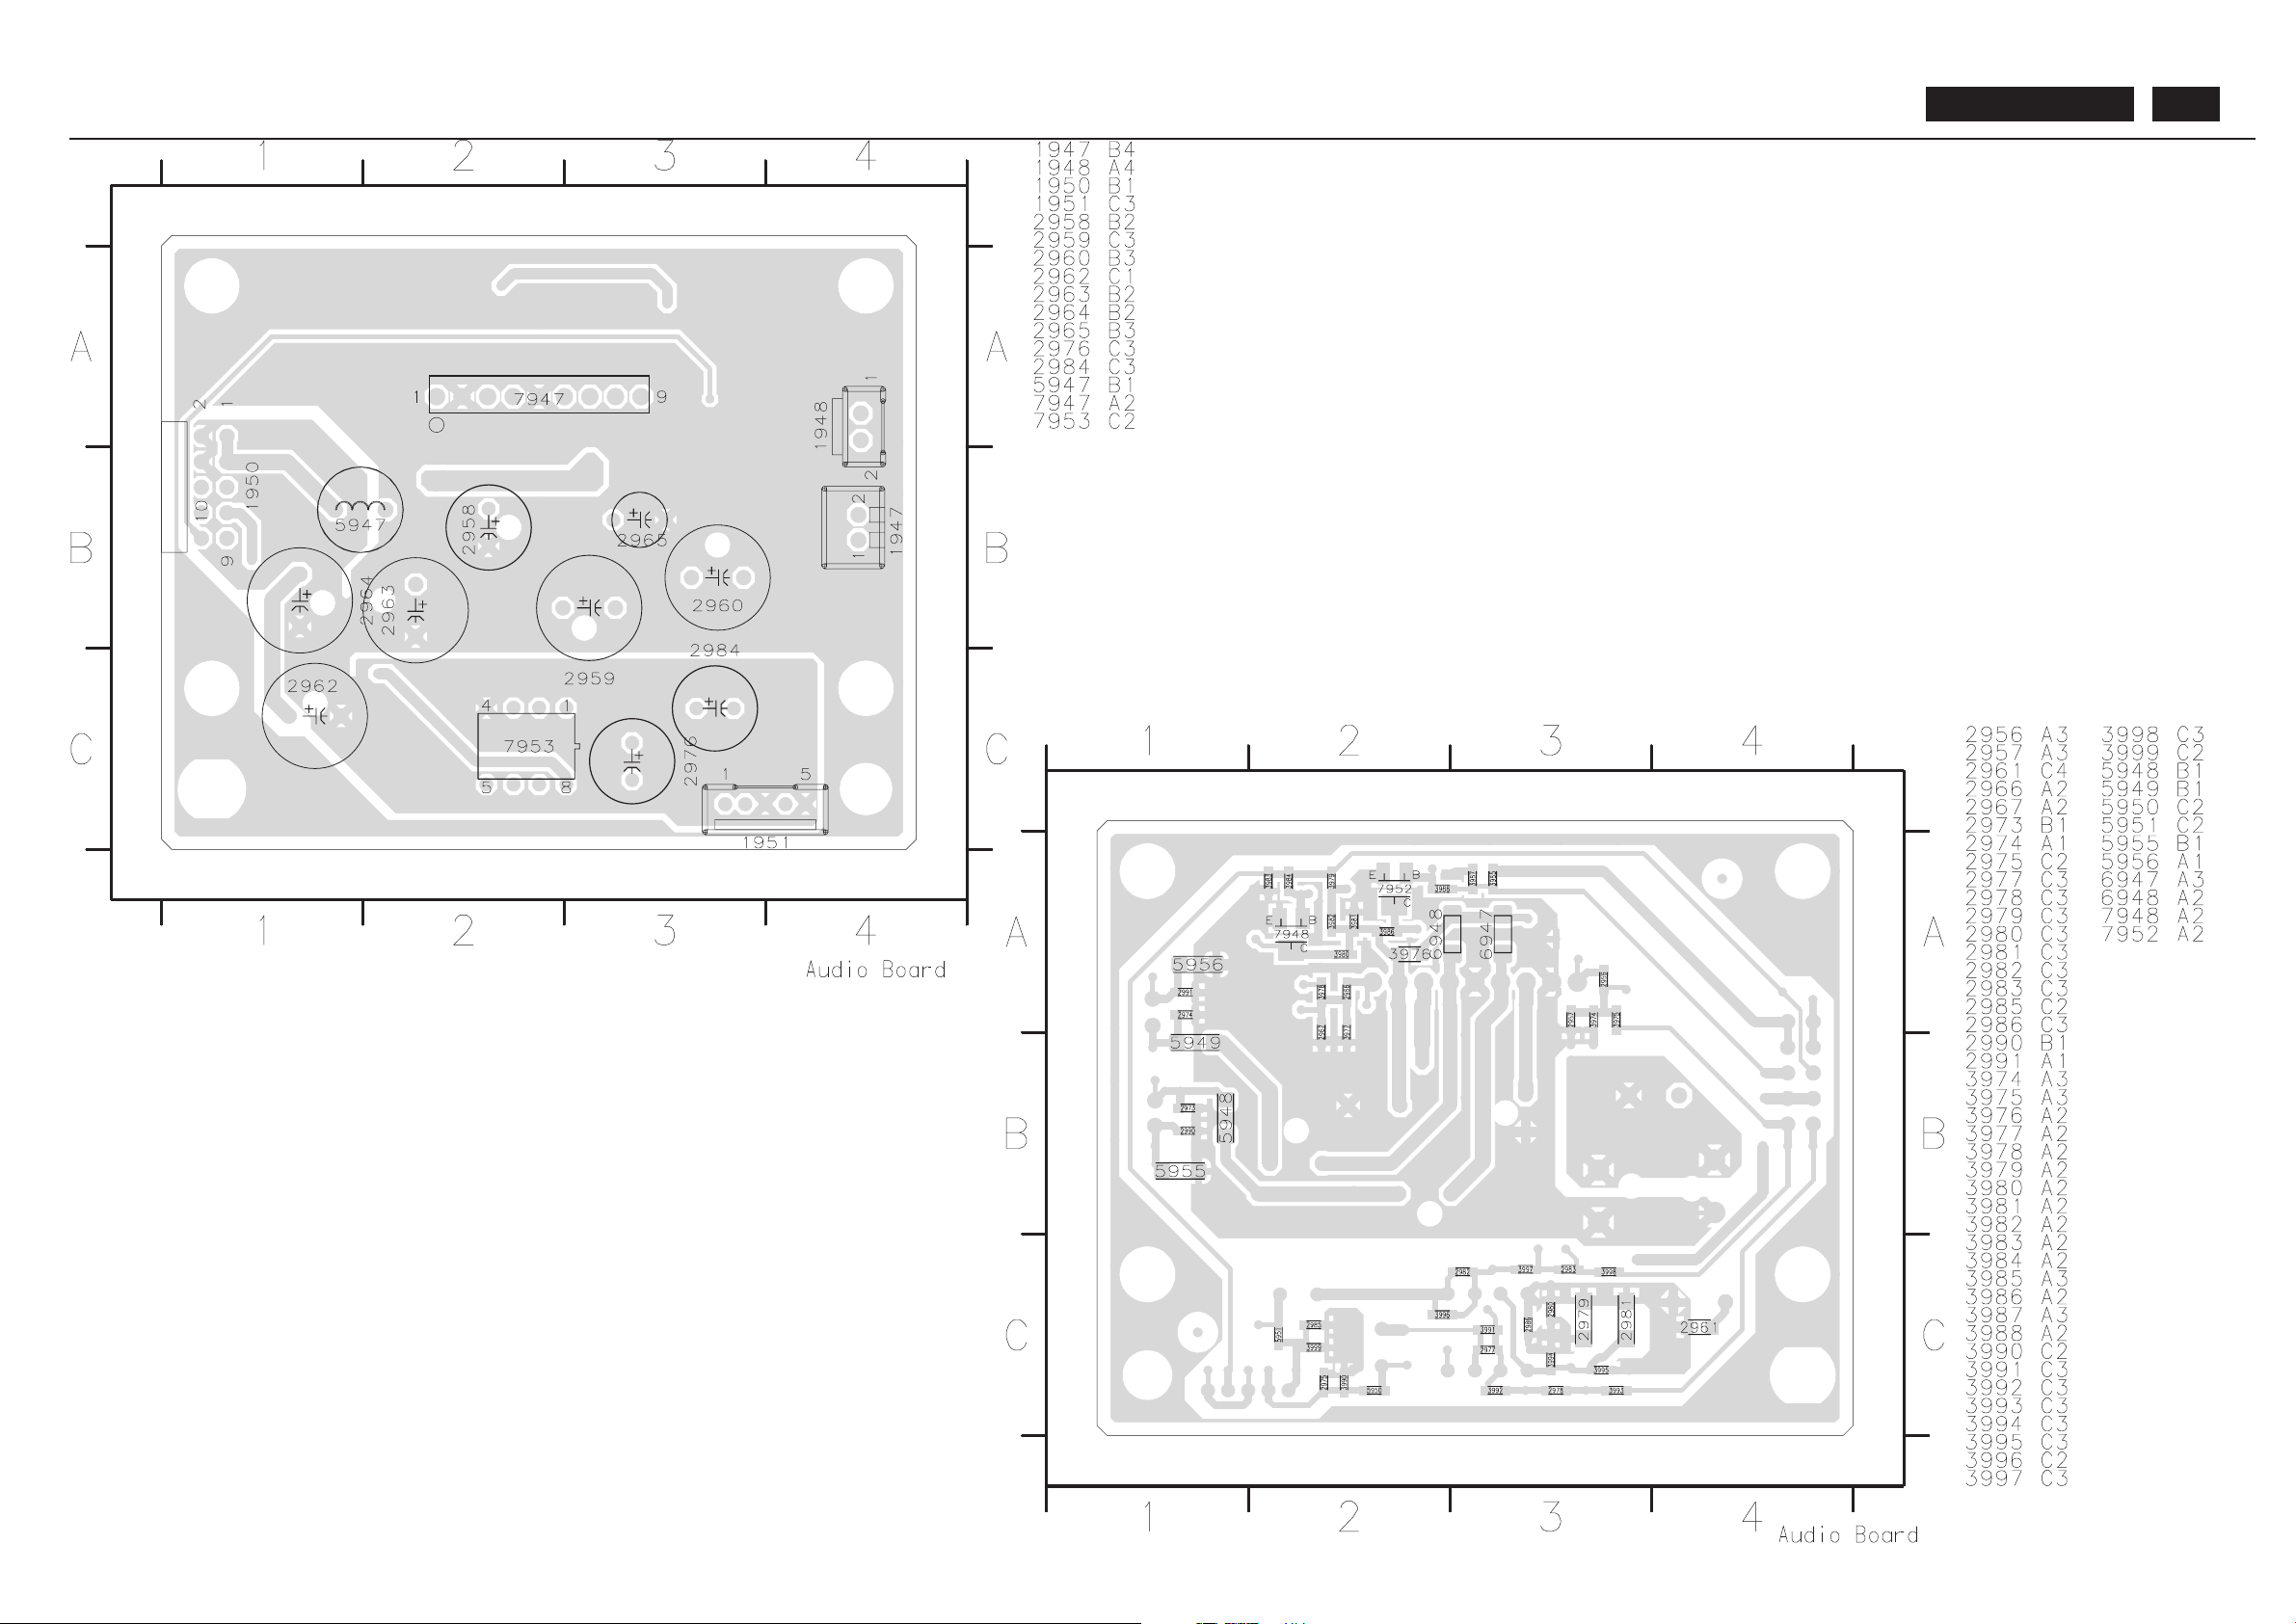
BDL4211. . . 81
Page 82
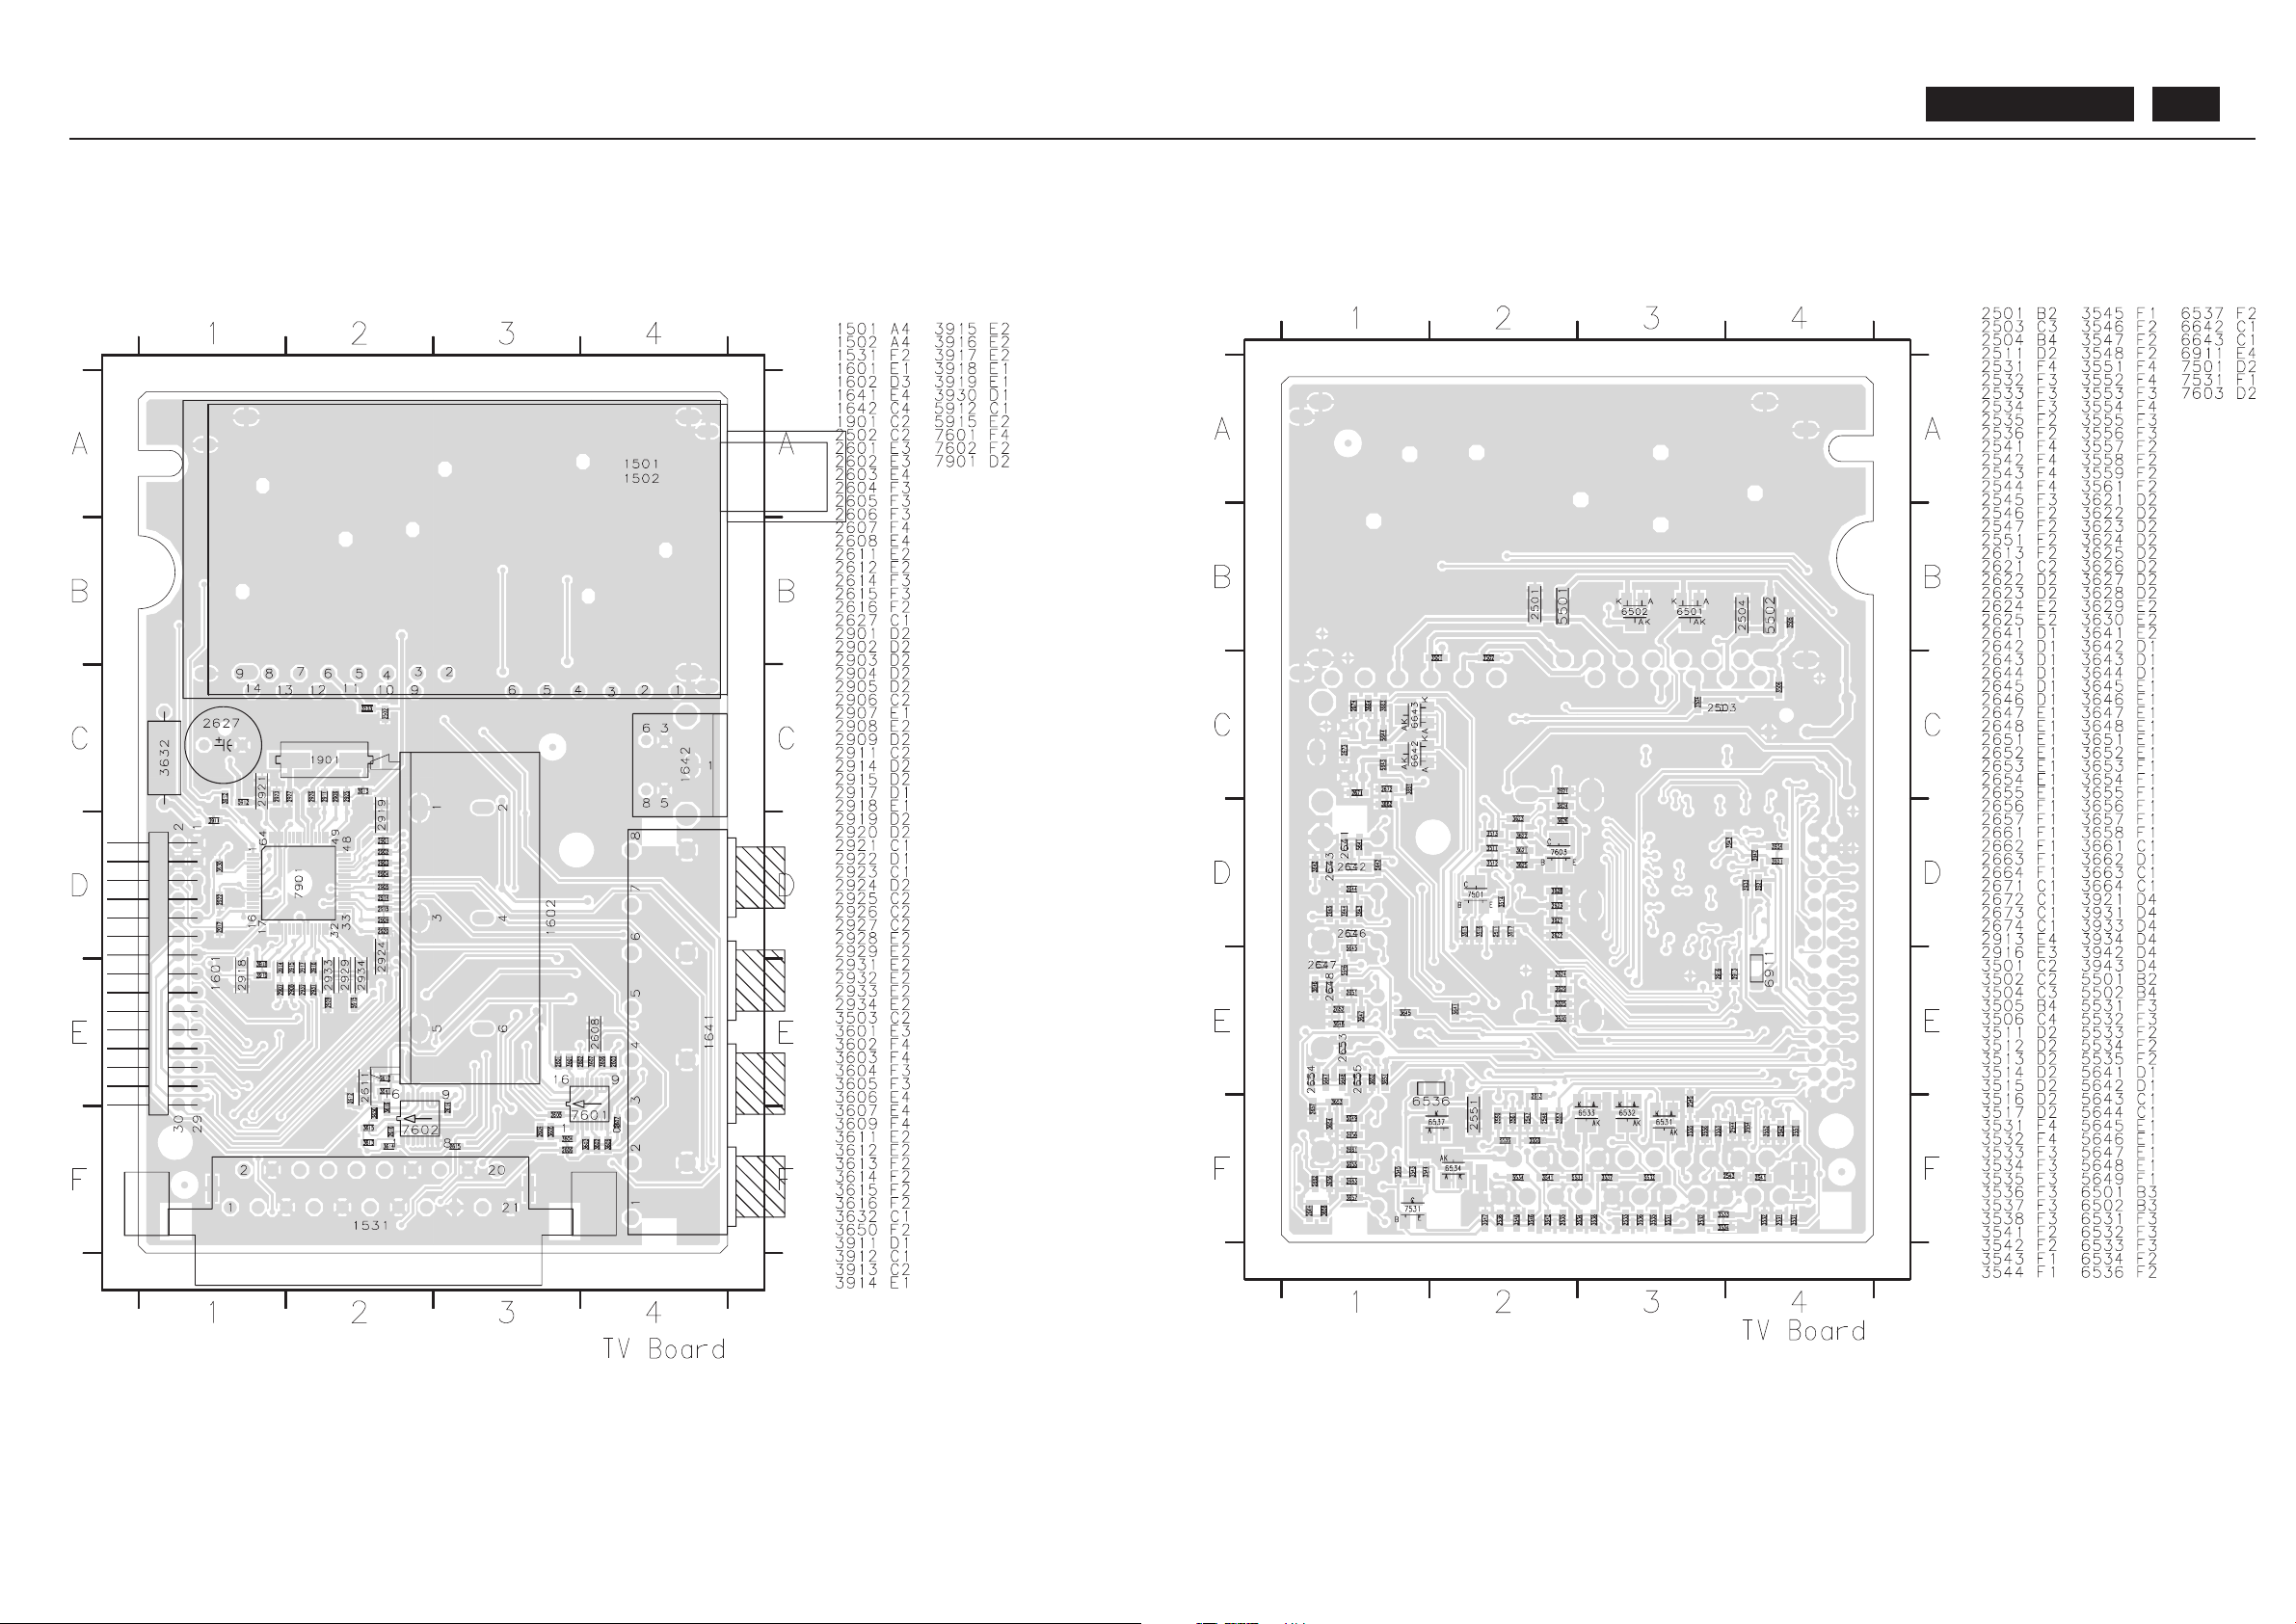
BDL4211. . . 82
Page 83
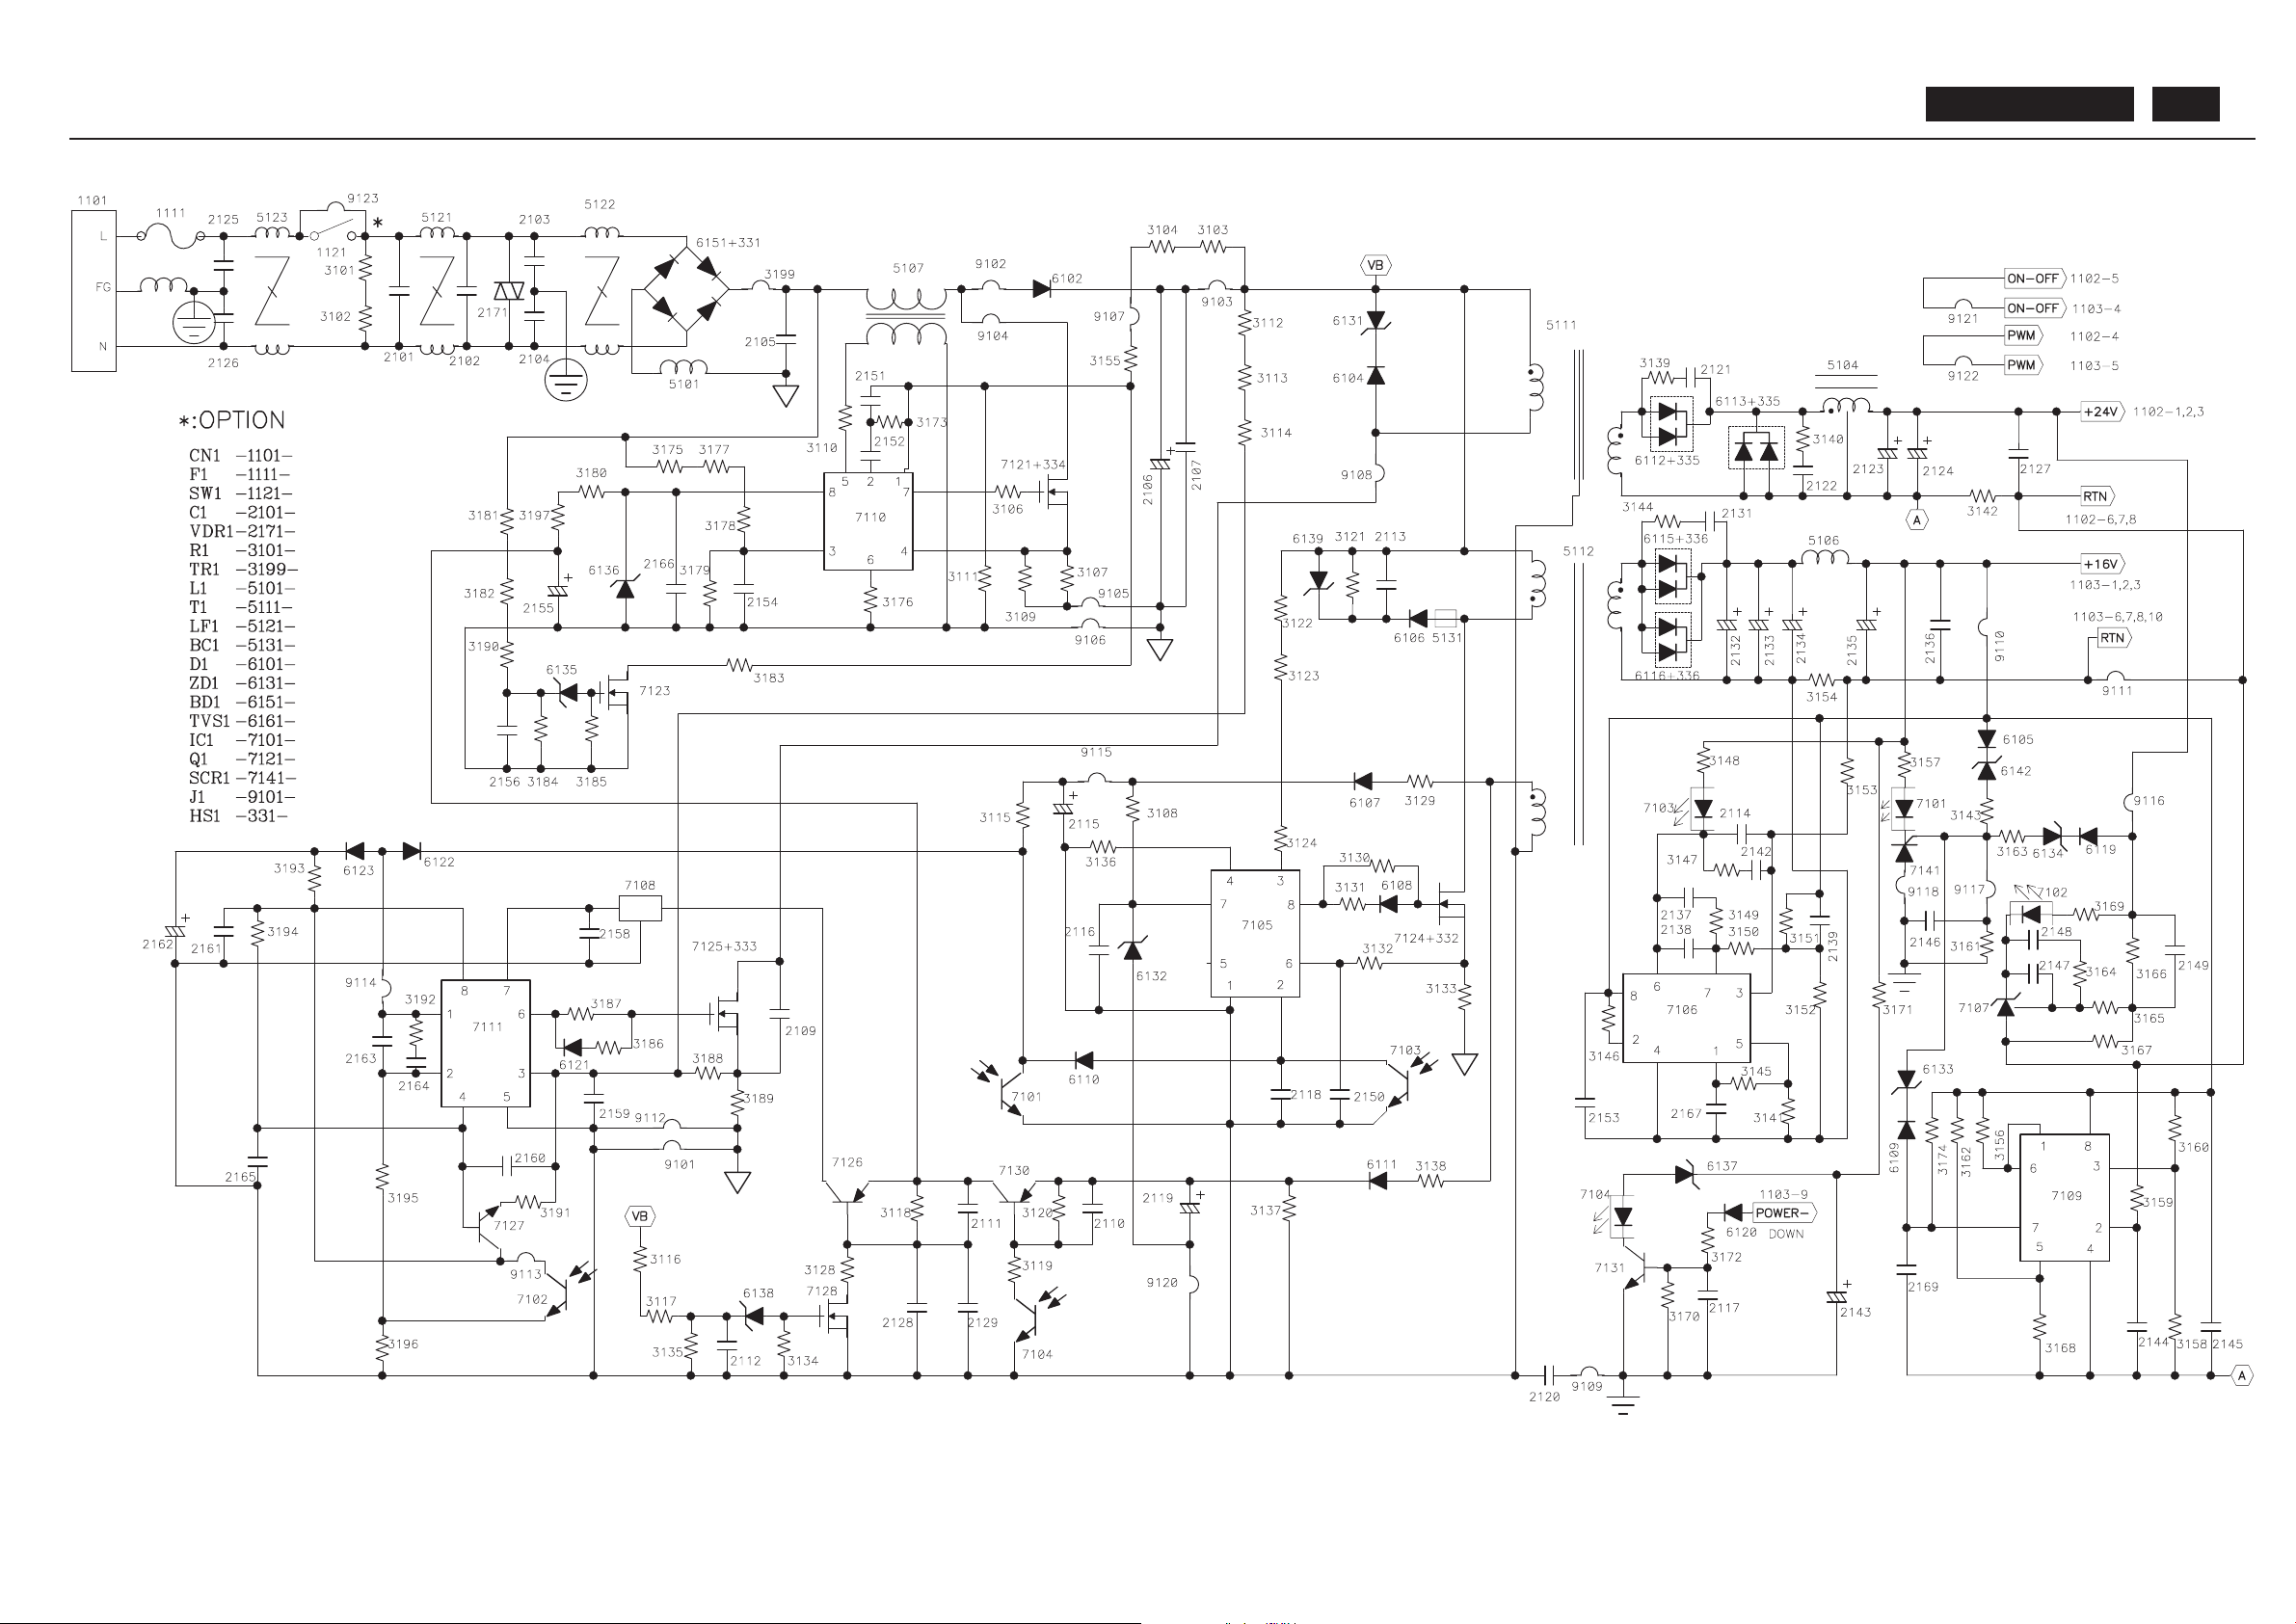
Power Board Diagram
BDL4211. . . 83
Page 84
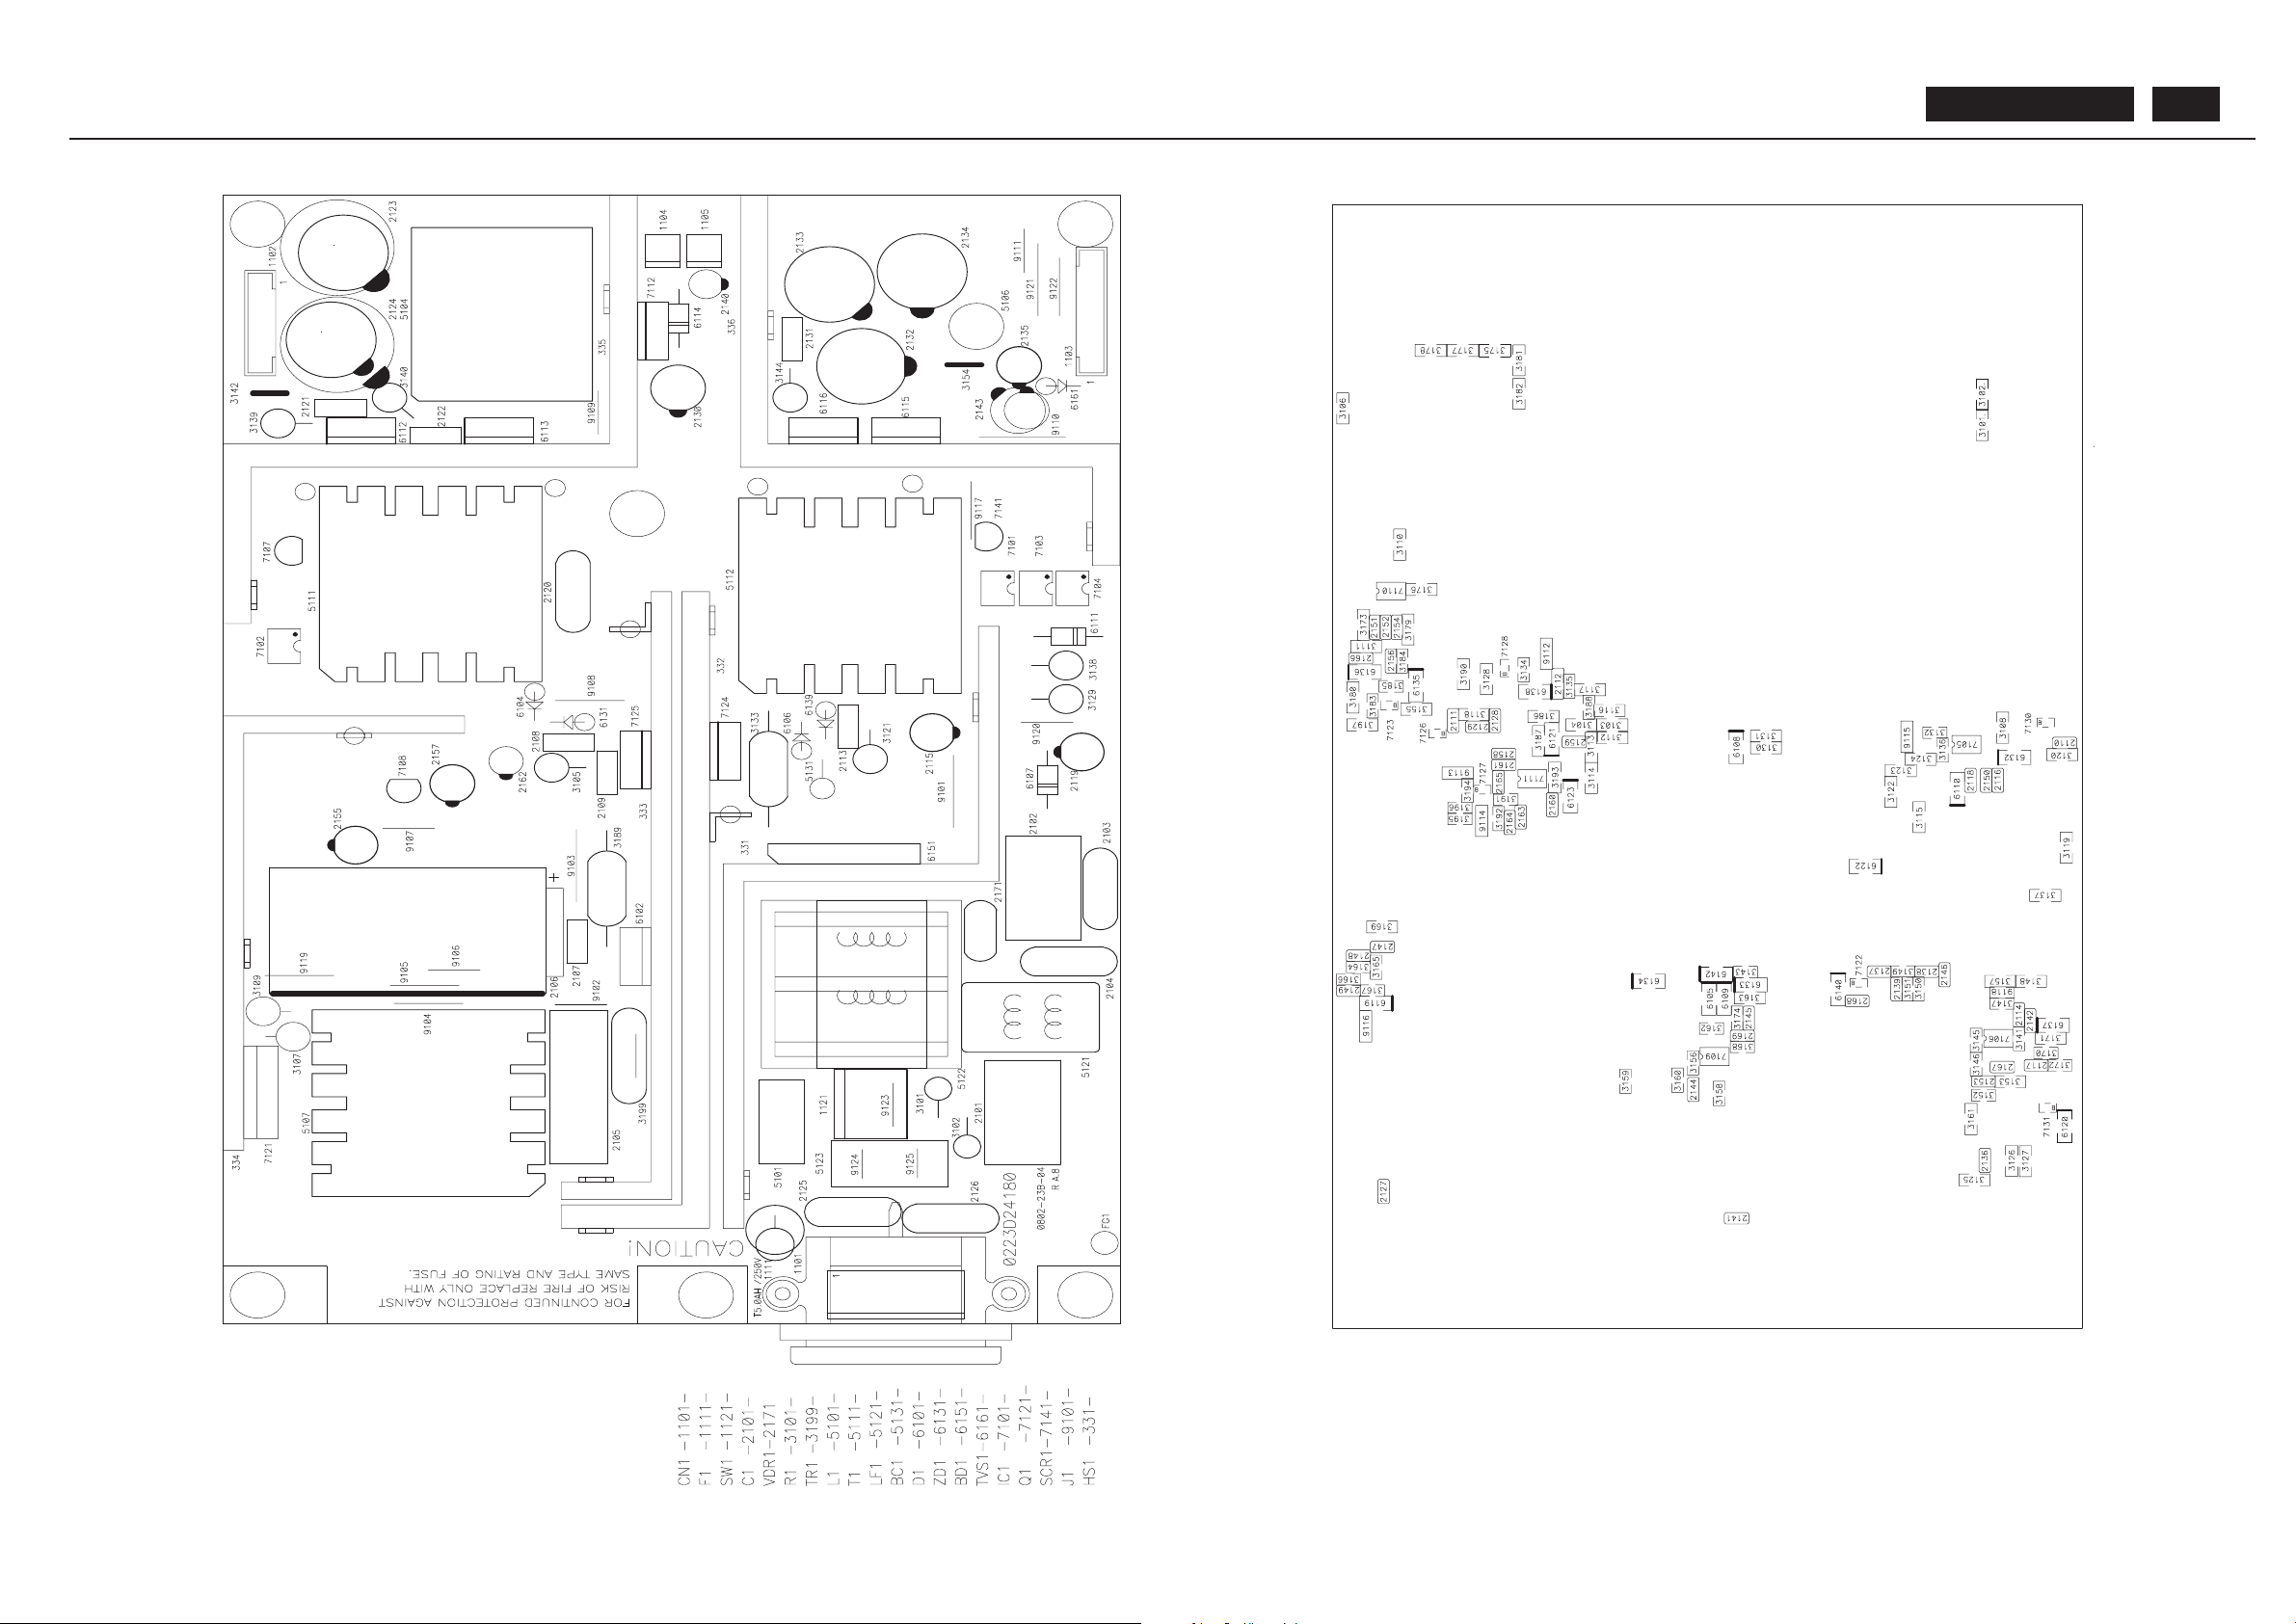
TV B ox(T V ) P CB C .B .A .
BDL4211. . . 84
Page 85
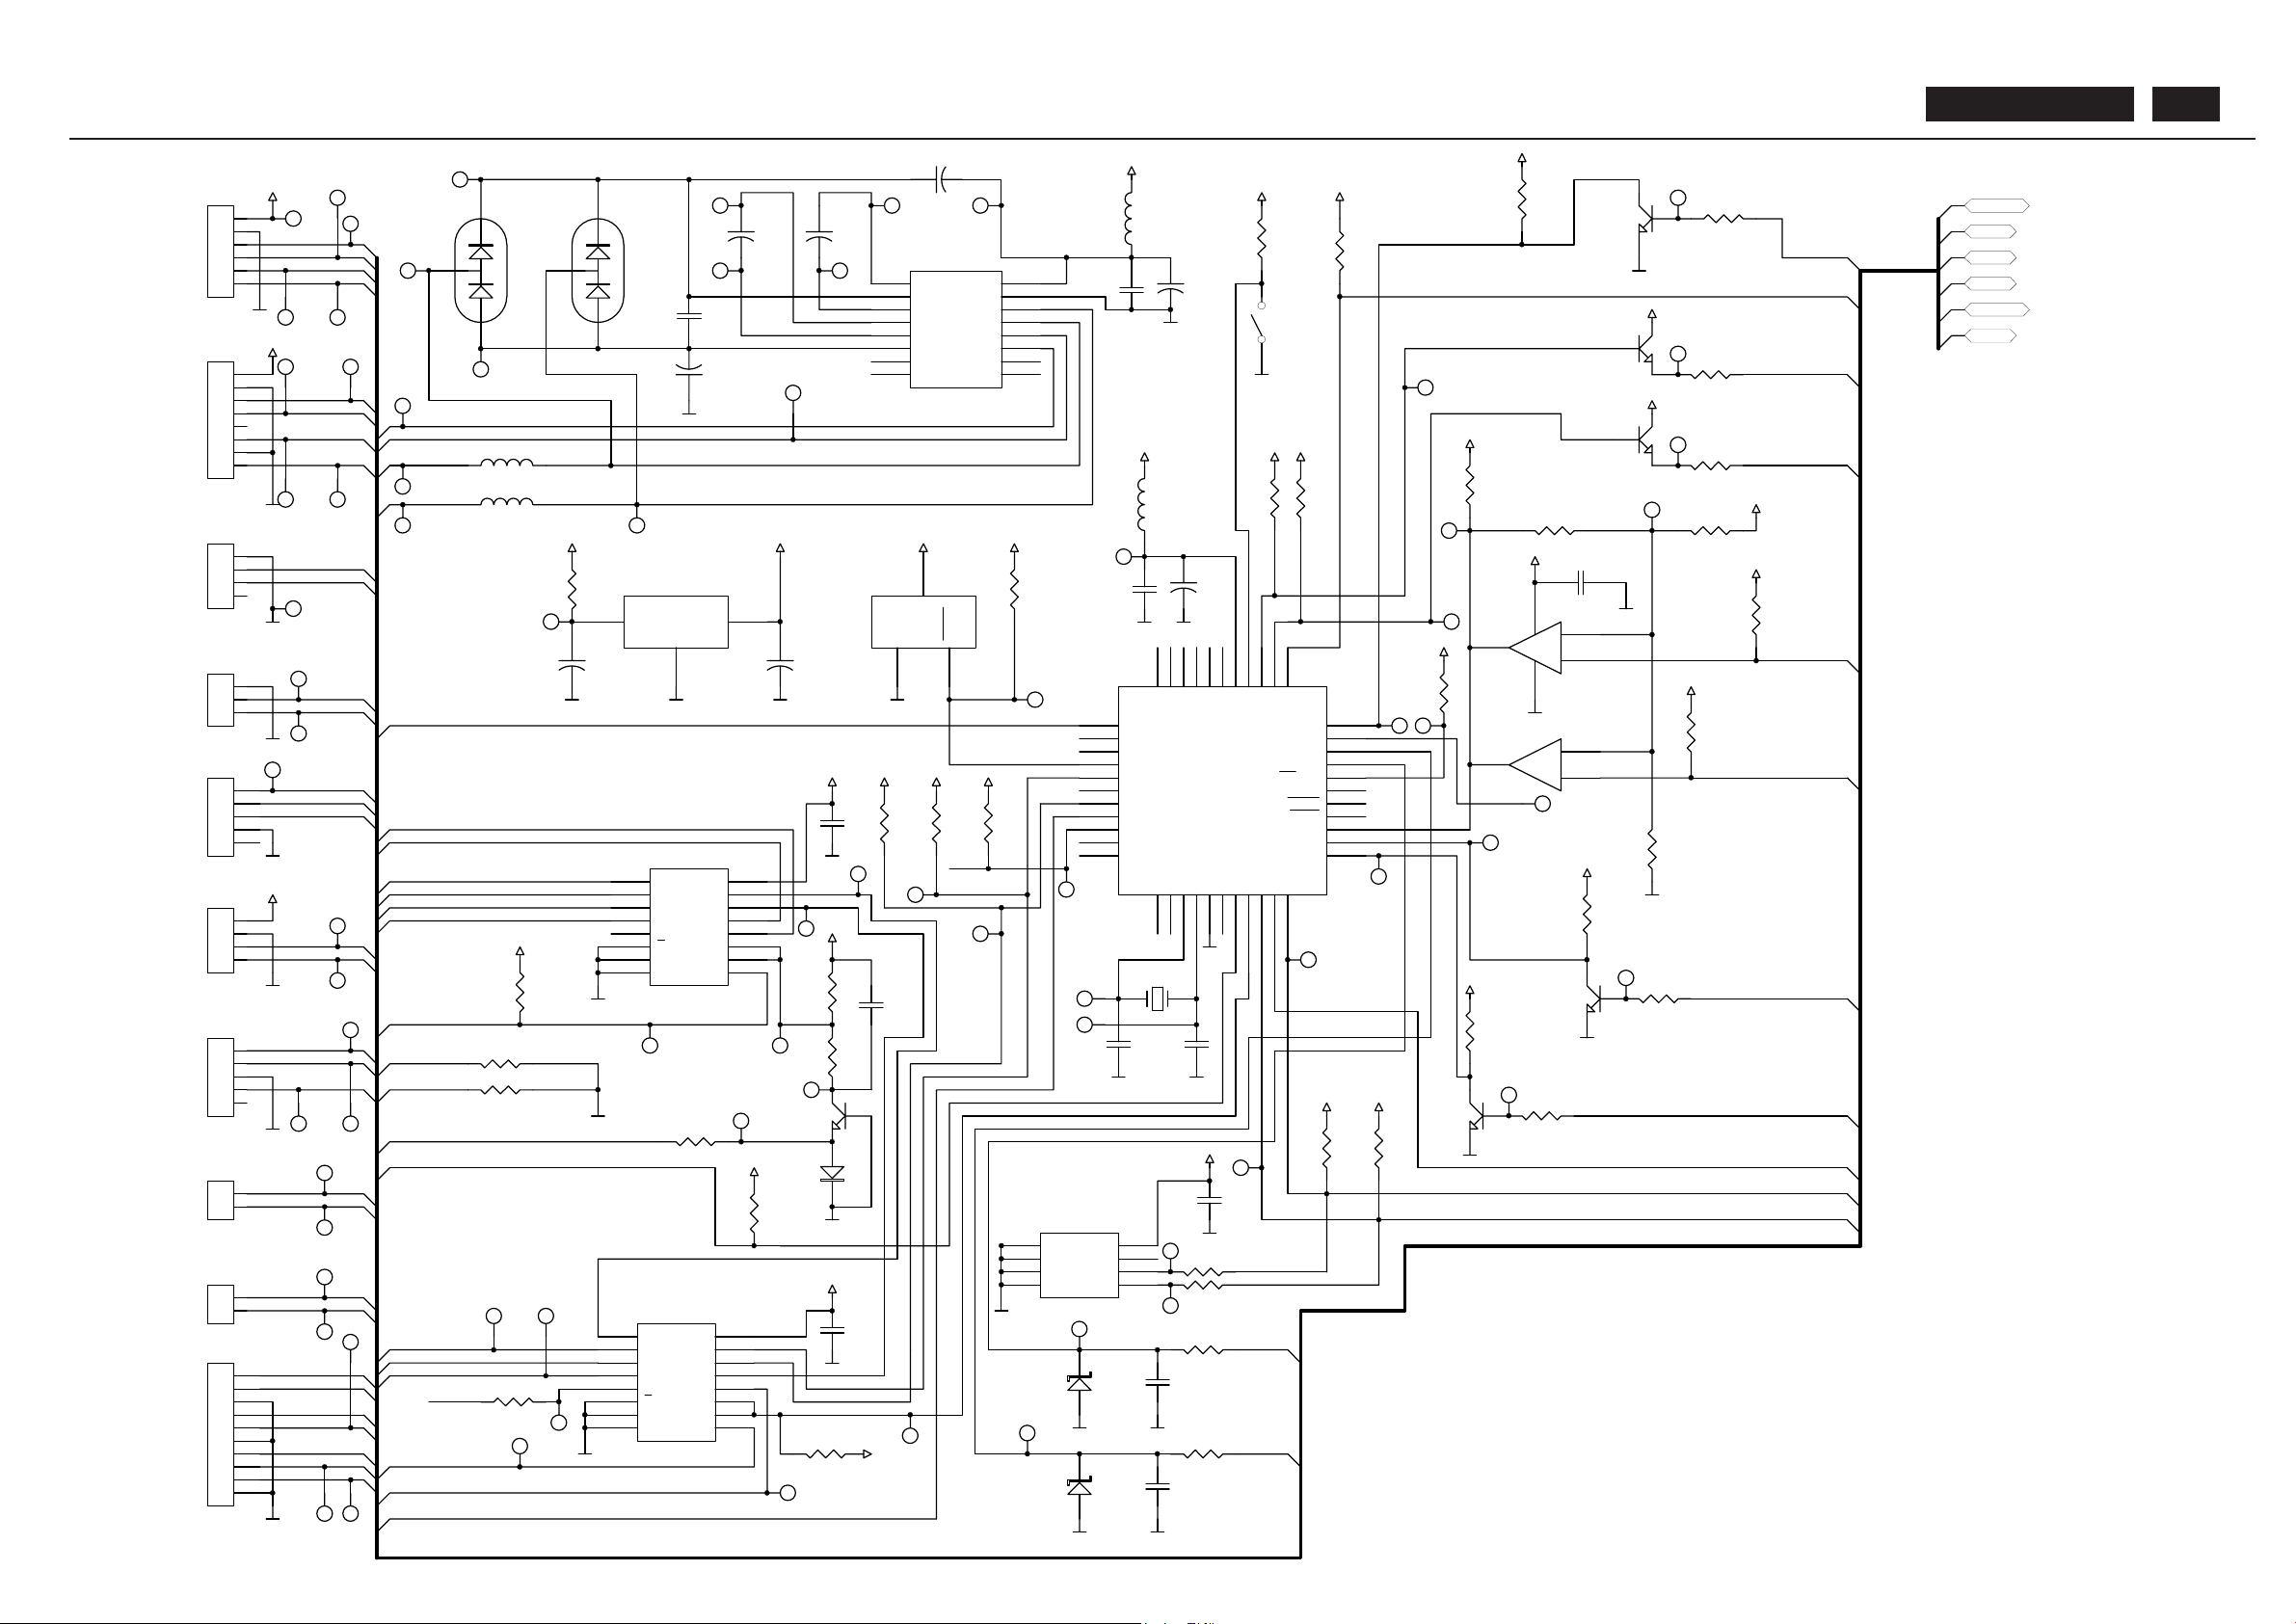
BDL4211. . . 85
+5V
GND
V2
BAV99
1
2
3
4
5
6
X1
B6B-PH-K-S
1
2
3
4
5
6
7
8
X2
B8B-PH-K-S
1
2
3
4
X3
B4B-XH-AM
1
2
3
4
X6
B4B-PH-K-S
1
2
3
X4
B3B-XH-AM
1
2
3
4
5
X7
B5B-PH-K-S
1
2
X8
B2B-PH-K-S
1
2
X9
B2B-PH-K-S
BL-ON
FAN on
+24V_Sense
GND
+12V
LED_G
LED_R
IR_36
ABC_in
+5V
GND
T1_out
R1_in
GND
GND
GEB_T1_in
GEB_R1_out
GND
temp
GND
+5V
LED_R-GEB
LED_G-GEB
GND
K1
A1
K2
A2
Power Supply board
Control board
Conn. RS232
GEB
IC
Sense temp
LED GEB
BL OK1
BL OK2
C1-
3
C2+
4
C1+
1
V+
2
V-
6
C2-
5
R2in
8
T2out
7
T1in
11
R1out
12
R2out
9
T2in
10
T1out
14
R1in
13
Vcc
16
GND
15
U1
MAX232
C1
100nF
A
1
AK
3
K
2
V1
BAV99
C2
100nF
T1_in
R1_out
R1_in
T1_out
+C14
10uF
16V
GND
+C15
10uF
16V
L2
BLM41A151SPT
L1
BLM41A151SPT
3Y1
3
3Z
4
2Y1
1
2Y0
2
E
6
3Y0
5
GND
8
Vee
7
S1
11
1Y0
12
S3
9
S2
10
1Z
14
1Y1
13
Vcc
16
2Z
15
U4
74HC4053
P1.13P1.2
4
Vss1
1
P1.0
2
P1.46P1.3
5
P1.6
8
P1.5
7
P3.2
14
P3.1
13
P3.4
16
P3.3
15
P3.0
11
RESERVED
12
RESET
10
P1.7
9
P3.5
17
P0.241P0.142P0.3
40
Vcc
44
P0.0
43
P2.6
30
P2.5
29
P0.7
36
EA/Vpp
35
P0.5
38
P0.6
37
ALE/P ROG
33
RESERVED
34
PSEN
32
P2.7
31
P0.4
39
P2.125P2.2
26
RESERVED23P2.0
24
P2.428P2.3
27
P3.719XTAL220P3.6
18
Vss22XTAL1
21
U6
S87C51
R9
4.7K
+5V
R2
4.7K
+5V
R3
4.7K
+5V
Q2
BC847C
R28
240
Q3
BC847C
R29
470
LED_R
LED_G
R15
4.7K
+5V
R16
4.7K
+5V
SCL
SDA
R18
4.7K
+5V
R5
4.7K
+5V
GND
Q9
BC847C
R50 10K
LED_G-GEB
R17
4.7K
+5V
GND
Q8
BC847C
R49 10K
LED_R-GEB
1
+
3
-
2
4 8
U7A
LM393
7
+
5
-
6
U7B
LM393
+5V
C5
100nF
GND
GND
R40 100K R22 47K
+5V
R21
47K
GND
R10
100K
+5V
R12
100K
+5V
K1
K2
Y1
11.0592
C24
22pF
C25
22pF
GND GND
GND1RESET
2
Vcc
3
U5
MAX810
+5V
GND
R8
4.7K
+5V
+5V
C3
100nF
GND
R6
4.7K
+5V
R7
4.7K
+5V
TXD
RXD
Q4
BC847C
D1
BAS19
GND
C23
470nF
25V
X7R
R53
12K
R41
100K
+5V
T1_in
GEB_T1_in
GEB_R1_out
R1_out
R46 0 Ohm
R47 0 Ohm
GND
A1
A2
Remote
RST
A2
3
Vss
4
A0
1
A1
2
SCL
6
SDA
5
Vcc
8
TEST
7
U8
X24C16
+5V
C7
100nF
GND
R33 100
R34 100
GND
ABC_in
temp
SCL
SDA
BL-Adj
I/O INTERFACE BOARD
Vin
I
Vout
O
GND
G
U3
LM340
+12V
R39
4.7
+
C22
100uF
GND
+
C18
10uF
16V
GNDGND
+5V
R1_in
L4
10uH
LQH32CN100K23
(Murata)
+5V
C4
100nF
GND
+
C19
10uF
16V
GND
GND
FAN-Sense
C8
100nF
GND
DZ1
5V1
GND
R56 1K
FAN-Sense
+24V_Sense
AUX
Keyboar d
Remote
GND
BL-ON +5V
C9
100nF
GND
DZ2
5V1
GND
R57 1K
IR_36
Keyboar d
+5V
R14
4.7K
C6
100nF
GND
R48 10K
+
C16
10uF
16V
+
C13
10uF
16V
GND
L3
10uH
LQH32CN100K23
(Murata)
+
C17
10uF
16V
3Y1
3
3Z
4
2Y1
1
2Y0
2
E
6
3Y0
5
GND
8
Vee
7
S1
11
1Y0
12
S3
9
S2
10
1Z
14
1Y1
13
Vcc
16
2Z
15
U2
74HC4053
GND
RX
TX
VIDEO_RX
VIDEO_TX
IR_36
KEYBOARD_EN
KEYBOARD_EN
REMOTE_EN
REMOTE_EN
AUX
VIDEO_RX
VIDEO_TX
IR_36
+5V
+5V
R65
4.7K
+5V
R66
4.7K
+5V
Video En
1
2
3
4
5
X5
B5B-XH-AM
Stand by ON
Key
R Key
BL-Adj
Stand by ON
Key
R Key
R67
4.7K
R68
4.7K
R69
10K
GND
+5V
Q10
BC847C
FAN on
Stand by ON
+5V
R70
100
R71
4.7K
+5V
U6-15
U6-15
1
2
3
4
5
6
7
8
9
10
X10
B10B-PH-K-S
R1
4.7K
+5V
S1
NM4001
GND
TP1
TP4
TP5
TP6
TP7
TP8
TP9
TP10
TP11
TP12
TP13
TP14
TP15
TP16
TP17
TP18
TP19
TP21
TP20
TP22
TP23
TP24
TP25
TP26
TP27
TP28
TP29
TP30
TP33
TP34
TP35
TP36
TP37
TP38
TP39
TP40 TP41
TP42
TP48
TP49
TP50
TP55
TP57
TP58
TP59
TP60
TP61
TP62
TP63
TP64
TP65
TP66
TP67
TP71
TP72
TP73
TP75
TP76
TP77
TP78
TP79
TP80
TP81
TP83
TP82
TP84
TP85
TP86
TP87
TP88
TP89
TP90
TP91
TP92
TP93
TP94
TP95
TP2
Page 86
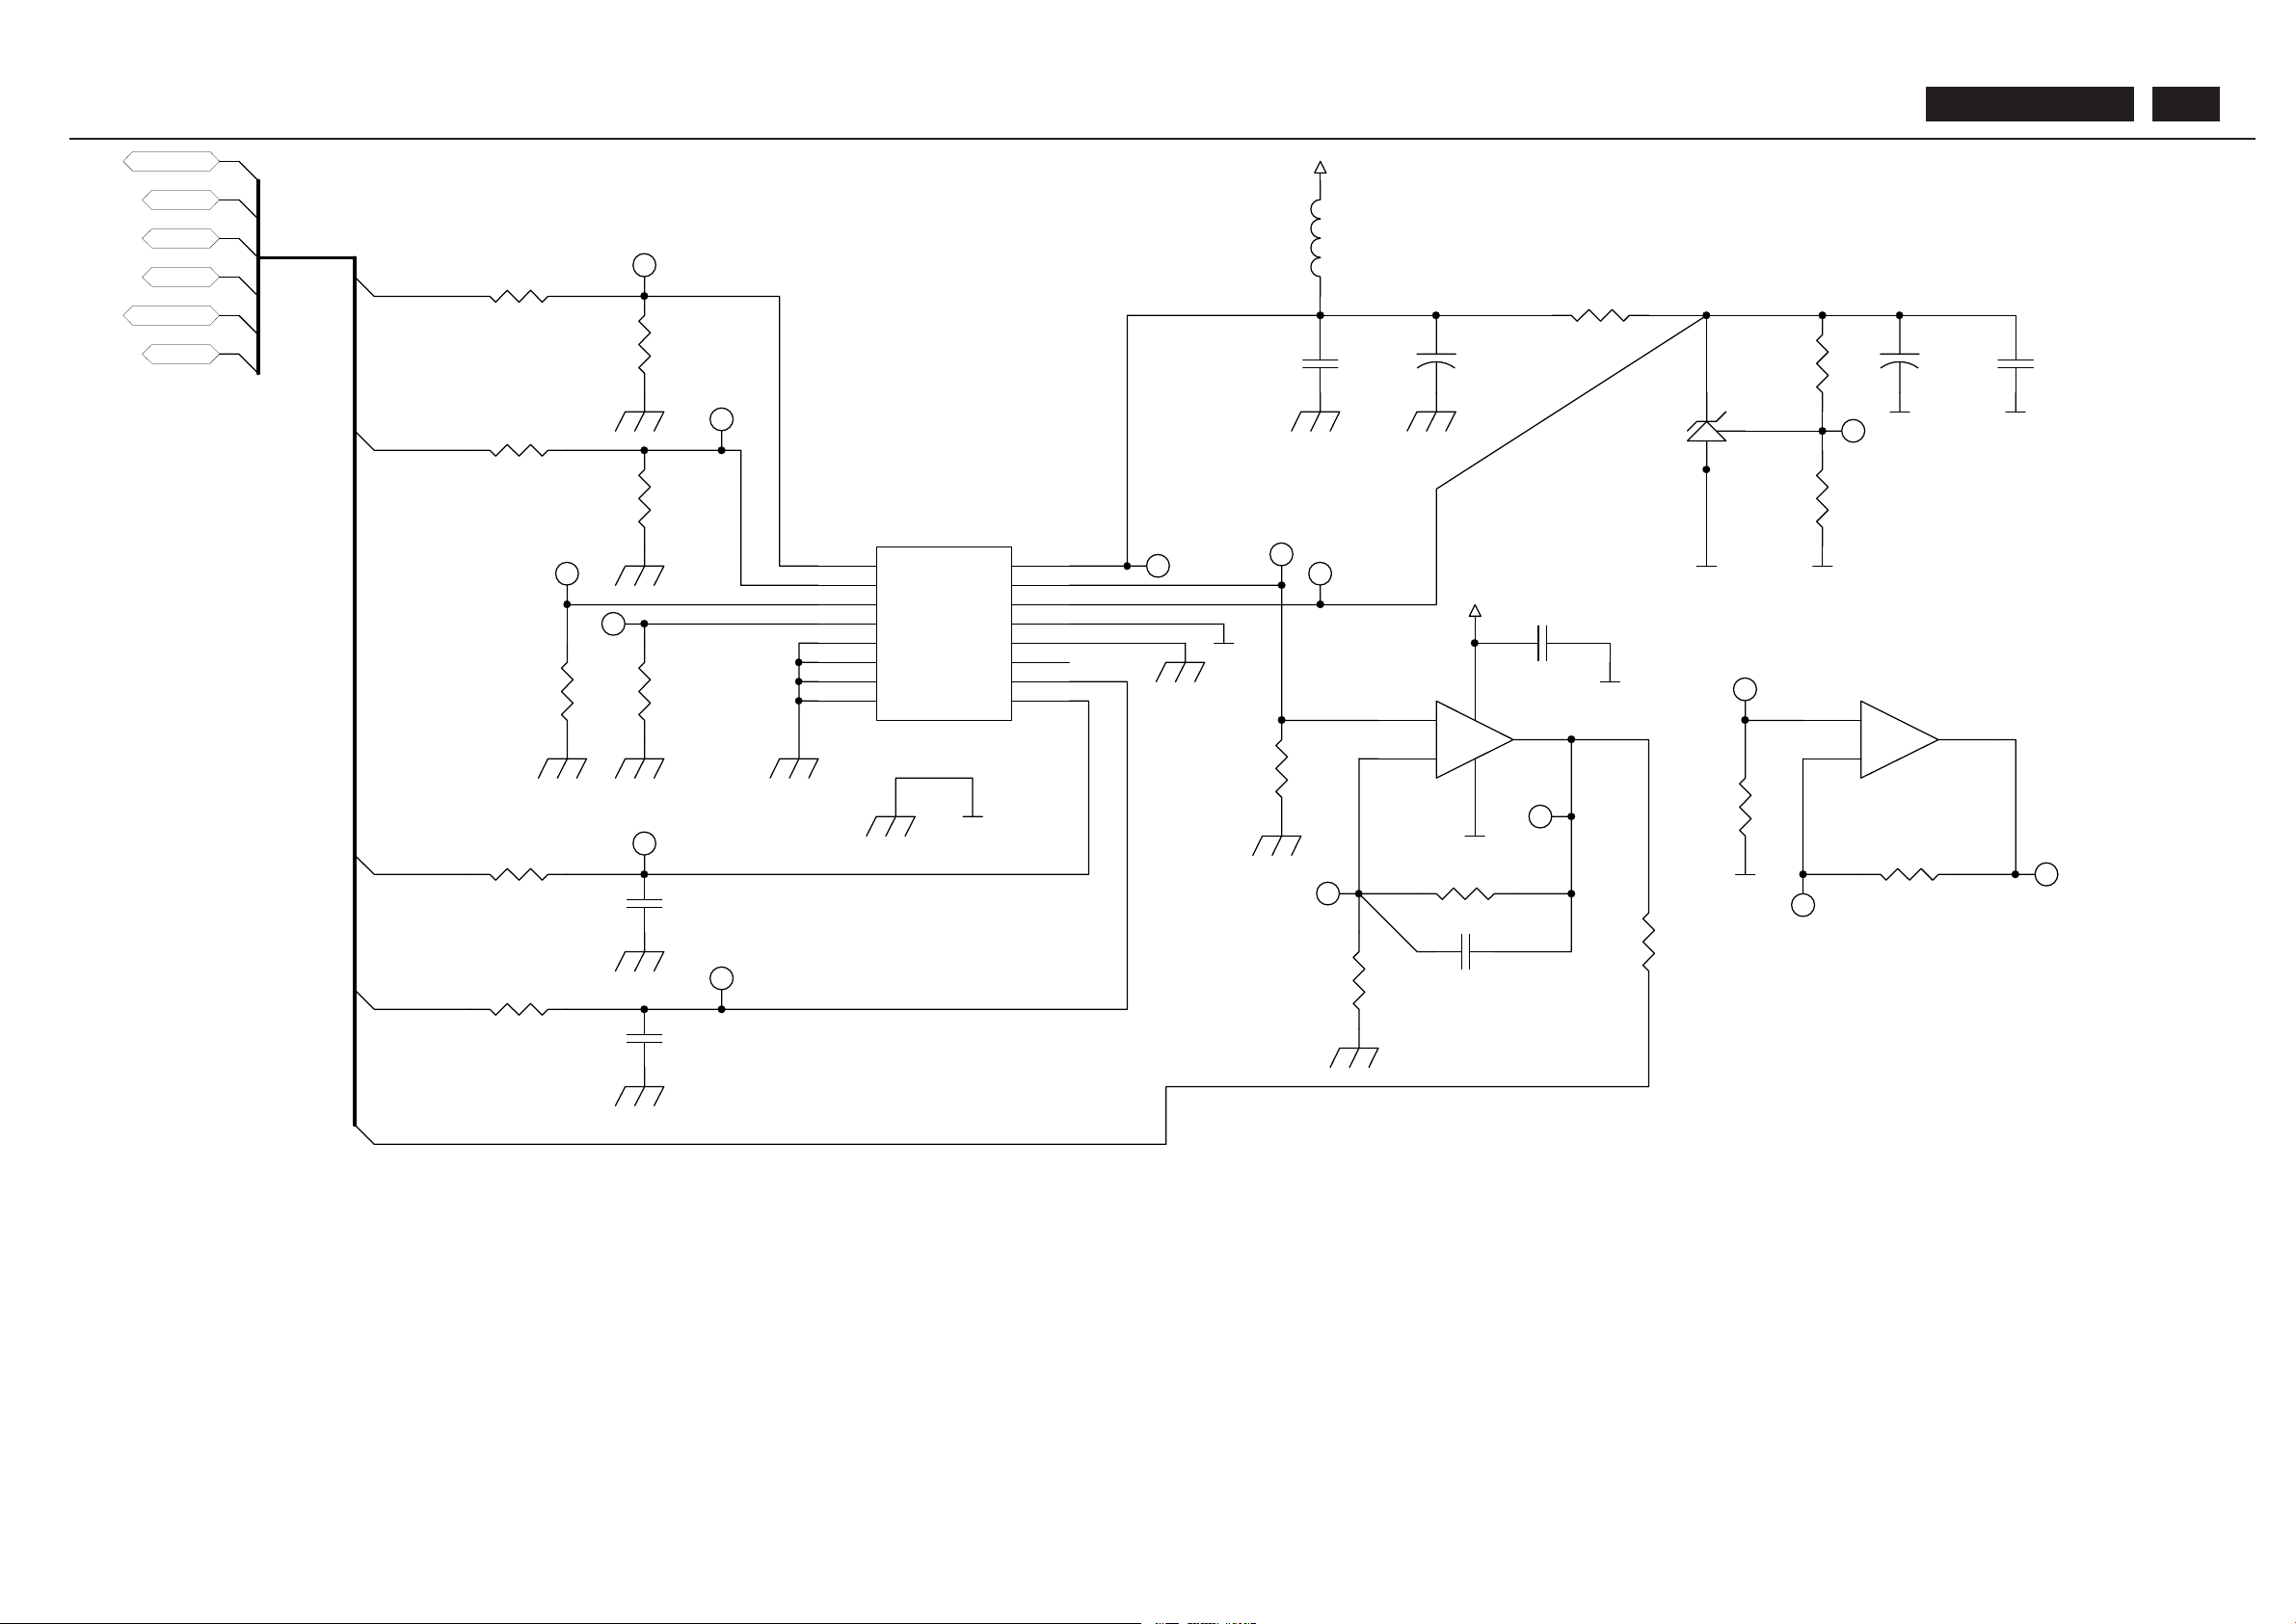
BDL4211. . . 86
I/O INTERFACE BOARD
AIN2
3
AIN3
4
AIN0
1
AIN1
2
A1
6
A0
5
Vss
8
A2
7
OSC
11
EXT
12
SDA
9
SCL
10
Vref
14
AGND
13
Vdd
16
AOUT
15
U9
PCF8591
R35 100
R42
100K
R36 100
R44
100K
R43
100K
R45
100K
R37 100
R38 100
C27
47pF
C28
47pF
7
+
5
-
6
U10B
LM358A
1
+
3
-
2
4 8
U10A
LM358A
+5V
C12
100nF
GND
R59 22K
R58 220
R27
47K
GND
C29
10pF
R61
1K
R60
1K
GND
+5V
C10
100nF
+C20
10uF
16V
C11
100nF
GND
+C21
10uF
16V
GND
R24
22K
R26
47K
GNDGND
GND
GND
R62
10
ABC_in
temp
SCL
SDA
BL-Adj
ABC_in
temp
SDA
SCL
BL-Adj
R25
47K
L5
10uH
LQH32CN100K23
(Murata)
AUX
D2
TL431
TP31
TP32
TP43
TP44
TP45
TP46
TP47
TP51
TP52
TP53
TP54
TP56
TP68
TP69
TP70
Page 87
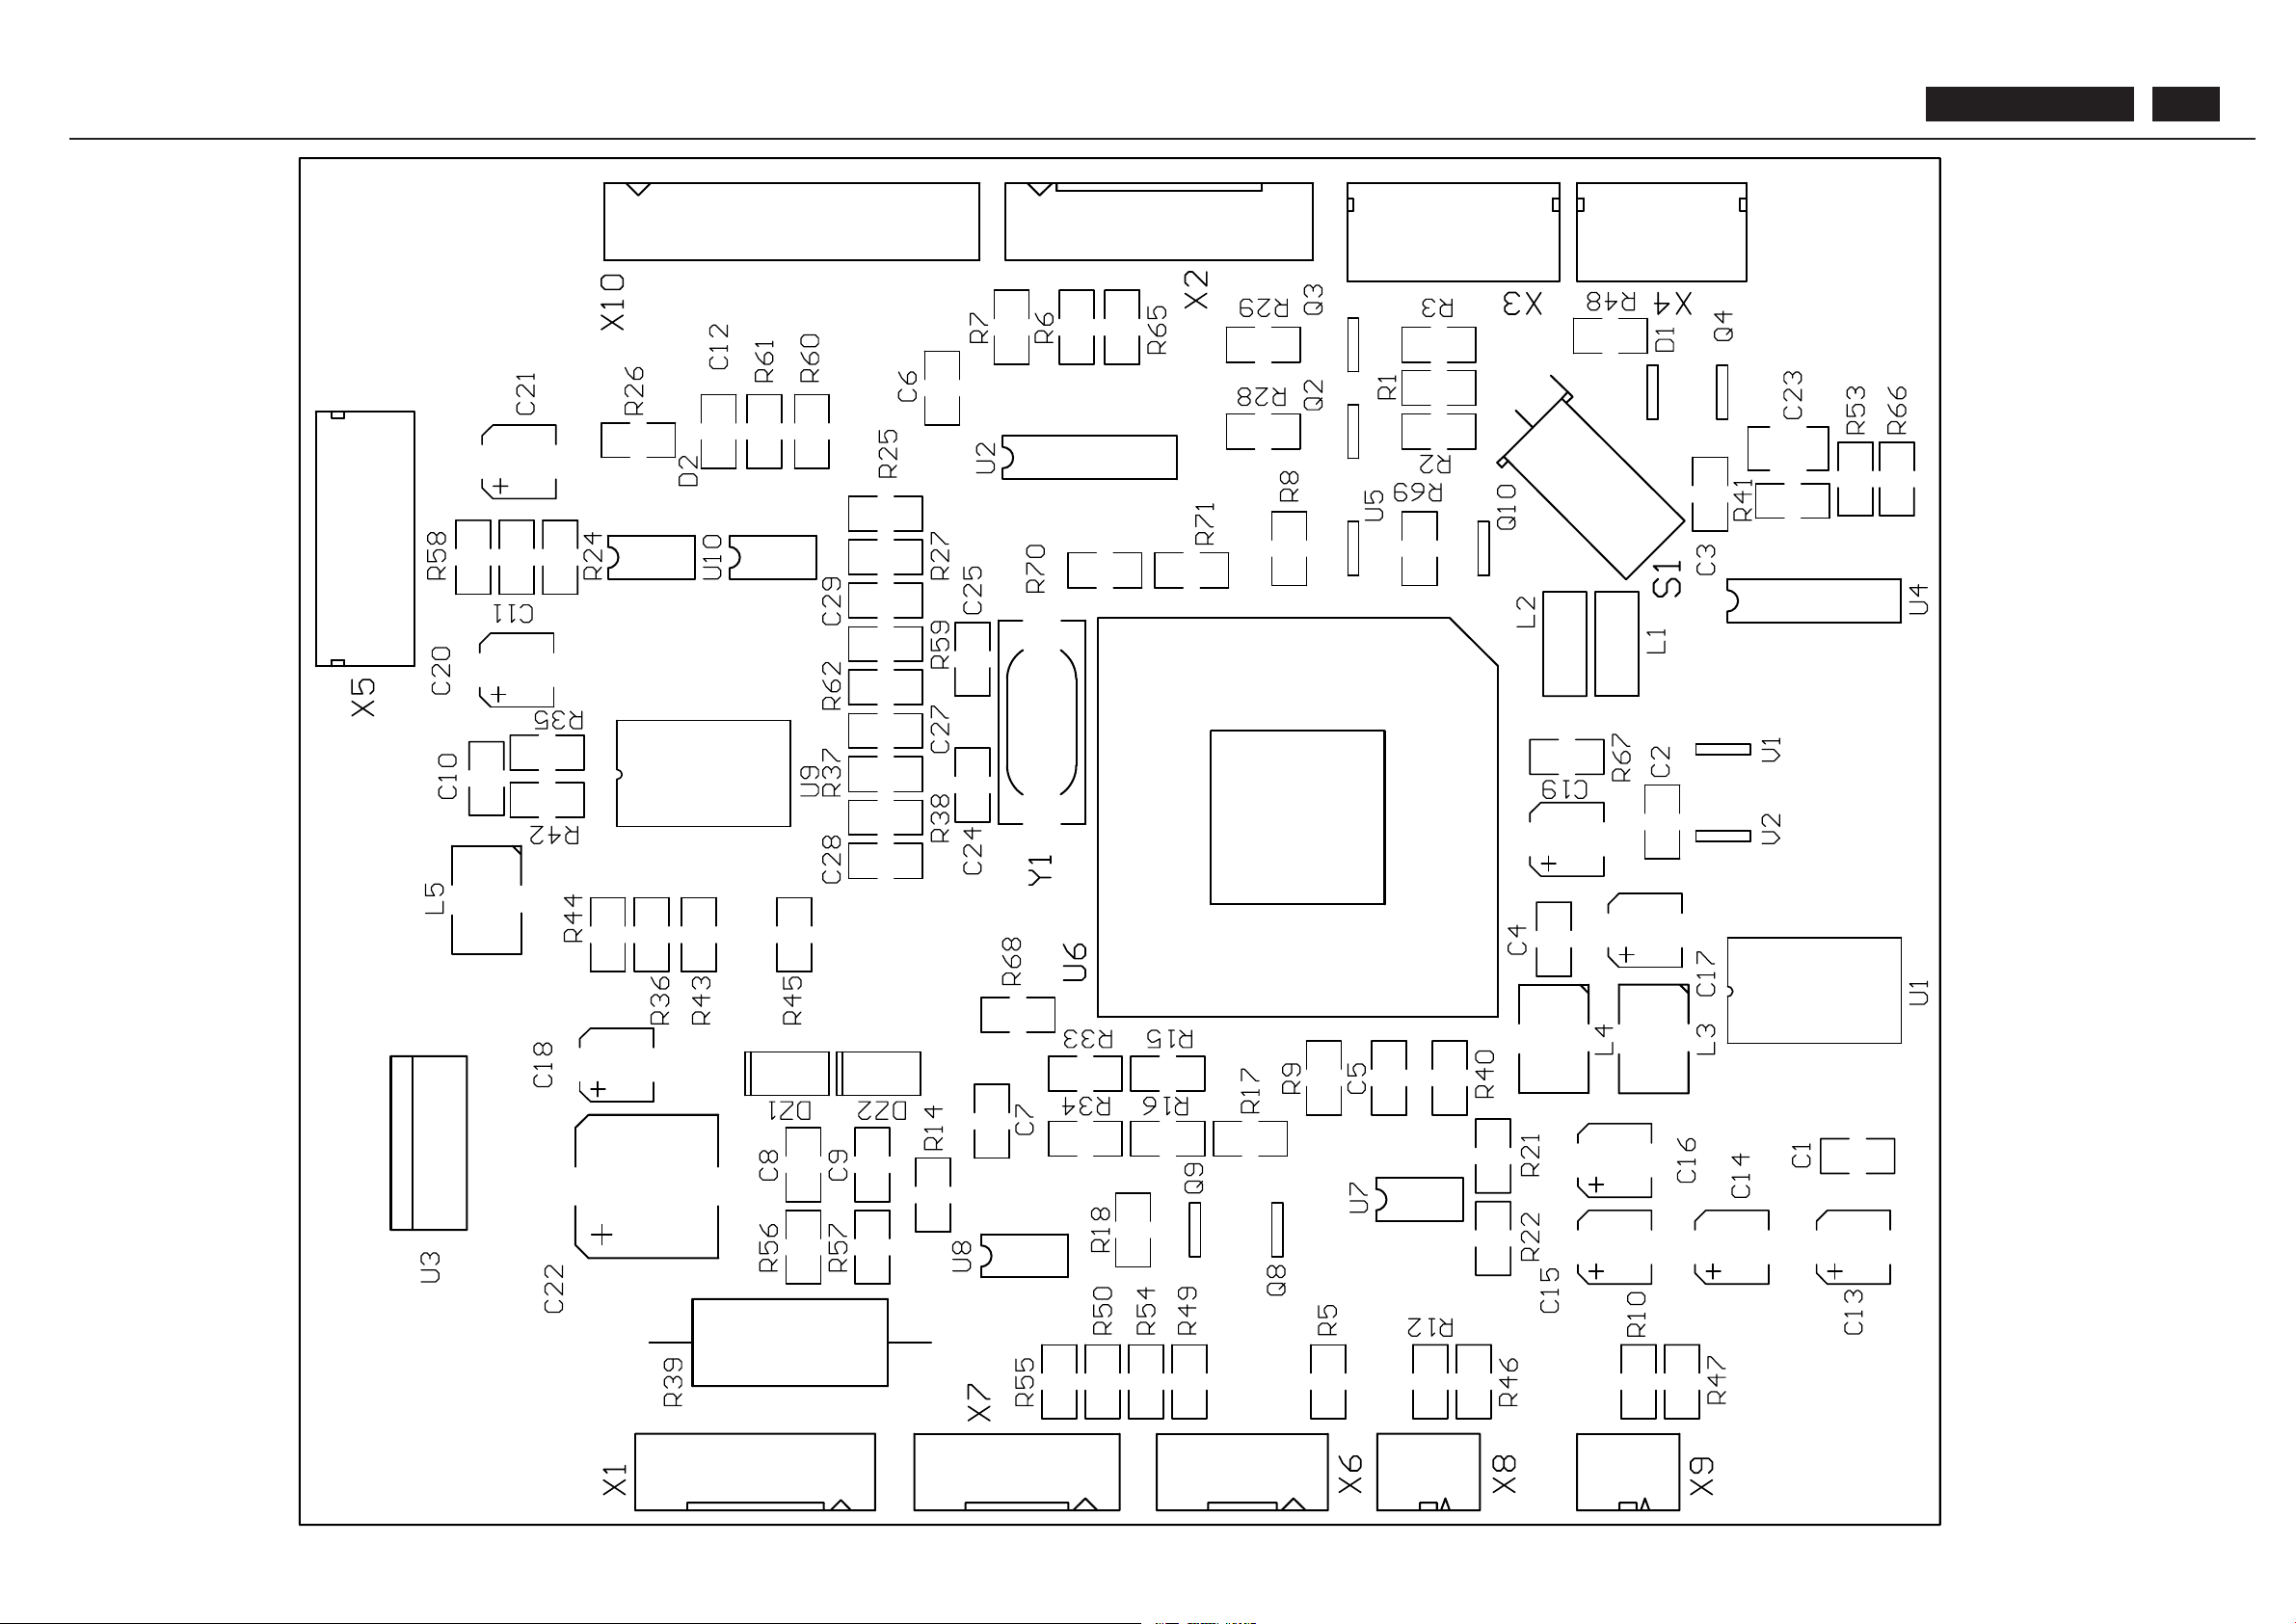
BDL4211. . . 87
Page 88
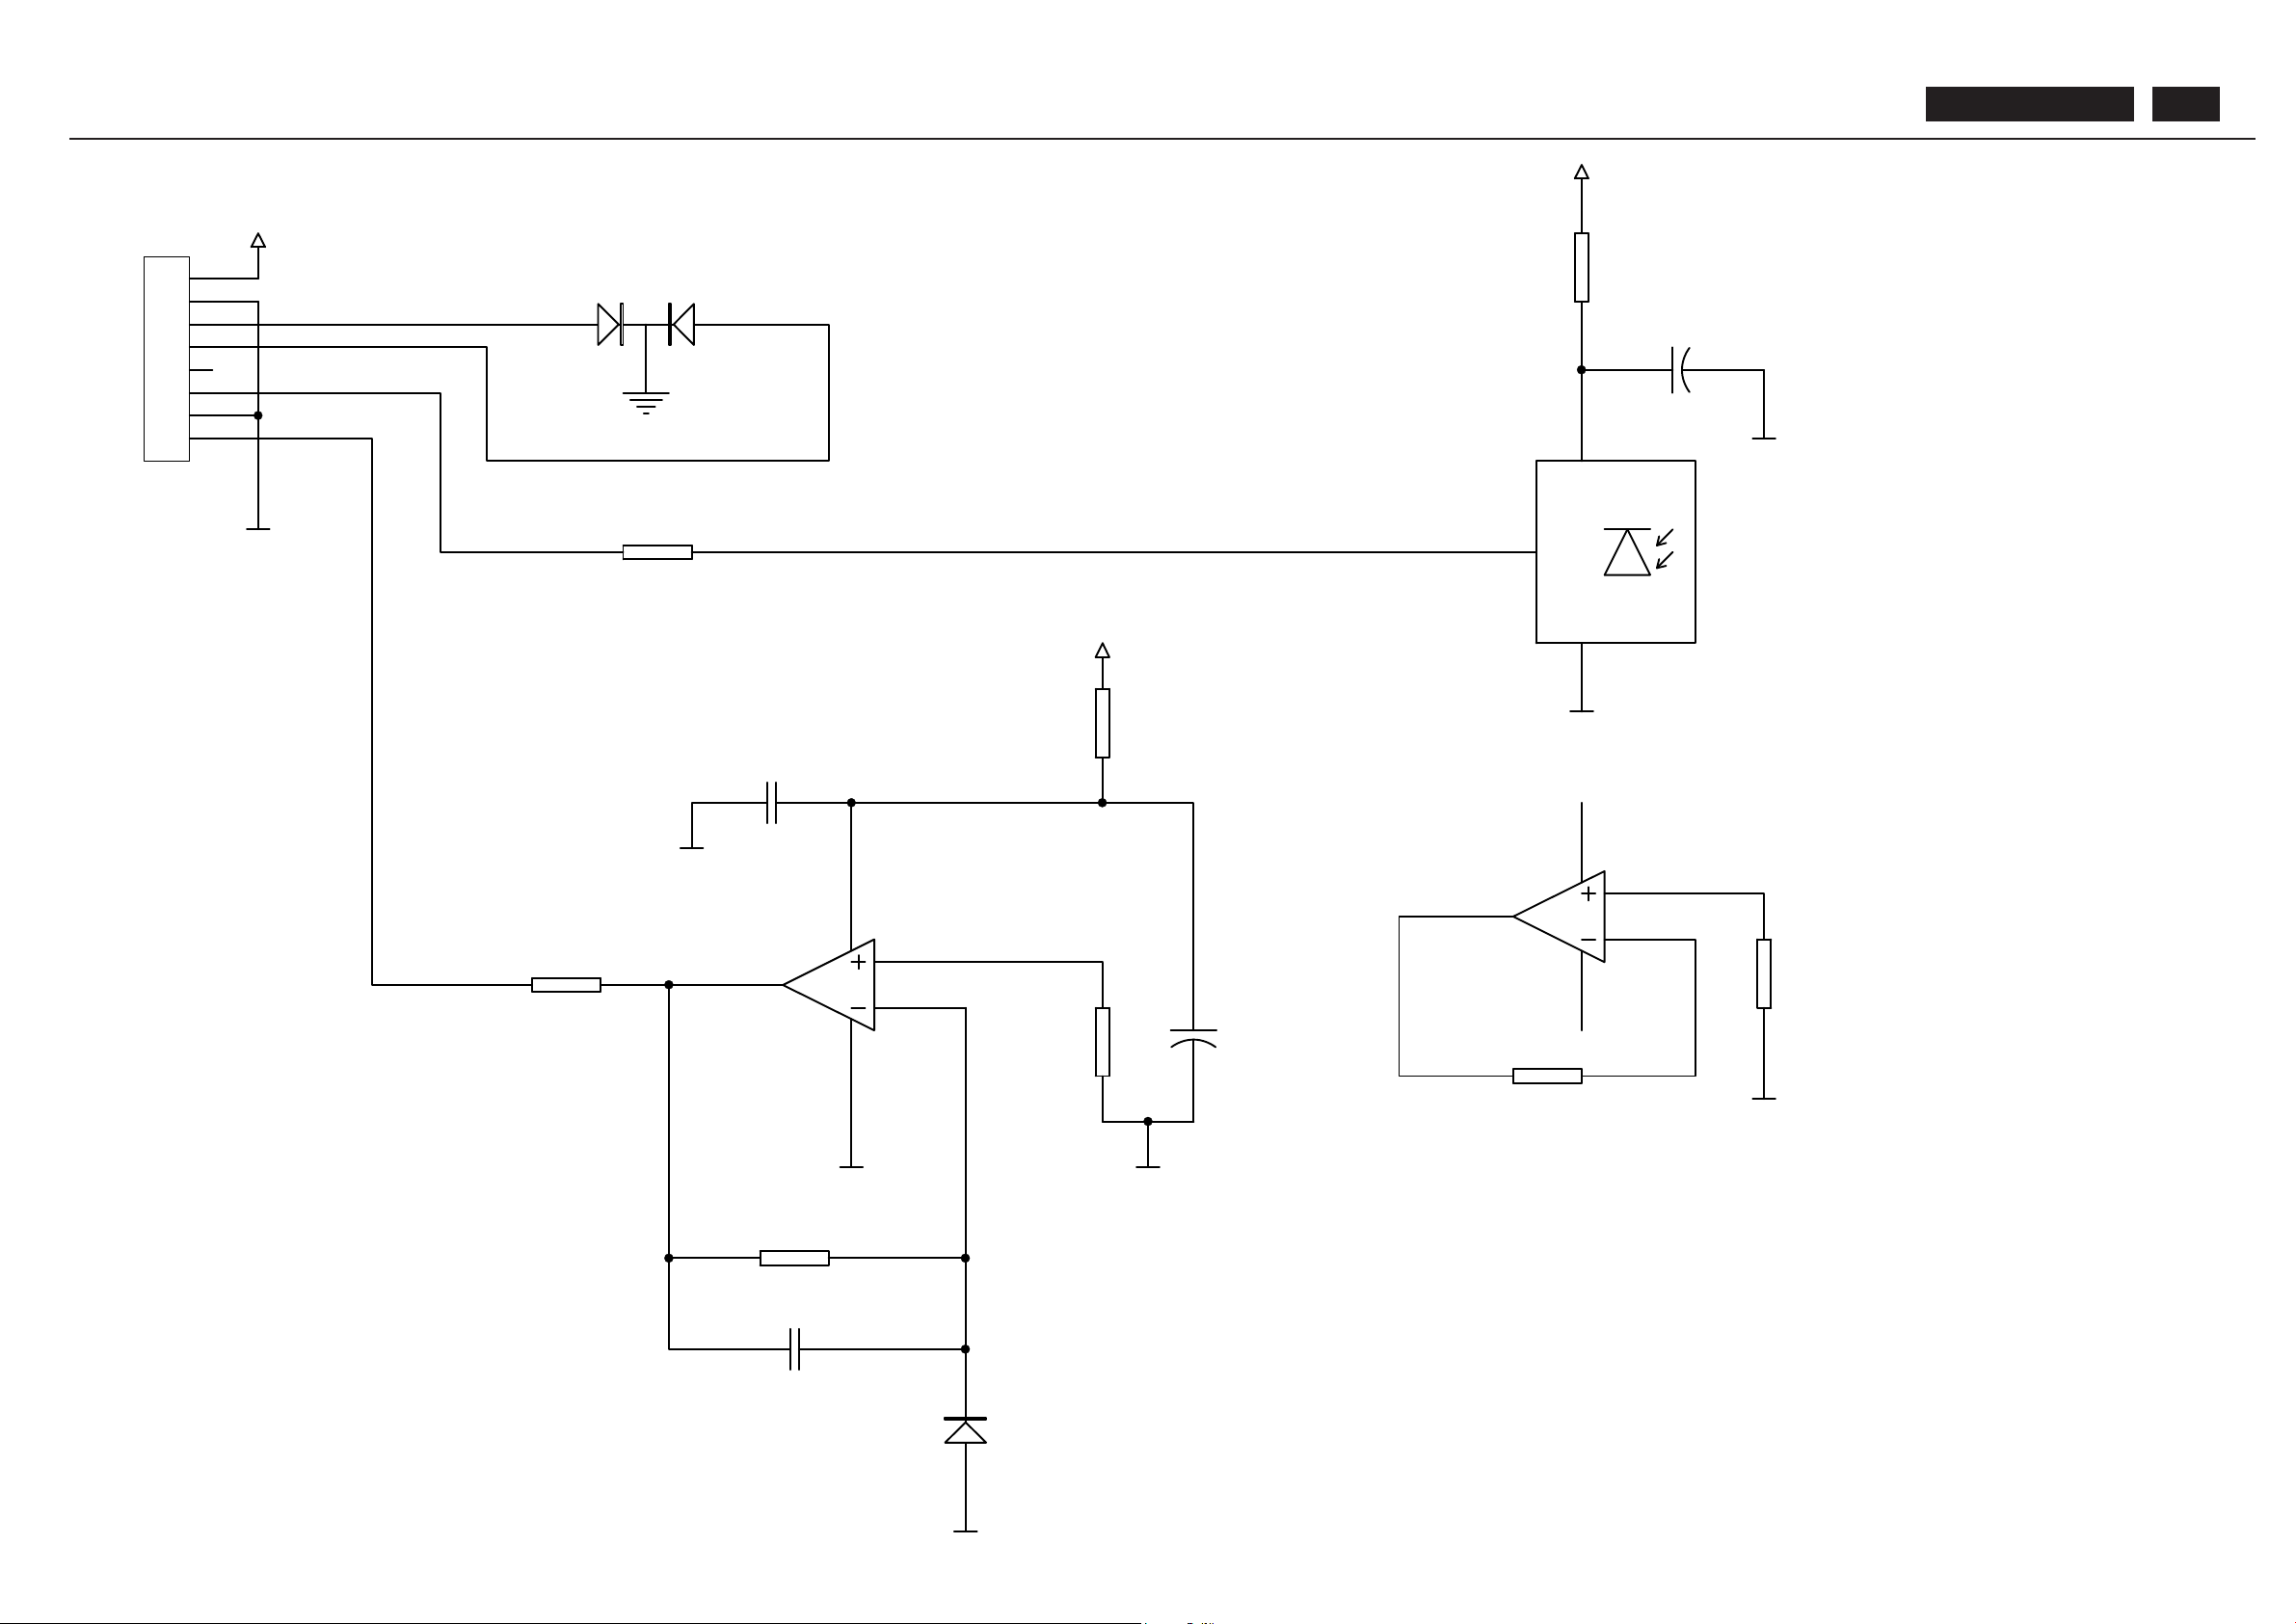
1
2
3
4
5
6
7
8
X1
S8B-PH-K-S
+5V
D1
TLUV 5300
GREEN
RED
R7
10
+
C2
47uF
C3
1nF
R9
220K
+ -
D2
BPW21R
GND
R2
1K
GND
R6
10
+5V
GND
R5
10
3
2
1
84
U1A
LM358A
GND
5
6
7
84
U1B
LM358A
R4
1K
R3
1K
GND
OUT
1
GND
2
VS
3
U2
TSOP41
GND
R1
10
+5V
+
C1
47uF
GND
C4
100nF
GND
CONTROL BOARD
BDL4211. . . 88
Page 89
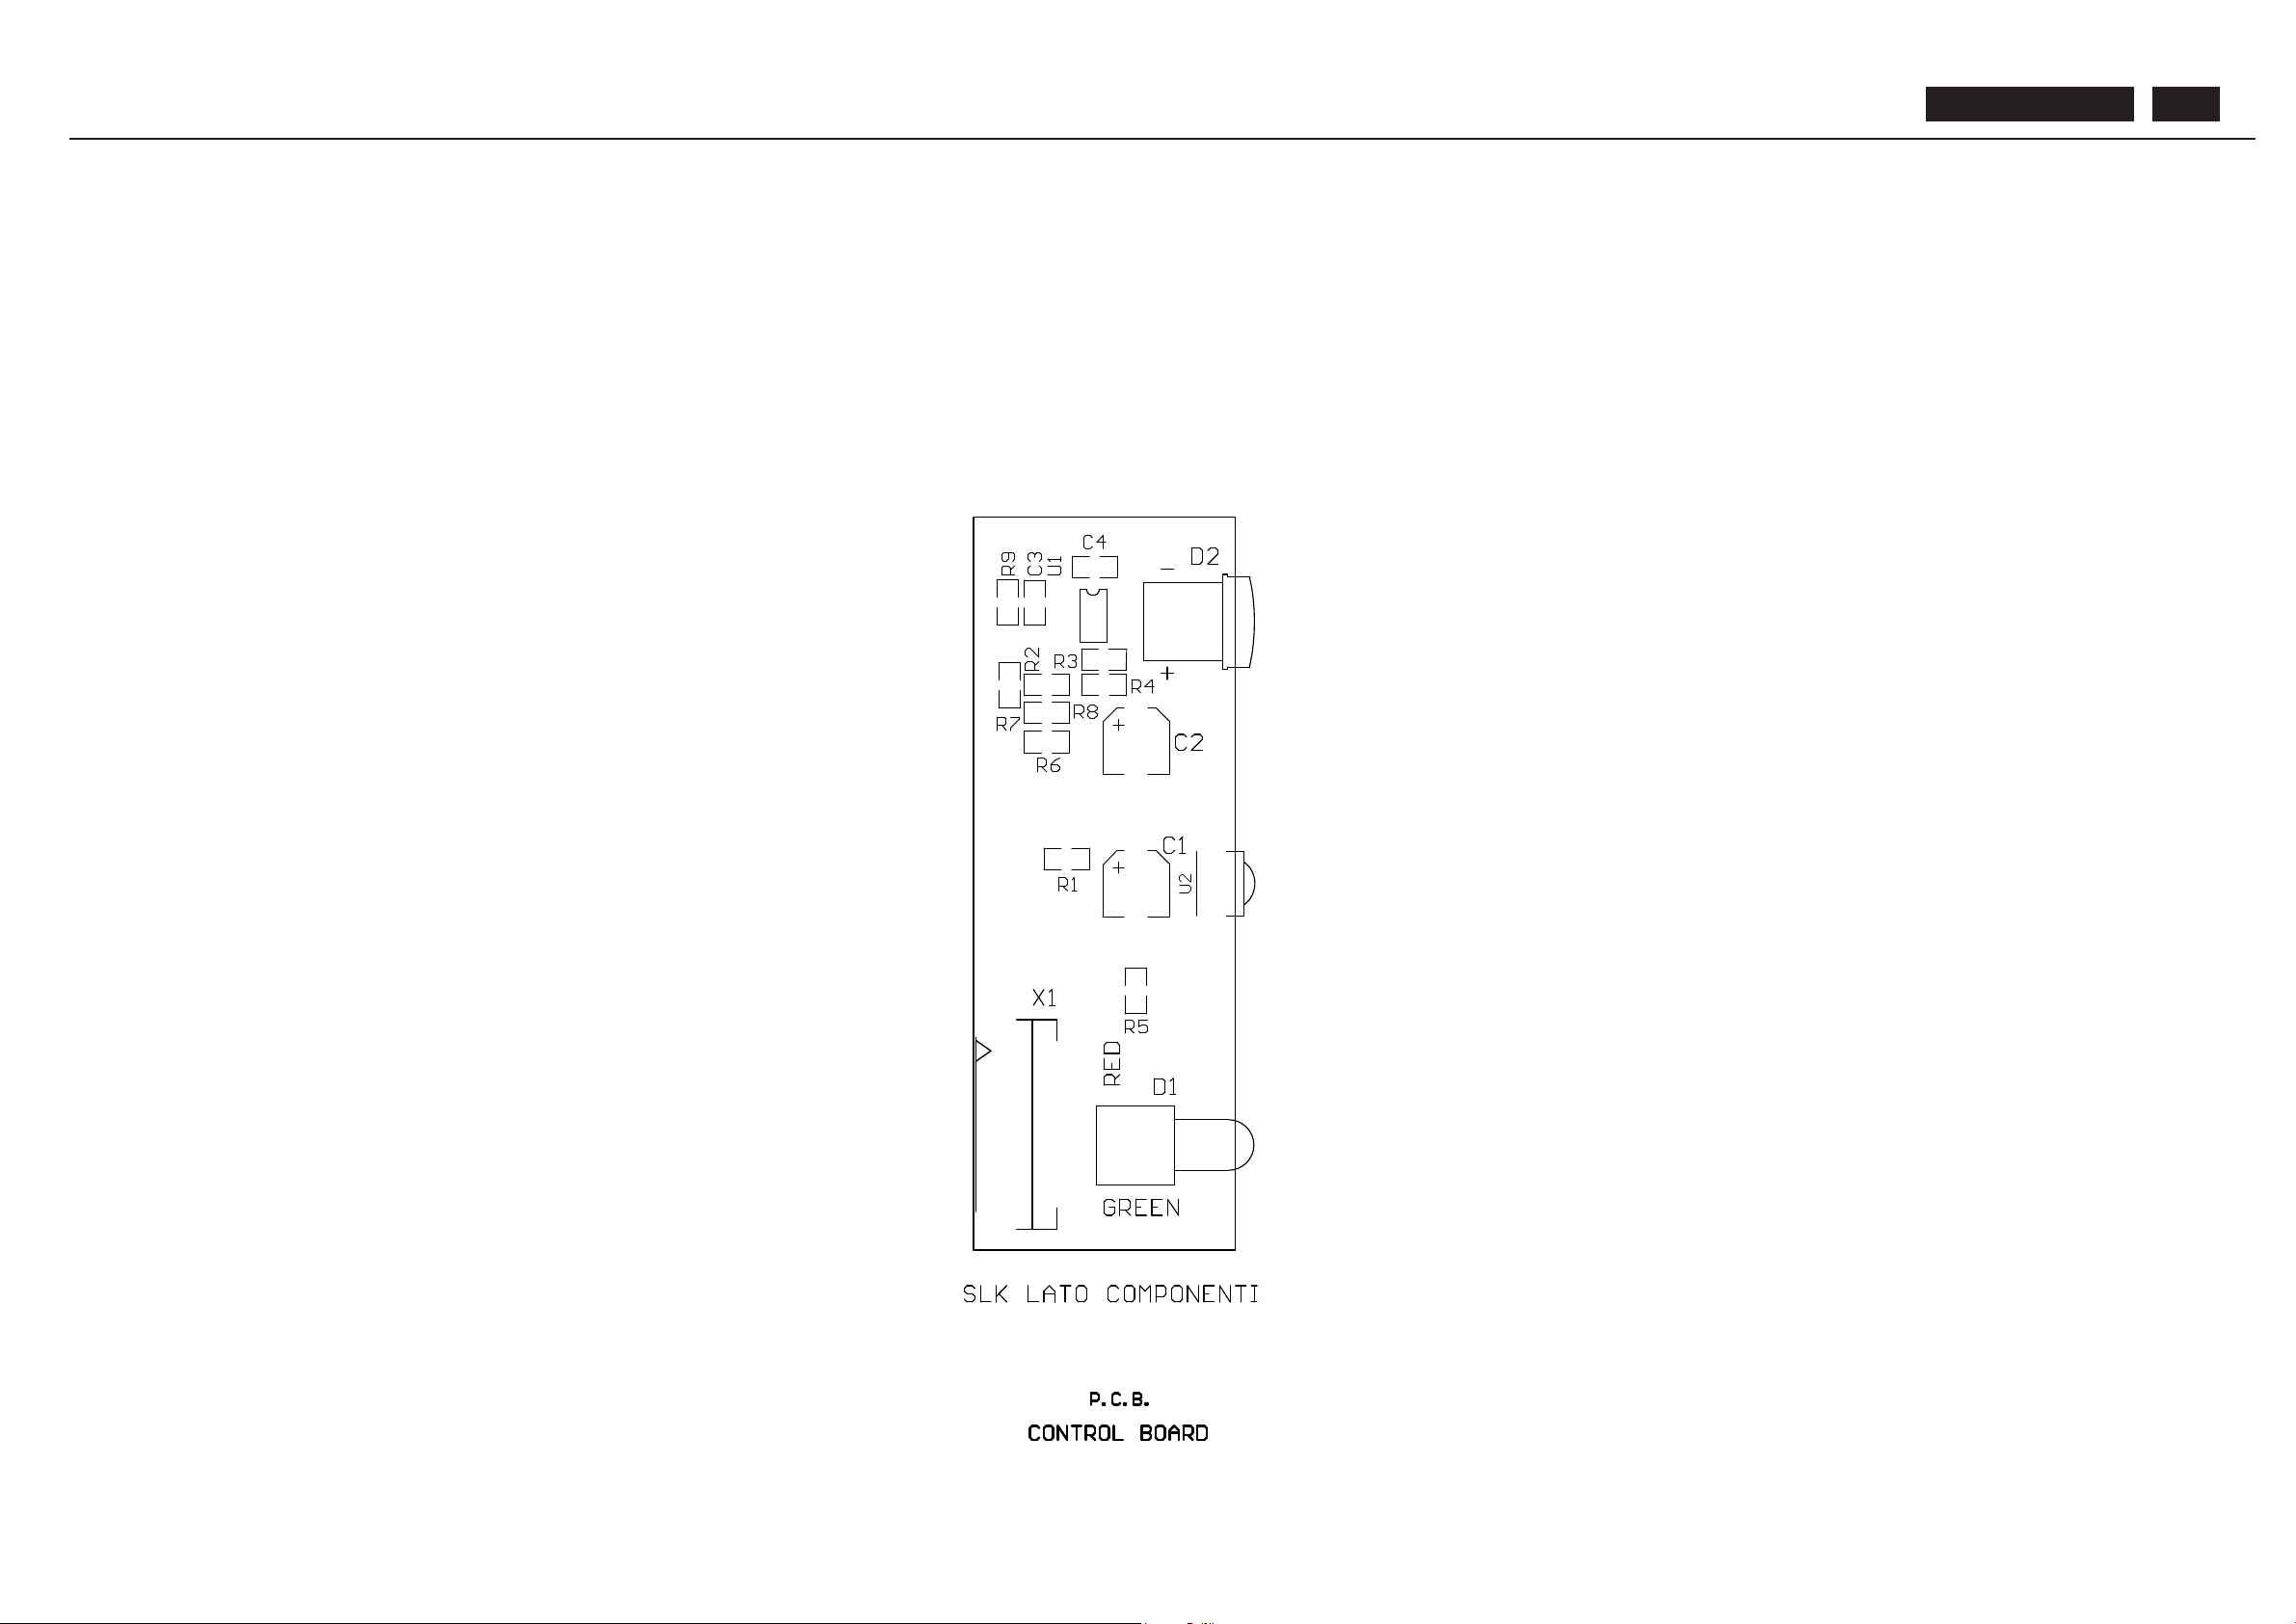
BDL4211. . . 89
Page 90
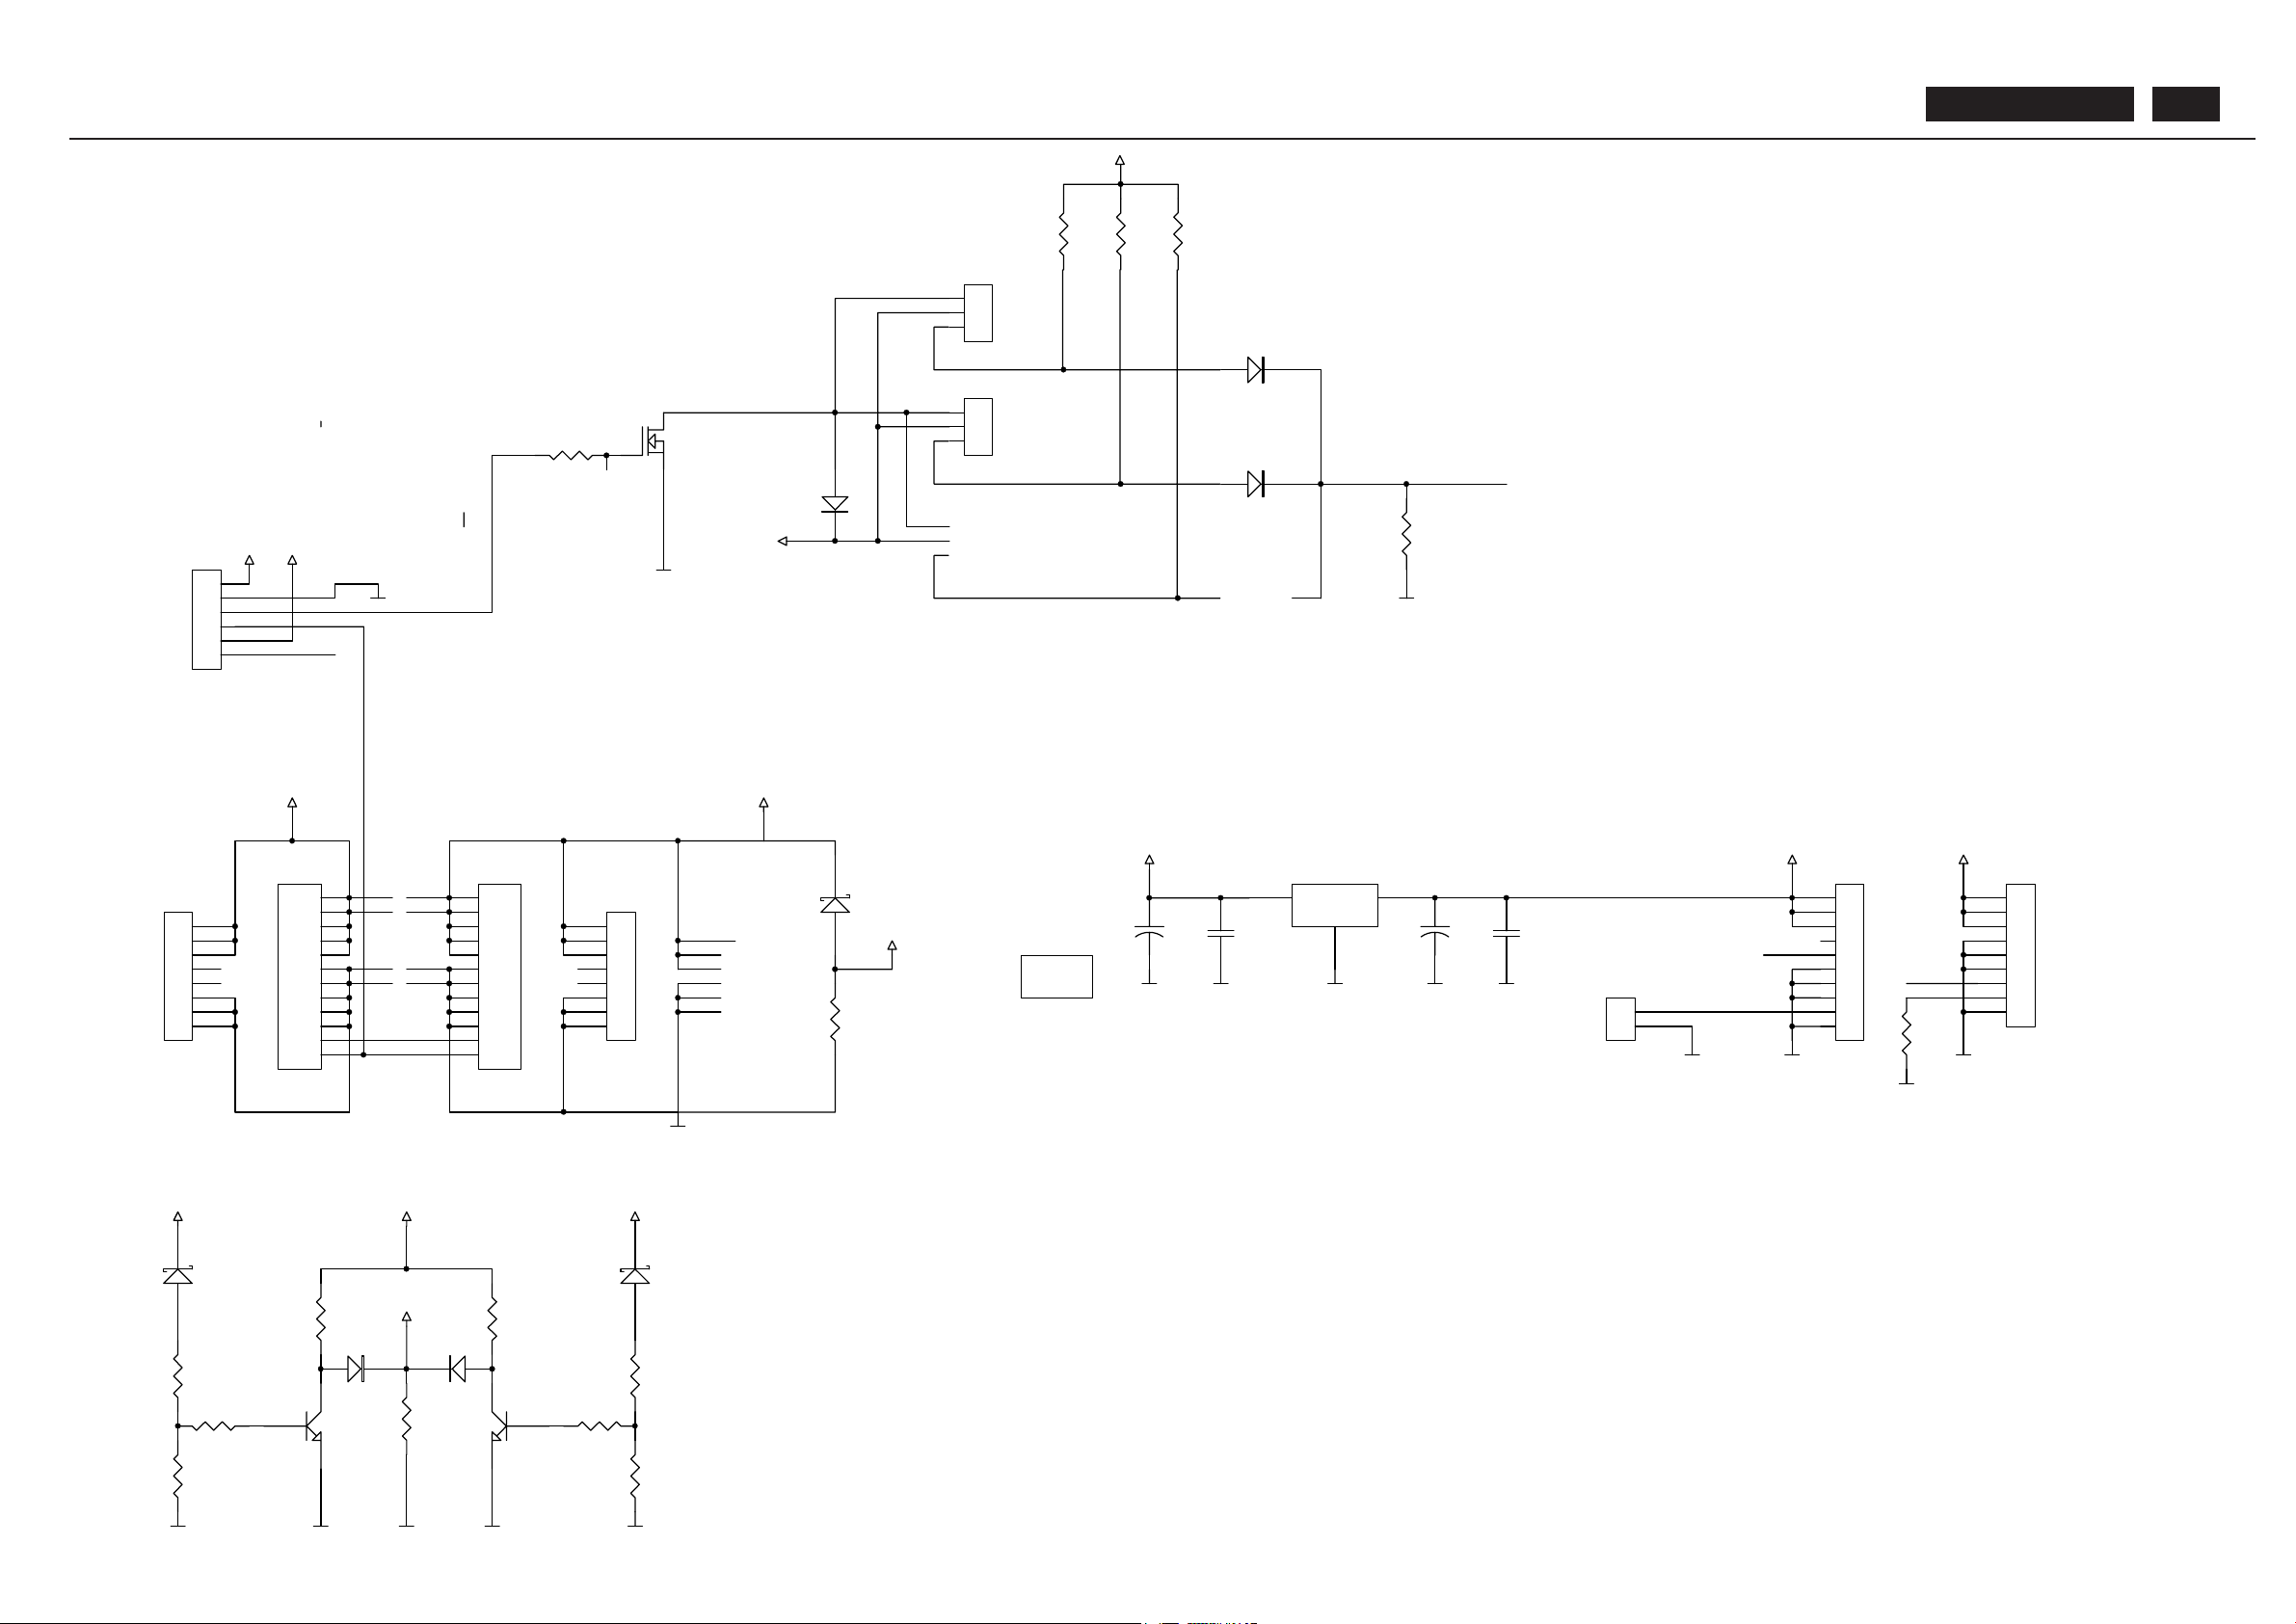
AUXILIARY POWER SUPPLY BOARD
1
2
3
4
5
6
X9
B6B-PH-K
To I/O Board
1
2
3
4
5
6
7
8
9
10
11
12
X5
B12B-PH-K
1
2
3
4
5
6
7
8
9
10
11
12
X6
B12B-PH-K
+12V
GND1
GND2
V10
BZX79B20 N.M.
+24Vsense
+24Vsense
V2
MTD3055VL
1
2
3
X10
B3B-PH-K
1
2
3
X11
B3B-PH-K
V1
BAV19
+12V
GND1
V3
1N4148
R1
2.7KR22.7K
+12V
R4
2.2K
GND1
FAN_DETECT
FAN_DETECT
1
2
3
4
5
6
7
8
9
10
X1
B10B-PH-K
to video
+3.3V
+C2
22uF
35V
C4
100nF
100VDIS1
DIS_6021PB
IN
I
OUT
O
GND
G
U1
LM340T-12
GND1GND1GND1
+C1
22uF
35V
C3
100nF
100V
GND1GND1
+16V+12V
1
2
X13
B2B-PH-K
GND1
SLAVE VERSION
R14
100
1
2
3
4
5
6
7
8
9
X2
B9B-PH-K
+16V
to SMPS
GND1
+3.3V
R15
1K
GND1
GND1
1
2
3
4
5
6
7
8
X4
B8B-PH-K
1
2
3
4
5
6
7
8
X3
B8B-PH-K
+24V-2+24V-1
BR.ADJ
BR.ADJ
R13
1K
V4
1N4148
V6
1N4148
V7
1N4148
R12
1K
R8
1K
V11
BC547
V12
BC547
R7
1K
R9
1K
R5
1K N.M.
R6
1K
R10
1K
R11
1K
GND1 GND1 GND1 GND1 GND1
+24Vsense
+12V+24V-2 +24V-1
V8
BZX79B20
V9
BZX79B20
BDL4211. . . 90
Page 91
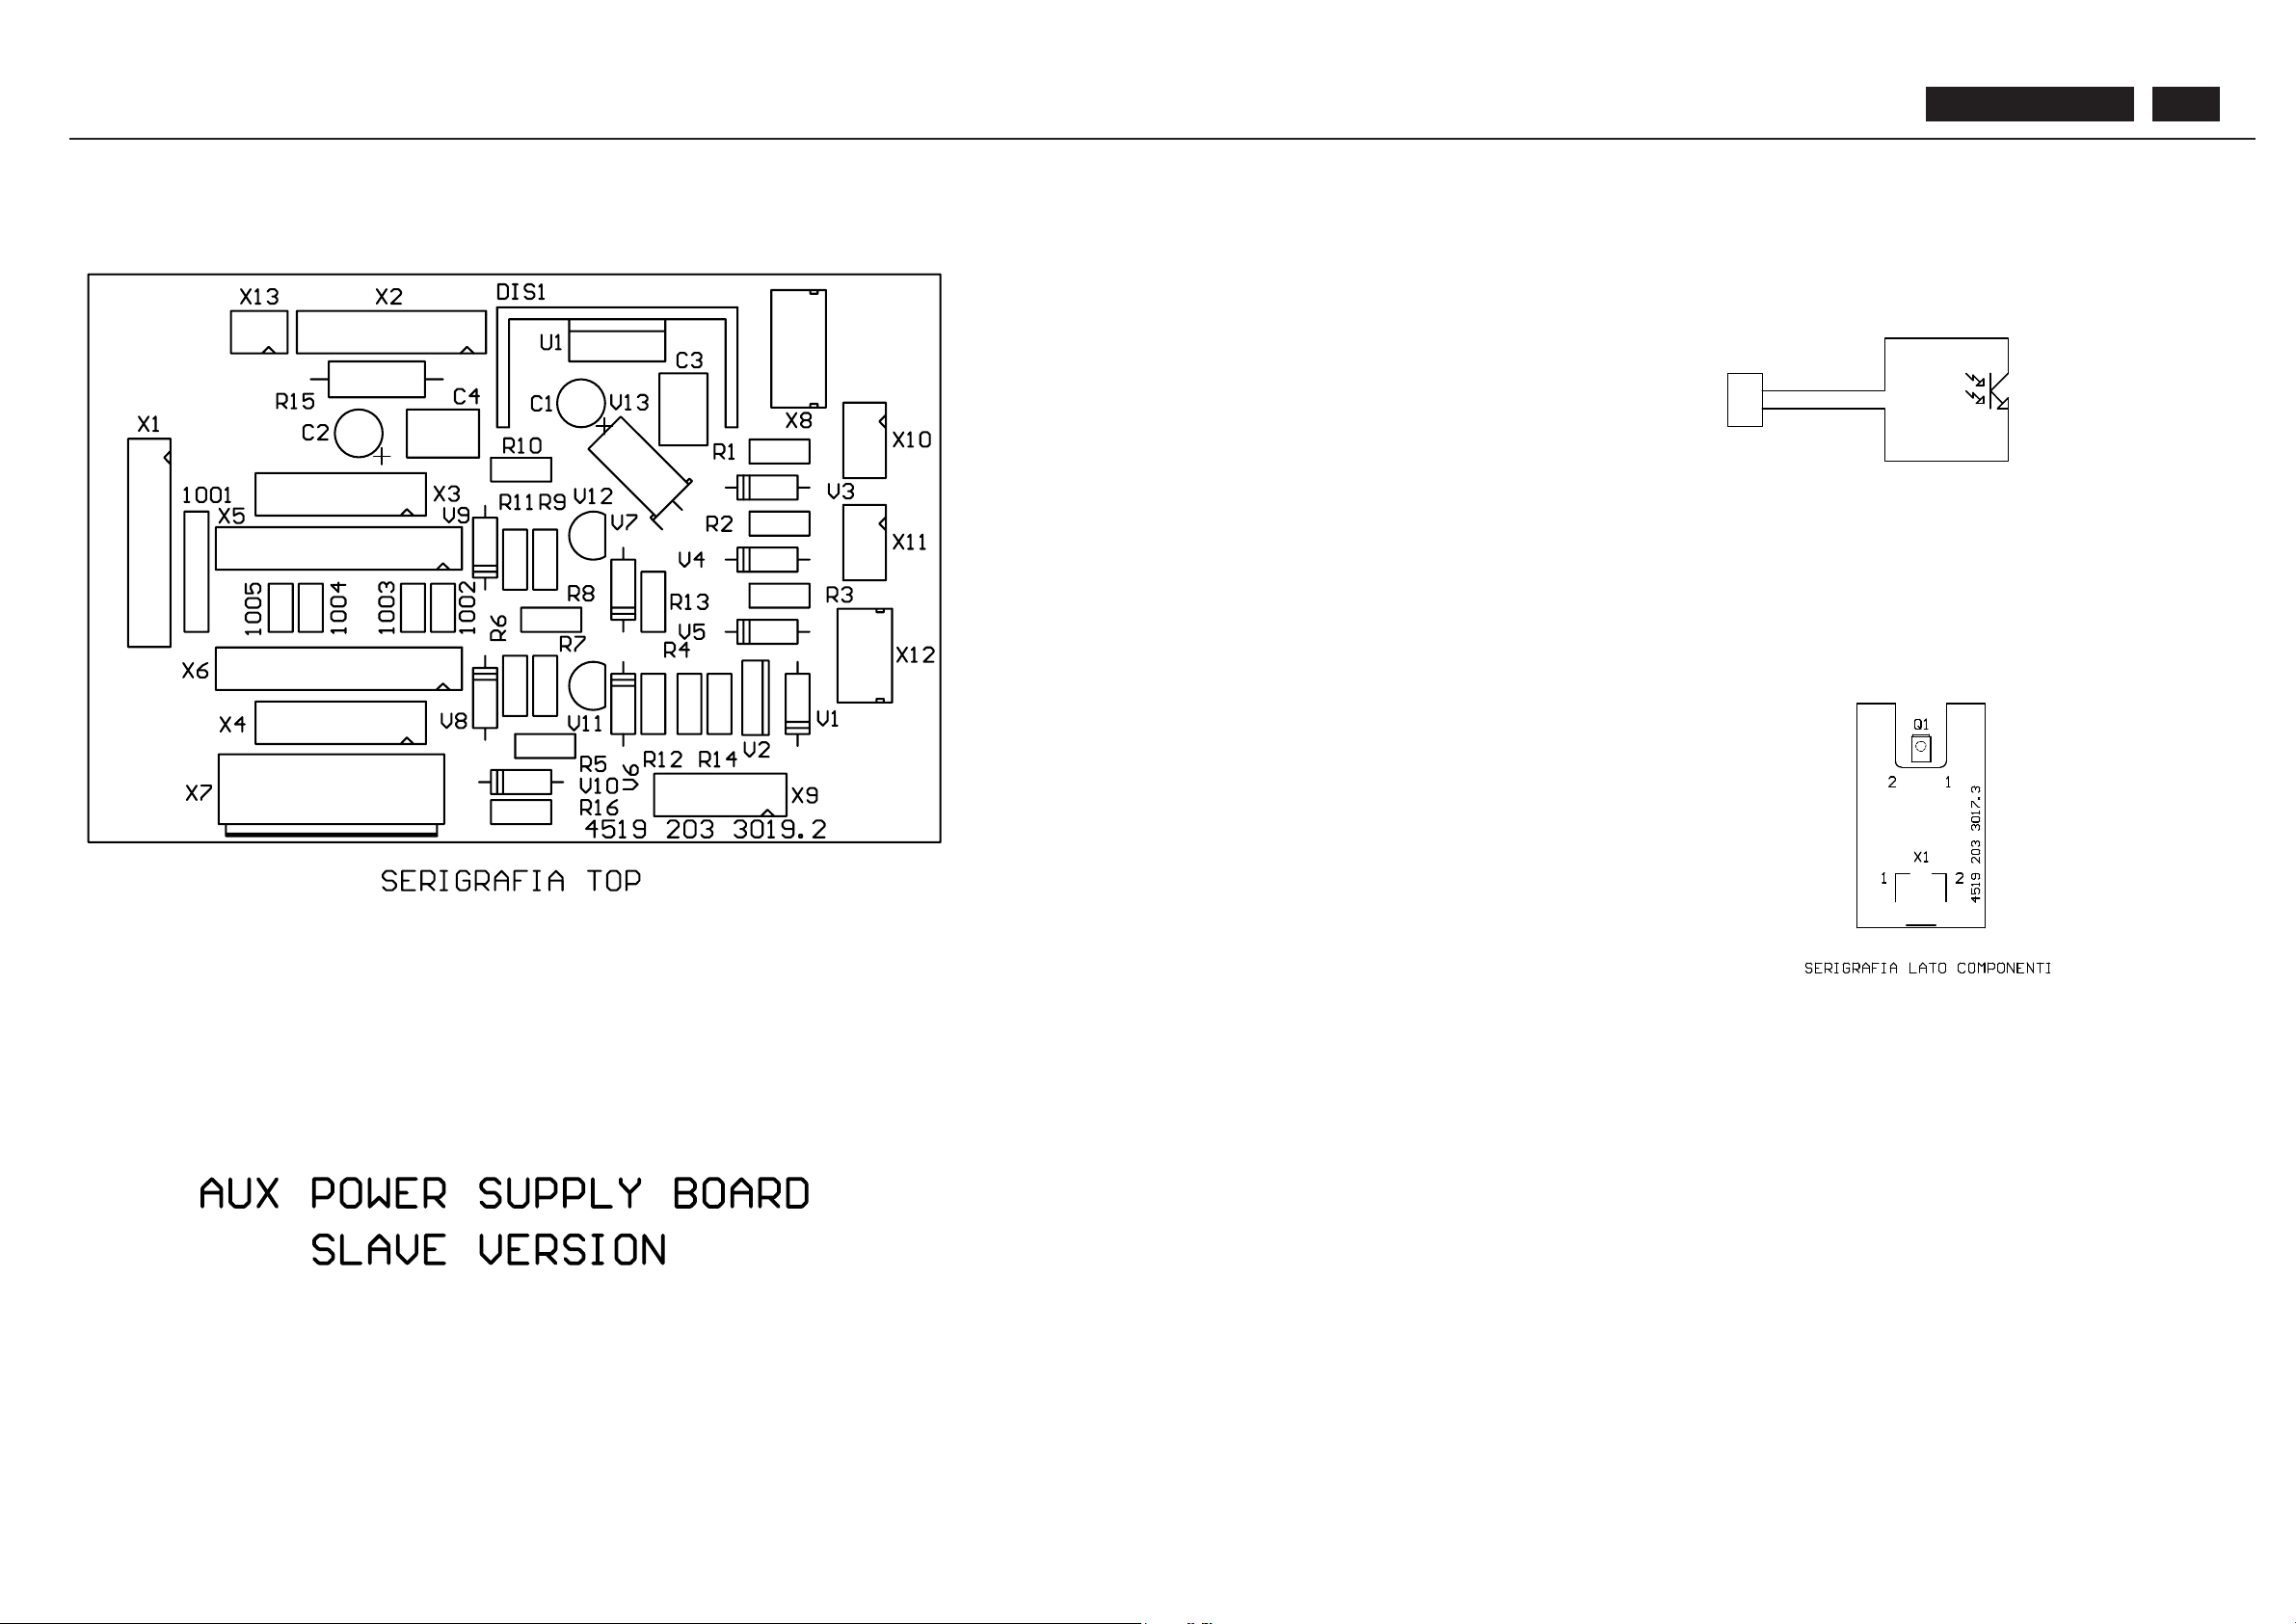
BDL4211. . . 91
1
2
X1
S 2B-PH-SM3-TB
LAMP SENSOR BOARD
Q1
PHOTO NPN
Page 92
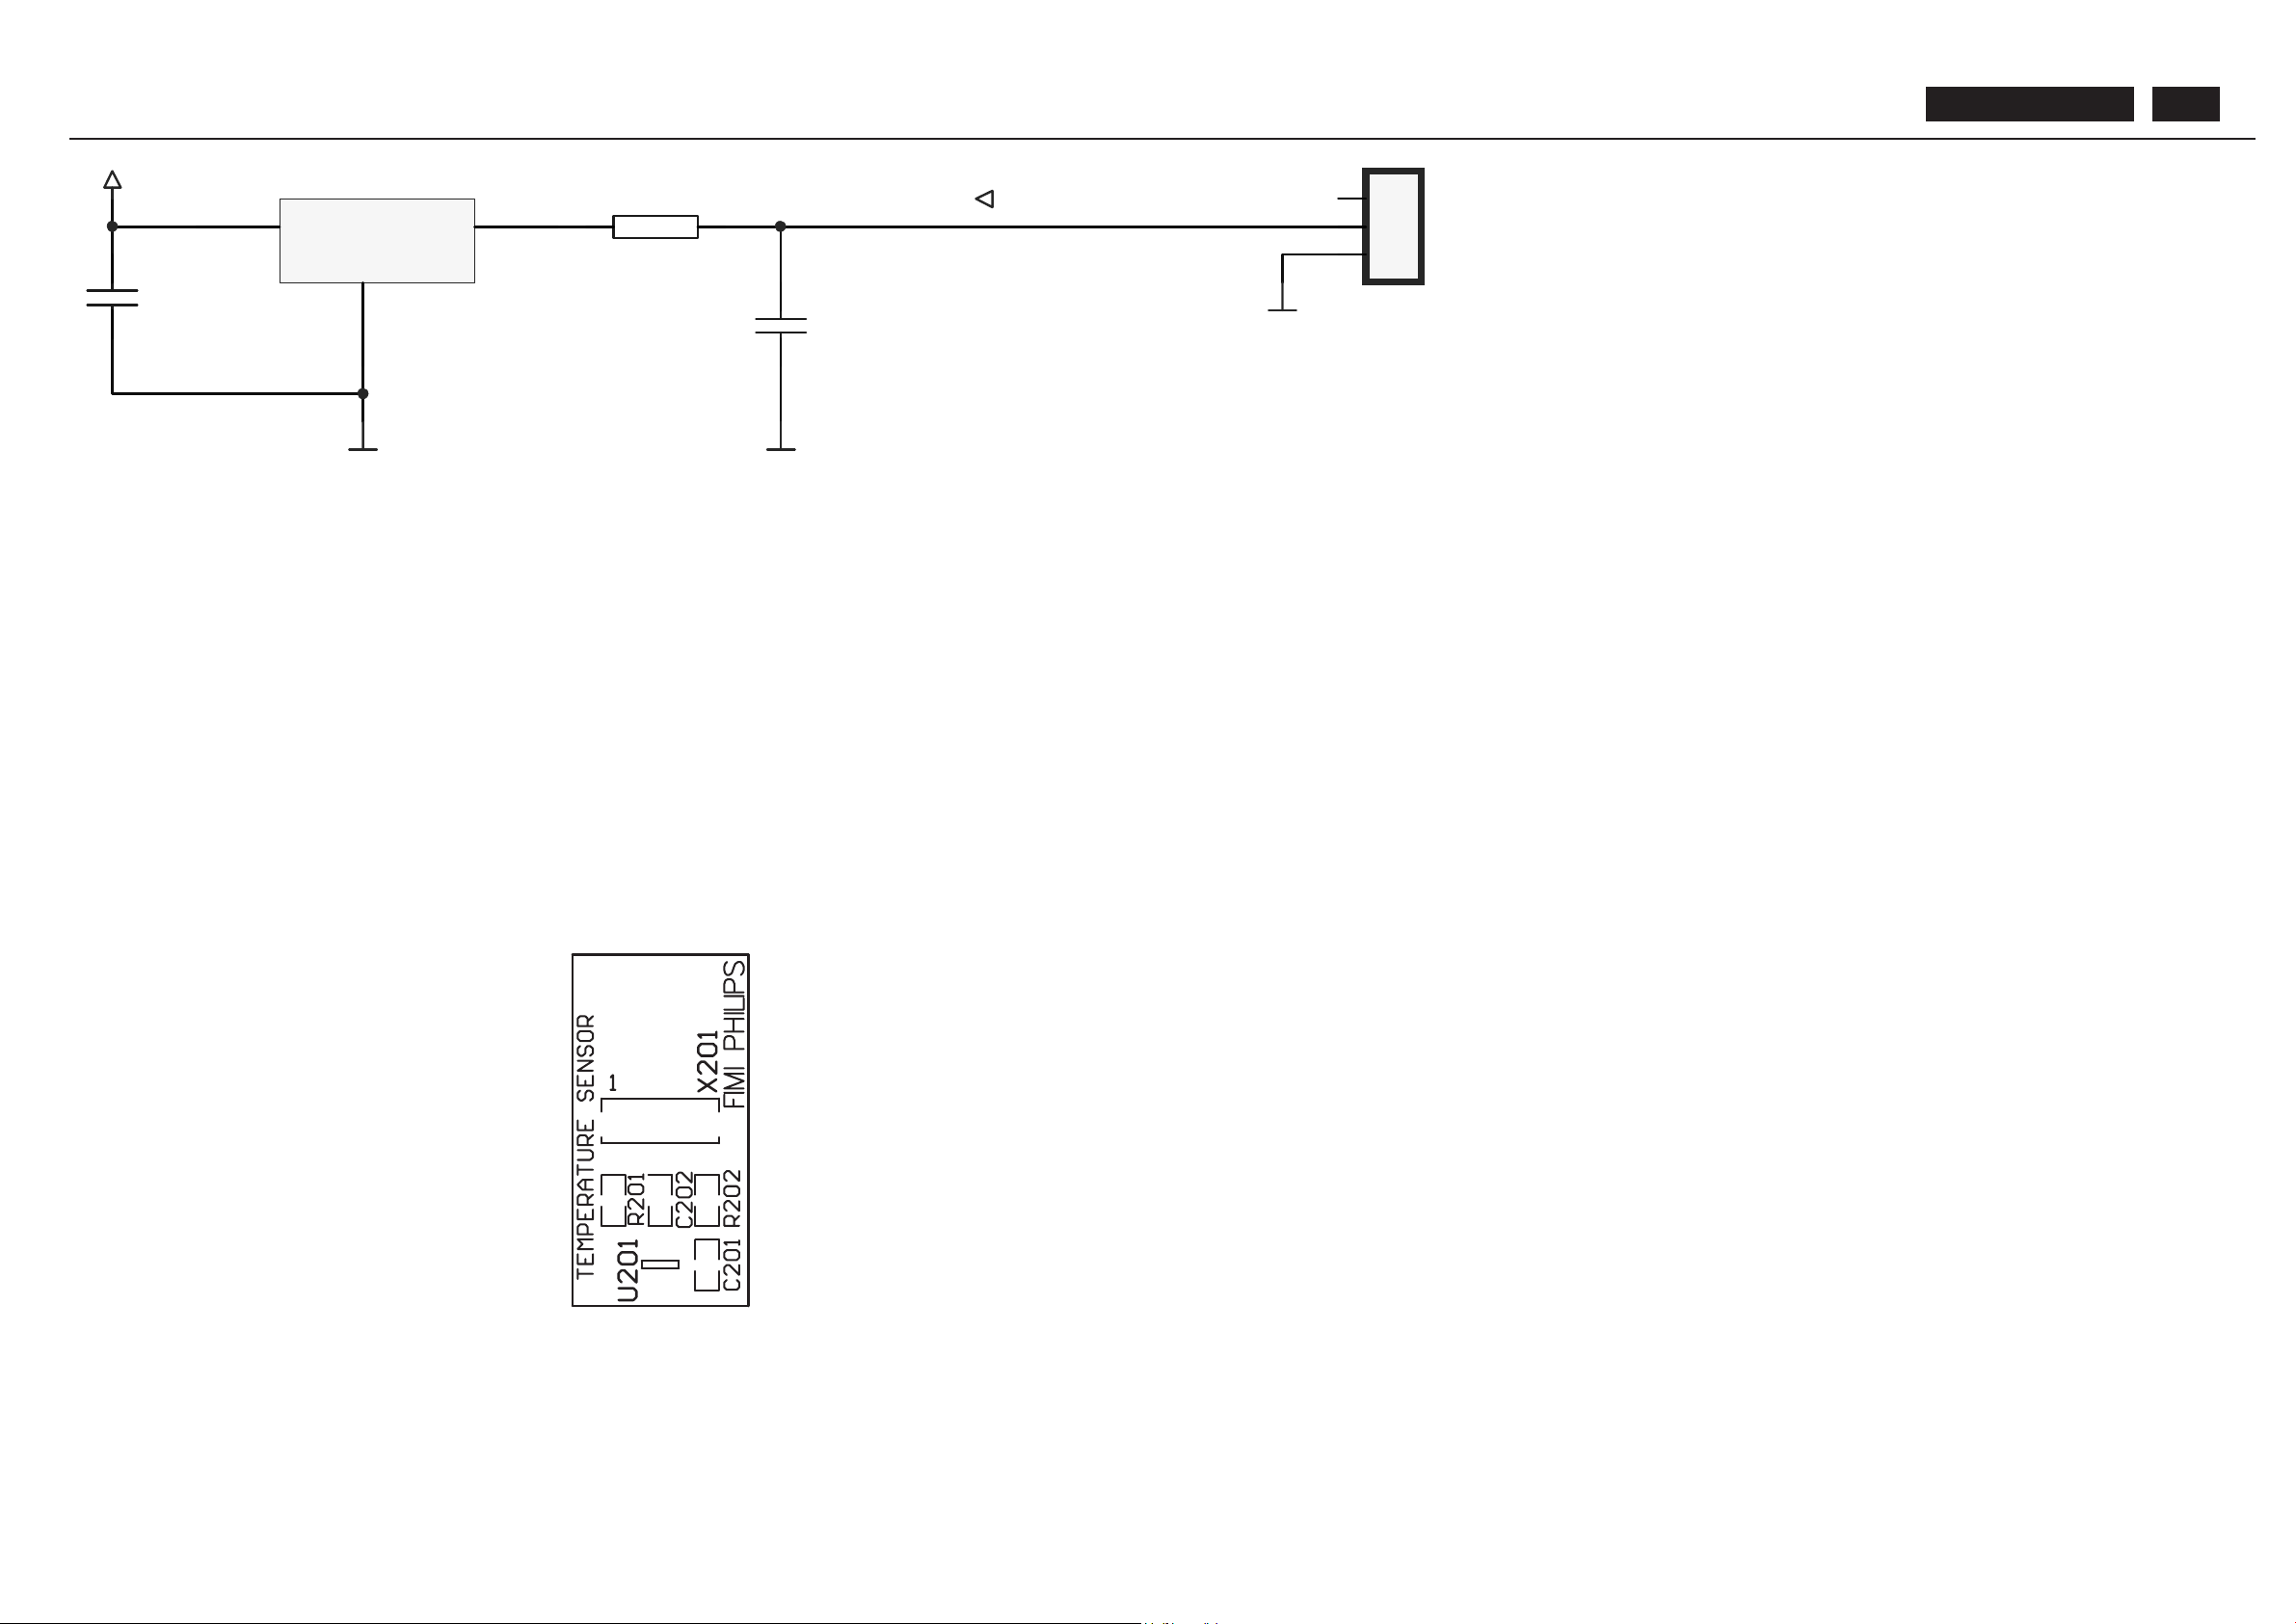
BDL4211. . . 92
Temperature sensor
R201
100
5% 0.1W
GND
3
VOUT
2
+VS
1
U201
LM45C
C201
100nF C202
100nF
GND1
GND1
+5V1
GND1
1
1
2
2
3
3
X201
B3B-XH-A
NP
Page 93
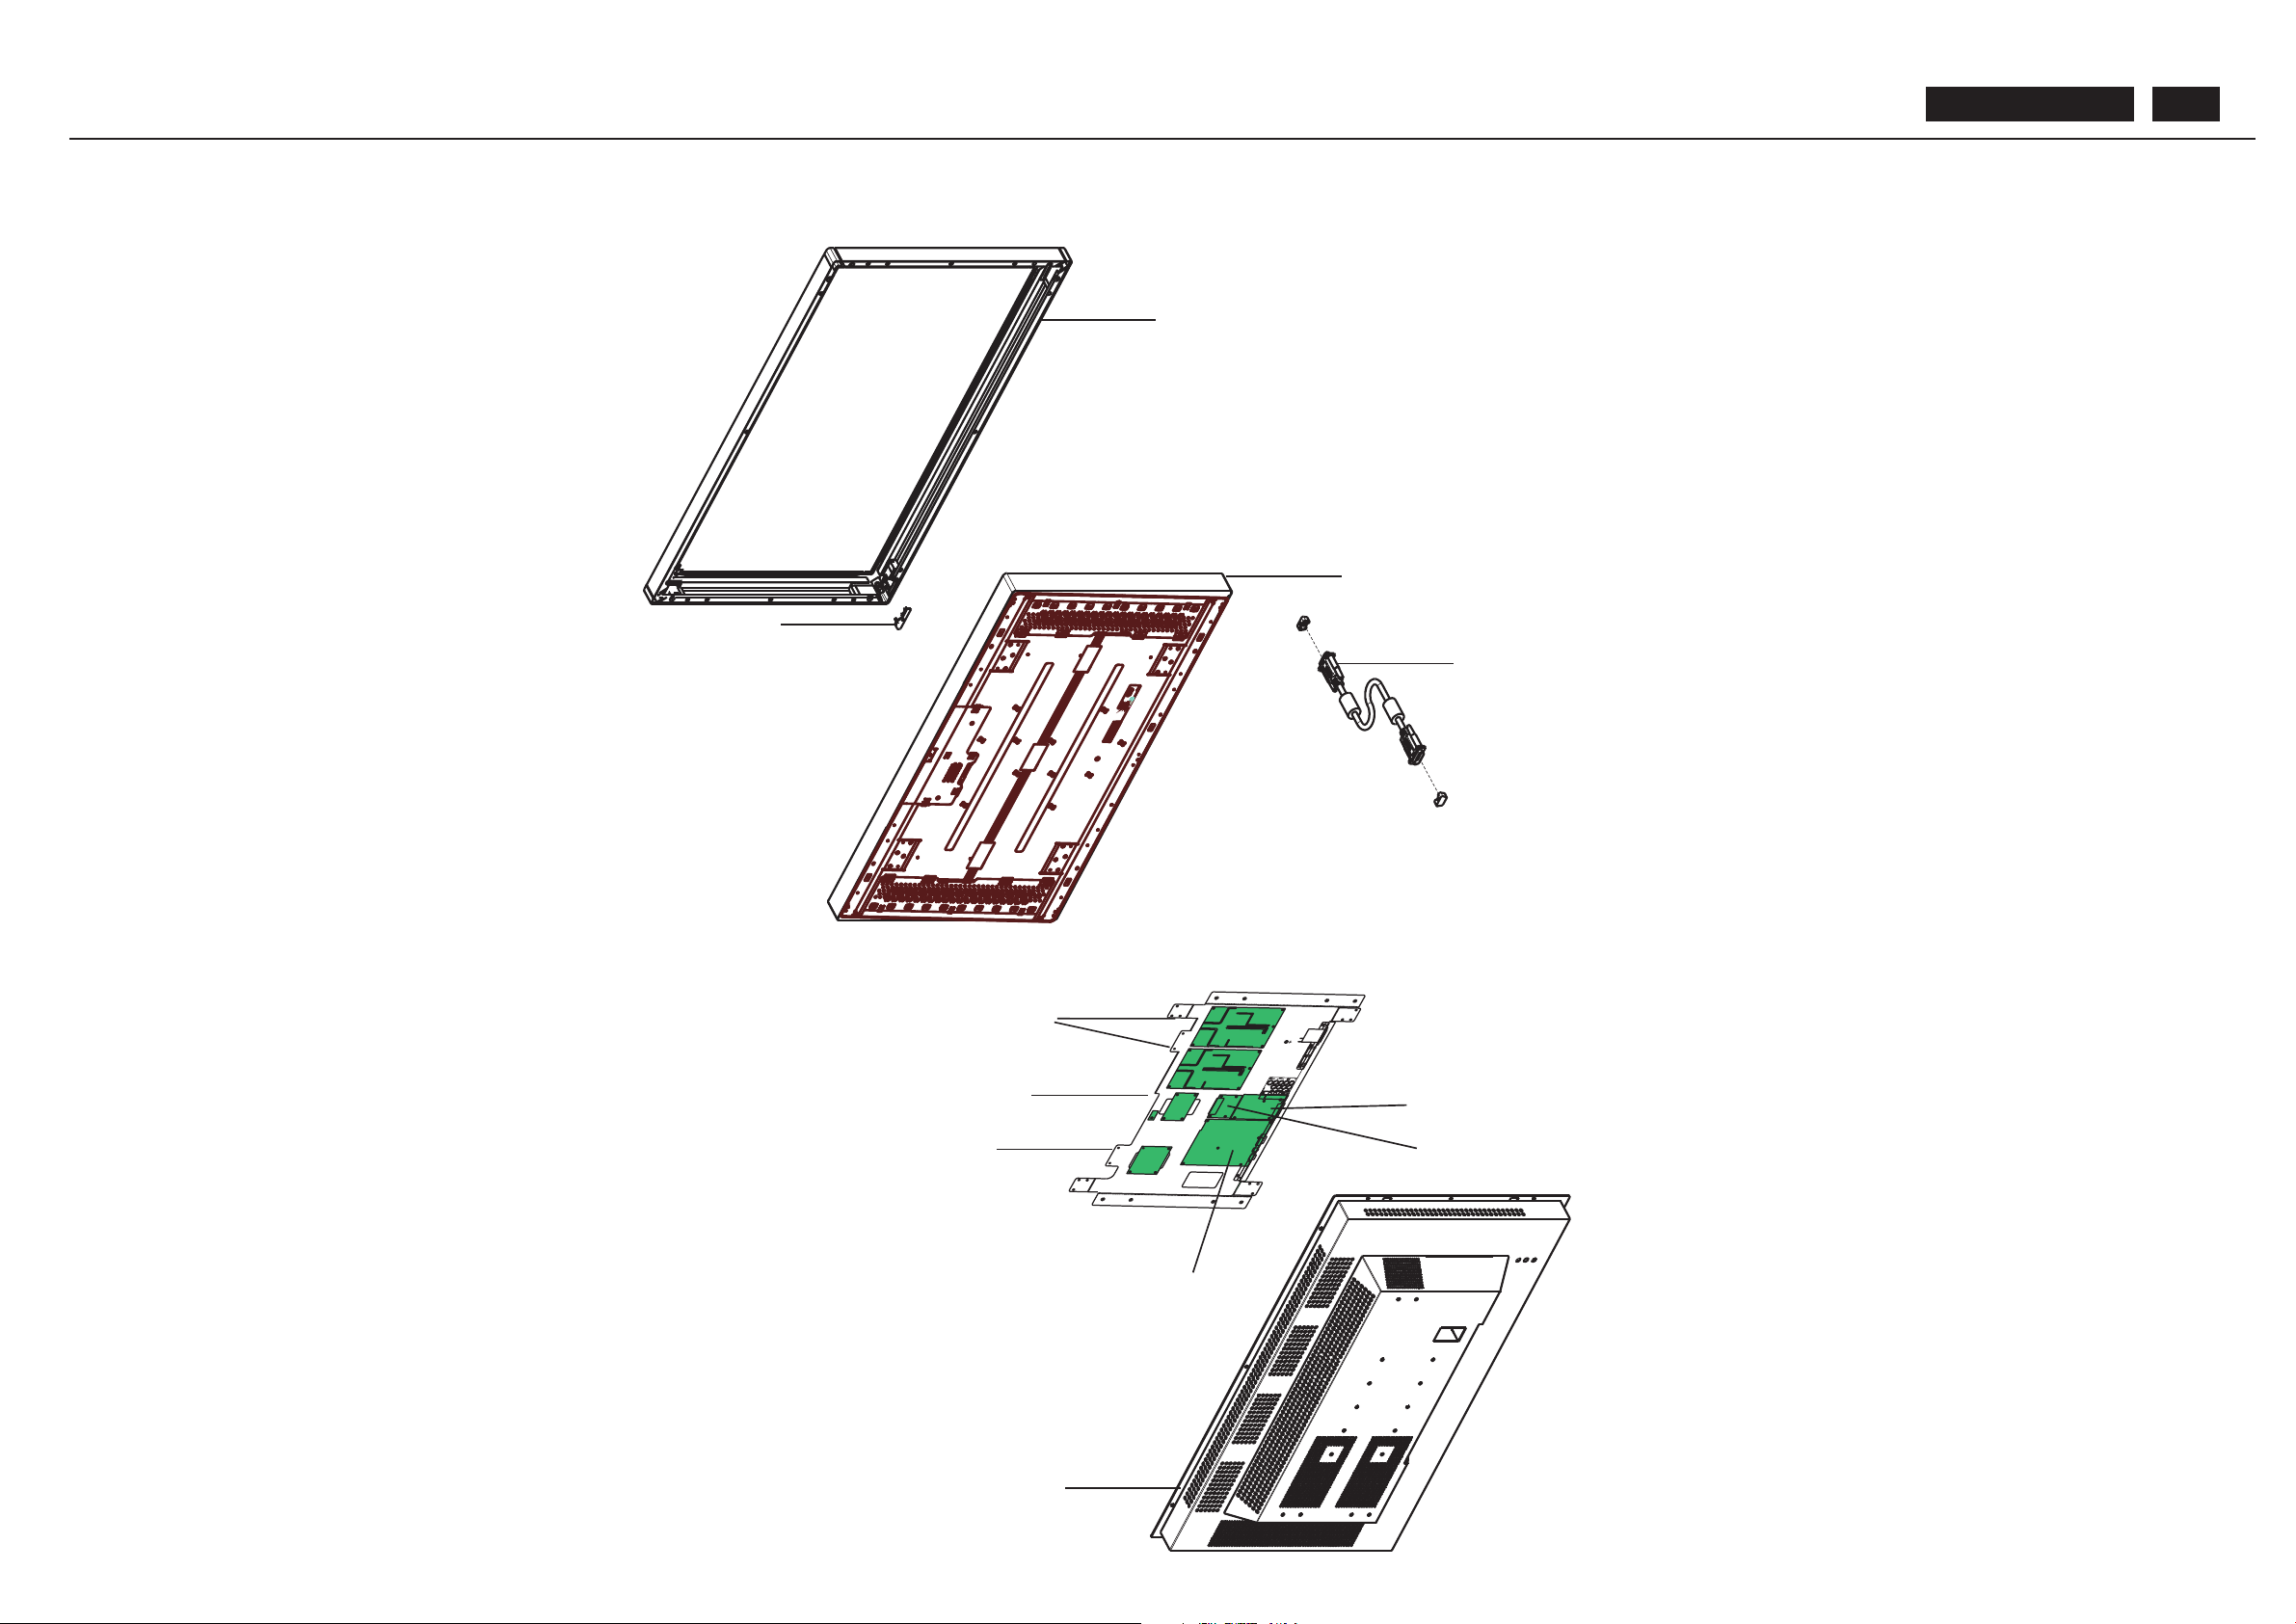
Exploded View
BACK COVER ASSY
AUDIO PCB
PCA MAIN ASSY
1069
PCA I/O ASSY
PCA AUX POWER SUPPLY
AC/DC POWER BOARD
CONTROL BOARD ASSY
I/F/ CABLE
TV BOX PCB ASSY
TFT -LCD LC420W02-A4
FRONT FRAME ASSY
BDL4211. . . 93
 Loading...