

Page 1
PHILIPS
*AZ8210
AZ8211
AZ8214
MIUPS
<§i) Radio cassette recorder/CD-player 5-
<T) Radiocassette/lecteur de CD 11
(5) Radio-Cassettenrecorder/CD-Spieler 17
<© Radiocassetterecorder/CD-speler 23
(T) Radiocasete/lector de CD 29
(T) Radioregistratore/lettore CD
CD Radiokassett/CD-spelare
(sg) Radionauhuri/CD-soitin
PHILIPS
35
41
47
Page 2

INDEX
México
Es necesario que lea
instructivo de manejo.
PRECAUCION • ADVERTENCIA
NO A8»R. RIESGO OE CHOOUE ELECTRICO
ATENCION
VERinOUE QUE EL VOLTAJE DE AUMENTADON
PARA EVITAR EL RIESGO OE CHOQUE ELECTRICO. NO QUITE LA TAPA.
EN CASO OE REQUERIR SERViaO. OIRUASE AL PERSONAL AUTORIZADO OE PHIUPS
SEA EL REQUERIDO PARA SU APARATO
cuidadosamente su
NOM
NOM
Danmark
Typeskiitet findes pS undersiden af apparaten.
Dette produkt overholder kravene til radio-
interferens af Europaeisk Faellesskab,
Bemaerk: Netafbryderen POWER er sekundart
indkoblet og afbryder ikke strommen fra nettet.
Den indbyggede netdel er derfor tilsluttet til lysnettet sé laenge netstikket sidder i stikkontakten.
Advarsel: Usynlig laserudstràling ved àbning nàr
sikkerhetsafbrydere er ude af funktion. UndgS
udsffittelse for stràling.
Garanti og service sider 54-56
Norge
Typeskilt finnes pâ apparatens underside.
Observer: Nettbryteren POWER er sekundert
innkoplet. Den innebygde netdelen er derfor
ikke frakoplet nettet sâ lenge apparatet er til
sluttet nettkontakten.
Garanti og service sider 54-56
(Ц) English
Illustrations
Guarantee and service
(F) Français
Illustrations
Garantie et service après-vente
(d) Deutsch
Abbildungen
Garantieleistung und Service
Nederlands
Afbeeidingen
Garantie en service
(T) Español
Ilustraciones
Garentia
d) Italiano
illustrazioni
Garanzia e servizio
page 5 J
pages 3-4 ra
pages 54-56 £
page 11 a
pages 3-4 g
pages 54-56 ¿
Seite 17 -S
Seiten 3-4 3
Seiten54-56 q
pagina 23 g
pagina's3^ "g
pagina's 54-56 "g
página 29
páginas 3-4
páginas 54-55
pagina 35 c
pagine 3-4 =
pagine 54-56 ±¡
O'
м
o
IC
ce
a
en
Ш
(?) Svenska
Figurer
Garanti och service
(|f) Suomi
Kuvat
Takuu ja huolto
sida 41 ■:<:
sidorna 3-4 §
sidorna 54-56 >
sivu 47 g
sivut 3-4 §
sivut 54-56 t/J
<0
Page 3
0 (P
CD OUT
AC MAINS VOLTAGE
8 X type D-cells - R20 - UM1
0
Page 4
Page 5

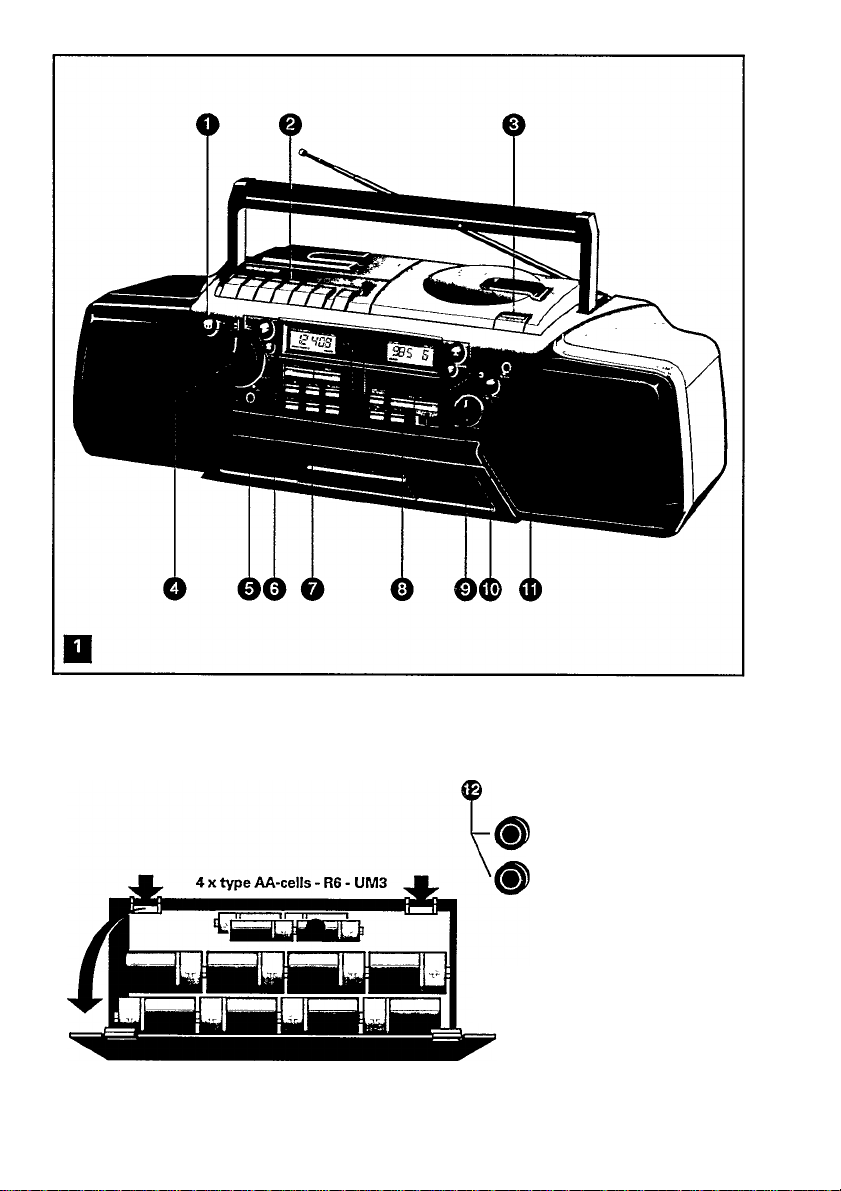
CONTROLS
.For the illustrations, keep the pages 3 and 4 open
TOP AND FRONT PANEL - fig. 1
® POWER button with ON indicator ^
@ cassette deck keyboard:
■ STOP/EJECT
• RECORD
► PLAY
REWIND - fast rewind
►► F.FWD - fast forward wind
II PAUSE
O DIRECTION - to change the play direction
<> tape direction indicators
TAPE MODE reverse selector
~ no reverse
C. single reverse
CJ continuous reverse (playback only)
® OPEN/CLOSE to open the CD cover
® VOLUME control
© 0 PHONES stereo headphone socket
© TUNER - TAPE - CD - mode selector to select the
sound source
@ CD keyboard and display:
ll►■- PLAY ►and PAUSE II button
■ -STOP button
PREVlOUS/NEXT>*i and w SEARCH **c
HM PREVIOUS/NEXT»r.
in position playback or STOP, press briefly to jump
to a previous or next track
№< SEARCH>*t
during playback, keep pressed to search fast
backward t« or forward
INTROSCAN - to play only the beginning of each
track
SHUFFLE - to play all tracks in a random order
press again to defeat the SHUFFLE function
REPEAT - to repeat continuously the disc or the
stored selection (memory)
press again to defeat the REPEAT function
CLEAR - to erase the memory
DISPLAY - to display all stored track numbers
STORE - to store the displayed track number in
the memory
CD display, shows:
-------
: - - please wait
TRACK - the total number of tracks
and during PLAY the number of the track being
played
TIME - the total playing time of the disc
and during PLAY the elapsed time of that track
REPEAT activated
SHUFFLE activated
MEMORY - the stored selection (memory) is
played
SCAN (INTROSCAN) activated
PAUSE activated
© TUNER/CLOCK keyboard and display:
FM MW LW SW (or AM/FM)
TUNING buttons
W-»- PRESET - to select PRESET stations
TIME SET/MEMORY - to store station
frequencies and to adjust the time
MONO/STEREO - FM mono/stereo button
TIME/FREQUENCY - to display either frequency
or time
TUNER/CLOCK display, shows:
FM/MW/LW/SW or AM/FM - the wave band
frequency in MHz (FM-SW) or kHz (AM/MW-LW)
the actual time (12 or 24 hours indication)
AM or PM in case of 12 hours time indication
PRESET /...£ indicating the PRESET location of
the shovi/n frequency
STEREO - when receiving an FM stereo station
© BASS/TREBLE tone control
® TURBO BASS GENERATOR bass button with in
dicator®- press —. to boost the bass response
'® MIC - microphone socket
BACK PANEL-fig. 2
® CD OUT sockets - for CD-reproduction through
e.g. your stereo system
® AC MAINS - socket for mains lead
® VOLTAGE selector (noton all versions)
The type plate Is located on the base of the set
_____________________________
lU
a
T3
JO
•D
z
lU
V>
CO
O)
c
m
cx
c
n
3
o
vt
c
o
(0
a
V)
o
c
re
0>
0)
re
(A
C
0>
>
E
o
3
Page 6

INSTALLATION
CONNECTIONS
SUPPLY
m
3
Batteries
(Q
Whenever convenient, use AC mains supply if you
5'
want to conserve battery life.
3
"
• Open the battery compartment {fig. 2).
1. Insert as indicated eight (preferably Alkaline)
batteries, type R20, UM1 or D-cells (fig. 2).
The battery supply is switched off when the set is
connected to the mains. When changing over to
battery supply, pull out the plug from the AC
MAINS socket®.
2. For the clock and the radio memory, insert four
batteries, type R6, UM3 or AA-cells (fig. 2).
• Remove the batteries if exhausted or if they will
not be used again for a long period.
Mains
• Check if the mains voltage as shown on the type
plate corresponds to your local mains supply. If it
does not, consult your dealer or service organisation.
If the set is equipped with a VOLTAGE selector ®,
set this selector to the local mains voltage.
• Connect the mains lead to the AC MAINS socket
® and the wall socket. The mains supply is now
switched on.
• To disconnect the set from the mains completely,
withdraw the mains plug from the wall socket.
Important note for users in U.K.:
When fitting a mains plug to the mains lead proceed as
follows:
The wires in the mains lead are coloured in accordance
with the following code; Blue=Neutral, Brown=Live.
These colours may not correspond with the oolour
markings identifying the terminals in your plug, so
proceed as follows:
Connect the Brown wire to the terminal marked L or
coloured Red.
Connect the Blue wire to the terminal marked N or
coloured Black.
Do not connect either wire to the earth terminal in the
plug, marked E or or coloured green, or green and
yellow.
Note: This apparatus must be protected by a 3 Amp
Fuse if a 13 Amp plug is used or, if any other type of plug
is used, by a 5 Amp Fuse either in the plug or adapter or
at the distribution board. If in doubt consult a qualified
electrician.
CONNECTIONS-fig. 1-2
Stereo headphone socket ©0 PHONES
For stereo headphones with 3.5 mm plug. Inserting
the plug will disconnect the loudspeakers.
CD Output sockets CD OUT @
Cinch-sockets for CD-reproduction (not radio or cas
sette) through e.g. your stereo system.
• Connect the CD OUT sockets ® to the input
sockets LINE IN, AUX or CD of the other set.
The CD OUT output signal is not affected by the
position of the controls VOLUME ®, BASS/TREBLE
©and TURBO BASS GENERATOR ®.
Socket for microphone ©MIC
For a microphone with 3.5 mm plug.
To avoid disturbing noises, reduce the VOLUME ©
before connecting the microphone.
- 'Public address': you can reproduce your voice
amplified through the loudspeakers: set the mode
selector ©to TAPE.
- Disc-jockey: you can mix your voice with the CD,
TAPE or TUNER: set the mode selector © to CD,
TAPE or TUNER.
- In position CD or TUNER, you can record it all on
the cassette deck.
Adjust the sound with the controls VOLUME @,
BASS/TREBLE © and TURBO BASS GENERATOR @.
If a howling sound occurs, keep the microphone away
from the loudspeakers or reduce the VOLUME ®.
Disconnect the microphone when not in use.
Page 7

TUNER
RADIO RECEPTION
• Switch on the set using the POWER button (T).
• Set the mode selector ® to TUNER.
• Adjust the sound with the controls VOLUME ©,
BASS/TREBLE @ and the TURBO BASS
GENERATOR bass button
• Select the wave band using the selector FM MW
LW SW (or AM/FM). (SWand LWnot on all versions).
- For FM, pull out the telescopiti aerial. To improve
FM-reception, incline and turn the aerial. Reduce
its length if the FM-signal is too strong (very close
to a transmitter).
- For AM/MW and LW (Medium and Long Wave),
the set is provided with a built-in aerial, so there is
no need to use the telescopic aerial. The aerial can
be directed by turning the whole set.
- For Short Wave (S\A/), the telescopic aerial must
be pulled out and placed in the vertical position. To
improve SW-reception, vary the length of the
aerial.
• Tune automatically, manually or by means of the
PRESET-buttons V-^to a radio station.
Automatic tuning (not on SW)
• Keep the TUNING button .^or pressed until R
appears on the display; then release the button. The
receiver stops when finding a strong station.
• If the station found is not the desired one, simply
repeat this operation.
Manual tuning
Manual tuning is useful when you already know the
frequency of the desired station (e.g. from your
programme guide), and if you want to tune to a weak
station.
• Keep the TUNING button or pressed until you
approach the required frequency.
• Then release the button and press the opposite
TUNING button quickly and briefly: then the
displayed frequency stops.
• Then press TUNING or briefly each time. In
this way the frequency is changed step-by-step until
finally the right frequency has been reached. One
step is 0.05 MHz (50 kHz) on FM, 9 or 10 kHz on
MW, 1 kHz on LW and 5 kHz
• When the word STEREO appears in the display,
you are receiving a FM-stereo station. A disturbing
noise, due to a weak FM-stereo signal, can be sup
pressed by pressing the MONO button once. The
word STEREO will then disappear and you will hear
(and record) the FM programme in mono.
• The radio returns to STEREO when pressing
MONO again or when selecting another station.
• Always switch off the set after use with POWER
button ©.
on SW.
PREFERRED STATIONS - PRESET
For each wave band, you can store the frequencies
of up to 6 stations in the memory.
Storing station frequencies
1. Select the wave band using the selector FM MW
LWSW (or AM/FM).
2. Using the TUNING buttons, tune either
automatically or manually to the frequency to be
stored.
3. If you want to store the frequency shown, press
TIME SET/MEMORY; the PRESET number starts
flashing. D means that the shown frequency has
not yet been stored.
4. Within 5 seconds, select the desired PRESET
location using the PRESET buttons
5. Then press TIME SET/MEMORY again; the
frequency is now stored.
• A stored frequency is only erased from the
memory by storing another frequency in its place.
• In case of mains breakdown or exhausted
batteries, the contents of the memory will be kept by
the four R6, UM3 or AA buffer batteries (fig. 2).
Tuning to a preselected station
• Set the mode selector ® to TUNER.
• Select the wave band using the selector FM MW
LWSW (or AM/FM).
• Select the desired PRESET location using the
PRESET buttons
CLOCK________________________________________
In position CD or TAPE, and also if the set is switch
ed off, the display shows the time.
In position TUNER, you can select time or frequency
indication by pressing TIME/FREQUENCY.
You can choose between 24 hours or 12 hours time
indication: first set the mode selector © to TAPE,
then keep TIME SET/MEMORY pressed and press
TIME/FREQUENCY.
In case of 12 hours indication, AM or PM appears on
the display.
Time setting
• Switch on the set using the POWER button (T).
• First, set the mode selector © to TAPE (not
TUNER or CD).
• Keep at the same time the buttons TIME SET/-
MEMORY and PRESET or pressed; after some
seconds, the displayed time starts running. When
approaching the actual time, release >1. or and the
displayed time stops.
• Keep TIME SET/MEMORY pressed and press
PRESET >1. or briefly each time; the time is
changed minute-by-minute until you finally reach the
correct time.
• The clock starts running when releasing the TIME
SET/MEMORY button.
• In case of mains breakdown or exhausted
batteries, the clock runs on the four R6, UM3 or AA
buffer batteries (fig. 2).
£
.¡2
"di
c
Ш
Page 8

COMPACT DISC
PLAYING A DISC
m
3
• Switch on the set using the POWER button ©.
• Set the mode selector © to CD: on the display
vi
appears
---------
3
"
• Adjust the sound with the controls VOLUME ©,
BASS/TREBLE ® and TURBO BASS 'GENERATOR ®.
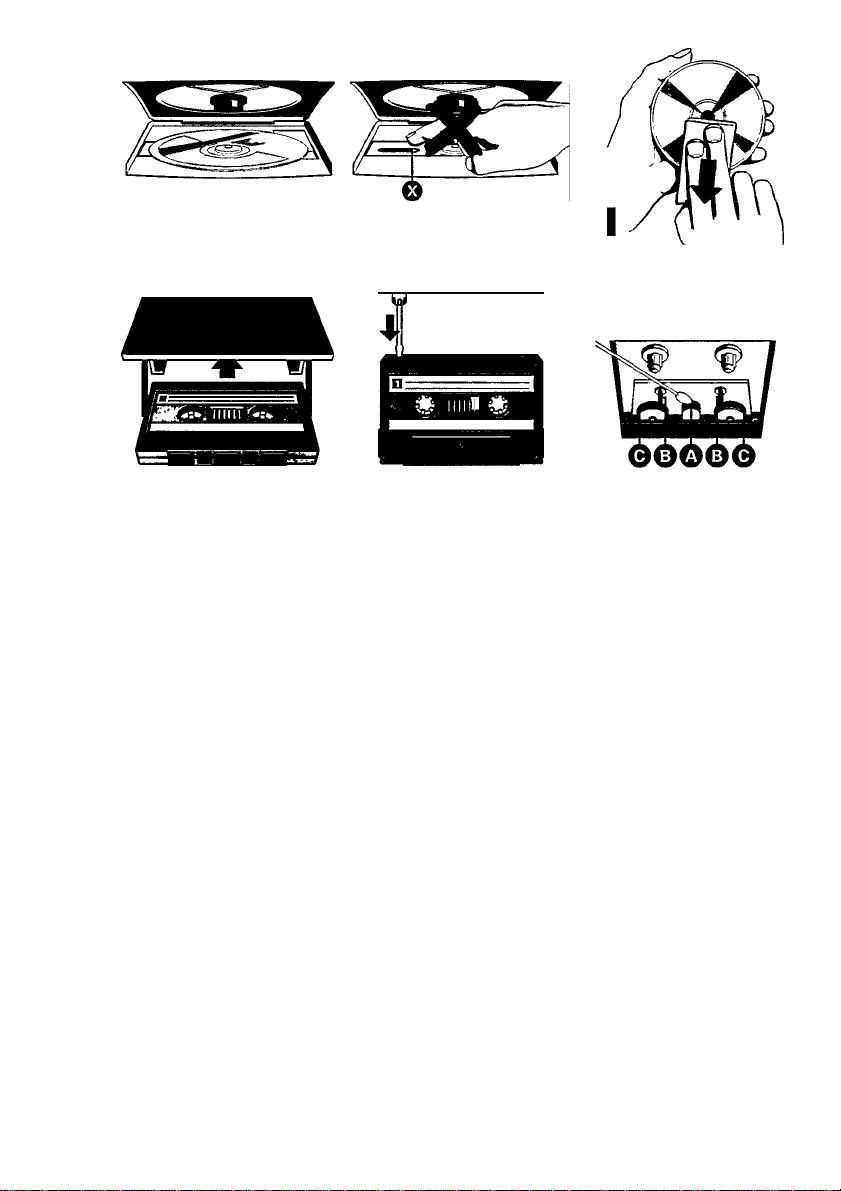
• Press OPEN/CLOSE ® to open the disc cover.
• Insert the disc, printed side facing up (fig. 3).
• Close the cover. The CD-player starts and scans
the contents list of the disc. After that, the total
playing time and the number of tracks appear on the
display and the CD-player stops.
• Playback will start by pressing PLAY ►. As soon as
playback starts, the display shows the track number /
and the elapsed playing time of the first title. When
the second title is reached the track number S
appears, etc.
• For brief interruptions, press PAUSE II The word
PAUSE then appears. To continue playback, press
PAUSE again.
• To stop playback, press STOP*.
The CD player also goes to position STOP;
- by pressing OPEN/CLOSE
- when the end of the disc is reached;
- if you move the function selector®;
- by switching off the set;
- if the batteries run down or if the power supply is
interrupted in another way.
• To take out the disc, open the disc cover by
pressing OPEN/CLOSE ®. Open the disc cover only
if the CD-player is in position STOP.
• Always switch off the set after use with POWER
button (T).
: -
Remarks
- If the battery voltage is not sufficient any more for
playing a disc, the CD-player will not start.
- If - - - - ; - - does not disappear, the CD-player
cannot read the disc. Possible causes are:
- you inserted the disc the wrong way: the label
should face up (fig. 3);
- the surface of the disc is badly scratched or
dirty, see 'Maintenance';
- the lens ® (fig. 4) is steamed up-because of a
sudden transition from a cold into a warm
environment; do not clean the lens, but let the set
acclimatize for a while.
REPEAT
______________________________________
If you want to repeat the whole disc (or the stored
selection) continuously, press REPEAT: the word
REPEAT appears.
The REPEAT function can only be switched on during
playback: PLAY, SHUFFLE or INTROSCAN.
To defeat the REPEAT-function, press REPEAT again
and the word REPEAT disappears.
INTROSCAN
The INTROSCAN function can be switched on from
the STOP, PLAY and SHUFFLE mode.
• Press INTROSCAN. The word SCAN then appears.
Only the first few seconds of each track are played,
but always from track number /.
• The moment you press PLAY ► or SHUFFLE, the
INTROSCAN function is defeated (the word SCAN
disappears) and the disc is played in the normal way
from this track number.
• If you press M4 or w, the INTROSCAN function
remains operative and the beginning of the next or
previous w< track is played.
• If INTROSCAN is not defeated by pressing PLAY
►, SHUFFLE or STOP 4 the CD player returns to
STOP as soon as the end of the disc is reached.
SHUFFLE
If you want to play all tracks in a random order, press
SHUFFLE: the word SHUFFLE appears.
The SHUFFLE function can be switched on from the
STOP, PLAY, REPEAT and INTROSCAN mode.
To defeat the SHUFFLE-function, press SHUFFLE
again and the word SHUFFLE disappears.
m PREVIOUS/NEXT>*i - w SEARCH
_________________
1. PREV10US/NEXT**{
Press briefly (less than 1 second)
a. During PLAY, INTROSCAN and SHUFFLE:
►w - go to the next track (title)
You can jump to the next title by pressing w once.
If you want to skip more than one track, then
press more than once until the display shows
the desired track number.
- go to the previous track (title)
If you want to repeat the running title from the
beginning, press once.
If you want to repeat one of the previous titles,
press more than once until the display shows
the required track number.
b. In position STOP:
In position STOP with a disc inserted you can
select the desired title using r« and w until the
display shows the required track number.
2. SEARCH»i
During playback, keep for search fonward and
for search backward pressed. The disc is played
partly and at high speed, however, the sound is
still recognizable.
Release the button as soon as you recognize the
required passage: the disc will be played in the
normal way from this passage.
If the button is pressed longer than 10 seconds,
the search speed increases.
Page 9

COMPACT DISC
PROGRAMMING TRACK NUMBERS RECORDING
CASSETTE
You may select a number of tracks and store these in
the memory in the desired sequence. When playing,
you will only hear the stored titles in the selected se
quence. At most, 20 tracks can be stored in the
memory. You may store each track more than once.
Manual selecting
• Load the disc, but do not press PLAY ►yet.
• Select the desired track using the buttons h* and
►H until the display shows the required track number.
• Store this track by pressing STORE.
• Select and store in this way all'desired titles.
Storing during INTROSCAN
• Press INTROSCAN to play the first few seconds of
each track.
• Press STORE as soon as you recognize a desired
title.
Storing during PLAY
• During normal PLAY you may store the running ti
tle by pressing STORE.
- After pressing STORE the character P (PROGRAM)
appears, indicating that the track has been stored.
- Store all desired titles in the required sequence.
You may store each track more than once.
- At most, 20 tracks can be stored in the memory.
When the memory is full, the character F (FULL) ap
pears.
- When pressing DISPLAY, the display will show in
sequence all stored track numbers.
- You can simply erase the whole memory by press
ing CLEAR: the character C for CLEAR appears now.
The contents of the memory are also erased:
- by opening the disc cover using OPEN/CLOSE
- if you move the function selector (D;
- by switching off the set;
- if the batteries get exhausted or if the power
supply is interrupted in another way.
How to play the stored selection
To play your selection, the CD-player should be in po
sition STOP; then press PLAY ►; now, the word
MEMORY appears.
Preparation
• Switch on the set using the POWER button ®.
• Press EJECT ■ to open the cassette holder.
• Insert the cassette (fig. 6).
For recording you must use a cassette on which the
tabs (fig. 7) are not broken out.
At the very beginning of the tape, no recording will
take place during the first 7 seconds when the leader
tape passes the recorder heads.
• Set the TAPE MODE selector to:
~no reverse, to record one cassette side. The
deck stops at the end of the tape.
C. single reverse, to record on both cassette sides
once. At the end of the first cassette side, the
tape direction is reversed and the TAPE MODE
selector jumps to position ZZ. The deck stops at
the end of the second cassette side.
CJ continuous reverse for continuous recording. At the
end of the second cassette side, the recorder does
not stop recording, but erases and overwrites the
previous recording.
• Select the tape direction using DIRECTriON button O.
• When monitoring during recording, adjust the
sound with the controls VOLUME ®, BASS/TREBLE
@ and TURBO BASS GENERATOR ®. These con
trols do not affect the recording.
Recording from the CD-player
• Set the mode selector ® to CD. It's not necessary
to start the CD-player separately; if you press RE
CORD •, the CD-player starts automatically:
- if the CD-player is in position STOP, recording will
start from the beginning of the disc (or from the
beginning of the programmed selection):
- if the CD-player is in position PAUSE, recording will
start from this very position;
- in position SCAN the CD-player will first return to
the beginning of that track and then recording will
start.
Recording from the radio
• Set the mode selector ©to TUNER.
• Tune to the desired radio station.
• In case of FM radio recordings, set the FM MONO/-
STEREO button to the desired position.
Microphone recording
• Connect the microphone to the socket MIC ®.
- Microphone only: set mode selector® to TAPE;
- Mixing with CD; set mode selector ® to CD;
- Mixing with radio: set mode selector® to TUNER.
• If a howling sound occurs:
- keep the microphone away from the loudspeakers,
- or reduce the VOLUME ®,
- or use headphones for monitoring.
o>
c
UI
Page 10

CASSETTE
MAINTENANCE
Starting and stopping the recording
• Start recording by pressing RECORD •; in doing
m
so, PLAY ► is pressed too.
3
ia_
• For brief interruptions, press PAUSE II To restart
S!’
recording, press this button once more.
3
"
• To stop recording, press STOP M On pressing
again, the cassette holder will open.
• Always switch off the set after use with POWER
button (T).
COPYRIGHT
Recording is permissible insofar as copyright or other
rights of third parties are not infringed.
For U.K. only: Recording and Playback of material may
require consent. See Copyright Act 1956 and The Per
former's Protection Acts 1958 to 1972.
___________________________________
FAST WINDING_________________________________
Press or ►>. To stop fast winding, press STOP ■.
SAFEGUARDING AGAINST ERASURE
Keep the cassette side to be safeguarded in front of
you (fig. 7) and break out the left tab. Now, recording
on this side is no longer possible.
You can render this safeguard ineffective by covering
the aperture with a piece of adhesive tape.
_____________
CASSETTE PLAYBACK__________________________
• Switch on the set using the POWER button ©.
• Set the mode selector © to TAPE.
• Adjust the sound with the controls VOLUME ©,
BASS/TREBLE © and TURBO BASS GENERATOR ®.
• Press EJECT Band insert a recorded cassette (fig. 6).
• Fast winding and rewinding: Press « or To
stop, press STOP ■.
• Set the TAPE MODE selector to:
—no reverse, to play one cassette side. So, the
deck stops at the end of the tape.
C_ single reverse, to play both cassette sides once.
At the end of the first cassette side, the tape di
rection is reversed and the TAPE MODE selector
jumps to position —. The deck stops at the end
of the second cassette side.
rj> continuous reverse, for non-stop playback: the deck
reverses the play direction whenever reaching the
end of the cassette.
• Select the tape direction using DIRECTION button
• Press PLAY ►and playback will start.
You can reverse the play direction at any moment by
pressing DIRECTION The tape direction indicators
o show the actual play direction.
• To stop playback, press STOP ■.
When the end of the tape is reached, the recorder
buttons are released (except for non-stop play).
• Always switch off the set after use with POWER
button ®.
MAINTENANCE
CD-player and discs
- The lens ® (fig. 4) should never be touched or
cleaned.
- The lens may steam up when the set is taken from
a cold into a warm environment. Playing a disc is not
possible then. Do not clean the lens, but let the set
acclimatize for a while.
- Always pick up the disc by the edge and put it
back in its box immediately after use.
- To clean, breath on the disc and wipe it off in a
straight line from centre to edge (fig. 5) using a soft,
lint-free cloth. Cleaning agents may harm the disc.
Cassette deck
To ensure a good recording and playback quality,
clean the parts ®@© indicated in fig. 8 after every
50 hours of operation or, on average, once a month.
• Open the cassette holder by pressing EJECT ■.
• Use a cotton bud slightly moistened with alcohol
or a special head cleaning fluid.
• Press PLAY ► and clean the rubber pressure rollers
©(fig. 8).
• Then press PAUSE II and clean the magnetic head
® and the capstans ©.
• After cleaning, press STOP»
Cleaning of the magnetic head ® can also be done
by playing the cleaning cassette SBC 114 through
once as an ordinary cassette.
Remarks
- The CD-player and the cassette decks are fitted
with self-lubricating bearings which must not be oiled
or greased.
- Fingerprints, dust and dirt on the apparatus can be
removed using a soft, clean and slightly damp leather
cloth. Do not use any cleaning agents, since they
may affect and harm the cabinet.
- Keep the set, batteries, discs and cassettes away
from rain, moisture, sand and excessive heat, e.g.
near heating equipment or in cars parked in the sun.
This product complies with the radio interference re
quirements of the European Community.
10
Page 11

53
Page 12

54
Page 13

GUARANTEE AND SERVICE VAUD FOR AUSTRAUA
The benefits given to the purchaser by this warranty
are in addition to all other rights and remedies, which,
under the Trade Practices Act or other Commonwealth
or State law, the purchaser or owner has in respect of
the product.
The Philips product carries the following warranties;
C-series HiPi-systems: 12 months. Compact Disc Play
ers: 12 months. Home Audio Systems: B months. Clock
radios, portable radios, cassette recorders, cassette
players and radio recorders: 90 days.
Any defect in materials or workmanship occurring
within the specified period from the date of delivery,
will be rectified free of charge by the retailer from
whom this product was purchased.
Note: Please retain your purchase docket to assist
prompt service.
Conditions of this warranty
1. All claims for warranty service must be made to the
retailer from whom this product was purchased. All
transport charges incurred in connection with war
ranty sen/ice or replacement will be paid by the
purchaser.
Z These warranties do not cover batteries and extend
only to defects in materials or workmanship occurringundernormaluseoftheproductwhereoperated
in accordance with our instructions.
Philips Consumer Products Division,
Technology Park
Figtree Drive, Australia Centre
Homebush 2140, New South Wales
GUARANTEE AND SERVICE FOR NEW ZEALAND
Thank-you for purchasing this quality Philips product.
The document you are now reading is your guarantee
card.
Guarantee
Philips NewZealand Ltd guarantees this product against
defective components and faulty workmanship for a
period of 12 months. Any defect in materials or work
manship occurring within 12 months from the date of
purchase subject to the following conditions will be
rectified free of charge by the retailer from whom this
product was purchased.
Conditions.
1. The product must have been purchased in New
Zealand, and this guarantee card completed at time
of purchase (this is your proof of the date of pur
chase).
2 The guarantee applies only to faults caused by
defective components, or faulty workmanship on
the part of the manufacturer.
3. The guarantee does not cover failures caused by
misuse, neglect, normal wear and tear, accidental
breakage, use on the incorrectvoltage, use contrary
tooperating instructions, or unauthorised modifica
tion to the product or repair by an unauthorised
technician.
4. Reasonable evidence (in the form of a sales docket
or completed guarantee card) must be supplied to
indicate that the product was purchased no more
than 12 months prior to the date of your claim.
5. In the event of a failure. Philips shall be under no
liabilityforany injury, or any loss ordamage caused
to property or products otherthan the product under
guarantee.
This guarantee does not prejudice your rights under
common law and statute, and is in addition to the
normal responsibilities of the retailer and Philips.
How to claim.
Should your Philips product fail within the guarantee
period, please return it to the retailerfrom whom it was
purchased. In most cases the retailer will be able to
satisfactorily repair or replace the product.
However, should the retailer not be able to conclude
the matter satisfactorily, or if you have other difficul
ties claiming under this guarantee, please contact
The Guarantee Controller,
Philips New Zealand Ltd.
SP.O. Box 41.021
Auckland
S (09) 84 44160
55
Page 14

GARANTIA PMtA MEXICO
Este aparato está fabricado con materiales de alta
calidad y ha sido cuidadosamente verificado. Philips,
por lo tanto, da a usted una garantía de 12 meses a
partir de su fecha de compra.
La garantía ampara la feposicidn de las piezas defec
tuosas debidas a fallas en su montaje o en los
materiales, incluyendo la mano de obra necesaria para
su reemplazo en nuestras Sucursales o talleres autori
zados.
En caso de fallas en su aparato le rogamos se sirva
poner en contacto con su distribuidor.
Esta garantía no cubrirá las averías que resulten como
consecuencia de una instalación incorrecta del apara
to, manifiesto maltrato o uso inadecuado del mismo.
Philipsse obliga a reparary devolver a usted su aparato
en un plazo no mayor de 30 días hábiles contados a
partir de la fecha de haber ingresado su aparato a uno
de nuestros talleres.
Para que esta garantía sea válida, es necesario que el
certificado que figura en la parte posterior de esté
instructivo haya sido debidamente llenado en el mo
mento de la compra del aparato.
En caso de extravío del certificado con la presentación
de la factura o remisión de su aparato podrá hacer
efectiva la garantía correspondiente.
Si usted tiene alguna duda o pregunta que no le pueda
solucionarsu distribuidor, porfavorponerse en contac
to con
Oficinas Centrales de Servicio,
Av. Coyoacán No. 1051, Col. del Valle,
03100 MÉXICO, D.F.
© 5-75-20-22 o 5-75-01-00
Tfi'S s gn on thè psckeg rg
is onV meant for Germany
D eses 2e eben auf der Vcrpeckwg
Qitrurfür Deutech’erd
Le S'j'rrba’e sur I'errlb3’'33e
n'a que du sens en Al'ernagn©
Dit symbool op de verpakknq
IS a"esn van tcepass rg m Du^tSiind
Estacei^al enelpeq;eie
esvä’ da si>’o para Äerran a
Questo s mbo'o Sü'i'nTba"o
e' destinato so'oa''a Gemana
Dette meerke pà mdpski ng=n
g^'der kun for Tvsk'a^d
Detta rrarke p5 efr>ba’'3get «¿r
endast avsett for Tysk'ar d
Tamà pakkauksessa o'e/a rrerk'nta on
tarko tettu a noastaan saksaa varte n
3139 116 13365
 Loading...