

Philips AZ8087/17, AZ8086/17, AZ8084/17, AZ1114/17, AZ1113/17 User Manual [es]
...
Owner’s Manual
Mode d’emploi
Instructivo de manejo
black film width 138 mm
AZ 1110 Family CD Radio Cassette Recorder
D
Y
N
A
M
IC
•C
D
•
R
A
D
I
O
•
T
A
PE
P
O
W
ER
O
F
F
P
O
W
E
R
O
N
•
C
D
•R
A
D
I
O
•
T
A
PE
P
O
W
ER
O
F
F
DB
B
B
O
O
S
T
P
O
W
E
R
O
N
S
H
U
FF
LE
SE
ARC
H
M
O
D
E
S
TOP
S
E
AR
C
H
M
O
D
E
STO
P
PA
US
E
SEA
R
C
H
PLAY
REC
OR
D
S
T
OP
•
O
P
E
N
P
AU
S
E
S
EA
R
C
H
PLAY
R
ECO
RD
S
TO
P
•
O
PE
N
PL
AY
•P
AUS
E
F
M
FM
-
M
W
-
F
M
-
M
W -
8
8
9
2
9
6
10
0
1
0
4
1
08
M
Hz
F
M
8
8
92
9
6
10
0
1
04
1
08
M
H
z
M
W
53
0
65
0
8
3
0
100
0
120
0
1
6
0
0
K
H
z
MW
5
3
0
6
5
0
83
0
1
0
0
0
1
2
0
0
1
6
0
0
KH
z
OPEN
O
P
E
N
AZ 1110 - Family CD Radio Cassette Recorder
CAUTION
RISK OF ELECTRIC SHOCK
DO NOT OPEN
CAUTION: TO REDUCE THE RISK OF ELECTRIC SHOCK, DO NOT
REMOVE COVER (OR BACK). NO USER-SERVICEABLE PARTS
INSIDE. REFER SERVICING TO QUALIFIED SERVICE PERSONNEL.
D
Y
N
A
M
IC
•
C
D
•
R
A
D
IO
•T
A
PE
P
O
W
E
R
O
F
F
DB
B
B
O
O
S
T
P
O
W
E
R
O
N
S
HUF
FLE
SEARCH
MODE
ST
OP
PLAY
•
PAUS
E
FM
F
M
-
A
M
-
88
92
96
1
00
104
108
M
H
z
A
M
5
3
0
6
5
0
8
3
0
1
0
0
0
1
2
0
0
1
6
0
0
K
H
z
O
P
E
N
PAUSE
SEARCH
PLAY
RECORD
STO
P
• OPEN
PA
US
E
SEARCH
PLAY
RECORD
ST
OP
• OPE
N
@
4
3
2
1
!
0
7
9
5
6
8
1
A A B C
D
YN
A
M
I
C
•C
D
•
R
A
D
IO
•T
A
P
E
P
O
W
ER
O
FF
D
B
B
BO
OS
T
PO
W
E
R
O
N
S
H
U
F
F
L
E
S
E
A
R
C
H
M
O
D
E
ST
OP
P
L
A
Y
•
P
A
U
S
E
FM
F
M
A
M
-
8
8
9
2
9
6
1
0
0
1
0
4
1
0
8
M
H
z
A
M
5
3
0
6
5
0
8
3
0
1
00
0
1
2
0
0
1
60
0
K
H
z
O
P
EN
PA
USE
S
E
A
RC
H
P
L
A
Y
RE
C
O
R
D
ST
O
P
•
O
P
E
N
P
A
U
S
E
S
EA
R
C
H
P
L
A
Y
R
ECO
RD
S
TO
P
• O
P
E
N
6 x D-cells - R14
REPEAT
ALL
REPEAT
x 1
x 2
x 3
x 4
REPEAT
ALL
SHUFFLE
SHUFFLE
SHUFFLE
REPEAT
ALL
PROGRAM
CLASS 1
LASER PRODUCT
D
Y
NA
M
IC
•
C
D
•RA
D
I
O
•T
A
P
E
P
O
W
ER
O
F
F
D
B
B
B
O
O
ST
P
O
W
E
R
O
N
S
H
U
F
F
L
E
SE
A
RC
H
M
OD
E
S
T
O
P
PLA
Y•P
AUSE
F
M
F
M
A
M
-
8
8
9
2
9
6
1
0
0
1
0
4
1
0
8
M
H
z
A
M
5
30
65
0
8
30
1
00
0
1
2
0
0
1
6
0
0
K
H
z
O
P
E
N
PA
U
S
E
SE
ARC
H
P
L
A
Y
R
E
C
O
R
D
ST
O
P •
O
P
EN
P
A
U
S
E
S
E
AR
C
H
P
L
A
Y
R
E
C
O
R
D
S
T
OP
•
OP
E
N
D
Y
N
A
M
IC
•C
D
•R
A
D
I
O
•
T
AP
E
P
O
W
E
R
OF
F
D
B
B
B
OO
S
T
P
O
W
ER
O
N
S
H
U
F
F
L
E
SEA
RC
H
MO
DE
S
T
O
P
P
LAY
•PAU
SE
F
M
F
M
-
A
M
-
8
8
9
2
9
6
1
0
0
1
0
4
1
0
8
M
H
z
A
M
5
30
6
50
8
30
1
0
0
0
1
2
0
0
1
60
0
K
H
z
O
P
E
N
PAUS
E
S
EAR
C
H
P
L
A
Y
R
E
C
O
R
D
S
T
O
P
•
O
PE
N
P
A
U
S
E
S
E
A
R
C
H
P
L
A
Y
R
E
C
O
R
D
S
T
O
P •
OPE
N
#%
$
Return your Warranty Registration card today to
ensure you receive all the benefits you’re entitled to.
POWER SUPPLY
CASSETTE RECORDER
• Once your Philips Magnavox purchase
is registered, you’re eligible to receive all
the privileges of owning a Philips
Magnavox product.
Warranty
Verification
Registering your product
within 10 days confirms
your right to maximum
protection under the
terms and conditions of
your Philips Magnavox
warranty.
Owner
Confirmation
Your completed Warranty
Registration Card serves
as verification of
ownership in the event of
product theft or loss.
Know these
ssaaffeettyy symbols
This “bolt of lightning”
indicates uninsulated material
t
electrical shock. For the safety of
everyone in your household, please do
not remove product covering.
within your unit may cause an
• So complete and return the Warranty
Registration Card enclosed with your
purchase at once. And take advantage
of these important benefits.
Model
Registration
Returning your Warranty
Registration Card right
away guarantees you’ll
receive all the information
and special offers which
you qualify for as the
owner of your model.
For Customer Use
Enter below the Serial No. which is
located on the rear of the cabinet. Retain
this information for future reference.
Model No. _______________________
Serial No. ________________________
WARNING: TO PREVENT
FIRE OR SHOCK HAZARD, DO
NOT EXPOSE THIS EQUIPMENT TO
RAIN OR MOISTURE.
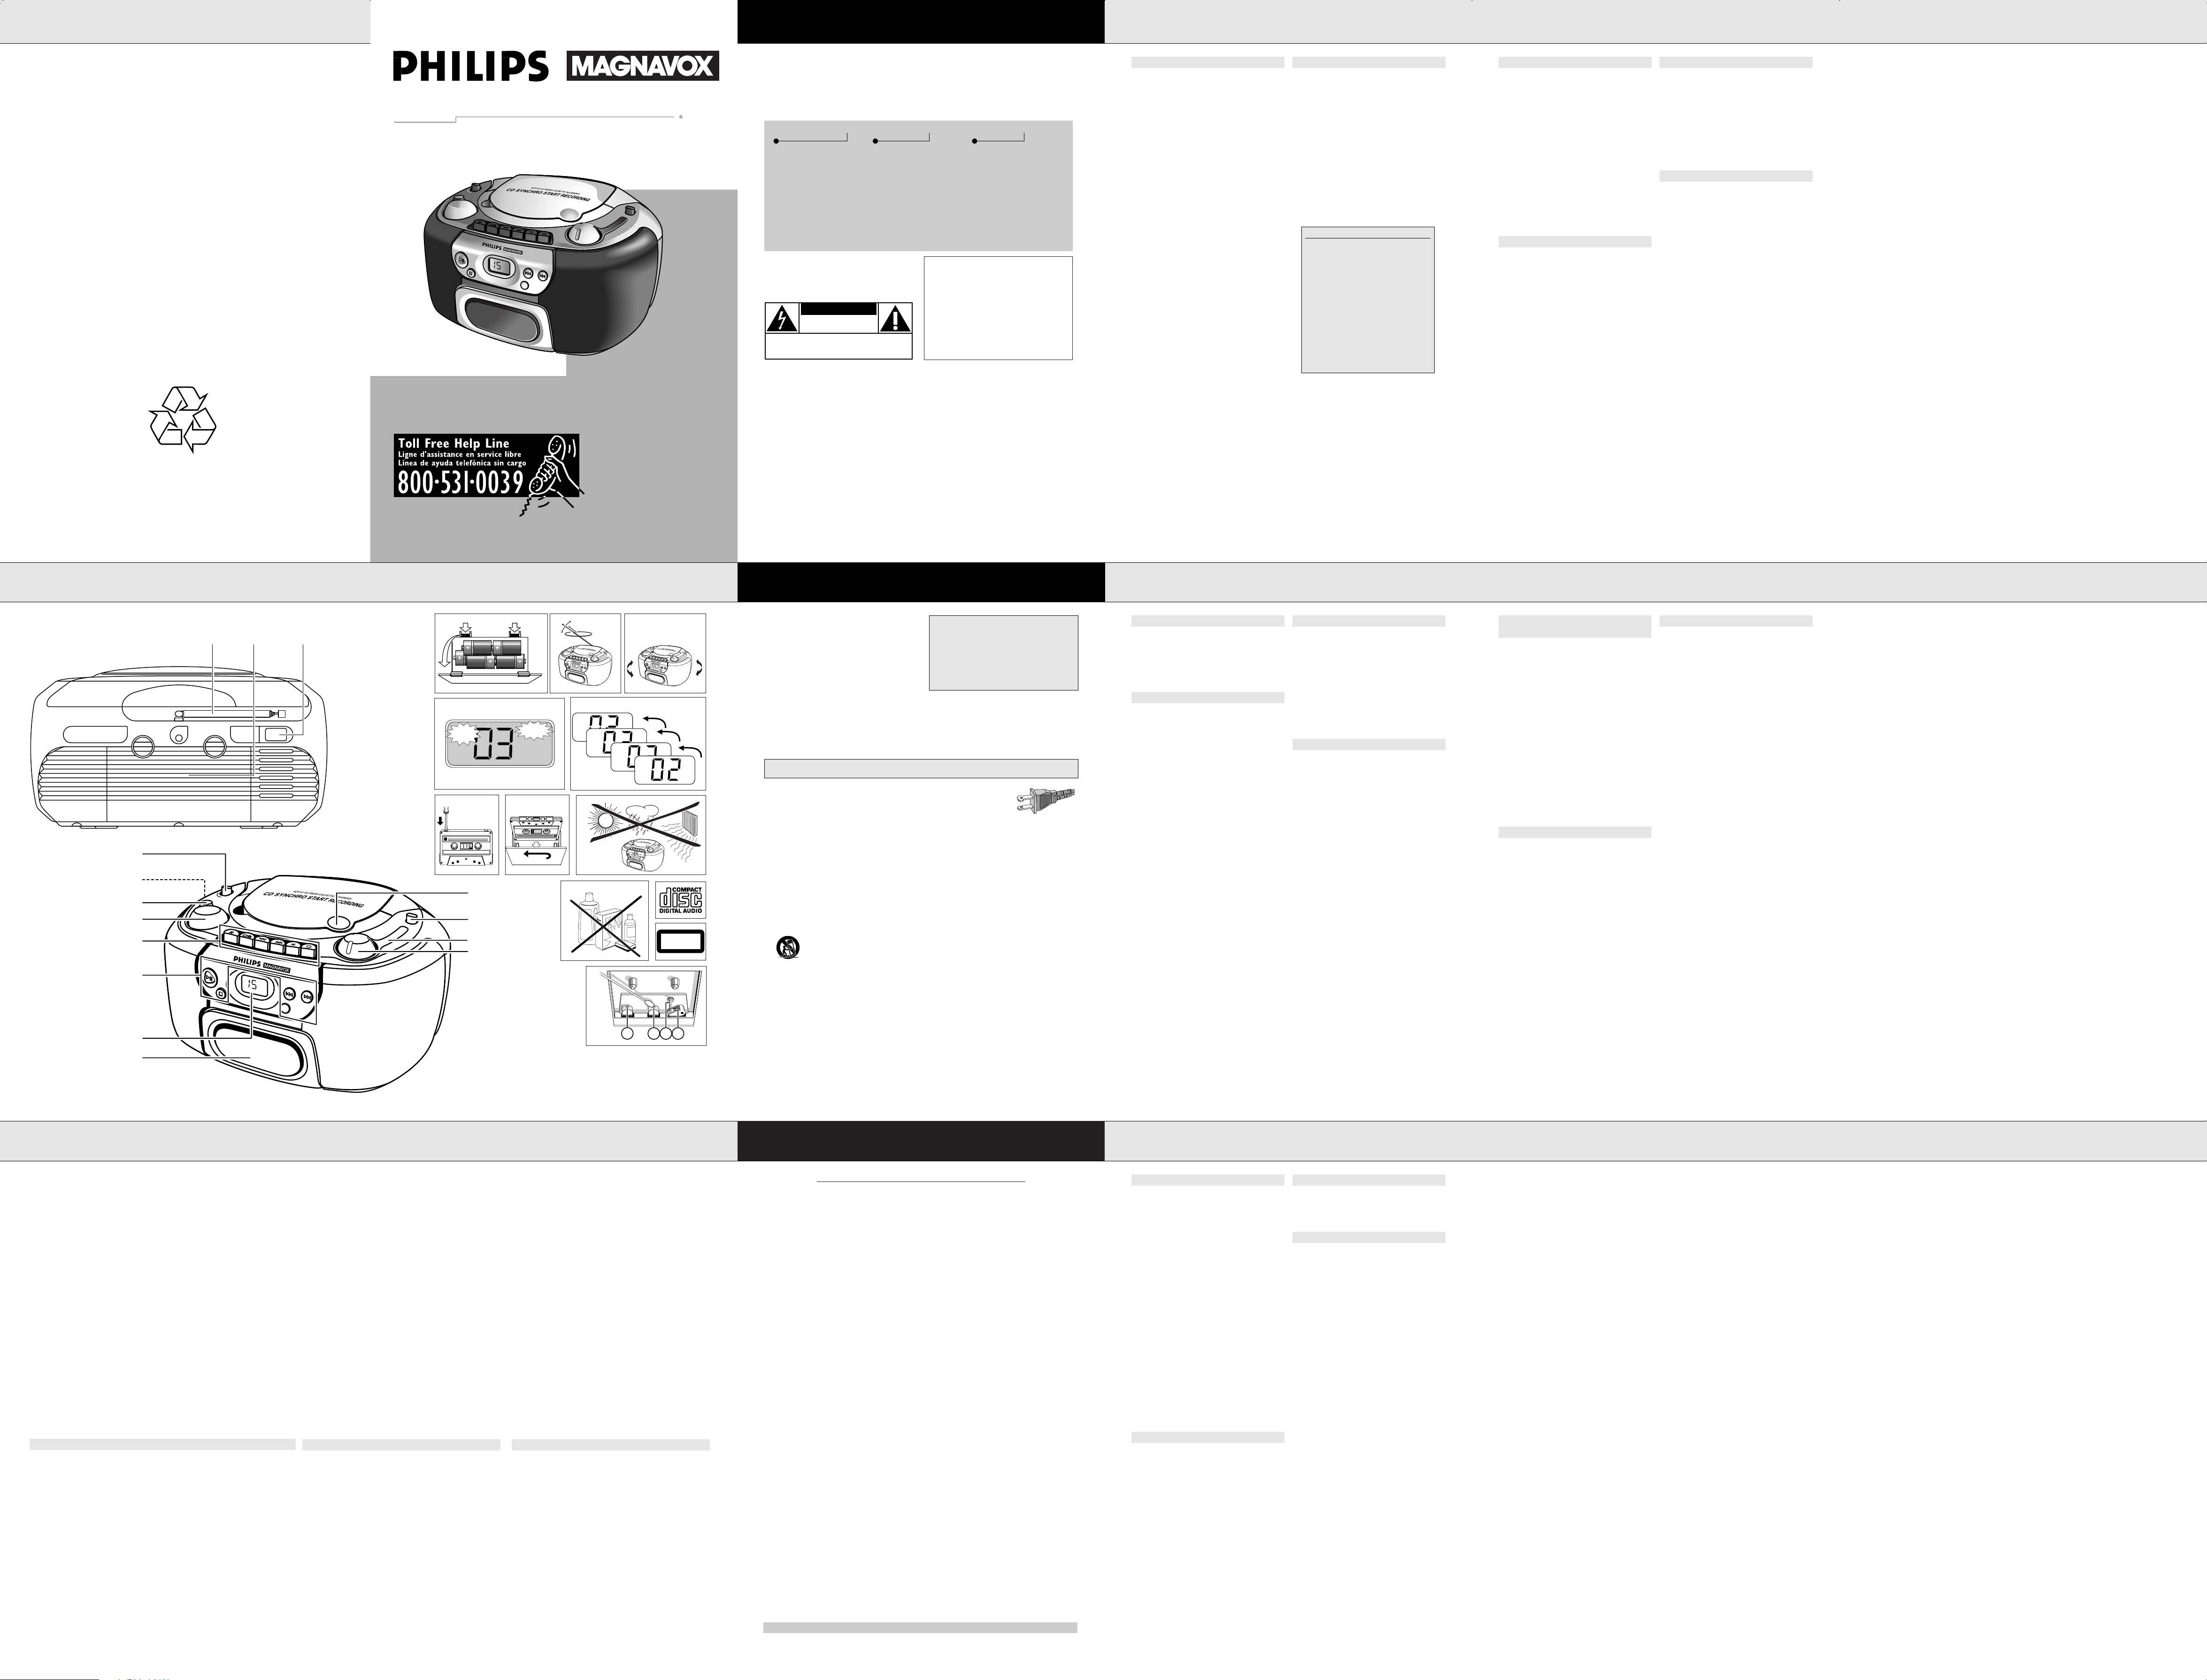
BATTERIES (see 1)
Whenever convenient, use the power supply if you
want to conserve battery life. Make sure you remove
the power plug from the set and wall outlet before
inserting batteries.
Batteries (optional)
1. Open the battery compartment and insert as
shown six batteries, type R20, or D-cells.
2. Replace the compartment door, making sure the
batteries are firmly and correctly in place.
3. Remove the batteries if exhausted or if they will
not be used again for a long period.
– The incorrect use of batteries can cause
electrolyte leakage and will corrode the
compartment or cause the batteries to burst.
Therefore:
– Do not mix battery types, e.g. alkaline with zinc
carbonate.
– When inserting new batteries, replace all
batteries at the same time.
– Remove the batteries if the set is not be used
for a long time.
Note: The battery supply is switched off when the
set is connected to the AC power supply.
AC POWER
1. Check if the power voltage as shown on the type
plate (on the bottom of the set) corresponds to
your local power voltage. If it does not, consult
your dealer or service organisation.
2. If your set is equipped with a voltage selector,
adjust it so that it matches with the local power
voltage
3. Connect the power cord to the AC MAINS outlet
and the wall outlet.
– The set is now ready to use.
4. To switch off the AC power supply completely, pull
the power plug out of the wall outlet.
– Disconnect the power cord when you change
over to battery supply, or to protect the set
during heavy thunderstorms.
Environmental information
All redundant packaging material has been
omitted. We have done our utmost to make
the packaging easily separable into three
mono materials: cardboard (box),
expandable polystyrene (buffer) and
polyethylene (bags, protective foam sheet).
Your set consists of materials which
can be recycled if dissassembled by a
specialized company. Please observe
the local regulations regarding the
disposal of packaging materials,
exhausted batteries and old equipment.
Both the model and production numbers can be found
on the bottom of the set.
CASSETTE PLAYBACK
1. Set the source selector to TAPE.
2. Press STOP•OPEN
9 / to open the cassette
holder.
3. Insert a recorded cassette.
4. Press PLAY 1 and playback will start.
5. Adjust the sound using the VOLUME, and DBB
controls.
6. For brief interruptions, press PAUSE ;. Press
PAUSE ; again to resume playback.
7. By pressing 5 or 6, fast winding of the tape is
possible in both directions.
8. To stop playback, press STOP•OPEN 9 /.
– The keys are automatically released at the end
of the tape.
9. Set the source selector to TAPE/POWER OFF
position (with the cassette keys released) to
switch off the set.
CASSETTE RECORDING (see 6 / 7 )
General information on cassette recording
– Recording is permissible insofar as copyright or
other rights of third parties are not infringed.
– This deck is not suited for recording on CHROME
(IEC
II) or METAL (IEC IV) type cassettes. For
recording you should use NORMAL type cassettes
(IEC I) on which the tabs have not been broken.
– The recording level is set automatically. Altering
the VOLUME control or, DBB switch will not affect
the recording in progress.
– No recording will take place during the first 7
seconds, when the leader tape passes the recorder
heads.
– To prevent the accidental erasure of a recording,
keep the cassette side to be safeguarded in front
of you and break out the left tab. Recording on this
side is no longer possible.
RECORDING FROM THE RADIO
1. Set the source selector to RADIO.
2. Tune to the desired radio station using the TUNING
knob.
3. Press STOP•OPEN 9 / to open the cassette
holder.
4. Insert a blank cassette.
5. Press RECORD 0 to start recording.
6. For brief interruptions, press PAUSE ;. To resume
recording, press PAUSE ; again.
7. To stop, press STOP•OPEN 9 /.
CD SYNCHRO START RECORDING
1. Set the source selector to CD.
2. Insert a CD and if desired, program track numbers.
3. Press STOP•OPEN 9 / to open the cassette
holder.
4. Insert a blank cassette.
5. Press RECORD 0 to start recording.
– Playing of the CD program starts automatically
from the beginning of the program. It is not
necessary to start the CD player separately.
6. For brief interruptions, press PAUSE ;. To resume
recording, press PAUSE ; again.
7. To stop recording press STOP•OPEN 9 /.
To select and record a particular passage
within a track
1. Press SEARCH ∞ or § to select a passage.
2. Put the CD player in PAUSE ; position at the
selected passage.
– Recording will start from this exact point when
you press RECORD 0.
A Division of Philips Electronics North America Corporation
PHILIPS CONSUMER ELECTRONICS COMPANY
Knoxville, Tennessee 37914-1810, U.S.A.
Printed in Hong Kong TCtext/CvB/747
1
4
2
5
6708
9
3
FM AM
The “exclamation point” calls
attention to features for which
s
you should read the enclosed
literature closely to prevent operating
CAUTION: To prevent electric
shock, match wide blade of plug to
wide slot, and fully insert.
and maintenance problems.
MAC5097
SAFETY
WARNING
To reduce the risk of fire or
electric shock, do not expose this
appliance to rain or moisture.
CAUTION
Use of controls or adjustments or
performance of procedures other
than herein may result in hazardous radiation exposure.
The set complies with the FCC-Rules, Part 15
and with 21 CFR 1040.10
SAFETY INSTRUCTIONS – Read before operating equipment
This product was designed and manufactured to meet
strict quality and safety standards.There are, however, some
installation and operation precautions which you should be
particularly aware of.
1. Read Instructions - All the safety and operating
instructions should be read before the appliance is
operated.
2. Retain Instructions - The safety and operating
instructions should be retained for future reference.
3. Heed Warnings - All warnings on the appliance
and in the operating instructions should be adhered
to.
4. Follow Instructions - All operating and use
instructions should be followed.
5. Water and Moisture - The appliance should not
be used near water - for example, near a bathtub,
washbowl, kitchen sink, laundry tub, in a wet
basement or near a swimming pool, etc.
6. Carts and Stands - The appliance should be
used only with a cart or stand that is recommended
by the manufacturer.
6A. An appliance and cart combination
7. Wall or Ceiling Mounting - The appliance
8. Ventilation - The appliance should be situated so
9. Heat - The appliance should be situated away from
10. Power Sources - The appliance should be
should be moved with care. Quick stops,
excessive force, and uneven surfaces may
cause the appliance and cart combination
to overturn.
should be mounted to a wall or ceiling only as
recommended by the manufacturer.
that its location or position does not interfere with
its proper ventilation. For example, the appliance
should not be situated on a bed, sofa, rug, or similar
surface that may block the ventilation openings; or,
placed in a built-in installation, such as a bookcase
or cabinet that may impede the flow of air through
the ventilation openings.
heat sources such as radiators, heat registers, stoves,
or other appliances (including amplifiers) that
produce heat.
connected to a power supply only of the type
described in the operating instructions or as
marked on the appliance.
ç Canada
This digital apparatus does not exceed the
Class B limits for radio noise emissions
from digital apparatus as set out in the Radio Interference Regulations of the Canadian Department of Communications.
11. Grounding or
Polarization - Precautions
that should be taken so that
the grounding or
polarization means of an
appliance is not defeated.
CAUTION:To prevent electric shock,
match the wide blade of this plug to the wide slot,
thenfully insert. Do not use this (polarized) plug
with an extension cord, receptacle or other outlet
unless the blades can be fully inserted to prevent
blade exposure.
12. Power-Cord Protection - Power supply cords
should be routed so that they are not likely to be
walked on or pinched by items placed upon or
against them, paying particular attention to cords
and plugs, convenience receptacles, and the point
where they exit from the appliance.
13. Cleaning - The appliance should be cleaned only
as recommended by the manufacturer.
14. Power Lines - An outdoor antenna should be
located away from power lines.
15. Nonuse Periods - The power cord of the appliance should be unplugged from the outlet when left
unused for a long period of time.
16. Object and Liquid Entry
so that objects do not fall and liquids are not spilled
into the enclosure through openings.
17. Damage Requiring Service - The appliance
should be serviced by qualified service personnel
when:
A.The power-supply cord or the plug has been
damaged; or
B. Objects have fallen, or liquid has spilled into the
appliance; or
C.The appliance has been exposed to r ain; or
D. The appliance does not appear to operate
normally or exhibits a marked change in
performance; or
E. The appliance has been dropped, or the enclosure
damaged.
18. Servicing - The user should not attempt to service
the appliance beyond that described in the operating
instructions. All other servicing should be referred to
qualified service personnel.
- Care should be taken
91/8 EL 4562-1
Polarized
AC
Plug
OPERATION/RADIO CD PLAYER
GENERAL OPERATION
1. To switch on the set, use the source selector
2. Adjust the sound using the VOLUME control and
DBB switch.
3. To switch off the set, set the source selector to
TAPE/OFF position, with the cassette keys
released.
RADIO (see 2 / 3)
1. Set the source selector to RADIO.
2. Adjust the sound using the VOLUME control and
the DBB switch.
3. Select the wave band using the FM-AM band
selector.
4. Tune to a radio station using the TUNING knob.
– For FM, pull out the telescopic antenna. To
improve FM-reception, incline and turn the
antenna. Reduce its length if the FM-signal is
too strong (very close to a transmitter).
– For AM, the set is provided with a built-in
antenna, so the telescopic antenna is not
needed. Direct the antenna by turning the
whole set.
5. To switch off the set, set the source selector to
TAPE/ POWER OFF position, with the cassette keys
released.
CD DISPLAY INDICATION (see 4)
– Total track number: in stop position.
– Current track number: during CD play.
– Current track number flashes: in PAUSE mode.
– SHUFFLE/REPEAT mode: the respective mode is
activated.
– PROGRAM: program function is active, P also
appears briefly when you store a track.
– No: error in CD operation or with the CD, or no
disc (see Troubleshooting).
– F: Program memory full, when you try to store
more then 20 tracks
PLAYING A CD
1. Set the source selector to CD.
2. To open the CD compartment, press OPEN on the
the CD door.
3. Insert the audio CD, printed side facing up.
4. To close the CD compartment, push the door down.
– The CD player scans the contents of the CD and
the total number of tracks is displayed
5. Press PLAY•PAUSE 2; to start playback.
6. Adjust the sound using the VOLUME control and
the DBB switch.
7. To interrupt playback, press PLAY•PAUSE 2;.
Press PLAY•PAUSE 2; again to continue
playback.
8. Press STOP 9 to stop CD playback.
9. Set the source selector to TAPE/OFF position to
switch off the set.
Note: CD playback will also stop when:
– the CD has reached the end;
– the CD door is opened;
– the source selector is in the RADIO or
TAPE/OFF position.
MAINTENANCE
PRECAUTIONS & GENERAL MAINTENANCE
(see 8 / 9)
– Place the set on a hard, flat surface so that it does
not tilt.
– Do not expose the set, CDs, batteries or cassettes
to humidity, rain, sand, direct sunlight or other
places where high temperatures can occur, such as
in the vicinity of heating apparatus or in motor
cars parked in the sun.
– Do not cover the set. The amplifier produces heat
which must dissipate freely, so make sure that
there is sufficient ventilation around the set.
A minimum gap of 15 cm is necessary.
– The mechanical parts of the CD player and the
cassette deck contain self-lubricating bearings and
must not be oiled or lubricated.
– A chamois leather slightly moistened with water is
sufficient for cleaning the housing. Do not use
cleaning agents containing alcohol, spirits,
ammonia or abrasives as these may harm the
housing.
CD MAINTENANCE
– The lens of the CD player should never be touched.
– The lens may cloud over if the CD player is moved
from cold to warm surroundings. The CD player
will not start. Give the player some time to
acclimatise.
– To take a CD out of its box, press the center
spindle while lifting the CD. Always pick up the CD
by the edge and replace the CD back in its box
after use to avoid scratching and dust.
– To clean the CD, wipe in a straight line from the
center towards the edge using a soft, lint-free
cloth. Do not use cleaning agents as they may
damage the disc.
– Never write on a CD or attach stickers to it.
RECORDER MAINTENANCE (see 0)
To ensure a good recording and playback quality,
clean the indicated parts
A,B and C after every 50
hours of operation or, on average, once a month. Use
a cotton bud slightly moistened with alcohol or a
special head cleaning fluid.
• Press PLAY 1 and clean the rubber pressure
roller C.
• Then press PAUSE ; and clean the capstan B and
the heads A.
• After cleaning, press STOP•OPEN 9 /.
Cleaning of the heads A can also be done by playing
a cleaning cassette through once.
English Français Español
1 DBB (Dynamic Bass Boost) – to increase the bass level
2 VOLUME – to adjust the volume level
3 Cassette keys
PAUSE ; – to interrupt playback
STOP•OPEN 9 / – to stop playback and open the cassette compartment
SEARCH 5 – to fast forward the tape
SEARCH 6 – to fast rewind the tape
PLAY 1 – to start playback
RECORD 0 – to start recording
4 CD buttons
PLAY•PAUSE 2; – to start or interrupt CD playback
STOP 9 – to stop playback
SEARCH ∞ § – to skip or search a passage or a track
MODE – to select a different playback mode e.g. to SHUFFLE or
REPEAT and to program track numbers
5 CD display – to indicate CD functions
6 Cassette compartment
7 TUNING – to tune to radio stations
8 Tuning dial pointer
9 Band selector – to select the wave band (FM-AM)
0 OPEN – to open the CD door
! Source selector – POWER ON/OFF switch and to select the sound source:
@
p – 3.5 mm headphone socket
BACK PANEL
# Telescopic antenna – to improve FM reception
$ AC MAINS – for power cord
% Battery door – to open the battery compartment
CD - RADIO - TAPE
LIMITED WARRANTY
pour amplifier les fréquences basses
pour régler le niveau sonore
Touches de la platine cassette
pour interrompre la lecture
pour interrompre la lecture et ouvrir le compartiment à cassette
rembobinage rapide de la cassette vers l'avant
rembobinage rapide de la cassette vers l'arrière
pour démarrer la lecture
pour démarrer l'enregistrement
Touches du lecteur de CD
pour démarrer ou interrompre la lecture du CD
pour interrompre la lecture
pour sauter ou rechercher un passage ou une plage spécifique
pour sélectionner un mode de lecture différent (par ex.: SHUFFLE ou
REPEAT) et pour programmer les numéros de plages
indique les fonctions du lecteur de CD
Compartiment à cassette
pour sélectionner les stations radio
Indicateur de syntonisation
pour sélectionner la bande de longueur d'ondes (FM-AM)
pour ouvrir le compartiment du disque
POWER ON/OFF et pour sélectionner la source sonore : CD-TUNER-
TAPE
prise casque 3,5 mm
PANNEAU ARRIÈRE
pour améliorer la réception en modulation de fréquence
prise pour le branchement sur secteur
compartiment à piles
Refuerzo dinámico de tonos bajos) – para reforzar los tonos bajos
para ajustar el volumen
Teclas del cassette
para interrumpir la reproducción
para parar la reproducción y abrir el compartimiento del cassette
para avance rápido de la cinta
para avance rápido de la cinta
para iniciar la reproducción
para iniciar la grabación
Botones de CD (disco compacto)
para iniciar o interrumpir la reproducción del CD
para parar la reproducción
para buscar o saltar a una parte o una pista particular
para seleccionar un modo de reproducción distinto, por ejemplo,
SHUFFLE (mezcla) o REPEAT (repetir) y programar números de pista
para indicar las funciones de CD
Compartimiento del cassette
para sintonizar emisoras de radio
Puntero del dial de sintonización
para seleccionar la banda de onda (FM-AM)
para abrir la puerta del CD
interruptor de POWER ON/OFF (apagado/encendido) y selector de la
fuente de sonido: CD - TUNER (sintonización) - TAPE (cinta)
zócalo de auricular de 3,5 mm
PANEL TRASERO
para mejorar la recepción de FM
enchufe para el cable de la red eléctrica
para abrir el compartimiento de la batería
PHILIPS MAGNAVOX PORTABLE COMPACT DISC
One Year Free Exchange
This product must be carried in for an exchange.
WHO IS COVERED?
You must have proof of purchase to exchange the
product.A sales receipt or other document showing
that you purchased the product is considered proof of
purchase.Attach it to this owner’s manual and keep
both nearby.
WHAT IS COVERED?
Warranty coverage begins the day you buy your
product. For one year thereafter,a defective or
inoperative product will be replaced with a new,
renewed or comparable product at no charge to you.A
replacement product is covered only for the original
warranty period.When the warranty on the original
product expires, the warranty on the replacement
product also expires.
WHAT IS EXCLUDED?
Your warranty does not cover:
• labor charges for installation or setup of the product,
adjustment of customer controls on the product, and
installation or repair of antenna systems outside of
the product.
• product repair and/or part replacement because of
misuse, accident,unauthorized repair or other cause
not within the control of Philips Consumer
Electronics Company.
• reception problems caused by signal conditions or
cable or antenna systems outside the unit.
• a product that requires modification or adaptation to
enable it to operate in any country other than the
country for which it was designed, manufactured,
approved and/or authorized, or repair of products
damaged by these modifications.
• incidental or consequential damages resulting from
the product. (Some states do not allow the exclusion
of incidental or consequential damages, so the above
exclusion may not apply to you.This includes, but is
not limited to, prerecorded material, whether
copyrighted or not copyrighted.)
• a product that is used for commercial or institutional
purposes.
WHERE IS EXCHANGE AVAILABLE?
You may exchange the product in all countries where
the product is officially distributed by Philips Consumer
Electronics Company. In countries where Philips
Consumer Electronics Company does not distribute the
product, the local Philips service organization will
attempt to provide a replacement product (although
there may be a delay if the appropriate product is not
readily available).
BEFORE REQUESTING EXCHANGE...
Please check your owner’s manual before requesting an
exchange.Adjustments of the controls discussed there
may save you a trip.
EXCHANGING A PRODUCT IN U.S.A.,
PUERTO RICO OR U.S.VIRGIN ISLANDS...
Contact your dealer to arrange an exchange. Or, ship
the product, insured and freight prepaid, and with proof
of purchase enclosed, to the address listed below.
(In U.S.A., Puerto Rico and U.S.Virgin Islands, all implied
warranties, including implied warranties of
merchantability and fitness for a particular purpose, are
limited in duration to the duration of this express
warranty.But, because some states do not allow
limitations on how long an implied warranty may last,
this limitation may not apply to you.)
EXCHANGING A PRODUCT IN CANADA...
Please contact Philips at:
(In Canada, this warranty is given in lieu of all other
warranties. No other warranties are expressed or
implied, including any implied warranties of
merchantability or fitness for a particular purpose.
Philips is not liable under any circumstances for any
direct, indirect, special, incidental or consequential
damages, howsoever incurred, even if notified of the
possibility of such damages.)
TO GET OUT-OF-WARRANTY EXCHANGE...
In U.S.A., Puerto Rico or U.S.Virgin Islands, contact
Philips Service Company at (800) 851-8885 to obtain
the cost of out-of-warranty exchange.Then carefully
pack the product and ship it to the Small Product
Service Center (address listed above). In Canada, call the
phone number listed above under “Exchanging a Product
a Canada” to obtain the cost of out-of-warranty
exchange.
REMEMBER...
Please record the model and serial numbers found on
the product below.Also, please fill out and mail your
warranty registration card promptly. It will be easier for
us to notify you if necessary.
Small Product Service Center
Philips Service Company
907 Snapps Ferry Road, Plant 2, Building 6
Greeneville,TN 37743
1-800-661-6162 (French Speaking)
1-800-363-7278 (English Speaking)
MODEL # __________________________________
SERIAL # __________________________________
CD PLAYER
SEARCH ∞ or §
Selecting a different track during playback
– You can jump to the next track by pressing
SEARCH § once. If you want to skip more than
one track, press SEARCH § more than once until
the display shows the desired track number.
– If you want to repeat the running track from the
beginning, press SEARCH ∞ once. If you want to
repeat one of the previous tracks, press
SEARCH ∞ more than once until the display
shows the desired track number.
Starting with a particular track
1. In the STOP position you can select a desired track
using the SEARCH ∞ or § button.
2. Press PLAY•PAUSE 2; to start playback.
Searching for a passage within a track
You can search for a passage within a track. The CD
is played at low volume and at high speed, however,
the sound is still recognizable.
1. Keep the SEARCH ∞ or § button pressed during
playback, and release the button as soon as you
recognize the desired passage:
– Normal CD playback will resume from this
point.
SHUFFLE/REPEAT (see 5)
The MODE button allows you to select four different modes
which can also be combined with PROGRAM. The modes
can be selected or changed during playback and will flash
for 2 seconds before playing your selected mode.
1. During playback only, press MODE until the desired
function appears on the display.
SHUFFLE - Tracks are played in random order.
REPEAT ALL, SHUFFLE - Continuous playback of
tracks in random order.
REPEAT REPEAT ALL - Repeats the entire CD.
– During playback you can use SEARCH ∞ or
Continuous playback of the current track.
SEARCH § to skip tracks.
2.
To leave the SHUFFLE/REPEAT modes, press the MODE
button repeatedly until the various SHUFFLE/REPEAT
modes are no longer shown on the display. You can also
press STOP 9 to quit playback.
PROGRAMMING TRACK NUMBERS
You may store at most 20 tracks in the memory in the
desired sequence.
You may store any track more than once.
Programming track numbers
1. In the stop position select the desired track using
SEARCH ∞ or SEARCH § until the display shows
the desired track number.
2. Store the desired track by pressing MODE 6 once.
– The display shows P and PROGAM followed by
your selected track number.
3. Select and store all desired tracks of a CD in this
way.
Checking a program
1. To review the set program, in the stop position
press and hold MODE for more than 2 seconds.
– The display will show the track numbers you
have selected in sequence.
2. To start playback of the program,
press PLAY•PAUSE 2;.
– Playback starts with the first track of the
program. After the last track, playback stops
and the display shows the CD’s total number of
tracks.
Erasing a program
You can erase the contents of the memory by;
– opening the CD door;
– setting the source selector to the TAPE or RADIO
position.
– pressing STOP twice during playback/in the stop
position.
TROUBLESHOOTING
If a fault occurs, first check the points listed below before taking the set for repair.
If you are unable to remedy a problem by following these hints, consult your dealer or service center.
WARNING: Under no circumstances should you try to repair the set yourself, as this would invalidate the
warranty.
PROBLEM
Set does not react to operation
of any control.
Display does not function
properly.
No sound.
Bad sound.
Severe radio hum or noise.
Poor radio reception.
Poor cassette sound quality.
Recording does not work.
CD playback does not work.
The CD skips tracks.
POSSIBLE CAUSE
– Electrostatic discharge.
– Electrostatic discharge.
– VOLUME is not adjusted.
– Headphones are connected.
– Batteries are exhausted.
– Batteries are incorrectly
inserted.
– Power cord is not securely
connected.
– Batteries are exhausted.
– Set too close to TV, VCR or
computer.
– Weak radio signal.
– Dust and dirt on the heads,
capstan or pressure roller.
– Use of incompatible cassette
types (METAL or CHROME).
– Cassette tab(s) may be broken
out.
– CD is badly scratched or dirty.
– No CD inserted.
– CD inserted upside down.
– Laser lens is steamed up.
– CD is damaged or dirty.
– PROGRAM/SHUFFLE is active.
REMEDY
• Switch off the set, disconnect
the power plug and reconnect
after a few seconds.
• Switch off the set, disconnect
the power plug and reconnect
after a few seconds.
• Adjust the VOLUME.
• Disconnect headphones.
• Insert new batteries.
• Insert the batteries correctly.
• Connect the power cord
properly.
• Replace batteries.
• Increase the distance.
• FM: aim and extend the
telescopic antenna for best
reception; (see 2)
• AM: rotate the entire set
(see 3).
• Clean the heads etc., see
Maintenance
• Only use NORMAL (IEC I) for
recording
• Apply a piece of adhesive tape
over the missing tab space.
• Replace or clean the CD, see
Maintenance.
• Insert CD.
• Insert CD with printed side
facing up.
• Wait until lens has
acclimatized.
• Replace or clean the CD.
• Switch off the PROGRAM/SHUFFLE function.
This warranty gives you specific legal rights.You may have other rights which vary from state/province to state/province.
Philips Service Company,P.O. Box 555, Jefferson City,Tennessee 37760,(423) 475-8869
EL4967E003 / MAC 4108 / 1-97

CONSEILS DE SÉCURITÉ – À lire avant de faire marcher le matériel
Ce produit a été conçu et fabriqué en conformité avec des normes
strictes de qualité et de sécurité. Il y a, cependant, certains précautions
d’installation et d’opération qu’il faut spécialement observer.
1. Lisez les instructions - Il faut lire toutes les instructions de sécu-
rité et d’opération avant de faire marcher l’appareil.
2. Gardez les instructions - Il faut garder les instructions de sécurité
et d’opération pour pouvoir s’y référer à l’avenir.
3. Faites attention aux avertissements - Il faut observer tous les
avertissements collés à l’appareil et écrits dans le manuel
d’instructions.
4. Suivez bien les instructions - Il faut suivre toutes les instructions
d’opération et d’utilisation.
5. Eau et humidité - L’appareil ne devrait pas être utilisé près de
l’eau (par exemple, près d’un baignoire, d’un lavabo, de l’évier, dans
un sous-sol humide ou près d’une piscine.
6. Chariots et supports - Il faut utiliser cet appareil uniquement avec
un chariot ou une table recommandée par le fabricant.
6A. Il faut déplacer un appareil et chariot avec soin. Un
arrêt rapide, une force excessive et des surfaces
inégales pourraient faire retourner l’appareil et le
chariot.
7. Montage au mur ou au plafond - Il faut monter l’appareil à un
mur ou plafond uniquement en suivant les recommandations du
fabricant.
8. Aération - Il faut situer l’appareil de telle façon que son
emplacement ou sa position ne gêne pas la bonne aération. Par
exemple, il ne faut pas placer l’appareil sur un lit, un sofa, un tapis
ou une autre surface pareille qui risque de boucher les ouvertures
d’aération; ni l’installer dans une bibliothèque ou un coffret qui
pourrait empêcher le flux d’air par les ouvertures d’aération.
9. Chaleur - Il faut situer l’appareil à l’écart des sources de chaleur
telles que les radiateurs, les bouches de chaleur, les fours ou
d’autres appareils (y compris les amplificateurs) qui produisent de la
chaleur.
10.Sources d’électricité - Il faut relier l’appareil uniquement à une
source d’électricité du type décrit dans les instructions d’opération
ou indiqué à même l’appareil.
11.Mise à terre ou polarisation
Précautions à prendre de manière à
ce que la mise à terre et la polarisation de l’appareil soient respectées.
ATTENTION: Pour
prévenir les chocs électriques, introduire la lame la plus large de la
fiche dans la borne la plus large et insérer à fond. Ne pas utiliser
cette fiche polarisée avec un prolongateur, une prise de courant ou
une autre sortie de courant, sauf si les lames peuvent être insérées
à fond sans en laisser aucune partie à découvert.
12.Protection du cordon d’alimentation - Il faut faire passer les
cordons d’alimentation de façon à éviter qu’on marche dessus ou
que les objets placés sur eux ou contre eux les coincent. Faire
attention en particulier au cordons et fiches et à l’endroit où ils
sortent de l’appareil.
13.Nettoyage - Il faut nettoyer l’appareil uniquement de la façon re-
commandée par le fabricant.
14.Lignes de transmission - Il faut situer une antenne extérieure à
l’écart des lignes de transmission d’électricité.
15.Périodes d’inactivité - Débranchez l’appareil lorsqu’il ne sera pas
utilisé pendant une longue période de temps.
16.Entrée des objets et des liquides
- Évitez de laisser tomber des
objets ou des liquides par les ouvertures de l’enclos.
17.Dommages qu’il faut faire réparer - Il faut faire réparer l’appa-
reil par un technicien qualifié lorsque:
A. Le cordon d’alimentation en électricité ou la fiche a été endom-
magé ou
B. On a laissé tomber des objets ou du liquide dans l’appareil ou
C. On a exposé l’appareil à la pluie ou
D. L’appareil ne paraît pas marcher normalement ou présente de
grands changements d’opération ou
E. On a laisseé tomber l’appareil ou endommager le coffret.
18.Service après-vente - L’utilisateur ne doit pas tenter de réparer
l’appareil sauf les réparations décrites dans les instructions d’opération. Toutes les autres réparations doivent être effectuées par un
technicien qualifié.
91/8 EL 4562-2
Fiche
CA polarisée
AVIS
Afin de réduire tout risque d’incendie ou de
choc électrique, il ne faut pas exposer cet
appareil à la pluie ou à l’humidité.
ATTENTION
L’utilisation des commandes ou réglages ou
le non-respect des procédures ci-incluses
peuvent se traduire par une exposition dangereuse à l’irradiation.
L’appareil répond aux normes FCC, Part 15 et 21 CFR
1040.10 et 1040.11.
ç Canada
Cet appareil numérique n'émet pas de bruits radioélectriques dépassant les limites applicables aux
appareils numériques de Classe B prescrites dans le
Règlement sur le Brouillage Radioélectrique édicté
par le Ministère des Communications du Canada.
Renvoyez votre carte d'enregistrement de garantie pour vous
ATTENTION
RISQUE DE CHOC ELECTRIQUE
NE PAS OUVRIR
ATTENTION: POUR REDUIRE LE RESQUE DE CHOC ELECTRIQUE, NE PAS ENLEVER
LE COUVERCLE (NI LE PANNEAU ARRIERE). CET APPAREIL NE COMPORTE AUCUNE
PIECE POUVANT TRE REPAREE PAR L’UTILISATEUR. CONFIER SON ENTRETIEN A
UN TECHNICIEN QUALIFIE.
INSTRUCCIONES SOBRE SEGURIDAD - Léalas antes de hacer funcionar el equipo
Este producto fue diseñado para cumplir con normas rigurosas de
calidad y seguridad. No obstante, existen algunas medidas de
precaución para la instalación y funcionamiento con las que Ud. debe
familiarizarse en particular.
1. Lea las instrucciones - Todas las instrucciones de seguridad y
funcionamiento deben leerse antes de hacer funcionar el aparato.
2. Guarde las instrucciones - Deben guardarse las instrucciones de
seguridad y funcionamiento para consultas futuras.
3. Preste atención a las advertencias - Ud. debe observar todas
las advertencias en el aparato y en las instrucciones de funcionamiento.
4. Siga las instrucciones - Ud. debe seguir todas las instrucciones
de funcionamiento y uso.
5. Agua y humedad - El aparato no debe usarse cerca de agua, por
ejemplo, cerca de un baño, lavabo, fregadero, tina para lavar ropa,
en un sótano húmedo o cerca de una piscina, etc.
6. Carritos o bastidores - El aparto sólo debe usarse con un carrito o
bastidor recomendado por el fabricante.
6A. La combinación carrito-aparato debe trasladarse con
cuidado. Cualquier parada repentina, fuerza excesiva y
superficie desnivelada pueden producir el volteo de la
combinación carrito-aparato.
7. Montaje en una pared o techo interior - El aparato sólo debe
montarse en una pared o techo interior según las recomendaciones
del fabricante.
8. Ventilación -El aparato debe situarse de tal modo que su ubica-
ción o posición no obstaculice una buena ventilación. Por ejemplo,
el aparato no debe situarse en una cama, sofá, alfombra o
superficie similar que puede bloquear las aberturas de ventilación;
tampoco debe colocarse en muebles embutidos, tal como sería el
caso de una estantería para libros o un armario, porque así se
podría impedir el flujo de aire por las aberturas de ventilación.
9. Calor - El aparato debe situarse lejos de fuentes de calor, tales co-
mo radiadores, rejillas para calefacción, hornos u otros aparatos (inclusive amplificadores) que puedan producir calor.
10.Fuentes de potencia - El aparato debe conectarse a una fuente de
energía únicamente del tipo descrito en las instrucciones de funcionamiento o según lo indicado en el aparato.
11.Puesta a tierra o polarización
Tome las precauciónes utilizando los
medios de puesta a tierra o de polarización de un aparato que no estén
estropeados.
AVISO: Para prevenir un choque eléctrico, haga coincidir la
clavija plana ancha con la ranura plana y inserte a fondo. No utilice
esta clavija polarizada con un cable de prolongación o otra toma de
red a menos que las clavijas estén completamente cubiertas.
12.Protección del cable de potencia - Los cables de alimentación
de energía deben encaminarse de tal modo que nadie pise encima
de ellos; también es importante que no estén apretados por
artículos colocados contra o encima de ellos. Hay que prestar
atención especial a los cables y enchufes, receptáculos convenientes y al lugar donde éstos salen del aparato.
13.Limpieza - El aparato sólo debe limpiarse de acuerdo con las reco-
mendaciones del fabricante.
14.Líneas de energía - Una antena exterior debe situarse lejos de las
líneas de energía.
15.Períodos sin uso - Se debe desenchufar el aparato cuando no se
lo usa por un período considerable de tiempo.
16.Entrada de objetos extraños o de líquidos
- Hay que tener cuidado para que ningún objeto caiga dentro y también para que no se
derrame ningún líquido dentro de las aberturas de la caja del aparato.
17.Daño que requiere servicio - El aparato sólo debe ser reparado
por un técnico calificado cuando:
A. Se ha dañado el cable de suministro de energía o el enchufe; o
B. Algún objeto hay caído dentro del aparato o se ha derramado
algún líquido dentro de mismo; o
C. El aparato ha sido expuesto a lluvia; o
D. El aparato no parece funcionar normalmente o exhibe un cambio
marcado en su funcionamiento; o
E. El aparato se ha caído o ha habido daño a su caja.
18.Servicio - El usuario no debe tratar de reparar el aparato más allá
de lo descrito en las instrucciones de funcionamiento. Toda otra reparación o mantenimiento debe dejarse a cargo del personal técnico
calificado para tal finalidad.
91/8 EL 4562-3
Clavija
polarizada de CA
AVISO
Para reducir el riesgo de fuego o choque
eléctrico, no exponga el aparato a la lluvia o
humedad.
ATENCIÓN
El uso de mandos o ajustes o la ejecucción
de métodos que no sean los aquí descritos
puede ocasionar peligro de exposición a
radiación.
El aparato cumple las normas FCC, Parte 15 y 21 CFR
1040.10 y 1040.11.
µ México 2
Es necesario que lea cuidadosamente su instructivo
de manejo.
No abrir, riesgo de choque eléctrico
Verifique que el voltaje de alimentación
sea el requerido para su aparato
2
ATENCIÓN
TS
Para evitar el riesgo de choque eléctrico, no quite la tapa.
En caso de requerir servicio, dirijase al personal calificado.
PRECAUCIÓN - ADVERTENCIA
PRECAUCION
RIESGO DE SACUDIDA ELECTRICA
NO ABRIR
PRECAUCION: PARA REDUCIR EL RIESGO DE SACUDIDA ELECTRICA,NO RETIRE
LA CUBIERTA (NI EL PANEL POSTERIOR). ESTE APARATONO CONTIENE NINGUNA
PARTE QUE PUEDA SER REPARADA POREL USARIO. DE SER NECESARIO ALGUN
SERVICIO O REPARACIONDEL APARATO, LLEVELO UN TECNICO CALIFICADO.
assurer de recevoir tous les avantages auxquels vous avez droit.
ALIMENTATION
MAGNETOPHONE
Envie hoy su Tarjeta de Registro de la Garantía
para recibir todas las ventajas correspondientes.
FUENTE DE ENERGIA
REPRODUCTOR DE CD MAGNETOFONO DE CASSETTES
• Dès que l'achat de votre appareil Philips
Magnavox est enregistré, vous avez droit à tous les
avantages dont bénéficient les possesseurs des
produits Philips Magnavox.
Vérification
de garantie
Enregistrez votre produit dans
les 10 jours pour confirmer
votre droit à une protection
maximum selon les termes et
les conditions de votre garantie
Philips Magnavox.
Confirmation
de possession
Votre carte d'enregistrement
de garantie prouve que vous
possédez l'appareil en cas de
vol ou de perte du produit.
Connaissez ces
symboles de
t
l'unité, risque de provoquer un choc
électrique. Pour la sécurité de chacun,
nous vous prions de ne pas retirer le
boîtier de ce produit.
s
problèmes de fonctionnement et
d'entretien si vous ne lisez pas les
informations s'y reportant.
ssééccuurriittee
Cet «éclair à pointe de flèche»
indique qu'un matériau non
isolé, situé à l'intérieur de
Le «point d'exclamation» attire
votre attention sur des sujets
risquant de provoquer des
• Remplissez et renvoyez votre carte
d'enregistrement de garantie jointe à votre appareil
sans tarder.Vous bénéficierez de ces avantages
importants.
Enregistrement
du modèle
Renvoyez votre carte
d'enregistrement de garantie dès
aujourd'hui pour vous assurer de
recevoir toutes les informations,
les offres et les bonus auxquels
vous avez droit en tant que
ossesseur de ce modèle.
Cet espace vous est réservé
Inscrivez ci-dessous le numéro de série situé à
l'arrière du bloc. Conservez cette information
pour vous y reporter à l'avenir.
N° de modèle ________________________
N° de série __________________________
DANGER: NE PAS EXPOSER
CET ÉQUIPEMENT A LA PLUIE NI A
UNE HUMIDITÉ EXCESSIVE POUR
ÉVITER LES RISQUES D'INCENDIE
ET DE CHOC ÉLECTRIQUE.
ATTENTION: Pour éviter les
chocs électriques, introduire la lame la
plus large de la fiche dans la borne
correspondante de la prise et pousser
jusqu'au fond.
MAC5097
PILES (voir 1)
Dans la mesure du possible, utiliser l’alimentation
secteur pour économiser les piles. Ne pas oublier de
débrancher le cordon d’alimentation de l’appareil et
la prise de courant murale avant d’insérer les piles.
Piles (en option)
1. Ouvrir le compartiment des piles et insérer comme
indiqué six piles de type R20 ou D-cells.
2. Refermer le compartiment en s’assurant que les
piles sont bien en place.
3. Retirer les piles du compartiment pour les
remplacer ou lorsqu’elles ne seront pas utilisées
pendant longtemps.
– L’usage inapproprié des piles pourra entraîner une
fuite de l’acide de remplissage et la corrosion du
compartiment ou pourra faire exploser les piles.
Par conséquent:
– Ne pas mélanger des piles de type différent,
comme des piles alcalines et des piles au
carbonate de zinc.
– Lors du remplacement des piles, remplacer les
huit piles en même temps.
– Retirez les piles si elles sont vides ou si
l’appareil ne doit pas être utilisé pendant une
longue période.
Remarque: L’alimentation par piles ne fonctionnera
pas lorsque l’appareil est branché sur secteur.
ALIMENTATION
1. Vérifier que la tension d’alimentation indiquée sur
la plaque d’identité (sur la base de l’appareil)
correspond à la tension d’alimentation locale.
Dans le cas contraire, consulter votre
concessionnaire ou service d’entretien.
2. Si votre appareil est doté d’un sélecteur de
tension, placez ce dernier en regard de la tension
locale.
3. Brancher le cordon d’alimentation dans la prise
MAINS ~ de l’appareil et dans la prise murale.
– L’appareil est maintenant prêt à être utilisé.
4. Pour mettre l’appareil entièrement hors tension,
débrancher le cordon d’alimentation de la prise
murale.
– Débrancher le cordon d’alimentation lors du
passage à une alimentation par piles ou pour
protéger l’appareil pendant de gros orages.
Informations relatives à l’environnement
Tous les matériaux d’emballage superflus ont été
supprimés. Nous avons fait de notre mieux pour
que l’emballage soit facilement séparable en
trois types de matériaux : carton (boîte),
polystyrène expansé (matériel tampon),
polyéthylène (sachets, panneau de protection en
mousse).
Votre appareil est composé de matériaux
pouvant être recyclés s’il est démonté par
une firme spécialisée. Veuillez observer les
règlements locaux lorsque vous vous
débarrassez des matériaux d’emballage,
des piles usagées et de votre ancien
appareil.
La référence du modèle et le numéro de fabrication
sont indiqués sur la base de l’appareil.
ECOUTE D’UNE CASSETTE
1. Régler le sélecteur de fonction 2 sur TAPE.
2. Appuyer sur STOP•OPEN 9/5 pour ouvrir le
compartiment de la cassette.
3. Insérer une cassette enregistrée.
4. Appuyer sur PLAY 1 5 et la lecture de la cassette
commencera.
5. Régler le son au moyen des boutons VOLUME 1, et
DBB 3.
6. Pour de brèves interruptions, appuyer sur PAUSE ;
5. Appuyer une fois de plus sur cette même
touche pour reprendre la lecture.
7. En appuyant sur 5 ou 6 5, il est possible
d’embobiner la cassette dans les deux sens.
8. Pour arrêter la lecture, appuyer sur STOP•OPEN 9/
5.
– Les touches se déclenchent automatiquement
en fin de bande.
9. Placez le sélecteur 2 en position TAPE/OFF (touches de
la platine cassette non enfoncées) pour arrêter
l’appareil.
– Le témoin POWER s'éteint.
ENREGISTREMENT D’UNE CASSETTE (voir 6/7)
Informations générales sur l’enregistrement des
cassettes
– Il est possible d’effectuer des enregistrements
dans la mesure où ils ne violent aucun copyright
ou autres droits de tout tiers.
– Ce magnétophone ne peut être utilisé pour
enregistrer des cassettes de type CHROME (IEC II)
ou METAL
(IEC IV). Pour enregistrer, utiliser des cassettes
de type NORMAL (IEC I) dont les languettes de
sûreté n’ont pas été cassées.
– Le niveau de l’enregistrement se règle
automatique-ment. L’enregistrement en cours ne
sera pas affecté par le réglage des boutons de
VOLUME 1 ou DBB 3.
– Aucun enregistrement n’aura lieu pendant les 7
premières secondes, lorsque la bande amorce
passe devant les têtes d’enregistrement.
– Pour éviter tout effacement accidentel d’un
enregistrement, placer la face de la cassette à
sauvegarder devant soi et casser la languette de
sûreté. Il ne sera plus possible d’enregistrer sur
cette face.
ENREGISTREMENT A PARTIR DE LA RADIO
1. Placez le sélecteur 2 sur TUNER.
2. Choisissez la station désirée à l’aide du bouton
TUNING #.
3. Appuyez sur STOP•OPEN 9/5 pour ouvrir le
compartiment à cassette.
4. Insérez une cassette destinée à recevoir
l’enregistrement.
5. Appuyez sur la touche RECORD 0 5 pour
démarrer l’enregistrement.
6. Pour de courtes interruptions, appuyez sur
PAUSE ; 5. Pour reprendre l’enregistrement,
appuyez de nouveau sur la même touche.
7. Pour arrêter, appuyez sur la touche STOP•OPEN 9/
5.
CD SYNCHRO - ENREGISTREMENT À PARTIR DU
LECTEUR CD
1. Régler le sélecteur de fonction 2 sur CD.
2. Mettre un CD dans le lecteur et si nécessaire,
programmer les numéros de plages musicales.
3. Appuyez sur STOP•OPEN 9/5 pour ouvrir le
compartiment à cassette.
4. Insérer une cassette enregistrable.
5. Appuyer sur RECORD 0 5 pour commencer
l’enregistrement.
– Le lecteur commencera automatiquement au
début de la séquence programmée. Il n’est pas
nécessaire de mettre le lecteur CD en marche
séparément.
6. Pour de brèves interruptions, appuyer sur PAUSE ;
5. Pour reprendre l’enregistrement, appuyer de
nouveau sur cette même touche.
7. Pour arrêter, appuyer sur STOP•OPEN 9/5
Pour sélectionner ou enregistrer un passage
particulier dans un morceau
1. Appuyer sur ∞ 6 ou § 6 pour sélectionner un
passage.
2. Mettre le lecteur CD en PAUSE ; 6 le positionner
sur le passage choisi.
– L’enregistrement commencera à partir de cet
endroit précis après avoir appuyé sur la touche
RECORD 0 5.
•
Una vez que se registre la compra de su
aparato Philips Magnavox, Ud. tiene de-recho
a todas las ventajas correspondientes al
dueño de un producto Philips Magnavox.
Verificación
de la garantía
Registre su producto dentro
de 10 días para confirmar su
derecho a máxima
protección bajo los términos
y condiciones de la garantía
de
Philips Magnavox.
Confirmación
del dueño
Su Tarjeta de Registro de la
Garantía comprueba que
Ud. es el dueño del aparato
en caso de robo o pérdida
del producto.
Conozca estos
simbolos de
t
resultar en una sacudida eléctrica. Para
la seguridad de todos, favor de no
remover la cubierta del producto.
s
debe leer la información adjunta
detenidamente para evitar problemas de
funcionamiento y mantenimiento.
sseegguurriiddaadd
El símbolo del “rayo” indica
que algún material no aislado
dentro de su unidad podría
El “signo de exclamación” le
llama la atención a
características sobre las que Ud.
• Sírvase llenar y devolver en seguida
la Tarjeta de Registro de la Garantía
empacada con su aparato. Saque
provecho de estas ventajas importantes.
Registro
del modelo
La devolución inmediata de su
Tarjeta de Registro de la
Garantía le garantiza que
recibirá toda la información y
todas las promociones
especiales que le
corresponden por ser el
dueño de su modelo.
Para uso del cliente:
Escriba abajo el número de serie que se
encuentra en el panel posterior. Guarde
esta información para el futuro.
No. de modelo ____________________
No. de serie ______________________
ADVERTENCIA: PARA EVITAR
EL RIESGO DE SACUDIDA
ELECTRICA O INCENDIO, NO
EXPONGA ESTE EQUIPO A LLUVIA
NI A HUMEDAD.
PRECAUCION: Para evitar
sacudida eléctrica, introduzca la patilla
ancha del enchufe al fondo de la ranura
ancha.
MAC5097
PILAS (véase 1)
Cuando sea conveniente, aprovéchese de la fuente de
energía si quiere conservar la vida de las pilas.
Asegúrese que desconecta el cable de alimentación
tanto del aparato como de la toma de la red, antes de
insertar las pilas.
Pilas (opcionales)
1. Abra el compartimiento de pilas e inserte seis
pilas, tipo R14 o C-cells, como se indica.
2. Cierre el compartimiento, asegurándose que las
pilas estén firmemente y correctamente colocadas.
3. Quite las pilas cuando estén gastadas o cuando no
vaya a usar el aparato por un largo tiempo.
– El uso incorrecto de las pilas puede ocasionar
fugas de electrólito y por tanto corrosión del
compartimiento o puede causar que las pilas
exploten. Por lo tanto:
– No mezcle los tipos de pila, es decir las
alcalinas con las de carbonado de zinc.
– Cuando inserte nuevas pilas, reemplace todas
las ocho pilas a la vez.
– Retire las pilas si están agotadas o cuando no
vaya a volver a utilizar el aparato durante un
largo periodo.
Nótese: Se apaga la alimentación desde las pilas
cuando el aparato esté conectado a la toma de la red.
ALIMENTACIÓN
1. Verifique que el voltaje que se indica en la placa
de tipo (en la base del aparato) corresponde al
voltaje de la red. Si no es así, consulte a su
distribuidor u organización de servicio.
2. Si su aparato está equipado con un selector de
voltaje, ajústelo al voltaje de la red.
3. Conecte el cable de alimentación al enchufe
MAINS y a la toma de la red en la pared.
– El aparato ahora está listo para su uso.
4. Para apagar la alimentación de Corriente Alterna
completamente, saque la clavija del enchufe de la
pared.
– Desconecte el cable de alimentación cuando
cambie a la alimentación de las pilas, o para
proteger el aparato durante tiempo de
relámpagos.
Información sobre el Cuidado del Ambiente
Se ha eliminado todo material redundante de
empaque. Hemos hecho todo lo posible para que
el material de empaque sea separable en tres
materiales primarios: cartón (caja), poliestireno
expandido (amortiguación), polietileno (bolsas,
lamina protector de espuma).
Su aparato está hecho de materiales que
pueden reciclarse si está desarmado por
una compañía especialista. Por favor
observe los reglamentos locales referente
al desecho de materiales de empaque, pilas
gastadas y viejos equipos.
El modelo y el número de producción de su aparato se
encuentran en la base del aparato.
REPRODUCCIÓN DE CASSETTES
1. Cambie el selector de fuente 2 a TAPE.
2. Pulse STOP•OPEN 9/5 para abrir el
compartimiento de cassettes.
3. Inserte un cassette pregrabado.
4. Pulse PLAY 1 5 y la reproducción comenzará.
5. Ajuste el sonido por medio de los controles
VOLUME 1 y DBB 3.
6. Para interrumpir la reproducción brevemente, pulse
PAUSE ; 5. Pulse esta tecla una vez más para
resumir la reproducción.
7. Pulsando 5 o 6 5, es posible rebobinar la cinta
en los dos sentidos.
. Para detener la reproducción, pulse STOP•OPEN 9/
8
5.
– Las teclas de sueltan automáticamente al
terminar la cinta.
9. Ajuste el selector 2 de fuente a la posición
TAPE/OFF (con las teclas de la reproductora de
cassettes sueltas) para apagar el aparato.
– El indicador POWER se apaga.
GRABANDO UN CASSETTE (véase 6 / 7 )
Información general sobre la grabación de
cassettes
– La grabación es permitida siempre y cuando los
derechos de propiedad y otros derechos de
terceros no son infringidos.
– Este magnetófono no es apto para la grabación de
cassettes tipo CHROME (IEC II) o METAL (IEC IV).
Para hacer grabaciones debe usar cassettes tipo
NORMAL (IEC I) en los cuales las lengüetas no han
sido rotas.
– El nivel de grabación se ajusta automáticamente.
Cambiando los controles VOLUMEN 1 o DBB 3
no afectará la grabación actual.
– La grabación no se realizará durante los primeros 7
segundos, mientras la porción delantera de la cinta
pase las cabezas de grabación.
– Para evitar el borrado accidental de una grabación,
coloque el lado del cassette que quiere conservar
hacia arriba y rompa la lengüeta a la derecha. No
es posible grabar en este lado del cassette.
GRABANDO DESDE LA RADIO
1. Con el selector de fuente 2, seleccione TUNER.
2. Sintonice la emisora de radio deseada, usando el
botón TUNING #.
3. Pulse STOP•OPEN 9 / 5 para abrir el
compartimiento de cassettes.
4. Inserta un cassette en que se puede grabar
5. Pulse RECORD 0 5 para comenzar la grabación
6. Para interrumpir brevemente la grabación, pulse
PAUSE ; 5. Para continuar la grabación, pulse
PAUSE ; 5 de nuevo
7. Para parar la grabación, pulse STOP•OPEN 9 /
5.
CD SYNCHRO GRABANDO DESDE EL REPRODUCTOR DE CD
1. Cambie el selector de fuente 2 a CD.
2. Inserte un CD y, si así lo desea, programe los
números de las pistas.
3. Pulse STOP•OPEN 9 / 5 para abrir el
compartimiento de cassette.
4. Inserte un cassette grabable.
5. Pulse RECORD 0 5 para iniciar la grabación.
– Reproducción de programa del CD comienza
automáticamente desde el principio del
programa. No es necesario arrancar el
reproductor de CD por separado.
6. Para interrupciones breves, pulse PAUSE ; 5.
Para resumir la grabación, vuelva a pulsar esta
tecla.
7. Para parar la grabación, pulse STOP•OPEN 9 /
5.
Para seleccionar y grabar un pasaje particular
dentro de una pista
1. Pulse ∞ 6 o § 6 para seleccionar el pasaje.
2. Ajuste el CD a PAUSE ; 6 ubique el pasaje
seleccionado.
– La grabación se iniciará desde este punto
preciso cuando pulse RECORD 0 5.
SÉCURITÉ
FONCTIONNEMENT/RADIO LECTEUR CD
FONCTIONNEMENT GENERAL
1. Pour mettre l’appareil en marche, utiliser le
sélecteur de fonction 2.
2. Régler le son en utilisant les boutons VOLUME 1
et DBB 3.
3. Pour éteindre l’appareil, mettre le sélecteur de
fonction 2 en position TAPE/OFF en s’assurant
que les touches du magnétophone sont relâchées.
RADIO (voir 2 / 3)
1. Mettre le sélecteur de fonction 2 sur TUNER
2. Régler le volume en utilisant les boutons de
VOLUME 1 et DBB 3.
3. Sélectionner la bande de fréquences en utilisant le
sélecteur FM-AM @.
4. Régler la radio sur la station de votre choix en
utilisant le bouton TUNING #.
– Pour une réception FM, étirer l’antenne
télescopique. Pour améliorer la réception FM,
incliner et tourner l’antenne. Raccourcir
l’antenne si le signal FM est trop puissant (si
vous êtes très près d’un émetteur).
– En ce qui concerne la réception AM, l’appareil
comprend une antenne incorporée, il n’est donc
pas nécessaire d’utiliser l’antenne télescopique.
Pour modifier la position de l’antenne, tourner
l’ensemble de l’appareil.
– Le témoin FM STEREO 9 s'allume lorsque vous
obtenez une réception stéréo en FM.
5. Pour mettre l'appareil hors tension, placez le
sélecteur de source 2 en position TAPE/
POWER OFF, lorsque toutes les touches de la
platine cassette sont relâchées.
FONCTIONNEMENT DE L’AFFICHEUR CD (voir 4)
– Nombre total de plages: en position STOP.
– Numéro de plage en cours: en mode lecture CD.
– Nombre total de plages clignote: en mode PAUSE.
– Mode SHUFFLE/REPEAT: lorsque le mode
correspondant est activé.
– PROGRAM: lorsque la fonction programme est
activée. P apparaît également brièvement lorsque
vous êtes en train de mémoriser une plage.
– No ou E: erreur de fonctionnement du lecteur de
CD ou erreur sur le CD, ou pas de CD en place (voir
la section "Recherche de pannes").
– F: la mémoire pour programmer est pleine lorsque
vous essayez de programmer plus de 20 plages.
POUR ECOUTER UN CD
1. Régler le sélecteur de fonction 2 sur CD.
2. Appuyez sur OPEN pour ouvrir le compartiment du
CD
3. Insérer l’AUDIO CD, la face imprimée du CD étant
tournée vers le haut.
4. Pour refermer la porte du CD, abaisser la porte.
– Le lecteur de CD explore le contenu du disque
et l'afficheur indique le nombre total de plages.
5. La lecture du CD commencera en appuyant sur
PLAY•PAUSE 2; 6.
6. Régler le son en utilisant les boutons VOLUME 1
et DBB 3.
7. Pour interrompre la lecture, appuyer sur
PLAY•PAUSE 2; 6.
Appuyer à nouveau sur PLAY•PAUSE 2 pour
reprendre la lecture.
8.
Appuyer sur STOP 9 6 pour arrêter la lecture du CD.
9. Mettre le sélecteur de fonction 2 en position
TAPE/OFF pour arrêter l’appareil.
Remarque: La lecture du CD s’arrêtera également
dans les cas suivants:
– lorsque le CD est arrivé à la fin;
– lorsque la porte du lecteur CD est ouverte;
– lorsque le sélecteur de fonction est en
position TAPE/OFF.
ENTRETIEN
PRECAUTIONS & ENTRETIEN GENERAL
(voir 8 / 9)
– Placer l’appareil sur une surface dure et plate pour
qu’il soit bien droit.
– Ne pas laisser l’appareil, des CD, des piles ou des
cassettes en contact avec l’humidité, la pluie, le
sable, à la lumière directe du soleil où dans des
endroits susceptibles de connaître des
températures élevées comme à proximité
d’appareils de chauffage ou dans des voitures
garées au soleil.
– Ne pas couvrir l’appareil. En effet, l’ampli produit
de la chaleur qui doit pouvoir se dissiper
librement; il faut donc s’assurer que l’appareil est
suffisamment ventilé. Un espace minimum de 15
centimètres est nécessaire.
– Les pièces mécaniques du lecteur CD et du
magnétophone contiennent des paliers
autolubrifiants et ne doivent donc pas être huilées
ou lubrifiées.
– Il est suffisant de nettoyer l’extérieur de l’appareil
avec une peau de chamois légèrement humide. Ne
pas utiliser de produits de nettoyage contenant de
l’alcool, de l’ammoniac ou des produits abrasifs
qui pourront endommager l’appareil.
ENTRETIEN DU LECTEUR CD
– Ne jamais toucher la lentille du lecteur CD.
– Si le lecteur CD est déplacé d’un endroit froid à un
endroit chaud, la lentille pourra se couvrir de
condensation. Dans ce cas, le lecteur CD ne
fonctionnera pas. Laisser le lecteur s’acclimater à
la nouvelle température pendant quelques temps.
– Pour sortir facilement le CD de sa boîte, appuyer
sur l’axe central tout en soulevant le CD.
Manipuler toujours le CD en le tenant par les
bords et le ranger toujours dans sa boîte après
l’usage, la partie imprimée tournée vers le haut.
– Ne pas utiliser de produits de nettoyage pour
nettoyer un CD, cela pourrait l’endommager. Pour
retirer la poussière et la saleté, souffler sur le CD
est l’essuyer avec un tissu doux non pelucheux en
ligne droite, du centre vers l’extérieur.
– Ne jamais écrire ou coller une étiquette sur un CD.
ENTRETIEN DU MAGNÉTOPHONE (voir 0)
Pour garantir une bonne qualité d’enregistrement et
de lecture, nettoyer les pièces indiquées A, B et C
toutes les 50 heures de fonctionnement ou, en
moyenne, une fois par mois. Utiliser un Coton–Tige
légèrement humidifié avec de l’alcool ou un nettoyant
liquide spécial pour têtes de lecture.
• Appuyer sur PLAY 1 5 et nettoyer le rouleau
presseur en caoutchouc C.
• Puis appuyer sur PAUSE ; 5 et nettoyer le galet
d’entraînement B et les têtes A.
• Après le nettoyage, appuyer sur
STOP•OPEN 9/5.
Le nettoyage des têtes A peut également être
effectué à l’aide d’une cassette autonettoyante.
SÉGURIDAD
OPERACIÓN/RADIO REPRODUCTOR DE CD
OPERACIÓN GENERAL
1. Para encender el aparato, use el selector de fuente
2.
2. Ajuste el sonido por medio de los controles
VOLUMEN 1 y DBB 3.
3. Para apagar el aparato, cambie el selector de
fuente a TAPE/OFF 2 con las teclas del cassette
sueltas.
RADIO (véase 2 / 3)
1. Cambie el selector de fuente a TUNER 2.
2. Ajuste el sonido por medio del control VOLUME 1
y DBB 3.
3. Seleccione la banda de ondas por medio del
selector FM-AM @.
4. Sintonice el aparato a una estación de radio por
medio del botón TUNING #.
– Para FM, extienda la antena telescópica. Para
mejorar la recepción de FM, incline y gire la
antena. Reduzca su longitud si la señal es
demasiado fuerte (muy cerca a una emisora).
– Para AM el aparato está dotado de una antena
incorporada, y no se necesita la antena
telescópica. Dirija la antena al girar el aparato
entero.
– El indicador FM STEREO 9 se enciende cuando
se está recibiendo en estéreo una transmisión
de FM estéreo.
5. Para apagar el aparato, ponga el selector de
fuente 2 en la posición TAPE/POWER OFF, con
las teclas del cassette sin apretar.
INDICACIONES EN LA PRESENTACIÓN DEL CD
(véase 4)
– Número total de pistas: en la posición de parada.
– Número de pista actual: durante la reproducción del CD.
– Número de pista actual: parpadea: en modo PAUSE
– Número de pista actual parpadea: en modo PAUSE
– Modo SHUFFLE (mezcla)/REPEAT (repetir): se
activa el modo respectivo.
– PROGRAM: la función de programación es activa.
P aparece tambien brevemente se está
almacenando una pista.
– No o E: error en el funcionamiento del CD o en el
CD mismo, o no se ha insertado un CD (consulte
Resolución de problemas).
– F: La memoria para programar está llena cuando si
intenta de superar el máximo de 20 pistas.
REPRODUCIENDO UN CD
1. Cambie el selector de fuente 2 a CD.
2. Pulse OPEN para abrir el compartimento del CD.
3. Inserte un AUDIO CD, con el lado impreso hacia arriba.
4. Para cerrar la puerta, presiónela hacia abajo.
– El reproductor de CD explora el contenido del
CD y en el visor aparece el número total de
pistas.
5. La reproducción comenzará al pulsar
PLAY•PAUSE 2; 6.
6. Ajuste el sonido por medio de los controles
VOLUMEN 1 y DBB 3.
7. Para interrumpir la reproducción, pulse
PLAY•PAUSE 2; 6.
Pulse PLAY•PAUSE 2; 6 de nuevo para
continuar la reproducción.
8. Pulse STOP 9 6 para detener la reproducción de
CD
9. Cambie el selector de fuente 2 a la posición
TAPE/OFF para apagar el aparato.
Nótese:
Reproducción del CD se detendrá también
cuando:
– el CD llegue a su final;
– la puerta del CD esté abierta;
– el selector de fuente esté en la posición
TUNER o TAPE/OFF.
MANTENIMIENTO
PRECAUCIONES & MANTENIMIENTO GENERAL
(véase 8 / 9)
– Ubique el aparato en una superficie dura y plana
de tal manera que no se incline.
– No exponga el aparato, los CD, las pilas ni los
cassettes a la humedad, la lluvia, la arena, o a la
luz directa del sol o dejarlos en lugares donde
ocurren altas temperaturas, tales como en las
cercanías de aparatos de calefacción o en
automóviles estacionados en el sol.
– No cubra el aparato. El amplificador produce calor
que tiene que disiparse libremente; entonces
asegúrese que hay suficiente ventilación alrededor
del aparato. Es necesario dejar un mínimo de 15
mm de espacio.
– Las partes mecánicas del reproductor CD y del
magnetófono de cassettes contienen rodamientos
autolubricantes, y no deben ser lubricadas.
– Un cuero de gamuza levemente humedecido con
agua es suficiente para limpiar la caja.
MANTENIMIENTO DEL REPRODUCTOR DE CD
– Nunca toque el lente de la reproductora de CD.
– El lente puede anublarse si el reproductor de CD
se mueve desde un ambiente frío hacia uno
caliente. El reproductor no arrancará. Déle un poco
de tiempo para que se aclimatice.
– Para sacar un CD de su estuche, apriete el huso
mientras levante el CD. Siempre aguante el CD por
el borde y siempre guárdelo en su estuche después
del uso, para evitar que se raye y se ensucie.
– Para limpiar el CD, frótelo en una línea recta desde
el centro hacia el borde usando un paño suave y
libre de hilacha. No use sustancias de limpieza, ya
que éstas pueden dañar el disco.
– Nunca escriba en un CD ni agrégue calcomanías.
MANTENIMIENTO DEL MAGNETOFONO
(véase 0)
Para asegurarse de una buena calidad de grabación y
reproducción, limpie las partes indicadas como A,
B y C después de cada 50 horas de operación o,
por medio, una vez al mes. Utilice un palillo de
algodón levemente mojado de alcohol o un líquido
especial para limpiar las cabezas.
• Pulse PLAY 1 5 y limpie la rodilla de caucho de
presión C.
• Luego pulse PAUSE ; y limpie el cabrestante B y
las cabezas A.
• Después de haberlos limpiado, pulse
STOP•OPEN 9 / 5.
Es posible también limpiar las cabezas A pasando
un cassette limpiador por la máquina una sola vez.
GARANTIE LIMITÉE
LECTEUR À DISQUE COMPACT PORTABLE PHILIPS MAGNAVOX
Il faut porter ce produit à un centre de service pour l’échanger.
QUI EST COUVERT ?
Il faudra présenter une preuve d’achat pour pouvoir
bénéficier des services de la garantie. Le reçu,la facture ou
un autre document portant la date d’achat qui prouve que
vous avez bien acheté le produit est considéré comme
preuve d’achat. L’attacher à ce manuel d’emploi et les garder
tous les deux à portée de main.
QU’EST-CE QUI EST COUVERT ?
La couverture de la garantie entre en vigueur le jour où vous
achetez le produit. Pendant un an à compter de cette date, tout
produit défectueux ou qui ne fonctionne pas sera remplacé par
un produit neuf, renouvelé ou un produit comparable sans frais
aucun au consommateur. Un produit de remplacement n’est
couvert que pendant la période non-écoulée de garantie
d’origine. Lorsque la garantie du produit d’origine vient à terme,
la garantie du produit de remplacement est terminée aussi.
QU’EST-CE QUI EST EXCLU DE LA GARANTIE ?
La garantie ne couvre pas:
• les frais de main d’œuvre pour installer ou préparer,pour
régler les commandes et pour installer ou réparer les
systèmes d’antenne à l’extérieur du produit.
• la réparation du produit et/ou d’une pièce pour cause du
mauvais emploi, d’accident,de réparations non-agréées ou
d’une autre raison qui ne peut pas être contrôlée par
Philips Consumer Electronics Company.
• des problèmes de réception dûs à des conditions de signal, au
câble ou aux systèmes d’antenne à l’extérieur de l’unité.
• un produit qui nécessite des modifications ou adaptations
pour lui permettre de fonctionner dans un pays autre que
le pays pour lequel il a été conçu, fabriqué, agréé et/ou
autorisé, ou la réparation des produits endommagés par
de telles modifications.
• des dommages indirects ou conséquents qui résultent du
produit. (Certains états ou provinces ne permettent pas
l’exclusion de dommages indirects ou conséquents. Il est
donc possible que l’exclusion ci-dessus ne s’applique pas
au cas présent. Cela comprend, mais de façon nonlimitative, des enregistrements, qu’ils soient protégés ou
non par les lois sur les droits d’auteur).
• un appareil acheté, utilisé ou réparé en dehors des ÉtatsUnis, de Porto Rico, des Îles Vierges ou du Canada ou
utilisé à des fins commerciales ou institutionnelles (y
compris mais non limités aux appareils utilisés pour la
location).
OÙ L’ÉCHANGE EST-ELLE PROPOSÉE ?
Le produit pourra s’échanger dans tous les pays où le
produit est distribué officiellement par Philips Consumer
Electronics Company. Dans des pays où Philips Consumer
Electronics Company ne distribue pas le produit,l’organisme
local de service Philips tentera de fournir un produit de
remplacement (mais il pourra y avoir des retards si le bon
produit n’est pas facilement disponible).
Philips Service Company,P.O. Box 555, Jefferson City,Tennessee 37760 É.-U., (423) 475-8869
vous pourriez avoir d’autres droits qui varient d’état en état et de province en province.
Échange gratuite pendant un an
AVANT DE DEMANDER UNE ÉCHANGE…
Veuillez consulter le manuel d’instructions avant de
demander un produit d’échange. Un petit réglage d’une des
commandes expliqué dans le manuel d’instructions pourrait
éviter de faire un trajet.
POUR BÉNÉFICIER DE L’ÉCHANGE GARANTIE
AUX É.-U.,AU PUERTO RICO OU DANS LES ÎLES
VIERGES AMÉRICAINES…
Contacter votre vendeur pour arranger l’échange. Ou bien,
renvoyer le produit, frêt et assurances payés, avec preuve
d’achat incluse, à l’adresse ci-dessous :
(Aux É.-U., au Puerto Rico et aux Îles Vierges,toute garantie
implicite, y compris des garanties de vendabilité et d’aptitude
à un but spécifique, est limitée à la durée de cette garantie
explicite. Mais,étant donné que certains états et provinces
ne permettent pas de limité la durée d’une garantie implicite,
cette limitation pourrait ne pas s’appliquer au cas présent.)
POUR BÉNÉFICIER D’UNE ÉCHANGE GARANTIE
AU CANADA…
Veuillez contacter Philips á :
(Au Canada, cette garantie est consentie à la place de toute
autre garantie.Aucune autre garantie n’est donnée, qu’elle soit
explicite ou implicite, y compris une garantie implicite de
vendabilité ou d’aptitude à un but spécifique. Philips n’est pas, en
aucun cas, responsable des dommages, qu’ils soit directs ou
indirects, spéciaux, secondaires ou conséquents, quels que soient
leurs origines, même en présence d’une notification de la
possibilité de tels dommages.)
POUR UNE ÉCHANGE HORS GARANTIE…
Aux É.-U., au Puerto Rico ou aux Îles Vierges américaines,
contacter Philips Service Company au (800) 851-8885 pour
savoir le prix d’une échange non couverte par la garantie. Puis
emballer le produit avec soins et le renvoyer au Small Product
Service Center (adresse ci-dessus).Au Canada, téléphonez au
numéro qui se trouve sous la rubrique « Pour bénéficier d’une
échange garantie au Canada »
échange hors garantie.
RAPPEL IMPORTANT...
Veuillez inscrire ci-dessous les numéros de modèle et de série
qui se trouvent sur le produit même. De plus, veuillez remplir et
renvoyer sans délai la carte d’enregistrement de garantie. Il nous
sera ainsi plus facile de vous contacter en cas de besoin.
Nº DE MODÈLE _______________________________
Nº DE SÉRIE _______________________________
Cette garantie vous donne des droits légaux spécifiques et
Small Product Service Center
Philips Service Company
907 Snapps Ferry Road, Plant 2, Building 6
Greeneville,TN 37743 É.-U.
1-800-661-6162 (Francophone)
1-800-363-7278 (Anglophone)
pour obtenir le prix d’un
LECTEUR CD
SEARCH ∞ ou §
Selection d’une plage differente pendant la
lecture
– Il est possible de passer au morceau suivant en
appuyant une fois sur SEARCH § 6. Pour sauter
plusieurs morceaux, appuyer sur SEARCH § 6
plus d’une fois jusqu’à ce que l’afficheur indique le
numéro du morceau voulu.
– Pour recommencer à écouter le morceau depuis le
début, appuyer une fois sur ∞ SEARCH 6. Pour
réécouter l’un des morceaux précédents, appuyer
sur ∞ SEARCH 6 plus d’une fois jusqu’à ce que
l’afficheur indique le numéro du morceau désiré.
Commencer par un morceau particulier
1. En position arrêt, il est également possible de
sélectionner le morceau désiré en utilisant les
touches de recherche ∞ SEARCH 6 SEARCH §
6.
2. Appuyer sur PLAY•PAUSE 2; 6 pour commencer
la lecture.
Recherche d’un passage particulier dans un
morceau
Il est possible de rechercher un passage particulier
dans un morceau. Le CD défilera très rapidement à
bas volume, mais le son sera quand même
reconnaissable.
1. Maintenir les touches SEARCH ∞ 6 SEARCH
ou § 6 appuyées pendant la lecture et relâcher
la touche dès que le passage souhaité est
identifié.
– La lecture normale du CD reprendra à partir de là.
SHUFFLE/REPEAT (modes aléatoire et
répétition) (voir 5)
La touche MODE 6 vous permet de sélectionner
différents modes qui peuvent être associés au mode
PROGRAM. Ils peuvent être choisis ou modifiés en
mode lecture et clignoteront pendant 2 secondes
avant de commencer la lecture.
1. En mode lecture uniquement, appuyez sur MODE 6
jusqu'à ce que la fonction désirée apparaisse dans
l'afficheur.
SHUFFLE - lecture des plages en ordre aléatoire.
REPEAT ALL, SHUFFLE -
plages en ordre aléatoire.
REPEAT - lecture à répétition de la plage en
cours.
REPEAT ALL - lecture à répétition du disque tout entier.
lecture à répétition des
En mode lecture, vous pouvez utiliser les touches
∞ SEARCH ou SEARCH § 6 pour sauter des plages.
2. Pour quitter le mode SHUFFLE/REPEAT, appuyez sur
la touche MODE 6 plusieurs fois jusqu'à ce que
les différents modes SHUFFLE/REPEAT ne soient
plus inscrits sur l'afficheur. Vous pouvez aussi
appuyer sur la touche STOP 9 6 pour quitter le
mode lecture.
PROGRAMMATION DES NUMEROS DE PLAGES
Il est possible de programmer un maximum de 20
plages musicales dans l’ordre souhaité. Une même
plage peut être programmée plus d’une fois.
Programmation des numéros de plages
1. En position arrêt sélectionnez la plage désirée à
l'aide des touches∞ SEARCH ou SEARCH § 6
jusqu'à ce l'afficheur indique le numéro
correspondant.
2. Appuyez une fois sur la touche MODE 6 pour
mémorisez la plage.
– L’afficheur indique P et PROG suivi par le numéro
de plage sélectionné.
3. Suivez la même procédure pour sélectionner et
mémoriser toutes les plages que vous désirez sur un
disque.
Vérification d'un programme
1. En position arrêt, maintenez la touche MODE 6
enfoncée pendant plus de 2 secondes pour revoir
un programme défini.
– L'afficheur indique la série des plages que vous
avez sélectionnées.
2. Pour démarrer la lecture du programme, appuyez
sur la touche PLAY•PAUSE 2; 6.
– La lecture commence à la première plage du
programme. A la fin de la dernière plage, la
lecture s'arrête et l'afficheur indique le nombre
total de plages du disque
Annulation d'un programme
Vous pouvez effacer votre programmation;
– en ouvrant le compartiment du disque.
– en plaçant le sélecteur source 2 sur TAPE ou
TUNER.
– en appuyant deux fois sur la touche STOP en mode
lecture/en mode STOP.
DÉPISTAGE DES PANNES
Si un défaut se manifeste, vérifiez tout d'abord les points suivants avant d'apporter la chaîne à réparer.
Si vous ne pouvez pas remédier au problème en suivant ces conseils, consultez votre revendeur ou le service après-vente.
ATTENTION: N'essayez, en aucun cas, de réparer les éléments de la chaîne vous-même, car vous perdriez le
bénéfice de la garantie
PROBLÈME
Le système ne réagit plus à
aucune commande
L’ecran ne fonctionne pas
correctement
Pas de son
Mauvais qualité du son
Ronflement ou parasites radio
de forte puissance
Mauvaise réception radio
Mauvaise qualité sonore de la
cassette
L’enregistrement ne fonctionne
pas
Pas de lecture du CD
Le CD saute des plages
CAUSE POSSIBLE
– Décharge électrostatique.
– Décharge électrostatique.
– Le volume n’est pas ajusté.
– Le casque d’écoute est branché.
– Les piles sont vides.
– La position des piles est incorrecte.
– Le câble secteur n’est pas
correctement branché.
– Les piles sont vides.
– Parasites dus à la proximité
d’équipe-ments électriques tels des
télévi-seurs, magnétoscopes,
moteurs, etc.
– Les signeaux radio sont faibles.
– Poussière et impuretés sur les
têtes, cabestan ou galet de
pression.
– Utilisation de types de
cassettes inadéquats (chrome
ou métal)
– Les ergots de la cassette sont
cassés.
– Le CD est très rayé ou sale.
– Absence de CD.
– Le CD est inséré à l’envers.
– La lentille laser est embuée.
– Le CD est défectueux ou sale.
– Le mode PROGRAM/SHUFFLE
est activé.
REMÈDE
• Mettez le système hors tension
et à nouveau sous tension
après quelque secondes.
• Mettez le système hors tension
et à nouveau sous tension
après quelque secondes.
• Ajustez le volume.
• Débranchez le casque d’écoute.
• Remplacez-les par des piles
neuves.
• Replacez les piles correctement.
• Branchez le câble secteur
correctement.
• Remplacez-les par des piles
neuves.
• Eloignez l’appareil radio des
équipements.
• FM: Inclinez et tournez
l’antenne télescopique; (voir 2)
• AM: orientez l’appareil.; (voir 3)
• Nettoyez les têtes, cabestan et
galet de pression (voir
‘Entretien’)
• Utilisez uniquement des
cassettes de type normal pour
l’enregistrement
• Appliquez un morceau de ruban
adhésif sur l’ouverture.
• Remplacez ou nettoyez le
disque (voir chapitre Entretien’).
• Insérez un disque.
• Insérez le disque, face imprimée
vers le haut.
• Attendez que l’humidité se soit
dissipée.
• Remplacez ou nettoyez le CD.
• Annulez le mode
PROGRAM/SHUFFLE.
GARANTIA LIMITADA
ATIL PHILIPS MAGNAVOX
OCADISCOS DE CD POR
T
Cambio gratis por un año
Se necesita presentarse en persona con este producto para cambiarlo.
¿QUIEN TIENE PROTECCION?
Usted debe tener su comprobante de venta para cambiar el
producto.Una nota de venta u otro documento mostrando que
usted compró el producto se considera un comprobante de venta.
Adjúntelo a este manual de instrucciones y reténgalo a la mano.
¿QUE CUBRE?
La protección bajo la garantía comienza el mismo día en que usted
compra el producto.Durante un año a partir de esta fecha, se
reemplazará un producto inoperante o defectuoso con otro
nuevo,renovado o comparable sin cargo alguno. Un producto de
reemplazo tiene cobertura sólo durante el período de la garantía
original. Una vez que venza la garantía original del producto,
también habrá vencido la garantía del producto de reemplazo.
¿QUE EXCLUYE LA GARANTIA?
Su garantía no cubre:
• cobros por mano de obra durante la instalación o montaje del
producto,ajuste de los controles del cliente o de preferencia e
instalación o reparación de los sistemas con antena fuera de la
unidad.
• reparación del producto y/o reemplazo de piezas,a raíz de uso
indebido, accidente, reparación no autorizada u otra causa no
bajo el control de Philips Consumer Electronics Company.
• problemas de recepción ocasionados por condiciones de
señales o sistemas de cable o de antena fuera de la unidad.
• un producto que requiera modificación o adaptación para que
opere en un país que no sea el país para el que fue concebido,
fabricado, aprobado y/o autorizado, o la reparación de
productos dañados por tales modificaciones.
• daños incidentales o consecuentes que resulten del producto.
(Algunos estados no permiten la exclusión por daños
incidentales o consecuentes, de modo que es posible que la
exclusión arriba indicada no le sea aplicable a usted. Esto
incluye, sin limitarse, materiales pregrabados con o sin amparo
de derechos de autor.)
• Una unidad que se ha comprado, usado o reparado fuera de
los EE.UU., Puerto Rico, las Islas Virgenes y el Canadá, o que se
ha usado para fines comerciales o institucionales (inclusive
productos usados con fines de arrendamiento, pero sin
limitarse a éstos).
¿DONDE SE EFECTUA EL CAMBIO?
Usted puede cambiar el producto en todos los países con
distribución oficial del producto por Philips Consumer
Electronics Company. En países donde Philips Consumer
Electronics Company no distribuye el producto, la entidad local
de servicio Philips tratará de darle un producto de reemplazo
(aunque puede haber demora si el producto apropiado no está
fácilmente disponible).
ANTES DE PEDIR UN CAMBIO…
Favor de consultar el manual de instrucciones antes de pedir un
cambio.Algunos ajustes de los controles según las indicaciones en
el manual podrían ahorrarle un viaje.
Esta garantía le otorga derechos legales específicos y usted podría gozar de otros derechos que varían de un estado a otro.
Philips Service Company,P.O. Box 555, Jefferson City,Tennessee 37760 USA,(423) 475-8869
EL4967S003 / MAC 4108 / 1-97
T
PARA CAMBIAR UN PRODUCTO EN LOS EE.UU.,
PUERTO RICO O LAS ISLAS VIRGENES…
Comuníquese con su distribuidor para concertar el cambio.
También, usted puede enviar el producto con el seguro y
transporte o franqueo prepagados, adjuntando el comprobante de
venta y enviándolo a la dirección a continuación:
(En los EE.UU., Puerto Rico o las Islas Vírgenes,toda garantía
implícita, inclusive las garantías implícitas de comerciabilidad y
aptitud para un propósito en particular, están limitadas en cuanto a
duración al plazo de esta garantía expresa. Puesto que algunos
estados no permiten limitaciones sobre la duración de una garantía
implícita, es posible que la limitación arriba indicada no le sea
aplicable a usted.)
PARA CAMBIAR UN PRODUCTO EN EL CANADA…
Favor de comunicarse con Philips al:
(En el Canadá, esta garantía es otorgada en lugar de toda otra
garantía. No se otorga ninguna otra garantía expresa ni implícita,
comprendiéndose aquí ninguna garantía implícita de
comerciabilidad o aptitud para propósito alguno. Philips no será
responsable bajo circunstancia alguna por daños y perjuicios
directos, indirectos, especiales,incidentales o consecuentes,
independientemente de la manera ocasionada, aún con notificación
de la posibilidad de los mismos.)
PARA CAMBIAR UN PRODUCTO DESPUES DE
VENCER LA GARANTIA…
En los EE.UU., Puerto Rico o las Islas Vírgenes,comuníquese con
Philips Service Company,llamando al (800) 851-8885 para obtener
el costo de cambio de un producto después de vencer la garantía.
Luego empaque el producto con cuidado y envíelo al Small
Product Service Center,a la dirección arriba. En el Canadá,llame
teléfono encontrado arriba en la sección ”Para cambiar un
producto en el Canada” para obtener el costo para cambiar un
producto no amparado por garantía.
RECUERDE…
Favor de anotar los números de modelo y serie del producto en el
espacio abajo.También,sírvase llenar y enviar oportunamente su
tarjeta de registro de la garantía.Así nos será más fácil notificarle
en caso de ser necesario.
Modelo No. __________________________________
Serie No. __________________________________
Small Product Service Center
Philips Service Company
907 Snapps Ferry Road, Plant 2, Building 6
Greeneville,TN 37743 USA
1-800-661-6162 (francófono)
1-800-363-7278 (anglófono)
REPRODUCTOR DE CD
SEARCH ∞ o §
Seleccionando una pista diferente durante la
reproduccion
– Usted puede saltar a la próxima pista al pulsar SEARCH
§ 6 una sola vez. Si quiere saltar más de una pista,
pulse SEARCH § 6 más de una vez hasta que la
presentación indique el número de la pista deseada.
– Si quiere repetir la pista actual desde el principio,
pulse ∞ SEARCH 6 más de una vez. Si quiere
repetir una de las pistas anteriores, pulse
∞ SEARCH 6 más de una vez hasta la
presentación indique el número de la pista
deseada.
Comenzando con una pista en particular
1. En la posición de parada puede seleccionar la
pista deseada utilizando los botones de búsqueda
∞ SEARCH o SEARCH § 6.
2. Pulse PLAY•PAUSE 2; 6 para comenzar la
reproducción.
Buscando un cierto pasaje dentro de una pista
Puede buscar un cierto pasaje dentro de una pista. El
CD reproduce a bajo volumen pero a alta velocidad,
sin embargo el sonido todavía se reconoce.
1. Mantenga pulsada la tecla ∞ SEARCH 6 o
SEARCH § 6 durante la reproducción, y suelte
la tecla en el momento que escuche el pasaje
deseado.
– La reproducción normal del CD se resumirá
desde este punto.
MODO SHUFFLE (mezcla) o REPEAT (repetir)
(véase 5)
El botón MODE 6 permite seleccionar cuatro modos
distintos que pueden ser combinados con PROGRAM.
Los modos se pueden seleccionar o cambiar durante
la reproducción y parpadean durante 2 segundos
antes de iniciar la reprodución.
1. Tan sólo durante la reproducción, pulse MODE 6
hasta que la función deseada aparezca en el visor.
SHUFFLE – Las pistas se reproducen en orden al azar.
REPEAT ALL, SHUFFLE –
las pistas en orden al azar.
REPEAT – Reproducción continua de la pista
actual.
REPEAT ALL – Repite el CD entero.
– Durante la reproducción se puede utilizar
∞ SEARCH or SEARCH § 6 para saltar
pistas.
Reproducción continua de
2. Para salir del modo SHUFFLE/REPEAT, pulse el botón
MODE 6 varias veces hasta que los diversos modos
SHUFFLE/ REPEAT no aparezcan en el visor. También
puede pulsar STOP 9 6 para salir del modo de
reproducción.
MODO SHUFFLE (mezcla) o REPEAT (repetir)
Puede almacenar hasta un máximo de 20 pistas en la
memoria en la secuencia que usted desea. Puede
almacenar cualquier pista más de una vez.
Programación de números de pista
1. En la posición de parada seleccione la pista deseada
utilizando
SEARCH
∞ o § 6 hasta que el visor
muestre el número de pista requerido.
2. Almacene la pista deseada pulsando MODE 6 una vez.
– En el visor aparece P y PROG y el número de la
pista seleccionada.
3. Seleccione y almacene de esta forma todas las
pistas deseadas de un CD.
Cómo verificar un programa
1.
Para revisar el programa seleccionado
posición de parada
durante más de 2 segundos
– El visor mostrará los números de las pistas
seleccionadas.
2. Para iniciar la reproducción de programa,
e PLAY•PAUSE 2; 6.
puls
– La reproducción empieza con la primera pista
del programa. Después de la última pista, la
reproducción para y el visor muestra el número
total de pistas del CD.
Para borrar un programa
Puede anular un programa;
– abriendo la puerta del CD.
– poniendo el selector de fuente 2 en la posición
de TAPE o de TUNER.
– pulsando STOP dos veces durante la
reprodución/en la posición de parada.
, mantenga pulsado MODE 6
.
en la
SOLUCIÓN DE PROBLEMAS
Si se produjera alguna anomalêa, compruebe primero los puntos mencionados a continuación antes de llevar
el aparato al taller de reparaciones.
ADVERTENCIA: Es ningún caso intente reparar el sistema Ud. mismo, pues ello anularía la garantía.
PROBLEMA
El equipo no reacciona a la
operación de ningún botón
La visualización no es correcta
Sin sonido
Sonido deficiente
Ruido o zumbido fuerte de
radio
Deficiente recepción de radio
Deficiente calidad de sonido
de una casete
La grabación no funciona
La reproducción de CD no
funciona
Se omiten pistas del CD
POSSIBLE CAUSA
– Descarga electrostática.
– Descarga electrostática.
– VOLUME no está ajustado.
– Los auriculares están
conectados.
– Pilas agotadas.
– Las pilas están
instaladasincorrectamente.
– El cable de red no está
conectado correctamente.
– Pilas agotadas.
– El equipo está demasiado
cercano a la TV, al vídeo o al
ordenador.
– Señal débil en la antena de
radio.
– Polvo y suciedad en las cabezas, el
cabrestante o el rodillo de presión.
– Está usando las cassettes de
tipo (METAL o CHROME)
– Deberá retirar la(s) pestaña(s)
del cassette.
– El CD está muy rayado o sucio.
– No se ha insertado un CD.
– El CD esta insertado al revés.
– El lente del laser está anublado.
– El CD está muy rayado o sucio.
– Está conectada la función
PROGRAM/SHUFFLE.
REMEDIO
• Desconecte la alimentacíon de
la unidad y espere unos
segundos para conectarla de
nuevo.
• Desconecte la alimentacíon de
la unidad y espere unos
segundos para conectarla de
nuevo.
• Ajuste VOLUME.
• Desconecte los auriculares.
• Coloque nuevas pilas.
• Introduzca las pilas
correctamente.
• Conecte correctamente el cable
de red.
• Coloque nuevas pilas.
• Aumente la distancia con
respecto a los mismos.
• FM: Incline y gire la antena
telescópica; (véase 2)
• AM : Gire todo el equipo.
(véase 3).
• Limpie los cabezan etc., véase
‘Mantenimiento’.
• Utilice únicamente cassettes de
tipo NORMAL para grabación.
• Aplique una tira de cinta adhesiva
sobre el espacio vacío de la
pestaña.
• Reemplace o limpie el CD,
véase ‘Mantenimiento’.
• Inserta un CD.
• Inserta el CD con el lado
impreso hacia arriba.
• Espere hasta que el lente se ha
aclimatizado.
• Reemplace o limpie el CD.
• Desactive la función
PROGRAM/SHUFFLE.
 Loading...