

Page 1
Portable CD Player
AZ7900
AZ7901
AZ7902
AZ7911
Page 2
2
Es necesario que lea cuidadosamente su instructivo de manejo.
Descripción: Tocadiscos de CD portatil
Modelo: AZ 7900/01, /11, /16, AZ 7901/01, /11, /16,
AZ 7902/01, /11, /16
Alimentación: 110–127/220–240 V~ 50–60 Hz
Consumo: 4 W (AY 3170)
Importador: Philips Mexicana, S.A. de C.V.
Domicilio: Norte 45, # 669, Col. Industrial Vallejo
Localidad y Telefono: C.P. 02300 México D.F., Tel. 72842 00
Exportador: Philips Hong Kong, Ltd.
País de Origen: China
Nº de Serie: ______________________________
LEA CUIDADOSAMENTE ESTE INSTRUCTIVO
ANTES DE USAR SU APARATO.
México
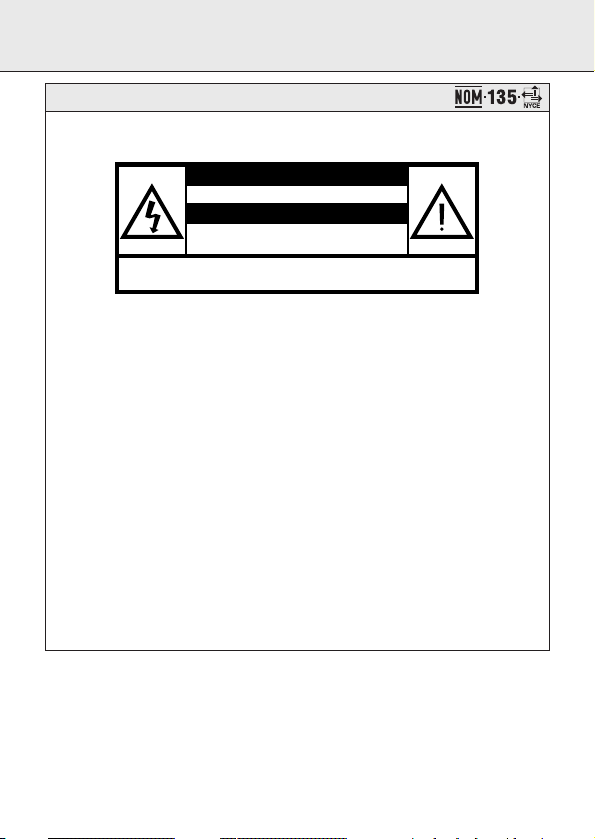
PRECAUCIÓN - ADVERTENCIA
No abrir, riesgo de choque eléctrico
Verifique que el voltaje de alimentación
Para evitar el riesgo de choque eléctrico, no quite la tapa.
En caso de requerir servicio, dirijase al personal calificado.
ATENCIÓN
sea el requerido para su aparato
Page 3
3
45
6
7
8
9
0
!
@
#
3
AL DBB
P
R
O
G
R
A
M
M
O
D
E
O
F
F
•
R
E
S
U
M
E
•
H
O
L
D
L
I
N
E
O
U
T
/
C
D
V
5
,
4
DIGIT
EN
P
V
O
L
.
0
O
2
1
$
Page 4

4
Page 5

5
English
English
Controls .................................................6
Quick start .............................................7
Power supply...................................8–10
Headphones.........................................10
CD play..........................................11–12
Features.........................................13–16
In-car connection.................................17
Troubleshooting.............................18–19
General information ............................20
Français
Informations générales .......................21
Commandes.........................................22
Mise en service rapide........................23
Alimentation électrique ................24–26
Ecouteurs.............................................26
Lecture CD.....................................27–28
Caractéristiques ............................29–32
Raccordement en voiture ....................33
Pannes et remèdes .......................34–35
Español
Controles .............................................36
Encendido rápido.................................37
Alimentación eléctrica..................38–40
Auriculares ..........................................40
Reproducción de un CD.................41–42
Características ..............................43–46
Conexión al automóvil.........................47
Localización de averías.................48–49
Información general ............................50
Guarantees
Polizia de garantía
Mexico.........................................66–67
Philips product warranty for
Australia......................................68–69
Guarantee and service for
New Zealand ....................................70
∑
FrançaisEspañol
Page 6

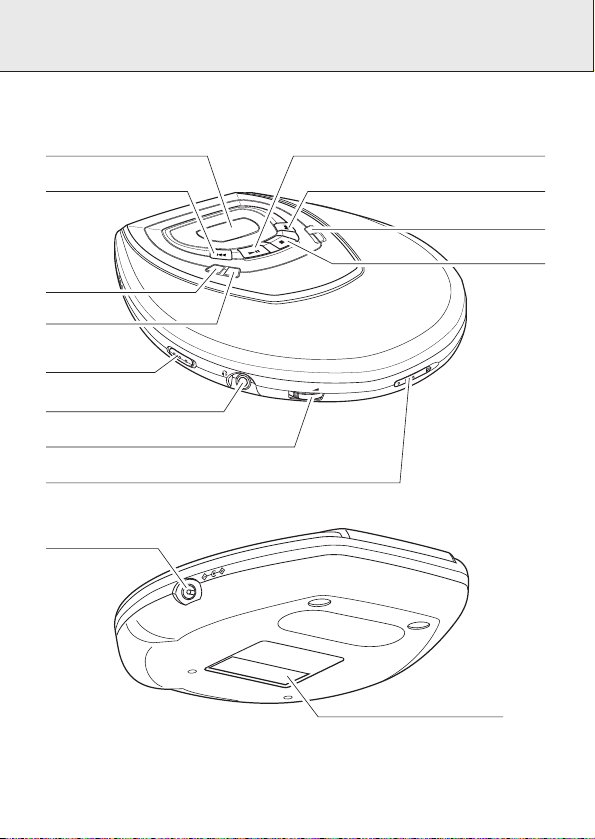
CONTROLS, refer to the illustration on page 3
6
1 9 .....................stops CD play, clears a program or switches the player off
2 DIGITAL DBB...DIGITAL DYNAMIC BASS BOOST switches the bass enhancement
on and off
3 §....................skips and searches CD tracks forwards
4 2;...................switches the player on, starts or pauses CD play
5 ........................display
6 ∞....................skips and searches CD tracks backwards
7 PROGRAM.......programs tracks and reviews the program
8 MODE..............selects the different playing possibilities:
SHUFFLE,
SHUFFLE REPEAT ALL, REPEAT, REPEAT ALL and SCAN
9 RESUME..........stores the last position of a CD track played
HOLD..............locks all buttons
OFF ..................switches RESUME and HOLD off
0 LINE OUT/p ....3.5 mm headphone socket, socket to connect the player to another
analogue audio input of an additional appliance, remote control
socket (not on all versions)
! VOL E.........adjusts the volume
@ OPEN 2...........opens the CD lid
# 4.5V DC...........socket for external power supply
$ ........................typeplate
English
This set complies with the radio interference requirements of the
European Community.
Page 7
7
English
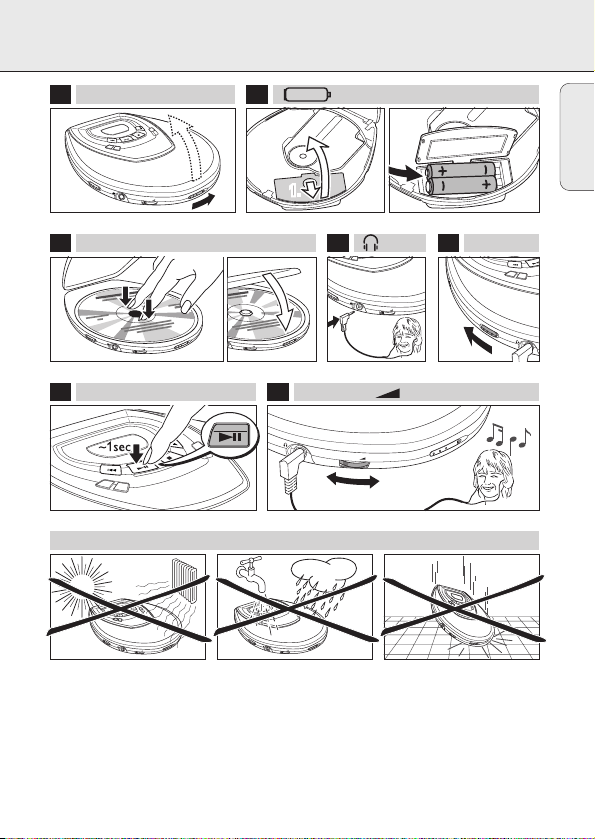
1 OPEN 2
QUICK START
B
B
D
L
A
T
I
G
I
D
P
R
O
G
R
A
M
M
O
D
E
O
F
F
•
R
E
S
U
M
E
•
H
O
L
D
L
I
N
E
O
U
T
/
2.
N
E
P
O
V
O
L
.
0
1.
AA
LR6
2.
1.
UM3
3 CD 4 5
L
I
N
E
O
U
T
/
V
O
L
.
O
F
F
•
R
E
S
U
M
E
•
H
O
L
D
L
I
N
E
O
U
T
/
N
E
P
O
V
O
L
.
0
N
E
P
O
V
O
L
.
0
0
6 PLAY 7 VOLUME
N
E
O
U
T
B
B
D
L
A
T
I
G
I
P
R
O
G
R
A
M
M
O
D
E
D
/
V
O
L
.
0
!!!
O
F
F
•
R
E
S
U
M
E
•
B
B
D
L
A
T
I
G
I
D
P
R
O
G
R
A
M
M
O
D
E
O
F
F
•
R
E
S
U
M
E
•
H
O
L
D
L
I
N
E
O
U
T
N
/
E
P
O
V
O
L
.
0
B
B
D
L
A
T
I
G
I
D
P
R
O
G
R
A
M
M
O
D
E
O
F
F
•
R
E
S
U
M
E
•
H
O
L
D
L
I
N
E
O
U
T
/
N
E
P
O
V
O
L
.
0
H
O
HOLD➟OFF
O
F
F
•
R
E
OPEN
P
R
O
G
R
A
M
M
O
D
E
L
D
L
I
N
E
O
U
T
V
O
L
.
0
P
R
O
G
R
A
M
M
O
D
E
S
U
M
E
•
H
O
L
D
L
I
N
E
O
U
T
/
B
B
D
L
A
T
I
G
I
D
O
P
E
N
Page 8
English
POWER SUPPLY
8
With this player you can use either:
• normal batteries type LR6, UM3 or AA (preferably Philips), or
• alkaline batteries type LR6, UM3 or AA (preferably Philips).
Notes: – Old and new or different types of batteries
should not be used in combination.
– Remove batteries if they are empty or if the
player is not going to be used for a long time.
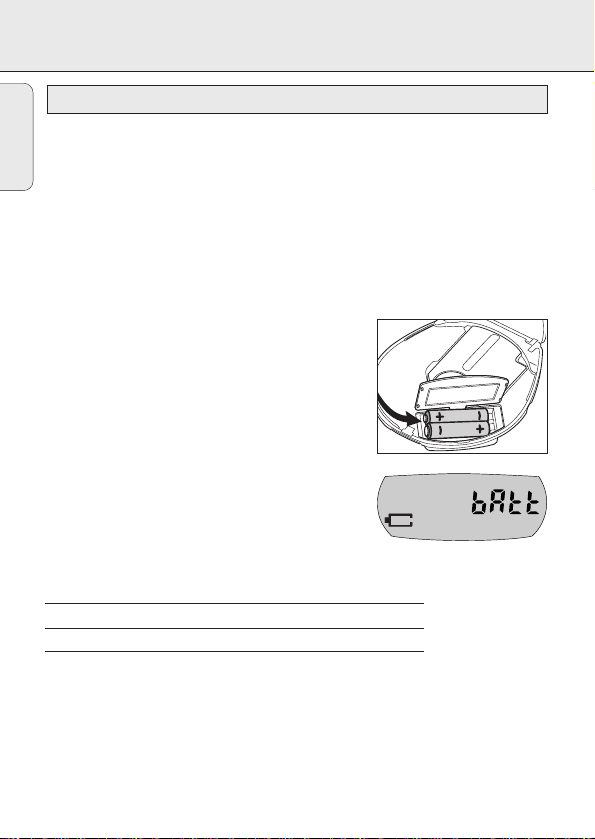
Inserting batteries
1 Push OPEN 2 to open the CD lid.
2 Open the battery compartment and insert either
2 normal or alkaline batteries.
Battery indication
• If A is shown or flashing (depending on
the version) and bAtt is displayed, the batteries
are empty.
Average playing time of batteries under normal conditions
Battery type Playing time
Normal 6 hours
Alkaline 18 hours
ECO-PLUS NiMH batteries (not on all versions) 9 hours
Batteries contain chemical substances, so they should be disposed of
properly.
Batteries (supplied or optionally available)
Page 9
POWER SUPPLY
9
Recharging works only on players with supplied rechargeable
ECO-PLUS NiMH batteries AY 3362.
Recharging the ECO-PLUS NiMH batteries on board
1 Make sure you insert the rechargeable ECO-PLUS NiMH
batteries AY 3362.
2 Connect the mains adapter to the 4.5V DC socket of
the player and to the wall socket.
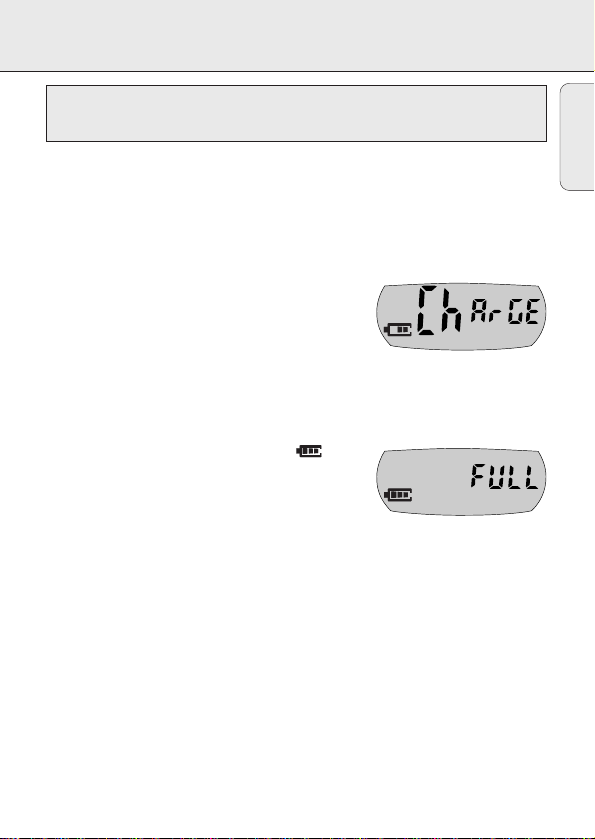
y A filled with 0–3 sections (depending on the
level of charge) is shown and ChArGE is
displayed.
• Recharging stops when you start playback or when
approximately 7 hours have passed by.
3 When the batteries are fully recharged, is
shown and FULL is displayed.
Notes: – It is normal for the batteries to become warm
during recharging.
– If the batteries become too warm, recharging will be interrupted for
approximately 30 minutes and Hot is displayed.
– To ensure proper recharging on board, take care that contacts are clean, and
you are using only the ECO-PLUS NiMH batteries AY 3362.
Rechargeable ECO-PLUS NiMH battery handling
• Recharging already charged or half-charged batteries will shorten their lifetime.
Therefore, after using the rechargeable ECO-PLUS NiMH batteries a few times,
discharge them completely before recharging.
• To avoid a short circuit, the batteries should not touch any metal objects.
• When the batteries quickly become empty after recharging, the contacts are dirty
or the end of their lifetime has been reached.
ECO-PLUS NiMH battery information (for versions supplied with
rechargeable ECO-PLUS NiMH batteries AY 3362 only)
English
Page 10

POWER SUPPLY/HEADPHONES
10
Use only the AY 3170 adapter (4.5 V/300 mA direct
current, positive pole to the centre pin). Any other
product may damage the player.
1 Make sure that the local voltage corresponds to the
mains adapter´s voltage.
2 Connect the mains adapter to the 4.5V DC socket
of the player and to the wall socket.
Note: Always disconnect the adapter when you are not using it.
• Connect the supplied headphones to the LINE OUT/p
socket.
Note: LINE OUT/p can also be used for connecting your
HiFi system (signal lead) or your car radio
(cassette adapter or signal lead). In both cases,
the volume of the player must be set to position 8.
H
Headphones AY 3677
Mains adapter (supplied or optionally available)
English
Use your head when using headphones
Hearing safety: Do not play your headphones at a high volume. Hearing experts
advise that continuous use at high volume can permanently damage your hearing.
Traffic safety: Do not use headphones while driving a vehicle. It may create a hazard
and it is illegal in many countries. Even if your headphones are an open-air type
designed to let you hear outside sounds, do not turn up the volume so high that you
cannot hear what is going on around you.
C
D
V
5
,
4
O
L
D
L
I
N
E
O
U
T
/
V
O
L
.
0
Page 11
CD PLAY
11
This CD player can play all kinds of Audio Discs such
as CD-Recordables and CD-Rewritables. Do not try to
play a CD-ROM, CDi, VCD, DVD or computer CD.
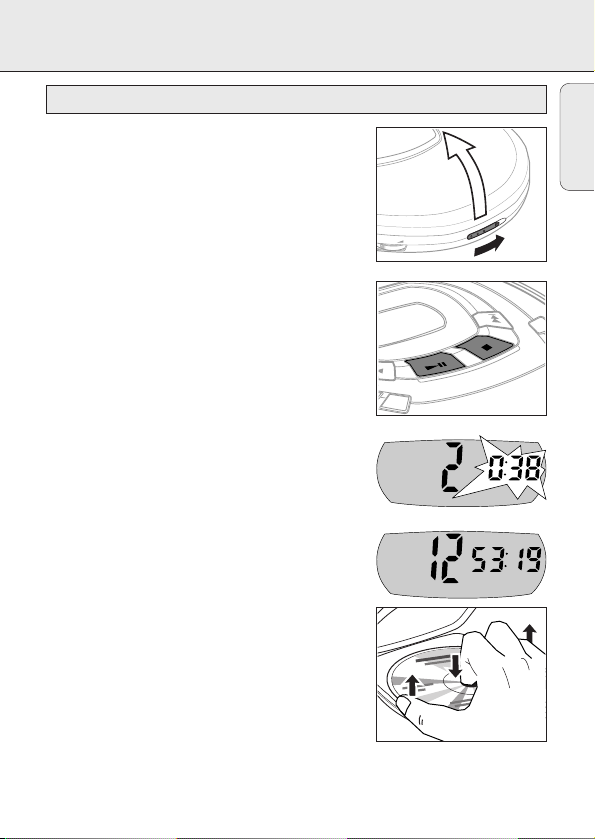
1 Push the OPEN 2 slider.
y The lid opens.
2 Insert an audio CD, printed side up, by pressing
gently on the CD centre so that it fits onto the hub.
Close the lid by pressing it down.
3 Press 2; for approximately 1 second to switch the
player on and start CD playback.
y The current track number and the elapsed
playing time are displayed.
• You can pause playback by pressing 2;.
y The time where playback was paused is flashing.
• Continue playback by pressing 2; again.
4 Press 9 to stop playback.
y The total number of tracks and the total playing
time of the CD are displayed.
5 Press 9 again to switch the player off.
• To remove the CD, hold it by its edge and press the
hub gently while lifting the CD.
Note: If there is no activity, the set will automatically
switch off after a while to save energy.
A
D
Playing a CD
English
N
E
P
V
O
L
.
0
M
M
O
D
E
O
AL DBB
IGIT
0
Page 12
CD PLAY
12
• If a recordable CD (CD-R) or a rewritable CD (CD-RW) is not recorded
properly, nF dISC is displayed. In that case use FINALIZE on your
CD recorder to complete the recording.
• If you want to play a rewritable CD (CD-RW), it takes 3–15 seconds for
sound reproduction to start once you have pressed 2;.
• Playback will stop if you open the CD lid.
• While the CD is read, 1 -:- is flashing.
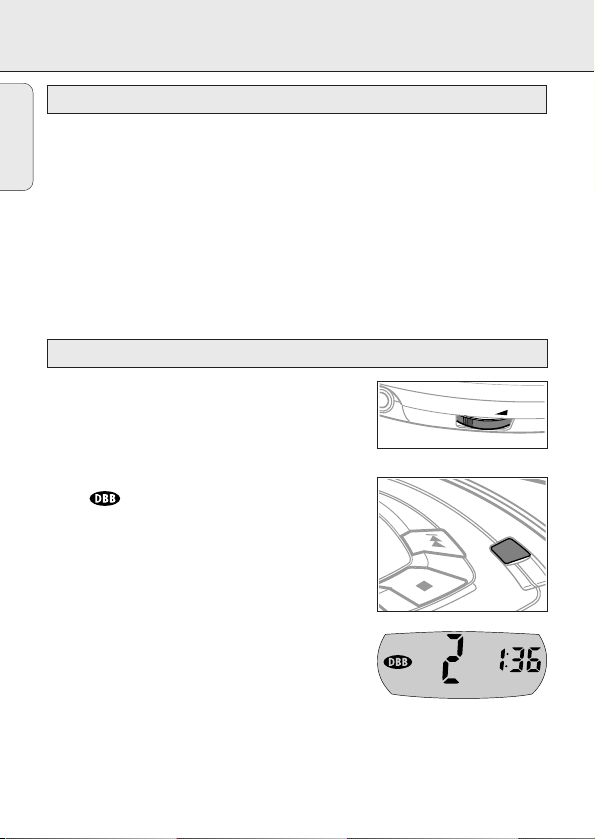
Volume adjustment
• Adjust the volume by using VOL E.
Bass adjustment
• Press DBB to switch the bass enhancement on or off.
y is shown if the bass enhancement is
activated.
Volume and bass
Playback information
English
V
O
L
.
0
B
B
D
L
ITA
IG
D
Page 13
FEATURES
13
Selecting a track during playback
• Briefly press ∞ or § once or several times to skip
to the current, previous or next track.
y Playback continues with the selected track and
its number is displayed.
Selecting a track when playback is stopped
1 Briefly press ∞ or § once or several times.
y The selected track number is displayed.
2 Press 2; to start CD play.
y Playback starts with the selected track.
Searching for a passage during playback
1 Keep ∞ or § pressed to find a particular passage in
a backward or forward direction.
y Searching is started and playback continues at
low volume. After 2 seconds the search speeds up.
2 Release the button when you reach the desired passage.
y Normal playback continues from this very position.
Notes: – During SCAN searching is not possible.
– During SHUFFLE, SHUFFLE REPEAT ALL, REPEAT
or while playing a program, searching is only
possible within the particular track.
Selecting a track and searching
English
P
R
O
G
R
A
M
M
O
D
E
Page 14

FEATURES
14
You can select up to 15 tracks and store them in
memory in a desired sequence. Any track can be stored
more than once.
1 While playback is stopped, select a track with
∞ or §.
2 Press PROGRAM to store the track.
y PROGRAM lights up; the track number
programmed and P with the total number of
stored tracks are displayed.
3 Select and store all desired tracks in this way.
4 Press 2; to start playback of your selected tracks.
y PROGRAM is shown and playback starts.
• You can review the program by pressing PROGRAM for more than 2 seconds.
y The display shows all stored tracks in sequence.
Notes: – If you press PROGRAM and there is no track selected,
SELECt is displayed.
– If you try to store more than 15 tracks, FULL is displayed.
Clearing the program
1 If necessary, press 9 to stop playback.
2 Press 9 to clear the program.
y CLEAr is displayed once, PROGRAM goes off
and the program is cleared.
Notes: The program will also be cleared if you
– interrupt the power supply or
– open the CD lid,
– or if the set switches off automatically.
Programming track numbers
English
P
R
O
G
R
A
M
M
O
D
E
Page 15

FEATURES
15
You can store the last position played. When restarting,
playback continues from where you have stopped.
1 Switch the slider to RESUME during playback to
activate RESUME.
y RESUME is shown.
2 Press 9 whenever you want to stop playback.
3 Press 2; whenever you want to resume playback.
y RESUME is shown and playback continues from
where you have stopped.
• To deactivate RESUME, switch the slider to OFF.
y RESUME goes off.
You can lock the buttons of the set. When a key is
pressed, no action will be executed then.
1 Switch the slider to HOLD to activate HOLD.
y All buttons are locked. HoLd is displayed by
pressing any key. If the set is switched off,
HoLd is displayed only by pressing 2;.
2 To deactivate HOLD, switch the slider to OFF.
Note: When you deactivate HOLD by switching the
slider to RESUME and restart, playback continues
from where you have stopped.
Locking all buttons – HOLD
Storing the last position played – RESUME
English
O
F
F
•
R
E
S
U
M
E
•
H
O
L
D
O
F
F
•
R
E
SU
M
E
•
H
O
L
D
L
I
N
E
O
U
T
/
L
I
N
E
O
U
T
/
Page 16
FEATURES
16
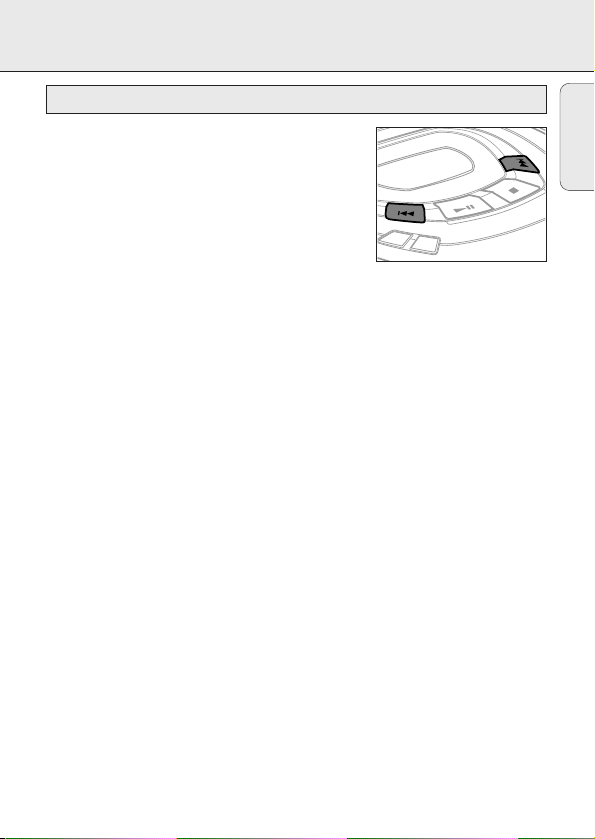
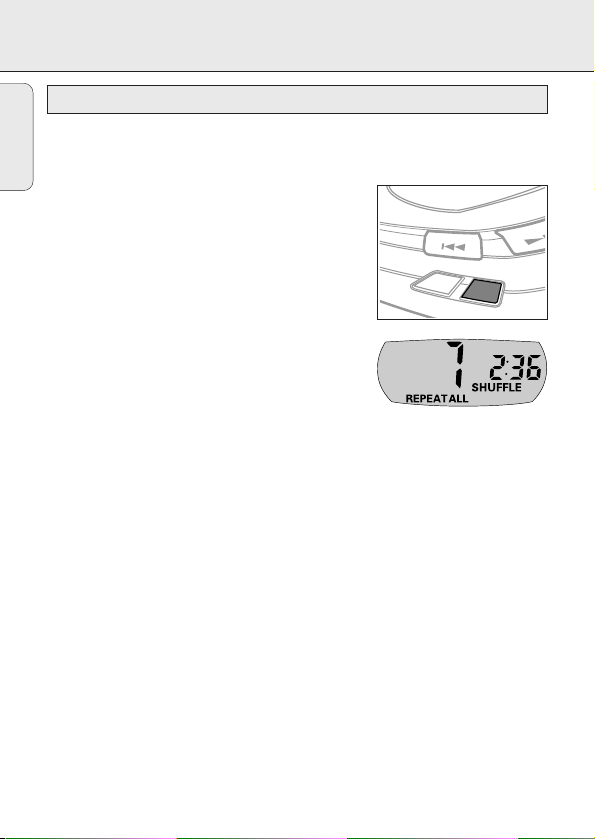
It is possible to play tracks in random order, to repeat a track
or the CD and to play the first few seconds of each track.
1 Press MODE during playback as often as necessary
until the display shows either:
y SHUFFLE: All tracks of the CD are played in
random order until all of them have been played
once.
y SHUFFLE REPEAT ALL: All tracks of the CD are
played repeatedly in random order.
y REPEAT: The current track is played repeatedly.
y REPEAT ALL: The entire CD is played repeatedly.
y SCAN: The first 10 seconds of each of the
remaining tracks are played in sequence.
2 Playback starts in the chosen mode after 2 seconds.
• To return to normal playback, press MODE repeatedly
until the display indicator goes off.
Selecting different playing possibilities – MODE
English
P
R
O
G
R
A
M
M
O
D
E
Page 17
IN-CAR CONNECTION
17
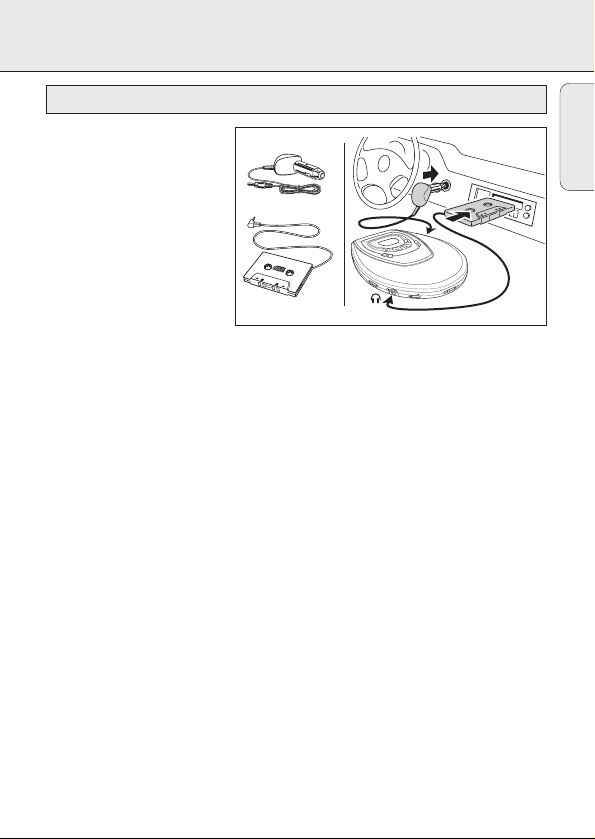
Only use the AY 3545 car
voltage converter (4.5 V, DC,
positive pole to the centre pin)
and the AY 3501 car cassette
adapter. Any other product may
damage the set.
1 Put the CD player on a
horizontal, vibration-free and
stable surface. Make sure it
is in a safe place, where the
player is neither a danger
nor obstacle to the driver and passengers.
2 Connect the DC plug of the voltage converter to the 4.5V DC socket of the
CD player (only for a 12 V car battery, negative grounding).
3 Insert the voltage converter into the cigarette lighter socket. If necessary, clean the
cigarette lighter socket to obtain a good electrical contact.
4 Turn down the volume and connect the cassette adapter plug to the LINE OUT/p
socket of the CD player.
5 Carefully insert the cassette adapter into the car radio’s cassette compartment.
6 Make sure the cord does not hinder your driving.
7 Start the CD player, set VOL E to position 8 and adjust the sound with the car
radio controls.
• Always remove the voltage converter from the cigarette lighter socket when the
CD player is not in use.
Notes: – Avoid excessive heat from the car heating or from direct sunlight (e.g. in a
parked car in the summer).
– If your car radio has a LINE IN socket, it is better to use it for the car radio
connection instead of the cassette adapter. Connect the signal lead to this
LINE IN socket and the LINE OUT/p socket of the CD player.
In-car use (connections supplied or optionally available)
English
DIGIT
DIGIT
AL
AL
DIGIT
AL
4,5 V DC
BB
D
AL
IT
IG
D
P
R
O
G
R
A
M
M
O
D
E
O
F
F
•
R
E
S
U
M
E
•
H
O
L
D
L
I
N
E
O
U
T
/
N
E
P
O
V
O
L
.
0
Page 18

TROUBLESHOOTING
18
Problem Possible cause Solution
No power, Batteries
playback does Batteries inserted incorrectly Insert the batteries
not start correctly.
Batteries are empty. Change the batteries.
Contact pins are dirty. Clean them with a cloth.
Mains adapter
Loose connection Connect the adapter
securely.
In-car use
Cigarette lighter is not powered Switch on ignition or insert
when ignition is off. batteries.
nF dISC CD-RW (CD-R) is not recorded Use FINALIZE on the
indication properly. CD recorder to complete
the recording.
no dISC The CD is badly Replace or clean the CD.
indication scratched or dirty.
CD is not or incorrectly inserted. Insert a CD, label upwards.
The laser lens is steamed up. Wait until the lens has
cleared.
HoLd indication HOLD is activated. Deactivate HOLD.
and/or no reaction
Electrostatic discharge Disconnect the set from
to controls
power supply or take out
the batteries for
a few seconds.
English
WARNING
Under no circumstances should you try to repair the set yourself as this
will invalidate the guarantee.
Page 19

TROUBLESHOOTING
19
Problem Possible cause Solution
The CD skips tracks. The CD is damaged or dirty. Replace or clean the CD.
RESUME, SHUFFLE or PROGRAM is Switch RESUME, SHUFFLE
active. or PROGRAM off.
No sound or PAUSE is activated. Press 2;.
bad sound quality
Loose, wrong or dirty Check and clean
connections connections.
Volume is not adjusted. Adjust the volume.
Malfunctions due to vicinity Keep the player away from
of active mobile phones active mobile phones.
Strong magnetic fields near Change the player’s position
the player or connections.
In-car use
cassette adapter is Insert the cassette adapter
inserted incorrectly. correctly.
Temperature inside the car Let the player adjust to the
is too high/low. temperature.
Cigarette lighter socket Clean the cigarette
is dirty. lighter socket.
Wrong playback direction of the Change the autoreverse
car cassette player’s direction.
autoreverse feature
English
If a fault occurs, first check the points listed, before taking the set for repair.
If you are unable to solve a problem by following these hints, consult your dealer or
service centre.
Page 20

GENERAL INFORMATION
20
• Do not touch the lens A of the CD player.
• Do not expose the set, batteries or CDs to humidity,
rain, sand or excessive heat (caused by heating
equipment or direct sunlight).
• You can clean the CD player with a soft, slightly
dampened, lint-free cloth. Do not use any cleaning
agents as they may have a corrosive effect.
• To clean the CD, wipe it in a straight line from the centre towards the edge using a
soft, lint-free cloth. A cleaning agent may damage the disc! Never write on a CD or
attach a sticker to it.
• The lens may cloud over when the set is moved suddenly from cold to warm
surroundings. Playing a CD is not possible then. Leave the CD player in a warm
environment until the moisture has evaporated.
• Active mobile phones in the vicinity of the CD player may cause malfunctions.
• Avoid dropping the set as this may cause damage.
• All redundant packing material has been omitted. We have done our utmost to
make the packaging easily separable into two mono materials: cardboard (box) and
polyethylene (bags, protective foam sheet).
• Your set consists of materials which can be recycled if disassembled by a
specialized company. Please observe the local regulations regarding the disposal of
packing materials, exhausted batteries and old equipment.
Environmental information
CD player and CD handling
English
A
Page 21

INFORMATIONS GENERALES
21
• Ne touchez jamais la lentille A du lecteur de CD.
• N'exposez jamais l'appareil, les piles ou les CD à
l'humidité, à la pluie ou à une chaleur excessive
(chauffage ou lumière directe du soleil).
• Vous pouvez nettoyer le lecteur de CD à l'aide d'un
chiffon doux, légèrement humide et non pelucheux.
N'utilisez pas de produits de nettoyage, car ils sont susceptibles d'avoir un effet
corrosif.
• Pour nettoyer un CD, essuyez-le en ligne droite du centre vers le bord, à l'aide d'un
chiffon doux non pelucheux. Les produits de nettoyage risquent d'endommager le
disque! N'inscrivez jamais rien sur un CD ou n'y collez aucune étiquette.
• La lentille peut se couvrir de buée lorsque vous faites passer brutalement l'appareil
du froid à la chaleur. Il n'est alors plus possible de lire un CD. Laissez le lecteur de
CD dans un environnement chaud jusqu'à ce que la buée s'évapore.
• Le fonctionnement du lecteur de CD peut être perturbé si des téléphones portables
fonctionnent près de l'appareil.
• Evitez de laisser tomber l'appareil, ce qui risquerait de l'endommager.
• Tous les matériaux d'emballage superflus ont été supprimés. Nous avons fait tout
notre possible pour que l'emballage puisse être trié en deux matériaux : carton
(boîte) et polyéthylène (sachets, plaques de protection en mousse).
• Votre appareil est composé de matériaux pouvant être recyclés s’il est démonté par
une firme spécialisée. Veuillez observer les règlements locaux lorsque vous vous
débarrassez des matériaux d’emballage, des piles usagées et de votre ancien
appareil.
Informations relatives à l'environnement
Lecteur de CD et manipulation des CD
Français
A
Page 22

COMMANDES,voir illustration page 3
22
1 9 .....................arrête la lecture CD, efface la programmation du CD ou éteint le
lecteur
2 DIGITAL DBB...DIGITAL DYNAMIC BASS BOOST active/désactive l'amplification
des basses
3 §....................avance d'une piste sur le CD ou effectue une recherche vers l'avant
4 2;...................allume le lecteur, démarre ou interrompt la lecture CD
5 ........................affichage
6 ∞....................recule d'une piste sur le CD ou effectue une recherche vers l'arrière
7 PROGRAM.......permet de programmer les pistes, affiche la programmation
8 MODE..............sélectionne l'une des possibilités de lecture :
SHUFFLE,
SHUFFLE REPEAT ALL, REPEAT, REPEAT ALL et SCAN
9 RESUME..........enregistre la dernière position de lecture d'une piste de CD
HOLD..............verrouille toutes les touches
OFF ..................désactive les fonctions RESUME et HOLD
0 LINE OUT/p ....prise pour casque de 3,5 mm, prise permettant de connecter le
lecteur à l'entrée audio analogique d'un autre appareil, prise pour la
télécommande (pas sur tous les modèles)
! VOL E.........règle le volume
@ OPEN 2...........ouvre le couvercle du lecteur
# 4.5V DC...........prise pour alimentation extérieure
$ ........................identification du modèle
Français
Cet appareil est conforme aux normes de la Communauté
européenne en matière d’interférences radio.
Page 23

23
Français
1 OPEN 2
MISE EN SERVICE RAPIDE
B
B
D
L
A
T
I
G
I
D
P
R
O
G
R
A
M
M
O
D
E
O
F
F
•
R
E
S
U
M
E
•
H
O
L
D
L
I
N
E
O
U
T
/
2.
N
E
P
O
V
O
L
.
0
1.
AA
LR6
2.
1.
UM3
3 CD 4 5
L
I
N
E
O
U
T
/
V
O
L
.
O
F
F
•
R
E
S
U
M
E
•
H
O
L
D
L
I
N
E
O
U
T
/
N
E
P
O
V
O
L
.
0
N
E
P
O
V
O
L
.
0
0
6 PLAY 7 VOLUME
N
E
O
U
T
B
B
D
L
A
T
I
G
I
P
R
O
G
R
A
M
M
O
D
E
D
/
V
O
L
.
0
!!!
O
F
F
•
R
E
S
U
B
B
D
L
A
T
I
G
I
D
P
R
O
G
R
A
M
M
O
D
E
O
F
F
•
R
E
S
U
M
E
•
H
O
L
D
L
I
N
E
O
U
T
N
/
E
P
O
V
O
L
.
0
B
B
D
L
A
T
I
G
I
D
P
R
O
G
R
A
M
M
O
D
E
O
F
F
•
R
E
S
U
M
E
•
H
O
L
D
L
I
N
E
O
U
T
/
N
E
P
O
V
O
L
.
0
M
HOLD➟OFF
O
F
F
•
R
OPEN
P
R
O
G
R
A
M
M
O
D
E
E
•
H
O
L
D
L
I
N
E
O
U
T
V
O
L
.
0
P
R
O
G
R
A
M
M
O
D
E
E
S
U
M
E
•
H
O
L
D
L
I
N
E
O
U
T
/
B
B
D
L
A
T
I
G
I
D
O
P
E
N
Page 24

Français
ALIMENTATION ELECTRIQUE
24
Avec ce lecteur, vous pouvez utiliser :
• des piles normales du type LR6, UM3 ou AA (de préférence Philips), ou
• des piles alcalines du type LR6, UM3 ou AA (de préférence Philips).
Remarques : – Il ne faut pas mélanger des piles usagées
et neuves ou des piles de types différents.
– Retirez les piles si elles sont déchargées
ou si vous n'utilisez pas le lecteur pendant
un certain temps.
Mise en place des piles
1 Appuyez sur OPEN 2 pour ouvrir le couvercle du
lecteur.
2 Ouvrez le compartiment des piles et placez y 2 piles
soit normales soit alcalines.
Témoin des piles
• Si A apparaît ou clignote (selon le modèle)
et que bAtt est affiché, les piles sont déchargées.
Durée moyenne d'utilisation des piles dans des conditions normales
Type de piles Durée d'utilisation
Normales 6 heures
Alcalines 18 heures
Piles ECO-PLUS au NiMH (pas sur tous les modèles) 9 heures
Les piles contiennent des substances chimiques et doivent par conséquent
être rejetées dans les endroits appropriés.
Piles (fournies ou disponibles en option)
Page 25

ALIMENTATION ELECTRIQUE
25
Le chargement ne fonctionne que sur les lecteurs livrés avec
des piles AY 3362 ECO-PLUS rechargeables.
Chargement des piles ECO-PLUS au NiMH sur l'appareil
1 Veillez à placer des piles AY 3362 ECO-PLUS NiMH
rechargeables au.
2 Branchez le bloc d'alimentation sur la prise 4.5V DC
du lecteur et sur la prise murale.
y A rempli de 0–3 sections (en fonction du
niveau de chargement) apparaît et l'indication
ChArGE est affichée.
• Le chargement s'arrête lorsque vous démarrez la
lecture d'un disque ou après environ 7 heures.
3 Lorsque les piles sont entièrement rechargées,
apparaît et l'indication FULL est affichée.
Remarques : – Il est normal que les piles chauffent
pendant le chargement.
– Si les piles sont trop chaudes, le chargement est interrompu pendant
environ 30 minutes et l'indication Hot apparaît.
– Pour garantir un chargement correct sur l'appareil, veillez à ce que les
contacts soient propres et n'utilisez que des piles AY 3362 ECO-PLUS
rechargeables au NiMH.
Manipulation des piles ECO-PLUS rechargeables au NiMH
• Le fait de recharger des piles déjà chargées ou chargées à moitié réduit leur durée
de vie. Par conséquent, après avoir utilisé plusieurs fois les piles ECO-PLUS au
NiMH, déchargez-les complètement avant de les recharger.
• Pour éviter les courts-circuits, les piles ne doivent pas toucher d'objets métalliques.
• Si les piles se déchargent rapidement après avoir été rechargées, cela signifie que
les contacts sont sales ou qu'elles ont atteint la fin de leur vie utile.
Informations relatives aux piles ECO-PLUS au NiMH
(uniquement pour les modèles livrés avec des piles AY 3362 ECO-PLUS
rechargeables au NiMH)
Français
Page 26

ALIMENTATION ELECTRIQUE / ECOUTEURS
26
N'utilisez que le bloc d'alimentation AY 3170 (4,5 V /
300 mA, courant continu, tension positive sur la borne
centrale). Tout autre appareil risque d'endommager le
lecteur.
1 Assurez-vous que la tension du réseau correspond à
celle du bloc d'alimentation.
2 Branchez le bloc d'alimentation sur la prise 4.5V DC du
lecteur et sur la prise murale.
Remarque : Débranchez toujours le bloc d'alimentation lorsque vous ne l'utilisez pas.
• Branchez les écouteurs fournis sur la prise
LINE OUT/p.
Remarque : La prise LINE OUT/p peut également servir
à brancher votre lecteur sur votre chaîne
HiFi (ligne de signal) ou sur votre autoradio
(cassette adaptatrice ou ligne de signal).
Dans les deux cas, le volume du lecteur doit
être réglé sur 8.
H
Ecouteurs AY 3677
Bloc d'alimentation (fourni ou disponible en option)
Français
Ecoutez la musique… et la voix de la raison!
Sécurité d’écoute : ne réglez pas vos écouteurs à un volume trop élevé. Les experts
de l’audition signalent qu’un utilisation continue à volume élevé peut nuire à l’ouïe.
Sécurité routière : n’utilisez pas vos écouteurs lorsque vous conduisez un véhicule.
Cela peut entraîner des dangers, et est interdit dans nombre de pays. Même si vous
utilisez des écouteurs de type ouvert, conçus pour vous permettre d’entendre les
sons environnants, ne réglez pas le volume si fort que vous n’entendez plus ce qui se
passe autour de vous.
O
L
D
L
I
N
E
O
U
T
/
C
D
V
5
,
4
V
O
L
.
0
Page 27

LECTURE CD
27
Ce lecteur CD peut lire tous les types de disques
audio comme les CD enregistrables ou réenregistrables.
N'essayez pas de lire un CD-ROM, un CDi, un CDV, un
DVD ou un CD d'ordinateur.
1 Appuyez sur la glissière OPEN 2.
y Le couvercle s'ouvre.
2 Introduisez un CD audio, face imprimée vers le haut,
en appuyant doucement sur le centre du CD, de
manière à le fixer sur l'axe. Fermezle couvercle en
l'abaissant et en appuyant.
3 Appuyez sur 2; pendant environ 1 seconde pour
mettre l'appareil en marche et démarrer la lecture
CD.
y Le numéro de la piste en cours de lecture et le
temps écoulé sont affichés.
• Vous pouvez interrompre la lecture en appuyant sur 2;.
y L'affichage du temps de lecture clignote.
• Reprenez la lecture en appuyant une nouvelle fois
sur 2;.
4 Appuyez sur 9 pour arrêter la lecture.
y Le nombre total de pistes et la durée totale de
lecture du CD sont affichés.
5 Appuyez une nouvelle fois sur 9 pour éteindre
l'appareil.
• Pour retirer le CD, saisissez-le par le bord et appuyez
doucement sur l'axe tout en soulevant le CD.
Remarque : Le lecteur s'éteint automatiquement après
un certain temps s'il n'est pas utilisé, de
manière à économiser l'énergie.
A
D
Lecture d'un CD
Français
V
O
L
.
0
M
M
O
D
E
0
N
E
P
O
AL DBB
IT
IG
Page 28

LECTURE CD
28
• Si un CD enregistrable (CD-R) ou réenregistrable (CD-RW) n'est pas
enregistré correctement, l'indication nF dISC est affichée. Dans ce cas,
utilisez la fonction FINALIZE de votre graveur de CD pour terminer
l'enregistrement.
• Si vous souhaitez lire un CD réenregistrable (CD-RW), il faut entre
3–15 secondes pour que la lecture démarre après avoir appuyé sur 2;.
• La lecture s'arrête si vous ouvrez le couvercle du CD.
• Pendant le balayage du CD, l'indication 1 -:- clignote.
Réglage du volume
• Réglez le volume au moyen de VOL E.
Réglage des basses
• Appuyez sur DBB pour activer ou désactiver
l’accentuation des basses.
y est affiché si l’accentuation des basses
est activée.
Volume et basses
Informations relatives à la lecture
Français
V
O
L
.
0
B
B
D
L
ITA
IG
D
Page 29

CARACTERISTIQUES
29
Sélection d'une piste en cours de lecture
• Appuyez brièvement une ou plusieurs fois sur ∞ ou
sur § pour aller au début de la piste en cours ou à la
piste précédente ou suivante.
y La lecture se poursuit avec la piste sélectionnée,
dont le numéro s'affiche.
Sélection d'une piste lorsque la lecture est arrêtée
1 Appuyez brièvement une ou plusieurs fois sur ∞ ou sur §.
y Le numéro de la piste sélectionnée est affiché.
2 Appuyez sur 2; pour lancer la lecture du CD.
y La lecture débute à la piste sélectionnée.
Recherche d'un passage en cours de lecture
1 Maintenez ∞ ou § enfoncé pour trouver un passage
donné vers l'avant ou vers l'arrière.
y La recherche débute et la lecture se poursuit avec
un volume inférieur. La recherche s'accélère après
2 secondes.
2 Relâchez la touche lorsque vous avez atteint le passage voulu.
y La lecture normale reprend à partir de cette position.
Remarques : – Le mode SCAN ne permet pas de procéder à une recherche.
– La recherche ne peut s'effectuer que sur une seule piste dans les
modes SHUFFLE, SHUFFLE REPEAT ALL et REPEAT, ou lors d'une lecture
programmée.
Sélection d'une pisteet recherche
Français
P
R
O
G
R
A
M
M
O
D
E
Page 30

CARACTERISTIQUES
30
Vous pouvez choisir jusqu'à 15 pistes et les stocker
en mémoire dans l'ordre voulu. Chaque piste peut être
choisie plus d'une fois.
1 Lorsque la lecture est arrêtée, sélectionnez une piste
à l'aide de ∞ ou §.
2 Appuyez sur PROGRAM pour mémoriser la piste.
y PROGRAM s'allume ; le numéro de la piste
programmée, le symbole P et le nombre total
de pistes programmées sont affichés.
3 Sélectionnez et mémorisez de la même manière
toutes les pistes voulues.
4 Appuyez sur 2; pour démarrer le lecteur des pistes
que vous avez choisies.
y PROGRAM apparaît et la lecture débute.
• Vous pouvez passer votre programme en revue en appuyant pendant plus de
2 secondes sur PROGRAM.
y L'affichage présente toutes les pistes mémorisées dans l'ordre.
Remarques : – Si vous appuyez sur PROGRAM sans qu'aucune piste ne soit
sélectionnée, l'indication SELECt apparaît.
– Si vous essayez de mémoriser plus de 15 pistes,
l'indication FULLapparaît.
Effacer le programme
1 Le cas échéant, appuyez sur 9 pour arrêter la lecture.
2 Appuyez sur 9 pour effacer le programme.
y CLEAr apparaît une fois, PROGRAM s'éteint et
le programme est effacé.
Remarques : Le programme est également effacé si vous
– coupez l'alimentation électrique ou
– ouvrez le compartiment CD,
– ou si l'appareil s'éteint automatiquement.
Programmation des numéros de pistes
Français
P
R
O
G
R
A
M
M
O
D
E
Page 31

CARACTERISTIQUES
31
Vous pouvez mémoriser la dernière position de lecture.
Lorsque vous rallumez l'appareil, la lecture reprend là où
vous l'aviez arrêtée.
1 Pendant la lecture, faites glisser le commutateur en
position RESUME pour activer la fonction RESUME.
y RESUME apparaît.
2 Appuyez sur 9 lorsque vous souhaitez arrêter la lecture.
3 Appuyez sur 2; lorsque vous souhaitez reprendre
la lecture.
y RESUME est affichée et la lecture reprend à partir
de l'endroit où vous l'aviez arrêtée.
• Pour désactiver la fonction RESUME, faites glisser le commutateur sur OFF.
y RESUME s'éteint.
Vous pouvez bloquer toutes les touches de l'appareil,
qui deviennent alors inopérantes.
1 Faites glisser le commutateur sur HOLD pour activer
la fonction HOLD.
y Toutes les touches sont bloquées. HoLd est
affichée dès que vous appuyez sur une touche. Si
l'appareil est éteint, HoLd n'apparaît que si
vous appuyez sur 2;.
2 Pour désactiver la fonction HOLD, faites glisser
le commutateur sur OFF.
Remarque : Si vous désactivez la fonction HOLD en
amenant le commutateur sur RESUME et
que vous remettez l'appareil en marche,
la lecture reprend là où vous l'aviez arrêtée.
Blocage de toutes les touches – HOLD
Mémorisation de la dernière position lue – RESUME
Français
O
F
F
•
R
E
S
U
M
E
•
H
O
L
D
L
I
N
O
F
F
•
R
E
SU
M
E
•
H
O
L
D
E
O
U
T
/
L
I
N
E
O
U
T
/
Page 32

CARACTERISTIQUES
32
Il est possible de jouer les morceaux dans un ordre aléatoire,
de rejouer une piste ou d'écouter les premières secondes
de chaque piste.
1 En cours de lecture, appuyez sur MODE aussi
souvent qu'il le faut, jusqu'à ce que l'une des
indications suivantes apparaisse :
y SHUFFLE : Toutes les pistes du CD sont lues dans
un ordre aléatoire, jusqu'à ce que chacune ait
été lue une fois.
y SHUFFLE REPEAT ALL : Toutes les pistes du CD sont
lues plusieurs fois dans un ordre aléatoire.
y REPEAT : La piste en cours de lecture est jouée de
façon répétée.
y REPEAT ALL : L'ensemble du CD est joué de façon
répétée.
y SCAN : Les 10 premières secondes des pistes
restantes sont lues dans l'ordre.
2 La lecture démarre dans le mode choisi après 2 secondes.
• Pour revenir à la lecture normale, appuyez sur MODE à
plusieurs reprises jusqu'à que l'indication disparaisse.
Sélection des différentes possibilités de lecture – MODE
FrançaisFrançais
P
R
O
G
R
A
M
M
O
D
E
Page 33

RACCORDEMENT EN VOITURE
33
N'utilisez que le transformateur
pour voiture AY 3545 (4,5 V CC,
tension positive sur la borne
centrale) et le adaptateurcassette AY 3501. Tout autre
produit risque d'endommager
l'appareil.
1 Placez le lecteur de CD sur
une surface horizontale,
stable et exempte de
vibrations. Veillez à choisir
un endroit sûr, où le lecteur ne risque pas de mettre en danger ou de gêner le
conducteur et les passagers.
2 Raccordez la fiche CC du transformateur à la prise 4.5V DC du lecteur de CD
(uniquement pour une batterie automobile de 12 V, mise à la terre négative).
3 Branchez le transformateur sur la prise de l'allume-cigare. Si nécessaire, nettoyez
cette dernière pour garantir un bon contact électrique.
4 Coupez le volume et raccordez la fiche de la cassette adaptatrice à la prise
LINE OUT/p du lecteur de CD.
5 Introduisez avec précaution le adaptateur-cassette dans le lecteur de cassettes de
l'autoradio.
6 Assurez-vous que le câble ne vous gêne pas pour conduire.
7 Mettez le lecteur de CD en marche, amenez le réglage VOL E en position 8 et
réglez le son au moyen des commandes de l'autoradio.
• Débranchez toujours le transformateur de la prise de l'allume-cigare lorsque vous
n'utilisez pas le lecteur de CD.
Remarques : – Evitez d'exposer l'appareil à la chaleur excessive du chauffage ou de la
lumière directe du soleil (par exemple, dans un véhicule en
stationnement en été).
– Si votre autoradio dispose d'une prise LINE IN, il est préférable
d'utiliser cette dernière plutôt qu'un adaptateur-cassette. Branchez la
ligne de signal d'une part sur cette prise LINE IN et d'autre part sur la
prise LINE OUT/p du lecteur de CD.
Utilisation en voiture (connecteurs fournis ou en option)
Français
DIGIT
DIGIT
AL
AL
DIGIT
AL
4,5 V DC
B
B
D
L
A
IT
IG
D
P
R
O
G
R
A
M
M
O
D
E
O
F
F
•
R
E
S
U
M
E
•
H
O
L
D
L
I
N
E
O
U
T
/
N
E
P
O
V
O
L
.
0
Page 34

PANNES ET REMEDES
34
Problème Cause possible Remède
Pas de courant, Piles
la lecture ne Les piles sont mal installées. Installez correctement les
démarre pas piles.
Les piles sont déchargées. Changez les piles.
Les broches de contact sont Nettoyez-les avec un
sales. chiffon.
Bloc d'alimentation
Mauvais raccordement Raccordez correctement
le bloc d'alimentation.
Utilisation en voiture
L'allume-cigare n'est pas sous Enclenchez l'allumage ou
tension lorsque l'allumage est placez des piles dans
coupé. l'appareil.
nF dISC Le CD-RW (CD-R) n'est pas Utilisez la fonction
indication enregistré correctement. FINALIZE de votre graveur
de CD pour terminer
l'enregistrement.
no dISC Le CD est excessivement rayé Remplacez ou nettoyez le
indication ou sale. CD.
Le CD n'est pas bien mis en Insérez le CD, face
place. imprimée vers le haut.
La lentille laser est embuée. Attendez que la buée
s'évapore
HoLd indication La fonction HOLD est activée. Désactivez la fonction
et/ou les touches HOLD.
n'ont aucun effet
Décharge électrostatique Débranchez l'appareil de
l'alimentation électrique ou
retirez les piles pendant
quelques secondes.
Français
AVERTISSEMENT
N'essayez en aucun cas de réparer l'appareil vous-même, sous peine
d'invalider la garantie.
Page 35

PANNES ET REMEDES
35
Problème Cause possible Remède
Le lecteur Le CD est endommagé ou sale. Remplacez ou
saute des pistes. nettoyez le CD.
La fonction RESUME, SHUFFLE ou Désactivez la fonction
PROGRAM est activée. RESUME, SHUFFLE
ou PROGRAM.
Pas de son ou La fonction PAUSE est activée. Appuyez sur 2;.
médiocre son
Raccordements défectueux, Vérifiez et nettoyez les
erronés ou sales raccordements.
Le volume n'est pas réglé. Réglez le volume.
Dysfonctionnements dus à la Eloignez le lecteur des
proximité d'un téléphone téléphones portables
portable en fonction.
Champs magnétiques puissants Insérez correctement le
près du lecteur adaptateur-cassette.
Utilisation en voiture Attendez que la
La cassette adaptatrice température du lecteur
est mal insérée. s'adapte.
La température dans la voiture Attendez que la
est trop élevée/basse. temperature du lecteur
s'adapte.
Le connecteur de Nettoyez le connecteur
l'allume-cigare est sale. de l'allume-cigare.
Mauvaise direction de lecture Inversez la direction de
de la fonction autoreverse du l'autoreverse.
lecteur de cassette de
l'autoradio.
Français
Dans le cas d'une anomalie de fonctionnement, commencez par vérifier les points cidessous avant de donner votre appareil à réparer.
Si vous ne parvenez pas à résoudre le problème en suivant ces instructions, veuillez
consulter votre fournisseur ou votre centre SAV.
Page 36

CONTROLES, consulte la figura de la página 3
36
1 9 .....................detiene la reproducción del CD, borra todos los programas o apaga
el equipo
2 DIGITAL DBB...DIGITAL DYNAMIC BASS BOOST activa y desactiva la
intensificación de graves
3 §....................realiza un salto y busca hacia delante en las pistas del CD
4 2;...................pone en marcha el equipo, inicia o hace una pausa en la
reproducción del CD
5 ........................pantalla
6 ∞....................realiza un salto y busca hacia atrás en las pistas del CD
7 PROGRAM.......programa pistas y revisa el programa
8 MODE..............selecciona entre las diferentes posibilidades de reproducción:
SHUFFLE, SHUFFLE REPEAT ALL, REPEAT, REPEAT ALL y SCAN
9 RESUME..........guarda la última posición de una pista de CD reproducida
HOLD..............bloquea todos los botones
OFF ..................desactiva RESUME y HOLD
0 LINE OUT/p ....conexión de 3,5 mm para auriculares, conexión para acoplar el
equipo a otro análogo de entrada de un aparato adicional, conexión
para mando a distancia (no disponible en todas las versiones)
! VOL E.........ajusta el volumen
@ OPEN 2...........abre la tapa del CD
# 4.5V DC...........conector para fuente de alimentación externa
$ ........................placa de características técnicas
Español
Este reproductor cumple las normas para interferencias de
radio establecidas por la Comunidad Europea.
Page 37

Español
37
1 OPEN 2
ENCENDIDO RAPIDO
B
B
D
L
A
T
I
G
I
D
P
R
O
G
R
A
M
M
O
D
E
O
F
F
•
R
E
S
U
M
E
•
H
O
L
D
L
I
N
E
O
U
T
/
2.
N
E
P
O
V
O
L
.
0
1.
AA
LR6
2.
1.
UM3
3 CD 4 5
L
I
N
E
O
U
T
/
V
O
L
.
O
F
F
•
R
E
S
U
M
E
•
H
O
L
D
L
I
N
E
O
U
T
/
N
E
P
O
V
O
L
.
0
N
E
P
O
V
O
L
.
0
0
6 PLAY 7 VOLUME
N
E
O
U
T
B
B
D
L
A
T
I
G
I
P
R
O
G
R
A
M
M
O
D
E
D
/
V
O
L
.
0
!!!
O
F
F
•
R
E
S
U
B
B
D
L
A
T
I
G
I
D
P
R
O
G
R
A
M
M
O
D
E
O
F
F
•
R
E
S
U
M
E
•
H
O
L
D
L
I
N
E
O
U
T
N
/
E
P
O
V
O
L
.
0
B
B
D
L
A
T
I
G
I
D
P
R
O
G
R
A
M
M
O
D
E
O
F
F
•
R
E
S
U
M
E
•
H
O
L
D
L
I
N
E
O
U
T
/
N
E
P
O
V
O
L
.
0
M
HOLD➟OFF
O
F
F
•
R
OPEN
P
R
O
G
R
A
M
M
O
D
E
E
•
H
O
L
D
L
I
N
E
O
U
T
V
O
L
.
0
P
R
O
G
R
A
M
M
O
D
E
E
S
U
M
E
•
H
O
L
D
L
I
N
E
O
U
T
/
B
B
D
L
A
T
I
G
I
D
O
P
E
N
Page 38

ALIMENTACIÓN ELÉCTRICA
38
Con este equipo puede utilizar:
• pilas normales de tipo LR6, UM3 o AA (preferiblemente, Philips) o
• pilas alcalinas tipo LR6, UM3 o AA (preferiblemente, Philips).
Notas: – No deben utilizarse mezcladas pilas nuevas con
pilas usadas ni de tipos diferentes.
– Si las pilas están descargadas o no va a utilizar
el equipo durante un largo período de tiempo, quítelas.
Instalación de las pilas
1 Pulse OPEN 2 para abrir la tapa del CD.
2 Abra el compartimento de las pilas e inserte 2 pilas
normales o alcalinas.
Indicación de las pilas
• Si A o parpadea (en función de la versión) y se
muestra bAtt, las pilas están descargadas.
Tiempo medio de reproducción con pilas en condiciones normales
Tipo de pila Tiempo de reproducción
Normal 6 horas
Alcalina 18 horas
Pilas de NiMH ECO-PLUS (no disponible para todas las versiones) 9 horas
Al deshacerse de las pilas, hágalo con precaución, ya que éstas contienen
sustancias químicas peligrosas.
Pilas (incluidas o disponibles de forma opcional)
Español
Page 39

ALIMENTACIÓN ELÉCTRICA
39
Sólo se pueden realizar recargas con los equipos equipados
con pilas recargables ECO-PLUS NiMH AY 3362.
Recarga de las pilas ECO-PLUS NiMH AY 3362 del equipo
1 Compruebe que las pilas instaladas son ECO-PLUS NiMH AY 3362.
2 Conecte el adaptador de red al conector 4.5V DC del
equipo y a la toma de pared.
y Aparece A con entre 0–3 secciones (en
función del nivel de carga) y ChArGE.
• La recarga se detiene al iniciarse una reproducción o
transcurridas 7 horas, aproximadamente.
3 Cuando las pilas están totalmente recargadas,
aparecerán y FULL.
Notas: – Es normal que las pilas se calienten durante el proceso de recarga.
– Si las pilas se calientan demasiado, la recarga se interrumpirá durante
aproximadamente 30 minutos, y aparecerá Hot en pantalla.
– Para asegurar una carga adecuada de las pilas cuando están instaladas en
el equipo, compruebe que los contactos están limpios y que sólo utiliza pilas
ECO-PLUS NiMH AY 3362.
Manejo de las pilas recargables ECO-PLUS NiMH
• La recarga de pilas ya cargadas o a media carga reducirá su tiempo de vida útil.
Por tanto, después de utilizar las pilas ECO-PLUS NiMH unas cuantas veces, es
conveniente recargarlas completamente antes de volver a cargarlas.
• Para evitar cortocircuitos, las pilas no deben entrar en contacto con ningún objeto
metálico.
• Si las pilas se descargan poco después de haberlas recargado, es que los
contactos están sucios o se ha terminado su vida útil.
Información sobre las pilas ECO-PLUS NiMH (sólo para las
versiones equipadas con pilas recargables ECO-PLUS NiMH AY 3362)
Español
Page 40

ALIMENTACIÓN ELÉCTRICA/AURICULARES
40
Utilice sólo el adaptador de red AY 3170 (4,5 V/300 mA
corriente continua, con el polo positivo en la patilla
central). Cualquier otro adaptador de red puede dañar el
equipo.
1 Compruebe que el voltaje local es el mismo que el
del adaptador de red.
2 Conecte el adaptador de red a la toma 4.5V DC del
reproductor y a un enchufe de pared.
Nota: Desconecte siempre el adaptador cuando no vaya a utilizarlo.
• Conecte los auriculares incluídos con el equipo a la
clavija LINE OUT/p.
Nota: LINE OUT/p también puede utilizarse para
conectar un equipo de alta fidelidad (cable de
señal) o la radio del automóvil (adaptador de
casete o conexión de señal). En ambos casos, el
volumen del reproductor debe colocarse en la
posición 8.
H
Auriculares AY 3677
Adaptador de red (incluido u opcional)
Español
Use la cabeza cuando utilice los auriculares
Advertencia de seguridad: No emplee los auriculares a gran volumen. Los
especialistas de oídos advierten que el uso continuado a gran volumen puede dañar
el oído de manera permanente.
Seguridad en la carretera: No utilice los auriculares mientras conduzca un vehículo,
ya que podría provocar un accidente y es ilegal en muchos países. Aunque sus
auriculares sean para utilizar al aire libre y diseñados para permitirle oír los sonidos
del exterior, no ponga el volumen tan alto que no pueda oír lo que pasa a su
alrededor.
O
L
D
L
I
N
E
O
U
T
C
D
V
5
,
4
/
V
O
L
.
0
Page 41

REPRODUCCIÓN DE UN CD
41
Este equipo puede reproducir toda clase de discos
de audio, como CD grabables y CD regrabables. No
intente reproducir un CD-ROM, CDi, VCD, DVD o CD de
ordenador.
1 Pulse el botón deslizante OPEN 2.
y Se abrirá la tapa.
2 Inserte un CD de audio con la cara impresa hacia
arriba, presionando el CD suavemente sobre su
centro de forma que se introduzca en el eje central.
Cierre la tapa empujándola hacia abajo.
3 Pulse 2; durante 1 segundo aproximadamente para
poner en marcha el equipo e iniciar la reproducción
del CD.
y Aparecerán en pantalla el número de pista actual
y el tiempo de reproducción transcurrido.
• Puede hacer una pausa la reproducción pulsando 2;.
y Parpadeará en la pantalla el tiempo transcurrido
hasta el momento de la interrupción.
• Continúe la reproducción pulsando otra vez 2;.
4 Pulse 9 para detener la reproducción.
y Aparecerá en la pantalla el número total depistas
y el tiempo total de reproducción del CD.
5 Pulse otra vez 9 para apagar el equipo.
• Para quitar el CD del equipo, sujételo por el borde y
presione suavemente el eje mientras levanta el disco.
Nota: Si no hay actividad, el equipo se apagará
automáticamente para ahorrar energía.
A
D
Reproducción de un CD
Español
N
E
P
V
O
L
.
0
M
M
O
D
E
O
AL DBB
IGIT
0
Page 42

REPRODUCCIÓN DE UN CD
42
• Si un CD grabable (CD-R) o CD regrabable (CD-RW) no está grabado
correctamente, aparecerá nF dISC en la pantalla. En ese caso, utilice
la función FINALIZE del reproductor de CD para completar la grabación.
• Si desea reproducir un CD regrabable (CD-RW), la reproducción tardará
entre 3–15 segundos después de pulsar 2;.
• La reproducción se detendrá si abre la tapa del reproductor de CD.
• Mientras el equipo lee el CD, parpadeará la indicación 1 -:- en la pantalla.
Ajuste del volumen
• Ajuste el volumen utilizando VOL E.
Ajuste de graves
• Pulsar DBB para activar o desactivar la
intensificación de bajos.
y se muestra en pantalla si se ha activado
la intensificación de bajos.
Volumen y graves
Información acerca de las reproducciones
Español
V
O
L
.
0
B
B
D
L
ITA
IG
D
Page 43

CARACTERÍSTICAS
43
Selección de una pista durante la reproducción
• Pulse brevemente ∞ o § una o varias veces para
saltar a la pista actual, la anterior o la siguiente.
y La reproducción continúa con la pista
seleccionada y su número aparece en pantalla.
Selección de una pista cuando se ha detenido la
reproducción
1 Pulse brevemente ∞ o § una o varias veces.
y Aparecerá en la pantalla el número de la pista
seleccionada.
2 Pulse 2; para iniciar la reproducción de CD.
y La reproducción empezar por la pista seleccionada.
Búsqueda de un pasaje durante la reproducción
1 Mantenga pulsada ∞ o § para buscar un pasaje
concreto hacia atrás o hacia delante, respectivamente.
y Se iniciará la búsqueda y la reproducción continúa
a bajo volumen. La búsqueda se acelera transcurridos
2 segundos.
2 Suelte el botón cuando llegue al pasaje que desee.
y La reproducción normal continuará desde ese punto.
Notas: – Durante la función SCAN no se puede realizar una búsqueda.
– Mientras se están utilizando las funciones SHUFFLE,
SHUFFLE REPEAT ALL, REPEAT o durante la reproducción
de un programa, sólo se puede realizar una búsqueda
en esa pista en concreto.
Selección de una pista durante la reproducción
Español
P
R
O
G
R
A
M
M
O
D
E
Page 44

CARACTERÍSTICAS
44
Puede seleccionar hasta 15 pistas y guardarlas en
memoria en la secuencia deseada. Se puede guardar
cualquier pista más de una vez.
1 Mientras la reproducción se encuentra detenida,
seleccione una pista mediante ∞ o §.
2 Pulse PROGRAM para guardar la pista.
y PROGRAM se encenderá; en la pantalla
aparecerán el número de la pista programada y
P con el número total de pistas guardadas.
3 Seleccione y guarde de esta manera todas las pistas
que desee.
4 Pulse 2; para iniciar la reproducción de las pistas
seleccionadas.
y Aparecerá PROGRAM en la pantalla y comenzará
la reproducción.
• Puede revisar el programa pulsando PROGRAM durante más de 2 segundos.
y Aparecerán en la pantalla todas las pistas guardadas por su orden.
Notas: – Si pulsa PROGRAM y no hay una pista seleccionada,
aparecerá SELECt en la pantalla.
– Si intenta guardar más de 15 pistas, aparecerá FULL.
Borrado del programa
1 Si fuese necesario, pulse 9 para detener la reproducción.
2 Pulse 9 para borrar el programa.
y Aparecer CLEAr una vez en la pantalla,
desaparecer PROGRAM y el programa se borrará.
Notas: También se borrará el programa si usted:
– interrumpe la alimentación eléctrica,
– abre la tapa del reproductor de CD,
– o el equipo se apaga automáticamente.
Programación de números de pista
Español
P
R
O
G
R
A
M
M
O
D
E
Page 45

CARACTERÍSTICAS
45
Se puede guardar la última posición reproducida. Al
reanudar la reproducción, ésta continuará desde el
mismo punto en que se detuvo.
1 Coloque el interruptor deslizante en la posición
RESUME durante la reproducción para activar RESUME.
y Aparece RESUME en la pantalla.
2 Pulse 9 cuando desee detener la reproducción.
3 Pulse 2; cuando desee continuar la reproducción.
y Aparecer RESUME en la pantalla y continuará la
reproducción a partir del punto en que se detuvo.
• Para desactivar la función RESUME, cambie el
interruptor deslizante a la posición OFF.
y Desaparece RESUME.
Se pueden bloquear los botones del equipo. Así, cuando
se pulse un botón no se ejecutará ninguna acción.
1 Coloque el interruptor deslizante en la posición HOLD
para activar esta función.
y Se bloquearán todos los botones. Aparecerá
HoLd en la pantalla cuando se pulse cualquier
tecla. Si se apaga el equipo, sólo aparecerá
HoLd en la pantalla al pulsar 2;.
2 Para desactivar la función HOLD, cambie el
interruptor deslizante a la posición OFF.
Nota: Al desactivar la función HOLD cambiando el interruptor
deslizante a RESUME y reiniciar, la reproducción
continuará desde la posición donde se detuvo.
Bloqueo de todos los botones – HOLD
Almacenamiento de la última posición reproducida – RESUME
Español
O
F
F
•
R
E
S
U
M
E
•
H
O
L
D
L
I
N
E
O
U
T
/
O
F
F
•
R
E
SU
M
E
•
H
O
L
D
L
I
N
E
O
U
T
/
Page 46

CARACTERÍSTICAS
46
Se pueden reproducir pistas en orden aleatorio, repetir
una pista o todo el CD y reproducir los primeros segundos
de cada pista.
1 Pulse MODE durante la reproducción las veces que
sean necesarias hasta que aparezca en la pantalla:
y SHUFFLE: Todas las pistas del CD se reproducirán
en orden aleatorio hasta que todas ellas se
hayan reproducido una vez.
y SHUFFLE REPEAT ALL: Todas las pistas del CD se
reproducirán repetidamente en orden aleatorio.
y REPEAT: La pista actual se reproducirá
repetidamente.
y REPEAT ALL: Todo el CD se reproducirá
repetidamente.
y SCAN: Los primeros 10 segundos de cada pista
se reproducirán según su orden.
2 La reproducción comenzará en el modo seleccionado
transcurridos 2 segundos.
• Para regresar al modo de reproducción normal, pulse
MODE repetidamente hasta que desaparezca la
indicación de la pantalla.
Selección de las distintas posibilidades de reproducción –
MODE
Español
P
R
O
G
R
A
M
M
O
D
E
Page 47

CONEXIÓN EN EL AUTOMÓVIL
47
Utilice sólo el adaptador de
tensión para vehículo AY 3545
(4.5 V/300 mA CC, con el polo
positivo en la patilla central) y el
adaptador de casete para
vehículo AY 3501. Cualquier otro
producto puede dañar el equipo.
1 Coloque el reproductor de CD
sobre una superficie
horizontal, estable y sin
vibraciones. Asegúrese de
que es un lugar seguro, en el que el reproductor no represente ningún peligro u
obstáculo para el conductor o los pasajeros.
2 Conecte el enchufe DC del adaptador de tensión a la toma 4.5V DC del reproductor
de CDs (únicamente para pilas de automóvil de 12 V con el negativo
conectado a tierra).
3 Inserte el adaptador de tensión en el encendedor. Si fuese necesario, limpie la
toma del encendedor para conseguir un buen contacto eléctrico.
4 Baje el volumen y conecte el enchufe del adaptador de casete a la toma
LINE OUT/p del reproductor de CDs.
5 Introduzca con cuidado el adaptador de casete en el compartimento del radiocasete
del vehÌculo.
6 Asegúrese de que el cable no impide la conducción.
7 Inicie el reproductor de CDs, coloque VOL E en la posición 8 y ajuste el sonido
con los controles del radiocasete del vehÌculo.
• Cuando no esté utilizando el reproductor de CDs, retire siempre el adaptador de
tensión de la toma del encendedor.
Notas: – Evite el calor excesivo procedente de la calefacción del vehículo o como
consecuencia de la exposición directa a la luz del sol (p. ej. en un coche
aparcado en verano).
– Si el radiocasete del vehÌculo tiene una toma LINE IN, es mejor utilizarla para
la conexión del radiocasete en lugar del adaptador de casete. Conecte el cable
de señal a esta toma LINE IN y a la toma LINE OUT/p del reproductor de CDs.
Utilización en el automóvil (conexiones incluidas u opcionales)
Español
DIGIT
DIGIT
AL
AL
DIGIT
AL
4,5 V DC
B
B
D
L
A
IT
IG
D
P
R
O
G
R
A
M
M
O
D
E
O
F
F
•
R
E
S
U
M
E
•
H
O
L
D
L
I
N
E
O
U
T
/
N
E
P
O
V
O
L
.
0
Page 48

LOCALIZACIÓN DE AVERÍAS
48
Problema Causa posible Solución
No se enciende, Pilas
no se inicia la Pilas introducidas Introduzca las pilas
reproducción incorrectamente. correctamente.
Pilas descargadas. Cambie las pilas.
Patillas de contacto sucias. Límpielas con un paño.
Adaptador de red
Conexión suelta Asegure la conexión.
Utilización en el vehículo
El encendedor no tiene Conecte el encendido
corriente cuando está o introduzca pilas.
inactivo el encendido.
nF dISC El CD-RW (CD-R) no se ha Utilice la función
indicación grabado correctamente. FINALIZE del grabador
de CD para completar
la grabación.
no dISC El CD está sucio o rayado. Cambie o limpie el CD.
indicación
No se ha introducido el CD Introduzca el CD con la
o se ha introducido al revés. etiqueta hacia arriba.
La lente del láser está Espere hasta que haya
empañada. desaparecido la
condensación de vapor de
la lente.
HoLd indicación La función HOLD está Desactíve HOLD.
o ninguna reacción activada.
a los controles
Descarga electrostática. Desconecte el equipo de
la fuente de alimentación
o retire las pilas durante
unos segundos.
Español
ADVERTENCIA
Bajo ninguna circunstancia deberá intentar el usuario reparar por sí
mismo el equipo, ya que esto invalidará la garantía.
Page 49

LOCALIZACIÓN DE AVERÍAS
49
Problema Causa posible Solución
Se saltan pistas El CD está dañado o sucio. Cambie o limpie el CD.
del CD
Las funciones RESUME, SHUFFLE Desactíve RESUME, SHUFFLE
o PROGRAM están activadas. o PROGRAM.
No hay sonido o su Está activada la función PAUSE. Pulse 2;.
calidad es
Las conexiones están sueltas, Compruebe y límpielas.
deficiente
sucias o mal realizadas.
El volumen no está ajustado. Ajústelo.
Funcionamiento incorrecto Mantenga el reproductor
debido a la proximidad alejado de ellos.
de teléfonos móviles en
funcionamiento
Fuertes campos magnéticos Cambie la posición o las
en las proximidades del equipo conexiones.
Utilización en el vehículo
El adaptador de casete Introdúzcalo
está introducido correctamente.
incorrectamente.
La temperatura en el interior Deje que el reproductor
del vehículo es de CD se adapte a la
demasiado alta o baja. temperatura.
La toma del encendedor Límpiela.
está sucia.
La dirección de reproducción Cámbiela.
de la función de inversión
automática es incorrecta.
Español
Si se produce un fallo, comprobar en primer lugar los puntos listados a continuación
antes de llevar el equipo a reparar.
Si el usuario no es capaz de resolver un problema mediante el seguimiento de estas
ayudas, debe consultar al comercio distribuidor o centro de servicio.
Page 50

INFORMACIÓN GENERAL
50
• No toque las lentes A del reproductor de CDs.
• No exponga el equipo, las pilas o los CDs a la
humedad, lluvia, arena o calor excesivo (ya sea
provocado por aparatos calefactores como por la
exposición directa al sol).
• Puede limpiar el reproductor de CD con un paño
suave, ligeramente humedecido y que no deje restos de hilos. No utilice productos
de limpieza, ya que pueden tener efectos corrosivos.
• Para limpiar el CD, frótelo siguiendo líneas rectas desde el centro al exterior utilizando
un paño suave que no deje restos de hilos. Los productos de limpieza pueden dañar el
disco! No escriba nunca sobre el CD ni pegue en él ninguna etiqueta.
• Las lentes pueden quedar turbias cuando se traslade de forma rápida de un ambiente
frío a otro templado. Esto imposibilitará la reproducción de un CD. En ese caso, deje
reposar el reproductor en un lugar cálido hasta que se evapore la humedad.
• La utilización de teléfonos móviles en las proximidades del reproductor de CD
puede provocar un funcionamiento incorrecto.
• Evite las caídas del equipo, ya que podría sufrir daños.
• Se ha suprimido todo el material de embalaje innecesario. Hemos hecho todo lo
posible para que el embalaje pueda separarse en dos tipos únicos de materiales:
cartón (la caja) y polietileno (las bolsas y la plancha de espuma protectora).
• Los materiales que componen el equipo son reciclables y reutilizables si son
desmontados por una empresa especializada. Por favor, siga las normas y
regulaciones locales a la hora de tirar los materiales de embalaje, pilas agotadas
o su antiguo equipo a la basura.
Información medioambiental
Manejo del reproductor de CD y de los CDs
Español
A
Page 51

POLIZA DE GARANTÍA
ESTA POLIZA ES GRATUITA
Este aparato ha sido cuidadosamente diseñado y se ha fabricado con los mejores materiales bajo un estricto
control de calidad, garantizando su buen funcionamiento por los periodos establecidos según el aparato (ver lista
en la parte inferior) a partir de la entrega del aparato al consumidor. Esta póliza incluye la reparación o
reposición gratuita de cualquier parte o componente que eventualmente fallase y la mano de obra
necesaria para su reparación, misma que se hará efectiva en cualquiera de nuestros centros de servicio
autorizados en el país.
Si su aparato llegase a requerir de nuestro servicio de garantía, acuda al centro de servicio más cercano a su
domicilio, de tener alguna duda por favor llame a nuestra CENTRAL DE SERVICIO al tel.: 57 28 42 52, y en el
interior del país LADA sin costo al 01800506 92 00 en donde con gusto le indicaremos el cetro de servicio
autorizado más cercano a su domicilio.
PHILIPS MEXICANA S.A. de C.V. a través de sus centros de servicio autorizados reparará y devolverá a usted
su aparato en un plazo no mayor a 20 días hábiles, contados a partir de la fecha de ingreso, impresa en la
orden de servicio de cualquiera de nuestros centros de servicio autorizados.
La garantía de esta póliza cubre cualquier desperfecto o daño eventualmente ocasionado por los
trabajos de reparación y/o traslado del aparato en el interior de nuestros centros de servicio
autorizados.
Esta póliza sólo tendrá validez, si está debidamente requisitada, sellada y firmada por la casa
vendedora, en caso de extravío de esta póliza, podrá hacer efectiva su garantía con la presentación de su
factura de compra.
ESTA POLIZA NO SE HARÁ EFECTIVA EN LOS SIGUIENTES CASOS:
• Cuando el aparato sea utilizado en condiciones anormales y los daños o desperfectos que manifestase sean
causados por mal trato, descuido o mal uso.
• Cuando el aparato no haya sido operado de acuerdo a su instructivo de uso, en donde se señalan las
condiciones normales de operación, los valores nominales y las tolerancias de las tensiones (voltaje),
frecuencia (ciclaje) de alimentación eléctrica y las características que deben reunir las instalaciones auxiliares.
• Cuando la causa de la falla o mal funcionamiento sea consecuencia de una reparación inadecuada o
alteración producida por personas no autorizadas por PHILIPS MEXICANA S.A. de C.V.
• Cuando los datos de esta póliza hayan sido alterados o modificados.
• Por fenómenos naturales no imputables a la empresa tales como: temblores, inundaciones, incendios,
descargas eléctricas, rayos, etc.
PERIODOS DE GARANTÍA
36 MESES. – Monitores para computadora.
12 MESES. – Televisores, videocassetteras,video reproductores DVD, grabador reproductor de disco compacto,
video proyectores (excepto la lámpara), cámaras de video, decodificadores de señal (IRD),
televisor para hotel, sistemas de observación, televisores de proyección, teléfonos celulares,
pagers, equipos modulares, sintoamplificadores, facsimil, LNB, antena de recepción de satélite,
DVD ROM, CDR ROM y CDRW ROM para computadora.
6 MESES. – Radiograbadoras con y sin reproductor de disco compacto, reproductor de cassette portátil,
reproductor de disco compacto portátil, radio relojes, radios A.M./F.M., auto estéros y teléfonos
inalámbricos.
3 MESES. – Accesorios, controles remotos, bocinas, cinta para fax y cámara de videoconferencia.
MC-719-ARCO
Page 52

Philips Mexicana, S.A. de C.V.
MODELO ___________________________________ Nº DE SERIE _____________________________
La presente garantía contará a partir de: DIA _____________ MES_____________ AÑO_____________
En caso que en su producto se produzca alguna falla, acuda al centro de servicio más cercano a su domicilio (según listado detalleres), de tener
alguna duda, por favor llame a nuestra CENTRAL DE SERVICIO, en donde con gusto le atenderemos.
Asi mismo, cuando requiera refacciones y partes originales para su producto, acuda a los centros de servicio. Para hacer efectiva la garantía de su
producto, es necesario que presente usted esta póliza debidamente requisitada o de lo contrario presentar su factura de compra.
CENTROS DE SERVICIO
NOTA: Los Centros que tengan (S) solo proporcionan Servicio y los que tengan (SR) venden refacciones y proporcionan Servicio.
Producto importado por:
Philips Mexicana, S.A. de C.V.
Norte 45 No. 669 Col. Ind. Vallejo
Del. Atzcapotzalco C.P. 02300
Tels. 5728 4200 y 57 2948 00
Centro de Información al Consumidor:
Norte 45 No. 669 Col. Ind. Vallejo
Del. Atzcapotzalco C.P. 02300
Tel. 5368 7788 Lada 01 800504 6200
Ciudad EDO Calle y Nº Colonia C. P. Nombre Comercial Lada Telefono Fax
Acapulco GRO Av. Revolucion Nº 28 M. Aleman 39300 Servicio Electronico Profesional 74 83 32 96 – S
Cd. Juarez CHIH. Rancho el Becerro 3011 Pradera Dorada 32610 Teleservicio Dominguez 16 18 21 28 18 21 28 S
Cd. Reynosa TAMPS Tiburcio Garza Nº 401 Rodriguez 88630 Teleservicio Pepe 89 22 59 86 – S
Chihuahua CHIH. Trasviña y Retes Nº 3503-A San Felipe 31240 Zener Electronica 14 14 01 16 26 50 41 S
Colima COL Francisco I. Madero Nº 426 Centro 28000 TV Antenas de Colima 331 403 01 403 01 S
Culiacan SIN. Venustiano Carranza Nº 140-A Nte. Centro 80090 Estereo Voz 67 16 15 10 – S
Guadalajara JAL Av. Vallarta Nº 2250 Ladron de Guevara 44600 Leecom S.A. de C.V. 3
61618 88
616 01 26
615 72 62 SR
Leon GTO Hernandez Alvarez Nº 726 San Juan de Dios 37480 Tecnicos Especializados 47 70 26 99 15 58 64 S
Merida YUC Calle 70 Nº 443 X 49 Depto. 8 Centro 97000 Servicentro 99 28 54 28 23 39 97 S
Mexicali B.C.N. Calz. Cuauhtemoc Nº 866-2 Cuauhtemoc Nte. 21200 Baja Electronic’s 619 67 49 16 67 49 16 S
Mexico D.F. Calz. Vallejo Nº 1045-03 Esq Poniente 124
Industrial Nueva Vallejo
2300 Chyr S.A. de C.V. 5
567 22 56
567 96 32
567 96 32 SR
S
SR
SR
S
S
S
SR
S
S
SR
S
S
S
S
S
S
Mexico D.F. Calz. Vallejo Nº 904 Loc. 5 Industrial Vallejo 2300 Tecnologia y Servicio S.A. de C. V. 5 587 57 99 587 57 99
Mexico D.F. Pilares Nº 519 Local C-3 Del Valle 03100 Cocesionario Pilares 5
605 42 15
605 42 76
605 43 46
Monterrey N.L. Juan Mendez Nº 825 Nte. Centro 64000 Monterrey Centro Electronico S.A. 8 375 16 17 374 85 42
Morelia MICH. Lago de Patzcuaro Nº 500-A Ventura Puente 58020 Multiserv. Prof. de Zamora 43 12 03 17 –
Oaxaca OAX Huzares Nº 207 Centro 68000 El Francistor S. de R.L. de C.V. 951 647 37 –
Pachuca HGO Pza. de las Americas Lote 28 Nucleo D Valle de Sn Javier 42086 Frazare Electronica 77 14 15 81 –
Puebla PUE Av. 10 Poniente Nº 2902-B San Alejandro 72090 Selcom 22 48 77 64 48 77 64
Queretaro QRO Bolivia 32 Lomas de Queretaro 76190 Electronica Zener 421 610 09 –
San Luis Potosi S.L.P. Fuente De La Glorieta Nº 147 Balcones del Valle 78320 Servicios Electronicos 481 534 07 –
Tampico TAMPS Laredo Nº 105 Mainero 89060 Concesionario Philips Tampico 12 12 36 04 –
Toluca
EDO MEX
Calle Toluca Nº 505 Sanchez 50040 Concesionario Philips Toluca 72 14 83 09 17 03 21
Tijuana B.C.N. Calle 1a. Nº 1540-3 Centro 22000
Sistemas Inalambricos de
Comunicacion
66 85 95 58 85 95 58
Torreon COAH Mariano Lopez Ortiz Nº 1126 Nte. Centro 27000 Electronica Jomar 17 22 00 05 –
Tuxtla Gutierrez CHIS 10 Nte. Ote 153-A Centro 29000 KC-Video 96 18 19 08 –
Veracruz VER Guerrero Nº 1877 Entre Cortes y Canal Centro 91700 Antza Comunicaciones 29
32 78 23
32 44 44
32 78 23
Villahermosa TAB Sanchez Marmol Nº 206 Centro 86000 Tecnicentro 93 14 31 36 –
ETIQUETA TIPO
Page 53

AUSTRALIA
Philips product warranty for Australia only
68
Warranty conditions valid for Colour Television, Video Cassette Recorders, CD
Recordable, DVD Players, Audio Systems, and Portable Audio.
The benefits given to the purchaser by this warranty are in addition to all other rights and
remedies which the purchaser has in respect of the product under the Trade Practices Act
or other Commonwealth or State Law.
Philips Consumer Electronics warrants its products to the purchaser as follows and
subject to the stated conditions.
12 months free service
Conditions of warranty
1. All claims for warranty service should be made to your nearest Philips Authorised
Service Centre. Reasonable evidence of date of purchase must be provided.
2. This warranty extends only to defects occurring under normal use of the product
when operated in accordance with the instructions.
3. Home service within the normal service area of our Philips Authorised Service
Centres will be provided for television receivers with screen size 48 cm and above.
All other products are to be brought or sent to your nearest Philips Authorised
Service Centre.
4. This warranty does not cover:
a) Mileage or travelling time, pickup or delivery, cost of insurance.
b) Service costs arising from failure to correctly adjust the controls of the product
or to observe the instructions, or inspections that reveal that the product is in
normal working order.
c) Product failures caused by misuse, neglect, normal wear and tear, accidental
breakage, transit damage, inexpert repairs or modification by unauthorised persons,
lightning strikes, vermin infestation or liquid spillage.
d) Cleaning of video or audio heads.
e) Inadequate receiving antennae.
f) Replacement of worn or used batteries, styli or other consumables.
The conditions contained in this warranty card replace and override the provisions of
the World-Wide Guarantee for Products sold in Australia.
Page 54

69
Philips Authorised Service Centres
To contact your nearest Philips Authorised Service Centre call
1300 36 1392 from
anywhere in Australia.
Service is provided through 350 accredited service dealers throughout Australia. To
find out about your nearest centre, call 1300 36 1392.
Please record the following information for your records and keep in a safe place.
Model No:....................................................
Serial No:....................................................
Please retain your purchase receipt which is
required to claim service under warranty.
Philips Consumer Electronics Australia Limited
ACN 008 445 743, 3 Figtree Drive
Homebush NSW 2140
Version 4, 03/99, FPCP–030
Sydney
Newcastle
Perth
Melbourne
Brisbane
Adelaide
Hobart
Wollongong
Canberra
Page 55

NEW ZEALAND
Guarantee and Service for New Zealand
70
Thank-you for purchasing this quality Philips product.
Philips New Zealand Ltd guarantees this product against defective components and
faulty workmanship for a period of 12 months. Any defect in materials or workmanship occurring within 12 months from the date of purchase subject to the following
conditions will be rectified free of charge by the retailer from whom this product was
purchased.
Conditions
1. The product must have been purchased in New Zealand. As proof of purchase,
retain the original sales docket indicating the date of purchase.
2. The guarantee applies only to faults caused by defective components, or faulty
workmanship on the part of the manufacturer.
3. The guarantee does not cover failures caused by misuse, neglect, normal wear and
tear, accidental breakage, use on the incorrect voltage, use contrary to operating
instructions, or unauthorised modification to the product or repair by an
unauthorised technician.
4. Reasonable evidence (in the form of a sales docket) must be supplied to indicate
that the product was purchased no more than 12 months prior to the date of your
claim.
5. In the event of a failure, Philips shall be under no liability for any injury, or any loss
or damage caused to property or products other than the product under guarantee.
This guarantee does not prejudice your rights under common law and statute, and is
in addition to the normal responsibilities of the retailer and Philips.
How to claim
Should your Philips product fail within the guarantee period, please return it to the
retailer from whom it was purchased. In most cases the retailer will be able to satisfactorily repair or replace the product.
However, should the retailer not be able to conclude the matter satisfactorily, or if you
have other diffi-culties claiming under this guarantee, please contact
The Guarantee Controller
Philips New Zealand Ltd.
4 P.O. Box 41.021
Auckland
3 (09) 84 94 160
fax 3 (09) 84 97 858
Page 56

Page 57

English
3140 115 2760.1 VieUrs9944
Meet Philips at the Internet
http://www.philips.com
W
AZ7900
AZ7901
AZ7902
AZ7911
EspañolFrançais
∑
CLASS 1
LASER PRODUCT
 Loading...