

Page 1
PHILIPS
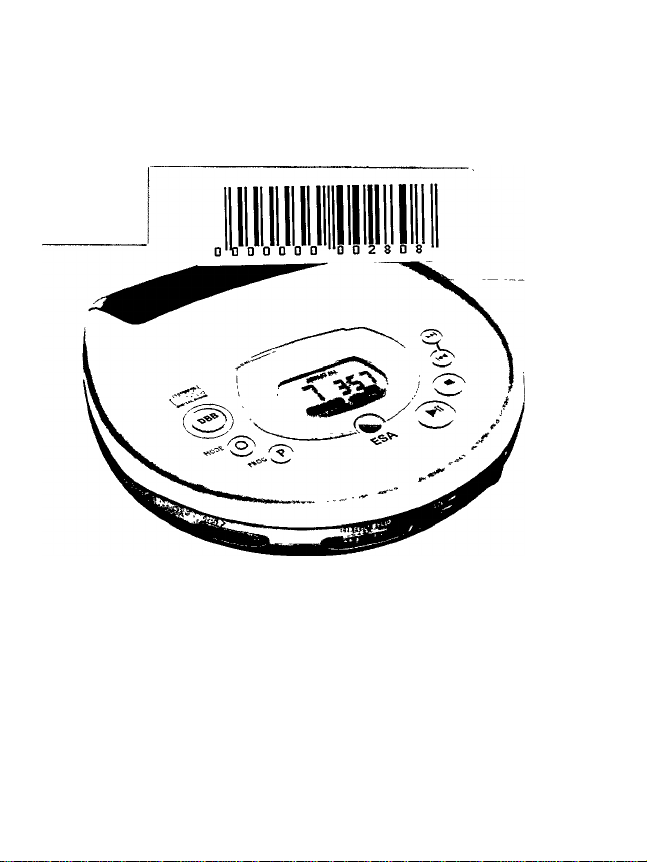
AZ 7381 Portable Compact Disc Player
AZ 7382
AZ 7481
AZ 7482
Instructions for use
Руководство no эксплуатации
Instrukcja obsfugi
Navod к obsluze
Navod na pouzitie
Hasznalati utmutato
PHILIPS
Page 2

MAGYARORSZAG
Minösegtanüsitäs
A garanciajegyen fellOntetett
forgalombahozö vällalat a 2/1984.
(111.10.) BkM-lpM egyuttes rendelet
drtelmdben taniisitja, bogy ezen
kbszüldk megfelel a müszaki adatokban
megadott drtekeknek.
Figyelem!
A meghibdsodott kdsziildket beledrtve a hälözati csatlakozdt is csak szakember (szerviz) javithatja.
Ne tegye ki a kdszOIdket esSnek vagy
nedvessdg batdsdnak!
Garancia
A forgalombahozö vällalat a termökre
12hönapgaranciötvallal.
Bernes mOködöshez
Teljesitm^ny
maximälis
ndvieges...................................4,5 W
köszenlöti ällapotban
&intösvödelmi osztöly If.
Tömeg.......................................0,225 kg
Befoglalö ntäretek
szölessög
magassög...............................27,8 mm
mölysög................................136,5 mm
Erösitöräsz
Kimeneti teljesitmöny....100 mW PMPO
__________________
...............
2 x /\A
..................................
.........
2,8 W
................................
2x10mWRMS
10 W
128 mm
SLOVAK REPUBLIC
Prístroj S3 nesmie pouHvaív mokrom a
vihkom prostredí! Chránte pred
striekajúcou a kvapkajúcouvodou!
CESKA REPUBLIKA
Vysfraha!
Tentó prístroj pracuje s laserovym
paprskem. Pfi nesptóvné manipulaci s
pfístrojem (v rozporu s tímto návodem)
mfitedojítknebezpeÉnému ozárení.
Proto prístroj za chodu neotevírejte ani
nesnímejte jeho kryty. Jakoukoli opravu
vídy svéfte specializovanému setvisu.
Nebezpecí!
Pfi sejmutí krytO a odjiStSní
bezpeEnostních spínaCú hrozí nebezpeEí
neviditelného laserového záfení!
Chrañte se pred prímym zásahem
laserového paprsku.
Záruka
Temo prístroj byl vyroben s nejvétSÍ
peElivostí a nejmodemSjSími vyrobními
metodami. Jsme presvSdEeni, íe vám
bude bezchybné sloufit, pokud budete
dodrzovat pokyny v návodu. V pfípadé
jakékoli závady se laskavS obrafte na
svého obchodníka nebo primo na
seivisní organizaci firmy Philips. Dbejte
téz, aby vám prodávající fádnS vypfnil
záruEní list
Pokud by vSak byly na pfístroji shiedány
cizí zásahy. nebo byl obsiuhován
V rozponj s pokyny V návodu, záruEní
nároky zanikají. ZáruEní doba je
dvanáct mSsícfi ode dne prodeje.
Pokud byste z jakéhokoli dúvodu
prístroj demontovali, vzdy nejdfíve
vytáhnéte sífovou zástrEku.
Prístroj chrañte pfed jakoukoli vihkostí
i pfed kapkami vody.
Page 3
m
3
ta
Page 4

Page 5
Page 6

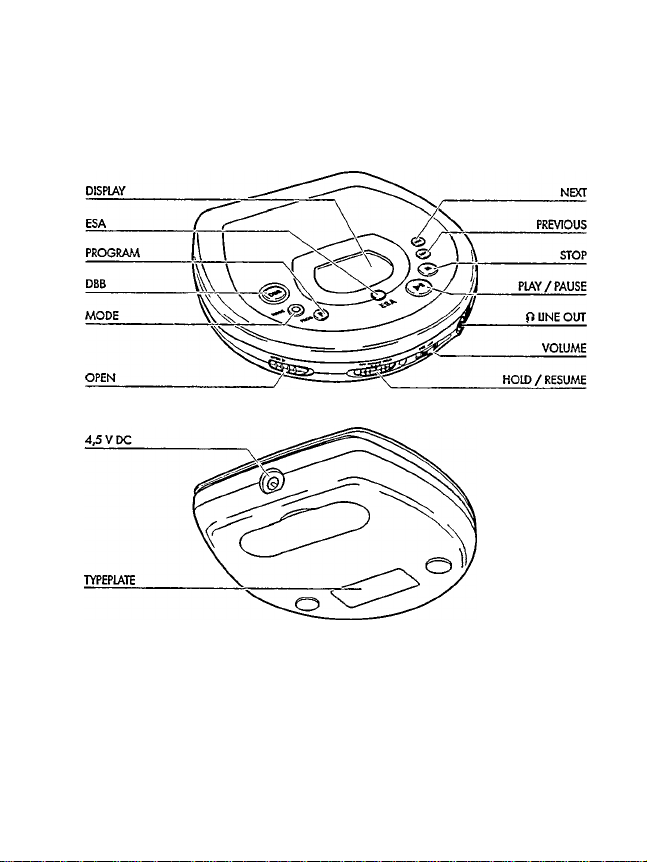
CONTROLS
DISPLAY
►w..............................skips and searches forward
r«.................................skips and searches backward
VOLUME
RESUME/HOLD
MODE O
PROG P
DOB
....................
....................
....................
......................
.........................
______________
shows tfie different playing modes, tracks and times
adjusts the volume level at the headphone socket
.......
activates the RESUME function and/or HOLD function (locking
all buttons)
selects the different playing modes: SHUFFLE-*
SHUFFLE REPEAT ALL-REPEAT-REPEAT ALL-SCAN-off
stores tracks in a program and reviews the program
please refer to the illustration on page 3
Dynamic Bass Boost enhances the bass response,
DBB1-DBB2-DBB 3-off
Press this button for more than 3 seconds to switch
off/on acoustic feedback.
STOP ■
.......................
stops CD play, deletes various settings, switches off the CD
player and activates charging.
OPEN..........................opens the lid of the CD player
►II
...............................
ESA
..........................
fi LINE OUT
4.5 V DC
....................
/Vote: -Status feedbacit (e.g. PAUSE, battery empty, etc.) and key operations are
accompanied by an acoustic signal through the headphone.
starts and pauses CD play
Electronic Shock Absorption is the buffer memory for
uninterrupted sound
................
Headphone and remote control socket (3,5 mm)
Socket for external power supply
Page 7

POWER SUPPLY
Mains adapter (supplied or optionally available)
AY 3160 mains adapter 4.5 V/400 mA direct current, positive pole to the center pin
1 Make sure that the local voltage corresponds
to the voltage of the adapter.
2 Connect the mains adapter to the player's
4.5 V DC socket and to the wall outlet.
Note: -Use only the AY 3160 adapter, other
products may damage the set.
-No acoustic feedback when using the
adapter.
-Always disconnect the adapter when you are not using it
Batteries, type IR6, UM3 or AA (supplied or optionally available)
Open the battery compartment and insert 2
alkaline batteries or the rechargeable battery
pack.
Typical playing times under normal conditions:
Alkaline batteries: 12 hours (ESA off)
10 hours (ESA on)
not to he used for a longer period of time.
Note: The battery condition will be indicated in the display:
-Full batteries: no indication.
-Weak batteries: <s - symbol flashes. This symbol is not available when
rechargeable batteries are used.
-Empty batteries: cr -symbol flashes and the message ófféré- appears.
-Replace the batteries or connect the mains adapter.
Batteries contain chemical substances, therefore they should be disposed of
properly.
Oi
B
UJ
Page 8

CONNECTIONS
Recharging the Philips battery pack on board
m
3
(supplied or optionally available)
(Q
AY 3361 NiCd battery pack for recharging on board
The battery pack will be recharged if the mains adapter is connected, the set is
switched off and you press the STOP ■ button.
-► Display indication during charging; fW/JrCf and
Approx, charging time; 5 hours (NiCd)
-► Display indication when fully charged; L and s
Note: - Use only the Philips battery pack, as other rechargeable batteries cannot be
recharged on board.
Connecting the headphones (supplied)
Connect the supplied headphones with the
OLINE OUT jack.
Note: Use this Jack also for connecting your HIFi system
(signal lead) or your car radio (adapter cassette or
signal lead). In both cases, the volume of the CD
player has to be set to position 8.
Use your head when using headphones
Hearing safety; Do not play your headphones at a high volume. Hearing experts
advise that continuous use at high volume can permanently damage your hearing.
Traffic safety; Do not use headphones while driving a vehicle. It may create a
hazard and it is illegal in many countries. Even if your headphones are an open-air
type designed to let you hear outside sounds, do not turn up the volume so high
that you cannot hear what is going on around you.
Page 9

CONNECTIONS
Connections for in-car use ¡supplied or optionally available)
AY 3545 - car voltage converter {4.5 V/600 mA, DC, positive pole to the center pin)
AY 3501 - car adapter cassette
1 Find a safe place for the
CD player on a horizontal,
vibration-free and stable
surface where it is no
danger to or in the way of
the driver or passengers,
2 Connect the DC plug of the
voltage converter to the DC
socket of your CD player
(only for a 12 V car battery, negative grounding).
3 Insert the voltage converter into the cigarette lighter socket. If necessary, clean the
cigarette lighter socket to obtain a good electrical contact.
4 Turn down the volume and switch off the autoreverse function of your car
radio cassette player.
5 Connect the adapter cassette plug to the Ti LINE OUT socket of the CD player.
6 Insert the adapter cassette carefully into the car radio's cassette compartment.
7 Make sure that the cord does not hinder your driving.
8 Start the CD player, turn its volume to position 8 and adjust the sound with the car
radio controls.
To remove the adapter cassette press the eject button of the car radio.
Always remove the voltage converter from the cigarette lighter socket when the CO
player is not in use.
Notes on in-car use:
- Avoid excessive heat from the car heating or from direct sunlight (e.g., in a parked
car in the summer).
- If your car radio has a LINE IN jack, it is best to use it for the car radio connection
instead of the adapter cassette. Connect the signal lead to this LINE IN jack and the
fi LINE OUT jack of the CD player.
Page 10

OPERATION
Inserting the CD
• Push gently on
the CD center
so that it fits
onto the hub.
Removing the CD
• Hold the CD
by its edge
and press the
hub gently.
Playing a CD
1 Open the lid by pushing the OPEN slide control to the side.
2 Insert an audio CD, printed side up. Push down on the left-
hand side to close the lid.
3 Press the ►II button to start CD play.
-► Display indication: (example)
1 = current track / 2:56 = elapsed time of cument track
4 Adjust the sound using the VOLUME and DBS controls.
5 Interrupt CD play by pressing the HI button. Continue CD play by pressing the Ml
button again.
-► Display indication: time of the current position (flashing).
6 Press the STOP ■ button to stop CD play.
-► Display indication: (example) i j -j _ ^ pj_
17 = total number of tracks / 51:05 = total playing time lib ruo
If you press the STOP ■ button again, you will switch off the set.
I
S55
Note: If no button is pressed for 10 seconds, the set will switch off automatically.
10
Page 11

OPERATION
Selecting another track:
Briefly press r« or kw once/several times to skip to the
beginning of the current/previous or next trackfs).
-► Display indication: selected track number.
-► During play; CD play continues automatically with the
selected track.
-► In stop position: press the ►!! button to start CD play.
Searching for a passage during CD play:
1 Hold down the r« or button to find a particular passage in forward or backward
direction.
-+■ After 2 seconds, searching will start at high speed.
2 Release the button when you have reached the desired passage.
Note: Searching is not possibie in the SCAN mode.
S)
B
lU
11
Page 12

OPERATION
MODEo- different playing modes
By pressing the MODE O button, you can successively
activate the playing modes:
SHUFFLE: The tracks are played in random order mti\ all of
them have been played once.
SHUFFLE REPEAT ALL: All tracks are played repeatedly in
random ort/er until you leave this
REPEAT: The track is played repeaferf/y until you leave this mode.
REPEAT ALL: The CD is played repeafecf/y until you leave this mode.
SCAN: Each track is scanned for 10 seconds until you leave this mode or all tracks
have been played once.
Press the MODE O button again to deactivate all modes.
The selected playing mode is indicated in the display.
During play: CD play continues automatically with the selected playing mode.
In stop position: press the WI button to start CD play.
mode.
12
Page 13

OPERATION
PROG P - programming of tracks (max. 99 tracks)
1 Select the desired track with PREV m or NEXT ►«.
2 As soon as the desired track is displayed, press the PROG button to store the track
in the memory.
Display indication: track number
IP ! total number of stored tracks, e.g.
Note:
■ When you press PROG and there is no track selected,
the display indicates SSL £Ct.
Playing the program:
If you have selected the tracks in STOP mode, press the PLAY/PAUSE Hi button.
If you have selected the tracks during CD play, first press STOP ■ and then the
PLAY/PAUSE HI button.
-► Display indication: PROGRAM.
-► Your program will be played in the selected playing mode (e.g. SHUFFLE).
Reviewing the settings:
Press the PROG button for more than 2 seconds.
->- Display indication: each stored track successively flashes for a short moment.
Erasing the program in STOP mode:
Press the STOP ■ button to erase the program.
-► PROGRAM disappears on the display and your program is erased.
L. L
S pc?3
LECb
O)
B
UJ
Note: Interrupting the power supply or opening the lid will erase the program.
13
Page 14

OPERATION
ESA - Electronic Shock Absorption Memory
m
3
CQ
Press the ESA button to switch on/off ESA.
-► The ESA symbol lights up in the display.
-+■ The ESA memory continuously stores in advance the CD
data to be played. This is to prevent sound skipping
during play due to shock and vibration.
Prolonged shocks and vibrations may empty the ESA
memory completely and CD play will be interrupted.
Note: When switching the ESA feature on and off, CD play will be delayed or
interrupted for a short time.
RESUME/HOLD
RESUME - playing from where you have stopped
1 Activate the RESUME feature by sliding the RESUME/HOLD
switch to the center setting.
2 If you stop CD play by pressing the STOP ■ button, the last
position played will be stored.
3 Press ►!! to resume CD play from the position it was
stopped at.
HOLD - deactivating all buttons
Activate the HOLD feature by sliding the RESUME/HOLD switch to the far right.
-► Now all buttons are locked until you switch the feature off again. If you press a
button (except OPEN), the display will indicate HOLD.
Note: - In the HOLD position, the RESUME function is automatically activated.
- Opening the lid erases the information about the last position played.
14
Page 15

GENERAL INFORMATION
Do not touch the lens (x) of the CD player!
Do not expose the CD player, batteries or CDs to rain and
dampness, sand and dust or to excessive heat caused by
heating equipment, or to direct sunlight.
The lens may cloud over when the set is suddenly moved
from cold to warm surroundings. Playing a CD is not possible then.
Leave the CD player in a warm environment until the moisture evaporates.
You can clean the CD player with a soft and slightly dampened
chamois leather. Do not use any cleaning agents
as they may have a corrosive effect.
Always pick up the CD by the edge and put it back in its
box after use.
To clean the CD, wipe it off in a straight line from the
center towards the edge using a soft, lint-free cloth.
A cleaning agent may damage the disc!
When a new CD does not stay on the hub remove
the small burrs around the center hole with a pen or similar
instrument.
Active mobile phones in the vicinity of the CD player may cause malfunctions.
Environmental information
Piease observe the local regulations regarding the disposal of packing materials,
exhausted batteries and obsolete equipment.
All redundant packaging material has been omitted. We have done our utmost to
make the packaging easily separable into three mono-materials: cardboard (box),
expandable polystyrene (buffer), and polyethylene (bags, protective foam sheet).
Your set consists of materials which can be recycled if disassembled by a
specialized company.
15
Page 16

TROUBLESHOOTING
If a fault occurs, please check the points listed below before taking your set for repair.
If you are not able to remedy a problem by following these hints, consult your dealer
or service facility.
PROBLEM
No power or no
CD play start
POSSIBLE CAUSE SOLUTION
Batteries
Batteries inserted incorrectly
Use of new batteries
Display: Batteries are empty
no indication Contact pins are dirty
Mains adapter
Loose connection
In-car use
Cigarette lighter is not powered Switch on ignition or
when ignition is switched off insert batteries
CD play does not
start or is
interrupted
Display: no
HOLD feature is activated
CD lid is not closed securely
Moisture condensation Leave the player in a warm
CD is not or incorrectly inserted Insert a CD, label facing up
indication CD is badly scratched
or no o' ISC
CD is dirty
Battery recharging Use of wrong batteries
on board does not
work, no CHARGE
Contacts are dirty
indication
Play does not start RESUME or SHUFFLE or
from the first track PROGRAM is activated
Insert the batteries correctly
Press ►!!
Change/recharqe the batteries
Clean them v;ith a cloth
Connect the adapter securely
Switch off the HOLD feature
Close the lid securely
place until the moisture
evaporates
Use another CD
Clean the CD
Only a battery pack can
be recharged on board
Clean them with a cloth
Switch off RESUME, SHUFRE
or PROGRAM
16
Page 17

TROUBLESHOOTING
Under no circumstances should you try to repair the unit yourself, as this
will invalidate the warranty.
PROBLEM POSSIBLE CAUSE
General
malfunction
Electrostatic discharge from
the user via the CD player
SOLUTION
Disconnect the set from the
power supply or take out the
batteries for a few seconds
No sound or bad PAUSE is activated Press ►!!
sound quality Loose or wrong connections Check connections
Volume is not turned up Adjust the volume
Headphones worn the wrong
wav
Headphone plug is dirty Clean the headphone plug
Strong magnetic fields near
the CD player
Pay attention to the L (left)
and R (right) indications
Change the player's position
or connections
In-car use
Strong vibrations Find another place for the set
Adapter cassette is
inserted incorrectly
Temperature inside car is too
high/low
Cigarette lighter/socket is too
dirty
Wrong playback direction of
the autoreverse feature of the
car cassette player
Insert the adapter cassette
correctly
Let the CD player adjust to
the temperature
Clean the cigarette
lighter/socket
Change the autoreverse
direction
Humarnoiseincar Unfit car radio input socket Use the adapter cassette
17
Page 18

Page 19

Page 20

Meet Philips at the Internet
http;//www. philips.com
3103 3061640.1
AZ7381
A27382
AZ7481
AZ7482
VieCHCSSI
 Loading...