

Page 1
AZ 7381
M
O
D
E
PROG
R
E
P
E
A
TA
L
L
R
E
P
E
A
TA
L
L
AZ 7382
AZ 7383
AZ 7384
AZ 7385
AZ 7386
AZ 7387
AZ 7481
AZ 7482
AZ 7483
AZ 7581
AZ 7582
AZ 7583
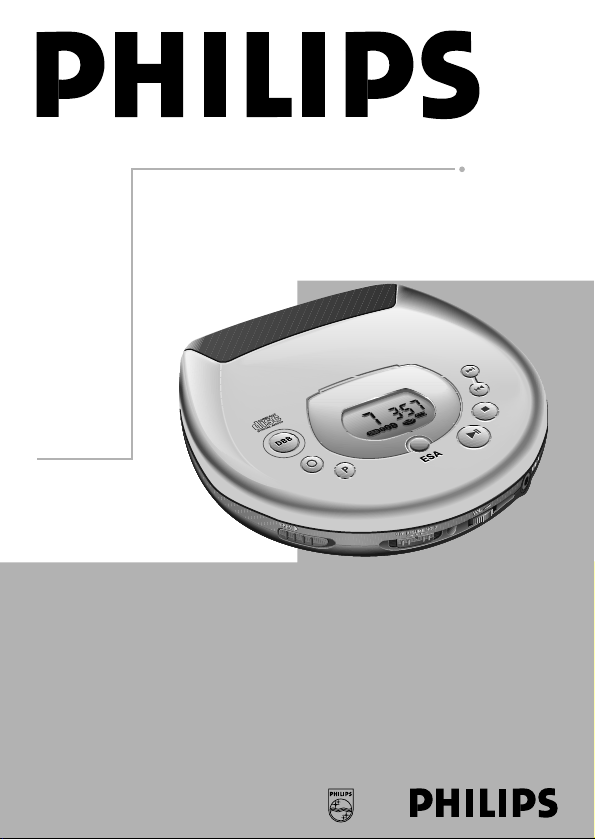
Portable Compact Disc Player
Instructions for use
Mode d’emploi
Instrucciones de manejo
√
Manual de Instruções
Page 2

BRASIL
CERTIFICADO DE GARANTIA PARA O BRASIL
(
Os dados deste manual estão sujeitos a alterações.)
Este aparelho é garantido pela PHILIPS DA AMAZÔNIA INDÚSTRIA ELETRÔNICA LTDA, por um período
superior ao estabelecido por lei, porém, para que a garantia tenha validade, é imprescindível que, além
deste certificado, seja apresentada a nota fiscal de compra do produto.
1) A PHILIPS DA AMAZÔNIA INDÚSTRIA ELETRÔNICA LTDA. assegura ao proprietário consumidor deste
aparelho a garantia de 365 dias (90 dias legal mais 275 dias adicional) CONTADOS A PARTIR DA
DATA DE ENTREGA DO PRODUTO, CONFORME EXPRESSO NA NOTA FISCAL DE COMPRA, que
passa a fazer parte deste certificado.
2) Esta garantia perderá sua validade se:
A) O defeito apresentado for ocasionado por uso indevido ou em desacordo com o seu manual de
instruções.
B) O produto for alterado, violado ou consertado por pessoa não autorizada pela Philips.
C) O produto for ligado a fonte de energia (rede elétrica, pilhas, bateria, etc.) de características
diferentes das recomendadas no manual de instruções e/ou no produto.
D) O número de série que identifica o produto estiver de alguma forma adulterado ou rasurado.
3) Estão excluídos desta garantia defeitos decorrentes do descumprimento do manual de instruções do
produto, de casos fortuitos ou de força maior, bem como aqueles causados por agentes da natureza e
acidentes.
4) Excluem-se igualmente desta garantia defeitos decorrentes do uso dos produtos em serviços não
doméstico/residencial regular ou em desacordo com o uso recomendado.
5) Nos municípios onde não exista oficina autorizada de serviço Philips, as despesas de transporte do
aparelho e/ou do técnico autorizado, correm por conta do Sr. consumidor requerente do serviço.
6) Este produto tem GARANTIA INTERNACIONAL. O serviço técnico (durante ou após a garantia) é
disponível em todos os países onde este produto é oficialmente distribuído pela Philips. Nos países onde
a Philips não distribui este produto, o serviço técnico da Philips local poderá prestar tal serviço, contudo
poderá ocorrer algum atraso no prazo de atendimento se a devida peça de reposição e o manual técnico
não forem prontamente disponíveis.
7) A garantia não será válida se o produto necessitar de modificações ou adaptações para habilitá-lo a
operar em qualquer outro país que não aquele para o qual foi designado, fabricado, aprovado e/ou
autorizado, ou ter sofrido qualquer dano decorrente deste tipo de modificação.
Dentro do Brasil, para informações adicionais sobre o produto ou para eventual necessidade de utilização da
rede de oficinas autorizadas, ligue para o CENTRO DE INFORMAÇÕES AO CONSUMIDOR, TEL 0800-123123
(discagem direta gratuita) ou escreva para a Caixa Postal 65106 – CEP 01390-970 – SÃO PAULO – SP.
Horário de atendimento: de segunda à sexta-feira, das 08:00 às 20:00 h, aos sábados das 08:00 às 13:00 h.
Para atendimento fora do Brasil, contate a Philips local ou a:
PHILIPS CONSUMER SERVICE
BEUKENLAAN 2
5651 CD EINDHOVEN
THE NETHERLANDS
PHILIPS DA AMAZÔNIA
INDÚSTRIA ELETRÔNICA LTDA.
Page 3
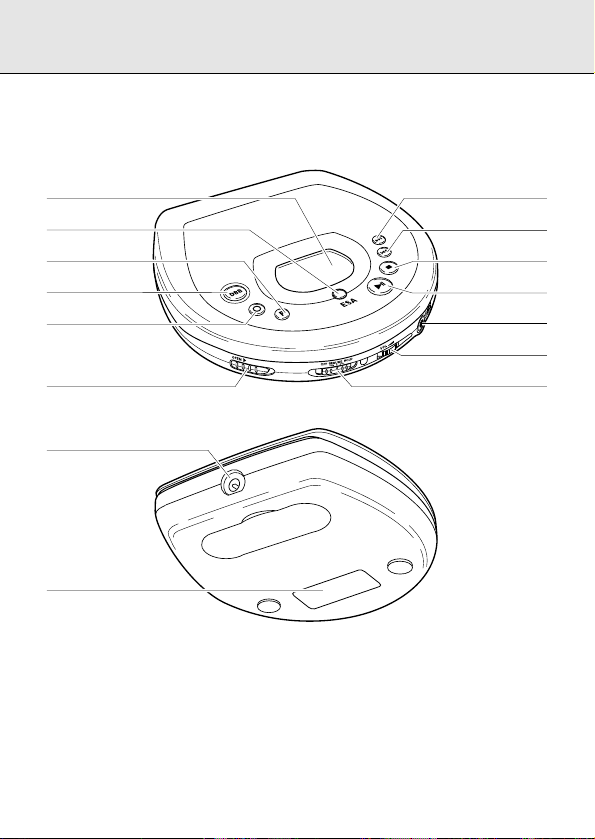
DISPLAY
ESA
PROGRAM
DBB
MODE
OPEN
4,5 V DC
TYPEPLATE
NEXT
PREVIOUS
STOP
PLAY / PAUSE
MODE
G
O
R
P
p LINE OUT
VOLUME
HOLD / RESUME
3
Page 4
Brasil
Garantia e Assistência Técnica ...............................................................................pág. 2
Australia
Guarantee and Service..........................................................................................page 66
Mexico
Es necesario que lea cuidadosamente su instructivo de manejo.
Garantía..................................................................................................................pág. 68
n
New Zealand
Guarantee and Service..........................................................................................page 69
4
Page 5

English
Controls...........................6
Power Supply ..................7
Connections .................8-9
Operation .................10-14
General information......15
Troubleshooting.......16-17
English
Français
Español
∑
Português
Commandes .................18
Alimentation..................19
Branchements..........20-21
Mandos .........................30
Alimentación.................31
Conexiones...............32-33
Controls.........................42
Power Supply ................43
Connections .............44-45
Controles.......................54
Alimentação..................55
Conexões..................56-57
Fonctionnement .......22-26
Généralités ...................27
Recherche des
pannes .....................28-29
Funcionamiento........33-38
Información general......39
Detección de
anomalías.................40-41
Operation .................46-50
General information......51
Troubleshooting.......52-53
Operação..................58-62
Informações Gerais.......63
Resolvendo Pequenos
Problemas ................64-65
Français
Español
∑
Português
5
Page 6

CONTROLS please refer to the illustration on page 3
DISPLAY......................
English
§ .................................skips and searches forward
∞ .................................skips and searches backward
VOLUME......................adjusts the volume level at the headphone socket
RESUME/HOLD ..........activates the RESUME function and/or HOLD function (locking
MODE 00......................selects the different playing modes: SHUFFLE™
PROG P........................stores tracks in a program and reviews the program
DBB..............................Dynamic Bass Boost: enhances the bass response,
STOP 9........................stops CD play, deletes various settings, switches off the CD
OPEN ...........................opens the lid of the CD player
2; ................................starts and pauses CD play
ESA ..............................Electronic Shock Absorption is the buffer memory for
p LINE OUT ................Headphone socket (3.5 mm)
4.5 V DC.......................Socket for external power supply
Note: -Status feedback (e.g. PAUSE, battery empty, etc.) and key operations are
accompanied by an acoustic signal through the headphone.
shows the different playing modes, tracks and times
all buttons)
SHUFFLE REPEAT ALL™REPEAT™REPEAT ALL™SCAN™off
DBB 1™DBB 2™DBB 3™off
Press this button for more than 3 seconds to switch
off/on acoustic feedback.
player and activates charging.
uninterrupted sound
This set complies with the radio interference requirements of the
6
European Community.
Page 7
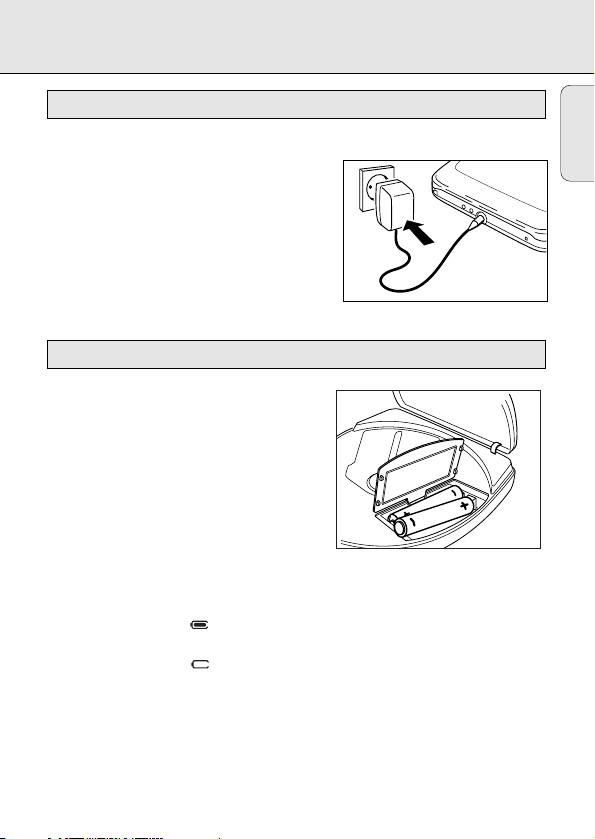
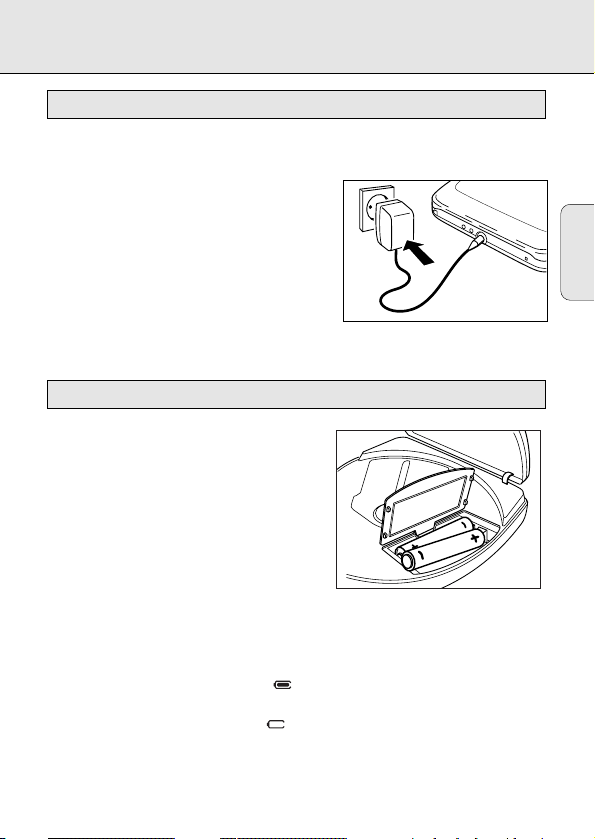
POWER SUPPLY
Mains adapter
AY 3160 mains adapter 4.5 V/400 mA direct current, positive pole to the center pin
1 Make sure that the local voltage corresponds
to the voltage of the adapter.
2 Connect the mains adapter to the player's
4.5 V DC socket and to the wall outlet.
Note: -Use only the AY 3160 adapter, other
products may damage the set.
-No acoustic feedback when using the
adapter.
-Always disconnect the adapter when you are not using it.
Batteries, type LR6, UM3 or AA
Open the battery compartment and insert 2
alkaline batteries or the rechargeable battery
pack.
Typical playing times under normal conditions:
Alkaline batteries: 12 hours (ESA off)
Remove batteries if empty or if the CD player is
not to be used for a longer period of time.
Note: The battery condition will be indicated in the display:
-Full batteries: no indication.
-Weak batteries: - symbol flashes. This symbol is not available when
rechargeable batteries are used.
-Empty batteries: -symbol flashes and the message bAtt appears.
-Replace the batteries or connect the mains adapter.
Batteries contain chemical substances, therefore they should be disposed of
properly.
(supplied or optionally available)
(supplied or optionally available)
10 hours (ESA on)
English
7
Page 8
CONNECTIONS
English
Recharging the Philips battery pack on board
(supplied or optionally available)
AY 3361 NiCd battery pack for recharging on board
The battery pack will be recharged if the mains adapter is connected, the set is
switched off and you press the STOP 9 button.
yy
Display indication during charging: CHARGE and
Approx. charging time: 5 hours (NiCd)
yy
Display indication when fully charged: FULL and
Note: - Use only the Philips battery pack, as other rechargeable batteries cannot be
recharged on board.
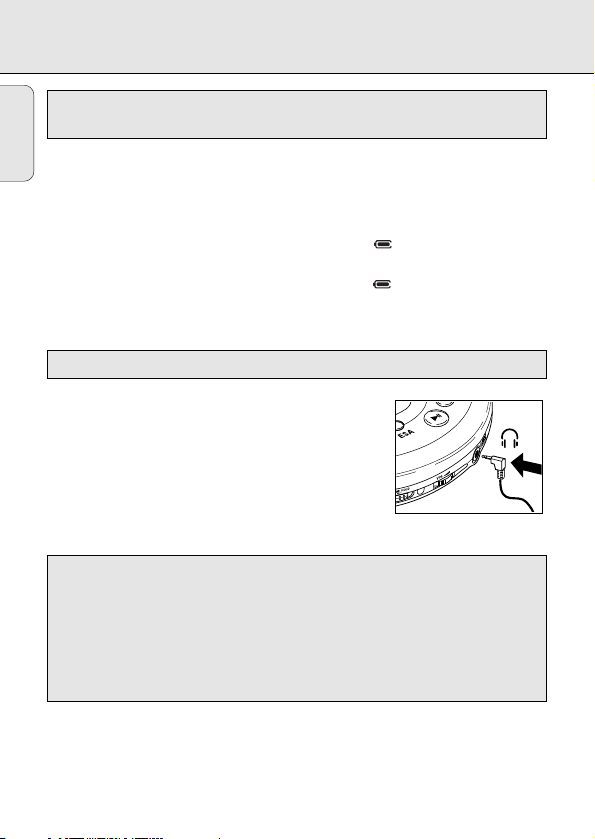
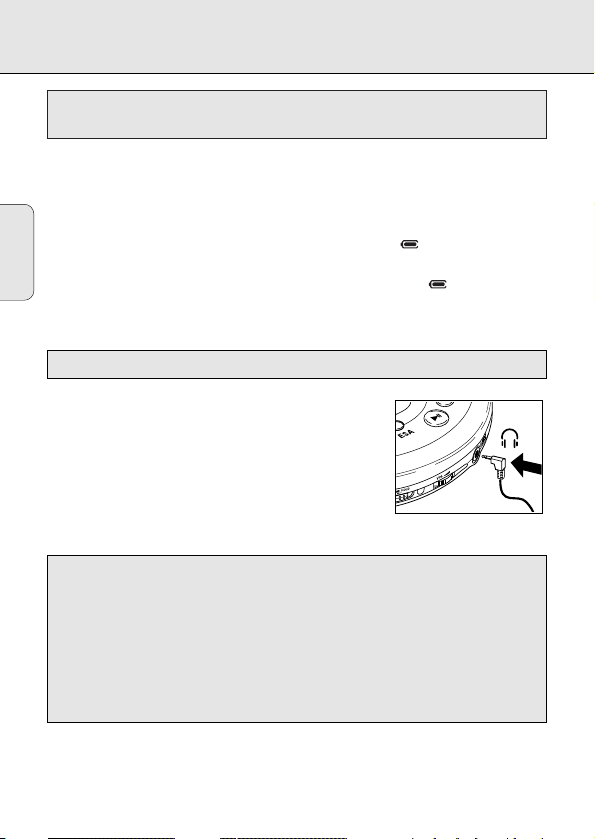
Connecting the headphones
Connect the supplied headphones with the
p LINE OUT jack.
AY 3674 (AZ 7582: AY 3675)
Note : Use this jack also for connecting your HiFi system
(signal lead) or your car radio (adapter cassette or
signal lead). In both cases, the volume of the CD
player has to be set to position 8.
Use your head when using headphones
Hearing safety: Do not play your headphones at a high volume. Hearing experts
advise that continuous use at high volume can permanently damage your hearing.
Traffic safety: Do not use headphones while driving a vehicle. It may create a
hazard and it is illegal in many countries. Even if your headphones are an open-air
type designed to let you hear outside sounds, do not turn up the volume so high
that you cannot hear what is going on around you.
(supplied)
8
Page 9
CONNECTIONS
DIGITAL
DIGITAL
DIGITAL
4,5 V DC
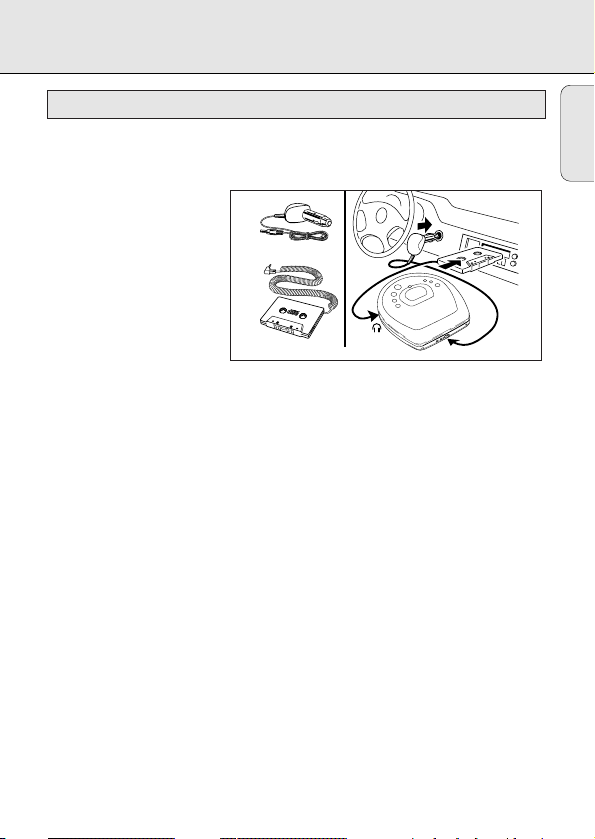
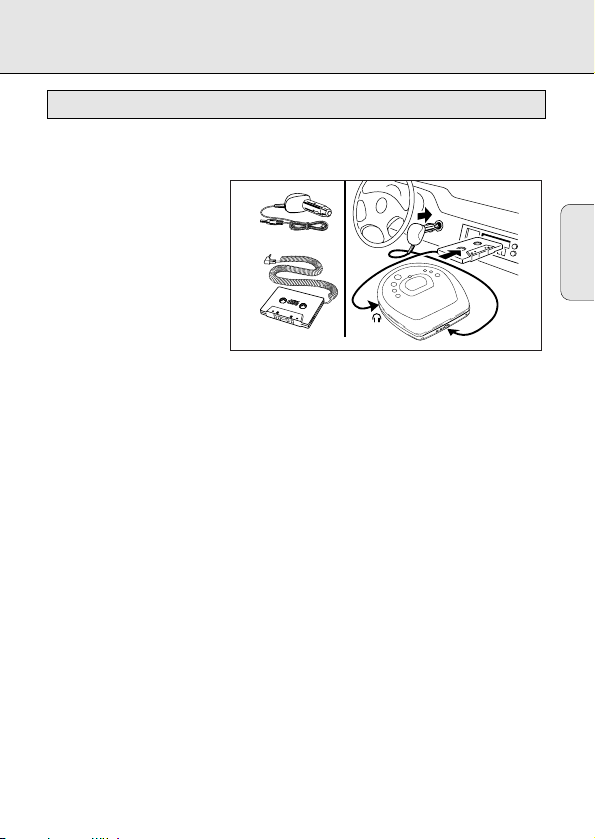
Connections for in-car use
(
supplied or optionally available
)
AY 3545 - car voltage converter (4.5 V/600 mA, DC, positive pole to the center pin)
AY 3501 - car adapter cassette
1 Find a safe place for the
CD player on a horizontal,
vibration-free and stable
surface where it is no
danger to or in the way of
the driver or passengers.
2 Connect the DC plug of the
voltage converter
to the DC
socket of your CD player
(
only for a 12 V car battery, negative grounding
3
Insert the voltage converter into the cigarette
).
lighter socket. If necessary, clean the
cigarette lighter socket to obtain a good electrical contact.
4 Turn down the volume and
switch off the autoreverse function of your car
radio cassette player.
5 Connect the adapter cassette plug to the p LINE OUT socket of the CD player.
6 Insert the adapter cassette carefully into the car radio’s cassette compartment.
7 Make sure that the cord does not hinder your driving.
8 Start the CD player, turn its volume to position 8 and adjust the sound with the car
radio controls.
To remove the adapter cassette press the eject button of the car radio.
Always remove the voltage converter from the
cigarette
lighter socket when the CD
player is not in use.
Notes on in-car use:
- Avoid excessive heat from the car heating or from direct sunlight (e.g., in a parked
car in the summer).
- If your car radio has a LINE IN jack, it is best to use it for the car radio connection
instead of the adapter cassette. Connect the signal lead to this LINE IN jack and the
p
LINE OUT jack of the CD player.
English
9
Page 10
OPERATION
M
O
D
E
P
R
O
G
English
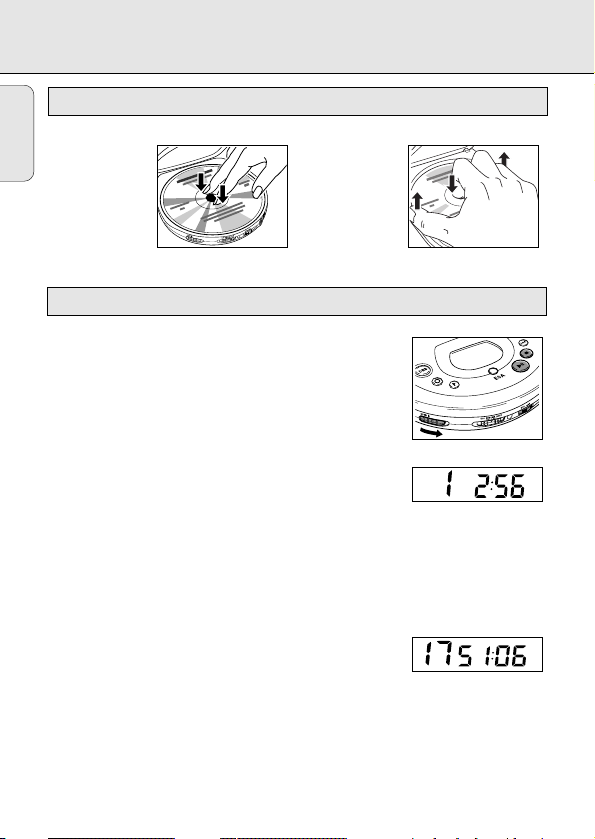
Inserting the CD Removing the CD
• Push gently on
the CD center
so that it fits
onto the hub.
• Hold the CD
by its edge
and press the
hub gently.
Playing a CD
1 Open the lid by pushing the OPEN slide control to the side.
2 Insert an audio CD, printed side up. Push down on the left-
hand side to close the lid.
3 Press the 2; button to start CD play.
yy
Display indication: (example)
1 = current track / 2:56 = elapsed time of current track
4 Adjust the sound using the VOLUME and DBB controls.
5 Interrupt CD play by pressing the 2; button. Continue CD play by pressing the 2;
button again.
yy
Display indication: time of the current position (flashing).
6 Press the STOP 9 button to stop CD play.
yy
Display indication: (example)
17 = total number of tracks / 51:06 = total playing time
If you press the STOP 9 button again, you will switch off the set.
Note: If no button is pressed for 10 seconds, the set will switch off automatically.
10
Page 11

∞ §
OPERATION
Selecting another track:
Briefly press ∞ or § once/several times to skip to the
beginning of the current/previous or next track(s).
yy
Display indication: selected track number.
yy
During play: CD play continues automatically with the
selected track.
yy
In stop position: press the 2; button to start CD play.
Searching for a passage during CD play:
1 Hold down the ∞ or § button to find a particular passage in forward or backward
direction.
yy
After 2 seconds, searching will start at high speed.
2 Release the button when you have reached the desired passage.
Note: Searching is not possible in the SCAN mode.
English
11
Page 12

OPERATION
MODE
P
R
O
G
English
MODE
00
– different playing modes
By pressing the MODE 0 button, you can successively
activate the playing modes:
SHUFFLE: The tracks are played
in random order
until all of
them have been played once.
SHUFFLE REPEAT ALL: All tracks are played
random order
repeatedly in
until you leave this
mode.
REPEAT: The track is played
REPEAT ALL: The CD is played
repeatedly
repeatedly
until you leave this mode.
until you leave this mode.
SCAN: Each track is scanned for 10 seconds until you leave this mode or all tracks
have been played once.
Press the MODE 0 button again to deactivate all modes.
yy
The selected playing mode is indicated in the display.
yy
During play: CD play continues automatically with the selected playing mode.
yy
In stop position: press the 2; button to start CD play.
12
Page 13

OPERATION
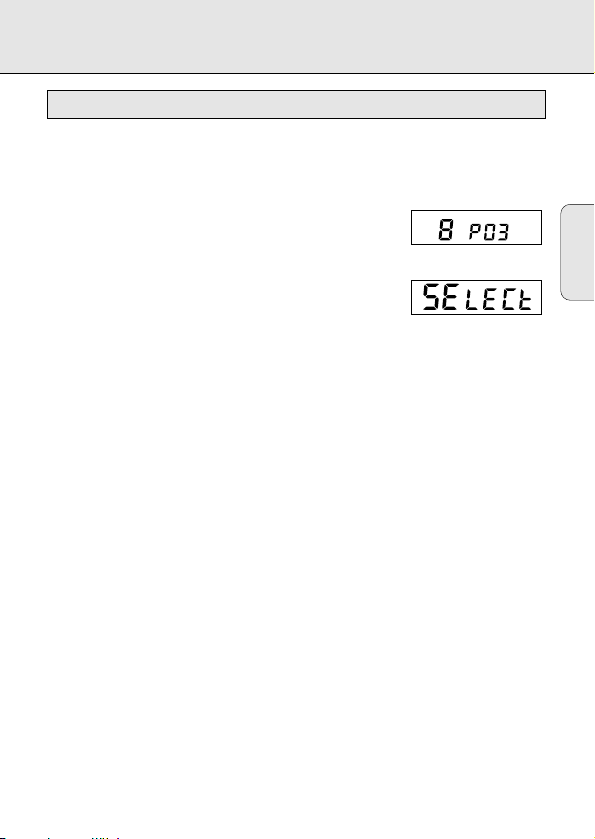
PROG P – programming of tracks (max. 99 tracks)
1 Select the desired track with PREV ∞ or NEXT §.
2 As soon as the desired track is displayed, press the PROG button to store the track
in the memory.
yy
Display indication: track number
PROG
/ P / total number of stored tracks, e.g.
Note:
-
When you press PROG and there is no track selected,
the display indicates
SELECt.
Playing the program:
If you have selected the tracks in STOP mode, press the PLAY/PAUSE 2; button.
If you have selected the tracks during CD play, first press STOP 9 and then the
PLAY/PAUSE 2; button.
yy
Display indication: PROGRAM.
yy
Your program will be played in the selected playing mode (e.g. SHUFFLE).
Reviewing the settings:
Press the PROG button for more than 2 seconds.
yy
Display indication: each stored track successively flashes for a short moment.
Erasing the program in STOP mode:
Press the STOP 9 button to erase the program.
yy
PROGRAM disappears on the display and your program is erased.
yy
CLEAR lights up briefly on the display.
Note: Interrupting the power supply or opening the lid will erase the program.
English
13
Page 14
OPERATION
P
R
O
G
English
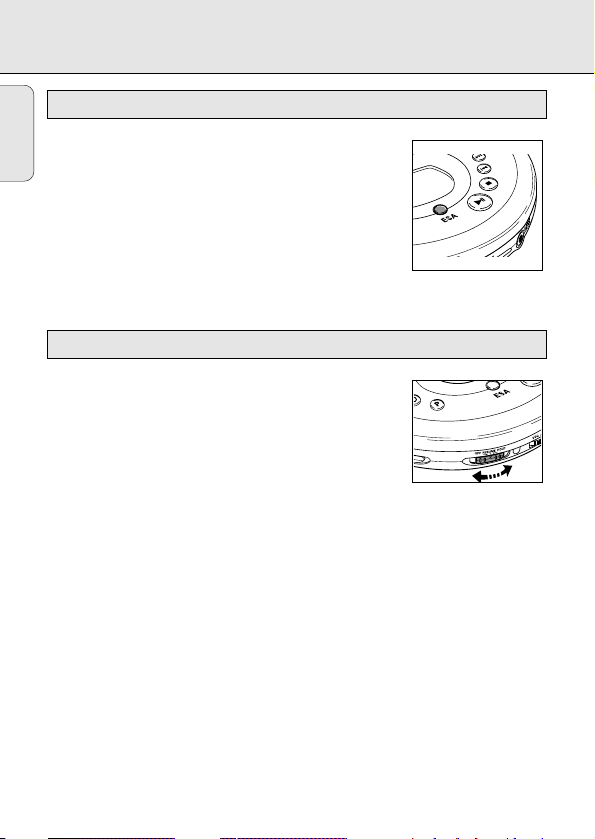
ESA – Electronic Shock Absorption Memory
Press the ESA button to switch on/off ESA.
yy
The ESA symbol lights up in the display.
yy
The ESA memory continuously stores in advance the CD
data to be played. This is to prevent sound skipping
during play due to shock and vibration.
yy
Prolonged shocks and vibrations may empty the ESA
memory completely and CD play will be interrupted.
Note: When switching the ESA feature on and off, CD play will be delayed or
interrupted for a short time.
RESUME / HOLD
RESUME – playing from where you have stopped
1 Activate the RESUME feature by sliding the RESUME/HOLD
switch to the center setting.
2 If you stop CD play by pressing the STOP 9 button, the last
position played will be stored.
3 Press 2; to resume CD play from the position it was
stopped at.
HOLD – deactivating all buttons
Activate the HOLD feature by sliding the RESUME/HOLD switch to the far right.
yy
Now all buttons are locked until you switch the feature off again. If you press a
button (except OPEN), the display will indicate HOLD.
Note: - In the HOLD position, the RESUME function is automatically activated.
- Opening the lid erases the information about the last position played.
14
Page 15
GENERAL INFORMATION
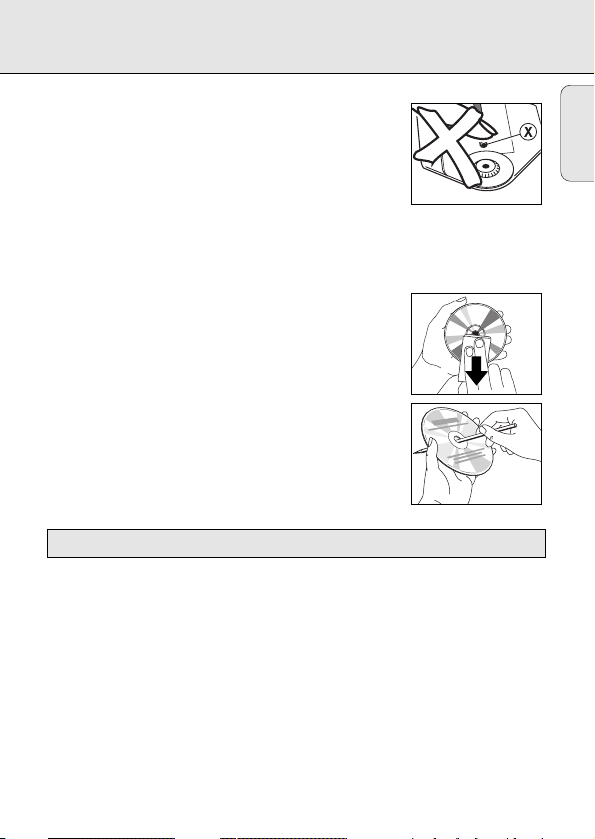
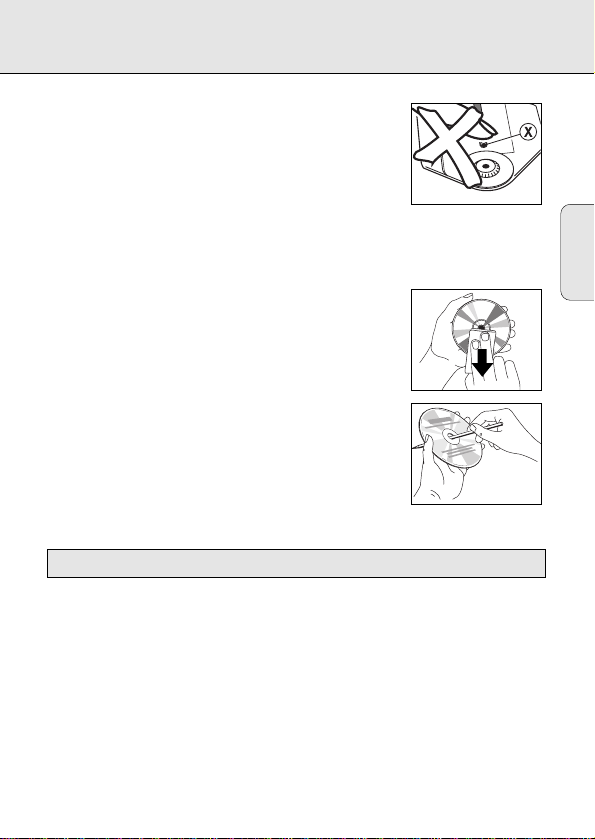
• Do not touch the lens X of the CD player!
• Do not expose the CD player, batteries or CDs to rain and
dampness, sand and dust or to excessive heat caused by
heating equipment, or to direct sunlight.
• The lens may cloud over when the set is suddenly moved
from cold to warm surroundings. Playing a CD is not possible then.
Leave the CD player in a warm environment until the moisture evaporates.
• You can clean the CD player with a soft and slightly dampened
chamois leather. Do not use any cleaning agents
as they may have a corrosive effect.
• Always pick up the CD by the edge and put it back in its
box after use.
• To clean the CD, wipe it off in a straight line from the
center towards the edge using a soft, lint-free cloth.
A cleaning agent may damage the disc!
• When a new CD does not stay on the hub remove
the small burrs around the center hole with a pen or similar
instrument.
• Active mobile phones in the vicinity of the CD player may cause malfunctions.
Environmental information
• Please observe the local regulations regarding the disposal of packing materials,
exhausted batteries and obsolete equipment.
• All redundant packaging material has been omitted. We have done our utmost to
make the packaging easily separable into three mono-materials: cardboard (box),
expandable polystyrene (buffer), and polyethylene (bags, protective foam sheet).
• Your set consists of materials which can be recycled if disassembled by a
specialized company.
English
15
Page 16
TROUBLESHOOTING
If a fault occurs, please check the points listed below before taking your set for repair.
English
If you are not able to remedy a problem by following these hints, consult your dealer
or service facility.
PROBLEM POSSIBLE CAUSE SOLUTION
No power or no Batteries
CD play start Batteries inserted incorrectly Insert the batteries correctly
Use of new batteries Press 2;
Display: Batteries are empty Change/recharge the batteries
no indication Contact pins are dirty Clean them with a cloth
Mains adapter
Loose connection Connect the adapter securely
In-car use
Cigarette lighter is not powered
when ignition is switched off insert batteries
CD play does not
start or is CD lid is not closed securely Close the lid securely
interrupted Moisture condensation Leave the player in a warm
Display: no CD is not or incorrectly inserted Insert a CD, label facing up
indication CD is badly scratched Use another CD
or no dISC CD is dirty Clean the CD
Battery recharging Use of wrong batteries
on board does not be recharged on board
work, no CHARGE Contacts are dirty Clean them with a cloth
indication
Play does not start RESUME or SHUFFLE or Switch off RESUME, SHUFFLE
from the first track PROGRAM is activated or PROGRAM
HOLD feature is activated Switch off the HOLD feature
Switch on ignition or
place until the moisture
evaporates
Only a battery
pack can
16
Page 17

TROUBLESHOOTING
Under no circumstances should you try to repair the unit yourself, as this
will invalidate the warranty.
PROBLEM POSSIBLE CAUSE SOLUTION
General Electrostatic discharge from
malfunction the user via the CD player power supply or take out the
No sound or bad PAUSE is activated Press 2;
sound quality Loose or wrong connections Check connections
Volume is not turned up Adjust the volume
Headphones worn the wrong Pay attention to the L (left)
way and R (right) indications
Headphone plug is dirty Clean the headphone plug
Strong magnetic fields near Change the player’s position
the CD player or connections
In-car use
Strong vibrations Find another place for the set
Adapter cassette is Insert the adapter cassette
inserted incorrectly correctly
Temperature inside car is too Let the CD player adjust to
high/low the temperature
Cigarette lighter/socket is too Clean the cigarette
dirty lighter/socket
Wrong playback direction of Change the autoreverse
the autoreverse feature of the
car cassette player
Hum or noise in car Unfit car radio input socket Use the adapter cassette
Disconnect the set from the
batteries for a few seconds
direction
English
17
Page 18

COMMANDES Veuillez vous reporter à l'illustration en page 3
DISPLAY......................
§ .................................saut et recherche en avant
∞ .................................saut et recherche en arrière
VOLUME......................règle le volume pour la prise d'écouteurs
RESUME/HOLD ..........active la fonction RESUME (reprise) et/ou HOLD (blocage de
MODE 00......................sélection des divers modes de lecture: SHUFFLE™SHUFFLE
Français
PROG P........................pour enregistrer des morceaux en mémoire et passer la
DBB..............................Dynamic Bass Boost: accentue les basses,
STOP 9........................arrête la lecture CD, efface divers réglages, arrête le lecteur
OPEN ...........................pour ouvrir le couvercle du lecteur CD
2; ................................démarrage de la lecture et pause
ESA ..............................Electronic Shock Absorption est la mémoire-tampon
p LINE OUT ................prise pour écouteurs (3,5 mm)
4.5 V DC.......................prise pour raccordement d'une alimentation externe
Remarque: -Les messages d'état (p. ex. PAUSE, pile usée, etc.) et l'actionnement des
touches s'accompagnent d'un signal acoustique dans les écouteurs.
indique les divers modes de lecture, les morceaux et la durée
toutes les touches)
REPEAT ALL™REPEAT™REPEAT ALL™SCAN™arrêt
programmation en revue
DBB 1™DBB 2™DBB 3™arrêt
Appuyez sur cette touche pendant plus de 3 secondes
pour activer/désactiver le feedback acoustique.
CD et active l'opération de charge.
assurant un son ininterrompu
Cet appareil est conforme aux normes d'interférence radio en vigueur
dans la Communauté européenne.
18
Page 19
ALIMENTATION
Bloc d'alimentation
Bloc d'alimentation AY 3160, 4,5 V / 400 mA, courant continu, pôle plus vers broche
centrale
1 Assurez-vous que la tension locale correspond
bien à celle du bloc d'alimentation.
2 Raccordez le bloc d'alimentation à la prise 4,5 V
CC de l'appareil et à la prise de courant.
Remarques: - Utilisez exclusivement le bloc
d'alimentation AY 3160, tout autre
produit risquant d'endommager
l'appareil.
- Il n'y a pas de feedback acoustique lorsqu'on utilise le bloc d'alimentation.
- Déconnectez toujours l'adaptateur lorsque vous ne l'utilisez pas.
Piles de type LR6, UM3 ou AA
Ouvrez le compartiment à piles et mettez en
place le bloc accumulateur rechargeable ou 2
piles alcalines.
Autonomie typique dans des conditions d'utilisation
normales:
piles alcalines: 12 heures (ESA désactivé)
10 heures (ESA activé)
Retirez les piles lorsqu'elles sont usées ou si
l'appareil doit rester inutilisé pendant une
période prolongée
Remarque: L'état des piles est indiqué sur l'afficheur:
- piles chargées:
- piles faibles: le symbole clignote. Ce symbole n'est pas affiché
pour les piles rechargeables.
- piles usées: le symbole clignote et le message bAtt s'affiche.
- Remplacez les piles ou raccordez le bloc d'alimentation.
Les piles contiennent des substances chimiques et doivent donc être
évacuées en conséquence.
(fourni ou en option)
(fournies ou en option)
pas d'indication
.
Français
19
Page 20
RACCORDEMENTS
Recharge dans l'appareil du bloc accumulateur Philips
(fourni ou en option)
Bloc accumulateur AY 3361 NiCd rechargeable dans l'appareil
Le bloc accumulateur est rechargé lorsque le bloc d'alimentation est raccordé, que
l'appareil est arrêté et que l'on appuie sur la touche STOP 9.
Français
yy
Affichage pendant l'opération de charge: CHARGE et
Durée de charge: env. 5 heures (NiCd)
yy
Affichage lorsque le bloc est entièrement chargé: FULL et
Remarque: - Utilisez exclusivement un bloc accumulateur Philips, des piles
rechargeables séparées ne pouvant pas être rechargées dans l'appareil.
Raccordement des écouteurs
Raccordez les écouteurs fournis au
connecteur p LINE OUT.
AY 3674 (AZ 7582: AY 3675)
Remarque: Utilisez également ce connecteur pour
raccorder votre chaîne hi-fi (câble signal) ou
votre autoradio (cassette d'adaptation ou câble
signal). Dans les deux cas, réglez le volume du lecteur CD sur 8.
Ecoutez la musique... et la voix de la raison!
Sécurité d'écoute: ne réglez pas vos écouteurs à un volume trop élevé. Les experts
de l'audition signalent qu'un utilisation continue à volume élevé peut nuire à l'ouïe.
Sécurité routière: n'utilisez pas vos écouteurs lorsque vous conduisez un véhicule.
Cela peut entraîner des dangers, et est interdit dans nombre de pays. Même si vous
utilisez des écouteurs de type ouvert, conçus pour vous permettre d'entendre les
sons environnants, ne réglez pas le volume si fort que vous n'entendez plus ce qui
se passe autour de vous.
(fournis)
20
Page 21
RACCORDEMENTS
DIGITAL
DIGITAL
DIGITAL
4,5 V DC
Raccordement pour l’utilisation en voiture
(fournis ou en option)
Transformateur pour automobile AY 3545 (4,5 V / 600 mA, CC, pôle plus vers broche
centrale). Cassette adaptatrice AY 3501.
1 Trouvez un emplacement
sûr pour votre lecteur CD
sur une surface horizontale,
exempte de vibrations et
stable où il ne risque pas de
gêner ou de mettre en
danger le conducteur ou les
passagers.
2 Connectez la fiche CC de
votre transformateur à la prise CC de votre lecteur CD
automobile 12V, mise à la terre négative)
3
Raccordez le transformateur à la prise de l'allume-cigares. Le cas échéant, nettoyez la
(uniquement pour batterie
.
prise de l'allume-cigares pour obtenir un bon contact électrique.
4 Réduisez le volume et
désactivez la fonction Autoreverse de votre autoradio-
cassette.
5 Raccordez la fiche de la cassette adaptatrice à la prise p LINE OUT du lecteur CD.
6 Introduisez avec précaution la cassette adaptatrice dans le compartiment cassette
de votre autoradio-cassette.
7 Vérifiez que le câble ne vous gêne pas pour conduire
8 Mettez le lecteur CD en marche, réglez son volume sur 8 et ajustez le son au
moyen des commandes de l'autoradio.
Pour retirer la cassette adaptatrice, appuyez sur la touche d'éjection de l'autoradiocassette. Retirez toujours le transformateur de la prise de l'allume-cigares lorsque
vous n'utilisez pas le lecteur CD.
Remarques sur l'utilisation en voiture:
- Evitez toute chaleur excessive due au chauffage de la voiture ou au rayonnement
direct du soleil (p. ex. dans une voiture en stationnement en été).
- Si votre autoradio dispose d'une prise LINE IN, il est préférable d'utiliser celle-ci
plutôt que la cassette adaptatrice pour raccorder l'appareil. Raccordez le câble
signal à cette prise LINE IN et à la prise pLINE OUT du lecteur CD.
Français
21
Page 22

FONCTIONNEMENT
M
O
D
E
P
R
O
G
Mise en place du CD Retrait du CD
• Appuyez
Français
doucement sur
le centre du
CD pour
l'emboîter sur
• Maintenez le
CD par le bord
et appuyez
doucement sur
l'axe.
l'axe.
Lecture d'un CD
1 Ouvrez le couvercle en poussant la coulisse OPEN
vers le côté.
2 Introduisez un CD audio, face imprimée vers le haut.
Appuyez sur le couvercle du côté gauche pour le fermer.
3 Appuyez sur la touche 2; pour démarrer la lecture.
yy
Affichage: (exemple)
1 = morceau en cours / 2:56 = temps écoulé du
morceau en cours
4 Ajustez le son au moyen des commandes VOLUME et DBB.
5 Pour interrompre la lecture CD, appuyez sur la touche 2;. Pour reprendre la
lecture, appuyez à nouveau sur 2;.
yy
Affichage: temps de la position momentanée (clignote).
6 Appuyez sur la touche STOP 9 pour mettre fin à la lecture CD.
yy
Affichage: (exemple)
17 = nombre total de morceaux / 51:06 = durée totale
de lecture
Si vous appuyez encore une fois sur STOP 9, ceci arrête l'appareil.
Remarque: si aucune touche n'est actionnée pendant 10 secondes, l'appareil
22
s'arrête automatiquement.
Page 23

FONCTIONNEMENT
∞ §
Pour sélectionner un autre morceau:
Appuyez brièvement à une ou plusieurs reprises sur l'une des
touches ∞ ou § pour sauter au début du ou des morceaux
précédents ou suivants.
yy
Affichage: numéro du morceau sélectionné.
yy
En cours de lecture: la lecture CD continue
automatiquement avec le morceau sélectionné.
yy
En position d'arrêt: appuyez sur la touche 2; pour démarrer la lecture.
Recherche d'un passage en cours de lecture:
1 Maintenez la touche ∞ ou § appuyée pour rechercher un passage donné vers
l'avant ou vers l'arrière.
yy
Au bout de 2 secondes, la recherche démarre à haute vitesse.
2 Relâchez la touche lorsque le passage voulu est atteint..
Remarque: En mode SCAN, la recherche n'est pas possible.
Français
23
Page 24

FONCTIONNEMENT
MODE
P
R
O
G
00
MODE
En appuyant sur la touche MODE 0, vous activez
activez successivement les différents modes de lecture:
SHUFFLE: les morceaux sont joués dans un
Français
SHUFFLE REPEAT ALL: tous les morceaux sont joués de
REPEAT: le morceau est
REPEAT ALL: le CD est joué de manière
SCAN: chaque morceau est amorcé pendant 10 secondes jusqu'à ce que vous quittiez
Appuyez à nouveau sur la touche MODE 0 pour désactiver tous les modes.
yy
yy
yy
– les divers modes de lecture
ordre aléatoire
jusqu'à ce que chaque morceau ait été joué une
fois.
manière
répétée
dans un
ordre aléatoire
quittiez ce mode.
répété
jusqu'à ce que vous quittiez ce mode.
répétée
jusqu'à ce que vous quittiez ce mode.
ce mode ou que tous les morceaux aient été joués une fois.
Le mode de lecture sélectionné est indiqué sur l'afficheur.
En cours de lecture: la lecture CD continue automatiquement dans le mode
sélectionné.
En position d'arrêt: appuyez sur la touche 2; pour démarrer la lecture.
jusqu'à ce que vous
24
Page 25
FONCTIONNEMENT
PROG - programmation de morceaux (99 au maximum)
1 Sélectionnez le morceau voulu avec les touches PREV ∞ ou NEXT §.
2 Dès que le morceau voulu s'affiche, appuyez sur la touche PROG pour l'enregistrer
en mémoire.
yy
Affichage: numéro du morceau
/ P / nombre total de morceaux programmés, p. ex.
Remarques:
-
Si vous appuyez sur PROG alors qu'aucun morceau n'est
sélectionné, l'afficheur indique
SELECt.
Lecture programmée:
Si vous avez programmé les morceaux en mode d'arrêt, appuyez sur la touche
PLAY/PAUSE 2; button.
Si vous avez programmé les morceaux en cours de lecture, appuyez d'abord sur STOP
9 puis sur la touche PLAY/PAUSE 2;.
yy
Affichage: PROGRAM.
yy
Votre programme est alors joué dans le mode de lecture sélectionné (p. ex.
SHUFFLE).
Vérification de la programmation:
Appuyez sur la touche PROG pendant plus de 2 secondes.
yy
Affichage: tous les morceaux en mémoire s'affichent brièvement l'un après
l'autre, en clignotant.
Effacer la programmation en mode STOP:
Appuyez sur la touche STOP 9 pour effacer la programmation.
yy
PROGRAM disparaît de l'affichage, et le programme est effacé.
yy
CLEAR s'allume brièvement sur l'afficheur.
Remarque: le programme est également effacé si l'alimentation est coupée ou si l'on
ouvre le couvercle.
PROG
Français
25
Page 26

FONCTIONNEMENT
P
R
O
G
ESA – Electronic Shock Absorption Memory
Appuyez sur la touche ESA pour activer/désactiver ESA.
yy
Le symbole ESA s'allume sur l'afficheur.
yy
La mémoire ESA enregistre à l'avance les données du CD
Français
à jouer. Ceci évite les sauts en cours de lecture pour
cause de choc ou de vibration.
yy
Les chocs ou vibrations prolongés peuvent vider
complètement la mémoire ESA; dans ce cas, la lecture
est interrompue.
Remarque: lorsque vous activez ou désactivez les fonctions ESA, la lecture est
retardée ou interrompue pour un petit instant.
RESUME / HOLD
RESUME – reprise de la lecture au point où
elle s'est arrêtée
1 Activez la fonction RESUME en amenant le commutateur
RESUME/HOLD en position centrale.
2 Si vous arrêtez un CD en appuyant sur la touche STOP 9,
la dernière position lue sera enregistrée en mémoire.
3 Appuyez sur 2; pour reprendre la lecture du CD à partir du point où vous l'aviez
arrêtée.
HOLD – désactiver toutes les touches
Activez la fonction HOLD en poussant le commutateur RESUME/HOLD tout à fait à droite.
yy
Toutes les touches sont à présent bloquées, jusqu'à ce que vous désactiviez à
nouveau cette fonction. Si vous appuyez sur une touche quelconque (à l'exception
de OPEN), l'afficheur indiquera HOLD.
Remarques: -En position HOLD, la fonction RESUME est automatiquement activée.
-Si vous ouvrez le couvercle, l'information sur la dernière position jouée
est effacée.
26
Page 27
INFORMATIONS GENERALES
• Ne touchez jamais la lentille X du lecteur CD!
• N'exposez pas le lecteur CD, les piles ou les CD à la pluie
au à l'humidité, au sable ou à la poussière, ni à une chaleur
excessive due à un chauffage ou au rayonnement direct du
soleil.
• La lentille peut s'embuer si l'appareil passe soudainement
d'un environnement froid à un environnement chaud. Il n'est alors pas possible de
lire un CD. Laissez le lecteur CD dans un environnement chaud jusqu'à ce que
l'humidité se soit évaporée.
• Vous pouvez nettoyer le lecteur CD avec une peau de
chamois légèrement humide. N'utilisez pas de produits
denettoyage qui pourraient avoir un effet corrosif.
• Saisissez toujours les CD par le bord et replacez-les dans
leur boîtier après usage.
• Pour nettoyer un CD, essuyez-le en ligne droite du centre
vers le bord, au moyen d'un chiffon doux ne peluchant pas.
Les produits de nettoyage risquent d'endommager le CD!
• Si un CD neuf ne s'emboîte pas correctement sur l'axe,
éliminez les petites bavures autour de l'orifice central au
moyen d'un crayon ou d'un outil similaire.
• Les téléphones mobiles actifs à proximité du lecteur CD
peuvent entraîner des problèmes de fonctionnement.
Informations concernant l'environnement
• Veuillez respecter les prescriptions locales en ce qui concerne l'évacuation des
matériaux d'emballage, des piles usées et des appareils hors service.
• Nous avons évité tout matériel d'emballage superflu et fait notre possible pour
permettre de séparer aisément les trois matériaux: carton (boîte), polystyrène
expansé (amortissement) et polyéthylène (sachets, feuille mousse protectrice).
• Votre appareil est réalisé en matériaux pouvant être recyclés après démontage par
une entreprise spécialisée.
Français
27
Page 28
RECHERCHE DE PANNES
Dans le cas d'une anomalie de fonctionnement, commencez par vérifier les points cidessous avant de donner votre appareil à réparer.
Si vous ne parvenez pas à résoudre le problème en suivant ces instructions, veuillez
consulter votre revendeur ou votre centre SAV.
PROBLEME CAUSE POSSIBLE SOLUTION
Français
Absence d'alimen- Piles
tation ou la lecture Les piles sont mal insérées Insérez les piles correctement
ne commence pas. Utilisation de nouvelles piles Appuyez sur 2;
Les piles sont épuisées Changez/rechargez les piles
Les fiches de contact sont salesNettoyez-les avec un chiffon
Adaptateur secteur
Pas d'indication Connexion lâche Branchez l'adaptateur
sur l'afficheur correctement
Utilisation en voiture
L'allume-cigares n'est pas alimenté Allumez le contact ou
lorsque le contact est coupé. insérez les piles
La lecture du CD
ne commence pas Le tiroir de chargement du Veillez à bien refermer le tiroir
ou s'interrompt disque n'est pas bien fermé du disque
Absence d'indication
sur l'afficheur vers le haut
ou no dISC Le CD est très rayé Utilisez un autre disque
La recharge des Utilisation de piles Un seul type de pile peut être
piles à l'intérieur de
l'appareil ne Les contacts sont sales
marche pas (pas d'indication de CHARGE)
La lecture ne Les fonctions RESUME, Neutralisez ces fonctions
commence pas à la SHUFFLE ou PROGRAM
première plage sont activées
28
Fonction HOLD activée Neutralisez cette fonction
Condensation due à l'humidité Laissez le CD dans un endroit
chauffé afin que l'humidité
s'évapore
Le CD n'est pas ou est mal inséré
Le CD est sale Nettoyez-le avec un chiffon
inappropriées
Insérez le CD, face imprimée
rechargé à l'intérieur de l'appareil
Nettoyez-les à l'aide d'un chiffon
Page 29
RECHERCHE DE PANNES
N'essayez en aucun cas de réparer votre appareil vous-même, sous peine
d'invalider la garantie.
PROBLEME CAUSE POSSIBLE SOLUTION
Problème général Décharge électrostatique
de fonctionnement via le lecteur CD source de courant, ou retirez
Pas de son, ou son PAUSE activé Appuyez sur 2;
de mauvaise qualité Mauvais raccordements Vérifiez les raccordements
Le volume est réglé trop bas Réglez le volume
Ecouteurs à l'envers Tenez compte des indications
Fiche d'écouteurs salie Nettoyez la fiche d'écouteurs
Champs magnétiques puissants Modifiez la position ou les
à proximité de l'appareil raccordements de l'appareil
En voiture Trouvez un meilleur
Fortes vibrations emplacement pour l'appareil
Cassette adaptatrice Introduisez correctement
mal insérée la cassette adaptatrice
Température trop élevée/basse Laissez l'appareil s'adapter
dans la voiture à la température
Allume-cigares/prise trop sale Nettoyez l'allume-cigares
Mauvaise direction de lecture Changez la direction
Autoreverse de
l'autoradio-cassette
Bourdonnement ou La prise d'entrée de l'autoradio Utilisez la cassette
bruit en voiture ne convient pas adaptatrice
Débranchez l'appareil de la
les piles pendant quelques
secondes
L (gauche) et R (droite)
ou la prise
Autoreverse
Français
29
Page 30

CONTROLES consulte la ilustración de la página 3
DISPLAY......................
§ .................................salta y busca hacia adelante
∞ .................................salta y busca hacia atrás
VOLUME......................ajusta el nivel del volumen en la toma de los auriculares
RESUME/HOLD ..........activa la función RESUME y/o la función de HOLD (bloqueando
MODE 00......................selecciona los diversos modos de reproducción:
PROG P........................guarda las canciones en un programa y revisa el programa
DBB..............................Dynamic Bass Boost: mejora la respuesta de los sonidos
Español
STOP 9........................detiene la reproducción del CD, borra diversas fijaciones,
OPEN ...........................abre la tapa del reproductor de CD
2; ................................comienza e interrumpe la reproducción de CD
ESA ..............................Electronic Shock Absorption es la memoria búfer para
p LINE OUT ................toma de los auriculares (3,5 mm)
4.5 V DC.......................toma de entrada de suministro eléctrico externo
Nota:- La información de estado (por ej. PAUSA, pilas descargadas, etc.) y las
operaciones principales son acompañadas por una señal acústica a través de
los auriculares.
muestra los distintos modos de reproducción, canciones y duraciones
todas las teclas)
SHUFFLE™SHUFFLE REPEAT ALL™REPEAT™REPEAT ALL™
SCAN™desconectado
graves, DBB 1™DBB 2™DBB 3™desconectado
Pulse esta tecla durante más de 3 segundos para
desconectar/conectar la realimentación acústica.
desconecta el reproductor de CD y activa la carga.
sonido ininterrumpido
Este reproductor cumple las normas sobre interferencias de radio
30
de la Comunidad Europa
Page 31

SUMINISTRO ELÉCTRICO
Adaptador a la red
Adaptador a la red AY 3160, de 4,5 V/460 mA, corriente continua, más polar a la
clavija central.
1 Asegúrese de que el voltaje local corresponde
al voltaje del adaptador.
2 Conecte el adaptador a la toma de 4,5 V CC del
reproductor y a la toma de la red.
Notas: - Utilice únicamente el adaptador AY 3160;
otros productos pueden dañar el equipo.
- Cuando se está utilizando el adaptador,
no hay realimentación acústica.
- Desconecte siempre el adaptador cuando no lo esté utilizando.
Pilas, tipo LR6, UM3 o AA
Abra el compartimiento de las pilas e introduzca
el juego de pilas recargables o dos pilas alcalinas.
Tiempos de reproducción habituales en
condiciones normales: Pilas alcalinas:
15 horas horas (ESA desconectado)
12 hours (ESA conectado)
Extraiga las pilas si están agotadas o si no va a
emplear el reproductor de CD durante mucho
tiempo.
Nota: El estado de las pilas aparecerá indicado en el visualizador:
- Baterías cargadas: sin indicación.
- Baterías gastadas: el símbolo parpadea. Este símbolo no aparece
cuando se utilizan pilas recargablessymbol flashes. This symbol is not available
when rechargeable batteries are used.
- Baterías descargadas: el símbolo parpadeay aparece el mensaje bAtt.
- Cambie las pilas o conecte el adaptador a la red.
Las pilas contienen sustancias químicas, por lo que deberá eliminarlas de la
manera conveniente.
(suministrado o disponible opcionalmente)
(suministradas o disponibles opcionalmente)
Español
31
Page 32

CONEXIONES
Recarga del juego de pilas Philips en el cargador
(suministrado o disponible opcionalmente)
Juego de pilas AY 3361 NiCd para recargar en el cargador
El juego de pilas se recargará si se conecta el adaptador a la red, el equipo está
desconectado y Ud. pulsa la tecla STOP 9.
yy
Indicación en el visualizador durante la carga: CHARGE y
Tiempo de carga aproximado: 5 horas (NiCd)
yy
Indicación en el visualizador si las pilas están cargadas: FULL y
Nota: - Utilice únicamente el juego de pilas Philips, ya que las pilas recargables
Español
sueltas no se pueden recargar en el cargador.
Conectar a los auriculares
Conecte los auriculares que se suministran en la
toma de p LINE OUT.
AY 3674 (AZ 7582: AY 3675)
Nota : Utilice también esta toma para conectar su sistema
HiFi (cable de señal) o su radio del automóvil
(casete adaptador o cable de señal). En ambos
casos, el volumen del reproductor de CD tiene que fijarse en la posición 8.
Use la cabeza cuando utilice los auriculares
Advertencia de seguridad: No emplee los auriculares a gran volumen. Los
especialistas de oídos advierten que el uso continuado a gran volumen puede dañar
el oído de manera permanente.
Seguridad en la carretera. No utilice los auriculares mientras conduzca un
vehículo, ya que podría provocar un accidente y es ilegal en muchos países. Aunque
sus auriculares sean para utilizar al aire libre y diseñados para permitirle oír los
sonidos del exterior, no ponga el volumen tan alto que no pueda oír lo que pasa a
su alrededor.
(suministrada)
32
Page 33

CONEXIONES
DIGITAL
DIGITAL
DIGITAL
4,5 V DC
Utilización en un vehículo
(suministrado o disponible opcionalmente)
AY 3545 - transformador de voltaje para automóvil (4,5 V/600 mA, CC, más polar para
la clavija central/AY 3501 - casete adaptador para automóvil
1 Busque un lugar seguro
para el reproductor de CD
en una superficie horizontal,
libre de vibraciones y
estable donde no corra
peligro ni esté en el paso
del conductor o de los
pasajeros.
2 Conecte la clavija de CC del
transformador de voltaje en la tomacorriente de CC de su reproductor
(sólo para una batería de automóvil de 12 V, toma a tierra negativa).
3
Inserte el transformador en el encastre del encendedor. Límpielo, si es necesario, para
obtener un buen contacto eléctrico
4 Baje el volumen y
desconecte la función de autoreverse del radiocasete de
.
su automóvil.
5 Conecte la clavija del casete adaptador en la toma p LINE OUT del
reproductor de CD.
6 Introduzca suavemente el casete adaptador en el compartimiento del radiocasete.
7 Asegúrese de que el cable no le estorba para conducir.
8 Ponga en marcha el reproductor de CD, suba el volumen hasta la posición 8 y
ajuste el sonido con los controles de la radio del coche.
Para extraer el casete adaptador, pulse la tecla de expulsar de la radio del coche.
Extraiga siempre el transformador del encastre del encendedor cuando no utilice el
reproductor de CD.
Notas sobre el empleo en un automóvil:
- Evite el calor excesivo de la calefacción del automóvil o de la luz del sol directa (por
ej., en un vehículo aparcado en verano).
- Si existe en la radio de su automóvil una toma de LINE IN, es mejor utilizarla para
conectar la radio del coche en lugar del casete adaptador. Conecte el cable de señal
en esta toma de LINE IN y en la toma de pLINE OUT del reproductor de CD.
Español
33
Page 34

FUNCIONAMIENTO
M
O
D
E
P
R
O
G
Poner el CD Extraer el CD
• Empuje
suavemente
en el centro
del CD para
que encaje en
el centro de
• Sujete el CD
por el borde y
presione
suavemente el
centro de
rotación.
rotación.
Reproducción de un CD
Español
1 Abra la tapa deslizando el control OPEN hacia un lado.
2 Introduzca un CD, la cara impresa hacia arriba. Apriete en
el lado de la izquierda para cerrar la tapa.
3 Pulse el tecla 2; para empezar la reproducción.
yy
Indicación en el visualizador: (ejemplo)1 = canción
actual / 2:56 = tiempo transcurrido de la canción
actual
4 Ajuste el sonido utilizando los controles de VOLUME y DBB.
5 Para interrumpir la reproducción del CD, pulse la tecla 2;. Para continuar la
reproducción, vuelva a pulsar la tecla 2;.
yy
Indicación en el visualizador: tiempo de la posición actual (parpadeando).
6 Pulse el tecla de STOP 9 para detener la reproducción del disco.
yy
Indicación en el visualizador: (ejemplo)
17 = número total de canciones / 51:06 = tiempo total
de reproducción
Si vuelve a pulsar la tecla de STOP 9, desconectará el equipo.
Nota: Si no pulsa ninguna tecla durante 10 segundos, el equipo se desconectará
automáticamente.
34
Page 35

FUNCIONAMIENTO
∞ §
Selección de otra canción:
Pulse brevemente la tecla ∞ o § una/varias veces para
saltar al principio de la canción actual/anterior o posterior.
yy
Indicación en el visualizador: número de la canción
seleccionada.
yy
Durante la reproducción: la reproducción del CD continúa
automáticamente con la canción seleccionada.
yy
En posición de parada: Pulse la tecla 2; para empezar la reproducción del CD.
Búsqueda de un pasaje durante la reproducción del CD:
1 Mantenga apretada la tecla ∞ o § para encontrar un pasaje concreto en
dirección hacia adelante o hacia atrás.
yy
La búsqueda a gran velocidad empezará al cabo de 2 segundos.
2 Suelte la tecla cuando haya llegado al pasaje deseado.
Nota: En el modo SCAN, la búsqueda es imposible.
Español
35
Page 36

FUNCIONAMIENTO
MODE
P
R
O
G
00
MODE
Pulsando la tecla MODE 0, puede activar sucesivamente los
modos de reproducción.
SHUFFLE: Las canciones se reproducen en
SHUFFLE REPEAT ALL: Todas las canciones se reproducen
REPEAT: La canción suena
REPEAT ALL: El CD suena
SCAN: Cada canción se escanea durante 10 segundos hasta que abandone este
Español
Vuelva a pulsar la tecla MODE 0 para desactivar todos los modos.
yy
yy
yy
– diversos modos de reproducción
orden arbitrario
hasta que todas ellas han sido reproducidas una vez.
varias veces en orden arbitrario
hasta que abandone este modo.
varias veces
varias veces
modo o hasta que todas las canciones se hayan reproducido una vez.
El modo de reproducción seleccionado se indica en el visualizador.
Durante la reproducción: el CD sigue reproduciendo automáticamente en el modo
de reproducción seleccionado.
En posición de parada: pulse la tecla 2; para empezar la reproducción del CD
hasta que abandone este modo.
hasta que abandone este modo.
36
Page 37

FUNCIONAMIENTO
PROG - programación de canciones (99 canciones máximo)
1 Seleccione la canción deseada con PREV ∞ o NEXT §.
2 En cuanto visualice la canción deseada, pulse la tecla PROG para guardar la
canción en la memoria.
yy
Indicación en el visualizador: número de canción
PROG
/ P / número total de canciones guardas, por ej.,
Notas:
-
Cuando pulsa PROG y no ha seleccionado ninguna
canción, el visualizador indica
SELECt.
Reproducción del programa:
Si ha seleccionado las canciones en el modo STOP, pulse la tecla de PLAY/PAUSE 2;.
Si ha seleccionado las canciones durante la reproducción del CD, pulse primero STOP
9 y luego la tecla de PLAY/PAUSE 2;.
yy
Indicación en el visualizador: PROGRAM.
yy
Su programa se reproducirá en el modo de reproducción seleccionado (por ej.,
SHUFFLE).
Revisión de las fijaciones:
Pulse la tecla PROG durante más de 2 segundos.
yy
Indicación en el visualizador: cada canción seleccionada parpadea sucesivamente
durante un momento.
Borrar el programa en modo STOP:
Pulse la tecla STOP 9 para borrar la programación.
yy
PROGRAM desaparece del visualizador y su programa se borra.
yy
CLEAR se ilumina brevemente en el visualizador.
Nota: La interrupción del suministro eléctrico o el abrir la tapa borrará el programa.
Español
37
Page 38

FUNCIONAMIENTO
P
R
O
G
ESA – Electronic Shock Absorption Memory
Pulse la tecla ESA para conectarla/deconectarla.
yy
Se ilumina el símbolo de ESA en el visualizador.
yy
La memoria ESA guarda constantemente por adelantado
los datos del CD a reproducir. Es para evitar que el sonido
salte durante la reproducción a causa de golpes y
vibraciones.
yy
Los golpes y vibraciones prolongadas pueden vaciar
completamente la memoria ESA y la reproducción del CD se interrumpirá.
Note: Cuando se conecta y desconecta el dispositivo ESA, la reproducción del CD se
Español
demorará o interrumpirá durante un corto periodo de tiempo.
RESUME / HOLD
RESUME – reproduce a partir del punto en que
ha parado
1 Activar el dispositivo RESUME deslizando el interruptor
RESUME/HOLD hasta el centro de la fijación.
2 Si detiene el CD pulsando la tecla STOP 9, se guardará la
última canción reproducida.
3 Pulse 2; para reanudar la reproducción del CD desde el punto en que fue
interrumpida.
HOLD – desactivación de todas las teclas
Active el dispositivo HOLD deslizando el interruptor RESUME/HOLD a la derecha.
yy
Ahora todas las teclas están bloqueadas hasta que vuelva a desconectar el
dispositivo. Si pulsa una tecla (excepto OPEN), el visualizador indicará HOLD.
Notas: - En la posición HOLD, la función RESUME se activa automáticamente.
- El abrir la tapa borra la información de la última canción reproducida.
38
Page 39

INFORMACIÓN GENERAL
• ¡No toque la lente X del reproductor de CD!
• No exponga el reproductor de CD, las pilas o los discos
compactos a la lluvia y humedad, arena y polvo o a un calor
excesivo producido por un equipo de calefacción o por la
luz del sol directa.
• La lente puede empañarse cuando se traslada el equipo
súbitamente de un ambiente frío a uno caliente. La reproducción de un CD es
imposible en este caso. Deje el reproductor de CD en un ambiente templado hasta
que se evapore la humedad.
• Conviene limpiar el reproductor de CD con una gamuza
suave y ligeramente humedecida. No utilice limpiadores ya
que podrían tener un efecto corrosivo.
• Sujete siempre el CD por los bordes y guárdelo en su caja
después de utilizarlo.
• Para limpiar el CD, frote en línea recta desde el centro
hacia el borde utilizando un paño suave sin borra. ¡Los
limpiadores pueden dañar el disco!
• Cuando un CD no entra en el centro de rotación, elimine las
pequeñas rebabas que hay en torno al agujero central con
un bolígrafo o instrumento similar.
• Los teléfonos móviles en funcionamiento cerca del
reproductor de CD pueden causar averías.
Información medioambiental
• Le rogamos que observe la normativa local con respecto a la eliminación de
materiales de embalaje, pilas gastadas y equipos obsoletos.
• Se ha omitido todo material de embalaje supérfluo. Hemos hecho todo lo posible
para que el embalaje pueda descomponerse fácilmente en tres materiales: cartón
(caja), poliestireno extensible (búfer) y polietileno (bolsas, lámina de espuma de
protección).
• Su equipo está fabricado con materiales que pueden reciclarse si lo desmonta una
empresa especializada.
Español
39
Page 40

DETECCIÓN DE AVERÍAS
Si se produce una avería, compruebe los puntos que figuran a continuación antes de
llevar a arreglar el equipo.
Si no puede solucionar un problema siguiendo estas sugerencias, consulte a su
vendedor o servicio técnico
PROBLEMA CAUSA POSIBLE SOLUCIÓN
La unidad no se Pilas
enciende Las pilas están mal colocadas Insértelas correctamente
Se han puesto pilas nuevas Pulse el botón 2;
Pantalla: No hay Pilas agotadas Sustitúyalas o recárguelas
indicación Espigas de contacto sucias Límpielas con un paño suave
Español
La reproducción del
disco se interrumpe
o no comienza Condensación de humedad Traslade el reproductor a un
Pantalla: no hay No se ha insertado disco Inserte un disco con la
indicación o se ha hecho mal etiqueta hacia arriba
o no dISC El disco está rayado Utilice otro disco
La recarga de Empleo de pilas indebidas Únicamente se puede recargar
baterías no funciona,
no hay indicación de
CHARGE
La reproducción no RESUME o SHUFFLE o Desactívelos
comienza desde la PROGRAM están activados
primera pieza
Adaptador de CA
Conexión suelta Conecte debidamente
En el coche
El encendedor no recibe Utilice pilas como
tensión con el alimentación auxiliar
contacto quitado
Función HOLD activada Desactívela
La tapa está mal cerrada Cierre bien la tapa
lugar cálido hasta que se
evapore la humedad
El disco está sucio Límpielo
un lote de pilas
Contactos de pila sucios Límpielos con un paño
40
Page 41

DETECCIÓN DE ANOMALÍAS
No trate de reparar la unidad bajo ningún concepto, ya que ello invalidará
la garantía.
PROBLEMA CASUA POSIBLE SOLUCIÓN
Funcionamiento Descarga electrostática
defectuoso general procedente del usuario vía suministro eléctrico o saque
el reproductor de CD
No hay sonido PAUSE activada Pulse 2;
o mala calidad
del sonido El volumen no está conectado Ajuste el volumen
Zumbido o ruido Toma de entrada de radio Utilice el casete adaptador
en el vehículo del vehículo inadecuada
Conexiones sueltas o equivocadas
Auriculares mal colocados Fíjese en las indicaciones
Clavija de los auriculares sucia Limpie la clavija
Fuertes campos magnéticos Cambie la posición o las
cerca del reproductor de CD conexiones del reproductor
Utilización en un vehículo
Fuertes vibraciones Busque otro sitio
El casete adaptador está Inserte bien el casete
mal insertado adaptador
La temperatura en el interior Deje que el reproductor de CD
del vehículo es demasiado se ajuste a la temperatura
alta/baja
El encastre del encendedor Limpie el encastre del
está muy sucio encendedor
Dirección de reproducción Cambie la dirección del
equivocada del dispositivo
de autoreverse
Desconecte el equipo del
las pilas durante unos segundos
Compruebe las conexiones
L (izquierdo) y R (derecho)
autoreverse
Español
41
Page 42

CONTROLES tomar como referência as figuras da página 3
DISPLAY......................
§ .................................salta faixas e avança a música
∞ .................................salta faixas e retrocede a música
VOLUME......................ajusta o volume no fone
RESUME/HOLD ..........ativa a função RESUME e HOLD (trava as teclas)
MODE 00......................seleciona os diferentes modos de reprodução: SHUFFLE™
PROG P........................armazena faixas na programação e revê a programação
DBB..............................reforço dinâmico de graves: amplia os tons graves,
STOP 9........................pára a reprodução, desativa várias seleções, desliga o
OPEN ...........................abre o compartimento de disco
2; ................................inicia e pausa a reprodução
ESA ..............................Electronic Shock Absorption é o sistema de memória que
p LINE OUT ................saída para o fone (3,5 mm)
4,5 Vdc.........................entrada do eliminador de pilhas/carregador de bateria
Nota: -Algumas indicações (ex. PAUSA, pilhas fracas, etc.) e o acionamento das teclas
Português
são acompanhadas de um sinal acústico nos fones.
mostra os diferentes modos de reprodução, faixas e tempo
SHUFFLE REPEAT ALL™REPEAT™REPEAT ALL™SCAN™modo
normal
DBB 1™DBB 2™DBB 3™desliga
Pressione esta tecla por 3 segundos para ligar /desligar
o sinal acústico de acionamento das teclas.
aparelho e ativa a carga da bateria
faz o antichoque
Este aparelho cumpre com os requisitos de rádio interferência da
54
Comunidade Européia.
Page 43

ALIMENTAÇÃO
Eliminador de pilhas
O eliminador é do tipo AY3160, de 4,5 V / 400 mA corrente contínua, polo positivo no
pino central
1 Certifique-se de que a voltagem local
corresponde à do eliminador, caso contrário
ajuste a chave seletora.
2 Ligue o eliminador à entrada 4,5 VDC do
aparelho e à tomada elétrica.
Nota: -Use sempre o eliminador de pilhas tipo
AY3160. O uso de um eliminador diferente
poderá danificar o aparelho.
-Ao usar o eliminador de pilhas não haverá sinal sonoro.
-Sempre desligue o eliminador quando não o estiver utilizando.
Pilhas, tipo LR6, UM3 ou AA
Abra o compartimento de pilhas e coloque 2
pilhas alcalinas ou a bateria recarregável.
O tempo de funcionamento típico, sob condições
normais e com pilhas de boa qualidade é:
Pilhas alcalinas: 12 horas (com o ESA desligado)
10 horas (com o ESA ligado)
Remova as pilhas se estiverem esgotadas ou se
não for utilizar o aparelho por longo tempo.
Nota: O estado das pilhas será indicado no visor:
-Pilhas em bom estado: sem indicação.
-Pilhas fracas: o símbolo pisca. Esta indicação não acontece com o uso
da bateria recarregável.
-Pilhas esgotadas: O símbolo pisca e aparece a mensagem bAtt.
-Coloque pilhas novas ou carregue a bateria.
As pilhas contém substâncias químicas e portanto, ao jogá-las, utilize o lixo
seletivo.
(fornecido)
(não fornecidas)
Português
55
Page 44

CONEXÕES
Como recarregar a bateria Philips dentro do aparelho
(fornecida)
A bateria tipo AY 3361 NiCad pode ser recarregada dentro do aparelho.
Para recarregar a bateria, ligue o eliminador de pilhas, desligue o aparelho e
pressione a tecla STOP 9.
yy
Durante a carga o visor indica: CHARGE e
O tempo de carga é de aprox. 5 horas.
yy
Quando carregada, o visor indica: FULL e
Nota: - Use apenas a bateria Philips, pois outros tipos de baterias não poderão ser
recarregadas no aparelho.
Como ligar o fone
Ligue o fone, fornecido, à saída p LINE OUT. .
AY 3674 (AZ 7582: AY 3675)
Nota : Use esta mesma saída para ligar o aparelho ao seu
equipamento de som doméstico (através de um cabo
de sinal) ou ao toca fitas do carro (através do
adaptador de fita cassete). Em ambos os casos o
volume do CD portátil deve ser ajustado por volta
Português
do nº 8.
Cuidado no uso do fone
Audição: Não use fones de ouvido em volume muito alto. Especialistas avisam que
o uso dos fones em volume elevado por tempo prolongado pode prejudicar
permanentemente a audição.
No trânsito: Não utilize fones ao dirigir. Isto é perigoso e, em alguns países, ilegal.
Mesmo se o fone for do tipo aberto, o que permite ouvir sons externos, não
aumente o volume do som pois isto poderá impedi-lo de ouvir o que acontece a sua
volta .
(fornecido)
.
.
56
Page 45

CONEXÕES
DIGITAL
DIGITAL
DIGITAL
4,5 V DC
Conexões no carro
(
acessórios fornecidos
)
AY 3545 - adaptador para o isqueiro do carro (4,5 V/600 mA DC, polo positivo no pino
central).
AY 3501 - adaptador para toca fitas.
1 Encontre um local para o CD
portátil, para que ele fique
numa superfície horizontal,
livre de vibrações e estável,
de modo a não oferecer
perigo ao motorista e
passageiros.
2 Ligue o aparelho ao
adaptador para isqueiro do
carro (
este adaptador é apenas para carros de 12 V com chassi negativo
).
3 Ligue o adaptador para isqueiro ao isqueiro do carro. É conveniente limpar os
contatos do isqueiro e do adaptador
4 Diminua o volume e
desligue a função auto reverse do toca fitas do carro.
5 Ligue o adaptador para fita cassete à saída p LINE OUT do toca discos CD.
6 Coloque cuidadosamente o adaptador para fita no toca fitas do carro.
7 Assegure-se que nenhum fio o atrapalhe ao dirigir.
8 Inicie a reprodução de um CD, coloque o volume na posição 8 e ajuste o som nos
controles do toca fitas do carro.
Para retirar o adaptador para fita, pressione a tecla eject do toca fitas.
Quando o aparelho não estiver em uso, retire o adaptador para isqueiro do carro.
Notas sobre o uso no carro:
- Evite o calor excessivo, tanto do aquecedor do carro como do sol (ex. carro
estacionado ao sol no verão).
- Se o rádio do carro possuir entrada LINE IN é melhor usar esta entrada do que
o adaptador para fita. Ligue o cabo de sinal à esta entrada LINE IN e à saída
p
LINE OUT do CD portátil.
Português
57
Page 46

M
O
D
E
P
R
O
G
OPERAÇÃO
Como colocar o CD Como retirar o CD
• Pressione
levemente o
centro do CD
para que ele
se fixe.
• Segure o CD
pela borda e
pressione
levemente o
centro.
Como ouvir o CD
1 Abra o compartimento com o controle OPEN, na lateral.
2 Coloque um CD de áudio, com o lado impresso para cima.
Pressione o lado esquerdo da tampa para fechá-la.
3 Pressione 2; para iniciar a reprodução.
yy
O mostrador indica: (por exemplo)
1 = faixa corrente / 2:56 = tempo decorrido da faixa
4 Ajuste o som com os controles VOLUME e DBB.
5 Para interrupções, pressione 2;. Para continuar a reprodução pressione 2;
novamente.
Português
yy
O visor indica: a indicação de tempo pisca.
6 Para parar a reprodução pressione STOP 9.
yy
Indicação do visor (por exemplo):
17 = número total de faixas / 51:06 = tempo total do
disco
Para desligar o aparelho, pressione STOP 9 novamente.
Nota: Se nenhuma tecla for pressionada em 10 segundos, o aparelho desliga-se
automaticamente.
58
Page 47

OPERAÇÃO
∞ §
Como selecionar faixas:
Pulse ∞ ou § uma ou várias vezes para ir ao início da faixa
corrente ou à outra faixa.
yy
Indicação do visor: número da faixa selecionada.
yy
Durante a reprodução: A reprodução do CD continua
normalmente a partir da faixa escolhida.
yy
Com o CD parado: pressione 2; para iniciar a reprodução.
Como procurar uma passagem durante a reprodução do CD:
1 Mantenha pressionada a tecla ∞ or § para retroceder ou avançar a música.
yy
Após 2 segundos a velocidade aumenta.
2 Solte a tecla ao encontrar a passagem desejada.
Nota: Esta procura não é possível no modo SCAN.
Português
59
Page 48

OPERAÇÃO
MODE
P
R
O
G
00
MODE
Pulsando sucessivamente a tecla MODE 0 pode-se escolher
os seguintes modos de reprodução:
SHUFFLE: As faixas serão reproduzidas
SHUFFLE REPEAT ALL: Todas as faixas são
REPEAT: A faixa é
REPEAT ALL: O CD é
SCAN: Reproduz os primeiros 10 segundos de cada faixa até que se desative este
Pressione a tecla MODE 0 novamente para desativar todos os modos.
yy
yy
yy
Português
– outros modos de reprodução
em ordem aleatória,
até que todas as faixas sejam reproduzidas.
repetidas em
ordem aleatória
este modo.
repetida
até que se desative este modo.
repetido
até que se desative este modo.
modo ou até que todas as faixas tenham tocado.
O modo escolhido é indicado no visor.
Durante a reprodução: A reprodução do CD continua no modo selecionado.
Com o CD parado: pressione 2; para iniciar a reprodução.
até que se desative
60
Page 49

OPERAÇÃO
PROG P – Como programar faixas (máx. 99 faixas)
1 Selecione a faixa desejada com PREV ∞ ou NEXT §.
2 Quando o número da faixa estiver no visor pressione PROG para programar esta
faixa.
yy
Indicação do visor: número da faixa
PROG
/ P / total de faixas programadas, por ex.
Nota:
-
Ao se pressionar PROG sem que nenhuma faixa
tenhasido escolhida, o visor indica
SELECt.
Como ouvir o programa:
Se a escolha das faixas foi feita com o CD parado, pressione PLAY/PAUSE 2;.
Se a escolha das faixas foi feita com o CD reproduzindo, primeiro pressione STOP 9e
então PLAY/PAUSE 2;.
yy
O visor indica: PROGRAM.
yy
As faixas programadas serão reproduzidas no modo escolhido (ex. SHUFFLE).
Como rever a programação:
Pressione a tecla PROG por mais de 2 segundos.
yy
O visor indica: todas as faixas programadas são mostradas brevemente.
Como apagar um programa com o CD parado:
Pressione STOP 9 para apagar o programa.
yy
A indicação PROGRAM desaparece do visor e o programa é apagado.
yy
O visor indica brevemente CLEAR.
Nota: A interrupção da energia ou a abertura do compartimento de disco também
apagam o programa.
Português
61
Page 50

OPERAÇÃO
P
R
O
G
ESA – Sistema anti-choque
Pressione ESA para ligar/desligar o ESA (Electronic Shock
Absorption)
yy
O símbolo ESA se ilumina.
yy
A memória ESA armazena antecipadamente a música do
CD. Isto previne a interrupção em caso de choques
mecânicos.
yy
Choques ou vibrações prolongadas podem esvaziar a
memória e, neste caso, a reprodução pode ser interrompida.
Nota: Ao se ligar ou desligar o sistema ESA, a reprodução do CD sofrerá uma ligeira
interrupção.
RESUME / HOLD
RESUME – retoma a reprodução onde ela foi parada
1 Ative a função RESUME deslocando a chave
RESUME/HOLD para a posição central.
2 Se você parar a música pressionando STOP 9, o ponto de
parada será memorizado pelo aparelho.
3 Pressione 2; para voltar à reprodução do ponto onde foi
parada.
HOLD – trava as teclas
Português
Ative o recurso HOLD deslocando a chave RESUME/HOLD para a extrema direita.
yy
Agora todas as teclas ficam travadas até que você desligue o HOLD. Se você
pressionar qualquer tecla (exceto OPEN), o visor indica HOLD.
Nota: - Na posição HOLD, a função RESUME é automaticamente ativada.
- Se a tampa do compartimento de disco for aberta, é perdida a informação da
última parada feita.
62
Page 51

INFORMAÇÕES GERAIS
• Não toque na lente X do leitor de CD.
• Não exponha o aparelho, a bateria ou pilhas e os discos à
chuva, umidade, poeira e areia e não exponha o aparelho
ao calor excessivo, como próximo a aquecedores ou
diretamente ao sol.
• A lente do leitor pode embaçar se o aparelho for levado de um local frio para um
local quente. Neste caso ele não funcionará. Aguarde que o aparelho se aclimate
ao novo ambiente..
• Para limpar o aparelho use um pano macio ligeiramente umedecido. Não use
qualquer agente de limpeza, pois poderá danificar o
gabinete.
• Sempre guarde o CD em seu estojo após o uso.
• Para limpar o CD utilize um pano macio e que não solte
fiapo. Limpe em movimentos do centro para a borda.
Agentes de limpeza poderão danificar o disco!
• Se um CD novo não se assentar corretamente no eixo do
aparelho, retire eventuais rebarbas do furo central do disco
utilizando uma caneta ou objeto similar.
• Fones sem fio operados na proximidade do aparelho
poderão causar interferência em seu funcionamento.
Informações ambientais
• Ao dispor dos materiais de embalagem, pilhas e equipamentos antigos, observe a
coleta seletiva de lixo.
• A embalagem do aparelho está otimizada. Ela pode ser separada em três materiais
básicos: papelão (caixa de embalagem), polistireno expandido (calços) e polietileno
(sacos e folhas plásticas).
• O aparelho é composto de materiais que podem ser reciclados desde que
desmontados por empresa especializada.
Português
63
Page 52

GUIA DE FALHAS
Se ocorrer alguma falha, cheque primeiramente os pontos abaixo antes de levar o
aparelho a uma oficina.
Caso o problema não desapareça leve o aparelho a uma oficina autorizada.
PROBLEMA POSSÍVEL CAUSA SOLUÇAO
Não liga ou o CD Pilhas/bateria
Não toca Pilhas colocadas Coloque-as corretamente
Não há indicação Pilhas gastas Troque/carregue-as
no visor Contatos sujos Limpe-os com um pano
A reprodução do
CD não inicia ou é A tampa do compartimento Feche-a corretamente
interrompida não está bem fechada
Português
Visor indica O disco está de ponta cabeça O lado impresso deve ficar
no d1SC para cima
ou não tem O disco está riscado Use outro disco
indicação O disco está sujo Limpe-o
A bateria não Tipo de bateria incorreto
carrega no aparelho ser carregada no aparelho
Não aparece a Os contatos estão sujos Limpe-os com um pano
indicação CHARGE
A reprodução não As funções RESUME, SHUFFLE Desative as funções RESUME,
inicia na primeira ou PROGRAM estão ativadas SHUFFLE ou PROGRAM
faixa
incorretamente
Troque as pilhas Pressione 2;
Eliminador de pilhas
Conexão frouxa Ligue-o corretamente
Uso no carro
Isqueiro do carro não tem
energia com a chave de ou coloque pilhas
ignição desligada
A função HOLD está ativada Desative o HOLD
A lente do leitor está Espere o aparelho se adaptar
embaçada ao ambiente
Ligue a chave de ignição
Só a bateria recomendada pode
64
Page 53

GUIA DE FALHAS
Não abra o aparelho e o eliminador de pilhas para acessar suas partes
internas pois há risco de choque elétrico e perda da garantia.
PROBLEMA POSSÍVEL CAUSA SOLUÇAO
Mal funcionamento Descargas eletrostáticas
geral elétrica e retire as pilhas por
Sem som ou A PAUSA está ativada Pressione 2;
qualidade do som Conexões frouxas ou soltas Cheque as conexões
é ruim Volume está baixo Ajuste o volume
Fones invertidos Atente para as indicações
Plugue do fone está sujo Limpe-o
Campos magnéticos intensos Mude o aparelho e os fios de
próximo ao aparelho lugar
Uso no carro
Vibrações intensas Coloque o aparelho em outro
Adaptador de fita cassete está Coloque-o corretamente
colocado incorretamente
Temperatura no interior do carro Aguarde o aparelho se
está muito alta ou muito baixa adaptar à temperatura
Os contatos do acendedor de Limpe-os
cigarro estão muito sujos
Direção incorreta do auto Mude a direção
reverse no toca fitas do carro
Ruídos ao usar no Entrada do toca fitas não Use o adaptador de fita
carro apropriada cassete
Desligue o aparelho da rede
alguns segundos
R (direito) e L (esquerdo)
lugar
Português
65
Page 54

AUSTRALIA
Philips product warranty for Australia
Warranty conditions valid for Colour Television, Video Cassette Recorders, Audio Systems, and
Portable Audio.
The benefits given to the purchaser by this warranty are in addition to all other rights and remedies
which the purchaser has in respect of the product under the Trade Practices Act or other
Commonwealth or State Law.
Philips Sound and Vision warrants it’s products to the purchaser as follows and subject to the
stated conditions.
12 months free service
Any defect in materials or workmanship in the product occurring within 12 months from the
original date of purchase will be rectified free of charge by Philips Service or one of our authorised
service centers.
Conditions of warranty
1. All claims for warranty service should be made to your nearest Philips Service Branch or to a
Philips authorised service dealer. Reasonable evidence of date of purchase must be provided.
2. This warranty extends only to defects occurring under normal use of the product when operated
in accordance with the instructions.
3. Home service within the normal service area of Philips Service or one of our authorised service
centres will be provided for television receivers with screen size 59cm and above. All other
products are to be brought or sent to your nearest Philips Service Branch or to an authorised
service centre.
4. This warranty does not cover:
a) Mileage or traveling time, pickup or delivery, cost of insurance.
b) Service costs arising from failure to correctly adjust the controls of the product or to observe
the instructions, or inspections that reveal that the product is in normal working order.
c) Product failures caused by misuse, neglect, normal wear and tear, accidental breakage,
transit damage, inexpert repairs or modification by unauthorised persons, lightning strikes,
vermin intestation or liquid spillage.
d) Cleaning of video or audio heads.
e) Inadequate receiving antennae.
f) Replacement of worn or used batteries, styli or other consumables.
The conditions contained in this warranty replace and override the provisions of the World-Wide
Guarantee for Products sold in Australia.
66
Page 55

AUSTRALIA
Philips Service Branches
To contact your nearest Philips Service Branch call
Sydney
Technology Park
Australia Centre
3 Figtree Drive
Homebush NSW 2140
Newcastle & Central Coast
984 Hunter Street
Newcastle West NSW 2302
Perth
1 Fredrick Street
Belmont WA 6104
Melbourne
Cnr Wellington &
Springvale Roads
Mulgrave VIC 3170
Service is also provided through 1,200 accredited service dealers throughout Australia. To find out
about your nearest centre, call 13 13 92.
Call us direct on the
Philips Customer Helpline
Philips customer care lasts as long as you keep the product. Whenever you need any information
on the care or operation of your product, remember it’s always best to go straight to the source.
Phone Philips Helpline direct on
– your call is always welcome.
Please record the following information for your records and keep in a safe place.
13 13 92from anywhere in Australia.
Brisbane
10 Graystone Street
Tingalpa QLD 4173
Also Service Centres:
Adelaide
348 Torrens Road
Croydon Park SA 5008
Hobart
2A Pierce Street
Moonah TAS 7009
Wollongong
1/216 Corrimal Street
Wollongong NSW 2500
Canberra
Unit F,
66–70 Maryborough Street
Fyshwick ACT 2609
13 13 91
7 days a week
Model No:....................................................
Serial No:....................................................
Please retain your purchase receipt which is required to claim
service under warranty.
Philips Electronics Australia Limited
ACN 008 445 743, 3 Figtree Drive
Homebush NSW 2140
Version 2, 08/97, FPCP–030
Page 56

MEXICO n
Garantía para México
Este aparato está fabricado con materiales de alta calidad y ha sido cuidadosamente
verificado. Philips, por lo tanto, da a usted una garantía de 12 meses a partir de su
fecha de compra.
La garantiá ampara la reposición de las piezas defectuosas debidas a fallas en su
montaje o en los materiales, incluyendo la mano de obra necesaria para su reemplazo
en nuestras Sucursales o talleres autorizados.
En caso de fallas en su aparato le rogamos se sirva poner en contacto con su distribuidor.
Esta garantía no cubrirá las averías que resulten como consecuencia de una instalación incorrecta del aparato, manifiesto maltrato o uso inadecuado del mismo.
Philips se obliga a reparar y devolver a usted su aparato en un plazo no mayor de 30
días hábiles contados a partir de la fecha de haber ingresado su aparato a uno de
nuestros talleres.
Para que esta garantía sea válida, es necesario que el certificado que figura en la
parte posterior de esté instructivo haya sido debidamente Ilenado en el momento de
la compra del aparato.
En caso de extravío del certificado con la presentacíon de la factura o remisíon de su
aparato podrá hacer efectiva la garantía correspondiente.
Si usted tiene alguna duda o pregunta que no le pueda solucionar su distribuidor, por
favor ponerse en contacto con:
Centro de Servicio Philips
Blvd. de los Ferrocarriles No.339
Col. Industrial Vallejo, 02300
México, D.F.
3 728-42 00
Centro de Información al Consumidor
3 368-77 88 ó 91 (800) 504-62 00
68
Page 57

NEW ZEALAND
Guarantee and Service for New Zealand
Thank-you for purchasing this quality Philips product.
Philips New Zealand Ltd guarantees this product against defective components and
faulty workmanship for a period of 12 months. Any defect in materials or workmanship occurring within 12 months from the date of purchase subject to the following
conditions will be rectified free of charge by the retailer from whom this product was
purchased.
Conditions
1. The product must have been purchased in New Zealand. As proof of purchase,
retain the original sales docket indicating the date of purchase.
2. The guarantee applies only to faults caused by defective components, or faulty
workmanship on the part of the manufacturer.
3. The guarantee does not cover failures caused by misuse, neglect, normal wear and
tear, accidental breakage, use on the incorrect voltage, use contrary to operating
instructions, or unauthorised modification to the product or repair by an
unauthorised technician.
4.
Reasonable evidence (in the form of a sales docket) must be supplied to indicate that
the product was purchased no more than 12 months prior to the date of your claim.
5. In the event of a failure, Philips shall be under no liability for any injury, or any loss
or damage caused to property or products other than the product under guarantee.
This guarantee does not prejudice your rights under common law and statute, and is
in addition to the normal responsibilities of the retailer and Philips.
How to claim
Should your Philips product fail within the guarantee period, please return it to the
retailer from whom it was purchased. In most cases the retailer will be able to satisfactorily repair or replace the product.
However, should the retailer not be able to conclude the matter satisfactorily, or if you
have other diffi-culties claiming under this guarantee, please contact
The Guarantee Controller
Philips New Zealand Ltd.
4 P.O. Box 41.021
Auckland
3 (09) 84 94 160
fax 3 (09) 84 97 858
69
Page 58

Meet Philips at the Internet
http://www. philips.com
W
CLASS 1
LASER PRODUCT
3140 115 2621.4 VieCHC9822
Page 59

AZ 7381
M
O
D
E
PROG
R
E
P
E
A
TA
L
L
R
E
P
E
A
TA
L
L
AZ 7382
AZ 7383
AZ 7384
AZ 7385
AZ 7386
AZ 7387
AZ 7481
AZ 7482
AZ 7483
AZ 7581
AZ 7582
AZ 7583
Portable Compact Disc Player
Bedienungsanleitung
Gebruiksaanwijzing
Istruzioni per l’uso
Brugsanvisning
Bruksanvisning
Käyttöohje
Manual de utilização
O‰ËÁ›Â˜ ¯Ú‹Ûˆ˜
Page 60

Deutsch
Deutsch
Bedienungselemente ......6
Stromversorgung.............7
Anschlüsse...................8-9
Bedienung................10-14
Allg. Informationen .......15
Fehlersuche..............16-17
Nederlands
Nederlands
Italiano
Italiano
Svenska
Svenska
Bedieningstoetsen ........18
Voeding..........................19
Aansluitingen...........20-21
Comandi ........................30
Alimentazione ...............31
Collegamenti............32-33
Reglage .........................42
Strömförsörjning ...........43
Anslutningar.............44-45
Bediening.................22-26
Algemene informatie .....27
Problemen
oplossen...................28-29
Funzionamento.........34-38
Informazioni generali......39
Ricerca guasti ..........40-41
Bruksanvisning.........46-50
Allmänna
upplysningar..................51
Felsökning................52-53
2
Page 61

DISPLAY
ESA
PROGRAM
DBB
MODE
OPEN
4,5 V DC
TYPEPLATE
NEXT
PREVIOUS
STOP
PLAY / PAUSE
MODE
G
O
R
P
p LINE OUT
VOLUME
HOLD / RESUME
3
Page 62

Deutschland
Hiermit wird bescheinigt, daß dieses Gerät in Übereinstimmung mit den Bestimmungen der Amtsblattverfügung 1046/1984 funkentstört ist.
Der Deutschen Bundespost wurde das Inverkehrbringen dieses Gerätes angezeigt und
die Berechtigung zur Überprüfung der Serie auf Einhaltung der Bestimmungen eingeräumt.
Norge
Typeskilt finnes på apparatens underside.
4
Page 63

Dansk
Betjeningsknapper ........54
Strømforsyning..............55
Tilslutninger.............56-57
Anvendelse ..............58-62
Generel information ........63
Fejlfinding ................64-65
Dansk
Suomi
Português
ŒППЛУИО¿
Käyttöpainikkeet ...........66
Virransyöttö...................67
Kytkennät.................68-69
Comandos......................78
Alimentação..................79
Ligações...................80-81
XВИЪИЫЩ‹ЪИ·....................90
TÚÔÊÔ‰ÔÛ›· ...................91
™˘Ó‰¤ÛÂȘ ................92-93
§ÂÈÙÔ˘ÚÁ›·................94-98
Käyttö.......................70-74
Yleistä ...........................75
Tarkistusluettelo......76-77
Funcionamento.........82-86
Informações gerais.........87
Avarias.....................88-89
°ÂÓÈΤ˜
ПЛЪФКФЪ›В˜ .................99
¢ÈfiÚıˆÛË
‚Ï·‚ÒÓ.................100-101
Suomi
Português
ŒППЛУИО¿
5
Page 64

BEDIENUNGSELEMENTE Abbildung auf Seite 3
DISPLAY......................
Deutsch
§ .................................wählt den nächsten Musiktitel oder eine beliebige Stelle der
∞ .................................wählt den vorhergehenden Musiktitel oder eine beliebige
VOLUME......................Lautstärkeregler für den Kopfhörerausgang
RESUME/HOLD ..........wählt die RESUME-Funktion (Fortsetzen der Wiedergabe) und
MODE 00......................wählt die verschiedenen Wiedergabefunktionen: SHUFFLE™
PROG ...........................speichert Musiktitel in einem Programm und überprüft dieses
DBB..............................Dynamic Bass Boost: verstärkt den Bassklang,
STOP 9........................stoppt die Wiedergabe, löscht diverse Einstellungen, schaltet
OPEN ...........................öffnet den CD-Spielerdeckel
2; ................................Taste zum Starten und Unterbrechen der Wiedergabe
ESA ..............................Electronic Shock Absorption aktiviert den elektronischen
p LINE OUT ................Buchse für Kopfhörer (3.5 mm Stereoklinke)
4,5 V DC.......................Buchse für externe Stromversorgung
Anm.: -Die Statusanzeige (z.B. PAUSE, Batterie leer,etc.) und die Tastenbedienung
werden von einem Signalton im Kopfhörer begleitet.
zeigt die verschiedenen Wiedergabefunktionen, Titel und Zeiten
CD bei längerem Drücken
Stelle der CD bei längerem Drücken
die HOLD-Funktion (Sperren aller Tasten)
SHUFFLE REPEAT ALL™REPEAT ™REPEAT ALL™SCAN™aus
Programm
DBB 1™DBB 2™DBB 3™aus
Drücken Sie diesen Knopf länger als 3 Sekunden, um
den Signalton aus-/einzuschalten.
den CD-Spieler ab und aktiviert die Ladefunktion
Pufferspeicher für ungestörten Musikgenuß
Dieser CD-Spieler entspricht den Funkentstörungsvorschriften der
6
Europäischen Union.
Page 65

STROMVERSORGUNG
Netzadapter
AY 3160 Netzadapter 4,5 V/400 mA Gleichspannung, Pluspol am Mittelstift
1 Achten Sie darauf, daß die Spannung des
Adapters mit der örtlichen Netzspannung
übereinstimmt (siehe Zubehör).
2 Verbinden Sie den Netzadapter mit der Buchse
4,5 V DC des CD-Spielers und der Steckdose.
Anm.: -Verwenden Sie nur den Adapter AY 3160,
da andere Produkte Ihr Gerät beschädigen
können
-Kein Signalton bei Netzbetrieb.
-Trennen Sie den Adapter immer vom Netz, wenn Sie ihn nicht benützen.
Batterien, Typ LR6, UM3, AA
Öffnen Sie das Batteriefach und legen Sie
zwei Alkali-Batterien oder einen Akku ein.
Typische Betriebszeit unter normalen
Alkali-Batterien: 12 Stunden (ESA aus)
Entfernen Sie die Batterien, wenn sie leer sind
oder der CD-Spieler längere Zeit nicht benützt wird.
Anm.: Der Ladezustand der eingelegten Batterien wird im Display angezeigt:
-Volle Batterien: keine Anzeige
Schwache Batterien: -Symbol blinkt. Wenn Sie einen Akku verwenden,
leuchtet dieses Symbol nicht.
-Leere Batterien: -Symbol blinkt und bAtt erscheint im Display.
-Wechseln Sie die Batterien oder schließen Sie den Netzadapter an.
Batterien enthalten chemische Substanzen und sollten ordnungsgemäß
entsorgt werden.
(mitgeliefert bzw. zusätzlich erhältlich)
.
(mitgeliefert bzw. zusätzlich erhältlich)
Bedingungen:
10 Stunden (ESA ein)
Deutsch
7
Page 66

ANSCHLÜSSE
Deutsch
Aufladen eines Philips Akku im CD-Spieler
(mitgeliefert bzw. zusätzlich erhältlich)
AY 3361 NiCd Akku, im Gerät aufladbar
Der Akku wird aufgeladen, wenn der Netzadapter angeschlossen ist, der
CD-Spieler ausgeschaltet ist und Sie STOP 9 drücken.
yy
Displayanzeige während des Aufladens: CHARGE und
Durchschnittliche Ladezeit: 5 Stunden (NiCd)
yy
Displayanzeige bei aufgeladenem Akku: FULL und
Anmerkung:
- Nur ein Philips Akku, nicht aber einzelne Nickel-Cadmium Batterien können im
CD-Spieler aufgeladen werden.
Anschließen des Kopfhörers
Schließen Sie den mitgelieferten Kopfhörer an die
p LINE OUT Buchse an.
AY 3674 (AZ 7582: AY 3675)
Anm.: Verwenden Sie diese Buchse auch zum Anschließen
an Ihre HiFi Stereoanlage (Signalkabel) oder an Ihr
Autoradio (Adaptercassette oder Signalkabel).
Stellen Sie die Lautstärke am CD-Spieler in beiden Fällen auf Maximum (8).
Kopfhörer ja – aber mit Köpfchen
Sicherheit beim hören: Stellen Sie keine zu hohe Lautstärke ein. Fachleute raten
von kontinuierlichem Musikhören mit hoher Lautstärke über einen längeren
Zeitraum ab, da hierdurch das Gehör Schaden nehmen kann.
Sicherheit im Straßenverkehr: Verwenden Sie den Kopfhörer nicht beim Fahren.
Dies kann Ihre Verkehrssicherheit beeinträchtigen und ist in vielen Ländern
verboten. Auch wenn Sie einen ‘offenen’ Kopfhörer verwenden, mit dem Sie
Außengeräusche wahrnehmen können, sollten Sie die Lautstärke immer so
einstellen, daß Sie noch hören können, was um Sie herum vorgeht.
(mitgeliefert)
8
Page 67

ANSCHLÜSSE
DIGITAL
DIGITAL
DIGITAL
4,5 V DC
Betrieb im Auto (
mitgeliefert bzw. zusätzlich erhältlich
)
AY 3545 - Auto-Adapter (4.5 V/600 mA, Gleichspannung, Pluspol am Mittelstift)
AY 3501 - Adapterkassette
1 Positionieren Sie Ihren
CD-Spieler an einem
horizontalen, stabilen und
vibrationsfreien Platz, wo er
weder den Fahrer noch die
Passagiere gefährdet oder
behindert.
2 Schließen Sie den Gleichspannungsstecker des Spannungswandlers
DC Buchse Ihres CD-Spielers
3
Stecken Sie dann den Spannungswandler in die Zigarettenanzünderbuchse
mangelhaftem elektrischen Kontakt reinigen Sie die
4 Reduzieren Sie die Lautstärke Ihres Autoradios und
(
nur für 12 V Autobatterie, Minuspol an Masse
Zigarettenanzünderbuchse.
schalten Sie die
an die 4,5 V
).
. Bei
Autoreverse-Funktion (falls vorhanden) Ihres Kassettenspielers aus.
5 Schließen Sie die Adapterkassette an die p LINE OUT Buchse Ihres CD-Spielers an.
6 Schieben Sie die Adapterkassette vorsichtig in den Kassettenspieler.
7 Vergewissern Sie sich, daß das Verbindungskabel Sie nicht beim Fahren behindert.
8 Starten Sie den CD-Spieler, stellen Sie seine Lautstärke auf Position 8 und regeln
Sie den Klang am Autoradio.
• Zum Herausnehmen der Kassette drücken Sie die Auswurftaste ‘EJECT’.
• Ziehen Sie stets den Spannungswandler aus der Zigarettenanzünderbuchse, wenn
Sie den CD-Spieler nicht benutzen.
Anmerkungen zum Betrieb im Auto:
- Vermeiden Sie übermäßige Erwärmung durch die Autoheizung oder direkte
Sonneneinstrahlung, z.B. beim Parken.
- Wenn Ihr Autoradio eine LINE IN Buchse hat, dann ist es besser, diese für den
Anschluß an das Autoradio zu verwenden als die Adapterkassette. Schließen Sie
das Signalkabel an die LINE IN Buchse und an die pLINE OUT Buchse des
CD-Spielers.
Deutsch
9
Page 68

BEDIENUNG
M
O
D
E
P
R
O
G
Deutsch
Einlegen der CD Herausnehmen der CD
• Drücken Sie
leicht auf die
CD, sodaß sie
fest auf der
Spindel sitzt.
• Fassen Sie die
CD am Rand
und drücken
Sie leicht auf
die Spindel.
Abspielen einer CD
1 Öffnen Sie den CD-Deckel indem Sie die OPEN Taste
zur Seite schieben.
2
Legen Sie eine Audio-CD mit der Beschriftung nach oben ein.
Drücken Sie auf die linke Seite des Deckels zum Schließen
3 Drücken Sie 2;, um die Wiedergabe zu starten.
yy
Displayanzeige, Beispiel:
1 = aktueller Titel / 2:56 = bereits abgespielte Zeit
4 Regeln Sie den Klang mit VOLUME und DBB.
5 Sie können die Wiedergabe durch Drücken von 2; unterbrechen. Um fortzusetzen,
drücken Sie nochmals 2;.
yy
Displayanzeige: blinkende Zeitanzeige der momentanen Position.
6 Drücken Sie STOP 9, um die Wiedergabe zu beenden.
yy
Displayanzeige, Beispiel:
17 = Anzahl der Titel / 51:06 = Gesamtwiedergabezeit
• Wenn Sie nochmals STOP 9 drücken, schalten Sie das Gerät ab.
.
Anmerkung: Wenn 10 Sekunden lang keine Taste gedrückt wird, schaltet sich das
Gerät automatisch ab.
10
Page 69

∞ §
BEDIENUNG
Auswählen eines Musiktitels:
Drücken Sie einmal/mehrmals kurz ∞ oder §, um zum
Anfang des aktuellen/vorherigen oder nächsten Titel zu
springen.
yy
Displayanzeige: ausgewählter Titel.
yy
Während der Wiedergabe: Die Wiedergabe setzt
automatisch mit dem ausgewählten Titel fort.
yy
In Position Stop: Drücken Sie 2;, um die Wiedergabe zu starten.
Suchen einer bestimmten Stelle während der Wiedergabe:
1 Halten Sie ∞ oder § gedrückt, um eine bestimmte Stelle auf der CD in Vorwärts-
oder Rückwertsrichtung zu suchen.
yy
Nach 2 Sekunden erhöht sich die Suchgeschwindigkeit.
2 Lassen Sie die Taste los, wenn die gewünschte Stelle erreicht ist.
Anmerkung: In der Betriebsart SCAN ist Suchen nicht möglich.
Deutsch
11
Page 70

BEDIENUNG
MODE
P
R
O
G
Deutsch
MODE
00
– verschiedene Wiedergabe-Betriebsarten
Durch mehrmaliges Drücken von MODE 0 können Sie
nacheinander diese Wiedergabefunktionen abrufen:
SHUFFLE: Alle Titel werden
in zufälliger Reihenfolge
einmal abgespielt.
SHUFFLE REPEAT ALL: Alle Titel werden
zufälliger Reihenfolge
wiederholt in
abgespielt, bis
Sie diese Betriebsart verlassen.
REPEAT: Der aktuelleTitel wird
wiederholt
abgespielt, bis Sie diese Betriebsart
verlassen.
REPEAT ALL: Die CD wird
wiederholt
abgespielt, bis Sie diese Betriebsart verlassen.
SCAN: Jeder Titel wird 10 Sekunden lang angespielt, bis Sie diese Betriebsart
verlassen oder alle Titel einmal gespielt wurden.
Drücken Sie nochmals MODE 0, um alle Wiedergabebetriebsarten auszuschalten.
yy
Im Display wird die gewählte Betriebsart angezeigt.
yy
Während der Wiedergabe: Die Wiedergabe setzt automatisch mit der gewählten
Betriebsart fort.
yy
In Position Stop: Drücken Sie 2;, um die Wiedergabe zu starten.
12
Page 71

BEDIENUNG
PROG – Programmieren von Musiktiteln (max. 99 Titel)
1 Wählen Sie mit PREV ∞ oder NEXT § den gewünschten Titel.
2 Sobald der gewünschte Titel im Display erscheint, drücken Sie PROG, um diesen
Titel im Programm abzuspeichern.
yy
Displayanzeige, Beispiel:
PROG
Titelnummer / P / Anzahl der gespeicherten Titel
Anmerkungen:
-
Wenn Sie die Taste PROG drücken, ohne vorher einen,
Titel auszuwählen, wird im Display
SELECt angezeigt.
Abspielen des Programms:
Wenn Sie die Titel in Position Stop gespeichert haben, drücken Sie PLAY/PAUSE 2;.
Wenn Sie die Titel während der Wiedergabe gespeichert haben, drücken Sie zuerst
STOP 9 und dann PLAY/PAUSE 2;.
yy
Displayanzeige: PROGRAM.
yy
Ihr Programm wird nun in der gewählten Betriebsart gespielt (z.B. SHUFFLE).
Überprüfen des Programms:
Halten Sie PROG zwei Sekunden lang gedrückt.
yy
Displayanzeige: Alle gespeicherten Titel blinken kurz hintereinander auf.
Löschen des Programms in Position Stop:
Drücken Sie STOP 9, um das gesamte Programm zu löschen.
yy
PROGRAM erlischt im Display.
yy
CLEAR erscheint kurz im Display.
Anmerkung: Durch eine Unterbrechung der Stromversorgung oder durch Öffnen des
CD-Spielerdeckels wird das Programm auch gelöscht.
Deutsch
13
Page 72

BEDIENUNG
P
R
O
G
Deutsch
ESA – Speicher für elektronische ‘Stoßdämpfung’
Drücken Sie ESA, um ESA ein-/auszuschalten.
yy
Das ESA Symbol leuchtet im Display auf.
yy
Nun werden laufend die Daten auf der CD im voraus
gespeichert. Dadurch werden Unterbrechungen durch
Stöße und Vibrationen beim Abspielen vermieden.
yy
Sehr starke Stöße und Vibrationen können den
ESA-Speicher ganz entleeren und das Abspielen der CD
wird unterbrochen.
Anmerkung: Beim Ein- und Ausschalten der ESA-Funktion wird die Wiedergabe
verzögert oder für einen Moment unterbrochen.
RESUME / HOLD
RESUME – Fortsetzen der Wiedergabe
1 Schieben Sie den Schalter RESUME/HOLD in die
Mittelposition, um die RESUME-Funktion einzuschalten.
2 Wenn Sie die Wiedergabe durch Drücken von STOP 9
beenden, wird die zuletzt gespielte Stelle gespeichert.
3 Drücken Sie 2;, um die Wiedergabe von dieser Stelle
fortzusetzen
HOLD – Deaktivieren aller Tasten
Schieben Sie den Schalter RESUME/HOLD ganz nach rechts, um die HOLD-Funktion
einzuschalten.
yy
Jetzt sind alle Tasten deaktiviert und funktionieren nicht bis Sie die
HOLD-Funktion wieder ausschalten. Wenn Sie eine Taste drücken
(ausgenommen OPEN), zeigt das Display HOLD.
Anmerkungen: -In der Position HOLD ist auch die RESUME-Funktion eingeschaltet.
-Öffnen Sie den CD-Spielerdeckel nicht, da dies die Information über
die zuletzt gespielte Stelle löscht.
14
Page 73

ALLGEMEINE INFORMATIONEN
• Berühren Sie niemals die Linse X des CD-Spielers!
• Schützen Sie den CD-Spieler, die Batterien und die CDs vor
Regen, Feuchtigkeit, Sand, Staub und übermäßiger Hitze
durch z.B. Heizgeräte oder direkte Sonneneinstrahlung
(z.B. in der Sonne geparktes Auto).
• Bei einem raschen Wechsel von kalter in warme Umgebung kann sich die Linse
beschlagen. Das Spielen einer CD ist dann nicht möglich. Lassen Sie dem Gerät
Zeit, sich zu akklimatisieren.
• Reinigen Sie den CD-Spieler nur mit einem feuchten faserfreien Tuch. Verwenden
Sie keine Reinigungsmittel, da diese das Gehäuse
angreifen können.
• Greifen Sie CDs immer am Rand an und legen Sie sie nach
dem Abspielen zurück in die Verpackung.
• Reinigen Sie Ihre CDs mit einem faserfreien Tuch. Wischen
Sie von der Mitte zum Rand. Reinigungsmittel können
Ihre CDs beschädigen.
• Wenn eine neue CD nicht auf der Mittelachse des Plattentellers liegen bleibt, liegt dies an Unebenheiten an der
Kante des Lochs in der CD. Glätten Sie diese Unebenheiten
mit einem Bleistift oder einem ähnlichen Gegenstand.
• Eingeschaltete Mobiltelefone in der Nähe des CD-Spielers können zu Störungen
führen.
Umweltaspekte
• Bitte informieren Sie sich darüber, wie Sie Verpackungsmaterialien, leere Batterien
und alte Geräte entsprechend den örtlichen Bestimmungen entsorgen können.
• Überflüssiges Verpackungsmaterial wurde vermieden. Wir haben unser möglichstes
getan, damit die Verpackung leicht in drei Monomaterialien aufteilbar ist: Pappe
(Schachtel), expandiertes Polystyrol - Styropor© (Puffer), Polyäthylen (Taschen,
Schaumstoffolien).
• Ihr Gerät besteht aus Materialien, die von darauf spezialisierten Betrieben
wiederverwertet werden können.
Deutsch
15
Page 74

FEHLERSUCHE
Deutsch
• Bei einem auftretenden Problem prüfen Sie bitte zuerst die nachstehenden Punkte,
bevor Sie das Gerät zur Reparatur bringen.
• Wenn Sie das Problem trotz nachstehender Hinweise nicht beheben können,
wenden Sie sich bitte an Ihren Händler oder an eine Servicestelle.
PROBLEM MÖGLICHE URSACHE LÖSUNG
Gerät schaltet Batterien
nicht ein / Batterien falsch eingelegt Batterien richtig einlegen
Wiedergabe startet Batterien sind neu eingelegt Drücken Sie 2;
nicht, keine Batterien sind leer Batterien wechseln
Displayanzeige Kontakte sind verschmutzt Kontakte mit Tuch reinigen
Netzadapter
Kabel locker Netzadapter richtig anstecken
Betrieb im Auto
Bei abgeschalteter Zündung
keine Stromversorgung zusätzliche Stromquelle ein
des Zigarettenanzünders
Wiedergabe
startet nicht oder CD-Spielerdeckel ist nicht Deckel ganz schließen
unterbricht richtig geschlossen
Display: keine CD ist nicht oder falsch CD mit der Beschriftung nach
Anzeige eingelegt oben einlegen
oder CD ist stark zerkratzt Verwenden Sie eine andere CD
no dISC CD ist schmutzig Reinigen Sie die CD
Batterieaufladung Falsche Batterien
im CD-Spieler aufgeladen werden
funktioniert nicht, Kontakte sind verschmutzt Kontakte mit Tuch reinigen
keine CHARGE-Anzeige
Wiedergabe startet RESUME oder SHUFFLE oder RESUME, SHUFFLE oder
nicht mit 1. Titel PROGRAM ist aktiviert PROGRAM ausschalten
HOLD-Funktion aktiviert Schalten Sie HOLD aus
Die Linse ist beschlagen CD-Spieler einige Zeit in
Legen Sie Batterien als
warmer Umgebung aufstellen
Nur ein Akku kann im Gerät
16
Page 75

FEHLERSUCHE
Versuchen Sie unter keinen Umständen, das Gerät selbst zu reparieren, da
die Garantie dadurch ihre Gültigkeit verliert.
PROBLEM MÖGLICHE URSACHE LÖSUNG
Allgemeine Fehl- Elektrostatische Entladung des Für einige Sekunden das
funktion des Benutzers über den CD-Spieler Gerät vom Netz trennen oder
CD-Spielers die Batterien herausnehmen
Kein Ton / PAUSE ist aktiviert Drücken Sie 2;
schlechte Kabel locker Verkabelung prüfen
Tonqualität Lautstärke minimal Lautstärke einstellen
Kopfhörer falsch aufgesetzt Auf L(inks) und R(echts)
Aufschrift achten
Kopfhörerstecker verschmutzt Stecker reinigen
Starke elektromagnetische Standort oder Verkabelung
Felder nahe dem CD-Spieler ändern
Betrieb im Auto
Starke Vibrationen Anderen Standort wählen
Adapterkassette ist schlecht Adapterkassette richtig
eingelegt einlegen
Temperatur im Auto ist zu CD-Spieler akklimatisieren
hoch/niedrig lassen
Zigarettenanzünderbuchse ist Zigarettenanzünderbuchse
verschmutzt reinigen
Falsche AUTOREVERSE- AUTOREVERSEBandlaufrichtung des Bandlaufrichtung wechseln
Autoradios
Rauschen/Brummen
(Betrieb im Auto) Autoradios
Ungeeigneter Eingang des Adapterkassette verwenden
Deutsch
17
Page 76

BEDIENINGSTOETSEN zie afbeelding op blz. 3
Batterijen niet weggooien,
maar inleveren als KCA.
ñ
DISPLAY......................
§ .................................springt en zoekt vooruit
∞ .................................springt en zoekt terug
VOLUME......................instelling van het geluidsniveau bij de de hoofdtelefoonbus
RESUME/HOLD ..........activeert de RESUME-functie en/of HOLD-functie (vergrendelt
Nederlands
MODE 00......................kiest de verschillende afspeelmodi: SHUFFLE™
PROG P........................slaat sporen in een programma op en controleert het programma
DBB..............................Dynamic Bass Boost: versterkt de bassen,
STOP 9........................stopt het afspelen van de CD, wist eerdere instellingen,
OPEN ...........................opent het deksel van de CD-speler
2; ................................start en onderbreekt het afspelen van de CD
ESA ..............................Electronic Shock Absorption is het buffer-geheugen voor
p LINE OUT ................Bus voor hoofdtelefoon (3,5mm)
4.5 V DC.......................Aansluiting voor externe voeding
Opmerking:- De status feedback (bijv. PAUSE, lege batterij, enz.) en het gebruik van de
toetsen worden door een akoestisch signaal in de hoofdtelefoon begeleid
.
geeft de verschillende afspeelmodi, nummers en tijden aan
alle toetsen)
SHUFFLE REPEAT ALL™REPEAT™REPEAT ALL™SCAN™uit
DBB 1™DBB 2™DBB 3™uit
Druk deze toets langer dan 3 seconden in om het
akoestische feedback in/uit te schakelen.
schakelt de CD-speler uit en activeert het laden.
ononderbroken geluid
Dit apparaat voldoet aan de radio-ontstoringseisen van de
18
Europese Gemeenschap.
Page 77

VOEDING
Netadapter
AY 3160 netadapter 4,5 V/400 mA gelijkstroom, plus-pool naar middenpin
1 Controleer of de plaatselijke netspanning met
de spanning van de adapter overeenstemt.
2 Sluit de netadapter op de 4,5 DC aansluiting
van de CD-speler en op het stopcontact aan.
Opmerkingen: - Gebruik uitsluitend de AY 3160
(bijgesloten of als optie verkrijgbaar)
adapter, andere producten kunnen
het toestel beschadigen.
- Geen akoestisch feedback bij
gebruik van de adapter.
- Onderbreek altijd de aansluiting van de adapter als u hem niet
gebruikt.
Batterijen, type LR6, UM3 of AA
(bijgesloten of als optie verkrijgbaar)
Open het batterijvakje en leg er de oplaadbare
batterij of 2 alkaline batterijen in.
Standaard afspeeltijden onder normale
omstandigheden:
Alkaline batterijen: 12 uur (ESA uit)
10 uur (ESA aan)
Verwijder de batterijen als zij leeg zijn of als de
CD-speler lang niet wordt gebruikt.
Opmerkingen: De toestand van de batterij wordt op het display aangegeven:
- Volle batterijen: geen indicatie.
- Zwakke batterijen: -symbool knippert. Dit symbool is niet te
zien, als oplaadbare batterijen worden gebruikt.
- Lege batterijen: -symbool knippert en de melding bAtt
verschijnt.
- Vervang de batterijen of sluit de netadapter aan.
Batterijen bevatten chemische stoffen en moeten daarom als chemisch afval
worden gedeponeerd.
19
Nederlands
Page 78

AANSLUITINGEN
Opladen van de oplaadbare Philips batterij in het toestel
(bijgesloten of als optie verkrijgbaar)
AY 3361 NiCd oplaadbare batterij om in het toestel op te laden
De oplaadbare batterij wordt opgeladen, als de netadapter aangesloten, het toestel
uitgeschakeld is en u de STOP 9 toets indrukt.
Nederlands
yy
Display indicatie tijdens het laden: CHARGE en
Laadtijd ca: 5 uur (NiCd)
yy
Display indicatie, als de batterij vol is: FULL en
Opmerking: - Gebruik alleen oplaadbare Philips batterijen, aangezien andere
oplaadbare batterijen niet in het toestel opgeladen kunnen worden.
Aansluiten van de hoofdtelefoon
Sluit de bijgesloten hoofdtelefoon aan op
de p LINE OUT aansluiting.
AY 3674 (AZ 7582: AY 3675)
Opmerking : Gebruik deze aansluiting ook voor het
aansluiten van uw hifi-systeem (signaalverbinding) of uw autoradio (adapter cassette
of signaal-verbinding). In beide gevallen moet het volume van de CDspeler op 8 worden gezet.
Gebruik uw hoofd bij het gebruik van uw hoofdtelefoon
Luisterveiligheid: Gebruik uw hoofdtelefoon niet met hoge geluidssterkte.
Oorspecialisten waarschuwen dat een voortdurend gebruik met hoge geluidssterkte
tot een permanene gehoorschade kan leiden.
Verkeersveiligheid: Gebruik geen hoofdtelefoon bij het besturen van een
voertuig. Het kan gevaarlijk zijn en is in talrijke landen wettelijk verboden. Zelfs
wanneer uw hoofdtelefoon er een is van het „open air“-type, waarmee u geluid van
buitenaf kunt horen, mag u de geluidssterkte niet zo hoog draaien dat u niet meer
kunt horen wat er rondom u heen gebeurt.
(bijgesloten)
Batterijen niet weggooien,
ñ
maar inleveren als KCA.
20
Page 79

AANSLUITINGEN
DIGITAL
DIGIT
AL
DIGITAL
4,5 V DC
Aansluitingen voor het gebruik in de auto
(bijgesloten of als optie verkrijgbaar)
AY 3545 - autospannings-converter (4,5 V/600 mA, DC, plus-pool naar middenpin)
AY 3501 - auto-adapter cassette
1 Zoek voor de CD-speler een
veilige plaats op een
horizontaal, trillingsvrij en
stabiel oppervlak, waar het
toestel geen gevaar voor de
bestuurder of de passagiers
betekent resp. niet in de
weg is.
2 Sluit de DC-stekker van de
spanningsconverter op de DC-bus van uw CD-speler aan
accu, negatieve aarding).
3
Steek de spanningsconverter in de bus van de sigarettenaansteker. Reinig, indien nodig,
de bus van de sigarettenaansteker zodat er een goed elektrisch contact ontstaat
4 Zet de geluidssterkte op laag en
schakel de autoreverse functie van uw auto
radio-cassette speler uit.
5 Sluit de adapter cassette-stekker op de
p LINE OUT
6 Schuif de adapter cassette voorzichtig in het cassettevak van de autoradio.
7 Let er goed op dat het snoer u niet bij het besturen van de auto belemmert.
8 Start de CD-speler, zet de geluidssterkte op 8 en stel het geluid met de
bedieningstoetsen van de autoradio in.
Druk op de eject-toets van de autoradio om de adapter cassette te verwijderen.
Verwijder altijd de spanningsconverter uit de bus van de sigarettenaansteker, als de
CD-speler niet gebruikt wordt.
Opmerkingen m.b.t. het gebruik in de auto:
- Vermijd overmatige hitte door de autoverwarming of direct zonlicht (bijv. ‘s zomers in
een geparkeerde auto).
- Als uw autoradio een LINE IN-aansluiting heeft, is het beter die in plaats van de
adapter cassette voor de autoradio-aansluiting te gebruiken. Sluit de signaalverbinding op deze LINE IN-aansluiting en op depLINE OUT-aansluiting van de CDspeler aan.
(alleen voor 12 V-auto-
.
-bus van de CD-speler aan.
Nederlands
21
Page 80

BEDIENING
M
O
D
E
P
R
O
G
Plaatsen van de CD Verwijderen van de CD
• Druk
voorzichtig op
het midden
Nederlands
van de CD
zodat hij op de
• Houd de CD
aan de rand
vast en druk
voorzichtig op
de spil.
spil past.
Afspelen van een CD
1 Open het deksel door de OPEN schuifknop opzij te schuiven.
2 Leg er een audio CD met de bedrukte zijde naar boven in.
Druk de linker kant van het deksel naar beneden om het te
sluiten.
3 Druk de 2; toets in om het afspelen van de CD te starten.
yy
Display indicatie: (voorbeeld)
1 = actueel spoor / 2:56 = verstreken tijd van het
actuele spoor
4 Gebruik de toetsen VOLUME en DBB om het geluid in te stellen.
5 Onderbreek het afspelen van de CD door indrukken van de 2;-toets. Zet het
afspelen van de CD voort door de 2;-toets opnieuw in te drukken.
yy
Display indicatie van: tijd van de actuele stand (knippert).
6 Druk de STOP 9 toets in om het afspelen van de CD te stoppen.
yy
Display indicatie van: (voorbeeld)
17 = totaal aantal sporen / 51:06 = totale speeltijd
Als u de STOP 9-toets opnieuw indrukt, schakelt u het toestel uit.
Opmerking:- Wordt er 10 seconden lang geen enkele toets ingedrukt, wordt het
toestel automatisch uitgeschakeld.
22
Page 81

BEDIENING
∞ §
Kiezen van een ander nummer:
Druk even de ∞ of § toets één keer/meerdere keren in om
naar het begin van het (de) actuele/vorige of volgende
nummer(s) te springen.
yy
Display indicatie: gekozen titel nummer.
yy
Tijdens het afspelen: het afspelen van de CD begint
automatisch met het gekozen nummer.
yy
In stop-stand: druk de 2; toets in om het afspelen van de CD te starten.
Opzoeken van een passage tijdens het afspelen van de CD:
1 Houd de ∞ of § toets ingedrukt om een bepaalde passage in voorwaartse of
achterwaartse richting te vinden.
yy
Na 2 seconden begint het zoeken met hoge snelheid.
2 Laat de toets los als u de gewenste passage bereikt heeft.
Opmerking: Zoeken is niet mogelijk in de SCAN modus.
Nederlands
23
Page 82

BEDIENING
MODE
P
R
O
G
00
MODE
Door indrukken van de MODE 0 toets kunt u achterelkaar
volgende afspeelmodi activeren:
SHUFFLE: De nummers worden
Nederlands
SHUFFLE REPEAT ALL: Alle nummers worden
REPEAT: Het nummer wordt
REPEAT ALL: De CD wordt
SCAN: Elk nummer wordt 10 seconden lang even gespeeld tot u deze modus verlaat
Druk de MODE 0 toets nogmaals in om alle modi te inactiveren .
yy
yy
yy
– verschillende afspeelmodi
in willekeurige volgorde
afgespeeld tot zij allemaal één keer afgespeeld zijn.
steeds weer in
willekeurige volgorde
u deze modus verlaate.
steeds weer
steeds wee
of tot alle nummers één keer gespeeld zijn.
De gekozen afspeelmodus wordt op het display aangegeven.
Tijdens het afspelen: Het afspelen van de CD wordt automatisch met de gekozen
afspeelmodus voortgezet.
In stop stand: druk de 2; toets in om het afspelen van de CD te starten.
afgespeeld tot
afgespeeld tot u deze modus verlaat.
r afgespeeld tot u deze modus verlaat.
24
Page 83

BEDIENING
PROG – programmeren van nummers (max. 99 nummers)
1 Kies het gewenste nummer met PREV ∞ of NEXT §.
2 Zodra het gewenste nummer op het display verschijnt, drukt u de PROG toets in om
het nummer in het geheugen op te slaan.
yy
Display indicatie van: titelnummer
PROG
/ P / totaal aantal opgeslagen nummers, bijv.
Opmerkingen:
- Als u de toets PROG indrukt en u heeft nog geen nummer
gekozen, wordt SELECt op het display aangegeven.
Afspelen van het programma:
Als u de nummers in de STOP modus gekozen heeft, druk dan de PLAY/PAUSE 2; toets
in.
Als u de nummers tijdens het afspelen van de CD gekozen heeft, druk dan eerst de
STOP 9 en dan de PLAY/PAUSE 2; toets in.
yy
Display indicatie: PROGRAM.
yy
Uw programma wordt in de gekozen afspeelmodus weergegeven (bijv. SHUFFLE).
Controle van de instellingen:
Druk de PROG toets meer dan 2 seconden lang in.
yy
Display indicatie: na elkaar knippert elk opgeslagen nummer een ogenblik lang.
Wissen van het programma in de STOP modus:
Druk de STOP 9 toets in om het programma te wissen.
yy
PROGRAM verdwijnt op het display en uw programma is gewist.
yy
CLEAR gaat heel even op het display branden.
Opmerking:- Door het onderbreken van de stroomtoevoer of het openen van het deksel
wordt het programma gewist.
Nederlands
25
Page 84

BEDIENING
P
R
O
G
ESA – Electronic Shock Absorption Memory
Druk de ESA toets in om ESA in/uit te schakelen.
yy
Het ESA-/PSM-symbool op het display gaat branden.
yy
Het ESA geheugen slaat van te voren doorlopend de CD-
Nederlands
gegevens op die afgespeeld moeten worden. Hierdoor
wordt tijdens het afspelen het door schokken en trillingen
veroorzaakte springen van het geluid voorkomen.
yy
Door langer durende schokken en trillingen kan het ESA
geheugen volledig leeg raken, het afspelen van de CD wordt dan onderbroken.
Opmerking: Als de ESA-functie in- en uitgeschakeld wordt, wordt het afspelen van de
CD vertraagd of voor korte tijd onderbroken.
RESUME / HOLD
RESUME – afspelen vanaf het punt waar u gestopt bent
1 Activeer de RESUME functie door de RESUME/HOLD
schakelaar in de middelste stand te schuiven.
2 Als u het afspelen van de CD door indrukken van de STOP
9 toets stopt, wordt de als laatste afgespeelde stand
opgeslagen.
3 Druk 2; in om de CD vanaf het punt waar hij gestopt werd verder af te laten
spelen.
HOLD – inactiveren van alle toetsen
Activeer de HOLD functie door de RESUME/HOLD schakelaar naar uiterst rechts te
schuiven.
yy
Nu zijn alle toetsen geblokkeerd totdat u deze functie weer uitschakelt. Als u een
toets indrukt (behalve OPEN), wordt HOLD op het display aangegeven.
Opmerking: - In de HOLD stand is de RESUME functie automatisch geactiveerd.
- Door het openen van het deksel wordt de informatie over het als laatste
gespeelde stukje gewist.
26
Page 85

ALGEMENE INFORMATIE
• Raak de lens X van de CD speler niet aan!
• Stel de CD-speler, batterijen of CD’s niet bloot aan regen en
vocht, zand en stof of overmatige hitte (veroorzaakt door
verwarmingen of direct zonlicht).
• De lens kan beslaan, als het toestel plotseling van een
koude naar een warme omgeving wordt gebracht. Het
afspelen van een CD is dan niet mogelijk. Laat de CD-speler in een warme
omgeving staan tot het vocht verdampt is.
• U kunt de CD-speler met een zachte en een beetje vochtige
zeemleren lap reinigen. Gebruik geen reinigingsmiddelen,
deze zouden het toestel kunnen aantasten.
• Pak de CD altijd aan de rand vast en leg hem na gebruik
weer terug in de box.
• Voor het reinigen van de CD veegt u met een zacht, pluisvrij
doekje in een rechte lijn van het midden naar de rand. Een
reinigingsmiddel kan de disc beschadigen!
• Als een nieuwe CD niet op de spil blijft zitten, verwijder
dan de kleine oneffenheden rond het middengat met een
pen of iets dergelijks.
• Ingeschakelde mobiele telefoons in de buurt van de CDspeler kunnen tot storingen leiden.
Environmental information
• Let a.u.b. op de plaatselijke voorschriften met betrekking tot het deponeren van
verpakkingsmateriaal, lege batterijen en niet meer gebruikte toestellen.
• Al het overtollige verpakkingsmateriaal is weggelaten. Wij hebben onze uiterste
best gedaan om de verpakking makkelijk in drie aparte materialen te kunnen
scheiden: karton (doos), uitzetbaar polysterol (buffer) en polyethyleen (zakken,
beschermende schuimlaag).
• Uw toestel bestaat uit materialen die, indien door een gespecialiseerd bedrijf uit
elkaar genomen, gerecycled kunnen worden.
Nederlands
27
Page 86

OPLOSSEN VAN PROBLEMEN
Als er een storing optreedt, controleer dan eerst de onderstaande lijst van punten
voordat u het toestel in reparatie geeft.
Als u het probleem niet met behulp van deze aanwijzingen op kunt lossen, neem dan
contact op met uw leverancier of service-organisatie.
PROBLEEM MOGELIJKE OORZAAK OPLOSSING
Geen voeding of de Batterijen
Nederlands
CD-speler wil niet De batterijen zijn verkeerd Plaats de batterijen op de
starten geplaatst juiste manier in de speler
Nieuwe batterijen Druk op 2;
De batterijen zijn leeg
Geen display- De contactpennen zijn vuil Maak schoon met een doek
indicatie Netadapter
niet goed aangesloten Sluit de adapter goed aan
In de auto
De sigarettenaansteker geeft geen
spanning als de motor uitstaat
Het afspelen wil niet
starten of wordt
onderbroken
Geen display- of de CD ligt verkeerd etiket naar boven
indicatie Er zitten krassen op de CD Gebruik een andere CD
of no dISC De CD is vuil Maak de CD schoon
Het opladen van
batterijen in
de speler
werkt niet, geen
CHARGE-indicatie
Weergave start nietRESUME of SHUFFLE of Schakel RESUME, SHUFFLE
met het 1. nummer PROGRAM is geactiveerd of PROGRAM uit
De HOLD-functie staat aan Zet de HOLD-functie uit
Het deksel van de CD-speler Sluit het deksel goed
is niet goed dicht
Vocht of condens op de lens Zet de speler op een warme
Er zit geen CD in het apparaat Leg er een CD in met het
Verkeerde batterijen In de speler kunnen enkel de
De contactpennen zijn vuil Maak schoon met een doek
Vervang de batterijen/laad ze op
Start de motor of
gebruik batterijen
plaats totdat het vocht
verdampt is
juiste batterijen opgeladen
worden
28
Page 87

OPLOSSEN VAN PROBLEMEN
U mag in geen geval proberen het toestel zelf te repareren, anders vervalt
de garantie.
PROBLEEM MOGELIJKE OORZAAK OPLOSSING
Algemene Elektrostatische ontlading van
storing de gebruiker via de CD-speler naar het toestel of neem de
Geen geluid of PAUSE is geactiveerd Druk 2; in
slechte Losse of verkeerde aansluitingenControleer de aansluitingen
geluidskwaliteit Geluidssterkte Regel de geluidssterkte
is niet hoger gedraaid
Hoofdtelefoon verkeerd Let op de L (links) en
opgezet R (rechts) indicaties
Stekker van de hoofdtelefoon Reinig de stekker van
is vuil de hoofdtelefoon
Sterke magnetische velden Verander de positie of de
in de buurt van de CD-speler aansluitingen van de speler
Gebruik in de auto
Sterke trillingen Zoek een andere plaats
Adapter cassette is er Schuif de adapter
verkeerd ingeschoven cassette er goed in
Temperatuuur in de auto Laat de CD-speler
is te hoog/laag acclimatiseren
Sigarettenaansteker/ Reinig de
-bus is te vuil sigarettenaansteker/-bus
Verkeerde weergave-richting Verander de richting
van de autoreverse-functie van
de auto-cassettespeler
Brommen of lawaai Ongeschikte Gebruik de adapter cassette
in de auto autoradio-ingangsbus
Onderbreek de stroomtoevoer
batterijen er even uit
van de autoreverse
Nederlands
29
Page 88

CONTROLLI Vedere illustrazione a pagina 3
DISPLAY......................
§ .................................salta e cerca avanti
∞ .................................salta e cerca indietro
VOLUME......................regola il livello del volume sulla presa della cuffia
RESUME/HOLD ..........attiva la funzione RESUME e/o la funzione HOLD (blocco di
MODE 00......................seleziona i diversi modi di riproduzione:
PROG P........................memorizza i brani in un programma e revisiona il programma
DBB..............................Dynamic Bass Boost: accentua la risposta dei bassi,
Italiano
STOP 9........................interrompe la riproduzione del CD, cancella varie impostazioni,
OPEN ...........................avvia e mette in pausa la riproduzione del CD
2; ................................starts and pauses CD play
ESA ..............................Electronic Shock Absorption è la memoria buffer che
p LINE OUT ................presa per cuffia (3,5 mm)
4.5 V DC.......................presa per alimentatore esterno
Nota:- Il feedback di stato (ad es. PAUSE, batteria scarica ecc.) e l’azionamento dei
tasti sono accompagnati da un segnale acustico in cuffia.
mostra i diversi modi di riproduzione, i brani e i tempi
tutti i pulsanti)
SHUFFLE™SHUFFLE REPEAT ALL™REPEAT™
REPEAT ALL™SCAN™disattivare
DBB 1™DBB 2™DBB 3™disattivare
Tenere premuto questo pulsante per più di 3 secondi per
disattivare e attivare la risposta acustica.
spegne il lettore CD ed attiva la carica.
garantisce un suono ininterrotto
Questo apparecchio soddisfa i requisiti previsti dalle normative della
Comunità Europea in materia di radiointerferenze.
30
Page 89

ALIMENTAZIONE
Adattatore di rete
AY 3160 adattatore di rete 4,5 V/400 mA corrente continua, polo positivo al pin centrale
1 Accertarsi che il voltaggio locale corrisponda
al voltaggio dell’adattatore.
2 Collegare l’adattatore alla presa a 4,5 V CC sul
lettore ed alla presa a parete.
Note: - Usare solo l’adattatore AY 3160, altri
prodotti potrebbero danneggiare
l’apparecchio.
- Non vi è feedback acustico quando si usa
l’adattatore.
- Scollegare sempre l’adattatore quando non lo si usa.
Batterie, tipo LR6, UM3 o AA
Aprire il vano batterie ed inserire il pacco di
batterie ricaricabile o 2 batterie alcaline.
Tempi di riproduzione caratteristici in condizioni
normali:
batterie alcaline: 12 ore (ESA disattivato)
Togliere le batterie, una volta scariche, o quando
si prevede di non usare il lettore CD per molto
tempo.
Note: Lo stato delle batterie viene indicato a display:
- batterie cariche: nessuna indicazione.
- batterie quasi scariche: il simbolo lampeggia. Questo simbolo non è
disponibile quando si usano le batterie ricaricabili.
- batterie scariche: lampeggia il simbolo -e appare il messaggio bAtt.
- sostituire le batterie o collegare l’adattatore.
Le batterie contengono sostanze chimiche e devono pertanto essere smaltite
in modo appropriato.
(fornito o disponibile come optional)
(fornite o disponibili come optional)
10 ore (ESA attivato)
Italiano
31
Page 90

COLLEGAMENTI
Ricarica del pacco di batterie Philips a bordo
(fornito o disponibile come optional)
AY 3361 - pacco di batterie NiCd per ricarica a bordo
Per ricaricare il pacco di batterie si deve collegare l’adattatore di rete, l’apparecchio
deve essere spento, e si deve premere il pulsante STOP 9.
yy
Indicazione a display durante la ricarica: CHARGE e
Tempo di ricarica approssimativo: 5 ore (NiCd)
yy
Indicazione a display con batterie completamente cariche: FULL e
Nota: - Usare solo il pacco di batterie Philips, in quanto batterie ricaricabili acquistate
Italiano
separatamente non possono essere ricaricate a bordo.
Per collegare la cuffia
Collegare la cuffia fornita con la presa jack
p LINE OUT.
AY 3674 (AZ 7582: AY 3675)
Nota : usare questa presa anche per collegare il sistema
HiFi (conduttore di segnale) o l’autoradio (cassetta
adattatore o conduttore di segnale). In entrambi i
casi, il volume del lettore CD deve essere impostato sulla posizione 8.
Usate la cuffia con intelligenza
Sicurezza dell’udito: non tenere un volume molto alto in cuffia. Gli esperti di
audiometria riferiscono che l’uso continuo ad alto volume può provocare danni
permanenti all’udito.
Sicurezza stradale: non usare la cuffia mentre si guida un veicolo. Può costituire
un pericolo e in molti paesi è illegale. Anche se la cuffia fosse del modello “aria
aperta” che consente di ascoltare i rumori esterni, non si deve alzare
eccessivamente il volume, tanto da non sentire più i rumori di ciò che accade intorno.
(fornita)
32
Page 91

COLLEGAMENTI
DIGITAL
DIGITAL
DIGITAL
4,5 V DC
Uso in automobile
(materiali forniti o disponibili come optional)
AY 3545 - convertitore di tensione per auto (4,5 V / 600 mA, CC, polo positivo al pin
centrale)/AY 3501 - cassetta adattatore per auto
1 Individuare una posizione
sicura per il lettore CD su
una superficie orizzontale,
stabile e non soggetta a
vibrazioni, dove non
costituisca un pericolo per il
conducente o i passeggeri o
non sia di ostacolo nel
passaggio.
2 Collegare la spina CC del convertitore di tensione alla presa CC del lettore CD
(vale solo per batteria auto a 12 V, messa a terra negativa)
3
Inserire il convertitore di tensione nella presa dell’accendisigaro. Se necessario, pulire
la presa dell’accendisigaro per garantire un contatto elettrico soddisfacente
4 Abbassare il volume e
disattivare la funzione autoreverse del lettore di
.
.
cassette dell’autoradio.
5 Collegare la spina della cassetta adattatore alla presa
p LINE OUT
del lettore CD.
6 Introdurre la cassetta con attenzione nel vano cassette dell’autoradio.
7 Accertarsi che il cavo non sia di intralcio nella guida.
8 Avviare il lettore CD, portare il volume alla posizione 8 e regolare il suono
utilizzando i comandi dell’autoradio.
Per estrarre la cassetta adattatore premere il pulsante di espulsione (eject)
dell’autoradio. Staccare sempre il convertitore di tensione dalla presa
dell’accendisigaro quando non si usa il lettore CD.
Note per l’uso in automobile:
- Evitare condizioni di eccessivo calore dovute al riscaldamento dell’auto o alla luce
diretta del sole (ad es. nell’auto parcheggiata al sole, d’estate).
- Se l’autoradio dispone di una presa jack LINE IN, è preferibile usare questa presa
per il collegamento all’autoradio, anziché la cassetta adattatore. Collegare il
conduttore del segnale a questa presa LINE IN ed alla presa
p
LINE OUT
del lettore CD.
Italiano
33
Page 92

FUNZIONAMENTO
M
O
D
E
P
R
O
G
Inserimento del CD Rimozione del CD
• Premere
delicatamente
sul centro del
CD per
inserirlo sul
• Afferrare il CD
per il bordo e
premere
delicatamente
sul perno.
perno.
Riproduzione di un CD
Italiano
1 Aprire il coperchio spingendo il cursore OPEN
2 Inserire un CD audio, con il lato stampato rivolto verso
l’alto. Premere sul lato sinistro per chiudere il coperchio.
3 Premere il pulsante 2; per avviare la riproduzione del CD.
yy
Indicazione a display: (esempio)
1 = brano corrente / 2:56 = tempo di riproduzione già
trascorso del brano corrente
4 Regolare il suono usando i comandi VOLUME e DBB.
5 Per interrompere la riproduzione del CD premere il pulsante 2;. Per proseguire la
riproduzione del CD premere di nuovo il pulsante 2;.
yy
Indicazione a display: tempo corrispondente alla posizione attuale
(lampeggiante).
6 Premere il pulsante STOP 9 per interrompere la riproduzione del CD.
yy
Indicazione a display: (esempio)
17 = totale dei brani / 51:06 = tempo di riproduzione
totale
Premendo di nuovo il pulsante STOP 9 si spegne l’apparecchio.
Nota: se non si preme alcun pulsante per 10 secondi, l’apparecchio si spegne
automaticamente
34
a lato
.
Page 93

FUNZIONAMENTO
∞ §
Per selezionare un brano diverso:
Premere brevemente il pulsante ∞ o § una o più volte per
saltare all’inizio del brano corrente o di brani precedenti o
successivi.
yy
Indicazione a display: numero del brano selezionato.
yy
Durante la riproduzione: la riproduzione del CD prosegue
automaticamente con il brano selezionato.
yy
In posizione di stop: premere il pulsante 2; per avviare la riproduzione del CD.
Ricerca di un passaggio durante la riproduzione del CD:
1 Tenere premuto il pulsante ∞ o § per trovare un passaggio particolare in
direzione avanti o indietro.
yy
Dopo 2 secondi, partirà la ricerca ad alta velocità.
2 Rilasciare il pulsante una volta raggiunto il passaggio desiderato.
Nota: la ricerca non è possibile nel modo SCAN.
Italiano
35
Page 94

FUNZIONAMENTO
MODE
P
R
O
G
00
MODE
Premendo il pulsante MODE 0 si possono attivare in
sequenza i seguenti modi di riproduzione:
SHUFFLE: i brani vengono riprodotti
SHUFFLE REPEAT ALL: tutti i brani vengono riprodotti
REPEAT: il brano viene riprodotto
REPEAT ALL: il CD viene riprodotto
Italiano
SCAN: ogni brano viene letto per 10 secondi finché non si esce da questo modo
Premere di nuovo il pulsante MODE 0 per disattivare questi modi operativi.
yy
yy
yy
– diversi modi di riproduzione
in ordine casuale
non siano stati tutti riprodotti una volta.
ripetutamente in ordine casuale
finché non si esce da questo modo di riproduzione.
ripetutamente
di riproduzione.
ripetutamente
di riproduzione.
operativo o finché tutti i brani non siano stati scansionati una volta.
Il modo di riproduzione selezionato è indicato a display.
Durante la riproduzione: la riproduzione del CD continua automaticamente nel
modo di riproduzione selezionato.
In posizione di stop: premere il pulsante 2; per avviare la riproduzione del CD.
finché
finché non si esce da questo modo
finché non si esce da questo modo
36
Page 95

OPERATION
PROG – programmazione dei brani (max. 99 brani)
1 Selezionare il brano desiderato con PREV ∞ o NEXT §.
2 Appena compare a display il numero del brano desiderato, premere il pulsante
PROG per memorizzare il brano.
yy
Indicazione a display: numero del brano
PROG
/ P / tnumero totale dei brani memorizzati, ad es.
Note:
- Quando si preme PROG, e nessun brano è selezionato, a
display compare la scritta SELECt.
Riproduzione del programma:
Se i brani sono stati selezionati in modo STOP, premere il pulsante PLAY/PAUSE 2;.
Se i brani sono stati selezionati durante la riproduzione del CD, premere prima
STOP 9 e quindi il pulsante PLAY/PAUSE 2;.
yy
Indicazione a display: PROGRAM.
yy
Il programma verrà riprodotto nel modo di riproduzione selezionato (ad es.
SHUFFLE).
Revisione delle impostazioni:
Premere il pulsante PROG per più di 2 secondi.
yy
Indicazione a display: i brani memorizzati lampeggiano brevemente in sequenza
uno dopo l’altro.
Cancellazione del programma in modo STOP:
Premere il pulsante STOP 9 per cancellare il programma.
yy
PROGRAM scompare dal display e il programma è cancellato.
yy
CLEAR lampeggia brevemente a display.
Nota: interrompendo l’alimentazione o aprendo il coperchio si cancella il programma.
Italiano
37
Page 96

FUNZIONAMENTO
P
R
O
G
ESA – Electronic Shock Absorption Memory
Premere il pulsante ESA per attivare e disattivare ESA.
yy
Nel display appare il simbolo ESA.
yy
La memoria ESA memorizza continuamente in anticipo i
dati relativi al CD da riprodurre. Ciò impedisce che il
suono si interrompa durante la riproduzione a causa di
urti e vibrazioni.
yy
Una serie prolungata di urti e vibrazioni possono svuotare
completamente la memoria ESA e la riproduzione del CD verrà interrotta.
Nota: quando si attivano o disattivano le funzioni ESA, la riproduzione del CD verrà
Italiano
ritardata o interrotta brevemente.
RESUME / HOLD
RESUME – riproduzione dall’ultimo punto di arresto
1 Attivare la funzione RESUME spostando il cursore
RESUME/HOLD sull’impostazione centrale.
2 Se si interrompe la riproduzione del CD premendo il
pulsante STOP 9, verrà memorizzata l’ultima posizione
riprodotta.
3 Premere 2; per riprendere la riproduzione del CD dalla posizione in cui il CD era
stato fermato.
HOLD – disabilitazione di tutti i pulsanti
La funzione HOLD si attiva portando il cursore RESUME/HOLD sulla posizione
all’estrema destra.
yy
Ora tutti i pulsanti sono disabilitati finché la funzione non verrà di nuovo
disattivata. Se si preme un pulsante (tranne OPEN), il display indicherà la scritta
HOLD.
Note: - In posizione HOLD la funzione RESUME è attivata automaticamente.
- Aprendo il coperchio si cancella l’informazione relativa all’ultima posizione riprodotta.
38
Page 97

INFORMAZIONI GENERALI
• Non toccare la lente X del lettore CD!
• Non esporre il lettore CD, le batterie o i CD a pioggia e
umidità, sabbia e polvere o calore eccessivo provocato da
caloriferi o dalla diretta luce del sole.
• La lente può appannarsi quando l’apparecchio viene
spostato improvvisamente da un ambiente freddo ad un
ambiente caldo. In queste condizioni non è possibile riprodurre un CD. Lasciare il
CD in un ambiente caldo fino a totale evaporazione dell’umidità.
• Il lettore CD può essere pulito con una pelle di camoscio
morbida e leggermente inumidita. Non usare detergenti,
perché potrebbero avere effetto corrosivo
• Afferrare sempre il CD per il bordo e riporlo nella custodia
dopo l’uso.
• Per pulire il CD, passare con un panno morbido e senza
plume in linea retta dal centro verso il bordo.
Un detergente può danneggiare il disco!
• Quando un CD nuovo non si inserisce sul perno, asportare
le piccole bave presenti intorno al foro centrale utilizzando
una penna o uno strumento simile.
• La presenza di cellulari in funzione nelle vicinanze del
lettore CD può provocare disturbi al funzionamento.
Informazioni ambientali
• Osservare le norme locali riguardanti lo smaltimento dei materiali di imballaggio, le
batterie scariche e le apparecchiature vecchie.
• Si è evitato di utilizzare materiale di imballaggio ridondante. Abbiamo fatto del
nostro meglio per facilitare lo smaltimento differenziato degli imballaggi
suddividendo i materiali in tre mono-materiali: cartone (scatola), polistirolo espanso
(tamponi) e polietilene (sacchetti, pellicola protettiva in espanso).
• L’apparecchio è costituito di materiali che possono essere riciclati se smontati da
un’azienda specializzata.
Italiano
39
Page 98

RICERCA GUASTI
Se si verifica un guasto, controllare i punti elencati di seguito prima di far riparare
l’apparecchio.
Se non si è in grado di risolvere un problema con l’aiuto di questi suggerimenti,
rivolgersi al rivenditore o al centro di assistenza.
PROBLEM POSSIBILE CAUSA SOLUZIONE
Mancanza di Batterie
alimentazione o il Batterie inserite in modo Inserire correttamente le
CD non si avvia sbagliato batterie
Nessuna indicazione
sul display Adattatore di rete
Italiano
Il CD non parte
o si interrompe Coperchio del lettore CD Chiudere bene il coperchio
Nessuna indicazione
sul display in modo sbagliato l’etichetta verso l’alto
o no dISC CD molto graffiato Usare un altro CD
La ricarica delle Impiego di batterie sbagliate
batterie nell’
apparecchio non Contatti sporchi Pulirli con un panno
funziona, no indicazione
del messaggio CHARGE
La riproduzione nonRESUME o SHUFFLE o Spegnere RESUME, SHUFFLE
inizia dal 1. brano PROGRAM attivati o PROGRAM
Uso di nuove batterie Premere 2;
Batterie scariche Sostituire/ricaricare le batterie
Contatti sporchi Pulire i contatti con un panno
Collegamenti allentati Collegare l’adattatore in modo
Uso nell’auto
L’accendisigari non viene Commutare l’avviamento
alimentato quando o inserire le batterie
l’avviamento è disinserito
Funzione HOLD attivata
non chiuso bene
Formazione di condensa Lasciare il lettore di CD in un
CD non inserito o inserito Inserire un CD con
CD sporco Pulire il CD
ben saldo
Disattivare la funzione HOLD
luogo caldo finché la condensa
non è evaporata
Solo un pacco batteria può essere
ricaricato nell’apparecchio
40
Page 99

RICERCA GUASTI
Non tentate mai di riparare da soli l’apparecchio, in tal caso decadrà la
garanzia
PROBLEM POSSIBILE CAUSA SOLUZIONE
Malfunzionamento Scarica elettrostatica dall’utente
generale attraverso il lettore CD alimentazione o estrarre le
Non c’è suono o il PAUSE è attivato Premere 2;
suono è di cattiva Collegamenti allentati Controllare i collegamenti
qualità o non corretti
Il volume non è stato alzato Regolare il volume
Cuffia indossata in modo Osservare le indicazioni
sbagliato L (sinistra) e R (destra)
Spinotto della cuffia sporco Pulire lo spinotto della cuffia
Forti campi magnetici Cambiare la posizione del
vicino al lettore CD lettore o i collegamenti
Uso in auto
Forti vibrazioni Individuare un’altra posizione
Cassetta adattatore inserita Inserire correttamente la
in modo non corretto cassetta
Temperatura all’interno dell’auto Lasciare che il lettore CD
troppo alta o troppo bassa si ambienti alla temperatura
Accendisigari o presa relativa Pulire l’accendisigaro o la
troppo sporchi presa relativa
Direzione di riproduzione Cambiare la direzione
errata dell’autoreverse dell’autoreverse
del lettore di cassette
Ronzio o rumore Presa di ingresso dell’autoradio Usare la cassetta adattatore
in auto non adatta
Scollegare l’apparecchio dalla
batterie per alcuni secondi
Italiano
41
Page 100

KONTROLLER var god se bild på sid 3
DISPLAY......................
§ .................................för att gå till nästa stycke eller för att komma framåt till en
∞ .................................för att gå till föregående stycke eller för att komma bakåt till
VOLUME......................för inställning av ljudstyrkan för hörlursutgången
RESUME/HOLD ..........för att aktivera RESUME-funktionen och/eller HOLD-funktionen
MODE 00......................för att välja de olika spellägena: SHUFFLE™
PROG P........................stores tracks in a program and reviews the program
DBB..............................Dynamic Bass Boost: basförstärkningsknapp,
STOP 9........................för att stoppa CD-spelningen, för att radera minnet, koppla ur
OPEN ...........................öppnar CD-spelarens skivfack
Svenska
2; ................................för att starta och ta paus i CD-spelningen
ESA ..............................Electronic Shock Absorption är ett buffertminnet för
p LINE OUT ................uttag för hörlurar (3,5 mm)
4.5 V DC.......................uttag för yttre strömförsörjning
Obs: -Indikeringar (t.ex. PAUSE, tomma batterier etc.) och tryckning på en knapp åtföljs
av en akustisk signal genom hörlurarna.
för att visa de olika spellägena, styckena och tiderna
viss passage
en viss passage
(låser alla knappar)
SHUFFLE REPEAT ALL™REPEAT™REPEAT ALL™SCAN™av
DBB 1™DBB 2™DBB 3™av
Om du trycker på denna knapp längre än 3 sekunder kan
du koppla ur/in den akustiska återkopplingen.
CD-spelaren och aktivera laddning.
optimal ljudåtergivning
Typskylten finns på spelarens undersida.
Klass 1 laserapparat –
bruksanvisning specificertas, kan användaren utsättas för osynlig laserstrålning, som
Denna apparat överensstämmer med EG:s direktiv om radioavstörning.
42
Varning!
Om apparaten används på annat sätt äni denna
överskrider gränsen för laserklass 1.
 Loading...