

Page 1
PHILIPS
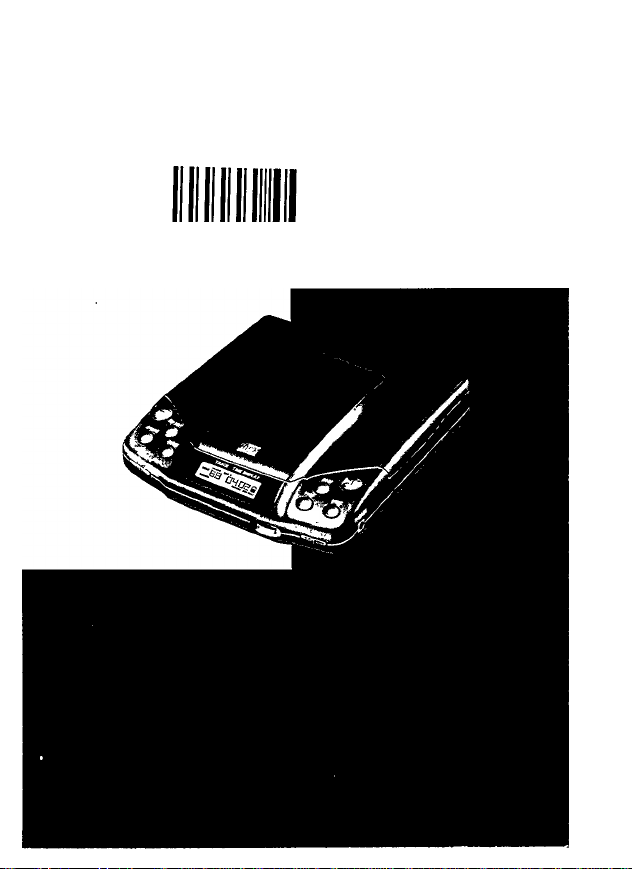
AZB826 Portable Compact Disc Player
OuOOOOQ 0 06D1
Page 2

INDEX
Ce) Deutschland
Hiermit wird bescheinigt, daß dieses
Gerät in Übereinstimmung mit den
Bestimmungen der Amtsblattverfü
gung 1046/1984 funk-entstört ist. Der
Deutschen Bundespost wurde das
Inverkehrbringen dieses Gerätes an
gezeigt und die Berechtigung zur
Überprüfung der Serie auf Einhaltung
der Bestimmungen eingeräumt.
Danmark
Typeskiltet findes pä undersiden af
apparaten.
Dette Produkt overholder kravene til
radio-interferens af Europsisk Fallesskab.
Advarsel: Usyniig laserudsträling ved
äbning när sikkerhetsafbrydere er ude
af funktion. Undgä udsattelse for
stráling.
Norge
Typeskilt finnes pä apparatens under
side.
@) México ÜOM
Es necesario que lea cuidadosamente
su instructivo de manejo.
Garantía
........................................
pág. 76
Australia
Guarantee
....................................
page 76
English page 4
(?) Frangais page 16 O
(d) Deutsch Seite 28 (d)
(© IMederlands pag. 40 <Ñp
CD Español página 52 CD
CD Italiano pagina 64 CD
New Zealand
Guarantee
....................................
page 77
Page 3
D! : 1.
¿Ur'¡£/b'OLD I VOUj¡viS¡
_
___
|=BiIÖ™ai| e-j-Qp
I I. I Mh; ' I
6VDC CDOKT OPTICAL‘■--
<.'^'-4- DIGITAL OUT
ÏATTSRV
Page 4

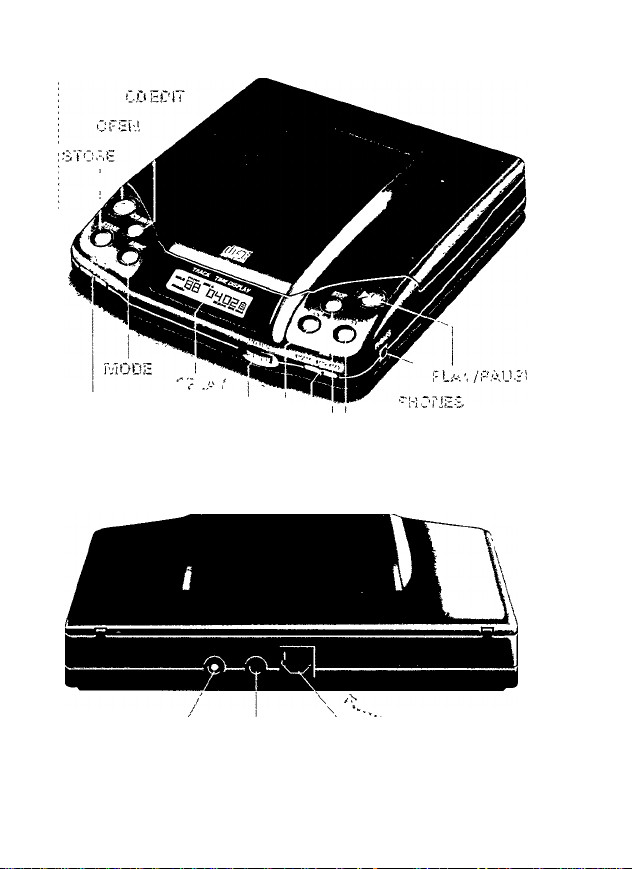
CONTROLS - figs. 1 - 2
REMOTE
................
CD EDIT
.................
OPEN
.....................
STORE
...................
RESUME/HOLD
MODE.....................press repeatedly until the required function appears in the dis
DISPLAY
................
socket for remote control, see 'Accessories'
during PLAY; to select REMAINING TIME indication
in STOP mode: to select the EDIT mode
to open the CD compartment
press to store the displayed track number
.....
in position ON, RESUME is active; if PLAY > is pressed, the
CD player will start with the last title played. In the SHUFFLE
mode, RESUME is ignored.
in position HOLD, the CD player buttons are inoperative (not
the remote-control buttons). The RESUME function is also
switched on.
in position OFF, the RESUME and HOLD functions are
switched off.
play. MEMORY can be activated with all modes to play the
programmed tracks only.
SCAN to play only the first 10 seconds of each title
SHUFFLE to play the titles of a CD in a random order
SHUFFLE REPEAT to repeat the CD continuously in a ran
dom order
REPEAT to repeat the CD continuously
NORMAL (no display indication) to cancel the SCAN,
SHUFFLE and REPEAT modes
TRACK the total number of
tracks (in the STOP mode) I PAUSECCEDir SOEA SSE B MEMORY I
and during PLAY the number I SS 00 DHQ2 HI I
of the track being played | k»*" kp«* »« «« |
TIME the total playing time of
the CD (in the STOP mode)
and during PLAY the elapsed time of that track
if the time flashes, PAUSE is activated
REMAIN the remaining playing time of the CD or the track
DBS (MAX) activated
SCAN activated
SHUFFLE activated
REPEAT activated (repeat the CD)
MEMORY the programmed selection (memory) is played
HOLD activated (the CD player buttons are inoperative)
RESUME activated
battery condition: ^
good; p;| sufficient: p| weak: p| empty: a
Page 5

CONTROLS - figs. 1 - 2
______________________
VOLUME.................volume control
KM PREVIOUS
DBB........................Dynamic Bass Boost - to boost the bass response:
STOP □...................stop button
MH NEXT................• press briefly to jump to a next wh track
PHONES
...............
PLAY >/ PAUSE [0..play and pause button
6 V DC ^ Sh ■&
CD OUT
..................
OPTICAL
DIGITAL OUT
BATTERY
In the case of power supply via the 6 V DC socket, the display is illuminated.
The type plate is located on the base of the set.
The VOLUME control does not affect the output signal of the
CD OUT and OPTICAL DIGITAL OUT sockets.
.......
• press briefly to jump to a previous km track
• during PLAY: keep pressed to play fast backwards km
NORM (normal) = DBB off (no bass boost)
MID = low bass boost
MAX = high bass boost
The DBB-selector does not affect the output signal of the CD
OUT and OPTICAL DIGITAL OUT sockets.
pressing a second time clears the memory and switches off
the CD player
• during PLAY: keep pressed to play fast forwards wh
socket for headphones or mini loudspeakers
......
socket for external power supply, 6 V DC ^ -Sh ■S>
for CD reproduction through your stereo system
.....
for CD reproduction through a high^uality stereo system with
an optical digital input. For connection, a special optical signal
lead, type SBC 1150, is required.
..............
battery compartment
CD
__
/■
-----
CD
(NL)
\
__
—
CD
\
_
r
CD
Page 6
POWER SUPPLY
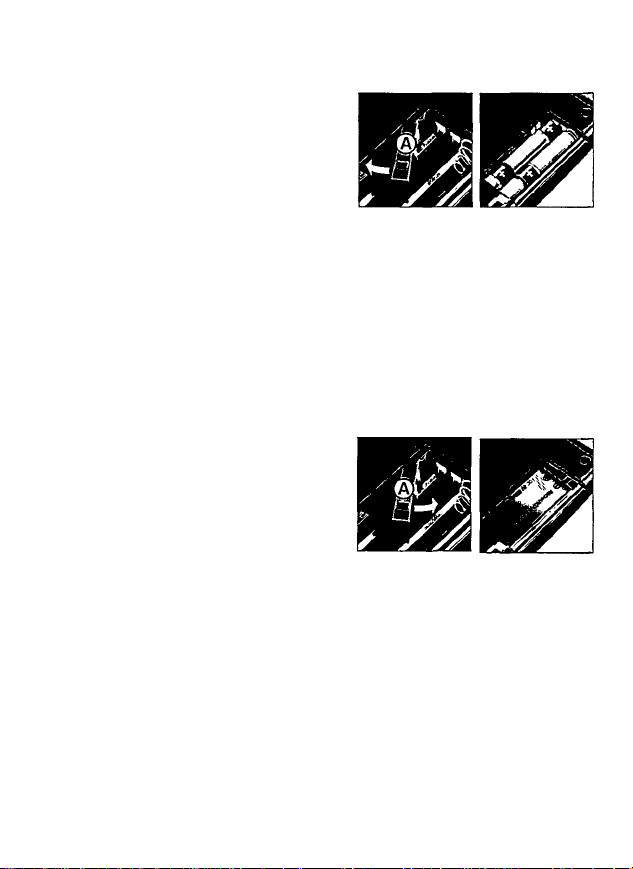
BATTERIES
• Open the battery door, move the lever 0
to the left and insert as indicated four (pre
ferably Alkaline) batteries, type R6, UM3 or
AA-cells. You may also use rechargeable
Nickel-Cadmium batteries, however, the
battery indicator is not valid for Nickel-Cad
mium batteries..
• Remove the batteries if exhausted or if
they are not to be used again for a long period.
The battery supply is switched off when the 6 V DC socket is in use. When
changing over to battery supply, pull out the plug from the 6 V DC socket.
1. Isl 2. 19 3. D 4.BATTERY INDICATOR
The indicator on the display shows the condition of the Alkaline batteries or the
rechargeable battery SBC 6408. The battery voltage is respectively good (1.), suf
ficient (2.), weak (3.) or empty (4., flashing). Replace or recharge weak batteries.
When the 'empty' indication (4.) starts flashing, the CD player will shut off.
The average playing time using Alkaline batteries is about 6 hours, and using the
rechargeable battery SBC 6408 about 2 hours.
RECHARGEABLE BATTERY SBC 6408
Instead of normal batteries, you can use
the rechargeable battery SBC 6408.
• Open the battery door, move the lever 0
to the right and insert the battery.
• This battery can be charged in the CD
player which is connected to the mains
adapter. After approx 5 hours, the battery is
fully charged.
• The charging progress is indicated by a flashing bar in the battery indicator.
• If the CD player is used during charging, the charging time will be longer.
• Prevent t)ie battery from being discharged completely; this would affect its
charging capacity and lifetime.
• If the battery is not to be used for a long period, store it fully charged outside
the CD player. Batteries, even when not in use, discharge slowly, so recharge the
battery every 6 months to prevent it from being discharged completely.
• If the fully charged battery becomes exhausted relatively quickly, it may be
worn out and be due for replacement. A new or additional battery is available
from your dealer under type number SBC 6408. Do not throw batteries in the bin.
Page 7

POWER SUPPLY
CONNECTIONS
MAINS ADAPTER SBC 6619
At home, you can use the mains adapter SBC 6619, deiivering
6 V/600 mA Direct Current, ^ -€)- O, plus-poie ^ to the centre
pin.
Whenever convenient, use the mains adapter if you want to
conserve battery life.
• First check that the mains voltage of the mains adapter corresponds to your local mains supply. If not, consult your dealer or service organi
sation. If the adapter is equipped with a voltage selector, set this seiector to the
local mains voltage.
• Connect the mains adapter to the 6 V DC socket and the wall socket. Remove
the mains adapter from the wall socket when the CD player is not in use.
COIMNECTIONS
Headphone socket PHONES
• For headphones (or mini ioudspeakers) with 3.5 mm plug, see 'Accessories'.
REMOTE socket
• For a remote controi unit, see 'Accessories'.
CD OUT socket
• For CD reproduction at home through your stereo system
(amplifier, receiver, recorder, etc.). Use the signal lead SBC
1059 to connect the socket CD OUT to the input sockets LINE
IN, AUX or CD IN of the other set.
• Adjust the sound with the controls of the stereo system.
The VOLUME control and the DBB selector of the CD player
do not affect the output signal of the CD OUT socket.
OPTICAL DIGITAL OUT socket
• For CD reproduction through a high-quality stereo system with the same type
of optical socket. Use the signal lead SBC 1150 to connect the socket OPTICAL
DIGITAL OUT to the input socket OPTICAL DIGITAL IN of the other set.
• Adjust the sound with the controls of the stereo system.
The VOLUME control and the DBB selector of the CD player do not affect the
output signal of the OPTICAL DIGITAL OUT socket.
______________________________________________
Page 8

ACCESSORIES
OPTIONAL ACCESSORIES (if not already supplied)
SBC 1059
SBC 1085
SBC 1150
SBC 3124
SBC 3206
SBC 3546
SBC 3547
SBC 3557
SBC 6209
SBC 6211
SBC 6408
signal lead with 3.5 mm stereo plug and two 'cinch' plugs ('Phono'),
signal lead with 3.5 mm stereo plugs at both ends,
optical signal lead for connection of the OPTICAL DIGITAL OUT sock
et to a socket of the same type on your stereo system.
• SBC 3137 - SBC 3172 stereo headphones.
■ SBC 3207 - SBC 3208 mini loudspeaker systems (with amplifier),
car mounting plate for CD player with extra damping,
flexible mounting arm to install the mounting plate in the car.
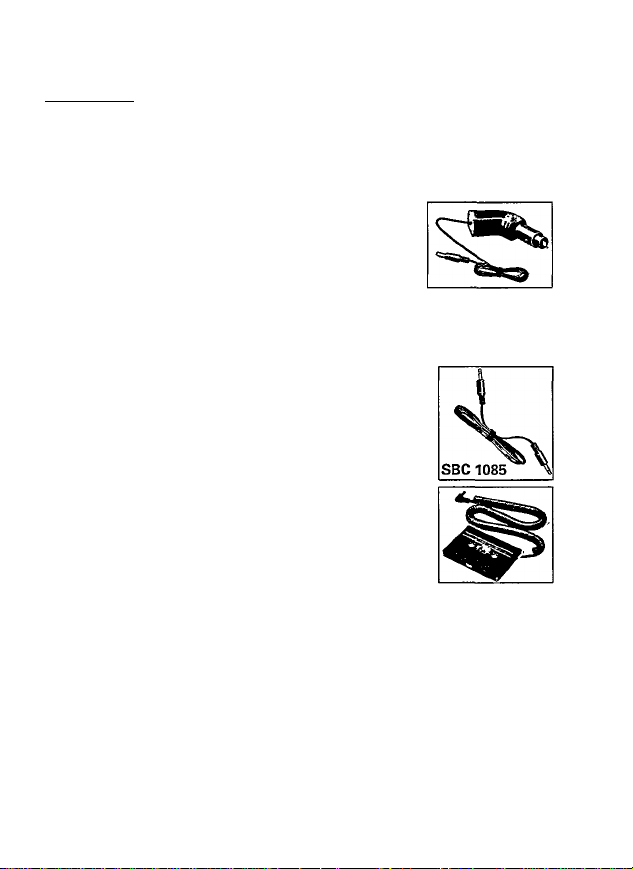
car accessory kit contains:
1. Supply cable for power supply from the cigarette lighter socket on
your dashboard, with voltage converter from 12 V to 6 V
2. CD cassette adapter for CD reproduction through your car radio
cassette player, with lead and 3.5 mm stereo plug
infrared remote control set (transmitter and receiver)
wire remote control with PLAY, STOP and PREVIOUS/NEXT.
rechargeable battery.
SBC 3557 Mk n
Page 9
IN-CAR USE
ll\i-CAR USE
• Find a good and safe place for the CD player, on a horizontal, vibration-free and
stable surface where it is not dangerous or in the way of the driver or passengers,
see also 'Accessories'.
• Avoid excessive heat from the car heating or from direct sunshine, e.g. when
parking in the sun and avoid moisture, dust and dirt.
Supply from the cigarette lighter socket
Use the voltage converter from the accessory kit SBC 3557
Mk. II for power supply from the cigarette lighter socket
(only fora 12 V car battery, negative grounding). The convert
er delivers 6 V/500 mA Direct Current, Ф ❖ plus-pole Ф
to the centre pin
• First connect the DC-plug to the 6 V DC socket.
• Then insert the voltage converter into the cigarette-lighter socket. If necessary,
clean the cigarette-lighter socket to obtain a good electrical contact.
• Remove the converter from the cigarette-lighter socket when the CD player is
not in use and also when listening to the car radio.
Car radio connection
- If your car radio is provided with a LINE IN socket, preferably
connect this LINE IN socket with the CD OUT socket of the
CD player using the signal lead SBC 1085.
- For a car radio/cassette player without LINE IN socket, you
can use the cassette adapter from the accessory kit SBC 3557
Mk. II as follows;
• Turn down the volume of your car radio cassette-player.
• Connect the cassette-adapter plug to the socket CD OUT
of the CD player.
• Switch off the autoreverse function (if present) of the car
cassette player.
• Slide the cassette carefully into the car radio cassette player.
• Start the CD player and adjust the sound with the car radio controls.
• To remove the cassette, press the eject button of the cassette player.
RESUME
• If you switch off the car ignition, the CD player is also switched off. If RESUME
was switched on, and you switch on the ignition again, the CD player will start
with the last title played as soon as you press PLAY>. Note that RESUME will op
erate only if the rechargeable battery is inserted.
Page 10

PLAYING A CD
PLAYING A CD
• Ensure that the HOLD function is switched off, otherwise the CD player but
tons will not operate.
• Connect headphones to the PHONES socket.
• Press OPEN to open the CD cover.
• Insert the CD, printed side facing up) and close the
cover. The CD player starts and scans the contents list of
the disc, disc appears and then the number of tracks and .
the total playing time of the CD. After that, the CD player stops.
If no CD is inserted, no dISC appears.
• Adjust the volume using the VOLUME control and the bass response using the
DBB selector.
• Start playback by pressing PLAY >.
As soon as playback starts, the display shows the corresponding track number
and the elapsed playing time of that track, see also chapter 'ELAPSED/REMAIN-
ING TIME'.
• For brief interruptions, press PAUSE 01; the time indication flashes. To continue
playback, press PLAY>/PAUSEOO again.
• To stop playback, press STOP □. The display will show the total playing time
and the total number of tracks present on the CD.
• The CD player also goes to position STOP:
- when the end of the CD is reached;
- when the CD cover is opened;
- if the batteries run down or if the power supply is interrupted in another way.
• Open the CD cover only if the CD player is in STOP position.
• To switch off the CD player immediately, press STOP a second time.
• In the STOP position, the CD player automatically shuts down 15 seconds after
the last command. Press PLAY > to reactivate the CD player.
When using an external power supply via the 6 V DC socket, the CD player enters
the standby mode 15 seconds after the last command (30 seconds in the EDIT
mode) and the illumination extinguishes. To reactivate, press PLAY on the CD
player (or any button on the wire remote control for longer than 3 seconds).
Remarks
- If the batteries are exhausted, the CD player will not function normally, e.g. it
will not start. Replace the batteries or use the mains adapter.
- If after pressing PLAY >, nc d I SC appears and the CD player shuts down af
ter a few seconds, this means that the CD player cannot read the CD. Possible
causes are:
- you Inserted the CD upside down;
- the CD is badly scratched or dirty, see 'Maintenance';
- the lens (x) is steamed up, see 'Maintenance';
- the batteries are exhausted.
10
Page 11

RESUME / HOLD
PREVIOUS / NEXT
RESUME/HOLD
• If the STOP button has been pressed and the RESUME switch is in position
ON or HOLD (the word RESUME appears on the display), the CD player will start
with the last title played as soon as you press PLAY > again (provided you did not
press the OPEN button). Note that RESIJME will operate only if the rechargeable
battery is inserted. In the SHUFFLE mode. RESUME will be ignored.
• If the CD player is connected to the cigar lighter socket of your car and you
switched off the car ignition while RESUME is switched on, the CD player will
start with the last title played as soon as you switch on the ignition again and
press PLAY>. Note that RESUME will operate only if the rechargeable battery is
inserted.
• When carrying the player with you, you can slide the RESUME/HOLD switch to
HOLD. The word HOLD appears on the display. The CD player buttons are then
inoperative (not the remote control buttons). The playing of a CD will now not be
interrupted when a button is accidentally touched. In position HOLD, RESUME is
switched on as well.
PREViOUS/IMEXT
1. Go to the next or previous track
Press briefly Hess than 0.5 second)
a. During PLAY;
NEXT - go to the next title
You can jump to the next title by briefly pressing NEXT once.
If you want to skip more than one track, then briefly press NEXT more than
once until the display shows the desired track number.
PREV - go to the previous title
If you want to repeat the current title from the beginning, briefly press PREV
once.
If you want to repeat one of the previous titles, briefly press PREV more
than once until the display shows the required track number.
b. In STOP mode with a CD inserted
You can select the title by pressing PREV and NEXT briefly, once or more than
once, until the display shows the required track number.
2. Search during PLAY
Keep pressed (for longer than 0.5 second)
During PLAY, keep NEXT for search forwards of PREV for search backwards
pressed. The CD is played partially and at high speed, however, the sound is
still recognizable.
Release the button as soon as you recognize the required passage; the CD will
be played normally from this passage onwards.
If the button is pressed for longer than 6 seconds, the search speed will in
crease.
_____________________________________________
11
Page 12

ELAPSED/REMAINING TIME MODE
ELAPSED/REMAINING TIME
As soon as playback starts, the display shows the corresponding track number
and the elapsed playing time of that track.
If you want to see the remaining time of the track, press the EDIT button once
during play: the word REMAIN appears in the display.
If you press EDIT for the second time, you will see the remaining time of the
CD and the remaining titles.
To return to the normal mode, press EDIT for the third time: the word REMAIN
disappears and you will see the track number and the e/apsed time again.
MODE (SCAN / SHUFFLE / REPEAT)______________________________
By pressing the MODE button several times, all play modes will successively ap
pear on the display.
If you selected the function in the STOP mode, you can start the chosen play
mode by pressing PLAY.
If you selected the function in the PLAY mode, the chosen play mode will start
after about 2 seconds.
MEMORY can be activated with all modes to play the programmed tracks only.
SCAN to play only the first 10 seconds of each title. After the last title, the CD
player stops.
If you press PREV or NEXT, the CD player jumps to the previous or next title
(the SEARCH function is inoperative.)
If you press PLAY, you leave the SCAN mode and the running title will be
played in the normal way.
To leave the SCAN mode, press PLAY or STOP or select another MODE.
SHUFFLE to play the titles of a CD in a random order. After the last title, the CD
player stops.
If the word MEMORY is also visible on the display, only the titles stored in the
memory will be played in a random order.
To leave the SHUFFLE mode, press STOP or select another MODE.
SHUFFLE REPEAT to repeat the CD continuously in a random order;
If the word MEMORY is also visible on the display, only the titles stored in the
memory will be repeated in a random order.
To leave the SHUFFLE REPEAT mode, press STOP or select another MODE.
REPEAT to repeat the CD continuously.
If the word MEMORY is also visible on the display, only the titles stored in the
memory will be repeated.
To leave the REPEAT mode, press STOP or select another MODE.
12
Page 13

PROGRAMMING TRACK NUMBERS
PROGRAMMING TRACK NUMBERS
You may select a number of tracks and store these in the memory in the desired
sequence. When playing, you will only hear the stored titles in the selected se
quence. A maximum of 20 tracks can be stored in the memory. You may store
each track more than once.
Programming can be done in the positions STOP, PLAY, SCAN and SHUFFLE.
Programming in the STOP position
• Select the desired title using the buttons PREV and NEXT until the display
shows the required track number.
• Store this track by pressing STORE briefly. The word MEMORY appears, indi
cating that the title has been stored.
• Select and store all desired titles in this way.
• You can erase the whole memory by pressing STOP D; the character C for
CLEAR appears.
• To play your selection, press PLAY >: the word MEMORY indicates that a selec
tion is played.
Programming during PLAY, SCAN and SHUFFLE
• As soon as you recognize a desired title, press STORE briefly: the word MEM
ORY appears, indicating that the track has been stored.
• The buttons PREV and NEXT can also be used to select the desired title.
• Store all desired titles in this way by pressing STORE.
• You can erase the whole memory by pressing STOP D twice: the character C
for CLEAR appears.
• To play your selection, first return to STOP and then press PLAY >: the word
MEMORY indicates that a selection is played.
- Store all desired titles in the required sequence. You may store each track more
than once.
- A maximum of 20 tracks can be stored in the memory. When the memory is
full, the word PUL L appears.
- When pressing STORE for longer than 1.5 second in the STOP or PLAY
mode, the display will show in sequence all the stored track numbers.
- When pressing STORE for longer than 1.5 second in the MEMORY PLAY
mode, the display will show the actual title and then in sequence all remaining
track numbers that are stored.
The contents of the memory are also erased:
- by opening the CD cover using the OPEN button:
- if the battery becomes exhausted or if the power supply is interrupted in an
other way.
13
Page 14

EDIT
EDIT
________________________________________________________
The EDIT function is very useful when copying a CD on a cassette. You enter the
playing time of the cassette into the CD player. The CD player adds silent pas
sages of 5 seconds between the tracks, and, knowing the playing times of the
different tracks, calculates if the next track (in the ADVANCED EDIT mode), or
one of the next tracks (in the OPTIIVIAL EDIT mode) will fit on the cassette side.
If it does not fit, the CD player goes to the PAUSE mode.
Preparation
• Connect the CD player to the cassette recorder or to the stereo system and ad
just the system and/or recorder for recording from the CD player.
• Insert a cassette and remember the playing time.
Programming the EDIT mode
• From the STOP mode, press the EDIT button. The word CD EDIT appears and
the characters Rd for ADVANCED EDIT.
• Using the buttons PREV and NEXT, you can select OP for OPTlIvlAL EDIT or re
turn to Rd for ADVANCED EDIT;
- ADVANCED EDIT: the characters Rd for ADVANCED EDIT will appear. As
soon as the next track will not fit completely on the cassette side, the CD play
er goes to the PAUSE mode.
- OPTIMAL EDIT: the characters OP for OPTIMAL EDIT will appear. As soon as
the next track will not fit completely on the cassette side, the CD player looks
for another track on the CD which would fit on the remaining tape length. If the
CD player finds such a track, that track will be played (and recorded). If the CD
player does not find such a track, it goes to the PAUSE mode.
• Press the EDIT button again to enter the playing time of the cassette to be
recorded. The display shows C GO. Using the buttons PREV and NEXT, you can
select other playing times, e.g. C 90, C 100, C EO.
• Press the EDIT button again to store the playing time of the cassette.
You have now finished programming the EDIT mode.
Note that the CD player automatically leaves the EDIT mode and returns to the
STANDBY mode 30 seconds after the last command.
Recording
• Start the recording by pressing the RECORD button on the cassette recorder
and the PLAY button on the CD player. SIDE A appears in the display.
• If the first cassette side has reached its end and not all tracks have been
recorded yet (the CD player is then in the PAUSE mode), reverse the cassette.
• Continue the recording by pressing the RECORD button on the cassette
recorder and the PLAY button on the CD player. The remaining tracks will now be
recorded. SIDE B appears in the display.
• During recording, only the buttons STOP, CD EDIT and STORE are operative.
• To stop recording, press STOP on the cassette recorder and the CD player.
• By pressing STOP on the CD player, you leave the EDIT mode.
14
Page 15
MAINTENANCE
MAINTENANCE
• Avoid excessive heat (maximum 50 "O, e.g. from the car heating or from direct
sunshine, e.g. when parking in the sun.
• Do not expose the set, batteries or CDs to rain or moisture.
• Keep the set and the (iDs away from sand.
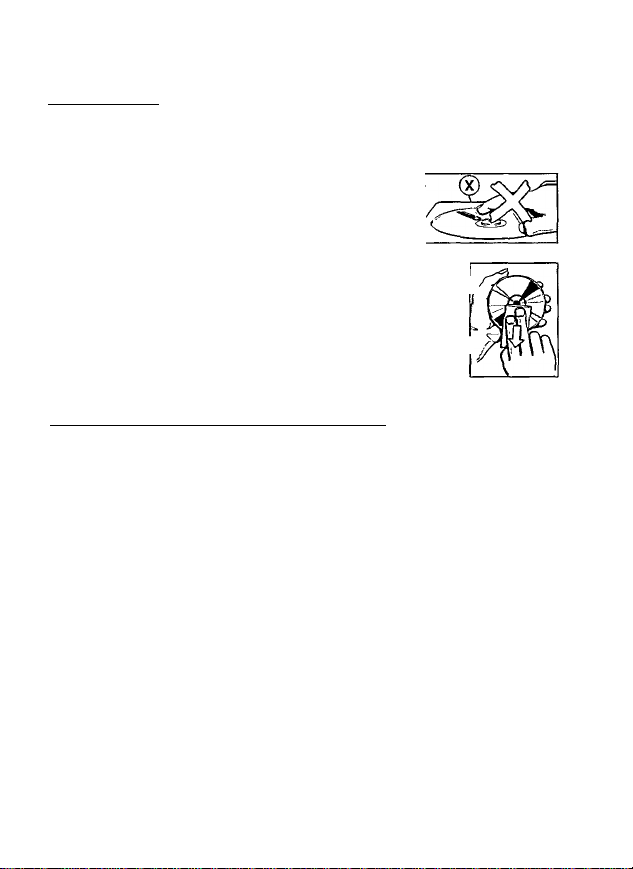
• The lens <g) should never be cleaned.
• The lens may steam up when the set is taken from a cold
into a warm environment. Playing a CD is then not possible.
Do not clean the lens, but let the set acclimatize for a while.
• Always pick up the CD by the edge and put it back in its
box immediately after use.
• To remove dirt from a CD, first breathe on the CD and wipe it off
in a straight line from centre to edge using a soft, lint-free cloth. Thej^
use of cleaning agents may damage the CD.
• The mechanism of the CD player is fitted with self-lubricating
bearings and therefore must not be oiled or greased.
• Fingerprints, dust and dirt on the cabinet can be removed using a
soft, clean and slightly damp leather cloth. Cleaning agents may
damage the cabinet.
• To avoid cracking noises, clean the headphone plug from time to time.
USE YOUR HEAD WHEN USING HEADPHONES
• Hearing safety: Do not play your headphones at a high volume. Hearing ex
perts advise that continuous use at high volume can permanently damage hear
ing.
• Traffic safety: Do not use headphones while driving a vehicle. It may create a
traffic hazard and it is illegal in many countries. Even if your headphones are an
open-air type designed to let you hear outside sounds, do not turn up the volume
so high that you cannot hear what is going on around you.
This product complies with the radio interference requirements of the European
Community.
____________________
15
Page 16

Australia
Guarantee and Service valid for Australia
The benefits given to the purchaser by this warranty are in addition to all
other rights and remedies, which, under the Trade Practices Act or other
Commonwealth or State law, the purchaser or owner has in respect of the
product.
The Phiiips product carries the following warranties:
C-series HiPi-systems 12 months. Compact Disc Players: 12 months. Home
Audio Systems: 6 months. Clock radios, portable radios, cassette recorders,
cassette players and radio recorders: 90 days.
Any defect in materials or workmanship occurring within the specified peri
od from the date of delivery, will be rectified free of charge by the retaiier
from whom this product was purchased.
Note: Please retain your purchase docket to assist prompt service.
Conditions of this warranty
1. All claims for warranty service must be made to the retailer from whom
this product was purchased. All transport charges incurred in connection
with warranty service or replacement will be paid by the purchaser.
2. These warranties do not cover batteries and extend oniy to defects in ma
terials or workmanship occurring under normal use of the product where
operated in accordance with our instructions.
Philips Consumer Products Division, Technology Park, Figtree Drive,
Australia Centre, Homebush 2140, New South Wales
Garantía para México !°!!
Este aparato está fabricado con materiales de alta calidad y ha sido cuidado
samente verificado. Philips, por lo tanto, da a usted una garantía de 12 me
ses a partir de su fecha de compra.
La garantiá ampara ia reposición de las piezas defectuosas debidas a failas
en su montaje o en los materiales, incluyendo la mano de obra necesaria pa
ra su reemplazo en nuestras Sucursales o talleres autorizados.
En caso de fallas en su aparato le rogamos se sirva poner en contacto con
su distribuidor.
Esta garantía no cubrirá las averías que resulten como consecuencia de una
instalación incorrecta del aparato, manifiesto maltrato o uso inadecuado del
mismo.
Philips se obliga a reparar y devolver a usted su aparato en un plazo no ma
yor de 30 días hábiles contados a partir de la fecha de haber ingresado su
aparato a uno de nuestros talleres.
Con la presentación de la factura o remisión de su aparato podrá hacer efec
tiva la garantía.
Si usted tiene alguna duda o pregunta que no le pueda solucionar su distri
buidor, por favor ponerse en contacto con:
Oficinas Centrales de Servicio, Av. Coyoacán No. 1051, Col. del Valle,
03100 México, D.F. - 0 5-75-20-22 o 5-75-01-00
76
México @)
Page 17

New Zealand
Guarantee and Service for New Zealand
Thank-you for purchasing this quality Philips product.
Philips New Zealand Ltd guarantees this product against defective compo
nents and faulty workmanship for a period of 12 months. Any defect in ma
terials or workmanship occurring within 12 months from the date of pur
chase subject to the following conditions will be rectified free of charge by
the retailer from whom this product was purchased.
Conditions
1. The product must have been purchased in New Zealand. As proof of pur
chase, retain the original invoice or cash receipt indicating the date of pur
chase.
2. The guarantee applies only to faults caused by defective components, or
faulty workmanship on the part of the manufacturer.
3. The guarantee does not cover failures caused by misuse, neglect, normal
wear and tear, accidental breakage, use on the incorrect voltage, use con
trary to operating instructions, or unauthorised modification to the product
or repair by an unauthorised technician.
4. Reasonable evidence {in the form of a sales docket or completed guaran
tee card) must be supplied to indicate that the product was purchased no
more than 12 months prior to the date of your claim.
5. In the event of a failure. Philips shall be under no liability for any injury, or
any loss or damage caused to property or products other than the product
under guarantee.
This guarantee does not prejudice your rights under common law and
statute, and is in addition to the normal responsibilities of the retailer and
Philips.
Howto claim
Should your Philips product fail within the guarantee period, please return it
to the retailer from whom it was purchased. In most cases the retailer will
be able to satisfactorily repair or replace the product.
However, should the retailer not be able to conclude the matter satisfac
torily, or if you have other difficulties claiming under this guarantee, please
contact
The Guarantee Controller, Philips New Zealand Ltd. S P.O. Box 41.021
Auckland
0(09) 84 44160
_________________________________
77
Page 18

CD
CD
____
----
CD
CD
J
\
y
\
J
J
V
3103 306 1382.1 EvM 9231
 Loading...