

Page 1
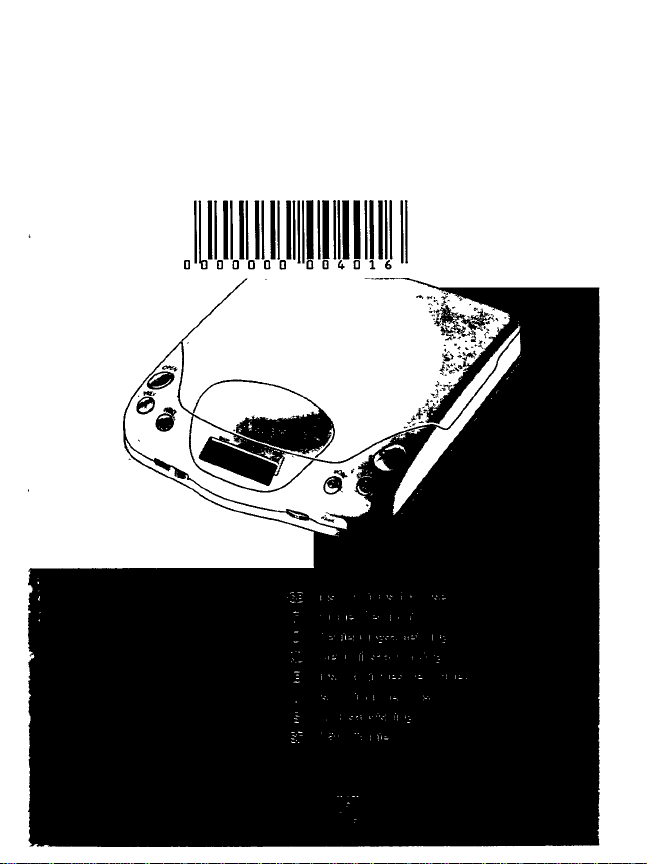
PHILIPS
AZ 6825 / AZ 6821C Portable Compact Disc Player
Page 2

INDEX
(d) Deutschland
Hiermit wird bescheinigt, daß dieses
Gerät in Übereinstimmung mit den
Bestimmungen der Amtsblattverfü
gung 1046/1934 funkentstört ist. Der
Deutschen Bundespost wurde das In
verkehrbringen dieses Gerätes ange
zeigt und die Berechtigung zur Über
prüfung der Serie auf Einhaitung der
Bestimmungen eingeräumt.
Danmark
Typeskiltet findes pä undersiden af
apparaten.Dette produkt overholder
kravene til radio-interferens af Euro-
p$iskF$llesskab.
Advarsel: Usyniig laserudsträling ved
äbning när sikkerhetsafbrydere er ude
af funktion. Undgä udsaettelse for
sträling.
Norge
Typeskilt finnes pä apparatens
underside.
(0) México Hil
Es necesario que iea cuidadosamente
su instructivo de manejo.
@) Australia
Guarantee
.....................
page 116
English
..............................
Troubleshooting
...........................
page 4
pages 16-17
Français..........................page 18
Dépistage des pannes
Deutsch
Fehlersuche
Nederlands
Foutzoeklijst
Español
Localización de averías
...........
pages 30-31
..................
...............................
..................
......................
........................
..........
pagina 46
pag. 58-53
página 60
pág. 72-73
Seite 32
Seifen 44-45
Italiano.........................pagina 74
Elenco ricerca guasti.............pag. 86-87
Svenska
Felsökning
....................
...................
sidorna 100-101
sida 88
Suomi..............................SÌVU102
Tarkistusluettelo
...............
sivut 114-115
CD
CD
CD
CD
CD
New Zealand
Guarantee
.....................
page 117
Page 3
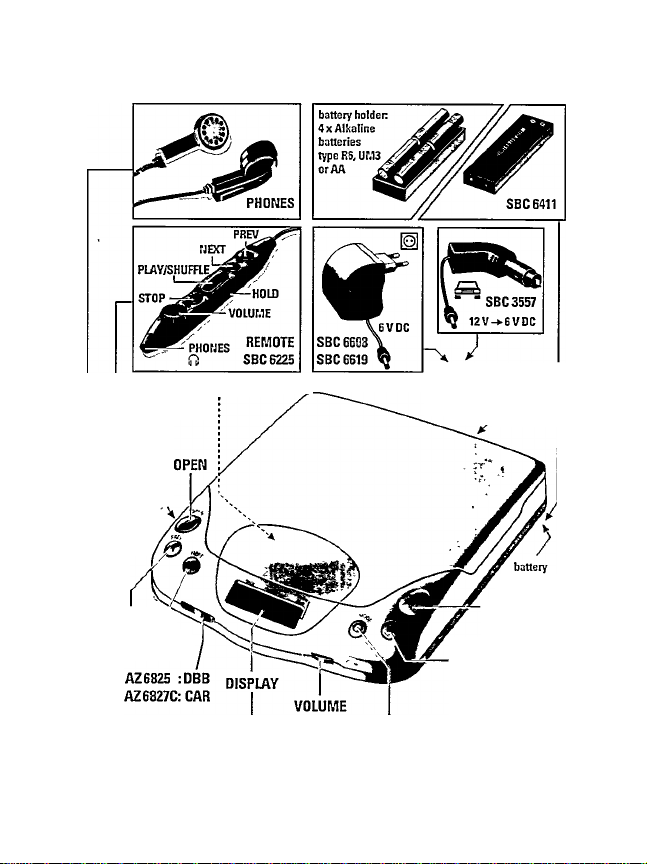
AZ6827C: BACKLIGHTSELECTOR
RESUME/HOLD
REMOTE
(AZE325)
-PHONES 0
PREVkm ^
NEXTkh
6V DC
J CD OUT
compartment
PLAY/PAUSE
0/ D O
STOPD
AZ6327C
4'S^OO BBSS ^
- DBS # II I ^ LJ-LJ LJ l«i
AZ6325
t/AX UJI fmJl RESUME REPEAT SHUFFIE
MODE
Page 4

OPERATING CONTROLS - page 3
OPEN Key for opening the lid of the CO player
MODE Key for selecting the different operating modes:
RESUME/HOLD Switch for activating the RESUME function (resuming playback)
DISPLAY For showing the different operating modes, tracks and times
VOLUME For adjusting the volume
PREV(ious) KM Key for selecting the previous music track or, if held down, for
STOP ■ Key for stopping playback, deleting various settings and switching
DBB AZE825 only: Dynamic Bass Boost Switch for increasing the
CAR ACOUSTICS AZB827C only: compensates the car acoustics by enlarging the
NEXT MH Key for selecting the next music track or, if held down, for
PlAY/PAUSE MO Key for starting playback. If pressed again, playback is interrupted
PHONES 0/ REMOTE Socket for connecting suitable headphones (16-32 Ohms/3.5 mm
Battery compartment Battery compartment for inserting the battery holder or the
Battery holder For the insertion of four Alkaline batteries
6 V DC Socket for connecting the supplied mains adapter
CD-OUT Socket for connecting the supplied cable for penmitting connection
Backlight colour AZ6827C only: (switch in the CD-compartment) for selecting green
SHUFFLE, REPEAT/SHUFFLE and REPEAT
and/or HOLD (blocking all keys) function
selecting a particular passage on the CD
off the CO player
bass level at the headphone output
stereo basis (only available via the PHONES socket)
selecting a particular passage on the CD
(PAUSE mode)
jack plug) or [AZ6825 on!^ the remote control SBC 6225
SBC 6411 battery pack
to a HiR installation
or orange backlight for the dispiay and buttons, or for switching off
the backlight. The backlight works only if the CD player is powered
via the 6 V DC socket.
The type plate is located on the base of the set
4
Page 5
POWER SUPPLY
Mains adapter (AZ 6825: SBC 6608, AZ 6827C: SBC 6619)
• Connect the small plug of the supplied mains adapter to the 6 V DC
socket. Then connect the mains plug to the wall socket
Important Make sure that the mains voltage of your mains adapter
corresponds to the voltage of the country in which the CD player Is
used. This should be home in mind when you travel to another country.
Alkaline batteries (type R6, UM3 or AA-cells)
• To insert the batteries:
1. Open the lid of the battery compartment
2. Remove the battery holder.
3. Insert 4 Alkaline batteries in the battery holder. Make sure that they are correctly
inserted according to the correct V and position (see illustration on bottom of
battery holder).
4. Replace the battery holder in the battery compart
ment as indicated.
5. Remove the batteries if the CD player is not used
for a long period of time.
Rechargeable battery pack SBC 6411
(optional for AZ 6827C)
• Before first use, the battery pack should be charged
for at least 20 hours.
• Use the mains adapter to charge the battery pack
when it is new or has not been used for a long time.
1. Open the lid of the battery compartment.
2. Insert the battery pack in the battery compartment.
3. Close the lid of the battery compartment.
4. Connect the mains adapter to the CD player and to the wall socket (see section on
mains adapter).
• The battery pack will now be charged. You may use the CD player during charging: this
delays the charging of the battery slightly. Charging will stop automatically once the
battery pack has been fully charged.
• After charging you can unplug the mains adapter and operate the CD player with the
charged battery pack,
• or, you can also charge the battery pack without the CD player by simply connecting the
battery pack direct to the mains adapter. During charging, a red light shines on the battery
pack.
Note: If the rechargeable battery pack is new or has not been used for a long period, it may
need several charging cycles to become fully charged.
__________________
Page 6

POWER SUPPLY
CONNECTIONS
Battery condition
• If the set is battery powered, you will see a battery symbol with 3 segments in the display
(in PLAY or in STOP mode).
jjj If all 3 segments light up, the batteries are fully charged,
pj Fewer segments will light up as the power decreases.
If the empty battery flashes, the CD player vdll switch itself off immediately. The
' batteries must then be changed or the battery pack recharged.
The battery symbol on the display is not valid for Nickel-Cadmium batteries. This type of
batteries can't be charged inside of the set.
Notes:
• With a set of Alkaline batteries the CD player operates for approximately 6 hours.
• With a full battery pack you can operate the CD player for about two hours.The
recharging of a flat battery pack takes about 5 hours. During the charging process the
display will show scrolling battery segments.
• The operating life of the battery pack will be longest if you recharge it after every use.
• If the battery pack is not in use, recharge it every 4 months, otherwise the battery will be
damaged.
• After having been recharged about 500 times, the battery pack can no longer provide the
required power. You should take it to your dealer or dispose of it at the nearest used
battery collection point. A new battery pack can be obtained from your dealer.
• If the CD player is powered via the mains adapter, the battery symbol will extinguish
except if a battery pack is in the battery compartment
• If you change the source of power supply during operation of the CD player (i.e. change
from battery operation to mains adapter operation, or vice versa), the current function may
be briefly interrupted and the current PLAY mode lost
Headphone/remote control socket PHONES O/REMOTE__________________
• For headphones (or mini loudspeakers) with 3.5 mm plug (see accessories)
or (A26825onlyjthe remote control SBC 6225.
CD OUT socket
• For CD reproduction through your stereo system (amplifier, cassette
deck, radio cassette recorder etc.). Use the signal lead SBC 1059 to
connect the socket CD OUT to the input sockets CD IN, AUX or LINE IN
of the other set
Adjust the sound with the controls of the stereo system. The VOLUME control and the DBB
or CAR ACOUSTICS selector of the CO player do not affect the output signal of the CD OUT
socket
SBC 1059 ^
Page 7

PLAYING A CD
1. Ensure that the HOLD-function on the CD player or the remote control is switched off,
otherwise the CD-player or remote control buttons will not operate
2. Ensure that the CD player has a power supply.
3. Connect either the supplied headphones or other suitable headphones (16-32 ohms/-
3.5 mm stereo plug) to the phones socket.
4. Open the lid of the CD player.
5. Insert the CD with the printed side up in the CD player.
6. Close the lid of the CD player on its left-hand side (push
to close) until you hear the lid engage. The CD will begin to rotate.
While the track and the total playing time are being
read, the following flashes on the display;
o' /5/Til
After a short time the display shows the number of
available tracks and the total playing time of the CD
that has been inserted, e.g.
The CD player is now in the STOP mode and, if no key is pressed in the next 15 seconds, it
will switch to the STANDBY mode. The display will be extinguished (except for the charge
symbol during charging).
7. Press the PLAY/PAUSE WD key. The CD will be played in the normal track order. The
number and the elapsed time of the current track will be shown on the display.
8. The volume control can be used to adjust the volume of the headphones.
9. To briefly interrupt playback, press the PLAY/PAUSE ND key. The time indication flashes
while the CD player is in PAUSE mode. Playback will be resumed if the key is pressed again.
10. To end playback, press the STOP ■ key. The CD stops and the total number of tracks and
the total playing time of the CD appear on the display. The CD player is now in STOP mode.
IC
lU
-? n I7[=l
5
l:u _/
1:1
General_________________________________________________________
• Tlie CD player switches from the STOP to the STANDBY mode:
- If you press the STOP« key again.
- If the lid is closed, the CO has been recognised and no key is pressed for 15 seconds.
- If the battery is empty.
• By pressing the PLAY/PAUSE MD key you can switch the CD player on again and the
selected function will be executed.
/Voie: Always ensure that the CD is clean. Othen/vise there may be errors in playback.
Page 8

RESUME
HOLD
RESUME: Resuming playback
This function is very useful when the CD player is connected to the cigarette lighter in your
car. If you switch off the car ignition, the CD player is also switched off. If you switch on the
ignition again, playback will continue from the place where it has been stopped
• Slide the RESUME/HOLD switch to the RESUME ON position during playback.
• Stop playback by pressing the STOP ■ key.
• Press the PLAY/PAUSE No key to resume playback. Playback will start from the position
where it has been stopped.
• To switch off the RESUME function, slide the switch to the OFF position.
Notes:
1. If the power has not been interrupted, the CD player will resume playback exactly from the
position where it was stopped.
2 If the power was interrupted while resume was switched on, the CD player will resume
playback from about the position where it was stopped with an accuracy of+or -20
seconds.
HOLD: Deactivating all CD-player keys
Use this function when carrying the player with you. The CD-player buttons are then inopera
tive and the lid cannot be opened. Now, playback of a CD will not be interrupted when a
button is accidentally touched.
• To switch on the HOLD-function, slide the RESUME/HOLD switch into the RESUME/HOLD
ON position.
• To switch off the HOLD function, slide the switch to the OFF or RESUME ON position.
Notes:
1. In the HOLD position the RESUME function is automatically activated.
2 If HOLD is switched on and you try to activate the CD player from the standby mode, the
set will not start and the display shows 'HOLD'.
3. AZ6325 only: The HOLD switch on the remote control SBC 6225 makes only the remote
control buttons inoperative and does not affect the CD player buttons.
__________________________
_
Page 9

NEXT/PREVIOUS
SEARCH
Next/Previous: Changing the track in STOP, PLAY and SHUFFLE mode
Next
• Press the NEXTmh key for less than half a second. The next track will be shown on the
display and played.
• To jump one track further, press the key again.
Previous:
• Press the PREVkm key for less than half a second. The current track will be shown on the
display and playback of this track will start again.
• To go back to the previous track press the key again.
Search: Looking for a particular passage in PLAY mode
• If you hold down the NEXT i>w key for more than half a second, you can search for a
particular passage in a forward direction.
• If you hold down the PREV km key for more than a half second, you can search for a
particular passage in a reverse direction.
• To reach a fast search speed keep pressing the NEXT >w or PREV km key for longer than
5 seconds.
While searching for a particular passage, the CD will be played back at a low volume.
Note: Searching for a particular passage in the STOP and PAUSE mode is not possible. In the
SHUFFLE mode, SEARCH is only possible within the particular track.
________
Page 10

SHUFFLE
REPEAT
SHUFFLE: Playing tracks in random order
Press the MODE key repeatedly until SHUFFLE lights up on the display.
- If you press the MODE key in the STOP mode, you can start this function with the
PLAY/PAUSEWD key.
- If you press the MODE key in the PLAY mode, the selected function will flash for 2
seconds on the display before it is executed and displayed continuously.
The tracks will be played in random order until all of them have been played.
While the CD player is searching for a track, the
display will show, for example:
• The SHUFFLE mode is ended:
- If you press the STOP «key.
- If you select another mode or deactivate all modes with the MODE key.
REPEAT: Repeating the CD
• Press the MODE key repeatedly until REPEAT lights up on the display.
- If you press the MODE key in the STOP mode, you can start this function with the
PLAY/PAUSEWD key.
- If you press the MODE key in the PLAY mode, the selected function will flash for two
seconds on the display before it is executed and displayed continuously.
• The CD player plays the CD to the end, before repeating playback from the beginning. This
function will be continued until the REPEAT mode is ended.
The display will show, for example:
• The REPEAT mode is ended:
- If you press the STOP «key.
- If you select another mode or deactivate all modes with the MODE key.
__________________ _________________
REPEAT/SHUFFLE: Repeating the CD in random order__________________
• Press the MODE key repeatedly until REPEAT and SHUFFLE light up on the display.
- If you press the MODE key in the STOP mode, you can start it with the PLAY/PAUSE
WD key.
- If you press the MODE key in the PLAY mode, the selected function will flash for two
seconds on the display before it is executed and displayed continuously.
• The CD player will repeatedly play the tracks of the CD in random order.
The display will show, for example:
The REPEAT/SHUFFLE or the REPEAT mode is ended:
- If you press the STDPB key.
If you select another mode or deactivate all modes with the MODE key.
I ~l C n n Op\
/ — _/ u-u -1
• —I REPEAT SHUfFlE
1:1
10
Page 11

AZ6825 ONLY
DBB: Dynamic Bass Boost
By using the DBB switch you can adjust the sound at the headphones output.
• Slide the DBB switch into the DBB position (display shows 'DBB') or into the DBB MAX
position (display shows 'DBB MAX'). The bass accentuation will diminish as the volume
increases. The position of the DBB switch at a given time will appear on the display.
• To deactivate DBB, slide the switch into the OFF position.
Note: Dynamic Bass Boost is not affective at the CD OUT socket.
Remote control SBC 6225
PREV(ious)
NEXT
..........
..................
key for selecting the previous music track
key for selecting the next music track
PLAY/SHUFFLE.....pressing lx=starting playback
pressing 2x=shuffle on
pressing 3x=shuffle off
STOP
..................
HOLD
.................
VOLUME
PHONES O
..............
pressing lx=stopping playback
pressing 2x=power off (switch-on again using the PLAY/SHUFFLE button)
switch for activating the HOLD function of the remote control (blocking
all remote control buttons)
for reducing the main volume that has been adjusted with the VOLUME
control on the CD player
...........
socket for headphones (16-32 Ohms/3.5 mm jack plug)
11
Page 12

IN-CAR USE
Shock absorption and damping
This set is specially designed as an in-car portable CD player provided with special
components for absorption and damping of shocks, vibrations and resonances.
• The suspension is geometricaily balanced to prevent shocks from being translated into
rotationai movements.
• Three precision springs supply shock absorption and ate coupled to the mechanism by
smoothly-contacting silicon rings.
• Proper damping of short-term shocks and long-temn resonances is achieved through three
oil-filled dampers.
Car acoustics {KZ6827C only}
In a car, the position of the loudspeakers is never perfect. By using the Car acoustics switch
you can compensate the sound for the limited car acoustics. The stereo image is enlarged,
giving an impressive sound for any kind of music.
• Slide the Car acoustics switch into the ON position (display shows 'CAR')
• To deactivate the car acoustics, slide the switch to the OFF position.
Note: Car acoustics is only affective at the PHONES socket, so use the PHONES socket for
connection to the car radio.
Display illumination (AZ68Z7C only)
When the CD player is powered via the 6 V DC socket (via the mains adapter or the cigarette
lighter socket in your car) the CD piayer display and buttons are backlighted.
When opening the lid of the CD player, the set is switched on for approx. 15 seconds, showing
the selected backlight coiour. You can change (or switch off) the backlight coiour by moving
the selector located in the CD compartment.
• To select the backlight colour, move the selector to GREEN or ORANGE.
• To switch off the backiight, move the selector to the OFF position.
yVofe; When pressing the PLAY button, its backlight changes its colour, e.g. to orange when
green backlight is selected. When pressing STOP, the backlight returns to the selected colour.
12
Page 13

IN-CAR USE
• Rnd a good and safe place for the CD player, on a horizontal, vibration-free and stable
surface where it is not dangerous or in the way of the driver or passengers, see also
'Accessories'.
• Avoid excessive heat from the car heating or from direct sunshine, e.g. when parking in the
sun and avoid moisture, dust and dirt
Supply from the cigarette lighter socket
- Use the voltage converter from the accessory kit SBC 3557 for
power supply from the cigarette lighter socket ¡only fora 12 V
car battery, negative grounding). The converter delivers 6 V/500 mA Direct Current, ❖ -®- plus-pole to the centre
pin.
• First connect the DC-plug to the 6 V DC socket.
• Then insert the voltage converter into the cigarette-lighter socket. If necessary, clean the
cigarette-lighter socket to obtain a good electrical contact.
• Remove the converter from the cigarette-lighter socket when the CD player is not in use
and also when listening to the car radio.
Car radio connection
- If your car radio is provided with a LINE IN socket preferably connect
this LINE IN socket to the PHDNES ii/REMOTE socket of the CD
player using the signal lead SBC 1085.
- For a car radio/cassette player without LINE IN socket, you can use
the cassette adapter from the accessory kit SBC 3557 as follows;
• Turn down the volume of your car radio cassette-player.
• Connect the cassette-adapter plug to the PHONES O/REMOTE
socket of the CD-player. Make sure that the lead does not hinder
your driving.
• Switch off the autoreverse function (if present) of the car cassette
player.
• Slide the cassette carefully into the car radio cassette player. Do not remove the protective
film from the metal head of the cassette adapter.
• Start the CD player and adjust the sound with the car radio controls.
• To remove the cassette, press the eject button of the cassette player.
Resume
• If you switch off the car ignition, the CD player is also switched off. If RESUME was
switched on, and you switch on the ignition again, the CD player will start from the
position where it has been stopped as soon as you press PLAY/PAUSE.
13
Page 14

PRECAUTIONS
Maintenance
General
• Do not expose the CD player, the battery and the discs to rain and dampness or to
excessive heat caused by heating equipment or to direct sunlight, for example inside a car
parked in the sun.
• Do not expose the CD player and the discs to sand.
• The mechanical parts of the CD player contain self-lubricating bearings and therefore must
not be oiled or lubricated.
• Fingerprints, dust and dirt on the player can be wiped off with a clean, soft and slightly
dampened chamois leather. Do not use cleaning agents that contain abrasives or solvents
such as petrol, diluting agents, alcohol, benzine or ammonia, as these may have a
corrosive effect on the housing.
• The labels are removeable without leaving any glue on the door.
CD player and discs
• The lens ® must not be cleaned.
• The lens may cloud over if the player is suddenly moved from cold
to warm surroundings. If that happens, it is not possible to play a
disc. Do not clean the lens, but give the player some time to
acclimatise.
• Always hold the discs at the edges and always replace them in their
covers after use.
• To remove dust, breathe on the disc and wipe it with a soft, lint-free
cloth in a straight line from the centre towards the edge. A cleaning
agent may damage the disc!
Use your head when using headphones
• Hearing safety: Do not play your headphones at a high volume. Hearing experts advise
that continuous use at high volume can pemianently damage hearing.
• Traffic safety: Do not use headphones while driving a vehicle. Using while driving may
create a hazard and it is illegal in many countries. Even if your headphones are an open-air
type designed to let you hear outside sounds, do not turn up the volume so high that you
cannot hear what is going on around you.
Radio interference suppression
This CD player complies with the radio interference requirements as laid down in European
Community regulations.
____________________________________
_______
14
Page 15

ACCESSORIES
Accessories already supplied with AZ 6827C
Battery holder
SBC 1059
SBC 3557
SBC 6619
...........
..................
.................
.................
For 4 Alkaline batteries, type R6, UM3 or AA-cells
Signal lead with 3.5 mm stereo plug and two cinch plugs
Car adapter set, consisting of
-adapter cassette and
- power adapter for connecting the player to the cigarettelighter.
Mains adapter
Accessories already supplied with AZ 6825
Battery holder
SBC 1059
Pouch......................For protecting the CD player when carrying it around
SBC 6225
SBC 6411
SBC 6608
..........
..................
..................
..................
..................
For 4 Alkaline batteries, type R6, UM3 or AA-cells
Signal lead with 3.5 mm stereo plug and two cinch plugs
Wire remote control
Rechargeable battery
Mains adapter
___________________________
____________________________
Optional accessories_______________________________________________
SBC 1085
..................
SBC 3206/3207/3208 ...Mini Loudspeaker systems with amplifier
SBC 3546
.................
SBC 3547
.................
SBC 3557
..................
SBC 6411
..................
Signal cable with 3.5 mm jack plug at both ends
Shock-absorbant mounting plate for installing the CD player in a car
Shock-absorbant mounting plate on a flexible 'swan neck' for
installing the CD player in a car
Car adapter set, consisting of
- adapter cassette and
- power adapter for connecting the player to the cigarettelighter.
Rechargeable battery
SBC 3557
SBC 1085
✓
SBC 6411
15
Page 16

TROUBLESHOOTING
If you are not able to remedy a problem by following these hints, consult your dealer or
service facility. Under no circumstances should you try to repair the unit yourself, as this
would invalidate the guarantee.
Problem Possible cause Remedy
No power or CD does not start
(no display indication)
No CD play start or interrup
tion of CD play (no o'/St or
Error)
No sound or bad sound -Headphone plug is dirty
-Batteries or battery pack not
inserted or exhausted
-Contact pins of batteries or
batterv pack are dirtv
-Batteries incorrectly inserted
-Lid of CD player is not
securely closed
-HDLD-function is active •Switch off the HDLD-function
-The mains adapter is not
connected securely
-Local voltage incorrectly
adjusted on mains adapter
-No CD inserted or the CD is
incorrectly inserted
-The CD is dirty •Clean the CD with a soft,
-The CD is badly scratched •Use another CD,
-Moisture condensation on
the lens
-PAUSE is activated (time
indication is flashinol
-Loose or wrong connections •Check connections
-VOLUME is not turned up •Adjust the VOLUME
-Headphones worn the wrong
wav around
-Strong magnetic fields near
the CD player
• Insert batteries or battery
pack or use AC power adapter
•Clean the contact pins with a
soft, lint-free cloth
•Insert the batteries correctly
•Close the lid securely
•Connect the mains adapter
securely
•Adjust voltage selector on
mains adapter correctly
•Insert a CD with the label
facing up
lint-free cloth.
•Open the lid and allow the
set to acclimatize for a few
minutes
•Clean headphone plug
•Press the PLAY/PAUSE
button
•Pay attention to the 'L' (left)
and 'R' (right) indication
•Find another place for unit or
change connections
16
Page 17

TROUBLESHOOTING
Problem
Lid of CD plaver does not ooen
VOLUME and DBB/CAR
ACOUSTICS do not work
PLAY does not start from the
first track
Short playing time with
batteries or battery pack
Possible cause
-HOLD function is active
-VOLUME and DBB/CAR
ACOUSTICS work only at the
PHONES output
-RESUME or SHUFaE
activated
-Contact pins are dirty •Clean the contact pins with a
-Batteries or battery pack
exhausted
-Battery pack is nearly
exhausted
TROUBLESHOOTING FOR IN-CAR USE
Probiem
No power or CD does not start
(no display indication) or
interruption of CD play
No sound or bad sound
Severe hum or noise
VOLUME and DBB/CAR
ACOUSTICS do not work
Possible cause Remedy
-Cigarette lighter is not
powered when ignition is off
-Cigarette lighter socket is
dirty
-Temperature in the car is too
high ot too low
-Strong vibrations
-Adapter cassette is
incorrectly inserted
-Unfit car radio input lack •Use the adapter cassette
-VOLUME and DBB/CAR
ACOUSTICS work only at the
PHONES output
Remedy
•Switch off the HOLD-function
•Connect headphones to the
PHONES socket
•Switch off RESUME or
SHUFFLE
soft, lint-free cloth
•Replace batteries or battery
pack or use mains adapter
•Recharge battery pack or
connect mains adapter
• If desired, insert additionally
batteries or battery pack
•Clean cigarette lighter socket
•Open the lid and allow the
set to acclimatize for a few
minutes
•Chooseanotherplaceforthe
CD player
•Insert adapter cassette
correctly
•Connect the car radio to the
PHONES socket
17
Page 18

Australia
Guarantee and Service valid for Australia
The benefits given to the purchaser by this warranty are in addition to all other rights and
remedies, which, under the Trade Practices Act or other Commonwealth or State law, the
purchaser or owner has In respect of the product.
The Philips product carries the following warranties:
C-series HIR-systems 12 months. Compact Disc Players: 12 months. Home Audio Systems:
6 months. Clock radios, portable radios, cassette recorders, cassette players and radio record
ers: 90 days.
Any defect in materials or workmanship occurring within the specified period from the date of
delivery, will be rectified free of charge by the retailer from whom this product was
purchased.
Note: Please retain your purchase docket to assist prompt service.
Conditions of this warranty
1. All claims for warranty service must be made to the retailer from whom this product was
purchased. All transport charges Incurred in connection with warranty service or
replacement will be paid by the purchaser.
2. These warranties do not cover batteries and extend only to defects in materials or
workmanship occurring under normal use of the product where operated in accordance
with our instructions.
Philips Consumer Products Division,
Technology Park, Figtree Drive, Australia Centre,
Homebush 2140, New South Wales
116
Page 19

New Zealand
Guarantee and Service for New Zealand
Thank-you for purchasing this quality Philips product.
Philips New Zeaiand Ltd guarantees this product against defective components and fauity
workmanship for a period of 12 months. Any defect in materials or workmanship occurring
within 12 months from the date of purchase subject to the following conditions will be
rectified free of charge by the retailer from whom this product was purchased.
Conditions
1. The product must have been purchased in New Zealand. As proof of purchase, retain the
original sales docket indicating the date of purchase.
2. The guarantee applies only to faults caused by defective components, or faulty
workmanship on the part of the manufacturer.
3. The guarantee does not cover failures caused by misuse, neglect, normal wear and tear,
accidental breakage, use on the incorrect voltage, use contrary to operating instructions, or
unauthorised modification to the product or repair by an unauthorised technician.
4. Reasonable evidence (in the fomt of a sales docket) must be supplied to indicate that the
product was purchased no more than 12 months prior to the date of your claim.
5. In the event of a failure. Philips shall be under no liability for any injury, or any loss or
damage caused to property or products other than the product under guarantee.
This guarantee does not prejudice your rights under common law and statute, and is in
addition to the normal responsibilities of the retailer and Philips.
Howto claim
Should your Philips product fail within the guarantee period, please return it to the retailer
from whom it was purchased. In most cases the retailer will be able to satisfactorily repair or
replace the product
However, should the retailer not be able to conclude the matter satisfactorily, or if you have
other difficulties claiming under this guarantee, please contact
The Guarantee Controller
Philips New Zealand Ltd.
SP.O. Box 41.021
Auckland
Q (09) 84 94160
fax S (09) 84 97 858
117
Page 20

CD
CD
(©
CD
CD
/XV
3140 105 20403
Printed in Hong Kong
BK/9344
 Loading...