

Philips AZ3705 User Manual
PHILIPS
AZ3705 / AZ3708 Portable CD Changer System
□ i l D O a Q O 00 S3
Instructions for Use
Mode d’emploi
5*8
Instrucciones de manejo
mmimm
PHILIPS

GUARANTEE AND SERVICE VALID FDR AUSTRALIA GUARANTEE AND SERVICE FDR NEW ZEALAND
The benefits given to the purchaser by this warranty are in
addition to all other rights and remedies, which, under the
Trade Practices Act or other Commonwealth or State law,
the purchaser or owner has in respect of the product.
The Philips product carries the following warranties:
C-series HiFi-systems: 12 months. Compact Disc Players:
12 months. Home Audio Systems: 6 months. Clock radios,
portable radios, cassette recorders, cassette players and
radio recorders: 90 days.
Any defect in materials or workmanship occurring within
the specified period from the date of delivery, will be
rectified free of charge by the retailer from whom this
product was purchased.
Note: Please retain your purchase docket to assist prompt
service.
Conditions of this warranty
1. All claims for warranty service must be made to the
retailer from whom this product was purchased. All
transport charges incurred in connection with
warranty service or replacement will be paid by the
purchaser.
2. These warranties do not cover batteries and extend
only to defects in materials or workmanship occurring
under normal use of the product where operated in
accordance with our instructions.
Philips Consumer Products Division,
Technology Park
Figtree Drive, Australia Centre
Homebush2140,
New South Wales
Thank-you for purchasing this quality Philips product. The
document you are now reading is your guarantee card.
Guarantee
Philips New Zealand Ltd guarantees this product against
defective components and faulty workmanship for a period
of 12 months. Any defect in materials or workmanship
occurring within 12 months from the date of purchase
subject to the following conditions will be rectified free of
charge by the retailerfrom whom this product was
purchased.
Conditions.
1. The product must have been purchased in New
Zealand, and this guarantee card completed at time of
purchase {this is your proof of the date of purchase).
2. The guarantee applies only to faults caused by
defective components, orfaulty workmanship on the
part of the manufacturer.
3. The guarantee does not cover failures caused by
misuse, neglect, normal wear and tear, accidental
breakage, use on the incorrect voltage, use contrary to
operating instructions, or unauthorised modification to
the product or repair by an unauthorised technician.
4. Reasonable evidence (in the fomo of a sales docket or
completed guarantee card) must be supplied to
indicate that the product was purchased no more than
12 months priortothe date of your claim.
5. In the event of a failure. Philips shall be under no
liability for any injury, or any loss or damage caused to
property or products other than the product under
guarantee.
This guarantee does not prejudice your rights under
common law and statute, and is in addition to the normal
responsibilities of the retailer and Philips.
Howto claim.
Should your Philips product fail within the guarantee
period, please return it to the retailer from whom it was
purchased. In most cases the retailer will be able to
satisfactorily repair or replace the product.
However, should the retailer not be able to conclude the
matter satisfactorily, or if you have other difficulties
claiming underthis guarantee, please contact
The Guarantee Controller,
Philips New Zealand Ltd.
B P.O.Box41.021
Auckland
S (09)8494160
fax S (09) 84 97 858

Index
English
Français
Español
Generai Information >
Safety Information^
Preparation
Controls
...............
Operating the System.
GénéralitésInformations Relatives à la Sécurité - 21
Préparations
Commandes
Utilisation de l'appareil —————.27
Información General
Información de Seguridad ——.38
Preparacións
Controles —
Funcionamiento del sistema —.44
4>3í:
..............................
GARANTIA PARA MEXICO
N O M
Este aparato está fabricado con materiales de alta calidad
y ha sido cuidadosamente verificado. Philips, por lo tanto,
da a usted una garantía de 12 meses a partir de su fecha
de compra.
La garantía ampara la reposición de las piezas
defectuosas debidas a fallas en su montaje o en los
materiales, incluyendo la mano de obra necesaria para su
reemplazo en nuestras Sucursales o talleres autorizados.
En caso de fallas en su aparato le rogamos se sirva poner
en contacto con su distribuidor.
Esta garantía no cubrirá las averías que resulten como
consecuencia de una instalación incorrecta del aparato,
manifiesto maltrato o uso inadecuado del mismo.
Philips se obliga a reparary devolver a usted su aparato en
un plazo no mayor de 30 días hábiles contados a partir de
la fecha de haber ingresado su aparato a uno de nuestros
talleres.
Para que esta garantía sea válida, es necesario que el
certificado que figura en la parte posterior de esté
instructivo haya sido debidamente llenado en el momento
de la compra del aparato.
En caso de extravío del certificado con la presentación de
la factura o remisión de su aparato podrá hacer efectiva la
garantía correspondiente.
Si usted tiene alguna duda o pregunta que no le pueda
solucionar su distribuidor, por favor ponerse en contacto
^4
^4
-7-9
-10
-21
..........................
.........—------
_______
........——..................
....................
...................................
...........................56-57
...................................
-------------
——
-------
......
...........K
22-23
24-2S
39-40
—. 41-43
58-60
-38
55
61
Oñcinas Centrales de Servicio,
Av. Coyoacán No. 1051,
Col. del Valle,
03100 MÉXICO, D.F.
S 5-75-20-22 o 5-75-01-00
.
....
— 45-46 —
_______
-11-12
.12-16 w
,17-18 =
___
___
-
,28-29 CO
-29-33 *5
.34-35 S"
___
-
___
— 46-50
—... 51-52 n
53 ^
62-63
71
19
^20
36 <0
37 ù:
Tuner ——
_______—................
CD Changer
.........................
Cassette Deck
Maintenance ..........
Troubleshooting -
Syntoniseur.—
Lecteur de Disques Compacts .
Platine Cassette ....................
Entretien Remèdes en cas de panne —
Sintonizador-.-.-.
Reproductor de CD —
Reproductor de casete —
Mantenimiento —
Solución de problemas ———54 ^
m m m
...
...................-
....
.................
....
.............
___________—.......
........
_______
............................
....................................
...................,„.63-67 w
.....................................68-69 ^
......................................... 70 -a-
.
............................
en
c
LU

General Information
Safety Information
General Information
m
3
• The typeplate is located at the base of the set.
• Recording is permissible if copyright or other rights
S5‘
of third parties are not infringed.
1 All unnecessary packaging material has been
omitted. We have done our utmost to make the
packaging easy to separate into three monomaterials:
- cardboard (box)
- expandable polystyrene (buffer)
- polyethylene (bags, protective foam sheet).
Please observe the local regulations regarding the
disposal of these packaging materials.
2 Your set consists of materials which can be
recycled and reused if disassembled by a
specialized company. Please follow local
regulations on recycling your old set.
3 Do not dispose dead batteries with your household
waste. Dispose batteries according to local
regulations.
Safety information
• Before operating the system, check that the
operating voltage indicated on the typeplate (or the
voltage indication beside the voltage selector) of
your system is identical with the voltage of your
local power supply. If not, please consult your
dealer. The type plate is located at the rear of your
system.
• When the system is switched on, do not move it
around.
• Place the system on a solid base (e.g. a cabinet).
• Place the system in a location with adequate
ventilation to prevent internal heat build-up in your
system.
• Do not expose the system to excessive moisture,
rain, sand or heat sources.
• Under no circumstances should you repair the unit
yourself, as this will invalidate the warranty!
• If the system is brought directly from a cold to a
warm location, or is placed in a very damp room,
moisture may condense on the lens of the CD unit
inside the system. Should this occur, the CD player
will not operate normally. Leave the power on for
about one hour with no disc in the unit until normal
playback is possible.
• Electrostatic discharge may cause unexpected
problems. See whether these problems disappear if
you unplug the AC power cord and plug it in again
after a few seconds.
• To disconnect the system from the power
supply completely, withdraw the AC power
cord from the wall socket
IMPORTANT
To help ensure the top quality performance and
long-life reliability of the CD portion of your new
Philips purchases, we recommend the following
procedures:
1. When situating this product for use, be sure it is
positioned on a perfectly level surface, and not
tilted to either side, forward or backward.
2. When moving this product from one place to
another, such as from one room to another.
• Use the feature, CD LOCK, to secure the CD tray
before transportation. (See page 16)
• Turn the power off and wait for at least 10
seconds for the CD changer mechanism to reset
itself.
• If operating by AC power, unplug the cord from
the AC outlet.
• Lift the unit by its handle and keep it in a level,
horizontal position while moving.
3. When moving the product from one location to a
second, more remote location:
• Remove all discs from the CD mechanism.
(Transporting this unit with discs loaded inside
can result in disc damage or product
malfunction.)
• Turn the power off and wait for at least 10
seconds for the CD changer mechanism to reset
itself.
• If operating by AC power, unplug the cord from
the AC outlet. Detach the cord and store it in the
battery compartment.
• Take care in transporting the unit and keep it in
a horizontal position.
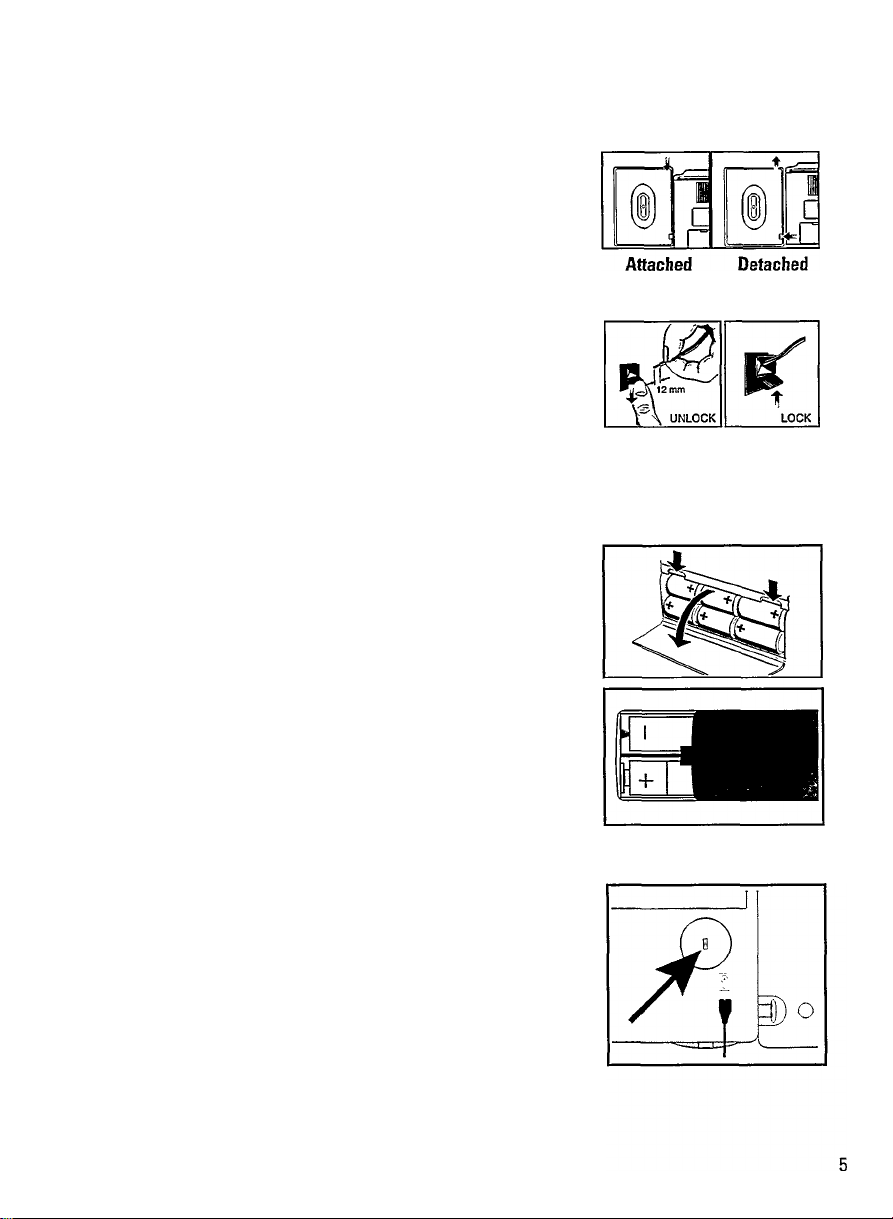
Attaching the Speakers
To attach/detach the loudspeakers, please see diagrams as
indicated.
Speakers' Connection
• Connect the right speaker to terminal R, with the red wire to +
and the black wire to —.
• Connect the left speaker to terminal L, with the red wire to +
and the black wire to —.
• Clip the stripped portion of the speakers wire as shown.
Batteries
FortheSet (notsupplied)
• Open the battery compartment and insert six batteries, type
R20, UM-1 or D-cells (preferably alkaline).
• Remove the batteries if they are dead or the set is not to be used
for a long time.
Preparation
.¿3
"Si
LU
e
Forthe Remote Control (supplied)
• Open the battery compartment and insert two batteries, type
RB, UM-3 or AA-cells (preferably alkaline).
• Remove the batteries if they are dead or the remote control is not
to be used for a long time.
Adjusting the Operating Voltage
Before connecting the AC power cord to a wall outlet, make
sure that the voltage selector at the rear of the system is set
to the local power line voltage. If not, reset the selector
before connecting to the wall outlet.

Preparation
AC Power Supply
m
=3
(fi
1 Before operating the set, check that the operating voltage
indicated on the typeplate of your set is identical to your local
power supply. If not. please consult your authorized service center.
The typeplate is located at the base of the set.
2 Connect the AC power socket to the set and the AC power plug to
the wall outlet.
• The battery supply is switched off when the set is connected to
the AC power supply. To change over to battery supply, pull out
the plug from the unit's AC power socket.
• To disconnect the set from the power supply completely, withdraw
the AC power cord from the wall socket.

Remote Control Functions
- First selsct the source you wish to control by pressing the PLAY
button (for AZ3705) or one of the source select keys on the remote
control (e.g. CD or TUNER (for model AZ3708 only)).
- Then select the desired function.
For model AZ3705 only
OPEN
.........................................................
DISC UP
....................................................
M W
..................................... .....................
►II.............................................................to start or interrupt play in CD mode.
■ ..........................................................to stop play in CD mode.
VOLUME A/T
........................
For mode! AZ3708 only
DIGITS 0 -9..............................................(numbers consisting of two digits must
in CD mode
in TUNER mode...........................to key in a preset number
CD ..............................................................to select CD mode.
TUNER........................................................to select TUNER mode.
DISC UP
SHUFFLE
►II
................................... ........................
■ ..........................................................to stop play in CD mode.
M M.....................................
OPEN.........................................................to open or close the CD tray.
VOLUME A/T
...................................
....................................................
...................................................
.....................
........................ .............
to open or close the CD tray.
to select desired disc.
to select previous or next track for CD
mode.
.............to adjust the volume.
be keyed in within 2 seconds)
to key in a track number
to select desired disc.
to play CD tracks at random.
to start or interrupt play in CD mode.
to select previous/next track for CD
mode or to select preset station for
TUNER mode.
to adjust the volume.
Controls
"o>
O O
6 6 6
6
KcnMa Ccrod
s IS [£
Dscup MI sKumi
CD (ZD CD
M « H
cocDa
(^as
Remote Control
 Loading...