

Page 1
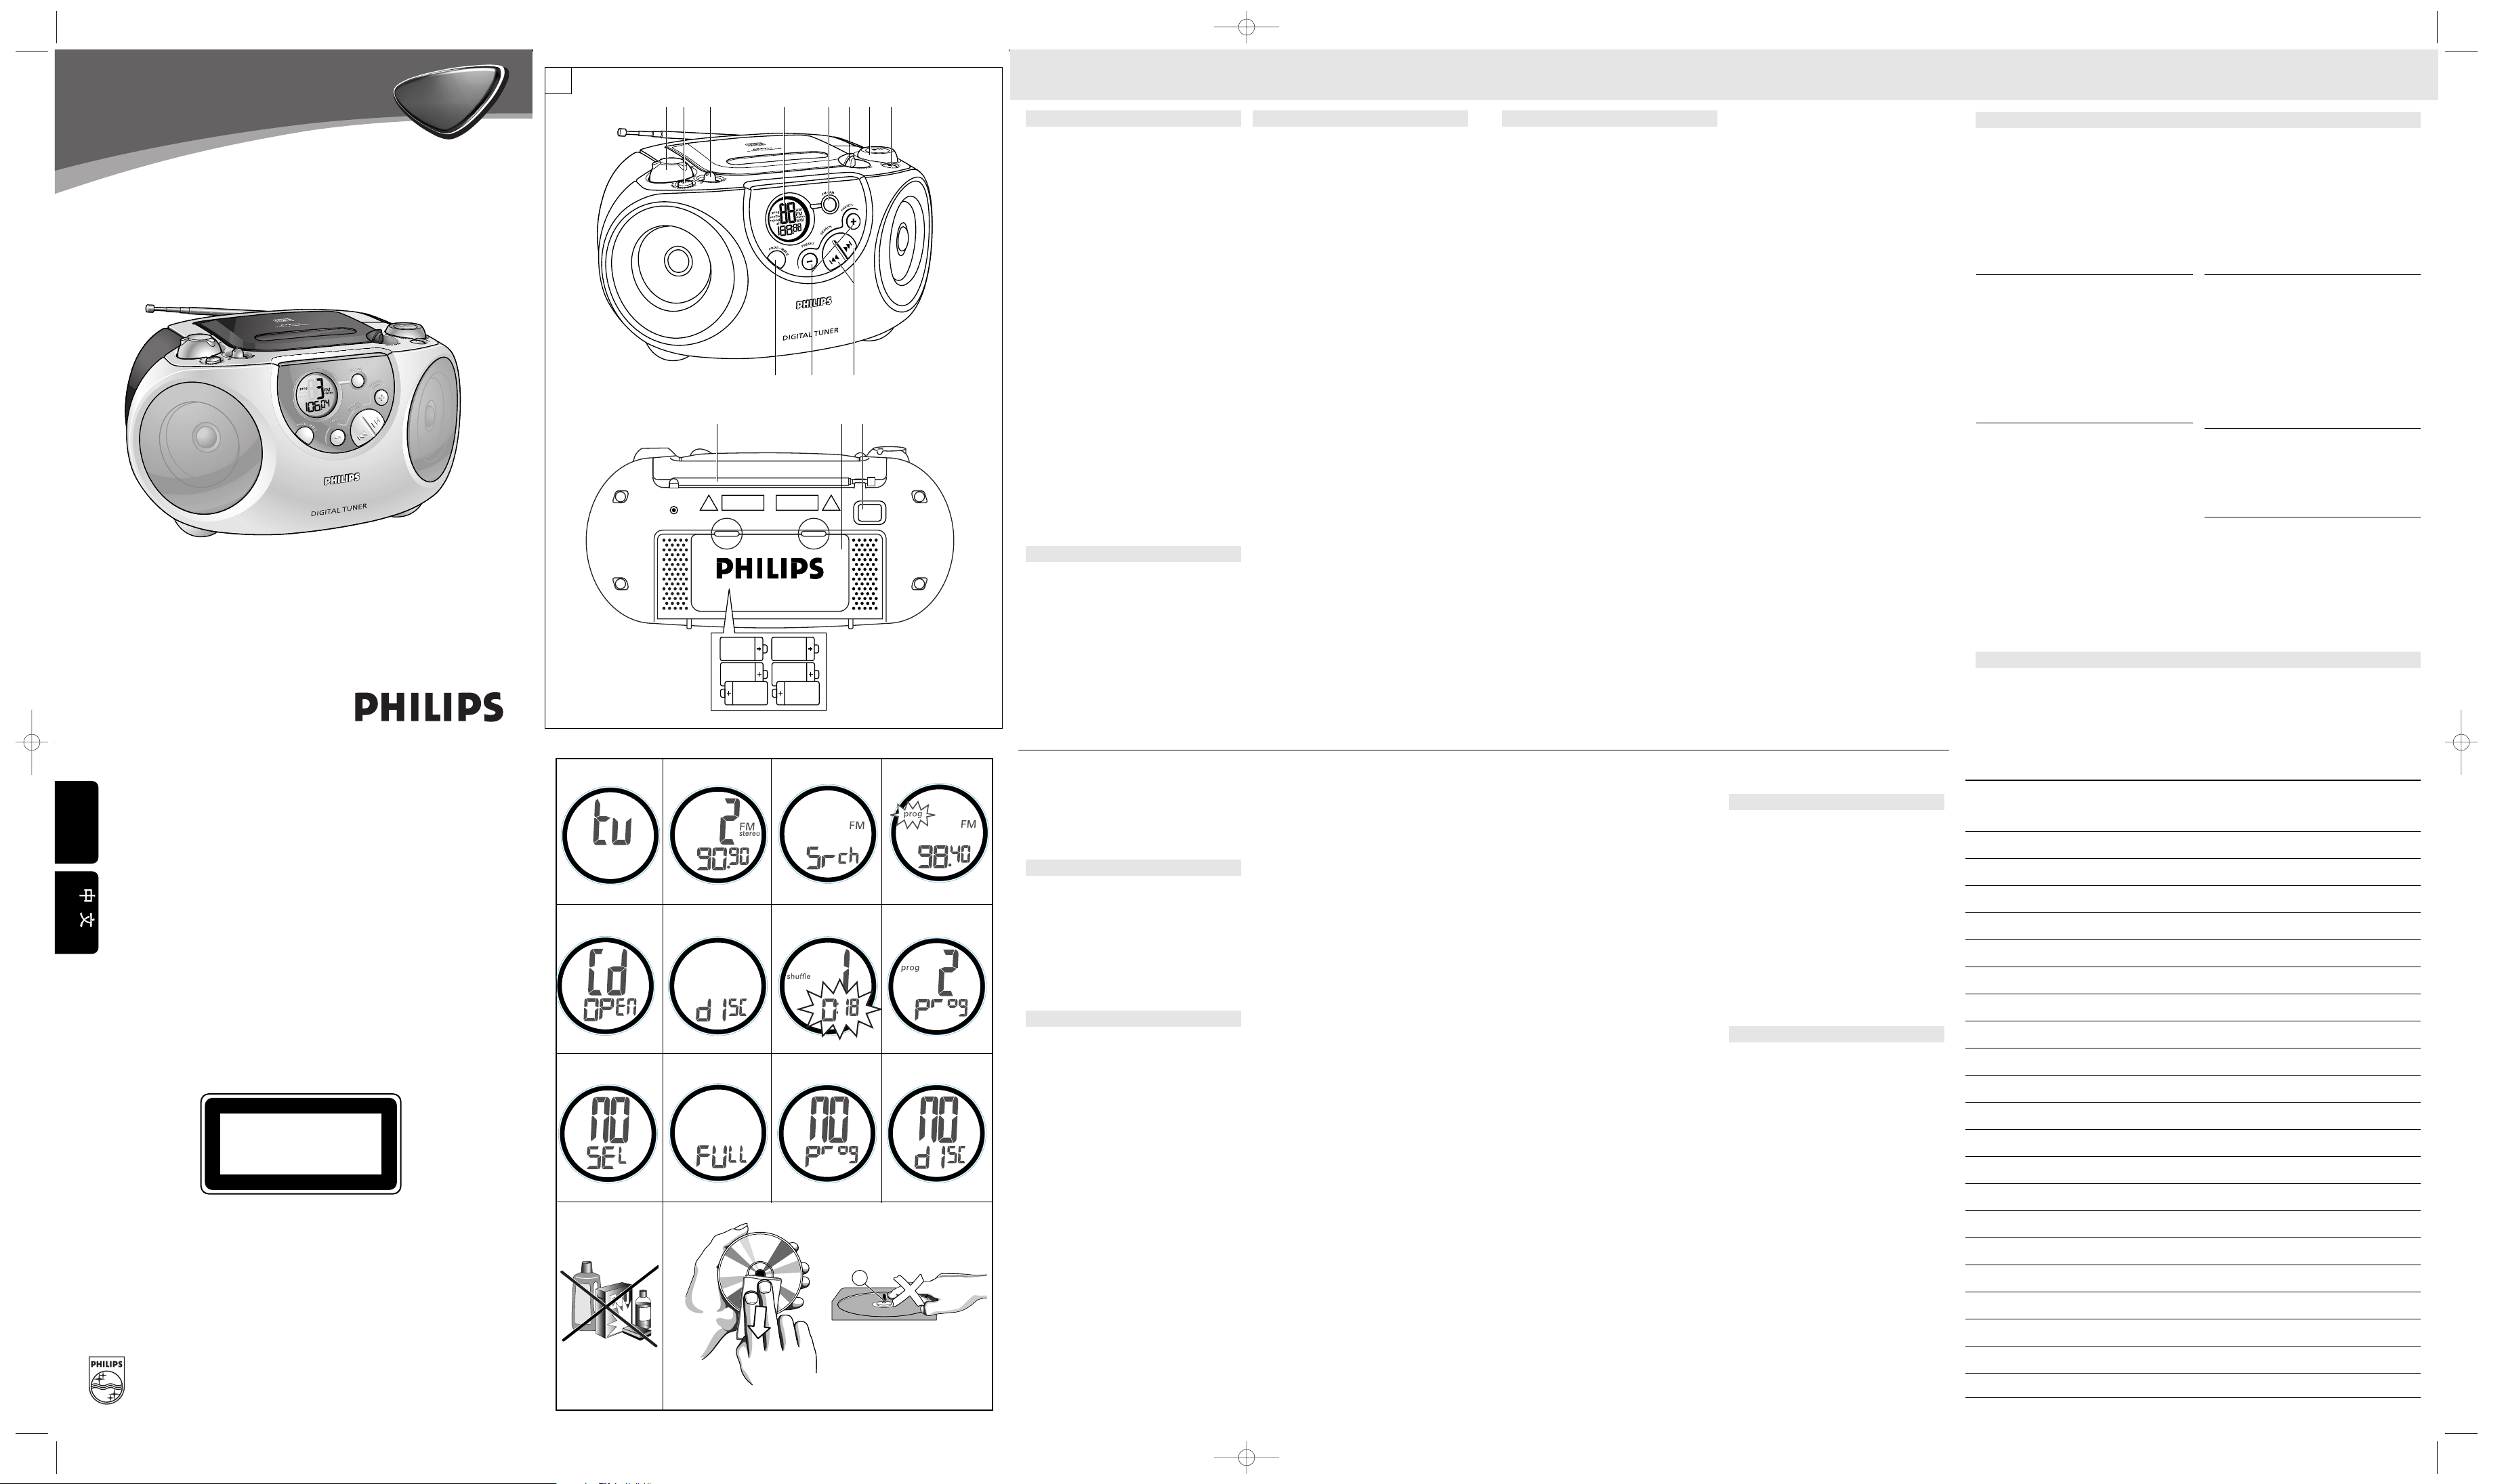
Top and front panels (See 1)
1VOLUME
– adjusts volume level
2DBB (Dynamic Bass Boost)
– enhances bass response
3Source selector
– selects source of sound CD or TUNER. Also the
power off switch
4Display
– shows the CD and tuner functions
5FM•MW (AM)
– selects FM/ MW (AM) waveband
6LIFT TO OPEN
– opens/ closes the CD door
7PRESS TO PLAY 2;
– starts or pauses CD play
8STOP 9
– stops CD playback; erases a CD programme
9SEARCH ∞ , §
CD: skips or searches a passage/track back-
wards or forward
Tuner: tunes to a station (up, down)
0PRESET +, –
– selects a preset station (up, down)
!PROG MODE
CD: – programmes and reviews programmed
track numbers;
– plays tracks CD/ programme in random
order;
– repeats a track/CD/ programme
Tuner: – programmes preset stations
Back Panel (See 1)
@Telescopic aerial
– to improve FM reception
#Battery door
– to open battery compartment
$AC MAINS
– inlet for mains lead
CAUTION
Use of controls or adjustments or performance of procedures other than herein may result in hazardous
radiation exposure or other unsafe operation.
Power Supply
Whenever convenient, use the power supply if you
want to conserve battery life. Make sure you remove
the plug from the set and wall socket before inserting
batteries.
Batteries (not included)
Open the battery compartment and insert six batteries, type R-14, UM-2 or C-cells, (preferably alkaline)
with the correct polarity as indicated by the "+" and
"–" symbols inside the compartment.
Batteries contain chemical substances, so they
should be disposed of properly.
Incorrect use of batteries can cause electrolyte leakage and will corrode the compartment or cause the
batteries to burst. Therefore:
• Do not mix battery types: e.g. alkaline with carbon
zinc. Only use batteries of the same type for the
set.
• When inserting new batteries, do not try to mix old
batteries with the new ones.
• Remove the batteries if the set is not to be used
for a long time.
Using AC Power
1 Check if the mains voltage, as shown on the type
plate located on the bottom of the set, corresponds
to your local mains supply. If it does not, consult
your dealer or service centre.
2 Connect the mains lead to the AC MAINS inlet and
the wall socket. The power supply is now connected and ready for use.
3 To switch off completely, unplug the mains lead
from the wall socket.
• Unplug the mains lead from the wall socket to protect your set during heavy thunderstorms.
The typeplate is located on the bottom of the set
CD Player
Display indication for CD functions
– CD open: CD door open (See 6)
– disc: CD inserted (See 7)
– In stop mode: total track number and total playback time
– During CD playback: elapsed playback time of
current track and current track number
– Pause: elapsed playback time freezes and flashes
(See 8)
– shuffle/ repeat modes: when the respective mode
is activated
– prog: when CD programme active); prog also
appears briefly when you store a track (See 9)
– no sel: programme activated but no tracks select-
ed (See 0)
– full: programme memory full (See !)
– no prog: programme cancelled (See @)
– no disc: no disc/ error in CD operation /CD-R(W) is
blank or the disc is not finalized (See # +
Troubleshooting)
Playing a CD
This CD-player can play Audio Discs and CDRecordables. Do not try to play CD-Rewritables,
a CD-ROM, CDi, VCD, DVD or computer CD.
1 Adjust the source selector to CD.
™ Display: shows Cd briefly.
2 To open the CD door, lift the CD door at the edge
marked LIFT TO OPEN.
3 Insert a CD or CD-R with the printed side facing up
and press the CD door gently close.
4 Press 2; on the set to start playback.
5 To pause playback press 2;. To resume, press 2;
again.
6 To stop CD playback, press STOP 9.
Note: CD play will also stop when:
– you open the CD compartment;
– you select TUNER sound source;
– the CD has reached to the end.
Selecting a different track
During playback you can use ∞ or § to select a par-
ticular track.
• If you have selected a track number in the stop or
pause position, press 2; to start playback.
• Press § once briefly for the next track, or press
repeatedly until the desired track number appears
in the display.
• Press ∞ once briefly to return to the beginning of
a current track.
• Press ∞ more than once briefly for a previous
track.
Finding a passage within a track
1 Press and hold down ∞ or §.
• The CD is played at high speed and low volume.
2 When you recognize the passage you want release
∞ or §.
™ Normal playback resumes.
Different play modes: Shuffle and Repeat
PROG MODE allows you to select various play
modes. The modes can be selected or changed during
playback of an entire CD/ CD programme in the following sequence:
shuffle – all tracks are played in random order
shuffle repeat all –
repeats the entire CD in random order
repeat – plays the current track continuously
repeat all – plays the entire CD continuously
1 During playback, select your play mode by pressing
PROG MODE once or more until the desired play
mode is shown.
™ Display: your selected mode flashes 2 seconds
before playback
• You can use ∞ or § to skip tracks during the
shuffle/ repeat modes.
• The shuffle/ repeat play options can be combined
and used with a programme: e.g. shuffle/ repeat all
repeats the entire CD programme in random order.
2 To return to normal playback press PROG MODE
until the shuffle/ repeat modes are no longer
shown.
• You can also press 9 to quit the play mode.
Switching power on/off: Save energy
Whether you are using mains or battery supply, to
avoid unnecessary energy consumption always adjust
the source selector to off.
General operation
1 To select your sound source adjust the source
selector to CD/TUNER/OFF.
2 Adjust the sound with the VOLUME and DBB
(Dynamic Bass Boost) controls.
3 To switch off the set, adjust the source selector to
off position.
Note: When the set is switched off the tuner presets
will be retained in the set’s memory.
Tuner
Radio reception
1 Adjust the source selector to TUNER.
™ Display: shows tu briefly (See 2).
2 Press FM•MW once or more to select the desired
waveband.
™ Display: shows your waveband and the preset
number and the frequency of a preset station if
already programmed (See 3)
3 Press and hold down ∞ or § briefly to tune to a
radio station. Release when the frequency in the
display starts to change.
™ The radio automatically tunes to a radio station
of sufficient reception. Display shows Srch dur-
ing automatic tuning. (See 4)
– For FM, pull out the telescopic aerial. Incline and
turn the aerial. Reduce its length if the signal is too
strong (very close to a transmitter).
– For MW (AM) the set is provided with a built-in
aerial so the telescopic aerial is not needed. Direct
the aerial by turning the whole set.
Programming radio stations
You can store up to a total of 32 radio stations in the
memory: 20 FM and 12 MW(AM).
1 Tune to your desired station (see Radio Reception).
2 Press PROG MODE to activate programming.
™ Display: prog flashes. (See 5)
3 Press PRESET + or – once or more to allocate a
number from 1 to 20 for FM or 1 to 12 for MW(AM).
4 Press PROG MODE again to confirm the setting.
™ Display: prog disappears, the preset number and
the frequency of the preset station are shown.
(See 3)
5 Repeat steps 1-4 to store other stations.
• You can erase a preset station by storing another
frequency in its place.
Changing tuning grid (some versions only)
In North and South America the frequency step
between adjacent channels in the AM and FM band
are 10 KHz and 100 KHz respectively. In the rest of
the world this step is 9 KHz and 50 KHz. Usually the
frequency step has been preset in the factory for your
area.
1 Check that the set is completely switched off.
2 To select 9KHz: Simultaneously, press STOP 9 and
PRESET – on the set.
3 Switch the set on to TUNER and then release the
controls.
• To select 10KHz: Repeat steps 1-3 but in step 2,
simultaneously, press STOP 9 and PRESET + on
the set.
™ When you tune to radio stations, the display
shows tuning in either steps of 9 kHz or 10 kHz.
™ All preset and autostore stations will be affect-
ed and you may need to reprogramme stations.
Programming track numbers
You may store up to 20 tracks in the desired
sequence. If you like, store any track more than once.
1 In the STOP mode, press ∞ or § for your desired
track.
2 When your chosen track number appears, press
PROG MODE once to store the track.
™ The display shows prog and prog briefly fol-
lowed by your selected track number. (See 9)
™ If you attempt to programme without first select-
ing a track number, no sel is shown.
(See 0)
3 Repeat steps 1 to 2 to select and store all desired
tracks in this way.
™ full is displayed if you attempt to programme
more than 20 tracks.(See !)
4 To play your programme, press 2;.
Reviewing your set programme
• In the STOP mode, press and hold down
PROG MODE for more than one second.
™ The display shows all your stored track numbers
in sequence.
Erasing a programme
You can erase the contents of the memory by:
– opening the CD door;
– selecting TUNER source;
– pressing 9 (twice during playback or in the stop
position
™ Display: shows no prog briefly when the pro-
gramme is cancelled.(See @)
Precautions & General Maintenance (See $)
• Place the set on a hard and flat surface so that the
system does not tilt.
• Do not expose the set, batteries or CDs to humidity,
rain, sand or excessive heat caused by heating
equipment or direct sunlight.
• Do not cover the set. Adequate ventilation with a
minimum gap of 6 inches between the ventilation
holes and surrounding surfaces is necessary to prevent heat build-up.
• The mechanical parts of the set contain self-lubricating bearings and must not be oiled or lubricated.
• To clean the set, use a soft dry cloth. Do not use
any cleaning agents containing alcohol, ammonia,
benzene or abrasives as these may harm the housing.
CD player and CD handling (See %)
• The lens of the CD player should never be touched!
• Sudden changes in the surrounding temperature
can cause condensation to form and the lens of
your CD player to cloud over. Playing a CD is then
not possible. Do not attempt to clean the lens but
leave the set in a warm environment until the
moisture evaporates.
• Always close the CD door to keep the CD compartment dust-free. To clean, dust the compartment
with a soft dry cloth.
• To clean the CD, wipe in a straight line from the
centre towards the edge using a soft, lint-free
cloth. Do not use cleaning agents as they may
damage the disc.
• Never write on a CD or attach any stickers to it.
Meet Philips at the Internet
http://www.philips.com
W
CLASS 1
LASER PRODUCT
AZ 3010
AZ 3014
English
3 x 2 R14 • UM2 • C-CELLS
1 2 3 4 5 6 7 8
@ # $
! 0 9
AZ3010
AZ3014
CD Soundmachine
Audio
Audio
– Problem
• Solution
No sound /power
– Volume not adjusted
• Adjust the VOLUME
– Mains lead not securely connected
• Connect the AC mains lead properly
– Batteries exhausted/ incorrectly inserted
• Insert (fresh) batteries correctly
Display does not function does not function
properly/ No reaction to operation of any of
the controls
– Electrostatic discharge
• Switch off and unplug the set. Reconnect after a
few seconds
no disc indication
– CD-RW inserted /No CD inserted
• Insert a CD or a CD-R
– CD badly scratched or dirty
• Replace/ clean CD, see Maintenance
– Laser lens steamed up
• Wait until lens has cleared
– CD-R is blank or the disc is not finalized
• Use a finalized CD-R
CD playback does not work
– CD badly scratched/ dirty
• Replace/ clean CD (see maintenance)
– Laser lens steamed up
• Wait until lens has adjusted to room temperature
The CD skips tracks
– CD damaged or dirty
• Replace or clean CD
– SHUFFLE or a program is active
• Quit SHUFFLE/ program mode(s)
Troubleshooting
If a fault occurs, first check the points listed below before taking the set for repair.
Do not open the set as there is a risk of electric shock.
If you are unable to remedy a problem by following these hints, consult your dealer or service centre.
WARNING: Under no circumstances should you try to repair the set yourself, as this will invalidate the
guarantee.
Environmental information
We have done our best to reduce the packaging and make it easy to separate into 3 materials: cardboard, paper
pulp and expandable polyethylene.
Your set consists of materials which can be recycled if disassembled by a specialized company. Please observe
the local regulations regarding the disposal of packaging, exhausted batteries and old equipment.
1
4
7
9
@
5
8
0
#
3
6
!
X
$%
2
English CONTROLS POWER SUPPLY
CD PLAYER
CD PLAYER MAINTENANCE & SAFETY
BASIC FUNCTIONS TUNER
TROUBLESHOOTING
NOTES
XP AZ3010/15 5/19/03 12:16 PM Page 1
Page 2
1
X
1 2 3 4 5 6 7 8
! 0 9
@ # $
3 x 2 R14 • UM2 • C-CELLS
中文
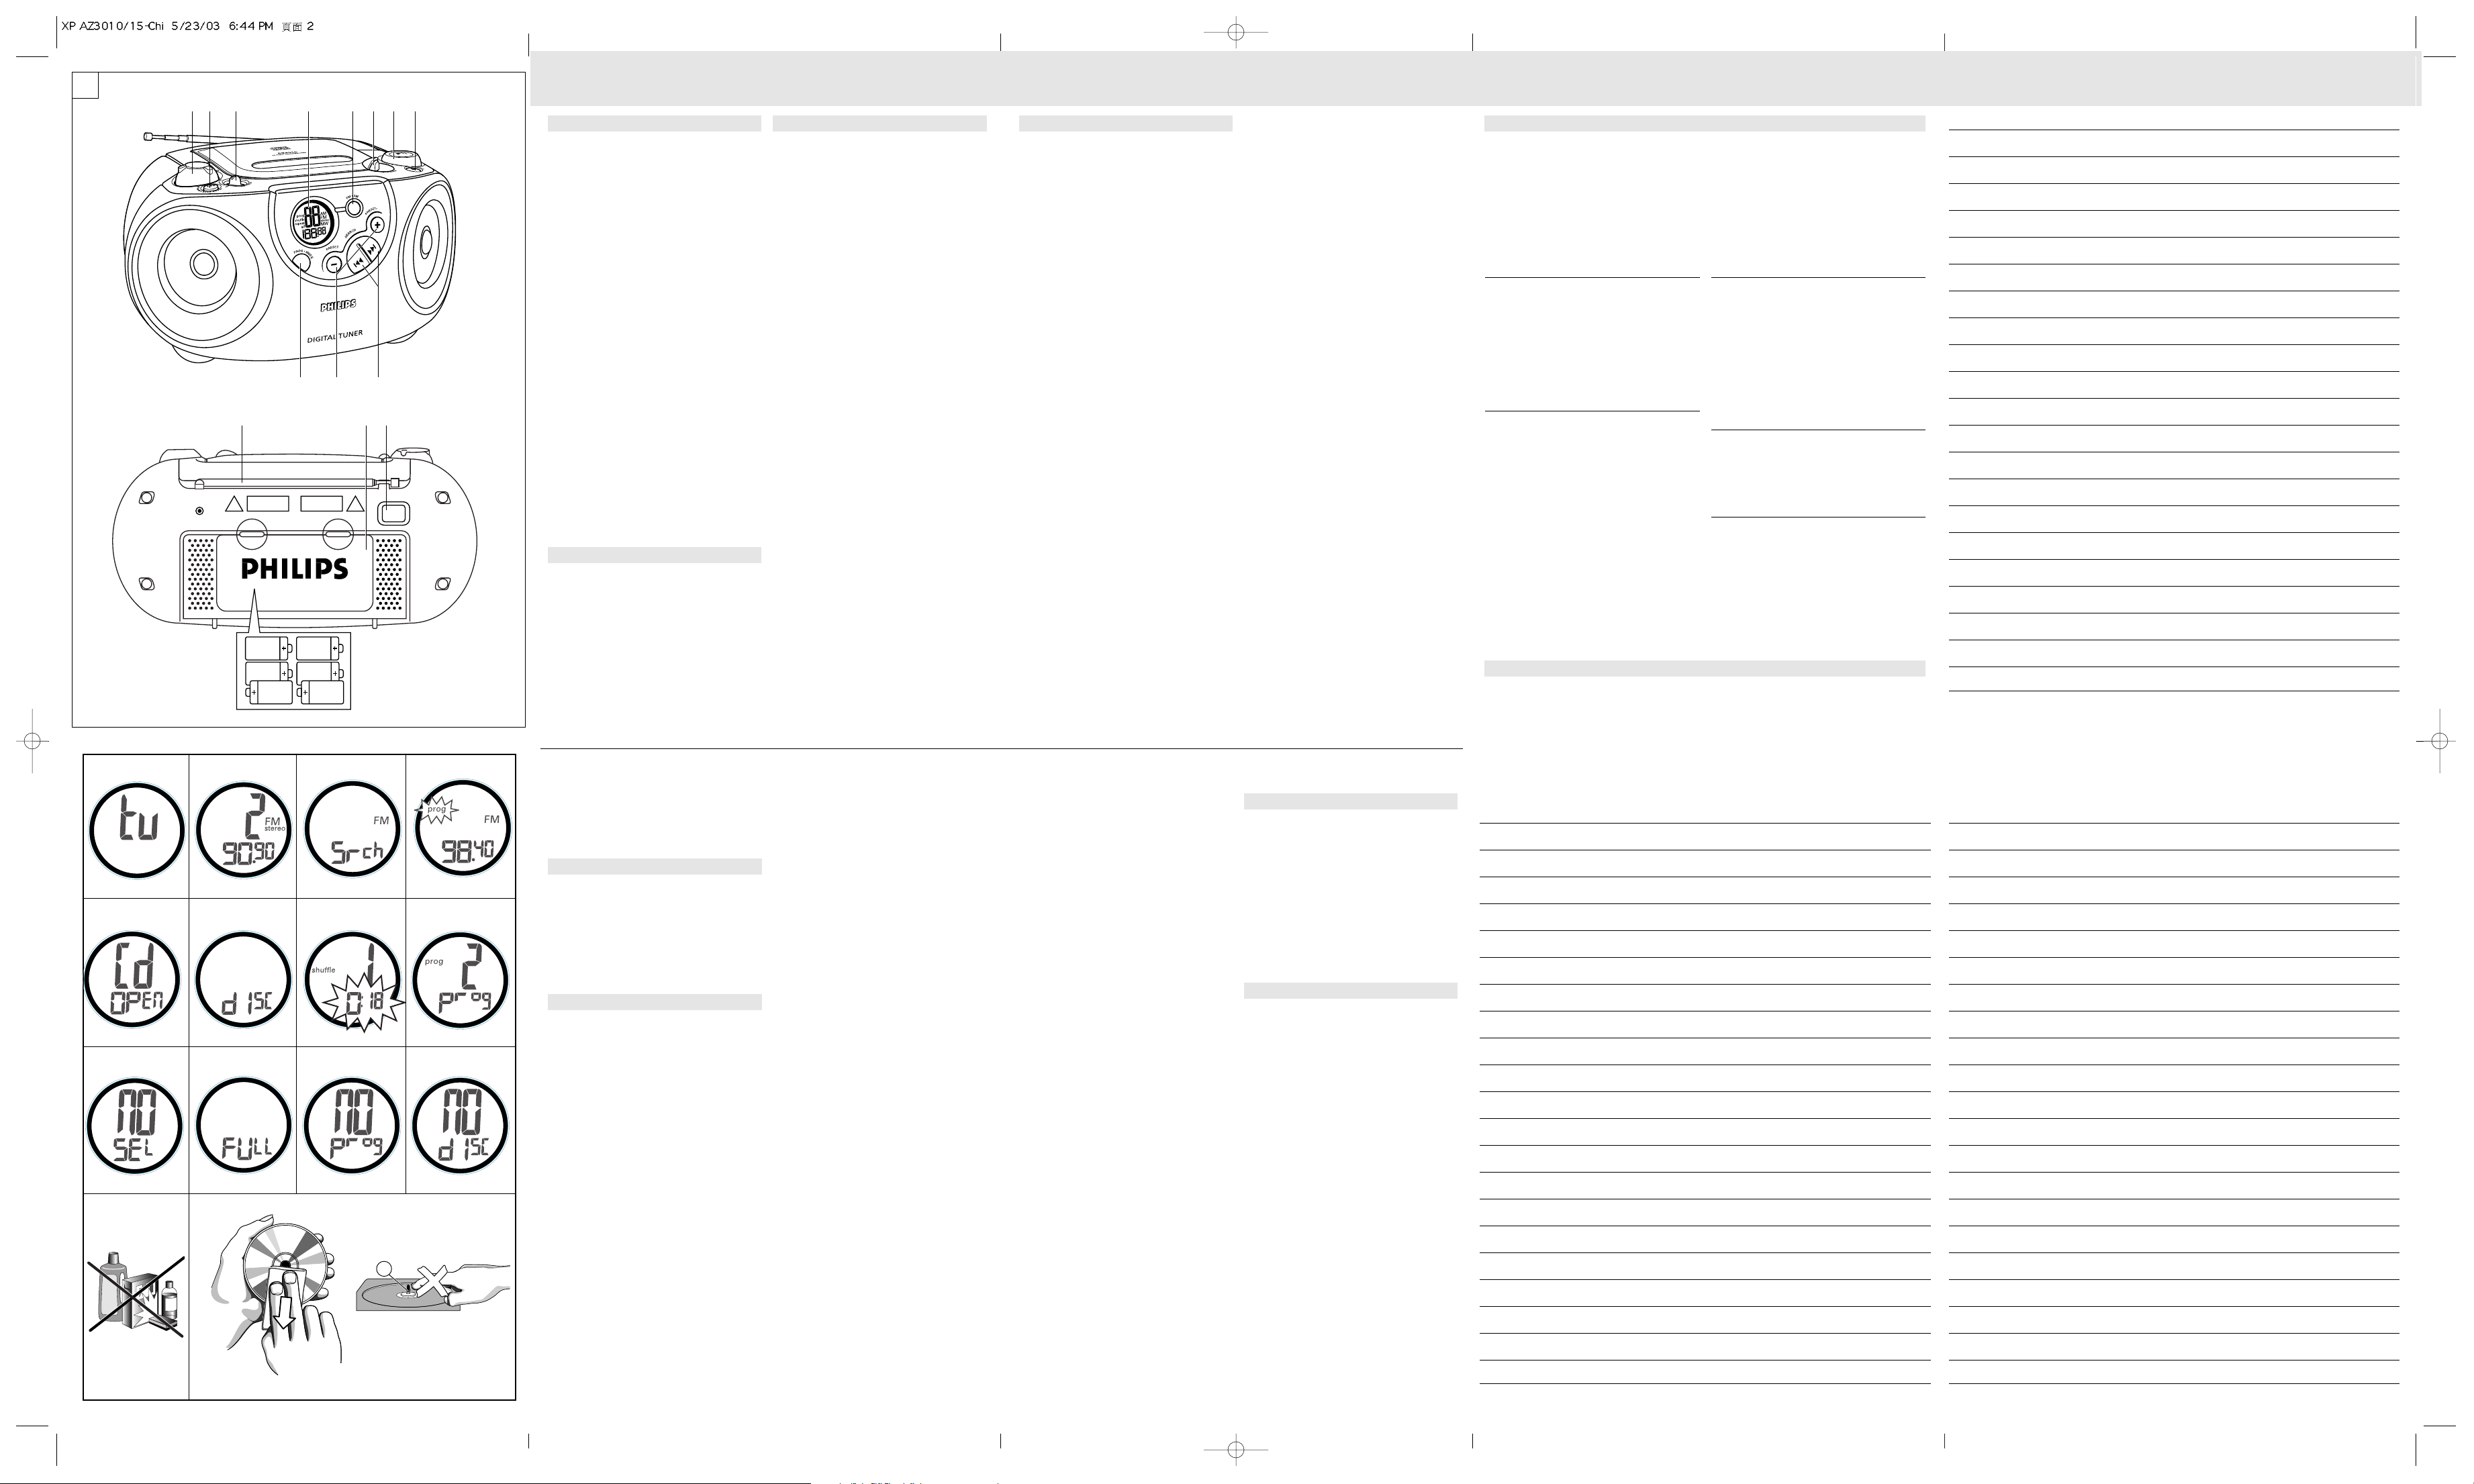
頂面板和前面板(見圖 1
控制器 電源供給
)
1VOLUME
調整音量大小
–
2DBB
增強低音響應
–
(
超動感低音增強
)
3音源選擇器
(
– 選擇CD
激光唱機)或
源,也用來關閉電源
TUNER
(
調諧器)為音
4顯示屏
顯示激光唱機和調諧器的功能
–
5FM•MW (AM)
– 選擇FM/ MW (AM)
波段
6LIFT TO OPEN
開/關CD門蓋
–
7PRESS TO PLAY 2;
開始或暫停CD播放
–
8STOP 9
– 停止CD
播放;抹除CD程序
9SEARCH ∞ , §
激光唱機: 向後或向前跳選或搜尋一段曲詞/
一首曲目
調諧器: 調諧選台(向上,向下
)
0PRESET +, –
選擇預設電台(向上,向下
–
)
!PROG MODE
激光唱機:– 曲目編程和檢查程序;
以亂序(不依順序)方式播放曲
–
目 /光盤/ 程序;
重複播放一首曲目 /一張
調諧器:
後面板(見圖 1
–
個程序
預設電台編程
–
)
CD
@拉桿天線
增強接收FM波段的能力
–
#電池盒蓋
打開電池盒
–
$AC MAINS
電源線插座
–
注意
若不按本說明書指定的方法使用控制器、調整器
或執行操作步驟,可能會導致產生有害的輻射或
其它不安全的運行情況。
電源供給
方便時請盡可能使用交流電源供電,以保存電池
壽命。放入電池之前,請務必將電源線插頭從本
機的電源線插座和牆上的交流電源插座中拔出。
電池(不包括在本機內
打開電池盒,依照盒內所標示的正
)
(
極性符號放入六個
"–"
(
最好是鹼性電池)。
電池含有化學物質,因此應予以適當的棄置處
理。
不正確使用電池會造成電解質漏泄進而腐蝕電池
盒,甚至引起電池爆炸。因此:
勿將不同類型的電池,例如鹼性電池與碳鋅電
•
池混合使用。本機只可使用相同類型的電池。
安放新電池時,不要嘗試將新電池和舊電池混
•
合使用。
若長時間將不使用本機,應把電池取出。
•
使用交流電源
檢查位於本機底部銘牌所標示的電源電壓是否
1
與您當地的電源電壓相符。如不相符,請咨詢
您的代理商或維修服務中心。
將電源線一端插頭插入本機的
2
線插座,另一端插頭插入牆上的交流電源插
座。本機電源即已接通,可供使用。
要完全切斷本機的交流電源,必須將電源線插
3
/ 一
頭從牆上的交流電源插座中拔出。
在大雷雨期間,請將電源線插頭從牆上的交流
•
電源插座中拔出,以保護本機的安全。
銘牌位於本機底部。
)
R-14, UM-2或C
)
(
、負
"+"
型電池
AC MAINS
電源
激光唱機
激光唱機
功能的顯示屏信息
CD
– CD open:CD
– disc:CD
在停止狀態:顯示曲目總數和總播放時間
–
– 在CD
和當前曲目的序號
在暫停時:已播放時間固定不變及閃爍
–
(
見圖
– shuffle/ repeat
顯示
:
– prog
一首曲目時也會短暫出現
– no sel
目時顯示(見圖
:
– full
– no prog
– no disc
R(W)
和「故障排除」一節
播放
CD
本激光唱機能播放音樂
刻錄
CD-R
光盤,
CD-RW
光盤。
將音源選擇器調整到
1
顯示屏:短暫顯示Cd字樣。
™
要打開CD門蓋,在CD門蓋邊緣標有
2
OPEN
放入一張CD或
3
然後輕按
按機上的2;按鈕開始播放。
4
要暫停播放,按2;按鈕。要恢復播放,再按
5
一次
要停止CD播放,按
6
註釋:下列情況CD播放也將停止,當:
您打開CD片盤;
–
您選擇
–
光盤已播放完畢。
–
門蓋打開(見圖
光盤已放入(見圖
播放期間:顯示當前曲目的已播放時間
8 )
模式:當相應的模式被啟動時
當CD編程功能啟動時顯示;當您儲存
:
編程功能已啟動但卻沒有選擇任何曲
0
)
程序存儲器已滿時顯示(見圖
:
程序被取消時顯示(見圖
:
片盤中沒有光盤/
光盤空白或者光盤未完成時顯示(見圖
片
光盤。但不要嘗試用它播放可重刻錄
CD-ROM, CDi, VCD, DVD
字樣處將它揭開。
CD-R
門蓋把它關上。
CD
按鈕。
2;
(
調諧器)音源;
TUNER
6 )
7 )
信息(見圖
prog
! )
@ )
操作出錯/
CD
)
(
光盤
CD
STOP 9
Audio Disc
或電腦
位置。
CD
光盤(印刷商標面朝上),
按鈕。
9 )
CD-
)
和可
CD
LIFT TO
選擇一首不同曲目
在播放期間,您可以使用
曲目。
如果您在停止或暫停狀態下選擇了一首曲目,
•
按鈕即可開始播放。
按
2;
輕按§按鈕一次跳至下一首曲目,或重複按
•
該按鈕直到您想要的曲目序號出現在顯示屏
上。
輕按∞按鈕一次回到當前曲目的開頭。
•
輕按∞多於一次跳至前一首曲目。
•
在一首曲目中尋找某段曲詞
按住∞或§按鈕不放。
1
光盤以高速、低音量播放。
•CD
當到達您想要的曲詞時,立刻放開∞或§按
2
鈕。
激光唱機恢復正常播放。
™
不同的播放模式:
#
(
重複播放)
Repeat
PROG MODE
在播放整張
如下次序予以選擇或改變:
shuffle –
按鈕可讓您選擇不同的播放模式。
CD/ CD
以亂序方式播放所有曲目
∞ 或§
(
亂序播放)和
Shuffle
程序期間,這些播放模式可依
shuffle repeat all –
以亂序方式重複播放整張CD光盤
連續重複播放當前曲目
repeat –
repeat all –
在播放期間,按
1
以選擇播放模式,直至您想要的播放模式顯示
為止。
™
•在shuffle/ repeat
按鈕跳選曲目。
• shuffle/ repeat
用:例如
重複播放整張
要回到正常的播放模式,按
2
直至所有的
示為止。
您也可以按9按鈕退出該播放模式。
•
連續重複播放整張CD光盤
PROG MODE
顯示屏:您所選的播放模式閃爍兩秒,然後
開始播放。
模式中,您可以使用∞或
播放模式選項也可與程序結合使
shuffle/ repeat all
光盤/CD程序。
CD
shuffle/ repeat
模式指示字樣不再顯
按鈕選擇一首
按鈕一次或多次
能以亂序方式連續
PROG MODE
按鈕
故障排除
故障排除
如果本機出現故障,在送去修理之前請先檢查下表所列各項。
不要打開本機,以免遭受電擊的危險。
如果下列這些方法仍未能解決問題,請咨詢您的經銷商或維修服務中心。
無論任何情況您都不應自已動手修理本機,因為這樣做將會令保用卡失效。
警告:
問題
–
解決方法
•
無聲音/ 無電源
音量未調整
–
適當調整音量
•
電源線未連接緊固
–
緊固連接交流電源線
•
電池電力耗盡/ 電池放置不正確
–
正確放入(新)電池
•
顯示屏不能正常工作
均無反應
靜電充積
–
關機,拔出電源線插頭,靜待數秒後重新插電
•
並開機
/ 對任何控制器操作
§
環保信息
我們已盡量將包裝材料減少,並使它易於分為如下三類物料:紙板,紙漿和聚苯乙烯發泡膠。
如果由專業公司拆卸本機,機內所用的材料均可回收再用。請遵守當地對於處置包裝材料、無用電池
及廢舊設備之有關法規。
出現 no disc 指示信息
放入了
–
•
– CD
•
–
•
– CD-R
•
不能播放CD光盤
– CD
CD-RW 光盤/
放入一張CD或
光盤嚴重刮花或污髒
更換/ 清潔CD光盤,見「維護保養」一節
激光鏡頭蒙上水汽
靜待至鏡頭完全清晰為止
光盤空白或該光盤未被完成
使用一張已完成的
光盤嚴重刮花/ 污髒
•更換/ 清潔CD
激光鏡頭蒙上水氣
–
靜待至鏡頭溫度調整至室溫為止
•
光盤跳音
CD
光盤損壞或污髒
– CD
更換或清潔CD光盤
•
退出
SHUFFLE/
或編程功能執行中
– SHUFFLE
•
沒有放入任何CD光盤
光盤
CD-R
光盤
CD-R
光盤(見「維護保養」一節
編程模式
備註
)
2
6
0
3
7
!
$%
4
8
@
5
9
#
開機及關機:節省電能
無論您使用交流電源或電池供電,關機時總應把
音源選擇器調整至
損耗。
一般操作
要選擇您想要的音源,將音源選擇器調整至
1
CD/TUNER/OFF
2 使用VOLUME和DBB
器調整聲音。
要關閉本機,將音源選擇器調整至
3
註釋:當本機關閉時,調諧器的預設電台將保存
在機內的存儲器中。
調諧器
收音
將音源選擇器調整至
1
顯示屏:短暫顯示tu字樣( 見圖
™
2 按FM•MW
段。
顯示屏:顯示您所選的波段,預設電台序號
™
和該預設電台(若已被編程的話)的頻率
(
3)
見圖
短暫按住∞或§按鈕以調諧至一個電台,當
3
顯示屏上的頻率數字開始變動時,放開該按
鈕。
收音機自動調諧至一個接收信號令人滿意的
™
電台。自動調諧期間,顯示屏顯示
樣。(見圖
– 接收FM
波段時,應拉出拉桿天線,並將它傾
斜和轉動以獲得最佳的接收。若信號太強(十分
靠近發射台),可縮短拉桿天線的長度。
– 接收MW (AM)
線,因此只要轉動機體便可改變內置天線的方
向而無需使用拉桿天線。
位置,以避免不必要的電能
off
位置。
(
超動感低音增強)控制
位置。
off
位置。
TUNER
按鈕一次或多次,選擇您想要的波
。
2)
。
Srch
字
4)
波段時,由於本機設有內置天
電台編程
您能將多達32個電台儲存在本機的存儲器中:
個FM電台和
調諧到您想要的電台(見「收音」一節)。
1
2 按PROG MODE
™
顯示屏:
12 個MW(AM)
按鈕啟動編程功能。
字樣閃爍。(見圖
prog
3 按PRESET + 或–
(
對
電台而言)或從1至
FM
台而言)中選擇一個數字指定為該預設電台的
序號。
再按
4
PROG MODE
顯示屏:
™
和頻率顯示。(見圖
重複上述步驟
5
您可在某一預設電台序號的位置儲存另一個頻
•
率而把該預設電台抹除。
改變頻階
在南、北美洲,AM和
階分別為
一頻階分別為
廠時已根據所進口地區設定了適當的頻階。
1
2
(
10 KHz 和100 KHz
確定本機已完全關閉。
要選擇
9KHz
PRESET –
將本機切換到
3
個控制按鈕。
要選擇
•
10KHz
中要同時按住機上的
2
鈕。
當您調諧到一個電台時,顯示屏便會顯示本
™
機是以
所有預設電台和自動儲存的電台都將受到影
™
響,您可能需要重新進行電台編程。
字樣消失,該預設電台的序號
prog
1-4
僅一些版本裝設
9 KHz和50 KHz
頻階:
按鈕不放。
TUNER
頻階:
9 kHz 還是10 kHz
電台。
5
)
按鈕一次或多次,從1至
按鈕確認所作的設定。
,以儲存其它電台。
FM
同時按住機上的
重複步驟
(
對
12
MW(AM)
3
)
)
波段相鄰頻道之間的頻
;全球其它地區的這
。通常,本機在出
STOP 9
位置,然後放開上述兩
,但在步驟
1-3
STOP 9和PRESET +
調諧選台。
激光唱機 維護保養與安全基本功能 調諧器
編輯程序
字樣和
首曲目作為程
20
PROG MODE
(編程)
prog
20
20
電
您可依想要的播放次序儲存多達
序。若喜歡的話,每首曲目均可儲存多次。
在停止狀態,按∞或§按鈕選取您想要的曲
1
目。
當您所選的曲目序號出現時,按
2
按鈕一次以儲存這首曲目。
顯示屏短暫顯示
™
息,然後顯示您所選擇的曲目序號。(見圖
prog
9 )
如果您沒有預先選擇曲目序號而嘗試進行曲
™
目編程,顯示屏將顯示
信息。(見圖
重複步驟1至2,以此方法選擇和儲存您想要
3
的全部曲目。
如果您試圖編輯和儲存超過20首曲目,顯
™
示屏將顯示
!
)
要播放您的程序,按2;按鈕。
4
檢查您所設定的程序
在停止狀態,按住
•
和
按
上。
顯示屏依次序顯示您所儲存的所有曲目序
™
號。
抹除程序
您可用如下其中一種方法抹除存儲器的內容:
– 打開CD
– 選擇TUNER
在播放期間或在停止狀態,按9按鈕兩次。
–
顯示屏:當程序被取消時短暫顯示
™
(沒有程序) 信息。(見圖@)
門蓋;
(
調諧器) 音源;
0
)
(存儲器已滿) 信息。(見圖
full
PROG MODE
no sel
(未選擇曲目)
按鈕一秒以
no prog
使用注意事項和一般維護保養 (見圖
將本機放置在堅實的平面上,以免機體傾斜。
•
勿讓本機、電池或CD光盤暴露在潮濕、雨淋
•
和多塵的環境,也不要將它們放置在加熱設備
附近或陽光直射的場所,以免過度受熱。
切勿覆蓋本機。本機的通風孔與周圍物件表面
•
之間必須留有最少
信
況良好,防止熱量在機內積聚。
本機的機械部件使用自潤滑式軸承,不可任意
•
使用潤滑油或油脂。
機體可用一塊乾布清潔。不要使用任何含有酒
•
精、氨、苯或研磨成份的清潔劑,因為這些清
潔劑可能會損害機體。
激光唱機和CD光盤使用須知(見圖
永遠不要觸摸激光唱機的鏡頭
•
環境溫度的突然改變會產生冷凝現象從而令激
•
光唱機的鏡頭蒙上水汽,這時將不能播放
光盤。遇此情況時不要嘗試清潔鏡頭,只須讓
它在溫暖的環境中靜置一段時間,直至水汽自
然蒸發為止。
門蓋應常關閉,以保持片盤潔淨無塵。要清
•CD
潔片盤時,可使用一塊柔軟的乾布拭去片盤中
的塵埃。
要清潔CD光盤,可使用不起毛的軟布沿半徑
•
方向由中心向外輕輕拭擦。不要使用清潔劑,
因為它們可能會損壞光盤。
切勿在CD光盤上寫字或黏貼任何標籤。
•
英吋空隙,以確保通風狀
6
$
)
% )
!
CD
備註 備註
 Loading...