

Philips AZ2755/16, AZ2755/17, AZ2755/14, AZ 2755 User Manual
Portable CD Mini System
AZ 2755
SHUFFLE
REPEAT
SEARCH
SEARCH
STOP
VOLUME
SHUFFLE
REPEAT
SEARCH
SEARCH
STOP
VOLUME
D
igital
R
emote
C
ontrol
D
igital
R
emote
C
ontrol
PLAY
SEARCH
STOP/EJECT
PAUSE
PLAY
RECORD
SEARCH
STOP/EJECT
PAUSE
PLAY
SEARCH
STOP/EJECT
PAUSE
PLAY
RECORD
SEARCH
STOP/EJECT
PAUSE
BASS REFLEX SPEAKER SYSTEM
ELECTRONIC SOURCE SELECT
BASS REFLEX SPEAKER SYSTEM
ELECTRONIC SOURCE SELECT
TUNING
DECK B
PLAYBACK
DECK A
RECORD PLAYBACK
TUNER
SHUFFLE
POWER
REPEAT
CD
STOP
SEARCH
PLAY/PAUSE
FM
MW
BAND
TAPE
PROG
FM
MHz
88
•
92
•
96
•
100
•
104
•
108
MHz
FM
DBB
MW
KHz
530 600 700 900 1160 1340 1600
KHz
MW
TUNING
DECK B
PLAYBACK
DECK A
RECORD PLAYBACK
TUNER
SHUFFLE
POWER
REPEAT
CD
STOP
SEARCH
PLAY/PAUSE
FM
MW
BAND
TAPE
PROG
FM
MHz
88
•
92
•
96
•
100
•
104
•
108
MHz
FM
DBB
MW
KHz
530 600 700 900 1160 1340 1600
KHz
MW
ACCOUSTIC
BASS
LENS
ACCOUSTIC
BASS
LENS
ACCOUSTIC
BASS
LENS
ACCOUSTIC
BASS
LENS
AZ2755 CD RADIO CASSETTE RECORDER
AZ2755 CD RADIO CASSETTE RECORDER
SHUFFLE
REPEAT
SEARCH
SEARCH
STOP
VOLUME
SHUFFLE
REPEAT
SEARCH
SEARCH
STOP
VOLUME
D
igital
R
emote
C
ontrol
D
igital
R
emote
C
ontrol
3
AZ2755 CD RADIO CASSETTE RECORDER
PLAY
SEARCH
STOP/EJECT
PAUSE
PLAY
RECORD
SEARCH
STOP/EJECT
PAUSE
PLAY
SEARCH
STOP/EJECT
PAUSE
PLAY
RECORD
SEARCH
STOP/EJECT
PAUSE
BASS REFLEX SPEAKER SYSTEM
ELECTRONIC SOURCE SELECT
BASS REFLEX SPEAKER SYSTEM
ELECTRONIC SOURCE SELECT
TUNING
DECK B
PLAYBACK
DECK A
RECORD PLAYBACK
TUNER
SHUFFLE
POWER
REPEAT
CD
STOP
SEARCH
PLAY/PAUSE
FM
MW
BAND
TAPE
PROG
FM
MHz
88
•
92
•
96
•
100
•
104
•
108
MHz
FM
DBB
MW
KHz
530 600 700 900 1160 1340 1600
KHz
MW
ACCOUSTIC
BASS
LENS
ACCOUSTIC
BASS
LENS
ACCOUSTIC
BASS
LENS
ACCOUSTIC
BASS
LENS
1
8
AC
MAINS
SPEAKERS 4
+ R – + L –
^
2
3
45
$
6
7
%
90! @ #
*
&
SHUFFLE REPEAT
SEARCH SEARCH
STOP
VOLUME
Digital Remote Control
1
5
3
2
7
6
4

English
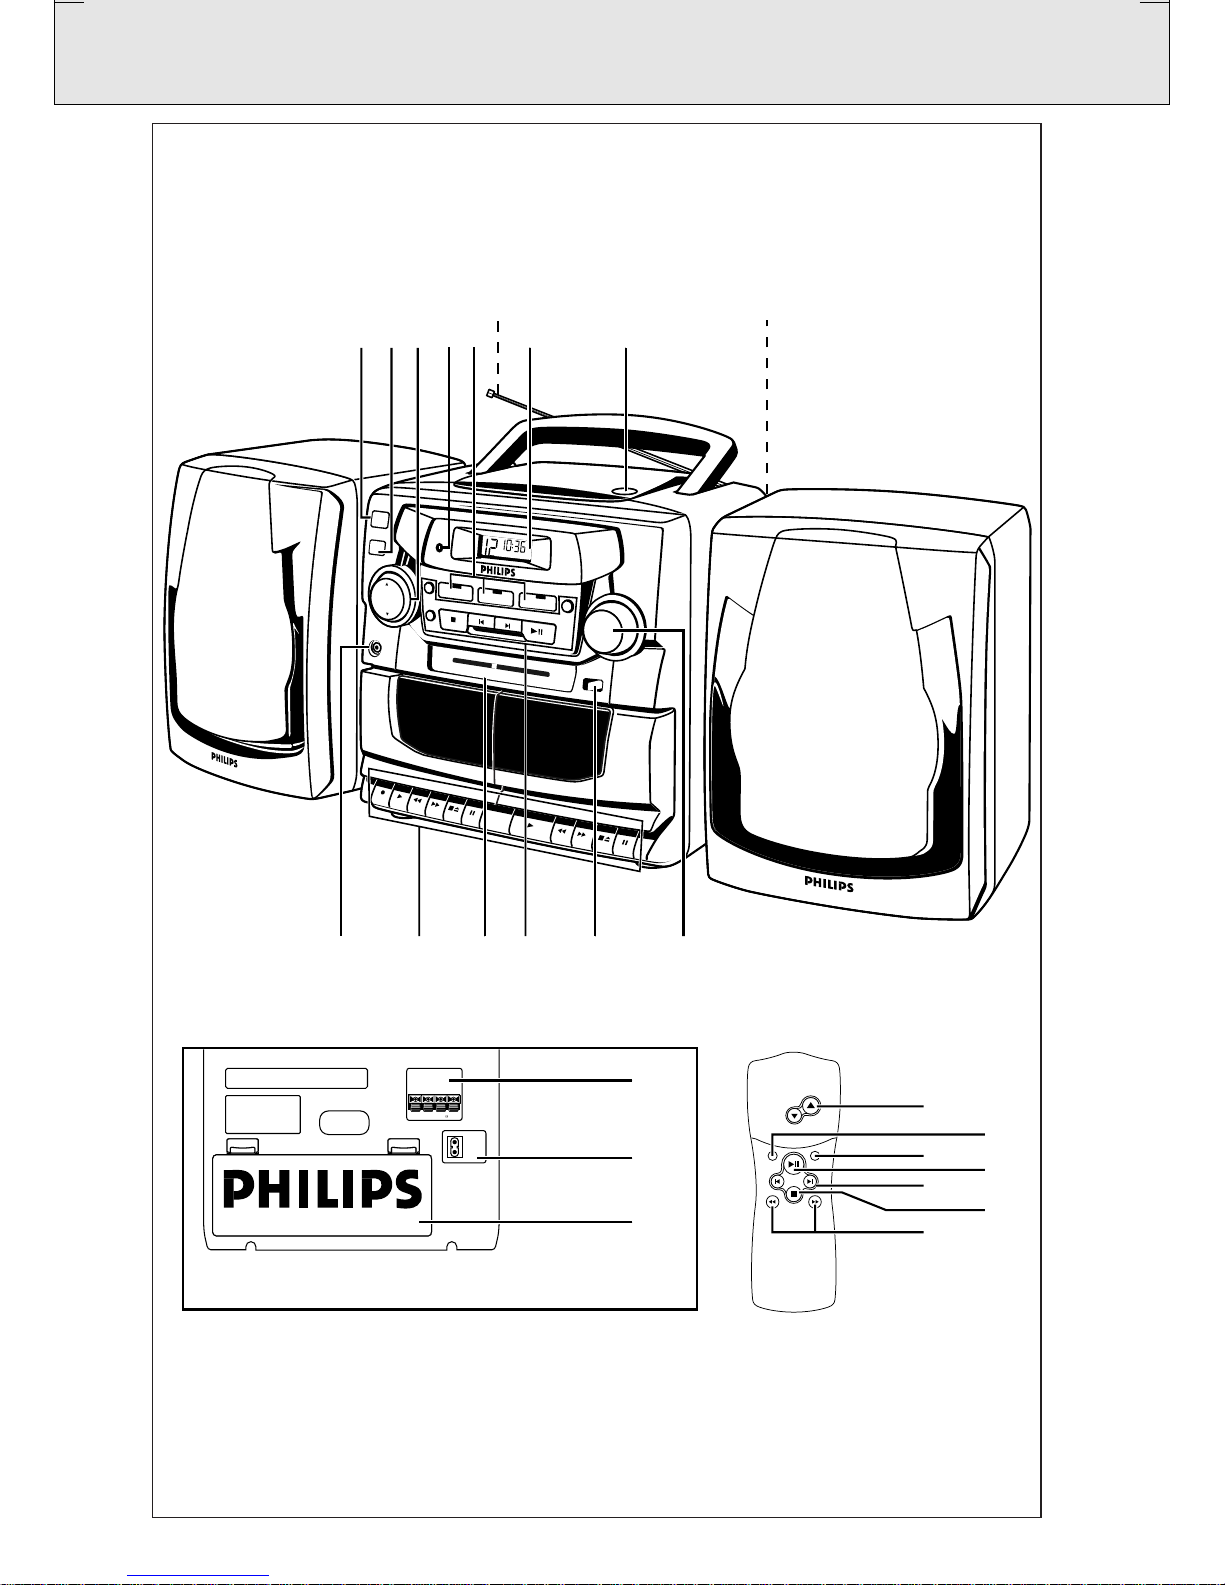
CONTROLS
4
TOP AND FRONT PANELS
1 POWER - to switch the set ON/OFF
2 DBB (Dynamic Bass Boost) - to enhance bass
response
3 VOLUME 4 , 3 - to adjust volume level
4 CD, TUNER, TAPE - to select source of
sound
5 REMOTE SENSOR - for the remote control
6 CD Display - to show the CD functions
7 OPEN - to open/ close the CD door
8 p 3.5 mm socket for stereo headphone
connection
9 CASSETTE RECORDER:
Deck 1:
RECORD 0 - to start recording
PLAY 2 - to start playback
SEARCH 5 or 6 - to fast rewind/wind the
tape.
STOP•EJECT 9/- to stop the tape and to
open the cassette
holder
PAUSE ; - to interrupt recording or playback
Deck 2:
PLAY 2 - to start playback
SEARCH 5 or 6 - to fast rewind/ wind the
tape.
STOP•EJECT 9/- to stop the tape and to
open the cassette
holder
PAUSE ; - to interrupt recording or playback
0 Tuning dial pointer
! CD PLAYER:
SHUFFLE - to play tracks CD/ programme in
random order
REPEAT - to repeat a track/ CD/ programme
STOP 9 - to stop playback
- to erase a programme
SEARCH ¡ / ™ - to skip or search a
passage/ track backwards
or forward
PLAY•PAUSE 2; - to start or interrupt
CD play
PROG - to programme and review
programmed track numbers
TUNER:
@ BAND - to select FM/ MW waveband
# TUNING - to tune to radio stations
BACK PANEL
$ Telescopic aerial - to improve FM
reception
% Speaker levers - to unlock the loudspeaker
boxes
^ Speaker - loudspeaker terminals
& AC MAINS - socket for mains lead
* Battery door - to open the battery
compartment
REMOTE CONTROL
1 VOLUME 4 , 3 - to adjust volume level
2 SHUFFLE – to play tracks in shuffle order
3 REPEAT - to repeat a track/ CD programme/
entire CD
4 2; – to start or interrupt CD play
5 J , K – to skip tracks
6 STOP 9 – to stop playback or erase a
programme
7 SEARCH 5 or 6 – to search back/
forwards within a track
English
POWER SUPPLY
5
Whenever convenient, use the power supply if you want to
conserve battery life. Make sure you remove the plug from the
set and wall socket before inserting batteries.
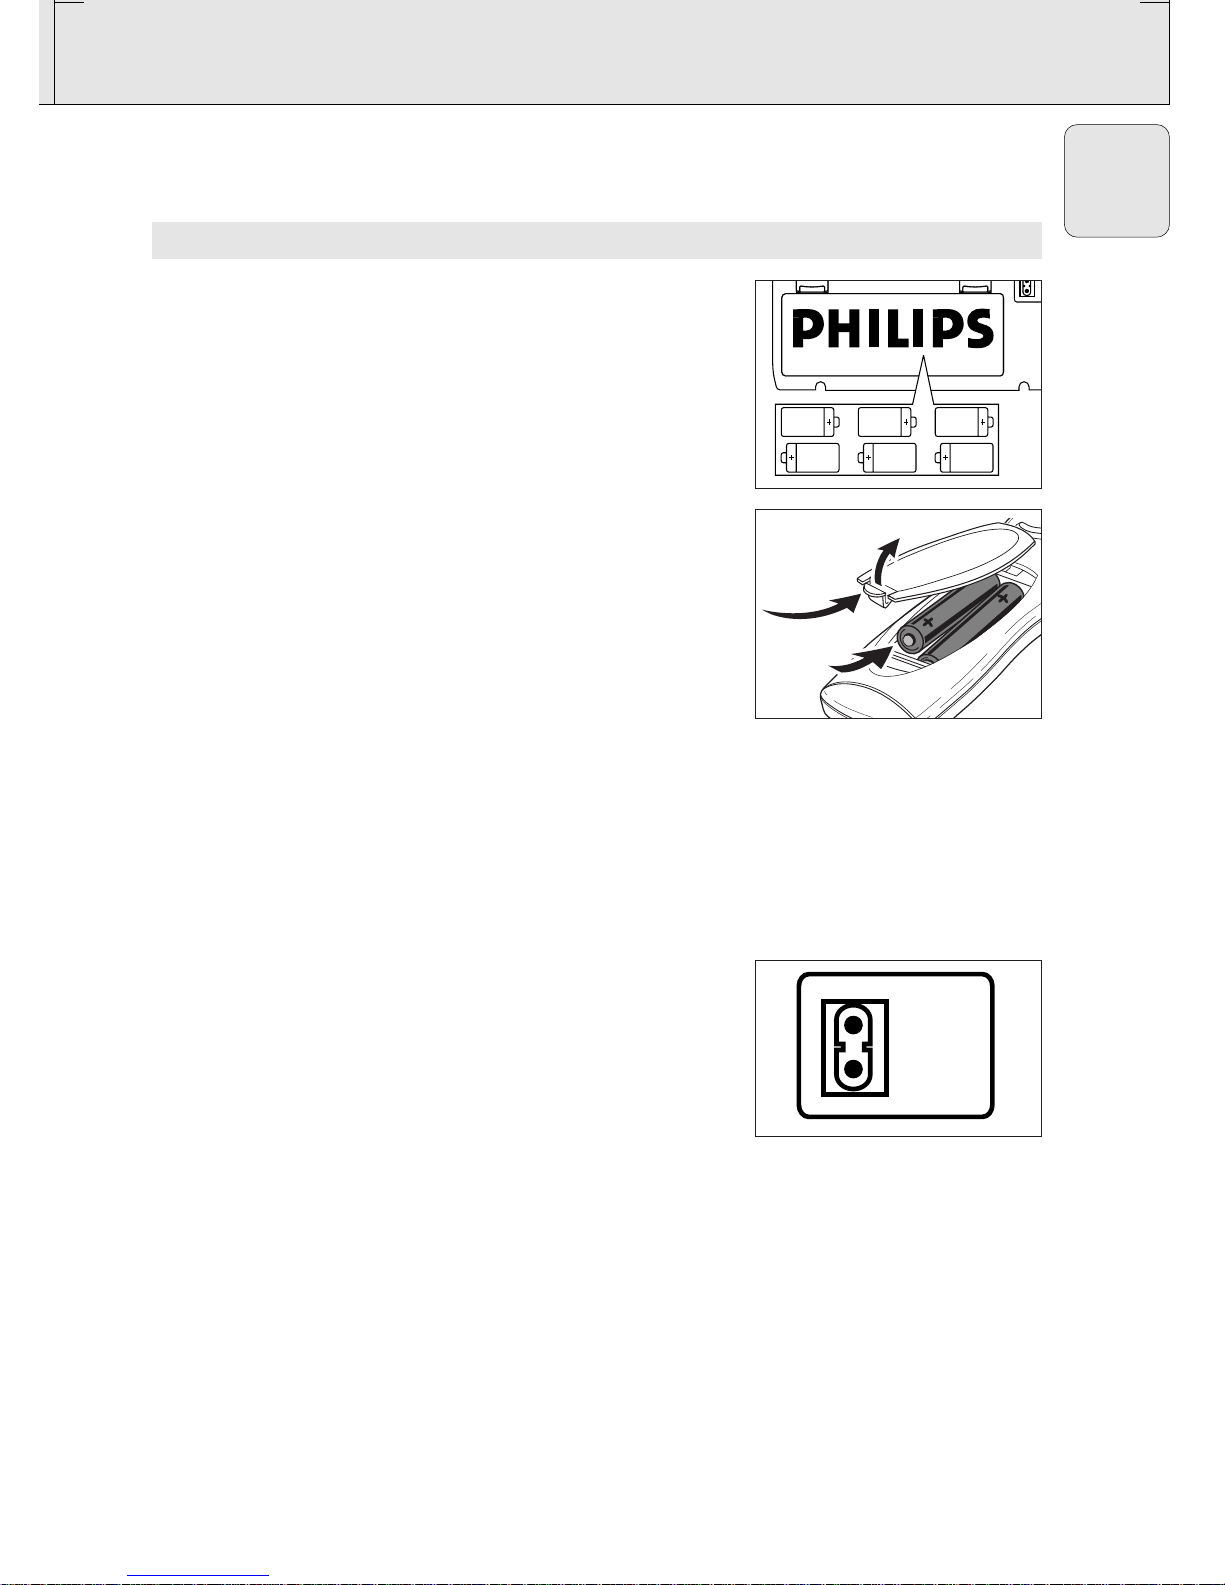
BATTERIES (OPTIONAL)
1.
Open the battery compartment and insert six batteries, type
R-20, UM-1 or D-cells, (preferably alkaline) with the correct
polarity as indicated by the "
+" and "-" symbols inside the
compartment.
Remote control (supplied)
Open the battery compartment and insert two batteries,
type AAA, R03 or UM4 (preferably alkaline).
2.
Replace the compartment door, making sure the batteries are
firmly and correctly in place. The set is now ready to operate.
3.
Remove the batteries if the set is not to be used for a long
time.
Incorrect use of batteries can cause electrolyte leakage and will
corrode the compartment or cause the batteries to burst.
Therefore:
•
Do not mix battery types:
e.g. alkaline with carbon zinc.
Only use batteries of the same type for the set.
• When inserting new batteries, do not try to mix old batteries
with the new ones.
• Remove the batteries if the set is not to be used for a long
time.
Using AC MAINS
1.
Check if the MAINS voltage
as shown on the type plate
on the base of the set
, corresponds to your local power
supply. If it does not, consult your dealer or service centre.
2.
Connect the mains lead to the MAINS socket and the wall
socket. The mains supply is now connected and ready for
use.
3.
To switch off completely, withdraw the mains lead from the
wall socket.
– Disconnect the mains lead from the wall socket to protect
your set during heavy thunderstorms.
The type plate is located on the bottom of the set.
Switching POWER on/off: Save energy
Whether you are using mains or battery supply, to avoid
unnecessary energy consumption
always push the POWER
button to the off position after using the set.
AC
MAIN
6 x R20•D-CELL•UM-1
AC
MAINS
 Loading...