

Page 1
Register your product and get support at
www.philips.com/welcome
EN User manual
AZ1837
KO 사용
설명서
Page 2
a eb c f g
d
hk ilmno j
p
AC-MAIN
S
r qs
Page 3
EN
1 Important
Safety
Know these safety symbols
This ‘bolt of lightning’ indicates uninsulated material within your unit may cause
an electrical shock. For the safety of ever yone in your household, please do not
remove product covering.
The ‘exclamation mar k’ calls attention to features for which you should read the
enclosed literature closely to prevent operating and maintenance problems.
WARNING: To reduce the risk of fire or elec tric shock, this apparatus should not
be exposed to rain or moisture and objects fi lled with liquids, such as vases, should
not be placed on this apparatus.
CAUTION: To prevent electric shock, fully inser t the plug. (For regions with
polarized plugs: To prevent electric shock, match wide blade to wide slot.)
a Read these instructions.
b Keep these instructions.
c Heed all warnings.
d Follow all instructions.
e Do not use this apparatus near water.
f Clean only with dr y cloth.
g Do not block any ventilation openings. Install in accordance with the
manufacturer’s instructions.
h Do not install near any heat sources such as radiators, heat registers, stoves,
or other apparatus (including amplifiers) that produce heat.
i Protect the power cord from being walked on or pinched, par ticularly at
plugs, convenience receptacles, and the point where they exit from the
apparatus.
j Only use attachments/accessories specified by the manufacturer.
Page 4

k Use only with the cart, stand, tripod, bracket, or table specifi ed by the
manufacturer or sold with the apparatus. When a cart is used, use caution
when moving the cart /apparatus combination to avoid injury from tip-over.
l Unplug this apparatus during lightning storms or when unused for long
periods of time.
m Refer all servicing to qualified service personnel. Servicing is required when
the apparatus has been damaged in any way, such as power-supply cord
or plug is damaged, liquid has been spilled or objects have fallen into the
apparatus, the apparatus has been exposed to rain or moisture, does not
operate normally, or has been dropped.
n Battery usage CAUTION – To prevent battery leakage which may result in
bodily injury, property damage, or damage to the unit:
Install all batteries correctly, + and - as marked on the unit. •
Do not mix batteries (old and new or car bon and alkaline, etc.).•
Remove batteries when the unit is not used for a long time.•
The batteries shall not be exposed to excessive heat such as sunshine, fire •
or the like.
o Apparatus shall not be exposed to dripping or splashing.
p Do not place any sources of danger on the apparatus (e.g. liquid filled
objects, lighted candles).
q This product may contain lead and mercury. Disposal of these materials
may be regulated due to environmental considerations. For disposal or
recycling information, please contact your local authorities or the Electronic
Industries Alliance: www.eiae.org.
r Where the MAINS plug or an appliance coupler is used as the disconnect
device, the disconnect device shall remain readily operable.
Warning
Never r emove the ca sing of this ap paratus . •
Never l ubricate any par t of this appar atus. •
Never p lace this apparatus on ot her el ect rical equipment. •
Keep this apparatus away f rom direc t sunlight , naked flames or heat. •
Never look into the laser beam inside this apparatus. •
Ensur e that you always have easy access to t he powe r cord, plug or adaptor to disconne ct this •
apparatu s from t he powe r.
Page 5

Caution
Use of controls or adjustments or per for mance of procedur es other tha n herein may r esul t in •
hazardous radiation exposure or other unsafe operation.
Notice
This product complies with the radio interference requirements of the European
Community.
Any changes or modifications made to this device that are not expressly approved
by Philips Consumer Lifestyle may void the user’s authority to operate the
equipment.
Your product is designed and manufactured with high quality materials and
components, which can be recycled and reused.
When this crossed-out wheeled bin symbol is attached to a product it means that
the product is covered by the European Directive 2002/96/EC .
Please inform yourself about the local separate collection system for electrical and
electronic products.
Please act according to your local rules and do not dispose of your old products
with your normal household waste. Correct disposal of your old product helps to
prevent potential negative consequences for the environment and human health.
Your produc t contains batteries covered by the European Directive 2006/66/EC,
which cannot be disposed with normal household waste.Please inform yourself
about the local rules on separate collection of bat ter ies because correct disposal
helps to prevent negative consequences for the environmental and human health.
Page 6
Environmental information
All unnecessary packaging has been omitted. We have tried to make the packaging
easy to separate into three materials: cardboard (box), polystyrene foam (buffer)
and polyethylene (bags, protective foam sheet.)
Your system consists of materials which can be recycled and reused if disassembled
by a specialized company. Please observe the local regulations regarding the disposal
of packaging materials, exhausted batteries and old equipment.
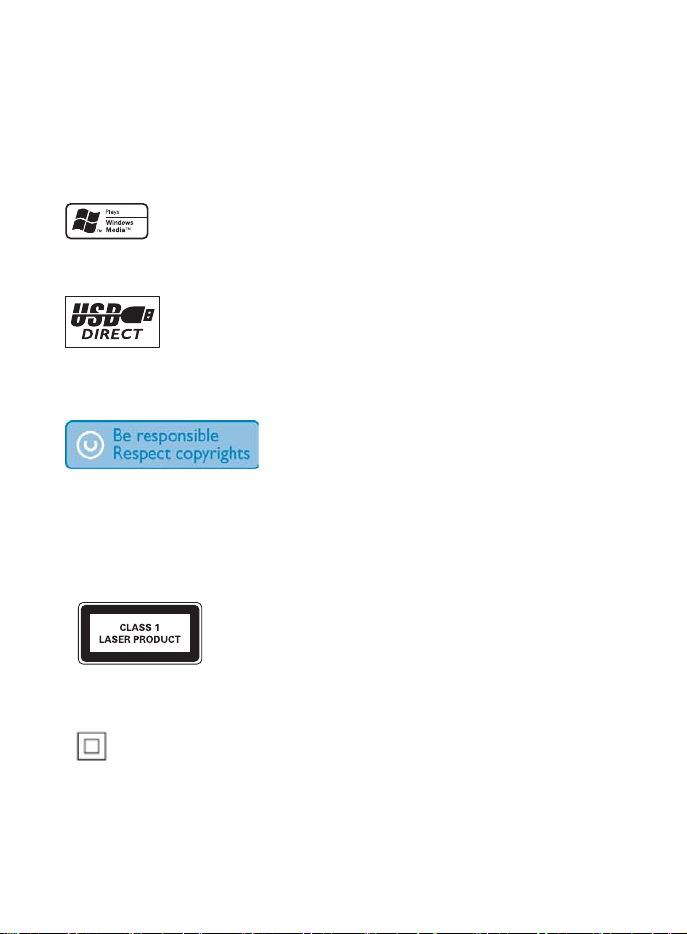
Windows Media and the Windows logo are trademarks, or registered tr ademarks
of Microsoft Corporation in the United States and/or other countries.
The USB-IF Logos are trademarks of Univer sal Serial Bus Implementers Forum, inc.
Recording and playback of material might require consent. See Copyright Act 1956
and The Performer’s Protec tion Acts 1958 to 1972.
The making of unauthorized copies of copy-protec ted material, including computer
programs, files, broadcas ts and sound recordings, may be an infringement of
copyrights and constitute a criminal offence. This equipment should not be used for
such purposes.
This apparatus includes these labels:
Class II equipment symbol
This symbol indicates that the apparatus has a double insulation system.
Page 7

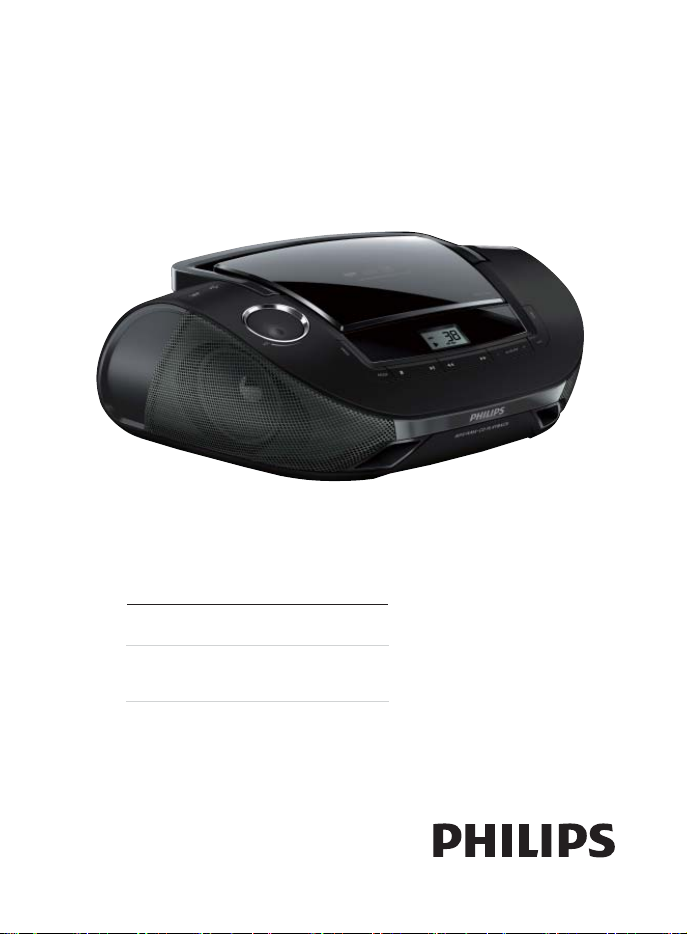
2 Your CD Soundmachine
Congratulations on your purchase, and welcome to Philips! To fully benefit from the
support that Philips offers, register your product at www.philips.com/welcome.
Introduction
With the CD Soundmachine, you can:
play CDs, MP3/wma discs•
play mp3/wma files on USB devices•
listen to FM/MW radio•
progr am the play sequence of tracks.•
What’s in the box
Check and identify the contents of the package:
Main unit•
Remote control•
AC power cord•
MP3 link cord•
User Manual•
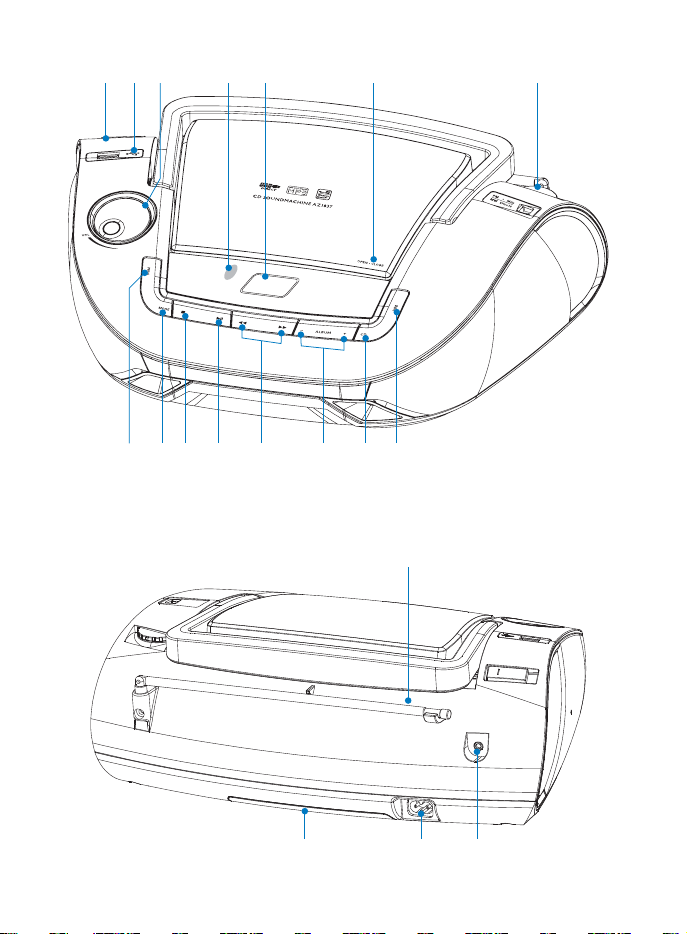
Overview of the main unit
a Source selector: CD/USB,FM, MW, OFF.
b
c VOL+/-
d Remote control sensor
e Display panel
f OPEN/CLOSE
g TUNING+/-
h USB
Select CD/USB, FM, MW(AM) source or turn off the unit•
USB socket.•
Adjust volume level•
Show cur rent status.•
Press to open or close the disc compar tment.•
Tun e to r ad i o s t ations•
Select USB device source.•
Page 8

i CD
j - ALBUM +
k
l
m
n MODE
o PROG
p Telescopic antenna
q MP3 LINK
r AC MAINS
s Battery compartment door
Select CD source.•
For MP3-CDs: Skip to the next/previous album in an MP3-CD•
/
Select the previous/next track•
Search backward/forward•
Star t or pause play•
Stop play.•
Erase a program•
Select a play mode: REPEAT or SHUFFLE•
For MP3-CDs: Program tracks and browse the progr am•
Adjust FM reception•
Socket for connecting an external device•
Jack for the supplied AC power cord•
Page 9

Overview of the remote control
c
d
e
b
a
CD
h
g
f
MODE PROG
a CD
b USB
c
d
e PROG
f MODE
Select CD source.•
Select USB device source.•
Star t or pause play•
/
Select the previous/next track•
Search backward/forward•
For MP3-CDs: Program tracks and browse the progr am•
Select a play mode: REPEAT or SHUFFLE•
USB
ALBUM
Page 10

g - ALBUM +
h
For MP3-CDs:Skip to the nex t/previous album in an MP3- CD•
Stop play.•
Erase a program•
3 Get started
Caution
Use of controls or adjustments or per for mance of procedur es other tha n herein may r esul t in •
hazardous radiation exposure or other unsafe operation.
Always follow the instructions in this chapter in sequence.
If you contact Philips, you will be asked for the model and serial number of this
apparatus. The model number and serial number are on the bottom of the apparatus.
Write the numbers here:
Model No. __________________________
Serial No. ___________________________
Connect AC power
Caution
Risk of product damage ! Ensu re that the power supply voltage corr espo nds to the voltage printed •
on the back or th e unde rsi de of the unit .
Warning
Risk of elec tric shock! Wh en you disconnect t he AC powe r, always pull the plug from the socke t. •
Never p ull th e cord.
Note
Install the apparatus nea r the power sup ply socket and wher e the AC power plug can be easily •
reached.
1 Connect the power cord to the AC~ MAINS socket on the apparatus and to
the power supply socket.
Page 11

Note
To save ener gy : After use , set the swi tch to • OFF.
AC-MAINS
Install batteries
Note
You can use both bat ter ies and AC power as powe r supp ly of this appa ratus. •
Batteries are not supplied with the accessories. •
1 Open the battery compar tment.
2 Insert 6 x 1.5V R14/UM-2/C-cell batteries with correct polarity (+/-) as
indicated.
3 Close the battery compar tment.
Page 12

Prepare the remote control
Caution
Risk of explosion ! Keep batterie s away fr om hea t, sunshin e or fire. Never disc ard batte ries in fire. •
Risk of decreased batter y life! Never mix dif ferent br ands or types of batteries . •
Risk of product damage ! When the remote co ntrol is not us ed for long per iods, remove the •
batteries.
For first-time use:
1 Remove the protective tab to ac tivate the remote control bat teries.
To replace the remote control batteries:
1 Open the battery compar tment.
2 Insert 1 CR2025 batterie with cor rect polarity (+/-) as indicated.
3 Close the battery compar tment.
4 Use your CD Soundmachine
Play a CD
Note
You cannot p lay CDs e ncoded with copyr ight p rotection technolog ies. •
You can play commercially available audio CDs:
CD-Recordables (CD-R)•
CD-Rewritables (CD-RW)•
Page 13

MP3-CDs•
WMA-CDs•
1 Switch the source selector to CD/USB.
2 Press and open the lid of the CD compartment.
3 Insert a CD with the printed side facing up.
4 Close the CD lid.
5 Press CD to select CD source.
6 Press to start play.
» [ ] is displayed.
To stop play, press »
To pause or resume play, press »
.
.
Play from USB devices
Note
Ensur e that the USB device contains playable audio contents for supported for mats. •
1 Insert the USB connector on the device into the socket.
2 Switch the source selector to CD/USB.
3 Press USB to select USB source.
4 Press - ALBUM + to select a folder.
5 Press / to select a file.
6 Press to start play.
To stop play, press •
To pause or resume play, press • .
.
Select a track
1 Press / to select a track.
Select an album
For MP3-CDs only.
1 Press - ALBUM + to select an album.
Find a passage within a track
1 Press and hold / .
The CD is played at high speed and with reduced volume. »
Page 14

2 Release / to resume normal play.
Tip
When s earch reaches the end of the las t track, t he CD s tops. •
Select play modes
1 Press MODE repeatedly to select a play mode:
• [ ] (repeat) – repeat a track
• [ ALL] (repeat all) - repeat an entire CD/program
• [ ] (shuffl e) - play tracks randomly
• [ ] (shuffl e repeat all) - repeat all tracks randomly.
2 To return to normal play, press MODE repeatedly until play mode icons are no
longer displayed.
Tip
Shuffle play c annot be selected when you play progr ammed tracks . •
Program play sequence
You can program up to 20 tracks in the desired sequence.
1 In stop mode, press PROG to star t to program play sequence.
» [PROG] and [P01] are displayed.
For MP3-CDs: press » - ALBUM + to select an album.
2 Press / to select a track.
3 Press PROG to program the track.
» [PROG] and [P02] are displayed.
4 Repeat steps 2 to 4 to select and program all tracks.
5 To play program, press .
6 To delete program, press in stop mode.
When all 20 tracks are stored, no more tracks can be selected and the »
display shows [FUL].
In stop mode, press and hold • PROG to browse programmed tracks.
» [CLr]is displayed.
Page 15

Listen to an external device
You can listen to an MP3 player through this apparatus.
Note
When you connect an external device to • MP3 LINK jack , the a ppar atus switches to MP3 LINK
source automatically.
1 Use the supplied 3.5mm plugs cable on both ends to connec t MP3 LINK jack
(3.5mm) on this appar atus and the headphone jack on an MP3 player.
Listen to radio
1 Switch the FM/MW selector to FM or MW.
2 Tur n TUNING+/- until you find optimal reception.
Tip
To improve FM reception, you ca n extend, incline or turn the teles copic a ntenna for be st •
reception.
To improve M W reception, tur n the appar atus to face a differ ent direc tion.
•
5 Product information
Note
Product information is subject to change without prior notice. •
Dimensions (L x W x H) 341mm x 236mm x 122mm
Weight 1.8 kg
Power supply DC 9V 1.5 A
Power consumption Active <12 W
Power output 2 x 1 W RMS
Operating temperature r ange -10 °C - 50 °C
220-240V, 50/60 Hz
14 °F -122 °F
Page 16

USB playability information
Compatible USB devices:
Supported formats:
Unsupported formats:
USB flash memory (USB 2.0 or USB1.1)•
USB flash players (USB 2.0 or USB1.1)•
memory cards (requires an additional card reader to work with this unit)•
USB or memor y file format FAT12, FAT16, FAT32 (sec tor size: 512 by tes)•
MP3 bit rate (data rate): 32-320 Kbps and variable bit rate•
WMA v9 or earlier•
Director y nesting up to a maximum of 8 levels•
Number of albums/ folders: maximum 99•
Number of tracks/titles: maximum 999•
ID3 tag v2.0 or later•
File name in Unicode UTF8 (maximum length: 128 bytes)•
Empty albums: an empty album is an album that does not contain MP3/•
WMA files, and is not be shown in the display.
Unsupported file formats are skipped. For example, Word documents •
(.doc) or MP3 files with extension .dlf are ignored and not played.
AAC, WAV, PCM audio files•
DRM protected WMA files (.wav, .m4a, .m4p, .mp4, .aac)•
WMA files in Lossless format•
6 Troubleshooting
Troubleshooting
Warning
Never r emove the ca sing of this ap paratus . •
To keep the warranty valid, never try to repair the system yourself.
If you encounter problems when using this apparatus, check the following points before
requesting service. If the problem remains unsolved, go to the Philips web site (www.
Philips.com/support). When you contact Philips, ensure that the apparatus is nearby and
the model number and serial number are available.
No power
Page 17

Ensure that the Mains cord is connected securely.•
Ensure that there is power at the AC Mains.•
Ensure that the batteries are inserted correctly.•
No sound
Adjust the volume. •
Ensure that the track played is of a compatible format. •
Display does not function properly./No reaction to operation of any of the controls.
1 Disconnect the AC power cord.
2 Connect the AC power cord after a few seconds.
Cannot play disc
Ensure that the disc label is inser ted with the printed side facing up. •
Wipe the disc with fibre cleaning cloth from the centre to the edge in a •
straight line.
This disc may be defective. Play another disc. •
Ensure that the CD is a finalised CD/CD-R/CD-RW. •
Ensure that the laser lens is clean. •
Ensure that the CD is not encoded with copyright protection technologies. •
The CD skips tracks
Ensure that the CD is not damaged or dirty. •
Ensure that program/shuffle mode is deactivated. •
USB device or SD/MMC card not supported
The USB device or SD/MMC card is incompatible with the apparatus. Try •
another one.
Page 18

© 2010 Koninklijke Philips Electronics N.V.
All rights reserved.
Document order number: AZ1837_73_UM_V1.1
 Loading...