

Philips AZ1575/18, AZ1575/16, AZ1575/13 User Manual
CD Radio Cassette Recorder
STOP
PLAY•PA
USE
TUNER
PRESET
PRO
G
S
H
U
F
F
L
E
R
E
P
E
A
T
S
E
A
R
C
H
D
IG
ITA
L EQ
U
ALIZER
D
IG
IT
A
L
T
U
N
E
R
D
IG
ITA
L EQ
U
A
LIZ
ER
D
IG
IT
A
L
T
U
N
E
R
IN
C
R
E
D
IB
L
E
S
U
R
R
O
U
N
D
BAND
S
O
U
N
D
C
O
N
T
R
O
L
C
E
N
T
E
R
FM
AM
B
A
T
L
O
W
LW
PROG
SHUFFLE
•
•
V
O
L
S
O
U
N
D
C
O
N
T
R
O
L
C
E
N
T
E
R
S
O
U
N
D
C
O
N
T
R
O
L
C
E
N
T
E
R
V
O
L
U
M
E
V
O
L
U
M
E
AZ 1575
C
D
R
A
D
IO
C
A
S
S
E
T
T
E
R
E
C
O
R
D
E
R
AZ 1575
C
D
R
A
D
I
O
C
A
S
S
E
T
T
E
R
E
C
O
R
D
E
R
O
P
E
N
C
L
O
S
E
O
P
E
N
C
L
O
S
E
C
D
R
E
W
R
I
T
A
B
L
E
C
O
M
P
A
T
I
B
L
E
C
D
S
Y
N
C
R
O
S
T
R
A
T
R
E
C
O
R
D
I
N
G
C
D
R
E
W
R
IT
A
B
L
E
C
O
M
P
A
T
I
B
L
E
C
D
S
Y
N
C
R
O
S
T
R
A
T
R
E
C
O
R
D
IN
G
SHUFFLE
REPEAT
SEARCH
SEARCH
STOP
TUNING
PRESET
VOLUME
SHUFFLE
REPEAT
SEARCH
SEARCH
STOP
TUNING
PRESET
VOLUME
S
H
U
F
F
L
E
R
E
P
E
A
T
S
E
A
R
C
H
S
E
A
R
C
H
T
U
N
IN
G
P
R
E
S
E
T
V
O
L
U
M
E
S
H
U
F
F
L
E
R
E
P
E
A
T
S
E
A
R
C
H
S
E
A
R
C
H
T
U
N
IN
G
P
R
E
S
E
T
V
O
L
U
M
E
DIG
ITA
L
RE
M
O
TE C
ON
TRO
L
D
IG
ITA
L R
E
M
O
TE C
O
NT
RO
L
R
E
M
O
T
E
S
E
N
S
O
R
AZ 1575
C
D
R
E
W
R
I
T
A
B
L
E
C
O
M
P
A
T
I
B
L
E
C
D SY
NC
RO
ST
RAT
REC
O
RD
ING
A
Z
1
5
7
5
C
D
R
A
D
IO
C
A
SS
E
T
T
E
R
E
C
O
R
D
E
R
O
P
E
N
C
L
O
S
E
S
T
O
P
P
L
A
Y
•P
A
U
SE
T
U
N
E
R
P
R
E
S
E
T
P
R
O
G
S
H
U
F
F
L
E
R
E
P
E
A
T
S
E
A
R
C
H
B
A
N
D
S
O
U
N
D
C
O
N
T
R
O
L
C
E
N
T
E
R
R
EMO
TE
SEN
S
OR
FM
A
M
BA
T
LO
W
L
W
P
R
O
G
S
H
U
F
F
L
E
•
•
V
OL
S
O
U
N
D
C
O
N
T
R
O
L
C
E
N
T
E
R
V
O
L
U
M
E
D
IG
IT
AL EQ
U
ALIZER
D
IG
IT
A
L
T
U
N
E
R
INCREDIBLE SURROUND
1
2345
890
@!#$ %
^&
)
(
¡
™
7
6
*
£
MAINS ~
SHUFFLE
REPEAT
SEARCH
SEARCH
STOP
TUNING
PRESET
VOLUME
SHUFFLE
REPEAT
SEARCH
SEARCH
STOP
TUNING
PRESET
VOLUME
S
H
U
F
F
L
E
R
E
P
E
A
T
S
E
A
R
C
H
S
E
A
R
C
H
T
U
N
I
N
G
P
R
E
S
E
T
V
O
L
U
M
E
D
IG
IT
A
L
R
E
M
O
T
E
C
O
N
T
R
O
L
6
9
4
2
1
8
5
7
3
3

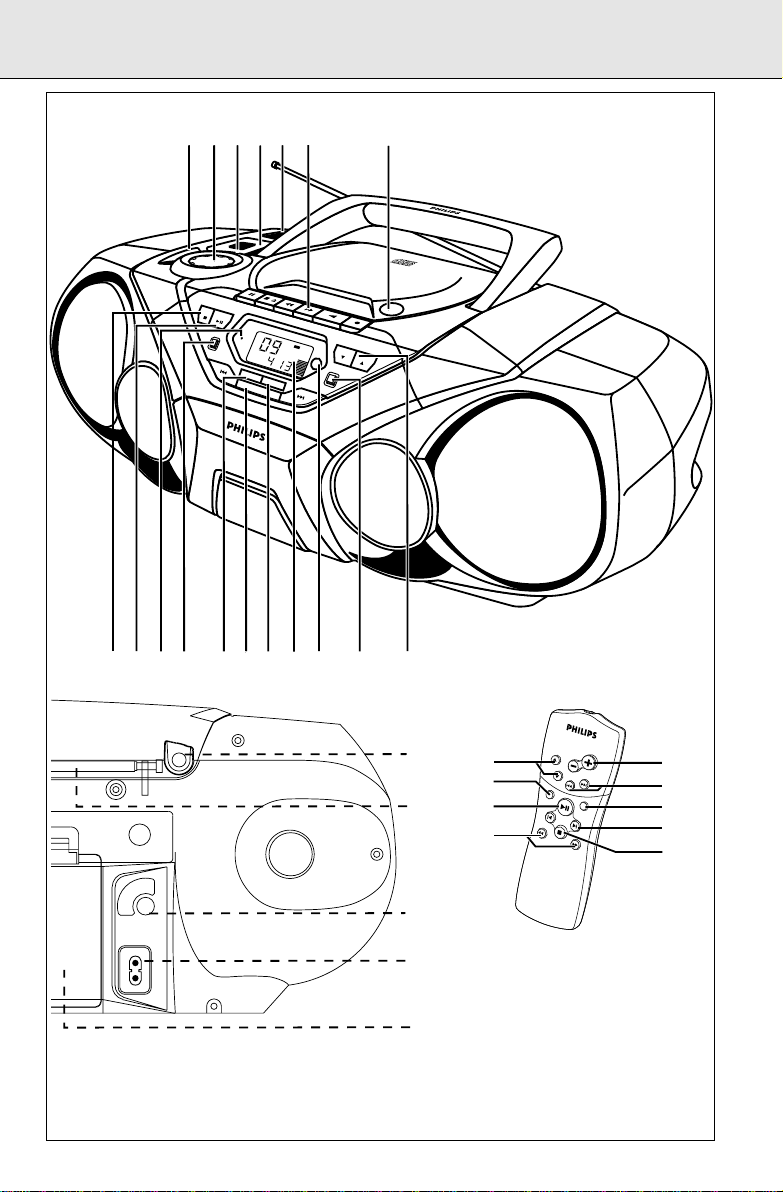
CONTROLS
English
TOP AND FRONT PANELS
1 DIGITAL EQUALIZER – selects volume or the
various frequency for adjustment: volume,
bass, mid and high frequencies
2 VOLUME/SOUND CONTROL CENTER –
adjusts the volume level and digital equalizer
settings
3 DIGITAL DBB (Dynamic Bass Boost)–
enhances the bass
4 INCREDIBLE SURROUND –
creates a super-enhanced stereo effect
5 POWER slider – selects the sound source for
CD/ TUNER/ TAPE and also
switches the set off
6 CASSETTE RECORDER keys:
RECORD 0 – starts recording
PLAY 1 – starts playback
SEARCH 5, 6 – fast winds/rewinds the
tape
OPEN•STOP /9– stops the tape;
– opens the cassette
compartment
PAUSE ; – interrupts recording or playback
7 OPEN•CLOSE – opens/ closes the CD door
8 STOP 9 – stops CD playback or erase a
CD programme
9 PLAY•PAUSE 2; – starts or interrupts
CD play
0 BATT LOW– indicates when battery power is
running low
! PROG – CD: programmes tracks and reviews
the programme;
Tuner: programmes preset radio
stations
@ SHUFFLE – plays CD tracks in random order
# SEARCH ∞, §
TUNER: - (down, up) tunes to radio stations;
CD: - searches back and forward within a
track;
- skips to the beginning of a current track/
previous/ subsequent track
$ REPEAT– repeats a track / CD programme /
entire CD
% Display – shows the status of the set
^ REMOTE SENSOR – infrared sensor for
remote control
& BAND – selects waveband
* TUNER PRESET 4,3 –
selects a preset tuner station (down, up)
BACK PANEL
( p – 3.5 mm headphone socket
) Telescopic aerial– improves FM reception
¡ Voltage selector(not all versions) – to be set
to the local mains voltage. Disconnect the
mains lead first if this selector has to be reset.
™ AC MAINS – inlet for mains cord
£ Battery door
REMOTE CONTROL
1 VOLUME +,– – adjusts volume level
2 PRESET 3,4 – (up, down) selects a preset
radio station
3 TUNING ∞, § – (down, up) tunes to radio
stations
4 SHUFFLE – to play CD tracks in random order
5 REPEAT– repeats a track/ CD programme/
entire CD
6 2; – starts CD playback/ interrupts
CD playback
7 ¡, ™ – skips to the beginning of a current
track/ previous/ subsequent track
8 STOP 9 – stops CD playback or erases a
CD programme
9 SEARCH 5, 6 – searches backwards or
forwards within a track/CD
CAUTION
Use of controls or adjustments or performance of procedures other than herein
may result in hazardous radiation exposure or other unsafe operation.
4
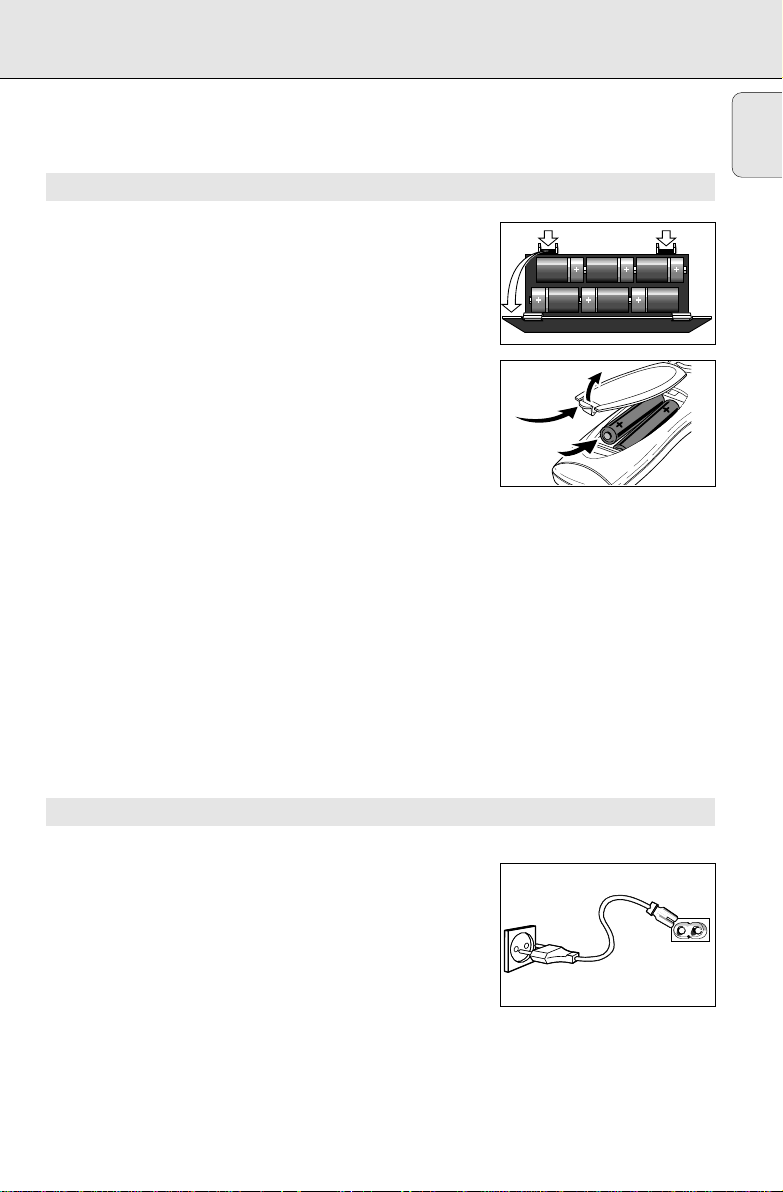
Whenever convenient, use the power supply if you want to
6 x R-20 - UM1 - D-cells
conserve battery life. Make sure you remove the plug from the
set and wall socket before inserting batteries.
BATTERIES (OPTIONAL)
1. Open the battery compartment and insert six batteries, type
R-20, UM-1 or D-cells, (preferably alkaline) with the correct
polarity as indicated by the "+" and "-" symbols inside the
compartment.
Remote control (supplied)
Open the battery compartment and insert two batteries,
type AAA, R03 or UM4 (preferably alkaline).
2. Replace the compartment door, making sure the batteries are
firmly and correctly in place. The set is now ready to operate.
– If BATT LOW lights up, battery power is running low.
– The BATT LOW indicator eventually goes out if the batteries
are too weak.
– Incorrect use of batteries can cause electrolyte leakage and
will corrode the compartment or cause the batteries to burst.
Therefore:
– Do not mix battery types, e.g. alkaline with carbon zinc.
Only use batteries of the same type for the set.
– When inserting new batteries, do not try to mix old
batteries with the new ones.
– Remove the batteries if the set is not to be used for a long
time.
– Batteries contain chemical substances, so they
should be disposed of properly.
POWER SUPPLY
English
USING AC POWER
1. Check if the mains voltage as shown on the type plate
located on the bottom of the set, corresponds to your local
power supply. If it does not, consult your dealer or service
centre.
2. If your set is equipped with a voltage selector, adjust the
selector so that it matches with the local mains.
3. Connect the mains lead to the wall socket and the set is now
ready for use.
4. To disconnect the set from the mains completely, remove the
plug from the wall socket.
MAINS
5
 Loading...