

Page 1
Eiglitli: This digital app^tus does not exca^ the Class B limits for radio noise emis
sions from digital apparatus as set out in the Radio Interference Regulations of the Cana
dian Department of Communications.
Français: Cet appareil numérique n’émet pas de bruits radioélectriques dépassant les li
mites applicables aux appareils numériques de Classe B prescrites dans le Règlement sur
le Brouillage Radioélectrique édicté par le Ministère des Communications du Canada.
Es necesario que lea cuidadosamente su instructivo de manejo.
'lÉF'lfMMI llil sIIÉÜM' filéMrtithr M Mills |s lÉMÉ»
piigpili^^ jil pSfiMMiri! iMÉNIwiÉhk
l'ÿ,
■■■; ■ •
>' ■i:
V-, -
:h- . .■>
Page 2
PHILIPS
Thb-product was designed and manufactured to
meet strict quality and safety standards. There are.
hoiwever, some installation «kJ opmation precautions
wMi you should be particuiariy awere of.
1. Read tMtmelioiia-All the safety and operating
instructiims should be read before the appliance is
operated.
2. Retain Inslractiens - The safety and operating
^ instructions should be retained for future reference.
3L Heed VWanmfs-All waitings on the appliance
and in the operating instnjcbons should be adhered to.
4. fdllaw Inelnwliene - AH operating and use
instructions should be followred.
5. Wider and Meiettna - The appliance should not
be used nev water-for example, near a bathtub,
washbowl, kitchen sink, laundry tub, in a wet
basement or near a swimming pool, ete.
CataaedStaedi- The appiianr» should be
used only with a cart or stand that is recommended
by the manufacturer.
M.
7. Well or Ceiling Mowilbii
should be mounted to a wall or ceiling only as
recommended by the manufacturer.
8l Veetiletioa - The appliance sfxiuld be situated
so that its location or position does not interfere with
its proper ventilation. Tor example, the appliance
should not be situated on a bed, sofa, rug, or similar
surface that may block the ventilation openings; or,
placed in a built-in installation, such as a bookcase
or cabinet that may impede the flow of air through
№e ventilation openings.
9. HMt - The appliance should be situated away
from heat sources such as radiators, heat registers,
stoves, or other appliances (including amplifiers) that
produce heat.
10. Power $Mrc«s - The appliance should be
connected to a power supply only of the type
described in the operating instructions or as marked
on the appliance.
An appliance and cart combination
should be moved with care. Quick
stops, excessive force, and uneven
surfaces may cause the appliance and
cart combination to overturn.
II.CrwMdhig or Potarhotfoo -*
Precautions should be taken so
that the grounding or polaritation
means of an apfHiance is not
defeated.
CAUTION: To prevent electric shock, match
the wide blade of this plug to the wide slot fully
insert. Do not use this (polarized) plug with an
extension cord, receptacle or other outlet unless the
blades can be fully inserted to prevent blade
exposure. ' , ^ ' ...
P«wei4M PrelectiMi - Power supply cords
should be muted so dHH they are not likely to be
walked on or pinched tiy items placed upon or
against them, paying particular attention to cords
and plugs, oot^ience rBOaptecles, and the pmnt
where they екк horn the appliance.
13. dwaitg-The appliance should be cleaned only
as recommended by the nanufacturer.
U.Pmwgr4ip»e ♦ An outdoor antenna should be
located away from power lines.
15.11о«ие PwMs • The power cord of the appli
ance should be unplu^jed from the outlet when left
unused for a kmg period of time.
HORjed «Ml ligaid EaPry - Care should be taken
so that objects do not fall and liquids are not spilled
into the enclosure through openings.
17. Damage Reqairiag Service - The appliance
should be serviced by qualified service personnel
when;
A. The power-suppiy cord or the (^ug has been
damaged: or
B. Objects have fallen, or liquid has spilied into
the appliance; or
C. The appliance has been exposed to rain; or
D. The appliance does not appear to operate
normally or exhibits a marked change in
performance; or
E. 1he appliance has been dropped, or the
enclosure damaged.
18. Servicing - The user should not attempt to
service the appliance beyond that described in the
operating instructions. AH other servicing should be
referred to qualified service personnel.
PHILIPS
MAGNAVOX
Cofigrcitu/otions on your purchase,
and welcome to the *Jdmilyr*
Dear Philips Magnavox product owner:
Thank you for your confidence in Philips Magnavox You’ve selected one of the
best-built, best-backed products available today. And we’il do everything in our
power to keep you happy with your purchase for many years to come.
As a member of the Philips Magnavox'"family,” you’re entitled to
protection by one of the most comprehensive warranties and outstanding
service networks in the industry.
What’s more, your purchase guarantees you'll receive all the information
and special offers for which you qualify, plus easy access to accessories
from our convenient home shopping network.
And most importantly you can count on our uncompromising commitment
to your total satisfaction.
All of tWs is our way of saying welcome-and thanks for investing in a
Philips Magnavox product.
Sincerely,
Robert Minkhorst
President and Chief Executive Officer
P.S. Remember» to get the most from your Philips Magnavox
product, you must return your Warranty Registration Card
within 10 days. So please mail it to us ri^t now!
91/8
a «62-1
Page 3
; i ‘^:: ??.'.i,'b^' 'FTJS
ж
^ SASiellilienONS ^
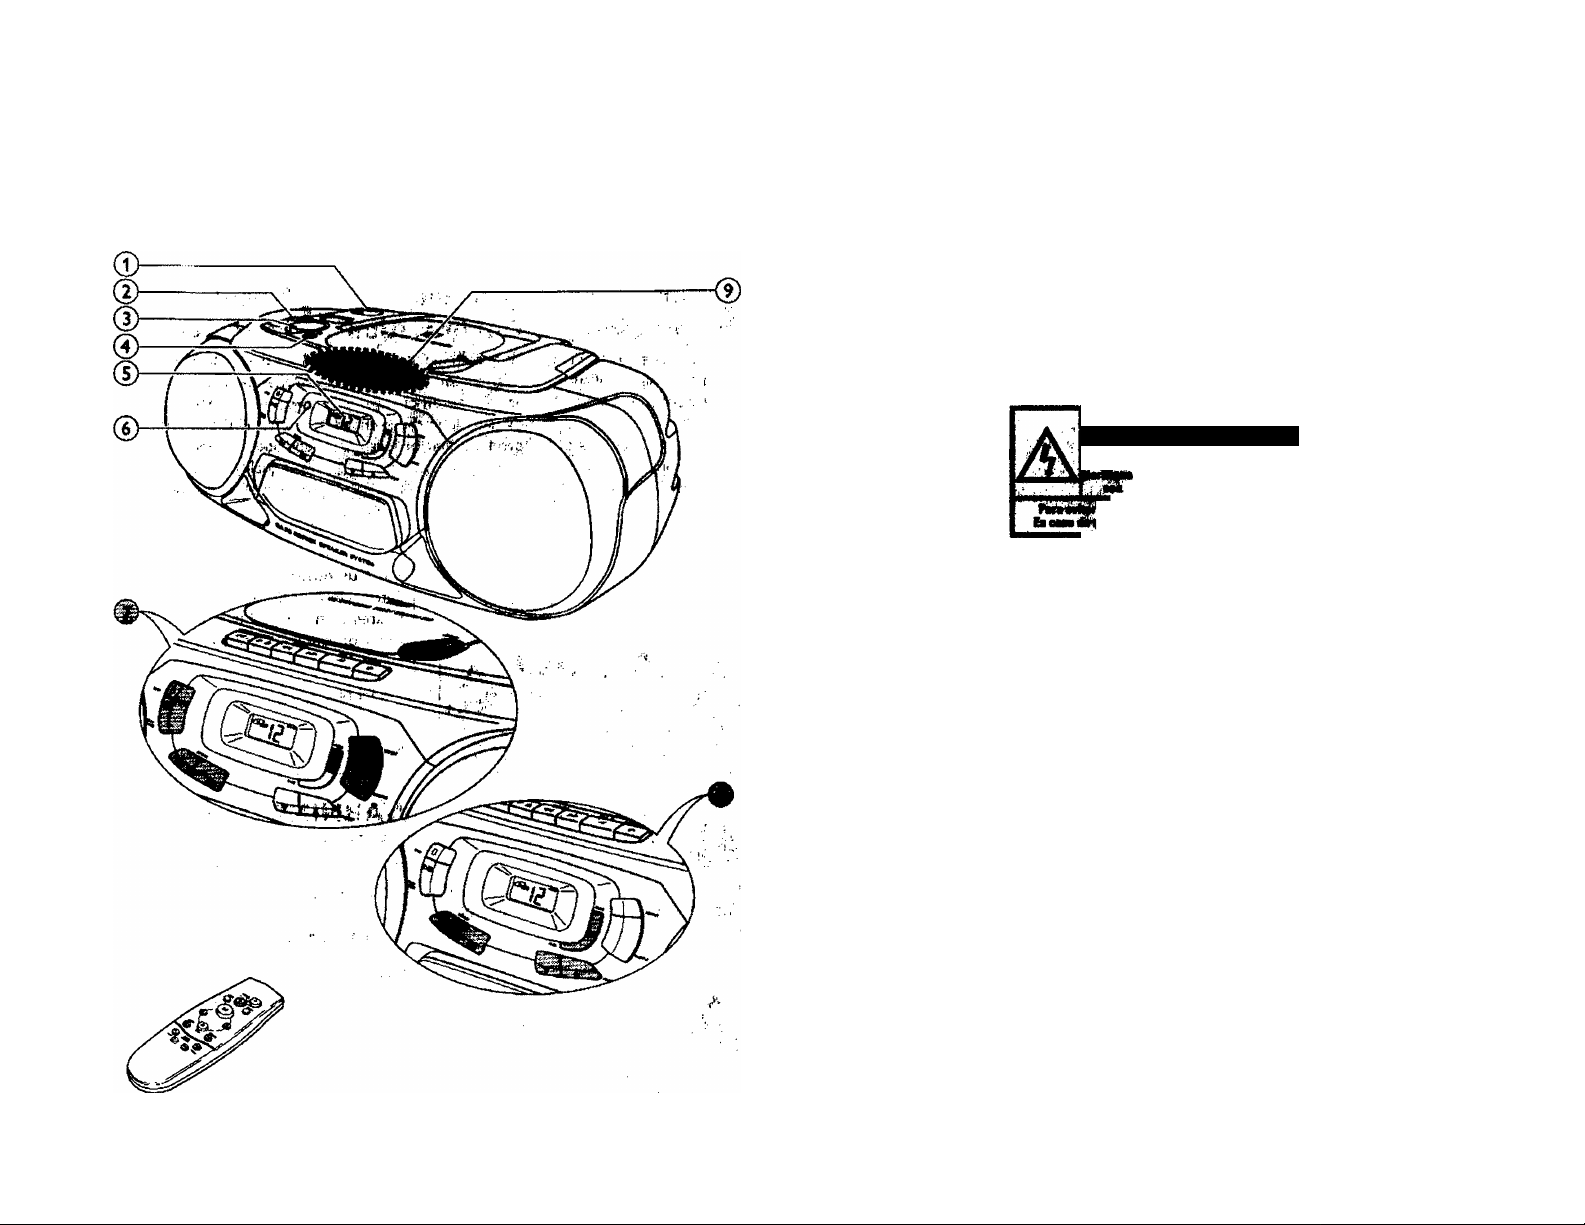
0 POWER:
CD, HJNm, TAP£...S8lects the sound source
0DB8.............................enhances the bass
0 VOLUME....................adjusts the volume level
00
..........................
Afoie.- Connecting the headphones will switch
J
off the speakers.
0 Display
0 REMOTE SENSOR ..sensor for the infrared
0CO PLAYER
¿iOPEN
STOP □
PLAY-PAUSE >D!l...starts and interrupts CD
SEARCH t<M IX»
PROGRAM
SHUFFLE
REPEAT
0 RADIO
SEARCH KM wx
BAND
PROGRAM
PRESET AV.
.......
..........
.
......
..................
.....
.............
...............
.................
......
.....................
.............
3.5mm headphone socket
remote control {AZ1208
only)
opens the CD
compartment
stops CD play and erases
the program
play
skips and searches
forward and backward
programs track numbers
and reviews the program
plays CD tracks in random
order
repeats a track, the entire
CD, or the program
tunes to radio stations
selects the wave band
programs radio preset
stations
.selects a radio preset
station
0CAS8CrrE^ROER
PAUSE Di...............interrupts recording or
playback
STOP-OPEN 04 ...stops the tape and opens
the cassette compartment
SEARCH
SEARCH ^
PLAY <3
RECORD O
REMOTE COIflROl (AZ 120B only)
VOLUME ▼ ▲
SHUFFLE
REPEAT
►II
M W
■
............................
SEARCH 44 ►►
PRESET ▲ ▼
TUNING M4
..........
...............
.................
............
.........
..............
.................
.........................
.......................
..........
............
rewinds the tape
fast forwards the tape
starts playback
starts recaitfinfl
decreases or' increases the
volume level
4 )lays CD tracks in random
order/,
repeats a track, the entire
CD; dr the program
starts and interrupts CD
play
selects the beginning of a
current, previous or
subsequent track of a CD
stops CD play and erases
the program
.....
searches backward/forward
in a CD track
selects a radio preset
station
tunes to radio stations
iVW Ul9 fini^iVIHilf
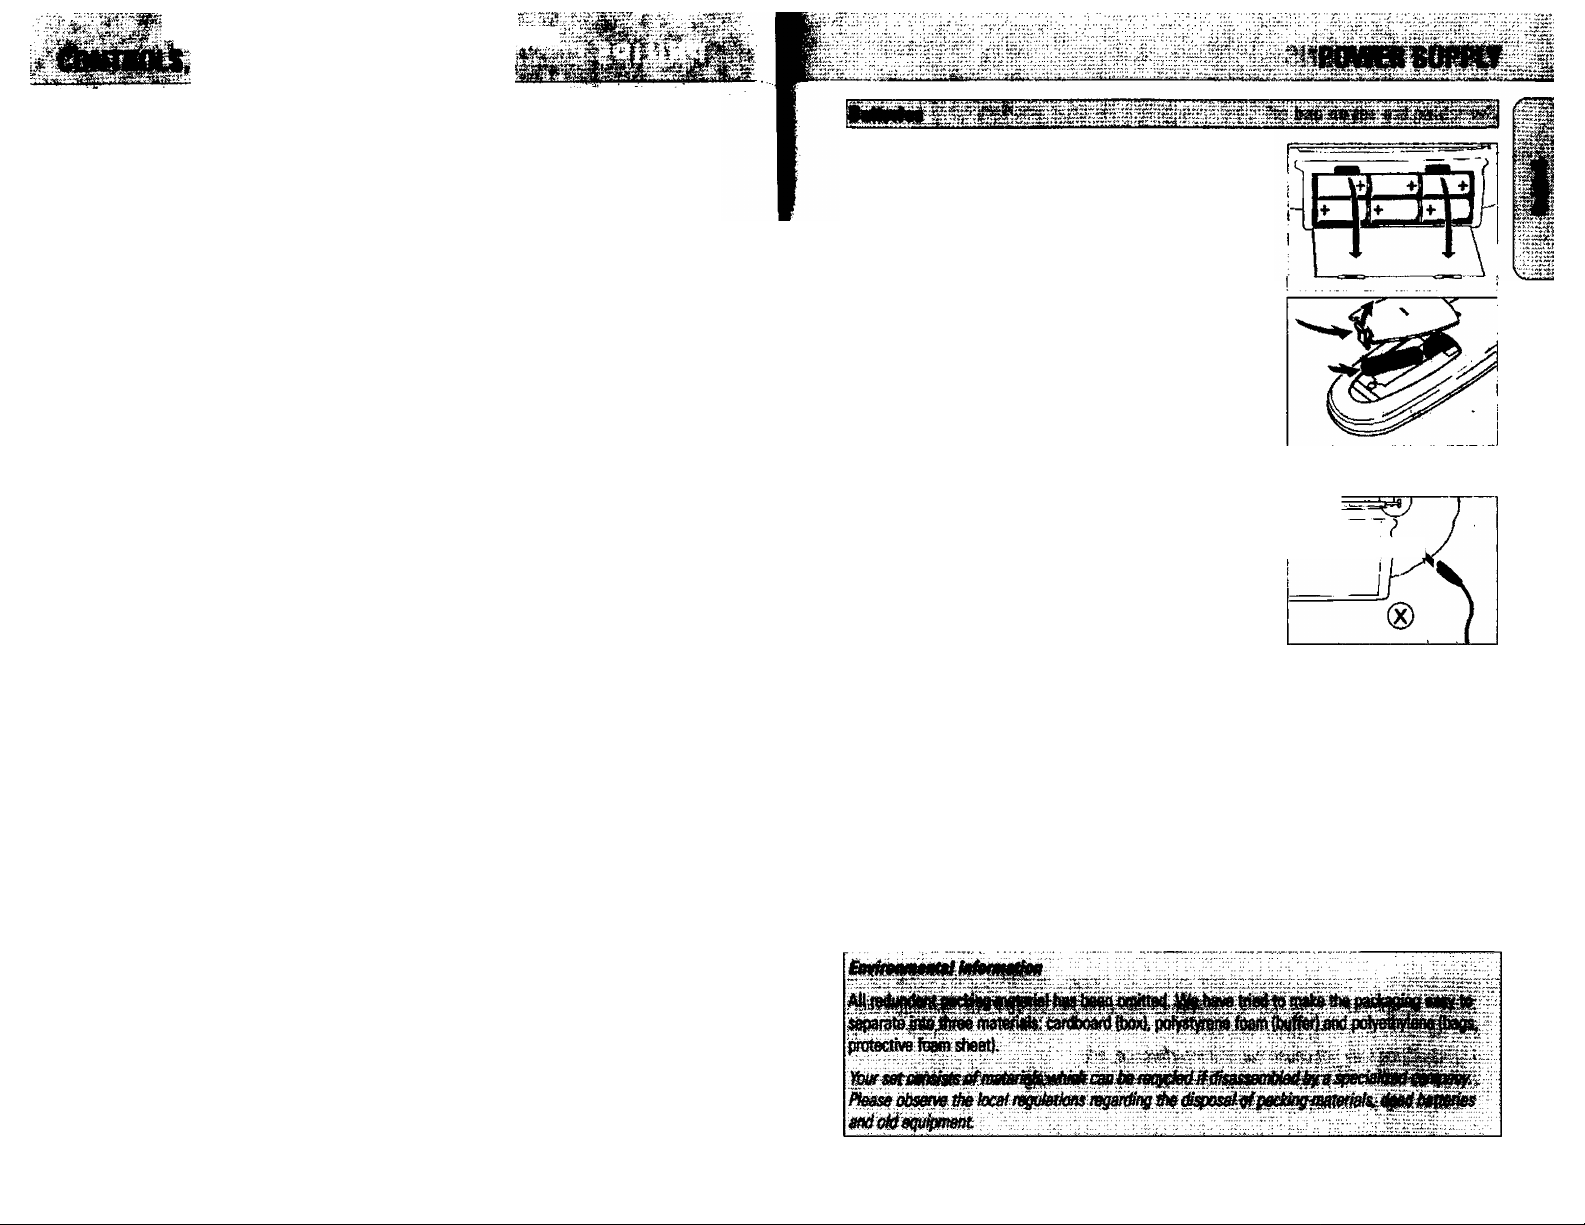
Open the battery compartment of the set and insert 6 batteries,
type R20, UM-1 or D-ceils (preferably alkaline).
For the remote control (AZ 1206 only)
Open the battery compartment of the remote control and insert 2
batteries, type R63, UM*4 or AAA-cells (preferably alkaline).
Remove batteries if they are dead or if the set is not going to be
used for a long time.
BattariBi contain chamicaf satstancas, so Шву ^ншШ ta
Mhtposad ofpfopatfy.
1 Check whedrer the yolt^ as shownerrthe%pe plate
correspotKis to your local voltage. If it does rwt, consult your ¡__ ^ ^
dealer or service orianization. Tfia tjfpa plata is tocatai on ]- j g
tha Bottom
2 If the set is equipped with a VOLTAGE selector 0, set this
selector to the local voltage.
3 Connect the AC power cord to the AC MAINS socket and to the
wall socket. This switches on the AC power supply. Tie AC
powafiCsMis insUe tha ftetteiy compartmant
The battery supply will be switched off when the set is connected
to the AC power. To change to battery supply, disconnect the AC
power cord from the unit's AC MAINS socket.
To disconnect the set from AC power completely, remove the AC
power cord from the wait socket.
Page 4

*^.Kii!iii.*0Lv; I'lsibS
Set the POWER control to the desired sound source:
CD. TUNER, or TAPE
The set is switched off when the POWER control is set to
OFF/TAPE and the keys of the tape deck are released.
0
Note: If you use batteries, always be sure to switch the set off
after use. This will avoid unnecessary power consumption.
Adjust the volume using the VOLUME control.
— Display indication: Volurne level from 0 to 32 |AZ 1208 only).
Increase and decrease the bass level by pressing DBB.
The bass level can also be emphasized if you place the set against
a wall or shelf. Oo not cover any vents; leave sufficient room
around the unit for ventilation.
i ...........
5/r 1??%*'®’’-'.'. S.'O^
) f'f »»-*v #<#•►*• > Vi
1 Set the POWER control to TUNER.
2 Select the wave band by using the BAND selector.
— Display indication: the selected waveband.
3 Press SEARCH km or mh for approximately 1 second and then
release the button.
— The. radio automatically tunes to a station with sufficient
strength. Display indication during automatic tuning: Srch
4 Repeat this procedure until you find a station you desire.
To tune to a weak station briefly press SEARCH km or wh as often
as necessary for optimum reception, or until the correct
frequency is Indicated in the display.
You can store up to 29 radio stations in the memory. When
tuning to a preset station, the preset number (1 to 29) is indicated
in the display.
For FM stations, puli out the telescopic antenna. To Improve the
signal, incline and turn the antenna. Reduce Its length if the signal
is too strong {very close to a transmitter).
For AM stations, direct the built-in antenna by turning thewhole
set. The telescopic antenna is not needed.
1 Set the POWER control to TUNER.
2 Press fflOGRAM to enter the programming mode.
-* During programming. pro6Mm hashes on the display.
3 Tune to a desired s|tetlon with SEARCH km or wh. as described
earlier (see HTuning to radio stations*).
“♦ If the frequency is already stored in the memory, the preset
number vtnti be displayed.
4 Press PRESET V or A to allocate a number from 1 to 29 to the
preset station.
5 Press RI06RAM to confirm the setting.
Press PRESET v or A until the desired preset number appears
on the display.
11
Page 5

1 Set the POWER control to CO.
2 Press A OPEN to open the CO comparunent.
3 Insert an audio CD (printed side up) artd close the CD
compartment.
-* The CD player starts and scans the contents list of the CD.
Then, the CO player stops. Display indication: the total
number of tracks and the total playing lime of the CD.
♦ Press the PlAY PAUSE N1 button to start CD play.
-* Display indication: the current track number.
ry
Ui
SHUFRf - Ptayiiii itt raodom orAir
1 Press SHUff LE before or during CD play.
- All the tracks of the CO (or program if availaWe) will now be
played in random order.
2 Press SHUFFLE again to return to normal CD play.
REPEAT - Rapeating tile tntire CDor onatracfcaftkieCD
1 Before or during CO play, press REPEAT repeatedly to cause the
display to show the different repeating modes.
nofior. the curreitt-^rack is played repeatedly.
fj^EKr Mi: the entire CD or program is played repeatedly.
UiH'
v_
5 Press the STOP O button to stop CD play.
-* Display indication: the total number of tracks.
You can interrupt CD play by pressing PlAY PAUSE >11 Contioue
CD play by pressing the button again.
— Display indication; the time of the actual position flashes.
Hole: CD play will also stop if:
- you open ihe CD compartment
-the end of the CD is reached, or
- you move the POWER cmtroi to TUNER or TAPE.
If you make a mistake when operating the CD player, or if the
CD player cannot read the CO, the display shows Cd Err. (See
•TROUBLESHOOTING*'.}
If you press PLAY PAUSE Nl and there is no CO inserted, the
display shows no d iSC.
2 Press REPEAT until tiie display indication disappears to return to
normal CD play.
Hole: You can activate the different playing modes at the same
time, e. g. you can repeatedly play the entire CD or program
in random order fmmi mnnt mj.
Saiactiif aaothartiack
Briefly press the SEARCH w or t>w button once/several times to
skip to the beginning of the current, previous or subsequent
tracMs).
During play:
CD play continues automatically with the selected track.
Wh&} pfaybadc is
Press PlAY PAUSE C^to start CD play.
-* Display indication; the selected track number.
Searchiog for a passaga during CD piay
1 Hold down the SEARCH km on>tH button to find a particular
passage in a forward or backward direction.
-* CD play continues at a low volume.
2 Release the button when you have reached the desired passage.
Note: in die SHUFFLE and REPEAT modes or when playing a program,
searching is only possible within the particular track.
12
13
Page 6

You can select a nuniber of tracks and store these in the memofy
in the desired sequerrce. You can store any track more than once.
A maximum of 20 tracks can be stored in the memory.
1 Select the desired track with SEARCH kw or w».
2 As soon as the number of the desired track is displayed, press
the PROGRAM button to store the track in the memory.
— PROWMi appears in the display and the number of the
stored track is shown. Then pro^ lights up briefly.
.ili//
1 (-
52^
À.
1 Set the POWER control to TAPE
2 Press STOP-OPEN OA to open the cassette compartment.
3 Insert a recorded cassette with the open side upwards and close
the cassette compartment.
A
.J
4 Press PLAY < to start playback.
5 Pressor to rewind or fast forward the tape.
3 Select and store all desired tracks in this way.
You can review your settings by pressing the PROGRAM button
for more than 2 seconds.
“* The display shows all stored track numbers in sequence.
if you try to store more than 20 tracks, the display shows FUL L
If you press PROGRAM and there is no track selected, the display
shows f»o 56L.
If you have selected the tracks while playback is stopped, press
PLAY-PAUSE >11.
If you have selected the tracks during CD play, first press STOP □,
then press PLAY-PAUSE Will.
From the stop position, press STOP □.
— no prog lights up briefly, piuigiiam disappears, and your
program is erased.
Note: The program will also he erased if you:
- interrupt the power supply.
~ open the CD compartment or
- move the POWER control to TUNER or TAPE.
6 To stop the tape press STOP-OPEN 04.
Afore: The keys are released at the enrf of the tape.
Recording is permissible insofar as copyright or other rights of
third parties are not infringed upon.
For recording on this set you should use a cassette of the type
NORMAL (lEC type I|. This deck is not suitable for recording on
cassettes of the type CHROME {lEC type II) or METAL {lEC
type IV}.
The recording level is set automatically. The contrals VOLUME and
OBB do not affect the recording.
At the very beginning and end of the tape, no recording will take
place in the ? seconds during \^ich the leader tape passes the
recorder heads.
Pfotacting tapes from accidental arasure l ^
Keep the cassette side to be protected in front of you and snap off
the left tab. Now. recording on this side is no longer possible.
To record again on this side of the cassette, cover the opening with
a piece of adhesive tape. !
14
15
Page 7

v-v : V.;.:.
-----
1 Set the POWER control to CD.
2 Insert a CO and, if desired, program the track numbers.
3 Press STOP-OPEN OA to open the cassette compartment.
J
4 Insert a blank, unprotected, cassette and close the cassette
compartment.
5 Press RECORD O to start recording.
Playing of the CD or program starts automatically. It is not
necessary to start the CD player separately.
6 For brief interruptions press PAUSE IB. Press the PAUSE Bl key
again to resume recording.
7 To stop recording, press STOP-OPEN DA.
Hoxe: the recording can be started from different positions:
- if the CD player is in pause mode, recording will start
from this very position fuse SEARCH m<j on>w/’
- if die CO ptayer is in stop mode, recording will start from
the beginning of the CD or program.
1 Set the POWER control to TUNER.
2 Tune to the desired radio station (see "RADIO"}.
3 Press STOP'OPEN UL to open the cassette compartment.
4 Insert a blank, unprotected, cassette and close the cassette
compartment.
5 Press RECORD O to start recording.
6 For brief interruptions press PAUSE B8. To resume recording press
the PAUSE Bl key again.
%ij./
!}j t'
■■/4 /i
'Ч.
The mechanical parts of the set contain selMubricating bearings
and must not be oiled or lubricated!
You can clean the set with a soft, slightly dampened, lint-free cloth.
Do not use any cleaning agents as they may have a corrosive effect
.......
.
To ensure prr^ recording and playback quality, clean parts
(D and © after approximatelY 50 hours of operation. Use a
cotton sw^ slightly moistened with alcohol or headK^teaner duid.
Press PLAY < and clean ihe rubber pressure rollers ®,
Press PAUSE II and clean the ca(»tans (в) and the heads ©.
Note: Cleaning of the heads © can also be done by playing a
cleaning tape оке.
The lens © of die CD player should never be touched. Always
keep the CD compartment closed to avoid dust on the lens.
The lens may cloud over when die set is suddenly moved from ebid
to warm surroundings. Playing a CD is not possible then. Leave the
CO player in a warm environment until the moisture evaporates.
To take the CD out of its box easily, press the center spindle while
lifting the CO. Always pick up the CD by the edge and put it back
in its box after use.
To clean the CD, wipe it in a straight line from the center toward
the edge using a soft, lint-free cloth. A cleaning agent may damage
the disc!
Never write on a CD or attach a sticker to it.
7 To stop recording, press STOP-OPEN 1114.
16
Page 8

Limited WARRANTY
ProUem
NoMniil.
MpOMftr
Po$$ible causB
VOLUME is not adjusted.
Headphones are connected.
Soliitioii
Adjust volume.
Disconnect headphones.
Power cord is not securely connected. Connect the power cord properly.
Batteries are dead.
Batteries are inserted incorrectly.
Insert fresh battarm
Insert batteries correctly.
Trying to change over from AC power to Remove the power cord from the
battery supply without removing the power coid. unit's AC MAINS socket.
N* iwKtioR to Electrostatic discharge,
•pontioa of «ny koy*
Disconnect the set from power supply,
reconnect after a few seconds.
Poor radio raeoiilioo Weak radio signal. Adjust the antenna for optimum
reception.
no proq Of
Cd ladicalloa
Hie CO skip» tracks
interference caused by electrical equipment
like TVs, computers, engines, etc.
The CD is badly scratched or dirty.
No CD is inserted. Insert a CD.
The CD is inserted upside down.
The laser lens is steamed op.
The CD is damaged or dirty. Reiidace or clean the CD.
SHURU or moNMAM is active.
Keep the radio away from electrical
equipment.
Replace or clean the CO.
Insert CD with label facing up.
Wait until the lens has cleared.
Switch off StWRUE or fMGMM.
Roorcassatto Oust and dirt on the heads, capstans or Clean heads, capstans, and pressure
sotmd i|Bality pressure rollers.
Use of unsuitable cassette types
(METAL or CHROME) for recording.
(tocardiag does
Cassette tabis) may be snapped off.
flottmift
rollers.
Only use NORMAL type cassettes for
recording.
Apply a piece of adhesive tape over
the opening.
Baaioto cootrol does Batteries are inserted incorrectly. Insert batteries correctly.
•otfubction property Batteries are dead.
IM12» only)
Distance to the set is too large. Reduce distance.
insert fresh batteries.
Thb product must be carried in for an »(dfange.
■ ^Onc liter
WHO IS COVf RED?
You must have proof of purchase to exchance the product
A sales receipt or other document dtowlng that you
purchased the product is considered proof of purchase.
Attach it to this owner’s manual and keep both nearby.
WHAT IS COVCMIOf
Warranty coverage b^ns the day you buy your product.
For one year th№feahiena defecove or hK^rativ« product
wHI be repiMed with a new, renewed or comparable
produa at no chsrfe to yoaA repleoement product b
covered only for the brVnal warmty period. When the
warranty on the orifinit product «xpirae, the warranty on
the rapiacemenc produa also expires.
WHAT 1$ EXCLUPEO?
Your warranty does not coven
• labor chai^ for intcdiation or soop of the product,
adjustinenc of custonier cofKrob on the product, end
instaibtion or repair of antenna systems oucdde of the
product
• produa repair andter pert replacement because of
nrd$use.acdldent UMHithortzed repair or other cause
trot within the control of Philips Cortsumer Eieoronlcs
Company.
• reception probleim caused by signal conditions or
cable or antenna systems outside the unit
• a produa that'requires mod№catk>n or adaptation to
eiufale k to opmte in any country other than the
country for which it was designed, manuftctured,
approv^ and/or authorized, or repair of products
durafed by these mod№casiont.
• irKidwttal or consequential damages resulting from the
product (Some states do not all^ the exclusion of
incidental or consequential damages, so the above
exclusion may not apply to you.TlHS indudes, but is not
limited to, preiecarM material, wiiether copyrighted
or not copyrigitted.)
■ a produa used for commerdaJ or Insticutionai
purposes.
WHERE IS EXCHANGE AVAILABUE?
You may exchange the produa in all coumriei where the
produa b ofRcblly distributed by Pfi%s Consumer
Bectronics Company In couittries where Phdips Consumer
Bectronks Company does not disorlaute the product the
local PhHips service orgmization will attempt to provide a
replacement produa (altixxq^ there msy be a delay if the
appropriate produa is not rudUy avadable).
BEFORE REQUESTtNC EXCHANGE...
Please check your owner’s manual before requesting an
exchange. Ar^ustments of the controls discussed there nuy
save you atrip.
EXCHANGING A PRODUCT IN U.SA.,
PUmTD RICO OR U.S.VtR6iN ISLANDS...
Comaa your dealer to arrange an «xchartge.Or.ship the
product insured and freight prepaid, and with proof of
purchase enclosed, to the addre^ listed below.
(In USA,Bjerto Kko and USLVtrgfo Isiandtainmptbd
vnrraiitiasviwiurlng impied warranties of merchamabilHy and
fitness for a partkuiar purpose, are feniod itt duration to the
duration of thb express warranty. ButiMOMM some states do
not ailaw bniatiot» cm ix>w lorg an impfied winarity Rif^
last, thb Bmitatfon tray iwc apply to you^
EXCHA>№flNG A PRODUCT IN CANADA.,.
Ptaooe contaa Philips at:
(In Canad8,thit warranty b given in Heu of all other
warranties. No other warranties are expressed or implied,
indudiitg ary implied warranties of merchantability or
fitness a particular purpose. Phiips b not Kabie under
any drcumstaiKes for any direct, indirect, special, incidental
or consequential damages, howsoever incurred, even if
notified of the possibility of such damages.)
TO GET OUTOF-WARRANTY EXCHANGE...
In UJA. Puerto Rko or U5.Vkgpn biands, contaa Philips
Service Company at (800) fiSI-liSS to obtain the cost of outof-waiiraniy exchange.TlMR iwdttlw product and
ship it to die Small Produa Service Center (aiMreis listed
above). In Canada. caN tha pitona number fisted ai№Ma under
’‘Exdungbg a Produa in Canada’* to obtain the «pit of outof-warranty ecchaqge.
REHEMBER...
Please record the model and serial numbers found on the
produa below. Also, please fW out and mail your warranty
registration card ptxxnptiy. It will be easier for us to notify
you If necessary.
Smalt Produa Service Center
Philips Service Company
907 Srtapps Ferry Road, Plant 2, Building 6
Gie«mviie.TN 37743
1-800-«614162 (French Speaking)
1 •B00-3fi3>72?8 (English SpeAfog)
MODEL#
SERIAL#
Philips Service Company, P.a Box $55, Jefferson City,Tennessee 37740, (423) 475>aM9
18
aj6095T001 / MACS433 11-97
19
 Loading...