

Page 1
Audio
Audio
MP3-CD Soundmachine
AZ 1150
AZ 1155
Page 2

AZ 1150 /00 page 2
Important notes for users in the U.K.
Mains plug
This apparatus is fitted with an approved 13 Amp
plug.To change a fuse in this type of plug proceed
as follows:
1. Remove fuse cover and fuse.
2. Fix new fuse which should be a BS1362
5 Amp,A.S.T.A. or BSI approved type.
3. Refit the fuse cover.
If the fitted plug is not suitable for your socket
outlets, it should be cut off and an appropriate
plug fitted in its place. If the mains plug contains a
fuse, this should have a value of 5 Amp. If a plug
without a fuse is used, the fuse at the distribution
board should not be greater than 5 Amp.
Note:The severed plug must be disposed of to
avoid a possible shock hazard should it be
inserted into a 13 Amp socket elsewhere.
How to connect a plug
The wires in the mains lead are coloured with
the following code: blue = neutral (N), brown =
live (L). As these colours may not correspond
with the colour markings identifying the terminals
in your plug, proceed as follows:
• Connect the blue wire to the terminal marked
N or coloured black.
• Connect the brown wire to the terminal
marked L or coloured red.
• Do not connect either wire to the ear th
terminal in the plug, marked E (or e) or
coloured green (or green and yellow).
Before replacing the plug cover, make certain that
the cord grip is clamped over the sheath of the
lead - not simply over the two wires.
Norge
Typeskilt finnes på apparatens underside.
Observer: Nettbryteren er sekundert
innkoplet. Den innebygde netdelen er derfor
ikke frakoplet nettet så lenge apparatet er
tilsluttet nettkontakten.
For å redusere faren for brann eller elektrisk
støt, skal apparatet ikke utsettes for regn eller
fuktighet.
Italia
DICHIARAZIONE DI CONFORMITA’
Si dichiara che l’apparecchio Lettore CD/Radioregistratore mod. AZ1150, AZ1155 Philips
risponde alle prescrizioni dell’art. 2 comma 1
del D. M. 28 Agosto 1995 n. 548.
Philips Consumer Electronics
Philips, Glaslaan 2, SFF 10
5616 JB Eindhoven,The Netherlands
Copyright in the U.K.
Recording and playback of material may require
consent. See Copyright Act 1956 and The
Performer’s Protection Acts 1958 to 1972.
2
Page 3
AZ 1150 /00
&*
)
(
AC MAINS
12^
3
4
5
6
#
$
%
7
90!
@
8
1
2
3
%
B
CD
V
O
L
U
M
E
S
E
A
R
C
H
P
R
E
S
E
T
T
U
N
IN
G
B
A
N
D
T
U
N
E
R
R
E
P
E
A
T
M
U
T
E
B
A
S
S
S
H
U
F
F
L
E
K
L
$
#
!
0
@
4
5
7
6
8
9
page 3
3
Page 4

AZ 1150 /00 page 4
Index
English
English 6
Français
Français 18
Español
Español 32
Deutsch
Deutsch 44
Nederlands
Nederlands 56
Italiano
Italiano 68
Svenska
Svenska 80
Dansk
Dansk 92
4
Page 5

AZ 1150 /00
page 5
Suomi 104
Português 116
E 128
Index
Suomi
Portugês
E
5
Page 6

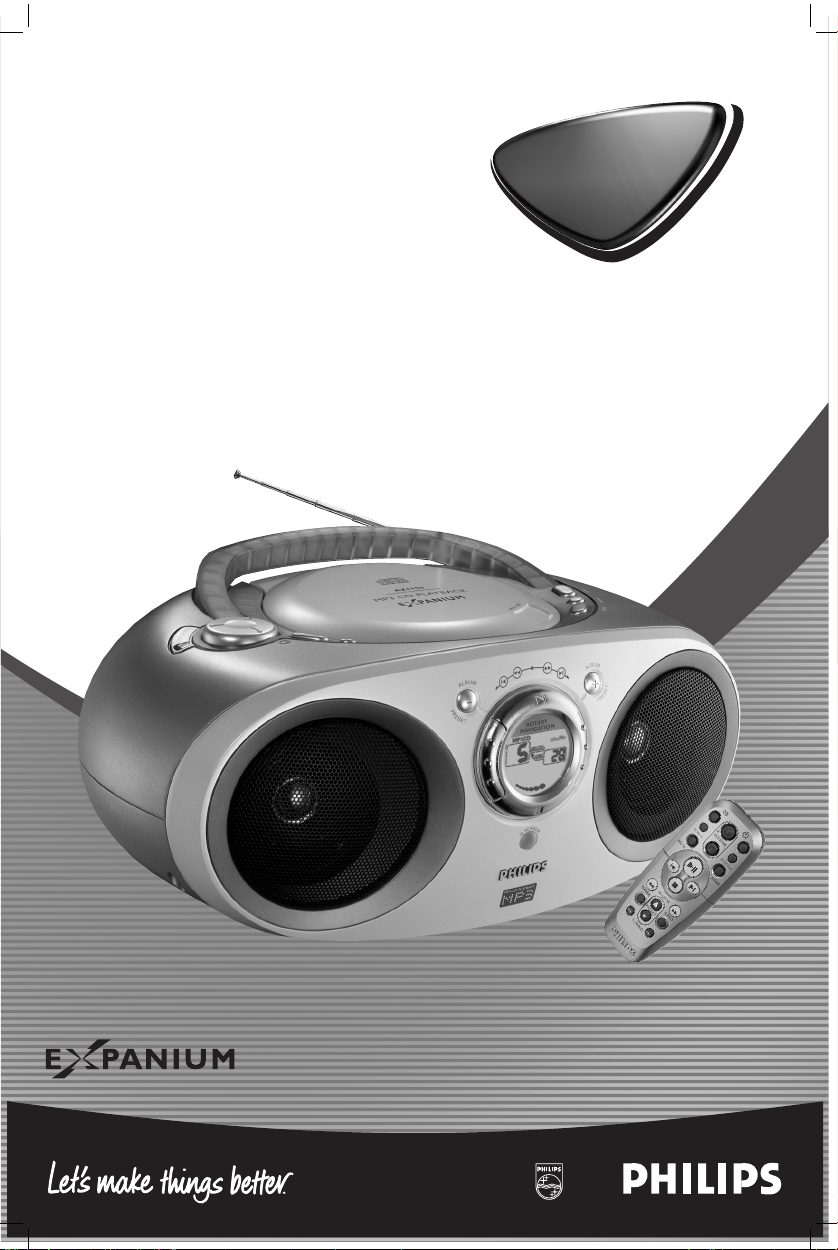
Comandi
Pannello superiore e frontale
1 2; – inizia o mette in pausa la
riproduzione del CD MP3/CD
2 OPEN•CLOSE – premere per
aprire/chiudere lo sportello del CD
3 BAND – seleziona la banda radio FM/
MW (AM)/LW (solo in alcune versioni)
4 PROGRAM
– CD MP3/CD: programma/ revisiona i
brani programmati;
– TUNER: programma le stazioni del
sintonizzatore
5 CD MODE
– riproduce brani CD MP3/CD/un
programma in ordine sparso
– ripete un brano/CD/ programma
6 + ALBUM, PRESET
– solo CD MP3: seleziona l'album seguente
– TUNER: seleziona la stazione
preselezionata successiva
Italiano
7 ROTARY NAVIGATION 5 , 6
– CD MP3/CD: ricerca velocemente
all'indietro, in avanti entro un brano
– TUNER: sintonizza la radio
(manualmente: in giù, in su)
¡ , ™
– CD MP3/CD: salta al brano/titolo
precedente, seguente
– TUNER: ricerca di sintonizzazione
automatica (in giù, in su)
8 STOP 9 – interrompe la riproduzione del
CD MP3; cancella un programma CD MP3
68
9 IR SENSOR (solo modelli AZ1155)
– infrarossi per telecomando
10 Visualizzatore – retroilluminato solo
quando alimentato da rete
– CD MP3: retroilluminazione arancio
– TUNER/CD: retroilluminazione verde
11 - ALBUM, PRESET
– solo CD MP3: seleziona l'album precedente
– TUNER: seleziona la stazione preselezionata
12 SOURCE – seleziona la fonte sonora per
CD MP3 o TUNER
13 POWER – spegne/accende l'apparecchio
14 LOW BATT – l'indicatore si illumina se la
batteria si sta scaricando
15 ULTRABASS 2 – migliora la risposta dei bassi
16 VOLUME – regola il livello del volume
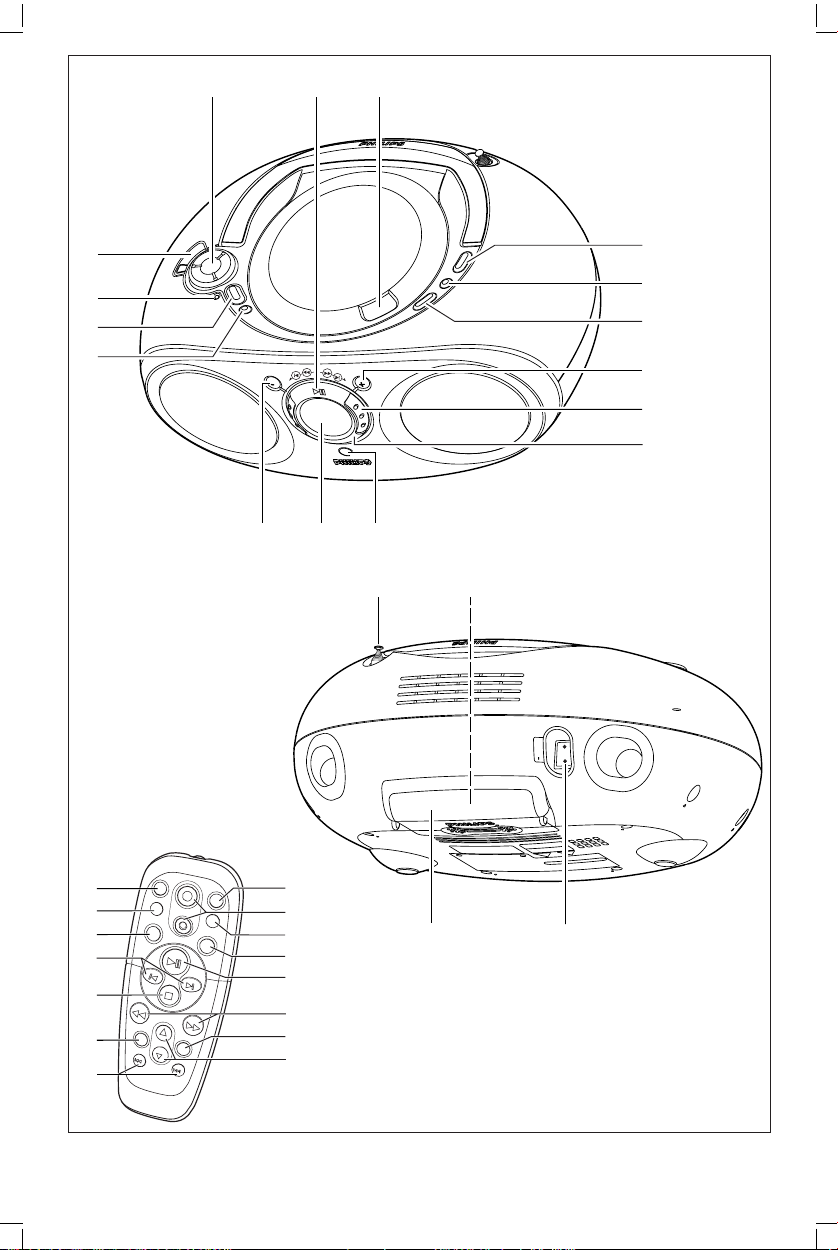
Pannello posteriore
17 Antenna telescopica – per migliorare la
ricezione FM
18 Selettore di voltaggio – (dentro lo
scomparto della batteria, non in tutte le
versioni) si regola per adeguarsi al voltaggio
di zona 110/220V prima di inserire la spina
19 AC MAINS – presa per il cavo di
alimentazione
20 Sportello della batterie – aprire per
inserire 6 x R-14, UM-2 or celle C
Questo prodotto è conforme ai requisiti
delle interferenze radio della Unione
Europea.
Page 7

AC MAINS
6 x 1.5V R14/ UM2/ C CELL
Telecomando digitale Alimentazione
TELECOMANDO DIGITALE
(solo per modelli AZ1155)
1CD– seleziona la fonte sonora MP3CD -CD
2 y – sposta l'apparecchio in posizione
standby
3 + VOLUME - – regola il livello del volume
(in su in giù)
4 SHUFFLE – riproduce tutti i brani CD
MP3 in ordine sparso
5 BASS – seleziona accensione/spegnimento
di ULTRABASS 2
6 2; – inizia la riproduzione di CD MP3/CD
– mette in pausa il CD MP3/CD
7 SEARCH 5 , 6 – il brano CD MP3
8 BAND – seleziona la banda radio FM/
MW(AM)/LW (solo in alcune versioni)
9 PRESET 3 , 4 (su, giù)
MP3-CD : seleziona un album
TUNER : seleziona una stazione radio
preselezionata
10 TUNING ∞ , § (giù, su) – sintonizza
sulle stazioni del sintonizzatore
Alimentazione
Se conveniente,usare l’alimentazione per
assicurare la durata di vita delle batterie.
Estrarre la spina dall’apparecchio e dalla
presa a muro prima di inserire le batterie.
Batterie (non incluse)
1 Aprire il comparto batterie ed inserir vi sei
batterie di tipo R-14, UM-2 o a celle C,
(preferibilmente alcaline), rispettando la
polarità indicata dai simboli "+" e "–"
all’interno del comparto.
• Telecomando (solo per modelli AZ1155)
11 TUNER – seleziona la fonte sonora del
sintonizzatore
12 9 – interrompe la riproduzione del CD
MP3;
– cancella un programma CD MP3
13 ¡ , ™ – salta all'inizio del brano corrente,
precedente/ seguente
14 MUTE – interrompe/ riavvia il suono
15 REPEAT – ripete un brano/ programma/
intero CD MP3/CD
Italiano
Aprire il comparto batterie ed inserir vi due
batterie di tipo AAA, R03 o UM4
(preferibilmente alcaline).
2 Chiudere lo sportello dello scomparto ed
assicurarsi che le batterie siano ferme e
corrette al loro posto. L’apparecchio è
pronto per funzionare.
69
Page 8

S
O
U
L
O
W
B
A
T
T
.
V
O
L
U
M
E
U
L
T
R
A
B
A
S
S
2
P
O
W
E
R
M
AC MAINS
Alimentazione
➜ Se si accende l’indicatore BATT LOW,
le batterie stanno per esaurirsi.
L’indicatore BATT LOW si spegne se le
batterie sono scariche.
Le batterie contengono sostanze
chimiche, pertanto devono essere
smaltite correttamente.
L’uso improprio delle batterie può causare
perdite elettrolitiche e corrodere il
comparto o causare la combustione
dellebatterie. Pertanto:
• Non usare contemporaneamente tipi
diversi di batterie,ad es.alcaline con zinco
carbonio. Usare solo batterie dello stesso
tipo per ogni apparecchio.
• Se si inseriscono batterie nuove, non usarle
insieme a quelle vecchie.
• Estrarre le batterie se si pensa di non
utilizzare l’apparecchio per lungo tempo.
2 Collegare il cordoncino di alimentazione all
presa AC MAINS e quindi alla presa muro.
L’alimentazione a questo punto è collegata
e pronta per l’uso.
3 Per spegnere completamente,tirare la
spinadalla presa a muro.
• Tirare la spina dalla presa a muro per
proteggere l’apparecchio durante un
temporale.
La targhetta del tipo si trova sul fondo
dell'apparecchio.
Accensione/spegnimento
dell’alimentazione:
Risparmia energia
Sempre premere il pulsante POWER
dopo usando dell’apparecchio.
Uso dell’alimentazione CA
1 Controllare che la tensione di rete indicata
Italiano
sulla piastrina del tipo posizionata sul
fondo dell’apparecchio corrisponda
all’alimentazione locale. In caso contrario,
rivolgersi al rivenditore o al centro assistenza.
70
• La retroilluminazione funziona solo quando
S
IN
A
M
C
A
alimentato da rete.
Consumo elettrico
in posizione standby..............................................≤ 2 W
Page 9

S
O
U
R
C
E
L
O
W
B
A
T
T
.
M
E
A
B
A
S
S
A
L
B
U
M
P
R
E
S
E
T
A
L
B
U
M
P
R
E
S
E
T
P
O
W
E
R
B
A
N
D
M
P3 C
D PLAY
BA
CK
Z
1
1
5
5
C
D
R
A
D
IO
S
O
U
N
D
M
A
C
H
IN
E
P
R
O
G
R
A
M
C
D
M
O
D
E
U
L
T
R
A
B
A
S
S
2
•
D
I
G
I
T
A
L
T
U
N
E
R
O
P
E
N
•
C
L
O
S
E
R
O
T
A
R
Y
N
A
V
I
G
A
T
I
O
N
M
Funzionamento Generale Sintonizzatore digitale
Funzionamento generale
2
S
S
A
B
A
R
T
L
U
P
O
L
O
W
.
T
T
B
A
W
E
R
S
O
U
R
C
E
AZ1155
V
O
L
U
M
E
1 Premere il pulsante POWER.
2 Per selezionare la fonte sonora, premere
SOURCE una o più volte.
3 Regolare il suono con i comandi
VOLUME e ULTRABASS 2.
➜ Il livello del volume viene visualizzato
brevemente con numeri da 0-32, durante
la regolazione del volume. Durante
l'operazione è visibile la barra del volume.
➜ Quando è attivato si accende la luce
d'indicazione di ULTRABASS 2.
MUTE: solo su modelli
• Premere MUTE sul telecomando per
interrompere immediatamente la
riproduzione del sonoro.
➜ La riproduzione continua senza suono e
la barra del volume lampeggia.
• Per riattivare la riproduzione del suono potete:
– premere nuovamente MUTE;
– regolare il comando del volume;
– cambiare fonte.
Sintonizzarsi sulle stazioni
radio
1 Premere il pulsante POWER.
2 Premere SOURCE una o più volte per
selezionare TUNER.
➜ Visualizzatore: mostra banda radio,
frequenza / e il numero della stazione
preselezionata se è già in memoria.
3 Premere BAND una o più volte seleziona
la banda radio desiderata.
4 Sintonizzarsi sulle stazioni: è possibile
sintonizzarsi sulle stazioni manualmente o
con la ricerca automatica di sintonizzazione:
Ricerca automatica di sintonizzazione:
• Ruotare delicatamente in senso antiorario o
orario e tenere in posizione l'anello di
ROTARY NAVIGATION verso ¡ o ™,
lasciarlo andare quando la frequenza sul
visualizzatore inizia a cambiare.
➜ La radio si sintonizza automaticamente su
una stazione da cui ci sia sufficiente ricezione.
Durante la sintonizzazione automatica sul
visualizzatore compare Sr ch.
Italiano
4 Per spegnere l'apparecchio premere POWER.
Nota: quando l'apparecchio viene spento,
verranno conservati in memoria:
– le preselezioni del sintonizzatore;
– le regolazioni del suono fino al livello di
volume 20 (massimo).
71
Page 10

C
D
M
O
D
E
P
R
O
G
R
A
M
U
L
T
R
A
B
A
S
S
2
•
D
I
G
I
T
A
L
T
U
N
E
R
O
P
E
N
•
C
L
O
S
E
A
L
B
U
M
P
R
E
S
E
T
A
L
B
U
M
P
R
E
S
E
T
Sintonizzatore digitale
Sintonizzazione manuale:
• Ruotare delicatamente l'anello di
ROTARY NAVIGATION su 5 o 6 ,e
poi lasciarlo andare.
• Ripetete la procedura precedente finchè
raggiungete la frequenza desiderata.
Per migliorare la ricezione
• Per la ricezione in FM, estrarre l’antenna
telescopica. Inclinare e ruotare l’antenna.
Ridurne la lunghezza se il segnale è troppo
forte (vicinanza eccessiva ad un trasmettitore).
➜ Se si riceve in stereo una stazione FM,
appare l’indicazione stereo.
• Per la ricezione in MW(AM) / LW,
l’apparecchio è dotato di un’antenna
incorporata, pertanto non è necessario
usare l’antenna telescopica. Dirigere
l’antenna ruotando tutto l’apparecchio.
FM
MW
(AM)/LW
Italiano
5 Per spegnere il sintonizzatore premere
POWER.
Programmazione delle
stazioni radio
Si possono memorizzare fino a 30 stazioni
radio in totale. Si può cancella una stazione
preimpostata memorizzando un’altra
frequenza al suo posto.
72
Memorizzazione automatica
La programmazione automatica inizierà con
il numero scelto preselezionato. Da questo
numero preselezionato in su, le stazioni di
sintonizzatore memorizzate
precedentemente verranno sovrascritte.
L'unità programmerà solamente stazioni
che non sono già in memoria.
1 Premere ALBUM, PRESET + o - una o
più volte (¡ o ™ sul telecomando) per
selezionare il numero preselezionato da cui
iniziare la programmazione.
Nota: Se non si seleziona alcun numero
preselezionato si inizierà con 1 e tutte le
preselezioni verranno sovrascritte.
2 Premere PROGRAM per più di 2
secondi per attivare la programmazione.
➜ Il visualizzatore mostra 'A'
(memorizzazione automatica) e 'Sr ch'
e le stazioni disponibili vengono
programmate in ordine di lunghezza di
banda radio : FM, seguita da MW (AM)
e /LW (solo in alcune versioni). L'ultima
preselezione verrà quindi
automaticamente riprodotta.
Page 11

Sintonizzatore digitale Riproduzione di CD MP3
Programmazione manuale
1 Sintonizza sulla stazione desiderata (vedere
sintonizzare sulle stazioni).
2 Premere PROGRAM per attivare la
programmazione.
➜ Visualizzatore: program lampeggia.
3 Premere ALBUM, PRESET + o - una o
più volte per assegnare un numero da 1 a
30 a questa stazione.
4 Premere di nuovo PROGRAM per
confermare.
➜ Visualizzatore: program scompare, viene
mostrato il numero preselezionato, la
banda radio e la frequenza.
5 Ripetere i quattro passaggi precedenti per
memorizzare altre stazioni.
ATTENZIONE
L'uso dei comandi o regolazioni o
prestazioni delle procedure oltre a
quelle descritte nel presente
potrebbero causare esposizione a
radiazioni pericolose o altre
operazioni rischiose.
Informazioni ambientali
Tutto il materiale d’imballaggio non
necessario è stato omesso. Il materiale
d’imballaggio può essere facilmente separato
in tre tipi: car tone,polistirene e plastica.
L’apparecchio consiste di materiale che può
essere riciclato se smontato da un’azienda
specializzata. Si prega di osser vare i regolamenti
locali riguardanti lo smaltimento di materiale da
imballaggio, batterie scariche e vecchi
apparecchi.
Riproduzione di CD MP3
CARATTERISTICHE IMPORTANTI
Formati accettati:
• Formato del disco ISO9660, Joliet e CD
multi sessioni. Usate il formato ISO9660
quando è acceso il CD-ROM.
• formato musicale MP3.
• velocità dei bit di MP3 (velocità dei dati):
32-320 Kbps e velocità dei bit variabile.
• 650Mb e 700Mb CD-Rs.
• indice organizzabile fino a un massimo di 8
livelli (max. 64 caratteri).
Informazioni generali
La tecnologia di compressione della musica
MP3 (MPEG Audio Layer 3) riduce i dati
audio digitali originali fino a 10 volte senza
che il suono perda significativamente in
qualità. Questo ci permette di registrare
fino a 10 ore di musica di qualità simile al
CD su un singolo CD-ROM.
Come ottenere musica MP3
Scaricare da Internet file musicali legali sul
disco rigido del proprio computer oppure
crearli con i propri CD audio. A tale scopo,
inserire un CD audio nel drive del CDROM del proprio computer e convertire la
musica utilizzando un software di codifica
adatto. Per ottenere una buona qualità del
suono con file musicali MP3 si consiglia una
velocità di trasmissione dei bit di 128 kbps
o superiore
Italiano
73
Page 12

album
title
MP3CD
Riproduzione di CD MP3
Alcuni software di codifica offrono
un'opzione per proteggere i file musicali,
ovvero i file possono essere riprodotti solo
sul computer con cui sono stati creati. Se
tali file vengono masterizzati su un CDROM, non è possibile riprodurli con questo
apparecchio. Assicurarsi di aver disattivato
l'opzione di protezione nel software di
codifica prima di creare i file musicali. In
questo caso l'utilizzatore sarà responsabile
del rispetto di tutte le leggi sul copyright
locali o internazionali.
Quando è acceso il CD MP3
• Assicuratevi che i nomi dei file dei file MP3
finiscano con .mp3.
• Riproduzione di registrazione multisessione: Per reproduzione di ultima
sessione sulla multi-sessione CDs, assicurate
avere registrato più di brano o titulo nell
ultima sessione.
• Assicuratevi di chiudere la sessione.
Come organizzare file MP3
Italiano
Potete memorizzare fino a un massimo
numero di 40 album e 400 titoli su un CD
MP3. Al fine di gestire facilmente l'elevato
numero di file musicali presenti su un CDROM, è possibile organizzarli in cartelle
(«album »).I brani di un album verranno
74
riprodotti in ordine alfabetico. Se si
desidera organizzarli in un determinato
ordine, assegnare ai file un nome che
cominci con dei numeri.
Esempio:
001-ONEWORLD.MP3
002-FIRESTARTER.MP3
003-DEEP.MP3.
• È possibile che sia presente un album 00
che verrà riprodotto prima di tutti gli altri
album. L'album 00 contiene tutti i brani
che non sono stati inseriti in un album.
• Album e titoli CD MP3 sono mostrati
come numeri nel visualizzatore.
IMPORTANTE!
Questo apparecchio non riproduce/è
compatibile con i seguenti:
• Formatto del disco UDF.
• I CD-R(W)s non sono finalizatti.
• I formati di CD mescolati (di combinare
brani di CD audio e di MP3 su del disco).
• Album vuoti: un album vuoto è un album
che non contiene file MP3, e non verrà
mostrato sul visualizzatore.
• I formati dei file che non sono accettati
verranno saltati. Questo significa che es.:
Documenti word .doc o file MP3 con
estensione .dlf sono ignorati e non
verranno riprodotti.
• File della lista di riproduzione es. .m3u, .pls
di WMA, AAC, Winamp, Sonic, RealJukebox,
MS Mediaplayer 7.0, MusicMatch.
• Registrazioni create su es. DirectCD,
PacketWriting e Package Writing.
Page 13

S
O
U
R
C
E
L
O
W
B
A
T
T
.
V
O
L
U
M
E
A
L
B
U
M
P
R
E
S
E
T
A
L
B
U
M
P
R
E
S
E
T
P
O
W
E
R
C
D
M
O
U
L
T
R
A
B
A
S
S
2
•
D
I
G
I
T
A
L
T
U
N
E
R
O
P
E
N
•
C
L
O
S
E
R
O
T
A
R
Y
N
A
V
I
G
A
T
I
O
N
program
repeat all
CD
Riproduzione di un MP3 & CD
LETTORE DI CD MP3
risoluzione dei problemi)
Indicazione sul visualizzatore per
funzioni CD MP3:
Riproduzione di un MP3 & CD
Questo lettore CD riproduce dischi audio
che comprendono CD-R, e CD MP3 CDROM.
•
– OPEn: sportello del CD aperto
– rEAd: il CD sta leggando
– MP3CD: quando è inserito un CD ROM MP3
– CD: quando è inserito un CD audio
– MP3-CD in modalità stop: numero
totale degli album e numero totale dei titoli
– CD in modalità stop: numero totale
dei brani e tempo totale di riproduzione
– Durante la riproduzione del CD
MP3/CD: tempo di riproduzione
trascorso del brano corrente e numero
del titolo/ numero del brano corrente
– PAUS: durante in pausa la riproduzione
– Modalità SHUFFLE/ REPEAT: quando
vengono attivate le rispettive modalità
– program: quando è attivo il programma CD;
– Prog compare anche brevemente quando
mettete in memoria un titolo/ brano
– no SEL: il programma è attivato ma
non ci sono titoli/ brani selezionati
– FULL: memoria del programma piena
– no album: ALBUM, PRESET + o -
premuto durante la riproduzione di un
CD MP3 o di un CD che non contiene
arrangiamenti di album
– CdEr, no Cd o nF Cd: errore / nessun
disco inserito/ il CD/ CD-R è vuoto/ il disco
non è finalizzato (vedere suggerimenti per la
comunque non si possono riprodurre CD-I,
CDV,VCD, DVD.
1 Premere il pulsante POWER.
2 Premere SOURCE una o più volte per
selezionare CD MP3.
3 Per aprire lo sportello del CD, sollevare lo
sportello del CD sull'estremità
contrassegnata OPEN•CLOSE.
4 Inserire un CD o CD-R con la parte
stampata rivolta verso l'alto e chiudete lo
sportello del CD.
5 Premere 2; per iniziare la riproduzione.
6 Per mettere in pausa la riproduzione
premere 2;. Per ricominciare premere di
nuovo 2;.
7 Per interrompere premere 9.
8 Per spegnere l'apparecchio premere
POWER.
Nota: la riproduzione di un CD MP3 si
interromperà anche quando:
– premete il pulsante di apertura del CD;
– selezionate come fonte il sintonizzatore
(TUNER);
– il disco ha raggiunto la fine.
Italiano
75
Page 14

C
D
M
O
D
E
P
R
O
G
R
A
M
B
A
N
D
G
I
T
A
L
T
U
N
E
R
O
P
E
N
•
C
L
O
S
E
Riproduzione di un MP3 & CD
Selezionare un brano diverso
A seconda se state ascoltando un MP3 o
un CD Audio, durante la riproduzione
semplicemente usate il pulsante ROTARY
NAVIGATION (o i pulsanti ¡ o ™ del
telecomando, solo per AZ1155) per
selezionare un brano particolare.
– Se avete selezionato un brano nella
posizione di stop o di pausa premere 2;
per iniziare la riproduzione
U
B
M
L
A
-
P
R
E
S
E
T
NAVIGATION
MP3CD
ROTARY
album
title
•
Solo in modalità CD MP3:
Prima premere ALBUM, PRESET + o -
una o più volte per trovare il vostro album.
Poi seguite i seguenti 2 passaggi.
A
U
B
M
L
+
T
E
S
E
R
P
➜ Non si sente alcun suono durante
l'avvolgimento/ riavvolgimento rapido di
un MP3.
➜ Il CD viene riprodotto ad alta velocità e
basso volume.
2 Quando riconoscete il passaggio che volete
lasciate andare l'anello di ROTARY
NAVIGATION.
➜ Ricomincia la normale riproduzione.
Nota: La ricerca non è possibile durante la
riproduzione dei file MP3 messe con bit
variabile.
Modi di lettura diversi:
SHUFFLE e REPEAT
CD MODE consente di selezionare vari
modalità di lettura.Le modalità possono
essere selezionate o cambiate durante la
riproduzione diun intero CD/Programma
CD nella seguente sequenza:
CD MP3 & CD:
1 Ruotate delicatamente l'anello di
ROTARY NAVIGATION in senso
orario o antiorario a ¡ o ™, (o i pulsanti ¡
Italiano
, ™ sul telecomando, solo per AZ1155).
2 Lasciate andare l'anello di ROTARY
NAVIGATION quando raggiungete il
brano desiderato.
Trovare un passaggio
all'interno di un brano
1 Ruotate delicatamente l'anello di
ROTARY NAVIGATION in senso
orario o antiorario a 5 o 6, (o i pulsanti
5 o 6 del telecomando, solo per
AZ1155) e tenere premuto.
76
SHUFFLE – tutti i brani vengono letti in
ordine casuale
SHUFFLE REPEAT ALL – ripete
l’intero CD in ordine casuale
REPEAT – riproduce ripetutamente il
brano corrente
REPEAT ALL – riproduce continuamente
l’intero CD
Page 15

Riproduzione di un MP3 & CD
1 Durante la riproduzione, selezionare la
modalità di lettura premendo una o più
volte CD MODE fino a visualizzare la
modalità di lettura desiderata.
• Le opzioni SHUFFLE/ REPEAT di
lettura possono essere combinate ed usate
con un programma: es. SHUFFLE
REPEAT ALL - ripete l’intero programma
CD in ordine casuale.
2 Per ritornare alla normale riproduzione
premere CD MODE fino a quando le
modalità SHUFFLE/ REPEAT non sono
più visualizzate.
• Si può anche premere 9 per uscire dalla
modalità di riproduzione.
Programmazione dei numeri
di brano
Si possono memorizzare fino a 30 brani nella
sequenza desiderata. Se si desidera,
memorizzare qualsiasi brano più di una volta:
CD:
• Prima usare il ROTARY NAVIGATION
(o i pulsanti ¡ o ™ sul telecomando, solo
per AZ1155) per selezionare un brano
particolare.
2 Quando compare il numero del brano che
avete selezionato premere PROGRAM
una volta per memorizzare il brano.
➜ Il visualizzatore mostra brevemente
program e 'Prog' seguiti dal numero
del brano che avete selezionato.
➜ Se tentate di programmare senza prima
aver selezionato il numero di un brano
compare, no SEL.
3 Ripetere i passaggi 1 e 2 per selezionare e
mettere in memoria tutti i brani desiderati
in questo modo.
➜ FULL è visualizzato se tentate di
programmare più di 30 brani.
4 Per riprodurre il programma premere 2;.
Per rivedere un programma
1 In posizione stop, prima selezionare il
vostro album e i brani come segue:
Solo per CD MP3:
• premere ALBUM, PRESET + o - una o
più volte per trovare l'album.
• Ruotare il ROTARY NAVIGATION in
senso antiorario o orario (o i pulsanti ¡ o
™ del telecomando, solo per AZ1155) per
selezionare un brano particolare.
➜ Visualizzatore: album/ title lampeggia se
non avete fatto la rispettiva selezione.
• Continuate con i seguenti passaggi 2-4.
• In posizione stop, premere e tenere premuto
PROGRAM per più di 2 secondi.
➜ Il visualizzatore mostra tutti i numeri dei
brani memorizzati in sequenza o il titolo
del brano CD MP3 e i numeri dell'album.
➜ Display: visualizza 'no Pr' si non avete
memorizzato qualsiasi brano/titolo.
Cancellazione di un programma
Il contenuto della memoria può essere
cancellato:
– aprendo lo sportello del CD;
– selezionando la sorgente di suono
TUNER source;
– premendo 9 (due volte durante la
riproduzione o una volta nella posizione di
stop.)
77
Italiano
Page 16

Manutenzione
Precauzioni &
Manutenzione Generale
• Poggiare l’apparecchio su una superficie
piana edura,in modo che non si muova.
• Non esporre l’apparecchio, le batterie, o i
CD ad umidità, pioggia, sabbia o calore
eccessivo, generato da apparecchi di
riscaldamento o dai raggi solari diretti.
• Non coprire l'apparecchio. E'necessario
provvedere ad una ventilazione adeguata,
lasciando una distanza minima di 15 cm fra
le prese d'aria e le superfici circostanti, per
evitare la formazione di calore.
• Non oliare né lubrificare le parti
meccaniche dell’apparecchio contenenti
cuscinetti autolubrificanti.
• Per pulire l’apparecchio, usare un panno in
pelle di camoscio, soffice e leggermente
inumidito. Non utilizzare detergenti a base
di alcool, ammoniaca, benzene o abrasivi,
che potrebbero danneggiarne
l’alloggiamento.
Italiano
Lettore di CD MP3 e utilizzo
del CD
• Non toccare mai la lente del lettore di CD!
• Improvvisi cambiamenti di temperatura
circostante possono causare condensa che
appannerebbe la lente del lettore di CD,
che renderà impossibile la riproduzione dei
CD. Non cercare di pulire la lente, ma
trasportare l’apparecchio in un ambiente
caldo, sino a fare evaporare l’umidità.
• Per mantenere lo scomparto del CD libero
da polvere, chiudere sempre lo sportello
del CD. Per pulire e spolverale lo
scomparto con un panno morbido ed
asciutto.
• Per estrarre un CD dalla custodia,
esercitare una pressione sul perno centrale
di questa, sollevando il CD. Prendere
sempre il CD tenendolo dai bordi e riporlo
nella scatola dopo l’uso per evitare graffie
polvere.
• Per pulire il CD, passare su di esso un
panno soffice e non peloso, con un
movimento in linea retta dal centro verso i
bordi. Non usare detergenti, che
potrebbero danneggiare il disco.
78
• Non scrivere mai su di un CD e non
attaccare adesivi su di esso.
Page 17

Individuazione dei Malfunzionamenti
In caso di malfunzionamento, controllare innanzi tutto i punti elencati di seguito,
prima di richiedere la riparazione dell’apparecchio.
Se non si è in grado di risolvere il problema seguendo questi suggerimenti, rivolgersi
al rivenditore o al centro assistenza.
ATTENZIONE: Non aprire l’apparecchio, per non correre il rischio di scosse
elettriche. Non cercare in alcun caso di riparare l’apparecchioda soli, per non
invalidare la garanzia.
Problema Soluzione
Mancanza di suono / – Regolare VOLUME
Mancanza di alimentazione – Conduttore di alimentazione collegato male. Collegare
correttamente il conduttore di alimentazione CA
– Batterie scariche/ inserite male. Inserire correttamente
nuove batterie
Il display non funziona – Scarica elettrostatica
correttamente/ Assenza di Spegnere e tirare la spina dell’apparecchio.
reazione al funzionamento di Ricollegarlo dopo pochi secondi.
qualsiasi comando
Indicazione Err, no Cd – Nessun CD inserito,inserire un CD
o nF dISC – CD graffiato o sporco. Sostituire/ pulire il CD, vedi
Manutenzione
– La lente del laser appannata.
Attendere che la lente si pulisca
– Il CD-(R) è vuoto oppure il disco non è finalizzato.
Usare un CD-(R) finalizzato.
Il CD salta le tracce – CD danneggiato o sporco
Sostituire o pulire il CD
– SHUFFLE o PROGRAM attivo
Spegnere SHUFFLE / PROGRAM
Il suono salta durante la – file MP3 fatti con compressione superiore a 320kbps
riproduzione di un MP3 Usare un livello di compressione più basso perregistrare
brani CD in formato MP3
– CD danneggiato o sporco. Sostituire o pulire il CD
Non si riesce a trovare il – Utilizzata estensione sbagliata del file
brano MP3 desiderato Salvare il file come .MP3
79
Italiano
 Loading...