

Page 1

AZ1037
MP3-CD Soundmachine
Thank you for choosing Philips.
Need help fast?
Read your Quick Start Guide and/or
User Manual first for quick tips
that make using your Philips product
more enjoyable.
If you have read your instructions
and still need assistance,
you may access our online help at
www.philips.com/support
Philips vous remercie de
votre confiance.
Besoin d'une aide
rapide?
Les Guide d'utilisation rapide et Manuel de
l'utilisateur regorgent d'astuces destinées à
simplifier l'utilisation de votre produit Philips.
Toutefois, si vous ne parvenez pas à résoudre
votre probléme, vous pouvez accéder à
notre aide en ligne à l'adresse
www.philips.com/support
Gracias por escoger Philips
Necesita ayuda
inmediata?
Lea primero la Guía de uso rápido o el
Manual del usuario, en donde encontrará
consejos que le ayudarán a disfrutar
plenamente de su producto Philips.
Si después de leerlo aún necesita ayuda,
consulte nuestro servicio de
asistencia en línea en
www.philips.com/support
Page 2
Retournez rapidement votre carte
d’enregistrement de garantie pour profiter
pleinement de votre achat.
L’enregistrement de votre modèle auprès de PHILIPS confirme votre éligibilité à tous les bénéfices
mentionnés ci-dessous. N’oubliez donc pas de remplir votre carte d’enregistrement de garantie et de
nous la retourner le plus tôt possible afin d’assurer :
*Preuve d’achat
Retournez la carte
d’enregistrement ci-incluse
afin de garantir que la date
d’achat de votre produit sera
classée dans nos dossiers et
éviter ainsi le besoin de remplir
d’autres formulaires afin
d’obtenir votre service de
garantie.
*Avis sur la
sécurité des
produits
En enregistrant votre produit,
vous serez avisé - directement
par le fabriquant - de toutes
défectuosités compromettant
la sécurité ou de tout retrait
du produit du marché.
*Bénéfices
additionnels de
l’enregistrement
du produit
L’enregistrement de votre
produit garantit que vous
bénéficierez de tous les
privilèges auxquels vous avez
droit y compris des
offres-rabais spéciales.
Sachez reconnaître ces
symboles de
sécurité
Ce symbole « d’éclair »
s’applique aux matériaux non
isolés présents dans votre
appareil et pouvant causer un
choc électrique. Pour assurer la sécurité
des membres de votre famille, veuillez ne
pas enlever le couvercle de votre produit.
Les « points d’exclamation » ont
pour but d’attirer votre attention
sur des caractéristiques à propos
desquelles vous devez lire soigneusement
la documentation accompagnant l’appareil
afin d’éviter tout problème d’exploitation
ou d’entretien.
AVERTISSEMENT : Afin de réduire les
risques d’incendie ou de choc électrique, ne
pas exposer cet a
ppareil à la pluie ou à l’hu-
midité et les objets r
emplis de liquide,
comme les vases, ne doivent pas être placés
sur le dessus de l’appareil.
ATTENTION : Pour éviter les chocs
électriques, introduire la lame la plus
large de la fiche dans la borne
correspondante de la prise et pousser à
fond.
AVIS
À l’usage du client
Entrez ci-dessous le numéro de série
qui se trouve à la base du boîtier du
dispositif. Conservez ces informations
pour référence ultérieure.
No. de modèle : __________________
No. de série :
____________________
AVIS O
Page 3

AVIS
Symbole d' un appareil de classe II
Ce symbole indique que l'appareil est équipé
d'un système à double isolation.
Nettoyez avec un chiffon
Si la prise SECTEUR ou un coupleur
d'appareil est utilisé comme dispositif de
désaccouplage, le dispositif de
désaccouplage doit rester facilement accessible.
sec uniquement.
9
AVIS O
Page 4

Philips, P.O. Box 671539, Marietta, GA. 30006-0026
GARANTIE LIMITÉE PHILIPS
UN (1) AN
COUVERTURE DE GARANTIE:
La provision pour garanties de PHILIPS se limite aux termes
énumérés ci-dessous.
QUI EST COUVERT?
Philips garantit le produit au premier acheteur ou à la personne
recevant le produit en cadeau contre tout défaut de matière ou
de main d’œuvre conformément à la date d’achat originale («
Période de garantie ») d’un distributeur agréé. Le reçu de vente
original indiquant le nom du produit ainsi que la date d’achat
d’un détaillant agréé est considéré comme une preuve d'achat.
QU'EST-CE QUI EST COUVERT?
La garantie de Philips couvre les nouveaux produits en cas de
défaut et suivant la réception par Philips d’une réclamation
valide dans les limites de la garantie. Philips s’engage, à son
choix, à (1) réparer le produit gratuitement avec des pièces de
rechange neuves ou remises à neuf, ou à (2) échanger le produit pour un produit neuf ou ayant été fabriqué à partir de
pièces neuves ou usagées en bon état et au moins fonctionnellement équivalent ou comparable au produit d’origine dans l’inventaire actuel de Philips, ou à (3) rembourser le prix d’achat
initial du produit.
Philips garantit les produits ou pièces de remplacement prévus
sous cette garantie contre tout défaut de matière ou de main
d’œuvre à partir de la date de remplacement ou de réparation
pour une période de quatre-vingt-dix (90) jours ou pour la portion restante de la garantie du produit d’origine, la plus longue
de ces couvertures étant à retenir. Lorsqu’un produit ou une
pièce est échangée, tout article de rechange devient votre propriété et l’article remplacé devient la propriété de Philips.
Lorsqu’un remboursement est effectué, votre produit devient la
propriété de Philips.
Remarque : tout produit vendu et identifié comme
étant remis à neuf ou rénové porte une garantie limitée
de quatre-vingt-dix (90) jours.
Un produit de remplacement ne pourra être envoyé
que si toutes les exigences de la garantie ont été
respectées. Tout manquement de répondre à toutes les
exigences pourra entraîner un délai.
CE QUI N’EST PAS COUVERT - EXCLUSIONS ET
LIMITATIONS:
Cette garantie limitée ne s’applique qu’aux nouveaux produits
fabriqués par ou pour Philips pouvant être identifiés par la marque de commerce, le nom commercial ou le logo qui y sont
apposés. Cette garantie limitée ne s’applique à aucun produit
matériel ou logiciel non Philips, même si celui-ci est incorporé
au produit ou vendu avec celui-ci. Les fabricants, fournisseurs
ou éditeurs non-Philips peuvent fournir une garantie séparée
pour leurs propres produits intégrés au produit fourni.
Philips ne saurait être tenu responsable de tout dommage ou
perte de programmes, données ou autres informations mis en
mémoire dans tous médias contenus dans le produit ou de tout
produit ou pièce non-Philips non couvert par cette garantie. La
récupération ou réinstallation des programmes, données ou
autres informations n’est pas couverte par cette garantie limitée.
Cette garantie ne s’applique pas (a) aux dommages causés par
un accident, un abus, un mauvais usage, une mauvaise application ou à un produit non-Philips, (b) aux dommages causés par
un service réalisé par quiconque autre que Philips ou qu’un centre de service agréé de Philips, (c) à un produit ou pièce ayant
été modifié sans la permission écrite de Philips, ou (d) si tout
numéro de série de Philips a été supprimé ou défiguré, ou (e) à
un produit, accessoire ou produit non durable vendu « TEL
QUEL » sans garantie de quelque description que ce soit par
l’inclusion de produits remis à neuf Philips vendu « TEL QUEL »
par certains détaillants.
Cette garantie limitée ne couvre pas:
• les frais d'expédition pour le renvoi du produit défectueux à
Philips.
• les frais de main-d'œuvre pour l'installation ou la configuration
du produit, le réglage des commandes sur le produit du client
ainsi que l'installation ou la réparation du système d'antenne
externe au produit.
• la réparation du produit et/ou le remplacement des pièces à
cause d'une mauvaise installation, d'un raccordement à une alimentation électrique incorrecte, d’un emploi abusif, d'une négligence, d’un mauvais usage, d'un accident, d'une réparation non
autorisée ou de toute autre cause non contrôlable par Philips.
• tout dommage ou réclamation pour des produits non
disponibles à l’utilisation ou pour des données perdues ou logiciel perdu.
• tout dommage au produit encouru lors de l’expédition.
• un produit nécessitant une modification ou adaptation afin de
permettre l'utilisation dans tout pays autre que celui pour
lequel il était désigné, fabriqué, approuvé et/ou autorisé ou
toute réparation du produit endommagé par ces modifications.
• un produit utilisé à des fins commerciales ou institutionnelles
(y compris mais non de façon limitative les fins de location).
• un produit perdu lors de l’expédition sans preuve signée de la
réception.
• tout manquement d’exploiter le produit selon le manuel de
l’utilisateur.
POUR OBTENIR DE L’AIDE AUX ÉTATS-UNIS, À
PUERTO RICO OU AUX ÎLES VIERGES
AMÉRICAINES …Communiquez avec le centre de service à
la clientèle de Philips au: 1-888-PHILIPS (1-888-744-5477)
POUR OBTENIR DE L’AIDE AU CANADA…
1-800-661-6162 (pour un service en français)
1-888-PHILIPS (1-888-744-5477) (pour un service en anglais ou
en espagnol)
LA RÉPARATION OU LE REMPLACEMENT
CONFORMÉMENT À CETTE GARANTIE CONSTITUE LE
SEUL REMÈDE POUR LE CONSOMMATEUR. PHILIPS N’EST
AUCUNEMENT RESPONSABLE DE TOUT DOMMAGE
ACCESSOIRE OU INDIRECT RÉSULTANT DE LA VIOLATION DE TOUTE GARANTIE EXPRESSE OU IMPLICITE SUR
CE PRODUIT. SAUF DANS LA MESURE INTERDITE PAR LES
LOIS APPLICABLES, TOUTE GARANTIE IMPLICITE DE
QUALITÉ LOYALE ET MARCHANDE OU D’UTILITÉ PARTICULIÈRE DU PRODUIT EST LIMITÉE DANS LE TEMPS À LA
DURÉE DE CETTE GARANTIE.
Certains états ne reconnaissent pas l'exclusion ou la limitation
de la responsabilité pour dommages indirects ou accessoires,
ou autorisent des limitations sur la durée d’une garantie
implicite, il est donc possible que les limitations ou exclusions
mentionnées ci-dessus soient sans effet dans votre cas.
Cette garantie vous donne des droits légaux spécifiques. Il est possible que vous bénéficiiez de droits supplémentaires variant d'un État/Province à l'autre.
3121 233 48881
Page 5
@
#
3
2
1
4
8
7
$
%
0
!
9
5
6
1
Page 6

2
^
6 x R14 • UM-2 • C-CELLS
Page 7

English Controls
MODE
Supplied Accessories
– AC power cord
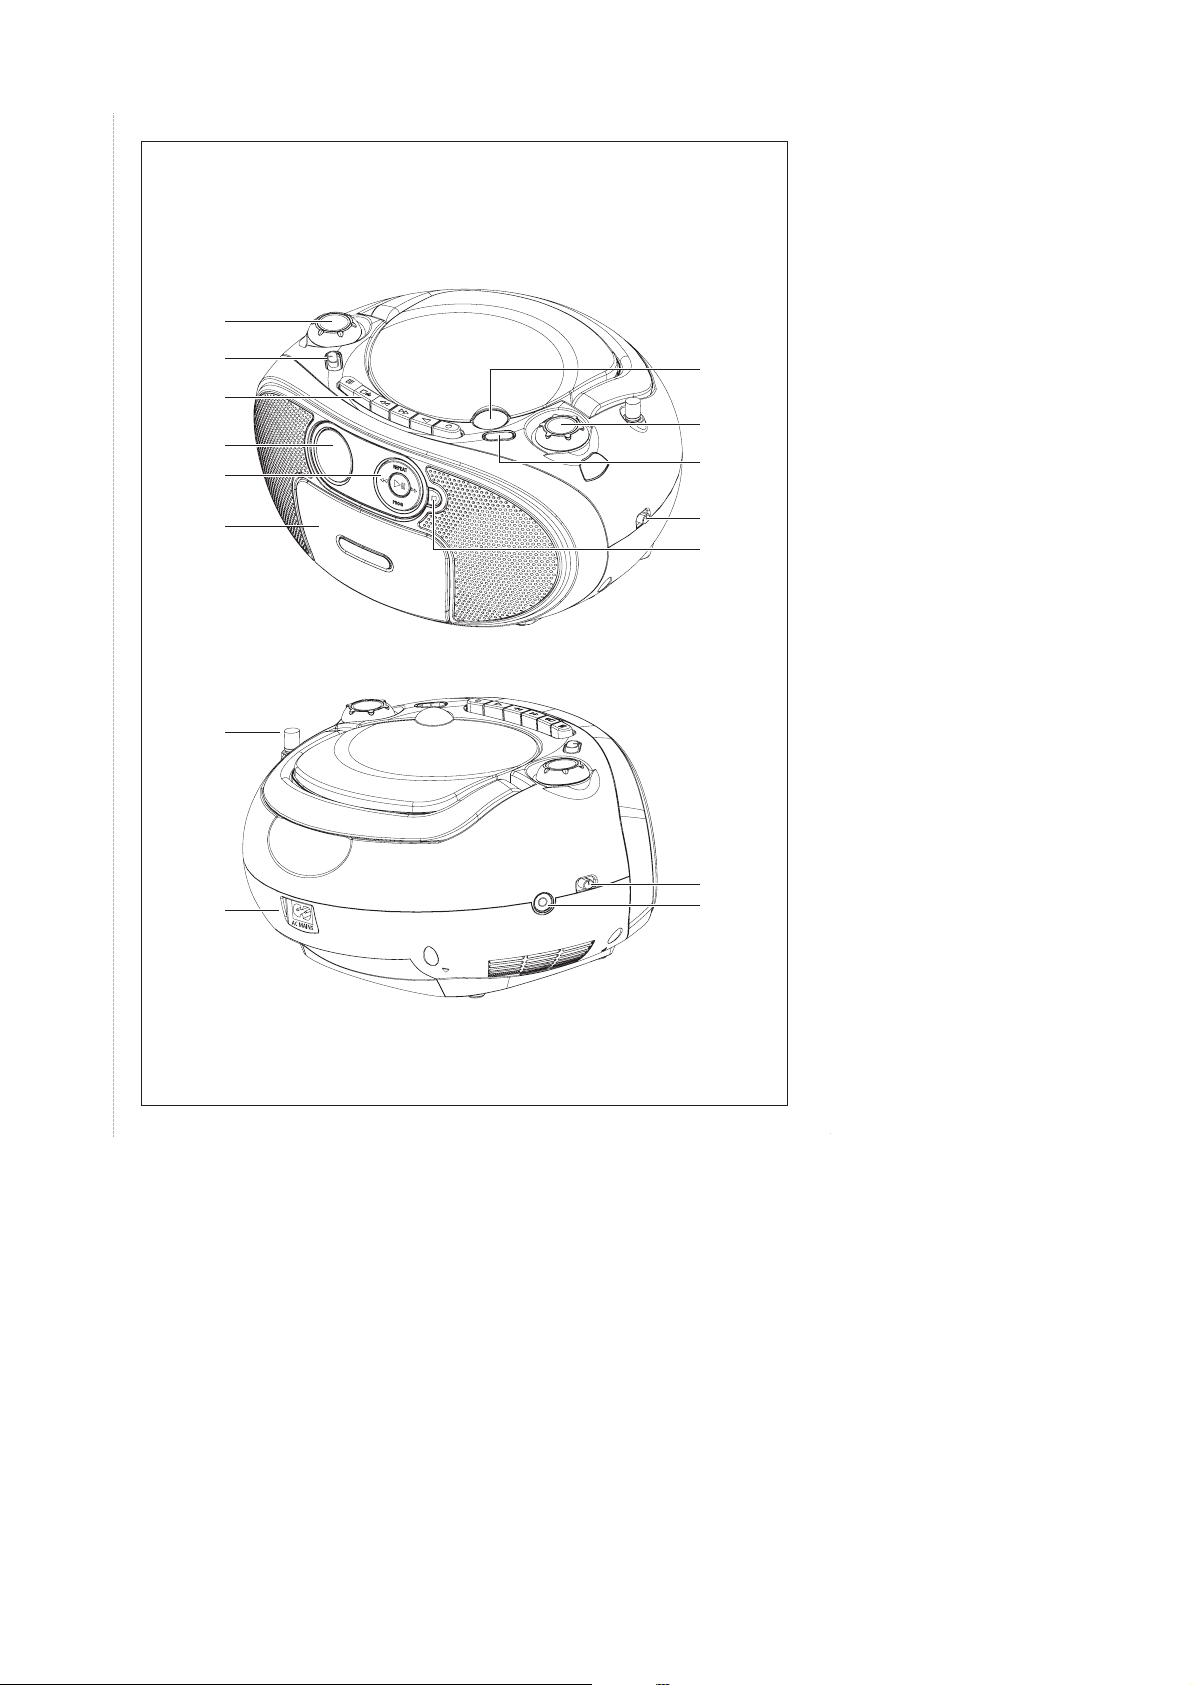
Top and front panels
(see 1)
1
VOLUME–adjusts volume level.
2
Source selector: CD/MP3,TUNER,
TAPE/OFF
–
selects CD/MP3, tape or radio source of
sound
–
power off switch
3
Cassette recorder keys:
PAUSE ;–pauses playback or recording
STOP•OPEN 9
–
stops playback or recording.
–
opens the cassette holder.
F.FWD/REW 5 or 6–fast winds/rewinds
PLAY 1–starts playback
REC 0–starts recording
4 Display – shows disc functions
2;–starts or pauses CD/MP3 playback
5
§, ∞
D/MP3: – fast searches back and forward
C
ALBUM+
MP3 only: selects albums (up)
PROG – programs tracks and reviews the
6 Cassette door
7 LIFT TO OPEN – lift here to open the
TUNING
8
/
the tape
– skips to the beginning of a
current track/ previous/ later
track
program
CD door.
– tunes to radio stations
9
0 BAND –
! 9
@
# AC MAINS~ – inlet for power cord.
$
% p – 3.5 mm stereo headphone socket
^ Battery door – open to insert 6 x 1.5V R-
– selects different play modes: for
example, REPEAT or
SHUFFLE (random order)
selects wavebands (FM or MW)
–
stops CD/MP3 playback;
–
erases a program.
Back panel (see 2)
Telescopic antenna - improves FM
reception.
DBB–turns the bass enhancement on/off.
Helpful hints: The speakers will be muted
when headphones are connected to the set.
14/ UM2/ C-cells.
Page 8

Power Supply
Power supply
Whenever convenient, use the power cord if
you want to conserve battery life. Make sure
you remove the plug from the set and wall
outlet before inserting batteries.
Batteries (not included)
Main set (see 2)
• Insert 6 batteries, type R-14, UM2 or C-
cells (not included, preferably alkaline) with
the correct polarity.
• Incorrect use of batteries can cause
electrolyte leakage and will corrode the
compartment or cause the batteries to
burst:
• Do not mix battery types: e.g. alkaline with
carbon zinc. Only use batteries of the same
type for the set.
• When inserting new batteries, do not try to
mix old batteries with the new ones.
• Remove the batteries if the set is not to be
used for a long time.
Batteries contain chemical substances,
so they should be disposed of properly.
Using AC Mains
1 Check if the mains voltage, as shown on
the type plate located on the
bottom of the set, corresponds to your
local mains supply. If it does not, consult your
dealer or service center.
2 Connect the mains lead to the AC MAINS
~ inlet and the wall socket.The mains lead is
now connected and ready for use.
3 To switch the set off completely, withdraw
the mains lead from the wall socket.
4 Install the unit near the AC outlet and where
the AC power plug can be easily reached.
• Disconnect the mains lead from the wall
socket to protect your set during heavy
thunderstorms.
All markings are located on the bottom
of the set.
Helpful hints:
– To avoid unnecessary energy consumption,
always adjust the Source selector to
TAPE/OFF
that the tape deck keys are released.
after using the set. Also check
CAUTION
- Visible and invisible laser radiation.
If the cover is open,do not look at
the beam.
- High voltage! Do not open.You
run the risk of getting an electric
shock.The machine does not
contain any user-serviceable parts.
- Modification of the product could
result in hazardous radiation of
EMC or other unsafe operation.
Page 9

Basic operation
Switching on and off and selecting
functions
1 To switch on, push the Source selector
slider to CD/MP3, TUNER,or
TAPE/OFF as desired.
2 To switch off, push the Source selector
slider to
TAPE/OFF
and check the cassette
keys are released.
Helpful hints:
– To change from TAPE to TUNER or CD
function, or when you are switching off the set:
first, make sure you press the tape
STOP•OPEN 9
/ key to end playback and
all the cassette keys are released.
Adjusting volume and sound
Adjust the sound with the VOLUME and
DBB controls.
Radio reception
1 Adjust the Source selector to
TUNER
.
2 Adjust BAND to select your desired
waveband, MW or FM.
3 Tu r n TUNING to tune to a station.
To improve radio reception:
• For FM, extend and turn the telescopic
antenna for best reception. Reduce its length
if the signal is too strong.
• For MW, the set uses a built-in antenna.
Direct this antenna for best reception by
turning the whole set.
About MP3
The music compression technology MP3
(MPEG1 Audio Layer 3) significantly reduce
the digital data of an audio CD while
maintaining CD quality sound.
• Getting MP3 files: you can either
download legal music files from the internet
to your computer hard disc, or create such
files by converting audio CD files in your
computer through appropriate encoder
software. (128kbps bit rate or higher is
recommended for MP3 files.)
• Creating a MP3 CD: burn the music files
from your computer hard disc on a CDR or
CDRW using your CD burner.
Helpful hints:
– Make sure that the file names of the MP3
files end with .mp3.
– Total number of music files and albums:
around 350 (with a typical file name length of
20 characters)
– The length of file names affects the number of
tracks for playback.With shorter file names,
more files can be burned on a disc.
Basic Operation/Tuner CD/MP3 player
AVIS
Page 10

CD/MP3 Player
Playing a disc
This player plays Audio Discs including CDR/ CD-RW, and MP3 CD. Do not try to play
a CD-ROM, CD-I, CDV, VCD, DVD or
computer CD.
IMPORTANT!
• For a disc with CD Audio tracks and
MP3 files, only the CD Audio tracks will
be played.
•
This player does not support UDF
format CD.
1 Lift the CD door at LIFT TO OPEN.
Insert a CD with the printed facing up and
press the CD door gently.
2 Push the Source selector slider to
CD/MP3.
➜ Display shows --- and later, the total
number of tracks.
;
3 Press 2
➜Audio CD: current track number appears
MP3: “MP3” is displayed, and display shows
current album and track number in turn.
(See 3)
4 To pause playback, press 2
2;again to resume play.
5 To stop playback, press 9.
Helpful hints:
CD play will also stop when:
– the CD door is opened
– the CD has reached the end
– you select tuner or tape source.
to start playback.
;
(See 4). Press
Selecting a different track
• Press
• In the pause/stop position, press 2
§, ∞
once or repeatedly until the
desired track number appears in the display.
For MP3: first press ALBUM+ once or
more to find your album.
➜ ‘’ALBUM” and current album number flash
briefly. (See 5)
;
to start
playback.
Finding a passage within a
track
1 During playback, press and hold
➜The CD is played at high speed and
reduced volume.
2 When you recognize the passage you want,
release
§ or ∞
to resume normal playback.
§ or ∞
.
Different play modes:
REPEAT and SHUFFLE
(See 6 - 7
REPEAT – plays the current track
continuously
REPEAPT ALL – repeats the entire
disc/program
SHUFFLE – tracks of the entire disc are
played in random order
Note:
– Shuffle play is not available for program
playback.
1 To select play mode, press MODE once or
more.
➜Display shows the selected mode.
;
2 Press 2
position.
3 To return to normal playback, press MODE
repeatedly until the various modes are no
longer displayed.
– You can also press 9 to cancel your play
to start playback. if in the stop
modes.
)
Page 11

CD/MP3 Player
Programming track
numbers
You may store up to 20 tracks (for MP3: 10
tracks) in the desired sequence. If you like,
store any track more than once.
For Audio CD:
1 In the stop position, press PROG to
activate programming.
➜ Display: PROGRAM and P01 flash,
indicating the start of the program. (See 8)
2 Press
3 Press PROG to store the desired track
4 Repeat steps 2 to 3 to select and store all
5 To play your programme, press 2
1 In the stop position, press PROG to
2 If necessary, press ALBUM+ to select
3 Press
4 Press PROG to store the desired track
§or∞
to select your desired track
number.
➜ Display: PROGRAM and your desired
track number flash.
number.
➜ Display: PROGRAM and P02 flash,
indicating the next program location
available.
desired tracks in this way.
➜ ‘’PROGRAM” and --- flash after 20
tracks are stored.
;
.
For MP3:
activate programming.
➜ Display: PROGRAM and P01 flash,
indicating the start of the program.
another album.
➜ Display: ALBUM and selected album
number (See 9)
§or∞
to select your desired track
number.
➜ Display: the selected track number in
current album.
number.
➜ Display: PROGRAM and P02 flash,
indicating the next program location
available.
5 Repeat steps 2 to 4 to select and store all
desired tracks in this way.
➜ ‘’PROGRAM” and --- flash after 10
tracks are stored.
6 To play your programme, press 2
Helpful hints:
–
When playback of
SHUFFLE
keys are void
Reviewing the program
In the stop position, press and hold
PROGRAM to see your store track
numbers.
➜ The stored track numbers are displayed
in the sequence.
MP3 only: ALBUM and an album number
appear, then a stored track number in the
album is displayed.
Helpful hints:
–
Display shows flashing P01 if no track is
programmed.
Erasing the program
You can erase the contents of the memory
by:
– pressing STOP 9 (twice during playback
or once in the stop position);
– selecting
source;
– opening the disc door.
➜ Display: PROGRAM disappears.
PROGRAM
is active, use of the
.
TUNERorTAPE
;
.
or
ALBUM+
sound
Page 12

Cassette Recorder
Cassette playback
1 Push the Source selector slider to TAPE
2 Press
STOP•OPEN 9
/ to open the
cassette holder and insert a cassette and
close the deck.
3 Press
PLAY 1
to start playback.
4 To pause playback press
PAUSE ;
.To
resume, press the key again.
5 To stop the tape, press
STOP•OPEN 9
/.
Fast forwarding/rewinding
1 Press
F.FWD/REW 5 or 6
unti you
reach your desired passage.
2 Press
9
/ to stop fast forwarding/rewinding.
Helpful hints:
– During playback, the keys are automatically
released at the end of a tape and the set is
switched off (unless
PAUSE ;
mode has been
activated.)
– During fast forwarding/rewinding, the keys will
not be released at the end of a tape.To switch
off the set, make sure the cassette keys are
also released.
General information on recording
• Recording is permissible insofar as copyright
or. other rights of third parties are not
infringed.
• For recording, use only NORMAL type
cassettes (IEC type I) on which the tabs have
not yet been broken.This deck is not suited
for recording on CHROME (IEC II) or
METAL (IEC IV) type cassettes.
• The best recording level is set automatically.
Altering the VOLUME or DBB will not
affect the recording.
• To protect a tape from accidental erasure,
break out the tabs. If you wish to record
again, cover the tabs with a piece of adhesive
tape.
Recording from the CD Player
1 Select CD/MP3 source.
2 Insert a CD and if desired, program track
numbers.
3 Press
9
/ to open the cassette holder.
Insert a blank tape and close the deck.
4 Press
REC 0
to start recording.
5 Press
2;
to start CD playback.
6 For brief interruptions press
PAUSE ;
.To
resume recording, press ;again.
7 To stop recording, press
9
/.
Recording from the Radio
1 Select TUNER source.
2 Tune to the desired radio station (see
Radio reception).
3 Follows steps 3, 4, 6,7 under Recording
from the CD Player.
The making of unauthorized copies of
copy-protected material, including
computer programmes, files,
broadcasts and sound recordings, may
be an infringement of copyrights and
constitute a criminal offence.This
equipment should not be used for such
purposes.
AVIS
Page 13

Maintenance & safety (see 0)
CD player and CD handling
• If the CD player cannot read CDs correctly,
use a cleaning CD to clean the lens before
taking the set to repair.
• The lens of the CD player should never be
touched!
• Sudden changes in the surrounding
temperature can cause condensation on the
lens of your CD player. Playing a CD is then
not possible. Do not attempt to clean the
lens but leave the set in a warm
environment until the moisture evaporates.
• Always close the CD-tape door to avoid
dust on the lens.
• To clean the CD, wipe in a straight line from
the center towards the edge using a soft, lintfree cloth. Do not use cleaning agents as
they may damage the disc.
• Never write on a CD or attach any stickers
to it.
Tape deck maintenance
To ensure quality recording and playback of
the tape deck, clean parts A, B and C as
shown, once a month. Use a cotton bud
slightly moistened with alcohol or a special
head cleaning fluid to clean the deck.
9
1 Open the cassette holder by pressing
2 Press 1 and clean the roller C.
;
3 Press
4 After cleaning, press
and clean the heads A, and the
capstan B.
9
/.
➜ Cleaning of the heads can also be done
by playing a cleaning cassette through once.
/.
Safety information
• Place the set on a flat, hard and stable
surface so that the system does not tilt.
• Do not expose the set, batteries, CDs to
humidity, rain, sand or excessive heat caused
by heating equipment or direct sunlight.
• The apparatus shall not be exposed to
dripping or splashing.
• Adequate ventilation with a minimum gap of
15cm (6 inches) between the ventilation
holes and surrounding surfaces is necessary
to prevent heat build-up.
• Do not cover the ventilation openings with
items such as newspapers, table-cloths,
curtains, etc.
• No objects filled with liquids, such as vases,
shall be placed on the apparatus.
• No naked flame sources, such as lighted
candles, should be placed on the apparatus.
• The mechanical par ts of the set contain selflubricating bearings and must not be oiled or
lubricated.
• To clean the set, use a dry cloth. Do not use
any cleaning agents containing alcohol,
ammonia, benzene or abrasives as these may
harm the housing.
Page 14

Problem
– Possible cause
• Remedy
No sound /power
– Volume not adjusted
• Adjust the VOLUME
– Power cord not securely connected
• Connect the AC power cord properly
– Batteries dead/ incorrectly inserted
• Insert (fresh) batteries correctly
– Headphones connected to the set
•
Disconnect headphones
– CD contains non-audio files
• Press
∞ , §
once or more to skip to a CD
audio track, instead of the data file.
Display does not function properly/ No
reaction to operation of any of the
controls
– Electrostatic discharge
• Switch off and unplug the set. Reconnect after a
few seconds
Severe radio hum or noise
– Electrical interference: set too close to TV, VCR or
computer
• Increase the distance
Poor radio reception
– Weak radio signal
• FM:Adjust the FM telescopic aerial
no indication
– No disc inserted
•
Insert asuitable disc
– CD badly scratched or dirty
•
Replace/ clean CD, see Maintenance & Safety
– Laser lens steamed up
• Wait until lens has cleared
– CD-R/CD-RW is blank or not finalized
•
Use a finalized CD-R or CD-RW only
Note:
Make sure the CD is not encoded with
Copyright protection technologies, as some
do not conform to the Compact Disc
standard.
The CD skips tracks
– CD damaged or dirty
• Replace or clean CD
– PROGRAM/ SHUFFLE is active
• Quit PROGRAM/ SHUFFLE mode
Note:
For a disc with CD Audio tracks and MP3
files, only the CD Audio tracks will be
played.
The MP3-CD skips albums
–
CD contains non-MP3 file folders
• Check your disc contains suitable file folders.
Poor cassette sound quality
– Dust and dirt on the heads, etc.
• Clean deck parts, see Maintenance
– Use of incompatible cassette types (METAL or
CHROME)
• Only use NORMAL (IEC
I
) for recording
Recording does not work
– Cassette tab(s) may be broken
• Apply adhesive tape over the missing tab space
Troubleshooting
If a fault occurs, first check the points listed below before taking the set for repair.
If you are unable to remedy a problem by following these hints, consult your dealer or service centre.
WARNING: Do not open the set as there is a risk of electric shock. Under no
circumstances should you try to repair the set yourself, as this will
invalidate the guarantee.
Page 15

Printed in China PDCC-JH-0717
W
CLASS 1
LASER PRODUCT
AZ1037
English
Français Español
PHILIPS CONSUMER ELECTRONICS COMPANY
Marietta, GA 30006-0026, U.S.A.
Meet Philips at the Internet
http://www.philips.com
 Loading...