

Page 1
Portable CD Player
AX321IAX3212,AX32T3,AX32T4,AX3215
AX32 7 6, AX32 7 7, AX32 7 8, AX32 7 9, AX3220
AX3221AX3222, AX3223, AX3224, AX3225
Read this manual first!
If you have any problems, do not attempt
to return this product to the store.
For fast help, call us first!
1-800-531-0039
Audio
314011529681
Lef¿ mh IdsM'
PHILIPS
PHILIPS CONSUMER ELECTRONICS NORTH AMERICA
Knoxville, Tennessee 37914-1810, U.S.A.
Page 2
Page 3
QUICK START
MISE EN SERVICE RAPIDE
ENCENDIDO RAPIDO
CD
O
•I ii
H VI ®
Page 4

IMPORTANT SAFETY INSTRUCTIONS
1. Read these instructions.
2. Keep these instructions.
3. Heed ail warnings.
4. Follow all instructions.
5. Do not use this apparatus near water.
6. Clean only with a dry cloth.
7. Do not block any of the ventilation openings. Install in
accordance with the manufacturers instructions.
8. Do not install near any heat sources such as radiators, heat regis
ters, stoves, or other apparatus (including amplifiers) that produce heat.
9. Only use attachments/accessories specified by the manufacturer.
IOl — Use only with a cart, stand, tripod, bracket, or table
specified by the manufacturer or sold with the apparatus.
When a cart is used, use caution when moving the
cart/apparatus combination to avoid injury from tip-over.
11. Refer all servicing to qualified service personnel. Servicing is
required when the apparatus has been damaged in any way, such as if
the power-supply cord or plug is damaged, liquid has been spilled or
objects have fallen into the apparatus, or when the apparatus has been
exposed to rain or moisture, does not operate normally, or has been
dropped.
12. Battery usage CAUTION -To prevent battery leakage which
may result in bodily injury, property damage or damage to the unit:
• Install ALL batteries correctly, + and - as marked on the unit.
• Do not mix batteries (OLD and NEW or CARBON and
ALKALINE, etc).
• Remove batteries when the unit is not used for a long time.
EL 6474-E004:02/8
Page 5

Return your Warranty Registration card today to
ensure you receive all the benefits you're entitled to.
Once your Philips purchase is regis
tered, you 're eligible to receive ail the
privileges of owning a Philips product.
^Warranty i
Verification
'.Registering your product
' wjiWCi' iWajff .qpOrins «,
your right to maximum
1. protection under the
tepms andACon^itiops of
your Philips warranty. .
Know these
symbols
So complete and return the Warranty
Registration Card enclosed with your
purchase at once, and take advantage
of these important benefits.
Owner I
Confirrn^tion
Your completed ^
Warranty Registration
Card sprves as verifica
tion of ownership Jn thp„
event of product theft „
or loss.
For Customer Use
Enter below the Serial No. which is
located on the rear of the cabinet. Retain
this information for future reference.
Model I
Registration
Returning your Warranty
avjfa^ guarantees you^lf /
receive ¿all the Infpf^ijiation
and special offers wlijch
you qualify for as the ^ ^
owner of your model, ^ 4
RISK OF ELECTRIC SHOCK
A
CAUTION: TO REDUCE THE RISK OF ELECTRIC SHOCK, DO NOT
REMOVE COVER (OR BACK). NO USER-SERVICEABLE PARTS
INSIDE. REFER SERVICING TO QUAUFIED SERVICE PERSONNEL.
This "bolt of lightning"
A
within your unit may cause an
electrical shock. For the safety of
everyone In your household, please
do not remove product covering.
A
you should read the enclosed litera
ture closely to prevent operating and
maintenance problems.
indicates uninsulated material
The "exclamation point" calls
attention to features for which
DO NOT OPEN
A
Model No.
Serial No.
WARNING: to prevent fire
OR SHOCK HAZARD, DO NOT
EXPOSE THIS EQUIPMENT TO RAIN
OR MOISTURE.
CAUTION: To prevent electric
shock, match wide blade of plug to
wide slot, and fully insert.
MAC5097
Page 6

LIMITED WARRANTY
PORTABLE COMPACT DISC
One Year Free Exchange
This product must be carried in for an exchange.
WHO IS COVERED?
You must have proof of purchase to exchange the product. A sales receipt or other doc
ument showing that you purchased the product is considered proof of purchase. Attach it
to this owner's manual and keep both nearby.
WHAT IS COVERED?
Warranty coverage begins the day you buy your product. For one year thereafter, a
defective or inoperative product will be replaced with a new, renewed or comparable
product at no charge to you. A replacement product is covered only for the original war
ranty period. When the warranty on the original product expires, the warranty on the
replacement product also expires.
WHAT IS EXCLUDED?
Your warranty does not cover:
• labor charges for installation or setup of the product, adjustment of customer controls
on the product, and installation or repair of antenna systems outside of the product.
• product repair and/or part replacement because of misuse, accident, unauthorized repair
or other cause not within the control of Philips.
• reception problems caused by signal conditions or cable or antenna systems outside
the unit.
• a product that requires modification or adaptation to enable it to operate in any coun
try other than the country for which it was designed, manufactured, approved and/or
authorized, or repair of products damaged by these modifications.
• incidental or consequential damages resulting from the product. (Some states do not
allow the exclusion of incidental or consequential damages, so the above exclusion may
not apply to you. This includes, but is not limited to, prerecorded material, whether
hat is used for commercial or institutional purposes
EXCHANGE AVAILABLE?
lange the product in all countries where the product is officially distributed
iountries where Philips does not distribute the product, the local Philips
ization will attempt to provide a replacement product (although there may
he appropriate product is not readily available).
Philips, P.O. Box 520890, Miami,
FL 33152, USA, (402) 536-4171
Page 7

BEFORE REQUESTING EXCHANGE...
Please check your owner's manual for assistance. If you have additional questions, call us
at 1-800-531-0039.
EXCHANGING A PRODUCT IN U.S.A.,
PUERTO RICO, OR U.S.VIRGIN ISLANDS...
Contact 1-800-531-0039 to arrange an exchange. Or, ship the product, insured and
freight prepaid, and with proof of purchase enclosed, to the address listed below.
Philips Exchange Program
Suite A
406 North Irish Street
Greeneville TN 37745
(In U.S.A., Puerto Rico, and U.S.Virgin Islands, all implied warranties, including implied war
ranties of merchantability and fitness for a particular purpose, are limited in duration to
the duration of this express warranty. But, because some states do not allow limitations
on how long an implied warranty may last, this limitation may not apply to you.)
EXCHANGING A PRODUCT IN CANADA...
Please contact Philips at:
1-800-661-6162 (French Speaking)
1-800-531-0039 (English or Spanish Speaking)
(In Canada, this warranty is given in lieu of all other warranties. No other warranties are
expressed or implied, including any implied warranties of merchantability or fitness for a
particular purpose. Philips is not liable under any circumstances for any direct, indirect,
special, incidental or consequential damages, howsoever incurred, even if notified of the
possibility of such damages.)
REMEMBER...
Please record below the model and serial numbers found on the product. Also, please fill
out and mail your warranty registration card promptly. It will be easier for us to notify
you if necessary.
MODEL#
SERIAL#
EL4967E007 / 8-02
Page 8

BELT CLIP
English (supplied or optionally available)
CLIP CEINTURE CINTURÓN DE CIERRE
LOCK
1 To attach the belt clip to the CD player, position the shaped grip (found on the back of
the belt grip) so that it fits into the belt clip hole of the CD player. Turn the clip to
LOCK as indicated on the CD player.
2 To detach, gently lift the belt clip and turn to RELEASE as indicated on the CD player.
Français (fourni ou en option)
1 Pour fixer le clip ceinture, placez l'attache (située sur le dos du clip) dans le trou prévu
à cet effet sur l'appareil. Tournez l'attachejusqu'à LOCK, comme indiqué sur l'appareil.
2 Pour enlever l'attache, soulevez-la doucement et tournez-la jusqu'à RELEASE.
Español (suministrado o disponible de forma opcional)
1 Para ponerse el cinturón, encaje el broche (en la parte posterior del cinturón) en el orificio
del cinturón de cierre. Gire el cierre hasta LOCK tal y como se indica.
2 Para quitárselo, levante con cuidado el cinturón y gire hasta RELEASE tal y como se indica.
Page 9

El aparato cumple las t]ormas FCC, Pane 15y 21 CFR1M0..W^^^
dependiente de dos condiciones siguientes:
1. Este aparato.no puede provocar interferencia dañina, y
2:¡Este aparato debe aceptar cualquier interferencia recibida; incluyendo^^b^^^^
i interferencias que pueden provocar un funcionamiento insufíciente:
CAUTION
Use of controls or adjuspnents or performance of procedure other than
herein may result in hazardous radiation exposure or other unsafe
operation.
L'appareilrépond aux normes FCC, Part15et 21 CFR 1040.10. Fonctionnement
soumis aux deux conditions suivantes :
1. Cet appareil ne doit pas provoquer d'interférences nuisibles, et
2Æet appareil doit accepter toute interférence reçue, y compris les
i /nierférenœs süscepf^^^^ un fonctlonement peu satisfaisant.
The set complies vvitii U\e FGG-Rules. Part15 and with 21 CFR 1040.10.
OperationTs subject to the foiiowing two conditions:
1. This device may not cause harmful interference, and
2: This device mustaccept anyinterferencereceived, including interference
that may cause undesired operation.
Canada
English: This digital apparatus does not exceed the Class B limits for radio noise
emissions from digital apparatus as set out in the Radio Interference Regulations
of the Canadian Department of Communications.
Français : Cet appareil numérique n'émet pas de bruits radioélectriques dépas
sant les limites applicables aux appareils numériques de Classe B prescrites dans
le Règlement sur le Brouillage Radioélectrique édicté par le Ministère des
Communications du Canada.
ATTENTION
L'utilisation de commandes ou de réglages ou l'exécution de procédures
autres que celles décrites dans le préserdmanuql risque
rferdratneruneexposhion àmrayonnerrientrlar^ermtxouti'ayoirtTmdres.
conséquences sur la sécurité
PRECAUCIÓN .
ta utilización de controles o ajirstes y la realización de procedimieaUrs
distintos de los conteniríos en este manual pueden provocar la
exposición a radiaciones peligrosas y a otros peligros.
Page 10

CONTROLS/ POWER SUPPLY
POWER SUPPLY / GENERAL INFORMATION
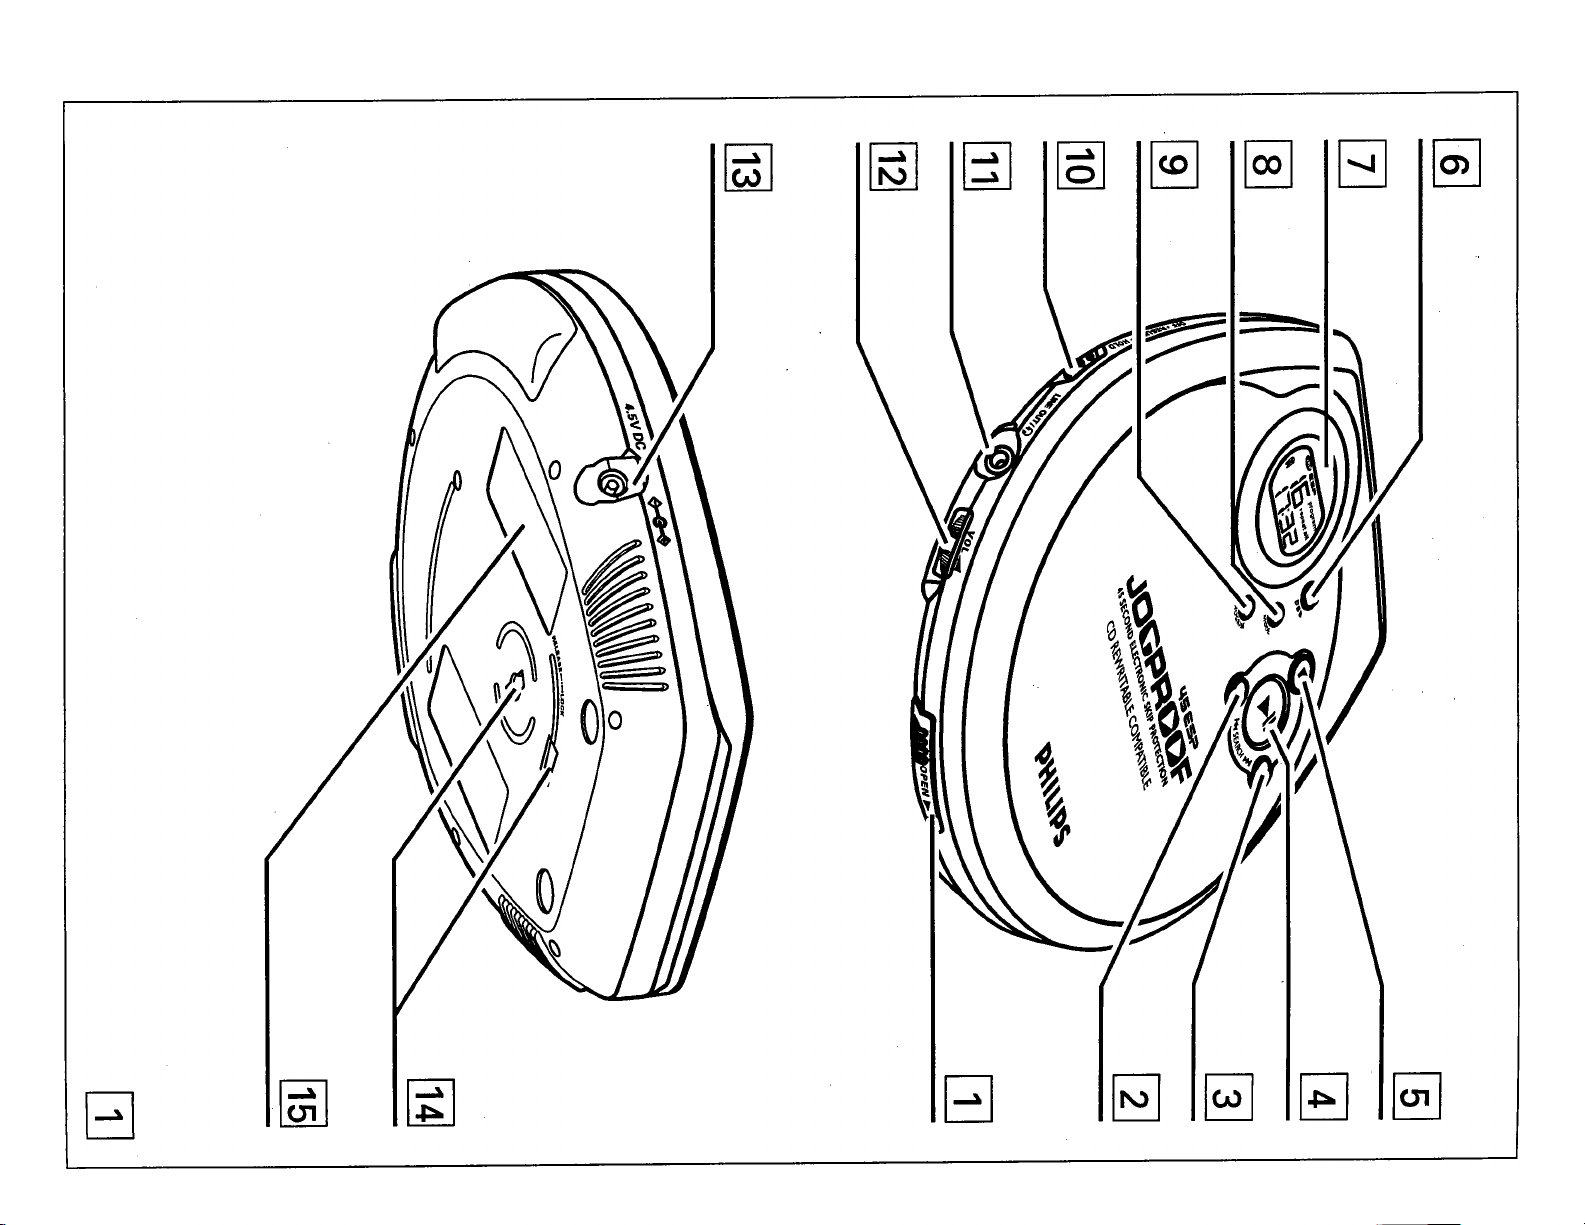
CONTROLS (seefigure[T] )
Q] OPEN ►
[|] ►H
[4] HI
d] ■
d] DBB
[7]
d] MODE
d] PROGRAM
[igl RESUME.....................stores the last position of a CD track played
[ij] LINE OUT/ii................3.5 mm headphone jack and LINE OUTJack to connect the
Oil VOL .............................adjusts the volume
Ui 4.5V DC
Uil
[i5|
......................
..............................skips and searches CD tracks backwards
................................
.................................
...................................
..............................
.......................................
...........................
HOLD
.......................
OFF
...........................
.......................................
......................................
opens the CD lid
skips and searches CD tracks forwards
switches the player on, starts or pauses CD play
stops CD play, clears a program or switches the player off
switches the bass enhancement on and off. This button also
switches acoustic feedback (the beep) on/off when it is
pressed for more than 2 seconds
display
selects the different playing possibilities: shuffle,
shuffle repeat ail, repeat, repeat all and SCRÌI
..................
programs tracks and reviews the program
locks all buttons
switches RESUME and HOLD off
player to another audio input of an additional appliance,
remote control (not on all versions)
..................
jack for external power supply
belt clip holder
type plate
Mains adapter (supplied or optionally available)
Use only the AY 3170 adapter (4.5 V / 300 mA direct
current, positive pole to the center pin). Any other product
may damage the player.
1 Make sure the local voltage corresponds to the power
adapter's voltage.
2 Connect the power adapter to the 4.5V DC jack of the
player and to the wall outlet.
Note: Always disconnect the adapter when you are not using it
Environihei№l information
• All redundant packing material has been omitted. We have done our utmost to
make the packaging easily separable into two materials: cardboard (box) and
polyethylene (bags, protective foam sheet).
• Your set consists of materials which can be recycled if disassembled by a
specialized company. Please observe the local regulations regarding the
disposal of packing materials, dead batteries and old equipment.
Batteries (supplied or optionally available)
You can use the following batteries with this CD-player:
• normal batteries type LR6, UM3 or AA (preferably Philips), or
• alkaline batteries type LR6, UM3 or AA (preferably Philips).
Notes:- Old and new or different types of batteries should not be combined.
- Remove batteries if they are empty or if the player is not going to be used for
a long time.
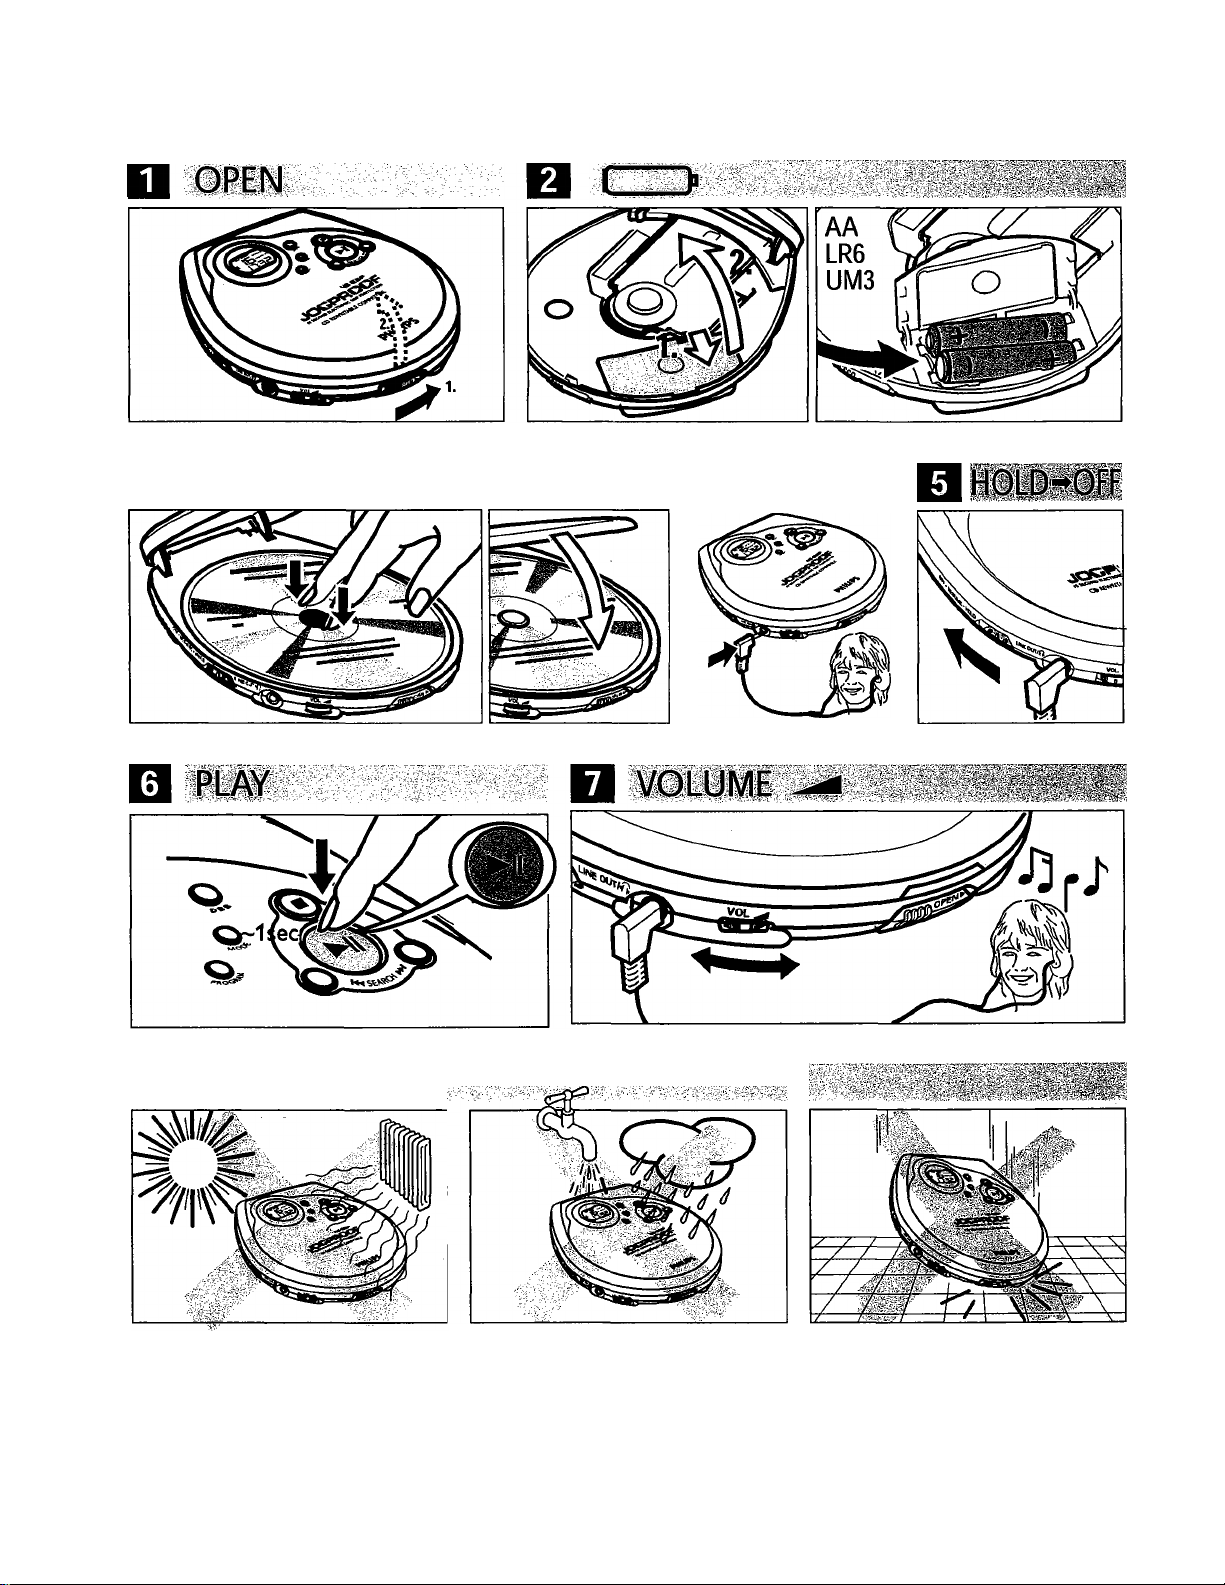
Inserting batteries
1 Push OPEN ► to open the CD lid.
2 Open the battery compartment and insert either 2
normal or alkaline batteries.
Battery indication
The approximate power level of your batteries is shown
in the display.
il Battery full
Battery two-thirds full
Q Battery one-third full
Q Battery dead or empty. When the batteries are dead or empty, the symbol
f] flashes, bRtt is displayed, and the beep tone sounds repeatedly.
Average playing time of batteries under normal conditions
Battery type______________________________________ESP on
Normal
Alkaline
5 hours
16 hours
___________
Power Save
6 hours
20 hours
Batteries contain chemical substances, so they should be disposed
of properly.
CD player and CD handling
• Do not touch the lens (a) of the CD player.
• Do not expose the unit, batteries or CDs to humidity,
rain, sand or excessive heat (caused by heating
equipment or direct sunlight).
• You can clean the CD player with a soft, slightly
dampened, lint-free cloth. Do not use any cleaning
agents as they may have a corrosive effect.
• To clean the CD, wipe it in a straight line from the
center toward the edge using a soft, lint-free cloth. A cleaning agent may
damage the disc! Never write on a CD or attach a sticker to it.
• The lens may cloud over when the unit is moved suddenly from cold to warm
surroundings. Playing a CD is not possible then. Leave the CD player in a warm
environment until the moisture has evaporated.
• Active mobile phones in the vicinity of the CD player may cause malfunctions.
• Avoid dropping the unit as this may cause damage.
Headphones
• Connect the supplied headphones to the LINE OUT/0
jack of the player.
Note: LINE OUT/Ti can also be used for
connecting this set to your HiFi system. To ar^ust the
sound and volume, use the controls on the connected
audio equipment and on the CD player.
IMPORTANT!
Hearing safety: Do not play your headphones at a high volume. Hearing experts
advise that continuous use at high volume can permanently damage your hearing.
Traffic safety: Do not use headphones while driving a vehicle. It may create a
hazard and it is illegal in many countries. Even if your headphones are an open-air
type designed to let you hear outside sounds, do not turn up the volume so high
that you cannot hear what is going on around you.
Page 11

GENERAL INFORMATION / CD PLAY
CD PLAY/FEATURES
l№car use (connections supplied or optionally available)
Only use the AY 3545 (4822 21910033) or AY 3548 (3140118 71890) car voltage
converter (4.5 V DC, positive pole to the center pin) and the AY 3501 cassette car
adapter. Any other product may damage the set.
Put the set on a horizontal, vibration-free and
1
stable surface. Make sure it is in a safe place,
where the set is neither a danger nor an
obstacle to the driver and the passengers.
2 Plug the voltage converter into the
cigarette lighter jack (only for 12 Vcar
battery, negative grounding), then connect
the wired end with 4.5V DC inputjack on the
set.
3 If necessary, clean the cigarette lighterjack to obtain a good eiectrical con
tact.
4 Turn down the volume and connect the cassette adapter plug to LINE OUT/ii
on the set.
5 Carefully insert the cassette adapter into the car radio’s cassette compartment.
6 Make sure the cord does not hinder your driving.
7 Decrease the volume on the set if necessary. Start playback on the set and
adjust the sound with the car radio controls.
• Always remove the voltage converter from the cigarette lighter jack-
when the set is not in use.
Note: If your car radio has a LINE INjack, it is better to use it for the
car radio connection instead of the cassette.adapter. Connect the signal
lead to this LINE IN jack and to LINE OUT/rj on the set.
Playback information
• If a CD-Recordable (CD-R) or a CD-Rewritable (CD-R\W) is not recorded
properly, nF d ISC \s displayed, indicating that the CD has not been
hnalized. In that case, use FINALIZE on your CD recorder to complete the
recording.
• When playing a CD-Rewritable (CD-RW), please note that it takes 3-15
seconds after pressing ►ll for sound reproduction to start.
• Playback will stop if you open the CD lid.
• While the CD is read, ' - - flashes in the display.
Volume and bass
Volume adjustment
• Adjust the volume by using VOL.
Bass adjustment
• Press DBB to switch the bass enhancement on or
off
—¡s shown if the bass enhancement is
activated.
Remote control (supplied or optionally, available)
Use the AY 3768 cord remote control.The buttons on the remote
control have the same functions as the corresponding buttons on the set.
1 Press ■ twice to switch off the set.
2 Firmly connect the remote control to LINE OUT/iT on the set.
3 Adjust the volume VOL on the CD player and remote control.
Playing a CD
This CD-player can play all kinds of Audio Discs such
as CD-Recordables and CD-Rewritables. Do not try to
play a CD-ROM, CDi, VCD, DVD or computer CD.
1 Push the OPEN ► slider to open the player.
2 Insert an audio CD, printed side up, by pressing the
CD onto the hub.
3 Close the player by pressing the lid down.
4 Press ►!! to switch the player on and start playback.
-►The current track number and elapsed playing
time are displayed.
• You can pause playback by pressing ►ll.
—►The time at which playback was paused starts
flashing.
• You can continue playback by pressing ►!! again.
5 Press ■ to stop playback.
—►The total number of tracks and the total playing
time of the CD are displayed.
6 Press ■ again to switch the player off.
• To remove the CD, hold it by its edge and press the
hub gently while lifting the CD.
Selecting a track and searching
Selecting a track during playback
• Briefly press or once or several times to skip to
the current, previous or next track.
—►Playback continues with the selected track, and
the track's number Is displayed.
Selecting a track when playback is stopped
1 Briefly press or once or several times to select the desired track. The
track number is displayed.
2 Press ►!! to start CD play.
—►Playback starts with the selected track.
Searching for a passage during playback
1 Keep 1« or pressed to find a particular passage in
a backward or forward direction.
—►Searching starts while playback continues at low
volume. After 2 seconds the search speeds up.
2 Release the button when you reach the desired passage.
—►Playback continues from this position.
Notes: - If the player is in SCAN mode (see MODE chapter), searching is not
possible.
- In shuffle, shuffle repeat all or repeat mode (see MODE chapter), or
while playing a program, searching is only possible within the
particular track.
Note: If there is no activity, the set will automatically
switch off after a while to save energy.
Page 12

FE/VTÜRES
FEATURES / TROUBLESHOOTING
Programming track numbers
You can store up to 30 tracks to play in a program.
A single track may be stored more than once in the
program.
1 While playback is stopped, select a track with
w^or^w.
2 Press PROGRAM to store the track.
-^program lights up; the track number
programmed and P with the totai number of
stored tracks are displayed.
3 Select and store all desired tracks in this way.
4 Press Ml to start playback of your selected tracks.
-^■program is shown and playback starts.
• You can review the program by pressing PROGRAM
for more than 2 seconds.
—►The display shows all the stored tracks in
sequence.
Notes: - If you press PROGRAM and there is no track selected, SEi is
displayed.
- If you try to store more than 30 tracks, FULL is displayed.
Clearing the program
• Whiie playback is stopped, press ■ to clear program.
—►l L r is displayed once, program goes off,
and the program is cieared.
Note: The program will also be cleared if the power
supply is interrupted, or if the CD-player lid is
opened, or if the set switches off automatically.
RESUME àhd HOLD
You can lock the buttons of the set by switching the slider to HOLD. Now, when a
key is pressed, no action will be executed. This is of use, for example, when
transporting the piayer in a bag. With HOLD activated, you can avoid accidental
activation of other functions.
1 Switch the slider to HOLD to activate HOLD.
—►All buttons are locked. HoL d is shown when
you press any button. If the set is switched off,
hold will be shown only when ►II is pressed.
2 To deactivate HOLD, switch the slider to OFF.
Note: If you deactivate HOLD by switching the slider to RESUME,
you win be activating the RESUME function.
It IS possible to play tracks in random order, to repeat a
single track or the entire CD, and to play the first few
seconds of each track.
1 Press MODE during playback as often as required in
order to activate one of the following 'modes'. The
active mode is shown in the display.
shuffle: All tracks of the CD are played in
random order until all of them have been played once.
—^shuffle repeat all: All tracks of the CD
are played repeatedly in random order.
—>■ repeat ;The current track is played repeatedly.
—>~repeat aff; The entire CD is played repeatedly.
—► SCR Pi-. The first 10 seconds of each of the
remaining tracks are played in sequence.
2 Playback starts in the chosen mode after 2 seconds.
• To return to normal playback, press MODE repeatedly until the display shows
no active modes.
ESP / Power Save Mode
With a conventional portable CD-player you might have experienced that the
music stopped e.g. when you were jogging. The ELECTRONIC SKIP PROTECTION
prevents loss of sound caused by light vibrations and shocks. Continuous playback
is ensured. However ESP does not prevent playback interruptions during vigorous
running. It also does not protect the unit against ariy damage caused by droppingl
On this set ESP is default on. It is possible to set ESP off and enter the Power
Save mode. The Power Save mode helps to extend battery
lifetime for longer playback.
• Press MODE for more than 2 seconds.
—disappears, power save modeis now activated.
• Press MODE again for more than 2 seconds.
—►ssR is displayed once
ESP on Power Save '^ESP on
Troubleshooting
WARNING: Under no circumstances should you try to repair the set yourself as
this will invalidate the warranty. If a fault occurs, first check the points listed,
before taking the unit for repair. If you are unable to solve a problem by following
these hints, consult your dealer or service center.
The CD player has no power, or playback does not start
• Check that your batteries are not dead or empty, that they are inserted
correctly, that the contact pins are clean.
Your adapter connection may be loose. Connect it securely.
For in-car use, check that the car ignition is on. Also check player's batteries.
The indication /) о d >5C is displayed
Check that the CD is clean and correctly inserted (label-side upward).
If your lens has steamed up, wait a few minutes for this to clear.
The indication nF d < SC is displayed
CD-RW (CD-R) was not recorded properly. Use FINALIZE on your CD-recorder.
The indication нош is on and/or there is no reaction to controls
If HOLD is activated, then deactivate it.
Electrostatic discharge. Disconnect power or remove batteries for a few seconds.
The CD skips tracks
The CD is damaged or dirty. Replace or clean the CD.
RESUME, SHUFFLE or PROGRAM is active. Switch off whichever is on.
No sound or bad sound quality.
PAUSE might be active. Press ►!!.
Loose, wrong or dirty connections. Check and clean connections.
Volume might not be appropriately adjusted. Adjust the volume.
Strong magnetic fields. Check player's position and connections. Also keep
away from active mobile phones.
For in-car use, check that the cassette adapter is inserted correctly, that the car
cassette player's playback direction is correct (press autoreverse to change),
and that the cigarette lighter Jack is clean. Allow time for temperature change.
Page 13

Page 14

English
Français
Español
Meet Philips at the Internet
http://www.philipsusa.com
3140 115 2968.1
 Loading...