

PHILIPS AWH1620/51(30YC), AWH1621/51(50YC), AWH1622/51(80YC), AWH1623/51(100YC) User guide [en, ru]
Page 1
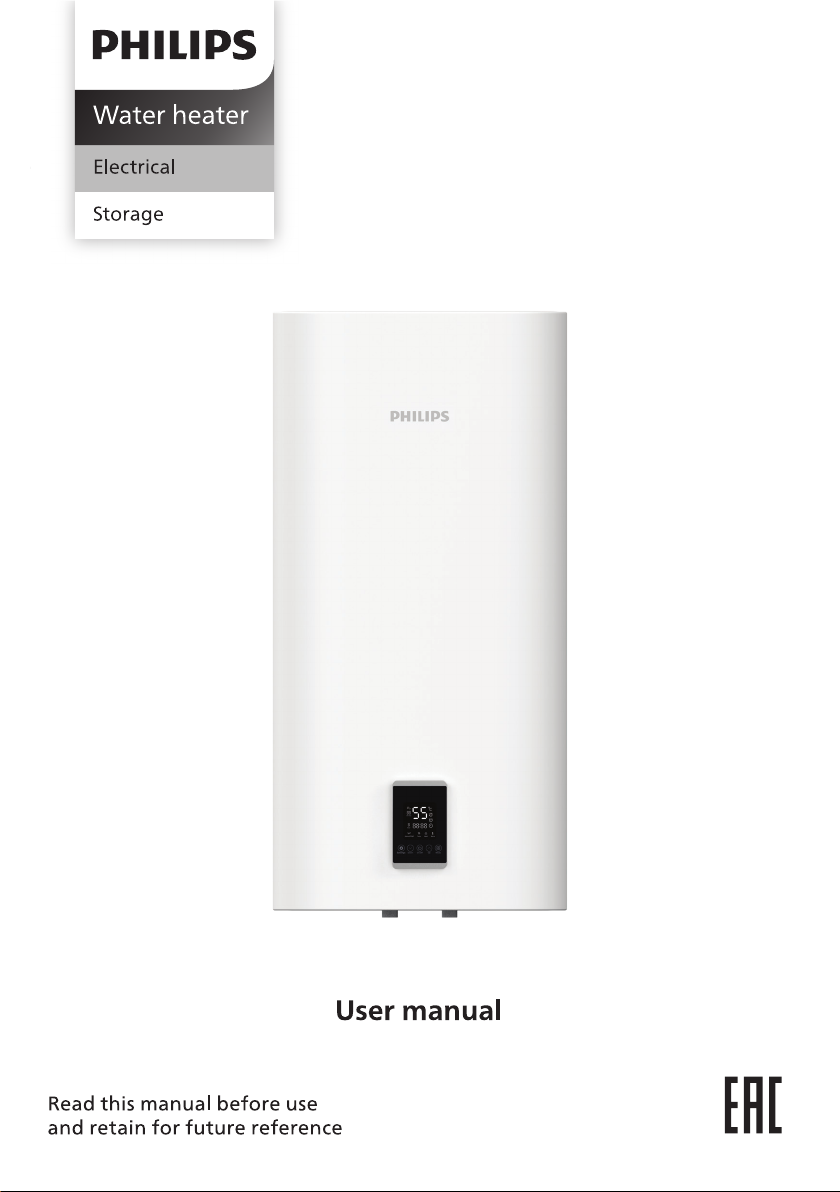
AWH1620/51(30YC )
AWH1621/51(5 0YC)
AWH1622/51(80YC)
AWH1623/51(100YC )
Page 2

Page 3

CONTENTS EN
NOTATION USED . . . . . . . . . . . . . . . . . . . . . . . . . . . . . . . . . . . . . . . . . . . . . . . . . . . . . . . . . 3
SAFETY REGULATIONS . . . . . . . . . . . . . . . . . . . . . . . . . . . . . . . . . . . . . . . . . . . . . . . . . . . . 4
PURPOSE . . . . . . . . . . . . . . . . . . . . . . . . . . . . . . . . . . . . . . . . . . . . . . . . . . . . . . . . . . . . . . . . 5
PRINCIPLE OF OPERATION . . . . . . . . . . . . . . . . . . . . . . . . . . . . . . . . . . . . . . . . . . . . . . . . 5
SYSTEM OF DEVICE . . . . . . . . . . . . . . . . . . . . . . . . . . . . . . . . . . . . . . . . . . . . . . . . . . . . . . . 6
SPECIFICATIONS . . . . . . . . . . . . . . . . . . . . . . . . . . . . . . . . . . . . . . . . . . . . . . . . . . . . . . . . . . 7
INSTALLATION . . . . . . . . . . . . . . . . . . . . . . . . . . . . . . . . . . . . . . . . . . . . . . . . . . . . . . . . . . . 8
MOUNTING . . . . . . . . . . . . . . . . . . . . . . . . . . . . . . . . . . . . . . . . . . . . . . . . . . . . . . . . . . . . . 10
residual current device) . . . . . . . . . . . . . . . . . . . . . . . . . . . . . . . . . . . . . . . . . . . . . . . 11
RCD (
EXPLOITATION . . . . . . . . . . . . . . . . . . . . . . . . . . . . . . . . . . . . . . . . . . . . . . . . . . . . . . . . . .12
SERVICE . . . . . . . . . . . . . . . . . . . . . . . . . . . . . . . . . . . . . . . . . . . . . . . . . . . . . . . . . . . . . . . . .14
TROUBLESHOOTING . . . . . . . . . . . . . . . . . . . . . . . . . . . . . . . . . . . . . . . . . . . . . . . . . . . . . 15
ELECTRICAL PRINCIPAL DIAGRAM . . . . . . . . . . . . . . . . . . . . . . . . . . . . . . . . . . . . . . . . 15
TRANSPORTATION AND STORAGE . . . . . . . . . . . . . . . . . . . . . . . . . . . . . . . . . . . . . . . . 16
EQUIPMENT . . . . . . . . . . . . . . . . . . . . . . . . . . . . . . . . . . . . . . . . . . . . . . . . . . . . . . . . . . . . .16
SERVICE LIFE . . . . . . . . . . . . . . . . . . . . . . . . . . . . . . . . . . . . . . . . . . . . . . . . . . . . . . . . . . . . 16
DATE OF MANUFACTURE . . . . . . . . . . . . . . . . . . . . . . . . . . . . . . . . . . . . . . . . . . . . . . . . 16
DISPOSAL RULES . . . . . . . . . . . . . . . . . . . . . . . . . . . . . . . . . . . . . . . . . . . . . . . . . . . . . . . .16
PRODUCT CERTIFICATION . . . . . . . . . . . . . . . . . . . . . . . . . . . . . . . . . . . . . . . . . . . . . . . .17
WARRANTY . . . . . . . . . . . . . . . . . . . . . . . . . . . . . . . . . . . . . . . . . . . . . . . . . . . . . . . . . . . . . 19
1
Page 4

СОДЕРЖАНИЕ RU
24
25
26
26
27
28
29
31
)32
33
35
36
36
37
37
37
37
37
38
40
2
Page 5

Thank you for purchasing and a good
choice of PHILIPS water heater!
Please read the manual and operating
conditions carefully before using the
device. After reading, keep this manual in
a safe place for future reference.
Notation used
Caution!
Requirements that, if not followed, could
result in serious injury or death.
Attention!
Requirements that, if not followed,
could result in serious injury or serious
equipment damage.
Note:
1. If the power cable is damaged, it must be
replaced by an authorized service agent.
2. The water heater must be installed in
accordance with existing local electrical
codes.
3. Misprints may be made in the text
and numerical designations of the
instructions.
4. If after reading the instructions you still
have questions about the operation
of the device, contact the seller or
an authorized service center for
clarication.
5. There is a shield on the product, which
contains technical characteristics and
other useful information about the
device.
6. In order to improve the quality of
products, the manufacturer reserves the
right to change the component parts
of the product for dierent shipments,
the color scheme and appearance of the
device without prior notice, which does
not violate the quality standards and
legal norms adopted in the country of
production / transit / sale.
7. Indicators and symbols on the display,
control panels of the water heater may
not match the graphic image in the user
manual, it depends on the series of the
device.
3
Page 6

Safety regulations
Caution!Attention!
• Read this instruction manual carefully
before installation and operation. If you
have any questions, please contact the
ocial dealer of the manufacturer.
• Use the device only for the intended
purpose specied in the user manual.
• Do not store gasoline or other volatile or
ammable liquids near the water heater -
this is very dangerous.
• Do not connect or disconnect the water
heater from the mains by removing the
plug from the socket.
• Do not put foreign objects into the
openings of the water heater.
• It is forbidden to use the water heater by
persons who are not familiar with the user
manual, as well as children and persons
under the inuence of drugs, alcohol,
people with limited mental, sensory or
physical abilities, unless they are supervised
by a person responsible for their safety.
• Do not use the water heater if there is any
damage to the appliance or cable, after
a malfunction, if the appliance has been
dropped or damaged in any other way.
• Before installing the water heater without
connecting it to the mains, check and make
sure that a ground loop is present in your
mains. In the absence of a ground loop in
your electrical network, the operation of
the water heater is life-threatening.
• Before cleaning or servicing, assembling or
disassembling individual parts, and before
moving the device, disconnect it from the
mains.
• Do not turn on the water heater if it is not
lled with water.
• It is forbidden to turn on the water
heater in an electric network through an
extension cord.
• Do not turn on the water heater if it is not
serviceable.
• Do not remove the cover of the water
heater while it is running.
• Always turn o the water heater during
thunderstorms.
• If strange sounds or smoke come from
the water heater, turn o the appliance
immediately.
• Before cleaning and maintaining the
water heater, always disconnect it from the
mains. Clean and maintain according to
the instructions in this instruction manual.
• Do not use or allow hazardous chemicals to
clean the water heater.
• To avoid the risk of electric shock, a
damaged electrical cable should only be
replaced by a qualied service center.
• Since the temperature of the water in
the water heater can reach +75 °C, when
using the water heater, do not put any
parts of your body under hot water when
you turn it on for the rst time. To prevent
burns, adjust the outlet water temperature
correctly.
• Do not use the water heater for purposes
other than those specied in this
instruction manual.
• Do not use the water heater in an explosive
or corrosive environment.
• It is forbidden to make changes to the
design of the water heater or modify it.
• Any service work must be carried out
by authorized service centers. Incorrect
installation may void your warranty.
4
Page 7

• To avoid the risk of electric shock, do not
place the electric cable near heaters or
ammable or combustible substances.
• Do not immerse the body of the water
heater in water or other liquids.
• When the device is not in use, always
unplug the mains plug from the electrical
outlet.
• Do not sit, stand or place any heavy objects
on the water heater.
• Do not attempt to repair the water heater
yourself. To repair the water heater,
contact an authorized service center of the
manufacturer.
• When disconnecting the water heater
from the power supply, do not pull on the
cord or touch it with wet hands.
• Do not install the water heater in places
where it can be exposed to direct sunlight,
high temperatures, or near sensitive
electrical equipment.
• Be sure to check that the voltage of the
water heater matches the data of the
electrical network.
• Children are not aware of the dangers that
can arise when using electrical appliances.
Therefore, do not allow them to use or
play with the appliance without your
supervision. Do not leave the power cord
within reach of children, even when the
appliance is turned o.
• Keep packaging materials (cardboard,
plastic, etc.) out of the reach of children as
they may be dangerous.
Purpose
Electric water heater storage type is
designed to heat cold water coming from
the water supply. The water heater is used
for domestic purposes.
Principle of operation
Tap water enters the water heater and
is evenly distributed throughout the
volume of the tank thanks to a specially
installed jet divider. This contributes to
the fact that the water heated with the
help of a heating element inside the water
heater is gradually displaced by warm
masses upward, from where it is taken and
supplied.
5
Page 8
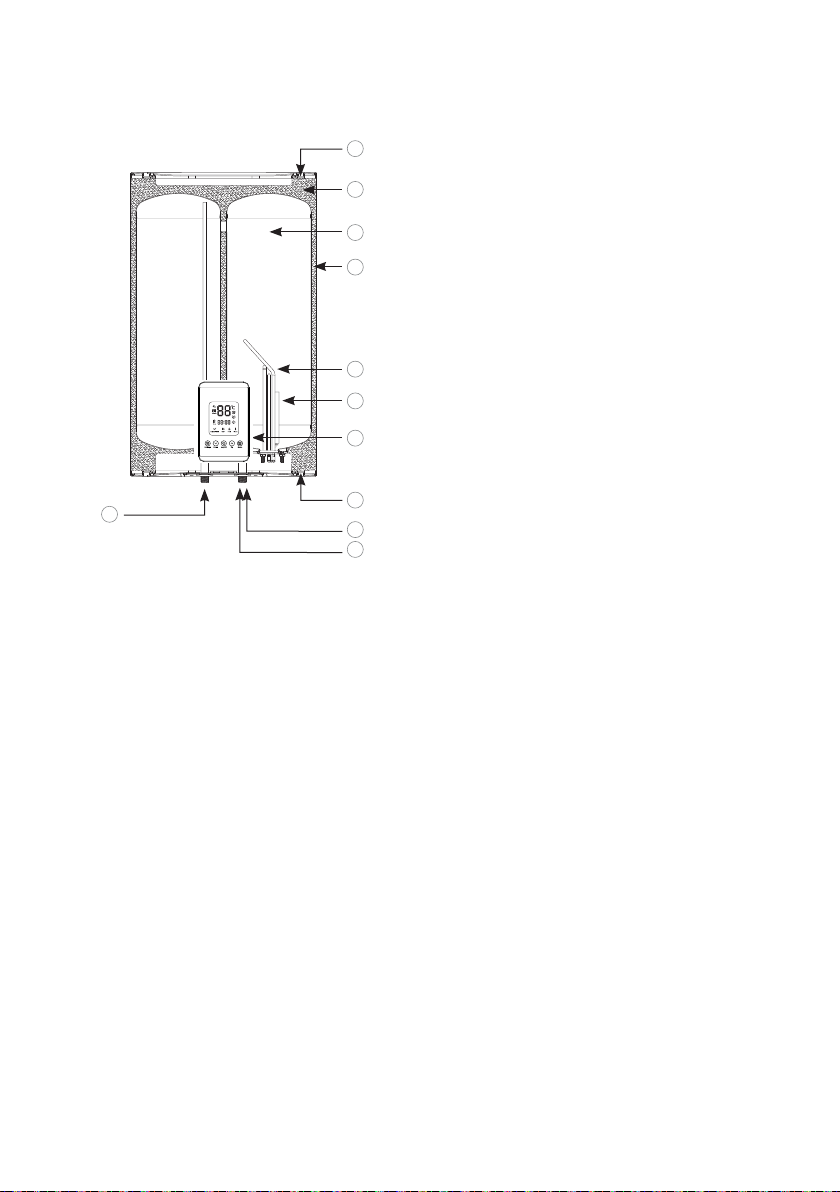
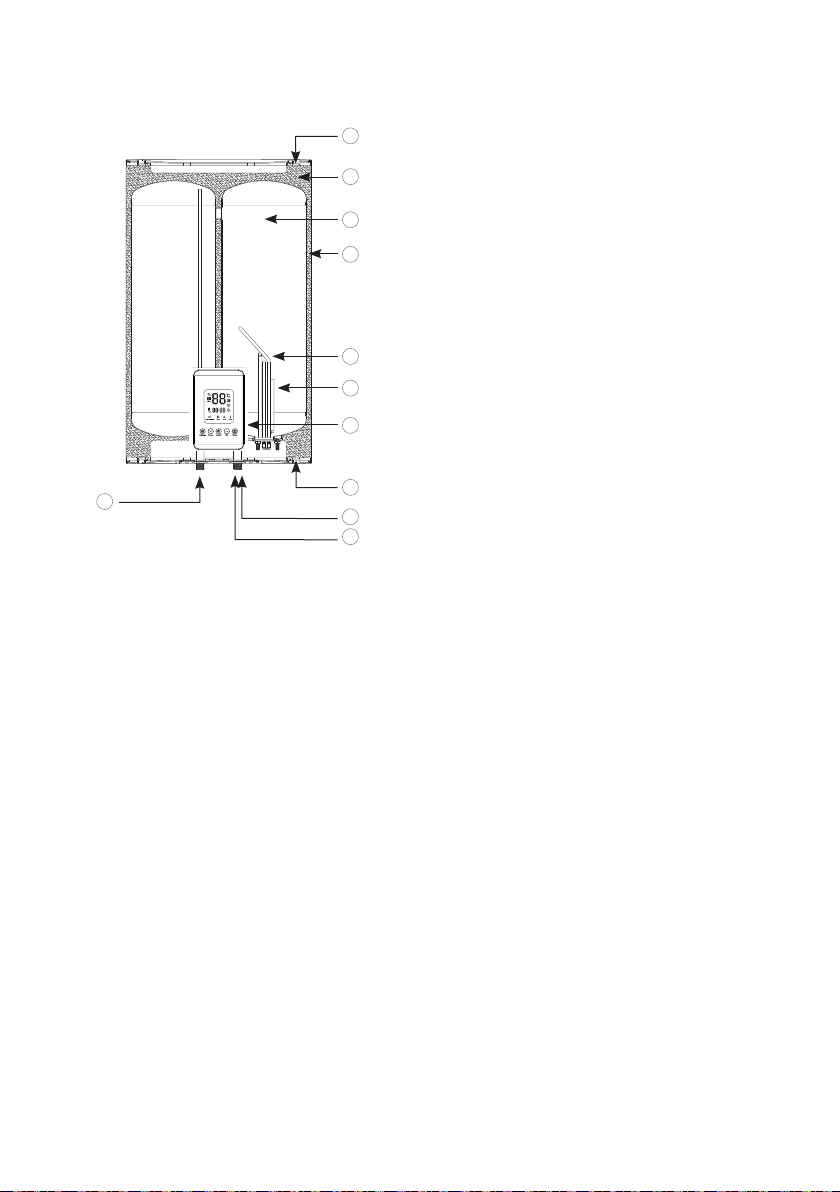
System of device
1
1. Upper end cap
2. Thermal insulation layer
2
3
4
3. Inner tank
4. Water heater housing
5. Dry heating element DRY SHELL (HE)
6. Magnesium anode
7. Control panel
8. Bottom end cap
9. Dielectric coupling Static CARE
5
6
7
11
8
9
10
10. Cold water inlet
11. Hot water outlet
6
Page 9
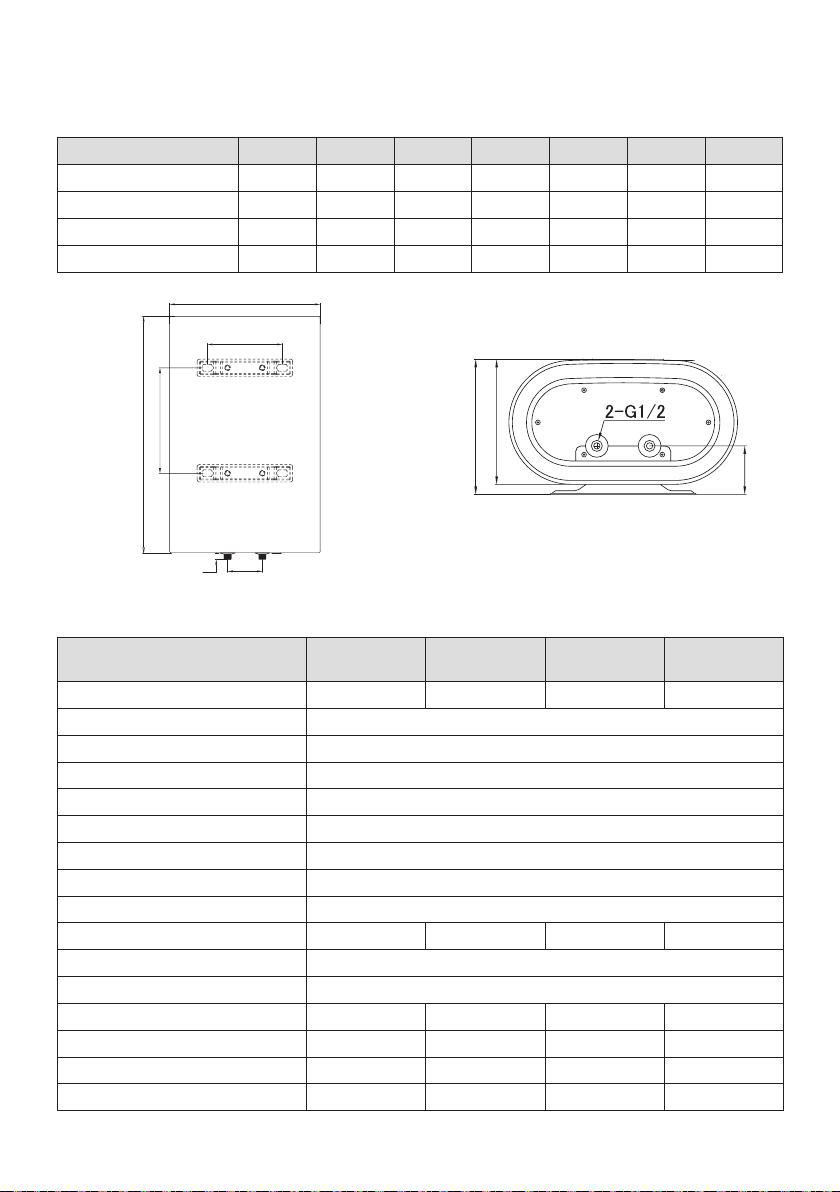
Specications
(
'
)
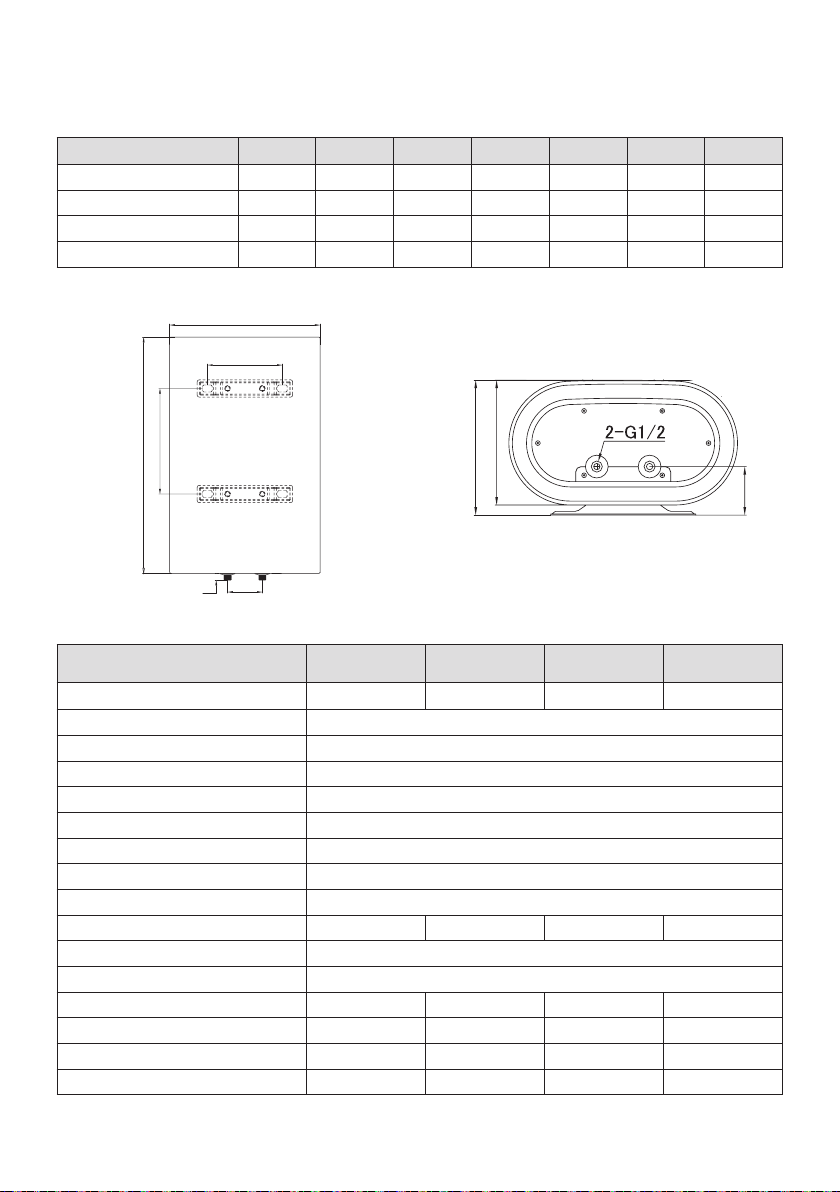
Main dimensions
Model / Dimensions, mm A B C D E F G
AWH1620/51(30YC) 256 236 92 433 550 240 216
AWH1621/51(50YC) 256 236 92 433 850 500 216
AWH1622/51(80YC) 290 270 110 493 1005 450 267
AWH1623/51(100YC) 290 270 110 493 1200 550 267
*
-
,
+
Parameter / Model
2
AWH1620/
51(30YC)
(
'
AWH1621/
51(50YC)
AWH1622/
51(80YC)
AWH1623/
51(100YC)
Tank capacity, L 30 50 80 100
Heating element type Dry heating element DRY SHELL
Rated input, W 800/1200/2000
Power supply, V/Hz 220-240/50
Rated current, A 9
Rated pressure, MPa 0,7
Minimum pressure of water, Bar 0,2
Maximum pressure of water, Bar 7
Maximum temperature of water, °C 78
Heating time, min (Δt= 45 °C) 50 70 130 160
Ingress protection IPX4
Class of electric protection I
Net dimensions (W×H×D), mm 433x550x236 433x850x236 493x1005x270 493x1200x270
Packing dimensions (W×H×D), mm 635x490x300 930x490x300 1090x555x335 1285x555x335
Net weight, kg 10,5 14,5 20,5 23,5
Gross weight, kg 12 16 22,5 26
)
7
Page 10
Installation
1. The water heater should be installed
on a solid wall. The wall on which the
electric water heater is to be installed
must be capable of supporting at least
twice the weight of the water heater
when fully lled with water, and the
wall must be free of cracks and other
damage. Otherwise, it is necessary
to take measures to strengthen the
fastening or install the water heater on
a special support.
2. If the bathroom is too small, the water
heater can be installed in another
place, closed from direct sunlight and
inaccessible to moisture. However, to
reduce heat losses in the pipelines, the
installation site of the water heater
should be as close as possible to the point
of use of hot water.
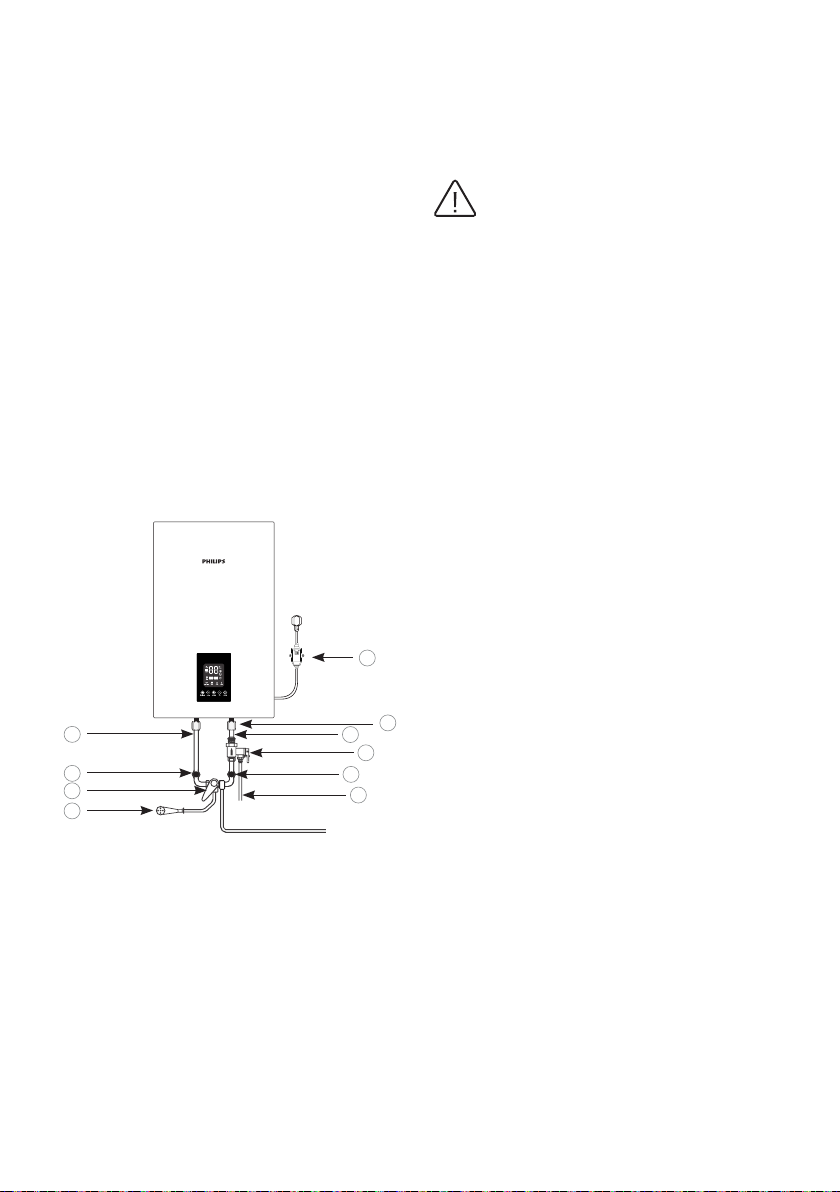
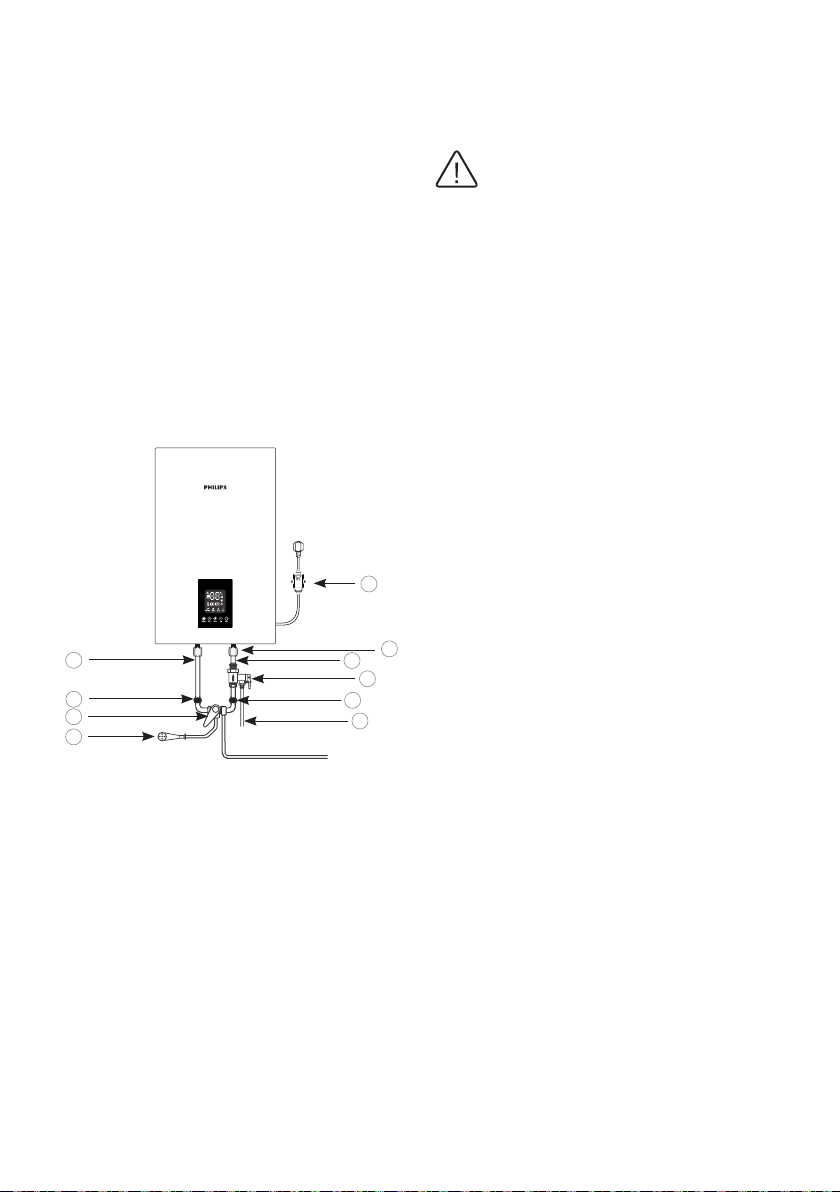
Water heater installation methods
The installation method of the water
heater for one consumption point is shown
in g. 3.
Attention!
The water heater must be installed on a
vertical wall in a strictly vertical position.
Installing the device in any other position or
skew relative to the vertical will inevitably
lead to the failure of the water heater,
creating an emergency and is considered by
the manufacturer as a non-warranty case.
2
3*
4*
5*
3
1. Power cord with plug and RCD
2. Hot water outlet
3. Hot water ow control tap*
4. Faucet*
5. Shower head*
6. Cold water inlet tap*
7. Drain tube
8. Combined safety valve
9. Cold water inlet
10. Dielectric coupling Static CARE
8
1
10
9
8
6
7
Page 11

The installation method of the water heater for several consumption points is shown in
g. 4.
1
2
14
13
11
1. Power cord with plug and RCD
2. Mounted water heater
3. Combined safety valve
4. Cold water inlet tap*
5. Faucet*
6. Shower head*
7. Water main shut-o valve*
12
3
8
4
5
10
7
6
9
4
8. Drain tube
9. Water supply
10. Bath*
11. Tee*
12. Inlet pipe
13. Outlet pipe
14. Dielectric coupling Static CARE
9
Page 12

Mounting
Water supply connection
1. Determine the points for the bolt
holes (determined according to the
specication of the instrument you have
chosen). Drill two holes of appropriate
depth in the wall using a drill bit that ts
the bolts, install the mounting bracket,
and then hang the electric water heater.
2. Attach the power outlet to the wall. The
socket requirements are as follows: 220240V / 10A, single-phase, three-wire. It is
recommended to place the socket on the
right side above the water heater.
Attention!
Please use the accessories provided by the
manufacturer to install the water heater.
The electric water heater must not be
mounted on the wall before you make
sure that the bracket is securely and rmly
installed. Otherwise, the electric water
heater may fall o the wall, resulting in
damage and even serious injury or injury.
When determining the points for holes
for anchor bolts, a free space between the
bottom of the water heater and the oor
should be at least 0.6 m.
Attention!
The water pressure in the water heater
corresponds to the water pressure in the
water main. If the pressure in the line
exceeds 0.7 MPa, then a pressure reducer
should be installed in front of the water
heater so that the pressure does not
exceed 0.7 MPa.
1. The water heater is connected to a water
supply network with a pressure of at least
0.02 MPa, maximum 0.7 MPa
2. To connect the water heater to the water
supply, pipes with a diameter of G1/2 are
used.
3. When connecting pipes, use rubber seals
on the threaded pipe ends to prevent
leakage.
4. Screw the safety valve onto the inlet
pipe, marked in blue and with a sign of
the direction of water ow, so that the
water ow matches the direction of the
arrow on the valve body. On the pressure
relief hole of the safety valve, put a drain
pipe to drain water (it may appear when
heated) into the sewer.
5. The safety valve is installed on the cold
water pipe (marked with a blue ring).
(maximum pressure 0.7 MPa / 7.0 Bar). If
the water pressure in the line exceeds 6
Bar, a pressure reducing valve should be
installed.
6. Connect the water heater with the valve
mounted to the water supply network install a shut-o valve at the water supply
point.
7. Connect the desired number of
consumption points to the outlet marked
in red.
8. Open the shut-o valve and one of the
collapsible valves. After lling the tank, as
evidenced by the outow of water from
the collapsible tap, close the collapsible
tap and check the tightness of all
connections.
Attention!
In places or on a wall where water can
enter, the installation height of the
electrical outlet must be at least 1.8 m.
10
Page 13
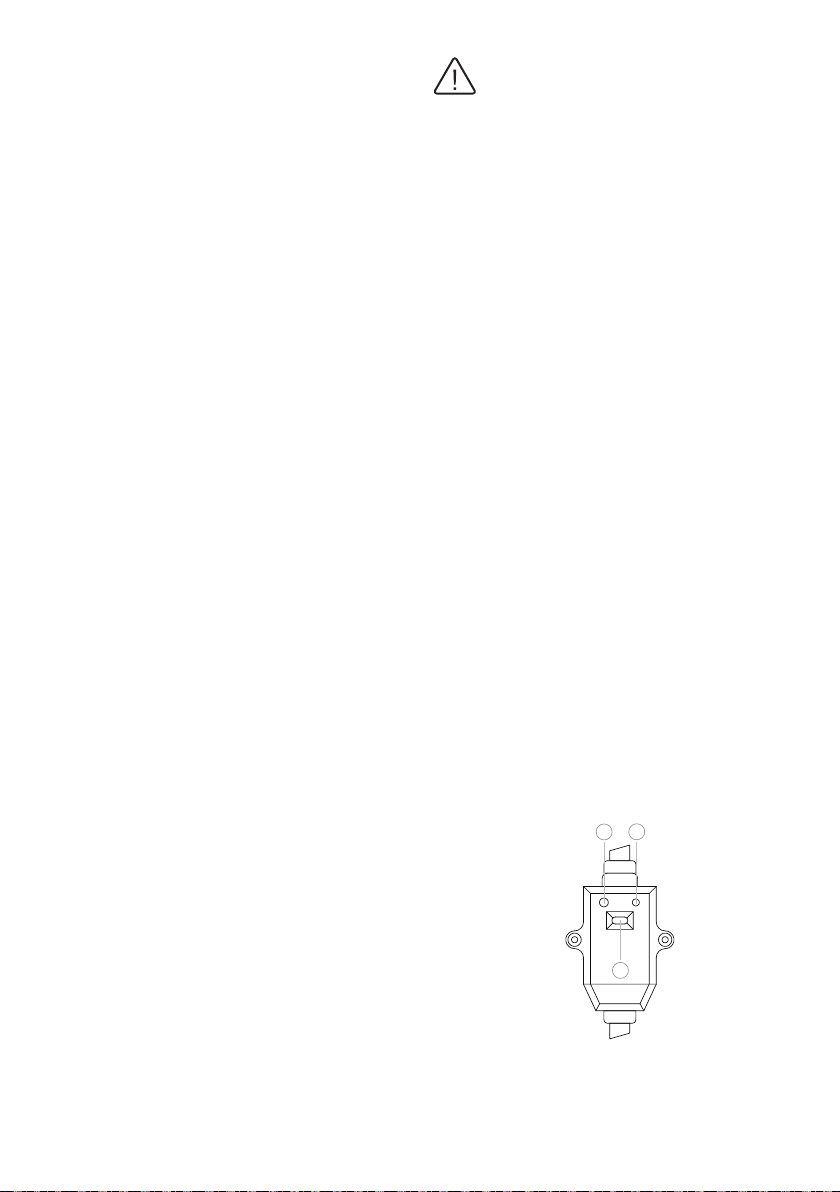
Electrical connection
1. Before connecting, make sure that the
power supply at the connection point
matches the parameters indicated on the
identication plate with the technical
data of the device. The water heater is
designed to be connected to a single-
phase 220–240 V electrical network.
When installing the water heater, the
current electrical safety regulations must
be observed.
2. The electrical outlet and plug must be
kept dry at all times to prevent electrical
leakage. Regularly check that the electrical
plug is rmly connected to the outlet. The
electrical socket must be designed for a
rated current of at least 10 A, an electrical
cable with a core cross section of at least
3 × 1.5 mm2 (for copper). Carry out the
check in the following order: insert the
electric plug into the socket, after half
an hour of operation, turn o the water
heater and remove the plug from the
socket, check with your hand if the plug
has warmed up. If the plug has become
hotter than 50°C, replace the outlet with a
dierent one to avoid damage, accidents,
or re due to poor electrical contact. This
should be done by a specialist.
Attention!
1. Do not mount additional devices, such as
a shut-o valve, between the safety valve
and the inlet pipe.
2. If the water at the installation site contains
a large amount of calcium, manganese or
iron salts, then it is necessary to install an
appropriate lter in the supply system to
reduce the amount of scale in the tank and
on the heating element.
3. Before connecting the storage water heater,
make sure that the water heater is properly
grounded. Proper grounding is important
to minimize electric shock and re hazards.
The power cord is equipped with a plug
with a grounding contact. The device must
be used with a properly grounded power
outlet. If the outlet you plan to use is not
properly grounded or protected by a time
delay fuse or circuit breaker, contact a
qualied electrician to install the correct
outlet.
4. To ensure reliable operation and safe
operation of the water heater, before using
it for the rst time, check that it is correctly
connected to an AC 220 V electrical
network. The connected water heater
must be securely connected to the ground
loop of your electrical network. Using the
water heater without grounding is life-
threatening.
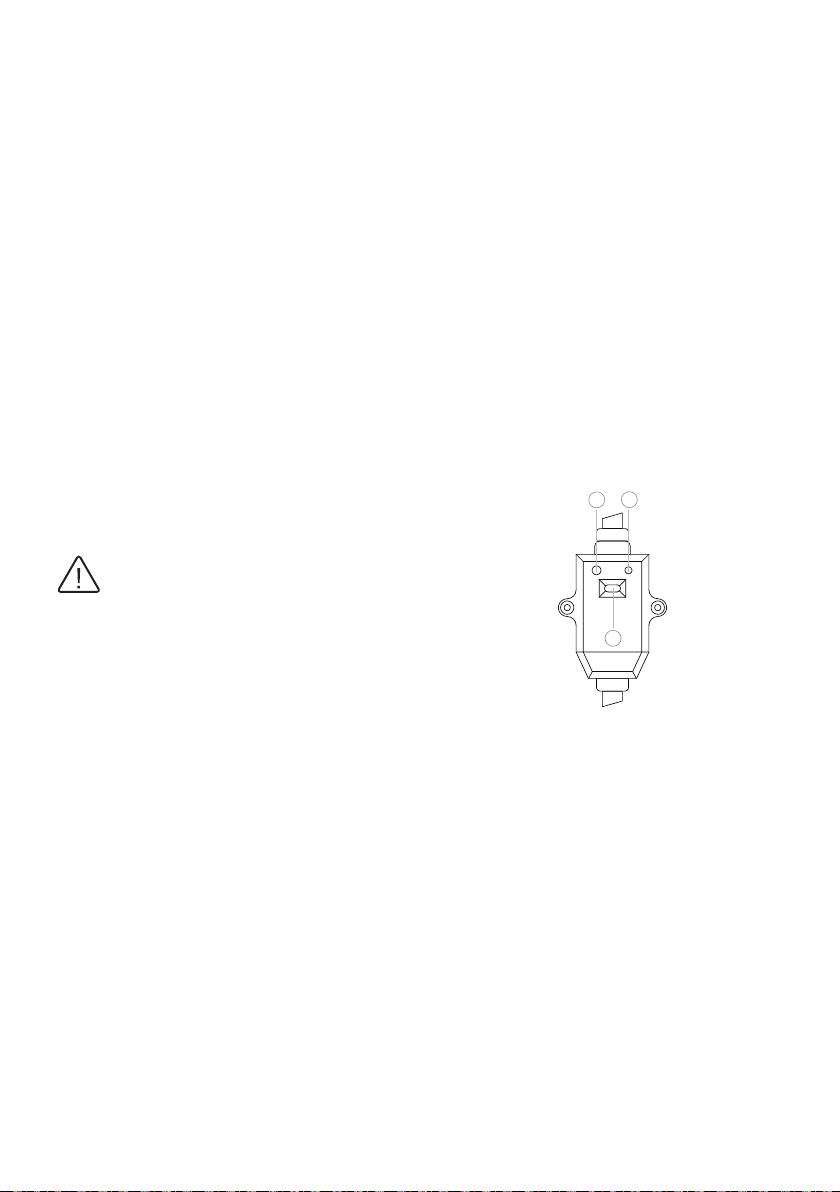
RCD (residual current device)
• Prevention of electrical leakage.
• Follow the installation instructions when
connecting the water heater.
• Connect the power plug to the mains, press
the button on the front side of the RCD (3),
the indicator light will light up.
• To test the RCD, press the TEST button (2).
The Power indicator (1) will be o.
• To restart the RCD, press button (3).
1
g. 5
2
3
11
Page 14
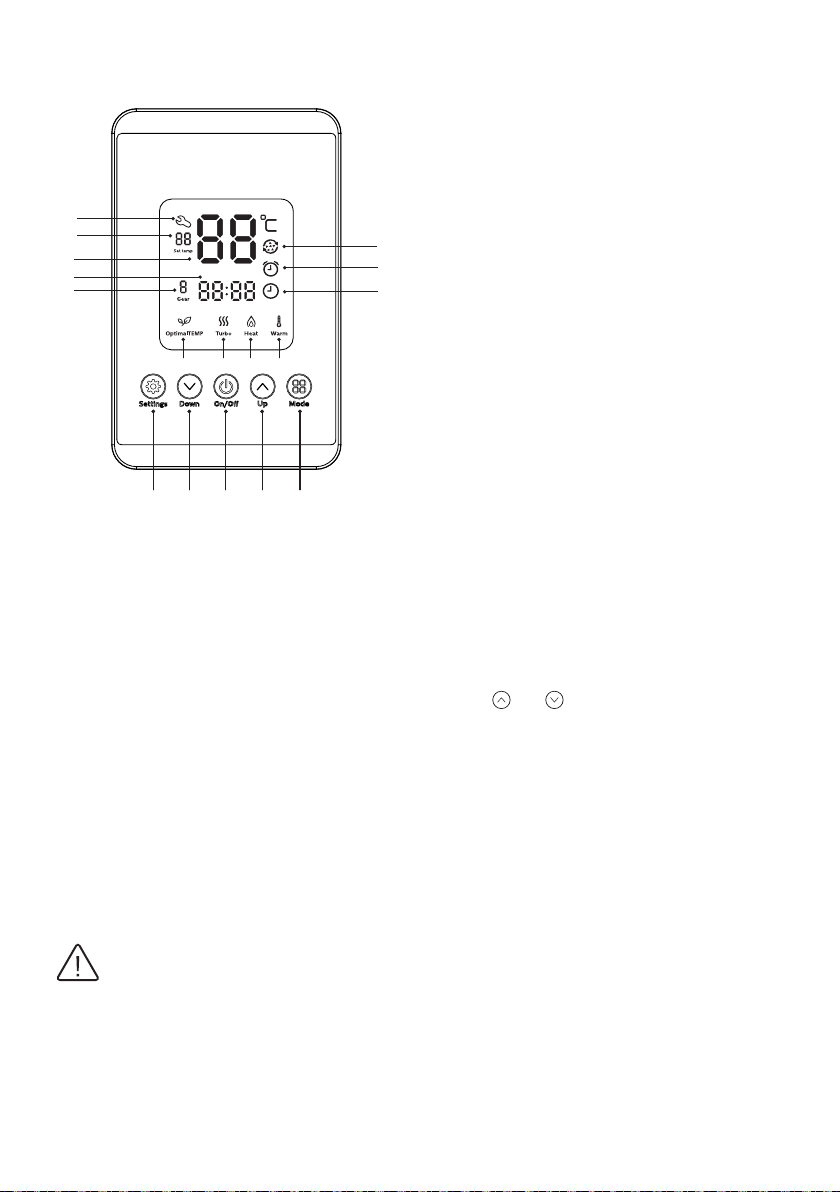
Exploitation
1
2
3
4
5
13
6 7 8 9
14 15 16 17
g. 6
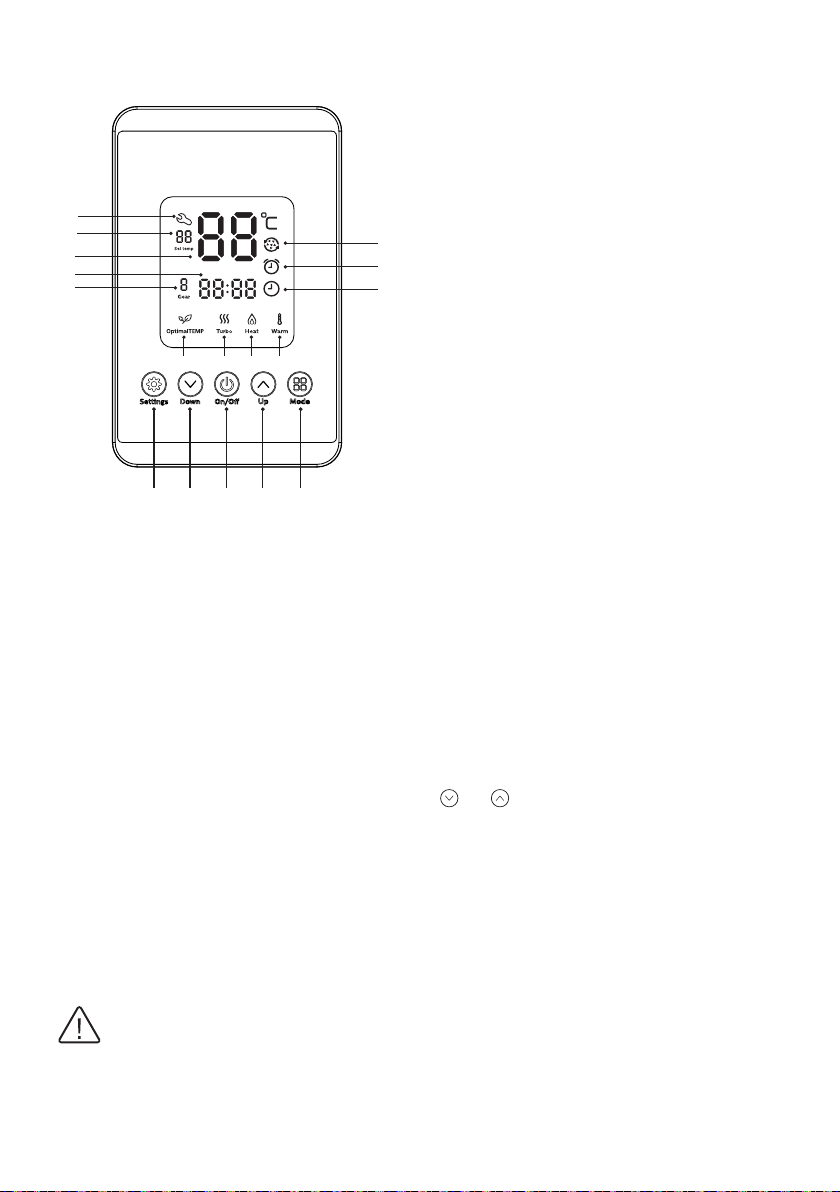
1. Regular service indicator
2. Set water temperature indicator
3. Tank water temperature indicator
4. Time
5. Power mode indicator
6. OptimalTEMP mode indicator
10
7. Turbo mode indicator
11
8. Heating indicator
12
9. Warm indicator
10. Antibacterial mode indicator
11. Timer indicator
12. Time indicator
13. Power mode selection button
14. Button to decrease temperature and
time during related settings
15. Water heater on/o button
16. Button to increase temperature
and time during related settings
17. Operation mode/time setting button
Turning on the water heater
1. Open one of the hot water outlet valves,
then open the cold water supply valve. The
electric water heater will begin to ll with
water. When water ows freely from the
hot water tap, this means that the water
heater is completely lled with water and
the hot water outlet tap can be closed.
2. Insert the electrical plug into the socket.
3. Press the «On/O» button on the control
panel. The screen will display the actual
water temperature, power level, set
temperature, operation mode and time.
Attention!
During normal operation, the cold water
supply tap must be set to the «open»
position.
12
Temperature setting
After turning on the water heater, press
button or to adjust the desired water
temperature. Selection range from 35 to 75 °C.
Power mode selection
To select the power mode, press the
«Set» button and select one of the heater
heating power modes:
1 - low (800 W)
2 - medium (1200 W)
3 - intensive (2000 W)
Operating mode selection
Press the «Mode» button to select one
of the three operating modes of the
device: normal mode, «OptimalTEMP»,
«Turbo». When the «OptimalTEMP» and
«Turbo» indicators are off, this is the
normal operation mode, you can adjust
the temperature and select the power
mode. Pressing the «Mode» button again
Page 15
will turn on the «OptimalTEMP» mode,
in which a fixed temperature of 55 ° C is
set and the average power mode. Press
«Mode» again to select «Turbo» mode.
This mode has a fixed temperature of
75 °C and an intensive power mode. In
the «OptimalTEMP» and «Turbo» modes,
the temperature and power adjustment
buttons do not work.
Indicators:
The water heater automatically maintains the
set temperature.
«Heat» - the indicator lights up when the
water in the tank is being heated.
«Warm» - the indicator lights up during heat
saving, when there is no heating.
Setting the time and timer
1. With the water heater o, press the
«Mode» button to set the time. The time
display “00” will ash on the screen. Set
the desired hour with button
Press the «Mode» button again to set the
minute time.
2. Press «Mode» again to set the timer to
turn on heating of water. At this time, the
indicator
Set the desired hour with button
. Then press «Mode» again and enter the
minute time settings. After the setting
process is completed, the indicator
will turn o, the set time is automatically
saved.
3. To set the timer for heating when the water
heater is on, hold down the “Settings”
button for 3 seconds. Using button
, select ON on the screen. The water
heater will work in heat saving mode and
heating will start when the set time is
reached. After heating is completed, the
appliance will return to the heat-saving
mode. To disable this function, hold the
«Settings» button for 3 seconds, then
select OFF on the screen.
Regular service maintenance
The
« »
panel when regular service maintenance is
recommended.
will light up on the screen.
indicator lights up on the control
or .
or
or
Attention!
Any service work must be carried out by
specialists of authorized service centers
with an appropriate mark in the sheet with
information about the service performed
(p. 14).
After completing regular service maintenance,
press and hold the
to turn o the indicator.
« »
button for 3 seconds
Attention!
During heating, water may start to drip
from the opening of the safety valve.
Water leakage cannot be avoided and
must not be prevented, since blocking the
valve can lead to rupture of the internal
tank (in the event of an equipment failure).
Antibacterial automatic protection
During the operation of the water heater,
the process of sterilization of water in the
tank is carried out, during which almost all
vegetative forms of microorganisms are
destroyed.
The rst cycle of the mode is activated 3
days after the rst switching on of the
water heater. After that, if within 30 days
the temperature in the water heater has
not risen above 65° C, then the next cycle is
switched on. If the water heater is turned o,
the antibacterial protection function is also
disabled. During the cycle, the temperature in
the water heater rises above 75°C for 1 hour.
To disable the mode, press and hold the «
»
and « » buttons at the same time. The « »
indicator will ash, then turn o. To turn it on
again, press and hold the same buttons, after
which the «
screen.
Shutdown
To turn o the water heater, press the «On/
O» button. The water heater will stop
working, the screen will display the time and
the internal temperature of the water.
It is recommended to always disconnect the
water heater from the mains if you do not
plan to use the appliance for some time.
» indicator will light up on the
13
Page 16
Service
лампочка - индика
тор работы УЗО (1)
кнопка TEST (2)
кнопка перезапуска (3)
лампочка - индика
тор работы УЗО (1)
кнопка TEST (2)
кнопка перезапуска (3)
лампочка - индика
тор работы УЗО (1)
кнопка TEST (2)
кнопка перезапуска (3)
1. Check the electrical plug and socket
as often as possible. Reliable electrical
contact must be ensured, as well as
proper grounding. The plug and socket
must not become excessively hot.
2. If the water heater is not used for a long
time, especially in regions with low air
temperature (below °C), to prevent damage
to the water heater (due to freezing of water
in the internal tank), the water from the
heater should be drained.
3. To ensure reliable operation of the water
heater for a long time and maintain
warranty obligations, it is recommended
that regular maintenance by specialists
of authorized service centers is
recommended, during which the internal
tank is cleaned, salt deposits are removed
from the electrical heating elements of
the water heater, and the condition of
the magnesium anode is checked, in case
consumption of half or more is replaced.
The frequency of maintenance of the
water heater depends on the hardness of
the water in the area. Possible intervals
from 3 months to a year.
The frequency of cleaning the tank
depends on the hardness of the
water. Cleaning must be carried out
by authorized service centers. In the
warranty card, a note is required that
maintenance is carried out at least once
every 12 months.
4. Preventive work must be carried out
with strict observance of the operating
instructions and safety precautions by
specialists of authorized service centers.
5. Remember to check the operation of
the safety valve ev ery 14 days. Check
method: move the drain handle to
the upper position until you feel the
transition of the thread, and then
w a t e r s h o u l d o w f r o m t h e v a l v e h o l e .
After checking the water ow, return the
handle to the previous position.
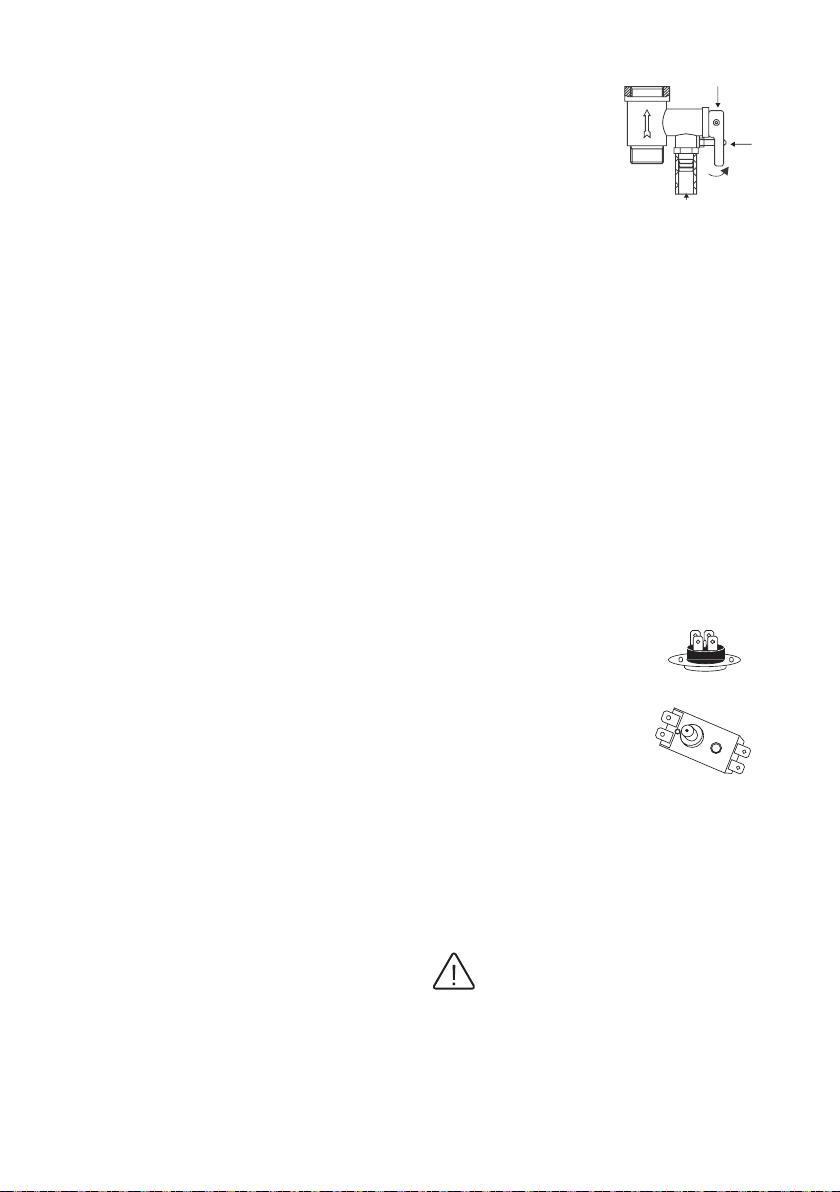
6. Check periodically for scale and blockage.
Drainage of the valve,
in order to avoid
clogging, is carried
out as follows: if the
valve has a lever,
then it must be lifted
several times, if the
valve is without a
lever, it must be
unscrewed and
scale accumulations
7
removed.
Thermal switch
The PHILIPS water heater is equipped with
a thermal switch that will cut o the power
supply to the heating element when the
water overheats or is not present in the water
heater. If the water heater is connected to
the electrical network, but there is no water
heating and the indicator lamp does not
light up, then the thermal switch has turned
o or has not been turned on. To return
the water heater to working condition, you
must: – turn o the power supply from the
electric heater, remove the lining of the
bottom cover of the vertical water heater;
- unscrew the nut
fastening the thermal
switch xed on the
heating element
1
ange, turn the thermal
switch over and press
until it clicks the button
located in the center of
the thermal switch (Fig.
8) *; – if the button is
2
8
not pressed and there
is no click, then wait until the thermal switch
cools down to the initial temperature.
Note: disconnection of the thermal switch is
not a warranty case, if this is not the result of
a warranty malfunction of the thermostat.
Attention!
1. Never drain water if its temperature is
above 50 °C, as this may cause burns.
2. If water does not ow, the valve is
damaged. In this case, the water heater
must not be used and it is recommended
to call a service technician.
14
Page 17
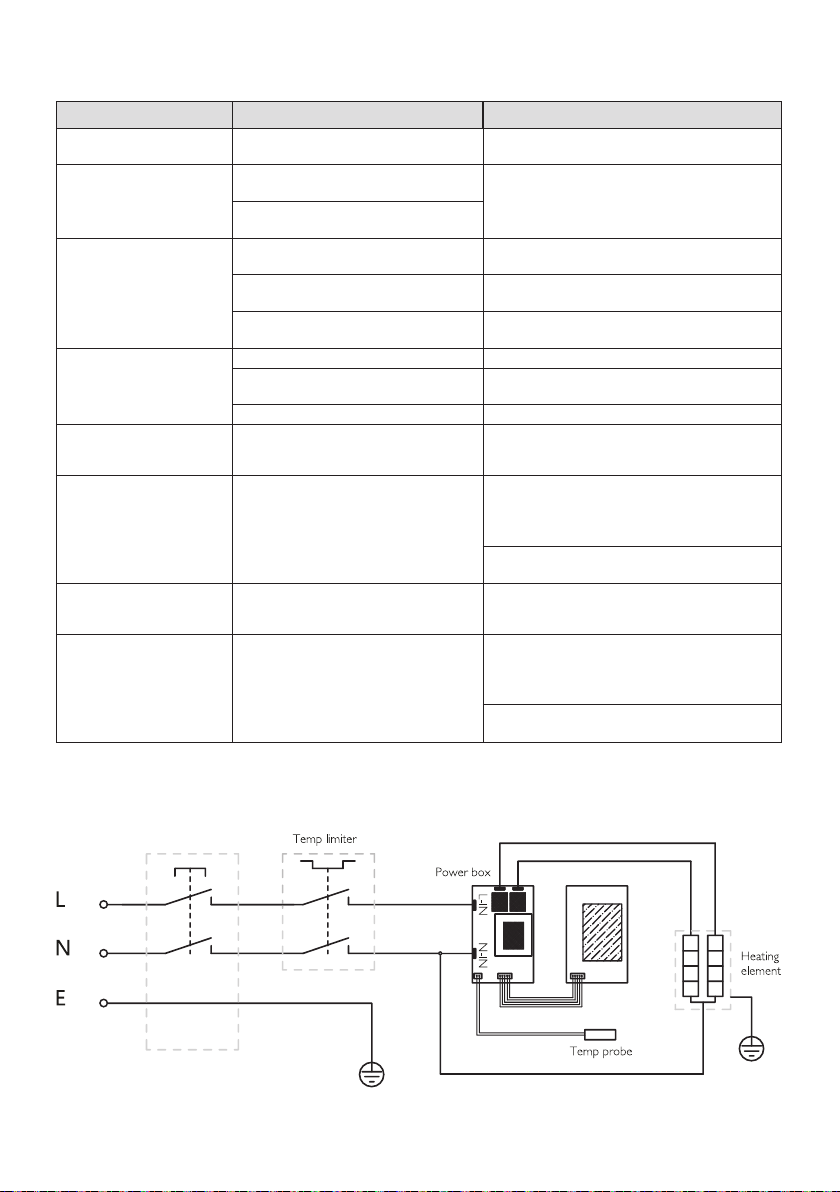
Troubleshooting
The phenomenon Reasons Treatment failure
The water temperature
is too high
Water ows from the
body of the appliance
Indicator do not light,
water does not heat up
No water ows from
the hot water tap
Water leak
E1 Dry burn protection.
E2 Temperature sensor defective.
E4 Device overheating protection.
Damage to the water temperature
control system.
1. Destruction of the inner tank
(corrosion).
2. The seal at the connection point
of the heating element is broken.
1. Damage to the temperature
control device.
2. The temperature limiter has been
activated or not activated
3. Damage to the temperature
limiting device.
1. The water supply is turned o. Wait until the water supply is restored.
2. Too low water pressure.
3. Closed cold water tap. Open the cold water supply tap.
The seal at the pipe connection is
broken.
Contact a repair specialist an authorized
center.
Contact a repair specialist an authorized
center.
Contact a repair specialist an authorized
service center.
Turn on the thermal switch, following the
instructions for turning it on.
Contact a repair specialist an authorized
service center.
Turn on the water heater again when
normal water pressure is restored.
Replace joint seal.
Wait until the water in the tank cools
down, restart the water heater according
to the instructions for turning the device
on and o.
Contact a repair specialist an authorized
service center.
Contact a repair specialist an authorized
service center.
Wait until the water in the tank cools
down, restart the water heater according
to the instructions for turning the device
on and o.
Contact a repair specialist an authorized
service center.
Electrical principal diagram
RCD
LED
8
15
Page 18
Transportation and storage
Date of manufacture
Products should be stored in dry, ventilated
warehouses at a temperature not lower
than -30°C.
1. During transportation and storage, the
requirements of handling signs on the
packaging of the device must be strictly
observed.
2. During transportation, any possible
shocks and movements of the package
inside the vehicle must be excluded.
3. Temperature requirements: from -30 to
+50 °С.
4. Humidity requirements: 15 to 85%
(no condensation).
Equipment
• Water heater — 1 pc.
• Safety valve — 1 pc.
• Anchor bolts — 2 pcs.
• Dielectric coupling Static CARE - 2
pcs.
• User Manual / Warranty card - 1 pc.
• Packing — 1 pc.
Service life
The date of manufacture is indicated on
the device and is determined as follows:
№ ХХХХХХХХХХХХХ
year / month / day of production
Disposal rules
At the end of its useful life, the device must
be disposed of in accordance with the rules,
regulations and methods in force at
the place of disposal. Do not dispose
of the device with household waste.
At the end of the device’s useful life,
take it to a collection point for recycling, if
this is required by the rules and regulations
in your area. This will help avoid possible
consequences for the environment and
human health, and will also encourage the
reuse of product components. Information
about where and how you can dispose of
the appliance can be obtained from your
local authorities.
The service life of the water heater is
15 years, provided that the relevant
installation and operation regulations are
observed.
16
Page 19

Product certication
The product meets the requirements:
TR CU 004/2011 «On safety
of low-voltage equipment»,
TR CU 020/2011 «Electromagnetic
compatibility of technical equipment».
TR EEU 037/2016 «On restriction of using
hazardous substances in the electrical and
radioelectronic articles».
Manufacturer:
AQUASHIELD EUROPE s.r.o.
Hájkova 1, Prague 3 130 00 Czech Republic.
Importer in the Russian Federation:
«Kompaniya BIS» LLC
119180, Moscow, B.Polyanka str.,
2, bld.2, R. I/8, the Russian Federation
Tel: 8 495 150-50-05,
e-mail: [email protected]
Made in China
COMMISSIONING INFORMATION
Date of work Service center name
Full name of the
master
Produced works
17
Page 20

SERVICE INFORMATION
Seal, Signature
master
Full name of the
Service
center name
cartridge
Replacing the
AWH9820 lter
magnesium
branded one
anode with a
Replacing the
element
the heating
Cleaning the
inspection of
inner tank and
Service date
Service
Number №
18
Page 21
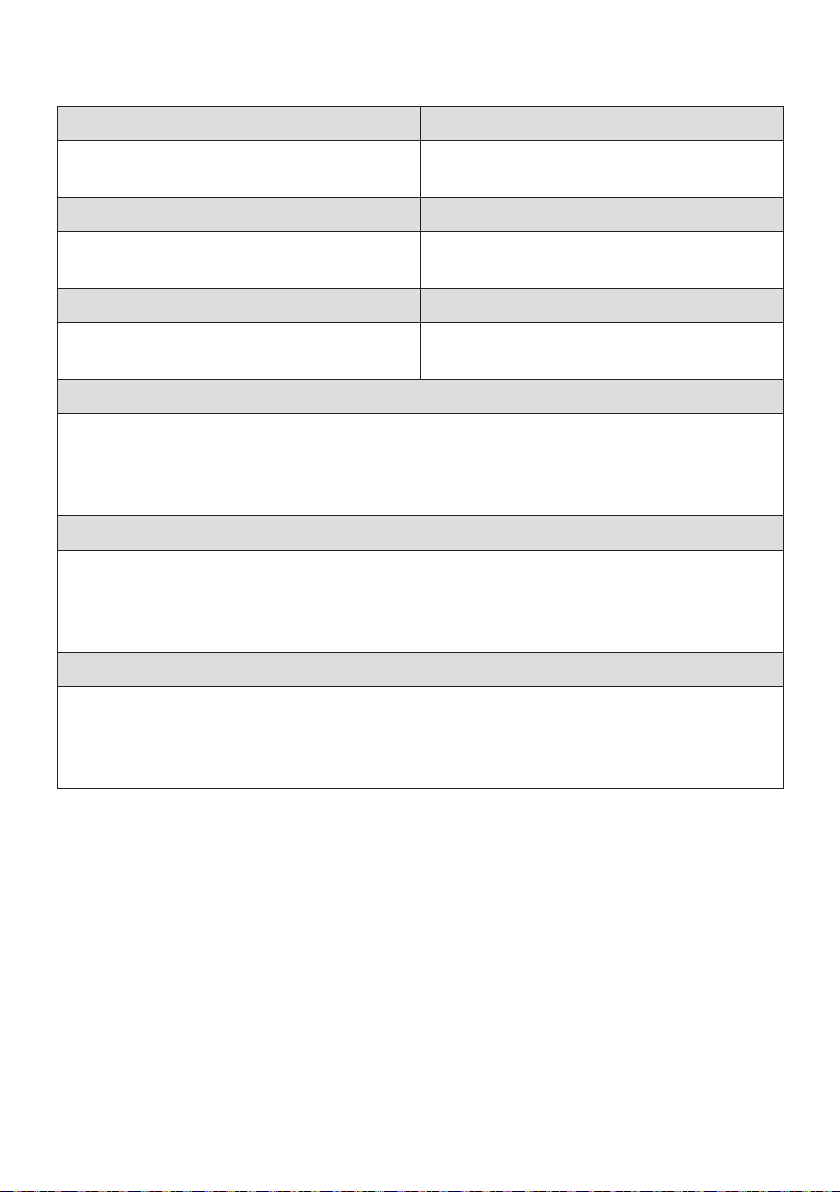
WARRANTY
Model Serial number
Date of manufacture Guarantee period
Date of sale* Mounting date**
Customer
Salesman
The organization that installs the equipment
19
Page 22

WARRANTY
Dear Customer!
Thank you for choosing a PHILIPS product.
You have made the right choice in favor of quality equipment.
This document does not limit the rights of the
Buyers dened by law, but supplements and
claries the provisions stipulated by law. The
conditions and rules set out in this warranty
card are voluntary unilateral obligations of the
Manufacturer to the Buyer and regulate the
procedure for their relationship in connection
with the quality guarantee provided.
We ask you to carefully study the terms of the
warranty and make sure that the warranty card
has been correctly lled out and has the stamp
of the Seller. In the absence of the Seller’s stamp
and the date of sale (or a cash receipt with the
date of sale), the warranty period of the product
is calculated from the date of manufacture of
the product.
Carefully check the appearance of the product
and its completeness, present all claims
regarding the appearance and completeness of
the product to the Seller upon purchase of the
product.
For installation (connection) of water heaters,
we recommend contacting our authorized
service centers. The Seller/Manufacturer shall
not be liable for defects in the product resulting
from its improper installation (connection),
failure to comply with the requirements of the
Installation section of the User Manual.
Information about service centers authorized to
repair and maintain the product can be found
on the Philips.com website.
The warranty period for water heaters is:
1) 24 months - unconditional guarantee.
2) 48 months for all electrical components
and 72 months for tank leakage under the
following conditions:
a) Installation of the water heater in
accordance with the rules for installation,
storage and transportation.
b) Annual maintenance by an authorized
service center with the replacement of the
magnesium anode with a branded one.
3) 60 months for all electrical components
and 120 months for tank leakage under the
following conditions:
a) Installation of the water heater in
accordance with the rules for installation,
storage and transportation.
b) Annual maintenance by an authorized
service center with the replacement of the
magnesium anode with a branded one.
c) Installing a branded AWH9820 lter with
its annual maintenance *
Information about the maintenance performed
is recorded in the operation manual.
The warranty for the equipment is valid under
the following operating conditions:
• use of the product in strict accordance with the
instruction manual; compliance with regulations
and safety requirements.
The warranty periods apply only to products
that have been used for domestic purposes, not
related to business activities.
Warranty obligations apply only to types of
breakdowns caused by a proven manufacturing
defect of the manufacturer. All other types of
breakdowns must be eliminated by the forces
and at the expense of the Buyer.
The product warranty is valid only if the
warranty card is lled out correctly and the
following information is available:
• model name;
• serial number (located on a special label with
the EAN-128 code);
• Date of sale;
Seal of the seller’s company and signature of the
representative of the seller’s company.
In case of failure of the product during the
warranty period, you must contact an authorized
service center or the Seller of the product.
Warranty repair of the product is carried out in
authorized service centers within a period not
exceeding 30 (thirty) days.
This warranty does not give any right to recover
or cover damages resulting from alteration and
adjustment of the product without the prior
written consent of the Manufacturer.
The warranty does not apply to: consumables
and component parts of the equipment, the
failure and / or scheduled replacement of
which during the warranty period is due to the
very need for their use. These include: various
lters, various lamps and light bulbs, fuses, trim
parts and housings. The magnesium anode is
a consumable item and is not covered under
warranty.
20
Page 23

The warranty is not provided in the following
cases:
• if the serial number of the product is
completely/partially changed, erased,
deleted or illegible;
• use of the product not for its intended
purpose, not in accordance with its
Operating Instructions, including the
operation of the product with overload or
in conjunction with auxiliary equipment
not recommended by the Seller /
Manufacturer;
• the presence of mechanical damage on
the product (chips, cracks, etc.), exposure
to excessive force, chemically aggressive
substances, high temperatures, high
humidity/dustiness, concentrated vapors,
if any of the above caused the product to
malfunction;
• repair of the product by unauthorized
organizations/persons;
• natural disasters (re, ood, etc.) and other
causes beyond the control of the Seller /
Manufacturer and the Buyer;
• defects resulting from the ingress of
foreign objects, liquids, insects and their
metabolic products, etc. into the product;
• improper storage of the product;
• if malfunctions in water heaters have
occurred as a result of:
- freezing or just a single excess of the
maximum allowable water pressure
indicated on the rating plate of the water
heater;
- operation without protective devices
or devices that do not comply with the
technical characteristics of water heaters;
- use of corrosive water;
- corrosion from an electrochemical
reaction, untimely maintenance of
water heaters in accordance with the
operating instructions (including failure
to comply with the frequency and timing
of maintenance established by the
instructions in the amount specied in
the instructions).
The buyer is warned that, in accordance
with paragraph 11 of the «List of non-food
products of good quality, not subject to
return or exchange for a similar product
of a dierent size, shape, size, style, color
or conguration» Post. Government of the
Russian Federation dated 19.01.1998. No. 55,
he is not entitled to demand the exchange
of the purchased product in accordance
with Art. 25 of the Law “On Protection of
Consumer Rights” and Art. 502 of the Civil
Code of the Russian Federation.
All necessary information about the
purchased product and its consumer
properties in accordance with Art. 10 of the
Law «On Protection of Consumer Rights» is
provided to the Buyer in full.
The buyer received the instruction manual
for the purchased product in Russian.
_________________________________
_________________________________
________________________________
The Buyer is familiar with and agrees to
the terms of warranty service/features of
operation of the purchased product.
_________________________________
_________________________________
________________________________
21
Page 24

ASC seal
master
Full name of the
Spare part
replacement
the defect
Description of
repair
End date of
INFORMATION ABOUT WARRANTY REPAIRS
Date of
the ASC
application to
(TO BE COMPLETED BY AN AUTHORIZED SERVICE CENTER (ASC):
Name of ASC
22
Page 25

23
Page 26

Благодарим вас за приобретение и удачный выбор
водонагревателя PHILIPS!
Используемые обозначения
Осторожно!
Внимание!
Примечание:
-
-
-
-
-
24
Page 27

Правила безопасности
Осторожно!Внимание!
• -
• -
• -
•
•
•
•
•
• -
•
• -
• -
•
•
•
•
•
•
•
•
•
•
•
25
Page 28

•
•
•
•
•
•
•
•
•
•
Назначение
Принцип работы
26
Page 29
Устройство прибора
1
2
3
4
5
6
7
11
8
9
10
27
Page 30
Технические характеристики
(
'
)
Модель / Размеры, мм
A B C D E F G
256 236 92 433 550 240 216
256 236 92 433 850 500 216
290 270 110 493 1005 450 267
290 270 110 493 1200 550 267
*
-
,
+
Параметр / Модель
AWH1620/
51(30YC)
30 50 80 100
9
7
78
50 70 130 160
IPX4
I
xx 433x550x236 433x850x236 493x1005x270 493x1200x270
xx 635x490x300 930x490x300 1090x555x335 1285x555x335
12 16 26
(
'
AWH1621/
51(50YC)
AWH1622/
51(80YC)
AWH1623/
51(100YC)
)
28
Page 31
Установка
Способы монтажа водонагревателя
-
1
2
3*
4*
5*
10
9
8
6
7
Внимание!
29
Page 32

1
2
14
13
11
12
3
8
4
6
5
10
7
9
30
Page 33

Монтаж
-
-
Внимание!
Внимание!
Подключение к водопроводной
магистрали
-
-
-
-
Внимание!
31
Page 34
Подключение к электрической сети
-
2
Внимание!
УЗО
(устройство защитного
отключения)
•
•
•
•
•
2
1
-
32
3
-
-
-
-
-
-
-
Page 35
Эксплуатация
1
2
3
4
5
13
6 7 8 9
14 15 16 17
10
11
12
Включение водонагревателя
-
Внимание!
Настройка температуры
Выбор режима мощности
33
Page 36
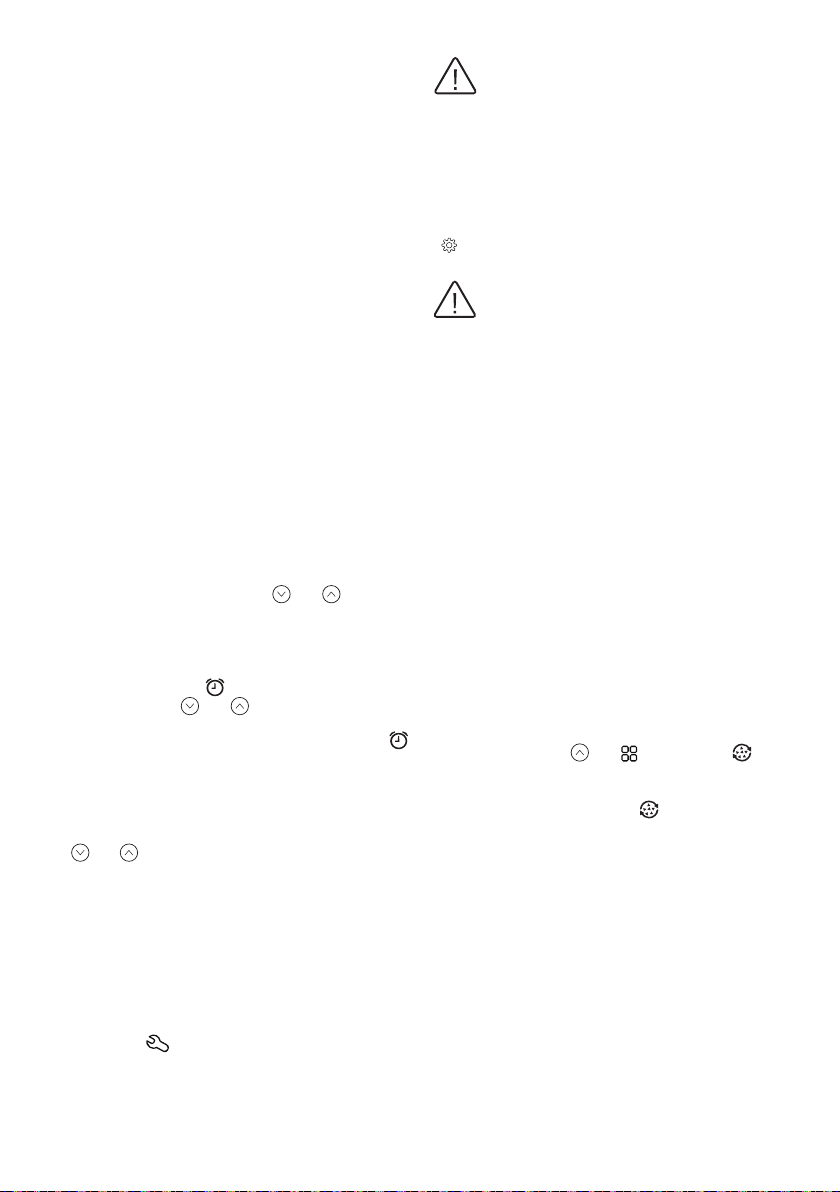
Выбор режима работы
Индикаторы:
«Heat»
«Warm»
Установка времени и таймера
-
Регулярное сервисное обслуживание
Внимание!
Внимание!
Антибактериальная автоматическая
защита
-
-
Выключение
34
Page 37
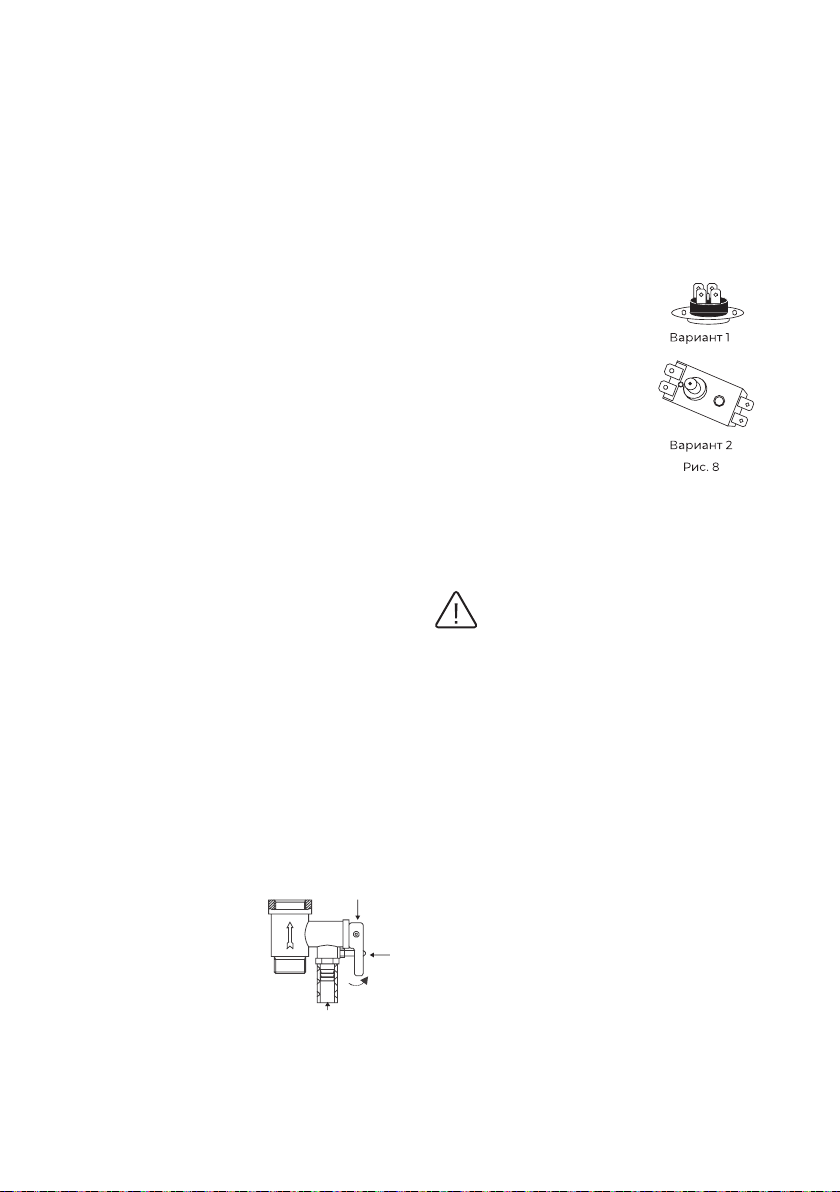
Обслуживание
лампочка - индика
тор работы УЗО (1)
кнопка TEST (2)
кнопка перезапуска (3)
лампочка - индика
тор работы УЗО (1)
кнопка TEST (2)
кнопка перезапуска (3)
лампочка - индика
тор работы УЗО (1)
кнопка TEST (2)
кнопка перезапуска (3)
ручка слива
отверстие сброса давления
винт
Термовыключатель
-
-
Примечание:
Внимание!
-
-
-
35
Page 38
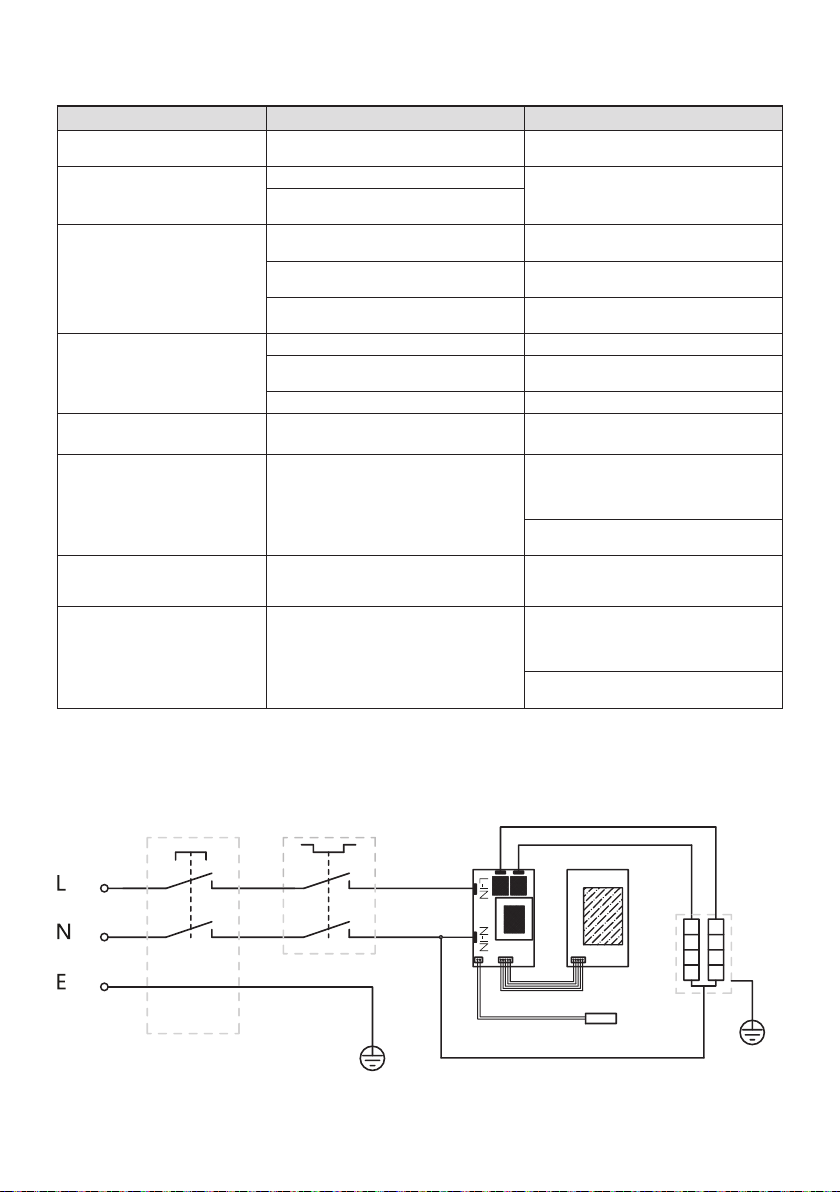
Поиск и устранение неисправностей
Проблема Возможные причины Способ устранения
Температура воды слишком
высокая
Вода течет из корпуса прибора
Индикаторные лампочки не
горят, вода не греется
Из крана выхода горячей воды
не течет вода
Протечка воды
E1
E2
E4
Электрическая принципиальная схема
36
Page 39
Транспортировка
и хранение
Комплектация
•
•
•
•
•
•
Срок эксплуатации
Дата изготовления
№ ХХХХХХХХХХХХХ
Правила утилизации
37
Page 40

Сертификация продукции
Товар соответствует требованиям:
Изготовитель:
Импортёр в РФ:
проведения работ
38
Дата
ИНФОРМАЦИЯ О ПРОВЕДЕНИИ
ПУСКОНАЛАДОЧНЫХ РАБОТ
Название сервисного
центра
ФИО мастера Произведенные работы
Page 41
Печать,
Подпись
ФИО мастера
Название
сервисного центра
фильтра AWH9820
Замена наполнителя
ный
анода на фирмен-
Замена магниевого
осмотр ТЭНа
Чистка бака и
ИНФОРМАЦИЯ О ПРОВЕДЕННОМ ОБСЛУЖИВАНИИ:
обслуживания
Дата сервисного
Номер
обслуживания №
39
Page 42
ГАРАНТИЙНЫЕ ОБЯЗАТЕЛЬСТВА
Модель Серийный номер
Дата изготовления Срок гарантии
Дата продажи* Дата монтажа**
Покупатель
Продавец
Организация, осуществившая монтаж оборудования
40
Page 43

ГАРАНТИЙНЫЕ ОБЯЗАТЕЛЬСТВА
Уважаемый Покупатель!
-
-
-
-
-
41
Page 44

-
-
-
-
-
-
-
-
-
-
-
_________________________________
_________________________________
________________________________
_________________________________
_________________________________
________________________________
42
Page 45

АСЦ
Печать
ФИО
мастера
части
Замена запасной
дефекта
Описание
ремонта
Дата окончания
ИНФОРМАЦИЯ О ГАРАНТИЙНЫХ РЕМОНТАХ
в АСЦ
Дата обращения
(ЗАПОЛНЯЕТСЯ АВТОРИЗОВАННЫМ СЕРВИСНЫМ ЦЕНТРОМ (АСЦ):
АСЦ
Название
Page 46

Visit us:
www.philips.com/water
Specications are subject to change without notice
©2022 AquaShield
All rights reserved.
The Philips trademark and the Philips Shield Emblem are registered trademarks of Koninklijke Philips N.V. used under license.
This product has been manufactured by and is sold under the responsibility
of Hong Kong AquaShield Health Technology Company Limited
and Hong Kong AquaShield Health Technology Company Limited is the warrantor in relation to this product.
Rev A JAN 22
 Loading...