

Philips AW 7890 User Manual
CONSUMER ELECTRONICS
iiiìM Mllìì
AW7890 AW7892
PHILIPS
■~«~ï
(D
(D
(NL)
(D
(D
□ tiOOOOQ D01138
Stereo Radio Cassette Recorder
Radiocassette stéréo
Stereo-Radio-Cassetten-Recorder 11
Stereo radio-cassetterecorder
Radiocasete estéreo
Radioregistratore stereo
stereo kassettradio
Stereo radionauhuri
7
15
19
23
27
31
3

English...........
Illustrations
Guarantee and service.................pages 38-39-40
.......................................
_
page 3 (T) Italiano
pages 36-37
..............
Illustrazioni
Garanzia e sen/izio .....................pagine 38-39-40
.......................................
pagina 23
pagine 36-37
(T) Français
Illustrations
Garantie et service après-vente .. pages 38-39-40
........................................
(d) Deutsch...........
Abbildungen.......................................Seiten 36-37
Garantieleistung und Service
Amtsblatt ..................................................Seite 51
Nederlands
Afbeeldingen
Garantie en sen/ice...................pagina’s 38-39-40
.................................
(T) Español
Ilustraciones
Garantía ....................................páginas 38-39-40
..................................
........... ...
pages 36-37
_
___
Seiten 38-39-40
__
pagina 15
pagina’s 36-37
.
...........
página 19
páginas 36-37
page 7 (¥) Svenska sida 27
Seite 11 (s^ Suomi sivu 31
_
ynu
Rgurer..............................................sidorna 36-37
Garanti och service
Kuvat.................................................. sivut 36-37
Takuu ja huolto................................ sivut 38-39-40
....................
sidorna 38-39-40
(DK) Danmark
Typeskiltet findes i batterirummet.
Dette Produkt overholder kravene til radio-interferens
af Europaeisk Fasllesmarked.
Bemaerk: Netafbryderen POWER © er sekundaert
indkoblet og afbryder ikke strommen fra nettet. Den
indbyggede netdel er derfor tilsluttet til lysnettet sä
lange netstikket sidder i stikkontakten.
Garanti og sen/ice
(¥) Norqe
---------
' «
Typeskilt finnes i battenrommet.
Observer: Nettbryteren POWER © er sekundert
innkoplet. Den innebygde netdelen er derfor ikke
frakoplet nettet sä lenge apparatet er tilsluttet
nettkontakten.
Garanti og service
..........................
..........................
sider 38-39-40
sider 38-39-40
N0M
Es necesario que lea cuidadosamente su instructivo
de manejo.

English
For the illustrations, keep the pages 36-37 open
@ MAINS - socket for mains lead
The type plate will be found in the battery com
partment.
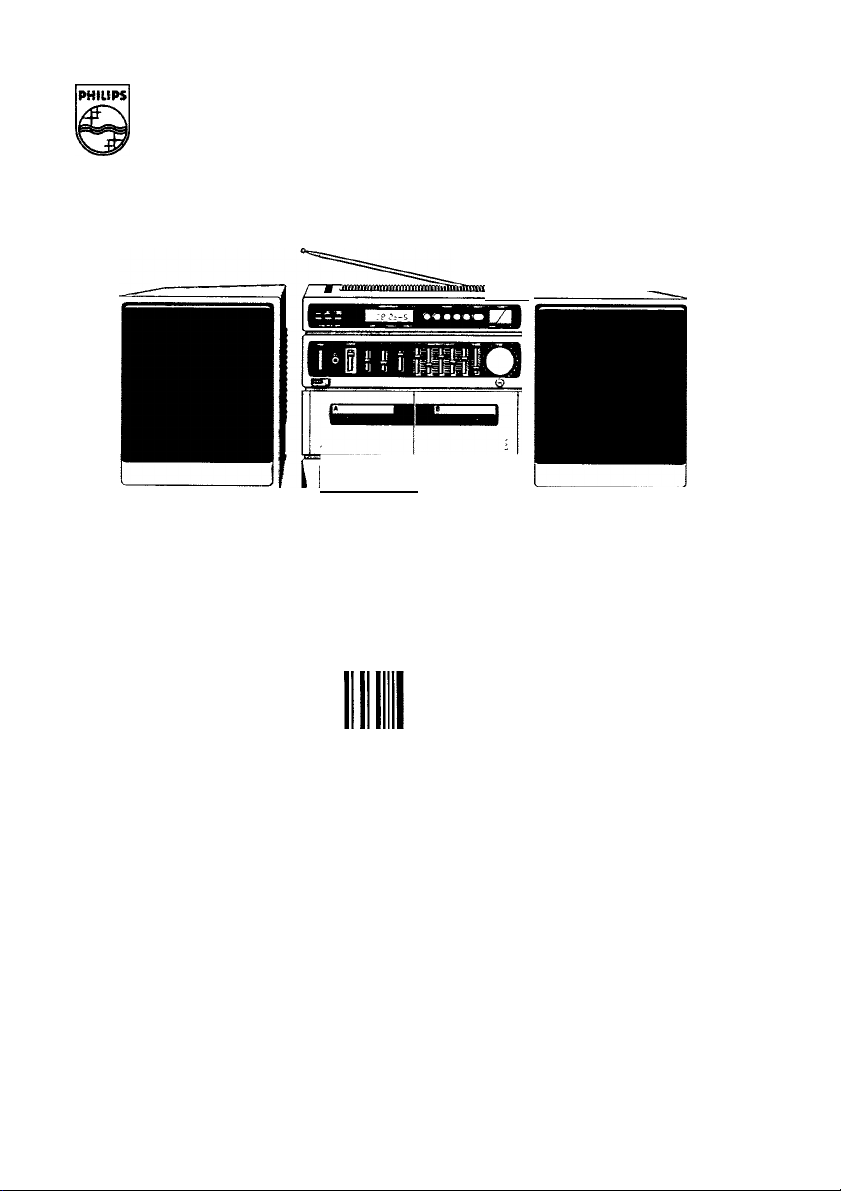
CONTROLS - figs. 1-2
_______________
© POWER on/off switch with indicator -3s© DUBBING SPEED selector with high speed
indicator -3s© FM STEREO indicator 3s
© radio display, shows;
FM/MW/LW - the selected wave band (UNnoton
all versions)
the tuned frequency in ’MHz’ (for FM) or ’kHz’ (for
MW and LW)
’T.,.’5’, indicating the PRESET location of the
shown frequency
© ’P1’...’P5’ PRESET buttons - to select PRESET
transmitters
© MEMORY button - to store transmitter frequen
cies
® radio TUNING buttons v / д
® ,'¡7, PHONES socket for stereo headphones
® FUNCTION selector - to select the sound source
for reproduction or recording
® FM MONO/STEREO selector
© BAND selector
® GRAPHIC EQUALIZER tone controls
100 Hz - lower bass
500 Hz - upper bass
3 kHz (3 000 Hz) - mid-range
5 kHz (5 000 Hz) - lower treble
12 kHz (12 000 Hz) - upper treble
© BALANCE control
® built-in mono microphone MIC
© VOLUME control
© tape counter with zero reset button, deck A
® deck A keyboard, recording and playback
• RECORD - record
► PLAY
<4 REWIND - fast rewind
>► F.FWD - fast forward wind
■ STOP/EJECT
II
PAUSE
© deck В keyboard, for playback only
► PLAY
<4 REWIND - fast rewind
F.FWD - fast forward wind
■ STOP/EJECT
II
PAUSE
© EXT. ANTENNA socket for FM-aerial (not on all
versions)
@ CD/AUX sockets for recording from an amplifier,
receiver, recorder, CD player, etc.
® RIF-selector, for eliminating possible whistle
tones during MW and LW radio recordings
@ VOLTAGE selector (not on all versions)
@ terminals for loudspeakers SPEAKERS
SUPPLY
Battery supply
• Open the battery compartment (fig. 2).
• Forthe RADIO PRESET MEMORY (fig. 2), insert as
indicated three batteries, type R6, UM3 or AA.
• For the radio cassette recorder, insert as indicated
eight batteries, type R20, UM1 or D-cells (fig. 2).
• Remove the batteries if exhausted or if they will not
be used again for a long period.
• The battery supply is switched off if the mains lead
socket MAINS @ is occupied. To change over to
battery supply, pull out the plug from the MAINS
socket
Mains supply
• Check if the mains voltage as shown on the type
plate corresponds to your local mains supply. If it
does not, consult your dealer or service organisa
tion.
If the set is equipped with a VOLTAGE selector©, set
this selector to the local mains voltage.
• Connect the mains lead to the MAINS socket ©
and the wall socket. The mains supply is now
switched on.
• To disconnect the set from the mains completely,
withdraw the mains plug from the wall socket.
Important note for users In U.K.;
When fitting a mains plug to the mams lead proceed as folIov;s'
The v.^res in the mams lead are coloured in accordance v.rith the
fo!Iov;ing code: Blue=Neutral, Brovmi=Lp.'e.
These colours may not correspond v/ith the colour markings idenlitying
the terminals in your plug, so proceed as follows:
Connect the Brovm v/ire to the terminal marked L or coloured Red.
Connect the Blue v;ire to the terminal marked N or coloured Black.
No connecton Is necessary to the earth terminal.
Note: This apparatus must be protected by a 3 Amp Fuse if a 13 Amp
plug is used or, if any other type of plug is used, by a 5 Amp Fuse either
in the plug or adapter or at the distribution board. If in doubt consult
a qualified electrician.
CONNECTIONS
Stereo headphone socket PHONES ©
You may connect stereo headphones with 3.5 mm
plug to socket PHONES ©. The loudspeakers are
then muted.
Socket for FM-aerial © EXT. ANTENNA
(Not on all versions)
Socket © is for connection of:
- a roof-mounted FM aerial with an impedance of
75 ohms
- the Cable or Community Antenna System, imped
ance 75 ohms

Input sockets CD/AUX @
Cinch-sockets for amplifying or recording the signal
from an amplifier, receiver, tuner, recorder, CD
player, etc.
• Connect the CD/AUX sockets @ to the output
sockets TAPE OUT, REC OUT or UNE OUT of the
other set.
• Then release the button and press it again quickly
and briefly: then the displayed frequency stops.
• Then press TUNING V or A briefly each time. In
this way the frequency is changed step-by-step until
finally the right frequency has been reached. One
step is 0.05 MHz (50 kHz) on FM, 9 or 10 kHz on MW
and 1 kHz on LW.
Loudspeaker terminals @ SPEAKERS
See fig. 4 for connecting the supplied loudspeakers
(or others with an impedance of 8 Ohms). Connect
the coloured (or marked) wire to the coloured
tenninal.
See fig. 3 for removing and fixing the supplied
loudspeakers.
RADIO RECEPTION_________________
• Switch on the set with POWER switch ©.
• Set the FUNCTION selector © to RADIO.
• Adjust the sound with the controls VOLUME ©,
BALANCE ©and GRAPHIC EQUAUZER ©
• Select the wave band using the BAND selector©.
The radio display © shows the selected wave band
’FM', ’MW (Medium Wave) or ’LW (Long Wave) and
the frequency in ’MHz’ (for FM) or ’kHz' (for MW and
LW). (LW not on all versions).
- For FM, pull out the telescopic aerial. To improve
FM-reception, incline and turn the aerial. Reduce
its length if the FM-signal is too strong (very close
to a transmitter).
You may also push-ln the telescopic aerial and
connect an external FM-aerial with an impedance
of 75 Ohms (or the Community or Cable Antenna
system) to the EXT. ANTENNA socket!^ (not on all
versions).
- For AM/MW and LW (Medium and Long Wave), the
set is provided with a built-in aerial, so there is no
need to use the telescopic aerial. The aerial can
be directed by turning the whole set.
• In case of FM-reception, set the FM MONO/STE-
REO selector ® to the desired position.
• Tune automatically, manually or by means of the
PRESET-buttons ’P1’...’P5’ to a radio station.
Automatic tuning
• Keep TUNING @ V or A pressed until the
displayed frequency keeps on changing: then re
lease the button. The receiver stops when finding a
strong transmitter.
• If the transmitter found is not the desired one,
simply repeat this operation.
• When the FM STEREO indicator Q) ^ lights up,
you are receiving a FM-stereo transmitter. A disturb
ing noise, due to a weak FM-stereo signal, can be
suppressed by setting the FM MONO/STEREO
selector ©to FM MONO. The FM STEREO indicator
© -S' will then go out and you will hear (and record)
the FM programme in mono.
• Always switch off the set after use with POWER
switch ©.
PREFERRED TRANSMITTERS - PRE
SET
______________________________
For each wave band you can store the frequencies
of 5 transmitters.
Storing transmitter frequencies
1. Select the wave band using the BAND selector®.
2. Using the TUNING V A buttons ©, tune either
automatically or manually to the frequency to be
stored. Programme guides often contain a list of
transmitter frequencies.
3. If you want to store the frequency shown, press
MEMORY ©.
4. Now, press the desired PRESET button ’P1’...’P5’.
The chosen PRESET-location is shown on the
display. The frequency is now stored.
• A stored frequency is only erased from the
memory by storing another frequency in its place.
• The contents of the memory will be kept (also if the
power supply is interrupted) until the RADIO PRESET
MEMORY batteries (fig. 2) are exhausted.
Tuning to a preselected transmitter
• Set the FUNCTION selector © to RADIO.
• Select the wave band using the BAND selector ©
• In case of FM-reception, set the FM MONO/STE
REO selector ©to the desired position.
• Press the desired PRESET button ’P1’...’P5’. The
chosen PRESET-location is shown on the display.
• Always switch off the set after use with POWER
switch ©
Manuai tuning
Manual tuning is useful when you already know the
frequency of the desired transmitter (e.g. from your
programme guide).
• Keep TUNING © V or A pressed until you
approach the required frequency.
 Loading...