

Page 1

AT850
Rechargeable Cordless/Cord
Tripleheader Shaver
Always here to help you
Register your product and get support at
www.norelco.com/register
Question?
Question?
Contact
Contact
Philips
Philips
Norelco
Norelco
Page 2

2
ENGLISH 4
Congratulations on your purchase and
welcome to Philips Norelco!
To fully benefit from the support that Philips
Norelco offers, register your product at
www.norelco.com/register
AT850
Page 3

ENGLISHENGLISH
54
IMPORTANT SAFETY
INSTRUCTIONS
When using an electric appliance, basic precautions should
always be followed, including the following:
Read all instructions before using this appliance.
DANGER
To reduce the risk of electric shock:
1. Do not reach for a corded shaver/charging stand that has
fallen into water. Unplug immediately.
2. Power plug and the accessories connected to it are not for
immersion or for use in shower.
3. Do not use an extension cord with this appliance.
4. Always unplug this shaver/charging stand from the electrical
outlet immediately after use, except when shaver is (re)
charging.
5. Unplug and remove power supply cord from shaver
before cleaning.
6. The batteries used in this device may present a fire or
chemical burn hazard if mistreated. Do not disassemble, heat
above 100ºC (212°F) or incinerate.
WARNING
To reduce the risk of burns, fire, electric shock, or
injury to persons:
1. Close supervision is necessary when this shaver is used by,
on, or near children or invalids.
2. Use this shaver for its intended household use as described
in this manual. Do not use attachments not recommended
by Philips Electronics North America Corporation.
3. Never operate this shaver/charging stand if it has a damaged
cord or charging plug, if it is not working properly, if it has
been dropped or damaged, or dropped into water while
plugged in. For assistance call 1-800-243-3050.
4. Keep the shaver, cord, charging stand and charging plug away
from heated surfaces.
5. Never drop or insert any object into any opening.
6. Do not use the adapter in or near a power outlet that
contains an electric air freshener to prevent damage to the
adapter.
7. Do not charge or plug in shaver/charging stand outdoors or
operate where aerosol (spray) products are being used or
where oxygen is being administered.
8. Do not use this shaver with a damaged or broken comb, as
facial injury may occur.
9. Always attach plug to shaver first, then plug into outlet.
Be certain plug is inserted firmly into shaver, up to mark
indicated on plug. For stand usage, always put shaver in
charging stand first, attach cord to charging stand, then
plug into outlet. To disconnect, remove charging plug from
outlet.
10. Never put the shaver/charging stand in direct sunlight or
store at a temperature above 140°F (60°C).
11. Keep the cord/charging stand dry at all times. Do not handle
with wet hands.
12. To prevent possible damage to the cord, do not wrap cord
around the shaver or charging stand.
13. Do not attempt to open the appliance to replace the
battery.
14. Only use the power plug supplied with the appliance.
SAVE THESE
INSTRUCTIONS
IMPORTANT: The power plug contains a transformer. Do
not cut off the power plug to replace it with another plug, as
this will cause a hazardous condition.
Page 4

6
ENGLISHENGLISH
7
Table of Contents
Features ........................................................ 8-9
45 - DAY MONEY-BACK GUARANTEE
To enjoy the closest and most comfortable shave from your new Philips Norelco
Men’s Shaver, the shaver should be used exclusively for 3 weeks. This allows your
hair and skin enough time to adapt to the Philips Norelco Shaving System. If, after
that period of time, you are not fully satisfied with your Philips Norelco Men’s
Shaver, send the product back along with dated sales receipt and we’ll refund
you the full purchase price. The shaver must be shipped prepaid by insured
mail, insurance prepaid, have the original sales receipt, indicating purchase price, the date of purchase, and the money-back guarantee return
authorization form enclosed. We cannot be responsible for lost mail.
The shaver must be postmarked no later than 45 days from the date of purchase.
Philips Norelco reserves the right to verify the purchase price of the shaver and
limit refunds not to exceed suggested retail price.
To obtain money-back guarantee return authorization form,
call 1-800-243-3050 for assistance. Delivery of refund check will
occur 6–8 weeks AFTER receipt of refund product.
LED Multi-Purpose Display .......................10
Before First Use ...........................................11
Charging ...................................................11-13
Recharging ..................................................... 14
Quick Charge ...............................................14
Put It To The Test & Shaving Tips ........14-15
How to Shave
With An Electric Shaver .......................15-16
Trimming ........................................................16
Cleaning ....................................................17-22
Replacing the Shaving Heads ...............22-24
Storage ............................................................ 24
Assistance ...................................................... 25
Disposal .......................................................... 25
Accessories ...................................................26
Warranty ........................................................ 27
Page 5

ENGLISH ENGLISH
98
Features
Shaver Head
Assembly
Protective Cap
Individually
Floating
Heads
Shaver Head
Release Button
• Hair Chamber
captures shaven
hair
Electronic
On/Off Button
Shaver Head Replacement
Indicator
LED Charge
Indicators
• Battery Charge, Full,
Low & Quick Charge
Indicators
Pop-up Trimmer
Automatic
Worldwide Voltage
100V to 240V AC
Charging Stand
Pouch
Cleaning Brush
Rechargeable -
8-hour Full
Charge for up to
45 minutes
cordless use
Corded or cord
free use
Full 2-Year Warranty
45-Day Money-Back
Guarantee
Page 6
ENGLISH
ENGLISH
1110
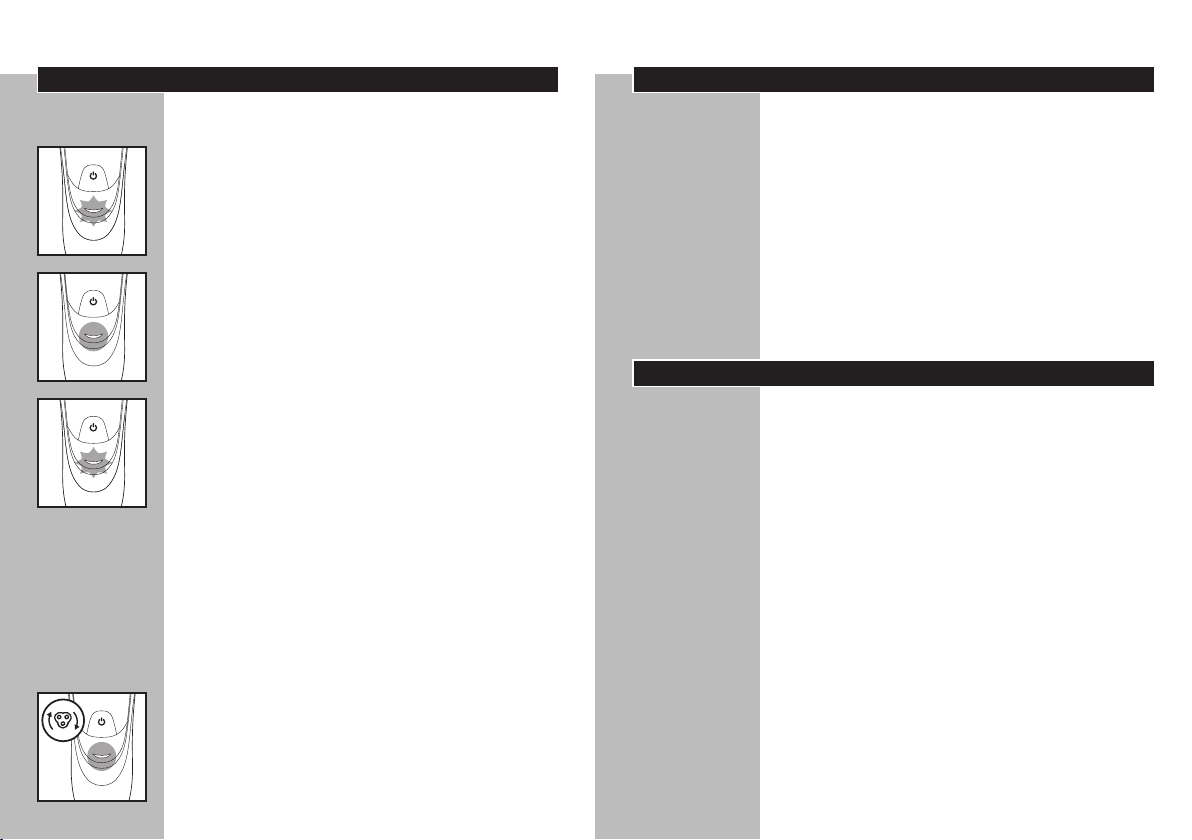
LED Multi-Purpose Display
The display provides the following information:
◗ Charging Indicator
C
When the shaver is charging, the charging light
blinks green.
◗ Full Charge Indicator
C
When the battery is fully charged, the charging
light lights up continuously. After approximately
30 minutes, the charging light goes out to save
energy.
◗ Low Battery Indicator
C
When the battery is almost empty (5 or less
shaving minutes left), the charging light starts to
blink orange. When you turn the shaver OFF the
charging light blinks orange for a few seconds.
◗ Quick Charge Indicator
When you charge the empty battery, the
charging light alternately blinks orange and green.
After approximately 3 minutes, the charging light
continues to blink green.
- The shaver now contains enough energy for a
5-minute shave.
Before First Use
◗ Charge the shaver before you start using
it (see ‘Charging’). Make sure the shaver is
switched off before you start charging it.
Important
◗ Only use the power cord provided to charge
the shaver.
◗ The power plug transforms 100-240V AC to
less than 24V DC.
Charging
◗ Charging or recharging at temperatures below
40ºF or higher than 95ºF adversely affects
lifetime of batteries.
◗ Charging or recharging requires eight full
hours.
◗ A fully charged shaver has a cordless shaving
time of up to 45 minutes.
◗ When charging shaver for the first time or
after a long period of non-use, charge until
the charging light lights up continuously.
◗ Do not charge shaver in a pouch.
◗ Do not charge/recharge or use shaver until
fully dried.
◗ Shaver Head Replacement Indicator
C
-Once a year, depending on your shaving behavior,
the shaver head replacement symbol will light up
orange continuously, as a reminder to replace the
shaver heads.
Page 7
ENGLISH
ENGLISH
1312
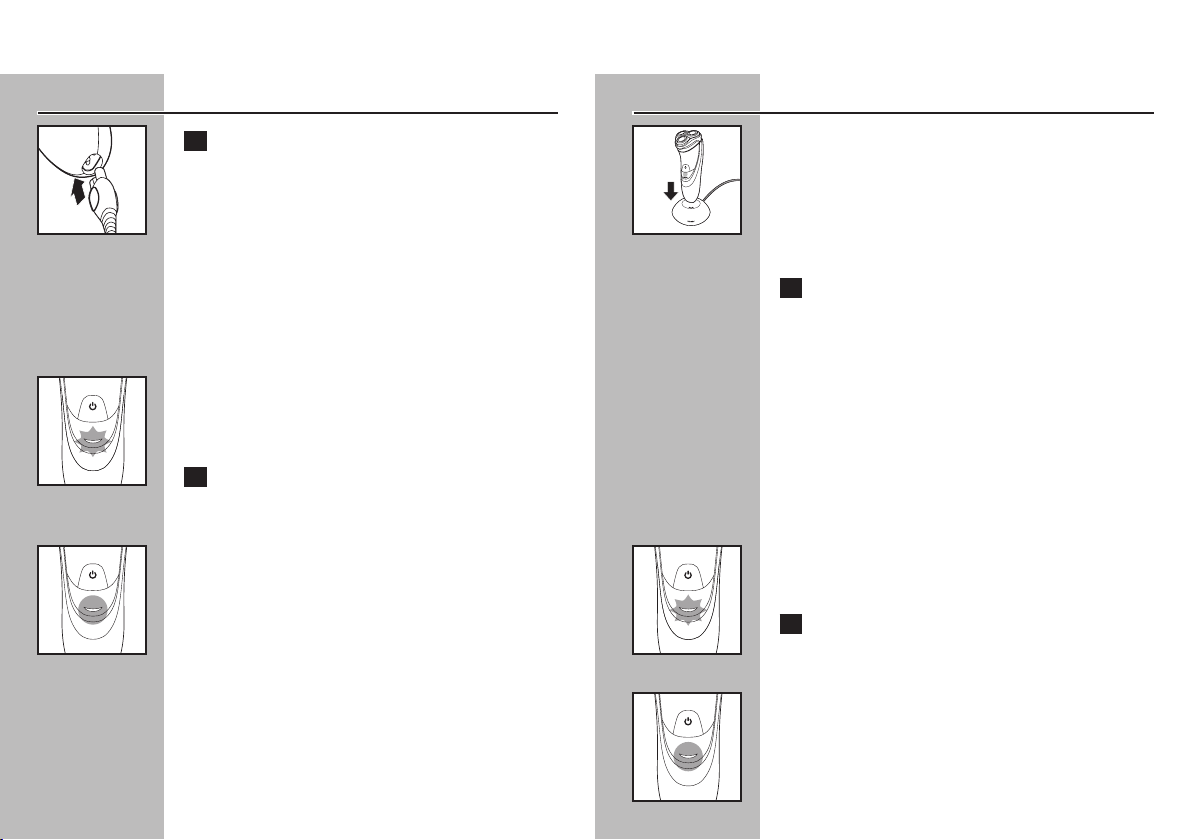
Charging with a Cord
1 Connect cord directly to shaver and
C
◗ An adaptor plug may be necessary for
C
C
connect the charging plug into any 100V to
240V AC outlet. Use only the power cord
provided.
charging plug usage in some foreign countries.
Use an attachment plug adaptor of the proper
configuration for the power outlet.
The charging plug will automatically convert to
work on 100V to 240V AC systems.
◗ The display on the shaver will indicate shaver
is charging.
2 Charging and recharging requires a full
8 hours. A fully charged shaver has a
cordless shaving time of up to 45 minutes.
◗ When the battery is fully charged, the
charging light lights up continuously.
After approximately 30 minutes, the charging light
goes out to save energy.
Charging in Charging Stand
C ◗ Always place shaver in stand in an upright
position making sure charging contacts in
bottom of stand fit into recess in bottom of
shaver.
◗ Always remove shaver from stand by lifting
straight up. Do not tilt shaver.
1 Place shaver in charging stand and connect
the small plug of cord to charging stand.
Connect the charging plug into any 100V
to 240V AC outlet. Use only the power
cord provided.
◗ An adaptor plug may be necessary for
charging plug usage in some foreign countries.
Use an attachment plug adaptor of the proper
configuration for the power outlet.
The charging plug will automatically convert to
work on 100V to 240V AC systems.
◗ The display on the shaver will indicate shaver
C
is charging.
2 Charging and recharging requires a full
8 hours. A fully charged shaver has a
cordless shaving time of up to 45 minutes.
◗ When the battery is fully charged, the
C
charging light lights up continuously.
After approximately 30 minutes, the charging light
goes out to save energy.
Page 8
ENGLISH
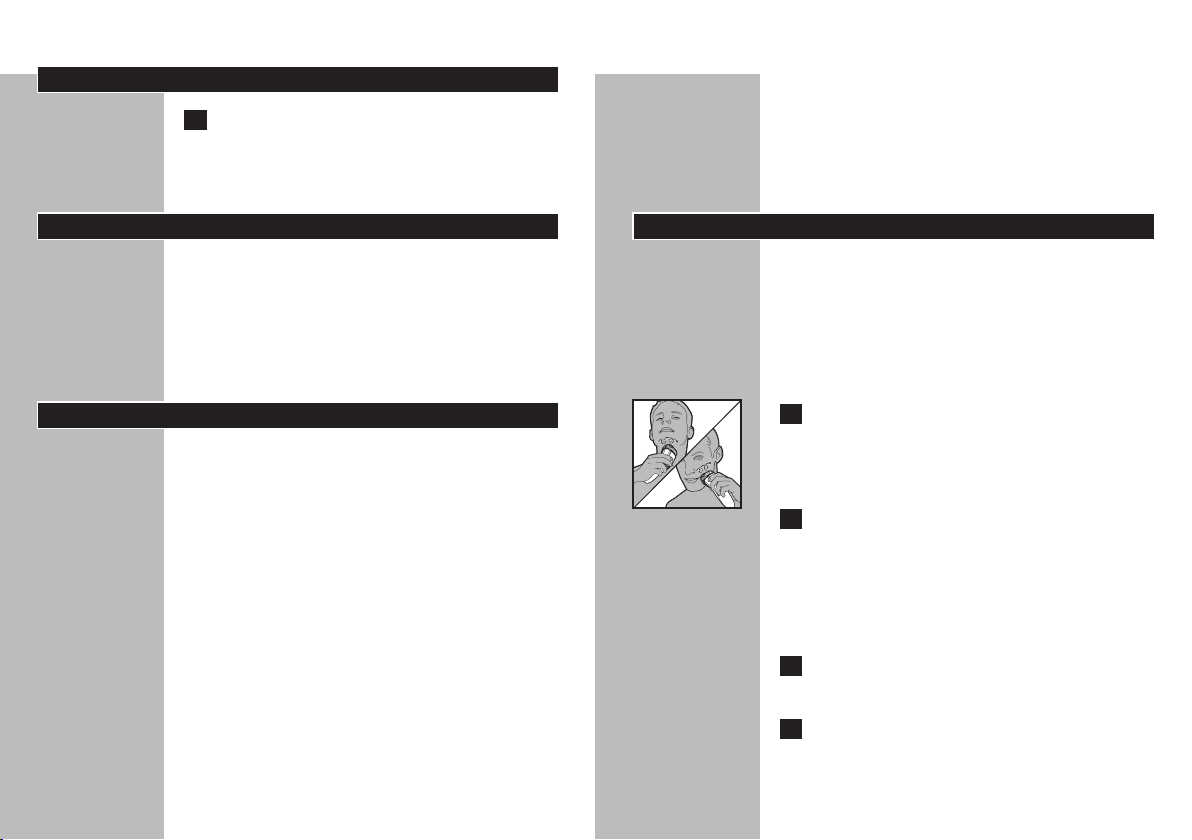
1 Recharging requires 8 hours.
Recharging
Recharge when the charging light on the shaver
display blinks orange.
ENGLISH
◗ If you are still not convinced after 21 days,
Philips Norelco will refund you the full
purchase price as long as the request is
received within 45 days of purchase.
1514
Quick Charge
When you charge the empty battery, the charging
light alternately blinks orange and green. After
approximately 3 minutes, the charging light
continues to blink green. The shaver now contains
enough energy for a 5-minute shave.
Put It To The Test & Shaving Tips
◗ 21 Day Trial and Conversion Process. It is a fact
that your skin and beard need time to adjust to
a new shaving system.
◗ Use your new shaver exclusively for 3 weeks
to fully enjoy the closeness of a Philips Norelco
shave.
◗ At first you may not get as close a shave as you
expect, or your face may even become slightly
irritated. This is normal since your beard and
skin will need time to adjust. Invest 3 weeks and
you’ll soon experience the full joy of your new
shaver.
◗ Stick with it! If you alternate shaving methods
during the adjustment period, it may make it
more difficult to adapt to the Philips Norelco
shaving system.
How To Shave With An Electric Shaver
◗ Use this shaver for its intended household use
as described in this manual.
◗ For hygienic reasons, the shaver should only
be used by one person.
◗ Shaving with a clean, dry face gives the best
results.
C 1 Turn shaver ON by pressing the on/off
button once. Shave against the direction
of beard growth using both straight and
circular movements.
2 Stretch your skin with your free hand
so blades can cut whiskers. Gently press
shaver to skin so the floating heads can
follow the contours of your face. DO
NOT press too hard. Too much pressure
can pinch the skin into the combs.
3 Turn shaver OFF by pressing the on/off
button once.
4 Clean the shaver after each use (see
chapter 'Cleaning').
Page 9
ENGLISH
C 5 Put the Protective Cap on the shaver to
1 Turn shaver ON.
C
C
C
5 Turn shaver OFF.
protect shaving heads.
Replace your Philips Norelco shaving heads
(model #HQ8 or SH50) once a year for optimal
shaving results.
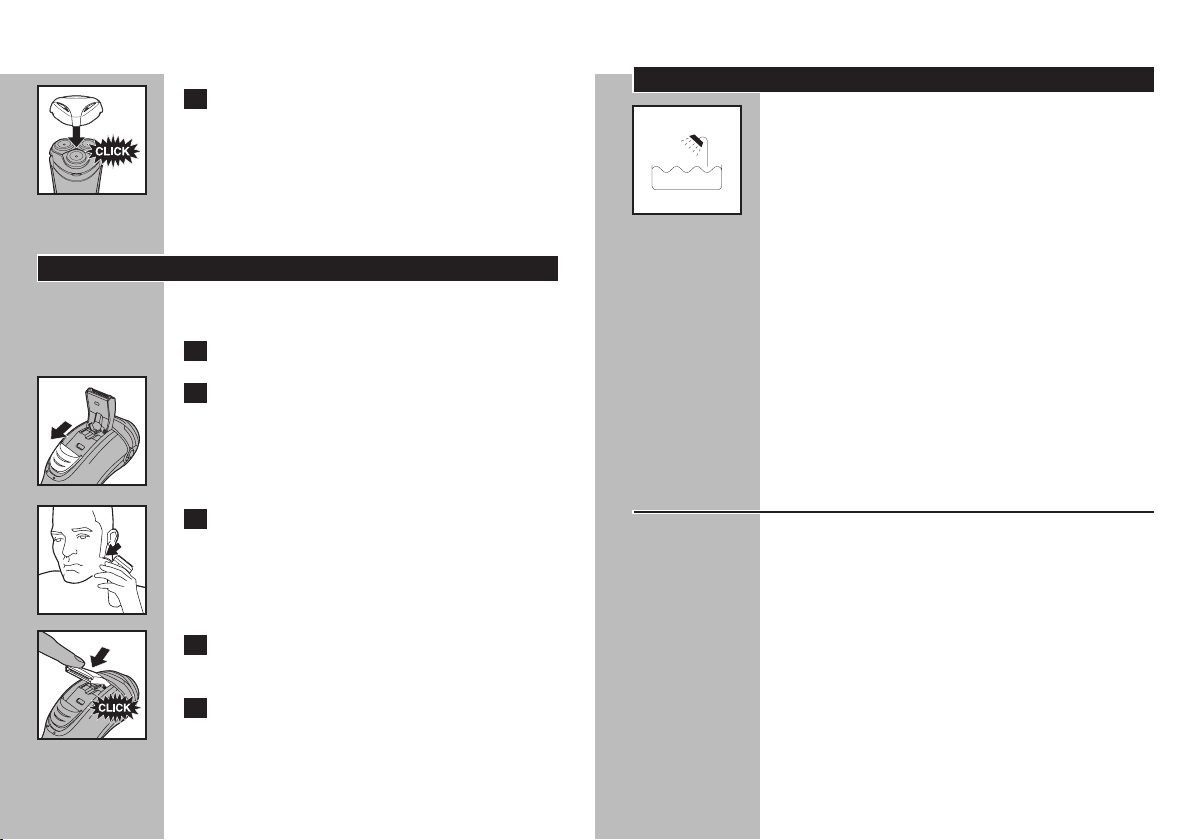
Trimming
To groom sideburns and moustache:
2 Push down spring-release trimmer switch.
The trimmer can be activated while the shaver is
running.
3 Hold trimmer as shown and move in
downward strokes with gentle pressure.
4 Close trimmer by pressing trimmer down.
ENGLISH
1716
Cleaning
C ◗ This symbol indicates that the shaver can be
used in the bath or shower.
◗ Always clean your shaver after each use.
◗ Always switch shaver OFF, unplug and remove
power cord before cleaning.
◗ Never clean, remove or replace head
assembly while motor is on.
◗ Do not apply pressure to combs. Do not
touch shaving heads with hard objects as this
may dent or damage precision-made slotted
combs.
◗ Do not use shaver if combs are damaged or
broken. Facial injury may occur.
◗ Do not use compressed air, abrasives,
scourers or liquids such as acetone to clean
the shaver.
Cleaning the Shaving Unit
The shaving heads may be quickly cleaned after
each use by rinsing with hot water: Water from
the tap should be on a hot setting, BUT BE
CAREFUL TO TEST WATER FIRST SO AS NOT
TO BURN OR SCALD HANDS.
◗ Regular cleaning guarantees better shaving
results.
◗ Do not immerse shaver in water.
◗ While rinsing shaving heads, water may drip
out of the base of shaver. This is a normal
occurrence.
Page 10
ENGLISH
18
ENGLISH
19
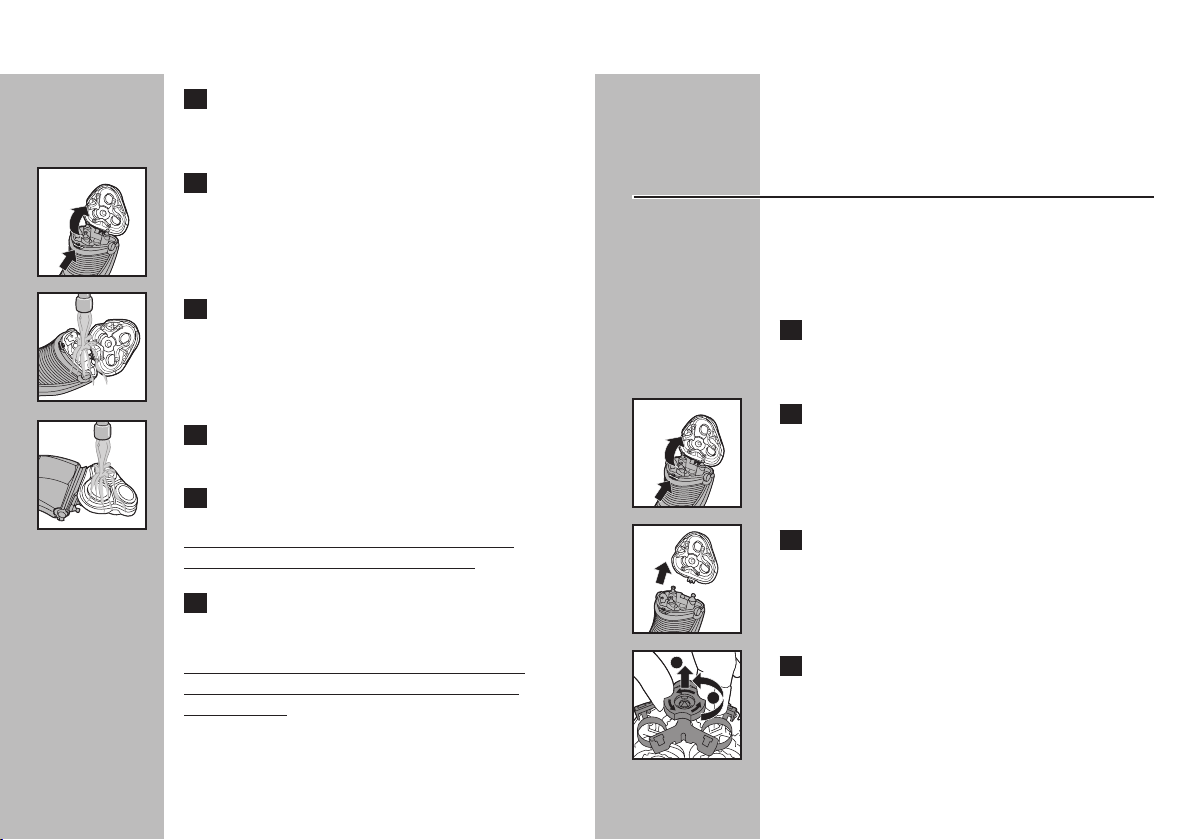
1 Always turn shaver OFF, unplug from
outlet and remove power cord from
shaver.
2 Press the Shaver Head Release Button to
C
C
open the Shaver Head Assembly.
3 Clean inside shaving heads and hair
chamber by running under hot water.
◗ You may also clean the hair chamber without
water by using the supplied brush.
Extra-thorough Cleaning Method
Do not mix up the cutters and combs as the
shaving performance may be adversely affected
for several weeks before optimal shaving
performance is restored.
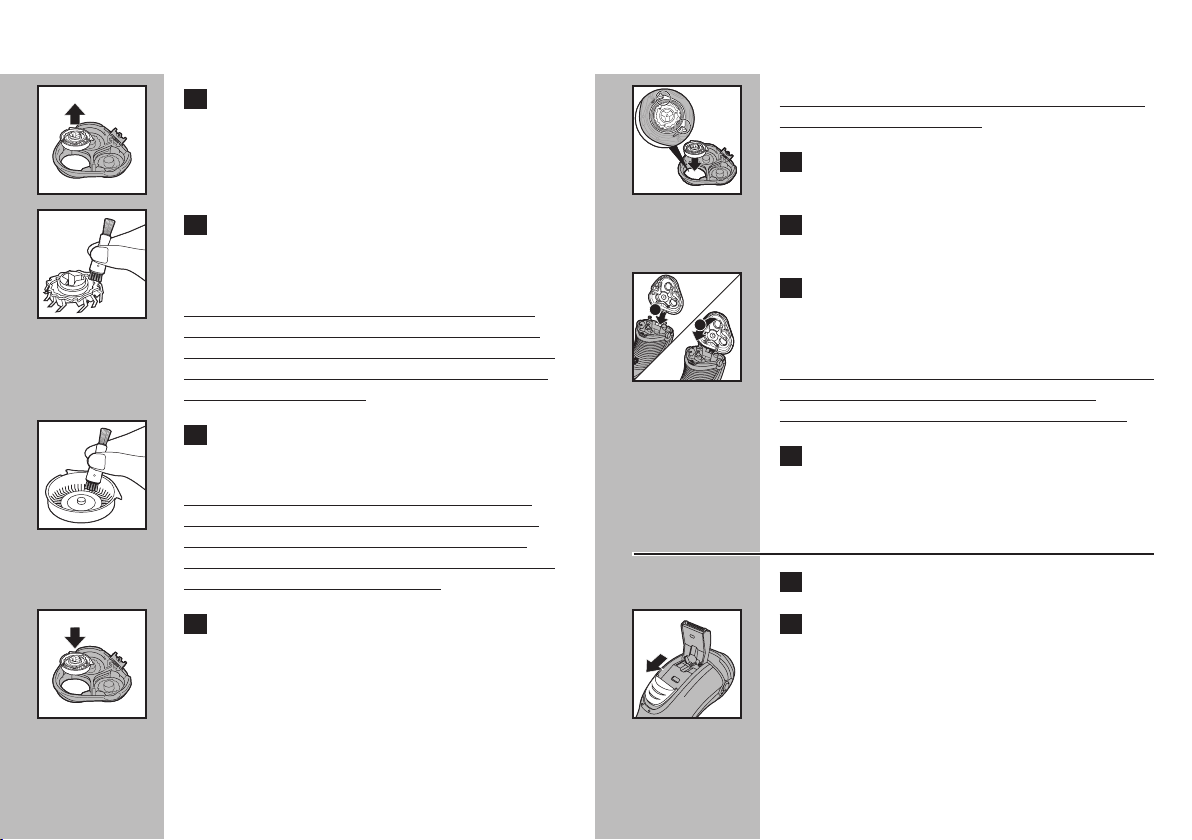
1 Turn shaver OFF, remove the charging plug
from the outlet and power cord from the
shaver.
C 2 Press the Shaver Head Release Button to
4 Clean outside of Shaver Head Assembly by
C
5 Close the Shaver Head Assembly and
running under hot water.
shake off excess water.
Be careful not to hit the shaving unit against
anything while shaking off excess water.
6 Open Shaver Head Assembly again and
leave open to air dry.
NOTE: Do not wipe or dry the shaving heads
with a towel or tissue. This could damage the
shaving heads.
C 3 Pull the shaving unit off the shaver.
B
C 4 Turn the lock counterclockwise to unlock
A
open the Shaver Head Assembly.
(A) and remove the retaining frame (B).
◗ If the shaving unit becomes detached from the
shaver, you can easily reattach it.
Page 11
ENGLISH
20
ENGLISH
21
C 5 Remove and clean one set of cutters and
combs at a time.
C 6 Separate the cutter from the comb and
clean it with the short bristled side of the
brush supplied.
Do not clean more than one cutter and comb
at a time, since they are all matching sets. If you
accidentally interchange the cutters and combs, it
could take several weeks before optimal shaving
performance is restored.
C 7 Clean the inside and outside of the comb
with the brush supplied.
For optimum performance, shaver cutters and
combs should be cleaned in a degreasing liquid
(e.g. alcohol) and lubricated with one drop of
mineral oil (in the center of the head). This helps
prevent wear of the shaving heads.
C 8 Replace the set back into the Shaver Head
Assembly.
C Make sure that the two pointy edges of the head
fit exactly into the recesses.
9 Repeat the process for the other two sets
of cutters and combs.
10 Replace the frame and turn the lock
clockwise until it locks into place.
C 11 Insert the notch of the shaving unit into
1
2
12 Put the Protective Cap on shaver to
1 Turn shaver OFF.
the slot in the top of the shaver (1) and
then close the shaving unit (2).
NOTE: If the shaving unit does not close smoothly,
make sure you inserted the shaving heads
properly and that the retaining frame is locked.
protect heads.
After Each Use: Trimmer
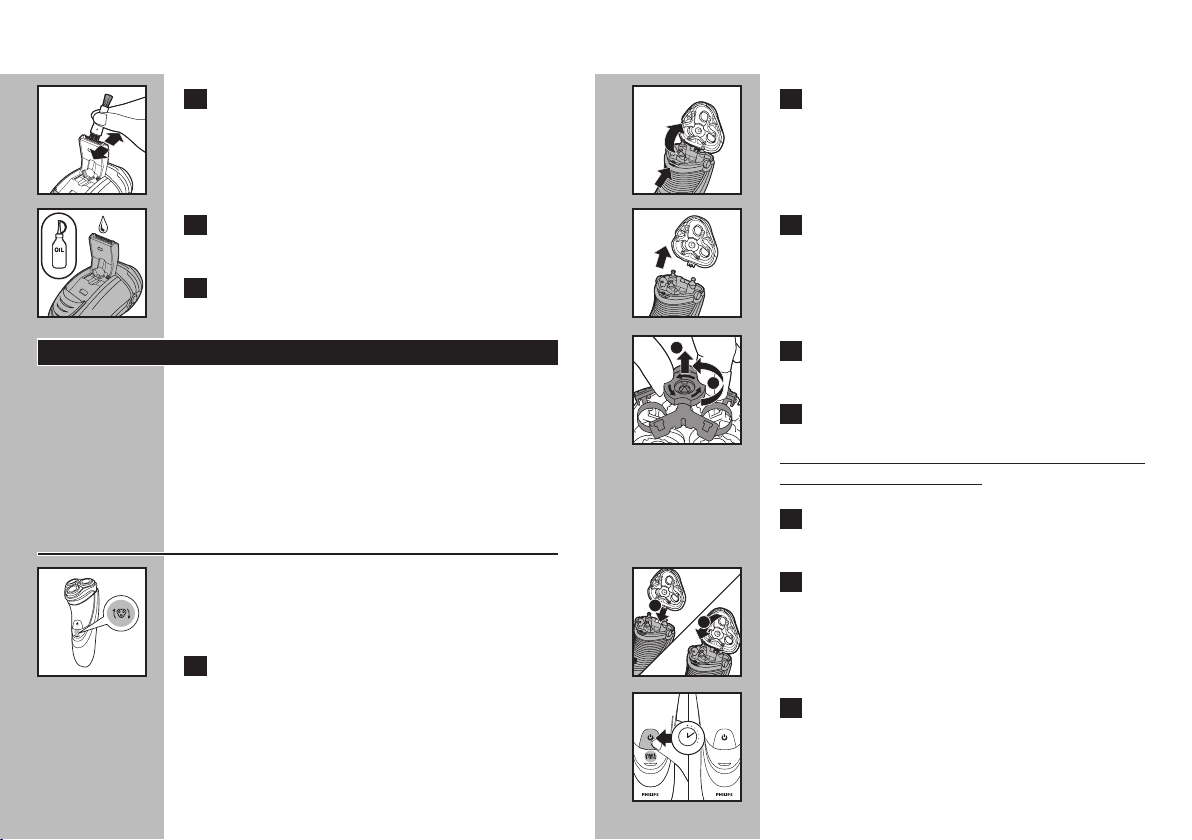
C 2 Push down spring-release trimmer switch.
Page 12
ENGLISH
22
ENGLISH
23
C 3 Clean trimmer with the short-bristled side
of the brush every time you use it.
C 4 Lubricate the trimmer teeth with one
drop of mineral oil every 6 months.
5 Close trimmer by pressing trimmer down.
Replacing the Shaving Heads
◗ Replace the shaving heads once a year for
optimal shaving results.
◗ Replace damaged or worn shaving heads with
model HQ8 or SH50 Philips Norelco shaving
heads only.
Shaver Head Replacement Indicator
C ◗ The shaver head replacement indicator
symbol will light up orange continuously to
remind you to replace your shaving heads.
1 Turn shaver OFF, remove the charging plug
from the outlet and power cord from the
shaver.
C 2 Press the Shaver Head Release Button to
open the Shaver Head Assembly.
C 3 Pull the shaving unit off the shaver.
B
C 4 Turn the lock counterclockwise to unlock
A
(A) and remove the retaining frame (B).
5 Remove the shaver heads and place the
new shaving heads in the shaving unit.
Make sure that the two pointy edges of the head
fit exactly into the recesses.
6 Replace the frame and turn the lock
clockwise until it locks into place.
C 7 Insert the notch of the shaving unit into
1
2
the slot in the top of the shaver (1) and
then close the shaving unit (2).
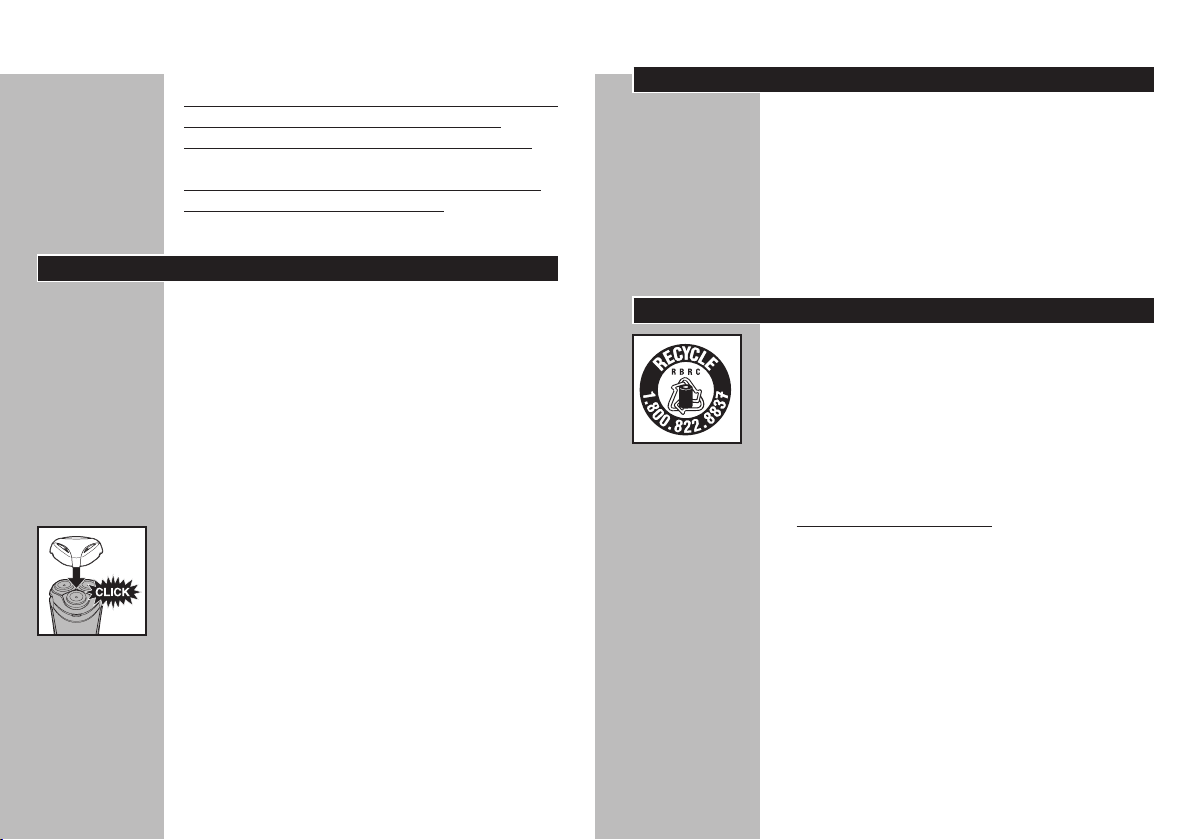
C 8 Press and hold the on/off button for at
5 sec.5 sec.
least 5 seconds to reset. The orange shaver
head replacement indicator symbol will go
out.
Page 13
ENGLISH
24
NOTE: If the shaving unit does not close smoothly,
make sure you inserted the shaving heads
properly and that the retaining frame is locked.
This shaver has no other user-serviceable parts.
For assistance call 1-800-243-3050.
Storage
ENGLISH
Assistance
◗ For assistance, visit our website:
www.philips.com/support or
call toll free 1-800-243-3050
◗ Online information is available 24 hours a day,
7 days a week.
25
◗ Be sure shaver is turned off. Remove cord
from outlet and shaver before storing in a
safe, dry location where it will not be crushed,
banged, or subject to damage.
◗ Do not wrap power cord around shaver when
storing.
◗ Store cord in a safe location where it will not
be cut or damaged.
◗ Do not place or store shaver where it can fall
or be pulled into a tub or sink, water or other
liquid while plugged in.
C ◗ Put the Protective Cap on shaver to protect
heads.
Disposal
◗ This Philips Norelco shaver contains a
C
rechargeable lithium-ion battery
which must be disposed of properly.
◗ Contact your local town or city officials
for battery disposal information or call
1-800-8-BATTERY or www.rbrc.com for
battery drop-off locations.
◗ For assistance, visit our website,
www.philips.com/support or call toll free:
1-800-243-3050.
Page 14
ENGLISH
26
ENGLISH
27
Accessories
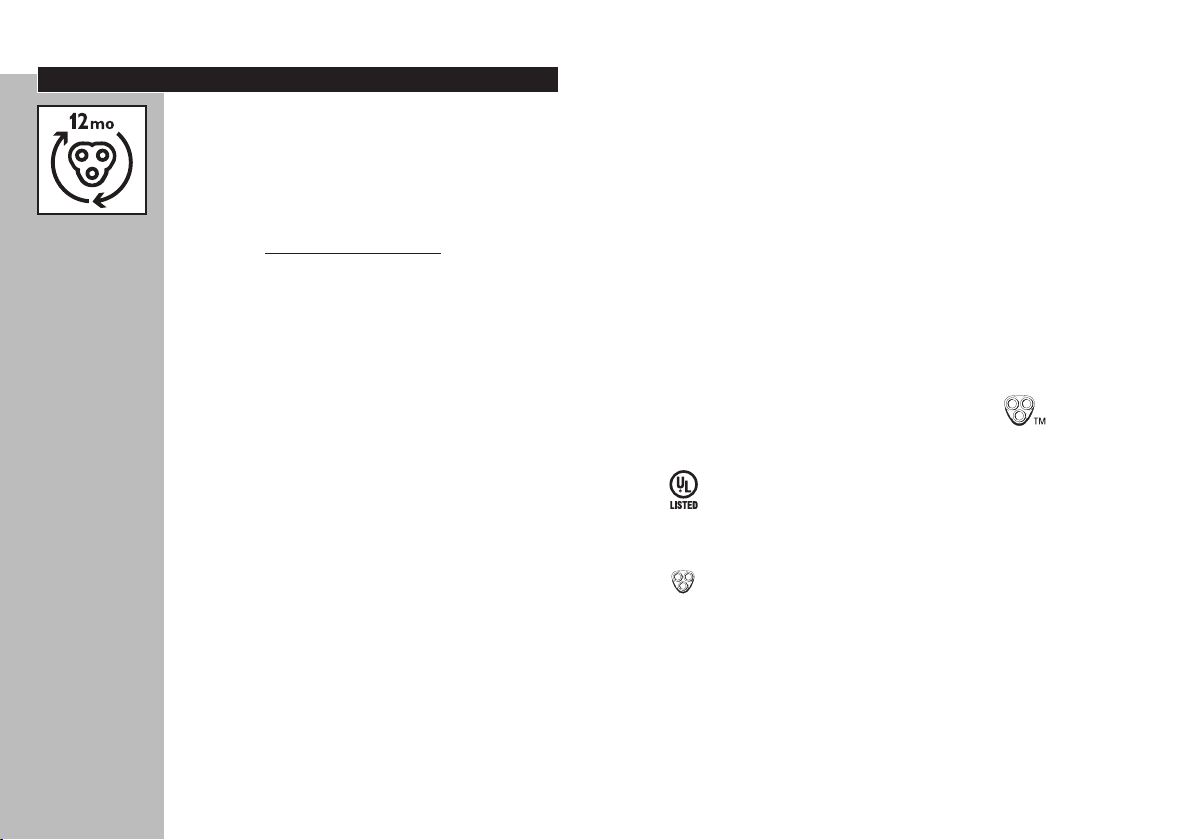
◗ Replacement Heads
C
Model HQ8 or SH50 - For maximum shaver
performance, replace your Philips Norelco
shaving heads once a year.
◗ Philips Norelco Shaver Accessories may be
purchased at a store near you, or on our
website www.philips.com/store
FULL TWO YEAR WARRANTY
Philips Electronics North America Corporation warrants each new Philips Norelco Product,
Model AT850 (except cutters and combs) against defects in materials or workmanship for a
period of two years from the date of purchase, and agrees to repair or replace any defective
product without charge.
IMPORTANT: This warranty does not cover damage resulting from accident, misuse or abuse,
lack of reasonable care, the affixing of any attachment not provided with the product or loss of
parts or subjecting the product to any but the specified voltage.*
NO RESPONSIBILITY IS ASSUMED FOR ANY SPECIAL, INCIDENTAL OR
CONSEQUENTIAL DAMAGES.
In order to obtain warranty service, simply go to www.philips.com/norelco or call 1-800-2433050 for assistance. It is suggested that for your protection you return shipments of product
by insured mail, insurance prepaid. Damage occurring during shipment is not covered by this
warranty.
NOTE: No other warranty, written or oral, is authorized by Philips Electronics North America
Corporation.
This warranty gives you specific legal rights, and you may also have other rights which vary from
state to state. Some states do not allow the exclusion or limitation of incidental or consequential damages, so the above exclusion and limitations may not apply to you.
* Read enclosed instructions carefully.
Manufactured for:
Philips Consumer Lifestyle
A Division of Philips Electronics North America Corporation
P.O.Box 10313, Stamford, CT 06904
This symbol on the product’s nameplate means it is
listed by Underwriters’ Laboratories, Inc.
Norelco and Tripleheader are Registered Trademarks of Philips Electronics North America
Corporation.
is a Trademark of Philips Electronics North America Corporation.
PHILIPS is a Registered Trademark of Koninklijke Philips N.V.
© 2016 Philips Electronics North America Corporation. All Rights Reserved.
 Loading...