

Page 1
-i V ■-■ ¡tr^Ytiisiiáiuí^íix. .-:,x
Page 2
1.4.
r<r-
■ .-Ik. V/-^:W;.tLi..I^I^ .u'..-.
m
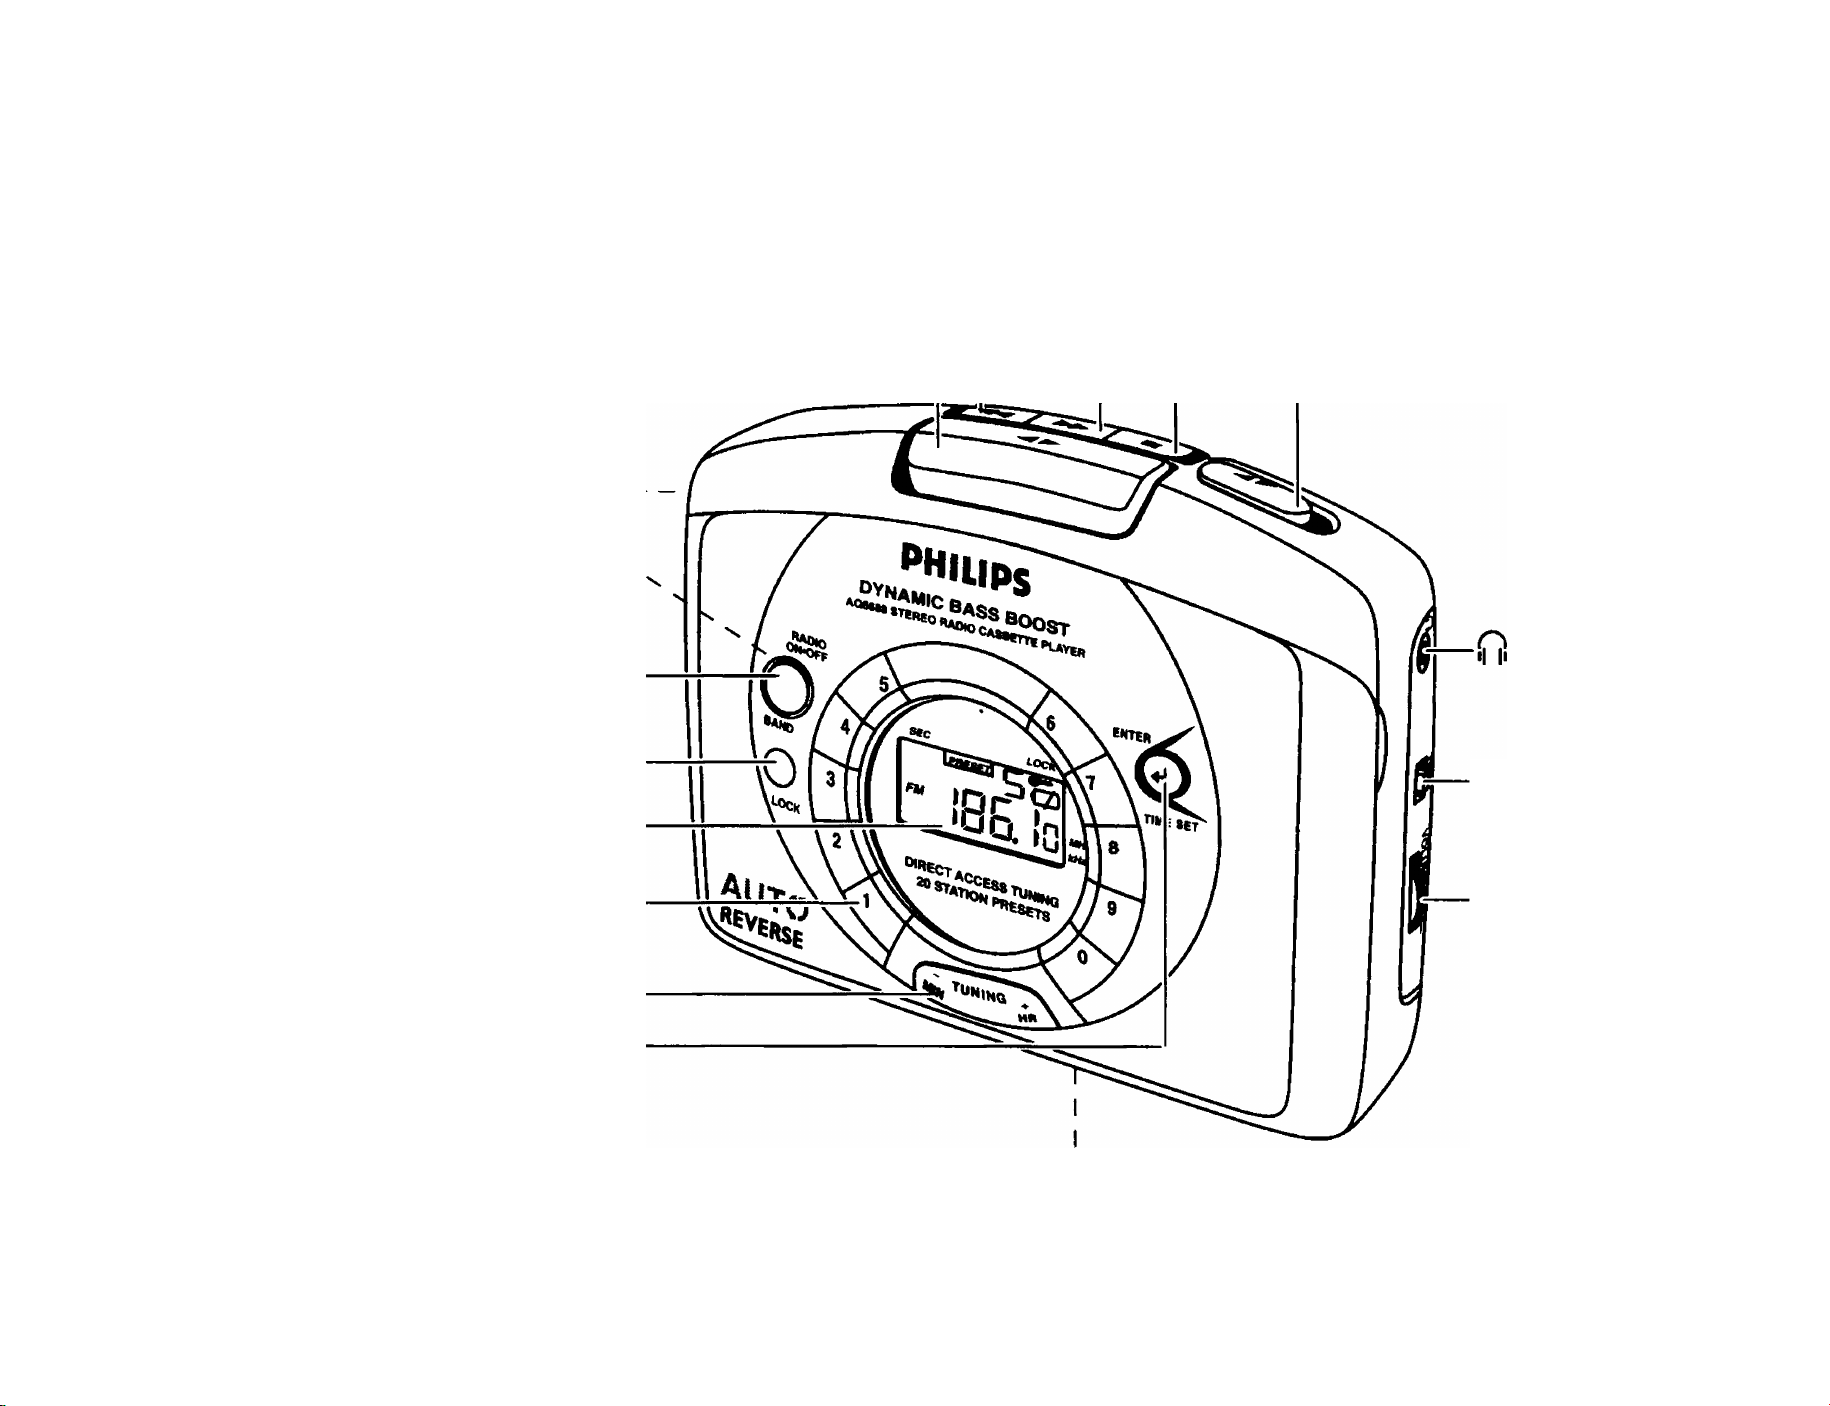
FAST WIND ◄◄ REWIND
DC3Ve^---
RESET
RADID DN-OFF
LOCK
display
preset memory buttons
PLAY ◄ ►
STOPB direction ◄ ►
socket
DBB
VOLUME
TUNING
ENTER
battery door
Page 3

/ SVjq«'
Mains adapter
The voltage of the 3V adapter must match with the local
voltage. The 3.5 mm adapter plug's 1.3 mm centre pin must
also be connected to the minus pole ©.
• Connect the mains adapter to the set's DC 3V socket.
• Always disconnect the mains adapter if you are not using it.
Battery (optional)
• Open battery door and insert two alkaline batteries, type R6,
MEMORY PROTECTION
The memory protection acts as a backup should there be a
power failure or interruption.
When changing batteries or power supply, the time setting,
presets and the last station listened to are retained for
approximately 2 minutes. This allows you to change batteries
or power supply without having to set your stored data all over
again.
UM3 or AA as indicated.(/se of Philips POWER UFE
batteries gives up to 18 hours of cassette playback.
• Remove the batteries from the set if they are exhausted or
not to be used for a long time.
— When the batteries are running low, 0 will flash
briefly in the display and you should insert new batteries.
If the radio is on, it will automatically switch off.
-* It may be necessary to reprogramme your preset stations.
Page 4

Reset button
CLOCK DISPLAY
Should you receive external interference e.g. static electricity
from carpets, thunderstorms, etc. which affects the display and
electronic functions of your set, the reset button allows you to
clear all data (e.g. tuning step, presets) from your set and to
start up again.
• Use a ball point pen to press the RESET button, found on
the back of the cassette door.
Locking
This button helps you to prevent any of the other front panel
controls from being accidentally pressed when you are
listening to the radio or when you are not using the radio.
1 Press the LOCK button
-* •“ appears in the display when LOCK is activated.
To deactivate the LOCK function, press LOCK again,
disappears from the display.
The time is displayed using either the 12 or 24-hour clock
system. The seconds are synchronized with the flashing colon
' second by second, and also by the 12-segment analogue
clock display, where each segment v represents 5 seconds.
1 In the time mode, press ENTER.
The clock digits will flash for 5 seconds.
2 To set the hour/ minutes for the clock time, press m or min
while the display is still flashing.
-* With your finger held down on hr , the hour will increase
steadily as a number from 1-12 or 0-23. Release hr when
you reach the approximate time setting.
With your finger held down on min, the minutes will
increase rapidly and continuously. Press briefly and
repeatedly if you need to adjust the minutes slowly.
3 Press the ENTER button a second time to confirm the time
setting.
The clock digits will stop flashing.
Page 5

->i:; :•’ •:.;: .VC^V-'^ '••• '
CHANGING THE TUNING STEPS AND 12/24-HR CIOCK
In North and South America the frequency step between
adjacent channels in the AM (MW) band is 10 KHz. In the
rest of the world this step is 9 KHz. Usually the frequency step
has been preset in the factory for your area.
The tuning step on this set is also combined with the hour clock
display where:
10 KHz uses the 12-hr clock
9 KHz uses the 24-hr clock
1 Connect the headphones to the 0 socket.
2 To switch on the radio and select your waveband:
• press RADIO ON-OFF once for AM (MW)
• press RADIO ON-OFF twice to select FM
STEREO appears on the display when you are receiving a
FM stereo transmission.
3 Select your station by one of the following:
by using the - TUNING + control (down or up);
pressing one of the Preset memory buttons 0-9 for a preset
station;
All preset stations will be lost and need to be programmed
again when you change the tuning step.
Direct Access Tuning, by entering the known band
frequency.
4 Adjust the sound with VOLUME and DBG (Dynamic Bass
1 In the radio mode, press and hold ENTER.
-* * The radio station frequency will disappear from the
display.
Boost) controls.
5 To turn off the radio, press RADIO ON-OFF once or until the
display shows
2 Without releasing ENTER, press and also hold down;
u AA and reverts to the clock mode.
• TUNING + (up) 5 seconds or more to select a tuning step of
10 KHz and the 12-hr clock.
-* The display shows 'U' briefly.
• TUNING - (down) 5 seconds or more to select a tuning step
of 9 KHz and the 24-hr clock.
To improve reception:
FM; The headphone cord functions as the FM-aerial. Extend it
fully and position the cord.
AM: Uses the built-in aerial. Turn the set to find the best
position.
The display shows 'E' briefly.
Page 6

•«v/'<f.'.s!i'^ Wi* »Vi*'WI
rv
TUNING
Direct Access tuning
The frequency of the station you wish to tune to must be
known. You can find these frequencies in station tables or
radio guides.
11n the radio mode, press ENTER.
The current frequency in the display disappears.
2 Use the Preset memory buttons to enter the digits of your
desired frequency within a 5 second period.
3 Press ENTER again to confirm your radio station.
The display shows the selected frequency or the nearest
Manual tuning
• Press TUNING - or + briefly, once or as often as required
until the right frequency is found. In this way, the frequency
can be changed step by step.
Automatic tuning
1 Press and hold down the TUNING - or + control until the
display frequency starts to run.
2 When a station of sufficient strength has been found, tuning
will stop, or you can stop the automatic tuning by pressing
the TUNING - or + control again.
3 Repeat until you have found the desired station.
frequency.
If you have made an incorrect entry, £>-will appear in
the display.
SELECTING & STORING FREQUENCIES: PRESETS
You can store the frequencies of 20 radio stations in the
; ''Vi
.W}%;
I
Entry examples of bands and frequencies:
e.g.i 98.1 MHz, FM: Press 9,8,1 and ENTER
e.g.ii 603 KHz, AM (MW): Press 6,0,3 and ENTER
memory, 10 on each waveband. A stored frequency is only
erased from the memory by storing another frequency in its
place, or if you reset your unit.
1 Select the waveband and tune to your desired station.
2 Select and press one of the Preset memory buttons 0-9 for
more than two seconds to store your station.
-* PRESET and your selected number will appear in the display.
Page 7

Finding your Preset station
CASSEHE PLAYBACK
1 Preset RADIO ON-OFF once or more to select the desired
waveband.
2 Press the preset number of your desired station.
1 Open the cassette door and insert a tape.
2 Press the cassette door lightly to shut.
3 Connect headphones to the ¡Ti socket.
4 To start playback, press ◄ ►
Erasing the Preset Memory by RESET
Use a ball-point pen to press the RESET button.
-* You will hear a click to indicate that all preset stations
stored and the last station tuned to have been cleared.
5 Adjust the sound with the VOLUME and DBB controls.
6 To fast wind, press ◄◄, to rewind press ►►. Press ■ to stop
All settings must now be reprogrammed into the memory.
7 To reverse the tape direction during playback, adjust the
e To stop playback, press ■ and the set is switched off.
AUTO REVERSE
The display shows t ЯРЕ and the analog clock
segments ▼ throughout the tape mode
fast winding.
DIRECTION-^ P’ control.
The display shows GPP before reverting to the clock
mode.
The tape direction will be automatically reversed each time the
tape reaches the end. Cassette playback continues in this way
unless you press ■ or until batteries are exhausted.
8
Page 8

¡iiWWIilllilWEa^^ tl,i»ltil<lliWl>lii
l^<uW;lâtoiRilk
Accessories (included)
1 X AY 3660 stereo headphones, 1 x Belt clip
Using the Belt Clip
1 To attach the belt clip, position the shaped grip on the
reverse so that it fits into the belt clip hole.
2 Simultaneously, press and turn the clip to LOCK as indicated
on the set.
3 To detach, gently lift the belt clip and turn to RELEASE as
MAINTENANCE
• For quality playback, clean the magnetic head after every 50
hours of operation or, on average once a month by playing
through a cleaning tape.
• Do not expose the set and cassettes to rain, moisture, sand,
or to excessive heat e.g. heating equipment, cars parked in
direct sunlight.
ENVIRONMENTAL NOTE
indicated on the set.
1 The packaging has been minimized so that it is easy to
TAKE CARE WHEN USING HEADPHONES
__________
separate into two mono-materials; cardboard, and
polyethylene. Please observe the local regulations regarding
Hearing Safety:
Listen at a moderate volume. Use at high volume can impair
your hearing!
Traffic Safety:
Do not use headphones while driving or cycling as you may
the disposal of these packaging materials.
2 Please inquire about local regulations on how to hand in
your old set for recycling.
3 Batteries contain chemical substances, so they
should be disposed of property.
cause a traffic accident!
Page 9

IIwWhCSIiIIMIWHi
_________________________________________
■
_ _ __ _
;••' j
If a fault occurs, first check the points listed below before taking the set for repair. If you are unable to remedy a problem by
following these hints, consult your dealer or service centre.
WARNING: Under no circumstances should you try to repair the set yourseif, as this wiii invalidate your
guarantee.
PROBLEM
- POSSIBLE CAUSE
• REMEDY
Hum when using mains adapter
- Adapter used is unsuitable
• Use a Philips SBC6650 or other standard regulated 3V DC
adapters
Poor sound/ no sound
- Headphones plug not fully inserted
• Insert plug fully
- Volume is turned down
• Turn up volume
- Tape head dirty
Severe radio hum/ distortion
- EM aerial (headphones cord) not fully extended
• Extend FM aerial fully
- Set too close to TV, computer, etc.
• Move set away from other electrical equipment
- Batteries weak
• Insert new batteries
Front panel controls/ display does not function properly
- Electrostatic discharge
• Use a bail-point pen to press the RESET button and then
Auto reverse occurs before end of tape
- High friction on tape
reprogramme settings
• Clean tape head (see MAINTENANCE)
The model number is found at the bottom of the set and the production number in the battery compartment
This set complies with the radio interference requirements of the European Union.
10
• Try fast winding the tape once
 Loading...