

Philips AntumbraButton, AntumbraTouch Installation Instructions Manual
Antumbra Button Ethernet Keypad
Antumbra Touch Ethernet Keypad
Installation Instructions
INSTRUCTIONS D’INSTALLATION INSTRUCCIONES DE INSTALACIÓN
ISTRUZIONI PER L’INSTALLAZIONE INSTALLATIE-INSTRUCTIES
INSTALLATIONSANWEISUNGEN インストール手順 安装指示
A
Must be installed by a qualified electrician in accordance with all
national and local electrical and construction codes and regulations.
Doit être installé par un électricien qualifié conformément aux codes et réglementations électriques nationaux et locaux du bâtiment.
La instalación debe realizarla un electricista calificado siguiendo todos los códigos y
normativas eléctricas y de construcción, tanto nacionales como locales.
Devono essere installati da un elettricista qualificato in conformità con le norme
locali e nazionali vigenti in materia di costruzioni edilizie e installazione di impianti
elettrici.
Moet door een gekwalificeerd elektricien overeenkomstig alle nationale en lokale
elektrische verordeningen worden geïnstalleerd.
Muss von einem geprüften Elektriker in Übereinstimmung mit allen nationalen und
örtlichen elektrischen Codes und Regelungen installiert werden.
国または地域の建築コードおよび規制にすべて従い、資格のある電気技師が設置してくだ
さい。
必须根据所有国家和地方的电气和施工准则及规范,由符合资格的电工进行安装
PUB-000410-00 (R01) 8 November 2018
B
Before installing this product, please visit the product page
at www.colorkinetics.com for the latest version of the installation
instructions. Due to continuous improvements and innovations,
installation instructions may change without notice.
Avant de procéder à l’installation de ce produit, veuillez consulter la page Web du
produit à l’adresse www.colorkinetics.com pour obtenir les instructions de montage
les plus récentes. En raison des améliorations et innovations sans cesse entreprises,
les instructions de montage peuvent être modifiées sans préavis.
Antes de instalar este producto, visite la página del producto en www.colorkinetics.
com para consultar la última versión de las instrucciones de instalación. Debido a las
continuas mejoras e innovaciones, las instrucciones de instalación pueden cambiar
sin previo aviso.
Prima di installare il prodotto, visitare la pagina relativa all’indirizzo www.colorkinetics.com per la versione più recente delle istruzioni d’installazione. Grazie ai
miglioramenti e alle innovazioni continue, le istruzioni sono soggette a modifiche
senza preavviso.
Ga voordat u dit product installeert, eerst naar de productpagina op www.colorkinetics.com voor de meeste recente versie van de installatie-instructies. Vanwege
voortdurende verbeteringen en innovaties kunnen de installatie-instructies zonder
bericht gewijzigd worden.
Besuchen Sie vor der Installation des Produkts bitte die Produktseite unter www.
colorkinetics.com, um die aktuellen Installationsanweisungen herunterzuladen.
Aufgrund kontinuierlicher Verbesserungen und Innovationen können die Installationsanweisungen ohne Vorankündigung geändert werden.
この製品を設置する前に、www.colorkinetics.com の製品ページにアクセスして、最新の設置
手順を確認してください。改善・改良を継続的に行っているため、取り付け手順が予告なく変
更さ れることがあります。
安装该产品之前,请先访问产品页面 www.colorkinetics.com 以获取最新版的安装说明。
由于在不断地改进和创新,安装说明可能会有所改动,恕不另行通知。
www.colorkinetics.com
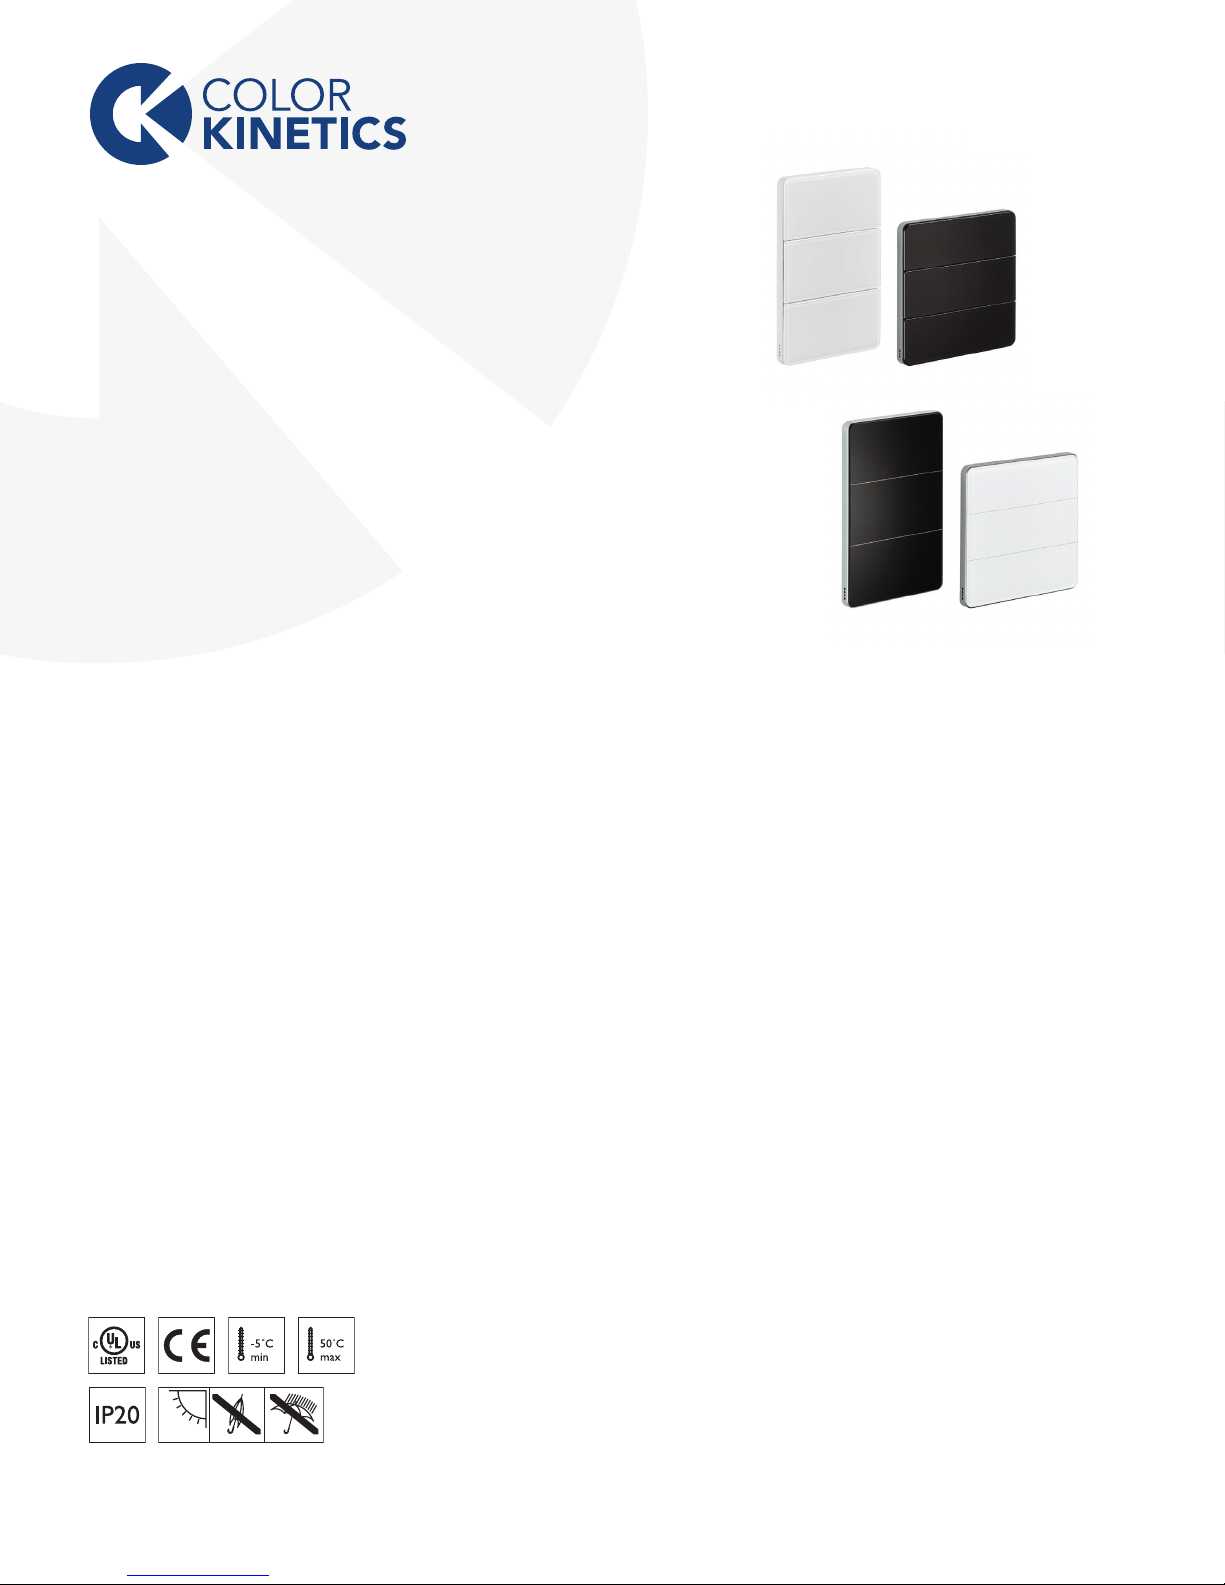
Confirm all components received.
1
2
Confirmez la réception de l’intégralité des composants
Compruebe si ha recibido todos los componentes
Confermare tutti i componenti ricevuti
Controleer alle ontvangen componenten
Bestätigen Sie, dass Sie alle Bestandteile erhalten haben
すべ てのコンポーネ ント が揃っていることを確 認します。
确认收到了所有部件
Antumbra Button, CE
Antumbra Button, UL
Antumbra Touch, ULAntumbra Touch, CE
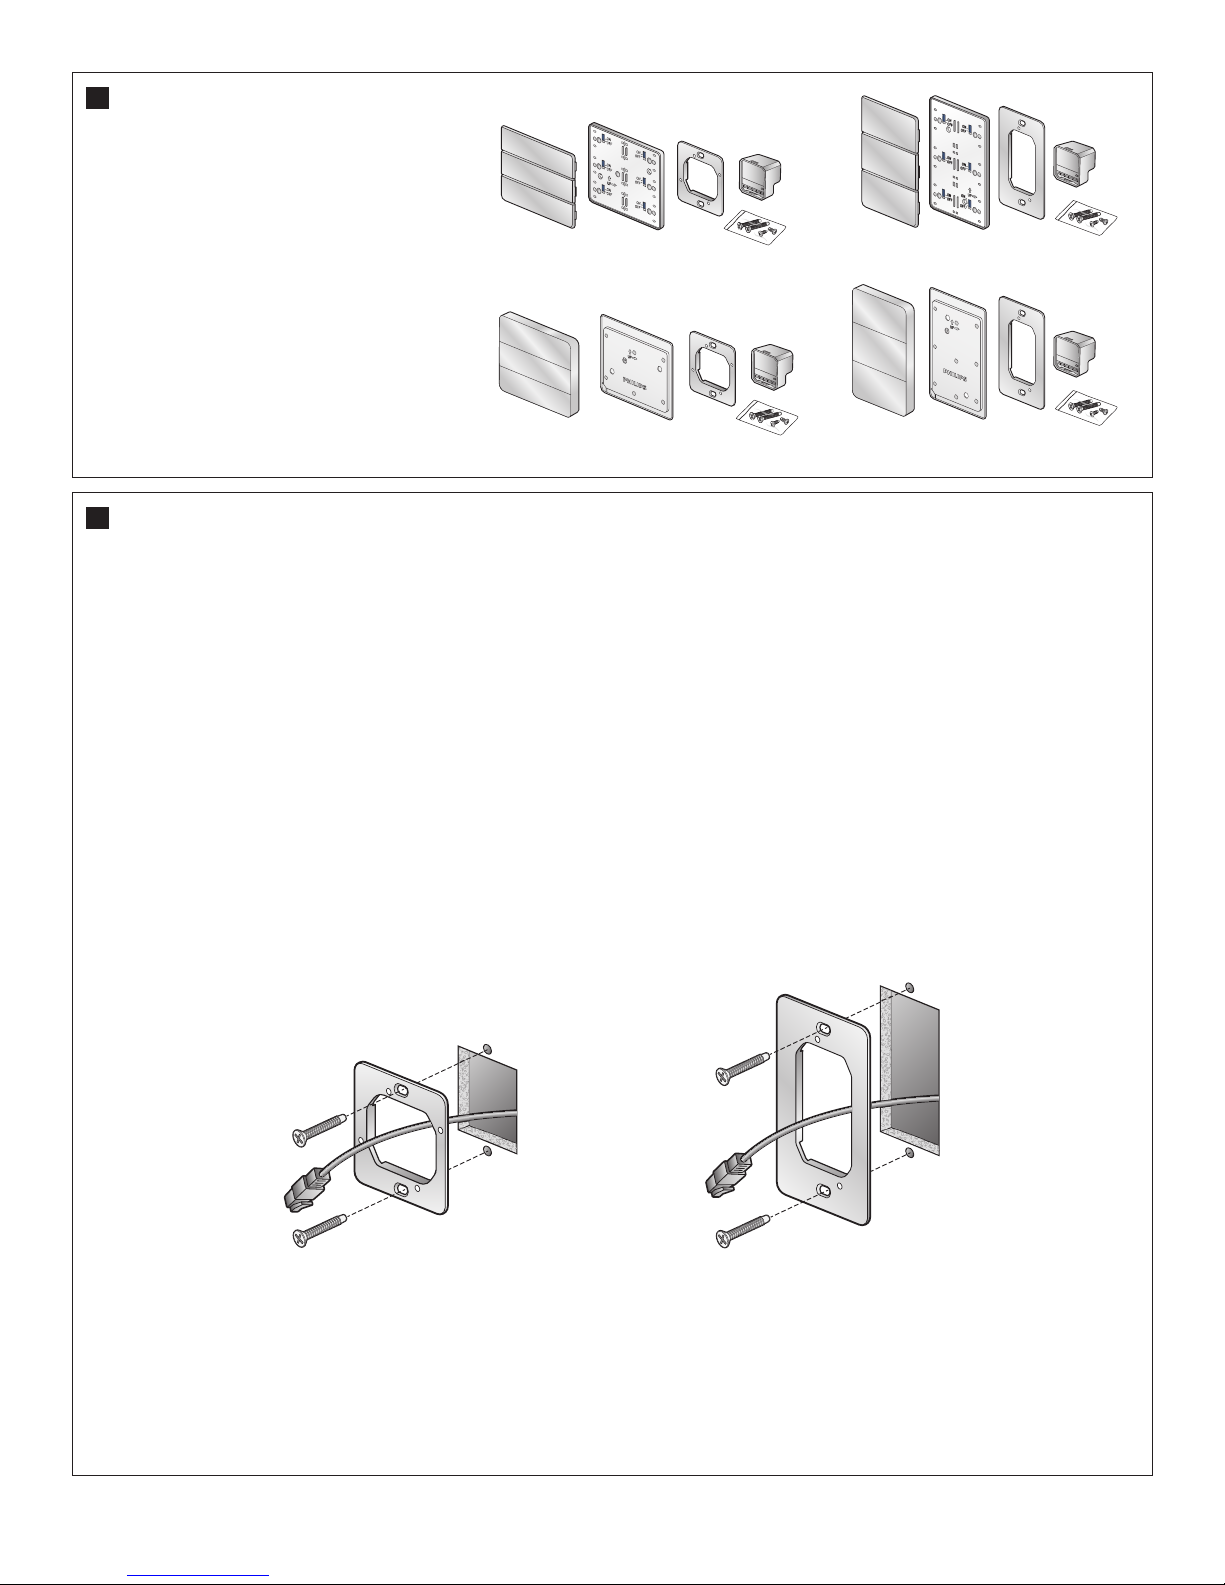
Secure the installation bracket, in accordance with local electrical codes, using the two longer
screws provided with the product.
À l’aide des deux longues vis fournies, fixez le support d’installation conformément aux codes électriques locaux.
Fije el soporte de instalación de acuerdo con los códigos eléctricos locales, usando los dos tornillos más largos incluidos con el producto.
Fissare la staffa di installazione, in conformità alle norme locali in materia di installazione di impianti elettrici, usando le due viti più lunghe fornite con il prodotto.
Bevestig de montageplaat met behulp van de twee meegeleverde lange schroeven, conform de plaatselijke elektrotechnische voorschriften.
Befestigen Sie die Montagehalterung im Einklang mit den örtlichen elektrotechnischen Bestimmungen und verwenden Sie dazu die zwei längeren Schrauben, die mit dem
Produkt geliefert wurden.
地域の電気工事規定に従い、製品に付属の長い方のネジ2本を使って取り付けブラケットを固定します。
根据本地电气规范,使用产品随附的两根长螺钉固定安装支架。
E
Use the screws provided with the product. Using screws of a dierent size may damage the panel.
Utilisez les vis fournies avec le produit. L’utilisation de vis d’une taille diérente risque d’endommager le couvercle.
Utilice los tornillos incluidos con el producto. Si utiliza tornillos de tamaño diferente podría dañar el panel.
Usare le viti fornite con il prodotto. L’uso di viti di dimensioni diverse può danneggiare il pannello.
Gebruik de bij het product meegeleverde schroeven. Door schroeven van andere afmetingen te gebruiken kan het paneel beschadigd raken.
Verwenden Sie die Schrauben, die mit dem Produkt geliefert wurden. Wenn Sie Schrauben einer anderen Größe verwenden, könnten Sie die Halterungsplatte beschädigen.
製品に付属のネジを使用します。異なるサイズのネジを使用すると、パネルが破損する可能性があります。
使用产品随附的螺钉。使用不同尺寸的螺钉可能会损坏面板。
ULCE
2 Antumbra Button Ethernet Keypad, Antumbra Touch Ethernet Keypad Installation Instructions
Mount the communication module by snapping it into
3
4
the back of the base unit. Use the locating pins to
ensure the correct orientation of the two modules.
Installez le module de communication en l’encliquetant au dos de l’unité de base. Utilisez les
goupilles de positionnement pour garantir la bonne orientation des deux modules.
Monte el módulo de comunicaciones encajándolo en la parte trasera de la unidad de base. Utilice
los pasadores de posicionamiento para asegurar la orientación correcta de los dos módulos.
Montare il modulo di comunicazione inserendolo fino a quando scatta nel retro dell’unità di base.
Usare i perni di centraggio per garantire la corretta orientazione dei due moduli.
Monteer de communicatiemodule door deze op de achterzijde van de basiseenheid vast te klikken.
Gebruik de locatiepinnen om te zorgen dat de twee modules correct in elkaar worden geklikt.
Setzen Sie das Kommunikationsmodul von hinten auf die Basiseinheit, bis es einrastet. Verwenden
Sie die Passstifte, um die korrekte Ausrichtung der zwei Module zu gewährleisten.
通信モジュールをベースユニットの背面にはめ込んで取り付けます。位置決めピンを使って、2つのモジュー
ルを正しい向きにします。
将通讯模块卡入主基板的背面。使用定位销确保两个模块的方向正确。
E
The two parts should click together with little resistance. When snapping the modules together, use caution not to
bend any of the electrical pins.
Les deux parties doivent s’encliqueter avec peu de résistance. Lorsque vous encliquetez les modules, prenez soin de ne pas plier les broches électriques.
Las dos partes deben ajustarse con un “clic” sin ejercer mucha resistencia. Al encajar los módulos, tenga cuidado de no doblar los pasadores eléctricos.
L’unione a scatto dei due componenti dovrebbe avvenire incontrando poca resistenza. Quando si uniscono i due moduli, fare attenzione a non piegare nessuna
delle puntine elettriche.
De twee onderdelen moeten zonder veel weerstand in elkaar geklikt kunnen worden. Let er bij het vastklikken van de modules op dat de elektrische pinnen niet
worden verbogen.
Die zwei Bauteile sollten mit nur wenig Widerstand einrasten. Wenn Sie die Module zusammenstecken, achten Sie bitte sorgfältig darauf, die elektrischen
Anschlussstifte nicht zu verbiegen.
2つのパーツは多少の抵抗をもって互いにかみ合っている必要があります。モジュールをはめ込む時は、電気ピンが折れないように注意してください。
两个部件应略带阻力卡紧在一起。将模块卡在一起时,注意不要弯曲任何电探针。
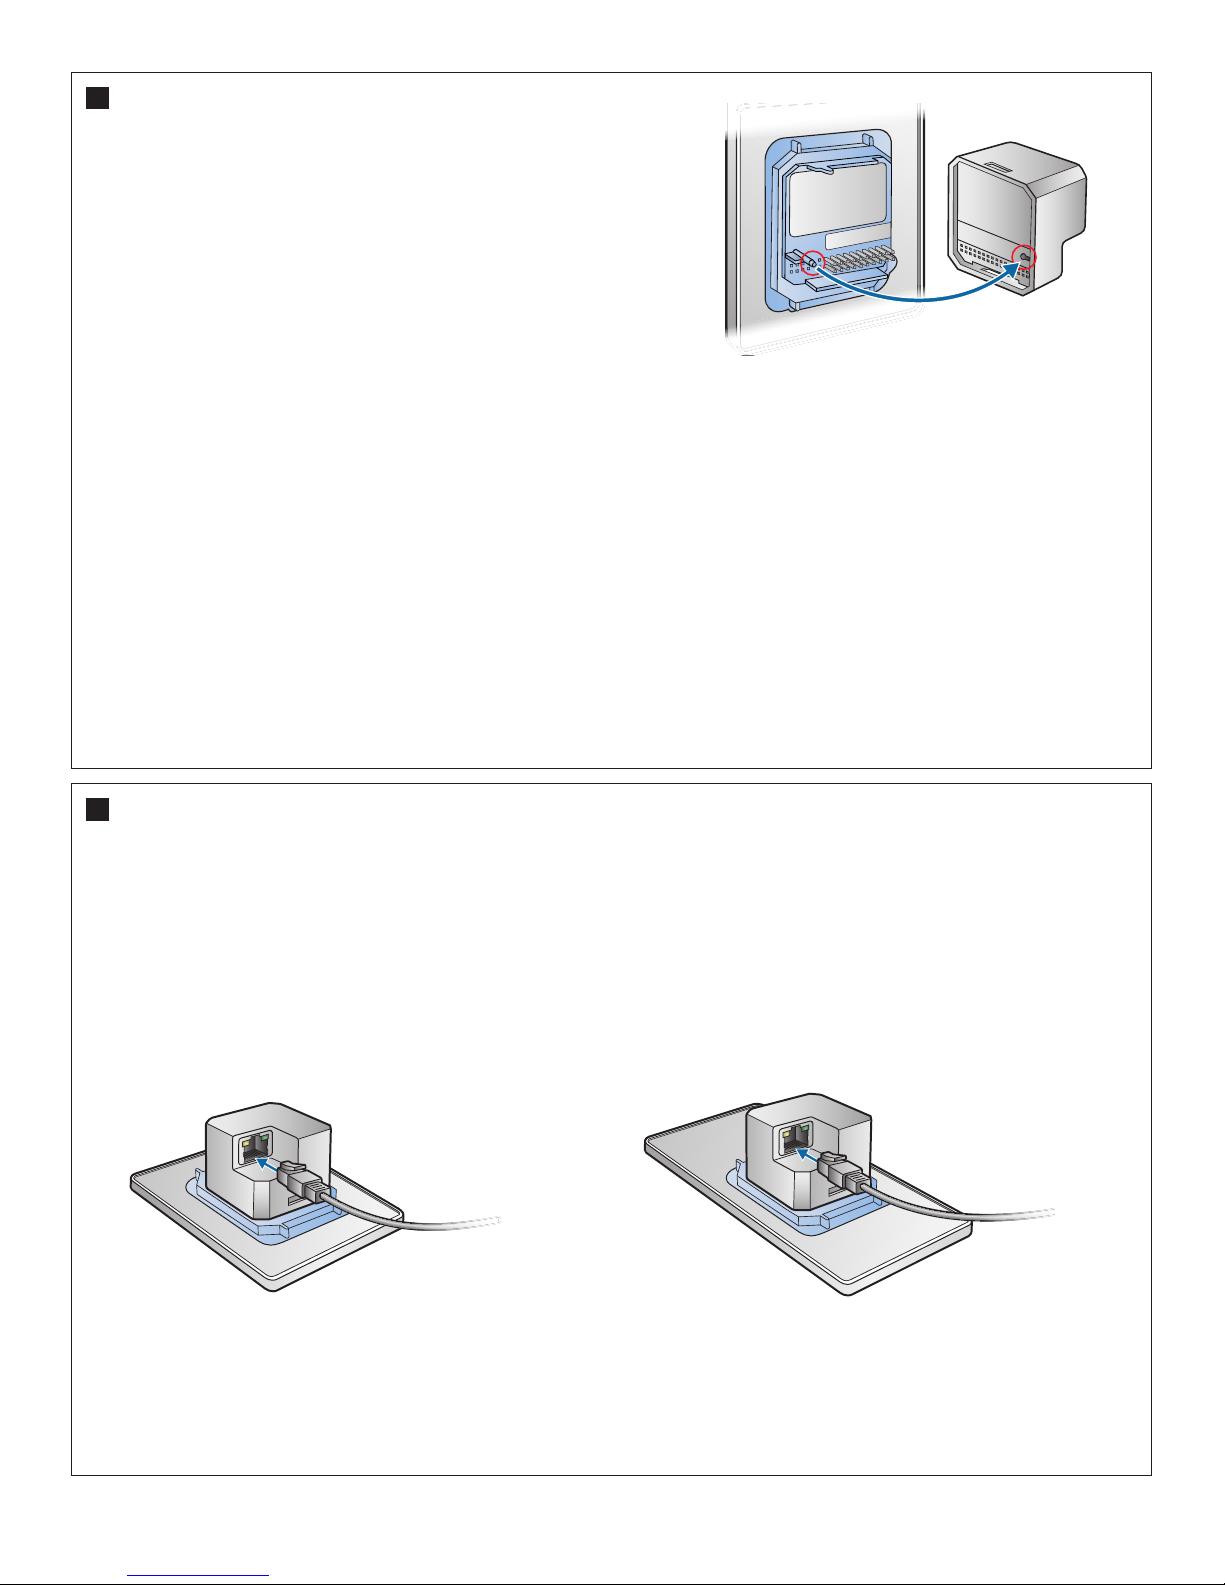
Connect one end of a shielded CAT-5 Ethernet network cable to the back of
the communication module.
Branchez une extrémité du câble réseau Ethernet blindé CAT-5 à l’arrière du module de communication.
Conecte un extremo del cable de red Ethernet blindado CAT-5 a la parte trasera del módulo de comunicaciones.
Collegare un’estremità del cavo di rete ethernet schermato CAT-5 al retro del modulo di comunicazione.
Sluit het ene uiteinde van een afgeschermde CAT-5-ethernet-netwerkkabel aan op de achterzijde van de communicatiemodule.
Verbinden Sie ein Ende eines geschirmten CAT-5-Ethernet-Netzwerkkabels mit der Rückseite des Kommunikationsmoduls.
の背面にシールドされたCAT-5イーサネットネットワークケーブルの一方の端を接続します通信モジュール。
屏蔽CAT-5以太网电缆的一端连接到通信模块的背面。
ULCE
Antumbra Button Ethernet Keypad, Antumbra Touch Ethernet Keypad Installation Instructions 3
 Loading...