

Page 1

AMF220
EN User manual 1 ZH-T 使用手冊 12
This product is only suitable for well insulated spaces or occasional use.
此產品僅適用於絕緣良好的空間或僅供偶爾使用。
Page 2

Page 3

English
Contents
1 Your 3-in-1: air purier, fan and heater ������������������������������������2
Product overview .......................................................................................................2
Display overview ........................................................................................................ 3
Controls overview ......................................................................................................4
2 Getting started ������������������������������������������������������������������������������5
Installing the lter ...................................................................................................... 5
Setting up the remote control ...............................................................................5
3 Using the 3-in-1: air purier, fan and heater ��������������������������� 5
Air quality light ............................................................................................................ 5
Turning on and o ......................................................................................................6
Heater and fan ............................................................................................................6
Oscillation ..................................................................................................................... 6
Setting the timer ......................................................................................................... 6
Setting the child lock ................................................................................................ 6
Sleep, turning light on/o ....................................................................................... 7
Pairing your remote control .................................................................................... 7
Replacing the battery ............................................................................................... 7
4 Cleaning and maintenance ��������������������������������������������������������8
Cleaning the body of the appliance ....................................................................8
Cleaning the lter surface .......................................................................................8
Filter replacement ......................................................................................................8
5 Troubleshooting ���������������������������������������������������������������������������9
1EN
Page 4

1 Your 3-in-1: air purifier, fan and heater
Congratulations on your purchase, and welcome to Philips!
To fully benet from the support that Philips oers, register your product at
www.philips.com/welcome.
Product overview
AB
C
D
E
F
H
G
A Remote control F Display screen
B Housing G Philips lter (FYM220/30)
C Control buttons H Back cover
D Light strip I Storage slot for remote control
E Air outlet J Air quality sensor
I
J
2 EN
Page 5

English
Display overview
L
K
K Temperature display N Air quality indicator
L Child lock indicator O Filter replacement alert
M PM2.5 display
M
N
O
3EN
Page 6

Controls overview
Short press Timer Oscillation Fan setting Heater setting On/o
Press for
3 seconds
4 EN
Sleep
Light on/o
Reset lter
lifetime
Child lock
Page 7

English
2 Getting started
Installing the lter
Note: Make sure the appliance is unplugged from the electrical outlet before installing the lter.
1 2 3 4 5
1 To remove the back cover, hold the side of it with both hands and pull.
2 Pull the lter from the appliance.
3 Remove all packaging materials from the lter.
4 Put the lter back into the appliance.
5 Reattach the back cover.
Setting up the remote control
1 Pull out the plastic lm on the remote control to
activate the battery.
2 Pair the remote control with the appliance if
you have multiple devices in one house (see the
chapter “Pairing your remote control”).
Note: Place the remote control in the slot and it snaps in place
automatically.
3 Using the 3-in-1: air purifier, fan and heater
Air quality light
PM2�5 level Air quality light color Air quality level
≤ 12 Blue Good
13-35 Blue-purple Fair
36-55 Purple-red Poor
> 55 Red Very poor
5EN
Page 8

Turning on and o
Note:
• Plug the appliance into the power outlet; do not use a power strip.
• If the appliance is running in heating mode when you turn it o, it continues working for
a few seconds to exhaust the remaining heat.
1 Press to switch on the appliance.
2 The display panel lights up, and appliance shows the PM2.5 level
and temperature.
3 Press to switch o the appliance.
Heater and fan
Light strip
Heater ( )
Fan ( )
Low Medium High Red
Low Medium High Blue
Oscillation
Press the button, the appliance can oscillate at three angles: 60°, 120° and 350°.
Setting the timer
Press the button repeatedly to set operating hours of the appliance. The timer is available
from 1 to 7 hours.
1 hour 2 hours 3 hours 4 hours 5 hours 6 hours 7 hours
To deactivate the timer, press the button repeatedly until all the hour indicators are o.
Setting the child lock
1 Press and hold the button for 3 seconds to activate the child
lock.
» appears on the screen.
» All the other buttons are unresponsive except on/o.
2 Press and hold the button for 3 seconds to deactivate child
lock.
» disappears.
3s
6 EN
Page 9

English
Sleep, turning light on/o
1 Press and hold the button for 3 seconds.
» The display screen dims, rest lights will turn o.
2 Press any button to turn all lights on.
Pairing your remote control
3s
1
X 2
2
5s
1 Unplug the appliance from the power outlet and wait for 10 seconds. Plug in the
appliance, then within 5 seconds,press the button on the appliance twice.
» The 2h indicator lights up.
2 Long press the button for 5 seconds on the remote control within 5 seconds.
» The and indicator of fan button on the appliance lights up, and the appliance
operates in the fan mode, indicating that the pairing is successful.
Note: If the “2h” indicator is blinking, you must repeat the pairing.
Replacing the battery
1
2
1
2 3
1 Push the battery bracket edge gently and pull it out of the remote control.
2 Insert the new battery with correct polarities as indicated.
3 Put the battery bracket back into the remote control.
7EN
Page 10
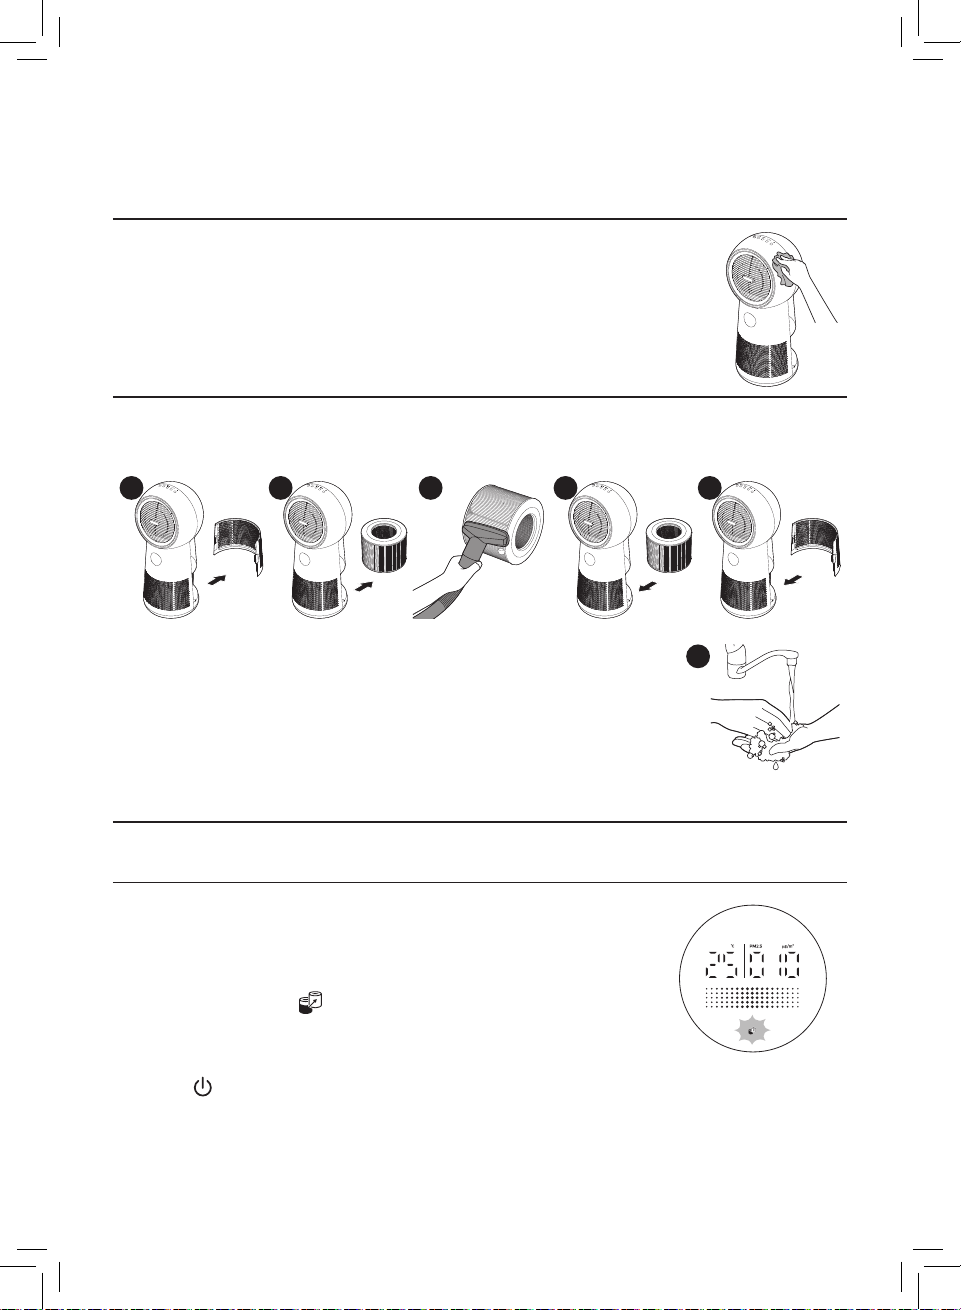
4 Cleaning and maintenance
6
Note: Switch o the appliance and unplug it from the power outlet before continuing.
Cleaning the body of the appliance
Use a soft, dry cloth to clean the appliance surface, including air inlet and
outlet.
Clean particle sensor surface. Do not open particle sensor cover.
Cleaning the lter surface
Clean the lter surface with a vacuum cleaner or brush every two weeks.
1 4 532
1 Pull the back cover and remove it from the appliance.
2 Pull the lter from the appliance.
3 Clean the surface of the lter with a vacuum cleaner.
4 Put the lter back into the appliance.
5 Reattach the back cover.
6 Wash your hands thoroughly after cleaning the lter.
Filter replacement
When the lter replacement alert lights up
Note:
• The lter is not washable or reusable.
• Do not smell the lter because it contains air pollutants.
Replace the lter when lights up on the screen.
1 Replace the lter with Philips lter (FYM220/30). Follow the
instructions in the chapter “Installing the lter”.
2 Press to switch on the appliance.
8 EN
Page 11

English
3 Press and hold the button for
3 seconds to reset the lter replacement
time.
» The lter replacement alert
disappears from the screen.
3
4
3s
4 Wash your hands thoroughly after
replacing the lter.
Before the lter replacement alert lights up
You can replace the lter before the lter replacement alert ( ) lights up. If you do this, you
need to reset the lter lifetime counter manually.
1 Unplug the appliance from the power outlet and wait 10 seconds.
2 Plug the appliance into the power outlet.
3 Within 15 seconds after power on, press and hold the button for
3 seconds to reset the lter lifetime counter.
» The lter replacement alert blinks once after successfully
resetting the lter.
5 Troubleshooting
This chapter summarizes the most common problems you could encounter with the
appliance. If you are unable to solve the problem with the information below, contact the
Consumer Care Center in your country.
Problem Possible solution
The airow from
the air outlet is
signicantly weaker
than before.
• The surface of the lter is dirty. Clean the surface of the lter (see
the chapter “Cleaning and maintenance”).
9EN
Page 12

Problem Possible solution
The air quality does
not improve even
though the appliance
has been operating
for a long time.
The appliance
produces a strange
smell.
The appliance is too
loud.
• Check whether the packing material is removed from the lter.
• Check whether the lter is installed in the appliance.
• Clean the sensor cover surface with mop or vacuum cleanser;
Do not open sensor cover or touch inside.
• Room size is too large, or the outdoor air quality is poor.
For optimum purication performance, close the doors and
windows when operating the appliance.
• There are indoor pollution sources. Examples include cigarette
smoke, cooking fumes, incense, perfume and alcohol.
• Filter has reached end of life. Replace the lter with a new one.
• The rst few times you use the appliance, it may produce a plastic
smell. This is normal.
• If the appliance produces a burning smell, immediately unplug
it and turn it upside down to check whether any foreign objects
have fallen into the appliance. If nothing is found, please contact
your Philips dealer or an authorized Philips service center.
• The lter may produce an odor after being used for a while
because of the absorption of indoor gases. It’s recommended that
you reactivate the lter by putting it in direct sunlight for repeated
use. If the odor remains, replace the lter.
• The noise level is higher if you select high speed.
• If anything drops into air outlet, it may also cause abnormal loud
sound. Immediate turn o the appliance and turn it upside down
to remove foreign objects.
• If there is an abnormal sound, contact the Consumer Care Center
in your country.
The appliance still
indicates that I need
to replace a lter, but
I already did.
The heating function
is not working.
10 EN
• Perhaps you did not reset the lter lifetime counter. Switch on the
appliance. Then press and hold the button for 3 seconds.
• Check whether the air inlet or air outlet is blocked.
• Check whether the lter surface is excessively dirty and
blocking airow. If so, the heating function may stop working for
protection.
Page 13
English
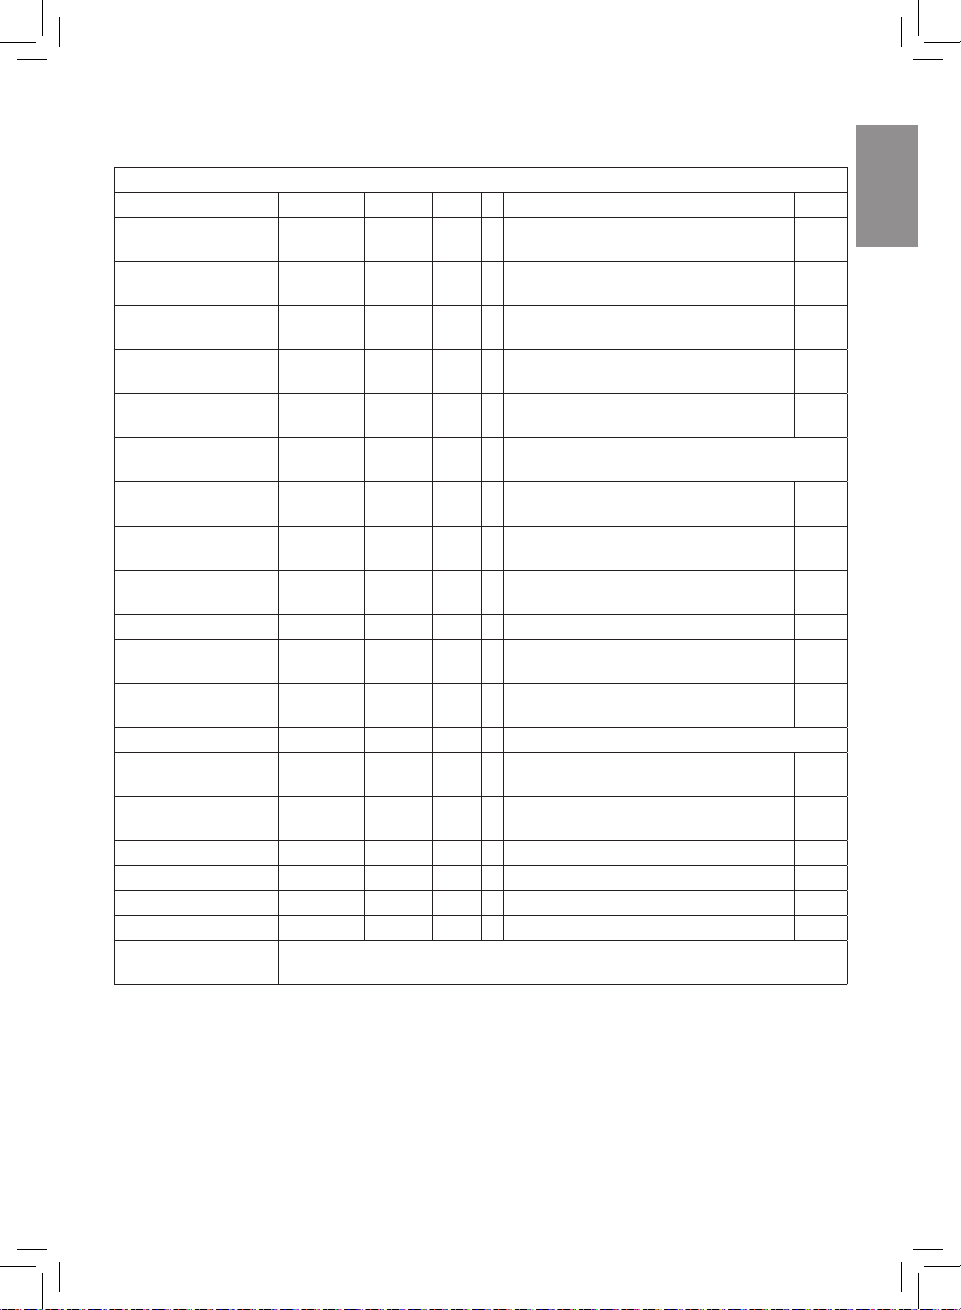
Information requirements for electric local space heaters
Model identier(s): AMF220
Item Symbol Value Unit Item Unit
Heat output Type of heat input, for electric storage local
space heaters only (select one)
Nominal heat output P nom 2,1 kW manual heat charge control, with integrated
thermostat
Minimum heat output
(indicative)
Maximum continuous
heat output
Auxiliary electricity
P min 1,2 kW manual heat charge control with room and/
or outdoor temperature feedback
P max, C 1,8 kW electronic heat charge control with room
and/or outdoor temperature feedback
fan assisted heat output [no]
consumption
At nominal heat output el max N/A kW Type of heat output/room temperature control
(select one)
At minimum heat
output
el min N /A kW single stage heat output and no room
temperature control
In standby mode el SB 0 kW Two or more manualstages, no room
temperature control
with mechanic thermostat room
temperature control
with electronic room temperature control [yes]
electronic room temperature control plus
day timer
electronic room temperature control plus
week timer
Other control options (multiple selections possible)
room temperature control, with
presence detection
room temperature control, with open
window detection
with distance control option [no]
with adaptive start control [no]
with working time limitation [yes]
with black bulb sensor [no]
Contact details Philips Consumer Lifestyle B.V.
Building TC, Tussendiepen 4, 9206 AD Drachten, The Netherlands
[no]
[no]
[yes]
[no]
[no]
[no]
[no]
[no]
[no]
[no]
11EN
Page 14

目錄
1 您的 3 合 1 風扇、暖風空氣清新機
產品概要
顯示概覽
控制鍵概覽
2 使用入門
安裝濾網
設定遙控器
.........................................................................................................13
........................................................................................................ 14
................................................................................................... 15
..................................................................................... 16
........................................................................................................ 16
................................................................................................... 16
......................................13
3 使用 3 合 1 風扇、暖風空氣清新機
空氣質素燈
..................................................................................................................17
開關
暖風及風扇
..................................................................................................................17
擺動
設定定時功能
設定兒童安全鎖
睡眠、開燈/關燈
配對您的遙控器
更換電池
4 清潔及保養
清潔本產品機身
清潔濾網表面
濾網更換
5 疑難排解
................................................................................................... 16
....................................................................................................17
................................................................................................17
...........................................................................................17
........................................................................................ 18
.......................................................................................... 18
........................................................................................................ 18
................................................................................. 19
.......................................................................................... 19
............................................................................................... 19
....................................................................................................... 20
......................................................................................21
..................................... 16
12 ZH-T
Page 15

繁體中文
1
您的
3 合 1
風扇、暖風空氣清新機
感謝您購買
請前往以下網址註冊您的產品,以獲得
www.philips.com/welcome
Philips
產品,同時歡迎您來到
。
產品概要
AB
C
D
E
F
Philips
Philips
世界!
的完整支援:
H
I
J
A
B
C
D
E
遙控器
外殼
控制按鈕
燈帶
排氣口
G
F
顯示屏幕
G
Philips
H
後蓋
I
遙控器收藏槽
J
空氣質素感應器
(FYM220/30)
濾網
13ZH-T
Page 16

顯示概覽
L
K
K
氣温顯示
L
兒童安全鎖指示燈
M
PM2.5
顯示
N
空氣質素顯示
O
濾網更換 警示
M
N
O
14 ZH-T
Page 17

繁體中文
控制鍵概覽
短按 定時器 擺動 風扇設定 暖風設定 開啟/關閉
長按
3
秒
睡眠
開燈/關燈
重設濾網壽命 兒童安全鎖
15ZH-T
Page 18

2
使用入門
安裝濾網
備註:安裝濾網前,請確保將產品的插頭從電源插座拔出。
1 2 3 4 5
1 請用雙手抓緊產品的兩側,然後拉出以拆卸後蓋。
2 從產品拉出濾網。
3 從濾網移除所有包裝物料。
4 將濾網裝回本產品。
5 重新裝上後蓋。
設定遙控器
1 將遙控器的膠片拉出,以啟用電池。
2 如果您在同一個房子內擁有多個裝置,則請
將遙控器與產品進行配對(請參閱「配對您
的遙控器」章節)。
備註:將遙控器放入收藏槽中,它會自動地卡合穩固。
3
使用
空氣質素燈
PM2.5
水平
12
≤
13-35
36-55
> 55
16 ZH-T
3 合 1
風扇、暖風空氣清新機
空氣質素指示燈的顏色 空氣質素水平
藍色 良好
藍紫色 一般
紫紅色 差
紅色 非常差
Page 19

繁體中文
開關
備註:
• 將產品插頭插入電源插座;切勿使用拖板。
• 如關閉產品時正在使用暖風模式,產品將繼續工作數秒,以將剩餘的暖風
排出。
1 按
2 顯示面板會亮起,然後產品會顯示
3 按下
以開啟本產品。
按鈕以關閉產品。
PM2.5
水平及温度。
暖風及風扇
( )
暖風
風扇
(
)
低 中 高 紅色
低 中 高 藍色
擺動
按下
按鈕,產品可以
60
120° 及 350°
°、
設定定時功能
重複按下
1
小時
要停用定時功能,請重複按下
按鈕以設定產品的運作時數。 定時功能可選擇
2
小時
3
小時
4
小時
按鈕,直至關閉所有時數顯示。
設定兒童安全鎖
1 按住
2 按住
»
» 除開/關以外,其他所有按鈕均不會作出回應。
»
3
按鈕
秒即可啟用兒童安全鎖。
會出現在螢幕上。
3
按鈕
秒即可停用兒童安全鎖。
消失。
三個角度擺動。
1 至 7
5
小時
小時。
6
小時
燈帶
7
小時
3s
17ZH-T
Page 20

睡眠、開燈/關燈
1 按住
» 顯示螢幕會變暗,其他燈光將會關閉。
按鈕
3
秒。
2 按動任何按鈕以亮起所有燈光。
配對您的遙控器
3s
1
X 2
1 將產品插頭從電源插座拔出,並等待
內按下
»2
5
2 在
» 產品上風扇按鈕的
備註: 如果「2h」指示燈在閃爍,您必須重複進行配對。
按鈕兩次。
小時指示燈會亮起。
秒內,長按遙控器的
表示配對成功。
及
2
10
秒。將產品插頭插入電源,然後在
5
按鈕
秒。
指示燈會亮起,然後產品會以風扇模式運作,
更換電池
1
2
1
2 3
5s
5
秒
1 輕推電池支架的邊緣,然後將其從遙控器中拉出。
2 如圖所示,依照正確的極性插入新電池。
3 將電池支架放回遙控器。
18 ZH-T
Page 21

繁體中文
4
6
清潔及保養
備註:請先關閉產品並從電源插座拔出插頭,然後繼續進行操作。
.
清潔本產品機身
使用柔軟的乾布清潔產品表面,包括進氣口及排氣口。
清潔微粒感應器的表面。切勿打開微粒感應器的護蓋。
清潔濾網表面
每兩星期使用吸塵機或刷子清潔濾網表面。
1 4 532
1 拉起後蓋,從產品拆下。
2 從產品拉出濾網。
3 使用吸塵機清潔濾網表面。
4 將濾網裝回本產品。
5 重新裝上後蓋。
6 清潔濾網後,必須徹底洗淨雙手。
19ZH-T
Page 22

濾網更換
當濾網更換指示燈亮起時
備註:
• 請勿清洗或重用濾網。
• 切勿用鼻子聞濾網,因為其含有空氣污染物。
當螢幕的
1 使用
章節的說明進行操作。
2 按
燈亮起時,請更換濾網。
Philips
以開啟本產品。
(FYM220/30)
濾網
進行更換。按照「安裝濾網」
3 按住
時間。
» 螢幕的濾網更換指示燈
消失。
3
按鈕
秒即可重設濾網更換
將會
4 更換濾網後,必須徹底洗淨雙手。
在濾網更換指示燈亮起之前
(
您可以在濾網更換指示燈
命計算器。
)
亮起之前更換濾網。更換後,您需要手動重設濾網壽
1 將產品插頭從電源插座拔出,並等待
2 將產品插頭插入電源。
3 開啟電源後
計算器。
» 成功重設濾網後,濾網更換指示燈
15
秒內,按住
按鈕
3
3
10
秒。
秒,以重設濾網壽命
會閃爍一下。
4
3s
20 ZH-T
Page 23

繁體中文
5
疑難排解
本章節總結一些您在本產品上最常見的問題。如果您按照以下資料仍未能解決問
題,請聯絡您的國家的
問題 可行解決方案
Philips
顧客服務中心。
排氣口的氣流明顯
比以前弱。
即使本產品經過長
時間運作,空氣質
素仍沒有改善。
本產品發出一陣
怪味。
產品發出太大的
聲響。
• 濾網的表面骯髒。請清潔濾網表面(請查看「清潔與保養」
章節)。
• 請檢查是否已移除濾網的所有包裝物料。
• 請檢查產品是否已安裝濾網。
Philips
服務中心。
• 請以抹布或吸塵機清潔感應器護蓋的表面。
切勿打開感應器護蓋或觸摸其內部。
• 房間面積太大或室外空氣質素太差。
為獲得最佳淨化性能,請在操作產品時關閉門窗。
• 有室內污染源頭。例如包括香煙煙霧、煮食煙霧、香爐、香
水及酒精。
• 濾網的使用壽命經已結束。更換全新的濾網。
• 在您最初數次使用本產品時,它可能會發出一點塑膠氣味。
此為正常。
• 如果產品釋出燒灼的氣味,請立即從電源插座拔出插頭並將
其倒置,以檢查是否有異物掉入產品中。如果沒有發現異
物,請聯絡您的
• 由於吸收了室內氣體,濾網使用一段時間後可能會產生氣
味。建議您將濾網置於陽光下,然後再重新使用。如果仍有
異味,請更換濾網。
• 如果您選擇以高速運作產品,則噪音水平會更高。
• 如果有任何東西掉入排氣口,亦有可能產生異常響亮的聲
音。請立即關閉產品並將其倒置以移除異物。
• 如果仍然有不正常的聲響,請聯絡您所在國家/地區的客戶
服務中心。
Philips
代理商或認可的
21ZH-T
Page 24

問題 可行解決方案
即使我已替換濾
網,本產品仍表示
需要替換。
暖風功能出現
故障。
• 可能您沒有重設濾網的使用時間。開啟本產品然後,按住
3
按鈕
秒。
• 請檢查進氣口或排氣口是否有阻塞。
• 請檢查濾網表面是否過度骯髒,因而阻塞氣流。如果是,暖
風功能可能會停止運作以保護產品。
22 ZH-T
Page 25

繁體中文
電子局部暖風機的資料要求
AMF220
型號:
項目 標誌 值 單位 項目 單位
暖風輸出 暖風輸出,僅適用於局部暖風機(選擇
一項)
P
額定暖風輸出
最低暖風輸出(指標)
正常
P
最小
2.1 kW
1.2 kW
手動儲熱控制,內置恆溫器
手動儲熱控制以及室內及/或室外溫度
[否]
[否]
反饋
最大持續暖風輸出
最大,
1.8 kW
C
電子儲熱控制以及室內及/或室外溫度
[是]
P
反饋
輔助耗電量 風扇協助暖風輸出
於額定暖風輸出
於最低暖風輸出
於待機模式
el
最大 不適用
el
不適用
最小
el
0 kW
SB
kW
kW
暖風輸出/室內溫度控制類型(選擇一項)
單級暖風輸出,並沒有室內溫度控制
兩個或以上的手動級,沒有室內溫度控制[否
有機械恆溫器室內溫度控制
有電子室內溫度控制
電子室內溫度控制及每日定時功能
電子室內溫度控制及每週定時功能
[否]
[否]
[否]
[是]
[否]
[否]
其他控制選項(可進行多項選擇)
[否]
[否]
[否]
[否]
[是]
[否]
聯絡詳細資料
Philips
優質生活有限公司
室內溫度控制,及人體感應
室內溫度控制,及開窗感應
有距離控制選項
有適應式開始控制
有工作時間限制
有黑色燈泡感應器
(Philips Consumer Lifestyle B.V.)
Building TC, Tussendiepen 4, 9206 AD Drachten, The Netherlands
]
23ZH-T
Page 26

Page 27

Page 28

© 2020 Koninklijke Philips N.V.
All rights reserved.
3000 063 30271
 Loading...