

Page 1
Colour Television Chassis
FM23, FM24, FM33
AA
Supplement ALIS PDP Repair Manual
Contents Page
1 Technical Specifications, Connection,
and Chassis Overview 2
2 Safety Instructions, Warnings, and Notes 3
3 Directions for Use (Not Applicable) 4
4 Mechanical Instructions 4
5 Service Modes, Error Codes, and Faultfinding 9
6 Block Diagrams, Testpoint Overview, and
Waveforms 31
(Not Applicable)
7 Circuit Diagrams and PWB layouts 33
(Not Applicable)
8 Alignments 33
9 Circuit Descriptions 34
List of Abbreviations 35
10 Spare Parts List (Not Applicable) 36
11 Revision List 36
©
Copyright 2004 Philips Consumer Electronics B.V. Eindhoven, The Netherlands.
All rights reserved. No part of this publication may be reproduced, stored in a
retrieval system or transmitted, in any form or by any means, electronic,
mechanical, photocopying, or otherwise without the prior permission of Philips.
Published by LM 0464 Service PaCE Printed in The Netherlands Subject to modification EN 3122 785 14580
Page 2
EN 2 ALIS-PDP Suppl.1.
Technical Specifications
1. Technical Specifications
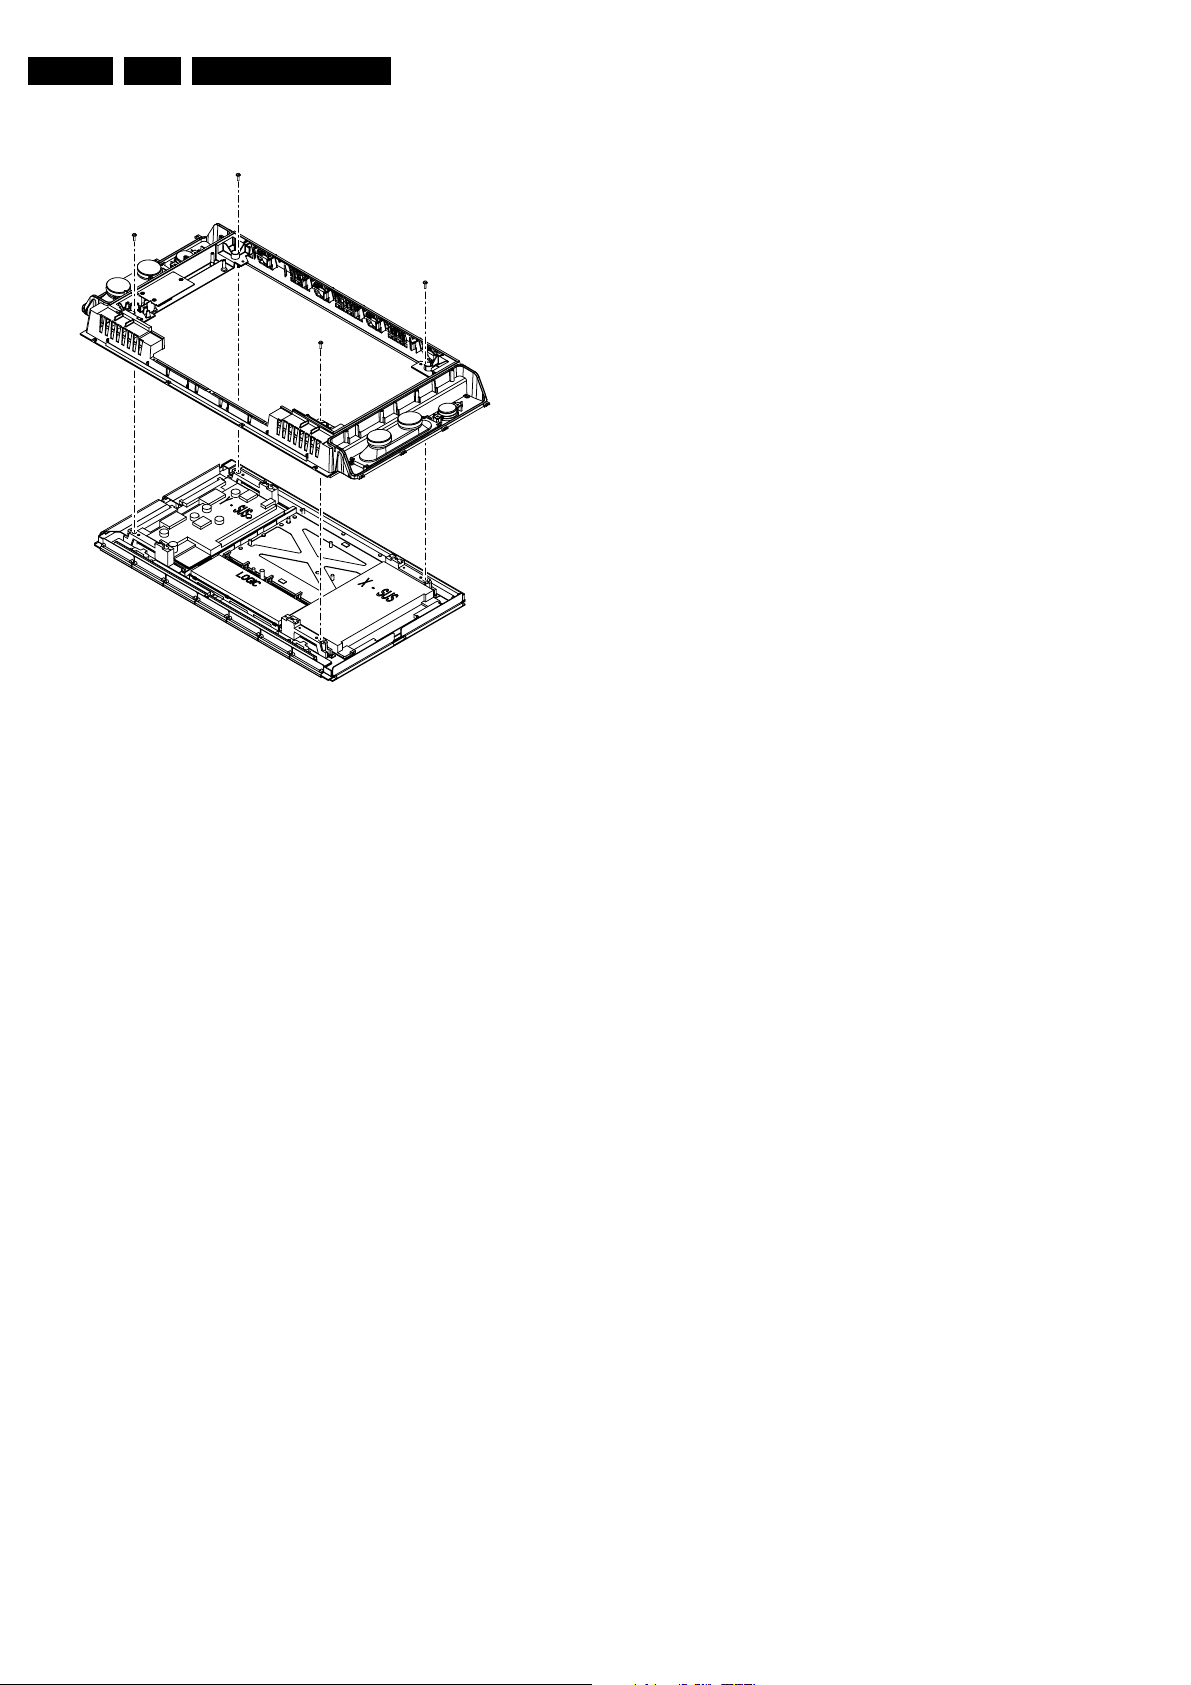
1.1 Chassis overview
Y-SUS BOARD
SCAN MODULE
ABUSL BOARD
LOGIC BOARD
ADM1 ADM2 ADM3 ADM4 ADM5 ADM6 ADM7 ADM8
Figure 1-1
PSU BOARD
X-SUS BOARD
XBB
ABUSR BOARD
ADRESS MODULE (ADM)
E_14580_001.eps
310304
Page 3

Safety Instructions, Warnings and Notes
2. Safety Instructions, Warnings and Notes
EN 3ALIS-PDP Suppl. 2.
2.1 Safety instructions h
It is not allowed to operate the FTV-set without glass plate. One
function of this glass plate is to absorb Infrared Radiation.
Without this glass plate the level of Infrared Radiation produced
by the plasma display could damage your eyes.
1. Safety regulations require that during a repair:
– the set should be connected to the mains via an
isolating transformer ( in this particular case a
transformer of ≥ 800 VA);
– safety components, indicated by the symbol h ,
should be replaced by components identical to the
original ones;
2. Safety regulations require that after a repair the set must
be returned in its original condition. In particular attention
should be paid to the following points.
– Note: The wire trees should be routed correctly and
fixed with the mounted cable clamps.
– The insulation of the mains lead should be checked for
external damage.
– The electrical DC resistance between the mains plug
and the secondary side should be checked (only for
sets that have a mains isolated power supply). This
check can be done as follows:
• unplug the mains cord and connect a wire between
the two pins of the mains plug;
• set the mains switch to the on position (keep the
mains cord unplugged!);
• measure the resistance value between the pins of
the mains plug and the metal shielding of the tuner
or the aerial connection on the set. The reading
should be between 4.5 MΩ and 12 MΩ;
• switch off the TV and remove the wire between the
two pins of the mains plug.
– The cabinet should be checked for defects to avoid
touching of any inner parts by the customer.
2.2 Warnings
1. ESD w
All ICs and many other semiconductors are susceptible to
electrostatic discharges (ESD w). Careless handling during
repair can reduce life drastically. When repairing, make sure
that you are connected with the same potential as the mass of
the set by a wristband with resistance. Keep components and
tools also at this same potential.
1. Available ESD protection equipment:
– complete kit ESD3 (combining all 6 prior products -
small table mat) 4822 310 10671
– wristband tester 4822 344 13999
2. Never replace modules or other components while the unit
is switched on.
3. When making settings, use plastic rather than metal tools.
This will prevent any short circuits and the danger of a
circuit becoming unstable.
2.3 Notes
1. A glass plate is positioned before the plasma display. This
glass plate can be cleaned with a slightly humid cloth. If
due to circumstances there is some dirt between the glass
plate and the plasma display panel it is recommended to do
some maintenance by a qualified service employee only.
2. Never disconnect the power display cable when the set is
operating
3. With DST no failures (error-codes) can be red, when the
set is in Service-mode.
4. If DST reacts with "error 2", there is no communication
between set and DST. Note that IR-transmitter LED is
positioned at right side of IR-receiver eye of the E-box.
Take into account that receiver-LED on DST is positioned
not in the middle but at the left side. Point corresponding
LED"s to each other. In case the amount of Infrared
produced by the screen pollutes the communication, the
set can be set in Standby-mode. Then still the errormessages can be retrieved.
2.3.1 Notes on safe handling of the plasma display
Notes to follow during service
• The work procedures shown with the Note indication are
important for ensuring the safety of the product and the
servicing work. Be sure to follow these instructions.
• Before starting the work, secure a sufficient working space.
• At all times other than when adjusting and checking the
product, be sure to turn OFF the main POWER switch and
disconnect the power cable from the power source of the
display (jig or the display itself) during servicing.
• To prevent electric shock and breakage of PC board, start
the servicing work at least 30 seconds after the main power
bas been turned off. Especially when installing and
removing the power supply PC board and the SUS PC
board in which high voltages are applied, start servicing at
least 2 minutes after the main power bas been turned off.
• While the main power is on, do not touch any parts or
circuits other than the ones specified. The high voltage
power supply block within the PDP module has a floating
ground. If any connection other than the one specified is
made between the measuring equipment and the high
voltage power supply block, it can result in electric shock or
activation of the leakage-detection circuit breaker.
• When installing the PDP module in, and removing it from
the packing carton, be sure to have at least two persons
perform the work white being careful to ensure that the
flexible printed-circuit cable of the PDP module does not
get caught by the packing carton.
• When the surface of the panel comes into contact with the
cushioning materials, be sure to confirm that there is no
foreign matter on top of the cushioning materials before the
surface of the panel comes into contact with the cushioning
materials. Failure to observe this precaution may result in,
the surface of the panel being scratched by foreign matter.
• When handling the circuit PC board, be sure to remove
static electricity from your body before handling the circuit
PC board.
• Be sure to handle the circuit PC board by holding the large
parts as the heat sink or transformer. Failure to observe
this precaution may result in the occurrence of an
abnormality in the soldered areas.
• Do not stack the circuit PC boards. Failure to observe this
precaution may result in problems resulting from scratches
on the parts, the deformation of parts, and short-circuits
due to residual electric charge.
• Routing of the wires and fixing them in position must be
done in accordance with the original routing and fixing
configuration when servicing is completed. All the wires
are routed far away from the areas that become hot (such
as the heat sink). These wires are fixed in position with the
wire clamps so that the wires do not move, thereby
ensuring that they are not damaged and their materials do
not deteriorate over long periods of time. Therefore, route
the cables and fix the cables to the original position and
states using the wire clamps.
• Perform a safety check when servicing is completed. Verify
that the peripherals of the serviced points have not
undergone any deterioration during servicing. Also verify
that the screws, parts and cables removed for servicing
purposes have all been returned to their proper locations in
accordance with the original setup
Page 4
EN 4 ALIS-PDP Suppl.3.
Directions for Use
3. Directions for Use
Not Applicable
4. Mechanical Instructions
Index of this chapter:
• Service Positions Monitor
• Rear Cover Removal
• Service Position Panels
• PDP and Glass Plate Replacement
• Re-assembly
Note: Figures below can deviate from the actual situation, due
to different set executions.
4.1 Service Positions Monitor
4.1.1 Transport Cushions
position. A better solution to access the IR-LED and/or ON/
OFF switch is to make some holes in the stands at the
position of the LED and switch. Do not make the holes to
big, as this will influence the strength of the stands.
4.1.2 Aluminium Stands
CL 36532051_001.eps
040703
E_14580_028.eps
310304
Figure 4-1 Transport cushions
First, put the monitor in its service position. Therefore,
disconnect all cables connected to the monitor and take the
monitor of the wall (or tabletop stand). Then, place the monitor
in the re-enforced transport cushions that function also as
service stand (you can order them separately under code 3122
126 40612). See figure "Transport cushions".
Notes:
• There are no special "re-enforced service stands". The
cushions used in the factory packaging are already made
of reinforced material.
• Always keep in mind that the stands are only designed to
keep the monitor in service position as long as the monitor
is being serviced. The stands are NOT designed to keep
the monitor in the upright position for more then two days.
• After the monitor is serviced, or when nobody is working on
the monitor (e.g. in the weekend), it should be removed
from the stands and laid down on a cushion or other
support system to prevent it from falling.
• Worn out stands should be replaced by new ones (monitor
will tilt to much forward).
• Never leave the monitor alone when the stands are not fully
pressed on its place.
• It is possible to move the right stand a bit to the right so that
you can access the IR-LED and ON/OFF switch, but the
monitor can then not be left alone because the stands are
NOT designed to carry the weight of the monitor in that
Figure 4-2 Aluminium stands
The aluminium stands (order code 3122 785 90480) can be
mounted with the back cover removed or still left on. So, the
stand can be used to store products or to do measurements. It
is also very suitable to perform duration tests without taking
much space, without having the risk of overheating and no risk
of products falling. The stands can be mounted and removed
quickly and easy with use of the delivered screws that can be
tightened and loosened manually without the use of tools. See
figure above.
Note: Only use the delivered screws to mount the monitor to
the stands.
Page 5
Mechanical Instructions
EN 5ALIS-PDP Suppl. 4.
4.1.3 Foam Bars
CL 36532051_002.eps
Figure 4-3 Foam bars
The foam bars (order code 3122 785 90580) can be used for
all types and sizes of FTVs and LCD TVs and can even be used
to e.g. exchange a CRT of a normal TV. By laying the plasma
or LCD TV flat on the (ESD protective) foam bars, a stable
situation is created to perform measurements and alignments.
See figure "Foam stand".
By first placing a mirror flat on the table under the TV you can
easily see if something is happening on the screen. The bars
are also handy to replace the screen (PDP or LCD).
190603
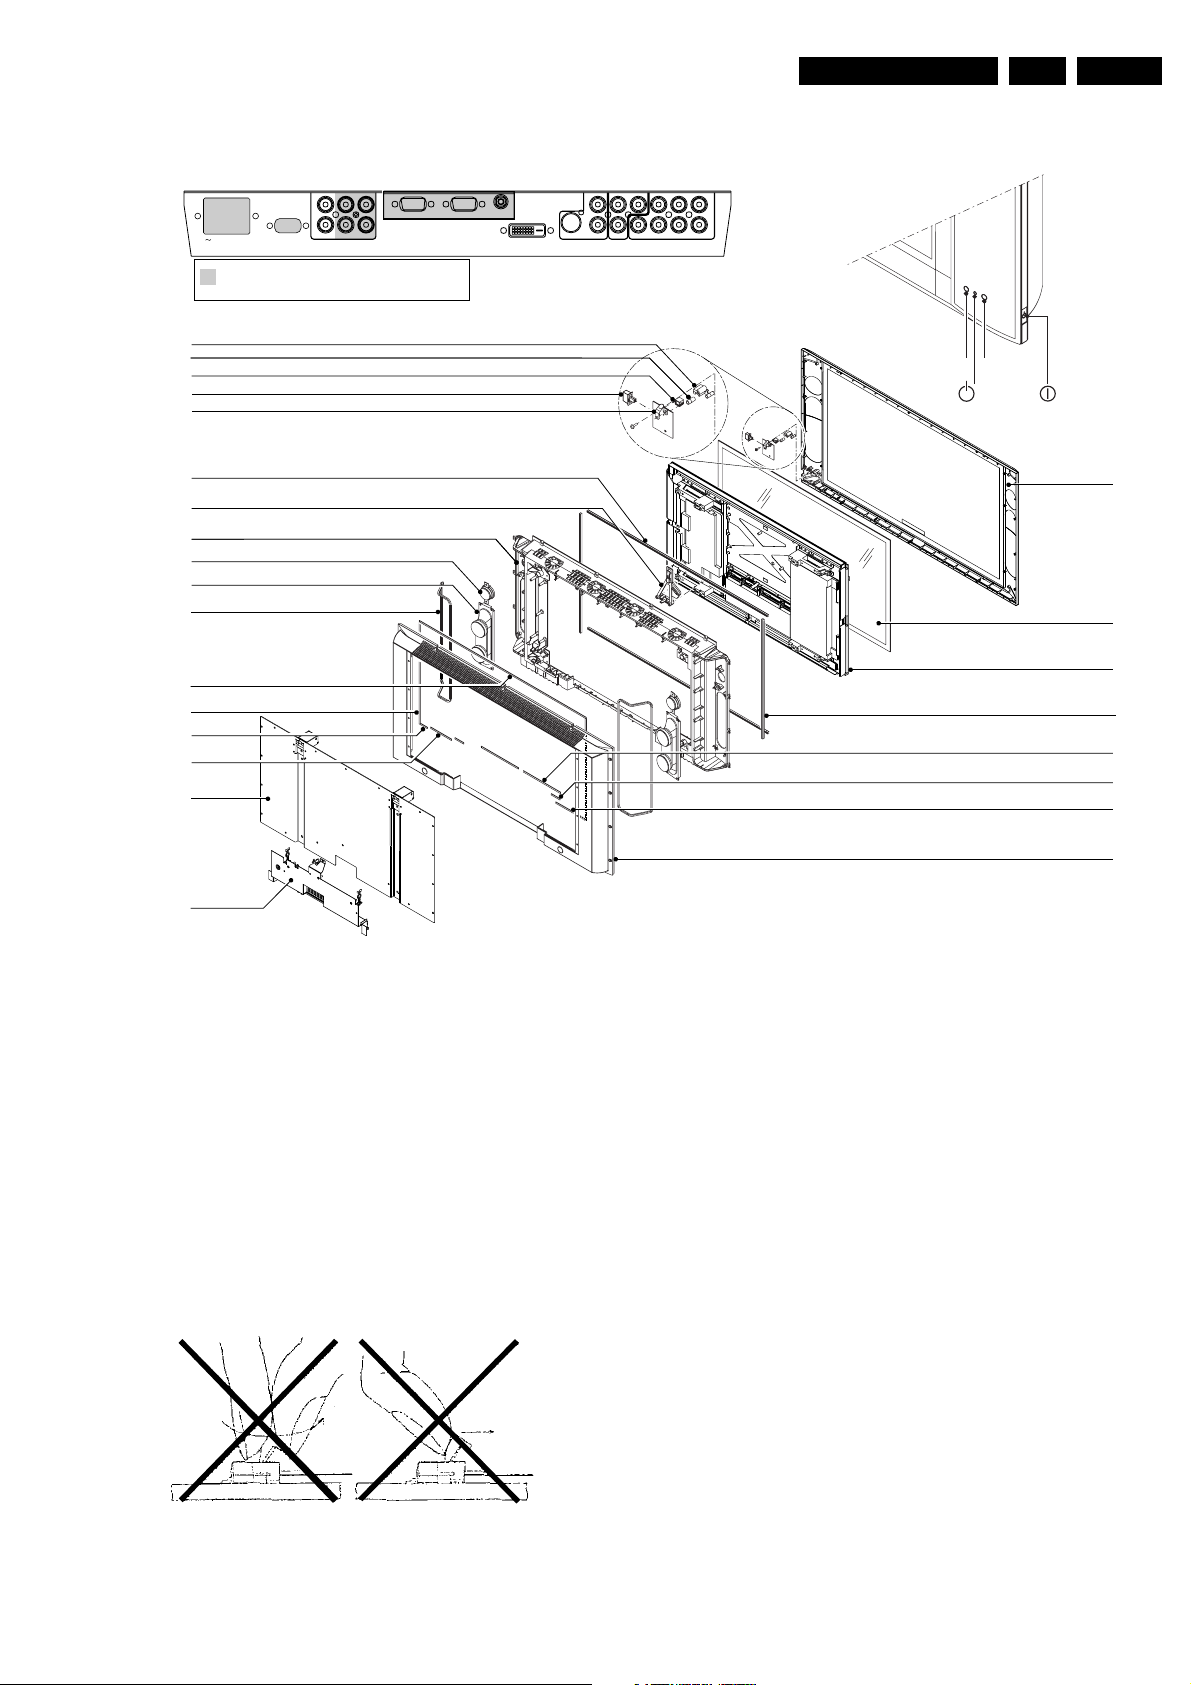
4.3 PDP and Glass Plate Replacement
Shielding frame
Front displayFoam cushion
Figure 4-5 Exchanging the glass plate
CL 16532099_046.eps
270901
4.2 Rear Cover Removal
Figure 4-4 Rear cover removal
To be able to access or measure the panels, remove the rear
cover (metal back plate):
1. Remove all fixation screws from the back plate, as
indicated in figure above (the amount of screws that need
to be removed differs from the amount in the figure above).
2. Remove the metal back plate. Make sure that wires and flat
foils are not damaged during plate removal.
CL 16532099_041.eps
250901
Exchanging the glass plate
1. Take the monitor from its service stand, and put it (face
down) on a soft surface (blanket, foam cushion or foam
stand), to make sure that you do not damage the front glass
plate.
2. Remove the metal back plate as described in paragraph
'Rear Cover Removal'.
3. Unscrew all fixation screws of the plastic back cover.
4. Lift and remove the plastic back cover.
5. If the triangular shaped cable holder at the left bottom is
present, unscrew the fixation screws of the holder at the left
bottom, see figure 'Exchange Glass Plate'.
6. Unplug the cable of the LED/Switch panel, connector 0320
7. If the ESM Filter Panel at the left bottom is present,
unscrew the fixation screws.
8. Unscrew all fixation screws of the (metallised) shielding
frame, see figure 'Exchange Glass Plate'.
9. You can now remove the (metallised) shielding frame,
together with the PDP, Audio panel, Power supply and
SCAVIO panel attached to it, see figure 'Exchange Glass
Plate'.
Note: To prevent scratches, make sure to put the shielding
frame together with the PDP on a soft surface.
10. Replace the glass plate.
Warning: make sure that the mains power is disconnected
when you remove the metal back plate.
Page 6
EN 6 ALIS-PDP Suppl.4.
Mechanical Instructions
CL 16532099_047.eps
Figure 4-6 Exchanging the PDP
To exchange the PDP panel:
1. Take out the SCAVIO panel and Power Supply panel, as
described earlier.
2. Unscrew all fixation screws of the (metallised) shielding
frame (two at the top and two at the bottom, see figure
'Exchange PDP').
3. The shielding frame can now be taken off the PDP.
4. Replace the PDP.
260901
Page 7
4.4 Board swap instructions for ALIS PDP
Mechanical Instructions
EN 7ALIS-PDP Suppl. 4.
AUDIO IN
L
R
MAINS
1
2
RS323
DVI-D
VGA2 VGA1
! All Functional blocks shaded grey are required for
the "Basic Configuration".
The remainder is required for the "Enhanced Configuration".
3
4
5
6
7
8
9
10
11
12
13
14
15
16
VGA1 VGA2 RC-OUT
DVI-D
Y/C S
SVHS
AV2 AV1
L
R
AUDIOINAUDIO
IN
CVBSB/Pb/Cb
B/Pr/Cr
H
L
R
AV3
v
AUDIO
IN
IR lightsensor
Red
18
19
20
21
22
23
24
17
Figure 4-7 Exploded view
Before dismounting panels read notes below!
Caution when removing circuit board!
When removing the circuit board after the main power is turned
on/off, wait for at least one minute before starting to remove the
circuit board.
If the circuit board removal is started immediately after turning
off the main power, it can result in electric shock or damage to
the circuit due to residual electric charge.
On handling the FPC connector!
To release the lock, release it by gently flipping it with the nail
of the thumb or forefinger. Never pinch the lock lever with
fingers or hook on it (especially with a fingernail).
Doing so might damage the lock lever.
E_14580_025.eps
260304
Figure 4-8 Handling FPC connector
E_14580_002.eps
250304
4.4.1 X-SUS Circuit Board Removal / installation Procedure
Remove the circuit board following the steps below. To install
the circuit board, reverse the removal procedure.
1. Remove the fixing screws (M3 X 8) at 9 locations.
2. Release the lock of the FPC connecter (CN21) and
disconnect the signal cable.
3. Disconnect the cables from the VH connectors (CN22,
CN23).
4. Pull out the XSUS board horizontally and disconnect the
connectors (CN24, CN25).
5. Remove the X-SUS board.
Make sure that you do not touch the heat sink when removing
the Y-SUS board.
4.4.2 Y-SUS Circuit Board Removal / installation Procedure
Remove the circuit board by following the steps below. To
install the circuit board, reverse the removal procedure.
1. Remove the fixing screws (M3 X 8) at 9 locations.
2. Release the lock of the FPC connecter (CN3 1) and
disconnect the signal cable.
3. Disconnect the cables from the VH connections (CN32,
CN33).
4. Pull out the YSUS board horizontally and disconnect the
connections (CN34, CN35).
5. Remove the Y-SUS board
25
Page 8

EN 8 ALIS-PDP Suppl.4.
4.4.3 ABUS-L Circuit Board Removal / Installation Procedure
Remove the circuit board by following the steps below. To
install the circuit board, reverse the removal procedure.
1. Disconnect the connecter CN52 from the ABUS-L board.
2. Raise the lock of the FPC connectors CN53, CN54, CN55
and CN56 to release it and remove the ADM flexible board.
3. Release the lock of the FPC connecter CN51 and
disconnect the signal cable (FPC).
4. Remove the screws (M3X8) fixing the ADM at the 8
locations.
5. Remove the screws (M3x8) fixing the ABUS-L board at the
3 locations.
6. Remove the ABUS-L board.
7. When installing the ABUS L-board, put the ABUS L-board
in such position that it is locked by the tabs before fixing it
in position (at 3 locations).
4.4.4 ABUS-R Circuit Board Removal / Installation Procedure
Remove the circuit board by following the steps below. To
install the circuit board, reverse the removal procedure.
1. Disconnect the connecter CN42 on the ABUS-R board.
2. Raise the lock of the FPC connectors CN43, CN44, CN45,
CN46 to release it and disconnect the ADM flexible board.
3. Release the lock of the FPC connecter CN41 and
disconnect the signal cable (FPC).
4. Remove the screws (M3X8) fixing the ADM at the 8
locations.
5. Remove the screws (M3X8) fixing the ABUS-R board at the
3 locations.
6. Remove the ABUS-R board.
7. When installing the ABUS-R board, put the ABUS R-board
in such position that it is locked by the tabs before fixing it
in position (at 3 locations).
Mechanical Instructions
4.4.5 LOGIC Board Removal / Installation Procedure
Remove the circuit board by following the steps below. To
install the circuit board, reverse the removal procedure.
1. Disconnect the EH connecter CN6.
2. Release the lock of the FPC connectors CN2, CN3, CN4,
CN5 and disconnect the signal cable (FPC).
3. Slide the lock of the FPC connecter CN7 toward the PSU
board side, then press it down toward the front and remove
the PSU signal cable.
4. Remove the screws (M3 X 8) fixing the LOGIC board in
position at 2 locations.
5. Remove the LOGIC board.
6. When installing the LOGIC board, put the LOGIC board in
such position that it is locked by the tabs before fixing it in
position (at 3 locations.
4.4.6 PSU Board Removal / Installation Procedure
Remove the circuit board by following the steps below. To
install the circuit board, reverse the removal procedure.
1. Release the lock of the cable clamp (large).(At 4 locations)
2. Disconnect the X-SUS board connecter CN23.
3. Disconnect the Y-SUS board connecter CN33.
4. Disconnect the ABUSR board connecter CN42.
5. Disconnect the ABUSL board connecter CN52.
6. Remove the wires (4), (5) from the cable clamp (small).
7. Disconnect the LOGIC board connecter CN6.
8. Disconnect the PSU signal cable from the PSU board
connecter CN69 side.
Page 9
Repair Process and Fault Finding
5. Repair Process and Fault Finding
EN 9ALIS-PDP Suppl. 5.
Index of this chapter:
1. Process flow
2. Repair instructions
3. Faultfinding
5.1 Process flow
The selected workshop receives the defect TV set and
investigates the PDP. Two possible solutions shall follow:
5.1.1 Advanced PDP exchange (actual way-of-working)
If the defect concerns one of the folowing items, the actual way
of working has to be followed:
• Glass broken
• Flex foil damaged
• Y-COM IC on flex foil is damaged
• NVM on logic board defect, no communication with
ComPair
A new PDP will be ordered at Euroservice. Euroservice issues
an RMA number and ships a refurbished PDP from its swap
(from 1st May 2003 onwards)
end user contacts dealer because his
pool in a flight case to the workshop. After receipt the workshop
sends the defect PDP, accompanied by a completely filled in
Failure Description Form (see Figure 5.1), in this flight case to
Euroservice. Euroservice makes sure the defect PDP is
repaired and afterwards added to its swap pool. The workshop
makes the TV set complete by building in the refurbished PDP.
Afterwards the TV set is sent back to the customer.
5.1.2 Customized repair
If the defect is not related to the exceptions, mentioned in 5.1.1,
the workshop orders the necessary spare parts, being boards,
at Euroservice. After receipt the workshop swaps the
concerning board and makes the TV set complete by building
in the PDP. Afterwards the TV set is sent back to the customer.
PDP flow chart
plasma TV set is defect
VIP workshop orders refurbished PDP
at Euroservice
Euroservice ships refurbished PDP from its
swap pool to VIP workshop in a flight case
VIP workshop swaps PDP's
and makes plasma TV set complete
dealer requests VIP workshop
to contact end user
VIP workshop brings home visit to end user
and swaps defect TV set with a loan set
VIP workshop analyses the PDP
of the defect plasma TV set
PDP:
YES
glass repair
or
flex c able m ach i ne
needed
??
NO
VIP workshop orders spare part(s)
being boards at Euroservice
Euroservice ships spare part(s) with
next-day-delivery to VIP workshop
VIP workshop repairs PDP on board level
and makes plasma TV set complete
VIP workshop brings plasma TV set to
end user and swaps with loan set
Figure 5-1 PDP flow chart
VIP workshop brings plasma TV set to
end user and swaps with loan set
E_14580_027.eps
250304
Page 10
EN 10 ALIS-PDP Suppl.5.
F
F
Failure Description Form for Defective Plasma Displays for Philips
Repair Process and Fault Finding
Form to be sent together with the defect
Plasma Display
actory/Service Repair Workshop
Product Data
Part No:
Serial No, display:
MRA No:
Serial No, set:
Condition Code | Symptom Code
Possible Condition Codes:
Possible Symptoms:
310 No Picture
321 Picture Too Dark
327 Only Partial Picture
350 Unstable Picture
351 Synchronisation Poblem
352 Picture Luminance Pumping [slow]
353 Picture Jitter
354 Picture Shaking
355 Flickering Picture (Luminance) [fast]
356 Flashing Picture (active-inactive)
35A Frozen Picture
Please fill in at least the yellow part
1 Constant
2 Intermittent
3 After a While
4 In a Hot Environment
5 In a Cold Environment
From:
Factory / Service Repair Workshop
Additional Failure Description
In case of 32 FTV please fill in service error codes of the monitor
35X Other Unstable Picture Problem
381 Burn-In Mark On Display (Phosphor)
382 Scratch On Display
384 Phosphor/Pixel Missing
a Non Lightning (Flickering) Cells each Color
R:. G:. B:.
b Wrong Phosphor/ For Each Color
c Non Extinguishing (Flickering) Cell:.
d High Intensity Cell Defect
e Mechanical Failure
- Due To Fujitsu Factory
A Inactive Row(s)
B Inactive Column(s)
C Various Missing Display Cells
D Picture, but non linear greyscale
E Video Stretched Over Total Height
431 Missing Color
64X Mechanical noise (accoustical sound)
F Broken Plasma Panel
G Broken flexible cabling
Date
PDP
New symptoms descriptions
ujitsu Part of Form
Recognition & Repair
Conditions (Temp., Soft, ETC ):
Normal
Under Stress
Failed Component Serial # defect
Glass Panel
X-SUS-Std
Y-SUS
Logic12
A-Bus Right
A-Bus Left
DC/DC
Other
PCB Name:
Repair Part/Location:
Corrective Action:
Preventive Action:
(not to be filled in by factory or by Service Workshop)
Æ
additional Description
Signature/Stamp Factory
Æ
Serial # replaced
Warranty?
Date
Ship to FJ?
Additional Failure Description :
Signature/Stamp Repair Center
Signature/Stamp FHP Japan
no/yes
no/yes
E_14580_026.eps
250304
Figure 5-2 Failure description form
Page 11

Repair Process and Fault Finding
EN 11ALIS-PDP Suppl. 5.
5.2 Repair instructions
5.2.1 General
All below listed Plasma Display Panels must be repaired on
board level except in case of:
• Broken glass panel
• Defective flex foil
• Defective Y-COM IC on the flex foil
The Plasma panels with these faults needs to be send back via
the central repair procedure of Euroservice.
To be able to repair the Plasma Display Panels on board level
the following repair tools are available:
9965 000 23434 Special LVDS cable
Power Supply
CN7 CN6
Logic Board
SCAVIO Customer's Interface Board
CN1
Figure 5-3 Extension cable kit ALIS PDP
3122 785 90581 Foam buffers for PDP
CN1
8
6
4
Compair
other
signals
SDA
GND
SCL
IIC
SCAVIO
E_14580_023.eps
SDA
GND
SCL
Compair
IIC
050404
Module description
X-SUS board FPF17R-XSS5002 996500017432
Y-SUS board FPF17R-YSS5003 996500017433
Logic board FPF17R-LGC5012 996500017435
A-BUS Right FPF17R-ABR5005 996500017436
A-BUS Left FPF17R-ABL5004 996500017437
Signal Cable (Logic - ABUS,SUS) FPF17R-CBL2001 996500017438
Signal Cable (XSUS-YSUS) FPF17R-CBL1001 996500017439
Factory code
number
The available modules for the Plasma Display Panel
FPF32C106128UA-62 are:
Module description
X-SUS board FPF17R-XSS5010 996500017440
Y-SUS board FPF17R-YSS5011 996500017441
Logic board FPF17R-LGC5013 996500017442
A-BUS Right FPF17R-ABR5005 996500017436
A-BUS Left FPF17R-ABL5004 996500017437
Signal Cable (Logic - ABUS,SUS) FPF17R-CBL2001 996500017438
Signal Cable (XSUS-YSUS) FPF17R-CBL1001 996500017439
Factory code
number
Remark:
1. If the LOGIC board is defective, the procedure mentioned
in chapter 5.x must be used.
5.2.3 32” H2 ALIS Plasma Display Panel
These Plasma Display Panels are used in FM23 sets with
production code:
• AG07 and higher for the sets 32FD9954/17S and
32FD9954/69S
• AG08 and higher for the sets 32FD994/69S
• AG09 and higher for the sets 32FD9944/01S
The involved Plasma Display Panels are:
Display type Service code number Production code
FPF32C106128UA-72 9322 194 11682
Service code
number
Service code
number
1
*
E_14580_024.eps
Figure 5-4 Foam buffers for PDP
The following Plasma Display Panels must be repaired on
board level:
1. 32” H1 ALIS Plasma Display Panel
2. 32” H2 ALIS Plasma Display Panel
3. 37” H2 ALIS Plasma Display Panel
4. 42” H1 ALIS Plasma Display Panel
5. 42” H2 ALIS Plasma Display Panel
5.2.2 32” H1 ALIS Plasma Display Panel
These Plasma Display Panels are used in FM23 sets with
production code AG00 up to and including AG05.
The involved Plasma Display Panels are:
Display type Service code number Production code
FPF32C106128UA-51 9322 172 11682
FPF32C106128UA-52 9322 178 04682
FPF32C106128UA-62 9322 190 61682 From AG06 0242 onwards
The available modules for the Plasma Display Panel
FPF32C106128UA-51 and -52 are:
250304
The available modules for this Plasma Display Panel are:
Module description
X-SUS board FPF17R-XSS5016 9965 000 22709
Y-SUS board FPF17R-YSS5017 9965 000 22710
Logic board FPF17R-LGC5018 9965 000 22711
A-BUS Right FPF17R-ABR5015 9965 000 22713
A-BUS Left FPF17R-ABL5014 9965 000 22712
Signal Cable (Logic - ABUS,SUS) FPF17R-CBL2001 9965 000 17438
Signal Cable (XSUS-YSUS) FPF17R-CBL1001 9965 000 17439
Factory code
number
Remark:
1. If the LOGIC board is defective, the procedure mentioned
in chapter 5.x must be used.
5.2.4 37” H2 ALIS Plasma Display Panel
These Plasma Display Panels are used in FM33 sets with
production code AG00 and onwards.
The involved Plasma Display Panels are:
Display type Service code number Production code
FPF37C128128UA-72 9322 156 44682
The available modules for these Plasma Display Panels are:
Module description
X-SUS board FPF18R-XSS5007 996500023342
Y-SUS board FPF18R-YSS5008 996500023343
Logic board FPF18R-LGC5009 996500023344
A-BUS Right FPF18R-ABL5005 996500023346
A-BUS Left FPF18R-ABR5004 996500023347
Signal Cable (Logic -ABUS,SUS) FPF18R-CBL100103 996500017431
Signal Cable (XSUS-YSUS) FPF18R-CBL100103 996500017431
Factory code
number
Service code
number
Service code
number
1
*
1
*
Page 12

EN 12 ALIS-PDP Suppl.5.
Repair Process and Fault Finding
Module description
Signal Cable (Logic - ABUS,SUS) FPF18R-CBL200112 996500017430
Signal Cable (XSUS-YSUS) FPF18R-CBL200113 996500023345
Factory code
number
Remark:
1. If the LOGIC board is defective, the procedure mentioned
in chapter 5.x must be used.
5.2.5 42” H1 ALIS Plasma Display Panel
These Plasma Display Panels are used in FM24 sets with
production code AG00 and higher.
The involved Plasma Display Panels are:
Display type Service code number Production code
FPF42C128128UB-54 9322 185 78682
The available modules for these Plasma Display Panels are:
Module description
X-SUS board FPF16R-XSS500203 996500017423
Y-SUS board FPF16R-YSS500303 996500017424
Logic board FPF16R-LGC5006 996500017425
A-BUS Right FPF16R-ABR5005 996500017426
A-BUS Left FPF16R-ABL5004 996500017427
Signal Cable (LOGIC-XSUS) FPF16R-CBL200104 996500017428
Signal Cable (LOGIC-YSUS) FPF16R-CBL200106 996500017429
Signal Cable (LOGIC-ABUS) FPF18R-CBL200112 996500017430
Signal Cable (XSUS-YSUS) FPF18R-CBL100103 996500017431
Factory code
number
Service code
number
Service code
number
1
*
Remark:
1. If the LOGIC board is defective, the procedure mentioned
in chapter 5.x must be used.
5.2.6 42” H2 ALIS Plasma Display Panel
These Plasma Display Panels are used in FM24 sets with
production code:
• AG04 and higher for the sets 42FD9934/17S, 42FD9934/
69S, 42FD9944/01S, 42FD9944/17S, 42FD9944/69S and
420P30/00
• AG06 and higher for the sets 42FD9954/69S
The involved Plasma Display Panels are:
Display type Service code number Production code
FPF42C128128UB-72 9322 194 10682
The available modules for these Plasma Display Panels are:
Module description
X-SUS board FPF16R-XSS5008 996500022705
Y-SUS board FPF16R-YSS5009 996500022704
Logic board FPF16R-LGC500703 996500022706
A-BUS Right FPF16R-ABR5011 996500022707
A-BUS Left FPF16R-ABL5010 996500022708
Signal Cable (LOGIC-XSUS) FPF16R-CBL200104 996500017428
Signal Cable (LOGIC-YSUS) FPF16R-CBL200106 996500017429
Signal Cable (LOGIC-ABUS) FPF18R-CBL200112 996500017430
Signal Cable (XSUS-YSUS) FPF18R-CBL100103 996500017431
Factory code
number
Service code
number
1
*
Remark:
1. If the LOGIC board is defective, the procedure mentioned
in chapter 5.x must be used.
Page 13

Repair Process and Fault Finding
Problem analysis procedure PDP repair / Board swap
PDP Repair procedure Board Swap
EN 13ALIS-PDP Suppl. 5.
The entire Screen does not light.
The set is going into protection.
(PSU is OK)
Step 0
Check the 3,3V Stby on the PSU and the
Logic board
Step 1
Check if there is no short circuit on the Boards
Power Supply lines
Step 3
Check current of 5V Vcc Power Supply line,
on ABUSL, ABUSR, Y-SUS, X-SUS board.
Vertical Line / Vertical Bar? Horizontal bar?
Logic Board Exchange
procedure.
Use of ComPair
Copy data from the
defective Logic board
Check Va on ABUSL and ABUSR Board
Step 4
Step 5
Check Vs on Y-SUS and X-SUS board
SDM Y-SUS
Step 6
Check Vs on Y-SUS and X-SUS board.
X-SUS board XBB
Figure 5-5
Restore data into the new
board
Ship Out
Auto alignment procedure
E_14580_008.eps
250304
Page 14

EN 14 ALIS-PDP Suppl.5.
Repair Process and Fault Finding
Problem Analysis Procedure the entire screen does not light.
The entire screen does not light
All the boards are connected
Connect the set to mains.
Switch the set on via vacation switch
Standby LED is on?
Set is in Standby?
Y
Check 3,3V Stby
on pin 1 CN6
Logic board
Y
Caution; do never disconnect connectors or
remove boards when the mains plug is connected.
Allow discharge of power supplies before
disconnecting connectors!
N
N
Switch vacation switch off
Check supply voltages
Vcc pin 6 Cn306
Vs pin 10 Cn323
Va pin 1 Cn323
Vcc Pin 3 Cn323
Vcc pin 7 Cn342
Vcc pin 7 Cn352
3,3V Standby is ok.
Switch on the set via RC
Disconnect CN306 Logic board
Y
Switch vacation switch on and check
3,3V Stby on PSU
N
Set is going into protection?
Y
Disconnect the mains plug.
Remove the following power connections
CN23 X-Sus
CN33 Y-Sus
CN42 ABUSR
CN52 ABUSL
1
3,3V Stby
on pin 1 Cn306
is ok?
Y
CC on Logic board
Replace Logic Board
Follow Logic board
replacement procedure
N
Defect is on PSU
board.
Standby supply repair
See PSU repair
method
E_14580_009.eps
250304
Figure 5-6
Page 15

1
X-Sus Board CN23
VCC pins 3 - 4
Vs pins 6 - 8
Va pins 1 - 4
are shorted?
N
Y-Sus Board CN33
Vcc pins 1 - 2
Vs pins 5 - 7
are shorted?
Repair Process and Fault Finding
Short-circuit check on Power Supply Lines
Check with ohmeter if following
pins are not shorted
Y
Y
Remove SDM from the following
connectors CN34 , CN35
EN 15ALIS-PDP Suppl. 5.
X-Sus board is defective
Replace X-Sus board
N
ABUSL Board
Va CN52 pins 1 - 4
Vcc CN52 pins 5 -7
are shorted?
N
Y-Sus Board CN33
Vcc pins 1 - 2
Vs pins 5 - 7
are shorted?
Y
Y
Remove ADM from the
following connectors
CN53, CN54, CN55, CN56
ABUSL Board
Va CN52 pins 1 - 4
Vcc CN52 pins 5 -7
are shorted?
N
N
SDM is defective
PDP is defective
Y-Sus board is defective.
Replace Y-Sus Board
ADM is defective
PDP is defective
ABUSL Board is defective
Y
2
PSU board has a short circuit
Replace ABUSL Board
End of analysis
E_14580_010.eps
310304
Figure 5-7
Page 16

EN 16 ALIS-PDP Suppl.5.
Repair Process and Fault Finding
2
ABUSR Board
Va CN42 pins 1 - 4
Vcc CN42 pins 5 -7
are shorted?
N
Only the Logic board CN306 and CN307 are
connected.
Connect set to mains
Switch vacation switch on
Switch set on via RC
Short-circuit check on Power Supply Lines
Y
Remove ADM from the following connectors
CN43, CN44, CN45, CN45
ABUSR Board
Va CN42 pins 1 - 4
Vcc CN42 pins 5 -7
are shorted?
Y
N
ADM is defective
PDP is defective
ABUSR Board is defective.
Replace ABUSR board
PSU Board
Vcc 5V exists a few
seconds?
Y
Disconnect the set from AC Mains
3
N
Check if VCEGO
is High
Logic board is
defective
In step 3 the 5V Vcc will be checked by use of an external PSU.
First adjust the current output on the external PSU to 5V 0,5A
Connect external PSU to Diodes D6224 and/or D6225 on the set
Replace Logic Board
Follow Logic board replacement
procedure
Set V output to 0V
PSU (D6224 not present in FM33).
See diagram P7
End of analysiis
E_14580_011.eps
310304
Figure 5-8
Page 17

Repair Process and Fault Finding
EN 17ALIS-PDP Suppl. 5.
3
Set is disconnected from AC mains!
Connect CN42 ABUSR
Switch the PSU on
Vcc 5V OK?
I < 0,35A?
Y
Switch off the PSU
Connect CN52 ABUSL
Switch on the PSU
Vcc 5V OK?
I < 0,35A?
Y
5V Vcc check ABUSR, ABUSL, Y-Sus, X-Sus board
In the next steps the 5V Vcc power supply lines will be checked.
AExternal Power Supply is connected to D6224/D6225 5V Vcc on the set PS.
For testing each board, ramp up the External PSU from 0 to 5V.
Monitor the current!
N
N
Adjust External PSU
max. current to 2A
ABUSR board is defective.
Replace ABUSR board
Logic buffer circuit has abnormalty.
ABUSL board is defective.
Replace ABUSL Board
Logic buffer circuit has abnormalty.
Switch off the PSU
Connect CN23 X-Sus
Switch on the PSU
Vcc 5V OK?
I < 2A?
Y
Switch off the PSU
Connect CN33 Y-Sus
Switch on the PSU
Vcc 5V OK?
I < 2A?
Y
Switch off the external PSU
and disconnect.
N
X-Sus board is defective
Replace X-Sus board
DC/DC power supply circuit or control
logic cicuit has abnormality
N
Y-Sus board is defective
Replace Y-Sus board
DC/DC power supply circuit or control
logic cicuit has abnormality
Switch PSU off
Remove ADM 1 - 8
4
Figure 5-9
End of analysis
E_14580_012.eps
250304
Page 18

EN 18 ALIS-PDP Suppl.5.
Repair Process and Fault Finding
4
Connect the set to AC Mains.
Switch on
PSU board Va 50V
exists?
N
Switch off
Disconnect connector CN42 ABUSR board
VA check on the ABUSR and ABUSL board
Va and Vs Check with internal PSU
For each step switch the set off and on via
the vacation swith and the RC
Y
ADM is defective
Panel chassis is defective
Switch on
PSU board
Va 50V exists?
N
Switch off
Disconnect connector CN52 ABUSL board
switch on
PSU board
Va 50V exists
Y
Y
ABUSR board is defective.
Replace ABUSR board.
ABUSL board is defective.
Replace ABUSL board
N
Disconnect the AC Power.
End of analysis
5
Figure 5-10
E_14580_013.eps
250304
Page 19

Repair Process and Fault Finding
Vs Check on Y-Sus & X-Sus board and SDM / XBB
EN 19ALIS-PDP Suppl. 5.
5
PSU board
Vs 80V exists?
N
Switch off
Disconnect SDM / Y-Sus board
Measure resistance of SDM power line
Between A1-A2, B1-B2, C1-C2 and D1-D2
SDM Power line is
shorted?
There is no start up of Vs switched and Va if power supply to
Remark:
X-Sus (CN23) or Y-Sus (CN33) board is diconnected.
Y
PSU Board Va block is defective.
Y
Panel chassis is defective
SDM is faulty
Switch off
End of analysis
ADM1 ADM2 ADM3 ADM4 ADM5 ADM6 ADM7 ADM8
A2
A1
B1
B2
C1
C2
D1
D2
Switch on
N
Switch off
N
PSU board Vs / Vcc
is output?
Y
SDM is faulty
Panel chassis is defective
6
Switch off
End of analysis
E_14580_014.eps
310304
Figure 5-11
Page 20

EN 20 ALIS-PDP Suppl.5.
Repair Process and Fault Finding
Vs Check on Y-Sus & X-Sus board and SDM / XBB
6
Disconnect connection from
XBB / X-Sus board
Measure resistance of XBB line.
Between A1-B1, B1-A2, A2-B2, B2-A3, A3-B3,
B3-A4, A4-B4
There is a posibility to check the VS and Va power supply lines
via an external power supply.
External power supply connected to VS or Va power supply line
and ground, output voltage = 20V, current = 0mA or very low
current to charge the capacitors at switch on.
ADM1 ADM2 ADM3 ADM4 ADM5 ADM6 ADM7 ADM8
A1
B1
A2
B2
A3
B3
A4
B4
XBB line has short-
circuit?
N
Y-Sus board is defective.
Replace Y-Sus board
X-Sus board is defective.
replace X-Sus Board
Y
XBB is faulty
Panel chassis is defective
X-Sus board is defective
End of analysis
Figure 5-12
E_14580_015.eps
310304
Page 21

Repair Process and Fault Finding
Vertical Line / Vertical bar Problem analysis procedure
Vertical line / Vertical bar
EN 21ALIS-PDP Suppl. 5.
Logic - ABUS board signal
cable has abnormal
appearance?
N
ADM flexible has
abnormal appearance?
N
Switch on
Y
Y
Signal cable is defective.
ADM is defective
PDPs is defective
End of analysis.
One vertical line?
N
1
Tap lightly on ADM flexible
Y
heat-melted junction
Any changes?
N
Panel Adress has open circuit or
ADM IC chip is defective.
PDP is defective
Figure 5-13
Heat-melted junction is
Y
defective.
PDP is defective
Switch off
End of analysis
E_14580_016.eps
250304
Page 22

EN 22 ALIS-PDP Suppl.5.
Repair Process and Fault Finding
1
Bar of 1/2 screen width on the
left does not light?
N
Bar of 1/2 screen width on the
right does not light?
Y
Voltage exists at
ABUSL board CN52?
N
Switch off
Disconnect CN52 from ABUSL board
Switch on
Voltage exists
at PSU board?
N
Y
Y
Y
Logic board is
defective
ABUSL board is
defective
PSU Cable is defective.
Connector has poor connection.
Logic board is defective.
Voltage exists at
ABUSR board CN42?
Y
Logic board is
defective
N
Disconnect CN42 from ABUSR board
Switch off
Switch on
N
Voltage exists
at PSU board?
Y
N
2
ABUSR board is
defective
PSU Cable is defective.
Connector has poor connection.
Logic board is defective.
Switch off
End of analysis
E_14580_017.eps
250304
Figure 5-14
Page 23

Repair Process and Fault Finding
2
EN 23ALIS-PDP Suppl. 5.
Vertical line of
different color?
Y
Exists in left 1/2
area?
Y
Switch off.
Replace ABUSL board.
Switch on
Normal?
N
Switch off
Replace Logic board
Switch on
Y
ABUSL board is
defective
N
N
Normal?
Y
LOGIC board is
defective.
N
Replace Logic ABUSL signal cable.
Switch off.
Switch on
Normal?
Y
N
Signal cable is
defective
ADM is defective
PDP is defective
3 4
Figure 5-15
Switch off
End of analysis
E_14580_018.eps
250304
Page 24

EN 24 ALIS-PDP Suppl.5.
Repair Process and Fault Finding
3
Replace ABUSR board
4
Switch off
Switch on
Normal?
Y
ABUSR board is
defective
N
Switch off
Replace Logic board
Switch on
Normal?
N
Switch on
Replace signal Cables Logic - ABUSR
Switch on
Normal?
N
Y
Y
Logic board is
defective
Signal cable is
defective
ADM is defective.
Panel chassis is
defectiive.
Panel is defective
Panel chassis is defective
Figure 5-16
Switch off
End of analysis
E_14580_019.eps
250304
Page 25

Repair Process and Fault Finding
Horizontal bar problem analysis procedure
Horizontal bar
Switch off
Replace X-Sus board
Switch on
EN 25ALIS-PDP Suppl. 5.
Normal?
N
Switch off
Replace X-Sus board (original board)
Replace Y-Sus board
Switch on
Normal?
Y
Y
X-Sus board is defective
Y-Sus board is defective
N
Figure 5-17
PDP is defective
SDM or XBB is defective
Switch off
End of analysis
E_14580_020.eps
250304
Page 26

EN 26 ALIS-PDP Suppl.5.
Repair Process and Fault Finding
Remark: Do not interchange boards between different PDP’s,
this can damage your PDP
Logic Board Exchange (1)
1. Copy NVM Data from defective Logic Board
1.
2.
Disconnect the LVDS Cable from the SCAVIO at
3.
Connect the service Cable (12nc 9965 000 23434) to
4.
5.
6.
Click the link in ComPair to open the Logic Board
7.
Unscrew the SCAVIO Panel
(CN0310)
the LVDS connector on the FME Logic board
Switch on the set
Set will go into protection or in stanby
exchange window
Click the "On" button.
In the titlel bar the module type will appear
8.
9.
Use the "Save" button to save the information to a file
10.
11.
Click button "copy from original"
Click the "Off" button
Switch off the set and replace the Logic board
1. Unscrew the SCAVIO panel to be able to reach the cable
going to connector CN1 on the Logic Board
2. Disconnect the cable from the SCAVIO panel at connector
0301. Leave the rest connected!
Note: In the diagram the cable at 0301 is still connected,
but at this moment in the process that should not be.
3. Connect the ComPair I2C cable as given in this diagram.
4. Switch on the set. It will go to stand by or protection mode.
5. Click the link in ComPair to open the Logic Board exchange
window.
6. Click the 'On' button. In the title bar the module type will
appear: 37H1.11, 42H2, or something similar.
Figure 5-18
7. Click button 'Copy from original'
8. The data is read from the EEPROM on the logic board and
displayed in the list.
9. Use the 'Save' button to save the information to a file. This
is optional, but better to be safe.
Note: If you close the window without saving, all settings
will be lost. If you intend to close this window before
replacing the board you should save the settings so you
can load them later.
10. Click the 'Off' button.
11. Switch off the set and replace the Logic Board with another
one.
Page 27

Repair Process and Fault Finding
Logic Board Exchange (2)
2. Write NVM Data to the new Logic Board
EN 27ALIS-PDP Suppl. 5.
1.
Switch off the set and replace the Logic board
And connect the service cable to the SCAVIO (CN0301)
2.
Switch the set on with the RC and bring the set in CSM
using code 123654
3.
4.
5.
Click the "On" button
Load the saved values
Click button paste to replacement
6.
7.
When ready you can switch off the set, and disconnect
Click button "Ship Out" (1)
ComPair
8.
Exchange back the original LVDS cable to the
original with ferrits
1. Switch off the set and replace the Logic Board with another
one. Now also connect the cable to connector 0301 as
depicted in the diagram above.
2. Restart the set with the new board. Switch the set on with
the remote control and activate CSM (123654). This is to
prevent the set to switch off because no input devices are
connected.
3. Click the 'On' button.
4. The module type will again appear in the title bar. This may
be different now from step 7 because another Logic Board
is used. If you closed the window after step 9 and did save
the settings you should load them now. Use the Load
button to do so.
Figure 5-19
(1) The PDP screen will be blanked for about 15s,
then 15s later, the ’Ship out’ process will end
E_14580_022.eps
250304
5. Click button 'Paste to replacement'. The settings copied
from the old board previously are now being written to the
new board. If successful the button 'Ship out' will be
enabled.
6. Click button 'Ship out'.
7. Now a process of voltage feedback initialization and self-
adjustment starts. This will take a few seconds. When
ready you can switch off the set, disconnect ComPair and
restart the set again to test.
8. Exchange the service LVDS cable with the original LVDS
cable.
Page 28

EN 28 ALIS-PDP Suppl.5.
Repair Process and Fault Finding
No Fault contents Suspected fault
Fault status
location
X-SUS, Y-SUS
PSU
Panel chassis
LOGIC
ABUSL
ABUSR
1
Entire screen
After momentarily
going on, the screen
becomes black
immediately or after a
few seconds. Main
power is turned off.
does not light.
Screen lights dimly
LOGIC Replace LOGIC
even on the back
2
3
Vertical Line
screen
Single vertical line (of
different color)
Vertical line from the
Panel chassis
LOGIC
Panel chassis Replace panel
middle of effective scan
4
area (Vertical line of
different color)
Analysis
procedure and
measure
Refer to the entire
screen does not
light.
board and folow
Logic Board
echange
procedure
Refer to vertical
Line / bar..
chassis
5
Vertical bar
6
7
Horizontal line
8
Bar width of 1/7 0f
horizontal size or in
multiples of 1/7, is
displayed. Abnormal
display.
Bar width of 3/7 or 4/7
of the screen width, is
displayed. Abnornial
display. (Vertical line of
different color)
Single horizontal line
(No light) or single
horizontal does not
light among the
effective scanning
area. Single horizontal
line does not light
Every other line(No
light) Entire screen
Panel chassis
ABUSL ABUSR
Refer to vertical
Line / bar..
LOGIC Above
boards are
connected
Panel chassis
ABUSL ABUSR
Refer to vertical
Line / bar..
LOGIC Above
boards are
connected
Panel chassis Replace panel
chassis
X-SUS
Y-SUS
Replace X-SUS
Y-SUS board
Figure 5-20
E_14580_005.eps
260304
Page 29

Repair Process and Fault Finding
EN 29ALIS-PDP Suppl. 5.
No Fault contents Suspected fault
Fault status
location
Bar width of 1/8 or
Panel chassis Replace panel
multiples of 1/8 of the
screen height, is
9
displayed Abnormal
(Screen does light)
Horizontal bar
Panel chassis Y-
SUS, X-SUS
Above boards
are connected
Panel chassis Perform all white
10
Image sticking.
Burn in?
Bar width of 1/2 of the
screen height.
Abnormal display
(Screen does not light)
Fixed display contents
are always displayed.
burn in?
11
Analysis
procedure and
measure
chassis
Refer to horizontal
bar.
heat run. After
judgment, replace
panel chassis if
needed.
Stains Oval-shaped points
having abnormal
luminance are
12
scattered in the upper
or lower part of screen.
Twinkle The entire screen
momentarily becomes
13
brighter or darker.
Flicker The entire screen
flickers continuously
14
Luminance is
abnormal
15
Screen is too dark or
too bright. (Out of
specifications)
Chrominance is
abnormal
16
Sync is
17
disturbed
Colors cannot be
displayed orrectly.
Panel chassis Perform all white
heat run. After
judgment, replace
panel chassis.
Poor connector
contact. Panel
chassis
Poor connector
contact. FFC
(Flat Foil
Connector / cable
reconnection or
Cable Exchange
connector Cable)
LOGIC
Replace LOGIC
board and folow
Logic Board
LOGIC
echange
procedure
Figure 5-21
E_14580_006.eps
260304
Page 30

EN 30 ALIS-PDP Suppl.5.
Repair Process and Fault Finding
No Fault contents Suspected fault
Fault status
location
Picture
18
distorted
Steps of
19
gradations are
Luminance linearity is
poor.
LOGIC
LOGIC
skipped
PSU, X-SUS
Y-SUS
(Core is broken,
Abnormal
20
sound
Control on
external
21
communication
Contrast, color
temperature
adjustment and Y
cannot be changed.
or transformer is
abnormal)
LOGIC Replace LOGIC
is abnormal
Analysis
procedure and
measure
Replace LOGIC
board and folow
Logic Board
echange
procedure
Locate cause of
abnormality from
listening and
viewing. Replace
the cause of
problem
board and folow
Logic Board
echange
procedure
E_14580_007.eps
260304
Figure 5-22
Page 31

Block Diagrams, Testpoint Overview, and Waveforms
6. Block Diagrams, Testpoint Overview, and Waveforms
Supplement on FM23, FM24, FM33 (3122 785 13891) service
manuals.
EN 31ALIS-PDP Suppl. 6.
Figure 6-1
E_14580_003.eps
250304
Page 32

EN 32 ALIS-PDP Suppl.6.
Block Diagrams, Testpoint Overview, and Waveforms
Figure 6-2
E_14580_004.eps
250304
Page 33

Circuit Diagrams and PWB Layouts
7. Circuit Diagrams and PWB Layouts
Supplement on FM23, FM24, FM33 (3122 785 13891) service
manuals.
8. Alignments
8.1 Voltage Setting Procedure
The Voltage Setting label, at the top left of the back of the PDP,
shows the following messages:
Table 8-1
Item Adjustment items Measurement point Adjustment value (conditions)
1 Vs voltage adjustment PSU board F241or CN392 test points Voltage setting label indication value* I% (all black)
2 Va voltage adjustment PSU board F240 or CN392 test points Voltage setting label indication value* I% (all black)
3 Vw voltage adjustment X-SUS board connecter CN26 6-pin Voltage setting label indication value* 1% (all black)
4 Vx voltage adjustment X-SUS board connecter CN26 1-pin Voltage setting label indication value* (all black)
If the voltage adjustments Vs and Va on the Power Supply Unit,
must be performed, depends on the version of Power Supply
Unit (see table 2).
EN 33ALIS-PDP Suppl. 7.
Table 8-2
PSU version 3 PSU v3 with precision R's PSU version 4
PDP with Vs feedback (-52 PDP) Feedback loop 'OFF', alignment is necessary Feedback loop 'ON', alignment (check) is
PDP with Vs/Va feedback
(with 'B' in serial number)
Feedback loop 'OFF', alignment is necessary Feedback loop 'ON', no alignment (check)
necessary (see voltage setting label)
necessary
This table also shows if the Vs and Va control loop must be
switched ON or OFF.
The voltage adjustments Vw and Vx are done automatically via
ComPair. After exchange of the Logic Board, click on ship out.
The settings from the old Logic Board will be restored in the
new Logic Board
Feedback loop 'ON', no alignment necessary
Feedback loop 'ON', no alignment necessary
Page 34

EN 34 ALIS-PDP Suppl.9.
Circuit Descriptions and Abbreviation List
9. Circuit Descriptions and Abbreviation List
9.1 Board Function Description
9.1.1 Logic board Function
Data Processor
• ( γ adjustment ( 1 / 2 . 2/ 2 . 4 / 2 . 6 / 2 8)
• NTSC/EBU format (Color matrix) Switch
• RGB gain Control (White balance adjustment, Amplitude
1imitation)
• Error Diffusion Technology (Greyscale adjustment)
• Dither (Greyscale adjustment)
• Burn-in Pattern generation
Data Converter
• Quasi out-line adjustment (luminous Pattern control)
Scan Controller
• Address driver control signal generator (ADM)
• Scan driver control signal generator (SDM)
• X/Y sustain control signal generator
Waveform ROM
• Waveform Pattern for drive / Timing memory
MPU
• Synchronous détection
• System control
• Driving voltage (Va, Vs, Vr, Vw) Minute adjustment
• Abnormal watch (breakdown detection)/abnormal
processing
• Ls (sustain) current control (sustain pulse control)
• La (address) current control (sub-field control)
• External communication control
• Flash memory (firmware)
9.1.3 Function of Y-SUS Board
DC/DC power supply block
• Vcc (+5V) -> Y Fvcc (+5V, floating)/Y Fve (+ 18V, floating)/
Ve (+ 17V)
Switching block
• Switching during address period
• Switching during sustain period
• Switching during reset period
Current detector block
• Isy (sustain) current detection
• Isp (SDM) current detection
9.1.4 Function of PSU Board
Standby power supply block
• AC100-240 +5V & +3V3 Standby
PFC block (AD/DC power supply block)
• AC100-240 +390V
AD/DC power supply block
• +380V - Vcc (+5V) / Vs (+80V)/Va (+60V)
Current detection block
• la (address) current detection
Abnormal voltage monitoring
• Vs excess voltage monitoring
• Va excess voltage monitoring
EEPROM
• Control parameter memory
• The accumulation energizing time (Every hour)
• Abnormal status memory (16 careers)
9.1.2 Function of X-SUS Board
DC/DC power supply block
• Vs (+60V) Vw (+185V)/Vx (+45V)
• Vcc (+5V) XFvcc (+5V, floating)/XFve (+ 18V,
floating)/Ve (+ 17v)/Vb(-5)
X switching block
• Switching during address period
• Switching during sustain period
• Switching during reset period
Current detector block
• Isx (sustain) current detection
Page 35

Circuit Descriptions and Abbreviation List
EN 35ALIS-PDP Suppl. 9.
9.2 List of abbreviations
ADM Address module
Burn-in rack Test equipment of the shelf test in
which the PDP unit is left to stand in
drive condition
CPU The unit for controlling the circuit
operation
DOXE The control voltage for even-
numbered lines in the X direction
DOYSD Used in the drive voltage in the Y
direction (down)
DOYSU Used in the drive voltage in the Y
direction (up)
DOXO The control voltage for odd-numbered
lines in the X direction
External power ON Running the external powers (Vcc, Va,
Vs) on the designated voltage. Unless
otherwise specified
External power OFF Making the external powers (Vcc, Va,
Vs) to stop their operation completely.
Unless otherwise specified
Flexible cable The cable to connect the electric
circuit to the panel
Flicker Continuous switching between bright
and dark views by the PDP itself
Gradation Shading of the display colour
OPUMP The name of a circuit where the
current from X/YSUS is returned
Oscilloscope A device that allows the flow and
strength of the running current to be
visually checked and measured
Panel The indication part of the plasma
display panel (PDP)
Panel voltage The voltage required operating the
PDP normally
Parts Each PC board and parts mounted in
the PC boards
PDP Plasma display panel abbreviated
Probe A cable with contact finger that can
transfer the status of the electric circuit
to be measured to an oscilloscope
Protection cover A cover made by aluminium to protect
the PDP entirely during test
ROM Memory that stores the drive
sequence and other data
SDM Scan module
SUS XSUS or YSUS
Tapping Light impact
Unit of COM The unit of circuits connected to the
panel with flexible cable. (YCOM UP/
DOWN, XBUS UP/DOWN, address
sections, the unit of PC boards in
ACOM 1 to 5)
Va The power supply at 60 V. which is
used to write data on the panel
Vcc The power supply at 5 V, which is used
to operate the logic section mainly
Vs The power supply ranging from 127 V
to 180 V, which is used to maintain
display data. In addition, this can
serve as the primary side for the
secondary voltage (Vw, -Vy, Vsc)
White solid A condition when the screen display is
entirely white
XSUS The name of the circuit that controls
the panel operation in the X direction
YCOM The circuit used to output a panel Y
line selection signal and the voltage of
a display data keep signal
YCOMDV The name of the panel drives voltage
signal output from YCOM UP/DOWN
section
YSUS The name of the circuit that controls
the panel operation in the Y directio
Page 36

EN 36 ALIS-PDP Suppl.10.
10. Spare Parts List
For spare parts list see chapter 5.2
11. Revision List
Supplement on FM23, FM24, FM33 (3122 785 13891) service
manuals.
Spare Parts List
 Loading...