

Page 1
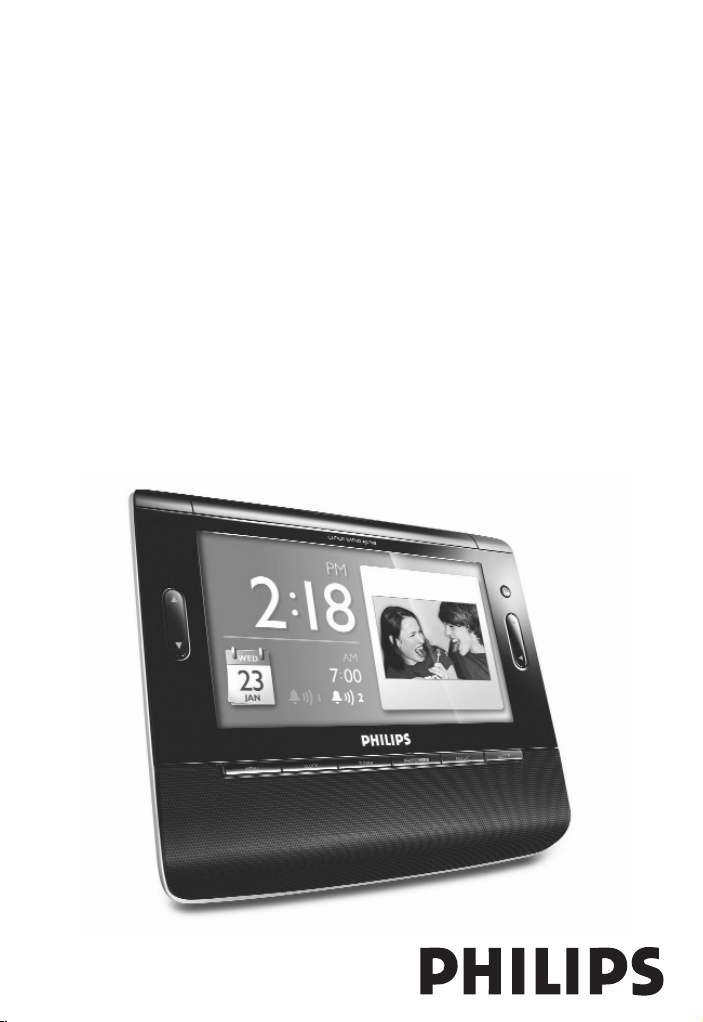
AJL308Clock Radio
Thank you for choosing Philips.
Need help fast?
Read your Quick Start Guide and/or
User Manual first for quick tips
that make using your Philips product
more enjoyable.
If you have read your instructions
and still need assistance,
you may access our online help at
www.philips.com/welcome
Philips vous remercie de
votre confiance.
Besoin d'une aide
rapide?
Le Guide rapide de début et Manuel de
l'utilisateur regorgent d'astuces destinées à
simplifier l'utilisation de votre produit Philips.
Toutefois, si vous ne parvenez pas à résoudre
votre probléme, vous pouvez accéder à
notre aide en ligne à l'adresse
www.philips.com/welcome
Gracias por escoger Philips
Necesita ayuda
inmediata?
Lea primero la Guía rápida del comienzo
o el Manual del usuario, en donde encontrará
consejos que le ayudarán a disfrutar
plenamente de su producto Philips.
Si después de leerlo aún necesita ayuda,
consulte nuestro servicio de
asistencia en línea en
www.philips.com/welcome
Register your product and get support at
www.philips.com/welcome
User Manual
Page 2
Page 3
Mexico
Es necesario que lea cuidadosamente su instructivo de manejo.
Descripción: Radio reloj
Modelo: AJL308/55
Alimentación: 110–127/220–240 V; ~50–60 Hz
Consumo: 9 W
Importador : Philips Mexicana, S.A. de C.V.
Domicilio: Av. La palma No. 6
Col. San Fernando la Herradura, Huixquilucan
é
Localidad y Telefono: Edo. de M
Tel. 52 69 90 00
Exportador : Philips Electronics Hong Kong Ltd.
País de Origen: China
Nº de Serie: ______________________________________
LEA CUIDADOSAMENTE ESTE INSTRUCTIVO
ANTES DE USAR SU APARATO.
xico C.P. 52784
AVISO IMPORTANTE
Philips Mexicana, S.A.de C.V.no se hace responsable por daños o desperfectos causados por:
– Maltrato, descuido o mal uso, presencia de insectos o roedores (cucarachas, ratones etc.).
– Cuando el aparato no haya sido operarado de acuerdo con el
instructivo del uso, fuera de los valores nominales y tolerancias de las tensiones (voltaje), frecuencia
(ciclaje) de alimentación
eléctrica y las características que deben reunir las instalaciones auxiliares.
–Por fenómenos naturales tales como: temblores, inundaciones, incendios, descargas eléctricas, rayos
etc. o delitos causados por terceros (choques asaltos, riñas, etc.).
Page 4
Page 5

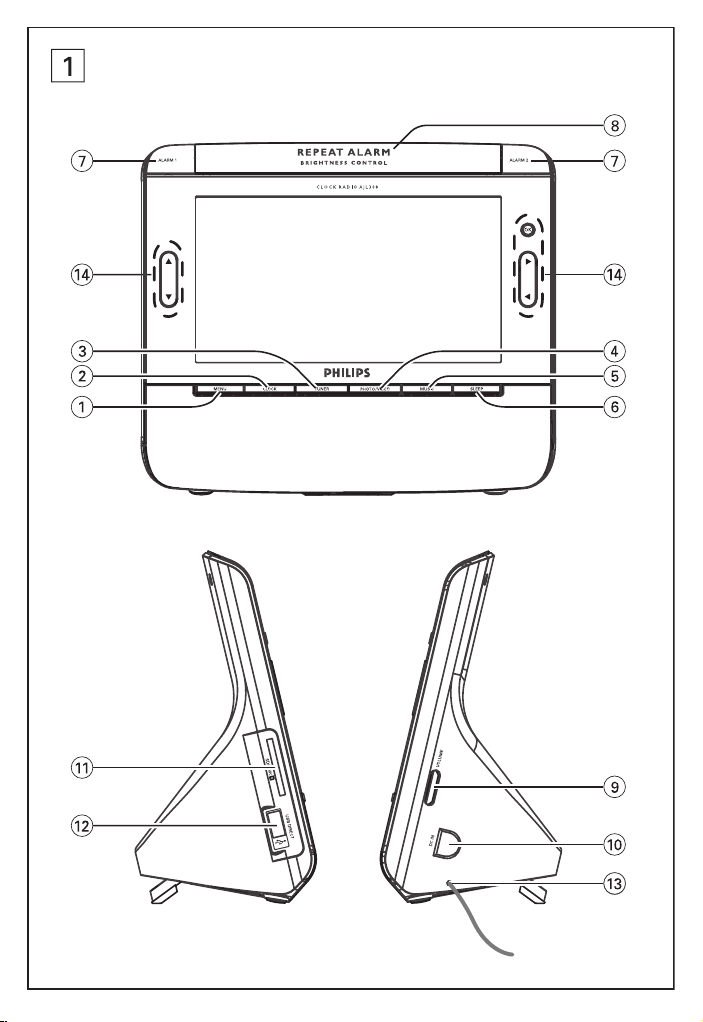
English Controls
Congratulations on your purchase and
welcome to Philips!
To fully benifit from the support that
Philips offers, register your product at
www.philips.com/welcome.
Supplied accessory
– 1 X certified power adapter
(Input: 100-240V ~50/60Hz 0.3A~0.4A,
Output: 9V 1A)
Controls (see 1 )
1 MENU
– switches to menu setting
2 CLOCK
– switches to clock mode
3 TUNER
– switches to tuner mode
$ OK, 3,4,2,1
Mode
Button
OK
3
4
Clock
**Enlarge a picture in zoom mode
-Select previous photo
-Navigate in
zoom mode
- Select next
photo
-Navigate in
zoom mode
Tu r n on or off
radio
-Select a radio
station
-Select a preset
number in
program mode
-Select a radio
station
-Select a preset
number in
program mode
Tuner
4 PHOTO/VIDEO
– switches between photo and video modes
5 MUSIC
– switches to music mode
6 SLEEP
– sets, activates or deactivates sleep function
7 ALARM 1/ALARM 2
– sets, activates or deactivates alarm
8 REPEAT ALARM/BRIGHTNESS
CONTROL
– repeats alarm at 9-minute interval
– adjusts brightness of LCD screen
9 VOLUME
– adjusts volume level
0 DC IN
socket for DC 9V adaptor
–
! SD/MMC slot
– connects to SD or MMC card
@ USB port
– connects to USB device
# Pigtail – FM antenna to improve reception.
Music Photo Video
Start or pause
playback
-Select Repeat
One/All or
shuffle mode
-Cancel play
mode
-Select Repeat
One/All or
shuffle mode
-Cancel play
mode
Display a picture
in a full screen
-Rotate a picture 90oclock-
wise
-Navigate in
thumbnail pictures
-Rotate a picture 90oanti
clockwise
-Navigate in
thumbnail pictures
Start or pause
playback
-Switch between
16:9 and 4:3
screen ratio
*- Selects audio
language
-Select Repeat
One/All mode
-Cancel play
mode
*- Selects
subtitle language
- Select next
photo
2
1
* = press and hold
** = in clock mode, press and hold CLOCK button to enter zoom mode
-Navigate in
zoom mode
-Select previous photo
-Navigate in
zoom mode
-Fine tune to a
station
*-Tune to a radio
station
-Fine tune to a
station
*-Tune to a radio
station
-Select next
music file
*-Fast forward
playback
-Select previ-
ous music file
*-Fast reverse
playback
-Select next
photo
-Navigate in
thumbnail pictures
-Select previous
photo
-Navigate in
thumbnail pictures
-Select next
video file
*-Fast forward
playback
-Select previous
video file
*-Fast reverse
playback
Page 6
Power supply/Basic operation
Alarm
Power supply
1 Connect the supplied power adapter to the
set's DC 9V socket and to the power socket.
Helpful hints:
To avoid damage to the set, use only the
adapter supplied!
The type plate is located on the bottom
of the set.
Setting OSD (On Screen
Display) language
1 Press MENU.
➜The menu appears.
2 Press 12 to highlight “General”.
3 Press 4 to highlight “Language”.
4 Press 12 to select desired language.
5 After finishing the setting, press CLOCK,
TUNER, PHOTO/VIDEO or MUSIC to
exit the setup menu.
Setting time and date
1 Press CLOCK.
2 Use MENU.
3 Use 3 4 1 2 to select a field of “Time
Set” and “Date (Year-Month-Day)”.
4 Press OK to confirm.
5 Press or hold down 3 4 to set the values.
6 Press OK to confirm.
7 Repeat Steps 3-6 to set other values of “Time
Set and “Date (Year-Month-Day)”.
8 After finishing the setting, press CLOCK,
TUNER, PHOTO/VIDEO or MUSIC to
exit the setup menu.
To change time format
1 In the Clock menu, press 3 4 to select the
value of “12/24 Hour Format”.
2 Press 12 to toggle between 12H and 24H.
Note:
When the set is disconnected from the power
outlet for about 5 minutes, you need to reset the
time and date.
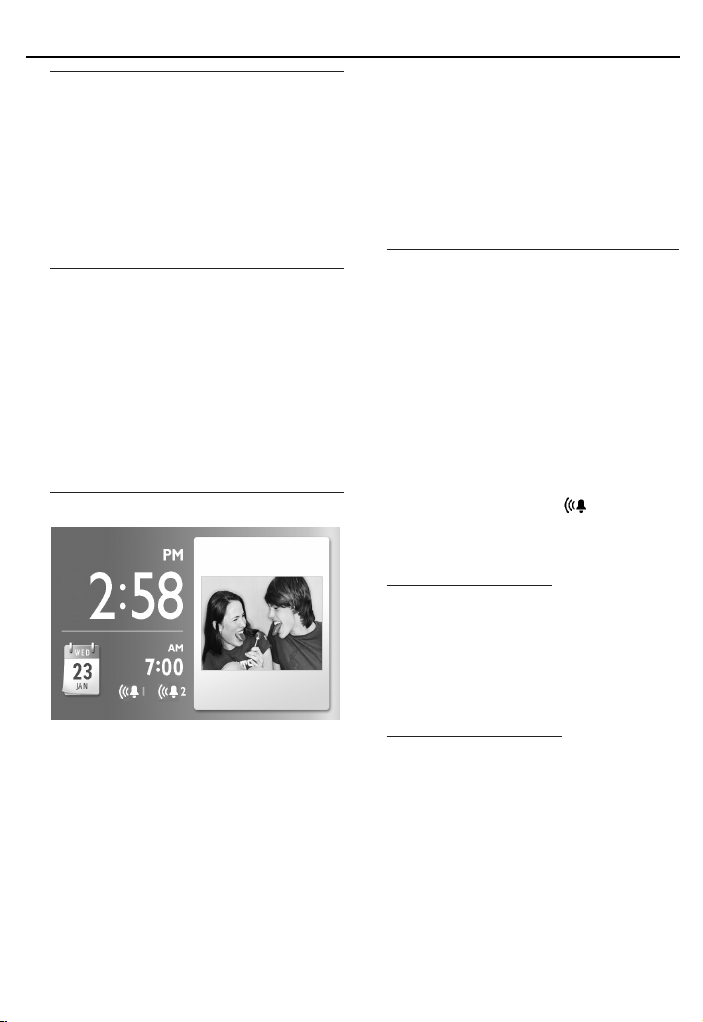
Setting and activating alarm
You can set two different alarm times.
1 Press CLOCK.
2 Press and hold ALARM 1 or ALARM 2.
➜The hour digits flash.
3 Press or hold down 3 4 to set hour.
4 Press ALARM 1 or ALARM 2 to confirm.
➜The minute digits flash.
5 Press or hold down 3 4 to set minute.
6 Press ALARM 1 or ALARM 2 to confirm.
7 Press again ALARM 1 or ALARM 2 to
activate alarm setting.
➜When alarm is activated, is displayed.
➜At the set alarm time,
the alarm will sound and its volume will
increase gradually.
Selecting alarm mode
1 Press MENU.
➜The menu appears.
2 Use 12 to highlight “Clock”.
3 Press 34 to select “Alarm Music”.
4 Press 12 to select specific music you like.
➜Alarm will go off with the music you select.
Switching off the alarm
There are three ways of switching off the
alarm. Unless you choose to cancel the alarm
completely, the DAILY ALARM RESET option
will be automatically kept activated from the
time your alarm first goes off.
Daily alarm reset
If you want the alarm to be stopped
immediately but also wish to repeat the alarm
call at the same time for the following day:
Page 7
Digital tuner
1 During the alarm call, press any button except
REPEAT ALARM /
CONTROL
➜ is displayed.
.
BRIGHTNESS
Repeat alarm
This will repeat your alarm call at 9-minute
intervals.
1 During the alarm call, press
REPEAT ALARM /
CONTROL
➜ flashes.
.
BRIGHTNESS
Switching off the alarm completely
1 Press repeatedly ALARM 1 or ALARM 2
until is changed to .
➜When alarm is deactivated, is dispalyed.
Helpful hints:
During alarm call, if no button is pressed, alarm
call will last 30 minutes.
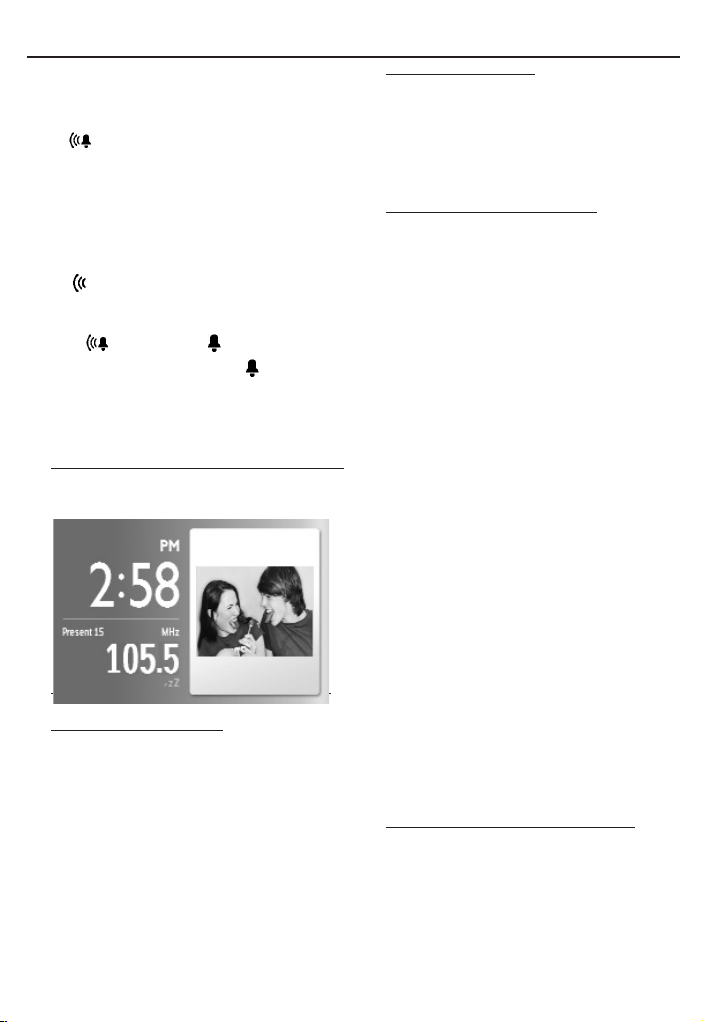
Tuner
Tuning to radio station
1 Press TUNER to switch on radio (FM only).
2 Press and hold 12for about 2 seconds, then
release.
➜The radio automatically tunes to a station
of sufficient reception.
3 Repeat step 2 if necessary until you find the
desired station.
• To tune to a weak station, press 12briefly
and repeatedly until you have found optimal
reception.
Turning on/off radio
• To turn off radio, press OK.To turn on radio,
press OK again.
To improve reception:
FM: Extend and adjust the pigtail for optimum
reception.
Programming radio stations
You can store up to a total of 20 FM radio
stations in the memory, manually or automatically (Auto store).
Manual programming
1 Tune to your desired station (See “Tuning to
radio station”).
2 Press and hold TUNER for about 2 seconds,
then release.
➜Preset number will flash.
3 Press 34 once or more to allocate a
number from 1 to 20.
➜Preset number will flash.
4 Press TUNER again to confirm.
5 Repeat steps 1-4 to store other stations.
Note:
– You can erase a preset station by storing
another frequency in its place.
Auto store
Autostore automatically starts programming
radio stations from preset 1. Any previous
presets e.g. manually programmed will be
erased.
1 In TUNER mode, press MENU to display
tuner menu.
2 Press 4 to select “Tuner Auto Program”.
3 Press OK.
➜Available stations are programmed (FM).
After all stations are stored, the first autostore preset station will then automatically
play.
To listen to a preset or autostore
station
Press 34 once or more until the desired
preset station is displayed.
Page 8
USB/Memory card(SD/MMC)
Using USB device/memory
card (SD/MMC)
Connect a USB device, or a memory card
(SD or MMC card) to AJL308, you can enjoy
audio, picture and video files stored on the
USB device or memory card through the
speakers and LCD screen of AJL308.
Listening to music
1 Plug a compatible USB device or a memory
card (SD or MMC) to USB port, or memory
card slot.
➜The folder(s) indicating the inserted device
appears.
2 Press 3 4 to select the folder of USB
device (if present) or memory card (if present).
3 Press OK to open the folder.
➜The set will auto switch to clock mode.
4 Press MUSIC to switch to music mode.
➜All the stored music files are listed in the
menu.
5 Press 34 to select a file.
6 Press OK to play.
•To pause, press OK.To resume, press OK
again.
•To select next/previous file, press 12.
•To fast forward/reverse, press and hold
2 or 1 until 6 or 5 appears on the
lower- left corner of the screen, then press
briefly and repeatedly to select 5 different
playback speeds.To return to normal playback, press 2 or 1 until displayed 6 or
is change to 2.
•To repeat One,All or Shuffle, press once
or more 3\4.To cancel play mode, press
3\4 until “Off ” is display.
5
➜The slideshow of the stored pictures will
start from the selected picture.
• Press 34 to rotate the picture 90
wise or anti clockwise.
• Press 12to display previous/next photo.
• To change slideshow interval, see “Using
setup menu options”
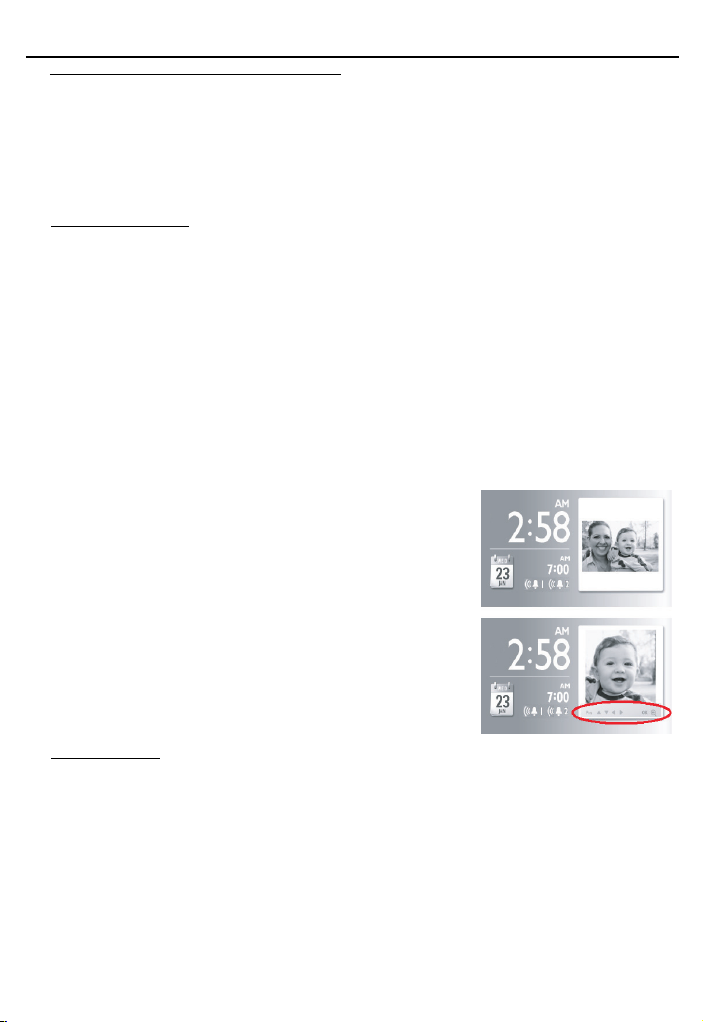
To view photo in clock mode
1 Press OK to access thumbnail, then press 3
4 1 2 to select desired photo, then press
OK to confirm.
Or, direclty press 3(1) /4(2) display
previous/next photo.
• To enlarge the displayed photo (zoom
mode), press and hold CLOCK for around
2 seconds, then press OK repeatedly to
enlarge picture or resume to normal size, and
you may use 3 4 1 2 to pan the enlarged
picture through.To exit zoom mode, press
CLOCK again.
Before zoom
After zoom
o
clock-
Viewing photo
1 Repeat steps 1 to 3 in “Listening to music”.
2 Press PHOTO/VIDEO to switch to photo
mode.
➜The pictures stored on the USB device or
memory card will be displayed in
thumbnail.
3 To display a picture in full screen, press 3 4
12 to select a thumbnail, then press OK.
Page 9

USB/Memory card(SD/MMC)
To select display picture format
•You may change still picture display format on
the screen by selecting “Widescreen” or
“Normal” under “Display Format” in the
General Menu.
Wide screen
Viewing video
1 Repeat steps 1 to 3 in “Listening to music”.
2 Press PHOTO/VIDEO to switch to
VIDEO mode.
3 Press 34 to select a video file.
4 Press OK to play.
•To pause, press OK.To resume, press OK
again.
•To display next/previous video file, press
once or more 12.
•To fast forward/reverse, press and hold 2
or 1 until 6 or 5 appears on the lower-
left corner of the screen, then press briefly
and repeatedly to select 5 different playback
speeds.To return to normal playback, press 2
or 1 until displayed 6 or 5 is change to 2.
•To repeat One/All, press once or more 4.
To cancel play mode, press 4 until “Off “is
displayed.
•To switch between 16:9 and 4:3 screen
ratio, press once or more 3.
•To select audio language, press and hold
3 (The feature is dependent on video file.)
•To select subtitle language, press and
hold 4 (The feature is dependent on video
file.)
Normal
Compatible memory card
– SD card
– MMC card
Note:
In some USB flash players (or memory
devices), the stored contents are recorded
using copyright protection technology. Such
protected contents will be unplayable on any
other devices (such as AJL308 device).
File compatibility
Music
• This device only suppor ts unprotected music
with the following file extension:
.mp3
.wma
• Music bought from on-line music stores are
not supported because they are secured by
Digital Rights Management protection (DRM).
Picture
• This device only suppor ts picture file with the
following file extension:
.jpg
Video
• This device only suppor ts video file with the
following file:
MPEG4
DivX
Compatible USB device
– USB flash memory (USB 2.0 or USB 1.1)
– USB flash player (USB 2.0 or USB 1.1)
• USB device which requires driver installation
under Windows XP is not supported.
Page 10

Sleep / Illumination
Sleep
The clock radio has a built-in sleep timer,
which enables the set to automatically turn
off sound during radio or music playback
after a set period of time.
Option 1:
1 Press TUNER.
2 Press SLEEP until your desired sleep option
is displayed.
➜Radio will turn on if radio was previously
turned off.
Option 2:
1 Press CLOCK or PHOTO/VIDEO to
enter respective mode.
2 Press MENU.
3 Press 12 to highlight “General”.
4 Press 34 to select “Sleep Timer Music”.
5 Press 12 to select specific music you like.
➜The set will turn on with the music you
select.
Option 3: using USB/Memory card
(SD/MMC)
1 Repeat steps 1-8 described in “Listening to
music”.
2 Press SLEEP until your desired sleep option
is displayed.
To deactivate sleep function
When sleep is activated, is display.
• Press SLEEP until “Off” is displayed.
Automatically adjusting
To avoid strong light emitting from the unit at
night time, the auto dim function can be used
to adjust the brightness to the lowest level
automatically.
1 Press MENU.
2 Press 12to highlight “General”.
3 Press 34 to select “Auto Dim Timer”.
4 Press 12to select “On”.
5 Press 34 to select “Auto Dim - Start”.
6 Press 12to select the time that auto dim
will start.
7 Press 34 to select “Auto Dim - End”.
8 Press 12to select the time that auto dim
will end.
• When auto dim is set, during auto dim time
span, the LCD brightness will be auto
adjusted to the lowest level. Press any
button to increase the brightness and it will
last 10 seconds.
Using the stand
The set is equipped with a stand on the
bottom panel.To set the set for a different
viewing angle take the stand out, then place it
back by reversing (see the figure below) the
side of the stand.
Illumination brightness
The LCD brightness can be adjusted
manually and automatically.
Manually adjusting
• Press REPEAT ALARM /
CONTROL
brightness through 4 levels.
once or more to cycle screen
BRIGHTNESS
Page 11

Setup menu
Using Setup menu options
The setup menu offers you advanced features.
1 Press MENU.
➜The menu appears.
2 Press 12to select “General”.
3 Press 3 4 to select an item.
4 Press 12to select an option under the item.
4 After finishing the setting, press CLOCK,
TUNER, PHOTO/VIDEO or MUSIC to
exit the setup menu.
Setup
Language
Brightness -3~3 Select a brightness value
Auto Dim Timer Off/On Tu r ns on or off auto dim for LCD
Auto Dim - Start 9: 00 PM Set the start time for auto dim
Auto Dim - End 7: 00 AM Set the end time for auto dim
Wall Paper Blue/Green/Red/Purple Select different color for LCD
Sleep Timer Music 3 music files are preset Select one file for sleep function
Picture Display Slideshow mode/Browse mode Select different mode to display picture
Slideshow Sequence Sequential/Random Select different slideshow sequence
*
Slideshow Effect None/Random /16 effects available Select different slideshow effects
Slideshow Frequence
Display Format
File Information Display Off/On Tu r ns on or off file name display
Video Display
DivX VOD
Restore Default
settings
English/
5 Seconds/10 Seconds/ 30 Seconds/
1 Minute/ 5 Mintues/30 Minutes
1/ Hour/ 2 Hours
Wide screen/Normal
Playback Time/Remain Time
Reset
Option
Français/Deutsch/Español
Description
Select a desired on screen display
language
brightness.
background
Select different slideshow intervals
Select picture display format
Select different video time to be
displayed
Press OK to get DivX registration
code.
Press OK to restore to the factory
default settings.
* = To turn on slideshow effect, you must select slideshow mode in “Picture Display”.
Page 12

Safety and maintenance
Safety and general
maintenance
• If you do not intend to use the clock radio
for a long time, withdraw the power cord
from the wall outlet.
• Place the set on a hard and flat surface so
that the system does not tilt.
• Where the MAINS plug or an appliance
coupler is used as the disconnect device, the
disconnect device shall remain readily
operable.
• Install the unit near the AC outlet and where
the AC power plug can be easily reached.
• The apparatus shall not be exposed to drip-
ping or splashing
• Do not expose the set, batteries, to humidity,
rain, sand or excessive heat caused by
heating equipment or direct sunlight.
• No objects filled with liquids, such as vases,
shall be placed on the appartus.
• No naked flame sources, such as lighted
candles, should be placed on the apparatus.
• Do not cover the set. Adequate ventilation
with a minimum gap of 6 inches between the
ventilation holes and surrounding surfaces is
necessary to prevent heat build-up.
• The mechanical parts of the set contain
self-lubricating bearings and must not be
oiled or lubricated.
• To clean the set, use a soft dry cloth. Do not
use any cleaning agents containing alcohol,
ammonia, benzene or abrasives as these may
harm the housing.
Page 13

Tr oubleshooting
If a fault occurs, first check the points listed below before taking the set for repair.
If you are unable to remedy a problem by following these hints, consult your dealer or
service center.
WARNING:
circumstances should you try to repair the set yourself, as this will invalidate the
warranty.
Do not open the set as there is a risk of electric shock. Under no
No sound.
–Volume not adjusted.
• Adjust the VOLUME.
Occasional crackling sound during FM
broadcast.
–Weak signal.
• Extend the pigtail antenna fully.
The alarm does not function.
– Alarm time is not set.
• See section on Setting and activating alarm.
– Alarm is not activated.
•
See section on Setting and activating alarm.
“No card is selected” is displayed on the
screen.
–A USB device or memory card (SD or MMC) is
not inserted.
• Insert a USB device or memor y card (SD or
MMC).
The screen brightness keeps turning dark.
– The set is in auto dim timing.
•To let the screen keep bright, turn off auto dim
timer.
Note:
When opening the folder of an external
device or its file stored in, read time may
exceed the normal time due to large
folder or file.
Page 14

INFORMATION REGARDING USB DIRECT:
1. Compatibility of the USB connection on this product:
a) This product suppor ts most USB Mass storage devices (MSD) that these devices are compliant
to the USB MSD standards.
i) Most common Mass storage class devices are flash drives, memory sticks, jump drives and etc.
ii) If you see a "Disc Drive" showing up on your computer after you have plugged the mass
storage device into your computer, most likely it is MSD compliant and it will work with this
product.
b) If your Mass storage device requires a battery/power source, please make sure you have a
fresh battery in it or charge the USB device first and then plug it into this product again.
2. Supported Music type:
a) This device only suppor ts unprotected music with file extension: .mp3 .wma
b) Music bought from on-line music stores are not supported because they are secured by
Digital Rights Management protection (DRM).
c) File name extensions that ended with the following are not supported: .wav; .m4a; .m4p; .mp4;
.aac and etc.
3. No Direct connection can be made from a Computer USB port to this product even you have
either or both mp3 or wma file in your computer.
Environmental information
All unnecessary packaging material has been omitted.The packaging can be easily separated into three materials: cardboard, polystyrene and plastic.
Yo ur set consists of materials which can be recycled if disassembled by a
specialized company. Please observe the local regulations regarding the
disposal of packaging, dead batteries and old equipment.
Page 15

English
Meet Philips at the Internet
http://www.philips.com
W
AJL308
Printed in China PDCC-ZC-0811
 Loading...